Μ-9000 - Camera OLYMPUS - Free user manual and instructions
Find the device manual for free Μ-9000 OLYMPUS in PDF.
Download the instructions for your Camera in PDF format for free! Find your manual Μ-9000 - OLYMPUS and take your electronic device back in hand. On this page are published all the documents necessary for the use of your device. Μ-9000 by OLYMPUS.
USER MANUAL Μ-9000 OLYMPUS
Checking the contents of the box Step A #° USB cable AVeable Digital camera L-S0G Battery Charger microSD Atachment
4-08 Lihium lon Battery OLYMPUS Master 2 CD-ROM (Other accessories not shown: Instruction Manuel (Is manual), warranty card Contents may vary depending on purchase location mp2 Preparing the Camera “Preparing the Camera” (p. 10) se 4 How to Use the Camera “Three Types of Setting Operations” (p. 3) @ntents > Names of Parts . > Preparing the Camera 10 > Shooting, Viewing, and Erasing.……15 > Using Shooting Modes 18 > Using Shooting Functions 20 > Using Playback Features … 24 > Menus for Shooting Functions.…….26
Shooting and Playing Back Images “Shooting, Viewing, and Erasing" (p.15) Pr] Printing “Direct printing (PictBridge)" (p. 46) “Print Reservations (DPOF)" (p. 49) > Menus for Playback, Editing, and Printing Functions > Menus for Other Camera Settings > Printing. > Using OLYMPUS Master 2... > Usage Tips > Appendix > Index.
Please read “Menu Settings” (p. 26 to 45) while referring to this page. Three Types of Setting Operations Ubingthe Menu Various camera setings can be accessed hrough ihe menus, including functions used during shooting and playback and 1e datefime and screen display. ‘There may be unavailable menus depending on the other related setings or the selected SCN mode (p.30) 1 Set the mode dial to a position other than The > symbol in “Menu Setings” (. 26 to 45) indicates available shooting modes.
Shooling made top menu 3 use SP to select the desired menu, and press the (&] button. @ Pressing and conan holding tre @ El buton dispays an expianation {menu guide) of the selected option = Ex Sumenu 1 Eutons in use MENU buton
19-45 ©] 1 ri 1 | mausi] Movie Dual time. .p43 Number of storable still pictures/ remaining recording time Current memory Selt-timer Aperture value Shutter speed … Exposure compensation Compression/Frame rat Image size White balance .
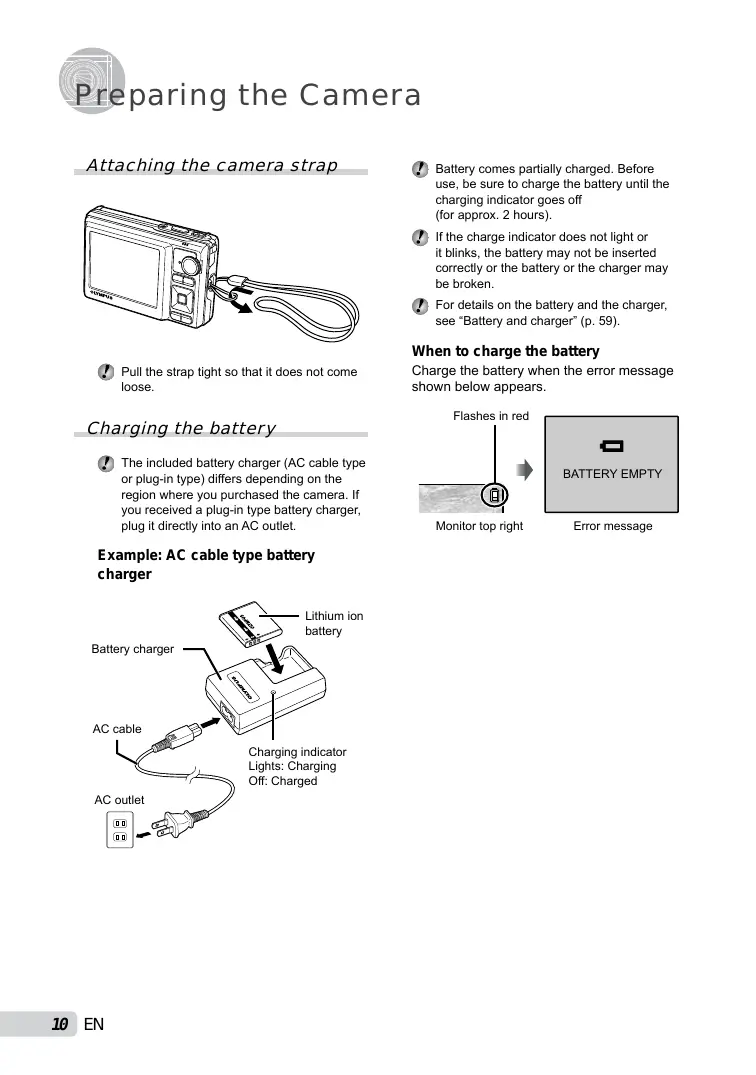
Préparing the Camera Attaching the camera strap @ Pul the strap light s0 that it does not come Icose. Charging the battery @ The included battery charger (AC cable 1ype or plugin type) difers depending on the region where you purchased the camera. If vou received à plug-in type battery charger, plug i direct into an AC outlet. Example: AC cable type battery charger Lithium ion battery Battery charger AC cable Charging indicator Lights: Gharging Off: Charged AC outlet
@ Battery comes partialy charged. Before use, be sure to charge the battery until the charging indicator goes off {for approx. 2 hours). @ 1fthe charge indicator does not light or itbiinks, {he battery may not be inserted correct orne baltery or the charger may be broken @ For details on the battery and the charger, see “Battery and charger (p. 59) When to charge the battery Charge the battery when the error message shown below appears. Flashes in red
Loading the battery and the xD-Picture Card” (sold separately) into the camera @ Do notinsert anything other tan an xD-Picture Card or the microSD Atlachment into the camera. Batiery/card compartiment cover Battery lock knob @ The battery has front side and back side. insert the battery in the correct direction as ilustrated. the battery is not inserted correelÿ the camera does not operale. @ insert ihe battery while sliding the battery lock knob in the direction of Ine arrow. @ Sing the battery lock knob in the direction of the arrow Lo unlock, and then remove the battery. @ 8e sure lo turn of ihe camera when you open or close 1he baltery/card compariment cover. When using he camera, be sure to close the batteryicard compariment cover. 3 Index area Notch @ insert ie card straight in until it licks into place. @ Do not touch the contact area on the card @ This camera allows the user to take pictures using Ie internal memory even when no xD-Picture Card (sold separalely is inserted. "Using an xD-Picture Card” (p. 60) @ “Number of storable pictures (stil pictures)! continuous recording length (movies) in the intemal memory and XD-Picture card” @.61)
@ Press in the card unti it cliks and comes out sig, and then grasp ne card lo pli out
Using a microSD card/ microSDHC card (sold separately) microSD card/microSDHC card (hereinafter referred to as “microSD card”) is also compatible with this camera by using the microSD Attachment. @ “Using a microSD Atachment" (p.62) L'insertthe microSD card into the Attachment. Insert the card to the end. 2 insertthe the camera. Notch @ Pul the microSD card straight out @ De not touch the contact area on the microSD Aftachment and microSD card
Arrow pad and operation guide The symbols A<T. © (9 ()] displayed on various setting and movie playback screens indicate that arrow pad are used.
Arrow pad Operation guides displayed at the bottom of the screen indicate that the MENU button, [Æ] button, 200m lever, or Îf button is used CHENTENT Bic YO 608 Operation guide Setting the date and time The date and time set here are saved to image file names, date prints, and other data. 1 Press the ON/OFF button to turn on the camera. ‘+ The date and ime setting screen is displayed when the date and time are not set. =6 + 2 use æ7/A to selectthe year for
3 Press to save the setting for [Y].
À as in steps 2 and 3, use &7 D and the [*) button to set [M] (month), [D] (day), and [TIME] (hours and minutes), and IY/M/D] (date order). @ For precise time seting, press 1ne (ÆJ button as 1he lime signal stikes 00 seconds @ To change the date and time, adjust ine setting from the menu. [@)] (Date/time) (p.43) To check the date and time Press the DISP. button while the camera is tumed off. The current time is displayed for approx. 3 seconds. Changing the display language The language for the menu and error messages displayed on the monitor is selectable. 1 press the MENU button, and press PA to select [31] (SETUP). SETUP. ] TENGUSH ÉPwonseru
Shooting, Viewing, and Erasing Shooting with optimum 3 Hold the camera, and compose the aperture value and shutter shot. speed ( mode) In this mode, automatic camera shooting can be used while also allowing changes to a wide range of other shooting menu functions, such as exposure compensation, white balance, and so on when needed. 1 setthe mode dial to Éà. 2 Press the ON/OFF button to turn on Verical gp the camera. @ Wen holding the camera, take care not to Number of storable cover te flash wh your ingers, et. Sul pitures (67) 4 press the shutter button halfway doun to focus on the subject. Wen he camera focuses on te subject, the exposure 1 locked (Shut speed and aperure valu are dispiayed) and tn AF target mark changes to green. The camera was unable 1 fous the AF target mark ashes red, Try ocusing again.
Monitor {standby mode screen) @ Press the ON/OFF button again to tum off the camera Press halfay Shutier speed Aperture value @ “Focusing" (p.56)
5 To take the picture, gentiy press the shutter button all the way down while being careful not to shake the camera. Press fully Image review screen To view images during shooting Pressing the (] button enables playback of images. To return to shooting, either press the (=) button again or press the shutter button halfway doun To shoot movies “Shooting movies (@ mode)" (p. 19)
Viewing images 1 setthe mode dial to 5]. Frame number Playback image 2 Use 7 PA to select an image. Displays Displays next 10 frames image before the current image Displays previous image Displays 10 frames after he current image @ Tre display size of the images can be changed. “Index view, calendar veu, and lose-up view (p.24)
To play back movies Select a movie, and press the [2] button. Erasing images during playback (Single image erase) Operations during movie playback Volume: During playback, press 47%. Fast-forward/rewind: Select with D] Each time a button is pressed, the playback speed cycles through 2x, 20x, and standard {1x) speed in the direction of the pressed button. Pause: Press the [Æ] button. Elapsed time/ ‘Total recording time During playback First (last) frame/frame advance: During pause, press S#7 to display the first frame, and press x to display the last frame. Playback is reversed while À is pressed, playback occurs normally while À is pressed. Press the (Æ] button to resume playback. During pause To stop movie playback Press the MENU button, 1 Press the 1 button when the playback image to be erased is displayed. oR/f 2 Press 37 to select [YES], and press the [#) button. @ 18 ERASE] (p. 37)
Using Shooting Modes This section describes the available shooting modes. Depending on the mode, some settings can be changed. For details on the functions that can be adjusted, see ‘Menus for Shooting Functions” on page 26. Using the best mode for the shooting scene (SCN mode) 1 setthe mode dial to SCN. PORTRAIT SET] ‘e An explanation of the selected mode is displayed wie the @ button is pressed and held. 2 Use 27/2 to select the best shooting mode for the scene, and press the (#] button. Icon indicating the scene mode that is set @ Te change to anoiher scene mode, use the menu. [4 SCENE MODE] (p. 30)
Enhancing skin tone and texture (BEAUTY mode) The camera finds a person's face and gives the skin a smooth, translucent look for taking the picture. 1 Setthe mode dial to BEAUTY. BEAUTY mode indicator 2 Pointthe camera toward the subject. Check the frame appearing around the face detected by the camera, and then press the shutter button to take the picture. The unedited image and edited image are botn saved the image cannot be retouche, oniy the unedited image is saved @ For some subjects, the frame may not appear, may lake some time Lo appear, or the ediing may not be effective. @ The [IMAGE SIZE] of the retouched image is limited to [An] or lower.
Shooting with automatic settings (AH mode) The camera will automatically select the optimal shooting mode for the scene. This is a fully automatic mode that allows you to take a picture suited to the scene by simply pressing the shuter buton. Setings in the shooting function 1 Setthe mode dial to ‘The indicator changes lo the icon for the scene mode selected by the camera. e Press the shutter button halfay dou or press the DISP. button to check which shooting mode the camera has automatically selected @ in some cases, Ine camera may not select ihe desired aholing mode @ ihen the camera cannot identify which is the optimal mode, P mode will be selected Shooting movies (& mode) Audi recorded with the movie. 1 setthe mode dial to @. £ mode indicator To zoom while shooting a movie The optical zoom is not available while shooting a movie. Use (DIGITAL ZOOM] (p. 28). To shoot a mo\ stabilization {DIS MOVIE MODE] (p. 29) with digital image 2 Press the shutter button halfway down to focus on the subject, and gently press the button all the way down to start recording. Press halfway Lights red during shooting Press fully Remaining recording time (p. 61) 3 Gentiy press the shutter button all the way down to stop recording.
Using Shooting Functions In addition to the wide variety of shooting modes, the camera has functions that broaden the expressive range and shooting options available to the photographer. Using the optical zoom Pressing the zoom lever adjusts the shooting range Press loward W (Wide) Press toward T (Telephoto) Zoom bar @ opical zoom: 10%, Digital zoom: 5x. @ Use of IMAGE STABILIZER] (Su images) 1DIS MOVIE MODE] (Movies) (p.29) is recommended en ShoGlng Win te ielepholo z00m To take larger images without reducing image quality {FINE ZOOMI (p. 28) To take larger images DIGITAL ZOOM] (p. 28)
Digital zoom range Using the flash The flash functions can be selected to best match the shooting conditions and render the desired image. 1 Press the 4 button.
2 use D4 to selectthe setting option, and press the [2] button to set. Item Description he flash fes automatically in FLASH AUTO Jlowrignt or backight conditions, Frhis emits pre-flashes to reduce REDEVE ne occurrence of red eye in your photos. Frhe flash fes regardless of the FLN available light. FLASH OFF |The flash does not fire. Adjusting the brightness (Exposure compensation) The standard brightness (appropriate exposure) set by the camera based on the shooting mode except for EX) can be adjusted brighter or darker to obtain a desired shot. 1 Press the E4 button. Exposure compensation value 2 use 7 2P4 to select the desired brightness image, and press the button. Shooting closeups {Macro shooting) This function enables the camera to focus and shoot subjects at close distances. 1 Press the % button. Lure. "2 © ‘+ DR æà 2 use D to selectthe setting option, and press the [] button to set. Item Description OFF [Macro mode is deactivated. This enables shooting as close as MACRO 10 cm/3.9 in." (90 cm/35.4 in.?) to he subject. This enables shooting as close las 1 cm/0. in. to 1he subject. Subjects at 50 em/19.7 in. or farther cannot be brought into focus. When the 200 is al the widest (W) position: 7 When the zoom is at the most telephoto (T) position. ? The 200m is automatically fixed. @ The flash (p. 20) and zoom (p. 20) cannot be set when [Ÿ] is selected.
Using the self-timer After the shutter button is pressed all the way down, the picture is taken after a time delay. 1 Press the © button. option, and press the set. Item Description This cancels the selftimer. approx. 10 seconds, and then où links for approx. 2 seconds, and ben the picture is taken. @ seirimer shooüng is automaticaly canceled after one shot. To cancel the self-timer after it starts Press the Ÿ) button again.
The sel-timer lamp turns on for Changing the shooting information display The display of the screen information can be changed to best match the situation, such as for the need of clear view of the screen or for making a precise composition by using the grid display. 1 Press the DISP. button. The displayed shooting information changes in the order shown below ac time ne button is pressed. “Shooting mode display” (p. 8) Normal Histogram Ds =e L)
Enc Reading a histogram Ifthe peak fils 100 much of the frame, the image will appear mostiy white. Ifthe peak fils too much of the frame, the image will appear mosly black. ‘The green section shows the luminance distribution in the center area of the monitor.
Using the FUNC menu The FUNC menu provides the following menu functions that can be quick called and set +[WB) (p.27) *[ESP/CE]) (p.28) +1ISO](p. 27) [€ IMAGE QUALITY] (p. 26)
- IDRIVE] (p.27) Quickly calling and using shooting functions The following menu functions can be quickly called and used (PANORAMA (p. 31) + [SHADOW AD.J (p. 29) 2 [MULTI WINDOWI (p.23) 1 press the (] button. 1 Press the OR/Î button.
2 Use 37/2 to selectthe menu function and 4 to select the setting option, and then press the button to set. 2 use D4 to selectthe menu function, and press the [] button to set. To use the effects preview screen (Multi window) Selecting an option from [(ZOOM], [EXPOSURE COMP], [WE] or [ESP/C=]] shows 4 preview images that reflect the adjusted values of the selected shooting function. Use 7 AP to select the desired image, and press the (] button. Brightening the monitor (Backlight boost) Pressing and holding the OR/f button brightens the monitor, The monitor returns to the riginal brightness if no operation is performed for 10 seconds.
Using Playback Features Index view, calendar view, and To select an image in index view close-up view Use &7/AP 4 to select an image, and press the [Æ] button to display the selected Index view and calendar view enable quick image in single-image view. selection of a target image. Close-up view (up to 10x magnification) allows checking of image To select images in calendar view details. Use 7/4 to select a date and press TT the 3] button or press toward T on the 1 Press toward W or T on the zoom Z00m lever to view the images taken on the lever. selected date. To scroll an image in close-up view Use 7 PA to move the viewing area Changing the image information display Shooting information displayed on the screen can be changed. Pg ÀE 1 Press the DISP. button. ‘+ The displayed image information changes in in order Shaun below cache the buton is z# fa pressed Fes ven Normal Hstogram ES RL < Detailed No information äl c) + sue a mu 8]
Lessssss we 7 ane] @ “Reading a histogramr (p. 22)
Playing back panorama images Panorama images that were combined together using [COMBINE IN CAMERA 1] or [COMBINE IN CAMERA 2] can be scrolled for viewing. @ “creating panoramic images {= PANORAMAT (p. 31) elect a panorama image during 1 sel duri playback. @ “Vieuing images” (p.16) Current viewing area To control panorama image playback Zoom in/Zoom out: Press toward W or T on the zoom lever. Playback direction: Press 7 DA to scroll in the direction of the pressed button. Pause: Press the [2] button. Restart scrolling: Press the [Æ] button. Stop playback: Press the MENU button.
Menus for Shooting Functions When the mode dial is set to a shooting mode position adjusted Ô SON BEAUTY @), settings can be ® 3 indicates positions of the mode dial at which the function can be set. @ The default setings of the function are highighted in Selecting the appropriate image quality for your application [ IMAGE QUALITY] < IMAGE QUALITY
Still images Submenu 1 Submenu 2 Application H2M (80682976) [Suitable or ping pires over A3 (11x17 in) En 2560%1920) —__ [Suitabie or ping pieures at A4 (8.511 in.) En 248% 1636) [Suiabie or ping pioures up to A4 (ES in. iace gze — LMU60200) — |Sutahie for panng piaures atAS er TN (1280960) [Suitable for printing pictures at postcard size. VGA (GAoxAg0) — [Putebie Pr Meuingpicures on a TV or using plaures on emals and \neb sites. 16:9 (1920%1080) … [Suitabie for playing pictures on wide screen TV. conresson ME IShooing athigh quai, NORMAL Shooting at normal qua. Movies Submenu 1 Submenu 2 Application IVGA (640»480) IMAGE SIZE JAVGA(320%240) __|Seiect the image quality based on the image size and frame rate Bofps Higher frame rates provide smoother movies. FRAME RATE : ME 15ps"
- frames per second @ “Number of storable pictures (til pctures){continuous recording length (movies) in ne internal memory and xD-Picture Card” (p. 61)
Adjust the settings for the functions wi Adjusting to a natural color scheme IWB]
2: À SON BEAUTY @ Submenu 2 Application Frhe camera automatically adjusts he white balance according to the shooting scene. AUTO u For shooling outdoor under a % 1] ? clear sky For shooling outdoor under a a cloudy sky For shooting under tungsten & 1] 1œ 8 lighting For shooling under daylight fuorescent ighting (household fighting, etc.) For shooting under neural # fluorescent ighting (desk lamps, ete.) For shooting under white ffuorescent ighting (offices, etc.) Selecting the ISO sensitivity [ISO]
C8 CAMERA MENU R ISO
ee: @ Atbreviaton for he Itemaional Organization fr Slandardization. 150 standards specify Ie sensiviy for igal ameres and flm lhus codes such 28180 100" are used t represent senstvit. @ inine ISO seting, alihough smaller values resul in less sensiiiy, sharp mages can be taken under fuly li condions. Larger values resul in higher Sensitivity, and images can be Lake at fast hutier speda even under aimiy I conditions. However, high senalityintoduces eectrosiai noise in the resulting picture, which may give à grainy eppearance referring to “Using the Menu” (p. 3). Submenu 2 Application The camera automaticaly adjusts AUTO the sensitvity according to the shooting scene. The camera uses a higher sensitvity compared to [AUTO] to HIGH ISO AUTO linimize blur caused by à moving subject or by camera shake. GaHOG200007 [The ISO (sensiiviy) seting is 800/1600 fixed by manuel selecting Shooting pictures sequentially while the shutter button is held down IDRIVE] Ti CAMERA MENU R DRIVE >: à SON Submenu 2 Application = One frame is shot each time the shuter button is pressed Sequential shooting at the focus, a brighiness (exposure), and uit balance that is locked in the first frame Sequentar shooing at a Ngher #3 speed than (G=]
- The shooting speed varies depending on the settings for [€ IMAGE QUALITY] (p. 26) @ Wen set to [Oh]. 18] (Sound recording) {P.29) is not valable. @ When set to [fr]. flash is set fixed [(®)] {FLASH OFF) and [ISO] is fixed to (AUTO) @ When set to [fr], [IMAGE SIZE] is imited to [Tr] or lower. Moreover, [FINE ZOOM] (. 28). (DIGITAL ZOOM] (p. 28), and [$] {Sound recording) (p. 29) are not available.
Shooting at higher magnifications than optical zoom without reducing the image quality [FINE ZOOM]
Application [Oniy optical 200m is used to z00m in for shooting, LOpical z00m and image croping où are combined to 200m in for shooting (Approx. 62x (max.). Submenu 2 OFF @ Tri function wil not reduce the image quality since it dose not convert ine data with fewer pixels into ne data with larger pixels. @ When set to [ON], [IMAGE SIZE] is limited to [CB or lower. @ Tris function is not avalable when {DIGITAL ZOOMI is (ON. @ This function is not available when IS% SUPER MACRO] (p. 21) is selected. Shooting at higher magnifications than optical zoom [DIGITAL ZOOM]
[3 CAMERA MENU DIGITAL ZOOM
1 SON BEAUTY @ Submenu 2 Application EE [Only optical zoom is used to zoom n for shooting. [Optical zoom and digital zoom are ON combined to zoom in for shooting approx. 50x (max.)). @ Tri function is no available en
@ Tri function is not available when Is$ SUPER MACRO] (p. 21) is selected.
Selecting the range for measuring the brightness [ESP/Le7] 1 CAMERA MENU à ESP/C) Submenu 2 Application Shots to obtain a balanced brighiness over the entire screen. Esp ateters he brighiness at the center and surrounding areas of fe screen separately.) one [Shoot ie subject atthe center C9 (spot) N during backlghting. @ Wnen set te [ESP] the center may appear dark when shooting against strong backighing Selecting the focusing area [AF MODE]
Submenu 2 Application FThis is used for taking pictures of people. (The camera automatically detects a face and displays à frame on the monitor). Press 1he Éhutter button halfway, when the camera focuses on a face the AF target mark lights green. When the JAF target mark lights orange, this indicates the camera has focused on something other than a face. This enables you to compose he hot without worrying about the FACE DETECT‘ IESP focusing position. The camera finds the subject to focus on and automatically adjusts the focus. Spor The camera focuses on 1he subject within the AF target mark.
- For some subjects, the frame may not appear or may take some time Lo appear.
Adjust the settings for the functions wi Recording sound when shooting still images [0] [3 CAMERA MENU » @ €: Ô SCN Submenu 2 Application OFF INo sound is recorded. The camera automatically stars recording for approx. 4 seconds C\ after taking the picture. This is useful for recording notes or comments about the picture. @ men recording, aim ie microphone (p. 6) atthe source of tne sound you want 10 record. Reducing the blur caused by the camera shake when shooting [IMAGE STABILIZER] (still images) / IDIS MOVIE MODE] (movies)
T& CAMERA MENU B IMAGE STABILIZER /
72: À SON BEAUTY @ Submenu 2 Application The image stabilzer is deactivated. or his is recommended for shooting [when Ihe camera is fixed in place on a tipod or other stable surface. ON [The image stsbilzeris actvated. @ The cameras defaut setings are IMAGE STABILIZER (sul images} Lo [ON] and [DIS MOVIE MODE] (movies) o [OFF] @ nie IMAGE STABILIZER] (sil images) is set lo [ON], noises may occur from the inside of ne camera Iine shuter button is pressed @ images may not be stabiized if camera shake is 100 severe @ wnen ne shuiter speed is extremal slow, such as when taking til Shots or taking pictures at nighl, (ne stablizer may not be à effective @ wnen shooting while ie [DIS MOVIE MODE] (movie) is set to (ON, 1e image wi be enlarged somewhat before saving referring to “Using the Menu” (p. 3). Brightening the subject against backlight [SHADOW ADJ ]
Fe camera nds à persons face that has been darkened by backight and makes it appear bighter for taking the picture. où Pointe camera toward the subject. Check he frame that appears around he face detected by the camera, and tnen press the shutter button to take the picture.) @ For some subjects, the frame may not appear or may take some time Lo appear. @ When set to [ONI, [ESP/CET (p. 28) is automatically fixed to [ESP], and [AF MODE] (p. 28) is automatically fixed to FACE DETECT]
Selecting a scene mode according to the shooting situation [ei SCENE MODE] # SCENE MODE ED :SCN @ in SCN mode, he oplimum shooting setings are pre-programmed for specific shooling scènes. For his reason, setings may not be changed in some modes. Submenu 1 Application PANIGHT SCENE #8 NIGHT+PORTRAIT SR SPORT he camera takes a Énooon, Bicur in ihe mode A SELF PORTA! ne 00e Ésunser” MarEworks TICUISINE/@ DOCUMENTS T4 BEACH & SNOW! IPRE-CAPTURE MOVIE ‘+ When the subject is dark, noise reduction is automaticaly actvated. This approximately doubles the shooting lime, during which no other pictures can be taken To shoot with the selected mode “Using the best mode for the shooting scene {SCN mode)" (p. 18)
Capturing the perfect moment when shooting (PRE-CAPTURE MOVIE] mode) D Use 728 to select [BPRE-CAPTURE MOVIE], and then press the (Æ] button to set. ‘+ This function is ready for shooting immediately after seting this option. @ Press the shutter button to start movie shooting. ‘+ A7-second movie, induding 2-second movie immediately before pressing the shutter button, is taken. The opical zoom and auto focus function are available during movie recording, @ Sound is not recorded. @ AF target mark does not appear on the monitor. @ Select [IMAGE SIZE] from [VGA] or [VGA], and select [FRAME RATE] from ÆXH301pe] or ER 15fps]
Adjust the settings for the functions wi Creating panoramic images E= PANORAMA] I PANORAMA E2:àscN Submenu 1 Application Three frames are taken and combined by the camera. The user ony composes the shots so that Ihe target marks and ointers overiap, and the camera automatically releases the shutter. The shooting functions are already reset to the optimum settings for panoramic shooting. Three frames are taken and combined by the camera, The user composes the shots using he guide frame and manually releases the shutter. The frames that were taken are combined into a panorama image using the OLYMPUS Master 2 software from he provided CD- JROM. Pictures are taken in the last [ISO] or [#4 SCENE MODE] setings (except for some scene modes). COMBINE IN CAMERA 12 COMBINE IN CAMERA 22
:! Not availble in SN moe (p. 18) ‘2 The [€ IMAGE QUALITY] (p. 26) setting cannot be changed @ The focus, exposure (p. 21), zoom position {P. 20), and [WE] (p. 27) are locked a the fistirame. @ The flash (p. 20) is fixed to © (FLASH OFF) mode. @ Panorama images can be edited using ISHADOW ADI] (p. 29) [COLOR EDIT] (P. 35) on @ ‘Piaying back panorama images” (p. 25) referring to “Using the Menu” (p. 3). Taking pictures with
ICOMBINE IN CAMERA 1]
© Press the shutter button to take the first frame. @ Move the camera slightly in the direction ofthe second frame. Target mark Pointer ÉRE ŒS m CANCEL* ES SAME + OK) Screen when combining images from left Lo right @ Move the camera slowly while keeping it Straight, and stop the camera where the pointer and target mark overlap. ‘+ The camera releases the shutter automatcaly.
SAVE OK) = res CANCEL SE @ combine oniy We pletures, press the EE button before taking the tir frame. {& Take the third frame in the same way as Step &. Arte tir frame is taken, the camera automaicalÿy processes tn frames and ne combined panorama image K dlsplayed @ To cancel making panorame picture during shooting, press the MENU button. @ Wen the shuter does not automatically release, y [COMBINE IN CAMERA 2] or
Taking pictures with
ICOMBINE IN CAMERA 2]
@Use D to select the direction that the frames are combined. Direction for combining the next frame @ Press the shutter button to take the first frame. ‘+ A guide frame appears as a reference. Guide frame ‘Joint area 1stframe ® Compose the second shot so that the joint area overtaps the guide frame. Composition of the 2nd frame
® Press the shutter button to take the second frame. @ To combine only two pictures, press the {3 button before taking the 1hird frame. © Take the third frame in the same way as Steps @) to ©. Ator the third frame is taken, the camora autematicaly processes the frames and the combined panorama image is displayed. @ To cancel making panoramic pleture during Shooting, press the MENU button. Taking pictures with [COMBINE IN PC] D Use 7 NBA to select the direction thatthe frames are combined. 2 Press the shutter button to take the first frame, and then compose the second shot. + Compose the shot using he guide frame so thatthe vo adjacent frames overiap. ® Repeat Step (2) until the number of required frames are taken, and then press utton when finished. @) When the 181 mark is displayed, you cannot continue shooting any further. Panorama shooting is possible for up to 10 frames @ Refer to he OLYMPUS Master 2 help guide for details on how to make panorama images
Adjust the settings for the functions while referring to “Using the Menu” (p. 3). Restoring the shooting functions to the default settings LS RESET] SRESET
(p.27 10 29) ÎThe current setngs are not 5 changed. YES EN 3
Menus for Playback, Editing, and Printing Functions @ The defauit settings of the function are highlighted in When the mode dial is set to the [#] position, settings can be adjusted. Playing back automatically [53 SLIDESHOW] ©) SLIDESHOW Submenu 1 Submenu 2 Submenu 3 Application ALL SLpicrure, NORMAL Select ine range of images for te slideshow, the Mie FADER "SLIDE |orr/A12 fype of transition effect (TYPE) used between MOVE ue [Z00M'éate images, and the background music (BGM])
- Only when [STILL PICTURE] is selected in Submenu 1 ? Only when [CALENDAR] is selected in Submenu 1 To start a slideshow After pressing the Er to make the [BGM] settings, the slideshow starts. To stop the slideshow, press the [Æ) button or the MENU button. @ (BG is not available when [A SILENT MODE] (p. 45) is set to [ON Retouching images [-+ PERFECT FIX] c PERFECT FIX @ Depending on the picture, he editing may not be effective. @ The retouching process may lower the image resolution Retouching the skin and eyes Lés BEAUTY FIX] mé BEAUTY FIX @ Depending on he picture, ie eding may not be effective. Submenu 1 |Submenu2| Application Submenu 1 Application TCLEAR SKIN. SHADOW ADJ] and æ ISPARKLE EYE] and au IREDEVE FIX] are applied IDRAMATIC EVE] are ogetner. applied together. Oniy sections darkened by IMakes skin 1ook SHADOW AD4 _ |backighting and dim ighting are smooth and brightencd cuear sk |FOETAVG! lianslucent. Select ne — éves hatae ele” esired effect from Eyes that are reddened by the REDEVE FIX [RS Me anuced among the 3 levels. SPARLEEVE Enhances ihe contrast Use 722 to select a correction of the eyes. method and press the (#] button. DRAMATIE [Eniarges the subjects eves. @ Use D4 to select an image for retouching, » and press the (£) button. Use 72 to select a correction ‘+ The retouched image is saved as a soparate method, and press the (®] button image.
@ Use D4 to select an image for retouching, and press the) button. The retouchod image is saved as a separate image.
Adjust the settings for the functions wi When [CLEAR SKIN] is selected Use SH7/2 to select the retouching level, and press the (Æ] button. referring to “Using the Menu” (p. 3). Changing the color tone of image ICOLOR EDIT] à EDIT COLOR EDIT
T Submenu 2 Application : Re En | FA] oucrenne [Pre nos bein Bt 1 = FThis changes îhe image to à ae changes ei DS] sc Teams ma Sauraton (hard [Fersen Pre cor Sauralen SSSR Con Îs sit most ar Saturaion (ot) [ren cie mage Changing the image size [Fm] —— EDIT» Fa Sepia Application This saves a high-resolution image ls a separate image with a smaller size for use in e-mail attachments and other applications. 320 x 240 Use BA to select an image. @Use 7/2 to select an image size and press the [2] button. ‘e The image with the selected size is saved as a Separate image. Cropping a picture [rt] 4 EDIT» + (D Use DA to select an image, and press the button. @ Use the zoom lever to select the size of the cropping frame, and use 7 | to move the frame. Cropping frame — ® Press the (] button. ‘e The odited image is saved as a separate image. Black & white Saturaton (hard) Saturation (soft) D Use BA to select an image, and press the button. ?) Use 3724 to select the desired color, and press the (#] button. The image with 1he selected coloris saved as a separate image.
Adding a calendar to an image ICALENDAR] & EDIT CALENDAR [CALENDAR Q] Jo Les] EE] ser. (D Use DA to select an image, and then press the [#5] button. (@ Use DA to select a calendar, and use 2 to select the image orientation, and press the (#) button. ® Use ZA to select the Year ofthe calendar, and then press @ Use 722 to select the Month ofthe calendar, and then press the [] button. ‘e The odited image is saved as a separate image. 36 EN Creating an index of9 frames from a movie [INDEX] ds EDIT à INDEX © Use DA to select a movie, and press the button. SET+OK) e This function extracts 9 frames from a movie and saves them as a new picture (INDEX) containing thumbnails of each frame. Protecting images [On] IE) PLAYBACK MENU à On @ Frolected images cannot be erasea by IERASE] (. 17). (SEL. IMAGE] or ALL ERASE] (p.87) but ll images are erased by MEMORY FORMAT/IEORMAT] (p.39) Submenu 2 Application OFF Images can be erased. Images are protected so Inat hey cannot be erased except by formatting of the internal Imemoryicard
Adjust the settings for the functions wi Rotating images [1] ( PLAYBACK MENU € referring to “Using the Menu” (p. 3). Erasing images [@ ERASE] © ERASE @ Check each pclure beloreerasing to avoid LEE | AA prlication) erasing any important pictures you may ao he image is rotaled 90° ant 19 Keep. COS not rotated. Submenu 1 Application pa [one seomce [nana res (D use Do sel an image AueSE [Ame pererarerer Use 72 to select the rotation direction. @ If necessary, repeat Steps (D and to adjust settings for other images, and press the [*] button. @ The new picture orientation will be saved even after the pour is turned off. Adding sound to still images [] © PLAYBACK MENU » ® Submenu 2 Application for approx. 4 seconds while YES Playing back the image. This is useful for recording notes or comments about the image. No No sound is recorded. Use BA to select an image. ® Aim the microphone towards the sound source. Microphone Use 7/2 to select [VES], and press the (3 button. ‘e Rocording stars. The camera adds (records) sound @ wnen erasing pures in te intemal memory, do not insert {ne card ino he camera. @ men erasing pures from the car, insert à card into the camera in advance To individually select and erase images [SEL. IMAGE] Use 7/2 to select [SEL. IMAGE], and press the (2) button. @ Use 7 2RPÉ to select the image to be erased, and press the (Æ] button to add a V7 mark to the image. @ Repeat Step (2) to select the images to be erased, and then press the 1 button to erase the selected images. @ Use 72 to select [VES], and press the (#] button. ‘e The images with a mark are erased. To erase all images [ALL ERASE] Use 7/2 to select [ALL ERASE], and press the (2) button. Use 7 to select [VES], and press the (#] button.
Saving print settings to the image data Le PRINT ORDER] # PRINT ORDER @ “Print Reservaions (DPOF) (. 49) @ Print reservation can oiy be set for st images Ina are record to (ne car,
Adjust the settings for the functions while referring to “Using the Menu” (p. 3). Menus for Other Camera Settings @ The defauit settings of the function are highlighted in Erasing data completely Changing the display language [8 £=1
IMEMORY FORMATJIFORMAT] À SETUP > ©
3 SETUP D MEMORY FORMAT/FORMAT @ “Changing the display language” (p. 14) @ Beiore formating, check that no important 2 A data 1 left in ne ntermal memory or card. Dee 2 EE ARpIEe ton ES Fe language for ne menus and @ Non-Olympus cards and cards that have Languages" error messages displayed on the been formatted by a computer must be monitor is selected formatted with his camera before use. ——
- The available languages vary depending on the Submenu 2 Application country and/or region where the camera was. U [Gompieyerssesthemagedan Puréhased vEs inthe itermal memory! or card including protected images). No Cancelsformating ‘* Be sure to remove the card before formatting the internal memory. Copying images in the internal memory to the card [BACKUP] 3 SETUP > BACKUP Submenu 2 YES
Application IBacks up image data in the internal memory to the card. [Canceis the backup. @ ittakes some time o back up data. Check ia ie battery has suffcient power beore Staring ie backup, or use an AG adapter
Setting the startup display screen and sound when the camera is turned on
Submenu 2 Submenu 3 Application OFF [No image is displayed ï JA preset mage” is displayed SCREEN [A st image stored in the internal memory or card is 2 registered for display. (This option leads 10 the setup screen.) as [OFF (No sound} VOLUME: PER he volume of te startup sound is selected ‘’ This image cannot be changed ‘2 When [SCREENI set Lo [OFF], this seing is not available. ‘+ When [& SILENT MODE] (p. 45) is set to [ON], this setting Is not available. To register a startup image Select [2] in Submenu 3 for [SCREENI, and press the (] button. (@ Use D4 to select the image to be registered, and press the (Æ] button. Selecting the menu screen color and background [MENU COLOR] 2 SETUP à MENU COLOR Submenu 2 Application NORMAL/COLOR 1/ COLOR 2/COLOR 3 ISelects the menu screen color or background image according to your preference.
Adjust the settings for the functions while referring to “Using the Menu” (p. 3). Selecting the camera sound and its volume [SOUND SETTINGS] 3 SETUP à SOUND SETTINGS Submenu 2 Submenu 3 Submenu 4 Application SOUND TYPE [A Selects the operating sound and volume BEEP OFF (No sound} [of he camera buttons (except the shutter VOLUME LowiHiGH button) SOUND TYPE [9 ISelects the type and volume of the shutter SHUTTER SOUND | OL UuE OFF (No sound [one 1e PE and vour ter LowiHicH JOFE (No sound} .) FAR _ \Adjusts the warning sound volume. JOFE (No sound} = ter ü © VOLUME Low/HIGH |Adjusts the image playback volume. @ To tum off all sounds at once, adjust the setting from [à SILENT MODE] (p. 45). Viewing the image immediately after shooting [REC VIEW]
Submenu 2 Application The image being recorded is not displayed. This allows the user lo prepare for the next hot while following the subject in the monitor afler shooting. The image being recorded is displayed. This allows 1e user lo briely check he image hat wes just taken. OFF
@ Even when set to [ON], you can resume shooting while the image is being displayed EN 4
Resetting the file name numbers of pictures [FILE NAME]
Folder name DIM Folder name 100oLmP: File name Pmddü00f jpg &esoivmP LE Pmad998s jpg | È | ‘Automatic numbering Automatic numbering Month: 1 to C (A=October, B-November, C=December) Day: 01 to 31 Submenu 2 Application for the folder name and file name [henever a new card is inserted.* This is useful when grouping images on separate cards. RESET his continues the numbering for he folder name and file name from ne previous card. This is useful for Imanaging all image folder names land fes names with sequential numbers. AUTO ‘The number for the folder name is reset to 100, and the one for Ihe file name is reset o 0001
This resets the sequential number Even when a new cardis Inserted, Adjusting the CCD and the image processing function [PIXEL MAPPING] #3 SETUP k PIXEL MAPPING @ is function has already been adjusted at factory shipping, and no agjustment is needed right alter purchase, Approxkmately once à years recommence. @ For best resuits, wait at last one minute after king or viewing pictures before perlomming pixel mapping. ne camera is tué of during pixel mapping, be sure Lo perform it again. To adjustthe CCD and the image processing function Press the [#] button when [START] {Submenu 2) is displayed. ‘+ The camera checks and adjusts he CCD and he image processing function at the same time.
Adjust the settings for the functions whil referring to “Using the Menu” (p. 3). Adjusting the brightness of the monitor Setting the date and time for another C1] SETUP RQ) To adjust the monitor brightness Use 728 to adjust the brighiness while viewing the screen, and then press the (3 button. SET+OK) Setting the date and time [ED] 2 SETUPR © @ “Seting the date and time” (p. 13) To select the date and time display order (D Press after setting “Minute”, and use SEA to select the date time zone [DUALTIME] #? SETUP DUALTIME @ 8y seting IDUALTIME to [ON] and seting the date and time, the set date and time is reflected in the image fille names, date prints rdsoon Supmenu Surenu Application Sutcnes te date and OFF — time setin [@) (Date/ time). urnes os due NProceeds Ldims ter setin où [om [obacrierrenasre ing line camera in another percent) Jim zone Date order —|
- The seing procedure is identical to Ihat in “Seting he date and time” (p. 13) @) The date display order is the same as that set with [@]
Selecting the video signal system to match your TV IVIDEO OUT]
#3 SETUP R VIDEO OUT
@ The TV video signal system varies depending on the countries and regions. Before vieuing camera images on your TV, select Ie video output according lo your TVS video signal type. Submenu 2 Application NTSC [Connecting the camera to a TV in North America, Taiwan, Korea, Japan, and so on PAL [Connecting the camera to a TV in European countries, China, and so on @ The factory defaut seings air according o the region where he camera Is sold. To play back camera images on a TV (D Connect the TV and camera Connect ta 1he TV video input jack (yellow) and audio input jack (white) AV cable (supplied) Connector cover @ Use the camera to select the same video signal system as the one of connected TV ([INTSCJ/ IPAL). @ Tum on the TV, and change ‘INPUT- to VIDEO (an input jack connected to the camera)." @ For details on changing the input source of the TV, refer to the TV instruction manual. (& Set the mode dial to [], and use 47 NBA to select the image for playback. @) Depending on the TV's settings, the displayed images and information may become cropped
Adjust the settings for the functions while referring to “Using the Menu” (p. 3). Saving battery power between shots IPOWER SAVE]
Submenu 2 Application OFF ‘ancels [POWER SAVE]. [When the camera is not being où used for approx. 10 seconds, the monitor automatically turns off to ave battery power. To resume standby mode Press any button or turn the mode dial. Turning off the camera sounds
# SILENT MODE Submenu 1. Application = ctvates the [SOUND SETTINGS] setting The electronic sounds (operating où sound, shutter sound, warning sound) and playback sounds are muted @ (sounD serrINGs) (p.41)
Printing Direct printing (PictBridge”?) By connecting the camera to a PictBridge- compatible printer, you can print images directly without using a computer. To find out if your printer supports PictBridge, refer to the printer instruction manual “! PictBridge is a standard for connecting digital cameras and printers of different makers and printing out pictures direct. @) The printing modes, paper sizes, and other parameters that can be set with le camera Vary depending on the printer that is used For details, refer lo the printer instruction manual. @ For details on the available paper types, loading paper, and instaling ink cassettes, refer lo the printer instruction manual. Printing images at the printer's standard settings LEASY PRINT] 1 bisplay the image to be printed on the monitor. @ “Vewing images” (p. 16) @ Printing can also be started when the camera is turmed of After performing Step 2, use Sa7/2n to select IEASY PRINT}, press the FE] button. Use Dé to select an image, and pres the [button
2° Turn on the printer, and then connect the printer and camera. Gbutton 7 Mult-connector USB cable (supplied)
3 Press 4 to start printing. 4 To print another image, use D@ to select an image, and press the button. To exit printing After a selected image is displayed on the screen, disconnect the USB cable from the camera and printer.
Changing the printer's settings for printing [CUSTOM PRINT] L Follow Steps 1 and 2 for [EASY PRINT] (p. 46), then press the button. 2 Use 37/7 to select mode, and press the (*] button. Submenu 2 Application Frhis prints the image selected in PRINT Le ALLPRINT is prints all images stored in he internal memory or card. MULTI PRINT [TPS prints one image in a multiple layout format. FThis prints an index of all images ALLINDEX |stored inthe internal memory or card PRINT ORDER" [TPS prints images based on the print reservation data on the card. {PRINT ORDER] is available only when print reservations have been made. “Print Reservalions {DPOF)' (p. 49) À use 37n to select [SIZE] (Submenu 3), and press @ 1fthe IPRINTPAPER] soreen is not displayed, the [SIZE], [BORDERLESS) and (PICS/SHEET] are set to the printers standard Backeiee 5 use æ72n to selectthe IBORDERLESS] or [PICS/SHEET] settings, and press the Submenu 4 Application The image is printed with a border around it ([OFF]) The image is printed to fil the entire paper (ON. {The number of _|The number of images per sheet images per sheet |([PICS/SHEET]) is selectable ony varies depending |when [MULTI PRINT] is selected on the printer.) _ in Step 3. OFFION"
6 use D4 to select an image. T Press 7 to make a [SINGLE PRINT] reservation for the current image. Press 2 if you wish to adjust detailed printer settings for the current image. To adjust detailed printer settings Use 7 ZRPA to adjust the detailed printer settings, and press the [2] button. FRINTINFO
FILE NAME EXT SETeOR) Submenu | Submenu Application his select ne number Ex [0 to 10 of prints. ISalecting VITE prints the mages with the date [WITH ve DATE ISelecting [WITHOUT] WITHOUT éints the images without he date ISalecting VITE prints the ile name on the image. Tir FLE NAME [TN |Selecting WITHOUT) does not prit any fls name on ne image Procseds Note [This selects a portion of # Iseting he image for printing, screen.)
To crop an image [+] (D Use the zoom lever to select the size of the cropping frame, use 7 AD o move the frame, and then press the button. Use &x7/2 to select [OK], and press the (#] button. 8 ifnecessary, repeat Steps 6 and 7 to select the image to be printed, make the detailed settings, and set ISINGLE PRINT]. 9 press the [) button. PRINT Back
10 use 7/2 to select [PRINTI, and press the [%) button. Printing start Wen [OPTION SET] is selected in [ALL PRINT] mode, [PRINT INFO] screen is displayed. ‘+ When printing is fnished, the [PRINT MODE SELECT] screen is displayed. To cancel printing {D Press the [=] button while [TRANSFERRING] is displayed Use 7/2 to select [CANCEL, then press the [2] button. 11 press the MENU button. 12 when the message [REMOVE USB CABLE] is displayed, disconnect the USB cable from the camera and printer. Print Reservations (DPOF':} In print reservations, the number of prints and date imprint option are saved in the image on the card. This enables easy printing at a printer or print shop supporting DPOF by using only the print reservations on the card without a computer or a camera
- DPOF is a standard for storing automatic printout information from digital cameras. @ Print reservations can be set oniy for the images stored on the card. Insert a card with recorded images before making print reservations. @ DPOF reservations set by another DPOF device cannot be changed by this camera. Make changes using the original device. Making new DPOF reservations with this camera wil erase the reservations made by the other device. @ DPOF print reservations can be made for up Lo 999 images per card Single-frame print reservations [4] 1 Setthe mode dial to (#], and then press the MENU button to display the top menu. 2 Use 7 P4 to select Lé PRINT ORDER], and press the (2) button. PRINT ORDER
3 use æ7/2 to select LE] and Reserving one print each of all press the (%) button. images on the card [#] ZL Follow Steps 1 and 2 in LOL] (p. 49). 2 Use 37m to select [], and press the [*) button. 3 Follow Steps 5 to 6 in LE]. 4 use Dé to select the image for print . : . reservation. Use S#7/5\ to select Resetting all print reservation the quantity. Press the [2] button. data 1 setthe mode dial to [>], and then press the MENU button to display the top menu. 2 Use 7 P4 to select Lé PRINT ORDER], and press the 3 Select either LE] or L], and press
Use 37/5 to select the [ED] (date the ( button. print) screen option, and press the button. Submenu 2 Application No This prints the image oniy. FThis prints the image win the shooting date. FThis prints the image win the shooting time. DATE TIME À use 37/2 to select [RESET], and press the [*) button. 6 use 37/2 to select [SETI, and press the (*) button.
Resetting the print reservation data for selected images L Follow Steps 1 and 2 of “Resetting all print reservation data” (p. 50). 2 use 37/2 to select LE], and press the [#) button. 3 use 37/2 to select [KEEP] and press the [#) button. the print reservation you want to cancel. Use 27/4 to set the print quantity to “0”.
If necessary, repeat Step 4, and then press the (2) button when finished. 6 use «37/5 to select the [@D] (date print) screen option, and press the button. ‘+ The settings are applied to the remaining images with the print reservation data. T use 37/2 to select [SETI, and press the [#) button.
Using OLYMPUS Master 2 System requirements and installation of OLYMPUS Master 2 Install the OLYMPUS Master 2 software by referring to the included installation guide: Connecting the camera to à computer 1 Make sure the camera is tued off. Te monitor of 2 Connectthe camera to a computer. ‘+ The camera automatically turns on Muli-connector Windows Afler the computer detects the camera, à message indicating the completion of the setting appears. Confirm the message and click“OK”. The camera is recognized as a removable disk. Macintosh When IPhota started, exit iPholo and start OLYMPUS Master 2. @) Wie ne camera 1 connected to the computer, shoong functions are disabted @ Connectingthe camera o a computer via a USB hub may cause unstable operaion @ Wnen [WTP] I set for ne submenu that appears by pressing À ae selecting PC] in Step 3, mages cannot be translered 10 a computer using OLYMPUS Master 2. Starting OLYMPUS Master 2
@ Locate he position of the USB port by relering lo Your computer insiructons manuel 3 Use 37/2 to select [PCI and press the (*) button. ‘+ The computer automatically detects the camera as a new device on the first connection.
1 Double-click the OLYMPUS Master 2 icon. Windows BA appears on te desktop Macintosh appears in the OLYMPUS Master 2 folder. Brouse window appears ar staring he @ Wien you start OLYMPUS Master 2 for the frs ime after installation, "Default Setings” and “Registration” screens appear. Follow the instructions on the screen
Operating OLYMPUS Master 2 When OLYMPUS Master 2 is started, Quick Start Guide appears on the screen that helps you to handle the camera without any question. When the Quick Start Guide is not displayed, click (in the toolbar to show the Guide.
For details on the operation, refer to the help guide of the software. Transferring and saving images without using OLYMPUS Master 2 This camera is compatible with 1he USB Mass Storage Class. You can transfer and save the image data on your computer while the camera and the computer are connected. System requirements Windows Windows 2000 Professional! XP Home Edition/ XP Professional/Vista Macintosh : Mac OS X v10.3 or later @ On a computer running Windows Vista, I IMTPI set for he submenu that appears by pressing after selecting [PC] in Step 3 of“Conneclng the camera lo a computer” (p.52), Windows Photo Gallery wil become avallabie. @ Even if a computer has USB ports, proper operalion is not guaranteed in te following cases. 2 Computers th USB ports installed sing an expansion card, etc. Computers without factrynstalld OS and home-bui computers
Usage Tips the camera does not work as intended, or if an error message is displayed on the screen, and you are usure of what to do, refer to the information below to fix the problem(s). Troubleshooting Battery “The camera does not work even wheh battery is installed” insert recharged battery in the correct direction. Charging the battery” (. 10), “Loading he battery and the xD-Picture Card” (sold separately) into the camera” (p. 11) Battery performance may have been reduced temporariy due to low temperature. Take the battery out of the camera, and warm it by puting it in your pocket for a while. Card/intemal memory “An error message is displayed" Error message” (p. 55) Shutter button “No picture is taken when the shutter button is pressed” + Gancal sleep mode. To save battery power, the camera automatically g0es into sleep mode and the monitor tums off ifthere is no operation after 3 minutes ven the camera is turned on. No picture is taken even if the shutter button is fuly pressed in this mode. (Operate the zoom lever or ather buttons to restore the camera from sleep mode before taking a picture. the camera is left for 15 minutes, it automatically tums off. Press the ONJOFF button to {um on the camera. ‘+ Setthe mode dial to a position other than [] ‘+ Wait until # (flash charge) stops blinking before taking pictures.
‘+ Condensation*' may have formed. Turn of the power and wait for the camera body lo become acclimated to the surrounding temperature and dry ut before taking pictures. ‘1 Dew drops can form in the camera when itis suddenly taken from a cold location into a warm, humid room “Vertical lines appear on the screen” Verical ines may appear on the screen at times such as when ne camera is pointed at an extremely bright subject under a clear sky. The lines do not appear, however, in he final image. “The light is caught in the picture” ‘+ Shooting with flash in dark situations results in an image with many flash reflections on dust in the ai. Date and time function “Date and time settings return to the default setting” ‘ Ifthe battery is removed and left out ofthe camerar for about 1 day'*, the date and time settings retum to the default seting and must be reset. “2 The time untilthe date and time settings return ta the defaut setting varies depending on how long the battery have been loaded Seting the date and time” (p.13) Others “Noises oceur from the inside of the camera in shooting standby mod ‘+ Auio focusing operation may cause lens movement noises even if you do not make any camera operation.
Error message @ Wen one ofthe messages below is displayed on the monitor, check he corecive action Error message Corrective action E] Card problem CARD ERROR | insert a new card Card problem WRITE Use a computer lo cancel the PROTECT __|read-only setting. Internal memory problem
MEMORY FULL | . Erace umwanted images Card problem + Replace the card.
CARD FULL |. Erase unwanted images. Card problem + Use S7/S lo select [CLEAN CARD], and press the LE) button. Take out the card, wipe the contact area (p. 60) with a soft, dry coth, and then load the card again. + Use SH7/RS lo select [ESRMAT and pres re button, Ne, use 372 to select [VES], and press the LE) button. Internal memory problem Use 37/2 to select IMEMORY FORMAT], and press the (Æ] button. Next use SE SA to select [YES], and ao) press the (5) buton.* £ Internal memory/Card problem no riérune | Take pures before vieing Une phto roue sofa. D. [ec oveutemaeors PRTURE |Compuir ine mage oût Canale ne De nage fe Error message Corrective action mue age Problem with selected image HE IMAGE |Use photo retouchsoftare, etc 1 edit ihe image on computer. BE EDITED [TR l'operation probiem CE Cicse the batercard caRD-cOuER |comparment cover OPEN BATTERY | Gang o bar EMPTY de y: (Oh |esmrecionprbiem Come the camere and NO | computer or printer comecty, CONNECTION Printer problem Loëd paper into the printer NO PAPER pe P Printer problem Reñl te ik in the printer, NOK 8 Printer problem Remove the jammed paper JAMMED ; peP Prime problem SETTINGS SETTINGS, | Rotum to ie status where the printer can be used Printer problem um of tne camers and printer, check ne printer for any PRES R OR. |Problems, and en tum he power on again. [un] CANNOT PRINT Problem with selected image Use a computer to print. Problem with selected image
- Before erasing important images, download them to à computer. 2 AI data will be erased. = This is displayed, for instance, when the printer s paper tray has been removed. Do not operate the printer while making the print setings on the
- This camera may be unable to print images Laken by other cameras.
Shooting tips When you are unsure of how to take a picture that you envision, refer to the information below. Focusing “Focusing on the subject” ‘+ Taking a picture of a subject not in the center of the screen After foeusing on an object atihe same distance 2s the subject, compose the shot, and take the picture Pressing the shutter button halfway (p. 15) ‘+ Set[AF MODE] (p. 28) to [ESP] Taking a picture of subjects where autofocus is difficult In the following cases, after focusing on an object {by pressing the shutter button halfway dou) with high contrast at Ihe same distance as the subject compose the shot, and take the picture. Subjects with low contrast When extremely bright objects appear in the center of the Object with no vertical lines" ‘* Iis also effective to compose the shot by holding the camera vertcally to focus, and then reluming to the horizontal position to take the picture.
When objects are at different distances Fast-moving object ‘The subject is not in the center of the frame
Camera shake “Taking pictures (or movies) without camera shake” e Taking pictures using IMAGE STABILIZER] (p.29) When a picture is taken of a shadowy subject, the CCD" shis to correct for camera shake even if the ISO speed is not increased. This function is also effective when taking pictures at a high zoom magnification
- À device that takes light received through the lens and converts it into electric signal. + Shooting movies using [DIS MOVIE MODE] (p.29) + Taking picture with [*&, SPORT] (p. 30) Since you can take pictures with a high shutter speed by seting [SK SPORT], fs also effective for blury subjects. ‘+ Taking pictures at a high ISO sensitivity Hahigh ISO sensitity is selected, pictures can be taken at a high shutter speed even at locations where a flash cannot be used 1SO] (p.27) Exposure (brightness) “Taking pictures with the right brightness’ Taking pictures of a subject ag; ta backlight Aface against the backlight is brightened. ISHADOW ADI] (p. 29) e Taking pictures using [FACE DETECTI for LAF MODE] (p. 28) Appropriate exposure is obtained for a face against the backlight, and the face is brightened Taking pictures using ICE] for LESPICEI (p.28) The picture can be taken based on {he brightness atthe center of the monitar, so is not affected by the light in the background. Taking pictures using [FILL IN] (p.21) flash Asubject against a backight is brightened Taking pictures of a white beach or snow Setthe mode to [J4 BEACH & SNOW (p. 30) Taking pictures using exposure compensation (p.21) Adjust the brighiness while viewing the screen for taking the picture. Normal, taking pictures of white subjects (such as snow) result in images that are darker than the actual subject. Use the IA button to adjust in the positive (+) direction to express whites as they appear. When taking pictures of black subjects, on the other hand, itis effective to adjust in he negative (-) direction. Color hue “Taking pictures with colors atthe same shade as they appear” ‘+ Taking pictures by selecting [MB] (p. 27) Best results in most environments can normalhy be obtained with ne AUTO setting, but for some subjects, you should try experimenting with different setings. (This is especially rue for sunshade under a clear sky, mixed natural and arificial ight setings, and so on.) Image quality “Taking sharper pictures” ‘+ Taking pictures with the optical zoom Avoid using [DIGITAL ZOOM] (p. 28) to take pictures. Taking pictures at a low ISO sensitivity the picture is taken with a high ISO sensitviy, noise (small colored spots and color unevenness that were not in the original image) can occur, and the image can appear grainy. ISO] (p.27) Panorama “Taking pictures so that the frames are stitched smoothly” ‘+ A tip for panoramic shooting Taking pictures by pivoting with the camera at the center prevents shiing of he image. Wen taking pictures of lose objects in particular, pivoling with the lens end at the center produces favorable results. LEA PANORAMA] (p. 31)
Battery =) “Making battery last longer” even if no pictures are actually taken ‘+ Repeatediy pressing the shutter button halfway. ‘+ Repeatediy using the zoom. + Set {POWER SAVE] (p. 45) to [ON] Playback/Æditing tips Playback “Viewing images in the internal memory and card” ‘+ Remove the card when teral memory. ‘+ Loading the battery and the xD-Picture Card” (sold separatety) into the camera 6.11) ‘+ -Usingthe microSD card/microSDHC card (sold separateiy) (p. 12) g pictures in the Editing “Erasing the sound recorded to a still image” Record over the sound with silence when playing back the image 18] (Add sound to st images) (p. 37)
Appendix Camera.care Exterior + Wipe gentiy with a soft cloth. Ifthe camera is very dirty, soak the cloth in mild soapy water and wring well. Wipe the camera with the damp cloth and then dry it with a dry cloth. If you have used the camera at the beach, use a cloth soaked in clean water and wrung well. Monitor + Wipe gentiy with a soft cloth Lens + Blow dust off the lens with a commercial blower, then wipe gentiy with a lens cleaner. Battery/Charger + Wipe gentiy with a soft, dry cloth. @ Do not use strong soMents such as benzene or alcohol, or chemically treated cloth. @ Mold may form on the lens surface ifthe lens is left dirt. Storage + When storing the camera for extended periods, remove the battery, AC adapter and card, and keep in a cool, dry place that is well ventilated + Periodically insert the battery and test the camera functions. @ Avoid Isaving the camera in places where chemical products are handled since this may result in corrosion Battery and charger + This camera uses one Olympus lithium ion battery (LI-50B). No other type of batteries can be used @ caution There is a risk of explosion if the battery is replaced with the incorrect battery type. Dispose of the used battery following the instructions in ‘Battery Handling Précautions”. (p. 65) + Power consumption by the camera varies. depending on which functions are used. + During the conditions described below, power is consumed continuously and the battery becomes exhausted quickly + The z00m is used repeatedly. + The shutter button is pressed halfway repeatedly in shooting mode, activating the auto focus. + Apicture is displayed on the monitor for an extended period of time. + The camera is connected to a computer or printer. + Using an exhausted battery may cause the camera to turn off without displaying the battery level warning + The rechargeable battery is not fully charged at the time of purchase. Charge the battery h the LI-50C charger before use. d rechargeable battery usually takes approximately 2 hours to charge (varies on usage). + The supplied LI-50C battery charger is used only for LI-50B battery. Do not charge other type of battery with the supplied battery charger. It might cause explosion, leaking, overheating or fre + For plug-in type battery charger: This power unit is intended to be correctly orientated in a vertical or floor mount position
Using an AC adapter An AC adapter is useful for time-consuming tasks such as image downloads to a computer or when running a slideshow for a long period of time. To use an AC adapter for this camera, the multi-adapter (CB-MA3/accessory) is required. Do not use any other AC adapter with this camera Using your charger and AC adapter abroad + The charger and AC adapter can be used in most home electrical sources within the range of 100 V to 240 V AC (50/60Hz) around the worid. However, depending on the country. or area you are in, the AC wall outlet may be shaped differentiy and the charger and AC adapter may require a plug adapter to match the wall outlet. For details, ask at your local electrical shop or travel agent. + Do not use travel voltage converters as they could damage your charger and AC adapter. Using an xD-Picture Card A card (and internal memory) also corresponds to the film that records images in a film camera. Otherwise, the recorded images (data) can be erased, and retouching is also available with the use of a computer. Cards can be removed from the camera and exchanged, but this is not possible with the internal memory. Use of larger capacity cards enables you to take more pictures.
oLvMPus 72] Index area Notes can be filed in here) Contact area (Contact section of the card with the internal camera terminal) @ D not touch the contact area direct.
Cards compatible with this camera xD-Picture Card (16MB to 2GB) (TypeH/MIM+, Standard) Using a new card Before using a non-Olympus card or a card that was used for another purpose in a computer or other device, use [MEMORY FORMATJ/[FORMAT] (p. 39) to format the card Checking the image saving location The memory indicator shows whether the internal memory or card is being used during shooting and playback Current memory indicator Gi: Internal memory is being used None: Card is Current memory indicator Playback mode @ Even if MEMORY FORMATYIFORMAT], IERASE] (SEL. IMAGE], or [ALL ERASE] is performed, he data in he card is not completely erased. Wnen disposing of the card, damage Ihe card to prevent Ihe discosure of personal data
Readout/recording process of the card Never open the battery/card compartment cover or unplug the USB cable while the camera is reading or writing data, which is indicated by blinking of the card access lamp. This can not only damage the image data but also render the internal memory or card unusable. Card access lamp Number of storable pictures (s1 internal memory and xD-Picture Card I pictures)/continuous recoi g length (movies) in the Number of storable still pictures mace ge | COMPRES. | mai memory one With sound |Withoutsound| With sound |Without sound DES. De mms D fe EE QD [ae ES OS ===. De mme Movies Continuous recording length IMAGE SIZE | FRAME RATE aral memsy Using a 1 GB card (xD-Picture Card) ma | «or . . @ The maximum fe size of a single movie is 2 GB, regardiess of ne capacity fe card
Increasing the number of pictures that can be taken Eïther erase unwanted images, or connect the camera to a computer or other device to save the images, and then erase the images in the internal memory or card. LERASE] (p. 17), (SEL. IMAGE] (p. 37), ALL ERASE] (p. 37), [MEMORY FORMAT} IFORMAT] (p. 39) Using a microSD Attachment @ Do notuse the attachiment with Olympus digital cameras that do not support this microSD Aftachment, as well as with other brands of digital cameras, computers, prinlers, and other devices that support XD-Piclure Card. Doing so not only may damage {he pictures taken, but may also resul in the malfunction of the device. @ 1fihe microSD card cannot be removed, do not use force. Contact authorized distibutors/service centers. Cards compatible with this camera microSD card/microSDHC card @ For a lt of tested microSD cards, please visit our website (hip:/Awn.olympus.com Sending images You can send images to a computer or printer by using the USB cable provided with the camera. To send data to other devices, remove the attachment from the camera and use à commercially available microSD card adapter. Handling precautions Do not touch the contact area of the attachment or microSD card. Doing so may cause failure in reading the images. When fingerprints or stains are found on the contact area, wipe the area with a soft dry cloth
SERVICE PERSONNEL. À An exclamation mark enclosedin a angle alerts you t important operating and maintenance instructions in the ‘documentation provided wi tre product. Ita product is used vaut observing the inomation given under is symbol. serious injury or death may result Ita product is used vhout observing te information given under his symbol. injury or death may resuï. Ita products used vaut observing te information given under this symbol, minor personal injury, damage t tre equipment
À vanne À cauron orlss of valuabie data may eut. ARNINGE [TO AVOID THE RISK OF FIRE OR ELECTRICAL SHOCK,
NEVER DISASSEMBLE, EXPOSE THIS PRODUCT TO
MATER OR OPERATE IN À HIGH HUMIDITY ENVIRONMENT. General Precautions Read All Instructions — Before you use the product, read all operating instructions. Save all manuals and documentation for future reference. Cleaning — Always unplug this product from the wall outiet before cleaning. Use only à damp cloth for cleaning. Never use any type of liquid or aerosol cleaner, or any type of organic solvent to clean this product. Attachments — For your safety, and to avoid damaging the product, use only accessories recommended by Olympus. Water and Moisture — For précautions on products with weatherproof designs, read the weatherproofing sections. Location — To avoid damage to the product, mount the product securely on à stable tripod, stand, or bracket. Power Source — Connect this product only to the power source described on the product label Lightning — I a lightning storm occurs while using ‘an AC adapter, remove it from the wall outiet immediately, Foreign Objects — To avoid personal injury, never insert a metal object into the product Heat — Never use or store this product near any heat source such as a radialor, heat register, stove, or any type of equipment or appliance that generates heat, including stereo ampliers.
Handling the Camera À WARNING
- Do not use the camera near flammable or explosive gases. + Do not use the flash and LED on people infants, small children, et.) at close range. + You must be at least 1 m (3 1.) away from Ine faces of your subject. Firing ie flash too close to the subjecfs eyes could cause a momentary loss of vision + Keep young children and infants away from the camera. + Aays use and slore he camera out of the reach of Young chiléren and ifants to prevent the following dangerous situations which could cause serious injury + Becoming entangled in {he camera strap, causing strangulation: + Accidentaly swalowing the battery, cards or other small parts + Accidental ring the flash into their ou eyes or those of another chi + Accidentaly being injured by the moving parts of the camera + Do notlook atthe sun or strong lights with the camera. + Do notuse or store the camera in dusty or humid places. + Do not cover the flash with a hand while firing. + Do notinsert anything into the microSD Attachment other than the microSD card. This altachment is exclusive for use of microSD cards only. Other types of cards cannot be installed Do notinsert anything other than an xD-Picture Card orthe microSD Attachment into the camera If you insert a card by mistake, such as a microSD card, do not use force. Contact authorized distrbutors/service centers À cAUTION + Stop using the camera immediately if you notice any unusual odors, noise, or smoke around it. + Never remove the batteries wilh bare hands, which may cause a fre or burn your hands. + Never hold or operate the camera with wet hands. + Do notleae the camera in places were it may be subject to extremely high temperatures.
- Doing so maÿ cause pars to deterorate and, in some circumslances, cause {he camera Lo catch fre. Do not use {he charger or AC adapter if IS covered (such as a blanket, This could cause overheating, resulting in fire + Handle the camera with care to avoid getting a lou-temperature bu. + Winen he camera contains metal pars, overheating can resul in a low-temperature bu. Pay atention t the following + When used for a long period, the camera wi get hot. I you hold on Lo the camera in this state, a low-temperature burn may be caused + In places subject to extremely cold temperatures, the temperature of he cameras body may be lower Ian the environmental temperature. possible, wear gloves when handling the camera in cold temperatures. + Be careful with the strap. + Be carelul wih the stap when you camy the camera. I could easily catch on straÿ objects and cause serious damage.
Battery Handling Precautions Follow these important guidelines to prevent batteries from leaking, overheating, burning, exploding, or causing electrical shocks or burns. À DANGER
- The camera uses a lithium ion battery specied by Olympus. Charge the battery vith {ne specified charger. Do not usé any other chargers: Never heat or incinerale batteries Take precaulions when carrying or storing batteries to prevent them from coming into contact with any metal objects such as jewelry, pins, fasteners, ec. Never store batteries where Ihey will be exposed 10 direct sunligh or subjected lo high emperaiures in a hot vehicle, near a heal source, etc To prevent causing battery lsaks or damaging their terminals, carefuly follow al instructions regarding {he use of batteries. Never altempt lo disassemble 2 battery or modif in any way, older, etc. I battery uid gets into your êyes, flush your eyes immediately wilh clear, cold running water and seek medical attention immediately. + Aiays store batteries out of he reach of small chidren. l'a child accidentaly swallows a battery, s8ek medical attention immediately. À WARNING + Keep batteries dry at all times + To prevent bateres from leaking, overheaing, or causing a fre or explosion, use only batteries recommended for use wilh this product. Insert the battery carefuly as described in the operaling instructions. Ifrechargeable batteries have not been recharged within the specified lime, stop charging them and do not use them. + Do not use a battery iitis cracked or broken Ia batiery leaks, becomes discolored or deformed, or becomes abnormal in any other way during operation, stop using {he camera + Ira battery leaks fluid onto your clothing or skin, remove the clothing and flsh the affected area with clean, running cold water immediately. 1F the fluid bus your skin, seek medical attention immediately. Never subject batteries Lo strong shocks or continuous vibration
À cAUTION + Belore loading, ahways inspect the battery carefuly for eaks, isccloration, warping, or any other abnormait. + The baltery may become hot during prolonged use. To avoid minor burns, do not remove immediately aller using ne camera. + AMays unload the battery from the camera before string the camera for a long period. Caution for Usage Environment + To protect he high-precision technology contained in this product never leave {he camera in he places listed below, no mater in use or storage
- Places where temperalures and/or hurnidity are high or go through extreme changes. Direct sunlight, beaches,locked cars, or near other heat sources (slave, radiator, etc.) or humiiers in sandy or dusty environments. + Near flammeble items or explosives: + In wetplaces, such as balhrooms or in the rain When using products with weatherproof designs, read their manuals as wel. + in places prone Lo strong vibrations. + Do not get water or sand on {he camera when using it at the beach or in sandy places as this may lead to damage or malfunction. + Never drop Ie camera or subjectit lo severe shocks or vibrations. + When mounted on a ipod, adjust ie position of he camera with the ipod head. Do not uist the camera + Do not touch electric contacts on cameras. + Do not leave the camera pointed directy at the sun. This may cause lens or shuttr curlain damage. color falure, ghosting on the CCD, or may possibly cause fes. Do not push or pul severely on the lens. Before storing the camera for a long period, remove ihe batteries. Select a cool dry location for storage Lo prevent condensation or mold from fomming inside 1he camera. Afer storage, test he camera by tuming ion and pressing te shutter button to make sure that Lis operating normal. + AMaÿs observe the operalng environment restictions described in lhe cameras manual
Battery Handling Precautions ‘This camera uses a lithium ion battery specified by Olympus. Do not use any other type of battery. Ifthe battery terminals get wet or greasy, camera contact failure may result. Wipe the battery well with a dry cloth before use. Always charge a battery when using it for the first time, or i it has not been used for a long period When operating the camera with battery power at low temperatures, try to keep the camera and spare battery as warm as possible. A battery that has run down at low temperatures may be restored fer iLis warmed at room temperature. ‘The number of pictures you can take may vary ‘depending on the shooting conditions or battery. Before going on a long trip, and especially before traveling abroad, purchase extra batteries. À recommended battery may be difficult to obtain while traveling. Please recycle batteries lo help save our planet resources. When you throw away dead batteries, be sure lo cover their terminals and always observe local laws and regulations. LCD Monitor + Do not push the monitor forcibly; otherwise the image may become vague, resullng in à playback mode failure or damage to the monitor. + A strip of light may appear on the top/battom of the monitor, but this is not a malfunction. + When a subject is viewed diagonally in the camera, the edges may appear zigzagged on the monitor. This is not a malfunction; will be less noliceable in playback mode. + In places subject to low temperatures, the LCD monitor may Lake a long time Lo turn on or its color may change lemporarly. When using the camera in extremely cold places, its a good idea 0 occasionally place it in a warm place. An LCD monitor exhibiting poor performance due 10 low temperatures wil recover in normal temperatures. + The LCD used for the monitor is made with high-precision technology. However, black spots or bright spots of light may appear constant on the LCD monitor. Due lo its characteristics or the angle at which you are viewing the monitor, the spot may not be uniform in color and brightness. This is not a malfunction. Legal and Other Notices + Olympus makes no representations or warranties regarding any damages, or benefit expected by using this uni lawulÿ, or any request from a third person, which are caused by the inappropriate use of this product. + Olympus makes no representations or warranties regarding any damages or any benefit expected by using Ihis unit lawlully which are caused by erasing picture data.
Disclaimer of Warranty + Olympus makes no representations or warranties, either expressed or implied, by or conceming any content of these written materials or software, and in no event shall be liable for any implied warranty of merchantabilty or filness for any particular purpose or for any consequential, incidental or indirect damages (including but not limited to damages for loss of business profits, business interruption and loss of business information) arising from the use or inability to use these writien materials or software or equipment. Some countries do not allow the exclusion or limitation of liability for consequential or incidental damages, so the above limitations may not apply to you + Olympus reserves all rights Lo this manual. Warning Unauthorized photographing or use of copyrighted material may violate applicable copyright laws. Olympus assumes no responsibility for unauthorized photographing, use or other acts that infringe upon the rights of copyright owners. Copyright Notice Al rights reserved. No part of these written materials or this software may be reproduced or used in any form or by any means, electror or mechanical, including photocopying and recording or the use of any type of information storage and retrieval system, without the prior written permission of Olympus. No liability is assumed with respect to the use of the information contained in these written materials. or software, or for damages resulting from the use of the information contained therein. Olympus reserves the right to alter the features and contents of this publication or software without obligation or advance notice.
For customers in Europe CE" mark incicates that is product comples vi the European requirements for safe health environment and customer protection. CE mark cameras are intended for sales in Europe. This symbol frossed-out whecled bin WEEE Amex IV] indices separate collection of waste letical and electronic equipment in the EU countries. Please de not trou the equipment into to domesti refuse. Please use ne retum and calacion systems available in your country far the ispasal fs produt ‘This symbol frossed-out uhecled bin Directive 2008/G8/EC Annex I inccales soparate colction of waste batteries in na EU countie. Please do not throw (ne batteries int the domestic refuse. Plsase usa ne return and colction systems avaïabl in your country for the disposal of he waste batteries. Use Only Dedicated Rechargeable Battery and Battery Charger We strongly recommend {hat you use only he genuine Olympus dedicated rechargeable battery and battery charger ilh ihis camera. Using a non-genuine rechargeable battery and/or battery charger may resul in fre or personal injury due 10 leakage, heating ignition or damage to the battery. Olympus does not assume any liabiity for accidents or damage that may resul from the use of a battery andlor battery charger that are not genuine Olympus accessories. Provisions of warranty 1 HFthis product proves {0 be defectve, although ithas been used proper {in accordance win the written Safety Precautions and Operating instructions supplied with i), during a period of io years from the date of purchase from an authorized Olympus distbutor within 1e business area of Olympus Imaging Europa GmbH 28 slipulated on 1he website: hip:/wolympus. com ihis product wil be repaired, or at Olympus's option replaced, free of charge. To claim under this warranty the customer must Lake the product and this Warranty Certicate before 1he end of he two year warranty period lo 1he dealer where the product was purchased or any olher Olympus service station within the business area of Olympus Imaging Europa GmbH as stipulated on the website: tip-liwww.olympus.com. During the one year period of 1ne Word Wide Warranty the customer may lurn the product in at any Olympus service station. Please nolce Inat not in Al countries such Olympus service station exists.
2. The customer shall transport the product to the
dealer or Olympus authorized service station athis own risk and shall be responsible for any costs incurred in transporting the product. This warranty does not cover the following and the customer will be required Lo pay repair charge, even for defects occurring within the warranty period referred to above. Any defect Ihat occurs due lo mishandiing {such as an operation performed that is not mentioned in the Safety Precautions or other sections of the instructions, etc.) Any defect Ihat occurs due Lo repair, modification, cleaning, etc. performed by anyone other than Olympus or an Olympus authorized service station. Any defect or damage that occurs due lo transport, a fall, shock, etc. after purchase of the product. Any defect or damage that oceurs due to fire, earhquake, flood damage, thunderboll, other natural disasters, environmental pollution and irregular voltage sources. Any defect Ihat occurs due Lo careless or improper storage (such as keeping the product under conditions of high temperature and humidity, near insect repellents such as naphthalene or harmful drugs, etc.), improper maintenance, el. Any defect Ihat occurs due lo exhausted batteries, etc. Any defect Ihat occurs due lo sand, mud, ele. entering the inside of the product casing When this Warranty Certificate is not returned with the product. When any allerations whatsoever are made to the Warranty Certificate regarding the year, month and date of purchase, the customers name, the dealer's name, and the serial number. When proof of purchase is not presented with this Warranty Certificate.
‘This Warranty applies to the product only; the Warranty does not apply lo any other accessory equipment, such as {he case, strap, lens cap and batteries. Olympus's sole liabilty under this warranty shall be limited to repairing or replacing the product. Any liability for indirect or consequential loss or damage of any kind incurred or suffered by the customer due lo a defect of the product, and in particular any loss or damage caused to any lenses, flms, other equipment or accessories. used with the product or for any loss resulling from a delay in repair or loss of date, is excluded. Compelling regulations by law remain unaïfected by this. Notes regarding warranty maintenance This warranty will only be valid irthe Warranty Certificate is duly completed by Olympus or an authorized dealer or other documents contain sufficient proof. Therefore, please make sure that your name, the name of the dealer, the serial number and the year, month and date of purchase are all completed or the original invoice or the sales receipt (indicating the dealers name, the date of purchase and product type) is attached Lo this Warranty Certificate. Olympus reserves the right Lo refuse free-of- charge service if neilher Warranty Certificate is completed nor the above document is atlached or ifthe information contained in it is incomplete or ilegible. Since this Warranty Certificate wall not be re- issued, keep it in a safe place. Please refer to the list on the website: http:/w. olympus.com for the authorized international Olympus service network. Trademarks IBM is a registered trademark of International Business Machines Corporation. Microsoft and Windows are registered trademarks of Microsoft Corporation. Macintosh is a trademark of Apple Inc. XD-Picture Card is a trademark. microSD is a trademark of the SD Association. Al other company and product names are registered trademarks and/or trademarks of their respective owners. ‘The standards for camera flle systems referred to in this manual are the “Design rule for Camera File. system/DGF” standards stipulated by the Japan Electronics and Information Technology Industries: Association (JEITA).
SPECIFICATIONS Camera Product type :_ Digital camera (for shooting and displaying) Recording system Still pictures + Digital recording, JPEG ln accordance wi Design rule for Camera File system (DCF)) Applicable standards: Ex 2.2, Digital Print Order Format (DPF), PRINT Image Matching I, PictBridge Sound with stil pictures _: Wave format Movie +_AVIMoïon JPEG Memory + Intemal memory 2D-Picture Card (16 MB to 2 GB) (TypeH/M/M+, Standard) microSD card/microSDHC card (with the supplied microSD Attachment) No. of pictures + Approx 250 {when fully charged) {based on CIPA battery life measurement standards) No. of effective pixels 12,000,000 pixels Image pickup device 112.33" CCD (primary color fier), 12,700,000 pixels (gross) Lens Olympus lens 5.0 to 50.0 mm, B.2 10 5.9 lequivalent to 28 to 280 mm on à 35mm camera) Photometric system Digital ESP metering, spot metering system Shutter speed to 171000 sec. Shooting range 0.5 m (1.6 1.) 0 © (W), 1.0 m (3.3) to = (T) (normal)
0.1 m (0.3) 0 » (W). 0.91m (30 1.) to = (T) (macro mode)
0.01 m (0.4 into 0.5 m (1.6 L) (W oniy) super macro mode)
Monitor _2.T° TFT color LCD display. 230,000 dots Flash charge time : ‘Approx. 4 sec. (for ful flash discharge at room lemperature using a new full charged battery) Connector : Muli-connector (DC-IN jack USB connector, AV OUT jack) Automatic calendar system : 2000 up to 2099 Operating environment Temperature + O°C to 40 C (32 °F to 104 °F) [operation -20 °C to 60 °C (4 °F to 140 °F) (storage) Humidity 30 % to 90 % (operationl/10 % to 90 % (storage) Power supply One Olympus lithium ion battery (LI-508) or Olympus AC adapter Dimensions + 96.0 mm (W) x 60.0 mm (H) x 31.0 mm (D) (3.8 x2.4 x 121n) lexcluding protusions) Weight 185 g (6.5 02) [excluding battery and card) “Shadow Adjustment Technology" function contains patented technologies from Apical Limited.
Lithium ion battery (LI-50B) Product type Lithium ion rechargeable battery Model No. LI-S0BALI-50B8 Standard voltage : DC37V Standard capacity 925 man Battery life ‘Approx. 300 full charges (varies on usage) Operating environment Temperature + 0°C to 40°C (32°F lo 104°F) (chargingW 10°C to 60°C (14°F to 140°F) (operation)! 10°C to 35°C (14°F Lo 95°F) (storage) Dimensions 844 mm (W) x 40.0 mm (H) x 7.0 mm (D)(14*16*031n) Weight ‘Approx. 20 g (0.7 02) Battery charger (LI-50C) Model No. +_LESOCAALI-S0CABILI-S0CBALLI-50C8B Power requirements __:_ AC 100 to 240 V (50/60 Hz) Output + DC42V,700mA Charging time ‘Approx. 2 hours Operating environment Temperature _: 0° lo 40°C (32°F to 104°F) (operationÿ -20°C to 60°G (4°F to 140°F) (storage) Dimensions 62.0 mm (W) x 23.8 mm (H) * 90.0 mm (D) (240.9 x35in.) Weight +_Approx. 70 g (2.5 02) microSD Attachment Product type +_Atachment for microSD Card Operating Environment Temperature: 10°C to 40°C (14 lo 104°F) (operation) / -20°C to 65°C (-4 to 149°F) (storage) Humidity _95% and below (operation) 85% and below (storage) Dimensions 25.0 mm (W) x 20.3 mm (H) x 1.7 mm (D) (1.0 x 0.8 x 0.07 in.) (Handie:2.2 mm (0.09 in.) Weight + Approx. 0.9 g (0.03 02) Design and specifications subject lo change without notice.
Cropping a picture Ft . CUSTOM PRINT
OLYMPUS IMAGING EUROPA GMBH
Premises: Wendenstrasse 14-18, 20097 Hamburg, Germany. Tel: +49 40-23 77 3-0 / Fax: +49 40-23 07 61 Goods delivery: Bredowstrasse 20, 22113 Hamburg, Germany Letters: Postfach 10 49 08, 20034 Hamburg, Germany European Technical Customer Support: Please visit our homepage http:/Mww.olympus-europa.com or cal our TOLL FREE NUMBER: : 00600 - 67 10 83 00 for Austria, Belgium, Denmark, Finland, France, Germany, ltaly, Luxemburg, Netherlands, Norway, Portugal, Spain, Sweden, Switzerland, United Kingdom
- Please note some (mobile) phone services providers do no permit access or request an additional prefix to +800 numbers. For all European Countries not listed and in case that you can't get connected to the above mentioned number, please make use of ihe following CHARGED NUMBERS: +49 180 5 - 67 10 83 or +49 40 - 237 73 4899 Our Technical Customer Support is available from 9 am to 6 pm MET (Monday to Friday) © 2009 OLYMPUS IMAGING CORP. VN061802