
XJ (2014) - Automobile JAGUAR - Free user manual and instructions
Find the device manual for free XJ (2014) JAGUAR in PDF.


| Product Type | Luxury Sedan |
| Brand | Jaguar |
| Model | XJ (2014) |
| Category | Automobile |
| Body Style | 4-door sedan |
| Dimensions (L x W x H) | 5130 mm x 1899 mm x 1448 mm |
| Wheelbase | 3032 mm |
| Curb Weight | Approx. 1800-2000 kg |
| Fuel Type | Gasoline or Diesel |
| Fuel Tank Capacity | 80 L |
| Engine Options | 3.0L V6 Supercharged, 5.0L V8 Supercharged |
| Transmission | 8-speed automatic |
| Drivetrain | Rear-wheel drive |
| Steering | Electric Power Steering |
| Brakes | Ventilated disc brakes front and rear |
| Safety Features | ABS, ESC, airbags, traction control |
| Maintenance Interval | Every 16,000 km or 12 months |
| Recommended Oil | 5W-30 synthetic |
| Tire Pressure (Front/Rear) | 2.3 bar / 2.5 bar |
| Battery Type | 12V lead-acid (AGM recommended) |
| Warranty | 5 years / 80,000 km |
Frequently Asked Questions - XJ (2014) JAGUAR
User questions about XJ (2014) JAGUAR
0 question about this device. Answer the ones you know or ask your own.
Ask a new question about this device
Download the instructions for your Automobile in PDF format for free! Find your manual XJ (2014) - JAGUAR and take your electronic device back in hand. On this page are published all the documents necessary for the use of your device. XJ (2014) by JAGUAR.
USER MANUAL XJ (2014) JAGUAR
Comfort adjustments 4
Starting and driving 5
Driving aids 8
Heating and ventilation 10
Audio and touch screen 11
Navigation 14
Telephone 15
Filling station information 16
natural_image
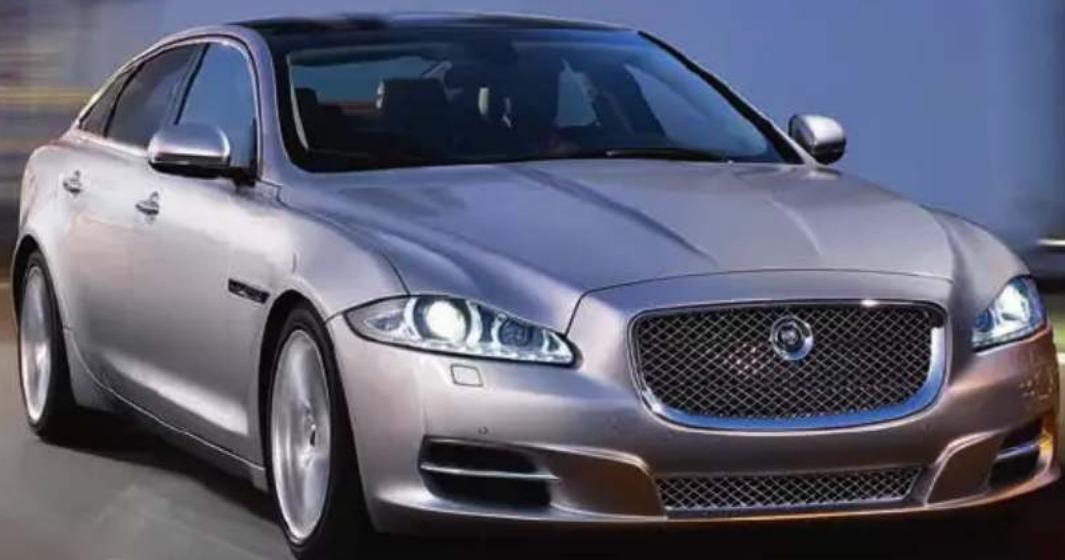
Silver luxury sedan with grille and headlights on, parked in a studio setting (no visible text or symbols)
- Headlamps, turn signals and Trip computer
- Manual gear change paddle (-) down
- Instrument panel, warning lamps, Message center and turn by turn navigation
- Manual gear change paddle (+) up
- Wiper and Washers
- START/STOP
- Sunroof control
- Parking aid
- Rear screen sun blind
- Sunroof blinds
- Interior lamps
- Audio system
- Climate control
- Windshield heater
- Rear screen heater
- Gear selector
- Dynamic stability control (DSC) switch
- Automatic speed limiter (ASL) switch
- Electronic parking brake (EPB)
- Dynamic mode switch
- Winter mode switch
- Instrument panel menu control
-
Adaptive cruise control gap setting and Cruise control cancel
-
Cruise control
- Steering column adjustment
- Telephone controls
- Heated steering wheel
- Audio/video menu control
- Instruments dimmer control
- Rear fog lamps
- Trunk release
- Central locking switches
- Hazard warning
- Touch screen Home menu
- Telephone menu
- Navigation menu
- Intelligent stop/start
- Heated front seats Touch screen menu
- Audio settings menu
- Audio/video menu
- CD/DVD eject
- Audio/video sources
- Rear window isolator
- Window controls
- Power folding mirror selectors and adjuster
- Driving position memory store controls.
Smart key

Press once to lock the vehicle and arm the exterior (perimetric) alarm.

Multi-point entry - Press once to disarm the alarm, unlock all doors and unlock the trunk.
Press and hold to unlock all doors and open the windows (Global opening).

Press once to switch the headlamps on for 30 seconds. Press again to switch off.

Press to open only the trunk. The rest of the security system remains active.

Press and hold for 3 seconds to activate/cancel the panic alarm.
Unlocking mode alternatives
Single-point entry allows only the driver's door to unlock with a single press. A second press unlocks all other doors and the trunk.
Multi-point entry will unlock all doors and trunk with a single press.
To change between modes, with the vehicle unlocked, press the lock and unlock buttons simultaneously for 3 seconds. The hazard warning lamps will flash twice to confirm the change. Mode change can also be made via the Instrument panel menu control.
Emergency key release
Slide the side section up to remove. Remove the keyblade and unfold it.
Use the blade to lever off the appropriate door lock cover. The cover has a key symbol embossed into it.
Insert the key into the exposed lock, then turn and release it to unlock.
If the security system was previously armed with the Smart key,
when the door is unlocked the alarm will sound. To disarm the alarm, press the unlock button on the Smart key or press the
START/STOP
button with the Smart key inside the vehicle.

natural_image
Illustration of a remote control panel with a red upward arrow indicating growth (no text or symbols present)Operating note
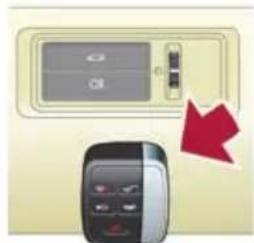
If the Smart key fails to operate, hold it against the facia, below the auxiliary switch pack. Start the engine as normal (see page 5). The Smart key can now be removed.
natural_image
Illustration of a mobile phone with a red downward arrow indicating a change (no text or symbols present)Keyless entry/exit
To unlock the vehicle and disarm the alarm, first make sure that the Smart key is outside the vehicle but within 3 ft (1 meter).
Operate a door handle or the trunk release button.
To lock the vehicle and arm the alarm, first make sure that the Smart key is outside the vehicle but within 3 ft (1 meter).
Press a door handle button once to lock.
Care point
The Smart key may not be detected if it is placed in a metal container, or if it is shielded by a device with a back lit LCD screen, (e.g., laptop, smart phone etc.) Keep the Smart key clear of such devices when attempting Keyless entry or Keyless starting.
Setting the driving position
See page 2, items 25 and 46
Driver's seat
Set the seat position using the following controls.
- Seat forwards and back, cushion height and cushion angle.
- Cushion length.
- Side bolster - inflate.
- Side bolster - deflate.
- Lumbar support.
- Seatback angle and head restraint.
Steering column
- With the vehicle stationary, adjust the steering column to the required driving position.
Door mirrors
- Press the left or right mirror selector.
- Use the mirror adjuster to set the mirror position.
Storing the driving position to memory
When the driver's seat, steering column and door mirrors are adjusted to the required position, the settings can be stored.
- Press the M button to activate the memory store function. The button will illuminate to indicate the memory store function is active.
- Press button 1, 2 or 3 to store the current driving position to the chosen number.
Use a stored memory position by pressing the appropriate button; 1, 2 or 3. The seat, steering wheel and mirrors will move to their preset positions.

Operating note
Memory buttons 1, 2 or 3 must be pressed within 5 seconds after pressing the M button, otherwise the memory store function will cancel.
Restraints

A warning indicator in the Instrument panel will illuminate if the seat belt of an occupied front seat is not fastened. This may be
accompanied by an audible warning.
Using child seats
Refer to Child Seat Positioning in the Owner's Handbook to determine the correct seat for your child.
If it becomes necessary to fit a child restraint on the front passenger seat, make the following seat adjustments:
- Move the seat fully rearward.
• Lumbar support to minimum setting. -
Seat cushion to highest position.
• Cushion front tilt to lowest position. -
Seatback to fully upright position.
- Adjust the upper seat belt anchorage to its lowest position.
When a front passenger seat occupancy sensor is fitted it determines the state of seat occupancy and sets the air bag status to suit. The status indicator is in the overhead console. - Seat unoccupied - air bag deactivated and indicator off.
- Seat occupied - air bag activated and indicator off.
- Low weight occupant or object - air bag deactivated and indicator on.
Engine start/stop
See page 2, item 6
Ignition only on
- With the Smart key inside the vehicle, press the START/STOP button once to switch on the ignition.
• A second press will switch off the ignition.
Engine start
- The rotary selector must be in either P or N position to enable engine starting.
- With the foot brake depressed, press and release the START/STOP button to start the engine.
- Press again to stop the engine and switch off the ignition.
Rolling start
If the engine is switched off while the vehicle is moving, it can be restarted after 2 seconds have elapsed. Select transmission N position and then press the START/STOP button.
Smart key use
The engine will continue to run, even if the Smart key is removed from the vehicle. However, if the engine is stopped, it cannot be restarted until the Smart key is returned to the vehicle.
Intelligent Stop/Start
See page 2, item 37
The Stop/Start system is automatically activated when the ignition is turned on. If the vehicle is stopped, the engine will turn off (unless it is required to support other vehicle systems). When the brake is released and a drive gear is selected, the engine will restart automatically.

A warning lamp in the Instrument panel will illuminate when the engine has been switched off by the Stop/Start system.
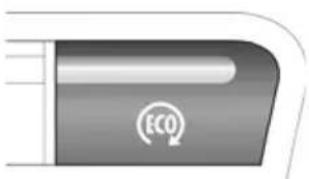
To switch Stop/Start off, press the Eco switch.
natural_image
Close-up of a metallic electronic component with a circular logo labeled 'ECO' (no readable text or symbols beyond the label)Note: The engine will restart automatically if the switch is pressed while an automatic engine stop is in progress.
Instrument panel menu
Driver information is displayed on a TFT Virtual Instrument Panel.
Many features of the display can be changed to suit personal preferences. Other features, such as the speedometer, can be altered to suit the driving situation. The speedometer can be configured for KPH or MPH via the Vehicle Settings menu.
To access the main menu in the Instrument panel, press any button on the right side steering wheel control. Use the direction controls to move through the menu and subsequent options. Press OK to confirm your selections.


natural_image
Diagram of a car interior with a control panel and directional arrows (no text or symbols)Warning lamps Displayed in the Instrument panel

Braking system fault or brake fluid low. USA only

Braking system fault or brake fluid low

Anti-lock braking system fault. USA only

Anti-lock braking system fault.

Engine/transmission emissions fault

Electric parking brake is applied. Flashing - EPB fault. USA only

Electric parking brake is applied. Flashing - EPB fault.

Dynamic stability control fault. Flashes when DSC is operating
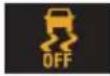
DSC switched off, Trac DSC on

Air bag fault

Low tire pressure

Seat belt reminder

Automatic speed limiter active

Forward alert active

Adaptive cruise control active in Follow mode
Transmission
See page 2, item 2, 4 and 16
Gearshift interlock
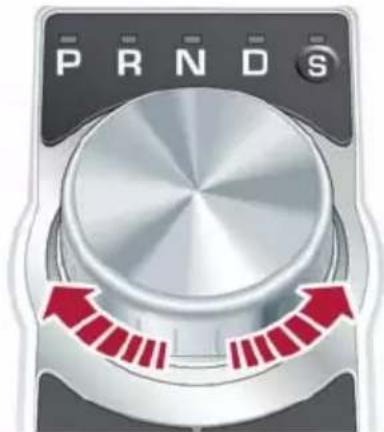
Apply the foot brake then move the selector from the P position. Maintain brake pressure until a gear is selected.
Automatic gear selection
Select D for fully automatic gear changes.
Sport mode
When selected, automatic gear change points are modified to make full use of engine power.
Press the selector down and rotate from D to S.
Manual gear changes
Manual gear change mode is effective when rapid acceleration and engine braking are required.
• To shift down, briefly pull the left (downshift) paddle.
• To shift up, briefly pull the right (upshift) paddle.
When the paddles are used in D, gear selection will revert to automatic if use of the paddles is not maintained. With S selected, continuous manual operation is initiated if the paddles are used.
To return to automatic operation, pull and hold the right (upshift) paddle for 2 seconds.
natural_image
Close-up of a metallic rotary knob with red directional arrows indicating rotation (no text or symbols)Select P before switching off the engine. However, if the engine is switched off with R, D or S selected, the selector will automatically return to P while retracting.
Operating note
If the engine is switched off with N selected, automatic selection of P is delayed for 10 minutes. DO NOT use this feature to enable towing of the vehicle. Refer to Vehicle recovery in the Owner's Handbook.
Electronic parking brake (EPB)
See page 2, item 19
Applying
- With the vehicle stationary, lift up the EPB switch and then release it. The red warning lamp in the Instrument panel will illuminate.
Releasing
- With the ignition on, apply the foot brake and press down on the EPB switch.
- If the vehicle is stationary with the EPB applied and either D or R selected, pressing the accelerator will automatically release the EPB.
Auto headlamps and wipers
See page 2, items 1 and 5
Auto headlamps
-
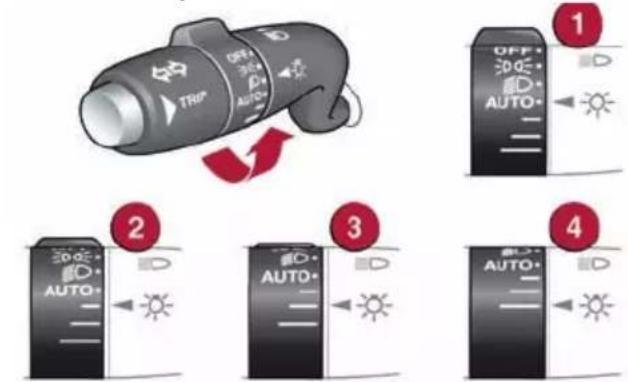
When the lighting control AUTO position is selected, side lamps and headlamps will turn on automatically as ambient light fades. With the lighting control in the low beam position, High beam assist will activate automatically in the absence of other vehicle lights ahead. Vehicle speed must be above 25 mph (40 km/h).
-
-
- The headlamps can temporarily illuminate ahead when exiting the car at night. Rotate the control for delay periods of 30, 60 or 120 seconds.
-
Auto wipers
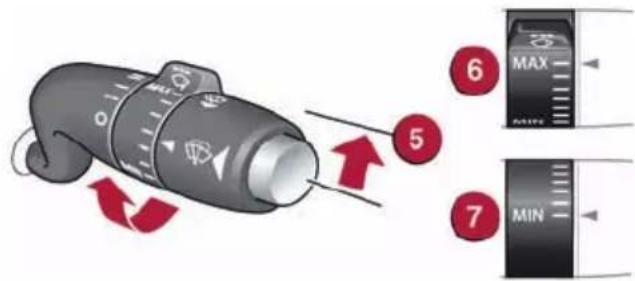
For automatic wipe, activated by the Rain sensor, move the wiper control up to the first position. Sensitivity can be adjusted by rotating the collar.
-
First stop for the Auto position.
-
Rain sensor maximum sensitivity.
-
Rain sensor minimum sensitivity.
Care point
Before entering an automatic car wash, turn the wipers off to deactivate the Rain sensor. Otherwise, the wipers will operate during the washing process and may be damaged.
Cruise control and Forward alert
See page 2, items 23 and 24
Setting Cruise control speed
-
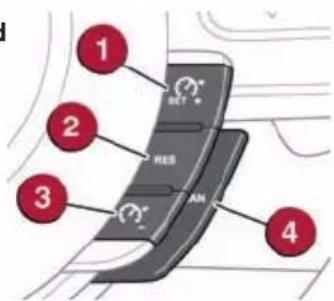
Press to cancel but retain the set speed in memory.
-
Press to set Cruise control at the current speed.
- Resumes the set speed after a cancellation.
- Press to decrease set speed until the desired new speed is reached.
Cruise control will also cancel if the brake pedal is pressed, or if vehicle speed falls below 20 mph (32 km/h).
Adaptive cruise control (ACC)
This enhancement uses a front mounted radar to monitor traffic ahead. ACC can be programmed to maintain a set gap to the vehicle ahead. If the vehicle ahead is traveling slower than the set speed, your vehicle will automatically slow down and then maintain the set gap until the road ahead clears. At that point your vehicle will accelerate to the set speed.
ACC gap setting
-
- Press to decrease or increase the set gap to the vehicle ahead.
- Press to cancel ACC and the set speed.
When ACC is active, an amber warning lamp will illuminate in the Instrument

panel. Set speeds are cleared at ignition switch off.
Forward alert
Forward alert is an additional feature of ACC and provides limited detection of objects in the road ahead. When necessary, it will give an audible warning plus the Message centre warning, FORWARD ALERT. The driver must take appropriate action.
See the Owner's Handbook for full details.
Automatic speed limiter (ASL)
See page 2, items 18 and 24
ASL allows any speed above 20 mph (32 km/h) to be set as a maximum speed. This is useful to make sure that any given speed limit is not exceeded.
Setting a speed
The setting procedure can be made while the vehicle is stationary.
- Press the ASL button. An ASL warning lamp illuminates in the speedometer.
- Use the Cruise control increase and decrease controls to set a speed. The Message center will display the set speed. Adjustment can be made at any time to suit variable speed limits.

natural_image
Close-up of a metallic cylindrical object with a small rectangular base labeled 'OFF' (no text or symbols on the object itself)
If ASL is suspended due to kick-down acceleration or by pressing the Cruise control CAN button, the Message center will display a LIMITER CANCELLED message.
Press the RES control to reinstate the ASL set speed. ASL will resume if vehicle speed is below the previously set speed limit.
Care point
When negotiating a steep downhill gradient, vehicle speed may exceed the set speed. The Message center will display a warning. Driver intervention may be required to reduce the speed.
Trip computer and Message center
See page 2, items 1 and 3
Trip computer
Trip computer information can be accessed via the TRIP button on the end of the lighting control. Information is displayed in the Instrument panel left side dial.

Press the TRIP button repeatedly to display data in the following order:
- Odometer.
- Trip distance since trip reset.
• Average speed since the start of the trip.
• Average fuel consumption since the trip reset.
• Instantaneous fuel consumption. - Remaining range estimate based on current fuel consumption.
3 trip memories are available via the TRIP button. You can specify which one is viewable in the Instrument panel menu.
Trip A and B can be reset to zero with a long press of the TRIP button. Auto will reset to zero after each ignition cycle.
Message centre
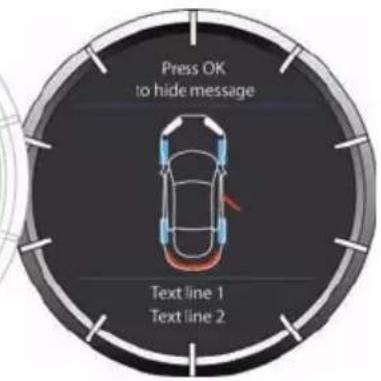
Messages are displayed in the Instrument panel right side dial and may be accompanied by an icon. If more than one message is active then each will be displayed in turn.
Turn by turn Navigation
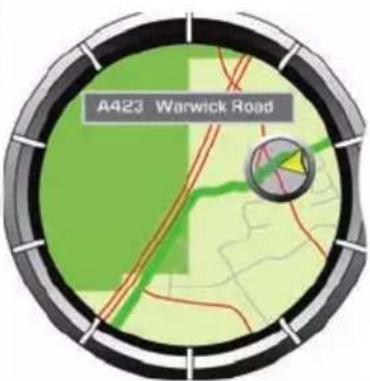
When a destination is set on the Navigation Touch screen and guidance is commenced, a simplified graphic guide is displayed in the Instrument panel. It gives turn by turn information about the next part of the journey.
JaguarDrive control
See page 2, items 17, 20 and 21
Winter mode, Dynamic mode and Dynamic Stability Control (DSC) allow the driver to more finely tune the vehicle's driving characteristics to suit prevailing conditions.

-
Winter mode. Use in slippery road conditions. Selects 2nd gear for driving away, moderates engine response and modifies gear change strategy to make sure maximum possible traction is achieved.
-
Dynamic mode. Delivers a high performance driving experience. If transmission S is now used with paddle gear selection, there is no automatic gear change, even if the rev limit is reached.
-
DSC is the default condition at engine start and is designed to control vehicle stability, even in difficult conditions. TracDSC is an alternative setting for dry tarmac use and optimises settings for maximum traction. To select TracDSC, depress the DSC switch for less than 10 seconds. Touch the switch again to return to DSC. To turn DSC off, depress the switch for more than 10 seconds.
Blind spot monitoring
Each mirror displays amber icons to warn of overtaking vehicles in adjacent lanes. The monitored area extends approximately 20 ft (6 meters) behind the rear wheels and 8.2 ft (2.5 meters) to the sides.
It switches on automatically at speeds of above 10mph (16 km/h) while in a forward gear.

natural_image
Illustration showing a device with signal waves interacting with a screen, next to an external screen (no text or symbols)Parking aids
See page 2, item 8
When transmission R is selected, Parking aids at the rear and front will activate.
The Touch screen will display a vehicle graphic and indicate the approximate distance to any object detected.
Note: Sensors may activate when water, snow or ice are detected on their surfaces. Make sure that the sensors are cleaned regularly.
An audible alert will increase in frequency as the object is approached.

To activate the front sensors manually, press the Parking aid switch in the overhead panel.
The front sensors are deactivated when vehicle speed exceeds 10 mph (16 km/h).
Audible alert volume can be adjusted via the Touch screen. Select the Home menu then Setup followed by System. Now select Volume presets. Use the + or - soft keys alongside Parking aid to adjust the volume.
Cancelling the Parking aid screen
Touch the screen to return to the previous view.
Rear camera
Activates when transmission R is selected. The Touch screen will display guidance lines to aid reversing.

natural_image
Exterior view of a paved lot with parked cars and curved road markings (no readable text or symbols)To cancel the view at any time, touch the screen.
Heating and ventilation
See page 2, items 13, 14, 15 and 38
Primary controls

- AUTO. This is the recommended operating mode. Automatically adjusts air conditioning, blower speed, air intake and airflow distribution to maintain the selected temperature(s). Helps to prevent screen fogging.
- Temperature control. Temperature is displayed on the Touch screen.
- Defrost. Fastest method to remove frost or heavy fogging from the windshield.
- Recirculation. Helps prevent fumes from entering.
- Blower speed. Rotate to adjust airflow speed through the vents.
- Press for cooled and dehumidified air.
- Heated windshield.
- Heated rear screen.
- Heated seats. Press to access menu options.
External water deposits
The system removes moisture from the air and deposits the excess water beneath the vehicle. This is normal and is no cause for concern.
Touch screen controls
Touch Climate on the Home menu.

- Settings. Air quality sensor sensitivity adjustment.
- Front seats. Temperature, ventilation and massage settings.
- Rear climate. Displays the Rear climate menu.
- Climate Off. Select to turn on/off.
- Sync. Synchronises all front and rear settings to match the driver's.
- Air distribution to the windshield, face and feet.
- Indication of selected blower speed. Use the rotary control to adjust.
Operating note
Seat heating and ventilating will operate only while the engine is running. This is to prevent the battery becoming discharged.
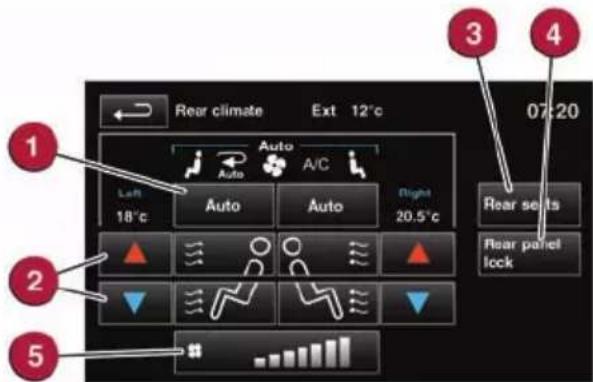
Rear climate control from the Touch screen
The Touch screen controls for Rear climate are very similar to those for the front climate. Areas of difference are:
- Auto. This is the recommended operating mode.
- Temperature adjustment. Select red to increase and blue to decrease temperature.
- Rear seats temperature and ventilation control.
- Rear control panel lock. Will disable the Rear climate control panel. Select again to re-enable.
- Indication of the selected blower speed. Use the rotary control to adjust.
Home menu
Care point
The Touch screen requires only light touches. Excess pressure could result in damage.
Operating note
Always run the engine during prolonged use of the Touch screen.
- Touch to turn the screen off
- Extra features menu.
- Climate menu.
- Shortcut soft key. Personal shortcuts can be set to quickly access any available part of the system. Shortcuts are made in the Setup menu.
- Setup. Personalize the screen view, system settings, voice and volume presets.
- Valet. Select to lock the trunk and glove box when using attendant parking. When returning to the vehicle, touch Valet again and follow the on-screen instructions.
- Audio/Video. Touch to select any of the audio or video sources, to set personal preferences and store stations to pre-sets.
- Nav. On the first navigation screen, touch Agree to move to the Nav menu or select Language if you need to select a different navigation language.
- Destination entry. Touch for direct access to the Destination entry menu.

- Phone. Secondary controls menu. Telephone primary settings are made from the hard controls below the Touch screen.
- AV. Hard key selection of the audio/video sources menu.
- Displays the Home menu.
- PHONE. Press to access the Phone menu.
- NAV. Hard key selection of the navigation options menu.
- Intelligent stop/start on/off.
- Press for audio tone and balance settings.
Steering wheel audio/video control
See page 2, item 28
- Short press to move to the next available audio or video source. Long press to scroll through the sub menu of the selected source.
- Press to increase volume.
- Press to decrease volume.
- Short press to select the next radio preset station or the next CD/MP3 track. Long press to search up for the next radio station or to advance through the CD/MP3 tracks.
- Has the same action as 4 but moves in the opposite direction.

Radio
Turn on the audio system. On the Touch screen Home menu, touch the Audio/Video option. The last used audio source controls will be displayed. Select Radio. If another audio source is displayed, touch the Radio soft key.
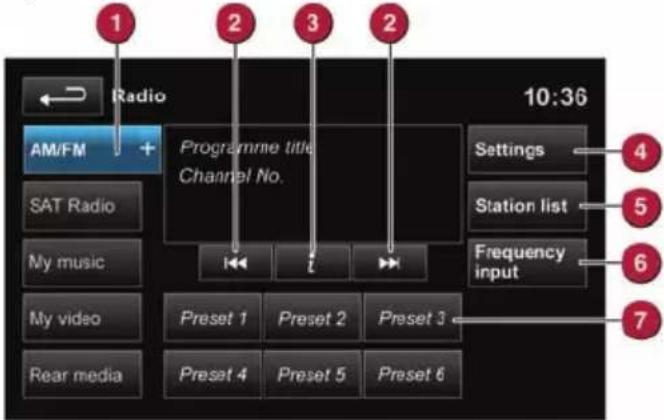
-
Touch to view and select wavebands. The + key will change to -. Touch a waveband to select. Touch - to exit waveband selection.
-
Move up or down to the next or previous station.
-
View information broadcast by the radio station.
-
Settings menu. HD Radio can be enabled here. The Advanced softkey allows favourite stations to be set for traffic and news information.
-
Station list. Options are available only for FM wavebands. All available FM stations will be listed. The list can be sorted by Frequency, Name or Category (pop, news, sport), by selecting the appropriate soft key.
Autostore replaces Station list when an AM waveband is selected. Select to store the 6 strongest AM stations. These stations will be on the preset keys.
-
Frequency input. Enter a station frequency. When the final digit is entered, the station will be tuned.
-
Preset soft keys. Can store 6 stations for each waveband. Touch and hold a soft key to store the current radio station. The softkey will display the station identity.
Satellite radio subscription service
Use channel 184 to preview satellite radio. The SIRIUS telephone number and ID number will be displayed. When the preview time expires you will need to subscribe to SIRIUS to enable further satellite reception.
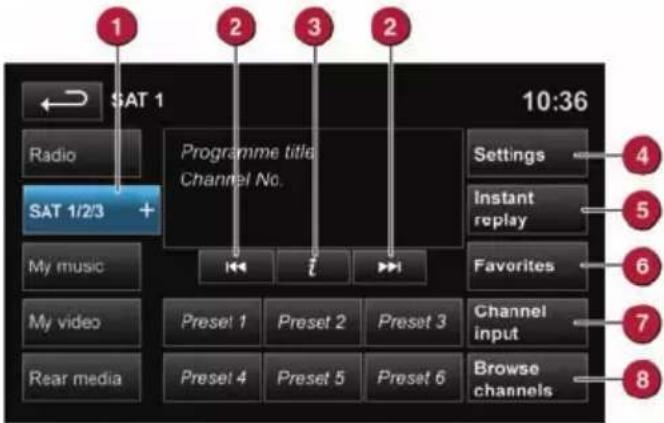
-
Touch to select the satellite bands. Touch the + icon to move through SAT 1, 2 and 3.
-
Use the seek arrows to move up or down to the next or previous channel.
-
Channel information.
-
Personalize settings in Options, Channel skip and Parental lock areas.
-
Instant replay. Allows live audio to be paused, rewound and replayed.
-
Favorites. Store the current song track information into memory. If the audio system subsequently finds a stored track playing on a subscribed channel, notification will be given.
-
Select to access the touch pad. Enter any 3 digit channel number then select OK.
-
Touch to view a list of channel categories. Select one to display full details of that channel and the current track.
NOTE: If there is more information than can fit in the display area, select 3.
NOTE: Use the seek buttons on the steering wheel to find preset channels.
Activating satellite radio
To activate satellite radio:
-
Make sure you are parked in an area with a clear view of the sky while activation takes place.
-
Call SIRIUS while sitting in the vehicle.
-
Provide them with the ID number.
You will also need your credit card. Activation may take up to 15 minutes.
HD radio
HD radio can provide much improved audio quality when compared to normal AM/FM reception. It can also provide additional information about available channel services.
When HD radio is activated and standard AM/FM is in use, if an HD signal is detected the radio will gradually transfer to the digital broadcast. Generally, no action is required but HD radio volume may be greater.
HD radio and AM/FM broadcasts are broadcast simultaneously, however, when switching between HD and AM/FM, there may be a slight time difference in delivery.
When an HD radio channel is being received, the station name is prefixed with HD.
If the prefix is HD1, further sub channels are available from that channel broadcaster.
To enable HD radio:
- Select the Settings soft key on the Radio menu screen.
- Select HD On to activate.
In areas of poor HD reception, automatic switching between HD and AM/FM will be more frequent. If this becomes unacceptable, either tune to an alternative channel or switch HD radio off via the Settings soft key.
CD player and portable media
Select the My music menu.
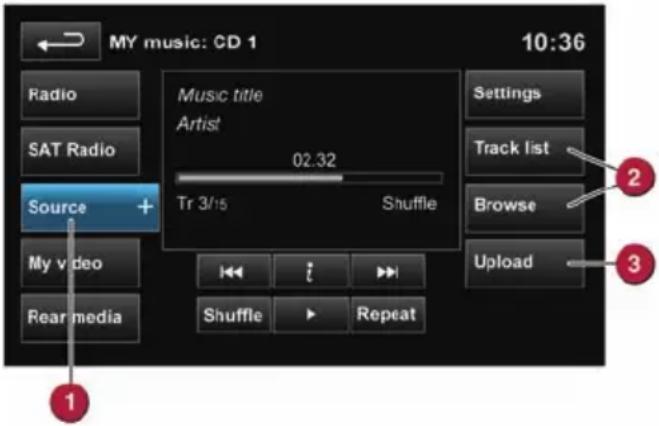
- Select to display all options. Select a source.
- Use Track list or Browse to find a track. Select the track to play.
- Use Upload to load discs. The CD player will accommodate one CD disc at a time but with Stored CD, up to 10 CD's can be loaded onto the virtual CD store. If the drive is full, select Replace to overwrite an existing CD.
Connecting ports for auxiliary devices, iPod, USB and Bluetooth wireless technology devices are located in the cubby box and rear center armrest. The 3.5mm AUX socket allows extra equipment (e.g., personal stereos
MP3 player, hand-held navigation unit, etc.) to be connected to the audio system. Devices connected to the AUX socket are controlled only from the device itself.
When connecting to the USB socket, use the cable supplied with your media device. iPod and USB devices can be operated from the Touch screen.
The system will play MP3, WMA, WAV and AAC files from a memory stick or a USB controlled MP3 player or mobile phone.
Some MP3 players use proprietary file systems that are not supported by the vehicle system. MP3 players must be set to Removable Device or Mass Storage Device mode. See the manufacturer's information. Only music files added to the device while in this mode can be played via the vehicle system.
Care point
Do not use discs with paper labels or dual format discs (Dual Discs or DVD Plus). They could become jammed inside the player.
Touch screen navigation
On initial activation, make sure that both the correct country and search area have been selected.
For more information, refer to the Navigation section of the Owner's Handbook.

flowchart
graph TD
    A["Nav menu: 1 of 2"] --> B["Destination entry"]
    B --> C["Previous destination"]
    C --> D["Display POI"]
    D --> E["Route voice guidance"]
    E --> F["Return to map"]
    F --> G["Cancel guidance"]
    G --> H["More..."]
    H --> I["6"]
    I --> J["7"]
    J --> K["8"]
    K --> L["9"]
    L --> M["10"]
NOTE: To access navigation press either the NAV hard key or touch the Nav icon on the Home menu.
- Use to enter a new destination. Provides a choice of options when entering a destination.
- Displays previous destinations entered. Previous destinations can be selected as a new destination.
- Turns the POI (Point Of Interest) icons on the map on/off.
- When a destination is set, the Jaguar logo in this position is replaced by a soft key which enables the last voice instruction to be repeated.
- Soft key is highlighted while Voice guidance is enabled. Touch to turn Voice guidance off.
- POI shortcuts: Touch an icon to list available POIs that are close to the vehicle position.
- Calculates a detour from the current route.
- Advances to the main map screen.
- There are 2 navigation menu screens. Use the More... soft key to toggle between them. The second map screen features the following soft keys.
Stored locations. Used to manage the stored data.
TMC (Traffic Message Channel). Provides data about road conditions and any events that may affect the current route.
Route options. Allows selection of various options for the route.
Nav set-up. For setting personal preferences within the navigation system.
- Cancel the current route guidance.
Selecting navigation
When navigation is selected after the ignition is turned on, a caution screen is displayed. Touch Agree.
NOTE: At the first time of accessing the caution screen, set the required language.
Setting a destination
Select Destination entry.
- Select Address and enter address details using the keyboard.
- As each part of the address is refined, touch OK or List to display all of the streets and towns that are available for selection.
- If the house number is not known, press OK, the midpoint of the road is then used as the destination.
- When the address entry fields are complete, press OK to move to the map screen.
Start guidance
The map screen will display the selected destination. Touch GO to start route calculation. Touch Review route if you want to take an alternative route.
Touch Go to start guidance.
Review route
There will be a choice of 3 routes or Change route. 3 routes will display 3 different route options on the map. Select Route 1, 2 or 3 by touching the respective box displayed on the right side of the map and then select GO.
Bluetooth® wireless technology devices
See page 2, items 26 and 35
Compatible Bluetooth wireless technology devices can be paired with the vehicle's in-built system. For the latest compatibility information, refer to www.jaguar.com. Select the required site. In the OWNER area you can find in Bluetooth connectivity information.
Connection must be made with the ignition on or the engine running.
Use the following procedure in conjunction with your phone manufacturer's instructions.
Pairing and connecting using your phone
NOTE: The process of pairing and connecting a phone to the vehicle will vary depending on the type of phone used.
- Switch the ignition on and make sure that the Touch screen is active.
- From the Home menu, select Phone.
- If no phone is connected, select Search new, otherwise select Change phone and then select Search new.
- Select the Device to vehicle option.
NOTE: The vehicle's Bluetooth wireless technology system is discoverable for only 3 minutes.
- Using your phone, search for Bluetooth wireless technology devices. On some phones, this is referred to as new paired device. See your phone's operating instructions for further information.
- When the vehicle's system is discovered, begin the pairing process and follow the on-screen instructions.
- When requested, enter a PIN of your choice into your phone and the vehicle system. Select OK.
- When your phone is paired and connected, a confirmation message will be displayed.
NOTE: Some phones require the pairing to be set as 'authorised' or 'trusted', in order to automatically connect. Please refer to your phone's operating instructions for further information.
Downloading phonebook entries
When a phone with phonebook download capability is paired and docked, its phonebook directory can be automatically downloaded to the vehicle system.
See PHONEBOOK in the Owner's Handbook for more information.
Calls via the Touch screen

With a phone paired and active, press the PHONE button below the Touch screen.
1. Select Digit Dial, Phonebook or Last 10.
With Digit Dial selected, use the keypad to enter the number.
With Phonebook selected, choose a number from the downloaded phonebook.
Last 10 displays the previous 10 calls. Choose one to dial.
- To make the call, touch the connect icon

- To end a call touch

Calls via the steering wheel controls
See page 2, item 26.

Connect. Press and release to send or accept a call or to access the Last 10 list. Press and hold to access Phonebook.

Disconnect. Use to end or reject a call.

Voice control talk button. The screen will display available options. Say Phone and follow the instructions.

Press to increase the call volume.

Press to decrease the call volume.

Press to scroll up or down lists of calls or phonebook entries.

Operating notes
- Reception is dependent on the phone and network signal. Performance may be improved by changing your phone's settings (e.g., from 3G to 2G).
- If echo is experienced during a call, reduce the audio system volume.
Fuel filler flap opening
The vehicle must be in an unlocked condition before the fuel filler flap can be opened. Press the fuel filler flap firmly, approximately 1.4 in (35 mm) from the rear edge and release. Pull the flap open. The correct fuel specification is shown on the inside of the fuel filler flap.
Filler cap

natural_image
Diagram of a device with a lid and connector, showing internal components and wiring (no text or symbols)Twist the cap counter-clockwise to release.
A hook is provided on the flap hinge to hold the cap while refueling.
Replace the cap and turn it clockwise until it clicks 3 times.
Incorrect fuelling
Do not use E85 fuels (85% ethanol content).
Equipment necessary for the use of fuels containing more than 15% ethanol is not fitted to this vehicle. If E85 fuels are used, serious engine and fuel system damage will occur.
Avoid using fuel containing methanol. If it is unavoidable, do not use a fuel with more than 10% methanol content. The fuel must contain co-solvents and corrosion inhibitors. Fuel system damage and engine performance problems can occur when methanol is used.
Fuels containing up to 15% MTBE can be used.
No responsibility is accepted for damage caused by using incorrect fuels.
If the vehicle is filled with the wrong type of fuel:
• DO NOT start the engine!
- Call for qualified assistance!
Fuel octane rating
Premium unleaded gasoline with a Cost of Living Council (CLC) or Anti Knock Index (AKI) octane rating of 91 or higher should be used.
Hood release
The hood release is located in the left side footwell.
Tire pressure label location
Tire pressures are shown on a label located in the driver's door opening.

natural_image
Diagram of a vehicle's seatbelt mechanism with a red arrow indicating direction (no text or symbols present)NOTE: Tire pressures must be checked and adjusted while the tires are cold.



- Smart key
- Unlocking mode alternatives
- Emergency key release
- START/STOP
- Operating note
- Keyless entry/exit
- Care point
- Setting the driving position
- Driver's seat
- Steering column
- Door mirrors
- Storing the driving position to memory
- Restraints
- Using child seats
- Engine start/stop
- Ignition only on
- Engine start
- Rolling start
- Smart key use
- Intelligent Stop/Start
- Instrument panel menu
- Warning lamps Displayed in the Instrument panel
- Transmission
- Gearshift interlock
- Automatic gear selection
- Sport mode
- Manual gear changes
- Electronic parking brake (EPB)
- Applying
- Releasing
- Auto headlamps and wipers
- Auto wipers
- Cruise control and Forward alert
- Setting Cruise control speed
- Adaptive cruise control (ACC)
- ACC gap setting
- Forward alert
- Automatic speed limiter (ASL)
- Setting a speed
- Trip computer and Message center
- Trip computer
- Message centre
- Turn by turn Navigation
- JaguarDrive control
- Blind spot monitoring
- Parking aids
- Cancelling the Parking aid screen
- Rear camera
- Heating and ventilation
- External water deposits
- Touch screen controls
- Rear climate control from the Touch screen
- Home menu
- Steering wheel audio/video control
- Radio
- Satellite radio subscription service
- Activating satellite radio
- HD radio
- CD player and portable media
- Touch screen navigation
- Selecting navigation
- Setting a destination
- Select Destination entry.
- Start guidance
- Review route
- Bluetooth® wireless technology devices
- Pairing and connecting using your phone
- Downloading phonebook entries
- Select Digit Dial, Phonebook or Last 10.
- Calls via the steering wheel controls
- Operating notes
- Fuel filler flap opening
- Incorrect fuelling
- Fuel octane rating
- Hood release
- Tire pressure label location
Brand : JAGUAR
Model : XJ (2014)
Category : Automobile