
VIP-1010PT - Telephone Planet - Free user manual and instructions
Find the device manual for free VIP-1010PT Planet in PDF.


| Product Type | Corded Landline Phone |
| Model | VIP-1010PT |
| Brand | Planet |
| Dimensions (W x D x H) | Approx. 20 x 15 x 10 cm |
| Weight | Approx. 0.5 kg |
| Power Supply | AC adapter (9V DC, 300mA) |
| Keypad | 12 alphanumeric keys with dial tone |
| Ringer Type | Electronic ringer with adjustable volume |
| Memory Functions | 10-number redial and 10 speed dial memories |
| Display | LCD screen with caller ID support |
| Connection | RJ11 telephone jack |
| Handset Cord | Coiled cord, standard RJ9 connector |
| Wall Mountable | Yes |
| Cleaning Instructions | Wipe with a soft, dry cloth. Avoid liquids. |
| Safety Precautions | Keep away from water and excessive heat |
| Included Accessories | Handset, base, coiled cord, telephone line cord, AC adapter |
| User Manual | Available in PDF format (78 pages, English) |
Frequently Asked Questions - VIP-1010PT Planet
User questions about VIP-1010PT Planet
0 question about this device. Answer the ones you know or ask your own.
Ask a new question about this device
Download the instructions for your Telephone in PDF format for free! Find your manual VIP-1010PT - Planet and take your electronic device back in hand. On this page are published all the documents necessary for the use of your device. VIP-1010PT by Planet.
USER MANUAL VIP-1010PT Planet
natural_image
Black OPPO landline telephone with keypad and keypad, no visible text or symbols on bodyUser's Manual
High Definition PoE IP Phone (1-Line)
VIP-1010PT

natural_image
Group of business professionals in a modern office meeting around a table with documents and water bottles (no visible text or symbols)Copyright
Copyright (C) 2014 PLANET Technology Corp. All rights reserved.
The products and programs described in this User's Manual are licensed products of PLANET Technology. This User's Manual contains proprietary information protected by copyright, and this User's Manual and all accompanying hardware, software, and documentation are copyrighted.
No part of this User's Manual may be copied, photocopied, reproduced, translated, or reduced to any electronic medium or machine-readable form by any means by electronic or mechanical including photocopying, recording, or information storage and retrieval systems, for any purpose other than the purchaser's personal use, and without the prior written permission of PLANET Technology.
Disclaimer
PLANET Technology does not warrant that the hardware will work properly in all environments and applications, and makes no warranty and representation, either implied or expressed, with respect to the quality, performance, merchantability, or fitness for a particular purpose.
PLANET has made every effort to ensure that this User's Manual is accurate; PLANET disclaims liability for any inaccuracies or omissions that may have occurred.
Information in this User's Manual is subject to change without notice and does not represent a commitment on the part of PLANET. PLANET assumes no responsibility for any inaccuracies that may be contained in this User's Manual. PLANET makes no commitment to update the information in this User's Manual, and reserves the right to make improvements on this User's Manual and/or on the products described in this User's Manual at any time without notice.
If users find information in this manual that is incorrect, misleading, or incomplete, we would appreciate their comments and suggestions.
CE Mark Warning
The is a class B device. In a domestic environment, this product may cause radio interference, in which case the user may be required to take adequate measures.
Energy Saving Note of the Device
This power required device does not support standby mode operation. For energy saving, please remove the DC-plug or push the hardware Power Switch to OFF position to disconnect the device from the power circuit.
Without removing the DC-plug or switching off the device, the device will still consume power from the power circuit. In view of Saving the Energy and reducing the unnecessary power consumption, it is strongly suggested to switch off or remove the DC-plug from the device if this device is not intended to be active.
WEEE Warning

To avoid the potential effects on the environment and human health as a result of the presence of hazardous substances in electrical and electronic equipment, end users of electrical and electronic equipment should understand the meaning of the crossed-out wheeled bin symbol. Do not dispose of WEEE as unsorted municipal
waste and have to collect such WEEE separately.
Trademarks
The PLANET logo is a trademark of PLANET Technology. This documentation may refer to numerous hardware and software products by their trade names. In most, if not all cases, their respective companies claim these designations as trademarks or registered trademarks.
Revision
User's Manual on PLANET SIP PoE IP Phone:
Model: VIP-1010PT
Rev: 1.0 (June, 2014)
Part No. EM-VIP-1010PT_v1.0
Table of Contents
1 INTRODUCTION....7
1.1 FEATURES....9
1.2 APPLICATION 11
1.3 PRODUCT SPECIFICATIONS 12
1.4 PHYSICAL SPECIFICATIONS AND PACKAGING 14
1.5 KEYPAD 15
2 INITIAL CONNECTION AND LOGIN 19
3 LCD BASIC FUNCTIONS ....21
3.1 MAKING A CALL 21
3.1.1 Call Device....21
3.1.2 Call Methods 21
3.2 ANSWERING A CALL....21
3.3 MUTE....22
3.4 CALL HOLD / RESUME FORWARD 22
3.5 DND (DO NOT DISTURBED) 22
3.6 CALL WAITING 22
3.7 CALL FORWARD 23
3.8 CALL TRANSFER 23
3.8.1 Blind Transfer....23
3.8.2 Consultation Transfer....24
3.9 THREE-WAY CONFERENCE CALL....24
3.10 CALL PARK 25
3.11 PICKUP 25
3.11.1 Specified Pickup....26
3.11.2 Group Pickup....26
3.12 SPEED DIAL 26
3.13 AUTO-REDIAL....27
3.14 HOT LINE....27
3.15 INTERCOM 27
3.16 HOTDESKING....28
3.16.1 Set the HotDesking Key 28
3.16.2 HotDesking Feature: 28
3.17 APPLICATION 29
3.17.1 Text Message 29
3.17.2 Voice Message 31
4 LCD ADVANCED SETTINGS....33
4.1 BASIC SETTINGS....33
4.1.1 Language 33
4.1.2 Date & Time....33
4.1.3 Backlight 34
4.1.4 Password Setting 34
4.2 SOUND SETTINGS....34
4.2.1 Phone Volume 34
4.2.2 Ring Tones....35
4.3 PHONE BOOK 35
4.3.1 Local Phone Book....35
4.3.2 Add contacts manually....35
4.3.3 Add Contacts from All Calls History: 36
4.3.4 Search Contacts 36
4.3.5 Blacklists....36
4.3.6 Remote Phone Book 36
4.4 HISTORY MANAGEMENT 37
4.5 SYSTEM CUSTOMIZATIONS 37
4.5.1 Programmable keys....37
4.5.2 SIP Account management 38
4.6 BASIC NETWORK SETTINGS 38
4.6.1 DHCP Mode....38
4.6.2 Static IP Mode 39
4.6.3 PPPoE Mode 39
4.7 RESET TO FACTORY 39
4.8 REBOOT 39
5 WEB CONFIGURATION....40
5.1 WAYS TO CONFIGURE....40
5.2 SETTING VIA WEB BROWSER....40
5.3 STATUS / BASIC 41
5.4 ACCOUNT / BASIC 42
5.5 ACCOUNT->ADVANCED 44
5.6 NETWORK / BASIC....47
5.7 NETWORK / ADVANCED 48
5.8 PHONE/TIME/LANGUAGE....50
5.9 PHONE / PREFERENCE 52
5.10 PHONE / CALL FEATURE....53
5.11 PHONE/VOICE 56
5.12 PHONE/KEY/DISPLAY....58
5.13 PHONE / RING TONES 59
5.14 PHONE / TONES....60
5.15 PHONE / DIAL PLAN 61
5.16 PHONE -> ACTION URL....63
5.17 PHONE BOOK->LOCAL PHONE BOOK....65
5.18 PHONE BOOK->REMOTE PHONE BOOK....66
5.19 PHONE BOOK->CALL LOG 67
5.20 PHONE BOOK->LDAP 68
5.21 PHONE BOOK->BROADSOFT 69
5.22 UPGRADE->BASIC....70
5.23 UPGRADE->ADVANCED 71
5.24 SECURITY->BASIC 73
5.25 SECURITY->ADVANCED 74
6 APPENDIX 75
6.1 DIGIT-CHARACTER MAP TABLE....75
6.2 FREQUENTLY ASKED QUESTIONS LIST 75
1 Introduction
natural_image
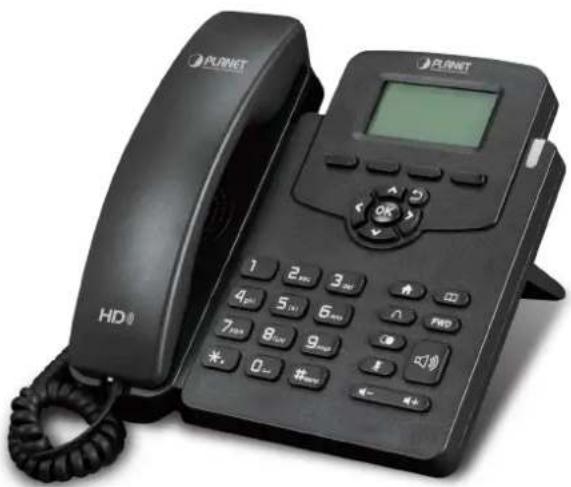
Black OPPO landline telephone with HD and keypad, no visible text or symbols on device bodyCost-effective, High-performance PoE VoIP Phone
To build high-performance VoIP communications at a low cost, PLANET has integrated high-definition voice into a cost-effective SIP phone. It complies with IEEE 802.3af PoE interface for flexible deployment. The VIP-1010PT makes it simple for the enterprise featuring voice and data system or expanding voice system to new locations. It helps the company to save money on long-distance calls; for example, the remote workers can dial in through a Unified VoIP Communication System just like an extension call but no long-distance call charge would occur. The VIP-1010PT also allows call to be transferred to anyone at any location within the voice system, which enables the enterprise to communicate more effectively and is helpful to streamline business processes.

natural_image
Illustration of a black telephone with a digital keypad surrounded by various gold coins and currency symbols (no text or labels)High-quality HD VoIP Voice
The VIP-1010PT delivers HD voice (High-definition Voice) which is the next generation of voice quality for telephony audio, making the quality of voice better than that (toll quality) of the standard digital telephony and even close to that of a room conversation. HD voice is transmitted in the audio frequency range of 50 Hz to 7 kHz or higher over telephone lines, resulting in higher quality voice and clearer communication.

Standard Compliance
The VIP-1010PT supports Session Initiation Protocol 2.0 (RFC 3261) for easy integration with general voice over IP system. The VIP-1010PT is able to broadly interoperate with equipment provided by VoIP infrastructure providers, thus enabling them to provide their customers with better multi-media exchange services.
Compliant with standard SIP RFC 3261
Enhanced, Full-Featured Business IP Phone
The VIP-1010PT is a full-featured, enhanced business IP Phone that addresses the communication needs of the enterprises. It provides 1 voice line and dual 10/100Mbps Ethernet. Furthermore, the VIP-1010PT delivers user-friendly design containing a 132x64 graphic LCD with white backlight.
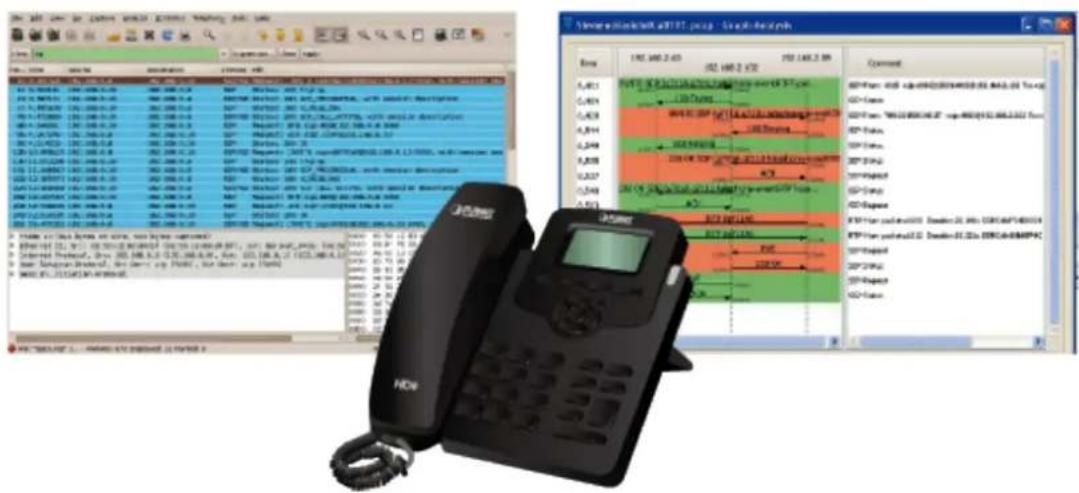
The VIP-1010PT supports all kinds of SIP-based phone features including LDAP, Call Waiting, Auto Answer, Music on Hold, Caller ID 3-way Conferencing, Call on Hold, Call Forwarding, Black List, DTMF Relay, In-Band, Out-of-Band (RFC 2833) and SIP Info, among others. Besides office use, the VIP-1010PT is also the ideal solution for VoIP service offered by Internet Telephony Service Provider (ITSP).
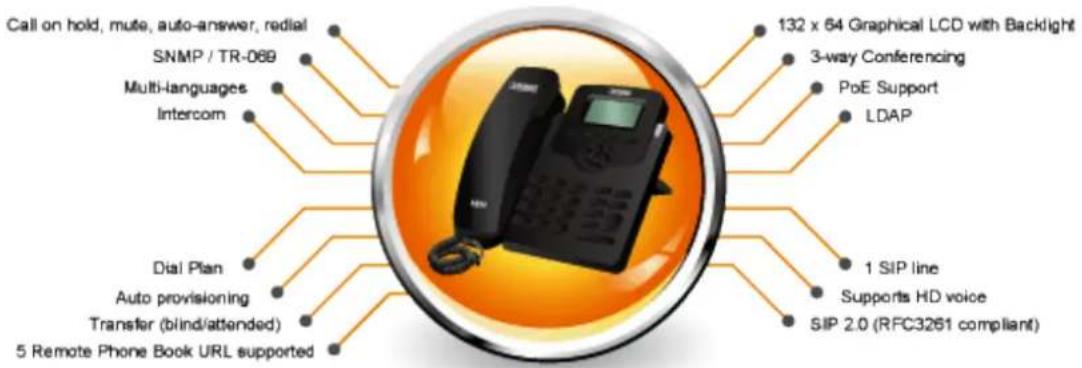
1.1 Features
Highlights
■ Supports SIP 2.0 (RFC3261)
■ Supports 1 SIP voice line
■ IEEE 802.3af Power over Ethernet compliant
■ Supports HD voice
■ LDAP/ TR-069 / SNMP
Phone Features
■ 1 line (supporting 1 SIP account)
■ Supports call waiting, call forwarding, call transfer
■ 3-way conferencing
■ Call on hold, mute, auto-answer, redial
■ Phonebook (500 groups), blacklist (100 groups), call logs (100 entries)
■ 5 remote phone book URL supported
■ Keypad Lock
■ DND (Do Not Disturb)
■ Volume adjustable, ring tones selectable
■ Call Pickup/Group Call Pickup
■ Speed Dial
Intercom
■ Daylight Saving
■ Network Packet Capture
■ Country Ringtone Signal
■ Direct IP Call
■ Auto Redial / Hot Desking
■ Hotline / XML Browser / Action URL
■ Multi-Languages: Default: English and Simple Chinese
P PPX Features
■ HD Voice
■ Dial Plan
■ SMS, Voicemail, MWI Message Notification
■ Wideband Codec: G.722
■ Narrowband Codec: PCMA, PCMU, G.729, G.722, G723_53, G23_63, G726_32
■ VAD, CNG, Echo Canceller
■ Full-Duplex Speakerphone
Security Features
■ Supports HTTPS (SSL)
■ Supports SRTP for Voice Data Encryption
■ Supports Login for Administration
■ SIP Over TLS
Network Features
■ SIP V1(RFC2543), V2(RFC3261)
■ Static IP/DHCP for IP configuration
■ 3 DTMF modes: In-Band, RFC2833, SIP INFO
■ HTTP/HTTPS Web Server for Management
■ NTP for Auto Time Setting
Administration Features
■ Auto provisioning using FTP/TFTP/HTTP/HTTPS/PnP
■ Dial through IP PBX using Phone Number
■ Dial through IP PBX using URL Address
■ Configuration Managements with Web, Keypad on the phone and Auto Provisioning
SNMP
■ TR069
1.2 Application
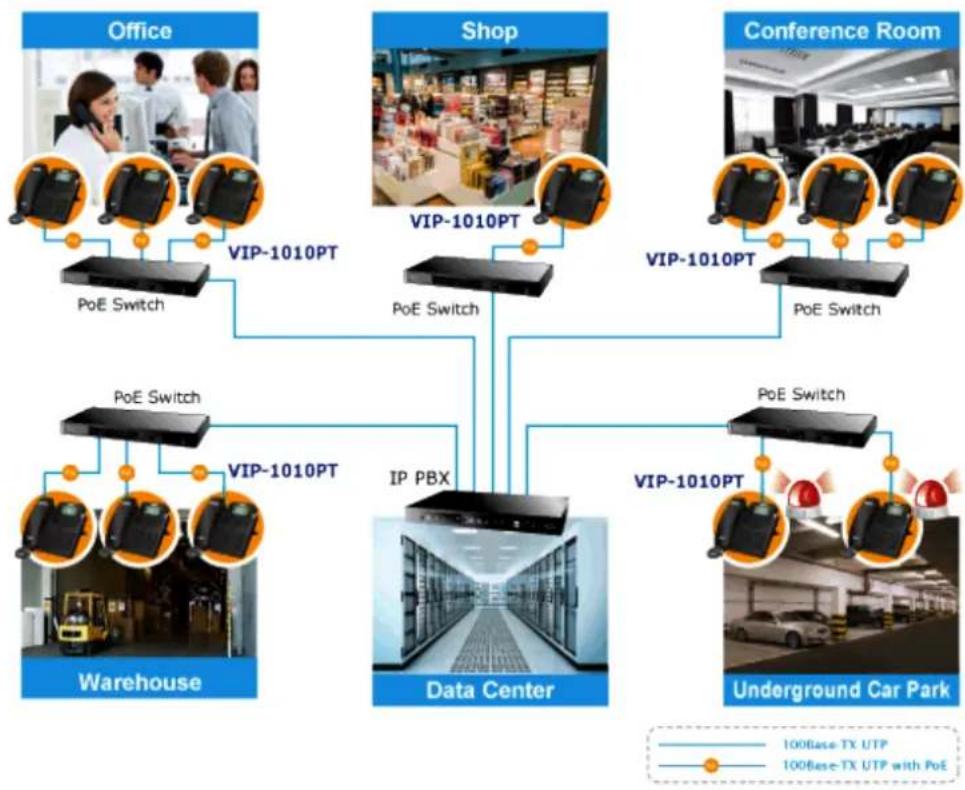
Enterprise IP PBX Deployment of VIP-1010PT
The VIP-1010PT is much easier to install and configure than the traditional phone system. Its low cost and high-definition voice quality give you value for money. Base on standard SIP 2.0, it is compatible with all the standard SIP-based servers.
flowchart
graph TD
    subgraph Office
        A["Office"] --> B["PoE Switch"]
        B --> C["VIP-1010PT"]
    end
    subgraph Shop
        D["Shop"] --> E["PoE Switch"]
        E --> F["VIP-1010PT"]
        F --> G["VIP-1010PT"]
        G --> H["Conference Room"]
        H --> I["PoE Switch"]
        I --> J["VIP-1010PT"]
    end
    subgraph Warehouse
        K["Warehouse"] --> L["PoE Switch"]
        L --> M["VIP-1010PT"]
        M --> N["IP PBX"]
        N --> O["Data Center"]
        O --> P["VIP-1010PT"]
        P --> Q["VIP-1010PT"]
        Q --> R["Underground Car Park"]
    end
    subgraph Data Center
        S["Data Center"] --> T["VIP-1010PT"]
        T --> U["VIP-1010PT"]
        U --> V["Overhead Bus"]
        V --> W["VIP-1010PT"]
        W --> X["VIP-1010PT"]
        X --> Y["Overhead Bus"]
        Y --> Z["VIP-1010PT"]
        Z --> AA["VIP-1010PT"]
        AA --> AB["VIP-1010PT"]
        AB --> AC["VIP-1010PT"]
        AC --> AD["VIP-1010PT"]
        AD --> AE["VIP-1010PT"]
        AE --> AF["VIP-1010PT"]
        AF --> AG["VIP-1010PT"]
        AG --> AH["VIP-1010PT"]
        AH --> AI["VIP-1010PT"]
        AI --> AJ["VIP-1010PT"]
        AJ --> AK["VIP-1010PT"]
        AK --> AL["VIP-1010PT"]
        AL --> AM["VIP-1010PT"]
        AM --> AN["VIP-1010PT"]
        AN --> AO["VIP-1010PT"]
        AO --> AP["VIP-1010PT"]
        AP --> AQ["VIP-1010PT"]
        AQ --> AR["VIP-1010PT"]
        AR --> AS["VIP-1010PT"]
        AS --> AT["VIP-1010PT"]
        AT --> AU["VIP-1010PT"]
        AU --> AV["VIP-1010PT"]
        AV --> AW["VIP-1010PT"]
        AW --> AX["VIP-1010PT"]
        AX --> AY["VIP-1010PT"]
        AY --> AZ["VIP-1010PT"]
        AZ --> BA["VIP-1010PT"]
        BA --> BB["VIP-1010PT"]
        BB --> BC["VIP-1010PT"]
        BC --> BD["VIP-1010PT"]
        BD --> BE["VIP-1010PT"]
        BE --> BF["VIP-1010PT"]
        BF --> BG["VIP-1010PT"]
        BG --> BH["VIP-1010PT"]
        BH --> BI["VIP-1010PT"]
        BI --> BJ["VIP-1010PT"]
        BJ --> BK["VIP-1010PT"]
        BK --> BL["VIP-1010PT"]
        BL --> BM["VIP-1010PT"]
        BM --> BN["VIP-1010PT"]
        BN --> BO["VIP-1010PT"]
        BO --> BP["VIP-1010PT"]
        BP --> BQ["VIP-1010PT"]
        BQ --> BR["VIP-1010PT"]
        BR --> BS["VIP-1010PT"]
        BS --> BT["VIP-1010PT"]
        BT --> BU["VIP-1010PT"]
        BU --> BV["VIP-1010PT"]
        BV --> BW["VIP-1010PT"]
        BW --> BX["VIP-1010PT"]
        BX --> BY["VIP-1010PT"]
        BY --> BZ["VIP-1010PT"]
        BZ --> CA["VIP-1010PT"]
        CA --> CB["VIP-1010PT"]
        CB --> CC["VIP-1010PT"]
        CC --> CD["VIP-1010PT"]
        CD --> CE["VIP-1010PT"]
        CE --> CF["VIP-1010PT"]
        CF --> CG["VIP-1010PT"]
        CG --> CH["VIP-1010PT"]
        CH --> CI["VIP-1010PT"]
        CI --> CJ["VIP-1010PT"]
        CJ --> CK["VIP-1010PT"]
        CK --> CL["VIP-1010PT"]
        CL --> CM["VIP-1010PT"]
        CM --> CN["VIP-1010PT"]
        CN --> CO["VIP-1010PT"]
        CO --> CP["VIP-1010PT"]
        CP --> CQ["VIP-1010PT"]
        CQ --> CR["VIP-1010PT"]
        CR --> CS["VIP-1010PT"]
        CS --> CT["VIP-1010PT"]
        CT --> CU["VIP-1010PT"]
        CU --> CV["VIP-1010PT"]
        CV --> CW["VIP-1010PT"]
        CW --> CX["VIP-1010PT"]
        CX --> CY["VIP-1010PT"]
        CY --> CZ["VIP-1010PT"]
        CZ --> DA["VIP-1010PT"]
        DA --> DB["Gear Bus with PoE"]
    end
    style Office fill:#f9f,stroke:#333
    style Shop fill:#f9f,stroke:#333
    style Conference Room fill:#f9f,stroke:#333
    style Warehouse fill:#ccf,stroke:#333
    style Data Center fill:#cfc,stroke:#333
    style Underground Car Park fill:#fcc,stroke:#333
1.3 Product Specifications
| Product | VIP-1010PT |
| Hardware | |
| Lines (direct numbers) | 1-line cost-effective IP phone |
| Display | 132 x 64 graphic LCD with blue backlight |
| Feature Keys | 4 Soft Keys10 Programmable Keys |
| Protocols and Standard | |
| Data Networking | MAC Address (IEEE 802.3)IPv4 (RFC 791)Address Resolution Protocol (ARP)DNS: A record (RFC 1706), SRV record (RFC 2782)Dynamic Host Configuration Protocol (DHCP) client (RFC 2131)TCP (RFC 793)User Datagram Protocol UDP (RFC 768)Real-time Protocol RTP (RFC 1889, 1890)Real-time Control Protocol (RTCP) (RFC 1889)Simple Network Time Protocol (SNTP) (RFC 2030)Backward compatible with RFC 2543Session Timer (RFC 4028)SDP (RFC 2327) |
| Voice Gateway | SIP version 2 (RFC 3261, 3262, 3263, 3264)Message Waiting Indicator (RFC 3842)Voice algorithms:- PCMA- PCMU- G.729- G.722- G723_53- G23_63- G726_32Dual-tone Multi-frequency (DTMF), In-Band and Out-of-Band (RFC 2833) (SIP INFO)Voice Activity Detection (VAD) with Silence SuppressionComfort Noise GenerationEcho Cancellation Message |
| Features | |
| Phone Features | 1 line (supporting 1 SIP account)Supports call waiting, call forwarding, call transfer3-way conferencingCall on hold, mute, auto-answer, redialPhonebook (500 groups), blacklist (100 groups), call logs (100 entries)5 Remote Phone Book URL supportedLDAPDND (Do Not Disturb)Volume adjustable, ring tones selectableCall Pickup/Group Call PickupSpeed DialIntercomDaylight SavingNetwork Packet CaptureCountry Ringtone SignalDirect IP CallAuto RedialHotlineXML BrowserHot DeskingKeypad LockAction URLMulti-Languages: Default: English and Simple Chinese |
| IP PBX Features | HD VoiceDial PlanSMS, Voicemail, MWI Message NotificationWideband Codec: G.722Narrowband Codec: PCMA, PCMU, G.729, G.722, G723_53, G23_63, G726_32VAD, CNG, Echo CancellerFull-Duplex Speakerphone |
| Security Features | Supports HTTPS (SSL) |
| Supports SRTP for Voice Data EncryptionSupports Login for AdministrationSIP Over TLSDial without Register | |
| Network Features | SIP V1(RFC2543), V2(RFC3261)Static IP/DHCP for IP configuration3 DTMF modes: In-Band, RFC2833, SIP INFOHTTP/HTTPS Web Server for ManagementNTP for Auto Time Setting |
| Administration Features | Auto provisioning using FTP/TFTP/HTTP/HTTPS/PnP Dial through IP PBX using Phone NumberDial through IP PBX using URL AddressConfiguration Managements with Web, Keypad on the phone and Auto ProvisioningSNMPTR069 |
| Environments | |
| Power Requirements | 5V DC, 1.2AIEEE 802.3af |
| Operating Temperature | 0 ~ 40 degrees C |
| Operating Humidity 10 ~ | 65% (non-condensing) |
| Weight 651g (without box) / 920g (with box) | |
| Dimensions (W x D x H) | 193 x 190 x 35 mm |
| Emission CE, FCC | |
| Connectors | Two 10/100BASE-T RJ-45 Ethernet portsHandset: RJ-9 connectorHeadset: RJ-9 connectorDC power jackBuilt-in speakerphone and microphone |
1.4 Physical Specifications and Packaging
Physical Specifications
imensions
| Dimensions (L x W x H) | 193 x 190 x 35 mm |
| Net Weight | 651g (without box) / 920g (with box) |
BASIC PACKAGING
■ SIP IP Phone Unit
■ Quick Installation Guide
■ RJ-45 Cable x 1
■ Stand x 1
1.5 Keypad
▶ eypad, LED, and Function Key Definitions
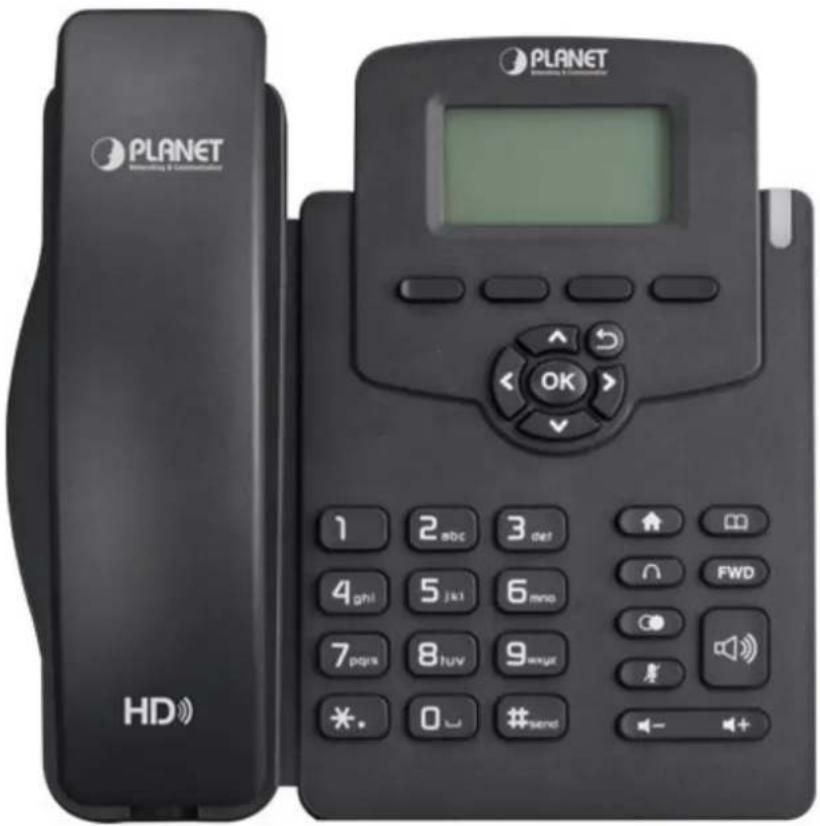
Keypad Description
| Key Key Name Function Description | ||
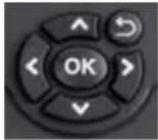 | Navigation | Assists you in selecting an item that you want to process under the menu by pressing the Up, Down, Right or Left key. Press the OK key to save. |
 | Soft Keys1/2/3/4 | Key combination includes functions such asHistory/Favorites/Redial/CallReturn/HotDesking/DND/Menu/MSG/Status/Book/FWD/PickUp/Group PickUp/Intercom/SpeedDial/and so on. |
 | Home | Back to the Home page |
 | Book | View Local Phone Book/Blacklist/Remote Phone Book |
 | Headset | Use the headset to call out or call in |
 | Forward | Forward the call to the third party |
 | Redial | View the Missed Calls, Incoming Calls and Dialed Calls. |
 | Mute | Press this key in calling mode and you can hear the other side,but the other side cannot hear you. |
 | Volume -/+ | Turn down or turn up the volume by pressing the “-” key or the “+” key. |
 | Hands-free | Make the phone into hands-free mode. |
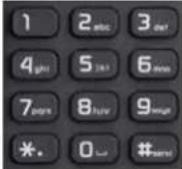 | DigitalKeyboard | Input the phone number or DTMF. |
 | Indicatorlight | Blinking light indicates there is an incoming call. |
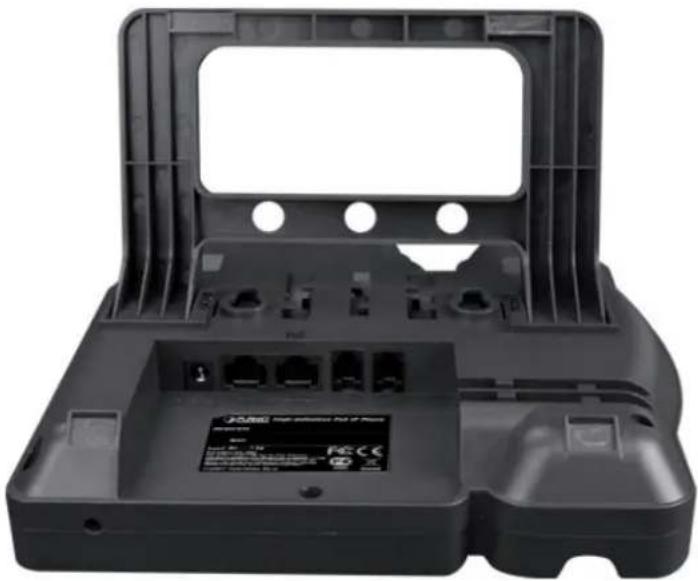
Rear View and Panel Descriptions
natural_image
Black plastic electronic device casing with ports and connectors (no visible text or symbols)eypad Description
| Port Port Name Description | ||
 | Power Switch | Input: 5V DC, 1.2A |
 | Internet | 10/100M Connect it to Network |
 | PC | 10/100M Connect it to PC |
 | Handset | Port type: RJ-9 connector |
 | Headset | Port type: RJ-9 connector |
Account and Status Display
| Port Name Description | |
| Register success | |
| Register failure | |
| Registering | |
| Deactivated account | |
| Auto answer | |
| No disturb | |
| Always forward | |
| Network disconnection | |
| Ring off | |
| Headset mode | |
| New voice message | |
| New text message | |
| Missed calls | |
2 Initial Connection and Login
The package should contain the following items plus the VIP-1010PT. If any item is missing or damaged, please contact the seller immediately.

natural_image
Product display of a smart home control unit with accessories and connectors (no visible text or symbols)Quick Installation Guide Handset Handset Cord RJ-45 Cable Stand

Step 1. Handset Connection
Plug one end of the handset cord into the handset and the other end into the handset jack
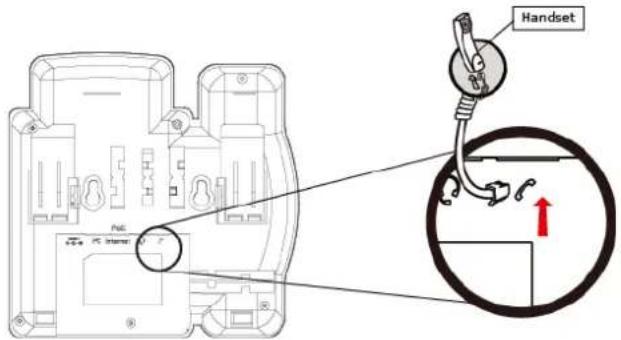
Step 2. Connecting Power System
The VIP-1010PT can be powered either by its external AC/DC adapter or by connecting to an IEEE 802.3af/at PSE device such as 802.3af injector / hub or 802.3af/at POE switch. Once the VIP-1010PT is powered, the LCD screen will prompt for POST.
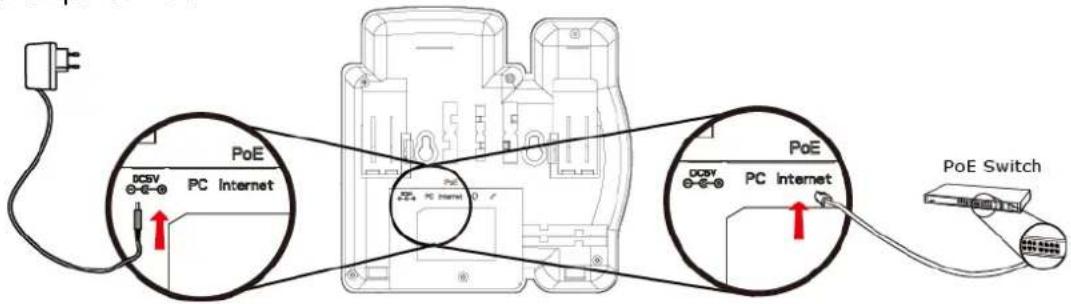
Note 1: This unit does not include the 5V/1.2A power adapter.
Note 2: Only WAN supports POE.
Step 3. Connecting Network
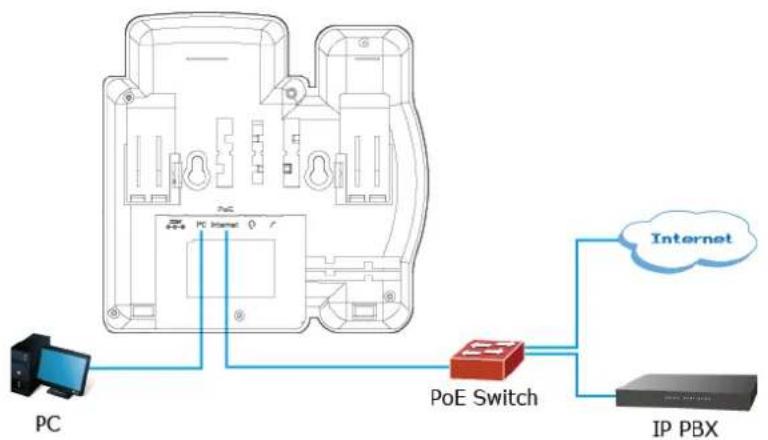
flowchart
graph TD
    PC["PC"] -->|Internet| PoE_Switch["PoE Switch"]
    PoE_Switch -->|Internet| IP_PBX["IP PBX"]
    PoE_Switch -->|Internet| PC_Internal["PC Internal"]
    style PC fill:#f9f,stroke:#333
    style PoE_Switch fill:#ccf,stroke:#333
    style IP_PBX fill:#cfc,stroke:#333
Step 4. Computer Network Setup
Set User computer's IP address to 192.168.0.x, where x is a number between 2 to 254 (except 1 where is being used for the phone by default). If User don't know how to do this, please ask User network administrator.
Connecting User PC to the VIP-1010PT PC port.
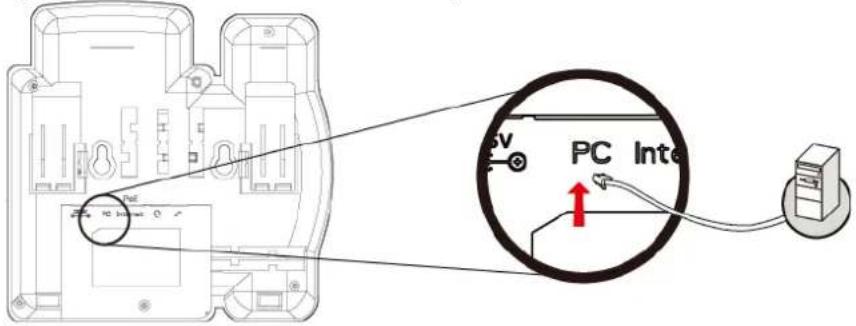
Step 5. Login Prompt
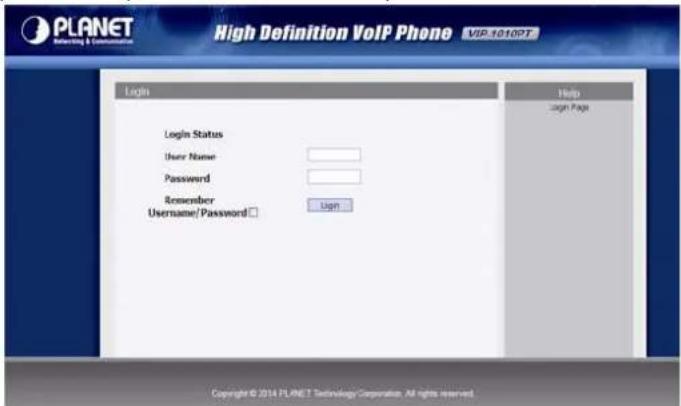
Use Web browser (Internet Explorer 6.0 or above) to connect to 192.168.0.1 (type this address in the address bar of Web browser).
User'll be prompted to input user name and password: admin and 123
3 LCD Basic Functions
3.1 Making a call
3.1.1 Call Device
User can make a phone call via the following methods :
-
Pick up the handset, icon will be shown on the idle screen.
-
Press the Hand-free key, icon will be shown on the idle screen.
-
Press the Headset key if the headset is connected to the Headset Port in advance.
The icon will be shown on the idle screen.
User can also dial the number first, and then choose the method user will use to speak to the other party.
3.1.2 Call Methods
User can press an available line key if there is more than one account, then
-
Dial the number user wants to call.
-
Press History soft key. Use the navigation keys to highlight user choice (press Left/Right key to choose Missed Calls, Incoming Calls and Outgoing Calls).
-
Press the Redial key twice to call the last number called or press Redial key to enter All Calls interface to choose the number to dial out.
-
Press the programmable keys which are set as speed dial keys. Then press the Send key or Dial soft key to make the call if necessary.
3.2 Answering a call
-
If user is not on another phone call, lift the handset to use, or press the Speaker key/Answer soft key to answer using the speaker phone, or press the Headset key to answer the headset.
-
If user is on another phone call, press the answer soft key to answer new
incoming and hold the current talking. During the conversation, user can alternate between Headset, Handset and Hand-free by pressing the corresponding keys.
Note: The ⚙ will flash during the Incoming interface
3.3 Mute
User can press the Mute key to make the user NOT be heard by the other party, but user can hear the other party. Icon will be shown on the LCD, and press the Mute key again to recover.
3.4 Call Hold / Resume Forward
- Press the Hold button or Hold soft key to put user active call on hold.
- If there is only one call on hold, press the hold soft key to retrieve the call.
- If there is more than one call on hold, press the line button, and the Up/Down button to highlight the call, and then press the Resume button to retrieve the call.
3.5 DND (Do Not Disturbed)
If user enables the DND mode, the phone will reject to answer all calls automatically and play busy tone; the UI will present missed calls at the same time.
3.6 Call Waiting
To configure Call Waiting via Phone interface:
- Press Menu --> Features--> Call Waiting--> Enter, ;
- Use the Left or Right key to activate or deactivate call waiting.
- Then press the Save key to save the changes.
3.7 Call Forward
User can set the static forward to transfer all the incoming calls to specified number; Also user can use dynamic forward to transfer all the incoming calls forward to the number inputted when the phone is ringing.
Forward: Enable call forward feature; Options are as follows :
● Always Forward: All the incoming calls will be transferred unconditionally to specified number.
- Busy Forward: The incoming calls will be transferred to specified number when the phone is busy.
- No Answer Forward: The incoming calls will be transferred to the specified number when the ring tone is time out without answer.
To configure Call Forward via Phone interface:
- Press Menu --> Features--> Call Forward--> Enter, or just press FWD key to enter Call Forward interface.
- There are 3 options: Always, Busy, and No Answer.
- If user chooses one of them, enter the phone number user wants to forward to the receiving party. Press Save to save the changes.
3.8 Call Transfer
User can use the following two ways to transfer call to the other party :
● Blind Transfer: Transfer call directly to the other party without any negotiation.
- Consultation Transfer: Transfer call to the other person involved after the other person involved answers the incoming call and with consultation.
3.8.1 Blind Transfer
-
Press the Trans soft key during the talking;
-
Enter the Trans number interface, and then input the number you will transfer to;
- Press the FWD key or the Trans soft key to transfer the call to the number you want to transfer to;
- Return to the Idle automatically ;
Note: The UI will display Hold status interface when the number you want to transfer to does not exist.
3.8.2 Consultation Transfer
- Press the Trans soft key to enter the number you want to transfer to during the talking. Input the number you want to transfer to.
- Press the OK key on the phone keyboard or the Dial key to make a call.
- Press the Trans soft key to finish transfer after the other person involved answers the incoming call and with consultation. You can finish transfer via putting down the handset or press the Cancel soft key to cancel transfer if you currently use handset to make or answer a call.
3.9 Three-way conference call
User can use the Local conference feature to hold a 3-way conference by pressing the Conference soft key to invite the current talking line and the line on hold to attend the conference. The Local conference feature of IP phone VIP-1010PT can invite two parties at most to attend conference. The conference type of IP phone VIP-1010PT is Local conference with default.
- Create talking with first party.
- Press the New soft key to create a new talking.
- Press the Back soft key of dial interface to hold talking with first party.
- Input the number of the second party and press the OK key on the phone keyboard or the Dial key or the Send soft key to make a call. When the
second party answers your call, inquire whether they want to attend the conference.
-
Press the Conference soft key to start the 3-way conference.
-
Press the Split soft key to split to two lines standalone talking, then these two parties talking are under Hold status.
-
Press the Resume soft key to resume the current talking.
-
Press the Cancel soft key or the 5 key to cancel the conference talking and return to Idle.
3.10 Call Park
User can use Call Park feature to park the current talking, and then resume the Parking talking with another phone (For example, with another phone of another office or conference). Press the Call Park key to park the current talking during the talking. If successful, you will hear voice announce or see the reserved extension number on the phone LCD. Dial the reserved extension number in another phone to resume the Parking talking.

Note
Not all servers can support Call Park feature.
To configure Call Park via Phone interface:
PATH: Press Menu-->Features-->Call Park-->Press Left or Right key or Switch soft key to enable Call Park-->Press the Down key to set Target number-->Press the Down key to set Account-->Press the Save soft key to save
3.11 Pickup
User can use pickup to answer other users' incoming call. The VIP-1010PT IP phone
supports specified pickup and group pickup.

Press the group pickup only to answer line 1 (incoming call) if there are many lines (incoming calls) in group.
3.11.1 Specified Pickup
Specified pickup can answer specified user's incoming calls
- Set specified pickup key via phone interface,
PATH: Press Menu-->Features-->Programmable keys-->Soft
Keys-->PickUp-->Press Down key to set label/Value-->Save soft key.
- Use specified pickup feature
When the user of specified pickup number is off or busy, you can press the Pickup key to answer incoming call.
3.11.2 Group Pickup
Group pickup can answer group's user incoming calls. Group pickup needs to set group members.
Set group pickup via phone interface
PATH: Press Menu-->Features-->Programmable keys-->Soft Keys-->Group PickUp-->Press Down key to set label/Value/Account-->Save soft key.
Use group pickup feature
When anyone in group receives an incoming call, you can press the group Pickup key to answer.
3.12 Speed Dial
User can use the Speed Dial feature to dial the specified contact speedily
PATH: Press Menu-->Features-->Programmable keys-->Soft Keys-->Speed Dial -->Press Down key to set label/Value/Account-->Save soft key
3.13 Auto-redial
When hung up by the other party during calling, the phone will enter the auto-redial screen. Press OK for redial now or wait for the timeout to cancel Auto-redial.
To configure Auto Redial via Phone interface:
- Press Menu --> Features--> Auto Redial--> Enter.
- Use the Left or Right key to activate or deactivate Auto Redial.
- Use the Up or Down key to configure Interval and Times.
- Then press the Save key to save the changes.
3.14 Hot line
The Hot line refers to the number you often dial. You can set hot lines in the phone. The phone will dial the hotline number automatically when you pick up the handset and press the hand-free or the account key. Also you can set the timeout of dialing the hotline number, and then the phone will dial the hotline number automatically after the timeout.
To configure Hot line via Phone interface:
- Press Menu --> Features--> Hot line--> Enter.
- Use the Left or Right key to activate or deactivate Hot line.
- Use the Up or Down key to configure Number and Timeout.
- Then press the Save key to save the changes.
3.15 Intercom
To configure Intercom via Phone interface:
PATH: Press Menu-->Features-->Programmable keys-->Soft keys-->Intercom-->Press Down key to set label/Value/Account-->Save soft key
- Press the Intercom key when the phone is available. The phone will connect the
extension number of remote user automatically.
- Press the Intercom key or the Back soft key to end the intercom.
- Answer the intercom incoming call.
- By default, the IP phone VIP-1010PT will answer the intercom incoming call automatically and make a noise. You can set the phone to enable the silent mode when picking up the intercom call so that the other will not hear you.
The features of intercom :
| Intercom Feature | Note |
| Allow Intercom | Enable or disable Auto-receive intercom |
| Intercom Mute | Enable or disable Mute mode after receiving intercom incoming |
3.16 HotDesking
In some working place, the people are always walking around. HotDesking feature will make the staff login his account on any computer in the company. In some public places, the working people are not fixed in one place. Anyone can use HotDesking for logging his account, and setting the phones to the familiar mode, such as the remote function of the computer.
3.16.1 Set the HotDesking Key
To configure Intercom via Phone interface:
PATH: Press Menu-->Features-->Programmable keys-->Soft keys-->HotDesking-->Press Down key to set label-->Save soft key
3.16.2 HotDesking Feature :
- After setting the HotDesking on Soft-key, it will return to the idle screen.
- Press the HotDesking, and enter the HotDesking screen.
-
If you press clear on the screen, the phone will begin to clear the information stored on the phone.
-
After clearing the setting, the phone will enter the account setting screen.
- After entering the account information, it will go back to the home screen, and begin to use the new account.
3.17 Application
3.17.1 Text Message
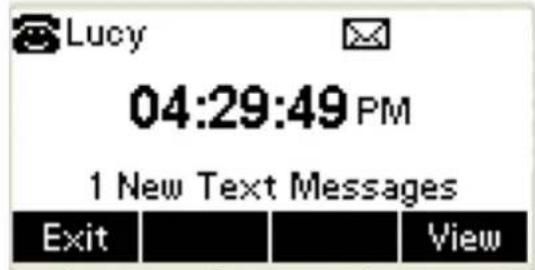
The VIP-1010PT IP Phone can send and answer text message. The phone will make a “Du” sound and present “N piece of new message” on the LCD (For example, 1 new message), and a twinkling message icon will appear.
Note: Not all servers support message feature.
Read Text Message
- Access Menu->Message->Text Message->In box.
- Press the OK key on the phone keyboard or the Enter soft key to enter the Text Message interface. Press the OK key on the phone keyboard or the Enter soft key to enter the in-box interface.
- Select the message you want to read and press the OK key on the phone keyboard or the Enter soft key to read.
Send Text Message
- In the Idle, press the Menu soft key.
-
In the mail menu interface, press the Down key on the phone keyboard to select Message. Press the OK key on the phone keyboard or the Enter soft key to enter Message interface.
-
In the Text Message interface, select "New Message". Press the OK key on the phone keyboard or the Enter soft key to enter new message and edit it. Press the "abc" soft key to switch the input methods.
- Press the OK key on the phone keyboard or the Send soft key to send message;
- Press the Left or Right key on the phone keyboard or the Switch soft key to switch to the relevant addresser.
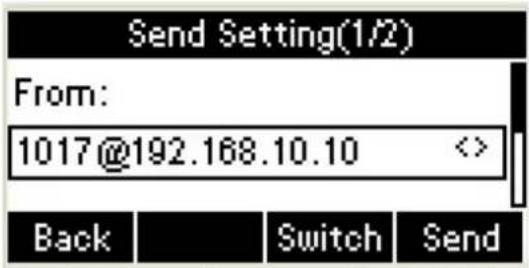
- Input the number of addresser :
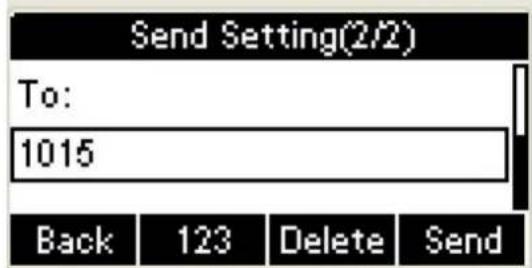
- Press the Send soft key to send message.
Delete Text Message
- In the Idle, press the Menu soft key.
- Press the main menu interface. Press the Down key on the phone keyboard to select message. Press the OK key on the phone keyboard or the Enter soft key to enter the Message interface
- In the Text Message interface, press the Down key on the phone keyboard to select in-box.
- Press the OK key on the phone keyboard or the Enter soft key to enter the in-box interface.
- Select the message you want to delete and press the Delete soft.key
- Delete all the text messages in the in-box. Press the Delete soft key and select "Delete All". Press the OK soft key and then all the messages in the in-box will be deleted.
3.17.2 Voice Message
The VIP-1010PT IP Phone can send or answer voice message. The phone will make a "Du Du" sound, the LED light of message flashes green, and the LCD presents "New Voice Message" on the LCD with a twinkling voice message icon.
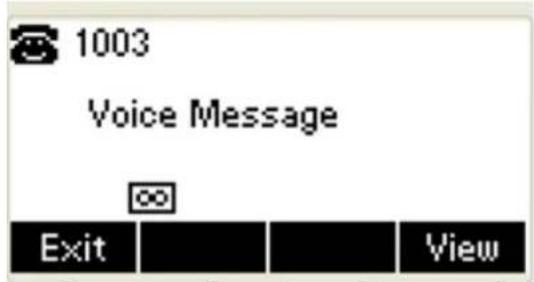
Note: Not all servers support voice message.
Voice Message
You can leave a message when the user whom you called is busy or unavailable. Leave a message according to the voice prompt of server, and then hang up after leaving the message.
Set Visit account number of voice message via phone interface.
- In the Idle, press the Menu soft key.
- In the Idle, press the Down key on the phone keyboard to select message, press the OK key on the phone keyboard or the Enter soft key to enter the Message interface.
- In the Message interface, press the Down key on the phone keyboard to select the voice message. Press the OK key on the phone keyboard or the Enter soft key to enter the Voice Message interface.
- Select the Voice Message Setting.
- Press the OK key on the phone keyboard or the Enter soft key to set account 1, input the Visit account number of voice message ( For example, *97). Press 123 soft key to switch the input methods.
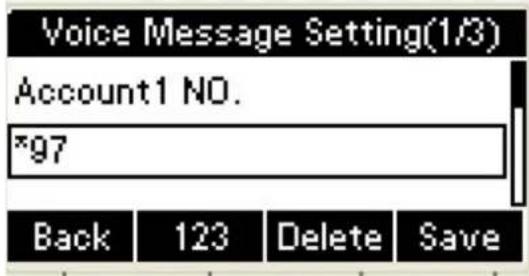
- Press the OK key on the phone keyboard or the Save soft key to save and return to message interface.
Check voice message
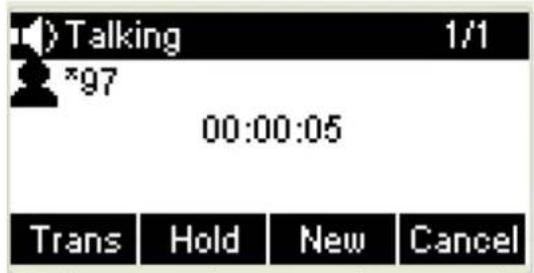
- Press the Message key or the Connect soft key to call the Visit account number of voice message.
- Check voice message according to voice prompt.
- Set the Visit account number of voice message first before checking voice message. The LED light of Message will darken after all the voice messages are checked.
- Check voice message via phone interface
- Access Menu->Message->Voice Message->New Message. The LCD displays new messages and old messages of every account.
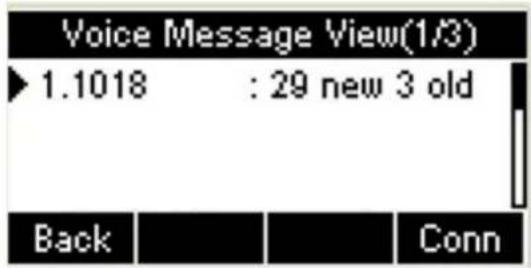
- 2. Select the account you will check and press the Connect soft key to check voice message.
4 LCD Advanced Settings
4.1 Basic Settings
4.1.1 Language
You can change the language through the method below:
Press Menu -> Settings -> Basic Setting -> Language
4.1.2 Date & Time
- The IP phone displays Time and Date in Idle status. You can set the Time and Date obtained from SNTP server automatically or you can set the time and date manually.
- Set SNTP via phone interface: Access Menu -> Settings -> Basic Setting -> Date & Time -> SNTP Setting.
-
To set the date & time format via the phone interface, access Menu -> Settings -> Basic Setting -> Date & Time -> Format Setting:
-
Access the Time Format in Format Setting interface and then press the Left or Right key on the phone keyboard, or the Switch soft key to select the time format (12 Hours or 24 Hours).
- In the Date & Time Format interface, press the Up or Down key on the phone keyboard to access the Date Format. Press the Left or Right key on the phone keyboard or the Switch soft key to select the date format to process setting.
- The phone supports four Date formats. The selected date format will appear in the Idle. For example, if the time was “2013-09-13”, the date formats in the menu and the corresponding formats displayed in the Idle would be as follows:
| Date Format | e.g.(2013-09-13) |
| YYYY-MM-DD | 2013-09-13 |
| YYYY/MM/DD | 2013/09/13 |
| DD-MM-YYYY | 13-09-2013 |
| DD/MM/YYYY | 13/09/2013 |
4.1.3 Backlight
Set the screen backlight level and duration of backlight
Press Menu -> Settings -> Basic Setting -> Backlight
4.1.4 Password Setting
This function is to set into the advanced Settings password
Press Menu -> Settings -> Advanced Setting -> Password Setting
A dialog box "Enter Password:" appears, enter the password: admin (default) and then press the OK key on the phone keyboard. Input the current password and the new password, and then confirm the new password to modify the current password.
4.2 Sound Settings
4.2.1 Phone Volume
- The Volume key can be used to adjust the volume of handset, hand-free or headset during a call. Also, the key can be used to adjust the ring tone volume in the Idle mode.
- Adjust the volume via the phone interface; access Menu -> Settings -> Basic Setting -> Phone Volume. In the Volume Setting interface, access the Handset Volume, Hands-free Volume or Headset Volume interface and then press the “+” or “-” soft key, or Left or Right key to adjust the volume. Press the Save soft key
to save the operation or press the Back soft key to cancel operation.
4.2.2 Ring Tones
-
The Ring Tone refers to the incoming ring tone, which reminds the user that a new call is coming with the phone. The VIP-1010PT supports phone ring tone to distinguish the incoming call from the other surrounding phone's ring tone. At the same time, the VIP-1010PT also supports setting of a specific incoming ring tone for contacts.
-
To set the ring tone via the phone interface, access Menu -> Settings -> Basic Setting -> Ring Tones.
4.3 Phone Book
4.3.1 Local Phone Book
The Local Phone Book is used for storing the contact names and numbers. The VIP-1010PT can store up to 500 entries. You can add, edit, delete, search, or call any contact from the Local Phone Book.
4.3.2 Add contacts manually
Add contacts manually from the Local phone book via Phone interface: Press Phone book -> Local phone book -> Add to Contacts.
Select the relevant group ( For example, contacts) and press the OK key on the phone keyboard or the Enter soft key in the UI to enter all Contacts:
- Press the Add soft key to enter the Add Contact interface.
- Input name in the relevant area.
- Press the Down key on the phone keyboard to input the office number in the relevant area.
- Press the Down key on the phone keyboard to input mobile number in the relevant area.
-
Press the Down key on the phone keyboard to input other numbers in the relevant area.
-
Press the Down key on the phone keyboard to enter Account selection; Press the Left or Right key on the phone keyboard or the Switch soft key to select the relevant account. If Auto selected, the phone will select the current available account automatically when the contact called from Local phone book.
4.3.3 Add Contacts from All Calls History :
Add contacts from All Calls History in the phone interface:
-
Press the History soft key.
-
Press the Up or Down key on the phone keyboard to select the contact you want to add.
-
Press the Option soft key to add to contacts.
4.3.4 Search Contacts
-
Press the Book soft key in the Idle interface to enter the Phone Book menu.
-
Select the Local Phone Book and press the OK key on the phone keyboard or the Enter soft key to enter the Local Phone Book.
-
Press the Search soft key to search contacts.
-
Input keywords such as name, any character of number or whole phone number and press the Search soft key or the OK key to enter the Search Contacts interface.
4.3.5 Blacklists
100 Blacklist contacts are available with the VIP-1010PT IP Phone. You can add, edit, delete, search or call contact. The phone will reject to answer automatically within the blacklist contacts' incoming call.
PATH: Press Phone book -> Blacklist -> Add.
4.3.6 Remote Phone Book
-
Access the remote phone book, add the contacts to the local phone book from the remote phone book or make calls from the remote phone book. Five URLs of remote phone book are available to set.
-
Set the remote phone book via web interface.
-
Access Book-> Remote Phone Book.
-
Input URL of phone book.
-
Input the phone book name.
- Click the Submit soft key to submit.
- Access the remote phone book via phone interface.
- Access Book->Remote phone book.
- Select the relevant Remote Group and press the Enter soft key. The phone will load the remote group information, and the LCD will display the contacts of this remote group.
- Press the ↻ key or the Back soft key to unlink.
- Press the Book soft key to enter the Phone Book Menu.
4.4 History Management
The History management of the VIP-1010PT contains dialed calls, received calls, missed calls and forwarded calls, and supports 100 storage logs at most. You can check the history, make calls from the calls history and delete the calls history.
-
Press the History key and the LCD will display all the recent calls.
-
Press the Left or Right key on the phone keyboard to switch the lists of All Calls, Dialed Calls, Received Calls, Missed Calls and Forwarded Calls.
-
Press the Up or Down key on the phone keyboard to select the log.
- Press the Option soft key and select the detail. The LCD will display the detailed information of this log; Press the Dial soft key to make a call from the History.
- Press the Option soft key to add to contacts(Move to Blacklists) from the History.
- Press the Delete soft key to delete calls log from the History.
- Press the Option soft key to select "Delete all" to delete all the calls log from the History.
4.5 System Customizations
4.5.1 Programmable keys
- Press the Menu soft key in the Idle interface and access Menu->Features->Programmable keys.
-
Select the programmable key you will set and press the Enter soft key.
-
Select key style in the type area.
- Input suitable value in the label area.
- (Optional) Select the relevant account in the account ID area.
- (Optional) Input suitable value in Value blank.
- Press the Save soft key to save or the Cancel soft key to cancel.
4.5.2 SIP Account management
4.5.2.1 Register an Account
Register an account via phone interface :
- Press the Menu soft key to enter setting interface to select Advanced setting, and input password(password: admin) to enter the Account setting.
- Press Enter key to enter the account activation status area.
- Input the label, display name, register name, account, password and SIP separately.
- Press the Save soft key to save, or the Back soft key to cancel.
4.5.2.2 Disable an Account
- Access Menu->Settings->Advanced setting->Account (password: admin).
- Press Enter key to enter the account activation status area.
- Select "Disable" in the account active status area.
- Press the Save soft key to save or the Back soft key to cancel.
4.6 Basic Network Settings
Through the Basic Network setting, you can set the IP phones to get the IP address by three ways: DHCP, static IP and PPPoE.
PATH: Menu -> Settings -> Advanced Setting -> Network
4.6.1 DHCP Mode
- In the Network Settings interface, Press the OK key on the phone keyboard or the Enter soft key to enter LAN Port.
- In the LAN Port interface, press the Up or Down key on the phone keyboard to select DHCP (default is DHCP).
- Press the Enter on the soft key or the OK key on the phone keyboard to enter the DHCP switch interface. It will automatically return to the last interface after seconds.
4.6.2 Static IP Mode
-
In the LAN Port interface, press the Up or Down key on the phone keyboard to select Static IP and then press the OK key on the phone keyboard or the Enter soft key to enter Static IP Setting interface and input IP address.
-
Press the Down key on the phone keyboard to enter the Subnet Mask of Static IP Setting and input the subnet mask.
-
Input the IP address, Subnet mask, Gateway, DNS 1 and DNS 2 in the corresponding area and press the OK key on the phone keyboard or the Save soft key to save.
4.6.3 PPPoE Mode
-
In the LAN Port interface, press the Up or Down key on the phone keyboard to select PPPoE and then press the OK key on the phone keyboard or the Enter soft key to enter PPPoE Setting interface.
-
Press the Up or Down key on the phone keyboard to enter User Name and Password.
-
In the related fields, input User Name and Password.
4.7 Reset to Factory
In the Advanced Setting interface, press the Up or Down key on the phone keyboard to select "Reset to factory". Press the OK key on the phone keyboard or the Enter soft key to access the reset to factory interface.
4.8 Reboot
This is a function to set the phone reboot.
-
In the Advanced Setting interface, press the Up or Down key on the phone keyboard to select Reboot.
-
Press the OK key or the Enter soft key to on the phone keyboard to enter the reboot warning interface.
5 Web Configuration
5.1 Ways to configure
The VIP-1010PT has two different ways for different users.
- Use phone keypad.
- Use web browser (recommended way).
5.2 Setting via web browser
When this phone and PC are connected to network, enter the IP address of the WAN port in this phone as the URL (e.g. http://xxx.xxx.xxx.xxx/ or http://xxx.xxx.xxx.xxx:xxxx/).
If user does not know the IP address, he can look it up on the phone's display by pressing the Status button.
The login page is shown below: A
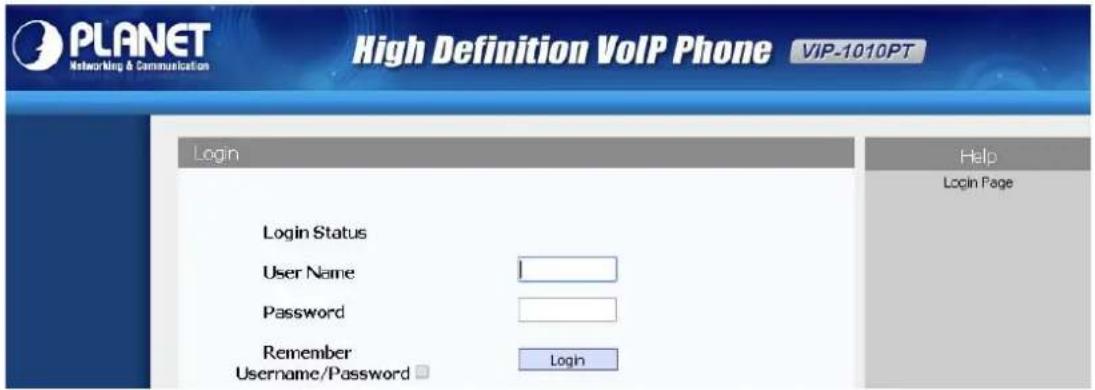
- Default user with root level:
◆ User Name: admin
◆ Password: 123
The default password of phone screen menu is 123.
After user configures the IP phone, he needs to click the Save button in the configuration under Maintenance on the left side of the screen to save user configuration. Otherwise, the phone will lose user modification after power is off and on.
5.3 Status / Basic
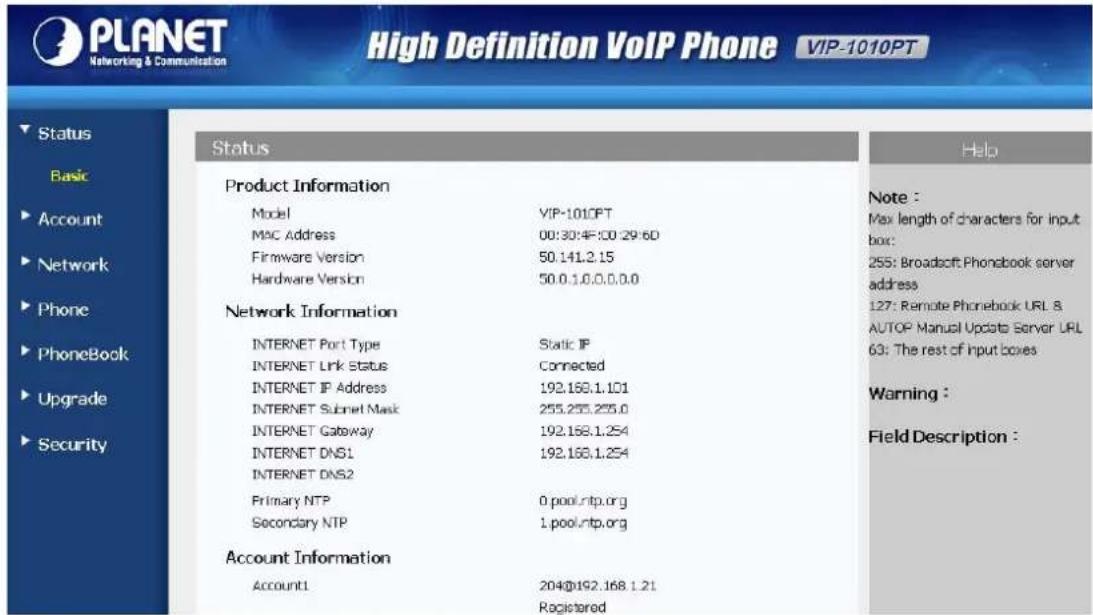
Status-> Basic page is used to display some basic information for IP phone. Please refer to the corresponding page for any further information.
Status
| Field Name Explanation | |
| Product Information | To display the device's information, such as Model name, MAC address (IP device's physical address), Firmware version and Hardware firmware. |
| Network Information | To display the device's Networking status(LAN Port), such as Port Type(which could be DHCP/Static/PPPoE), Link Status, IP Address, Subnet Mask, Gateway, Primary DNS server, Secondary DNS server, and Primary NTP server and Secondary NTP server (NTP server is used to synchronize time from Internet automatically.). |
| Account Information | To display device's Account information and Registration status (account user name, registered server's address, and register result). |
5.4 Account / Basic
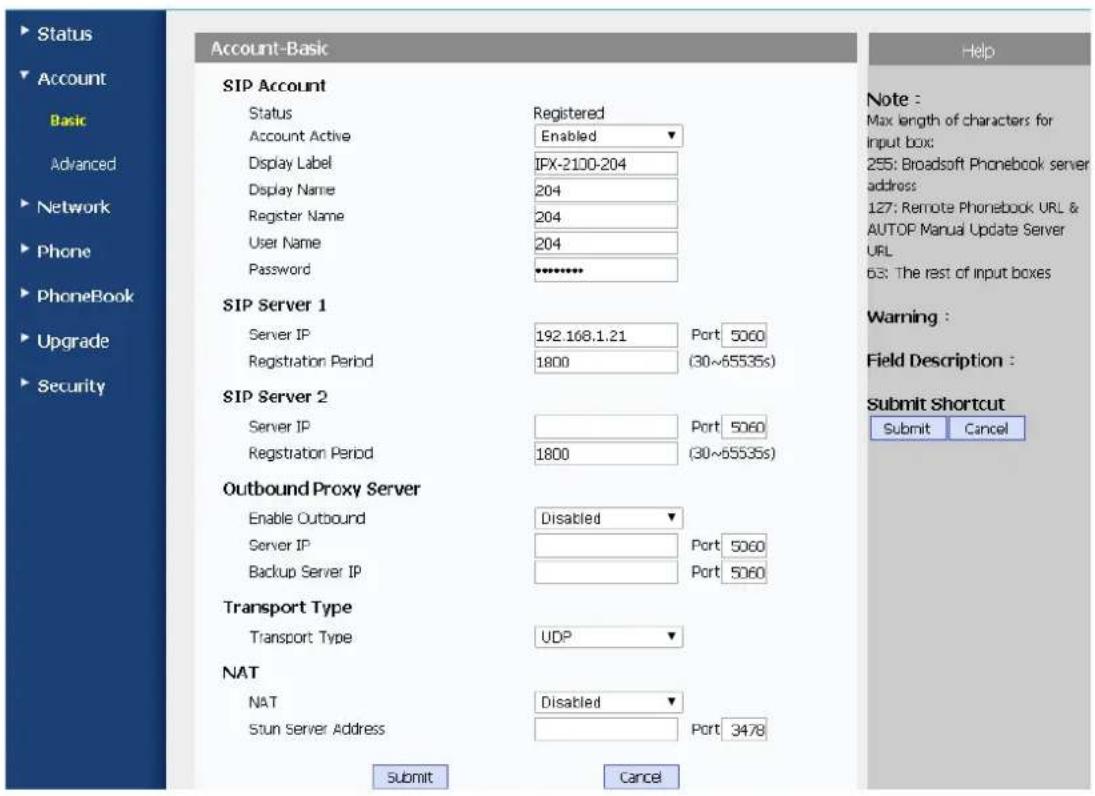
| Field Name Explanation | ||
| SIP Account To display and configure the specific Account settings. Status: To display register result. Display Label: Label is displayed on the phone's LCD screen. Display Name: Name is sent to the other call party for displaying. Register Name: Allocated by SIP server provider, used for authentication. User Name: Allocated by your SIP server provider, used for authentication. Password: Used for authorization. | ||
| SIP Server 1 | To display and configure Primary SIP server settings. Server IP: SIP server address; it could be an URL or IP address. Registration Period: The registration will expire after registration period. The IP phone will re-register automatically within registration period. | |
| SIP Server 2 | To display and configure Secondary SIP server settings. | |
| This is for redundancy; if registering to Primary SIP server fails, the IP phone will go to Secondary SIP server for registration. | ||
 | Secondary SIP server is used for redundancy; it can be left blank if there is no redundancy SIP server in user's environment. | |
| Outbound Proxy Server | To display and configure Outbound Proxy server settings. An outbound proxy server is used to receive all initiating request messages and route them to the designated SIP server. | |
 | If configured, all SIP request messages from the IP phone will be sent to the outbound proxy server forcefully. | |
| Transport Type To display and configure Transport type for SIP message UDP: UDP is an unreliable but very efficient transport layer protocol.TCP: Reliable but less-efficient transport layer protocol.TLS: Secured and Reliable transport layer protocol.DNS-SRV: A DNS RR for specifying the location of services. | ||
| NAT To display and | configure NAT (Net Address Translator) settings.STUN: Short for Simple Traversal of UDP over NATS, a solution to solving NAT issues; by default, NAT is disabled. | |
5.5 Account->Advanced
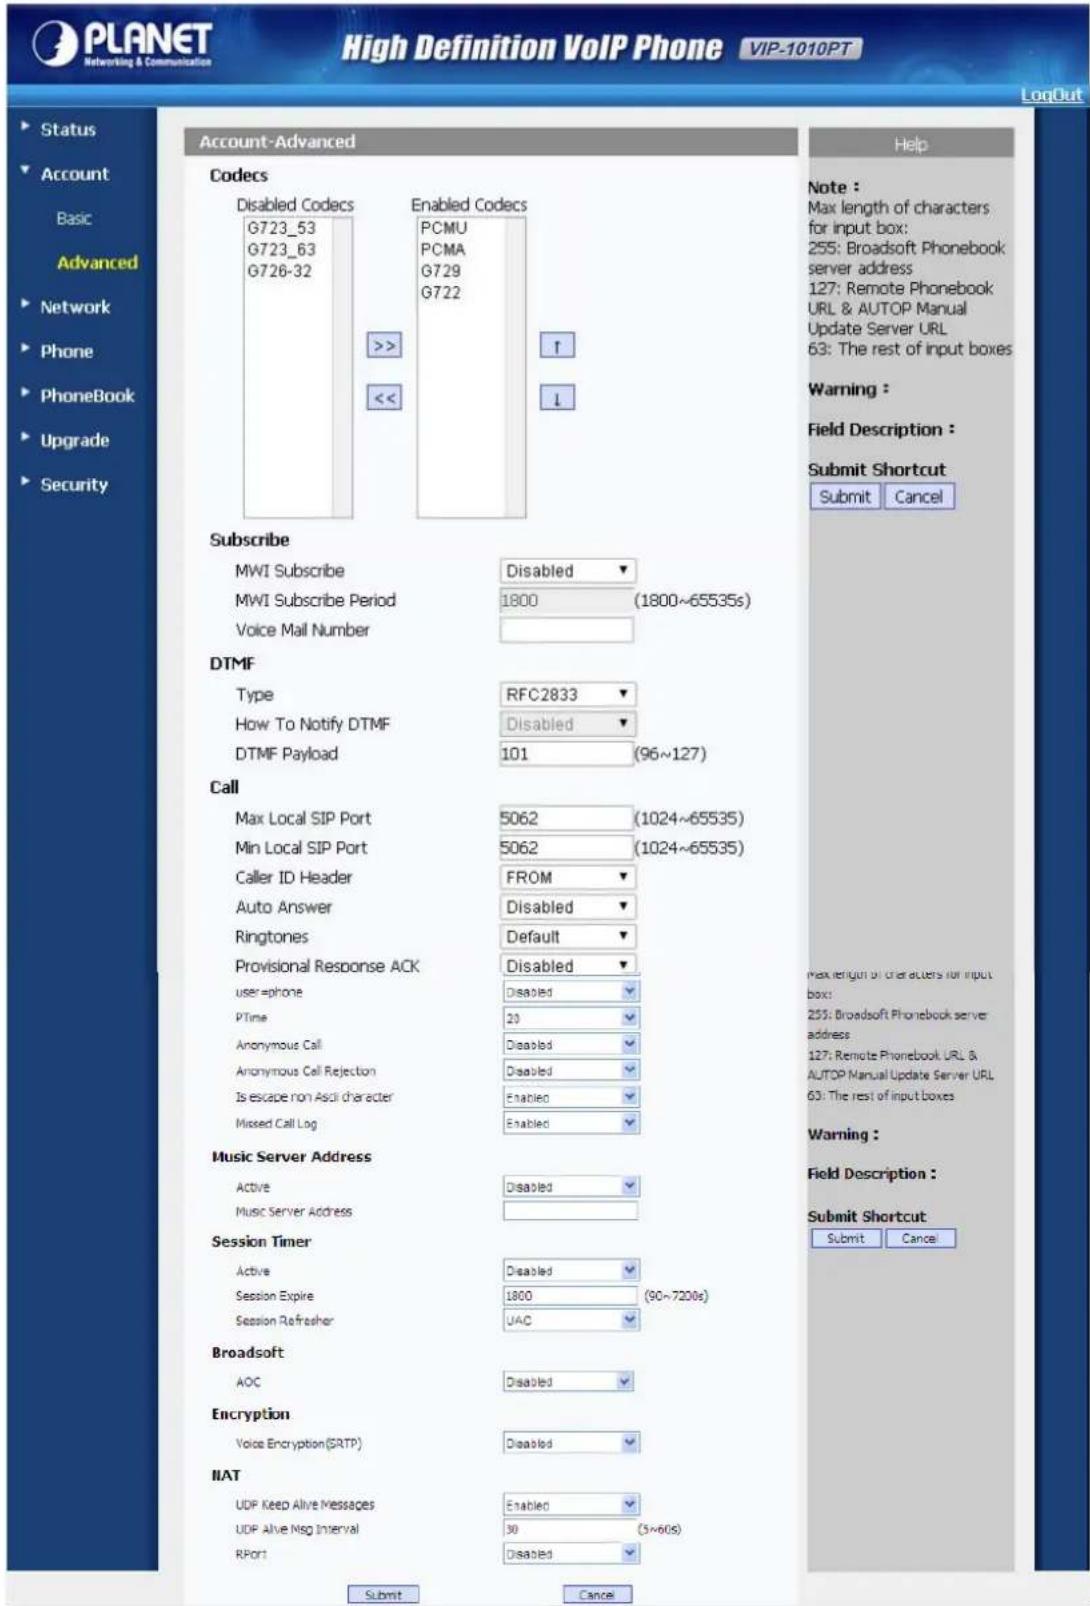
| Field Name Explanation | |
| Codecs To display and | configure available/unavailable codecs list. Codec means coder-decoder which is used to transfer analog signal to digital signal or vice versa. Familiar codecs are G723_53, G723_63, G726_32, PCMA, PCMU, G.729 and G722. |
| Subscribe | To display and configure MWI, subscription settings. MWI: Message Waiting Indicator which is used to indicate whether there is unread new voice messages. |
| DTMF To display and | configure DTMF settings. Type: Supports Inband, Info, RFC2833 or their combination. How To Notify DTMF: Only available when it is DTMF tone information. DTMF Payload: To configure payload type for DTMF. |
| Call To display and | configure call-related features. Max Local SIP Port: To configure maximum local sip port for designated account. Min Local SIP Port: To configure minimum local sip port for designated account. Caller ID Header: To configure which Caller ID format to fetch for displaying on Phone UI. Auto Answer: If enabled, IP phone will be auto-answered when there is an incoming call for designated account. Provisioning Response ACK: 100% reliability for all provisional messages, meaning it will send ACK every time the IP phone receives a provisional SIP message from SIP server. User=phone: If enabled, IP phone will send user=phone within SIP message. P Time: Interval time between two consecutive RTI packets. Anonymous Call: If enabled, all outgoing calls for the designated account will be anonymous numbers. Anonymous Call Rejection: If enabled, all incoming anonymous calls for the designated account will be rejected. |
| Music Server Address | To display or configure third-party MOH (music-on-hold) server.Active: To enable or disable this MOH server. If enabled, the IP phone will play MOH from configured server.Music Server Address: To configure MOH server address. | |
| Session Timer | To display or configure session timer settings.Active: To enable or disable this feature. If enabled, the ongoing call will be disconnected automatically once the session expired unless it's been refreshed by UAC or UAS.Session Expire: Configure session expiry time.Session Refresher: To configure who should respond for refreshing a session. | |
 | UAC means User Agent Client and here stands for IP phone. UAS means User Agent Server and here stands for SIP server. | |
| Broadsoft To display | or configure Broadsoft AOC feature.AOC: A feature is used to be accounted on Broadsoft platform.Please consult your administrator or Planet Technical support for further information. | |
| Encryption To enable | or disable SRTP feature.Voice Encryption (SRTP): If enabled, all audio signals (technically speaking it's RTP streams) will be encrypted for more security. | |
| NAT To display NAT-related settings.UDP keepalive message: If enabled, IP phone will send UDP keepalive message periodically to router to keep NAT port alive.UDP Alive Msg Interval: Keepalive message interval.Rport: Remote Port; if enabled, it will add Remote Port into outgoing SIP message for designated account. | ||
5.6 Network / Basic
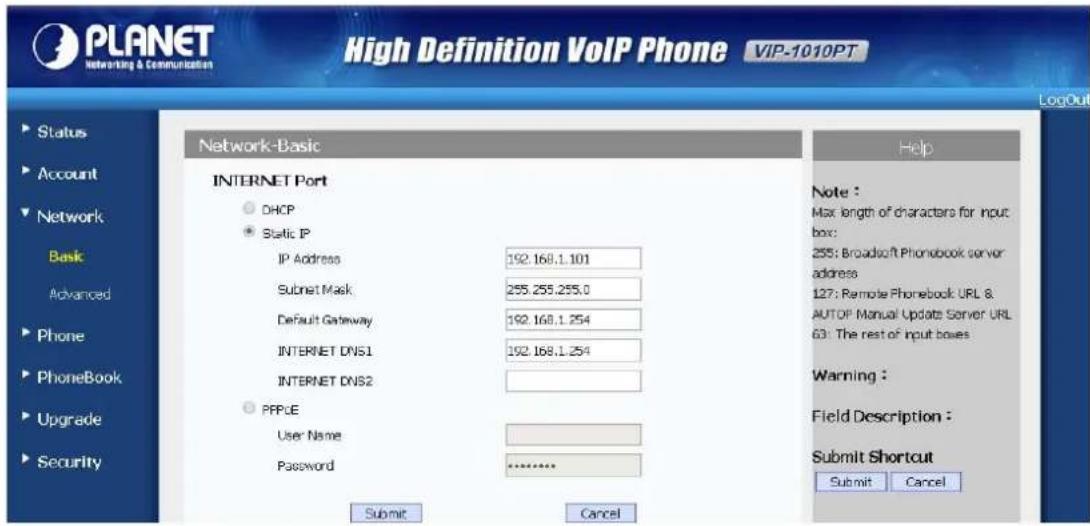
LANGUAGE
Field Name Explanation
LAN Port To display and configure LAN Port settings.
DHCP: If selected, IP phone will get IP address, Subnet Mask, Default Gateway and DNS server address from DHCP server automatically.
Static IP: If selected, you have to set IP address, Subnet Mask, Default Gateway and DNS server manually.
PPPoE: Use PPPoE username/password to connect to PPPoE server.
5.7 Network / Advanced
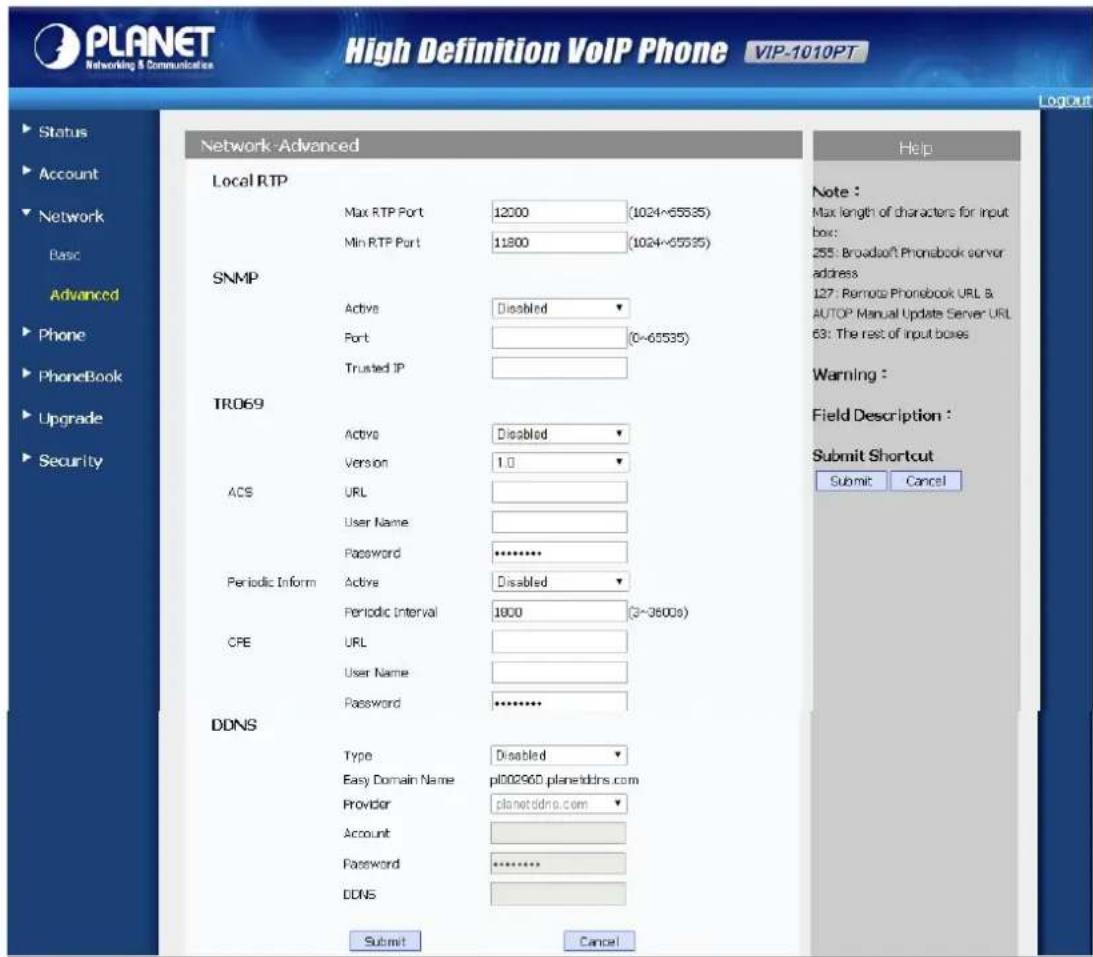
| Network Configuration | ||
| Field Name Explanation | ||
| Local RTP To display | and configure Local RTP settings.Max. RTP Port: Determine the maximum port that RTP stream can use.Min. RTP Port: Determine the minimum port that RTP stream can use. | |
| SNMP To display and | configure SNMP settings.Active: To enable or disable SNMP feature.Port: To configure SNMP server's port.Trusted IP: To configure allowed SNMP server address, it could be an IP address or any valid URL domain name.SNMP (Simple Network Management Protocols) is Internet-standard protocol for managing devices on IP | |
| networks. | ||
| TR069 To display and | configure TR069 settings.Active: To enable or disable TR069 feature.Version: To select supported TR069 version (version 1.0 or 1.1).ACS/CPE: ACS is short for Auto configuration servers as server side. CPE is short for Customer-premise equipment as client-side devices.URL: To configure URL address for ACS or CPE.User Name: To configure username for ACS or CPE.Password: To configure Password for ACS or CPE.Periodic Inform: To enable periodically inform.Periodic Interval: To configure interval for periodic inform. | |
 | TR-069(Technical Report 069) is a technical specification entitled CPE WAN Management Protocol (CWMP).It defines an application layer protocol for remote management of end-user devices. | |
| DDNS The VIP-1010PT supports Planet DDNS and Easy DDNS function. | ||

For now, the VIP-1010PT can only support Planet DDNS.
5.8 Phone/ Time/ Language
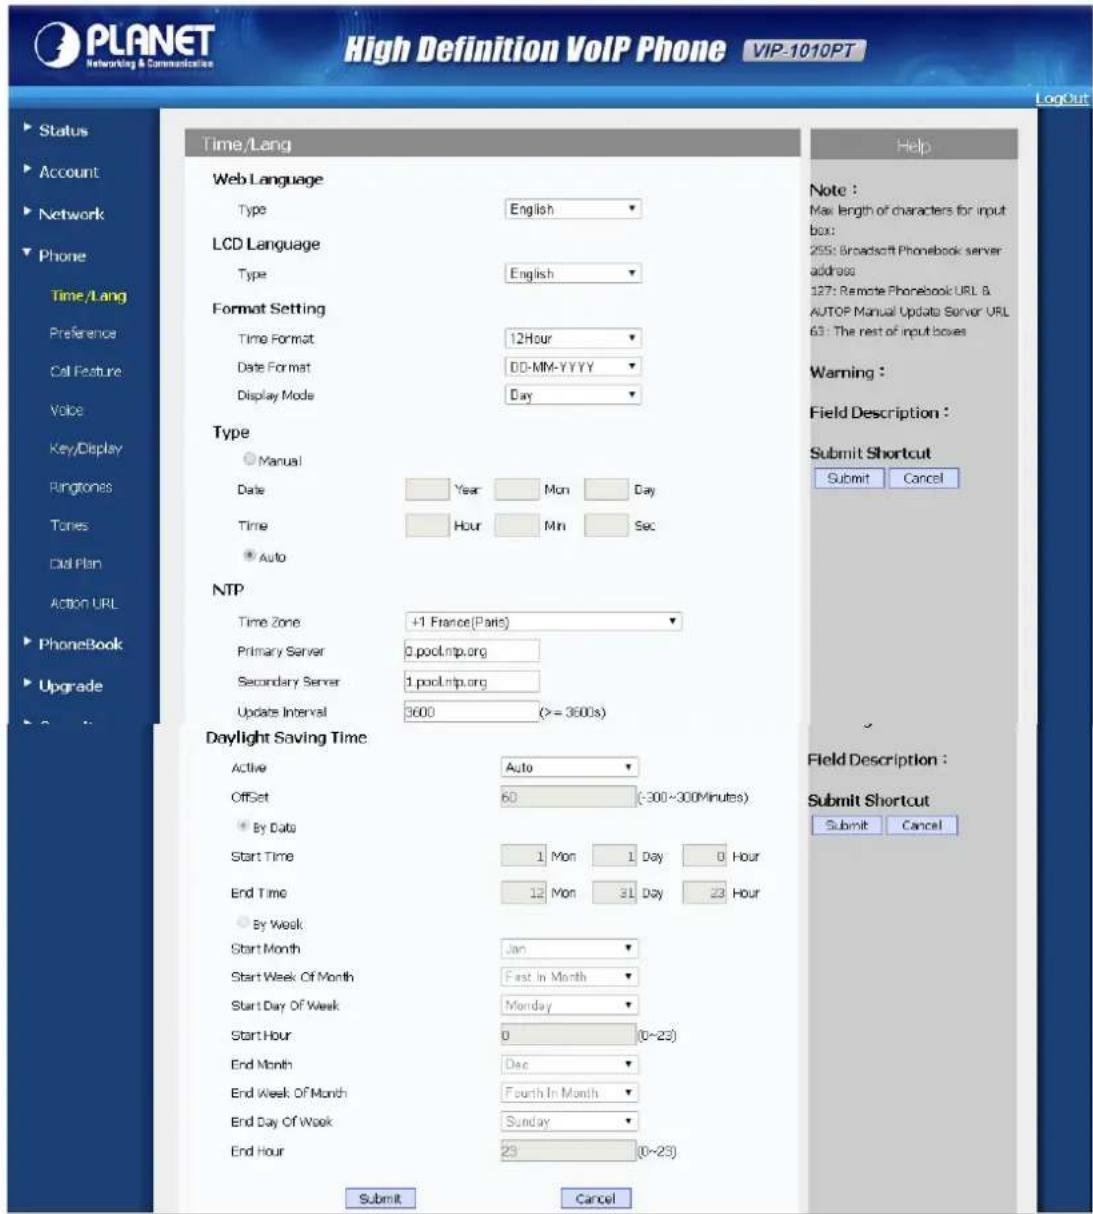
Time / Language Configuration
Field Name Explanation
Web Language To switch to designated language.
Format Setting To configure time display settings.
Time Format: Determine what format to display on Phone UI (12 hour/24 hour).
Date Format: Determine what format to display on Phone UI for Date.
Display Mode: Determine what mode to display Time &
| Date on Phone UI. | ||
| Type | To select how to configure time. It could be set manually or get from Internet automatically via NTP server.Manual: To set Time and Date manually.Auto: To get Time via NTP server. | |
 Note Note | If user sets time to be Manually, it will only take effect till the next reboot; after reboot, the phone will switch to Auto mode automatically because there is no way for IP phone to record time during power off. | |
| NTP To configure NTP | server related settings.Time Zone: To select local Time Zone for NTP server.Primary Server: To configure primary NTP server address.Secondary Server: To configure secondary NTP server address; it takes effect if primary NTP server is unreachable.Update Interval: To configure interval between two consecutive NTP requests. | |
 Note Note | Network Time Protocol (NTP) is used to automatically synchronize local time with Internet time, since NTP server only responds to GMT time, so that you need to specify the Time Zone for IP phone to decide the local time. | |
| Daylight Saving Time | To display or configure DST settings. | |
 Note Note | DST is short for daylight saving time, which means the time on the summer days when the sun rises early will be adjusted forward to save daylight. The DST will take effect during the period that is set by user. (All the settings for DST are all self-explanatory. Please consult with your administrator for local DST details.) | |
5.9 Phone / Preference
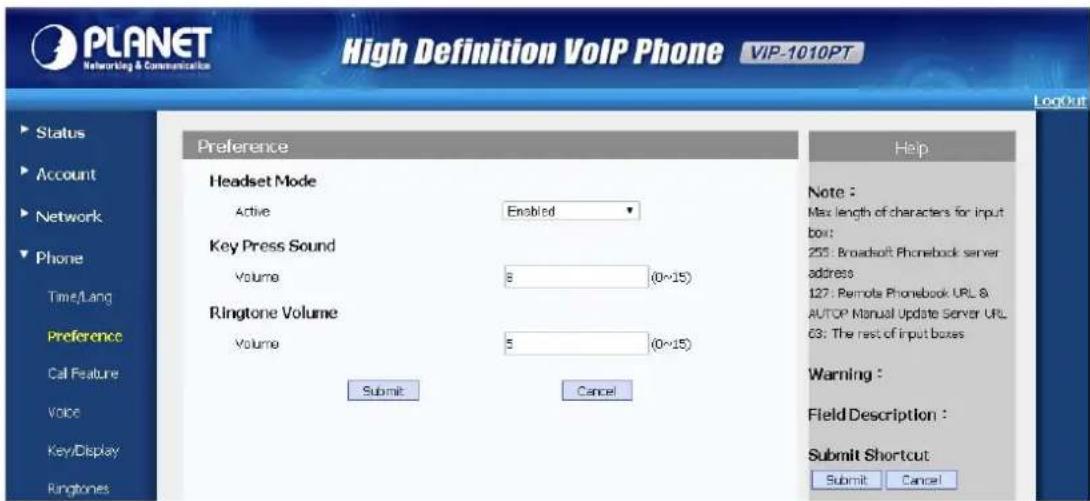
| Preference Configuration | |
| Field Name Explanation | |
| Headset Mode To enable or disable Headset Mode. Active: If enabled, the default audio track will be headset mode; if audio track is changed during a call, it will be back to headset mode after you hang up the call. | |
| Key Press Sound To configure the sound volume for key press. Volume: The valid volume range is from 0 to15; by default, it's 8. |
5.10 Phone / Call Feature
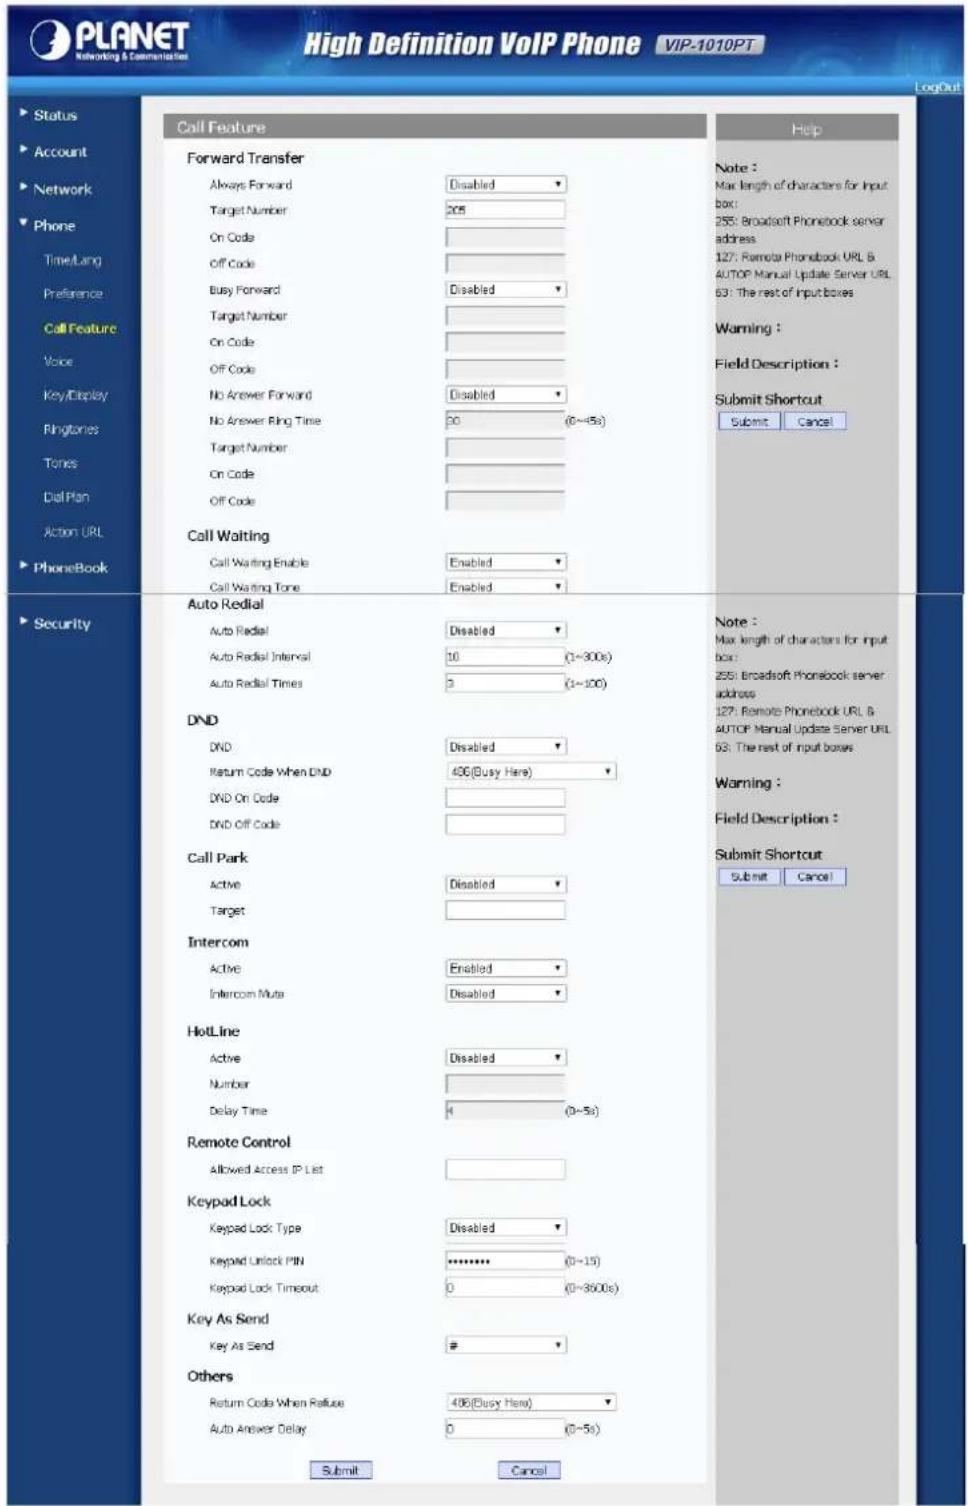
Call Feature Configuration
Field Name Explanation
Forward Transfer To display and configure Forward setting.

There are three types of forward: Always Forward, Busy Forward and No Answer Forward. Always Forward: Any incoming call will be forwarded in any situation. Busy Forward: An incoming call will be forwarded if IP phone is busy.
Call Waiting To enable or disable Call Waiting.
Call Waiting Enable: If enabled, it allows IP phones to receive a new incoming call when there is already an active call.
Auto Redial Auto redial allows IP phones to redial an unsuccessful call
for designated times within designated interval.
Auto Redial: To enable or disable auto redial feature.
Auto Redial Interval: Determine the interval between two consecutive attempts.
Auto Redial Times: Determine how many times to redial.
DND DND (Do Not Disturb) allows IP phones to ignore any incoming calls.
Return Code when DND: Determine what response code should be sent back to server when there is an incoming call if DND is on.
DND on Code: The Code is used to turn on DND on server's side; if configured, IP phone will send a SIP message to server to turn on DND on server side if you press DND when DND is off.
DND Off Code: The Code is used to turn off DND on server's side; if configured, IP phone will send a SIP message to server to turn off DND on server side if you press DND when DND is on.
Call Park Call park allows users to park a call to a special extension
and then retrieve it via any other phone within the same system.
Active: To enable or disable call park feature.
Account: To determine which account to take effect.
Target: To configure a designated target extension.

Please consult with your telephony system administrator for special extension on your system.
Intercom Intercom allows user to establish a call directly with the
| callee.Active: To enable or disable Intercom feature.Intercom Mute: If enabled, once the call established, the callee will be muted. | ||
| Hot Line Hot Line allows user to call out the defined number automatically without dialing any number.Active: To enable or disable Hot Line feature.Number: The number you want to dial out automatically.Delay Time: The delay time before calling out. | ||
| Remote Control Remote Control allows specific host to interact with IP phone by sending HTTP or HTTPS request. The specific action could be answering an incoming call, hang up an ongoing call and so on.Allowed Access IP List: To configure the allowed host address. | ||
| Key As Send Key As | Send allows you to disable send key or assign pound key as send key. | |
| Others Return Code | When Refuse: Allows user to assign specific code as returned code to SIP server when an incoming call is rejected.Auto Answer Delay: To configure delay time before an incoming call is automatically answered. | |
5.11 Phone / Voice
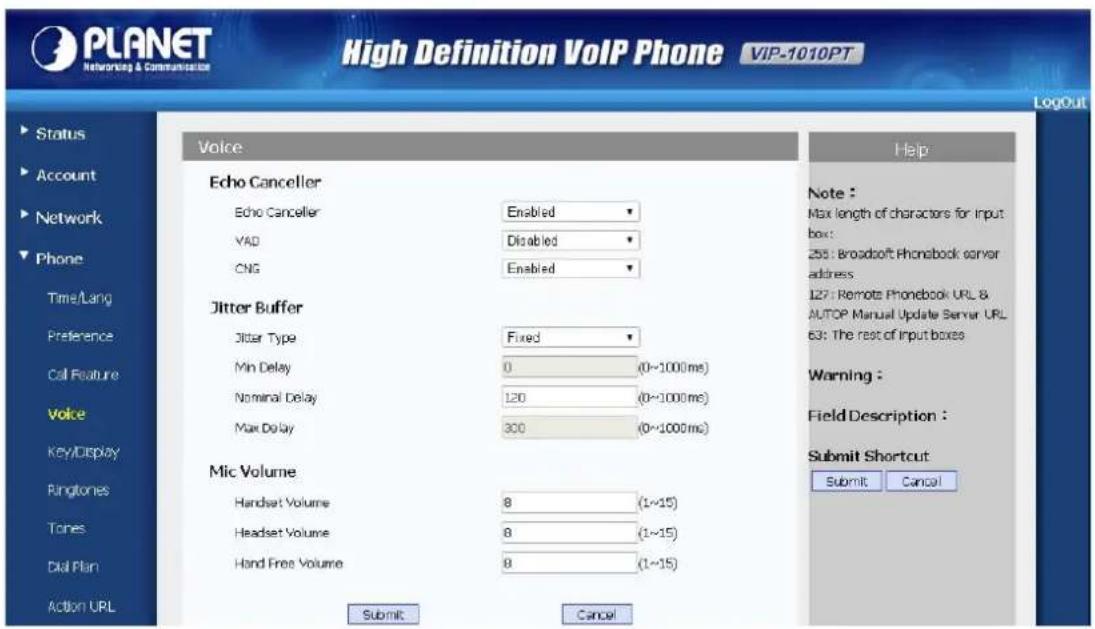
Voice Configuration
Field Name Explanation
| Echo Canceller Echo | Canceller: To remove acoustic echo from a voice communication in order to improve the voice quality. VAD (Voice Activity Detection): Allows IP phone to detect the presence or absence of human speech during a call. When detecting period of “silence”, VAD replaces that silence efficiently with special packets that indicate silence is occurring. It can facilitate speech processing, and deactivate some processes during non-speech section of an audio session. It can avoid unnecessary coding or transmission of silent packets in VoIP applications, saving on computation and network bandwidth.CNG (Comfort Noise Generation): Allows IP phone to generate comfortable background noise for voice communications during periods of silence in a conversation. It is a part of the silence suppression or VAD handling for VoIP technology. CNG, in conjunction with VAD algorithms, quickly responds when periods of silence occur and inserts artificial noise until voice activity resumes. The insertion of artificial noise gives the illusion of a constant transmission stream, so that backgroundsound is consistent throughout the call and the listener does not think the line has released. |
| Jitter Buffer Jitter buffer is a shared data area where voice packets can be collected, stored, and sent to the voice processor in even intervals. Jitter is a term indicating variations in packet arrival time, which can occur because of network congestion, timing drift or route changes. The jitter buffer, located at the receiving end of the voice connection, intentionally delays the arriving packets so that the end user experiences a clear connection with very little sound distortion.IP phones support two types of jitter buffers: fixed and adaptive.Fixed: Add the fixed delay to voice packets. You can configure the delay time for the static jitter buffer on IP phones.Adaptive: Capable of adapting the changes in the network's delay. The range of the delay time for the dynamic jitter buffer added to packets can be also configured on IP phones. | |
| Mic Volume | To configure Microphone volume for headset, handset or speaker mode. |
5.12 Phone/ Key/ Display
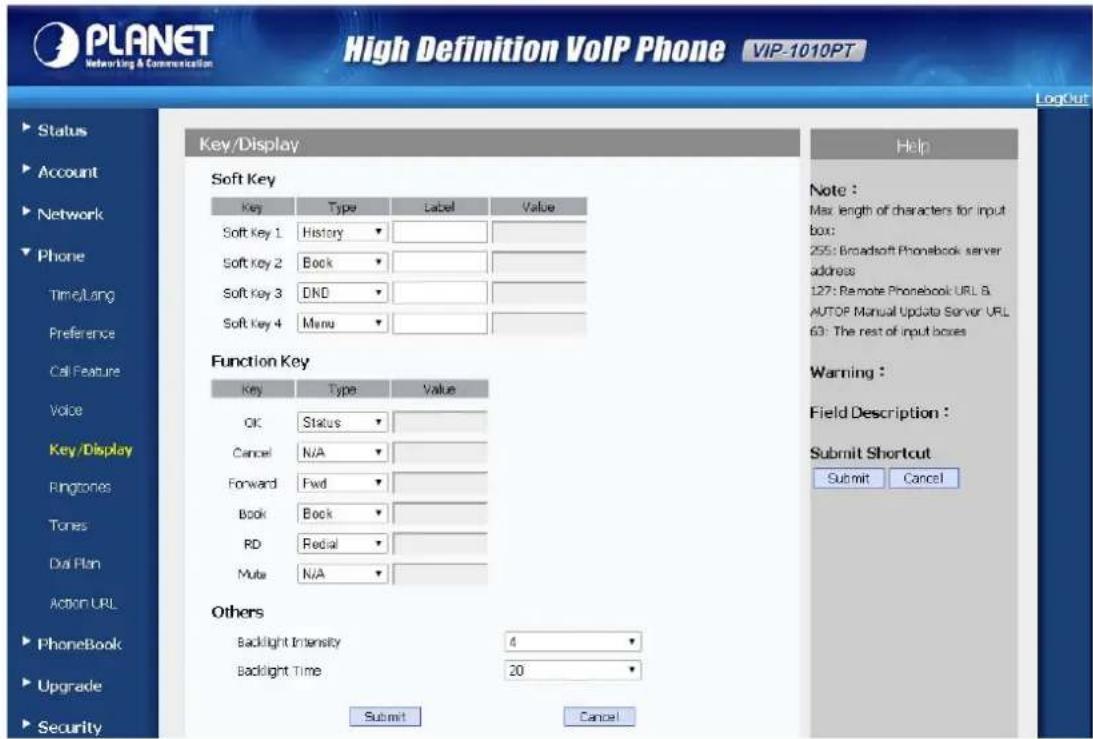
| TIME & DATE | |
| Field Name Explanation | |
| Soft Key | Allows user to assign specific feature to the designated soft keys.For softkey, the available features list:DND, Menu, MSG, Status, Book, Fwd, PickUp, Group, PickUp, Intercom, Speed Dial, History, Favorites, Redial, CallReturn and HotDesking. |
| Function Key | Allows user to assign specific feature to the designated function keys.For function keys, the available features list:N/A, DND, Menu, MSG, Status, Book, Fwd, PickUp, Group PickUp, Intercom, Speed Dial, History, Favorites, Redial, CallReturn and HotDesking. |
| Others Backlight Intensity: To adjust the backlight intensity of Phone UI.Backlight Time: To adjust backlight on timer; once expired, the backlight of Phone UI will go off. | |
5.13 Phone / Ring Tones
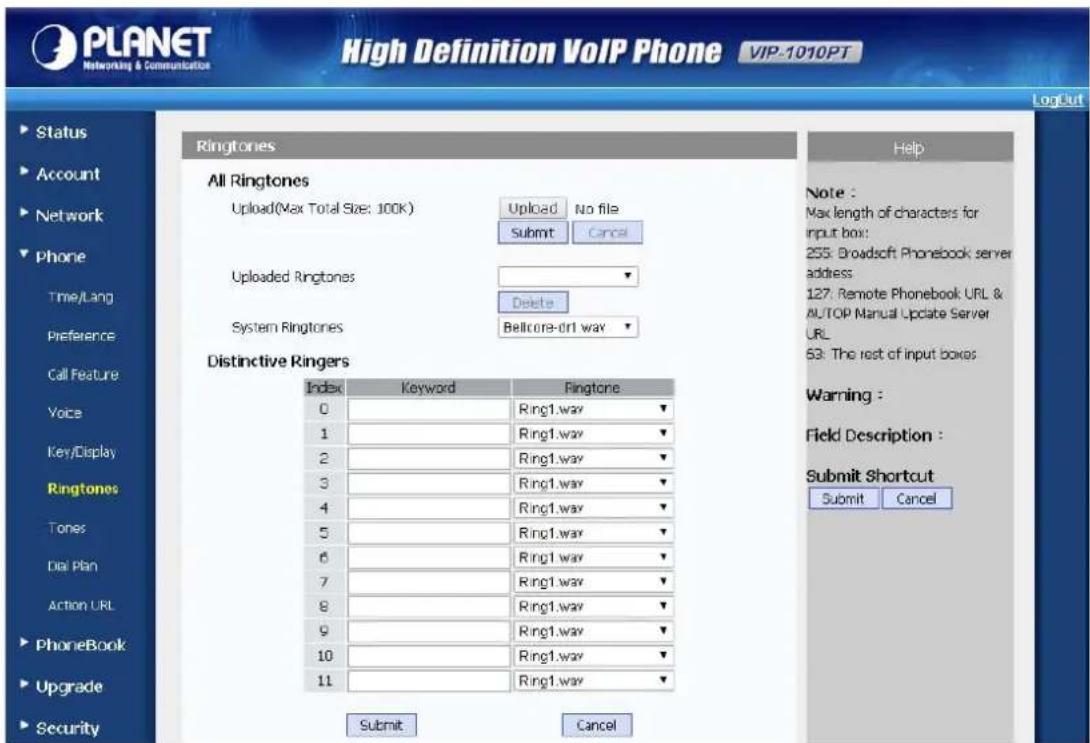
Ring Tone Configuration
Field Name Explanation
All Ringtones Allows user to upload and view ringtone files or delete uploaded ringtone files.

Ringtone files must be .wav format and has some specific requirements. Please contact Planet technical support team for instructions on how to make ringtone files.
Distinctive Ringers Distinctive ringers allow different incoming calls to trigger distinctive ringtones. The IP phone will check "Alert-Info" header inside the incoming "invite" SIP message. And strip out the URL or keyword inside the "Alert-Info" header, from the specific URL or keyword to match or download designated ringtones to play.
5.14 Phone / Tones
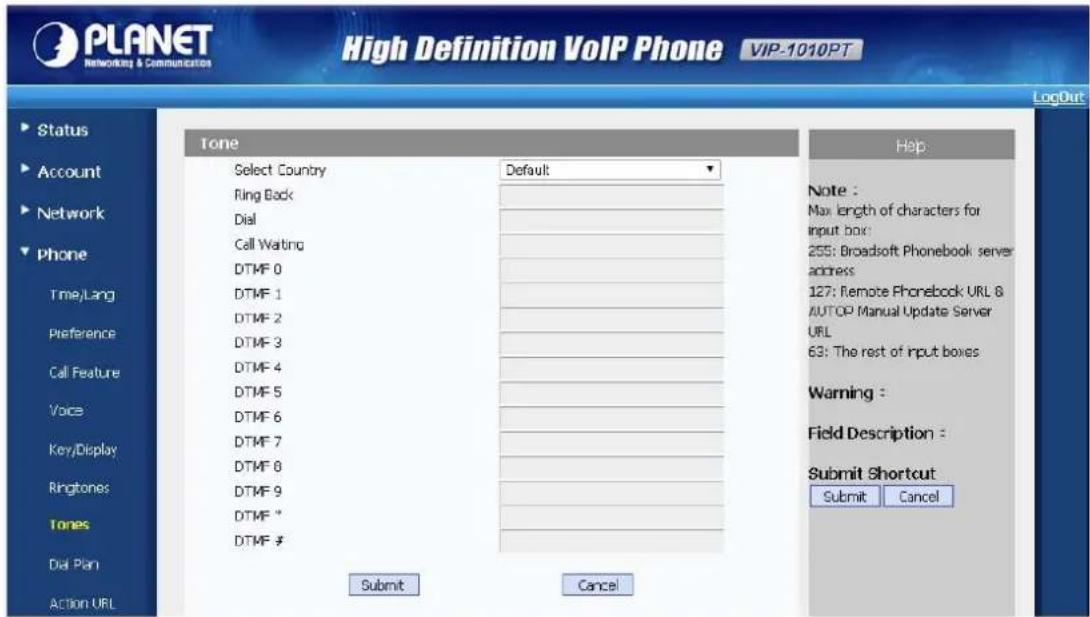
I AX2 Configuration
Field Name Explanation
Tone
Allows user to select a specialized tone sets (classified by countries) or to customize own tones.

Note
Available country tone sets are:
China, Spain, Luxembourg, Sweden, Taiwan, Belgium, Denmark, Finland, Germany, Netherlands, Norway and Portugal.
5.15 Phone / Dial Plan
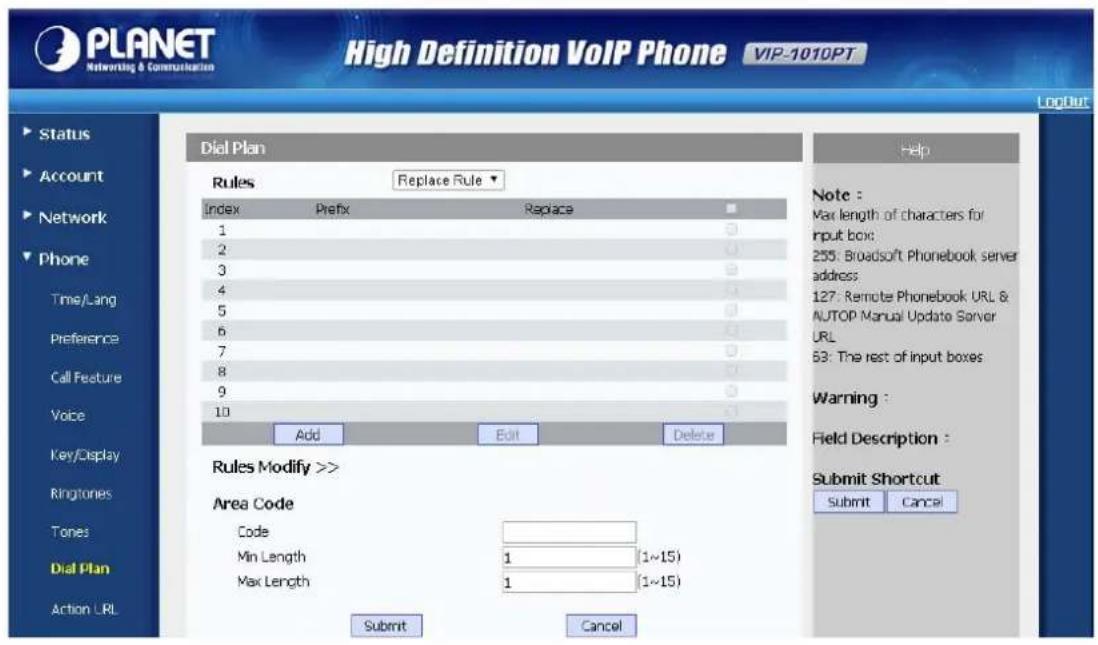
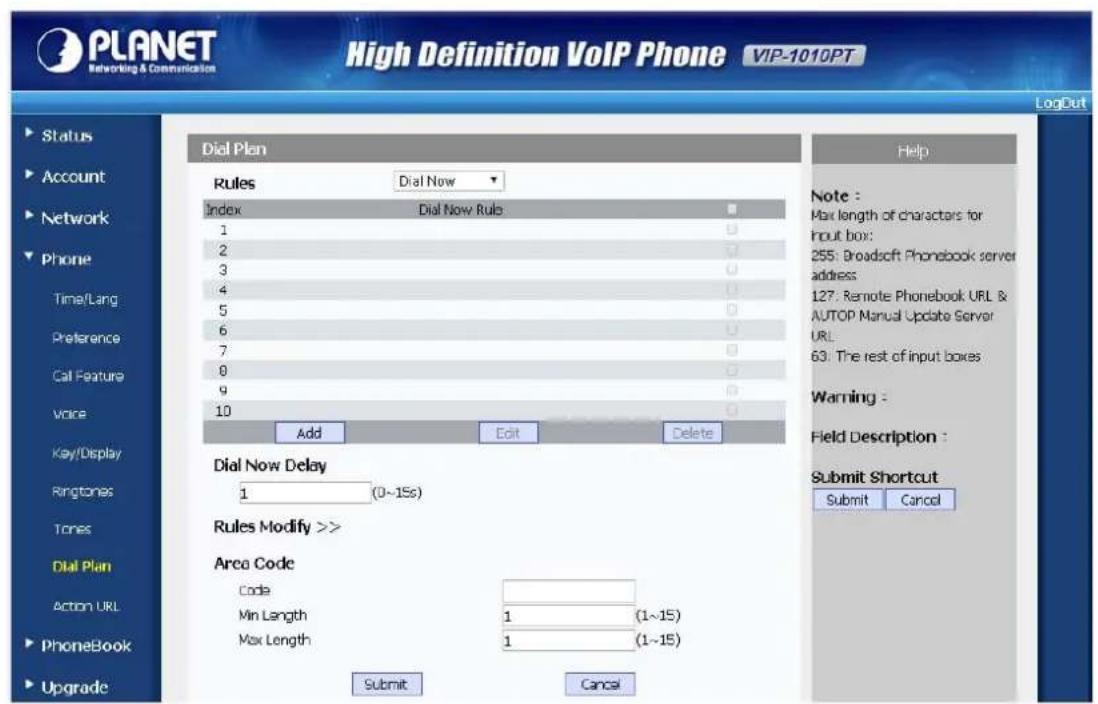
| Dial Plan | ||
| Field Name Explanation | ||
| Replace rule | ||
| Rules Allow user to select | Replace rule or Dial-now to display or edit. | |
| Rules Modified Allow user | to modify selected rules information To replace rules, you can modify related account, prefix and replacement. | |
| Area Code | Area codes are also known as NPAs (Numbering Plan Areas). They usually indicate different geographical areas within one country. If entered numbers match the predefined area code rule, the IP phone will automatically prefix outgoing number with area code. | |
 | There is only one area code rule supported. | |
| Dial Now | ||
| Rules Allow user to select | Replace rule or Dial-now to display or edit. | |
| Dial Now Delay Allow user | to configure dial now delay time for dial now. It means user can configure the IP phone to dial out the phone number automatically after the designated delay time if it matches any dial now rule. | |
| Rules Modify Allow user | to modify selected rules information, for dial-now rule, user can modify related account, Dial now Rule itself. | |
| Area Code | Area codes are also known as NPAs (Numbering Plan Areas). They usually indicate different geographical areas within one country. If entered numbers match the predefined area code rule, the IP phone will automatically prefix outgoing number with area code. | |
 | There is only one area code rule supported. | |
5.16 Phone -> Action URL
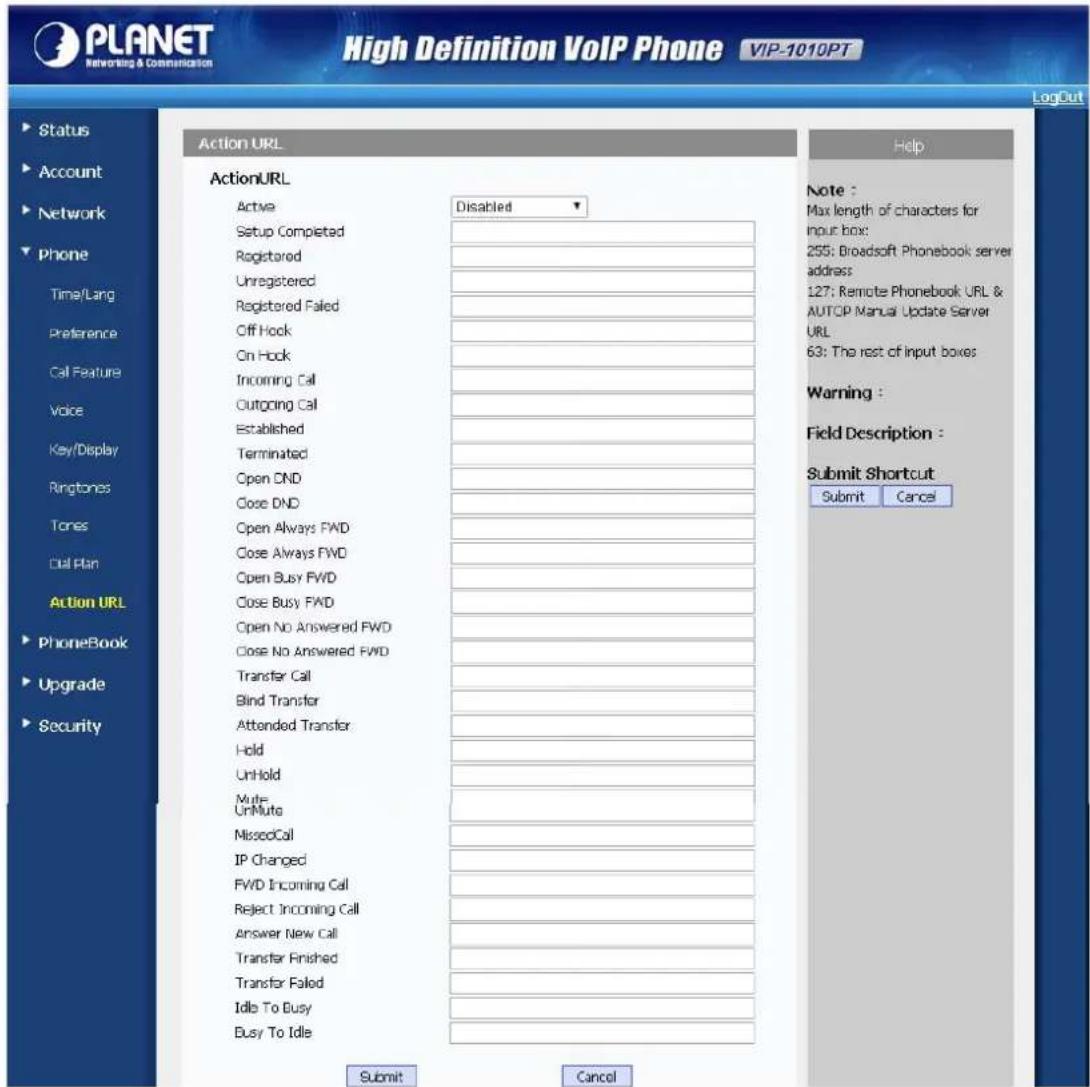
DIAL PEER
Field Name Explanation
Action URL To display and configure Action URL settings.
Setup Completed: When the IP phone completes startup.
Registered: When the IP phone successfully registers an account.
Unregistered: When the IP phone logs off the registered account.
Register Failed: When the IP phone fails to register an account.
Off Hook: When the IP phone is off hook.
On Hook: When the IP phone is on hook.
| Incoming Call: When the IP phone receives an incoming call.Outgoing Call: When the IP phone places a call.Established: When the IP phone establishes a call.Terminated: When the IP phone terminates a call.Open DND: When the IP phone enables the DND mode.Close DND: When the IP phone disables the DND mode.Open Always Forward: When the IP phone enables the always forward.Close Always Forward: When the IP phone disables the always forward.Open Busy Forward: When the IP phone enables the busy forward.Close Busy Forward: When the IP phone disables the busy forward.Open No Answer Forward: When the IP phone enables the no answer forward.Close No Answer Forward: When the IP phone disables the no answer forwardTransfer Call: When the IP phone transfers a call.Blind Transfer: When the IP phone blind transfers a call.Attended Transfer: When the IP phone performs the semi-attended/attended transfer.Hold: When the IP phone places a call on hold.UnHold: When the IP phone retrieves a hold call.Mute: When the IP phone mutes a call.UnMute: When the IP phone un-mutes a call.Missed Call: When the IP phone misses a call.IP Changed: When the IP address of the IP phone changes.FWD Incoming Call: When the IP phone forwards an incoming call.Reject Incoming Call: When the IP phone rejects an incoming call.Answer New Call: When the IP phone answers a new call.Transfer Finished: When the IP phone completes to transfer a call.Transfer Failed: When the IP phone fails to transfer a call.Idle To Busy: When the state of the IP phone changes from idle to busy.Busy To Idle: When the state of phone changes from busy to idle. |
5.17 Phone Book->Local Phone Book
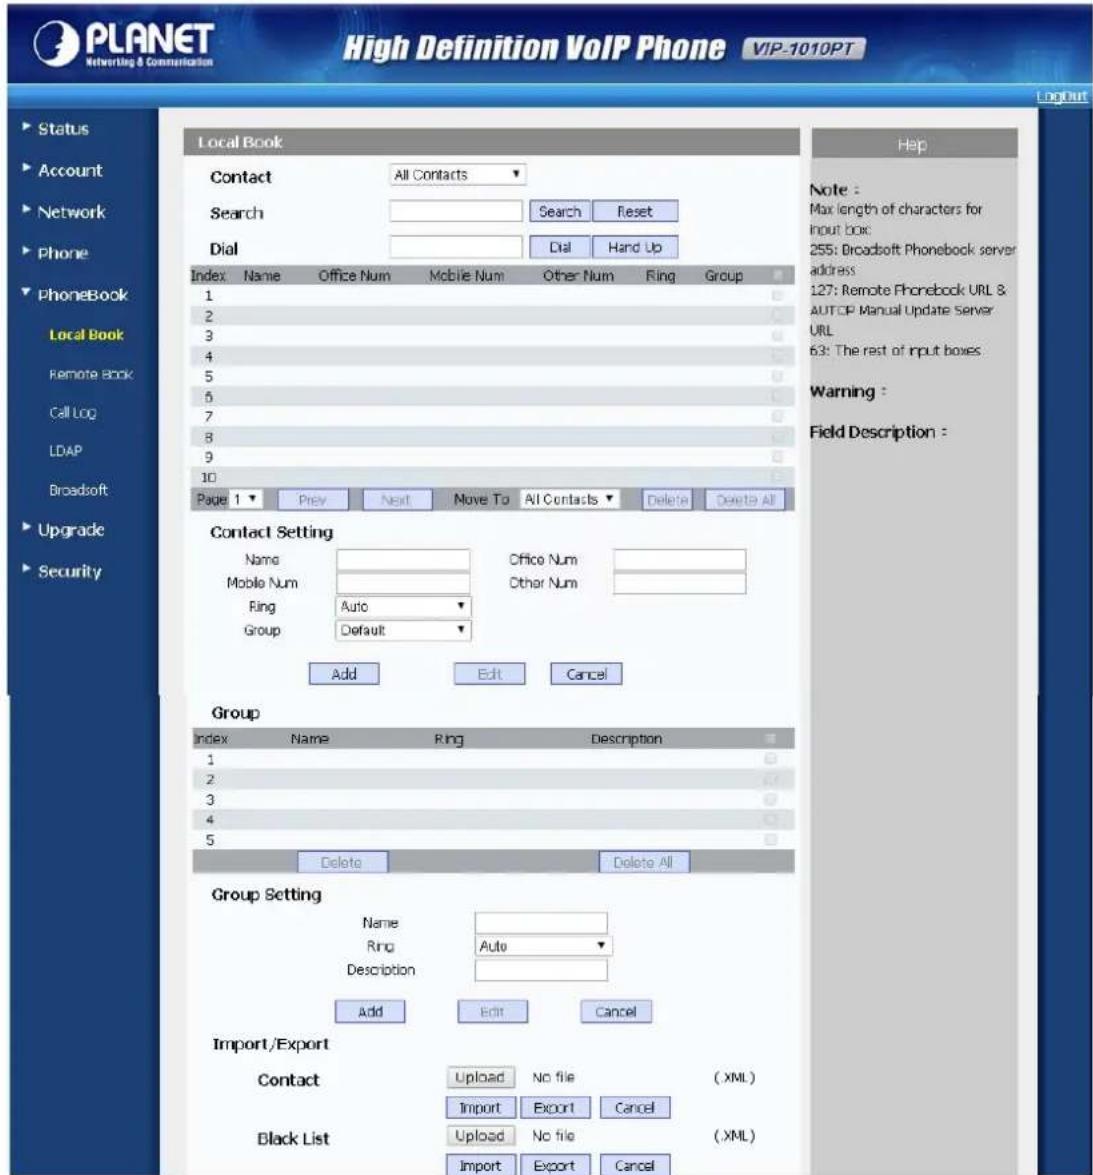
AUDIO Configuration
Field Name Explanation
Contact To display and select local contact type.
All Contacts: To display or edit all local contacts.
Favorites: To display or edit favorite contacts.
Black List: To display black list contacts.
Search To search designated contacts from local phonebook.
Dial To dial out a call or hang up an ongoing call from Web UI.
 Note Note | For this feature, you need to have the remote control privilege to control IP phone via Web UI. Please refer to section “Remote Control” on the Web UI->Phone->Call Feature page. | |
| Group To display or edit Group contacts. | ||
| Group Setting | To display or change Group name, related ringtone or description. | |
5.18 Phone Book->Remote Phone Book
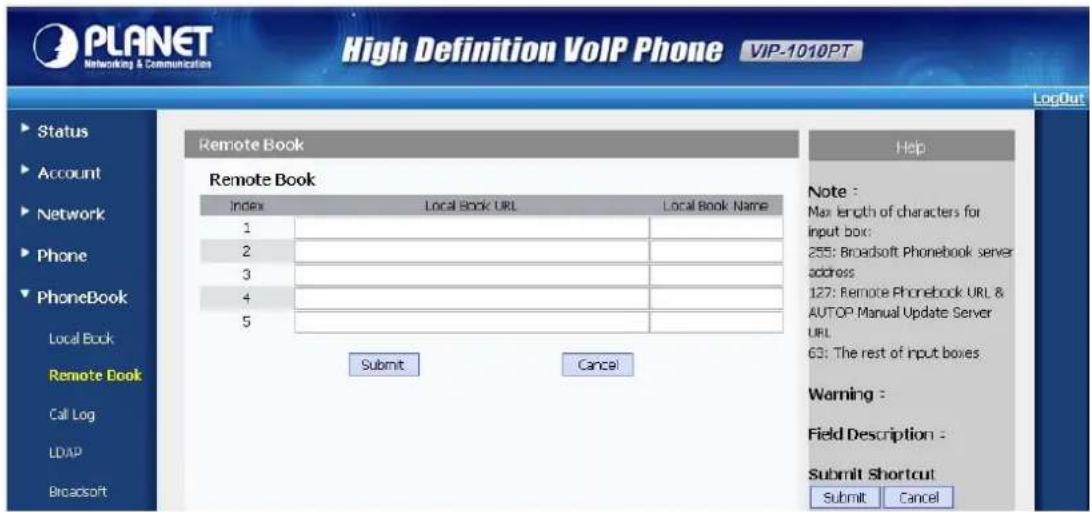
FEATURE
| Field Name Explanation | |
| Remote Book | To display and configure Remote Book settings. Index: To select desired Remote Book item to display and configure. Local Book URL: To configure remote book server address Local Book Name: To configure display remote book name on Phone UI |
 IP phone supports at most 5 remote books. Please refer to your administrator or Planet Technical Support team for how to establish a remote book server and how to create remote book xml file. IP phone supports at most 5 remote books. Please refer to your administrator or Planet Technical Support team for how to establish a remote book server and how to create remote book xml file. | |
| Note | |
5.19 Phone Book->Call log
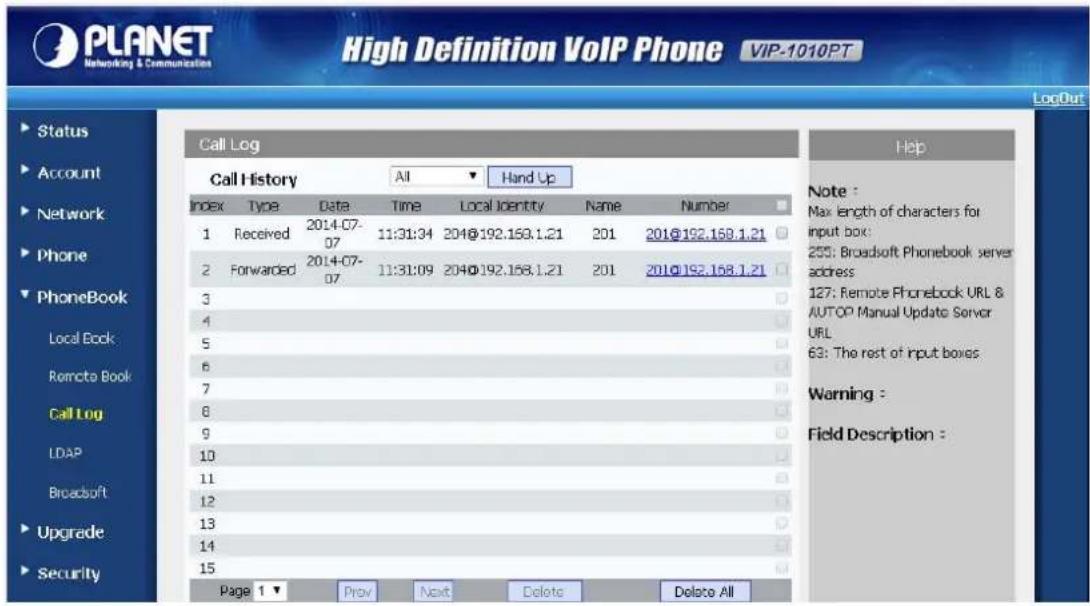
Call Log
Field Name Explanation
Basic Setting
Call History To display call history records.
Available call history types are All calls, Dialed calls,
Received calls, Missed calls and Forwarded calls.
HangUp: To click to hang up ongoing call on the IP phone.

For "HangUp" feature, you need to have the remote control privilege to control IP phone via Web UI. Please refer to section "Remote Control" on the Web UI->Phone->Call Feature page.
5.20 Phone Book->LDAP
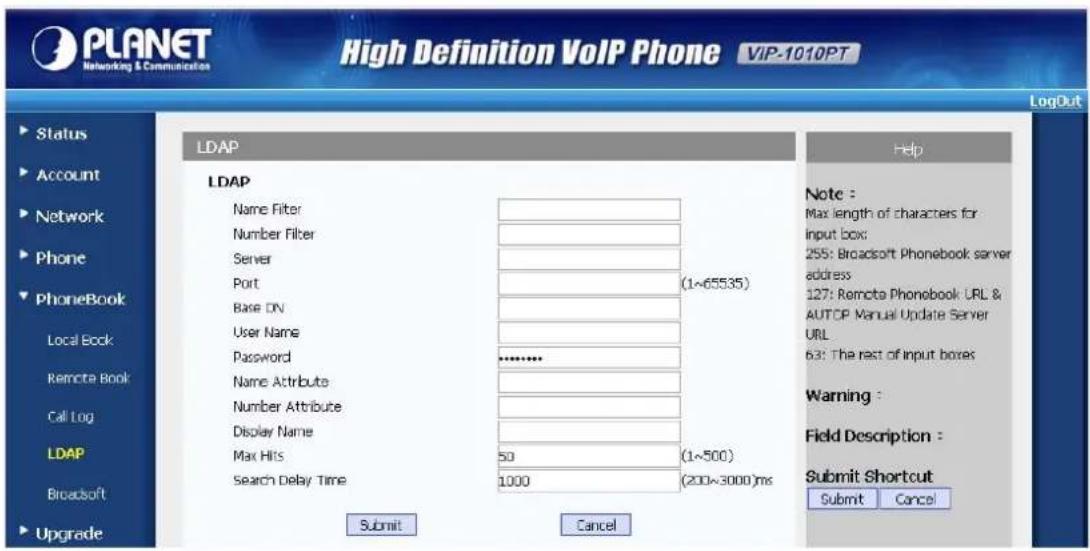
LDAP
Field Name Explanation
LDAP To display and configure LDAP phonebook settings.
Name Filter: The settings are used to tell LDAP server what name attributes to search. Number Filter: The settings are used to tell LDAP server what number attributes to search. Server: To configure LDAP server's address. Port: To configure LDAP server's port. Base DN: To configure searching base DN on LDAP server. User Name: To configure user name for accessing LDAP server. Password: To configure password for accessing LDAP server. Name Attribute: To configure which name attributes should be feedback from LDAP server. Number Attribute: To configure which number attributes should be feedback from LDAP server. Display Name: To configure display name on Phone UI when there is any searching result from LDAP server. Max. Hits: To configure the maximum size of result response from LDAP server. Search Delay Time: To configure delay time before initiating LDAP searching request after you input a value from Phone UI.
5.21 Phone Book->BroadSoft
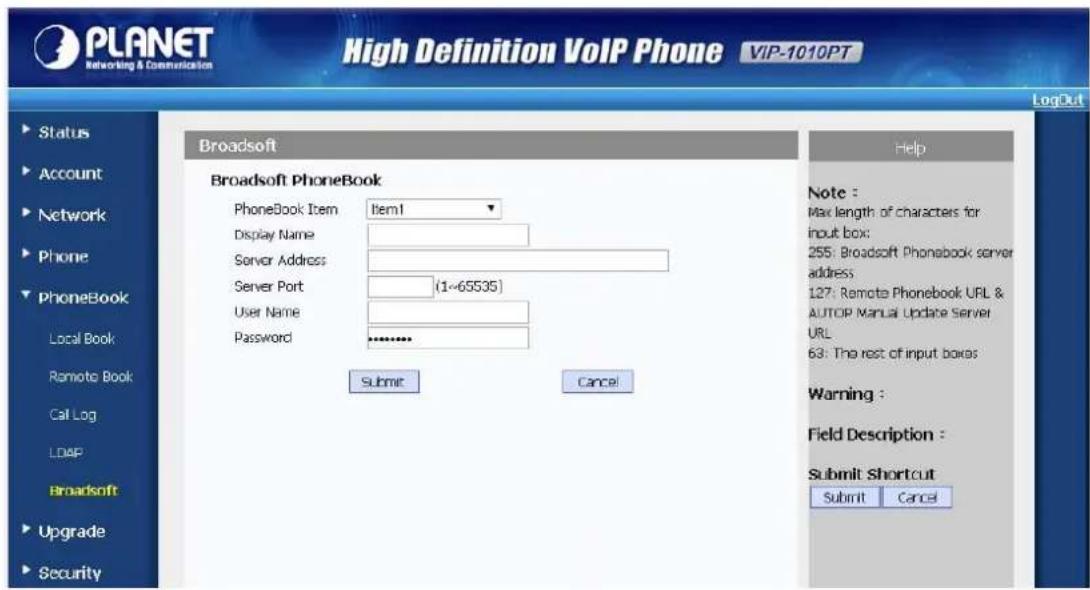
Broadsoft
Field Name Explanation
Broadsoft PhoneBook
To display and configure Broadsoft PhoneBook settings.
PhoneBook Item: To select specific item to configure.
Display Name: The name displayed on IP phone's LCD screen when accessed via Phone UI.
Server Address: Broadsoft PhoneBook server's address.
Server Port: Broadsoft PhoneBook server's port.
User Name: Username used to access Broadsoft PhoneBook server.
Password: Password used to access Broadsoft PhoneBook server.

Note
IP phone supports at most 5 Broadsoft PhoneBook items. For Broadsoft Phone Book's server address, port, username and password, you need to consult your Broadsoft service provider for further information.
5.22 Upgrade->Basic
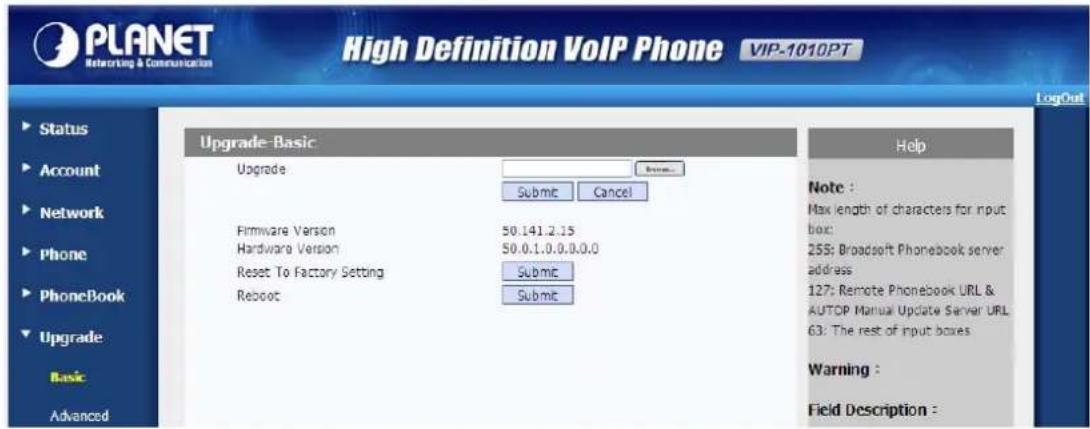
| Upgrade Configuration | |
| Field Name Explanation | |
| Upgrade To select up | grading ROM file from local or a remote server automatically.Note: Please make sure it's the right file format for the right model. |
| Firmware Version | To display firmware version; firmware version starts with MODEL name.For example, VIP-1010PT firmware version should be like 50.xxx.xxx.xxx. |
| Hardware Version To display Hardware version. | |
| Reset to Factory Setting | To enable you to reset IP phone's setting to factory settings. |
| Reboot To reboot IP | phone remotely from Web UI. |
5.23 Upgrade->Advanced
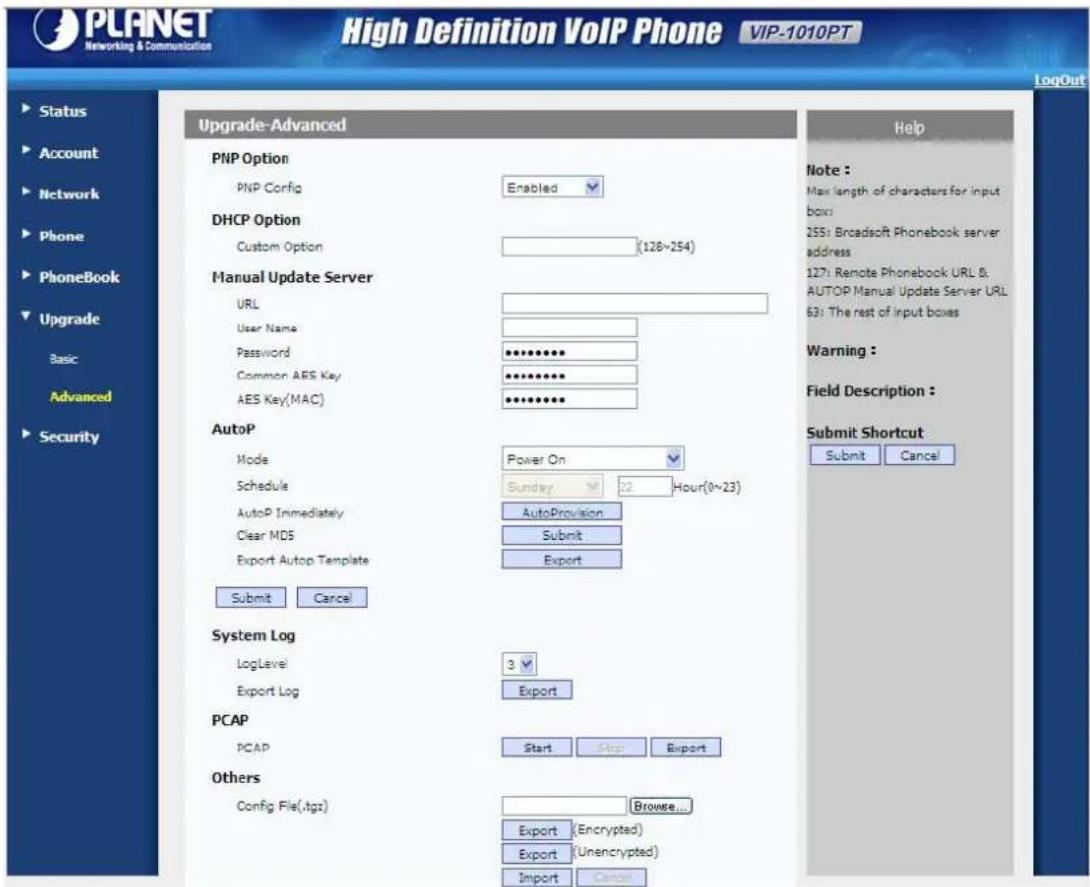
| Upgrade- Advance | |
| Field Name Explanation | |
| PNP Option To display and configure PNP setting for Auto Provisioning.PNP: Plug and Play; Once PNP is enabled, the phone will send SIP subscription message to PNP server automatically to get Auto Provisioning server's address. By default, this SIP message is sent to multicast address 224.0.1.75 (PNP server address by standard). | |
| DHCP Option To display and configure custom DHCP option.DHCP option: If configured, IP phone will use designated DHCP option to get Auto Provisioning server's address via DHCP.This setting requires DHCP server to support the corresponding option. | |
| Manual Update Server | To display and configure manual update server's settings.URL: Auto provisioning server address.User name: Configure if server needs a username to access, otherwise left blank.Password: Configure if server needs a password to access, otherwise left blank.Common AES Key: Used for IP phone to decipher common Auto Provisioning configuration file (For the VIP-1010PT, this configuration file is r000000000053.conf.).AES Key(MAC):Used for IP phone to decipher MAC-oriented auto portioning configuration file(for example, file name could be 00304f888888.conf if IP phone's MAC address is 00304f888888).Note: AES is one of many encryptions. It should be configured only if the configure file is ciphered with AES, otherwise left blank. |
| AutoP To display and | configure Auto Provisioning mode settings.This Auto Provisioning mode is actually self-explanatory.For example, mode "Power on" means IP phone will go to do Provisioning every time it powers on. |
| System Log To display | syslog level and export syslog file.Syslog level: From level 0~7. The higher level means the more specific syslog is saved to a temporary file.By default, it's level 3.Export Log: Click to export temporary syslog file to local PC. |
| PCAP To start, stop | packets capturing or to export capturedPacket file.Start: To start capturing all the packets file sent or received from IP phone.Stop: To stop capturing packets.Note: IP phone will save captured packets file to a temporary file; this file maximum size is 1M (megabytes), and will stop capturing once this maximum size is reached. |
| Others To display or | configure other features from this page.Configure file: To export or import configure file for IP phone. |
5.24 Security->Basic
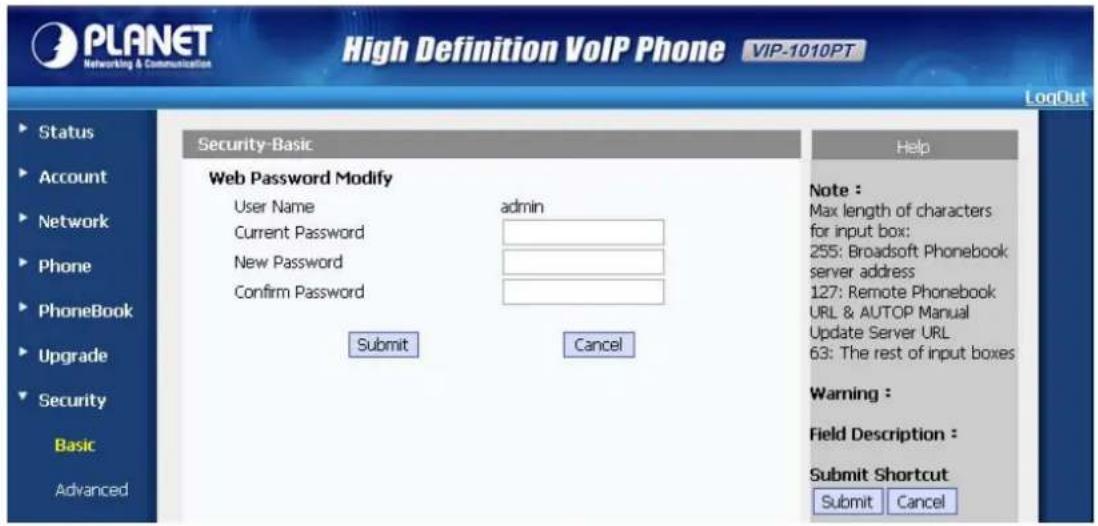
Upgrade- Advance
Field Name Explanation
| Web Password Modify | To modify user's password. Current Password: The current password you used. New Password: Input new password you intend to use. Confirm Password: Repeat the new password. For now, IP phone can only support user administrator mode. |
5.25 Security->Advanced
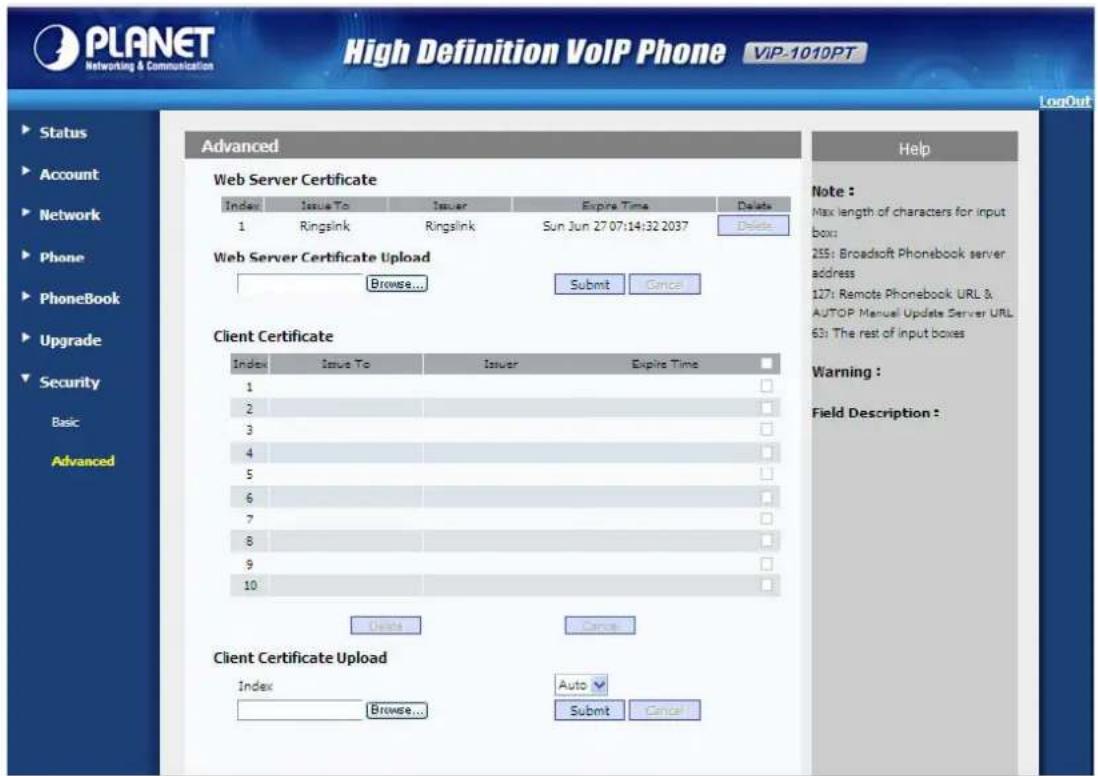
| Sections Description | |
| Web Server Certificate | To display or delete Certificate which is used when IP phone is connected from any incoming HTTPS request. The default certificate could not be deleted. |
| Web Server Certificate Upload | To upload a certificate file which will be used as server certificate. |
| Client Certificate To display or delete Certificates which is used when IP phone is connecting to any HTTPS server. | |
| Client Certificate Upload | To upload certificate files which is used as client certificate. |
6 Appendix
6.1 Digit-character Map Table
| Keypad Character Keypad Character | ||||
 | 1 @ |  | 7 PQRSpqrs | |
 | 2 ABCabc |  | 8 TUVtuv | |
 | 3 DEFdef |  | 9 WXYZwxyz | |
 | 4 GHlghi |  | */. | |
 | 5 JKLjkl |  | 0 | |
 | 6 MNOmno |  | #/SEND | |
6.2 Frequently Asked Questions List
| Q1: No operation after power on? |
| A1: Check if the power adapter is properly connected.If applicable, check if the PoE (Power over Ethernet) switch behind the IP phone is set correctly. |
| Q2: No dial tone? |
| A2: Check if the handset cord is properly connected. |
| Q3: Cannot make a call? |
| A3: Check the status of User SIP registration status or contact user administrator,supplier, or ITSP for more information or assistance. |
| Q4: Cannot receive any phone call? |
| A4: Check the status of user SIP registration status, or contact user administrator,supplier, or ITSP for more information or assistance |
| Q5: No voice during an active call? |
| A5: Check if the servers support the current audio codec type, or contact user administrator, supplier, or ITSP for more information or assistance. |
Q6: Cannot connect to the configuration website?
A6: Check if the Ethernet cable is properly connected.
Check if the URL is right; the format of URL is: http:// the Internet port IP address. Check if user firewall/NAT settings are correct.
Check if the version of IE is IE8, or use other browser such as Firefox or Mozilla, or contact user administrator, supplier, or ITSP for more information or assistance.
Q7: Forget the password?
A7: Default password of website and menu is null.
If user changes the password and then forget it, or user cannot access to the configuration website or the menu items need password.
Solution:
Factory default: press the Menu button and choose 16Factory Default and then a notice will appear. Choose OK by using the corresponding softkey button.
If user chooses the factory default, user will return the phone to the original factory settings and will erase ALL current settings, including the directory and call logs.
Q9: How to register VIP-1010PT to IPX-2100
A9:
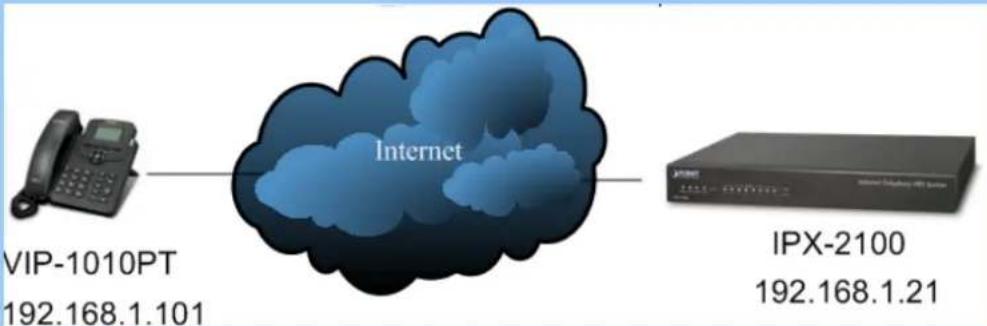
flowchart
graph LR
    A["Telephone"] --> B["Cloud"]
    B --> C["IPX-2100"]
    style B fill:#99ccff,stroke:#333
    note1["VIP-1010PT\n192.168.1.101"]
    note2["Internet"]
    note3["IPX-2100\n192.168.1.21"]
[In IPX-2100]
For extensions, please create a new account and remember their user name and password.
![PLANET Networking & Communication Internet Telephony PBK System IPX-2100 Home Operator Basic Extensions Trunks Outbound Routes Inbound Control Advanced Network Settings Security Report System Edit General SIP: ✓ IAX2: Name: 204 Extension: 204 Password: 123456 Outbound CID: DialPlan: DialPlan1 Analog Phone: None Voicemail Voicemail: ✓ VM Password: 1234 Delete VMail: ☐ Email(Fax/Voicemail): Other Options Web Manager: ✓ Agent: ☐ Call Waiting: ✓ Allow Being Spied: ☐ Pickup Group: 1_ Mobility Extension: ☐ Mobility Extension Number: _ VoIP Settings NAT: ✓ Transport: UDP ✓ SRTP: DTMF Mode: RFC2833 Permit IP: Video Options Video Call: H.261 H.263 H.263+ H.264 Audio Codecs ✓ alaw ✓ ulaw G.722 G.729 G.726 GSM Speex Save Cancel [In VIP-1010PT] On Account/ Basic page. Account Active = Enable Display Label = Choose any Display message you want. Display name: Choose any Display name you want. Register Name: 204 (in this case) User name : 204 (in this case) Password: 123456 (in this case) Server IP: 192.168.1.21 After saving, user can check the register status in "Status" item.](/content/2026/05/845345/images/49229db2dfeb2b9e93ebc23c4c010409f607f1f334db9c9e5fb03f892db463f0.jpg)
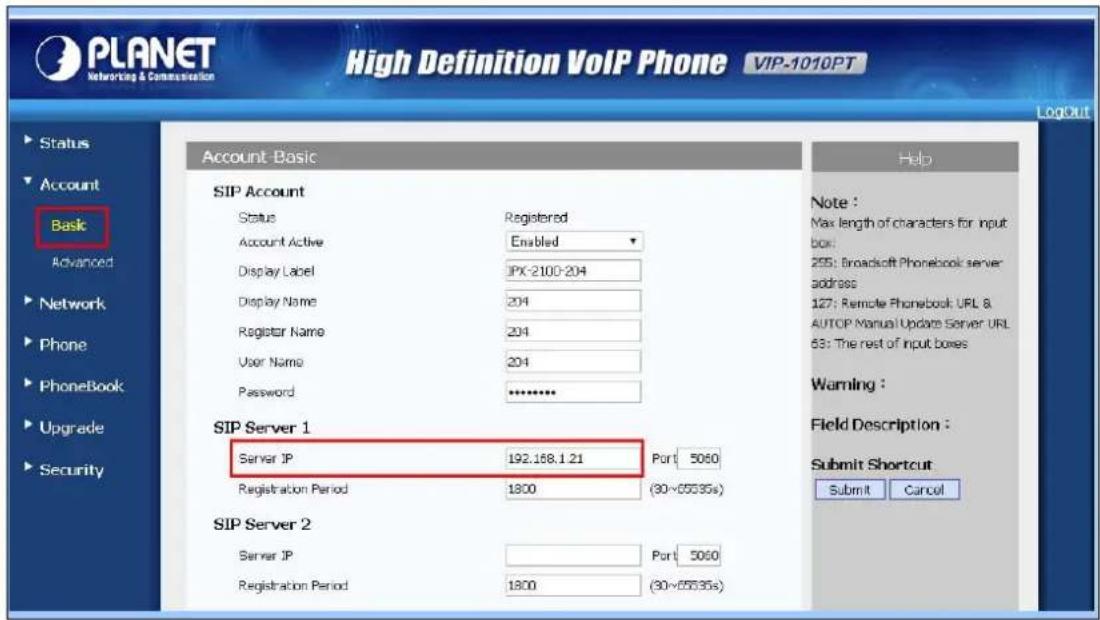
- User's Manual
- High Definition PoE IP Phone (1-Line)
- Copyright
- Disclaimer
- CE Mark Warning
- Energy Saving Note of the Device
- WEEE Warning
- Trademarks
- Revision
- Table of Contents
- INTRODUCTION....7
- INITIAL CONNECTION AND LOGIN 19
- LCD BASIC FUNCTIONS ....21
- LCD ADVANCED SETTINGS....33
- WEB CONFIGURATION....40
- APPENDIX 75
- Introduction
- Cost-effective, High-performance PoE VoIP Phone
- High-quality HD VoIP Voice
- Standard Compliance
- Compliant with standard SIP RFC 3261
- Enhanced, Full-Featured Business IP Phone
- Features
- Highlights
- Phone Features
- P PPX Features
- Security Features
- Network Features
- Administration Features
- Application
- Enterprise IP PBX Deployment of VIP-1010PT
- Product Specifications
- Physical Specifications and Packaging
- Physical Specifications
- imensions
- BASIC PACKAGING
- Keypad
- ▶ eypad, LED, and Function Key Definitions
- Rear View and Panel Descriptions
- Initial Connection and Login
- Step 1. Handset Connection
- Step 2. Connecting Power System
- Step 3. Connecting Network
- Step 4. Computer Network Setup
- Step 5. Login Prompt
- LCD Basic Functions
- Making a call
- Call Device
- Call Methods
- Answering a call
- Mute
- Call Hold / Resume Forward
- DND (Do Not Disturbed)
- Call Waiting
- Call Forward
- Call Transfer
- Blind Transfer
- Consultation Transfer
- Three-way conference call
- Call Park
- Pickup
- Specified Pickup
- Group Pickup
- Speed Dial
- Auto-redial
- Hot line
- Intercom
- HotDesking
- Set the HotDesking Key
- HotDesking Feature :
- Application
- Text Message
- Read Text Message
- Send Text Message
- Delete Text Message
- Voice Message
- Voice Message
- Check voice message
- LCD Advanced Settings
- Basic Settings
- Language
- Date & Time
- Backlight
- Password Setting
- Sound Settings
- Phone Volume
- Ring Tones
- Phone Book
- Local Phone Book
- Add contacts manually
- Add Contacts from All Calls History :
- Search Contacts
- Blacklists
- Remote Phone Book
- History Management
- System Customizations
- Programmable keys
- SIP Account management
- Register an Account
- Disable an Account
- Basic Network Settings
- DHCP Mode
- Static IP Mode
- PPPoE Mode
- Reset to Factory
- Reboot
- Web Configuration
- Ways to configure
- Setting via web browser
- Status / Basic
- Status
- Account / Basic
- Account->Advanced
- Network / Basic
- LANGUAGE
- Field Name Explanation
- Network / Advanced
- Phone/ Time/ Language
- Time / Language Configuration
- Phone / Preference
- Phone / Call Feature
- Call Feature Configuration
- Phone / Voice
- Voice Configuration
- Phone/ Key/ Display
- Phone / Ring Tones
- Ring Tone Configuration
- Phone / Tones
- I AX2 Configuration
- Phone / Dial Plan
- Phone -> Action URL
- DIAL PEER
- Phone Book->Local Phone Book
- AUDIO Configuration
- Phone Book->Remote Phone Book
- FEATURE
- Phone Book->Call log
- Call Log
- Basic Setting
- Phone Book->LDAP
- LDAP
- Phone Book->BroadSoft
- Broadsoft
- Broadsoft PhoneBook
- Upgrade->Basic
- Upgrade->Advanced
- Security->Basic
- Upgrade- Advance
- Security->Advanced
- Appendix
- Digit-character Map Table
- Frequently Asked Questions List
- Q6: Cannot connect to the configuration website?
- Q7: Forget the password?
- Q9: How to register VIP-1010PT to IPX-2100
Brand : Planet
Model : VIP-1010PT
Category : Telephone