
SCT 5016BMR - Car stereo SENCOR - Free user manual and instructions
Find the device manual for free SCT 5016BMR SENCOR in PDF.


| Product Type | Car stereo with Bluetooth, multimedia player and RDS radio receiver |
| Brand | Sencor |
| Model | SCT 5016BMR |
| Dimensions (W x D x H) | 178 x 115 x 50 mm |
| Net Weight | Approximately 0.8 kg |
| Power Supply | DC 12 V, negative ground |
| Maximum Power Output | 40 W x 4 channels |
| Speaker Impedance | 4 Ω |
| Frequency Range (Audio) | 20 Hz – 20 kHz |
| Signal-to-Noise Ratio | 85 dB |
| Channel Separation | 80 dB |
| FM Frequency Range (Europe) | 87.5 – 108 MHz |
| FM Frequency Range (USA) | 87.5 – 107.9 MHz |
| Bluetooth Version | 3.0 |
| Supported Audio Formats | MP3, WMA |
| Media Sources | USB, SD/MMC, AUX, Bluetooth, FM/AM radio |
| Detachable Front Panel | Yes, for theft prevention |
| Remote Control | Included, with battery (CR2025) |
| RDS Functions | AF, TA, PTY, EON, PI, PS |
| Equalizer Presets | Classic, Pop, Rock, DSP Off |
| Operating Temperature | -20 °C to +60 °C |
| Fuse Rating | 10 A |
Frequently Asked Questions - SCT 5016BMR SENCOR
User questions about SCT 5016BMR SENCOR
0 question about this device. Answer the ones you know or ask your own.
Ask a new question about this device
Download the instructions for your Car stereo in PDF format for free! Find your manual SCT 5016BMR - SENCOR and take your electronic device back in hand. On this page are published all the documents necessary for the use of your device. SCT 5016BMR by SENCOR.
USER MANUAL SCT 5016BMR SENCOR
Car radio with Bluetooth, multimedia player and RDS radio receiver
SCT 5016BMR
USER'S MANUAL
EN
IF YOU WANT TO USE THIS PRODUCT CORRECTLY, CAREFULLY READ THIS USER'S MANUAL AND STORE IT FOR FUTURE REFERENCE. IF YOU GIVE (SELL) THE DEVICE TO SOMEBODY, PLEASE ALSO INCLUDE ALL THE DOCUMENTATION TOGETHER WITH THIS DEVICE, INCLUDING THIS USER'S MANUAL.
Contents
- Installation instructions....2
- Installation....3
- Installation....5
- Description of the main unit....6
- Remote control....7
- Basic controls....9
- Radio 12
- Using RDS 15
- USB/SD/MMC input....19
- Bluetooth controls 21
- Troubleshooting....23
- Technical specifications....24
1. Installation instructions
- The device is designed to be powered by 12 V direct current. Before installing the unit, check that your vehicle has a 12 V power supply with the negative pole on the frame.
- The negative pole of the battery must be disconnected before the device is connected. This reduces the probability of damaging the device by an accidental shorting of the circuit.
- Check that the unit is correctly connected according to the coloured leads based on the wiring diagram. An incorrect wiring connection could cause the malfunction of the unit or damage to the vehicle's electrical system.
- Do not forget to connect the loudspeaker lead marked (-) to the (-) clamp. Never connect the left and right loudspeaker leads together or to the car body.
- Do not cover the ventilation openings on the unit. Blocking them will increase the temperatures inside the unit, which may damage it or cause a fire.
- This device can playback MP3 and WMA digital sound file formats.
- Do not attempt to repair the unit, modifications to the unit may cause a malfunction or damage the device.
- Stop the vehicle before performing anything that could prevent the vehicle from being driven safely.
- Do not turn on the device in extremely high or low temperatures. The normal operating temperature is between -20 and +60 °C.
- The device is supplied with a remote control. Use only the supplied remote control. Certain functions are only available by means of the remote control.
Due to the wide range of SD/MMC cards/USB devices available on the market it is not possible to guarantee the compatibility of the device with all SD/MMC cards/USB devices.

NOTE
Do not touch the connectors on the front panel of the main unit as this could result in a poor electrical contact. Only wipe the connectors using a clean and dry wiping cloth if necessary. After detaching the front panel from the main unit, store it in a protective case.
2. Installation
The following accessories are included with the device.
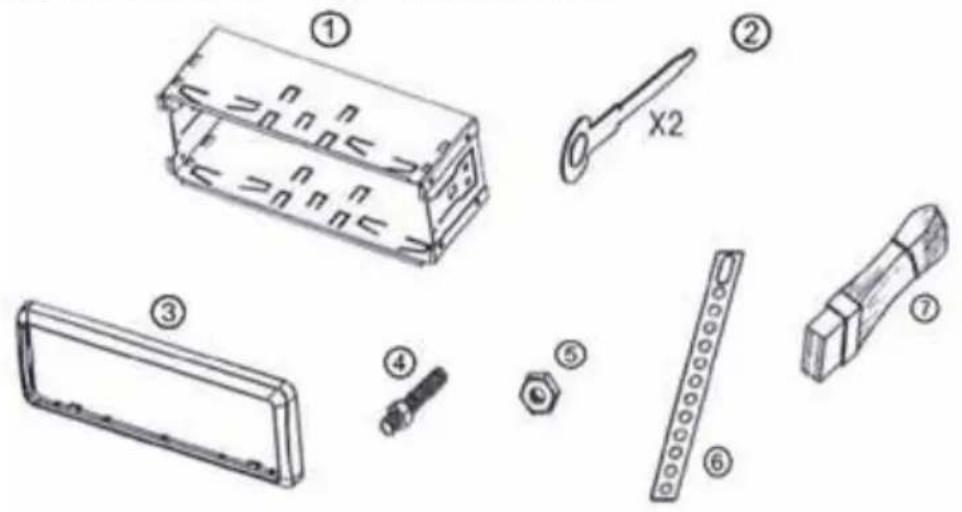
2.1. Installation procedure A
Insert the installation frame into the dashboard.
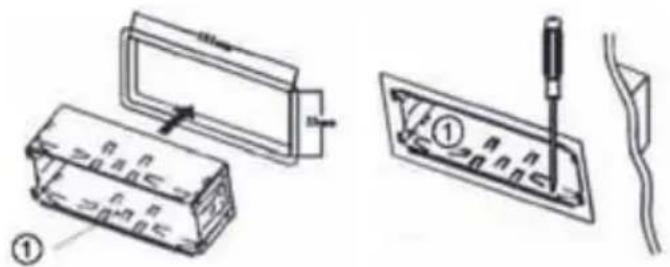
Bend the flaps inside into the dashboard so that the frame is held firmly in place.
If necessary use a metal strip to secure the rear side of the unit.
The strip can be bent to the necessary angle by hand. The strip will may theft more difficult.
To release the unit insert the keys on both sides and pull the unit out from the dashboard.
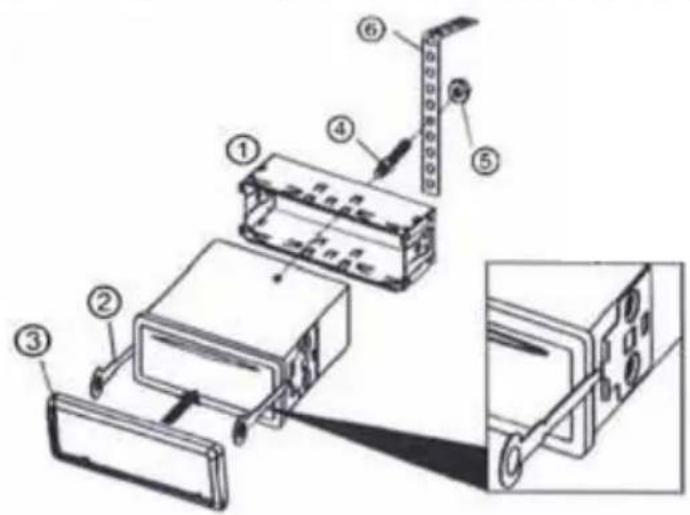
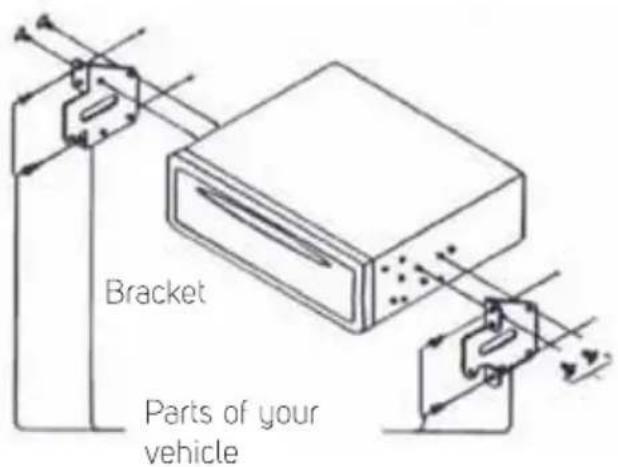
2.2. Installation procedure B
This installation method is used for most Japanese car models. The actual installation method depends on the car model and the supplied parts.
Note:
- Store small items in a location that is not accessible to children.
- Use only the supplied bolts for the installation.
- The installation method is modified depending on the car model and the supplied parts. You should have the unit installed by a qualified technician.
2.3. Detaching the front panel
Before detaching the front panel, check that the unit is turned off. Press the release button on the panel and pull it out.
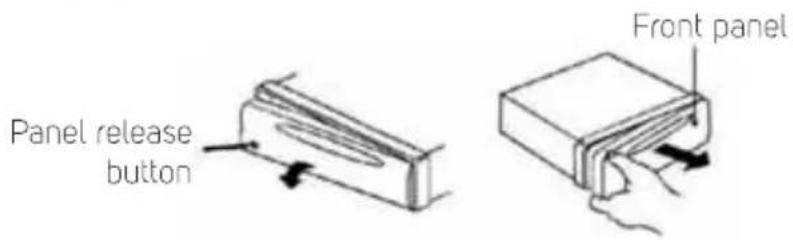
2.4. Attaching the front panel
First insert the right side of the panel into the main unit. Then press down the left side of the panel into the main unit until it is secured in place.
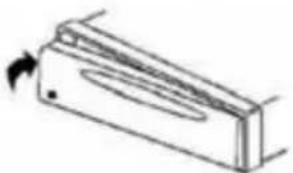
natural_image
Simple line drawing of a rectangular object with a curved internal feature and an arrow indicating direction (no text or symbols)3. Installation
Rear side of the unit
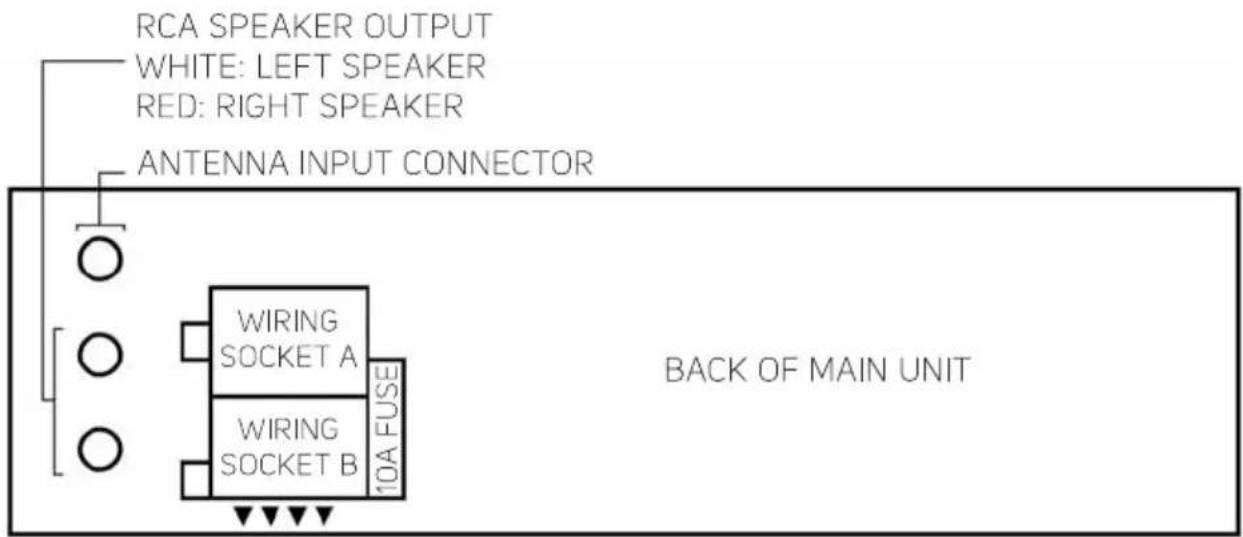
WIRING PLUG A (CONNECT TO SOCKET A)
- WHITE: FRONT LEFT SPEAKER (+)
- WHITE/BLACK: FRONT LEFT SPEAKER (-)
4. Description of the main unit
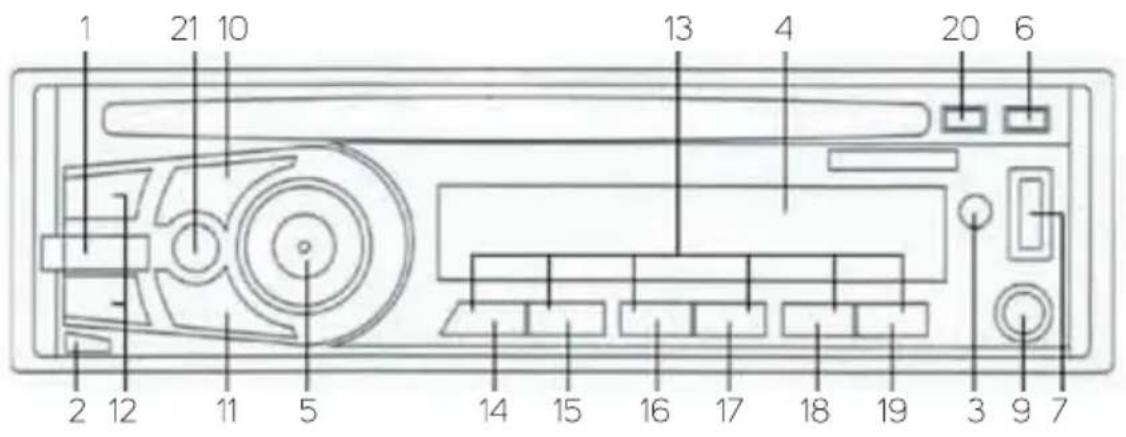
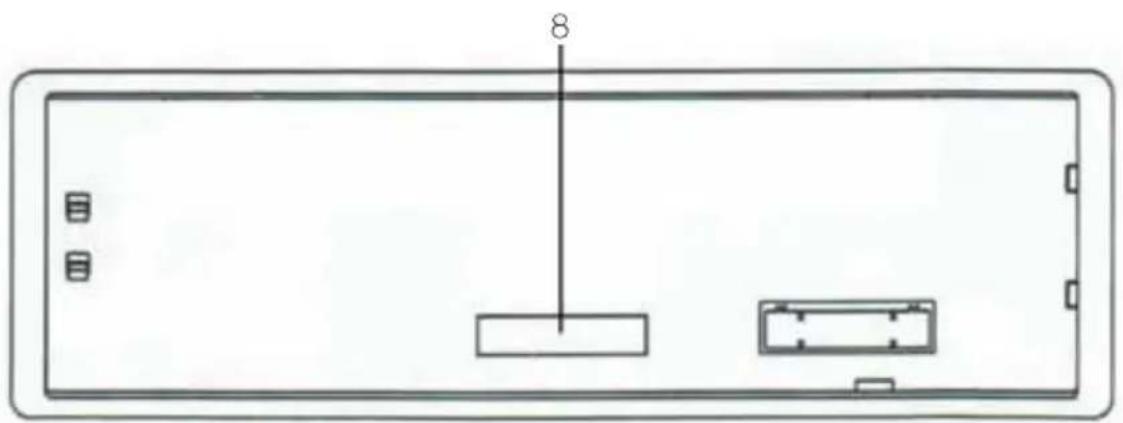
natural_image
Diagram of a device rear panel with two rectangular components and a vertical line labeled '8' (no text or symbols beyond the number)- ON/OFF button
Mode selector (MOD)/
End call
-
Panel release button ▲
-
Remote control sensor (IR)
-
LCD display
-
Audio control/Function selection dial
-
PTY control
-
USB cover/USB slot
-
SD/MMC card slot
-
AUX input jack (AUX)
-
Band/MP3 ID3 selectorč (BAND)/
Accept call
-
AF On/Off Controls (AF)
-
+▶▶▶/▶◀- Tuning/ Controlling the track
-
Preset station buttons (1-6)
-
Playback & Pause (PAU)
-
Playback introduction (INT)
-
Repeat (RPT)
-
Random playback (RDM)
-
Tracks downwards (-10)
-
Tracks upwards (+10)
-
TA On/Off (TA)
-
Save memory automatically/Seek (APS)
5. Remote control
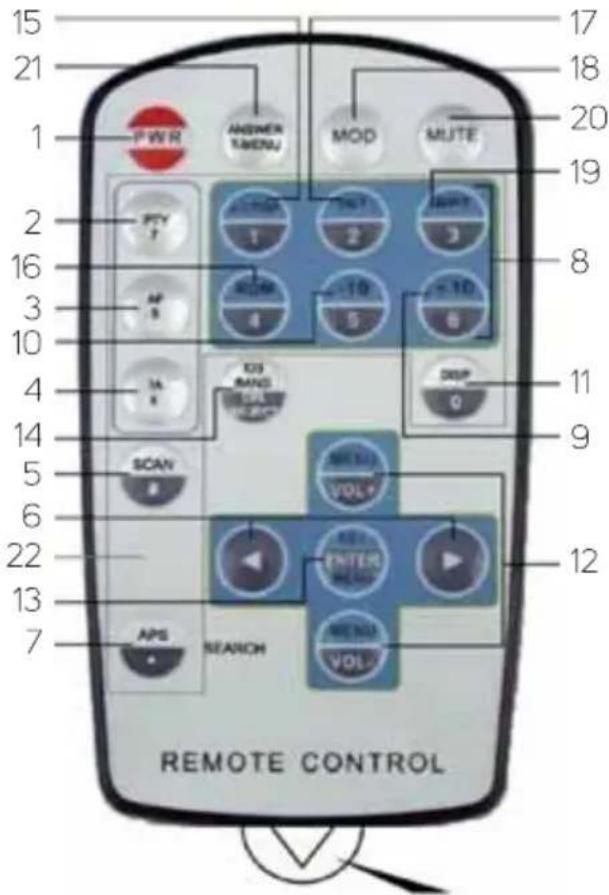
Remove this film before using.
- Power On/Off (PWR)
- PTY controls (PTY/7)
- AF controls/regional mode (AF/8)
- TA control/local (LO)/distant (DX) control (TA/9)
- Scan stations (SCAN/#)
- Tuning/Track selection (◄/►)
- Automatic saving to memory/searching for music (APS/*)
- Preset station buttons (1 - 6)
- Track selection upwards (+10)
- Track selection downwards (-10)
- Time display, settings (DISP/0)
-
Control of volume and functions (MENU/VOL+/-)
-
Audio control/function selection dial (SEL/ENTER/MENU)
- Frequency band/selector of MP3 ID3 (ID3 BAND/DEL REJECT)
- Play/Pause (▶II/TOP)
- Random playback (RDM/4)
- Intro track playback (INT/2)
- Mode selector (MOD)
- Repeated playback (RPT/3)
- Muting sound (MUTE)
Bluetooth control buttons:
- End call/reject call/delete function
- Accept call/menu
- Numerical buttons
Changing the batteries
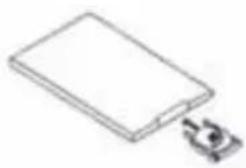
If the range of the remote control is reduced or the device does not respond to any functions during operation, replace the battery with a new one. Ensure that you maintain the correct polarity when inserting the battery into the remote control. Please see the provided procedure below for replacing the battery.
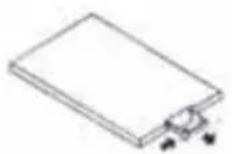
Slide out the battery holder according to the illustration
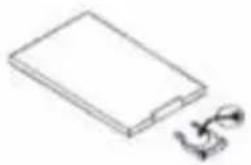
natural_image
Simple line drawing of a rectangular object with a small protrusion on the right side (no text or symbols)Insert a battery into the holder with the polarity (+) facing upwards
natural_image
Simple line drawing of a rectangular electronic component with a small protrusion at the bottom (no text or symbols)Slide in the battery holder into the remote control
Remote control and batteries
- Do not expose the remote control or the batteries to direct sunlight or sources of heat, such as heaters, heat exchangers, stoves or other appliances (including amplifiers) that produce heat. Do not use or leave the device in the vicinity of an open fire.
- Neither the remote control nor the batteries may be exposed to dripping or running water and objects filled with water must not be placed on them, e.g. vases. Protect against exposure to rain, spraying or pouring of any kind of liquid. Do not use outdoors. Not following these instructions creates a danger of damage to the remote control or the battery.
• Do not use this device near water.
• It is necessary to pay attention to the environmental impact aspects of battery disposal. -
The incorrect use of batteries may cause the leakage of the electrolyte and corrosion. To ensure that the remote control works correctly, proceed according to the instructions below:
-
Do not insert the batteries in the wrong polarity orientation.
- Do not charge, heat, open or short circuit the batteries.
- Do not throw batteries into a fire.
- Do not leave discharged batteries in the remote control.
- Do not combine various types of batteries or new and old batteries.
- If you will not be using the remote control for a longer period of time, remove the batteries to prevent potential damage caused by a subsequent battery leakage.
- If the remote control is not working correctly or its operational range is reduced, change all batteries for new ones.
- If electrolyte leaks out from the batteries, have the remote control cleaned at an authorised service centre.
6. Basic controls
6.1.ON/OFF
To turn on the device press the ⏻ button on the main unit or the PWR button on the remote control. To turn off the device press and hold the ⏻ button on the main unit for two seconds or the PWR button on the remote control. The unit can also be turned on by pressing any button on the remote control. All settings will remain stored in memory after the unit is turned off (it is essential that the unit is connected correctly).
Selecting a mode
Press the MOD button on the main unit or on the remote control to select a desired mode, USB input, SD/MMC card input, AUX input and Bluetooth control.
6.2. Setting the volume and audio
During normal reception/playback, set the volume by turning the audio selection dial on the main unit or by repeatedly pressing the VOL+/VOL- buttons. Other audio properties can be set by repeatedly pressing the audio selection dial on the main unit of the SEL button on the remote control to go to the following modes. The value of a given property (function) can then be changed by turning the audio selection dial or by pressing the VOL+/VOL- buttons.
Note: If you do not make any change within 5 seconds, the function selection will end and go back to normal reception/playback.
Bass (BAS)
Set the bass level.
• Treble (TRE)
Set the treble level.
• Stereophonic balance (BAL)
Set the sound level between the left and the right side.
• Front-rear balance (FAD)
Set the level between the front and the rear loudspeakers.
• Loudness (LOUD ON/OFF)
Activate/deactivate the highlighting of natural sound (suitable namely for lower volume).
• Equaliser settings (Classic/Pop/Rock/DSP OFF)
Setting the desired mode: CLASSIC - POP - ROCK - DSP OFF.
Note: The bass and treble levels are set to the default level when the preset equaliser is activated.
- Local/Distant reception (Operation only in FM radio mode)
See - main unit or remote control - radio operation details.
• Stereo/Mono selector (Operation only in FM radio mode)
See - main unit or remote control - radio operation details.
• Volume (VOL)
Output volume level setting.
6.3. Mute the sound (only using the remote control)
Press the MUTE button on the remote control to mute the audio. The word "MUTE" will appear on the LCD display. Press the button again to resume at the previously set volume level.
6.4. USB cover/USB slot
Open the USB cover and insert a USB device into the USB slot to playback MP3/WMA audio files. When a USB device is not inserted inside the USB slot, close the USB cover to prevent dust and dirt from entering into the device.
6.5. SD/MMC card slot
Insert an SD or MMC card into the SD/MMC slot to playback audio files in the MP3/WMA file format.
Note:
Ensure that you insert the USB device/SD/MMC card in the correct direction. Do not use force to insert the USB device/SD/MMC card into the slot. Otherwise you could damage the USB device/SD/MMC card and the device.
6.6. AUX output
Connect an external device into the AUX connector to playback audio using the unit.
6.7. LCD display
The LCD display shows the operating status of the unit.
6.8. Remote control sensor
The main unit can be controlled using a remote control. Point the remote control at the IR remote control sensor and press a button.
6.9. Detaching the front panel
Press the button for detaching the detachable front panel from the main unit as prevention against theft.
6.10. Function selection dial
Press and hold the function selection dial on the main unit or the SEL button on the remote control for 2 seconds to activate the function for controlling various modes. Repeatedly press the function selection dial on the main unit or the SEL button on the remote control to activate the following control modes.
AF ON and AF OFF
Automatic retuning, see details about RDS operation.
TA ON and TA OFF
Traffic announcements, see RDS operation.
PTY selection (Music/Speech/PTY Off)
Program type, see details about RDS operation.
Frequency coverage - selection (AREA EUR/AREA USA)
Tuning method, see details about radio operation.
Note: The frequency coverage selection is only available in the radio mode.
Alarm and seek (TA ALARM/TA SEEK)
See details about RDS operation.
Sound control and mute (PI SOUND/PI MUTE)
See details about RDS operation.
Return L and Return S
See details about RDS operation.
Beep (BEEP ON/BEEP OFF)
Turn the function selection dial on the main unit or press the VOL +/VOL - button to activate or deactivate beeping when a button is pressed.
6.11. Time display and settings
While the unit is running press the DISP button on the remote control to display the clock. Press again or after 5 seconds the display will return to the previous state.
Setting the time
In the clock mode press the DISP button until the hour digits start to flash.
Press the VOL +/VOL - button to set the hours and confirm by pressing the ENTER button.
Press the VOL +/VOL - button to set the minutes and confirm the setting by pressing the
ENTER button. After the settings are complete, press the DISP button to return to the normal clock display.
7. Radio
7.1. Selecting a broadcast band width
Repeatedly press the BAND button on the main unit or on the remote control to select the desired broadcast band in the following order: > FM1> FM2> FM3>.
7.2. Frequency range
In the radio mode press and hold the function selection dial on the main unit or the SEL button on the remote control for 2 seconds to activate settings mode. When a frequency coverage (AREA EUR/AREA USA) is achieved, select using the function selection dial on the main unit or using the VOL +/VOL - buttons on the remote control the following frequency ranges/tuning methods:
AREA EUR (European coverage): 87.5 MHz - 108 MHz
AREA USA (American coverage): 87.5 MHz - 107.9 MHz
7.3. Automatic saving to memory
In the radio mode and when the TA, AF & PTY functions are off, press APS on the main unit or on the remote control for 2 seconds.
The radio scans for the current available frequencies and checks signal strength until tuning is complete. The stations with the strongest signals are then stored under the corresponding preset digits 1 - 6. Press APS again to stop this function.
7.4. Automatic preset station scanning
In the radio mode, press APS on the main unit or on the remote control. All preset stations stored in memory will be scanned and the radio will pause for a few seconds at each station. Press the preset button no. 1 - 6 for 2 seconds to store the station. Press APS again to stop this function.
7.5. Automatic scanning up/down
a) Using the main unit
In the radio mode press the +▶▶I/I◀◀ - buttons - to automatically scan stations upwards/downwards. Press the preset buttons no. 1 - 6 for two seconds to store the station under the respective preset number.
b) Using the remote control
In the radio mode press the ◀/▶ buttons to automatically scan for a frequency upwards or downwards, for the reception of the next station with a strong signal. Press the preset buttons no. 1 - 6 for 2 seconds to store the station under the respective preset number.
7.6. Manual tuning upwards/downwards
a) Using the main unit
In the radio mode press the +▶▶I/I◀◀- for two seconds to activate manual tuning. The word "MANUAL" will appear on the LCD display for a short time. In the manual mode repeatedly press the +▶▶I/I◀◀- button to tune a frequency upwards or downwards to the desired frequency. When the reception of a desired station is achieved it can be stored under the desired preset number 1 - 6 by pressing the respective button for 2 seconds. When the manual tuning mode is not active for 5 seconds, the automatic scanning mode will be set and the word "AUTO" will appear on the LCD display for a short time.
b) Using the remote control
In the radio mode press the ◀/▶ buttons and within 2 seconds the manual tuning mode will be activated and the word "MANUAL" will appear on the LCD display for a short time. In this manual tuning mode repeatedly press the ◀/▶ buttons to tune the frequency upwards or downwards. When the reception of a station is achieved it can be stored under the desired preset number 1 - 6 by pressing the respective button for 2 seconds. When the selected mode is not active for 5 seconds, the device will switch to the automatic mode and the word "AUTO" will appear on the LCD display for a short time.
7.7. Preset stations
In the radio mode press one of the preset numbers 1 - 6 to select a station that was stored in memory. Press one of the preset numbers 1 - 6 for 2 seconds to store the station that is currently being played in memory. Storing in memory is indicated by the light of the given preset number lighting up on the display. This device can store up to 18 stations (FM1 x 6, FM2 x 6, FM3 x 6).
7.8. Automatic scanning (only with the remote control)
In the radio mode press SCAN to start scanning radio stations. When a station is found, scanning stops for 5 seconds. By pressing the preset buttons 1 - 6 for 2 seconds it is possible to store the scanned station under the desired memory number. Press the SCAN button to stop scanning.
7.9. Local/Distant reception
In the FM radio mode press the function selection dial on the main unit or repeatedly press the SEL button on the remote control until the local (LOCAL) or the distant (DX) mode is reached. When selecting the local/distant mode use the function selection dial on the main unit or the VOL+/VOL - buttons to select radio reception for a local (LOCAL) setting (reception of strong radio station signals) or a distant (DX) setting (for the reception of weak radio station signals). Distant reception will process more stations, however the signal of weaker stations may be affected by a loss of reception due to the effects of weather as well as the changing distance from the transmitter, terrain profile, etc.
7.10. Mono/Stereo
In the FM radio mode press the function selection dial on the main unit or REPEATEDLY press the SEL button on the remote control until the stereo (STEREO) or the mono (MONO) mode is reached. Use the function selection dial on the main unit or the VOL +/VOL - buttons to select radio reception in the mono (MONO) setting or in the stereo (STEREO) setting.
When the radio is receiving a stereophonic signal, a stereo indicator appears on the LCD display. No indicator is shown for mono reception. Monophonic reception is suitable for cleaner reception of weaker stations suffering from interference.
8. Using RDS
8.1. Overview of RDS functions
The Radio Data System (RDS) is a service, which makes it possible for FM stations to broadcast other digital information together with the standard program signal. Some of them are listed below. It depends on the specific radio station as to which services it uses or when it uses them.
PI (Program Identification)
This is a code that identifies the RDS station.
PS (Program Service Name)
The name of the current broadcasting station is shown on the display.
AF (Alternative Frequencies)
List(s) of alternative frequencies providing information about various transmitters broadcasting the same program in the same or neighbouring area. If the broadcasting quality on the main frequency worsens, the radio will automatically tune in to the strongest alternative frequency.
TP (Traffic Program)
The broadcast contains identification details for traffic information.
TA (Traffic Announcement)
Identification information whether traffic information is currently being broadcast or not.
PTY (Program Type Codes)
This code is used to designate the current program material. This function is used to search for programs corresponding to the selected program type, which is selected from a specific list of types, such as news, easy music, sport, etc.
EON (Enhanced Other Networks Information)
This is an additional service enabling the radio to gain information not only from the current station but also from others. For example, it makes it possible to switch to a different station of the same network for a traffic announcement, etc.
8.2. Activating the RDS mode
In the FM radio mode press the AF button on the main unit or on the remote control to activate or deactivate RDS operation. Whenever RDS is turned on (AF ON), the name of the program will be displayed on the LCD display under the condition that the RDS station is being received. «ALARM» will be displayed during an emergency broadcast. When the volume control is set to minimum, the audio output level will automatically adjust to the set level.
8.3. Regional program
In the FM radio mode press the AF button on the main unit or on the remote control for 2 seconds to turn the mode on or off. During a certain time some broadcasting stations may change their program from a standard program to a regional program. If the regional mode is turned off, the region identification in the PI code is ignored. The radio can switch broadcasting into a local version of the current program. When the regional broadcasting mode is turned on, the radio will only switch to a program bearing the same PI code.
Regional mode - turned on
AF or PI SEEK switching only works on a station that has all its PI codes the same as the current station.
Regional mode - turned off
The regional code in the PI format code is ignored when switching AF or when PI SEEK is activated.
Note:
When the AF switch is turned on, the +▶▶I/▶◀◀- buttons on the main unit or the ◀/▶ buttons on the remote control are used to scan only for stations that broadcast using RDS.
8.4. PTY program – selection
a) Using the main unit
In the FM radio mode press and hold the function selection dial for 2 seconds until the control mode of the desired function is activated. Hold down the function selection dial for a long time to display the PTY modes: PTY Music Group (music)/PTY Speech Group (speech)/PTY Off (PTY off). This function is implemented with preset station settings by pressing buttons no. 1 - 6. After selecting PTY MUSIC/PTY Speech, the radio will start to scan for corresponding PTY information and will stop if it detects this corresponding information. If the corresponding PTY information does not exist, the PTY mode will automatically switch back to normal mode.
b) Using the remote control
Every time PTY is pressed, the PTY mode will change in the following order: > PTY Music Group> PTY Speech Group> PTY Off>. When a desired PTY group is selected, repeatedly press the 1 - 6 number buttons to select a station. The radio will start to scan for the corresponding PTY information and will stop if it detects the corresponding PTY information. If the corresponding PTY information does not exist, the PTY function will automatically switch back to normal mode.
8.5. Traffic announcements TA
Press the TA button on the main menu or on the remote control for a short time to turn the TA function on or off. If the TA mode is turned on and the traffic announcement is broadcast:
- when the device is switched to the USB/SD/MMC input or AUX input mode, it will temporarily switch to the radio mode and when switched to an EON connected station,
- in the event that the volume is below the volume level of the traffic announcement, its threshold point will be increased
- when receiving a TP (Traffic Program) station, the TP segment is shown on the display
Press the TA button on the main unit or on the remote control for 2 seconds to activate the selection of the EON TA LOCAL (EON LOC) mode or the EON DISTANT (EON DX) mode. The purpose of this button is to reduce undesirable EON TA switching between EON TA information, which is received from the current station and EON connected stations, where no information is received due an excessively large distance. The switching becomes evident by listening to an unwanted program or frequent reduction of volume.
EON TA Local mode
When the intensity of the EON field is lower than the threshold level, the radio will not tune to this station. When the EON TA LOCAL mode is selected, "EON LO" is shown for a few seconds.
EON TA Distant mode
The EON TA switching is performed on the basis of information from the current station. When the EON TA mode is selected, "EON DX" is shown for a few seconds.
Note:
When TA is turned on, the +▶▶I/I◀◀- buttons on the main unit or the ◀/▶ buttons on the remote control are used to scan for only stations that broadcast using TA.
8.6. Programmable functions
Press and hold down the function selection dial on the main unit or the SEL button on the remote control for 2 seconds when the control is activated for various functions. If controls are activated, repeatedly press the function selection dial on the main unit or repeatedly press the SEL button on the remote control to activate the following programmable RDS controls and turn the dial to select the desired operating mode.
AF ON and OFF – only using the main unit
If you wish to turn the RDS function of turning to alternative frequencies on or off (see RDS MODE SETTINGS).
TA ON and OFF – only using the main unit
If you wish to turn TA traffic announcement on or off (see TRAFFIC SITUATION ANNOUNCEMENTS).
PTY ON and OFF (PTY OFF/Music/Speech) - only using the main unit
Select PTY program type mode (see details about the PTY selection program).
TA seek/TA alarm
Setting the radio steps, if the newly turned station does not receive TP information for 5 seconds.
TA SEEK: the radio will tune to a different station containing information about TP.
TA ALARM: the radio will not tune elsewhere, but beeps are made.
PI mute/PI sound
When travelling through an area where two stations have the same AF but a different received PI code at the same time the receiver will be unstable. In such a situation two modes may be selected.
PI SOUND: various PI sounds will be heard for a while.
PI MUTE: the radio will go mute for a while.
Retune L/Retune S
This is the selection of the starting time of automatic TA scanning or PI scanning. When PI information is not received at the time of tuning, the radio will start tuning to a different PI station. When even here no PI information is found, the radio will return to the last station and wait several minutes until a PI code is received.
TUNING L: 90 seconds
TUNING S: 30 seconds
Tuning frequency range selection
See remote control - radio operating details. (Available only in the radio mode)
Important note
The RDS function only works in countries or areas that have RDS broadcasting. Not all countries or areas have broadcasting with full RDS functionality. RDS may not work correctly if the signal is weak or in the event that the tuned station are not broadcasting RDS data. The reception of RDS will be significantly affected by geographical conditions.
9. USB/SD/MMC INPUT
9.1. USB slot
Insert a USB device into the USB slot to playback MP3/WMA audio files. After inserting a device into the USB slot playback will commence automatically.
9.2. SD/MMC port
Insert an SD or MMC card into the SD/MMC port to playback MP3/WMA audio files. The device will automatically start playback when the card is inserted into the port.
Note:
Ensure that you insert the USB device/SD/MMC card in the correct direction. Do not use force to insert the USB device/SD/MMC card into the slot. Otherwise you could damage the USB device/SD/MMC card and the device.
9.3. Selecting a mode
Repeatedly press the MOD button on the main unit or on the remote control to select the USB mode or the SD/MMC mode for USB/SD/MMC operation.
9.4. Play/pause
In the USB/SD/MMC playback mode press the PAU button on the main unit or the ▶II on the remote control to pause playback and the message "PAUSE" will appear on the LCD display. Press the button again to resume normal playback.
9.5. Fast forward/fast rewind
In the USB/SD/MMC device playback mode press and hold down the +▶▶/▶◀-buttons on the main unit or the ◀/▶ buttons on the remote control to fast forward/fast rewind. When the button is released the device will resume normal playback.
9.6. Selecting tracks
a) Using the main unit
In the USB/SD/MMC device playback mode repeatedly press the +▶▶▶I/I◀◀ - buttons to select a track for playback. Press the -10/+10 buttons to select 10 tracks at once (upwards or downwards) with the objective of selecting the desired track.
In the USB/SD/MMC device playback mode press APS to go to the seek mode. In this mode turn the function selection dial until you reach the desired track and press the function selection dial to confirm playback of the selected track.
b) Using the remote control
In the USB/SD/MMC playback mode press the ◀/▶ buttons to select a track upwards or downwards. In the USB/SD/MMC playback mode press the button with the number +10/-10 to load all 10 tracks downwards or upwards for the purpose of selecting desired tracks for playback. Press the SEARCH button to search directly. In this mode press the VOL+/VOL - button to select tracks and confirm the setting by pressing ENTER.
9.7. Overview of all tracks
In the USB/SD/MMC device playback mode press the INT button on the main unit or on the remote control to playback the first 10 seconds of every track. After pressing the INT button the function will appear on the LCD display. Press the INT button on the main unit or on the remote control again and playback will continue in the following order.
9.8. Repeated playback
In the USB/SD/MMC device playback mode press the RPT button on the main unit or on the remote control to repeatedly playback the same track. In the playback mode the RPT function will appear on the LCD display. Press again to stop repeated playback.
9.9. Playback in random order
In the USB/SD/MMC device playback mode press the RDM button on the main unit or on the remote control to playback the tracks on the device in random order. The function "RDM" will appear on the LCD display. Press again to resume normal playback of the current track.
9.10. MP3 ID3 display
In the MP3 device playback mode, repeatedly press BND on the main unit or use the ID3 button to display ID3 tags of the audio files on the LCD display. Audio files contain directory, album, title, artist and music.
Note:
It depends on the selected music files, displayed ID3 tags will vary or will not be available.
10. Bluetooth controls
First connect the telephone via Bluetooth and pair if necessary. Access to the BT mode is only possible with a connected telephone.
10.1. Selecting a mode
Repeatedly press the MOD button on the main unit or on the remote control to select the BLUETOOTH mode.
Note:
In the BLUETOOTH mode the microphone on the main unit is active.
10.2. Pairing
To pair the car radio with the mobile telephone proceed as follows.
- Activate the Bluetooth feature in your mobile telephone.
- On your telephone, start a scan for new devices for pairing
- After the scan is complete select "CAR KIT" from the list and confirm the pairing option.
- The entry code you will be asked for is "0000" and confirm.
- The display will show 'BT ON' for a moment when the pairing was successfully completed.
Note:
The steps described above are only a reference. The specific pairing procedure may differ depending on the type of mobile telephone. For this reason, follow the instructions contained in the user's manual for your telephone.
10.3. Connecting/disconnecting the telephone
All the radio functions are limited in the BLUETOOTH mode if you are receiving a call or dialling a number. As soon as the dialling stops or the call is ended, all the functions of the car radio will automatically be renewed.
10.4. Receiving a call
Identification details of the caller will appear on the display when a call is being received (depending on the type of mobile telephone). Press the button on the main unit or the ANSWER button on the remote control.
10.5. Dialling
a) using the main unit
Whenever a number is being dialled, "CALLING" will appear on the display.
b) using the remote control
Press the T-MENU button and the unit will switch to the dialling mode. "DIAL →" will appear on the screen. Now use the number buttons to enter the number of the person you are dialling and press the T-MENU button again to make the call. If you entered an incorrect number, press the DEL button.
10.6. Automatic redialling (only with the remote control)
To redial the last called number, press the T-MENU button twice. The last dialled number will appear on the screen if available. Press the T-MENU button to make the call.
10.7. Hanging up/rejecting an incoming call
Press the ☐ button on the main unit or the REJECT button on the remote control to hang up or reject the incoming call. The unit will switch to the initial mode.
10.8. Playing music
The bluetooth mode also makes it possible to playback music files stored on your mobile telephone.
Note:
Bluetooth controls from the main unit or the remote control are limited only to receiving incoming calls, ending incoming calls, rejecting incoming calls, dialling and playback of audio.
11. Troubleshooting
The device is not working:
- Check that all connections are connected correctly.
- Check for a burned fuse.
No sound:
- Check that the loudspeakers are connected correctly.
The device has "frozen":
- Turn off the device and restart it or disconnect it from the power supply and reconnect it.
The device does not respond when buttons are pressed:
- Turn off the device and restart it or disconnect it from the power supply and reconnect it.
Weak reception or unavailable radio signal:
- Check whether the antenna is connected.
- The antenna is not long enough. Extend the length of the antenna.
- The antenna is not thoroughly grounded. Thoroughly ground the antenna.
No stereo signal reception:
- Tune exactly to the required frequency.
- The signal is too weak, set to the MONO mode.
Remote control is not working:
- Replace the battery in the remote control.
- Point the remote control at the remote control sensor on the main unit.
- Clean the surface of the sensor.
The BLUETOOTH function is not working:
- Check that the mobile phone is paired with the car radio.
Note:
If you have performed all the above mentioned steps and the device still does not work, please contact your vendor. Never attempt to uninstall the device yourself.
12. Technical specifications
General
Power supply requirements ....DC 12 V, negative grounded
Impedance of loudspeakers 4 Ohm
Maximum power output....40 W x 4 channels
Control of bass (at 100 Hz)....+/-8 dB
treble (at 10 kHz) +/-8 dB
Chassis dimensions 178 (w) x 115 (d) x 50 (h) mm
Net weight......approximately 0.8 kg
Audio
Maximum output level....2 Vrms (+/- 3 dB)
Frequency range....20 Hz to 20 kHz
Noise to signal ratio 85 dB
Channel separation....80 dB
FM radio
Frequency broadcast band....87.5 - 108 MHz (Europe) 87.5 - 107.9 MHz (America)
Intermediate frequency 10.7 MHz
Effective sensitivity (-20 dB) 15 dB
Noise to signal ratio 60 dB
Stereo separation (at 1 kHz) 30 dB
Frequency range....30 Hz - 15 kHz
Integrated Bluetooth module....version 3.0
INSTRUCTIONS AND INFORMATION REGARDING THE DISPOSAL OF USED PACKAGING MATERIALS
Dispose of packaging material at a public waste disposal site.
DISPOSAL OF USED ELECTRICAL AND ELECTRONIC APPLIANCES
The meaning of the symbol on the product, its accessory or packaging indicates that this product shall not be treated as household waste. Please, dispose of this product at your applicable collection point for the recycling of electrical & electronic equipment waste. Alternatively in some states of the European Union or other European states you may return your products to your local retailer when buying an equivalent new product.
The correct disposal of this product will help save valuable natural resources and help in preventing the potential negative impact on the environment and human health, which could be caused as a result of improper liquidation of waste. Please ask your local authorities or the nearest waste collection centre for further details. The improper disposal of this type of waste may fall subject to national regulations for fines.
For business entities in European Union states
If you wish to dispose of an electrical or electronic device, request the necessary information from your seller or supplier.
Disposal in other countries outside the European Union
If you wish to dispose of this product, request the necessary information about the correct disposal method from local government departments or from your seller.

This product meets all the basic EU regulation requirements that relate to it.
Changes to the text, design and technical specifications may occur without prior notice and we reserve the right to make these changes.
The CE symbol displayed on the unit, the user's manual and on the packaging shows that the unit meets the basic requirements of the R&TTE directive, 1995/5/EC, and the Low voltage directive 73/23/EEC. Declaration of conformity can be found at www.sencor.cz.
SENCOR®
EN Warranty conditions
Warranty card is not a part of the device packaging.
This product is warranted for the period of 24 months from the date of purchase to the end-user. Warranty is limited to the following conditions. Warranty is referred only to the customer goods using for common domestic use. The claim for service can be applied either at dealer's shop where the product was bought, or at below mentioned authorized service shops. The end-user is obligated to set up a claim immediately when the defects appeared but only till the end of warranty period. The end user is obligated to cooperate to certify the claiming defects. Only completed and clean (according to hygienic standards) product will be accepted. In case of eligible warranty claim the warranty period will be prolonged by the period from the date of claim application till the date of taking over the product by end-user, or the date the end-user is obligated to take it over. To obtain the service under this warranty, end-user is obligated to certify his claim with duly completed following documents: receipt, certificate of warranty, certificate of installation.
This warranty is void especially if apply as follows:
■ Defects which were put on sale.
■ Wear-out or damage caused by common use.
The product was damaged by unprofessional or wrong installation, used in contrary to the applicable instruction manual, used in contrary to legal enactment and common process of use or used for another purpose which has been designed for.
■ The product was damaged by uncared-for or insufficient maintenance.
■ The product was damaged by dirt, accident of force majeure (natural disaster, fire, and flood).
■ Defects on functionality caused by low duality of signal, electromagnetic field interference etc.
The product was mechanically damaged (e.g. broken button, fall).
■ Damage caused by use of unsuitable media, fillings, expendable supplies (batteries) or by unsuitable working conditions (e.g. high temperatures, high humidity, quakes).
■ Repair, modification or other failure action to the product by unauthorized person.
■ End-user did not prove enough his right to claim (time and place of purchase).
■ Data on presented documents differs from data on products.
■ Cases when the claiming product cannot be identified according to the presented documents (e.g. the serial number or the warranty seal has been damaged).
Authorized service centers
Visit www.sencor.eu for detailed information about authorized service centers.


- Contents
- Installation instructions
- NOTE
- Installation
- Installation procedure A
- Installation procedure B
- Note:
- Detaching the front panel
- Attaching the front panel
- Installation
- Description of the main unit
- Remote control
- Changing the batteries
- Remote control and batteries
- Basic controls
- 6.1.ON/OFF
- Selecting a mode
- Setting the volume and audio
- Mute the sound (only using the remote control)
- USB cover/USB slot
- SD/MMC card slot
- AUX output
- LCD display
- Remote control sensor
- Detaching the front panel
- Function selection dial
- AF ON and AF OFF
- TA ON and TA OFF
- PTY selection (Music/Speech/PTY Off)
- Frequency coverage - selection (AREA EUR/AREA USA)
- Alarm and seek (TA ALARM/TA SEEK)
- Sound control and mute (PI SOUND/PI MUTE)
- Return L and Return S
- Beep (BEEP ON/BEEP OFF)
- Time display and settings
- Setting the time
- Radio
- Selecting a broadcast band width
- Frequency range
- Automatic saving to memory
- Automatic preset station scanning
- Automatic scanning up/down
- a) Using the main unit
- b) Using the remote control
- Manual tuning upwards/downwards
- Preset stations
- Automatic scanning (only with the remote control)
- Local/Distant reception
- Mono/Stereo
- Using RDS
- Overview of RDS functions
- PI (Program Identification)
- PS (Program Service Name)
- AF (Alternative Frequencies)
- TP (Traffic Program)
- TA (Traffic Announcement)
- PTY (Program Type Codes)
- EON (Enhanced Other Networks Information)
- Activating the RDS mode
- Regional program
- Regional mode - turned on
- Regional mode - turned off
- PTY program – selection
- Traffic announcements TA
- EON TA Local mode
- EON TA Distant mode
- Programmable functions
- AF ON and OFF – only using the main unit
- TA ON and OFF – only using the main unit
- PTY ON and OFF (PTY OFF/Music/Speech) - only using the main unit
- TA seek/TA alarm
- PI mute/PI sound
- Retune L/Retune S
- Tuning frequency range selection
- Important note
- USB/SD/MMC INPUT
- USB slot
- SD/MMC port
- Selecting a mode
- Play/pause
- Fast forward/fast rewind
- Selecting tracks
- Overview of all tracks
- Repeated playback
- Playback in random order
- MP3 ID3 display
- Bluetooth controls
- Selecting a mode
- Pairing
- Connecting/disconnecting the telephone
- Receiving a call
- Dialling
- Automatic redialling (only with the remote control)
- Hanging up/rejecting an incoming call
- Playing music
- Troubleshooting
- The device is not working:
- No sound:
- The device has "frozen":
- The device does not respond when buttons are pressed:
- Weak reception or unavailable radio signal:
- No stereo signal reception:
- Remote control is not working:
- The BLUETOOTH function is not working:
- Technical specifications
- General
- Audio
- FM radio
- INSTRUCTIONS AND INFORMATION REGARDING THE DISPOSAL OF USED PACKAGING MATERIALS
- DISPOSAL OF USED ELECTRICAL AND ELECTRONIC APPLIANCES
- For business entities in European Union states
- Disposal in other countries outside the European Union
- SENCOR®
- EN Warranty conditions
- This warranty is void especially if apply as follows:
- Authorized service centers
Brand : SENCOR
Model : SCT 5016BMR
Category : Car stereo