
535 Series - SSD Drive INTEL - Free user manual and instructions
Find the device manual for free 535 Series INTEL in PDF.


| Product Type | Solid State Drive (SSD) |
| Brand | Intel |
| Model | 535 Series |
| Interface | SATA III (6 Gb/s) |
| Form Factor | 2.5-inch |
| Included Hardware | Mounting adapter for 3.5-inch bay, screws, SATA cables (depending on package) |
| Data Migration Software | Intel Data Migration Software (download from Intel website) |
| Installation Options | Internal SATA drive for desktop or notebook; USB-to-SATA cable for external connection during migration |
| Handling Precautions | Keep in anti-static container, avoid touching gold connectors, use anti-static measures |
| Operating System Support | Windows, Linux (generally supported, check compatibility) |
| SSD Features | TRIM, S.M.A.R.T. support, low power consumption |
| Warranty | Contact Intel for warranty details |
Frequently Asked Questions - 535 Series INTEL
User questions about 535 Series INTEL
0 question about this device. Answer the ones you know or ask your own.
Ask a new question about this device
Download the instructions for your SSD Drive in PDF format for free! Find your manual 535 Series - INTEL and take your electronic device back in hand. On this page are published all the documents necessary for the use of your device. 535 Series by INTEL.
USER MANUAL 535 Series INTEL
Intel® Solid-State Drive
Installation Guide
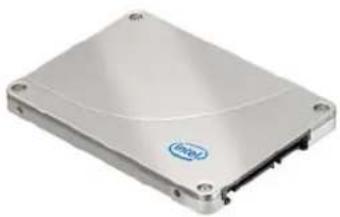
natural_image
Exterior view of a silver Intel 3.2-inch hard drive (no text or symbols visible)This guide explains how to install an Intel® Solid-State Drive (Intel® SSD) in a SATA-based desktop or notebook computer.
The instructions include migrating your data from your current storage device (such as a hard disk drive) to your new Intel SSD using Intel® Data Migration Software.
Overview
Installing an Intel SSD consists of three main steps:
- Connect the Intel SSD to your computer.
- Migrate your data from your current storage device to your new Intel SSD.
- Swap the placement of your current storage device with your new Intel SSD.
Before you Begin
- Download and save the Intel Data Migration Software to your current storage device: http://www.intel.com/go/ssdinstallation
- Confirm you have the necessary hardware for installation:
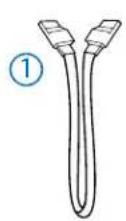
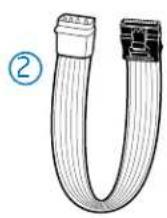
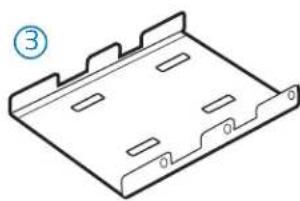
natural_image
Technical line drawing of a metal bracket with mounting holes and slots (no text or symbols)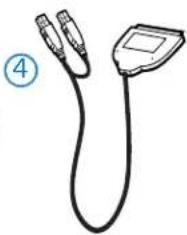
natural_image
Simple line drawing of a medical or laboratory device with two connectors and a screen (no text or symbols)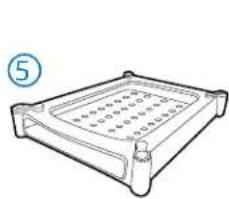
natural_image
Line drawing of a rectangular electronic device with a grid-like top and base (no text or symbols)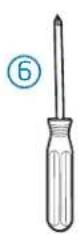
Hardware item Required for
-
SATA-to-SATA interface cable Desktop computers
-
SATA power adapter Desktop computers without a SATA power cable
-
3.5-inch mounting adapter and screws Desktop computers with 3.5-inch drive bay
-
USB-to-SATA cable Notebook computers
-
Drive sleeve
Notebook computers (optional - for use with your old storage device after the SSD is installed)
- Phillips screwdriver
Most computers
Note: Contents vary based on package purchased.
SSD Handling Precautions
Observe the following before beginning the installation:
- Keep the SSD in the protective anti-static container until you are ready to install.
- Handle the SSD with care. Do not touch the gold connectors.
• To minimize static electricity, touch the computer case before handling the SSD. - Do not remove the encasement or disassemble the SSD; these actions void the SSD warranty.
1. Connect the Intel SSD to your Computer
This step explains how to connect the Intel SSD to your computer in preparation for migrating your data. Note that your current storage device remains installed until the final step of the installation, "Swap Your Drives" on page 8.
Follow the steps for your platform:
— "Desktop Computers" (next section)
— "Notebook Computers" on page 4
Desktop Computers
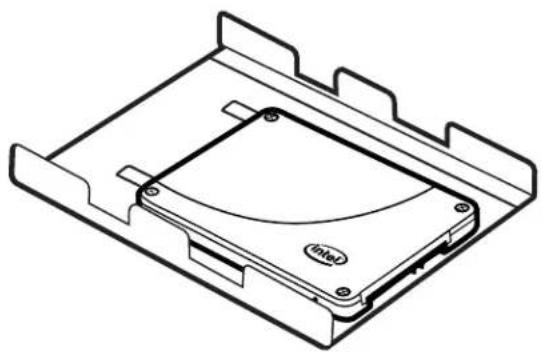
- If your desktop computer has a 3.5-inch drive bay, attach the Intel SSD to the mounting adapter. (This helps the SSD fit securely in a drive bay.) If your desktop computer has a 2.5-inch drive bay, you do not need to attach the mounting adapter. Go to step 2 in this section.
a. With the SSD right side up (Intel logo showing), place the Intel SSD on the mounting adapter. Make sure the edge of the Intel SSD (with connectors) aligns with the edge of the mounting adapter. See Figure 1.
b. Turn the SSD and mounting adapter over and insert one screw in each mounting hole on the bottom of the mounting adapter. See Figure 1.
Figure 1. Place and attach Intel SSD on mounting adapter
natural_image
Technical line drawing of an Intel CPU socket housing (no text or symbols)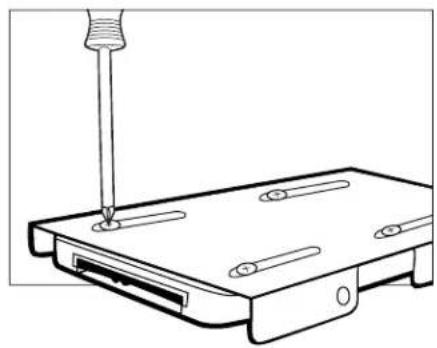
natural_image
Line drawing of a screwdriver inserted into a hard drive on a computer RAM module (no text or symbols)- Power off the computer. Keep the power cable connected.
- Remove the computer case.
Refer to your computer documentation to determine how to safely remove the computer case.
- Connect one end of the SATA-to-SATA interface cable to a SATA interface connector or SATA host adapter on your computer motherboard and connect the other end to the Intel SSD. See Figure 2.
Note: The SATA cable connectors are keyed to ensure correct orientation and contain a locking bracket for securing in place. Insert cables gently. Do not use excessive force.
- Locate an available SATA power cable (connected to the internal computer power supply) and connect it to the Intel SSD. See Figure 2.
Note: Most computers have an available SATA power cable. If your computer does not have a SATA power cable and instead uses a 4-pin power connector, use a SATA power adapter. (The SATA power adapter comes with certain packages or can be purchased separately.)
Figure 2. Connect SATA interface and power cables
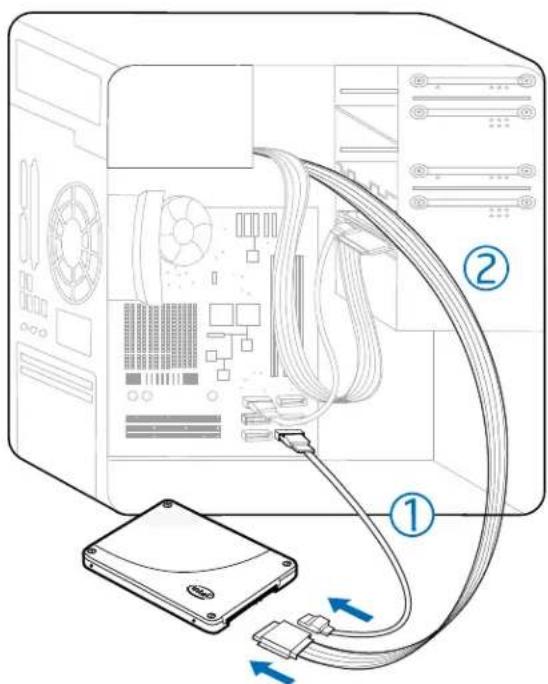
- SATA-to-SATA interface cable: Connect to SATA interface connector on computer motherboard and to Intel SSD.
-
SATA power cable (or SATA power adapter): Connect from power supply to Intel SSD.
-
Slide the connected Intel SSD with mounting adapter into an available 3.5-inch drive bay, or secure the Intel SSD to the computer by inserting one screw in each of the side-mounting or bottom-mounting holes.
- Power on the computer and wait for the operating system to recognize the Intel SSD.
A message appears when the SSD is recognized.
The Intel SSD is now connected. Proceed to "Migrate Your Data" on page 5.
Notebook Computers
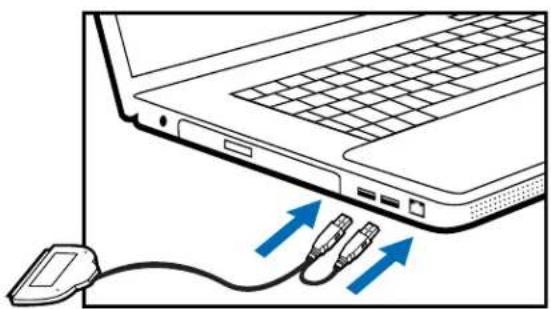
- Connect the dual end of a USB-to-SATA cable to two available USB ports on the computer. See Figure 3. You do not have to power off the computer.
Note: If your computer contains a USB 3.0 port (indicated with a blue connector), connect the blue end of the USB-to-SATA cable to the USB 3.0 port. If your computer does not contain a USB 3.0 port, you can connect the cable to any USB port.
Figure 3. Connect USB-to-SATA cable to notebook
natural_image
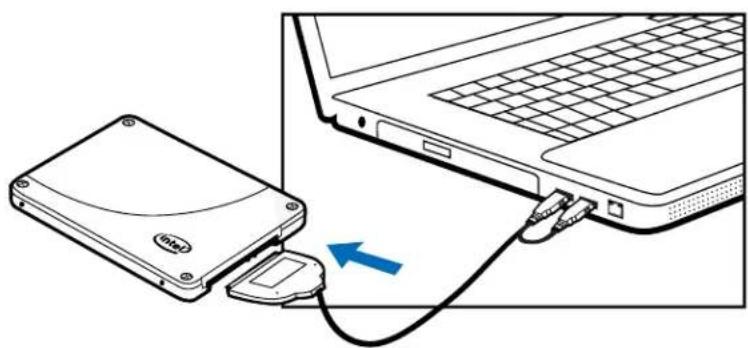
Line drawing of a laptop with two USB cable and a separate USB connector, showing connection arrows (no text or symbols)- Connect the single end of the USB-to-SATA cable to the Intel SSD. See Figure 4.
Figure 4. Connect USB-to-SATA cable to Intel SSD
natural_image
Diagram showing a laptop connected to a physical hard drive with a blue arrow indicating cable or connection (no text or symbols present)- Power on the computer, if necessary, and wait for the operating system to recognize the Intel SSD.
A message appears when the operating system recognizes the Intel SSD.
Note: SATA devices may draw more power than some systems are capable of delivering through USB ports. If the Intel SSD is not recognized, remove other USB devices (external keyboards, printers, mice, scanners, etc). Keep these devices removed until you have finished migrating your data from the old storage device to the Intel SSD. In some cases, it may be necessary to purchase an externally powered USB-SATA device or have your system data migrated by a professional.
The Intel SSD is now connected. Proceed to "Migrate Your Data" on page 5.
2. Migrate Your Data
This section explains how to migrate (transfer) your data from your current storage device to your new Intel SSD using Intel Data Migration Software.
Note: The migration process is identical for desktop and notebook computers.
- Make sure you have downloaded and saved the Intel Data Migration Software to your current storage device:
http://www.intel.com/go/ssdinstallation
Note: If the amount of data on your current storage device is greater than the capacity of the Intel SSD, the data migration will not complete. Remove unnecessary files or data from your current storage device to reduce its image size.
- After downloading, double-click the Intel Data Migration Software icon to start the installation.
- When the Intel Data Migration Software installation screen appears, choose Install Intel® Data Migration Software.
Figure 5. Intel Data Migration Software Installation screen
The Intel Data Migration Software wizard starts and guides you through the installation process.
- Click Next to begin the installation.
- Follow the prompts on the screen to complete the installation.
Note: When prompted for Setup Type, Typical is recommended.
- Click Close when the installation completes.
- Exit the Intel Data Migration Software screen, and proceed to the next section, "Start the Software and Migrate your Data" on page 6.
Start the Software and Migrate your Data
- Double-click the Intel Data Migration Software shortcut icon on your desktop.
- Complete the registration form when prompted, and then click Register Now. After registering the software, the Intel Data Migration Software screen appears.
Figure 6. Intel Data Migration Software screen
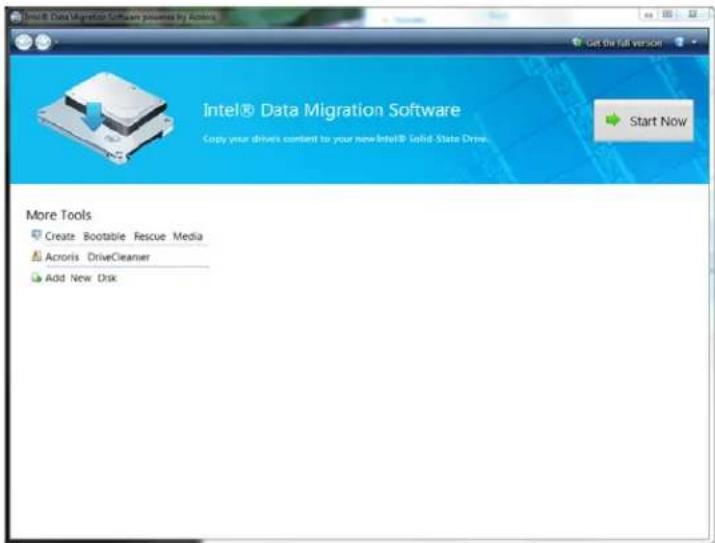
3. Click Start Now.
Intel Data Migration Software automatically detects both drives, and the Clone Now screen appears.
Figure 7. Clone Now screen
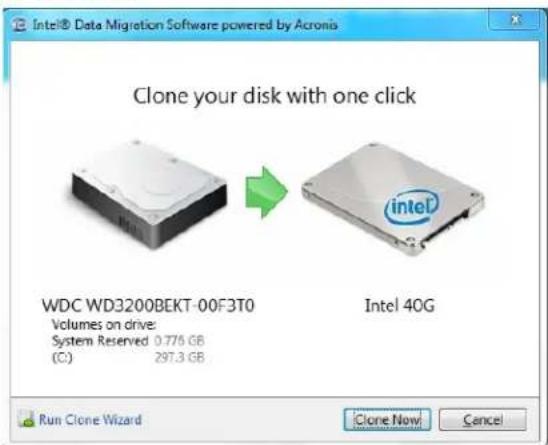
©
3. Swap Your Drives
After you have migrated your data onto the Intel SSD and shut down your computer, swap the placement of your current storage device with the new Intel SSD.
• For desktop computers:
— You can either physically remove the current storage device and replace it with the Intel SSD (see "Desktop Computers — Physically Swapping the Drives"), or
— Keep the storage device in your computer and change the boot order of the drives in the system BIOS to ensure that the computer boots from the Intel SSD (see "Desktop Computers — Changing the Boot Order of the Drives" on page 9).
- For notebook computers, remove the current storage device and replace it with the Intel SSD (see "Notebook Computers — Swapping the Drives" on page 9).
Desktop Computers — Physically Swapping the Drives
-
Make sure the computer is powered off.
-
Swap the SATA cable placement of the Intel SSD and your current storage device.
Figure 10. Swap drives
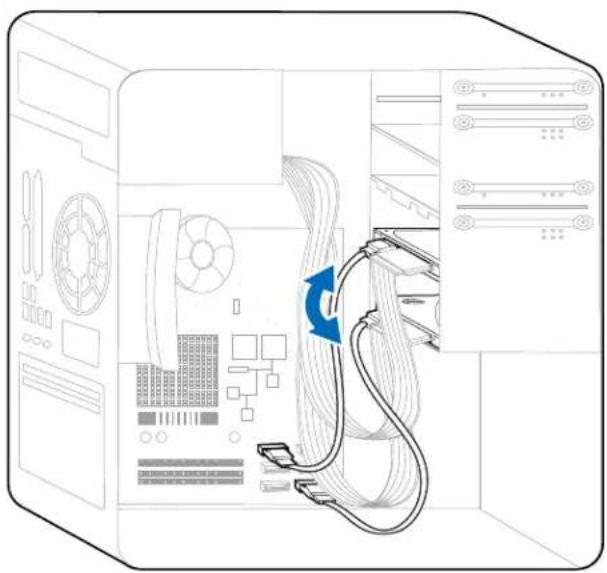
natural_image
Interior view of a server rack with cable routing and fan components (no text or symbols visible)- If desired, remove the current storage device.
Note: You may choose to keep your current storage device installed as a secondary or backup drive. However, make sure to configure the system BIOS and change the boot order so that the Intel SSD appears before your current storage device. See "Desktop Computers — Changing the Boot Order of the Drives" on page 9.
- After swapping the drives, power on the computer.
As your computer boots to the Intel SSD for the first time, a notification that the data migration process completed successfully appears when the operating system starts.
Enjoy your new high-performing Intel Solid-State Drive!
Desktop Computers — Changing the Boot Order of the Drives
- Close the computer case and start the computer.
- While the computer is booting, enter the BIOS setup menu.
Press a special key such as ESC, F1, or DELETE to enter the BIOS menu. Check your computer manufacturer's documentation for the correct key(s).
- Go to the Boot or Startup screen and change the boot order so that the Intel SSD appears before your old storage device.
- Save the settings and exit the BIOS setup menu.
- Restart the computer.
As your computer boots to the Intel SSD for the first time, a notification that the data migration process completed successfully appears when the operating system starts. Enjoy your new high-performing Intel Solid-State Drive!
Notebook Computers — Swapping the Drives
- Make sure the computer is powered off.
- Remove the current storage device from the computer's drive bay.
Refer to your computer documentation for instructions on safely accessing the drive bay.
- Remove any brackets or adaptors attached to the current storage device.
Not all storage devices have attached brackets or adaptors. If your devices does, remove these and connect them in a similar manner to the Intel SSD.
- Align the connector pins on the SSD with the SATA connector in the drive bay and slide the SSD into the drive opening.
Figure 11. Install Intel SSD in notebook
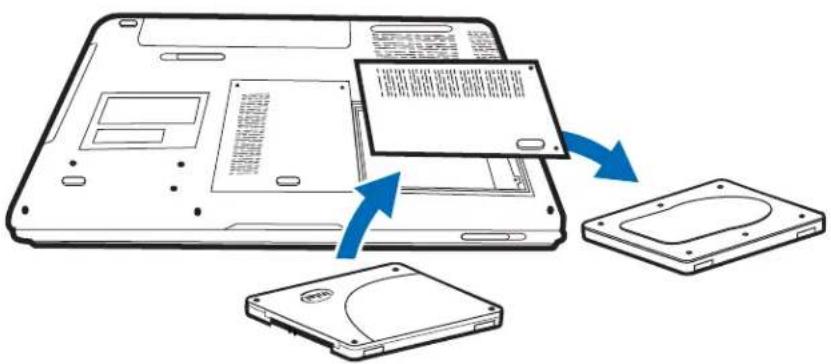
- Replace the cover and power on the computer.
Note: You may choose to keep your old storage device as a secondary or backup drive by connecting it to the computer using the USB-to-SATA cable. Protect the old storage device with the drive sleeve included with certain packages. Install the drive sleeve with caution. Intel is not responsible for data loss or damage to system components.
As your computer boots to the Intel SSD for the first time, a notification that the data migration process completed successfully appears when the operating system starts.
Enjoy your new high-performing Intel Solid-State Drive!
Additional Support
For more help with Intel SSDs, go to: http://www.intel.com/support
For more information about Intel SSDs, go to: http://www.intel.com/go/ssd
For instructional videos and to learn more about Intel SSDs, go to:
http://www.intel.com/go/ssdfacebook
Management Methods on Control of Pollution From Electronic Information Products
(China RoHS declaration)
产品中有毒有害物质的名称及含量
Hazardous Substances Table
| 部件名称(Parts) | 有毒有害物质或元素(Hazardous Substance) | |||||
| 铅(Pb) | 汞(Hg) | 镉(Cd) | 六价铬(Cr6+) | 多溴联苯(PBB) | 多溴二苯醚(PBDE) | |
| 卡Card | X | ○ | ○ | ○ | ○ | ○ |
| ○:表示该有毒有害物质在该部件所有均质材料中的含量均在SJ/T 11363-2006标准规定的限量要求以下。○:Indicates that this hazardous substance contained in all homogeneous materials of this part is below the limit requirement in SJ/T 11363-2006.×:表示该有毒有害物质至少在该部件的某一均质材料中的含量超出SJ/T 11363-2006标准规定的限量要求。×:Indicates that this hazardous substance contained in at least one of the homogeneous materials of this part is above the limit requirement in SJ/T 11363-2006.对销售之日的所售产品,本表显示我公司供应链的电子信息产品可能包含这些物质。注意:在所售产品中可能会也可能不会含有有所所列的部件。This table shows where these substances may be found in the supply chain of our electronic information products, as of the date of sale of the enclosed product. Note that some of the component types listed above may or may not be a part of the enclosed product. | ||||||
除非另外特别的标注,此标志为针对所涉及产品的环保使用期限标志.某些可更换的零部件可能会有一个不同的环保使用期限(例如,电池单元模块).此环保使用期限只适用于产品在产品手册中所规定的条件下工作. The Environment-Friendly Use Period (EFUP) for all enclosed products and their parts are per the symbol shown here, unless otherwise marked. Certain field-replaceable parts may have a different EFUP (for example, battery modules) number. The Environment-Friendly Use Period is valid only when the product is operated under the conditions defined in the product manual. The Environment-Friendly Use Period (EFUP) for all enclosed products and their parts are per the symbol shown here, unless otherwise marked. Certain field-replaceable parts may have a different EFUP (for example, battery modules) number. The Environment-Friendly Use Period is valid only when the product is operated under the conditions defined in the product manual. | ||||||
INFORMATION IN THIS DOCUMENT IS PROVIDED IN CONNECTION WITH INTEL PRODUCTS. NO LICENSE, EXPRESS OR IMPLIED, BY ESTOPPEL OR OTHERWISE, TO ANY INTELLECTUAL PROPERTY RIGHTS IS GRANTED BY THIS DOCUMENT. EXCEPT AS PROVIDED IN INTEL'S TERMS AND CONDITIONS OF SALE FOR SUCH PRODUCTS, INTEL ASSUMES NO LIABILITY WHATSOEVER, AND INTEL DISCLAIMS ANY EXPRESS OR IMPLIED WARRANTY, RELATING TO SALE AND/OR USE OF INTEL PRODUCTS INCLUDING LIABILITY OR WARRANTIES RELATING TO FITNESS FOR A PARTICULAR PURPOSE, MERCHANTABILITY, OR INFRINGEMENT OF ANY PATENT, COPYRIGHT OR OTHER INTELLECTUAL PROPERTY RIGHT.
UNLESS OTHERWISE AGREED IN WRITING BY INTEL, THE INTEL PRODUCTS ARE NOT DESIGNED NOR INTENDED FOR ANY APPLICATION IN WHICH THE FAILURE OF THE INTEL PRODUCT COULD CREATE A SITUATION WHERE PERSONAL INJURY OR DEATH MAY OCCUR.
Intel may make changes to specifications and product descriptions at any time, without notice. Designers must not rely on the absence or characteristics of any features or instructions marked "reserved" or "undefined." Intel reserves these for future definition and shall have no responsibility whatsoever for conflicts or incompatibilities arising from future changes to them. The information here is subject to change without notice. Do not finalize a design with this information.
The products described in this document may contain design defects or errors known as errata which may cause the product to deviate from published specifications. Current characterized errata are available on request.
Contact your local Intel sales office or your distributor to obtain the latest specifications and before placing your product order.
Copies of documents which have an order number and are referenced in this document, or other Intel literature, may be obtained by calling 1-800-548-4725, or go to: http://www.intel.com/design/literature.htm
Intel and the Intel logo are trademarks or registered trademarks of Intel Corporation or its subsidiaries in the United States and other countries.
* Other names and brands may be claimed as the property of others.
Copyright © 2011, Intel Corporation. All Rights Reserved.
G17251-001

- Intel® Solid-State Drive
- Installation Guide
- Overview
- Before you Begin
- Hardware item Required for
- SSD Handling Precautions
- Connect the Intel SSD to your Computer
- Desktop Computers
- Notebook Computers
- Migrate Your Data
- Start the Software and Migrate your Data
- Click Start Now.
- Swap Your Drives
- Desktop Computers — Physically Swapping the Drives
- Desktop Computers — Changing the Boot Order of the Drives
- Notebook Computers — Swapping the Drives
- Additional Support
Brand : INTEL
Model : 535 Series
Category : SSD Drive