
1980WU - Video projector EPSON - Free user manual and instructions
Find the device manual for free 1980WU EPSON in PDF.


| Product Type | Video Projector |
| Brand | Epson |
| Model | 1980WU |
| Supported Resolutions | SVGA (800x600) to WUXGA (1920x1200) |
| Network Connectivity | Wireless LAN (802.11b/g) and Wired LAN |
| Connection Modes | Quick Connection Mode and Advanced Connection Mode |
| Maximum Connected Devices | Up to 50 devices (computers and mobile devices) |
| Simultaneous Projection | Up to 4 screens (split display) |
| Mirroring | Up to 4 projectors simultaneously |
| Operating Systems Supported | Windows Vista/7/8/8.1/10, OS X 10.7.x-10.11.x |
| Software Edition | Standard Edition (full features) and Participant Edition |
| Moderator Function | Yes (Standard Edition) |
| Screen Distribution | Yes, distribute projected screen to participants |
| Thumbnail Display | Yes, for moderator to select participant screens |
| Audio Output via Projector | Yes (full screen, single projector) |
| USB Key Support | Yes (Windows only) for easy connection |
| Security | Passphrase, Projector Keyword, Moderator Password |
| Bandwidth Control | Adjustable from 256 Kbps to 4 Mbps or No Control |
| Maintenance | Clean lens and air filter regularly (recommended) |
| Input Source | LAN (via remote control or source search button) |
Frequently Asked Questions - 1980WU EPSON
User questions about 1980WU EPSON
0 question about this device. Answer the ones you know or ask your own.
Ask a new question about this device
Download the instructions for your Video projector in PDF format for free! Find your manual 1980WU - EPSON and take your electronic device back in hand. On this page are published all the documents necessary for the use of your device. 1980WU by EPSON.
USER MANUAL 1980WU EPSON
EasyMPMultiPCProjection OperationGuidev2.10
Contents
Introduction to EasyMP Multi PC Projection.... 7
EasyMP Multi PC Projection Features 7
Connection to Various Devices....7
Four-Panel Display 8
Change Presenters and Projection Position 9
Moderator Function 10
Screen Delivery and Thumbnail Display Function 11
EasyNetworkProjectionUsingaUSBFlashDrive(WindowsOnly)....12
Setting Up the Software for the First Time 14
Installing the Software 14
EasyMPMultiPCProjectionSystemRequirements....14
EasyMP Multi PC Projection Editions 16
Installing EasyMP Multi PC Projection (Windows).... 16
Installing EasyMP Multi PC Projection (OS X).... 17
Selecting Projector Network Settings 17
ConnectionMethodsforVariousNetworkEnvironments....18
RecommendedWirelessEnvironmentforMultiPCProjection....20
SettingUpaProjectortoConnectinQuickConnectionMode....20
SettingUpaProjectortoConnectinAdvancedConnectionMode(Wireless)....21
SettingUpaProjectortoConnectinAdvancedConnectionMode(Wired)....23
Connecting to the Projector and Projecting Images 25
Connection Methods 25
Connection Methods for Various Meeting Styles 25
ConnectingtheProjectorandaComputerDirectlyUsingWirelessCommunication....27
ConnectingtotheProjectorfromtheSoftwareoveraNetworkSystem....33
Selecting the Projector Search Method 37
Search Methods 38
Searching for Network Projectors Automatically 38
SearchingforNetworkProjectorsbySpecifyinganIPAddressorProjectorName....39
Searching for Network Projectors Using a Profile.... 41
Profiles for Search 41
Performing a Profile Search.... 41
Registering a Profile 43
Exporting a Profile 45
Importing a Profile 45
Sharing a Profile over a Network 46
Controlling the Projected Display 47
Screen Types for Projection Control.... 47
Operating the Projected Display Status 49
Changing the Number of Projected Panels.... 49
Changing the Presenter.... 51
Changing the Projection Position.... 52
Disconnecting.... 53
Using Additional Functions.... 56
Searching for Network Projectors Using a Shortcut 56
Creating a Shortcut.... 56
ConnectingtoNetworkProjectorUsingaUSBFlashDrive(WindowsOnly)....57
CreatingaUSBkeyonaUSBFlashDrive(WindowsOnly)....57
UsingaUSBKeytoConnectaWindowsComputer....58
Connecting to Multiple Projectors (Mirroring) 60
Outputting Audio from the Projector 61
Projecting Your Screen 62
Changing the Moderator.... 63
Distributing the Projected Screen 65
Selecting the Participant's Screen to Project Using Thumbnails 66
Hiding the Projection Control Screen 67
Prohibiting Participant Operations.... 68
Controlling the Connection Bandwidth 69
Bandwidth Control Restrictions 71
Solving Problems 72
Solving Network Connection Problems 72
SolutionsWhenYouCannotConnectUsingQuickConnectionMode....72
SolutionsWhenYouCannotConnectProjectorsUsingAdvancedConnectionMode(Wireless).73
SolutionsWhenYouCannotConnectProjectorsUsingAdvancedConnectionMode(Wired).....76
Solving Problems During Projection 77
Solutions When the Screen is Not Projected Properly 78
Solutions When Audio is Not Played Properly 78
SolutionsWhentheModeratorFunctionDoesNotWork....79
Solutions When the Projected Screen is Not Delivered 79
Error Messages List 80
ErrorMessageWhenStartingupEasyMPMultiPCProjection....80
Error Messages When Using a USB Key 83
ErrorMessageWhenSearchingforandSelectingProjectors....84
Error Messages When Projecting 85
Error Messages When Operating a Profile 85
ErrorMessageWhenUsingtheModeratorFunction....86
ErrorMessageWhenDistributingtheProjectedScreen....87
Event ID List 87
Screen Summary 90
Select Connection Mode Screen 91
Search Screen 92
Save Screen 95
Set options 96
Set options - User Settings 97
Set options - General settings 98
Set options - Adjust performance 101
Set options - Audio Output.... 103
Set options - Deliver 104
Toolbar 105
Projection Control Screen 108
Thumbnail Screen 112
Viewer Screen.... 114
Appendix 116
Updating and Uninstalling the Software 116
Getting the Latest Version of the Application 116
UninstallingEasyMPMultiPCProjection(WindowsVista/Windows7/Windows10)....116
UninstallingEasyMPMultiPCProjection(Windows8.x)....117
Uninstalling EasyMP Multi PC Projection (OS X).... 117
Supported Resolutions and Colors 117
Supported Resolutions 118
Display Color 118
Limitations 119
Connection Limitations 119
LimitationswhenProjectingfromWindowsPhotoGalleryorWindowsLivePhotoGallery......120
Limitations in Windows Aero.... 120
LimitationswhenProjectingfromWindowsMediaCenter....121
Notices 121
Copyright Notice 121
About Notations....122
General Notice.... 122
Copyright Attribution 123
IntroductiontoEasyMPMultiPCProjection
SeetheinformationheretolearnmoreaboutEasyMPMultiPCProjectionsoftware.
EasyMPMultiPCProjectionFeatures
EasyMPMultiPCProjectionFeatures
EasyMPMultiPCProjectionissoftwarethatallowsyoutoholdinteractivemeetingsorlessonsby projectingimagesfromnetworkprojectors.Youcanusevarietyofdisplayoptionsforyour environment.
ConnectiontoVariousDevices
Four-PanelDisplay
ChangePresentersandProjectionPosition
ModeratorFunction
ScreenDeliveryandThumbnailDisplayFunction
EasyNetworkProjectionUsingaUSBFlashDrive(WindowsOnly)
Parenttopic: Introduction to Easy MPMultiPCProjection
ConnectiontoVariousDevices
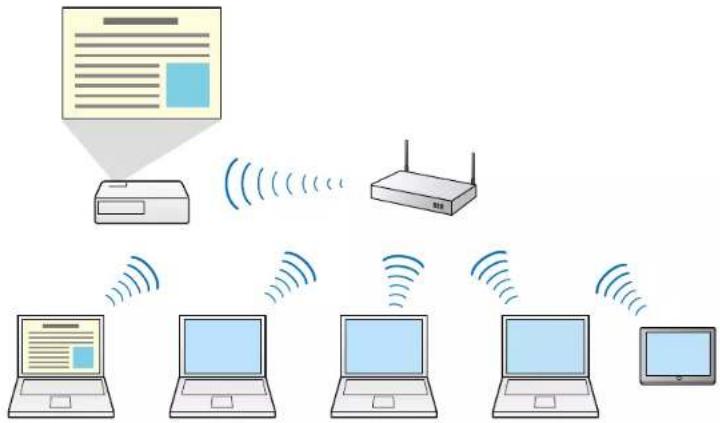
When you install EasyMPMultiPCProjection on an networked computer and use it to connect the projector, upto 50 other devices on thenetwork can project images from the projector. (Uptofour devices can project a tonetime.) The 50 devices can be a combination of computers running EasyMP MultiPCProjection and wireless devices, such as smartphones and tablets, running Epsoni Projection.
Youcanalsoholdremotemeetingsoveranetworkbysimultaneouslyprojectingthesameimageonuptofourprojectorsonthenetwork.
flowchart
graph TD
    A["Printer"] -->|Wireless Signal| B["Router"]
    B -->|Wireless Signal| C["Laptop"]
    C -->|Wireless Signal| D["Laptop"]
    D -->|Wireless Signal| E["Laptop"]
    E -->|Wireless Signal| F["Laptop"]
    F -->|Wireless Signal| G["Laptop"]
Parenttopic: EasyMPMultiPCProjectionFeatures
Relatedtasks
ConnectingtoMultipleProjectors(Mirroring)
Relatedtopics
ConnectionMethods
Four-PanelDisplay
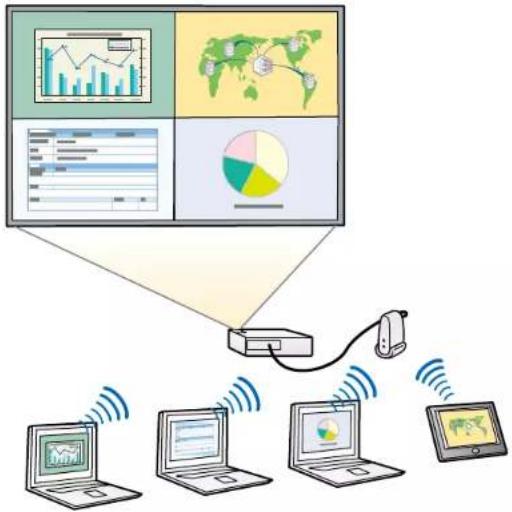
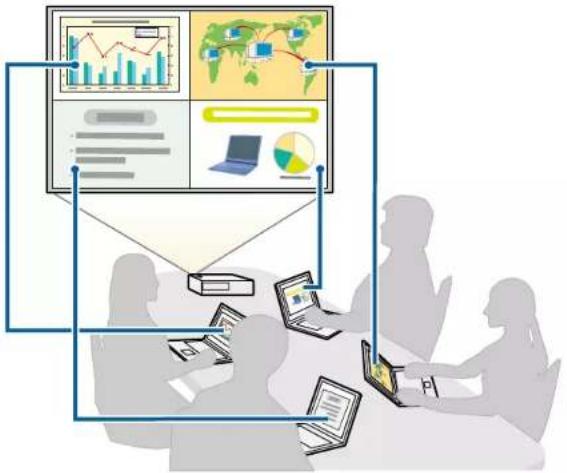
Youcansimultaneouslydisplayuptofourscreensinseparateprojectedpanels,whichisusefulinboth businessandeducationalenvironments.
Forexample,youcancompareandanalyzedatawhilesimultaneouslyprojectingscreensfrommultiple devices.Inaneducationalenvironment,youcanprojectlessonmaterialononepartofthescreenand studentanswersonanothertoenhancethelearningexperience.
flowchart
graph TD
    A["Central Device"] --> B["Laptop 1"]
    A --> C["Laptop 2"]
    A --> D["Laptop 3"]
    A --> E["Laptop 4"]
    B --> F["Wireless Signal"]
    C --> G["Wireless Signal"]
    D --> H["Wireless Signal"]
    E --> I["Wireless Signal"]
    style A fill:#f9f,stroke:#333
    style B fill:#ccf,stroke:#333
    style C fill:#ccf,stroke:#333
    style D fill:#ccf,stroke:#333
    style E fill:#ccf,stroke:#333
Parenttopic: EasyMPMultiPCProjectionFeatures
Relatedtasks
ChangingtheNumberofProjectedPanels
ChangePresentersandProjectionPosition
UsingEasyMPMultiPCProjection,youcaneasilychangethescreenbeingprojectedandtheprojection positionbysimplydragginganddroppingusernamesinpanelsontheprojectioncontrolscreen.
Youcansharetheprojectorwithotherusersonthesamenetworkwithouthavingtochangecable connections,allowinguserstotaketurnsgivingpresentations.
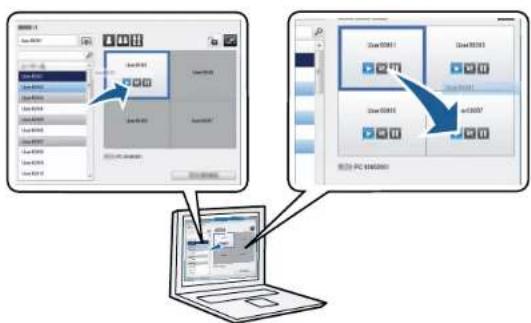
Note: The projection control screen is available only on the Standard Edition of the software.
Parenttopic: EasyMPMultiPCProjectionFeatures
Relatedtasks
ChangingthePresenter
ChangingtheProjectionPosition
ModeratorFunction
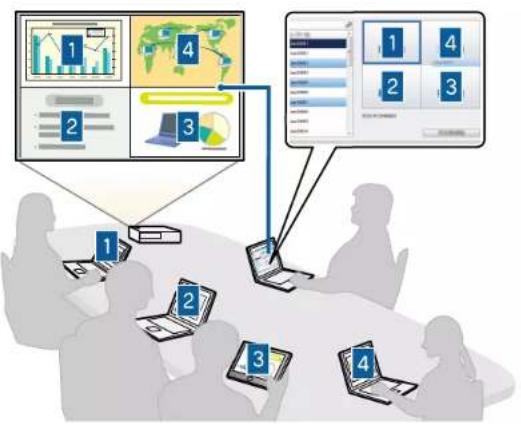
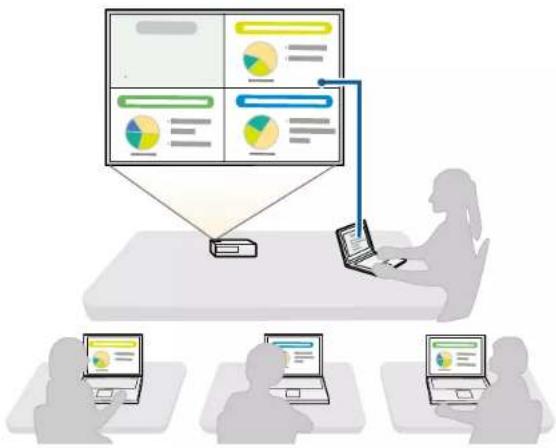
When using themoderator function, only one person plays a role of moderator who can control the projected display. This function is suitable for meeting in which one user is the moderator and the other users are participants, and the moderator must control the projected display.
Thiscanalsobeusefulinaclassroomenvironmentwherethemoderatormustcontrolthelessonwithout interruption.
flowchart
graph TD
    A["1: Data visualization"] --> B["2: Desktop computing"]
    C["4: Graph analysis"] --> D["3: System monitoring"]
    E["1: System monitoring"] --> F["2: System monitoring"]
    G["4: System monitoring"] --> H["3: System monitoring"]
Note: This function is available only for supported models.
Parenttopic: EasyMPMultiPCProjectionFeatures
Relatedtasks
ChangingtheModerator
Relatedtopics
ConnectionMethods
ScreenDeliveryandThumbnailDisplayFunction
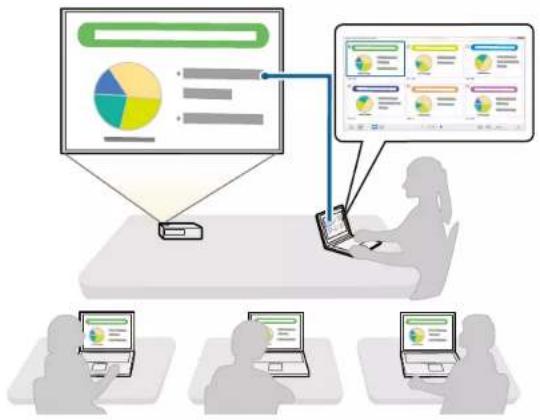
Youcandistributethecurrentlyprojectedscreenimagestotheparticipant'sdevices. Theparticipants canthenaddnotestotherceivedimagesusingdrawingsoftware,whichthemoderatorcancheckas
thumbnails. This feature is suitable for environments where the moderator wants to provide questions for the participant to answer, and then select which answers or side a project in response.
Note: This function is available only for supported models.
Parenttopic: EasyMPMultiPCProjectionFeatures
Relatedtasks
DistributingtheProjectedScreen
SelectingtheParticipant'sScreentoProjectUsingThumbnails
EasyNetworkProjectionUsingaUSBFlashDrive(WindowsOnly)
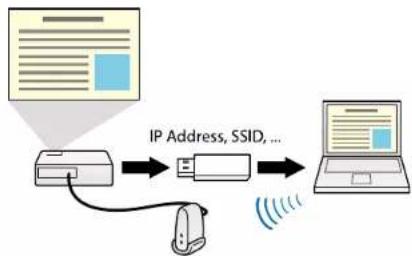
YoucanuseacommerciallyavailableUSBflashdriveasaUSBkeytotransfertheprojector'snetwork informationtoaWindowscomputer.CreatingtheUSBkeyallowsyoutoquicklyprojectimagesfromthe networkprojector.
When you can get the presenter, you can switch the projected screen by inserting the USB key to an new presenter's computer.
flowchart
graph LR
    A["IP Address, SSID"] --> B["User"]
    B --> C["Laptop"]
    C --> D["Wireless Signal"]
Note:
- Thisfunctionisavailableonlyforsupportedmodels.SeeyourprojectorUser'sGuideformoredetails.
- YoucannotusetheUSBkeyasaprojector'swirelessLANmodule.
Parenttopic: EasyMPMultiPCProjectionFeatures
Relatedtopics
ConnectingtoNetworkProjectorUsingaUSBFlashDrive(WindowsOnly)
SettingUptheSoftwarefortheFirstTime
Followtheseinstructionsbeforeconnectingacomputertotheprojectoroveranetwork.
InstallingtheSoftware
SelectingProjectorNetworkSettings
InstallingtheSoftware
InstallEasyMPMultiPCProjectionfromtheEPSONProjectorSoftwareCD-ROMsuppliedwithyourprojector(ifavailable)orbydownloadingitfromtheEpsonWebsite.
Note:
- If the languages selected for the installation differs from the language of the operating system being used, the screens may not display correctly.
- IfapreviousversionofEasyMPMultiPCProjectionisalreadyinstalledonyourcomputer, uninstallit firstandtheninstallEasyMPMultiPCProjection.
EasyMPMultiPCProjectionSystemRequirements
EasyMPMultiPCProjectionEditions
InstallingEasyMPMultiPCProjection(Windows)
InstallingEasyMPMultiPCProjection(OSX)
Parenttopic: SettingUptheSoftwarefortheFirstTime
Relatedtasks
GettingtheLatestVersionoftheApplication
EasyMPMultiPCProjectionSystemRequirements
YourcomputermustmeetthefollowingsystemrequirementstousetheEasyMPMultiPCProjection software.
| RequirementWindows | Mac | |
| OperatingsystemWindows | WsVistaUltimate(32-bit)Enterprise(32-bit)Business(32-bit)HomePremium(32-bit)HomeBasic(32-bit) | OS X10.7.x(32-and64-bit)10.8.x(64-bit)10.9.x(64-bit)10.10.x(64-bit)10.11.x(64-bit) |
| Windows7Ultimate(32-and64-bit)Enterprise(32-and64-bit)Professional(32-and64-bit)HomePremium(32-and64-bit)HomeBasic(32-bit)Starter(32-bit) | ||
| Windows8Windows8(32-and64-bit)Windows8Pro(32-and64-bit)Windows8Enterprise(32-and64-bit) | ||
| Windows8.1Windows8.1(32-and64-bit)Windows8.1Pro(32-and64-bit)Windows8.1Enterprise(32-and64-bit) | ||
| Windows10Windows10Home(32-and64-bit)Windows10Pro(32-and64-bit)Windows10Enterprise(32-and64-bit) |
| RequirementWindows$Mac | |
| CPUIntelCore2Duorfarster(IntelCorei5orfasterrecommended) | |
| Memory2GBormore(4GBormorerecommended) | |
| Harddiskspace50MBormore | |
| DisplayResolutionbetween800×600(SVGA)and1920×1200(WUXGA)16-bitcolororgreater(approximately32,000displaycolors) | |
Note:
- OperationisnotguaranteedforWindowsVistawithoutanyservicepacksinstalled,orWindowsVistaServicePack1.
•OperationisnotguaranteedforWindows7withoutanyservicepacksinstalled.
Parenttopic:InstallingtheSoftware
EasyMPMultiPCProjectionEditions
Youcanchoosethesoftwareeditiontoinstallthatsuitsyourroleintheprojectionenvironment.
- StandardEdition
YoucanuseallfunctionsofEasyMPMultiPCProjection.
Youcancontrol the projected image and also function as a moderator.
-ParticipantEdition
You can connect to the projector only as a participant of the moderator function and cannot control the projected images.
Parenttopic: InstallingtheSoftware
InstallingEasyMPMultiPCProjection(Windows)
InstallEasyMPMultiPCProjectiononyourcomputer.
Note: Youneedadministratorauthoritytoinstallthesoftware.
- Turnonyourcomputer.
-
Makesureallrunningapplicationsareclosed.
3.Dooneofthefollowing: -
InserttheEPSONProjectorSoftwareCD-ROMintothecomputer(ifavailable)andcontinuewith thesesteps.
- If you downloaded the software from the Epson Website, follow the screen instruction to install the software.
Theinstallerstartsautomatically.
- If the installer does not start automatically, open the CD-ROM drive from My Computer (or Computer), and then double-click EMP_MPPInst.exe.
- Followtheon-screen instruction to install.
Parenttopic: InstallingtheSoftware
InstallingEasyMPMultiPCProjection(OSX)
InstallEasyMPMultiPCProjectiononyourcomputer.
- Turnonyourcomputer.
-
Makesureallrunningapplicationsareclosed.
3.Dooneofthefollowing: -
InserttheEPSONProjectorSoftwareCD-ROMintothecomputer(ifavailable)andcontinuewith thesesteps.
-
If you downloaded the software from the Epson Website, follow the screen instruction to install the software.
-
Double-click the EMP_MPP installer.mpkgicon in the EPSON window.
Installationstarts.
5.Followtheon-screeninstructionstoinstall.
Parenttopic: InstallingtheSoftware
SelectingProjectorNetworkSettings
Followtheseinstructionstoselectaconnectionmethodbetweenacomputerandtheprojector,andthen setuptheprojector.
ConnectionMethodsforVariousNetworkEnvironments
RecommendedWirelessEnvironmentforMultiPCProjection
SettingUpaProjectortoConnectinQuickConnectionMode
SettingUpaProjectortoConnectinAdvancedConnectionMode(Wireless)
SettingUpaProjectortoConnectinAdvancedConnectionMode(Wired)
Parenttopic: SettingUptheSoftwarefortheFirstTime
ConnectionMethodsforVariousNetworkEnvironments
You can choose a connection modetousity our network environment.
Checkhowtheprojectorisconnectedtothenetworksystem(wirelessorwired)andthecommunication pathfromthecomputertotheprojector.
Depending on your projector, some connection methods may not be available. See your projector User's Guideformoredetails.
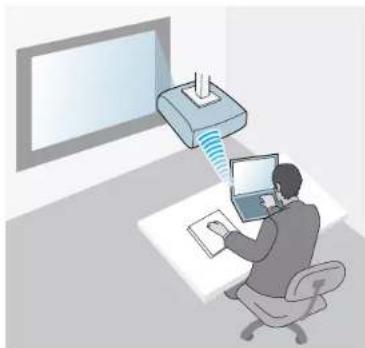
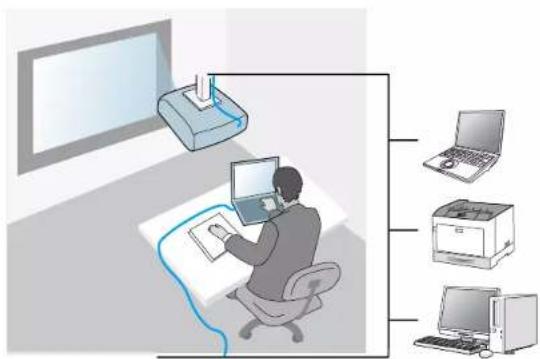
•Toconnecttheprojectortothecomputerdirectlyusingwirelesscommunication:UseQuick ConnectionMode.
natural_image
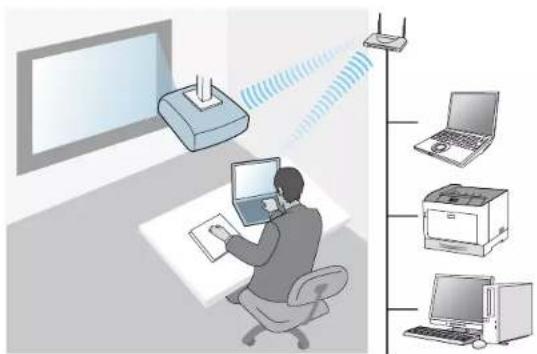
Illustration of a person using a laptop at a desk with a monitor and antenna (no text or symbols visible)•Toconnecttheprojectortothecomputerusingawirelessnetworksystem:UseAdvanced ConnectionMode.
natural_image
Illustration of a person using a computer with a projector and connected to a network device (no text or symbols present)- To connect the projector to the computer using a wired network system: Use Advanced Connection Mode.
Parenttopic: SelectingProjectorNetworkSettings
RecommendedWirelessEnvironmentforMultiPCProjection
When you connect multiple device to a projector using the Quick connection mode, were recommend limiting the number of device to six or less maintain the projection performance. Then number of devices that can connect to a projector at the same time differs depending on the wireless communication environment.
When you connect a project to wireless LAN and connect multiple devices wirelessly using the Advanced connection mode, not the following recommendations.
- Setup multiple access points so that one of the access points can connect up to 10 or 20 devices. See the access point manual form more information on the maximum number of devices that can be connected.
- When you use multiple access points, assign different channel to each access point, and use different access points for the projector connection and the computer connection.
- UseawirelessLANcontroller, if possible, toenhancetheconnectionstability.
• Useanaccesspointthatsupports802.11n.
Contactyournetworkadministratorforhelpinsettingupthewirelessenvironment.
Note: If your projector supports a wired LAN connection, we recommend using a wired LAN connection when you connect multiple devices to the projector.
Parenttopic: SelectingProjectorNetworkSettings
SettingUpaProjectortoConnectinQuickConnectionMode
Toconnectacomputerdirectlytotheprojectorusingwirelesscommunication,youneedtoselect networksettingsonthecomputerandtheprojector.
-
SelectthenecessarysettingstoconnectyourcomputertoawirelessLAN.Seethedocumentation suppliedwithyourcomputerformoredetails.
-
Install the wireless LAN unit in the projector, if necessary. See your projector User's Guide for instructions.
-
Turnontheprojector.
-
Press the Menu button on the remote control or the control panel, select the Network menu, and select NetworkConfiguration.
-
SelectWirelessLAN.
Ascreenlikeoneofthefollowingisdisplayed.
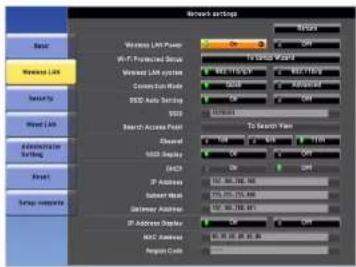
![Basic Wireless LAN Security Wired LAN Mail Others Reset Complete Wireless LAN Power Off Connection Mode Quick Channel 1ch Wireless LAN Sys. 802.11b/g SSID Auto Setting Off SSID IP Settings SSID Display Off IP Address Display Off Return [Esc] / [O]: Return [◆] : Select](/content/2026/05/844705/images/9163a45f5b94b0065244d2407a8aec70cb9ab028a593bd58a59596bdd7826dd1.jpg)
- Turnonwireless LAN support.
Note: The necessary settings vary depending on your projector. See your projector User's Guide for instructions.
-
SelectQuickforConnectionMode.
-
Select other options as necessary for your network. See your projector User's Guide for instructions.
- Selectsecuritysettings on the Security menu as necessary for your network. Check with your network administrator form more information on making the correct settings.
- When you have finished making settings, select Setup Complete or Complete and follow the on-screen instruction to save your settings and exit themenus.
Parenttopic: SelectingProjectorNetworkSettings
Relatedtasks
ConnectingtheProjectorandaComputerDirectlyUsingWirelessCommunication
SettingUpaProjectortoConnectinAdvancedConnectionMode(Wireless)
ToconnectacomputertotheprojectoroverawirelessLAN,youneedtoselectnetworksettingsonthe computerandtheprojector.
-
Contact your network administrator and writedown the settings for the access point, such as the SSID and security settings.
-
Connect the computer to the network.
Note: Tosetupanetworkconnection, if necessary, seethedocumentations supplied with your computerornetworkadapter.
-
Install the wireless LAN unit in the projector, if necessary. See your projector User's Guide for instructions.
-
Turnon the projector.
-
Press the Menu button on the remote control or the control panel, select the Network menu, and thenselectNetworkConfiguration.
6.SelectWirelessLAN.
Ascreenlikeoneofthefollowingisdisplayed.
![Network Settings Wireless LAN Power Wireless LAN System Connection Mode SSD Auto Setting SDD Search Access Point Channel SSD Subheader QDOT IP Address Server Main Gateway Address IP Address Index MAC Address Region Code To Search Type Wireless LAN Security Wired LAN Mail Others Reset Complete Basic Wireless LAN Wireless LAN Power Off Connection Mode Quick Channel 1ch Wireless LAN Sys. 802.11b/g SSID Auto Setting Off SSID IP Settings Off SSID Display Off IP Address Display Off Return [Esc] / [◆] : Return [◆] : Select](/content/2026/05/844705/images/2e70850866d87ec65c8646ebcf7ca8ea2fe69fd3314cb24b8a1e697eb92c88d7.jpg)
- Turnonwireless LAN support.
Note: The necessary settings vary depending on your projector. See your projector User's Guide for instructions.
-
SelectAdvancedforConnectionMode.
-
Select other options as necessary for your network. See your projector User's Guide for instructions.
-
Select security settings on the Security menu as necessary for your network. Check with your network administrator form more information on making the correct settings.
-
When you have finished making settings, select Setup Complete or Complete, and follow the on-screen instruction to save your settings and exit themenus.
Parenttopic: SelectingProjectorNetworkSettings
Relatedtasks
ConnectingtotheProjectorfromtheSoftwareoveraNetworkSystem
SettingUpaProjectortoConnectinAdvancedConnectionMode(Wired)
ToconnectacomputertotheprojectorusingawiredLAN,youneedtoselectnetworksettingsonthe computerandtheprojector.
- Contact your network administrator and check that DHCP is available under the current network environment.
Note: If DHCP is not available, write down the following values that are available for your projector.
- IPAddress
- SubnetMask
-
GatewayAddress
-
Connect the computer to the network.
Note: Tosetupanetworkconnection, if necessary, seethedocumentations supplied with your computerornetworkadapter.
- ConnectaLANcabletotheprojector.
- Turnontheprojector.
- Press the Menu button on the remote control or the control panel, select the Network menu, and select NetworkConfiguration.
- SelectWiredLAN.
Ascreenlikeoneofthefollowingisdisplayed.
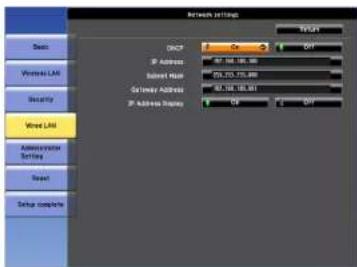
![Basic Wireless LAN Security Wired LAN Mail Others Reset Complete [Esc] / [O]: Return [◆] : Select IP Settings IP Address Display Off Return](/content/2026/05/844705/images/95bc30f5aa4bdda4470f6f7023fba429e3e34a6d250f4888b953d2f48ede6c8d.jpg)
- SelectIPsettingsasnecessary.
•DHCPisavailable:SetDHCPtoOn.
- DHCP is not available: Set DHCP to Off and enter the projector's IP Address, Subnet Mask, and GatewayAddressvaluesasnecessary.
- When you have finished making settings, select Setup Complete or Complete, and follow the on-screen instruction to save your settings and exit themenus.
Parenttopic: SelectingProjectorNetworkSettings
Relatedtasks
ConnectingtotheProjectorfromtheSoftwareoveraNetworkSystem
ConnectingtotheProjectorandProjectingImages
Followtheseinstructionstoconnectthecomputerandtheprojectoroveranetwork,andtoproject imagesfromyourcomputer'sscreenusingtheprojector.
Makesureyouhavealreadysetupthesoftwareandselectedaconconnectionmodefortheprojector.
ConnectionMethods
SelectingtheProjectorSearchMethod
ControllingtheProjectedDisplay
Disconnecting
Relatedtopics
InstallingtheSoftware
SelectingProjectorNetworkSettings
ConnectionMethods
Youcanselectasuitablemethodtoconnectthecomputerandtheprojectoroveranetworkdepending onyourmeetingstyle.
ConnectionMethodsforVariousMeetingStyles
ConnectingtheProjectorandaComputerDirectlyUsingWirelessCommunication
ConnectingtotheProjectorfromtheSoftwareoveraNetworkSystem
Parenttopic: ConnectingtotheProjectorandProjectingImages
ConnectionMethodsforVariousMeetingStyles
You can choose a connection method to suit the style of your meeting.
Decidehowyouwanttoholdyourmeeting. Depending on the connection method you selected, the connection procedure differs.
Note: Depending on your projector, some connection methods may not be available. See your projector User's Guideformoredetails.
- Alluserscancontroltheprojecteddisplayandbecomepresenters.(Holdingdiscussionsandinteractingwithotherusersinabusinessenvironment.)
flowchart
graph TD
    A["Data Visualization Panel 1"] --> B["Graph Analysis"]
    B --> C["Data Distribution"]
    C --> D["Data Presentation"]
    D --> E["User Interface"]
    E --> F["Application Setup"]
    F --> G["Software Deployment"]
    G --> H["Data Management"]
    H --> I["Data Review"]
    I --> J["Data Output"]
•Onlyoneuseristhemoderatorandhasfullcontroloverthemeetingusingthemoderatorfunction. (Holdingaclassorlessonusingtheparticipants'computerscreensinaneducationalenvironment.)
natural_image
Illustration of a person using a laptop to observe a large screen displaying charts and data visualizations, with three smaller laptops below (no text or symbols present)Note: To start a meeting using the moderator function, one user must connect to the projector as the moderator and the other users must connect to the projector as participants.
Parenttopic:ConnectionMethods
Relatedtasks
ChangingtheModerator
ConnectingtotheProjectorfromtheSoftwareoveraNetworkSystem
ConnectingtheProjectorandaComputerDirectlyUsingWirelessCommunication
When your projector is setup as indicated below, you can connect the projector and a computer directly using wireless communication to project the computer's screen.
- ThewirelessLANunitisinstalledintheprojectorotheprojectorhasbuilt-inwirelessLANmodules.
• The projector's connection methodissettoQuick.
Note:
- WhenyouusetheParticipantEditionofthesoftware,youmustconnecttheprojectoranda computeroveranetworksystem.
- When you connect the projector and a computer directly using wireless communication, the connection between the computer and an access point is disconnected.
-
Makesureyouturnonyourcomputer'swirelesscommunicationfunction.
-
Press the LAN button or Source Search button on the remote control to switch the input source to LAN.
The LAN stand by screen is projected.
![[LAN] Projector Name : EB* * * * * * SSID : IP Address ↓ : IP Address < : Keyword :](/content/2026/05/844705/images/dea9f1a0087a4d19bf91350edfa9f7028045f35d3fe4f579dde09d20e4c3413c.jpg)
2.StartEasyMPMultiPCProjection.
- Windows Vista and Windows 7: Click Start, select Programs (or All Programs), EPSON Projector, EasyMP Multi PC Projection, and then click EasyMP Multi PC Projection Ver.X.XX.
- Windows 8 and Windows 8.1: Navigate to the Apps screen and select EasyMP Multi PC ProjectionVer.X.XX.
- Windows 10: Select Start, select All apps, select EPSON Projector, and then select EasyMP MultiPCProjection.
- OS X: Double-click EasyMP Multi PC Projection from the Applications folder.
Note: You can also create a shortcut and use it to start Easy MP MultiPC Projection and to automatically search for saved projectors.
3. Select Quick Connection Mode, and then click OK.
![EasyMP Multi PC Projection Ver.X.XX Select Connection Mode. When connecting wirelessly, make sure you select the connection mode specified in the [Network] menu. (This is set to [Quick Connection Mode] by default.) ● Quick Connection Mode ○ Advanced Connection Mode Connect the computer and the projector over a wireless connection. □ Set the selected Connection Mode as the default mode for future connections. (Do not display this window again.) OK Cancel](/content/2026/05/844705/images/8c7c6647e3c4d90e404c890dedaf873ec82447966523123495401b52d8d62940.jpg)
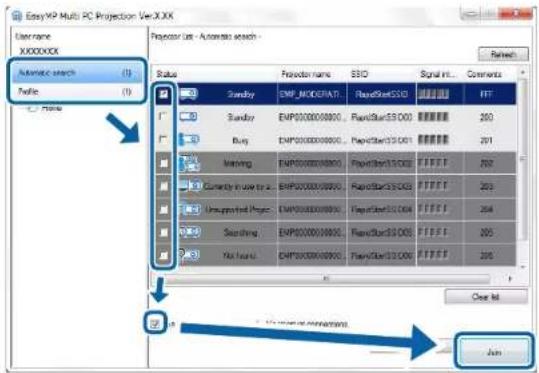
4. Searchfortheprojectorusingoneofthefollowingmethods.
•AutomaticSearch: Searchesfortheprojectorautomatically.
•Profile: Searchesfortheprojectorbasedonapreviouslysavedprofile.
Theprojectorsearchresultsaredisplayed.
5. Select the projector you want to connect to from the Projector List, and then select one of the following options.
- Youwantalluserstobeabletobecomeparticipantsinthemoderatorfunction:Makesure Connect as a Moderator, or disable interrupt connections is not selected, and then click Join.
- Youarethemoderatoruserandyoudonotwantotheruserstobeabletointerruptthemoderator presentation:SelectConnectasaModerator,ordisableinterruptconnections,andthenclick Join.
Note:
- Themoderatorfunctionisavailableonlyforsupportedmodelsandisavailableonlyonthe StandardEditionofthesoftware.
- Whenoneuserconnectsasamoderator, themoderatorfunctionturnson.
When the Projector Keyword is set to On or the Moderator Password is set in the projector settings, the keywordentryscreenis displayed.
-
Check the Projector Keyword displayed on the LAN stand by screen. Enter the keyword, and then click OK.
-
Whenthefollowingdialogboxisdisplayed, enter the pass phrases set on the projector, and then click Connect.
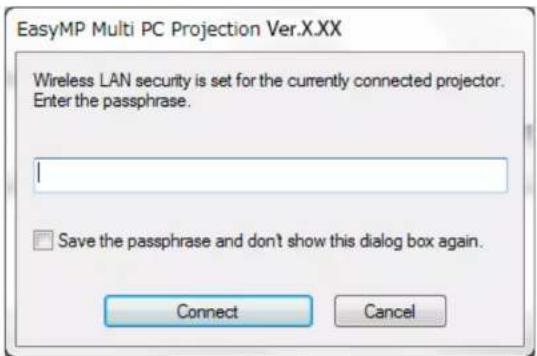
Note: If you select Save the passphrase and don't show this dialog box again, the projector's SSIDandpassphrasearesavedonthecomputerandthisdialogboxisnotdisplayedthenexttime youconnect.Youdonothavetoenterthepassphraseagain.
If the projector's passphrase has not been changed from the default, the following dialog box is displayed. Changethe passphrase from the projector's Network menu.
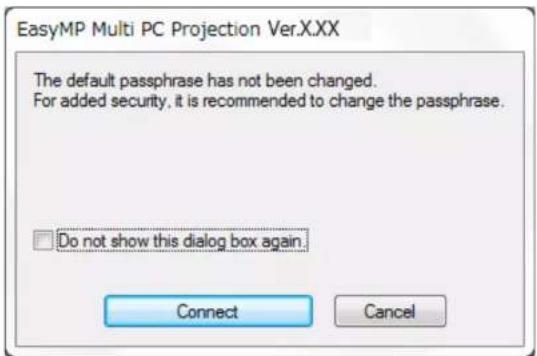
When a connection is established, the computers screen is projected and the following toolbar is displayed on the computers screen.

Thecomputerscreenfortheuserwhoconnectsfirstisprojectedinfullscreenmode.Userswhoconnect
latercanprojecttheirownscreenbyclickingthebuttononthetoolbarorcancontroltheprojected displayfromtheprojectioncontrolscreenbyclickingthebuttononthetoolbar.
Note:
- Whenaconnectionisestablished, the inputsourcefortheprojectorautomaticallyswitchestothelAN sourceifnoothersignalisbeinginput. If the inputsourcedoesnotautomaticallyswitchtothelAN source, press the LAN button or Source Search button on the remote control.
- Thedisplayedtoolbarvariesdependingontheconnectionmethodandtheeditionofthesoftware.
- When using the moderator function, only the moderator can control the projected display.
Parenttopic:ConnectionMethods
Relatedtasks
SettingUpaProjectortoConnectinQuickConnectionMode
Disconnecting
Relatedtopics
SelectingtheProjectorSearchMethod
ControllingtheProjectedDisplay
SearchingforNetworkProjectorsUsingaShortcut
ConnectingtotheProjectorfromtheSoftwareoveraNetworkSystem
When your projector is setup as indicated below, you can connect the projector and a computer over a network by using Easy MP Multi PC Projection.
- ThewirelessLANunitisinstalledifaprojectordoesnothavebuilt-inwirelessLANmodules(wirelessnetworksonly).
- ALANcableisconnectedtotheprojector(wirednetworksonly).
• The projector's connection methodissetto Advanced.
Note: Makesureyoualsoconnectedacomputertothenetwork.
- Press the LAN button or Source Search button on the remote control to switch the input source to LAN.
The LAN stand by screen is projected.
![[LAN] Projector Name : EB***** SSID : IP Address ↓ : IP Address ( ) : Keyword :](/content/2026/05/844705/images/71706b251c884a0d6082ddfd63ab801800a0019b44fd8782ea8c9d949ef6378c.jpg)
2.StartEasyMPMultiPCProjection.
- Windows Vista and Windows 7: Click Start, select Programs (or All Programs), EPSON Projector, EasyMP Multi PC Projection, and then click EasyMP Multi PC Projection Ver.X.XX.
- Windows 8 and Windows 8.1: Navigate to the Apps screen and select EasyMP Multi PC ProjectionVer.X.XX.
- Windows 10: Select Start, select All apps, select EPSON Projector, and then select EasyMP MultiPCProjection.
- OS X: Double-click EasyMP Multi PC Projection from the Applications folder.
Note: You can also create a shortcut and use it to start Easy MP MultiPC Projection and to automatically search for saved projectors.
3. Select Advanced Connection Mode, and then click OK.
![EasyMP Multi PC Projection Ver.XXX Select Connection Mode. When connecting wirelessly, make sure you select the connection mode specified in the [Network] menu. (This is set to [Quick Connection Mode] by default.) Quick Connection Mode Advanced Connection Mode Connect to the projector using a wireless LAN access point or wired LAN. Set the selected Connection Mode as the default mode for future connections. (Do not display this window again.) OK Cancel](/content/2026/05/844705/images/37155cc05b1bcb318ef850c6adb62ebbe7dd7dc24e5bb1e39dc79f3f4dfe14af.jpg)
4. Searchfortheprojectorusingoneofthefollowingmethods.
•Automaticsearch: Searchesfortheprojectorautomatically.
- Manualsearch: SearchesfortheprojectorbasedonaspecifiedIPaddressorprojectorname.
•Profile: Searchesfortheprojectorbasedonapreviouslysavedprofile.
Theprojectorsearchresultsaredisplayed.
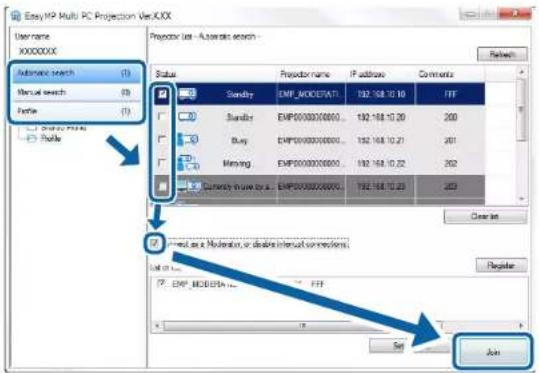
5. Select the projector you want to connect to from the Projector List, and then select one of the following options.
- Youwantalluserstobeabletobecomeparticipantsinthemoderatorfunction:Makesure Connect as a Moderator, or disable interrupt connections is not selected, and then click Join.
- Youarethemoderatoruserandyoudonotwantotheruserstobeabletointerruptthemoderator presentation:SelectConnectasaModerator,ordisableinterruptconnections,andthenclick Join.
Note:
- ThemoderatorfunctionisavailableonlyforsupportedmodelsandisavailableonlyontheStandardEditionofthesoftware.
- Whenoneuserconnectsasamoderator, themoderatorfunctionturnson.
When the Projector Keyword is set to On or the Moderator Password is set in the projector settings, the keywordentryscreenis displayed.
- ChecktheProjectorKeyworddisplayedontheLANstandbyscreen, enterthekeyword, and then clickOKasnecessary.
When a connection is established, the computers screen is projected and the following toolbar is displayed on the computers screen.

Thecomputerscreenfortheuserwhoconnectsfirstisprojectedinfullscreenmode.Userswhoconnect
latercanprojecttheirownscreenbyclickingthebuttononthetoolbarorcancontroltheprojected
displayfromtheprojectioncontrolscreenbyclickingthebuttonmthetoolbar.
Note:
- When a connection is established, the input source for the projector automatically switch the LAN source if no others signal is being input. If the input sourced does not automatically switch to the LAN source, press the LAN button or Source Search button on the remote control.
- Thedisplayedtoolbarvariesdependingontheconnectionmethodandtheeditionofthesoftware.
- When using the moderator function, only the moderator can control the projected display.
Parenttopic: ConnectionMethods
Relatedtasks
SettingUpaProjectortoConnectinAdvancedConnectionMode(Wireless)
SettingUpaProjectortoConnectinAdvancedConnectionMode(Wired)
Disconnecting
Relatedtopics
SelectingtheProjectorSearchMethod
ControllingtheProjectedDisplay
SearchingforNetworkProjectorsUsingaShortcut
SelectingtheProjectorSearchMethod
Youcanselectasuitablemethodtosearchforaprojectordependingonthestatusorlocationoftheprojectoryuwanttoconnectto.
SearchMethods
SearchingforNetworkProjectorsAutomatically
SearchingforNetworkProjectorsbySpecifyinganIPAddressorProjectorName
SearchingforNetworkProjectorsUsingaProfile
Parenttopic: ConnectingtotheProjectorandProjectingImages
SearchMethods
Youcanuseoneofthefollowingmethodstosearchfortheprojectoryouwanttoconnectto.Choosethe bestmethoddependingonyourenvironment.
•SearchingforNetworkProjectorsAutomatically
Youcanautomaticallysearchforavailableprojectorsonthenetwork.
Searchresultsdifferdependingontheconnectionmodeyouuse.
- QuickConnectionMode:DisplaytheSSIDforavailableprojectors.
- AdvancedConnectionMode: Displaysavailableprojectorsonthenetwork.Searchesare performedonlyonthesamesubnet.Projectorsondifferentsubnetsarenotdisplayedinthesearch results.
- SearchingforNetworkProjectorsbySpecifyinganIPAddressorProjectorName
If the projectoryouwanttoconnecttoisnotfoundautomatically, you can search forth target projector by specifying the Paddress or a projector name. Byspecifying the Paddress, you can also search for the projector at remote locations on different subnet.
- SearchingforNetworkProjectorsUsingaProfile
Youcansavenetworkprojectorinformationasaprofile,andthenspecifytheprofiletosearchforthe sameprojectorinsteadofprovidingprojectordetailseachtimeyousearch.Bycreatingagroupof profilesforeachplacewhereaprojectorissetupandmanagingthemwithfolders,thetargetprojector canbefoundquickly.
Parenttopic: Selecting the Projector Search Method
SearchingforNetworkProjectorsAutomatically
Youcanautomaticallysearchforavailableprojectorsonthenetwork,andthenprojectimagesbysimply selectingtheprojector.
ClickAutomaticsearchonthesearchscreen.
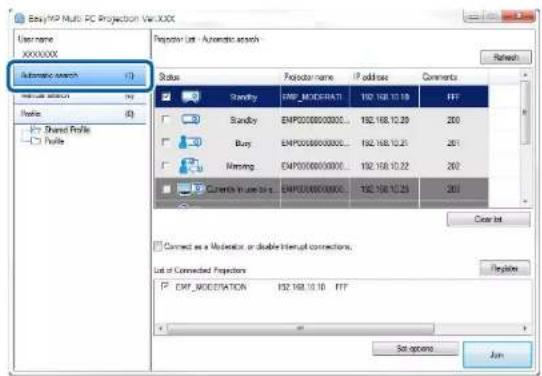
Thesearchresultsaredisplayed.
WhenyouclickRefresh, the latest information is displayed.
If you cannot find any projectors, try one of the other search methods.
Parenttopic: Selecting the Projector Search Method
Relatedconcepts
SearchMethods
Relatedtasks
SearchingforNetworkProjectorsbySpecifyinganIPAddressorProjectorName
Relatedtopics
SearchingforNetworkProjectorsUsingaProfile
SearchingforNetworkProjectorsbySpecifyinganIPAddressorProjectorName
If the projectoryouwanttoconnecttoisnotfoundautomatically, you can search forth the target projector by specifying the Paddressortheprojectorname.
Note: ManualSearchisavailableonlyinAdvancedConnectionMode.
- Click Manualsearchonthesearchscreen.
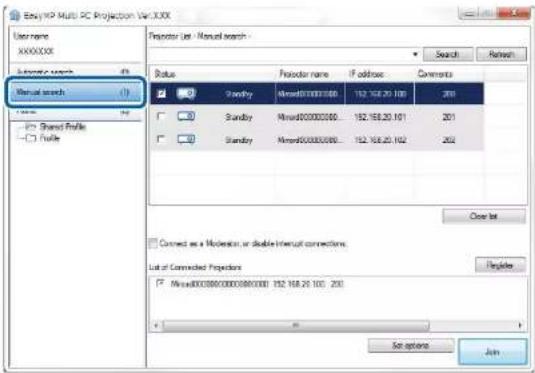
2.EnterthelPaddressortheprojectornamefortheprojectoryouwanttoconnectto,andthenclick Search.
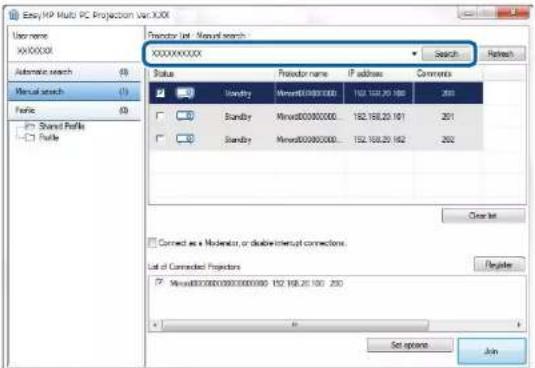
Thesearchresultsaredisplayed.
Parenttopic: Selecting the Projector Search Method
SearchingforNetworkProjectorsUsingaProfile
Youcansavenetworkprojectorinformationasaprofile,andthensearchforthesameprojectorusing theprofileinsteadofspecifyingtheprojectordetailseachtime.
ProfilesforSearch
PerformingaProfileSearch
RegisteringaProfile
ExportingaProfile
ImportingaProfile
SharingaProfileoveraNetwork
Parenttopic: Selecting the Projector Search Method
ProfilesforSearch
Youcansaveinformationforanetworkprojectorasaprofile.Aprofileisafilecontainingallofthe projector'sinformation,suchastheprojectorname,IPaddress,andSSID.Byusingaprofile,youcan easilysearchforsavedprojectorsinsteadofprovidingprojectordetails.
Youcanexporttheregisteredprofiletocreateabackup, and thenimportitlocallytoeasilysearchfor projectorsonanothercomputer. Youcanalsosharetheexportedprofileoveranetwork, allowingother userstoeasilysearchforprojectors.
Parenttopic: SearchingforNetworkProjectorsUsingaProfile
PerformingaProfileSearch
Youcanspecifytheprofiletosearchforthesavedprojectorinsteadofprovidingprojectordetailseach timeyousearch.
1. ClickProfileonthesearchscreen.
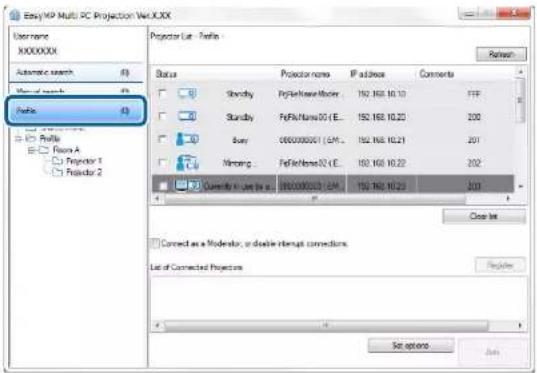
2. Double-click the folder or the projector icon for the profile you want to use from the list.
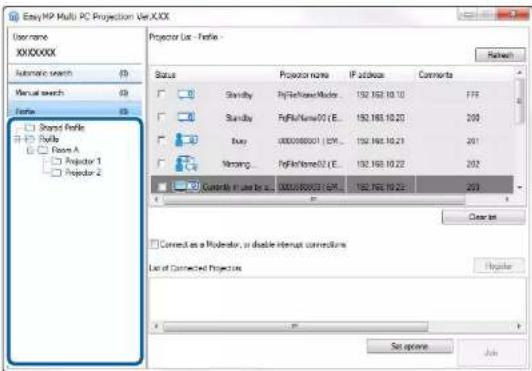
Thesearchresultsaredisplayed.
Parenttopic: SearchingforNetworkProjectorsUsingaProfile
Relatedtasks
RegisteringaProfile
RegisteringaProfile
Aftersearchingforaprojector,youcansavetheprojectordetailsasaprofileusingamemorablename thatyoucansearchforeasilylater.
Note: You cannot register a profile under the Shared Profile folder on the search screen.
-
While the projectors are displayed on these search screen, perform one of the following operations.
-
Register projectors displayed in the List of Connected Projectors: Click Register.
- Register a specific projector: Right-click the projector you want to register in the Projector List, and then click AddItemtoProfile.
- Register all projectors found by the search: Right-click one of the projectors in the Projector List, and then click AddAlltoProfile.
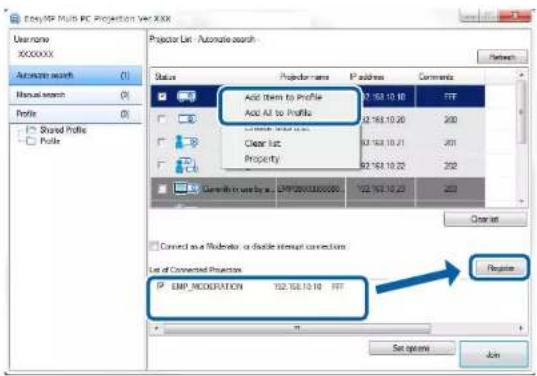
TheSavescreenisdisplayed.
- Enter the Projector file name, and select the folder where you want to save the profile, and then clickOK.
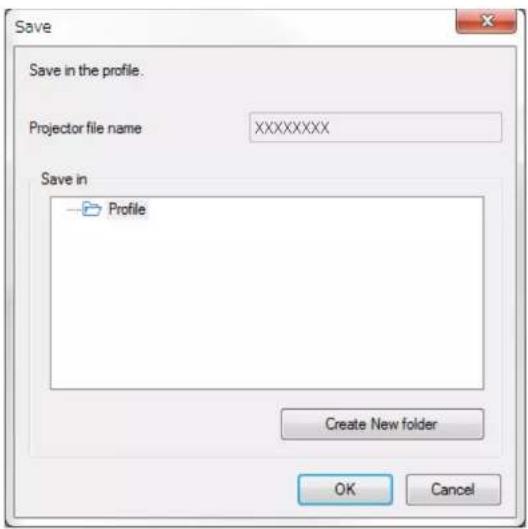
Theprofileisregisteredandtheprojectorinformationissavedintheprofile.
Note:
•Thefolderstructurecanbesixfoldersdeep.
- ClickCreateNewfolderifyouwanttocreateanewfolder.
- To register a specific projector, you can drag and drop the projector from the Projector List to the folderunderProfile.
- Youcandraganddropprofilesandfolderstochangethefolderstructure.
Parenttopic: SearchingforNetworkProjectorsUsingaProfile
ExportingaProfile
Youcanexportaprofileandshareitwithotherusersallowingthemtoeasilysearchforprojectorsand joinameeting.
Note: You cannot export the profiles under the Shared Profile folder on the search screen.
- On the search screen, right-click the folder containing the profile you want to share under Profile, and thenclickExport.
TheSaveAsscreenisdisplayed. - Selectwhereyouwanttosavetheprofile(.mplist), andthenclickSave.
Theprofileisexported.
Parenttopic: SearchingforNetworkProjectorsUsingaProfile
Relatedtasks
RegisteringaProfile
ImportingaProfile
SharingaProfileoveraNetwork
ImportingaProfile
Youcanlocallyimportanexportedprofileanduseittoeasilysearchforprojectorsandjoinameeting.
Note:
- Youcanalsoimportaprofile(.plist)exportedusingEasyMPNetworkProjection.
- You cannot import profiles under the Shared Profile folder on these search screen.
- You cannot import profiles created in a different connection mode.
- On the search screen, right-click the folder to which you want to import the profile under Profile, and thenclickImport.
TheOpenscreenisdisplayed.
- Selecttheprofile(.mplist), andthenclickOpen.
Theprofileisimportedlocally.
Parenttopic: SearchingforNetworkProjectorsUsingaProfile
Relatedtasks
ExportingaProfile
SharingaProfileoveraNetwork
Youcanshareanexportedprofilewithotherusersoveranetworksothatanychangedprojector informationiseasilyupdated. ThesharedprofileisreadandupdatedautomaticallywhenEasyMPMulti PCProjectionisstarted.
- Placetheprofile(.mplist)inasharednetworklocationsuchasaserver.
2.ClickSetoptionsonthesearchscreen.
TheSetoptionsscreenisdisplayed.
-
ClicktheUserSettingstab.
-
Enter the network location or URL to the shared profile (including the name of the profile) in Shared ProfileName.
-Forafileserver(Windowsonly):\xxxxx\xxxxx.mplist
•Forawebserver:http://xxxxx/xxxxx.mplist
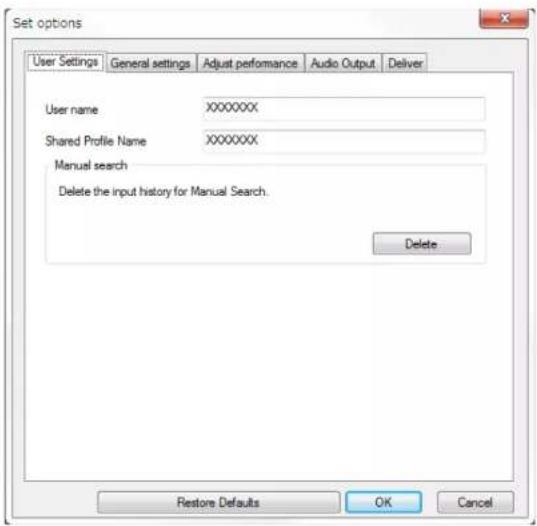
5.ClickOK.
ThesharedprofileisreadandtheSetoptionsscreencloses.
Note: ThesharedprofileisreadonlyandcannotbeeditedinEasyMPMultiPCProjection.
Parenttopic: SearchingforNetworkProjectorsUsingaProfile
Relatedtasks
ExportingaProfile
ControllingtheProjectedDisplay
Followtheseinstructionstousethetoolbarandtheprojectioncontrolscreentocontrolthescreenbeing projected.
ScreenTypesforProjectionControl
OperatingtheProjectedDisplayStatus
ChangingtheNumberofProjectedPanels
ChangingthePresenter
ChangingtheProjectionPosition
Parenttopic: ConnectingtotheProjectorandProjectingImages
ScreenTypesforProjectionControl
Youcanchoosethetypeofscreenyousetocontrolprojectedimagestosuityoursituation.Youcan switchthescreentypebyclickingthebuttononthetoolbarorthebuttonontheprojectioncontrol screen.
Note:
- Thedisplayedtoolbarandtheprojectioncontrolscreenvarydependingontheconnectionmethodand theeditionoryourroleofthissoftware.
•TheprojectioncontrolscreenisavailableonlyontheStandardEditionofthesoftware.
- Use the toolbartodisplayawideimage of the projected display and perform operations on the projected image.

- Use the projection controls screentochangethenumberofprojectedpanels, presenters, or the projection position.
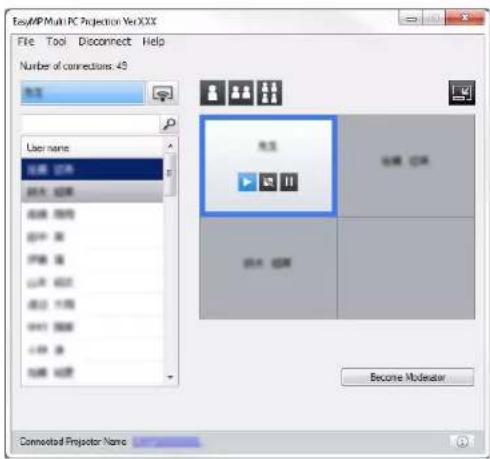
Parenttopic: Controlling the Projected Display
Relatedreferences
Toolbar
ProjectionControlScreen
OperatingtheProjectedDisplayStatus
Youcancontroltheprojecteddisplaywhileprojectingyourcomputerscreenbystarting,stopping,or pausingtheprojectedimage.
Performoneofthefollowingoperationsonthetoolbarortheprojectioncontrolscreen.
•Show:Clickthebutton.
Thecomputerscreenisprojectedasitis.
-Stop:Clickthebutton.
Theprojectedimagestops.Ablackscreenisprojectedwhilestopped.
- Pause:Clickthebutton.
Theprojectedimagepauses. The paused image is projected, even if you make changes on the computerscreen.
Note:
- Thesebuttonsarenotavailableforparticipantswhenusingthemoderatorfunction.
- Themoderatorcanalsocontroltheotherusers'projectionusingtheprojectioncontrolscreenwhen usingthemoderatorfunction.
Parenttopic: Controlling the Projected Display
Relatedreferences
ProjectionControlScreen
ChangingtheNumberofProjectedPanels
Youcandividetheprojecteddisplayintoamaximumoffourpanels.Bychangingthenumberofpanels,youcanprojectscreensfrommultipledevicasetthesametime,orprojectonecomputerscreeninfullscreenmode.
Note:
- Thisfunctionisnotavailableforparticipantswhenusingthemoderatorfunction.
- Youcanalsousethebuttontoprojectyourcomputerscreeninfullscreenmode.
- Clickthebuttononthetoolbar.
Theprojectioncontrolscreenisdisplayed.
- Click the panel of the user to be projected in the projection area.
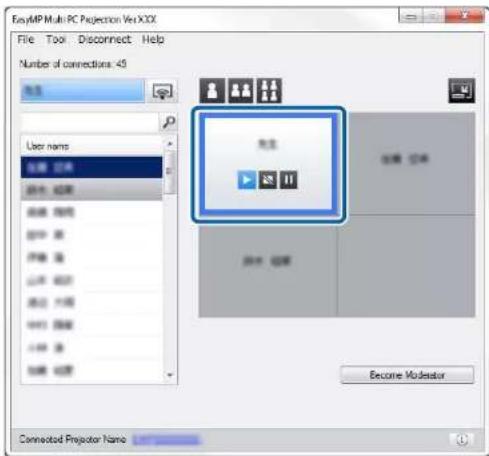
-
Perform one of the following operationstochangethenumberofavailablepanelsintheprojection area.
-
Projectonepanelinfullscreenmode:Clickthebutton
- Splittheprojectedddisplayintwoandprojectingtheselectedpanelandtheadjacentrightorleft panel:Clickthebutton.
- Splittheprojectedddisplayinfourandprojectingtheallfourpanels:Clickthebutton.

Thenumberofpanelschangesandthebackgroundcolorforpanelsbeingprojectedbecomeswhite.
Note:
- Youcanalsochangethenumberofpanelsbyright-clickingintheprojectionarea.Right-clickthe panel,andthenselectthenumberoftotalpanels.
- Ifthereisnouserinawhitepanel,ablackscreenisprojected.
• The background color for panels not being projected is gray.
Parenttopic: Controlling the Projected Display
Relatedreferences
ProjectionControlScreen
ChangingthePresenter
Youcanchangethepresenterbydragginganddroppingoneoftheconnectedusernamesinthelist ontoapanelintheprojectionarea.
Note: This function is not available for participants when using the moderator function.
- Clickthebuttononthetoolbar.
Theprojectioncontrolscreenisdisplayed.
- Select the user names in the user list, and the drag and drop the username onto a white panel in the projection area.
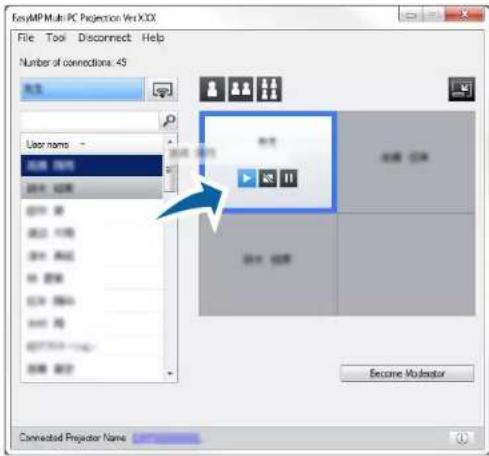
- If you cannot find the user that you want to project in the user list, you can search forth them using the user search box.
- Youcanalsoright-clickausernameintheuserlisttoselecttheprojectionposition.
- If there is nouserinawhitepanel, ablackscreenisprojected.
Theselecteduser'scomputerscreenisprojected.
- Tofinishprojecting, draganddroptheusernamefromtheprojectionareatotheuserlist.
Note: You can also finish the selected user's projection by right-clicking the panel in the projection area, and then clicking EndProjection.
The backgroundcoloroftheusernameintheuserlistisbluewhiletheirscreenisprojected. The backgroundcoloroftheusernameisgraywhenauserisinthepanelbuttheirscreenisnotbeing projected.
Parenttopic: Controlling the Projected Display
Relatedtasks
ChangingtheProjectionPosition
SelectingtheParticipant'sScreentoProjectUsingThumbnails
ChangingtheProjectionPosition
You can chan gethe projection position by dragging and dropping the username from one position to another in the projection area.
Note: This function is not available for participants when using the moderator function.
- Clickthebuttononthetoolbar.
The projection controls screen is displayed.
- Select the user in the projection area, and the drag and drop the username into another position.
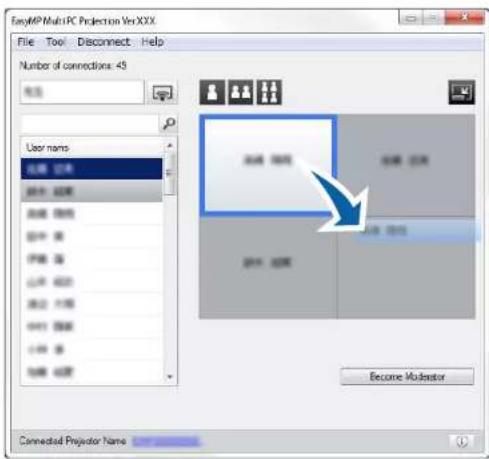
The projection position is changed.
Note: When the 🔒 or 🔒 button is selected, you can drag and drop the user name in a gray panel to the whitepaneltoswitchtheimagebeingprojected. If youdraganddroptheusernameinawhitepanelto thegraypanel, the imageforthatuserwillnotbeprojected.
Parenttopic: Controlling the Projected Display
Relatedtasks
ChangingtheNumberofProjectedPanels
Disconnecting
Youcandisconnectonecomputeroralldevicesfromtheprojectorwhenyoufinishprojecting.
- Performoneofthefollowingoperations.
- Disconnectyourcomputerandtheprojectors:ClicktheLeavebuttononthetoolbar.
The connection between your computer and the projectors is ended.

Note:
- When you are them moderator, the Disconnect All button is displayed on the tool bar instead of this button.
- You can also disconnect by clicking Leave from the Disconnect menu on the projection control screen.
- Themoderatorcandisconnectotherparticipantsbyright-clickingtheselecteduserintheuser list,andthenclickingLeaveontheprojectioncontrolscreenwhenusingthemoderator function.
- Whenthemoderatorleavesthemeeting, themoderatorfunctionturnsoff.
- Disconnectalldevicesfromtheprojectors: Clickthebutton, thetoolbar, and thenclick Disconnect All from the Disconnect menu on the projection control screen.
The connection between all devices and projectors participating in themeeting is ended.
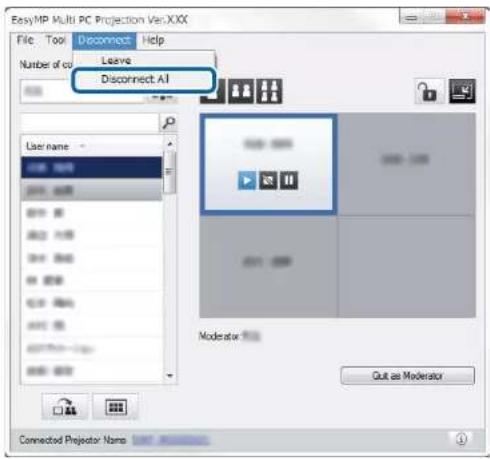
Note: This function is not available for participants when using the moderator function.
Theconfirmationscreenisdisplayed.
2.ClickOK.
Youarereturnedtothesearchscreen.
Parenttopic: ConnectingtotheProjectorandProjectingImages
UsingAdditionalFunctions
FollowtheseinstructionstouseadditionalEasyMPMultiPCProjectionfunctionsthatmaybeuseful duringameeting.
SearchingforNetworkProjectorsUsingaShortcut
ConnectingtoNetworkProjectorUsingaUSBFlashDrive(WindowsOnly)
ConnectingtoMultipleProjectors(Mirroring)
OutputtingAudiofromtheProjector
ProjectingYourScreen
ChangingtheModerator
DistributingtheProjectedScreen
SelectingtheParticipant'sScreentoProjectUsingThumbnails
HidingtheProjectionControlScreen
ProhibitingParticipantOperations
ControllingtheConnectionBandwidth
Relatedtopics
ConnectionMethods
SelectingtheProjectorSearchMethod
SearchingforNetworkProjectorsUsingaShortcut
Youcansavenetworkprojectorinformationasashortcut, andthendouble-clickittostartEasyMPMultiPCProjection. Thisallowsyoutoeasilysearchforthesameprojectorsinsteadofspecifyingtheprojectordetailseachtime.
CreatingaShortcut
Parenttopic: Using Additional Functions
CreatingaShortcut
Aftersearchingforaprojector,youcansavetheprojectordetailsasashortcutthatyoucanuselater.A shortcutcontainsalloftheprojector'sinformation,suchastheprojectornameandIPaddress.Creating afoldershortcutsavesinformationformultipleprojectorscontainedinthefolder.
- On the search screen, right-click the projector or folder from the Profile or Projector List, and then clickCreateShortcut.
TheSaveAsscreenisdisplayed.
- Selectwhereyouwanttosavetheshortcut(.pme), andthenclickSave.
Theshortcutiscreatedandtheprojectorinformationissavedintheshortcut.
Note:
- Double-clickingashortcut(.pme),youcanstartEasyMPMultiPCProjectioninthesamemodeasyoucreateditsshortcut.
- When you use the Participant Edition of the software, use a shortcut file created in Advanced ConnectionMode.
- You can also select the projector or folder from the Profile or Projector List, and then drag and drop tothelocationwhereyouwanttocreatetheshortcut.
Parenttopic: SearchingforNetworkProjectorsUsingaShortcut
ConnectingtoNetworkProjectorUsingaUSBFlashDrive(WindowsOnly)
YoucanuseacommerciallyavailableUSBflashdriveasaUSBkeytotransfertheprojector'snetwork informationtoaWindowscomputer.CreatingtheUSBkeyallowsyoutoquicklyprojectimagesfromthe networkprojector.
CreatingaUSBkeyonaUSBFlashDrive(WindowsOnly)
UsingaUSBKeytoConnectaWindowsComputer
Parenttopic: Using Additional Functions
CreatingaUSBkeyonaUSBFlashDrive(WindowsOnly)
YoucancreateaUSBkeyonacommerciallyavailableUSBflashdrivesoyoucanuseittoconnectto yourprojectorwirelessly.
Note: When creating a USB key, makes sure you use a USB flash drivethat meet the following conditions.
- FormattedtoFAT
•Nosecurityfunctions
WerecommenddeletinganyfilesonthedrivebeforecreatingaUSBkey.
1. StartUSBKeySetupTool.
- Windows Vista and Windows 7: Click Start, select Programs (or All Programs), EPSON Projector, EasyMP Multi PC Projection, Tools, and then click USB Key Setup Tool.
- Windows 8 and Windows 8.1: Navigate to the Apps screen and select USB Key Setup Tool.
-
Windows 10: Select Start, select All apps, select EPSON Projector, EasyMP Multi PC Projection, Tools, and then select USB Key Setup Tool.
-
Select the application type that starts when you insert the USB key to your computer.
- InsertanemptyUSBflashdrivedirectlytoyourcomputer'sUSBport.
- Followtheon-screeninstructionstocreatetheUSBkey.
USBkeycreationbeginsandthesoftwarewritesafiletotheUSBflashdrive.
Caution: DonotremovetheUSBflashdrivefromthecomputerduringUSBkeycreation. If you removethedrive, the USBkeymaynotbecreatedcorrectly. If USBkeycreationfails, create the USBkeyagain.
Note: If there are multiple USB flash drives connected to your computer, follow the on-screen instruction to specify the drive for which you want to create a USB key.
- Select Safely Remove Hardware in the Window stask bar, and then remove the USB flash drive.
YoucannowusetheUSBflashdriveasaUSBkey.
Parenttopic: ConnectingtoNetworkProjectorUsingaUSBFlashDrive(WindowsOnly)
UsingaUSBKeytoConnectaWindowsComputer
AftercreatingtheUSBkey,youcanquicklyprojectimagesfromthenetworkprojector.Ifyouhave previouslyusedtheUSBkey,youcanusethenetworkprojectorbysimplyconnectingtheUSBkeyto yourcomputer.
-
Makesureyourprojectorisusingoneofthefollowingnetworkconnections:
-
ThewirelessLANmoduleisinstalledorbuiltintoyourprojector.
•AwiredLANcableisconnectedtoyourprojector. -
Turnon the projector.
-
Press the LAN button or Source Search button on the remote control to switch the input source to LAN.
The LAN stand by screen is projected.
-
Verify that an SSID and Paddress are displayed.
-
Insert the USB key into the projector's USB Type Aport.
Note: The location of the USB Type A port varies depending on your projector. See your projector User's Guideformoredetails.
Youseeaprojectedmessagethatthenetworkinformationupdateiscomplete.
6.RemovetheUSBkey.
- Insert the USB key into a USB port on your computer.
Note: In Windows Vista, if the AutoPlay window is displayed, select Run LaunchMPP.exe, then selectAllow.
- Followtheon-screen instruction to install Easy MP Multi PC Projection.
Note:
- IftheWindowsFirewallmessageisdisplayed,clickYestodisablethefirewall.
- Youneedadministratorauthoritytoinstallthesoftware.
- Ifitisnotinstalledautomatically, double-clickMPPLaunch.exeintheUSBkey.
Afterafewminutes, yourcomputerimage is displayed by the projector.
Note: If you want to switch the presentation to your computer, click the button on the toolbar.
- When you have finished projecting wirelessly, select SafelyRemoveHardware in the Windows taskbar, and then remove the USB key from your computer.
Note:
- YoucansharetheUSBkeywithotheruserswithoutdisconnectingyourcomputer.Todothis, deselect the Quit application when removing the USB key checkbox on the Set options screeninEasyMPMultiPCProjection.
- YoumayneedtorestartyourcomputertoreactivateyourwirelessLANconnection.
Parenttopic: ConnectingtoNetworkProjectorUsingaUSBFlashDrive(WindowsOnly)
ConnectingtoMultipleProjectors(Mirroring)
Connectingtomultipleprojectorsandprojectingthesameimageisknownasmirroring.Youcanperform mirroringwithuptofour projectors.
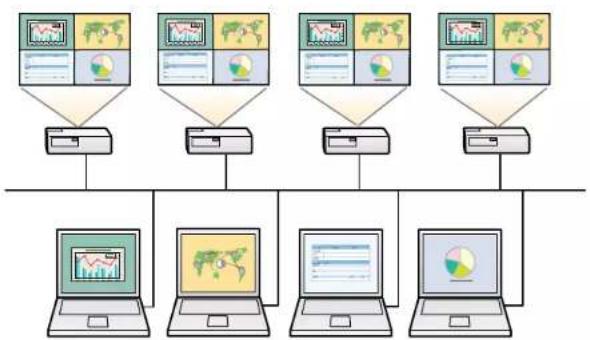
flowchart
graph TD
    A["Client 1"] --> B["Server"]
    C["Client 2"] --> D["Server"]
    E["Client 3"] --> F["Server"]
    G["Client 4"] --> H["Server"]
    I["Client 5"] --> J["Server"]
    B --> K["Laptop"]
    D --> L["Laptop"]
    F --> M["Laptop"]
    H --> N["Laptop"]
    J --> O["Laptop"]
    K --> P["Data Icon"]
    L --> Q["Data Icon"]
    M --> R["Data Icon"]
    N --> S["Data Icon"]
    O --> T["Data Icon"]
Note:
- MirroringisavailableonlyinAdvancedConnectionMode.
- You cannot perform mirroring with projector that are not compatible with Easy MP MultiPC Projection.
- Forbestresults, were recommend that you connect the project to a wired LAN to perform mirroring.
Onthesearchscreen,selectuptofourprojectorsyouwanttoconnectto,andthenclickJoin.
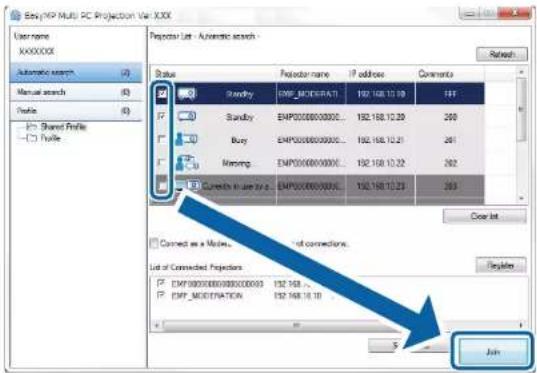
Aprojectormirroring group is formed and the same image is projected from multiple projectors.
Note:
- When you select one projector from a project or mirror mirroring group, also the projectors in that group are selected.
- Whenotherusersarealreadyconnectedtoaprojectorinamirroringgroup,youcanonlyselect anotherprojectorfromthesamemirroringgroup.Youcannotselectaprojectorthatisnotina mirroringgroup.
Parenttopic: Using Additional Functions
OutputtingAudiofromtheProjector
You can output audio from the projector only when one computer is connected to one projector, and you are projecting in full screen mode.
- ClickSetoptionsonthesearchscreen.
TheSetoptionsscreenisdisplayed.
-
ClicktheAudioOutputtab.
-
SelectOutputaudiofromtheprojector, and then click OK.
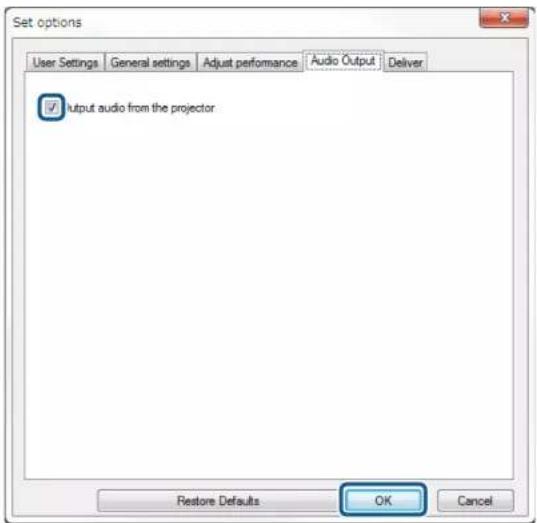
Note: When you select 256Kbps or 512Kbps as Use Bandwidth on the Adjust performance tab, you cannot output audio from the projector and cannot select this setting.
TheSetoptionsscreencloses.
Parenttopic: Using Additional Functions
Relatedtasks
ProjectingYourScreen
ControllingtheConnectionBandwidth
ProjectingYourScreen
Youcanprojectthecomputerscreeninfullscreenmodewithoutprojectinganyotherusers'screens.
- On thesearchscreen, select the projectory you want to connect to, and then click Join.
Thetoolbarisdisplayed.
- Clickthebutton.
Note:
- Youcanalsousethebuttonontheprojectioncontrolscreen.
- Thisbuttonisnotavailableforparticipantswhenusingthemoderatorfunction.
Yourcomputerscreenisprojectedinfullscreenmode.
Parenttopic: Using Additional Functions
ChangingtheModerator
While using the moderator function, you can change the moderator when another user need to control the projected display.
Note: The moderator function is available only on the Standard Edition of the software.
- On the search screen, select the projector you want to connect to, select Connect as a Moderator, or disable interrupt connections, and then click Join.
Themoderatorfunctionturnsonandthetoolbarisdisplayed.
- Clickthebuttononthetoolbar.
The projection controls screen is displayed.
3. ClicktheQuitasModeratorbuttononthemoderator'scomputer.
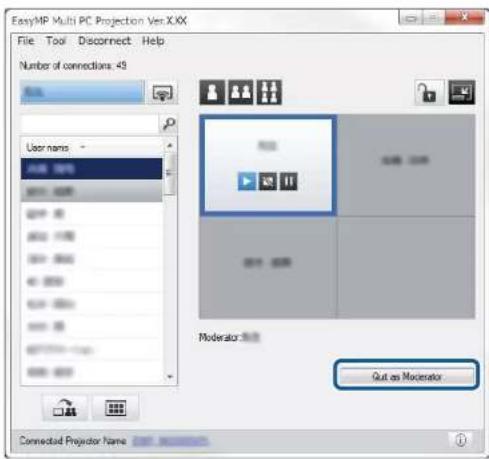
Theconfirmationscreenisdisplayed.
4.ClickOK.
Themoderatorfunctionturnsoff.
- Click the Become Moderator button on the projection control screen on a different user's computer.
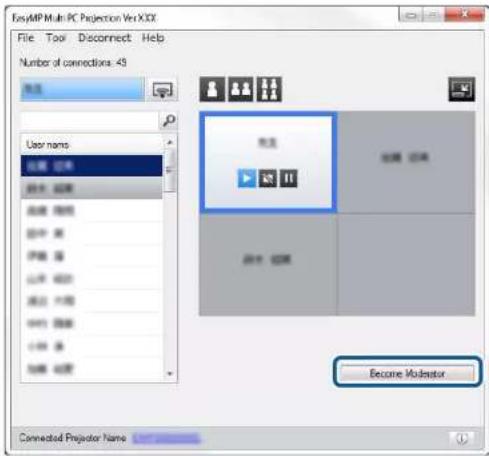
Theconfirmationscreenisdisplayed.
6.ClickOK.
Themoderatorfunctionturnsbackonandthenewmoderatorcancontroltheprojecteddisplay.
Parenttopic: Using Additional Functions
Relatedconcepts
ConnectionMethodsforVariousMeetingStyles
DistributingtheProjectedScreen
Themoderatorcandistributethecurrentlyprojectedscreenimagestotheparticipant'sdevices.
- Click the button on the tool bar or the projection controls screen.
Note: You can also deliver a blank screen. Click the button on the toolbar, and then click Deliver BlankScreenfromtheToolmenu.
Youseetheconfirmationscreen.
2.ClickStart.
Thebuttonandthebuttonappearonthecomputerscreen.
- Clickthebutton.
Whenthescreendistributionsucceeds, themoderatorseesacompletionmessageandthedistributed imageautomaticallyappearsintheViewerontheparticipant'sdevices.
Parenttopic: Using Additional Functions
Relatedreferences
ViewerScreen
SelectingtheParticipant'sScreentoProjectUsingThumbnails
Themoderatorcanchecktheparticipant'sdevicescreensasthumbnailsandselectwhichuserto project.
-
Click the button on the tool bar or the projection controls screen. Thethumnailsscreen is displayed.
-
Selectupto12thumbnailsyouwanttoproject.
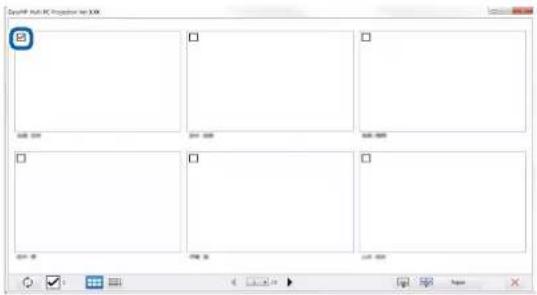
- Toclearallselections, click. If you click this again, the previously selected thumbnails are selected again.
- Toswitchthesizeandthenumberofthumbnailsdisplayedononepage,clicktheor button.


3.Clickthebutton.
Note: When you select more than 5 thumbnails, the thumbnail selections screen appears. After selecting up to 4 thumbnails, you must click the button again.
Theselectedthumbnailsareprojected. Clickthebuttontocloseth thu mbnailsscreenandreturn tothetoolbarortheprojectioncontrolscreen.
Parenttopic: Using Additional Functions
HidingtheProjectionControlScreen
Youcanhidetheprojectioncontrolscreenfromotheruserswhileprojectingyourcomputerscreen. This allowsyoutochangethenecessarysettingswithoutprojectingtheoperation. Theprojectedimage currentlydisplayedispausedautomaticallywhenyouswitchthetoolbartotheprojectioncontrolscreen. Yourcomputerscreenisprojectedagainwhenyoureturntothetoolbar.
Note: This function is available only for the moderator when using the moderator function.
- ClickSetoptionsonthesearchscreen.
TheSetoptionsscreenisdisplayed. -
ClicktheGeneralsettingstab.
-
Select Freeze projected screen when displaying Projection control screen, and then click OK.
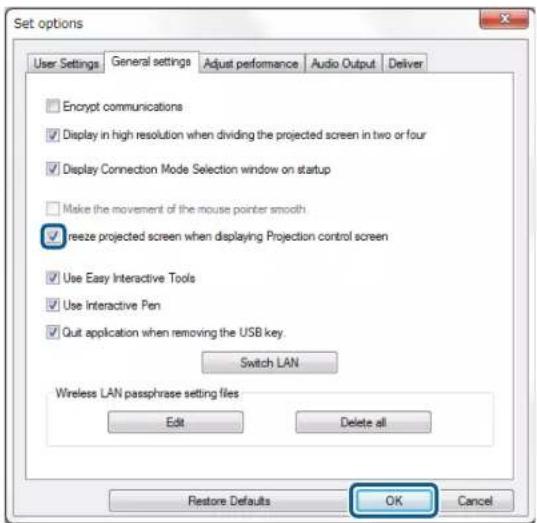
The Set options screen closes. The operation on the projector control screen will not be projected next timeyouuseit.
Parenttopic: Using Additional Functions
ProhibitingParticipantOperations
Themoderatorcanlockmouseoperationsonparticipant'sdevicessothattheparticipantcannotchange theimagesbeingprojected.
- Clickthebuttonontheprojectioncontrolscreentolocktheparticipant'smouseoperations.
Thebuttonchangestothebuttonontheprojectioncontrolscreen. Theparticipantsseethe icontoindicatethatmouseoperationsarelocked.
- Clickthebuttonontheprojectioncontrolscreentounlocktheparticipant'smouseoperations.
Thebuttonchangestothebuttonontheprojectioncontrolscreen. The participantscan operatethemouseontheirdevices.
Parenttopic: Using Additional Functions
ControllingtheConnectionBandwidth
You can reduce the sizeof datat transferred to the project to degree decrease the network load. Todo this, you can control the connection bandwidth.
- ClickSetoptionsonthesearchscreen.
Setoptionsscreenappears. - ClicktheAdjustperformancetab.
- SelectProjectionQuality.
- Image Priority: Transfers projected image data with a low compression ratio to prioritize image quality.
•SpeedPriority: Compressesprojectedimagedatatoincreasetransferspeed.
- SelectthebandwidthyouwanttouseastheUseBandwidthsetting.
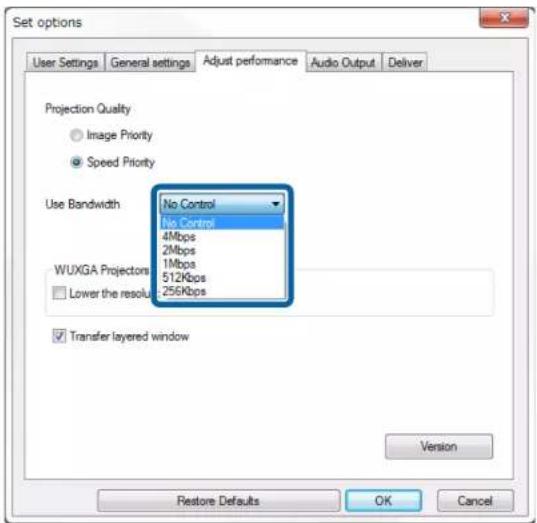
When you select an narrower bandwidth, the projected image quality may decline but then network load is reduced.
Note: If you donotneed to output audiowhile controlling bandwidth, makes sure you clear the Output audio from the projector setting on the Audio Output tab. The bandwidth used for audio can then be used for the image transferto improve the image equality.
BandwidthControlRestrictions
Parenttopic: Using Additional Functions
BandwidthControlRestrictions
Notethefollowingbandwidthlimitations.
- Whenyoulimitthebandwidth, the imagequality may decline due to the compression of the transferred data.
- When you select 256Kbps or 512Kbps as Use Bandwidth on the Adjust Performance tab, you cannot output audio from the projector. If you want to transfer audio, select the bandwidth to 1 Mbps or more.
- Thebandwidthmaymomentarilyexceedthevalueyouselectedbecauseeachvalueinthelistisan averagevaluemeasuredwithin30seconds.
- Youcanlimitthebandwidthonlyofdatayousend.Youcannotlimitdatathatyoureceive,suchasa thumbnail.
Parenttopic: Controlling the Connection Bandwidth
Relatedtasks
OutputtingAudiofromtheProjector
SolvingProblems
SeethefollowingsectionstocheckforsolutionstoproblemsyoumayhaveusingEasyMPMultiPC Projection.
SolvingNetworkConnectionProblems
SolvingProblemsDuringProjection
ErrorMessageList
EventIDList
SolvingNetworkConnectionProblems
Trythesesolutionsdependingonyournetworkenvironment.
SolutionsWhenYouCannotConnectUsingQuickConnectionMode
SolutionsWhenYouCannotConnectProjectorsUsingAdvancedConnectionMode(Wireless)
SolutionsWhenYouCannotConnectProjectorsUsingAdvancedConnectionMode(Wired)
Parenttopic: Solving Problems
SolutionsWhenYouCannotConnectUsingQuickConnectionMode
When you cannot connect the computer and the projector using Quick Connection Mode, try the followingsolutions.
- Check the status of the external devices used for the network connection or the environment in which thenetwork devices and the projector are located.
- Connect the specified wireless LAN unit to the projector securely. See your projector User's Guide formoredetails.
- Checkforanyobstaclesbetweenthecomputerandprojector,andchangetheirpositiontoimprove communication.Sometimestheindoorenvironmentpreventstheprojectorfrombeingfoundina search.
- Settheradiostrengthforthenetworkdevicestothemaximum.
- Checktheprojector'snetworksettings.
- SettheConnectionModesettingtoQuick.
•TurnonawirelessLAN.
- When you enable these security setting, set the same pass phrase to the computer and the projector.
- Closenetworksettingsontheprojector, and then return to the LAN standbyscreen.
- Checkthecomputer'snetworksettings.
- If the wireless LAN adapter is not installed on your computer, install a wireless LAN card on your computer.
- EnablethewirelessLANsettingorAirPortonyourcomputer.
- Checkthesoftwaresettings.
- Ifauserotherthanthemoderatorhasestablishedaconconnectionandtheprojectedimageremainsasitis,youcaninterruptthecurrentconnectiontoprojectyourscreen.
IfaProjectorKeywordissetfortheprojectorbutyoudonotknowthekeyword,displaytheHome screentochecktheprojectorkeyword.
If your project orders nothavea Homescreen, click the button on the tool bar or the projection controls screen on the computer from which you entered the keyword. If the keyword is not displayed, restart the projector and check the keyword displayed on the LAN stand by screen.
• Makesureyoustartthesoftwareintheconnectionmodethatyousetontheprojector. If you cannot selectorchangetheconnectionmode, selectDisplayConnectionModeSelectionwindowon startup on the General settings tab in the Set options screen. The select connection mode screen is displayed after restartingthesoftware.
Parenttopic: SolvingNetworkConnectionProblems
Relatedreferences
Setoptions-Generalsettings
SolutionsWhenYouCannotConnectProjectorsUsingAdvancedConnectionMode (Wireless)
When you cannot connect the computer and the projector using Advanced Connection Mode over a wireless network, try the following solutions. If you cannot resolve the problem, contact your network administrator.
- Check the status of the external devices used for thenetwork connection or the environment in which thenetwork devices and the projector are located.
- Connect the specified wireless LAN unit to the projector securely. See your projector User's Guide formoredetails.
- Checkforanyobstaclesbetweentheaccesspointandthecomputerorprojector,andchangetheir positiontoimprovecommunication.Sometimes,indoorenvironmentspreventtheprojectorfrom beingfoundinasearch.
- Makesurethattheaccesspointandthecomputerorprojectorarenottoofarapart.Movethem closertogetherandtrytoconnectagain.
- If the wireless connection is slow your projected image contains noise, check for interference from other equipment, such as Bluetooth device or microwave. Movethe interfering device farther away are expand your wireless bandwidth.
- Settheradiostrengthforthenetworkdevicestothemaximum.
- SetthelPaddress, thesubnetmask, and thegatewayaddressfortheaccesspointcorrectly.
- MakesurethewirelessLANsystemoftheaccesspointsupportstheprojector'swirelessLAN system.
- Checktheprojector'snetworksettings.
- SettheConnectionModesettingtoAdvanced.
- Setthecomputer, theaccesspoint, and theprojectortothesameSSID.
- Set DHCP to Off. When DHCP is set to On, it may take some time to enter LAN standby status if an available DHCP serverisnotfound.
- SettheIPaddress, thesubnetmask, and thegatewayaddress for the projector correctly.
•TurnonawirelessLAN.
- SetthewirelessLANsystemtomeetthestandardssupportedbytheaccesspoint.
- When you enable these security setting, set the same pass phrase to the access point, the computer, and the projector.
- Closenetworksettingsontheprojector, and then return to the LAN stand by screen.
- Checkthecomputer'snetworksettings.
- If the wireless LAN adapter is not installed on your computer, install a wireless LAN card on your computer.
- EnablethewirelessLANsettingorAirPortonyourcomputer.
- Connecttotheaccesspointtowhichtheprojectorisconnected.
- Turnoffthefirewall.Ifyoudonotwanttoturnitoff,registerthefirewallasanexception.Makethe necessarysettingstoopentheports.Theportsusedbythissoftwareare"3620","3621",and"3629".
- Checktheaccesspointsettings.
- Setconnectionpermissionattheaccesspointtoallowprojectorstoconnectifanyfunctionsthat blockconnections,suchasMACAddressrestrictionsandportrestrictions,arettotheaccess point.
- Checkthesoftwaresettings.
- Select the network adapter you are using from Switch LAN on the Set options screen. If the computerhas multiple LAN environments, a connection cannot be established unless then network adapter is selected correctly.
- If you cannot find the projector you want to connect to using Automatic search, select Manual search to specify the IP address.
- Ifauserotherthanthemoderatorhasestablishedconnectionandtheprojectedimageremainsasitis,youcaninterruptthecurrentconnectiontoprojectyourscreen. IfaProjectorKeywordissetfortheprojectorbutyoudonotknowthekeyword,displaytheHome screentochecktheprojectorkeyword.
If your projectordoesnothavea Homescreen, click the button on the tool bar or the projection controls screen on the computer from which you entered the keyword. If the keyword is not displayed, restart the projector and check the keyword displayed on the LAN stand by screen.
- Makesureyoustartthesoftwareintheconnectionmodethatyousetontheprojector. If you cannot selectorchangetheconnectionmode, selectDisplayConnectionModeSelectionwindowon startup on the General settings tab in the Set options screen. The select connection mode screen is displayed after restartingthesoftware.
- MakesuretheprojectorsupportstheEasyMPMultiPCProjectionversionbeingused. Install EasyMPMultiPCProjectionfromtheEPSONProjectorSoftwareCD-ROMsuppliedwiththe projector(ifavailable)ordownloaditfromtheEpsonWebsite.
- InstallthelatestversionofEasyMPMultiPCProjectiononallcomputers. Themaximumnumberof computerconnectionsandtheavailabilityofthemoderatorfunctionvariesdependingonthe projectormodel,nomatterwhichversionofEasyMPMultiPCProjectionyouareusing.
- Whenanotheruserisalreadyconnected,youcanonlyconnecttoprojectorsinthesamemirroring groupasthatselectedbytheotheruser.Selectaprojectorfromthesamemirroringgroupasthe userwhoisalreadyconnected,orselectaprojectorthatisinstandbystatus.
Parenttopic: Solving Network Connection Problems
Relatedreferences
Setoptions-Generalsettings
Relatedtasks
SearchingforNetworkProjectorsbySpecifyinganIPAddressorProjectorName
SolutionsWhenYouCannotConnectProjectorsUsingAdvancedConnectionMode (Wired)
When you cannot connect the computer and the projector using Advanced Connection Mode over a wired network, try the following solutions. If you cannot resolv the problem, contact your network administrator.
- Checkthestatusoftheexternaldevicesusedforthenetworkconnectionortheenvironmentinwhich thenetworkdevicesandtheprojectorarelocated.
- Connectthenetworkcablesecurely.
Note:
- Useacommerciallyavailable100BASE-TXor10BASE-TLANcable.
- Topreventmalfunctions, useacategory5orhighershieldedLANcable.
- Checktheprojector'snetworksettings.
- Set DHCP to Off. When DHCP is set to On, it may take some time to enter LAN standby status if an available DHCP server is not found.
- SetthelPaddress, thesubnetmask, and thegatewayaddressfortheprojectorcorrectly.
- Closenetworksettingsontheprojector, and then return to the LAN stand by screen.
- Checkthecomputer'snetworksettings.
- EnableLANsettingsyourcomputer.
Windows Vista: Check Control Panel > System and Maintenance > Device Manager.
Windows 7, Windows 8, Windows 8.1, and Windows 10: Check Control Panel > Hardware and Sound>DeviceManager.
- Turnoffthefirewall.Ifyoudonotwanttoturnitoff,registerthefirewallasanexception.Makethe necessarysettingstoopentheports.Theportsusedbythissoftwareare"3620","3621",and"3629".
- Checkthesoftwaresettings.
- Select the network adapter you are using from Switch LAN on the Set options screen. If the computerhas multiple LAN environments, a connection cannot be established unless then network adapter is selected correctly.
- If you cannot find the projector you want to connect to using Automatic search, select Manual search to specify the IP address.
- Ifauserotherthanthemoderatorhasestablished connection and the projected imageremains as itis, you can interrupt the current connection to project your screen.
IfaProjectorKeywordissetfortheprojectorbutyoudonotknowthekeyword,displaytheHome screentochecktheprojectorkeyword.
If your projectordoesnothavea Homescreen, click the button on the tool bar or the projection controls screen on the computer from which you entered the keyword. If the keyword is not displayed, restart the projector and check the keyword displayed on the LAN stand by screen.
- Makesureyoustartthesoftwareintheconnectionmodethatyousetontheprojector.Ifyoucannot selectorchangetheconnectionmode,selectDisplayConnectionModeSelectionwindowon startup on the General settings tab in the Set options screen. The select connection mode screenisdisplayedafterrestartingthesoftware.
- MakesuretheprojectorsupportstheEasyMPMultiPCProjectionversionbeingused.Install EasyMPMultiPCProjectionfromtheEPSONProjectorSoftwareCD-ROMsuppliedwiththe projector(ifavailable)ordownloaditfromtheEpsonWebsite.
- InstallthelatestversionofEasyMPMultiPCProjectiononallcomputers. Themaximumnumberof computerconnectionsandtheavailabilityofthemoderatorfunctionvariesdependingonthe projectormodel,nomatterwhichversionofEasyMPMultiPCProjectionyouareusing.
- Whenanotheruserisalreadyconnected,youcanonlyconnecttoprojectorsinthesamemirroring groupasthatselectedbytheotheruser.Selectaprojectorfromthesamemirroringgroupasthe userwhoisalreadyconnected,orselectaprojectorthatisinstandbystatus.
Parenttopic: Solving Network Connection Problems
Relatedreferences
Setoptions-Generalsettings
Relatedtasks
SearchingforNetworkProjectorsbySpecifyinganIPAddressorProjectorName
SolvingProblemsDuringProjection
Trythesesolutionsdependingonyoursituation.
SolutionsWhentheScreenisNotProjectedProperly
SolutionsWhenAudioisNotPlayedProperly
SolutionsWhentheModeratorFunctionDoesNotWork
SolutionsWhentheProjectedScreenisNotDelivered
Parenttopic: Solving Problems
SolutionsWhentheScreenisNotProjectedProperly
If the screen is not projected or there are problems with the project image and the following solutions.
- If you are using a Microsoft Office application, stop moving the mouse pointer. If you move the mouse pointer continuously, the screen may not be refreshed quickly.
- If the mouse pointer flickers, try the following solutions.
- Select Make the movement of the mouse pointer smooth on the General settings tab on the Setoptionsscreen.
- Clear Transfer layered window on the Adjust performance tab on the Set options screen.
•TheMediaPlayermovieplaybackscreenmaynotbeprojecteddependingonthecomputer.
- Thescreensaverpreviewmaynotbeprojectedproperlydependingonthecomputer.
- Reducethenumberofconnecteddevicesiftheconnectionspeeddeclines.
- ForOSX, when playing back movies, start Easy MP MultiPC Projection first before starting playback. If Easy MP MultiPC Projection is started during movie playback and the displays screen resolution and color numbers are changed, try moving them movie playback window, minimizing it, or resizing it and so on.
- When using a computer that does not meet the software requirements, images and audioform movies may stop.
- Whenanotheruseristhemoderator, you cannot control your projected display. Changethe moderator or project the screen without a moderator.
Parenttopic: Solving Problems During Projection
Relatedreferences
Setoptions-Generalsettings
Setoptions-Adjustperformance
Relatedtasks
ChangingtheModerator
SolutionsWhenAudioisNotPlayedProperly
If there is no audiocoming from the projector, try the following solutions.
- Audiocanonlybetransferredtooneprojector. When multiple projectors are connected to one computer, disconnect other projectors and try again.
- Select Output audio from the projector on the Audio Output tab on the Set options screen.
- Youcanonlyoutputthecomputer'saudiofromtheprojectorwhenprojectingonecomputerscreenin fullscreenmode.
- If the bandwidth is limited on the Adjust Performance tab on the Set options screen, try increasing the connection bandwidth.
• If the volume for the computer is set to the minimum while the projector volume is set to the maximum, then is may be mixed. Turnup the computer's volume and turn down the projector's volume.
Parenttopic: Solving Problems During Projection
Relatedreferences
Setoptions-AudioOutput
SolutionsWhentheModeratorFunctionDoesNotWork
If themoderatorfunctiondoesnotworkproperly, try the following solutions.
- Make sure you use the Standard Edition of the software. If you use the Participant Edition of the software and need them moderator function, reinstall this software as necessary.
- Make sure your projector supports the moderator function. See the User's Guide supplied with the projectorformoredetails.
- Whenanotheruseristhemoderator, you cannot control your projected display. Changethe moderator.
- Make sure you select Connect as a Moderator, or disable interrupt connections when you connect a projector.
Parenttopic: Solving Problems During Projection
Relatedtasks
ChangingtheModerator
SolutionsWhentheProjectedScreenisNotDelivered
If the screendelivery function does not work properly, try the following solutions.
- Make sure your projector supports the screen delivery function. See the User's Guide supplied with the projectorformoredetails.
•Closerunningprojectorfunctions.
- Makesuretheimagebeingprojectedisnotprotectedbycopyrights.
Parenttopic: Solving Problems During Projection
Relatedtasks
DistributingtheProjectedScreen
ErrorMessageList
When an error occurs, an error message is displayed on your computers screen. Check for your message and follow the instructions heretoclearthe error.
ErrorMessageWhenStartingupEasyMPMultiPCProjection
ErrorMessagesWhenUsingaUSBKey
ErrorMessageWhenSearchingforandSelectingProjectors
ErrorMessageWhenProjecting
ErrorMessageWhenOperatingaProfile
ErrorMessageWhenUsingtheModeratorFunction
ErrorMessageWhenDistributingtheProjectedScreen
Parenttopic: Solving Problems
ErrorMessageWhenStartingupEasyMPMultiPCProjection
| ErrorMessageRemedy | |
| Thisapplicationisalreadyrunning.TwoinstancesofEasyMPMultiPCProjection havebeenstarted. | |
| Cannotstartthisapplicationbecauseother EPSONProjectorsoftware(QuickWireless Connection)isalreadyrunning. | CloseQuickWirelessConnectionandthenstart EasyMPMultiPCProjection.TocloseQuickWirelessConnection,perform SafelyRemoveHardwarefromtheicononthetaskbartoremovetheQuickWirelessConnection USBKeyfromthecomputer. |
| Cannotstartthisapplicationbecauseother EPSONProjectorsoftware(USBDisplay)is alreadyrunning. | CloseUSBDisplayandthenstartEasyMPMulti PCProjection.DooneofthefollowingtocloseUSBDisplay:•Windows:DisconnecttheUSBcablefromthe projector.•OS X:Select Disconnect from the USB Display iconmenuonthemenubarorDock,andthen removetheUSBcable. |
| Cannotstartthisapplicationbecauseother EPSONProjectorsoftware(EasyMPNetwork Projection)isalreadyrunning. | CloseEasyMPNetworkProjectionandthenstart EasyMPMultiPCProjection. |
| Cannotstartthisapplicationbecauseother EPSONProjectorsoftware(USBKeySetupTool) isalreadyrunning. | ClosetheUSBKeySetupToolandthenstart EasyMPMultiPCProjection. |
| EasyMPMultiPCProjectioninitializationfailed.Restart | EasyMPMultiPCProjection.Ifthe messageisstilldisplayed,uninstallandthen reinstallEasyMPMultiPCProjection. |
| Cannotopentheshortcutfile.Theshortcutfilemaybeco | rupted.StartEasyMP MultiPCProjection,andthentrysearchingforand connectingtotheprojectoragain. |
| Cannotfindtheprojectorlinkedtotheshortcutfile. Searchagain. | Checkthefollowingitems.•Openashortcutfileintheconnectionmodefor whichyoucreatedtheshortcutfile.•OpenashortcutfileinAdvancedConnection ModeifyouusetheParticipantEditionofthe software. |
| Filesaremissingorinvalid.Failedtostartthe application.Reinstall/removetheapplication. | UninstallandthenreinstallEasyMPMultiPC Projection. |
| Networkadapterinformationcouldnotbe obtained. | Checkthefollowingitems.•Anetworkadapterisinstalledonthecomputer.•Thedriverforthenetworkadapterbeingusedis installedonthecomputer.•Thenetworkadapterisenabled.Afterchecking,restartthecomputerandthen restartEasyMPMultiPCProjection.Ifyoustillcannotconnect,checkthenetwork settingsonthecomputerandthenetworksettings ontheprojector. |
| Cannotstartfromtheshortcutwhileprojecting.Stopproj | ectingandthenstartprojectionfromthe shortcut.Youcannotstartprojectionfromthe shortcutwhenyouarealreadyprojectingusing EasyMPMultiPCProjection. |
| CannotstartfromtheshortcutwhiletheOption screenisdisplayed.ClosetheOptionscreen,and thentryopeningtheshortcutagain. | TheSetoptionsscreenisdisplayed.Closethe Setoptionsscreen. |
| TheslideshowwillnotbeginuntilPowerPointis restarted. | ClosePowerPoint,andthenstarttheslideshow again. |
| CannotbeusedwiththecurrentOSversion.ReinstallEasyMPMultiPCProjection. | ReinstallEasyMPMultiPCProjection. |
| Unabletostartfromtheshortcut.Aconnectionhas alreadybeenestablishedwiththeprojector. | Stopprojectingandthenstartprojectionfromthe shortcut.IftheUSBkeyisconnected,removethe USBkey. |
Parenttopic: ErrorMessagesList
Relatedtasks
UninstallingEasyMPMultiPCProjection(WindowsVista/Windows7/Windows10)
UninstallingEasyMPMultiPCProjection(Windows8.x)
UninstallingEasyMPMultiPCProjection(OSX)
InstallingEasyMPMultiPCProjection(Windows)
InstallingEasyMPMultiPCProjection(OSX)
ErrorMessageWhenUsingaUSBKey
| ErrorMessageRemedy | |
| Unabletofindconnectioninformation.Insertthe USBkey. | InserttheUSBkeysecurelyintoyourcomputer. |
| Unabletofindconnectioninformation.Insertthe USBkeyintotheprojector. | InserttheUSBkeysecurelyintotheprojectortoupdatetheprojectornetworkinformation. |
| Unabletofindaprojectorthatcanconnectwith QuickConnectionMode. | CloseEasyMPMultiPCProjectionandtheninsert theUSBkeyagain. |
| Unabletofindaprojectorthatcanconnectwith AdvancedConnectionMode. | |
| UnabletousetheUSBkeywhiletheapplicationis running. | |
| Unabletofindaprojectorthatcanconnectwith ParticipantEdition. | Makesuretheprojectorisconnectedtothe networkusingtheAdvancedconnectionmode, andthenupdatetheprojectornetworkinformation savedontheUSBkey. |
| Filesaremissingorinvalid.Failedtostartthe application.SetuptheUSBkeyagain. | DeleteallfilesontheUSBflashdrive,andthen starttheUSBKeySetupTooltocreateaUSBkey again. |
| UnabletosetuptheUSBkey.Filesaremissingor invalid.ReinstallEasyMPMultiPCProjection. | |
| UnabletosetuptheUSBkey.ReinserttheUSB memorydeviceandstartUSBKeySetupTool again. | |
| UnabletosetuptheUSBkey.Checktheamount offreespace.Necessaryfreespace:150MB | |
| AdministratorauthorityisrequiredtorunUSBKey SetupTool. | RuntheUSBKeySetupToolasauserwith administratorauthority. |
Parenttopic: ErrorMessagesList
Relatedtasks
CreatingaUSBkeyonaUSBFlashDrive(WindowsOnly)
UsingaUSBKeytoConnectaWindowsComputer
ErrorMessageWhenSearchingforandSelectingProjectors
| ErrorMessageRemedy | |
| Cannotjoin.Themaximumnumberofparticipants hasbeenexceeded. | Themaximumnumberofdevicesarealready connectedtotheprojector.Disconnectusersand projectorsthatarenotprojectingscreens. |
| Theprojectorkeyworddoesnotmatch.Pleasetry again. | ChecktheProjectorKeyworddisplayedonthe LANstandbyscreen,andentertheProjector Keyword. |
| Connectionfailedduetoprojectorkeyword mismatch. | |
| Theselectedprojectorismirroringanother projector. | Whenanotheruserisalreadyconnected,youcan onlyconnecttotheprojectorsinthesame mirroringgroupasthatselectedbytheotheruser.Selectaprojectorfromthesamemirroringgroup, orselectaprojectorthatisinstandbystatus. |
| Oneormoreprojectorsarenotresponding.Youcannot | connecttomultipleprojectors simultaneously.Checkthenetworksettingsonthe computerandthenetworksettingsonthe projector. |
| Anetworkerroroccurred.Turnonyourcomputer'swirelessLAN,andthen trysearchingfortheprojectoragain.Ifyoustill cannotconnecttotheprojector,checkthenetwork settingsonthecomputerandthenetworksettings ontheprojector. | |
| Connectiontotheprojectorfailed.Checkiftheprojectoryouwanttoconnecttois alreadyconnectedtoEasyMPNetworkProjection.Youcannotconnecttoaprojectorthatisalready connectedusingEasyMPNetworkProjection. | |
Parenttopic: ErrorMessagesList
Relatedtasks
UninstallingEasyMPMultiPCProjection(WindowsVista/Windows7/Windows10)
UninstallingEasyMPMultiPCProjection(Windows8.x)
UninstallingEasyMPMultiPCProjection(OSX)
GettingtheLatestVersionoftheApplication
InstallingEasyMPMultiPCProjection(Windows)
InstallingEasyMPMultiPCProjection(OSX)
Relatedtopics
SupportedResolutionsandColors
ErrorMessagesWhenProjecting
| ErrorMessageRemedy | |
| Theprojectorhasdisconnected.Anerrormayhaveoccurredintheprojector.Checktheprojector'sindicatorlights. | |
| Anetworkerroroccurred.Tryconnectingagain.Ifyoustillcannotconnectto theprojector,checkthenetworksettingsonthe computerandthenetworksettingsonthe projector. | |
Parenttopic: ErrorMessagesList
ErrorMessageWhenOperatingaProfile
| ErrorMessageRemedy | |
| Entermax.32characters.Theenteredtextexceeds32ch | characters.Shorten thenameto32charactersorless. |
| Enterafoldername.Nofoldernameentered.Enterafoldername. | |
| Foldersshouldnotbecreatedmorethan6layers deep. | Thefolderstructureisdeeperthansixfolders. Createthenewfolderhigherupinthefolder structure. |
| ThereisalreadyafoldernamedXXXinthisfolder.Afolder | withthesamenamealreadyexists.Enter anotherfoldername. |
| ThereisalreadyafilenamedXXXinthisfolder.Aprojector | withthesamenamealreadyexists.Enteranotherprojectorname. |
| Cannotimport.Formatnotsupportedbythis application. | Checktheprofileyouwanttoimport.Youcannot importaprofilewhenprojectorinformationhasnot beenregistered,orwhentheprofileiscorrupt. |
| Cannotimportbecausethefolderstructureexceedssixfolders. | Thefolderstructurecannotexceedsixlayers.Import,move,orcopytoafolderhigherupinthe folderstructure. |
| Cannotmovebecausethefolderstructureexceedssixfolders. | |
| Cannotcopybecausethefolderstructureexceedssixfolders. | |
| Failedtoopenthefile.Theprofilemaybecorrupted.Tryim | Importingthe profileagain. |
| Failedtosavethefile.Makesureyouhaveaccessrightsstothefolder, andthentryagain. | |
| Cannotimportcertainitemsbecausethe connectionmodesdiffer. | Importaprofileinthconnectionmodeinwhich youcreatedaprofile. |
Parenttopic: ErrorMessagesList
Relatedtasks
RegisteringaProfile
ImportingaProfile
ErrorMessageWhenUsingtheModeratorFunction
| ErrorMessageRemedy | |
| Cannotswitchtomoderator.Youcannotbecomethemod | deratorwhenanotheruseristhemoderator.Askthecurrentmoderatortoquit,andthentryagain. |
| FailedtoswitchtoModeratorModeMakesureanotheru | serisnothemoderator,andthentryagain. |
| Themoderatorfunctionisnotavailable.Youhavebeenconnectedasaparticipant. | Theprojectoryouareconnectingtodoesnotsupportthemoderatorfunction.Tobecomethemoderator,changetoaprojectorthatsupportsthemoderatorfunction. |
Parenttopic: ErrorMessagesList
Relatedtasks
ChangingtheModerator
ErrorMessageWhenDistributingtheProjectedScreen
| ErrorMessageRemedy | |
| Theprojectorisprocessing.Waitforawhile,andthentrytodeliveragain. | Closerunningprojectorfunctions,andthentryagain. |
| Cannotdelivertheimagecurrentlybeingprojected. | Makesuretheimagebeingprojectedisnotprotectedbycopyrights. |
| Anetworkerroroccurredwhiledelivering.Please tryagain. | Makesurethemoderatorcanconnecttotheprojector. |
| Cannotsavethereceivedfile.Checktheamountoffreespace. | Makesureyouhaveenoughfreespacetosavethereceivedimages. |
| Cannotsavethereceivedfile.ChecktheaccessrightstotheSaveTofolder. | CheckthelocationwherethereceivedimageissavedontheDelivertabintheSetoptionsscreenandmakesureyouhaveaccessrightstothefolder. |
| Cannotsavethereceivedfile.Checkthefoldersettings. |
Parenttopic:ErrorMessagesList
Relatedtasks
DistributingtheProjectedScreen
EventIDList
Whenaconnectionerroroccurs, anumberindicatingthetypeoferrorisdisplayedasfollows.
EventID:04xx
Checkthenumbersandthenapplythefollowingcountermeasures.Ifyoucannotresolvetheproblem, contact your network administrator, or contact Epson as described in your projector User's Guide.
| EventIDCauseRemedy | |
| 0432Failedtostartupthenetworksoftware.Restarttheprojector. | |
| 0435 | |
| EventIDCause | useRemedy | |
| 0434Network | kcommunicationisunstable.Checkthenetwork | communicationstatus,andreconnectafterwaitingforawhile. |
| 0481 | ||
| 0482 | ||
| 0433Cannot | playtransferredimages.Restartthenetworksoft | ware. |
| 0484Comm | unicationwasdisconnectedfromthe computer. | |
| 04FEThenet | worksoftwareendedunexpectedly.Checkthest | statusofnetwork communications.Restarttheprojector. |
| 04FFAsyste | merroroccurredintheprojector.Restarttheprojector. | |
| 0891Cannot | findanaccesspointwiththesame SSID. | Setthecomputer,theaccesspoint,andthe projectortothesameSSID. |
| 0892TheWPA | WPA/WPA2authenticationtypedoes notmatch. | CheckthatthewirelessLANsecurity settingsarecorrect. |
| 0893TheWEP | TEKIP/AESencryptiontypedoes notmatch. | |
| 0894Comm | unicationwasdisconnectedbecause theprojectorconnectedtoanunauthorized accesspoint. | Contactyournetworkadministratorformore information. |
| 0898Failed | toacquireDHCP.ChecktheDHCPservertoseefitis | operatingcorrectlyandchecktheLANcable toseeifitisconnectedcorrectly.Ifyouare notusingDHCP,setDHCPtoOff. |
| 0899Other | communicationerrorslfrestartingtheprojectororth | thenetwork softwaresdoesnotsolvetheproblem,contactEpsonasdescribedinyourprojector User'sGuide. |
| 089ATheEA | Pauthenticationtypeisnotthe same. | CheckthatthewirelessLANsecurity settingsarecorrect.Also,checkifthe certificateisinstalledcorrectly. |
| 089BEAPser | verauthenticationfailed. | |
| 089CEAPcl | entauthenticationfailed. | |
| 089DKeyex | changefailed. | |
| EventIDCauseRemedy | ||
| 0B01Thebuilt-instoragecouldnotbedetected correctly. | PerformDeleteAllInternalData.Whenthe internalstorageisdeletedcorrectly,plugin thepowercordfortheprojectorandturnit on.Ifitisnotdeletedcorrectly,contact EpsonasdescribedinyourprojectorUser's Guide.GotoExtended>WhiteboardSettings>InternalStorage. | |
| 0BFFAnerrorhasoccurredintheWhiteboard function. | Restarttheprojector. |
Parenttopic: Solving Problems
ScreenSummary
SeethesesectionsformoreinformationabouttheEasyMPMultiPCProjectionscreens.
SelectConnectionModeScreen
SearchScreen
SaveScreen
Setoptions
Toolbar
ProjectionControlScreen
ThumbnailScreen
ViewerScreen
SelectConnectionModeScreen
When you start Easy MP Multi PC Projection, these selection connection modes screen is displayed.
![EasyMP Multi PC Projection Ver:X.XX Select Connection Mode. When connecting wirelessly, make sure you select the connection mode specified in the [Network] menu. (This is set to [Quick Connection Mode] by default.) 1 Quick Connection Mode 2 Advanced Connection Mode Connect the computer and the projector over a wireless connection. Set the selected Connection Mode as the default mode for future connections. (Do not display this window again.) OK Cancel](/content/2026/05/844705/images/89ae87b0a6c10f9d7f068c4b61db5dc292a9c40321f4955a43fa0e75a00364c6.jpg)
| 1Selecttheconnectionmode. |
| 2Selecttoalwaysconnectusingtheselectedconnectionmode. |
Parenttopic:ScreenSummary
Relatedconcepts
ConnectionMethodsforVariousNetworkEnvironments
SearchScreen
WhenyoustartEasyMPMultiPCProjection, thesearchscreenisdisplayed.
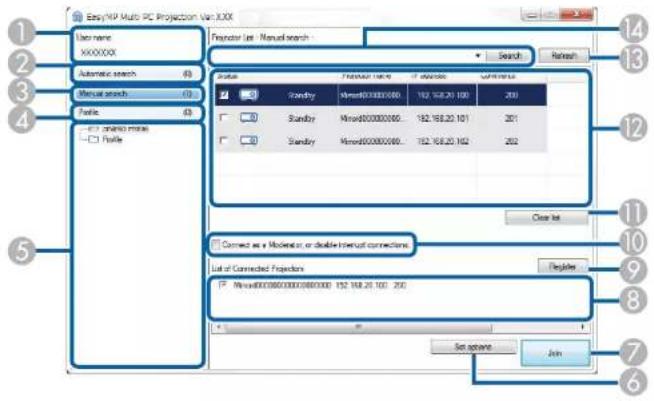
| 1UsernameDisplaystheusername | displayedintheuserlistontheprojection controlscreen.YoucanedittheusernameontheUserSettingstab ontheSetoptionsscreen. |
| 2AutomaticsearchSearchesfor | projectorsonthenetworktowhichthecomputeris connected. |
| 3Manualsearch(AdvancedConnection Modeonly) | Searchesforprojectorsonthenetworkbyspecifyingtheprojector's IPAddressorprojectorname. |
| 4ProfileSearchesforprojectorson | thenetworkbyusingtheprojector informationsavedpreviously. |
| 5ProfilelistDisplaystheregistered | profiles(projectorinformation).Whenyou double-clicktheprofile,theprojectorsregisteredintheprofileare searchedforonthenetwork. |
| 6SetoptionsDisplaystheSetoptionsscreen. | |
| 7JoinConnectstotheselectedproj | ctors. |
| 8List of Connected Projectors(Advanced ConnectionModeonly) | DisplaysinformationontheprojectorsselectedfromtheProjector List.Evenifthesearchmethodischanged,thecontentoftheListof ConnectedProjectorsremainsthesame. |
| 9Register(Advanced ConnectionModeonly) | RegisterstheprojectorsfromtheListofConnectedProjectorsto profile. |
| 10Connectasa Moderator,ordisable interruptconnections. | Connectstothesetectedprojectorsasthemoderatorandyoucan preventanyotherusersfrominterruptingyourconnection(supported modelsonly).ThemoderatorfunctionisavailableonlyontheStandardEditionof thesoftware. |
| 11Clear list | Clears information displayed in theProjector Listand theList of ConnectedProjectors. |
| 12ProjectorListDisplaysalistofth | eprojectorsfoundonthenetwork.Youcanthen selectprojectorstoconnectto.Thesearchresultsforeachsearch method (Automatic search,Manual search,andProfile) are displayedinseparatelists.Status:Seethedescriptionofprojectorstatusiconsinthenext table.Projectorname:Displaystheprojector'sname.SSID(QuickConnectionModeonly):Displaystheprojector'sSSID.SignallIntensity(QuickConnectionModeonly):Displaysthe signalintensitywhenaconnectionismadeinQuickConnection Mode.AstheSignalintensityincreases,sodoesthenumberoflit indicators.IPaddress(AdvancedConnectionModeonly):Displaysthe projector'sIPaddress.Comments:Displayscommentsfortheprojector.Youcaneditthe commentbyright-clickingtheprofile,andthenclickingProperty.Youcanenterupto32characters. |
| 13RefreshUpdatesinformationin | theProjectorList. |
| 14Manualsearchbox (AdvancedConnection Modeonly) | WhenusingManualsearch,entertheprojector'sIPaddressorthe projectorname.ClicktheSearchbuttontosearchforthespecified projector. |
ProjectorstatusiconsintheProjectorListaredescribedinthefollowingtable.
 Standby Standby | Available.Youcanconnecttotheprojector. |
 Busy Busy | Available.Althoughothercomputersareconnectedtotheprojector,youcan alsoconnectatthesametime. |
 Mirroring... Mirroring... | Available.Youcanconnecttoagroupofprojectorsthatareprojectingthe sameimage(mirroring). |
 Currentlyinuseby anotherapplication Currentlyinuseby anotherapplication | Notavailable.Theprojectorisdisplayingthenetworkconfigurationscreenor isbeingusedbyotherprojectorsoftware. |
 Searching Searching | Not available.AManual search or Profilesearch is already being used to searchfortheprojector. |
 Notfound. Notfound. | Not available.ThespecifiedprojectorcouldnotbefoundusingManualsearchorProfilesearch. |
 Unsupported Projectors Unsupported Projectors | Not available.TheprojectorisnotcompatiblewithEasyMPMultiPC Projection. |
 Notacquired Notacquired | Available.Displayedwhenaprojectorwithsecuritysettingsenabledisfound inQuickConnectionMode. |
Parenttopic:ScreenSummary
Relatedtasks
SearchingforNetworkProjectorsAutomatically
SearchingforNetworkProjectorsbySpecifyinganIPAddressorProjectorName
Relatedtopics
SearchingforNetworkProjectorsUsingaProfile
SearchingforNetworkProjectorsUsingaShortcut
Setoptions
SaveScreen
When you search for projectors and save information as a profile on the search screen, the Save screen is displayed.
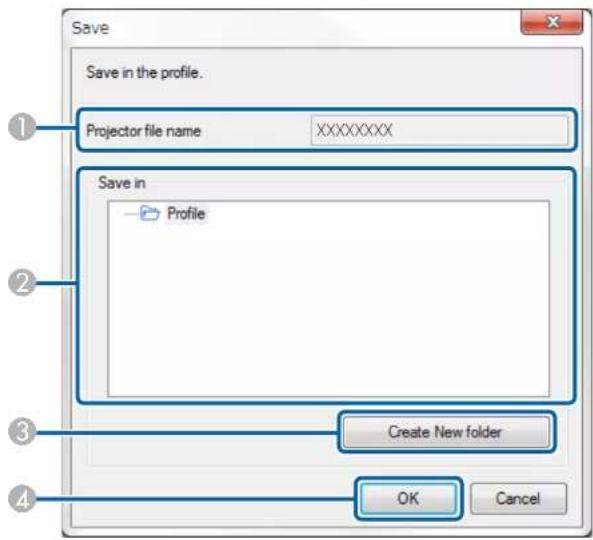
1ProjectorfilenameEntertheprojectorfilename.
| 2Save | inSelectthefolderwhereyou | wanttosavetheprofile. |
| 3Create | NewfolderCreatesanewfolder. | |
| 4OK | Registerstheprojectorinformationintheprofile. |
Parenttopic:ScreenSummary
Relatedtasks
RegisteringaProfile
Setoptions
When you click Set options on the EasyMP Multi PC Projection search screen, the Set options screen is displayed.
Note:
- You can also access Set options from the Tool menu on the projection control screen. When you access Set options from the projection control screen, the User Settings tab is not displayed.
•Theavailablesettingsvarydependingontheeditionofthesoftware.
Setoptions-UserSettings
Setoptions-Generalsettings
Setoptions-Adjustperformance
Setoptions-AudioOutput
Setoptions-Deliver
Parenttopic:ScreenSummary
Relatedreferences
SearchScreen
Toolbar
Setoptions-UserSettings
When you click the User Settings tab on the Set options screen, the following screen is displayed.
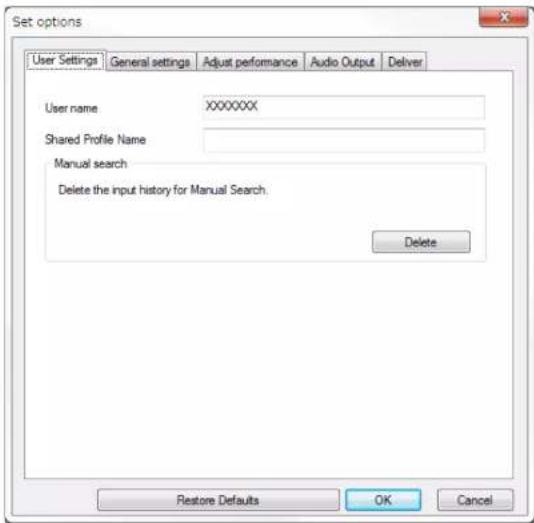
| UsernameEntertheusernamedis | playedintheuserlistontheprojection controlscreen.Youcanenterupto32characters.Thissettingis synchronizedwiththesettingonthesearchscreen. |
| SharedProfileName(AdvancedConnectionMode only) | EnterthenetworklocationorURLofthesharedprofile(includingthe nameoftheprofile)asshownbelow.Forafileserver(Windowsonly):\xxxxx\xxxxx.mplistForawebserver:http://xxxxx/xxxxx.mplist |
| Delete(AdvancedConnection Modeonly) | DeletestheinputhistoryforManualsearch. |
| Restore Defaults | Resets all adjustment values for Set options to their default settings,exceptforSwitchLANontheGeneralsettingstab. |
Parenttopic:Setoptions
Relatedreferences
SearchScreen
ProjectionControlScreen
Relatedtasks
SearchingforNetworkProjectorsAutomatically
SharingaProfileoveraNetwork
Setoptions-Generalsettings
When you click the General settings tab on the Set options screen, the following screen is displayed.
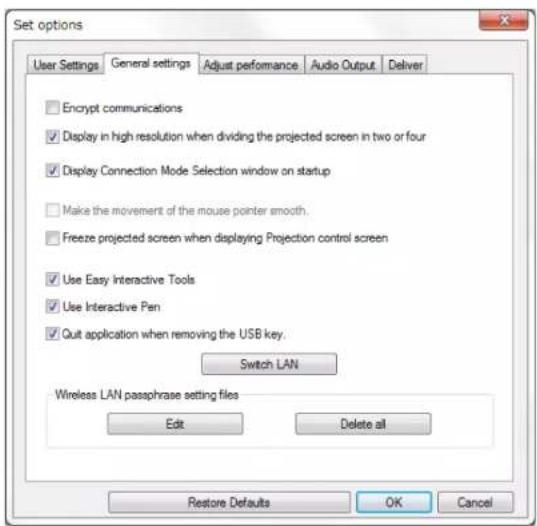
| EncryptcommunicationsSelectto | bencryptandtransmitdata.Evenifdataisintercepted,it cannotbedecrypted. |
| Displayinhighresolution whendividingtheprojected screenintwoorfour | AvailableonlyforprojectorswitharesolutionofWUXGA(1920× 1200).Selecttodisplayalldividedscreensinhighresolution.Clearthissettingifdisplayingtheimagetakestoolongoris interrupted. |
| DisplayConnectionMode Selectionwindowonstartup | SelecttodisplaytheSelectConnectionModescreeneachtimethe softwarestarts.Clearthischeckboxonceyouhavesettledonaregularstartup method. |
| Makethemovementofthe mousepointersmooth | WindowsVista/Windows7onlySelecttopreventthemousepointerfromflickeringwhenTransfer layeredwindowisselectedontheAdjustperformancetab.(If WindowsAeroisselectedasthethemeforWindowsVistaand Windows7,thissettingturnsoffWindowsAero.) |
| Freezeprojectedscreenwhen displayingProjectioncontrol screen | Availableonlyforthemoderatorwhenusingthemoderatorfunction.Selecttohidetheoperationsontheprojectioncontrolscreenfrom otheruserswhileprojectingyourcomputerscreen. |
| UseEasyInteractiveToolsWindow | wsonlySelecttouseEasyInteractiveToolswiththesoftware.ThissettingissynchronizedwithTransferlayeredwindowonthe Adjustperformancetab. |
| UseInteractivePenSelecttousethe | interactivefunctionoveranetwork(supported modelsonly).Youdonotneedtoconnectacomputertothe projectorwithaUSBcable.Youcanusethefollowingdevicesatthesametime.•Windows:TwoEasyInteractivePensandsixtouchpoints•OSX:Onemouse |
| Quitapplicationwhen removingtheUSBkey | SelecttodisconnectthecomputerwhenyouremovetheUSBkey fromyourcomputer.Deselectthischeckboxifyouwanttosharethe USBkeywithotheruserswithoutdisconnectingyourcomputer. |
| SwitchLANWindowsonly | Usethissettigifyouneedtoswitchthenetworkadapterusedto performasearchwhenacomputerhasmultipleadapters.Bydefault,allofthenetworkadaptersareusedtoperformasearch. |
| WirelessLANpassphrase settingfiles(Quick ConnectionModeonly) | InQuickConnectionMode,SSIDsandpassphrasesarestoredon thecomputerwhenconnectingtoaprojectorwithsecuritysettings enabled.Youcaneditanddeletethestoredinformation.Edit:Displaythewirelessnetworkmanagementscreenforthe computer.DeletealltheSSIDsandpassphrasesstoredonthe computer. |
| Restore Defaults | Resets all adjustment values forSet optionsto their default settings,exceptforSwitchLANontheGeneralsettingstab. |
Parenttopic:Setoptions
Relatedtasks
ChangingtheNumberofProjectedPanels
HidingtheProjectionControlScreen
Setoptions-Adjustperformance
When you click the Adjust performance tab on the Set options screen, the following screen is displayed.
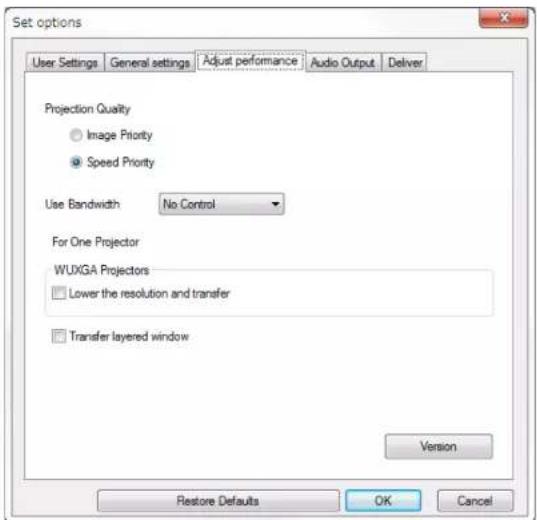
| ProjectionQualitySetsthepriority | forprojectedimagequalityandtransferspeed. |
| •ImagePriority:Transfersprojectedimagedatawithalow compressionratiotoprioritizeimagequality. | |
| •SpeedPriority:Compressesprojectedimagedatatoincrease transferspeed. | |
| UseBandwidthControlsthebandwidth | withthorthedatatransfer.Whenyouselecta narrowerbandwidth,theprojectedimagequalitymaydeclinebutthe networkloadisreduced. |
| Lowertheresolutionand transfer | AvailableonlywhentheUseBandwidthissetto1Mbpsormore andwhenyouconnecttotheprojectorwitharesolutionofWUXGA (1920×1200).Selecttoreducethesizeofthedatatobetransferredtotheprojector byloweringtheresolution. Usethisoptiononaslownetworkorifit takestoolongtodisplaytheimageorprojectionisinterrupted. |
| Transfer layered window | Windows 7 (when Windows 7 Basic is selected as the theme) onlyWhenusingalayeredwindow,contentssuchasmessages displayedonthecomputerarenotprojectedbytheprojector.Select thistoprojectcontentsfromadifferentlayeredwindow.Ifthemousepointerflickersonthescreen,selectMakethe movementofthemousepointersmoothontheGeneralsettings tab. |
| VersionDisplaysEasyMPMultiPC | Projectionversioninformation. |
| Restore Defaults | Resets all adjustment values for Set options to their default settings,exceptforSwitchLANontheGeneralsettingstab. |
Parenttopic:Setoptions
Relatedtasks
ChangingtheNumberofProjectedPanels
ProjectingYourScreen
ControllingtheConnectionBandwidth
Setoptions-AudioOutput
When you click the Audio Output tab on the Set options screen, the following screen is displayed.
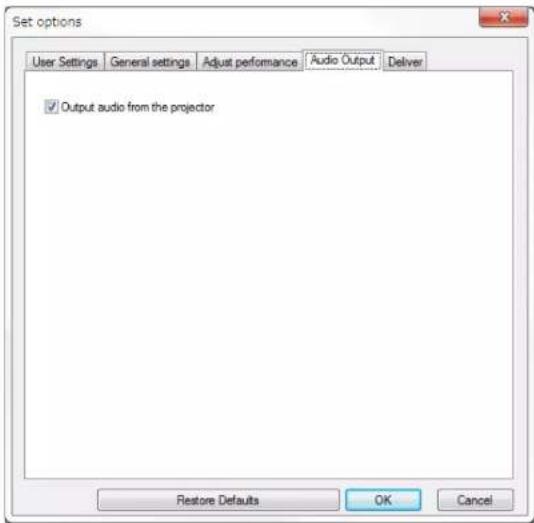
| Outputaudiofromthe projector | Selecttooutputthecomputer'saudiofromtheprojector.Clearto outputaudiofromthecomputer.Note:Youcanonlyoutputthecomputer'saudiofromtheprojectorwhen projectingonecomputerscreeninfullscreenmode.When you select 256Kbps or 512Kbps as Use Bandwidth on the AdjustPerformancetab,youcannotoutputaudiofromthe projectorandcannotselectthissetting. |
| Restore Defaults | Resets all adjustment values for Set options to their default settings,exceptforSwitchLANontheGeneralsettingstab. |
Parenttopic:Setoptions
Relatedtasks
OutputtingAudiofromtheProjector
ControllingtheConnectionBandwidth
Setoptions-Deliver
When you click the Deliver tab on the Set options screen, the following screen is displayed.
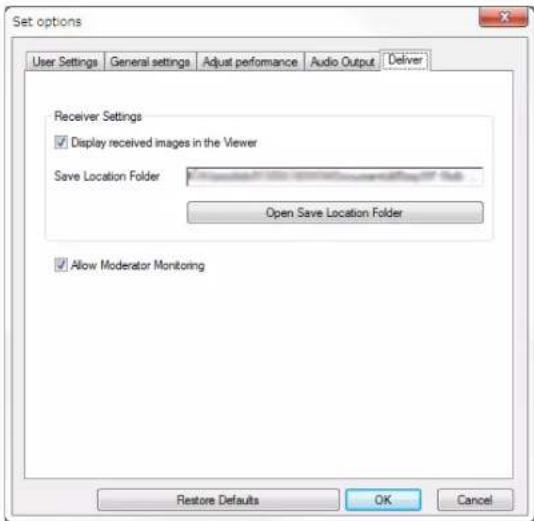
| Displayreceivedimagesinthe Viewer | SelecttoopenthereceivedimageintheViewerbundledwith EasyMPMultiPCProjection. |
| SaveLocationFolderDisplaysthe | folderwherethereceivedimagefileissaved.Savedimagesarestoredinthefollowingfolders.•Windows:\users\Documents\EasyMPMultiPCProjection•OSX:\Users\Pictures\EasyMPMultiPCProjection |
| OpenSaveLocationFolderOpensthe | folderwherethereceivedimagefileissaved. |
| AllowModeratorMonitoringSelecttoallowthemoderatortoviewthecomputerscreenasathumbnail. | |
| Restore Defaults | Resets all adjustment values forSet optionsto their defaultsettings,exceptforSwitchLANontheGeneralsettingstab. |
Parenttopic:Setoptions
Relatedtasks
DistributingtheProjectedScreen
Toolbar
AfterEasyMPMultiPCProjectionstartsandaconnectionismadewiththeprojector,thetoolbaris displayedonthecomputerscreen.Youcanusethistoolbartocontroltheprojectedimageandto disconnectthenetworkconnection.

Note: The items displayed on the toolbar vary depending on the connection method and the edition or yourroleofthesoftware.
| Show | ReleasesStoporPauseandprojectsthecomputerscreenasitis. |
| Stop | Stopsprojectionwhileconnectedtotheprojector.Ablackscreenis projectedwhilestopped. |
| Pause | Pausesthecomputerscreencurrentlydisplayed.Theprojected displaydoesnotchange,evenifyoumakechangesonthecomputer screen. |
| DeliverProjectedScreen | Distributesthecurrentlyprojectedscreenimagestheparticipant's devices. |
| DisplayThumbnails | Displaysthumbnailsoftheparticipant'sdevicescreensforthe moderatortocheck. |
| DisplayReceivedImage | DisplaysreceivedimagesintheViewer. |
| ProjectMyScreen | Projectyourcomputerscreeninfullscreenmode. |
| LeaveDisconnectstheconnectionbetweenyourcomputerandthe projectors. | |
| DisconnectAIDisconnectsthecon | nectionbetweenalldevicesandprojectors participatinginthemeeting. |
| SwitchtoProjectioncontrol screen | Switchestotheprojectioncontrolscreen. |
| ProjectorInformation | Displaysprojectornetworkinformation.TheProjectorKeywordis thekeywordyouenteredwhenyouconnectedtotheprojector.----:Theprojectorkeywordisnotset.Unknown:Theprojectorkeywordisnotacquiredbecausethe connectionisestablishedwithoutenteringtheprojectorkeyword suchasreadingQRcodeandinsertingtheUSBkey. |
Parenttopic:ScreenSummary
Relatedreferences
ProjectionControlScreen
Relatedtasks
OperatingtheProjectedDisplayStatus
ProjectingYourScreen
Disconnecting
ProjectionControlScreen
When you click the button on the toolbar, the projection controls screen is displayed.
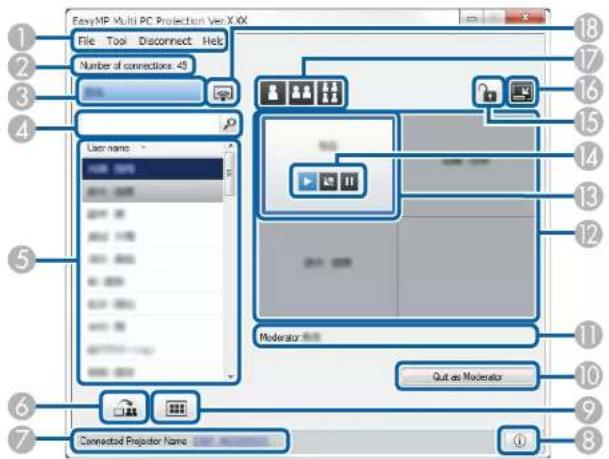
Note:
• The projection controlscreen is available only on Standard Edition of the software.
- The items displayed on the projection controls screen vary depending on your role of the software and projector being used.
| 1File | menuClicktoselectExittoclo | sethesoftware. |
| ToolmenuClicktoselectthe | followingitems.•DenyUserOperations:Lockstheparticipant'smouseoperations.•AllowUserOperations:Unlockstheparticipant'smouse operations.•DeliverBlankScreen:Distributesablankscreentothe participant'sdevicessothatparticipantscandrawfreely.•DisplayReceivedImage:DisplaysreceivedimagesintheViewer.•Setoptions:DisplaystheSetoptionsscreen. | |
| Disconnect menu | Click to selectLeaveorDisconnect All. | |
| HelpmenuClicktoselectVer | sioninformation. | |
| 2Numberofconnections | Display | sthenumberofusersconnectedtotheprojector. |
| 3User | informationDisplaysyourna | meandstatus.Displayedinbluewhenyour computerscreenisbeingprojected.Displayingraywhenyouare intheprojectionareabutnotprojecting. |
| 4User | searchbox | Entertheusernameyouwanttosearchfor,andthenclickthe button.Thesearchresultsaredisplayedintheuserlist.Clickthebuttontoreturntotheoriginaluserlist. |
| 5User | listDisplaystheusernamesf | orthecomputersconnectedtothe projectors.Youcanconnectupto50devicesbetweencomputersthat arerunningEasyMPMultiPCProjectionandsmartphonesortablets thatarerunningEpsoniProjection.Whenyoudraganddropausernametoawhitepanelinthe projectionarea,thecomputerscreenisprojected.Thebackgroundfor usersthatarecurrentlybeingprojectedisblueandusersthatarein theprojectionareabutnotcurrentlyprojectingisgray.Evenifauser leftthesession,theirnameremainsintheuserlistandtheirtextcolor isgray.Thedefaultsettingfortheusernameistheloginusername.Youcan changetheusernameontheUserSettingstabontheSetoption screen,orthesearchscreen. |
| 6 |  DeliverProjectedScreen DeliverProjectedScreen | Distributesthecurrentlyprojectedscreenimagestotheparticipant's devices. |
| 7 | ConnectedProjectorName | Displaysthenameoftheprojectoryouarecurrentlyconnectedto.Whenyouclicktheprojectorname,theprojectorcontrolwebpageis displayed.Youcancontrolprojectoroperationsonyourcomputer screeninthesamewayasusingtheremotecontrol.Seeyour projectorUser'sGuideformoredetails. |
| 8 |  ProjectorInformation ProjectorInformation | Displaysprojectornetworkinformation.TheProjectorKeywordis thekeywordyouenteredwhenyouconnectedtotheprojector.----:Theprojectorkeywordisnotset.Unknown:Theprojectorkeywordisnotacquiredbecausethe connectionisestablishedwithoutenteringtheprojectorkeywordsuch asreadingQRcodeandinsertingtheUSBkey. |
| 9 |  DisplayThumbnails DisplayThumbnails | Displaysthumbnailsoftheparticipant'sdevicescreensforthe moderatortocheck. |
| 10 | QuitasModerator/BecomeModerator | ClicktheQuitasModeratorbuttontostopbeingthemoderator,or theBecomeModeratorbuttontobecomethemoderator.The displayedbuttonvariesdependingontheconnectionmethod. |
| 11 | ModeratorDisplaysthemoderator | tornamewhenthereisamoderator. |
| 12 | ProjectionareaWhenthebackg | roundcolorforapaneliswhite,thecomputerscreen fortheuserinthatpanelisprojected.Ifthereisnouserinthewhite panel,ablackscreenisprojected.Bydragginganddroppingtheuser name,youcanchangethescreenbeingprojectedandthepositionat whichthecomputerscreenisprojected. |
| 13 | TargetpanelMovethetargetpan | elframedinbluebyclickingononeofthepanels intheprojectionarea.Youcanprojectthecomputerscreenwherethe targetpanelispositionedwhenyouclickoneofthechangeprojection buttons. |
| 14ScreencontrolbuttonsIndicates | thefollowingstatusoftheprojector.Show:ReleasesStoporPauseand projects the computer screenasitis.Stop:Stopsprojectionwhileconnectedtotheprojector.Ablack screenisprojectedwhilestopped.Pause:Pausesthecomputerscreencurrentlydisplayed.The projectedddisplaydoesnotchange,evenifyoumakechangeson thecomputerscreen. | |
| 15 | [YYYY]Deny/AllowUser Operations | Locksorunlockstheparticipant'smouseoperations. |
| 16 | [8ZAC]SwitchtoToolbar | Switchestothetoolbar. |
| 17Changeprojection buttons | Changesthenumberofpanelsavailableforprojectingcomputer screens.OneScreen:Projectsthescreenfromonedeviceinfull screenmodewithoutdividingtheprojectedddisplay.TwoScreens:Projectsthescreensfromuptotwodevicesat thesametimebydividingtheprojectedddisplayintwo.FourScreens:Projectsthescreensfromuptofourdevicesat thesametimebydividingtheprojectedddisplayinfour. | |
| 18 | [0&KC]ProjectMyScreen | Projectsyourcomputerscreeninfullscreenmode. |
Parenttopic:ScreenSummary
Relatedreferences
SearchScreen
Setoptions-UserSettings
Toolbar
Relatedtasks
Disconnecting
ProjectingYourScreen
ChangingtheModerator
HidingtheProjectionControlScreen
DistributingtheProjectedScreen
ProhibitingParticipantOperations
Relatedtopics
ControllingtheProjectedDisplay
ThumbnailScreen
When you click the button on a tool bar or a projection controlscreen, the following screen is displayed.
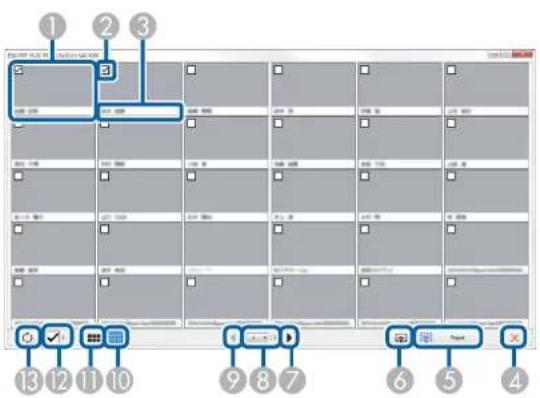
| 1 | ThumbnailDisplaysaparticipant's | devicescreen.Thethumbnailbeingprojectedissurroundedbyablueframe. |
| 2 | ThumbnailcheckboxSelectthethu | mbnailthatyouwanttoproject.Youcanselectupto12thunnails. |
| 3 | UsernameDisplaystheusername | ofeachthumbnail.Youcandisplayupto32characters. |
| 4 |  Close Close | Closesthethumbnailscreen. |
| 5 |  Project Project | Projectsthethumbnailyouselected.Whenyouselectmorethan5thumbnails,thethumbnailselectionscreenappears.Afterselectingupto4thumbnails,youmustclickthebuttonagain. |
| 6 | [A3EY]ProjectMyScreen | Projectsthescreenfromyourcomputerinfullscreenmodewithoutprojectinganyotherusers'screens. |
| 7 |  Next Next | Displaysnextpage. |
| 8 | PagelistSwitchestothepageyouw | anttoview. |
| 9 |  Previous Previous | Displayspreviouspage. |
| 10 |  DisplaySmallThumbnails DisplaySmallThumbnails | Reducesthesizeofeachthumbnailsoyoucanviewmorethumbnailsonthescreen. |
| 11 |  DisplayLarge Thumbnails DisplayLarge Thumbnails | Increasesthesizeofeachthumbnailsoyoucanviewmoredetails oneachone. |
| 12ClearAllDisplaysthenumberofse | electedthumbnails.Deselectthecheckbox toclearalltheselections.Ifyouselectthecheckboxagain,the previouslyselectedthumbnailsareselectedagain. | |
| 13 |  Refresh Refresh | Refreshesthethumbnails. |
Parenttopic:ScreenSummary
ViewerScreen
Theviewerscreenappearswhenyouperformoneofthefollowingoperations.
- Whenyoureceivethedistributedimagedata.
- When you select Display Received Image from the Tool menu on the projection control screen.
- Whenyouclickthebuttononthetoolbar.
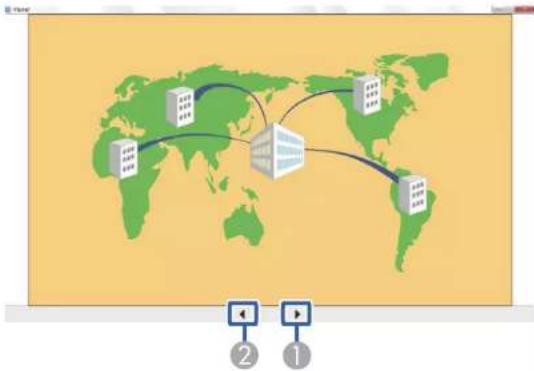
flowchart
graph TD
    A["House"] --> B["Central Building"]
    C["Building"] --> B
    B --> D["Building"]
    style A fill:#f9f,stroke:#333
    style C fill:#f9f,stroke:#333
    style B fill:#ccf,stroke:#333
    style D fill:#cff,stroke:#333
| 1NextdataDisplaysnextdata. | |
| 2PreviousdataDisplayspreviousdata. |
Parenttopic:ScreenSummary
Appendix
SeethesectionstolearnmoreaboutEasyMPMultiPCProjectionsoftware.
UpdatingandUninstallingtheSoftware
SupportedResolutionsandColors
Limitations
Notices
UpdatingandUninstallingtheSoftware
FollowtheseinstructionstoupdateoruninstallEasyMPMultiPCProjection.
GettingtheLatestVersionoftheApplication
UninstallingEasyMPMultiPCProjection(WindowsVista/Windows7/Windows10)
UninstallingEasyMPMultiPCProjection(Windows8.x)
UninstallingEasyMPMultiPCProjection(OSX)
Parenttopic:Appendix
GettingtheLatestVersionoftheApplication
Update to this software and this manual may be available for your product. To check for updates, visit epsilon.com/support (U.S) or epsilon.ca/support (Canada) and select your product.
Parenttopic: Updating and Uninstalling the Software
UninstallingEasyMPMultiPCProjection(WindowsVista/Windows7/Windows10)
FollowtheinstructionsbelowtouninstallEasyMPMultiPCProjection.
Note: Youneedadministratorauthoritytouninstallthesoftware.
-
Turnonyourcomputer.
-
Makesureallrunningapplicationsareclosed.
-
ClickStart, and then click ControlPanel.
Note: For Windows 10, right-click Start, and then click Control Panel.
-
Click Uninstallaprogram from the Program category.
-
SelectEasyMPMultiPCProjection, and then click Uninstall/Change.
- Followtheon-screen instructions.
Parenttopic: Updating and Uninstalling the Software
UninstallingEasyMPMultiPCProjection(Windows8.x)
FollowtheinstructionsbelowtouninstallEasyMPMultiPCProjection.
Note: Youneed administrator authority touninstall the software.
- Turnonyourcomputer.
- Makesureallrunningapplicationsareclosed.
- Navigate to the Apps screen, and then right-click (press and hold) EasyMP Multi PC Projection Ver.X.XX.
- SelectUninstallfromtheappbar.
- Followtheon-screen instructions.
Parenttopic: Updating and Uninstalling the Software
UninstallingEasyMPMultiPCProjection(OSX)
ForOSX, followtheinstructionsbelowtouninstallEasyMPMultiPCProjection.
- Turnonyourcomputer.
- Makesureallrunningapplicationsareclosed.
- OpentheApplicationsfolder.
- Open the EasyMP Multi PC Projection - Tools folder, and then double-click EasyMP Multi PC ProjectionUninstaller.app.
- Followtheon-screen instructions.
Parenttopic: Updating and Uninstalling the Software
SupportedResolutionsandColors
CheckthesesectionsforthecomputerscreenresolutionsandthenumberofcolorthatEasyMPMultiPCProjectioncanproject.
SupportedResolutions
DisplayColor
Parenttopic:Appendix
SupportedResolutions
The following computerscreen resolutions can be projected. You cannot connect to a computer with a resolution greater than WUXGA.
•SVGA(800×600)
•XGA(1024×768)
•SXGA(1280×960)
•SXGA(1280×1024)
•SXGA+(1400×1050)
•WXGA(1280×768)
•WXGA(1280×800)
•WXGA+(1440×900)
•UXGA(1600×1200)
•WUXGA(1920×1200)
When using a computer screen with a unique aspect ratio, the resolution is increased or decreased depending on the resolution of the computer and the project to avoid impairing image equality.
Dependingontheresolution, the vertical or horizontal margins may be projected in black.
Parenttopic: Supported Resolutions and Colors
DisplayColor
The following number of computers screen colors can be projected.
| WindowsOSX | |
| 16-bitcolorApprox.32,000colors(16-bit) | |
| 32-bitcolorApprox.16.7millioncolors(32-bit) |
Parenttopic: Supported Resolutions and Colors
Limitations
CheckthesesectionsforrestrictionsappliedwhenprojectingcomputerimageswhileusingEasyMP MultiPCProjection.
ConnectionLimitations
LimitationswhenProjectingfromWindowsPhotoGalleryorWindowsLivePhotoGallery
LimitationsinWindowsAero
LimitationswhenProjectingfromWindowsMediaCenter
Parenttopic:Appendix
ConnectionLimitations
NotethefollowinglimitationswhenusingEasyMPMultiPCProjection.
- Youcanconnectuptofourprojectorstoonecomputerandprojectsimultaneously.(Multi-screenisnot supported.)
- Youcanconnectupto50devicesbetweencomputersthatarerunningEasyMPMultiPCProjection andsmartphonesortabletsthatarerunningEpsoniProjection.(Ifanyofthecomputersarerunningan olderversionofEasyMPMultiPCProjection,thenumberofcomputersislimitedto16or32,and tabletsthatarerunningEpsoniProjectioncannotjointheconnection.)
- Audiocanonlybetransferredwhenconnectedtooneprojectorandprojectingonecomputerscreenin fullscreenmode.Ifmultipleprojectorsareconnectedoriftheprojecteddisplayisdivided,audio cannotbetransferredduringprojection.
- If the transmissions speed of the wireless LAN is slow, then network may disconnect unexpectedly.
- ApplicationsthatusepartofDirectXfunctionsmaynotbedisplayedcorrectly(Windowsonly).
- Youcannotprojectfull-screenMS-DOSprompts(Windowsonly).
- There are times when the image on the computer screen and the image projected by the projector may not match exactly.
•Moviesarenotplayedassmoothlyastheyareonacomputer.
- When you enable the Use Interactive Pen setting on the General settings tab on the Set options and see black bandson the computers screen, the position of the interactive pen may be misaligned.
Parenttopic: Limitations
LimitationswhenProjectingfromWindowsPhotoGalleryorWindowsLivePhoto Gallery
NotethefollowinglimitationswhenlaunchingWindowsPhotoGalleryorWindowsLivePhotoGallery whenusingEasyMPMultiPCProjection.
- SlideshowisplayedbackinsimplemodewhenprojectingfromWindowsPhotoGalleryorWindowsLivePhotoGallery.
Because the toolbar is not displayed, you cannot change the Theme (effects) while playing as slide show, regardless of the Windows Experience Index rating.
Oncesimplemodehasstarted,youcannotchangemodeswhileWindowsPhotoGalleryorWindowsLivePhotoGalleryisrunning,evenifyoucloseEasyMPMultiPCProjection.RestartWindowsPhotoGalleryorWindowsLivePhotoGallery.
- Youcannotplaymovies.
Parenttopic:Limitations
LimitationsinWindowsAero
NotethefollowinglimitationswhenthewindowdesignforyourcomputerisWindowsAero.
- The layered window is projected regardless of the Transfer layered window setting on the Set optionsscreeninEasyMPMultiPCProjection.
- AfewminutesafteryouconnectacomputertotheprojectoroveranetworkwithEasyMPMultiPC Projection,thefollowingmessagemaybedisplayed.
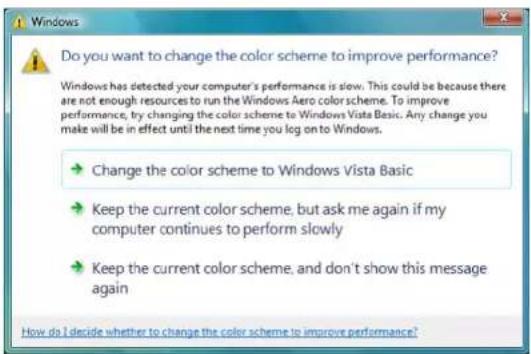
It is recommended that you select Keep the current color scheme, and don't show this message again. This selection is enabled until the computer is restarted.
Parenttopic: Limitations
LimitationswhenProjectingfromWindowsMediaCenter
NotethefollowinglimitationswhenprojectingfromWindowsMediaCenter.
- You cannot project images in full-screen mode using Windows Media Center. Switch to window display modetoproject the images.
• If audiostops during playback when transferring audio from the computer to the projector using EasyMPMultiPCProjection, try restarting the application you are using.
Parenttopic: Limitations
Notices
Checkthesesectionsforimportantnoticesaboutyoursoftware.
CopyrightNotice
AboutNotations
GeneralNotice
CopyrightAttribution
Parenttopic:Appendix
CopyrightNotice
Allrightsreserved. Nopartofthispublicationmaybereproduced,storedinaretrievalsystem,or transmittedinanyformorbyanymeans,electronic,mechanical,photocopying,recording,orotherwise, without the prior written permission of SeikoEpsonCorporation. Nopatentliability is assumed with respect to the use of the information contained herein. Neither is any liability assumed for damages resulting from the use of the information contained herein.
Neither Seiko Epson Corporation nor its affiliates shall be liable to the purchaser of this product or third parties for damages, losses, costs, or expenses incurred by the purchaser or third parties as a result of: accident, misuse, or abuse of this product or unauthorized modifications, repairs, or alteration to this product, or (excluding the U.S.) failure to strictly comply with Seiko Epson Corporation's operating and maintenance instructions.
SeikoEpsonCorporationshallnotbeliableagainstanydamagesorproblemsarisingfromtheuseof anyoptionsoranyconsumableproductsotherthanthosedesignatedasOriginalEpsonProductsor EpsonApprovedProductsbySeikoEpsonCorporation.
Thecontentsofthisguidemaybechangedorupdatedwithoutfurthernotice.
Illustrationsinthisguideandtheactualprojectormaydiffer.
Parenttopic:Notices
AboutNotations
- Microsoft ^ WindowsVista ^ operatingsystem
•Microsoft ^® Windows ^® 7operatingsystem
•Microsoft ^® Windows ^® 8operatingsystem
•Microsoft ^® Windows ^® 8.1operatingsystem
•Microsoft ^® Windows ^® 10operatingsystem
In this guide, the operating systems above are referred to as "Windows Vista", "Windows 7", "Windows 8", "Windows 8.1", and "Windows 10". Furthermore, the collective term Windows may be used to refer to WindowsVista, Windows7, Windows8, Windows8.1, Windows10, and multipleversionsofWindows maybereferredtoas,forexample,WindowsVista/7,withtheWindowsnotationomitted.
-OSX10.7.x
-OSX10.8.x
-OSX10.9.x
-OSX10.10.x
-OSX10.11.x
In this guide, the operating systems above are referred to as "OS X 10.7.x", "OS X 10.8.x", "OS X 10.9.x", "OS X 10.10.x" and "OS X 10.11.x". Furthermore, the collective term "OS X" is used to refer to themall.
Parenttopic:Notices
GeneralNotice
XGAaretrademarksorregisteredtrademarksofInternationalBusinessMachinesCorporation.
MacandOSXareregisteredtrademarksofAppleInc.
Microsoft, Windows, Windows Vista, PowerPoint, and Windows logo are trademarks or registered trademark of Microsoft Corporation in the United States and/or other countries.
Otherproductnamesusedhereinarealsoforidentificationpurposesonlyandmaybetrademarksof theirrespectiveowners.Epsondisclaimsanyandallrightsinthosemarks.
SoftwareCopyright: Thisproductusesfreesoftwareaswellassoftwaretowhichthiscompanyholdsthe rights.
©2016EpsonAmerica,Inc.
Parenttopic:Notices
CopyrightAttribution
8/16
CPD-51116
Parenttopic:Notices

- EasyMPMultiPCProjection OperationGuidev2.10
- Contents
- IntroductiontoEasyMPMultiPCProjection
- EasyMPMultiPCProjectionFeatures
- ConnectiontoVariousDevices
- Relatedtasks
- Relatedtopics
- Four-PanelDisplay
- ChangePresentersandProjectionPosition
- ModeratorFunction
- ScreenDeliveryandThumbnailDisplayFunction
- EasyNetworkProjectionUsingaUSBFlashDrive(WindowsOnly)
- Note:
- SettingUptheSoftwarefortheFirstTime
- InstallingtheSoftware
- EasyMPMultiPCProjectionSystemRequirements
- EasyMPMultiPCProjectionEditions
- - StandardEdition
- -ParticipantEdition
- InstallingEasyMPMultiPCProjection(Windows)
- InstallingEasyMPMultiPCProjection(OSX)
- SelectingProjectorNetworkSettings
- ConnectionMethodsforVariousNetworkEnvironments
- RecommendedWirelessEnvironmentforMultiPCProjection
- SettingUpaProjectortoConnectinQuickConnectionMode
- SettingUpaProjectortoConnectinAdvancedConnectionMode(Wireless)
- SettingUpaProjectortoConnectinAdvancedConnectionMode(Wired)
- ConnectingtotheProjectorandProjectingImages
- ConnectionMethods
- ConnectionMethodsforVariousMeetingStyles
- ConnectingtheProjectorandaComputerDirectlyUsingWirelessCommunication
- Select Quick Connection Mode, and then click OK.
- Searchfortheprojectorusingoneofthefollowingmethods.
- Select the projector you want to connect to from the Projector List, and then select one of the following options.
- ConnectingtotheProjectorfromtheSoftwareoveraNetworkSystem
- Select Advanced Connection Mode, and then click OK.
- SelectingtheProjectorSearchMethod
- SearchMethods
- SearchingforNetworkProjectorsAutomatically
- SearchingforNetworkProjectorsbySpecifyinganIPAddressorProjectorName
- SearchingforNetworkProjectorsUsingaProfile
- ProfilesforSearch
- PerformingaProfileSearch
- ClickProfileonthesearchscreen.
- Double-click the folder or the projector icon for the profile you want to use from the list.
- RegisteringaProfile
- ExportingaProfile
- ImportingaProfile
- SharingaProfileoveraNetwork
- ControllingtheProjectedDisplay
- ScreenTypesforProjectionControl
- Relatedreferences
- OperatingtheProjectedDisplayStatus
- ChangingtheNumberofProjectedPanels
- ChangingthePresenter
- ChangingtheProjectionPosition
- Disconnecting
- UsingAdditionalFunctions
- SearchingforNetworkProjectorsUsingaShortcut
- CreatingaShortcut
- ConnectingtoNetworkProjectorUsingaUSBFlashDrive(WindowsOnly)
- CreatingaUSBkeyonaUSBFlashDrive(WindowsOnly)
- StartUSBKeySetupTool.
- UsingaUSBKeytoConnectaWindowsComputer
- ConnectingtoMultipleProjectors(Mirroring)
- OutputtingAudiofromtheProjector
- ProjectingYourScreen
- ChangingtheModerator
- ClicktheQuitasModeratorbuttononthemoderator'scomputer.
- 4.ClickOK.
- DistributingtheProjectedScreen
- SelectingtheParticipant'sScreentoProjectUsingThumbnails
- 3.Clickthebutton.
- HidingtheProjectionControlScreen
- ProhibitingParticipantOperations
- ControllingtheConnectionBandwidth
- BandwidthControlRestrictions
- SolvingProblems
- SolvingNetworkConnectionProblems
- SolutionsWhenYouCannotConnectUsingQuickConnectionMode
- SolutionsWhenYouCannotConnectProjectorsUsingAdvancedConnectionMode (Wireless)
- SolutionsWhenYouCannotConnectProjectorsUsingAdvancedConnectionMode (Wired)
- SolvingProblemsDuringProjection
- SolutionsWhentheScreenisNotProjectedProperly
- SolutionsWhenAudioisNotPlayedProperly
- SolutionsWhentheModeratorFunctionDoesNotWork
- SolutionsWhentheProjectedScreenisNotDelivered
- ErrorMessageList
- EventIDList
- ScreenSummary
- SelectConnectionModeScreen
- SearchScreen
- SaveScreen
- Setoptions
- Setoptions-UserSettings
- Setoptions-Generalsettings
- Setoptions-Adjustperformance
- Setoptions-AudioOutput
- Setoptions-Deliver
- Toolbar
- ProjectionControlScreen
- ThumbnailScreen
- ViewerScreen
- Appendix
- UpdatingandUninstallingtheSoftware
- GettingtheLatestVersionoftheApplication
- UninstallingEasyMPMultiPCProjection(WindowsVista/Windows7/Windows10)
- UninstallingEasyMPMultiPCProjection(Windows8.x)
- UninstallingEasyMPMultiPCProjection(OSX)
- SupportedResolutionsandColors
- SupportedResolutions
- DisplayColor
- Limitations
- ConnectionLimitations
- LimitationswhenProjectingfromWindowsPhotoGalleryorWindowsLivePhoto Gallery
- LimitationsinWindowsAero
- LimitationswhenProjectingfromWindowsMediaCenter
- Notices
- CopyrightNotice
- AboutNotations
- GeneralNotice
- CopyrightAttribution
Brand : EPSON
Model : 1980WU
Category : Video projector