
NSA320S-2T - Server ZYXEL - Free user manual and instructions
Find the device manual for free NSA320S-2T ZYXEL in PDF.


| Product Type | Network Attached Storage (NAS) Server |
| Brand | ZyXEL |
| Model | NSA320S-2T |
| Hard Disk Bays | 2 internal SATA bays (supports RAID 0, JBOD, RAID 1) |
| Processor | Marvell 88F6282 (1.2 GHz, estimated) |
| Memory | 512 MB DDR3 RAM (estimated) |
| Dimensions (W x D x H) | Approx. 194 x 122 x 220 mm |
| Weight (without disks) | Approx. 2.0 kg |
| Power Input | 12V DC, 3A external power adapter |
| Power Consumption | About 20 W (normal operation, estimated) |
| Cooling | 1x 80mm fan (rear, speed controlled) |
| Network Interface | 1x Gigabit Ethernet (RJ-45) |
| USB Ports | 2x USB 2.0 (front/rear), 1x eSATA (rear, for 1-bay models; for 2-bay models, eSATA may vary) |
| Main Functions | File sharing (CIFS, FTP, NFS), backup, media server (DLNA, iTunes), download manager (HTTP, FTP, BitTorrent, eMule), print server, web publishing, cloud sync (Dropbox), Time Machine support |
| Supported RAID Levels | JBOD, RAID 0, RAID 1 (with 2 disks) |
| File System | Ext4 (internal), FAT32/NTFS (external USB) |
| LED Indicators | Power (blue), System (green/orange), HDD (green/red), USB (green/red), LAN (green/amber), Copy/Sync (green/red) |
| Reset Button | Rear, resets IP/password or factory defaults (hold 2s or 7s) |
| Copy/Sync Button | Front, copies/syncs files between USB device and NAS without PC |
| Maintenance & Cleaning | Keep away from dust and moisture; clean exterior with dry cloth; avoid obstructing ventilation slots. |
| Safety Precautions | Disconnect power before installing/removing disks; do not use near water; only use supplied power adapter. |
| Spare Parts & Repairability | Hard drives (standard 3.5" SATA), power adapter (12V, 3A), fan (80mm). Contact vendor for replacement parts. |
Frequently Asked Questions - NSA320S-2T ZYXEL
User questions about NSA320S-2T ZYXEL
0 question about this device. Answer the ones you know or ask your own.
Ask a new question about this device
Download the instructions for your Server in PDF format for free! Find your manual NSA320S-2T - ZYXEL and take your electronic device back in hand. On this page are published all the documents necessary for the use of your device. NSA320S-2T by ZYXEL.
USER MANUAL NSA320S-2T ZYXEL
KEEP THIS GUIDE FOR FUTURE REFERENCE.
Screenshots and graphics in this book may differ slightly from your product due to differences in your product firmware or your computer operating system. Every effort has been made to ensure that the information in this manual is accurate.
Related Documentation
- Quick Start Guide
The Quick Start Guide shows how to connect the NSA and get up and running right away.
• Web Configurator Online Help
The embedded Web Help contains descriptions of individual screens and supplementary information.
Contents Overview
User's Guide 15
Getting to Know Your NSA 17
NAS Starter Utility 21
Web Configurator Basics 29
Tutorials ....51
Technical Reference 135
Status Screen 137
System Setting 141
Storage 151
Network 165
Applications 175
Packages 215
Auto Upload 265
Dropbox 279
Using Time Machine with the NSA 283
Users 287
Groups 293
Shares 297
Maintenance Screens 305
Protecting Your Data 325
Troubleshooting 327
Product Specifications 345
Table of Contents
Contents Overview ....3
Table of Contents ....5
Part I: User's Guide .... 15
Chapter 1 Getting to Know Your NSA....17
1.1 Overview ...... 17
1.1.1 Hard Disks for 2-Bay Models ....18
1.1.2 Hard Disks for 1-Bay Models ....18
1.1.3 COPY/SYNC Button 19
1.1.4 RESET Button 19
Chapter 2 NAS Starter Utility....21
2.1 Overview ...... 21
2.2 Starting the NAS Starter Utility 21
2.3 NAS Seeker Screen 21
2.4 Main NAS Starter Utility Screen 23
2.4.1 Directory of the NAS 24
2.5 Import Files or Folders with zPilot 25
2.6 Network Drive 26
2.7 Manage the Device 27
2.8 Configure System Settings 27
Chapter 3 Web Configurator Basics....29
3.1 Overview ......29
3.2 Accessing the NSA Web Configurator ....29
3.2.1 Access the NSA Via NAS Starter Utility 30
3.2.2 Web Browser Access .... 30
3.3 Login 31
3.4 Home Screens 32
3.4.1 Now Playing (Music) 35
3.4.2 Exif and Google Maps (Photos) 35
3.4.3 Slideshow (Photos) 36
3.4.4 Favorite .... 37
3.4.5 File Browser 37
3.4.6 Share and Folder Names ....41
3.4.7 Application Zone 42
3.4.8 System Settings 43
3.5 Administration Screens 44
3.5.1 Global Administration Icons 45
3.5.2 Navigation Panel 46
3.5.3 Main Window 48
3.5.4 Status Messages ....48
3.5.5 Common Screen Icons 48
3.5.6 Session Example (Windows) 49
Chapter 4 Tutorials....51
4.1 Overview ....51
4.2 Windows 7 Network ....51
4.2.1 If the NSA Icon Does Not Display ....53
4.2.2 NSA Icon Right-click Options 54
4.3 Windows 7 Network Map ....55
4.4 Playing Media Files in Windows 7 ....58
4.5 Windows 7 Devices and Printers ....58
4.5.1 Windows 7 Desktop Shortcut ......60
4.6 Creating a Volume in a 2-Bay NSA 61
4.6.1 Creating a RAID 1 Volume ......61
4.6.2 Migrate Button 62
4.6.3 Create an Internal Volume Button 62
4.7 Creating a Volume in a 1-Bay NSA 63
4.7.1 Creating a RAID 1 Volume ......64
4.7.2 Migrate Button 64
4.7.3 Create a SATA Volume Button 65
4.7.4 Creating a PC Compatible Volume 67
4.8 Deleting a Volume ....70
4.9 File Sharing Tutorials ......71
4.9.1 Creating a User Account 71
4.9.2 Creating a Share 73
4.9.3 Creating a Group 75
4.9.4 Accessing a Share From Windows Explorer 76
4.9.5 Accessing a Share Using FTP 78
4.9.6 Accessing a Share Through the Web Configurator 79
4.10 Download Service Tutorial 80
4.10.1 Copying/Pasting a Download Link 80
4.10.2 Installing the Link Capture Browser Plugin 83
4.10.3 Using the Link Capture Browser Plugin 88
4.10.4 Configuring the Download Service Preferences 90
4.10.5 Using Download Service Notification 92
4.11 Broadcasting Tutorial 95
4.12 Printer Server Tutorial 99
4.13 Copy and Flickr Auto Upload Tutorial ....101
4.14 FTP Uploadr Tutorial 102
4.15 Web Configurator's Security Sessions 105
4.15.1 Customizing the NSA's Certificate 106
4.15.2 Downloading and Installing Customized Certificate 107
4.15.3 Turn on the NSA's Web Security 111
4.16 Using FTPES to Connect to the NSA 118
4.17 Using a Mac to Access the NSA 119
4.17.1 Finder .... 120
4.17.2 Go Menu 121
4.18 How to Use the BackupPlanner 122
4.18.1 Creating an Archive Backup .... 122
4.18.2 Creating a Synchronization Backup 125
4.18.3 Restoring Archived Files by Backup Job 128
4.18.4 Restoring by Backup Files 131
Part II: Technical Reference.... 135
Chapter 5
Status Screen 137
5.1 Overview 137
5.2 The Status Screen 137
Chapter 6
System Setting....141
6.1 Overview ...... 141
6.2 What You Can Do ....141
6.3 What You Need to Know ....141
6.4 The Firmware Upgrade Screen 143
6.5 Package Management Screen 143
6.5.1 Displaying the Package Information 146
6.6 The Server Name Screen 147
6.7 The Date/Time Screen 147
Chapter 7
Storage 151
7.1 Overview ...... 151
7.1.1 What You Need to Know About Storage .... 151
7.2 The Storage Screen 152
7.2.1 Disk Replacement Restrictions 152
7.2.2 Storage Screen 153
7.2.3 Volume Status 154
7.3 Creating an Internal (SATA) Volume 155
7.4 Editing a Volume 157
7.4.1 Scanning a Volume 158
7.5 Creating an External (USB) Volume 158
7.5.1 External Disks 159
7.6 Storage Technical Reference 160
7.6.1 Volumes and RAID 160
7.6.2 Choosing a Storage Method for a Volume 160
7.6.3 Storage Methods ...... 161
Chapter 8 Network 165
8.1 Overview 165
8.2 What You Can Do 165
8.3 What You Need to Know 165
8.4 The TCP/IP Screen 166
8.5 UPnP Port Mapping Screen 169
8.5.1 UPnP and the NSA's IP Address 169
8.5.2 UPnP and Security 170
8.5.3 The NSA's Services and UPnP 170
8.5.4 Configuring UPnP Port Mapping 171
8.6 The PPPoE Screen 172
8.7 Telnet Screen 173
Chapter 9 Applications ...... 175
9.1 Overview 175
9.2 What You Can Do ....175
9.3 What You Need to Know 175
9.4 FTP Server 177
9.5 The Media Server Screens 178
9.5.1 The Media Server Share Publish Screen 179
9.5.2 The Media Server SqueezeCenter Screen 180
9.6 The iTunes Server Screen 180
9.7 The Download Service Screen 181
9.7.1 Adding a Download Task 184
9.7.2 Configuring General Download Settings 186
9.7.3 Configuring the P2P Download Settings 188
9.7.4 Edit IP Filter 190
9.7.5 Selecting Files to Download 191
9.7.6 Displaying the Task Information 192
9.8 The Web Publishing Screen 193
9.9 The Broadcatching Screen 194
9.9.1 Adding a Broadcasting Channel 196
9.9.2 Editing a Broadcasting Channel 199
9.10 The Print Server Screen ....200
9.10.1 Print Server Rename 201
9.11 The Copy/Sync Button Screen 202
9.12 Technical Reference 203
9.12.1 Sharing Media Files on Your Network ......203
9.12.2 Download Service ....204
9.12.3 Link Capture Browser Plugin 205
9.12.4 Download Service Notification .....205
9.12.5 P2P Download Security 206
9.12.6 Web Publishing Example ......208
9.12.7 Web Publishing 209
9.12.8 Channel Guides for Broadcasting 210
9.12.9 Printer Sharing 211
9.12.10 Copying Files ...... 211
9.12.11 Synchronizing Files ......212
Chapter 10 Packages ......215
10.1 Overview ......215
10.2 What You Can Do ....215
10.3 SMART Screen 215
10.3.1 SMART Brief Summary 216
10.3.2 SMART Full Summary 217
10.4 DyDNS Screen 219
10.5 NFS Screen 220
10.5.1 Add/Edit NFS Share 221
10.5.2 NFS Session 222
10.6 Syslog Server Screen 223
10.7 TFTP Server Screen 225
10.8 eMule Screens 226
10.8.1 eMule Server Screen 226
10.8.2 Add Server 228
10.8.3 Edit Server 228
10.8.4 My Info 229
10.8.5 eMule Task Screen 230
10.8.6 Add Task 232
10.8.7 Preferences 233
10.8.8 Edit IP Filter 236
10.8.9 Share Browsing 236
10.8.10 Task Info 238
10.8.11 eMule Search Screen 239
10.9 pyLoad Screen 240
10.10 Polkast Setup 241
10.11 Protect Screens 245
10.12 Backup Screens 246
10.12.1 Backup: Step 1 247
10.12.2 Backup: Step 2 248
10.12.3 Backup: Step 3 ......250
10.12.4 Backup: Step 4 ....251
10.12.5 Edit Job Screen 252
10.12.6 Edit Job: Step 1 253
10.12.7 Edit Job: Step 2 254
10.12.8 Restore Archive Screen 255
10.12.9 Restore Archive: Step 1 ......255
10.12.10 Restore Archive: Step 2 ......256
10.12.11 Restore Archive: Step 3 ......257
12.2 Dropbox Screen 279
12.3 How to Use Dropbox with the NSA 281
Chapter 13
Using Time Machine with the NSA 283
13.1 Overview ......283
13.2 Time Machine Screen 283
13.3 Using Time Machine 283
Chapter 14
Users....287
14.1 Overview 287
14.2 What You Can Do ....287
14.3 The Users Screen 287
14.3.1 User Icons 289
14.3.2 Adding or Editing an Account ......289
14.3.3 Usernames ....291
14.4 Displaying User Info 292
Chapter 15
Groups 293
15.1 Overview ......293
15.2 What You Can Do ....293
15.3 The Groups Screen 293
15.3.1 Adding or Editing a Group ......294
15.3.2 Group Names ....295
er 16
Shares......297
16.1 Overview ......297
16.2 What You Can Do ....297
16.3 The Shares Screen 297
16.3.1 Adding or Editing Share 299
16.3.2 Configuring Advanced Share Access 300
16.3.3 Public and ANONYMOUS Share Access Rights 301
16.4 The Recycle Bin Configuration Screen 301
16.4.1 Recycle Bins 301
16.4.2 Configuring Recycle Bins 302
16.5 The Share Browser Screen ....302
16.5.1 Moving or Copying Files ....304
er 17
Maintenance Screens 305
17.1 Overview 305
17.2 What You Can Do ....305
17.3 The Power Screen 305
17.3.1 Notes on NSA-310 305
17.3.2 Editing the Power Control Schedule Screen 308
17.4 The Log Screen 309
17.4.1 Report Config Screen 310
17.4.2 Email Setting 311
17.4.3 Report Setting 312
17.4.4 Syslog Server Setting 312
17.5 The Configuration Screen 313
17.6 SSL Certification 314
17.6.1 Modifying or Creating a Certificate 315
17.7 The Shutdown Screen ....316
17.8 Technical Reference 317
17.8.1 Log Classes ....317
17.8.2 Log Severity Levels ......318
17.8.3 Log Messages ....318
Chapter 18
Protecting Your Data 325
18.1 Overview ......325
18.2 Protection Methods ...... 325
18.3 Configuration File Backup and Restoration 325
Chapter 19
Troubleshooting....327
19.1 Troubleshooting Overview ......327
19.2 Power, Hardware, Connections, and LEDs 327
19.3 NAS Starter Utility 329
19.4 NSA Login and Access 330
19.4.1 Enabling Scripting of Safe ActiveX Controls 332
19.5 | Cannot Access The NSA 334
19.6 Users Cannot Access the NSA 334
19.7 External USB Drives 336
19.8 Firmware 336
19.9 File Transfer 336
19.10 Networking 337
19.11 Some Features' Screens Do Not Display ....337
19.12 Media Server Functions ....338
19.13 Download Service and Broadcasting Functions ....340
19.14 Web Publishing 341
19.15 Auto Upload 342
19.16 Package Management 342
19.17 Backups 343
Chapter 20
Product Specifications....345
20.1 LEDs 345
20.2 Supported Media Server Content Formats 346
20.3 Supported iTunes Server Content Formats 346
Appendix A Legal Information....347
Index 351
PART I
User's Guide
Getting to Know Your NSA
1.1 Overview
This chapter covers the main features and applications of the NSA.
Use the NSA to do the following.
- Share files between computers on your network.
- Back up files from your computers to the NSA.
- Use the COPY/ SYNC button to copy or synchronize files between the NSA and USB devices like card readers, MP3 players, mass storage devices, and digital cameras without using a computer.
- Have the NSA handle large file downloads.
- Automatically download files from website feeds for convenient viewing.
- Play the NSA's video, music and photo files on your computers using the included media client software.
- Play the NSA's video, music and photo files on hardware-based media players.
- Use the NSA's website to share files with remote users.
- Use iTunes on your computer to play video and music files stored on the NSA.
- Share printers.
• Automatically upload photo and video files to your FTP server, Flickr and YouTube accounts.
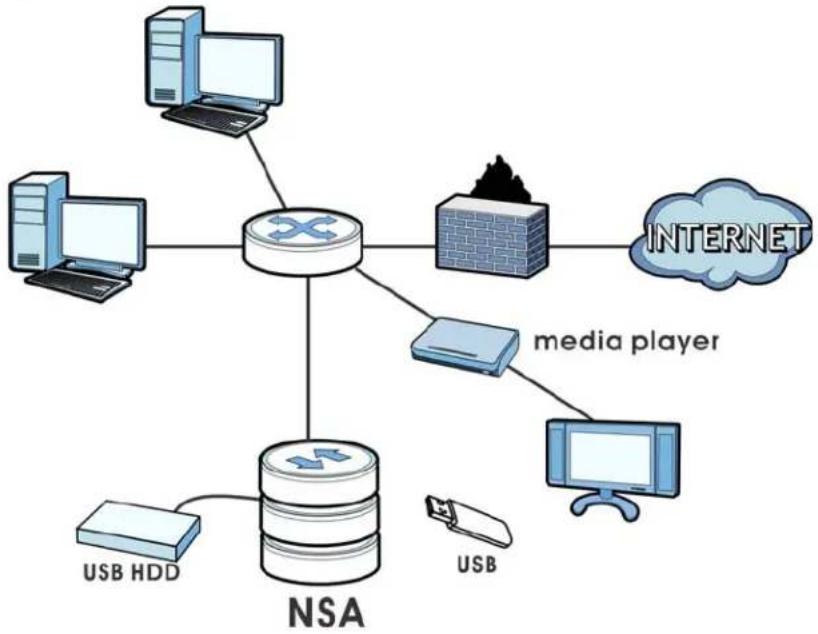
Figure 1 Example of the NSA in a Home Network
flowchart
graph TD
    A["Router"] --> B["PCs"]
    A --> C["Internet"]
    A --> D["media player"]
    A --> E["MS"]
    A --> F["USB HDD"]
    A --> G["USB"]
    style A fill:#f9f,stroke:#333
    style B fill:#ccf,stroke:#333
    style C fill:#cfc,stroke:#333
    style D fill:#fcc,stroke:#333
    style E fill:#cff,stroke:#333
    style F fill:#ffc,stroke:#333
    style G fill:#cfc,stroke:#333
Above is the NSA in a home network. Users back up and share data on the NSA. The media player plays the NSA's media files on the TV. A USB hard drive provides extra storage space and files are copied directly from the USB mass storage device to the NSA.
Place the NSA behind a firewall and/or IDP (Intrusion Detection and Prevention) device to protect it from attacks from the Internet.
Note: See Chapter 20 on page 345 for a more detailed list of NSA features.
Refer to the Quick Start Guide for hardware connections and how to install and remove hard drives from the disk trays.
Note: Turn off and disconnect the NSA before you install or remove the internal hard disk or disks.
Table 1 Model-specific Features
| FEATURE MODELS | |
| 2 hard disk bays NSA320, NSA325, NSA325 v2 | |
| 1 hard disk bay NSA310, NSA310S | |
| Telnet NSA310S, NSA325, NSA325 v2 | |
| Power Control Schedule | NSA310S, NSA320, NSA325, NSA325 v2 |
| Power On After Power Failure | NSA310S, NSA320, NSA325, NSA325 v2 |
1.1.1 Hard Disks for 2-Bay Models
The 2-bay NSA models have two internal hard disk bays. Install one or two SATA (Serial Advanced Technology Attachment) hard disks. Note that both SATA hard disks are treated as internal or SATA volumes in the Storage > Volume screen (Section 7.3 on page 155). Any hard disk connected to the USB port(s) is considered an external or USB volume.
1.1.2 Hard Disks for 1-Bay Models
The 1-bay NSA models have one internal hard disk bay and one external SATA (eSATA) port. This allows you to connect one internal SATA (Serial Advanced Technology Attachment) hard disk and one eSATA hard disk (optional).
Initializing the internal hard disk configures it as a JBOD volume by default. JBOD stands for Just a Bunch Of Disk and in this storage method, all disk space is used for your data - none is used for backup. If you are not using an eSATA hard disk, JBOD is the only storage method you can use.
If you attach an eSATA (external SATA) hard disk, you can create a RAID 1 volume. RAID 1 allows data recovery in case your hard disk fails. To create a RAID 1 volume on the NSA, you must delete the JBOD volume created by the firmware. Refer to Section 7.3 on page 155 for the Storage screen where you can create the RAID 1 volume.
The eSATA hard disk can also be configured as a JBOD or a PC Compatible Volume. See Section 7.1.1 on page 151 for more information on these storage methods.
Note that both SATA and eSATA hard disks are treated as internal or SATA volumes in the Storage screen (Section 7.3 on page 155). Any hard disk connected to the USB port(s) is considered an external or USB volume.
1.1.3 COPY/SYNC Button
Use the COPY/ SYNC button on the front panel to copy or synchronize files between a connected USB device and the NSA. See Section 9.11 on page 202 for more details on how to configure the copy/sync settings.
1.1.4 RESET Button
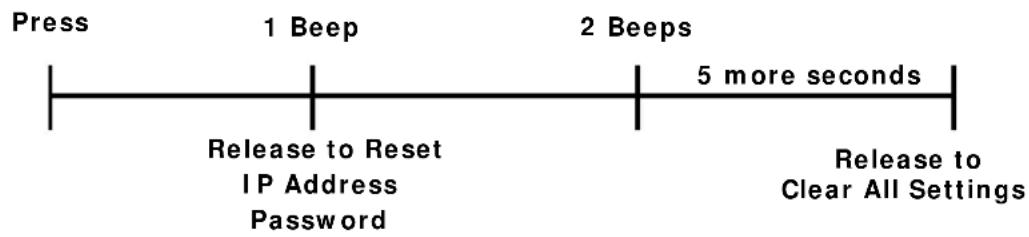
Use the RESET button on the rear panel to restore the NSA's default settings.
Figure 2 The RESET Button
flowchart
graph LR
    A["Press"] --> B["1 Beep"]
    B --> C["2 Beeps"]
    C --> D["5 more seconds"]
    D --> E["Release to Clear All Settings"]
    F["Release to Reset IP Address Password"] --> B
    G["Release to Clear All Settings"] --> C
- Press the RESET button until you hear one beep (after about two seconds), then release it. You will hear one more beep after you release the button.
This resets the NSA's IP address and password to the default values.
- Press the RESET button until you hear two beeps. After the second beep, continue pressing the button for five more seconds, then release it. You will hear three quick beeps after you release the button.
This resets the NSA to the factory default configuration. All settings you have configured on the NSA, including IP address, password, user accounts, groups, and so on will be reset to the factory defaults.
The reset process does NOT affect the volume settings, nor data stored on the NSA.
You should periodically back up your configuration file to your computer (see Section 17.5 on page 313 for details about managing the NSA's configuration file). You could then restore your configuration in the event that you or someone else reset the NSA to the factory defaults.
Note: Keep the NSA in a secure location in order to prevent unauthorized reset of the device.
You may need to close and re-open the NAS Starter Utility to discover the NSA. This is because the NSA automatically re-acquires IP address information, so its IP address may change. If no IP address information is assigned, the NSA uses Auto-IP to assign itself an IP address and subnet mask. For example, you could connect the NSA directly to your computer. If the computer is also set to get an IP address automatically, the computer and the NSA will choose addresses for themselves and be able to communicate.
Note: Installing this version of the NAS Starter Utility will uninstall previous versions.
2.1 Overview
Use the NAS Starter Utility to find, set up, and manage the NSA as well as copy files to it and access the files on it.
Make sure you have a backup of any existing data in the hard disk before installing it in the NSA. Using the initialization wizard formats the hard disk and deletes all data in the process.
The NAS Starter Utility supports Windows XP, Windows Vista, Windows 7, and Windows 8. Click Help to open a web help page about the NAS Starter Utility screens. NAS Starter Utility screens are shown here as they display with the Windows platform.
Note: Refer to the Quick Start Guide for your NSA's hardware connections and the steps for installing the NAS Starter Utility.
2.2 Starting the NAS Starter Utility
- The NAS Starter Utility broadcasts a request packet when you first run it. Each NSA has an NAS Starter Utility Agent that always listens and responds to requests from the NAS Starter Utility. The NAS Starter Utility receives the response packet that contains information, such as host name, IP, and so on.
- If you plan to use more than one NSA in your network, configure them with unique server names. This enables you to identify each NSA in the NAS Starter Utility screens.
2.3 NAS Seeker Screen
Use this screen to view the NSAs in your network. The NSA's Server Name. The default is 'nsa' followed by the number of your model ('nsa320' for example). See Section 2.8 on page 27 for how to change it to a more recognizable one in your network.
Start the NAS Starter Utility (click the icon in your Desktop or in Start > Programs > ZyXEL > NAS Starter Utility). The first time you open the NAS Starter Utility the discovery screen appears as follows.
Figure 3 NAS Seeker
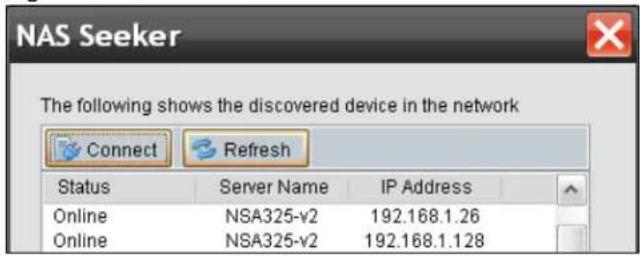
The following table describes the labels in this screen.
Table 2 NAS Seeker
| LABEL DESCRIPTION | |
| Connect Select a NSA | A and click this to connect to it. |
| Refresh | Click this to refresh the screen. The NAS Starter Utility does not automatically refresh. |
| Status | This shows whether the NSA is Online, Unreachable, Configuring, or Config Failed. |
| Server Name | This is the server name you configured for the NSA. If you have more than one NSA in your network, it is recommended that you give each one a unique name for identification purposes. |
| IP Address This is the current IP address of the NSA. | |
2.4 Main NAS Starter Utility Screen
The main NAS Starter Utility screen displays after you select an NSA in the NSA Seeker screen.
Figure 4 NAS Starter Utility Main Screen
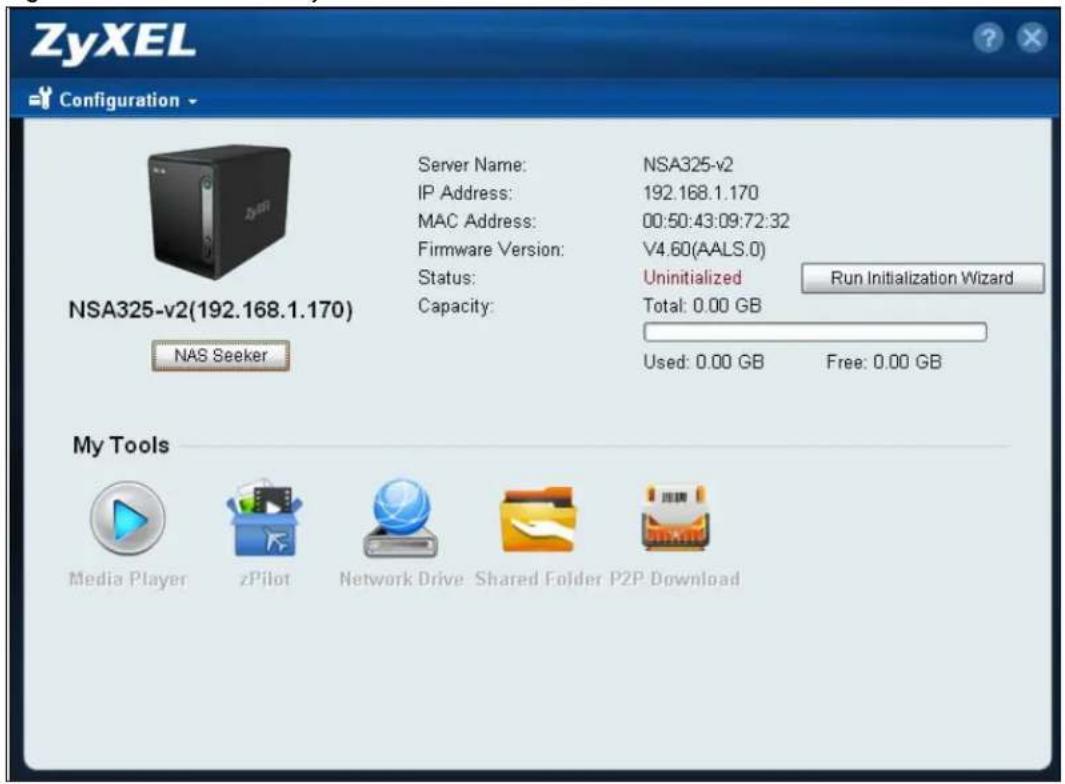
The following table describes the labels in this screen.
Table 3 NAS Starter Utility Main Screen
| LABEL DESCRIPTION | |
| ? Click this to display | the utility help. |
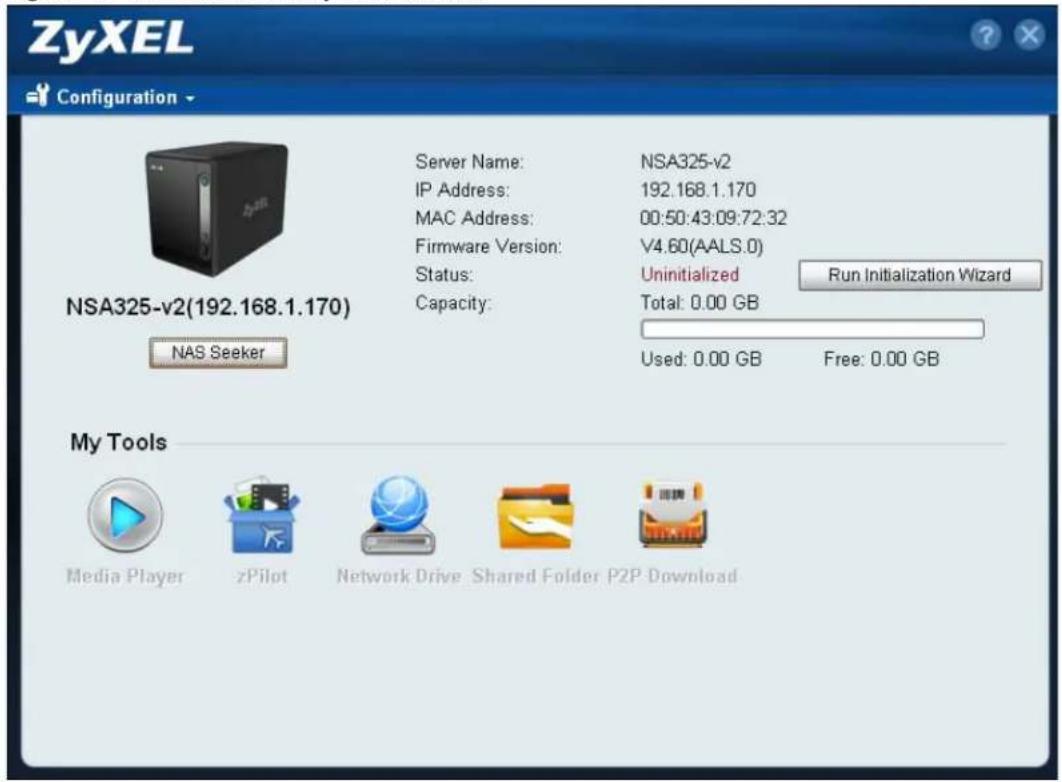
| Configuration | Click this to run the initialization wizard (see the utility help for details), configure system settings (see Section 2.8 on page 27), or go to the NSA's Web Configurator login screen (see Section 3.3 on page 31). |
| NAS Seeker | Click this to use the NSA Seeker screen (Section 2.3 on page 21) to find and connect to a different NSA on your network. |
| Server Name | This is the server name you configured for the NSA. If you have more than one NSA in your network, it is recommended that you give each one a unique name for identification purposes. |
| IP Address This is the current IP address of the NSA. | |
| MAC Address This is the NSA's unique physical hardware address (MAC). | |
| Firmware Version | This shows the version of firmware the NSA is currently using. |
| Status | This shows whether the NSA is Online, Uninitialized, Unreachable, Configuring, or Config Failed. |
| Run Initialization Wizard | This button displays if the NSA detects an installed hard disk that the NSA has not yet configured. Click the button to run the initialization wizard (see the utility help for details). |
Table 3 NAS Starter Utility Main Screen
| LABEL DESCRIPTION | |
| Capacity This shows | the NSA's total, in-use, and remaining storage capacity. |
| Media Player | Click this to go to theHome screens where you can play media files. SeeSection 3.4 on page 32for details on theHomescreen. |
| zPilot Click this to launch the zPilot to drag and drop files onto the NSA. | |
| Network Drive Click | this to add the NSA as a network drive in your computer's Windows Explorer. |
| Shared Folder Click | this to log into the NSA's file directory in Windows Explorer. |
| P2P Download | Click this to use the NSA to manage file downloads, including P2P downloads. |
| Dropbox Click this to use your Dropbox account to move files to the NSA and have the NSA download *.torrent files. | |
| SMART | This displays when the NSA has the SMART package installed. Click this to view hard disk health and performance details. |
| WordPress | This displays when the NSA has the WordPress package installed. Click this to create and manage a blog or website. Use the NSA administrator credentials to log in. The administrator can then create accounts for other users. |
| eMule This displays | when the NSA has the eMule package installed. Click this to use the NSA's eMule peer-to-peer (P2P) file-sharing console to download and share files from the Internet. SeeSection 10.8 on page 226for details. |
| Gallery This displays | when the NSA has the Gallery package installed. Click this to use your NSA to host pictures. You can upload images in your local computer or shares to this application. Use the NSA administrator account to log in to the Gallery console. |
| pyLoad | This displays when the NSA has the pyLoad package installed. Click this to use pyLoad to have the NSA manage your downloads, including those from one-click hosting sites. |
2.4.1 Directory of the NAS
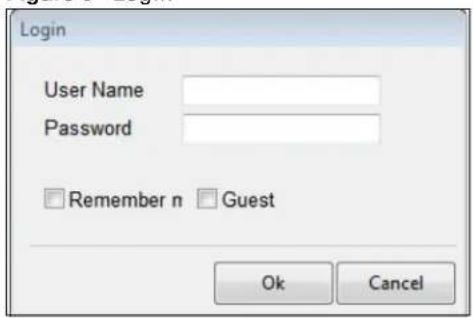
Click Shared Folder to log into the NSA's file directory in Windows Explorer. Enter the administrator user name and password and click Login.
Figure 5 Login
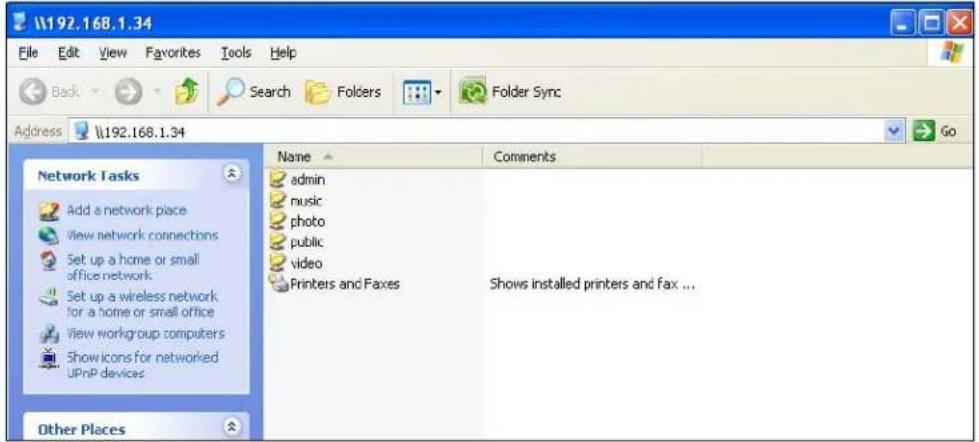
The utility opens the NSA's directory in Windows Explorer.
Figure 6 Directory
2.5 Import Files or Folders with zPilot
In the main NAS Starter Utility screen click zPilot to be able to drag and drop files from your computer to the NSA.
Enter the administrator user name and password and click Login.
Figure 7 Login
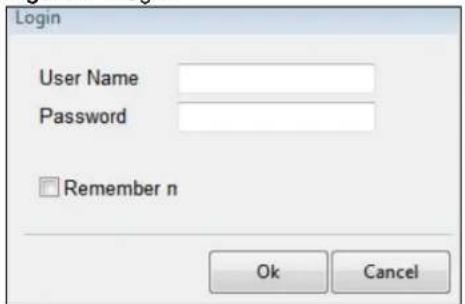
The zPilot icon displays.
Figure 8 zPilot
Drag files onto the zPilot icon to move them to the NSA. zPilot automatically sorts music, photo, and video files into the Music, Photo, and Video folders. zPilot automatically sorts the types of media files listed in Section 20.2 on page 346 (except for the subtitles). Other types of files go to the
Public folder. For folders of files you are prompted to choose the target destination. The zPilot icon shows the transfer rate.
Figure 9 zPilot Showing Transfer Rate
Double-click the zPilot icon to display status details about the file transfers. Select an entry and click Pause, Resume, or Remove to control the transfer. After the transfer finishes you can select the entry and click Open Destination Folder to see the file on the NSA. Click Clear Completed to clear completed transfers from the list.
Figure 10 zPilot Transfer Details

2.6 Network Drive
In the main NAS Starter Utility screen click Network Drive to add the NSA as a network drive in your computer's Windows Explorer.
Enter your user name and password and click Login to be able to add the NSA's shares to which you have access as network drives. Otherwise select Guest and click Login to be able to add the NSA's public shares as network drives.
Figure 11 Login
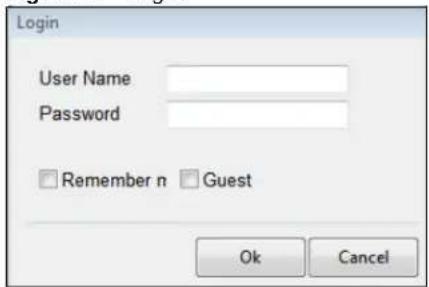
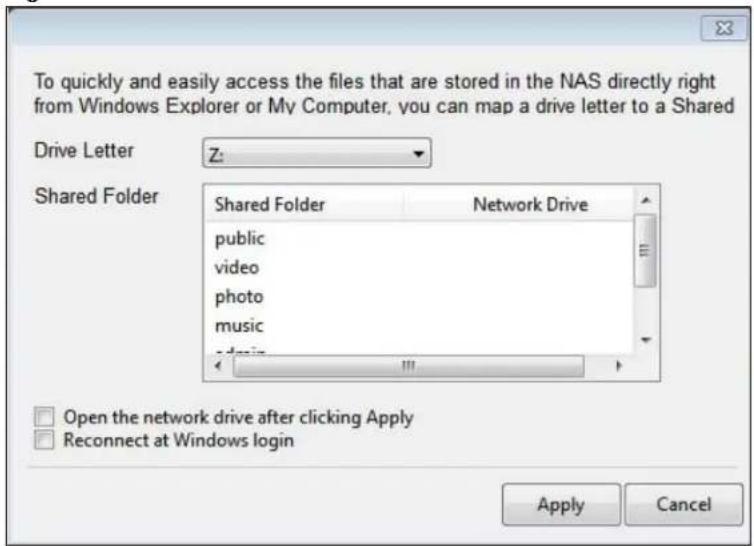
Select a share on the NSA and the drive letter on your computer to which you want to map it. The shares that each user can select to map depends on the user's permissions. For example, if share1 is private to user1, then only user1 is allowed to map share1. The table displays the NSA shares that are already mapped to drive letters on your computer. After you click Apply you can see the
new drive in Windows Explorer (My Computer) where you can access and use it like your computer's other drives.
Figure 12 Network Drive
2.7 Manage the Device
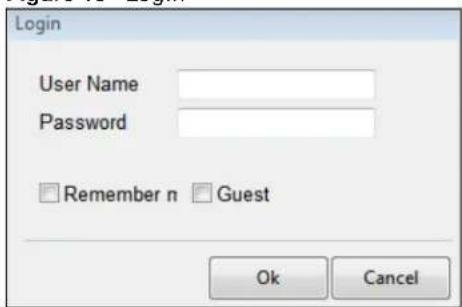
In the main NAS Starter Utility screen click Configuration > Administration to log into the NSA's administration screens where you can manage the NSA.
Enter the administrator user name and password and click Login.
Figure 13 Login
See Section 3.5 on page 44 for more on the administration screens.
2.8 Configure System Settings
Use these screens to be able to change the NSA's server name, time zone, PPPoE, IP address, subnet mask, default gateway, or DNS settings.
Click Configuration > System Setting in the main utility screen to display the following screen.
Figure 14 NAS Starter Utility > Configuration > System Setting
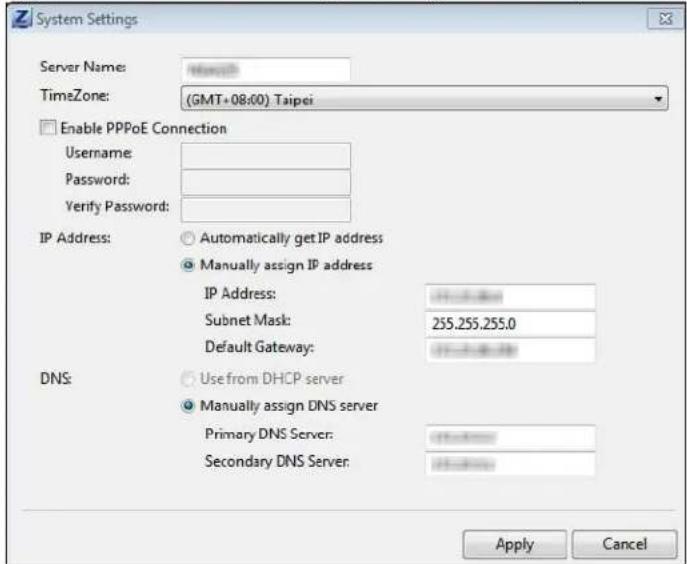
The following table describes the labels in this screen.
Table 4 NAS Starter Utility > Configuration > System Setting
| LABEL DESCRIPTION | |
| Server Name | Specify a name to uniquely identify the NSA on your network. You can enter up to 15 alphanumeric characters with minus signs allowed but not as the last character. The name must begin with an alphabetic character (a-z) and is case sensitive. |
| Time Zone | Choose the time zone of your location. This will set the time difference between your time zone and Greenwich Mean Time (GMT). |
| Enable PPPoE Connection | Click this if your Internet connection requires you to enter a user name and password to connect to the Internet. Enter your user name and password |
| Automatically get IP address | Select this if the NSA is automatically assigned an IP address from the ISP or a DHCP server in your network. |
| Manually assign IP address | Select this if you want to assign the NSA a fixed IP address, subnet mask and default gateway.Note: Do not configure an IP address that is already in use in your network. This results to a network IP address conflict and makes the NSA inaccessible. |
| Use from DHCP server | Domain Name System (DNS) is for mapping a domain name to its corresponding IP address and vice versa. Select this if the NSA is automatically given DNS information from the ISP or a DHCP server in your network. |
| DNS | Domain Name System (DNS) is for mapping a domain name to its corresponding IP address and vice versa.Select Use from DHCP server if the NSA is automatically given DNS information from the ISP or a DHCP server in your network.Select Manually assign DNS server if you were given specific IP address(es) of the DNS server(s). Enter the primary and secondary DNS in the corresponding fields. |
Web Configurator Basics
3.1 Overview
This chapter describes how to access the NSA web configurator and provides an overview of its screens.
The web configurator is an HTML-based management interface that allows easy NSA setup and management using an Internet browser.
Use Internet Explorer 7.0, Mozilla Firefox 3.6, Safari 5, Google Chrome 10, or later versions of these browsers. The recommended screen resolution is 1024 by 768 pixels or higher.
In order to use the web configurator you need to allow:
- Web browser pop-up windows from your device. Web pop-up blocking is enabled by default in Windows XP SP (Service Pack) 2.
- JavaScript (enabled by default).
3.2 Accessing the NSA Web Configurator
Make sure your NSA is properly connected and that your computer is in the same subnet as the NSA (refer to the Quick Start Guide or the appendices).
3.2.1 Access the NSA Via NAS Starter Utility
If you don't know the IP address of the NSA, then use the NAS Starter Utility to find it. Refer to the Quick Start Guide for how to install and run the NAS Starter Utility. See Chapter 2 on page 21 for more information on the NAS Starter Utility.
Figure 15 NAS Starter Utility Main Screen
3.2.2 Web Browser Access
Configure the server name of your NSA using the Network Configuration screen (Section 2.8 on page 27) of the NAS Starter Utility. Open your browser and type in the server name of the NSA. The default is 'nsa' followed by the number of your model ('nsa320' for example).
Figure 16 NSA URL

3.3 Login
The default username and password are 'admin' and '1234' respectively. Enter your username and password. See Chapter 14 on page 287 for how to create other user accounts. If you use the option to stay logged in for two weeks (assuming you do not log out), make sure you keep your computer secure from unauthorized access. Click User Login to go to the Home screens where you can play media files. Click Administrator Login to go to the advanced administration screens.
Figure 17 NSA Login Screen
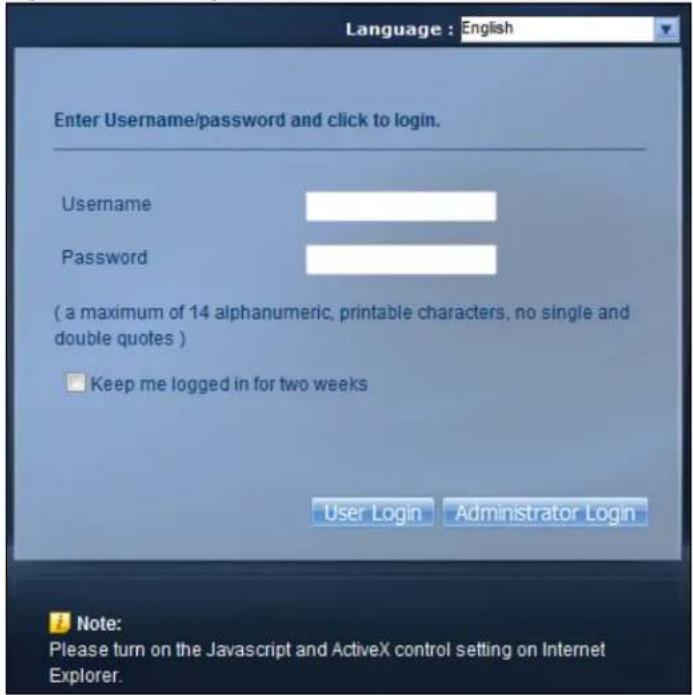
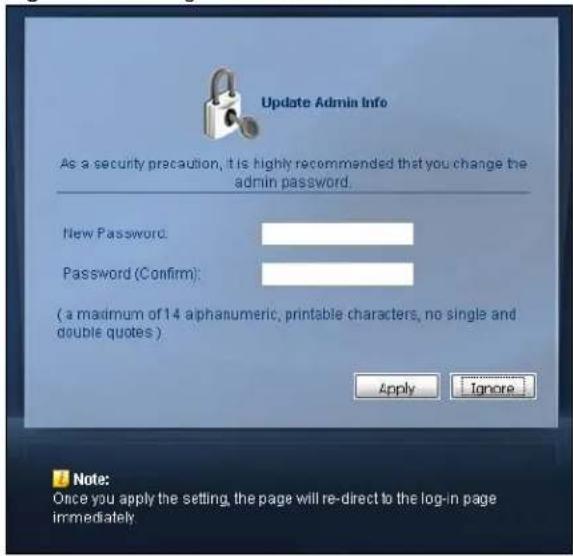
If you have not done so yet, you should see a screen asking you to change your password (highly recommended) as shown next. Type a new password (and retype it to confirm) and click Apply or click Ignore.
Figure 18 Change Password Screen
3.4 Home Screens
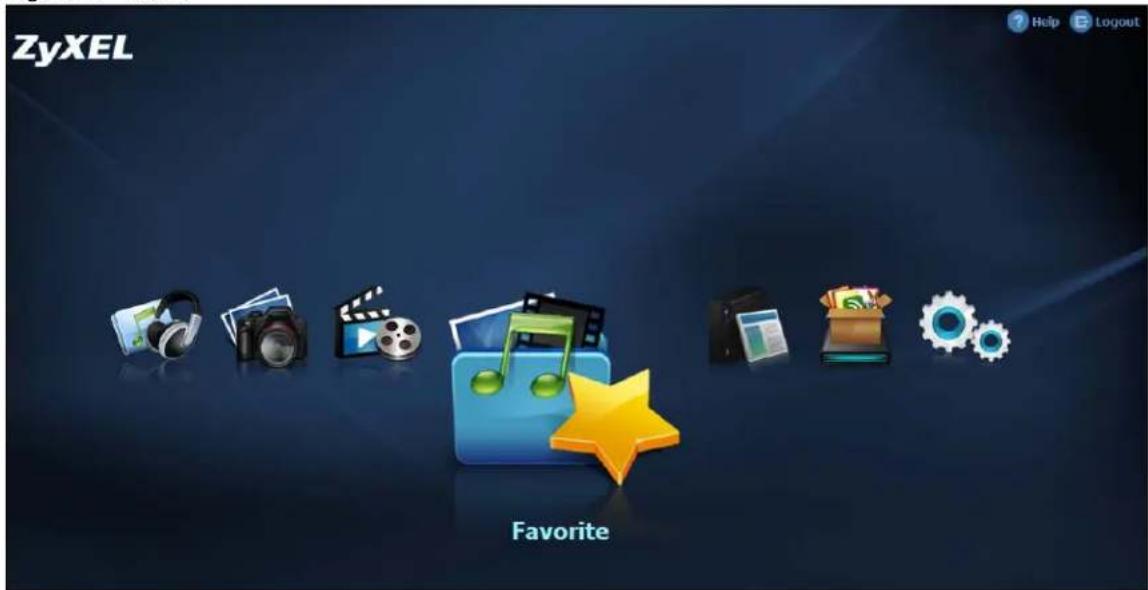
The Home screen after you log in using User Login.
Figure 19 Home
Note: If you did not select the option to stay logged in for two weeks when you logged in, the web configurator management session automatically times out if it is left idle for 15 minutes. Simply log back into the NSA if this happens to you.
The main Home screen displays icons for the various features you can access.
Table 5 Main Home Screen Icons
| ICON DESCRIPTION | |
 | Use Music, Photo, and Video to play and organize your music, picture, and video files. |
 | |
 | |
 | Use Favorite to view lists of commonly played, recently played, and recently added music files. |
 | Use File Browser to see your files in a tree-folder structure. |
 | Administrators can use Application Zone to install, access, and manage the NSA's applications. |
 | Use System to edit general system settings or log into the administrator advanced configuration screens. |
Note: Your browser may need Windows Media Player and VLC plugins installed to play music and video files. To get the VLC plugins, you have to download and install VLC (use the .exe file). To install a VLC plugin for Firefox, when you install VLC, you have to select the Mozilla plugin option.
Current VLC plugins may not support srt file format subtitles when playing videos.
The icons at the top-right of the screen are visible from most screens. Use them to navigate between the screens and menus. The following table describes the icons.
Table 6 Global Home Labels and Icons
| LABEL/ICON DESCRIPTION | |
| Home Click this to | return to the Home screen. |
| Help | Click this to open a web help page specific to the screen you are currently configuring. |
| Logout Click this at | any time to exit the web configurator. |
Here are some Home screen descriptions. A music screen is shown here as an example. Other screens work in a similar way.
Figure 20 Music Screen
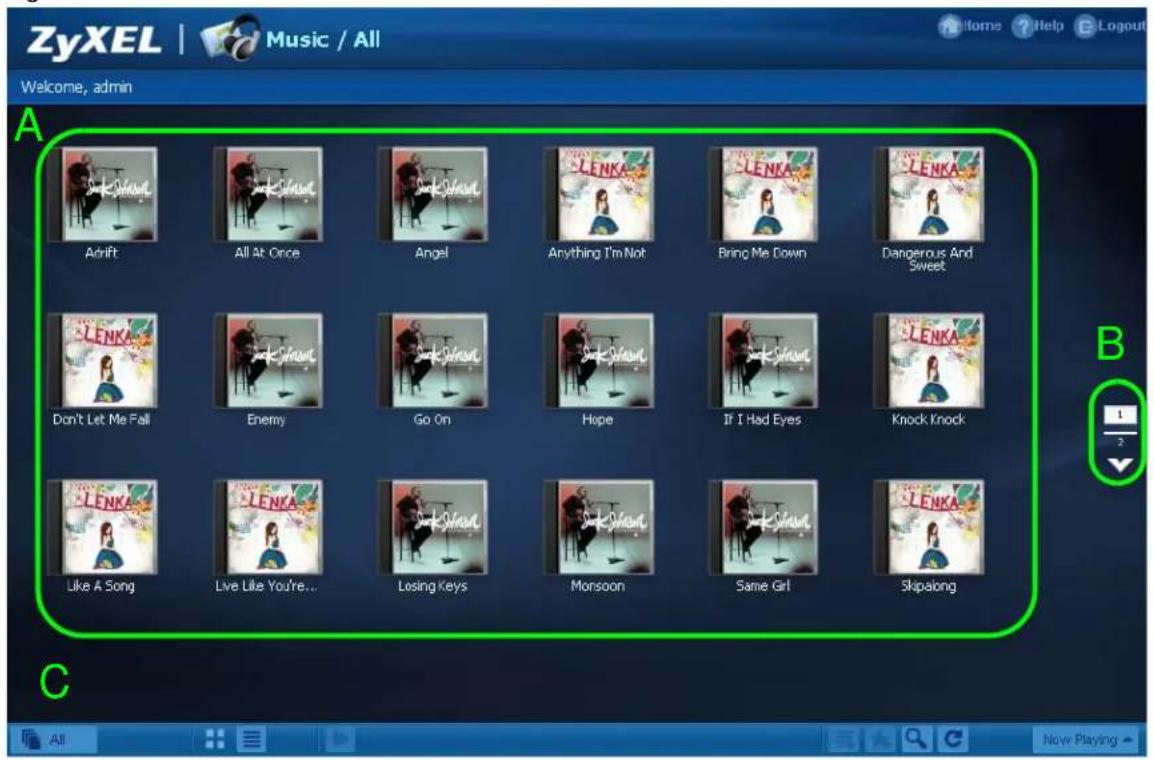
This table describes common labels in the Home media screens. Not every item displays in every screen.
Table 7 Home Media Screens
| LABEL DESCRIPTION | |
| A View files. Double-click an item to play it. | |
| B | Shows which page is displaying and the total number of pages of entries. Click an arrow or type a number to go to another page of entries. |
| C Select the sorting criteria:Artist - Sort music by artist.All - All of the menu's files display here.Folder - List the folders containing music files.Current Playlist - Show the playing and queued songs. | |
| Thumbnail Click this to view the files as thumbnails. | |
| List Click this to view the files as a list. | |
| Play | Click this to play the currently selected file. You can also double-click a file to play it. |
| Add to Current Playlist | Click this to add the selected music file to the currently playing playlist. |
| Search Click this to look for a file or folder by name. | |
Table 7 Home Media Screens
| LABEL DESCRIPTION | |
| Refresh Click this | to update the display in the screen. |
| Now Playing This | link is available when a song is playing. Click it to see details about the song that is currently playing. |
3.4.1 Now Playing (Music)
A Now Playing link displays when a song is playing. Click it to display a panel like the following. This screen displays the name of the current song and it's play progress and lets you control the playback.
Figure 21 Now Playing

3.4.2 Exif and Google Maps (Photos)
Click a photo's EXIF button to display or hide the photo's Exchangeable image file format (Exif) data.
Figure 22 Exif Information
![20100501106 EXIT Version [40,50,50,48] Camera Manufacture Nokia Camera Model 5800 Xpress Original Date 2010.05.01 13:24:36 Exposure Time 1/25/08 F-Number 2.8 Exposure Program ISO Speed 80 Exposure Bias Light Source Unknown Flash Light auto off Focal Length 3.7mm Exit Image Width 1536 Exit Image Length 2048 Image Width Image Length Orientation Top-Left Latitude N26.7939 Longitude E120.9811](/content/2026/05/844675/images/706c76e730bc5b891467b72fd2acd99ee33c0ce7ad44734ab686986da2dfe8a0.jpg)
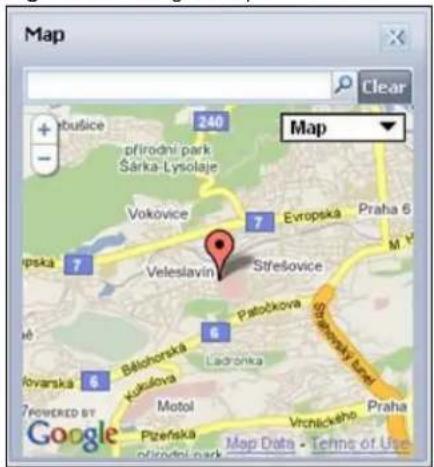
If a photo's Exif data includes GPS location data, click the latitude or longitude link to display the location in Google Maps. Click Clear to delete the markers of other photos and only display the current photo's marker.
Figure 23 Google Maps
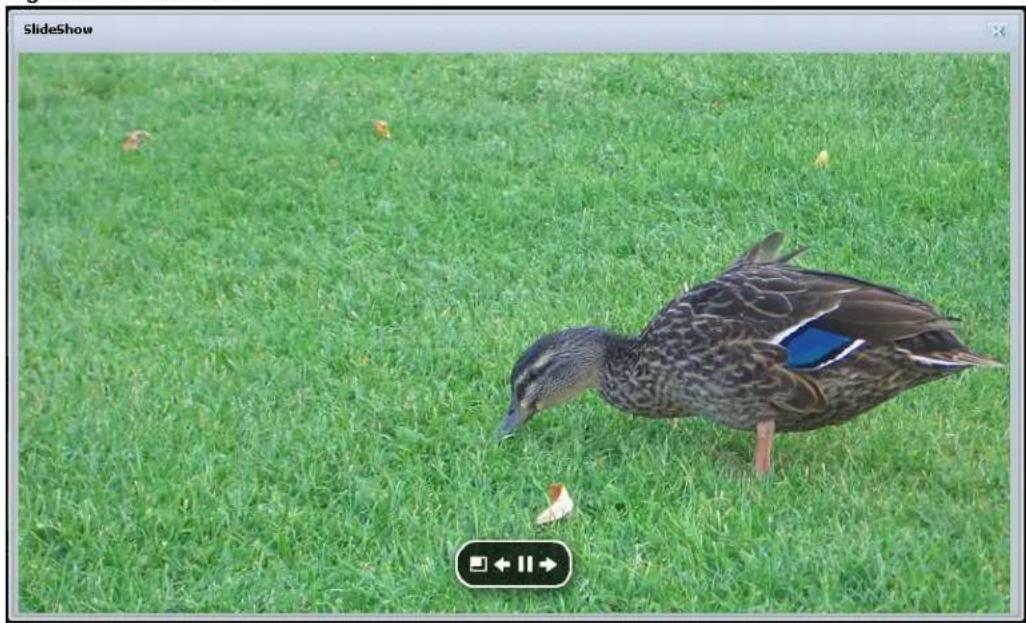
In a Photo menu click the SlideShow button to display the menu's files as a slideshow. Move your cursor over the slideshow's screen to display full screen, previous, pause, and next buttons for controlling the slideshow.
Note: Your browser must have the Flash Player plug-in installed to view slideshows.
Figure 24 Slideshow
natural_image
Duck standing on a grassy field, no visible text or symbols3.4.4 Favorite
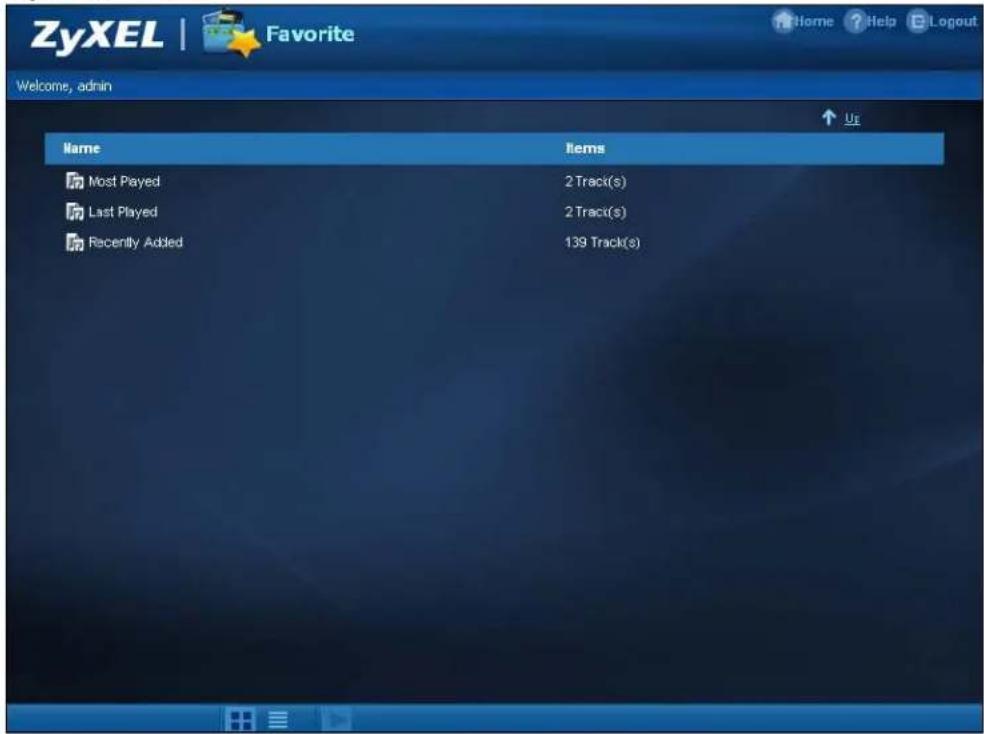
Use the Favorite menu to view lists of commonly played, recently played, and recently added music files.
Figure 25 Favorite
3.4.5 File Browser
Click File Browser to open the following screen. Use the file browsing screens to play, open, upload, and download files. A share is a set of user access permissions for a specific folder on a volume (gives someone access to a folder). It is equivalent to the Windows concept of a shared folder, but the access rights are independent of the folder (you configure the share and the folder separately). You can map a share to a network drive for easy and familiar file transfer for Windows users.
- A folder icon with a hand indicates a share.
• The administrator owns and manages the public shares. - Double-click a media file to open it. Double-click other types of files to be able to save them.
- Click to the right of a file or folder name to select it.
- Use the [SHIFT] key to select a range of entries. Hold down the [CTRL] key to select multiple individual entries.
- Drag and drop files to open a screen that lets you choose whether to copy or move them.
- You can upload files of up to 2 GB in size.
- You can download individual files of up to 4 GB in size with Mozilla Firefox and Internet Explorer 7 and later or up to 2 GB in size with Internet Explorer 6.
Figure 26 File Browser
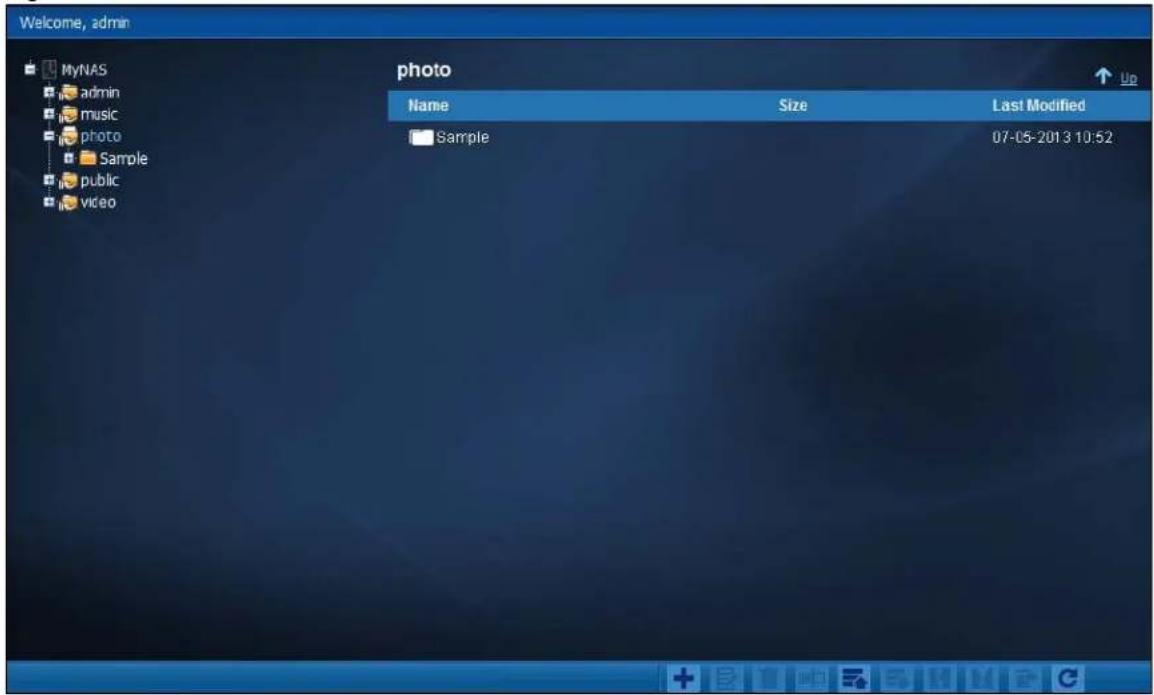
The following table describes the labels in this screen.
| LABEL DESCRIPTION | |
| Up | Click this to go to the next higher layer in the share's folder tree. |
| Name | This column identifies the names of folders and files in the share. Click a file's file name to open the file or save it to your computer. Click a folder's name to display the folder's contents. |
| Size This column | n displays a file's size in bytes. |
| Last Modified | This column displays the last time the file or folder was changed (in year-month-day hour:minute:second format). |
| Create New Folder | Click this to open the following screen where you can create a new folder within the share.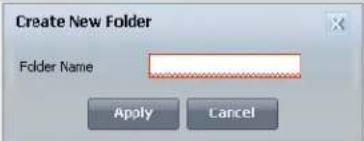 Specify a name to identify the folder. See Section 3.4.6 on page 41 for more information on folder names. ClickApplyto create a folder or clickCancelto exit this screen. Specify a name to identify the folder. See Section 3.4.6 on page 41 for more information on folder names. ClickApplyto create a folder or clickCancelto exit this screen. |
| Configure Share | Select a share and click this link to open a screen where you can see and configure share management details. |
| Delete Select a | file or folder and click this to delete it from the NSA. |
| Rename Select | a file or folder and click this to change its name. |
| Upload Click th | s to open the following screen where you can add files to the share. |
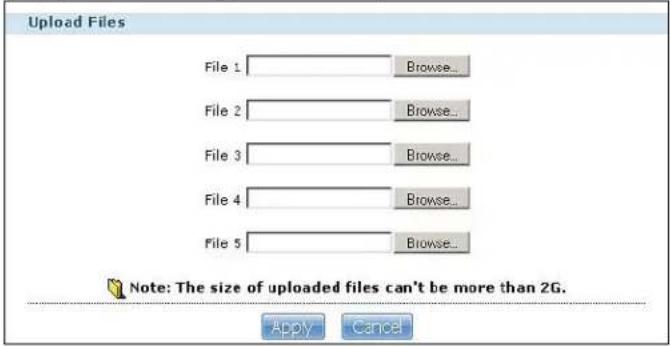 Use theBrowsebutton to locate your file/s and clickApplyto upload the file. ClickCancelto close this screen.Note: Do not refresh the screen while an upload is going on. Use theBrowsebutton to locate your file/s and clickApplyto upload the file. ClickCancelto close this screen.Note: Do not refresh the screen while an upload is going on. | |
| Download Select | a file and click this to save the file to your computer.Note: Do not refresh the screen while a download is going on. |
| Compress Select | files or folders and click this to compress them into a zip file. |
| Decompress | Select a zipped file and click this to create a folder named after the zip file and save the decompressed files into the folder. |
| Restore | When you are in a recycle bin folder, select a folder or file and click this to restore it. |
| Refresh | Click this to update the information displayed in the screen.Note: Do not refresh the screen while an upload or download is in progress. |
3.4.5.1 Configure Share Screen
In the File Browser screen, select a share and click Configure Share to open the following screen where you can see and configure share management details.
Figure 27 File Browser > Configure Share
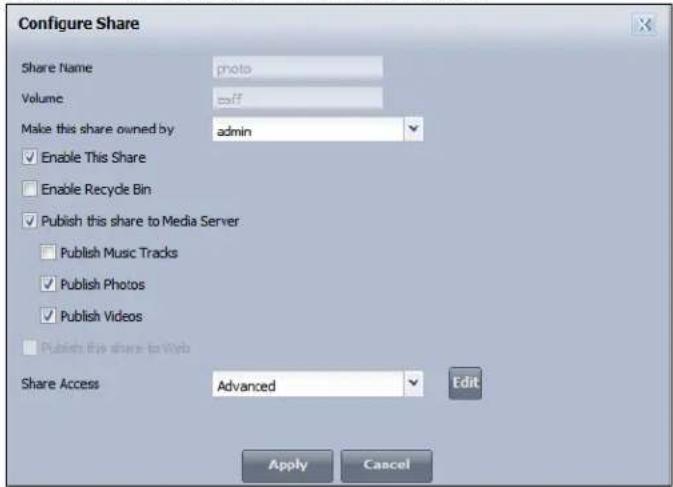
The following table describes the labels in the this screen.
Table 9 File Browser > Configure Share
| LABEL DESCRIPTION | |
| Share Name | Configure a name to identify this share. Type a share name from 1 to 239 single-byte (no Chinese characters allowed for example) ASCII characters. The name cannot be the same as another existing local share. See Section 3.4.6 on page 41 for more information on share names. This is not configurable for the NSA's default admin, music, photo, public, and video shares. |
| Volume This shows | the volume the share is on. It is read-only. |
| Make this share owned by | Select the administrator or user account that is to own (manage) this share. The share owner controls access rights to the share. This is not configurable for the NSA's default admin and public shares. |
| Enable This Share | Select this option to allow users to access this share. When this option is not selected, you cannot see and access this share. |
| Enable Recycle Bin | Select this option to keep deleted items in a recycle bin. When you delete an item, a recycle folder is created within the share, and the deleted item is stored in the recycle bin. Later if you want to retrieve a deleted item, you can select the item from the recycle folder and move/copy the item to another share. |
| Publish this share to Media Server | Select this option to make the share's files available to media clients. When you publish a share, you can also select whether or not to publish music tracks, photos, and videos. |
| Publish this share to Web | Select this option to let people use a web browser to access this share's files without logging into the Home screens. |
| Share Access | Select who can access the files in the share and how much access they are to be given. If you publish the share to the media server or the web, all users will have at least read-only access to the share, regardless of what you configure here.SelectKeep it private to ownerto allow only the share owner to read files in the share, delete files in the share and save files to the share.SelectMake it publicto allow anyone (with or without a user account on the NSA) to read files in the share, delete files in the share and save files to the share.SelectAdvancedto select which individual users can read the share's files, which users can delete the share's files, and which users are blocked from doing either. |
| Apply Click this to save your changes. | |
| Cancel Click this to return to the previous screen without saving. | |
3.4.6 Share and Folder Names
The name can only contain the following characters:
• Alphanumeric (A-z, 0-9) and Unicode.
The NSA allows FTP access to shares, folders or files with names encoded in the UTF-8 (8-bit UCS/Unicode Transformation Format) format. So your FTP client must support UTF-8 in order to access shares, folders or files on the NSA with Unicode names.
- Spaces
- _ [underscores]
• . [ periods ] - [ d a s h e s ]
Other limitations include:
- All leading and trailing spaces are removed automatically.
- Multiple spaces within names are converted to a single space.
- Share names must be unique (they cannot be the same as other share names).
- The NSA creates automatic volume names for external (USB) disk volumes. These are a type of share, so the share name you configure cannot conflict with the external (USB) disk volume names. "ExtVol1" or "ExtVol2" are examples of external (USB) disk volume names.
- Folder names must be unique (they cannot be the same as other folder names).
- The minimum character length of a name is one character, that is a name cannot be blank.
- The maximum character length of share name is 239 characters.
- Unicode is supported for share names, although your FTP client must support UTF-8. Full support should be available in all Windows versions after Windows 2000.
3.4.7 Application Zone
Administrators can click Application Zone to go to a screen where you can enable or disable various applications for file sharing and downloading.
Figure 28 Application Zone
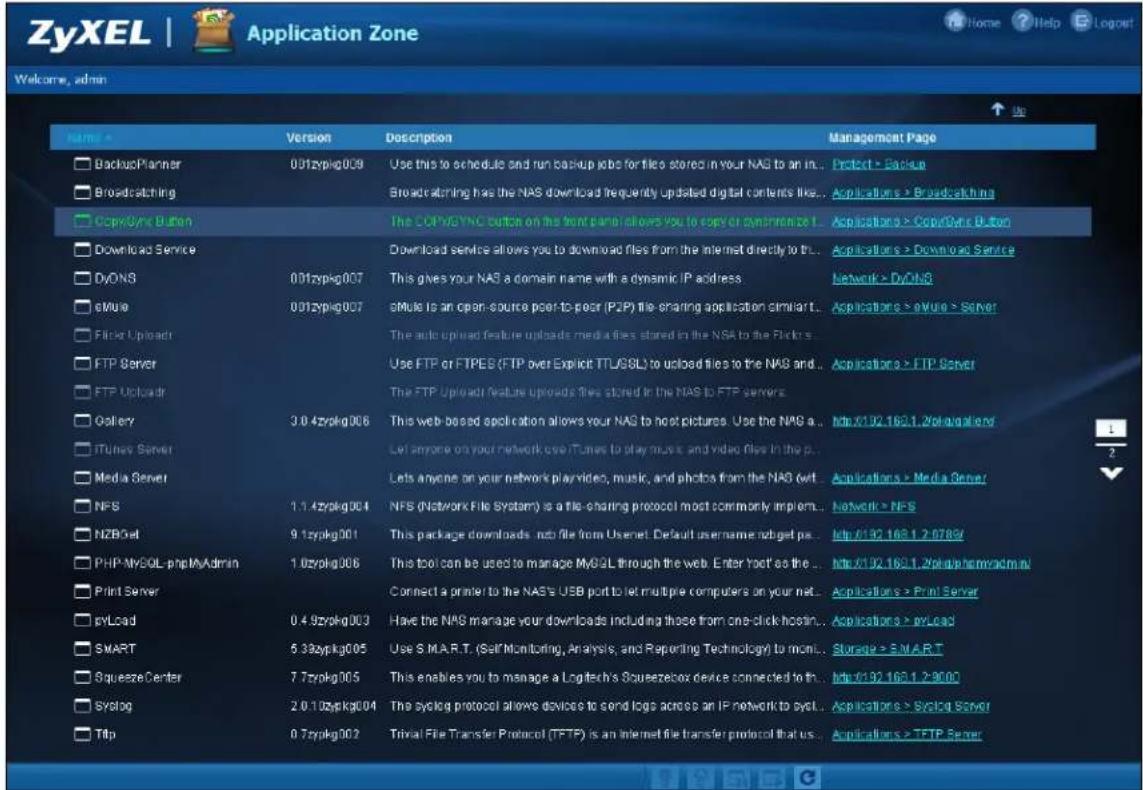
The following table describes the labels in the this screen.
Table 10 Application Zone
| LABEL DESCRIPTION | |
| Name This is the name of the application. | |
| Description | This is a brief description of the application. See Chapter 9 on page 175 for more information. |
| Management Page | Click this link to go the application's management page where you can configure settings for it. See Chapter 9 on page 175 for more information. |
| Enable | Select a disabled application and click this to turn on the application. Some applications are always enabled and cannot be disabled. |
| Disable | Select an enabled application and click this to turn off the application. Select the Flickr or Youtube Uploadr entry and click this to cancel all uploading. Some applications are always enabled and cannot be disabled. |
| Pause | Select the Flickr or Youtube Uploadr entry and click this to pause current uploading. Resume will resume current uploading. |
| Resume | Select the Flickr or Youtube Uploadr entry and click this to resume current uploading. |
3.4.8 System Settings
Click System > Settings to open the following screen. Use this screen to change general settings and an account password.
Figure 29 System > Settings
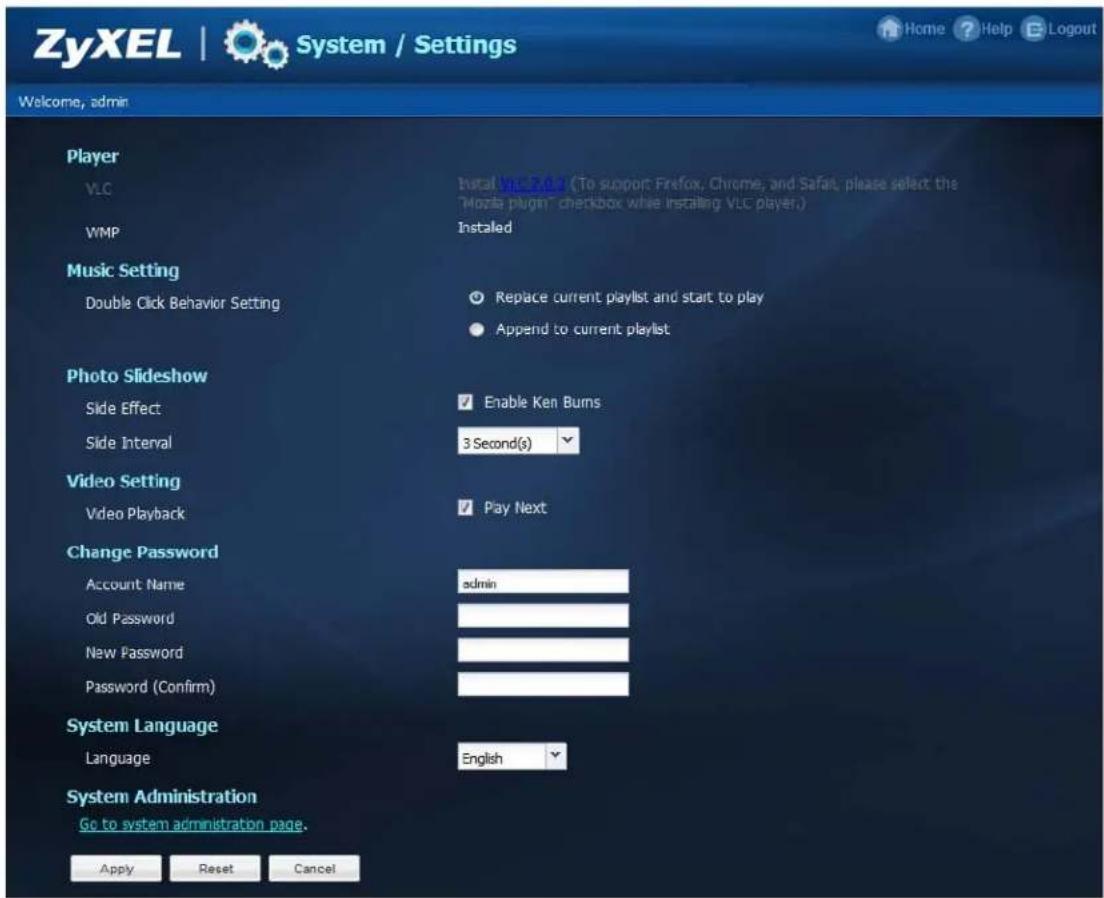
The following table describes the labels in this screen.
Table 11 System > Settings
| LABEL DESCRIPTION | |
| VLC This field displays | “Installed” if you already have VLC player installed or a link for installing it if you do not already have it installed. |
| WMP | This field displays “Installed” if you already have Windows Media Player installed or a link for installing it if you do not already have it installed. |
| Double Click Behavior Setting | SelectReplace current playlist and start to playto have double clicking a song cause the NSA to immediately stop any currently playing song and start playing the double-clicked song.SelectAppend to current playlistto have double clicking a song add a song to the end of the current playlist. |
| Slide Effect | Enable the Ken Burns effect to have the NSA automatically pan and zoom photos in slideshows. Disable it to display photos in slideshows normally. |
| Slide Interval | Select how long to display each image in a slideshow before changing to the next. |
| Video Playback | Select Play Next to play the rest of the video files in a folder. So for example, a folder has video files 1~10 and you play video 3. When video 3 finishes the device continues playing the rest of the videos in the folder (4~10). It does not loop back and play videos 1 and 2. |
| Account Name | Type the user name of the account for which you want to change the password. |
| Old Password Type the | user's current password. |
| New Password Create a | new password for the user. You can type from one to 14 single-byte (no Chinese characters allowed for example) ASCII characters. |
| Password (Confirm) | You must type the exact same password that you just typed in the above field. |
| Language Select the web configurator language from the drop-down list box. | |
| Go to system administration page | This link appears when you are logged in as the administrator. Click it to open the advanced administration screens. See Section 3.5 on page 44 for more on the advanced administration screens. |
| Apply Click this to save | your changes. |
| Reset Click this to refresh the screen. | |
| Cancel Click this to exit | the screen without saving your changes. |
3.5 Administration Screens
The System > Administration link displays when you log in as the administrator. Click System > Administration in the Home screen to open the advanced administration screens.
The Status screen is the first advanced administration screen that displays.
Figure 30 Status
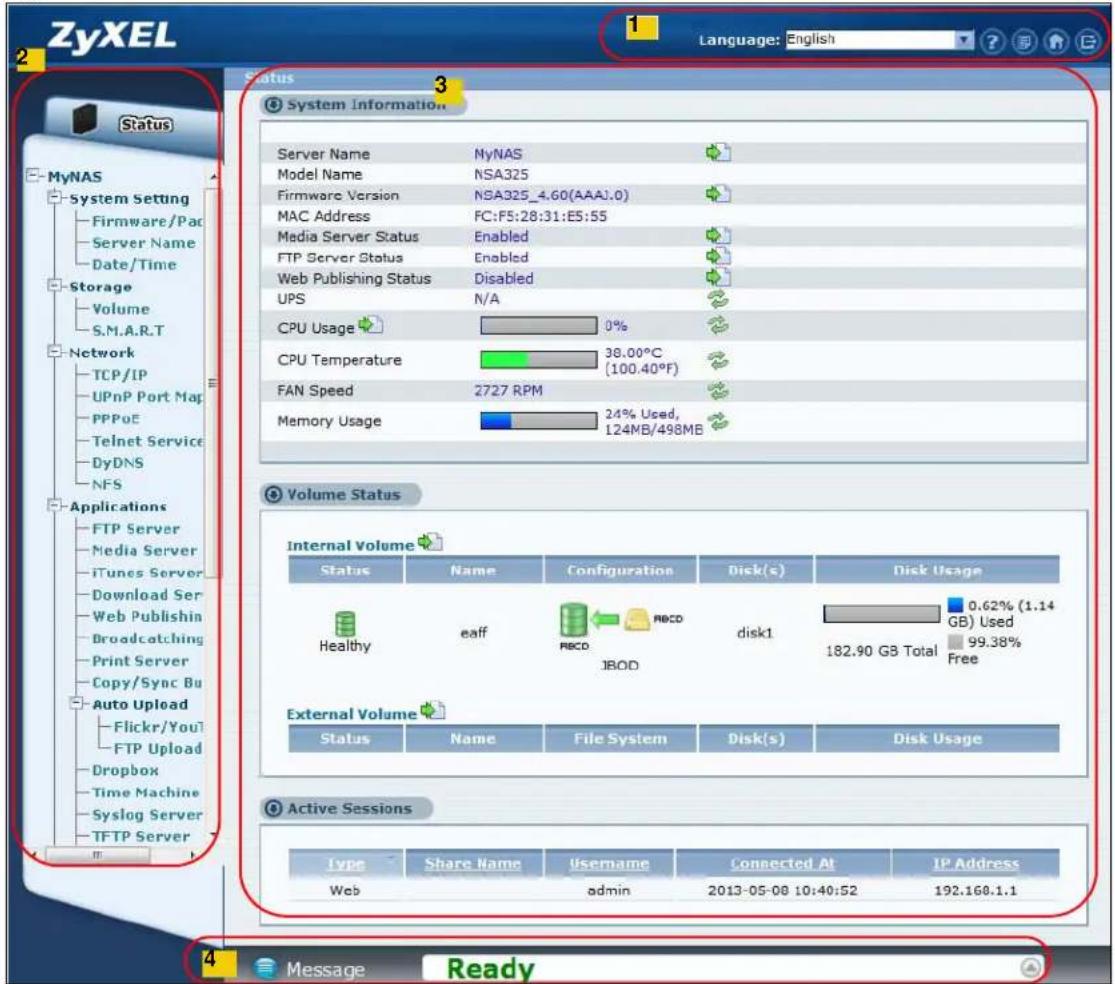
3.5.1 Global Administration Icons
The icons and language label at the top-right of the screen (1) are visible from most of the administration screens. The following table describes the 'global' icons and labels.
Table 12 Global Labels and Icons
| LABEL/ICON DESCRIPTION | |
| Language Select | the web configurator language from the drop-down list box. |
| Help Click this | to open web help specific to the screen you are in. |
| About Click this | to view the model name, firmware version and copyright. |
| Home Click this | to return to the Home screens. |
| Logout | Click this at any time to exit the web configurator. This is the same as clicking the Logout link at the bottom of the navigation panel. |
3.5.2 Navigation Panel
The navigation panel on the left of the Web Configurator screen (2) contains screen links. Click a link to display sub-links. There are no sub-links for the Status screen. Certain screens also contain hyper links that allow you to jump to another screen.
The following table describes the navigation panel screens.
Table 13 Screens Summary
| LINK SCREEN FUNCTION | ||
| Status This screen shows system information, the status of the volumes, and the users who are currently using the NSA. | ||
| System Setting | Firmware/ Packages | Upload/upgrade new firmware to your NSA and add useful applications. The NSA can download multiple packages/files at once and automatically goes through all the installation steps. |
| Server Name Sp | Specify the NSA's server name and workgroup name. | |
| Date / Time | Chose a time zone and/or allow the NSA to synchronize with a time server. | |
| Storage | Volume | View volume and disk information and create and edit volumes. A volume is a storage area that can span one or more internal disks or a single external (USB) disk. |
| S.M.A.R.T Instal | I the SMART package to display this screen you can use to monitor hard disks. | |
| Network | TCP/IP | Assign the NSA a dynamic or static IP address and DNS information. |
| UPnP Port Mapping | Configure your Internet gateway to allow access from the WAN (Internet) to services on the NSA. | |
| PPPoE | Configure PPPoE settings for a direct Internet connection. | |
| Telnet Service | Enable or disable Telnet access. This applies to the NSA310S, NSA325, and NSA325 v2. | |
| DyDNS | Install the DyDNS package to use Dynamic DNS (DDNS) services to use a domain name with a dynamic IP address. | |
| NFS | Install the NFS package to display this screen where you can configure NFS (Network File System) file-sharing. | |
| LINK | SCREEN | FUNCTION |
| Applications | FTP Server | Enable FTP file transfer to/from the NSA, set the number of FTP connections allowed, an FTP idle timeout, and the character set. |
| Media Server Enable or disable the sharing of media files and select which shares to share. | ||
| iTunes Server | Use the iTunes server to share media files with iTunes users on your network. | |
| Download Service | Have the NSA handle large file downloads. | |
| Web Publishing | Let people use a web browser to access files in shares without logging into the Home screens. | |
| Broadcasting | Subscribe the NSA to feeds to download frequently updated digital content like TV programs, radio talk shows, Podcasts (audio files), YouTube videos, or even P2P downloads. | |
| Print Server View and manage the NSA's list of printers and print jobs. | ||
| Copy/Sync Button | Copy or synchronize files between a USB device and the NSA. | |
| Auto Upload - Flickr/YouTube | Upload files in selected shares to your Flickr and/or YouTube accounts. | |
| Auto Upload - FTP Uploadr | Upload files in selected shares to FTP servers. | |
| Dropbox Use your Dropbox account to easily move files to your NSA and have the NSA download *.torrent files. | ||
| Time Machine Use Time Machine in OS X to use your NSA as a backup volume. | ||
| Syslog Server | Enable the syslog server and select the categories to include in the log report. | |
| TFTP Server Configure the NSA to accept log files from TFTP clients. | ||
| eMule - Server Configure the eMule server. | ||
| eMule - Task Manage eMule tasks. | ||
| eMule - Search | Search for files available in an eMule server using keywords and other parameters, such as file type, file size, and extension names. | |
| pyLoad | Configure the NAS to use pyLoad to manage your downloads, including those from one-click hosting sites. | |
| Sharing | Users | View, create and edit administrator and user accounts to let people use the NSA. |
| Groups | View, create and edit groups. Groups allow you to organize users into specific groups. You can create shares accessible only by the group members. | |
| Shares | View, create and edit shares. Shares are shared folders to which you can allow specific users read/write access rights. | |
| Maintenance | Power | Configure power saving settings for the NSA and have the NSA turn itself off and on or reboot according to the schedules you configure. |
| Log | View the NSA's logs and configure how you want to receive the log reports. | |
| Configuration | Back up and/or restore the NSA configuration file. | |
| SSL | Configure HTTPS and the NSA's SSL certificate. | |
| Shutdown | Restart the NSA or shut it down. | |
| Protect | Backup | Create and customize backup jobs. |
| Restore | Restore previous backups made with the NSA. | |
| Logout | Click this to exit the web configurator. This is recommended to prevent unauthorized administrator access to the NSA. | |
3.5.3 Main Window
The main window (3) shows the screen you select in the navigation panel. It is discussed in the rest of this document.
The Status screen is the first administration screen to display. See Chapter 5 on page 137 for more information about the Status screen.
3.5.4 Status Messages
The message text box at the bottom of the screen (4) displays status messages as you configure the NSA.
3.5.5 Common Screen Icons
The following table explains some icons that appear in several configuration screens.
Table 14 Common Configuration Screen Icons
| ICON DESCRIPTION | |
 | EditClick this to go to a screen where you can change the configuration settings of an entry. |
 | DeleteClick this to delete an entry from the list. |
 | EditClick this to jump to related item's configuration screen. |
 | RefreshClick this to refresh the data for the field or value with which it is associated. |
 | UserSee the chapter on user accounts for detailed information on variants of this icon. |
 | ShareSee the chapter on shares for detailed information on variants of this icon. |
 | HealthyThis represents a healthy volume. |
 | DegradedThis represents a degraded RAID 1 volume. Replace the faulty disk. If the replacement disk does not contain any partition, the NSA automatically restores the volume. If the replacement disk already contains a volume, you need to delete the volume and then click the Repair icon to fix the degraded RAID volume. |
 | DownThis represents a down volume. |
| [XTOA] | Scan DiskClick this to scan a hard disk for file system errors. |
  | EjectClick this before you remove an external hard drive so that you do not lose data that is being transferred to or from that hard drive.LocateClick this to cause the LED on the external storage device to blink. |
| [3C24] | RepairIf you replace a faulty disk with a disk that contains a volume, you need to delete the volume and then click this to fix the degraded RAID volume. |
3.5.6 Session Example (Windows)
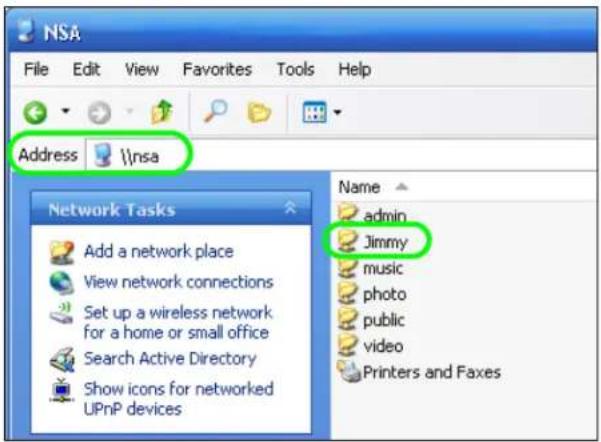
Open Windows Explorer and type two back slashes followed by the NSA name or IP address. Initially you can only read and write to the Public, Video, Music, and Photo folders until you create other shares on the NSA. This session is then displayed as shown in the following figure.
4.1 Overview
This chapter provides tutorials that show how to use the NSA.
• Windows 7 Network, see page 51
• Windows 7 Network Map, see page 55
- Playing Media Files in Windows 7, see page 58
- Windows 7 Devices and Printers, see page 58
- Creating a Volume in a 2-Bay NSA, see page 61
- Creating a Volume in a 1-Bay NSA, see page 63
- Deleting a Volume, see page 70
• File Sharing Tutorials, see page 71
- Download Service Tutorial, see page 80
- Broadcasting Tutorial, see page 95
• Copy and Flickr Auto Upload Tutorial, see page 101
• FTP Uploadr Tutorial, see page 102
• Web Configurator's Security Sessions, see page 105
• Using FTPES to Connect to the NSA, see page 118
• Using a Mac to Access the NSA, see page 119
• How to Use the BackupPlanner, see page 122
4.2 Windows 7 Network
To see your NSA in a Windows 7 home or work network:
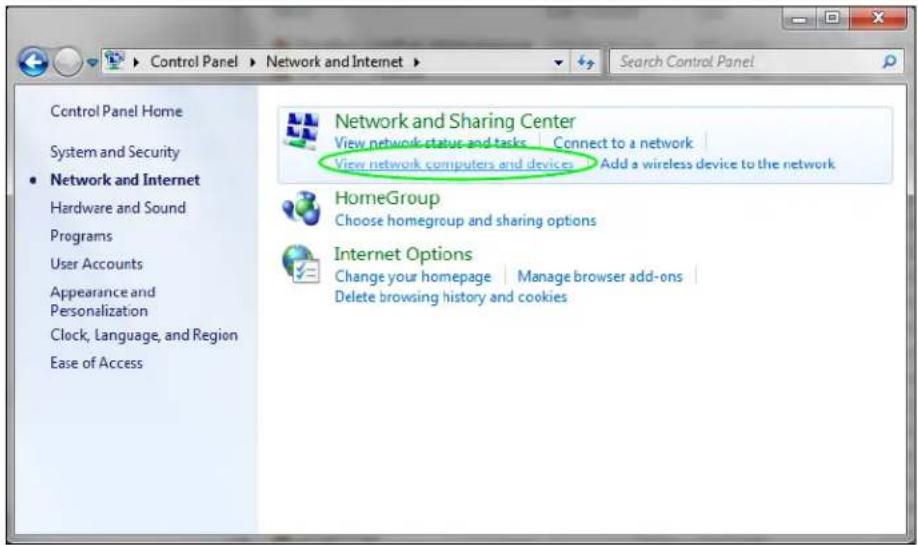
1 Click Start > Control Panel. Set View by to Category and click Network and Internet.
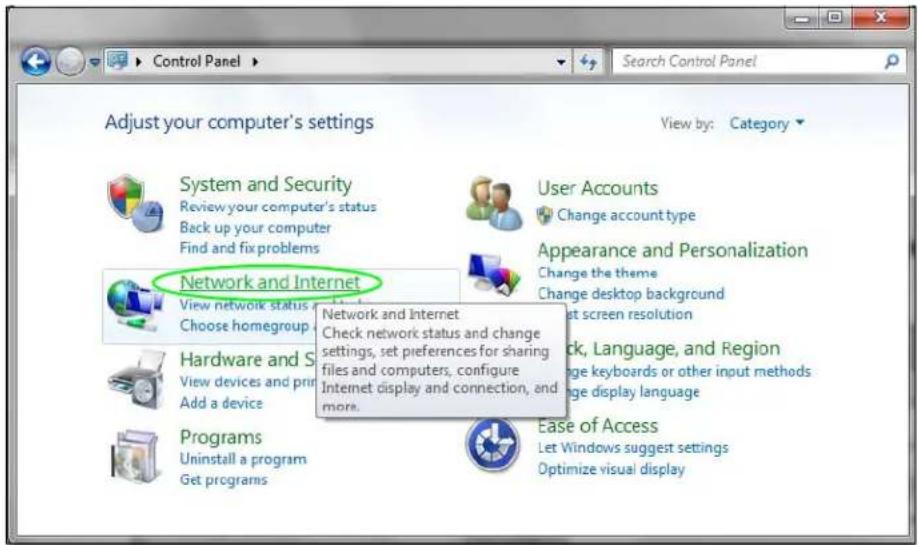
2 Click View network computers and devices.
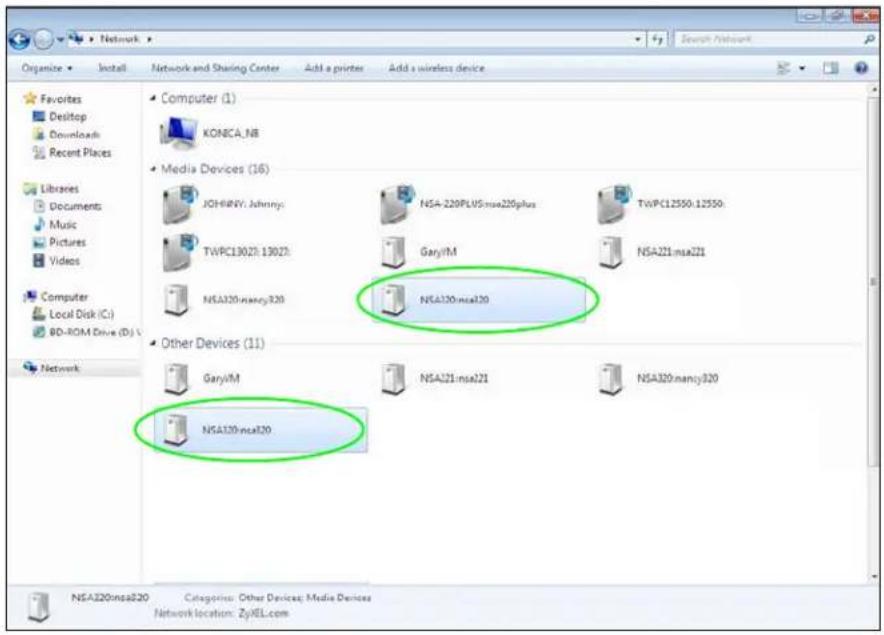
3 The NSA icon displays twice because the NSA is both a media server and a storage device. Double-click either NSA icon to open the Web Configurator login screen.
4.2.1 If the NSA Icon Does Not Display
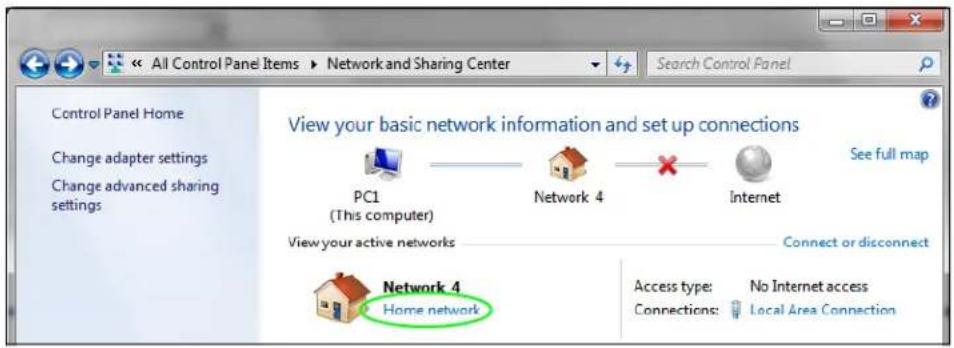
The network containing the NSA must be set as a home or work network in order for the NSA icons to display. If the network containing the NSA displays as "Public":
1 Click Network and Sharing Center and then the network's link (circled in the figure).
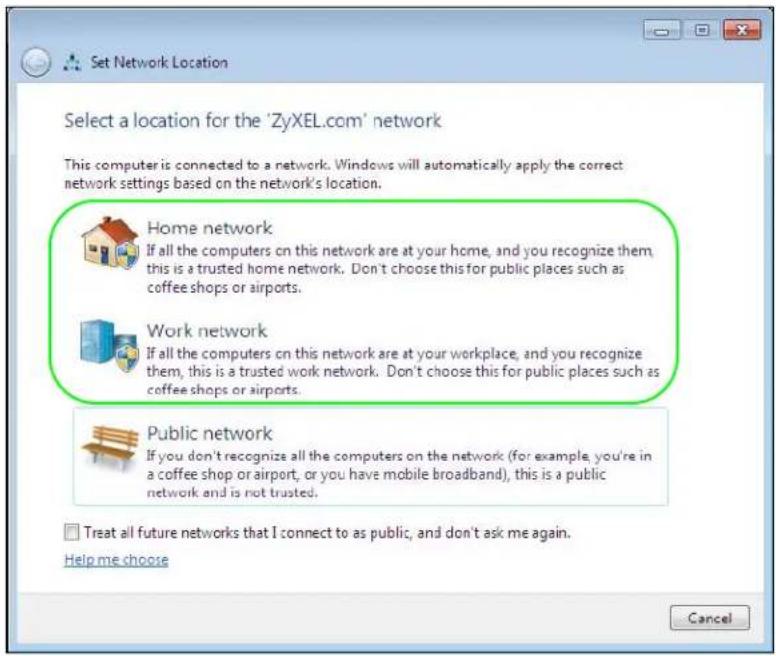
2 Use the Set Network Location screen to set the network's location to home or work.
4.2.2 NSA Icon Right-click Options
Right-click the NSA's icon to see these options:
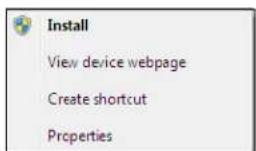
- Install/ Uninstall: Click Install to add the NSA as a device in your computer. After you install the NSA you can see it in the computer's list of devices (see Section 4.5 on page 58. Click Uninstall to remove the NSA from the list of devices installed in your computer.
• View device web page opens the Web Configurator login screen. - Create shortcut adds a desktop shortcut to the Web Configurator login screen.
- Properties opens a window of NSA details and troubleshooting information.
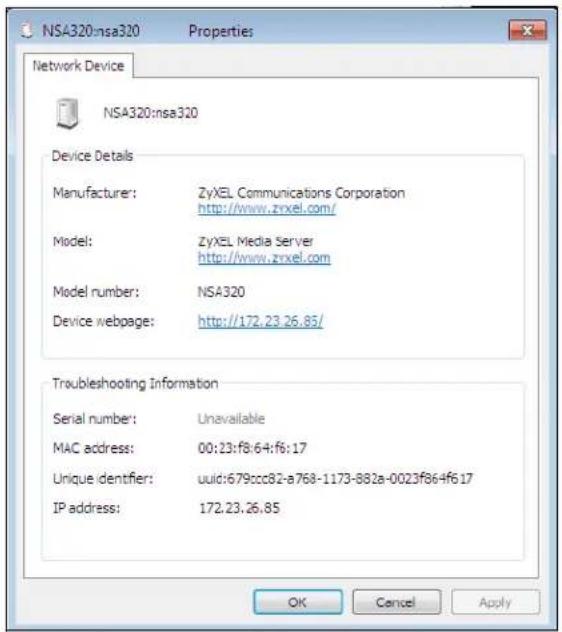
• Manufacturer identifies the company that produced the NSA.
- Model identifies the NSA model.
- Model number identifies the NSA model number.
- Device webpage shows the IP address for accessing the Web Configurator.
- Serial number is unavailable because the NSA does not have one.
- MAC address is the NSA's unique physical hardware address (MAC). You need the MAC address to register the product at myZyXEL.com. Customer support may also request it for troubleshooting purposes.
- Unique identifier is a unique UPnP ID that the NSA generated.
- IP address is the NSA's IP address. It is also the IP address for accessing the Web Configurator.
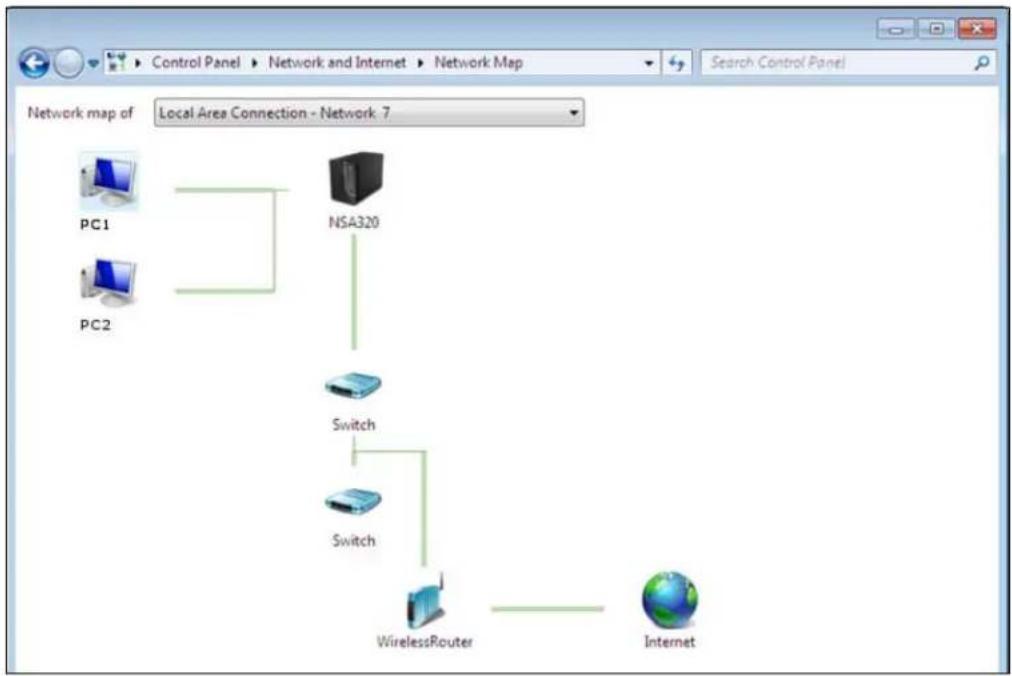
4.3 Windows 7 Network Map
To see your NSA in a Windows 7 home or work network map:
1 Click Start > Control Panel > View network status and tasks (or Network and Sharing Center if you view the Control Panel by icons).
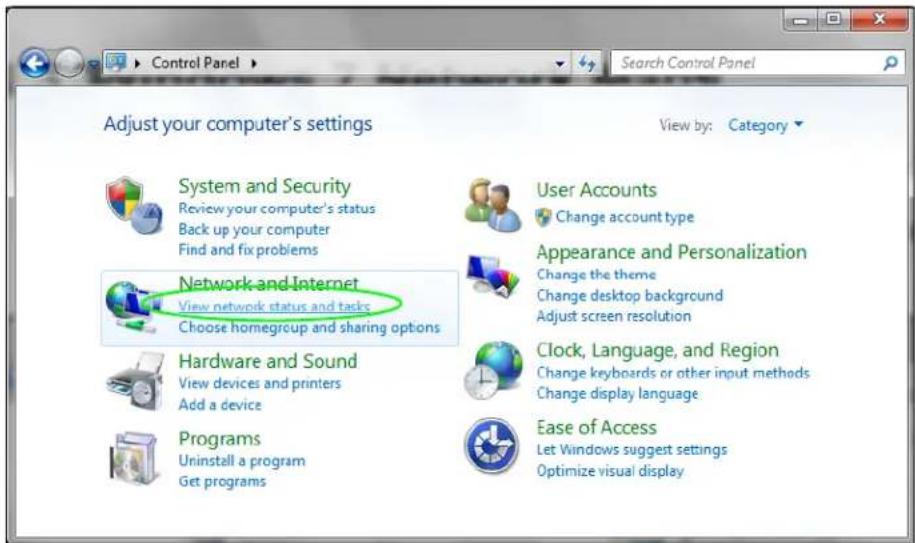
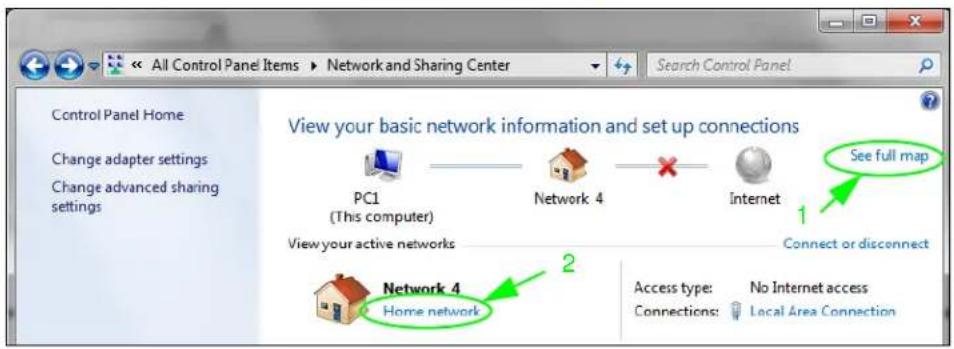
2 Click See full map (1 in the figure).
The network containing the NSA must be set as a home or work network in order to use the full map feature. If the network containing the NSA displays as "Public", click the network's link (2 in the figure, although it is already set to home here) and use the Set Network Location screen to set the network's location to home or work (see page 54).
3 Double-click the NSA's icon to open the Web Configurator login screen. See Section 4.2.2 on page 54 for the NSA icon's right-click options.
flowchart
graph TD
    A["PC1"] --> B["NSA320"]
    C["PC2"] --> B
    B --> D["Switch"]
    D --> E["Switch"]
    E --> F["WirelessRouter"]
    F --> G["Internet"]
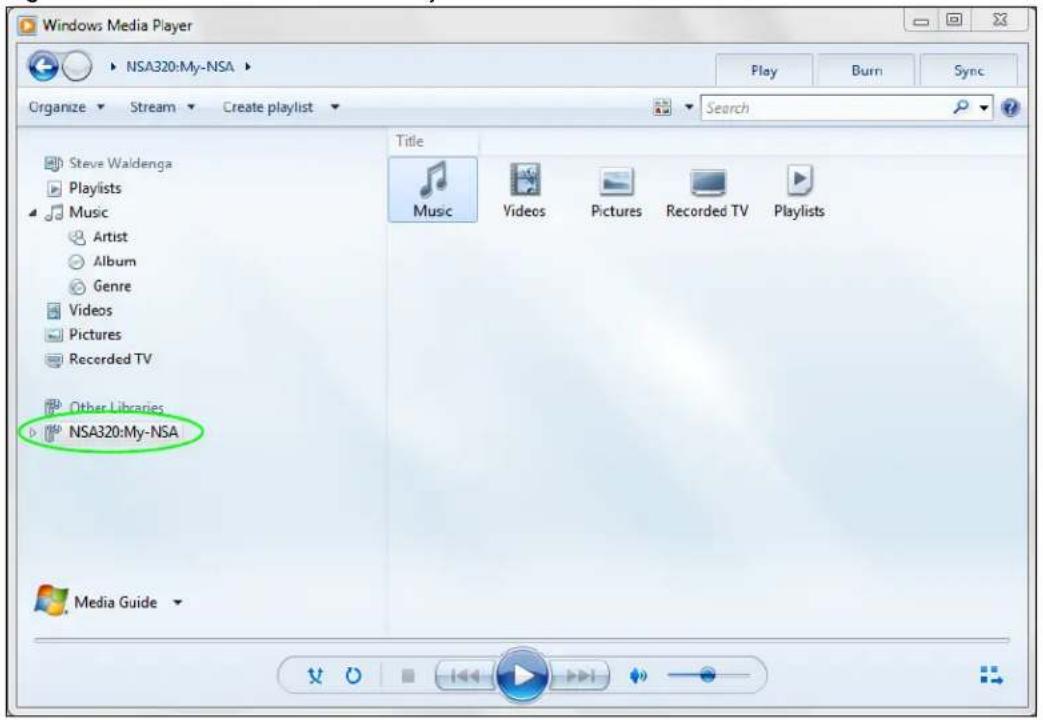
4.4 Playing Media Files in Windows 7
In Windows 7, the NSA automatically displays as a library in Windows Media Player.
Figure 31 NSA in Windows Media Player
4.5 Windows 7 Devices and Printers
After you use the NSA's network icon's install option you can manage the NSA from the Windows 7 Devices and Printers folder.
Click Start > Control Panel > Hardware and Sound > Devices and Printers. Select the NSA icon to display information about the NSA. Double-click the NSA icon to open a properties window (see page 55). Right-click the icon to display these options:
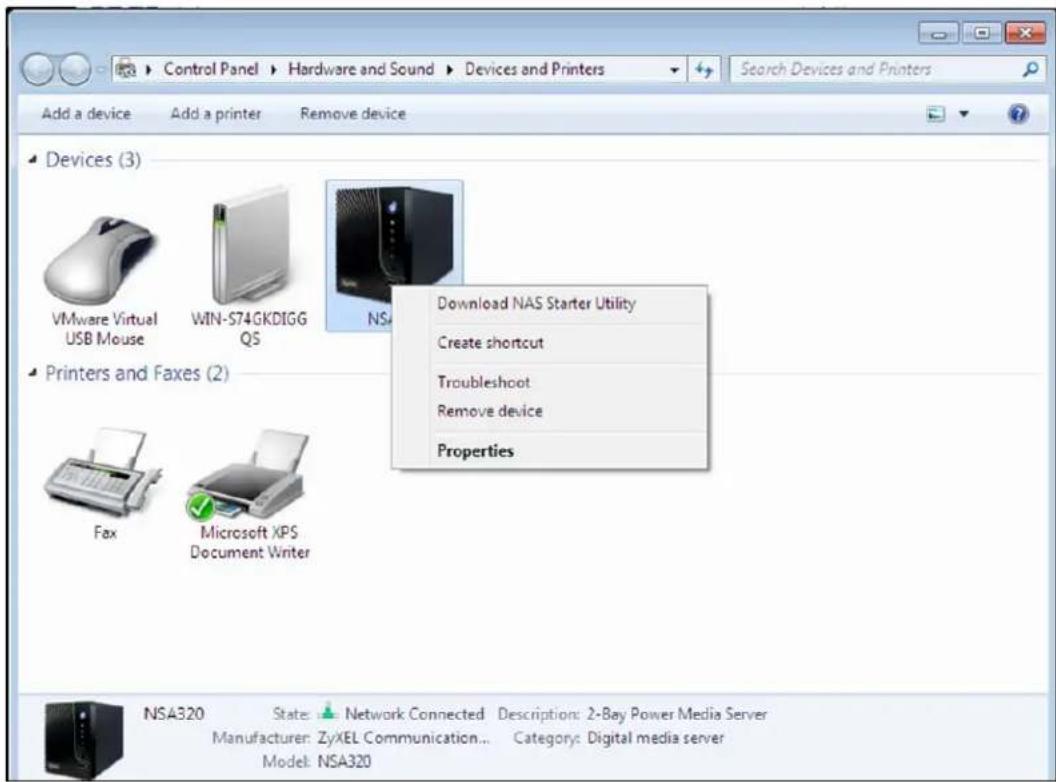
- Download NAS Starter Utility downloads the NSA's Starter Utility. It lets you find, set up, and manage the NSA as well as copy files to it and access the files on it. See Chapter 2 on page 21 for details.
- Create shortcut has Windows make a desktop shortcut to this screen.
- Troubleshoot opens Windows' device troubleshooting wizard.
- Remove device removes the NSA from the Windows 7 Devices and Printers folder.
- Properties opens a window of NSA details and troubleshooting information (see page 55).
4.5.1 Windows 7 Desktop Shortcut
This is the NSA's desktop shortcut. Double-click it to open a properties window (see page 55).
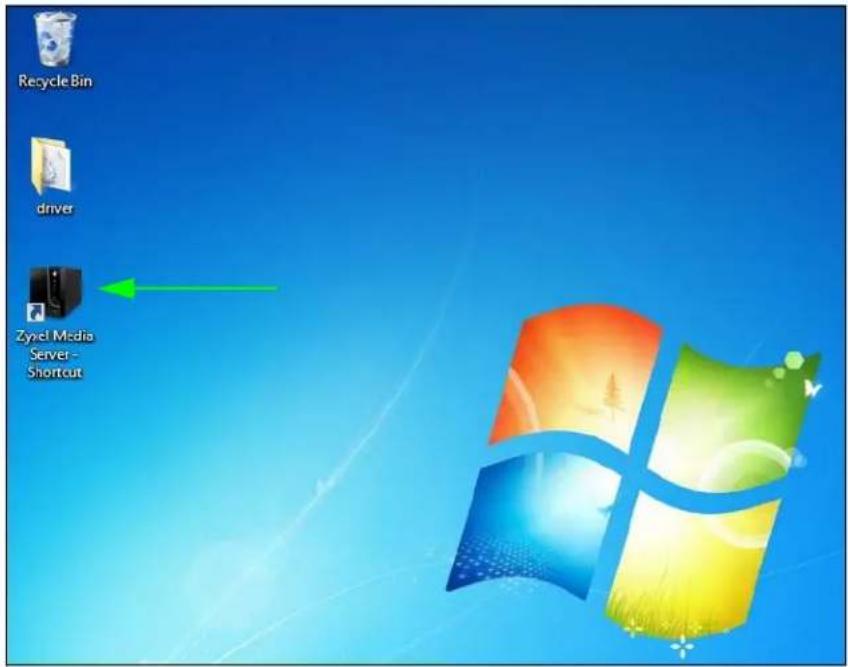
1 Right-click the NSA's desktop shortcut icon to see these options:
| Open file location |
| Download NAS Starter Utility |
| Restore previous versions |
| Send to |
| Cut |
| Copy |
| Create shortcut |
| Delete |
| Rename |
| Troubleshoot |
| Remove device |
| Properties |
- Open file location takes you to the Windows 7 Devices and Printers folder.
- Download NAS Starter Utility downloads the NSA's Starter Utility. It lets you find, set up, and manage the NSA as well as copy files to it and access the files on it. See Chapter 2 on page 21 for details.
- Restore previous versions is the Windows 7 option for restoring a file or folder. It does not apply to this shortcut.
- Send to give you options for copying the shortcut to another location.
- Cut removes this shortcut so you can paste it somewhere else.
- Copy copies the shortcut so you can paste it somewhere else.
-
Create shortcut has Windows make a desktop shortcut to this icon.
-
Delete sends the shortcut to the recycle bin.
- Rename lets you change the name of the shortcut.
- Troubleshoot opens Windows' device troubleshooting wizard.
- Remove device removes the NSA from the Windows 7 Devices and Printers folder.
- Properties opens a window of details about the shortcut.
4.6 Creating a Volume in a 2-Bay NSA
This section shows you how to create a volume in your 2-bay NSA.
Creating a volume deletes all existing data in the hard disk. Make sure you have a backup of your existing data before following the steps in this section.
Your NSA has two bays for Serial Advanced Technology Attachment (SATA) hard disks. The JBOD storage method is used if you are using a single hard disk for your NSA.
This JBOD volume shows up in the Storage > Volume screen (Section 7.3 on page 155) as follows.
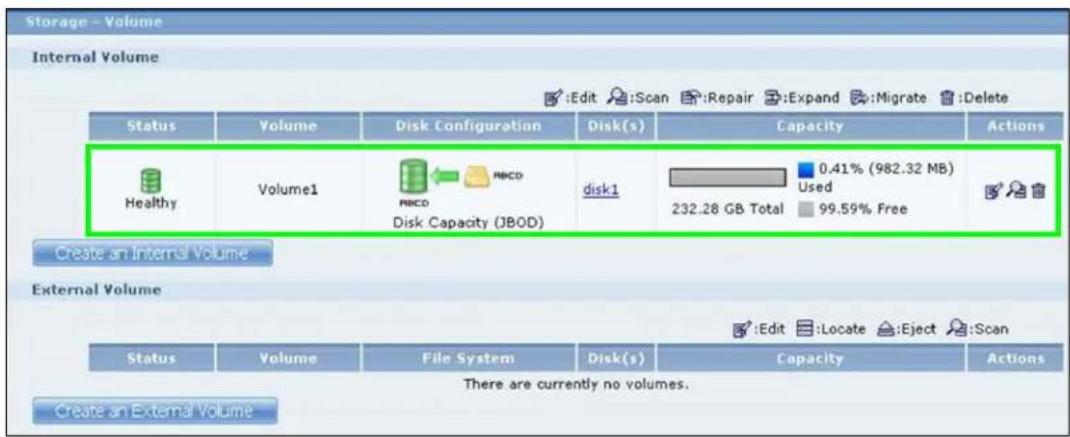
4.6.1 Creating a RAID 1 Volume
This storage method allows recovery of data if your hard disk fails. To create a RAID 1 volume, you must install two SATA hard disks in your NSA. There are two ways to create a RAID 1 volume:
- Click the Migrate button - If you already have a SATA hard disk with a volume and you later install a second SATA hard disk in your NSA, use the Migrate button to convert the existing JBOD volume to a RAID 1 volume.
- Click the Create an internal volume button - Use this if there are no existing volumes in your NSA.
4.6.2 Migrate Button
Do the following steps to create a RAID 1 volume.
1 Once you install a second SATA hard disk in the NSA, the Storage > Volume screen shows the Migrate button.
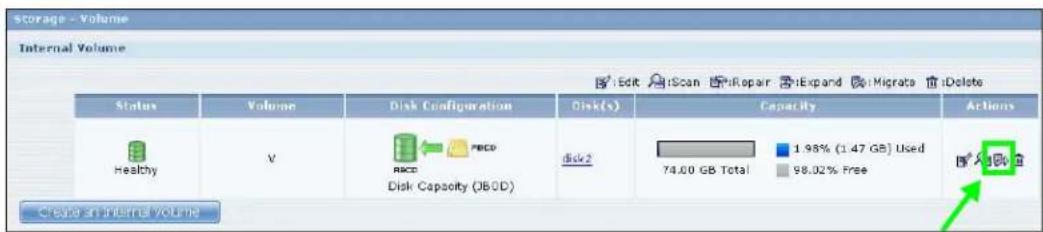
2 Click the Migrate button and you can see the following progress bar. Wait for the RAID 1 volume to be created. This may take quite a while depending on how much data you have in the original volume.
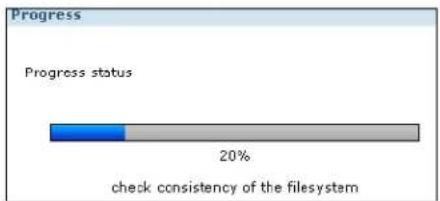
bar
Progress | Progress status | Percentage (%) | | :--- | :--- | | progress status | 20 | check consistency of the filesystem4.6.3 Create an Internal Volume Button
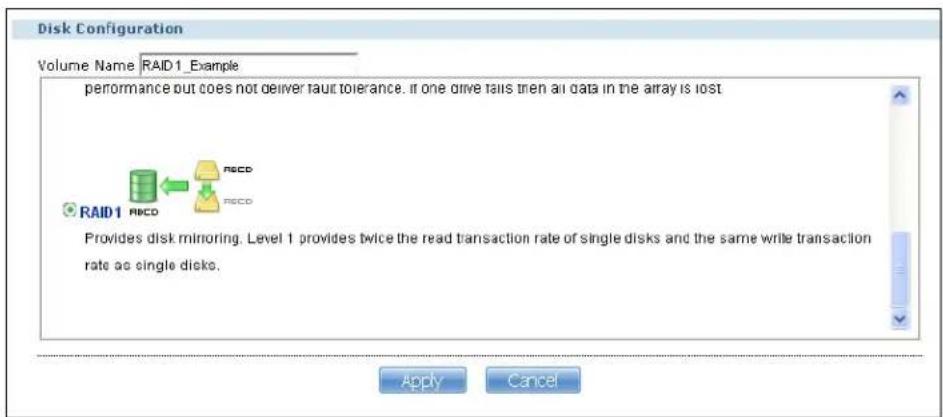
If you do not have an existing volume in the Storage > Volume screen, do the following steps to create a RAID 1 volume.
1 In the Storage > Volume screen, click Create an Internal Volume.
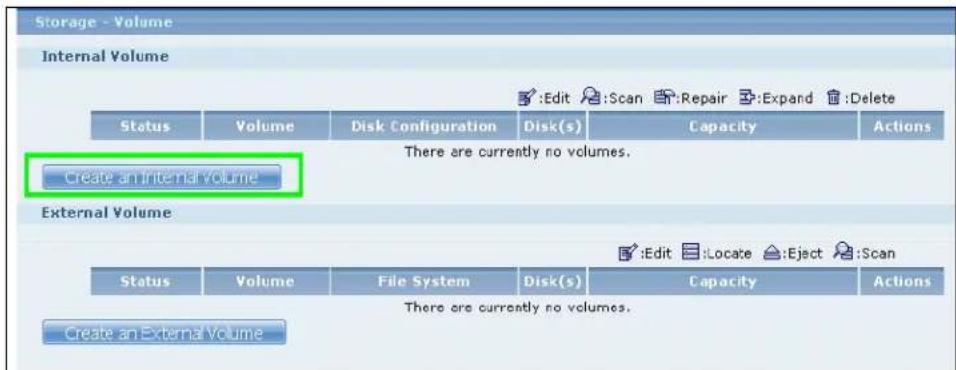
2 In the Disk Configuration screen, you can select the storage method.
- Type in the Volume Name for your RAID 1 volume. The volume name can be 1 to 31 characters (a-z, 0-9, " [spaces], "_", and ".").
- Choose RAID 1 and click Apply.
This deletes all existing data in the SATA hard disk. Make sure you have a backup of any existing data in the hard disk.
The NSA starts creating the volume and you can see the following progress bar. Wait for the RAID 1 volume to be created.
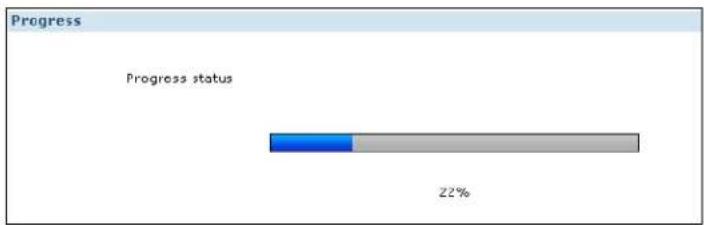
bar
Progress | Progress status | Percentage (%) | | :--- | :--- | | Segment 1 | 22 |3 The Storage > Volume screen displays with your RAID 1 volume.
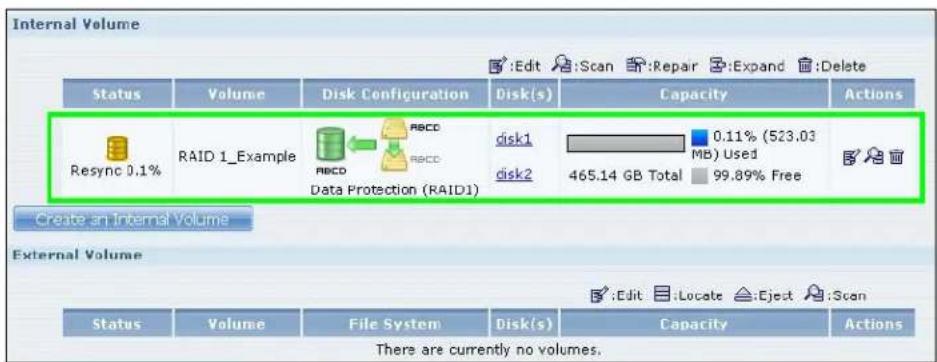
4.7 Creating a Volume in a 1-Bay NSA
This section shows you how to create a volume on your 1-bay NSA.
Creating a volume deletes all existing data in the SATA or eSATA hard disk. Make sure you have a backup of your existing data before following the steps in this section.
Your NSA has a single bay for a SATA (Serial Advanced Technology Attachment) hard disk. JBOD is the only storage method for the NSA310S and the default storage method if you are using a single hard disk in the NSA310.
This JBOD volume shows up in the Storage > Volume screen (Section 7.2 on page 152) as follows.
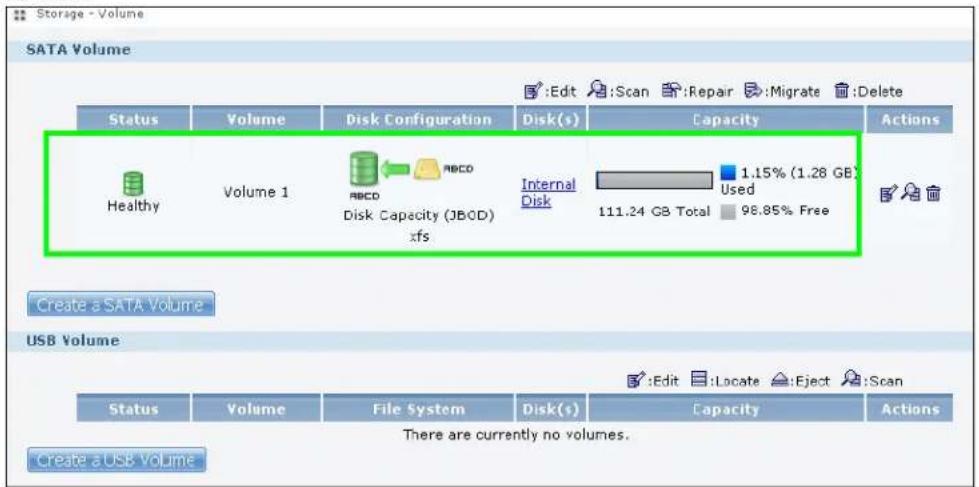
When you attach an eSATA hard disk to your NSA, you can configure this volume as: 1) a backup to your SATA hard disk (RAID 1); or 2) as a separate storage drive (either another JBOD or a PC Compatible Volume).
4.7.1 Creating a RAID 1 Volume
This applies to the NSA310. This storage method allows recovery of data if your hard disk fails. To create a RAID 1 volume, you must connect an eSATA hard disk to your NSA. There are two ways to create a RAID 1 volume:
- Click the Migrate button - This is a quick way to create a RAID 1 volume. Use this to automatically synchronize data in the internal hard disk to the eSATA hard disk.
- Click the Create a SATA volume button - Use this if there are no existing volumes in your NSA.
4.7.2 Migrate Button
Do the following steps to create a RAID 1 volume.
1 Once you attach the eSATA hard disk to the NSA, the Storage > Volume screen shows the Migrate button.
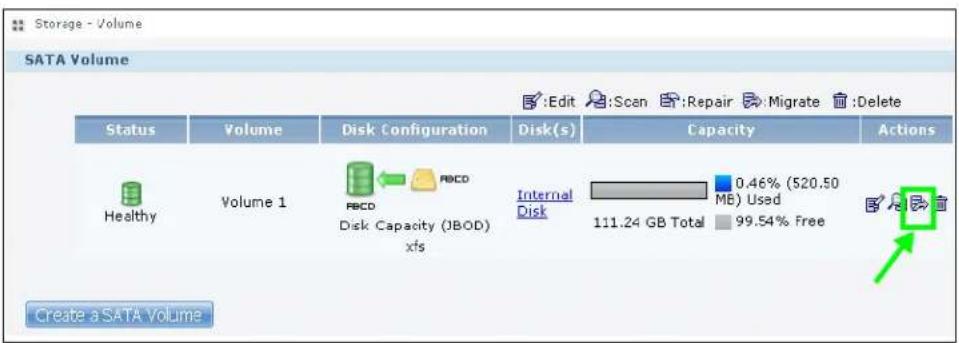
2 Click the Migrate button and you can see the following progress bar. Wait for up to 10 minutes for the RAID 1 volume to be created.
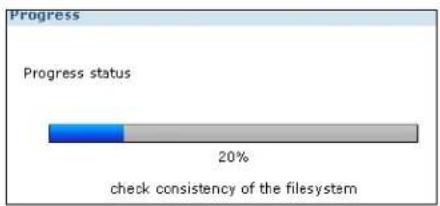
bar
Progress | Progress status | Percentage (%) | | :--- | :--- | | check consistency of the filesystem | 20 |4.7.3 Create a SATA Volume Button
If you do not have an existing volume in the Storage > Volume screen, do the following steps to create a RAID 1 volume.
1 In the Storage > Volume screen, click Create a SATA Volume.
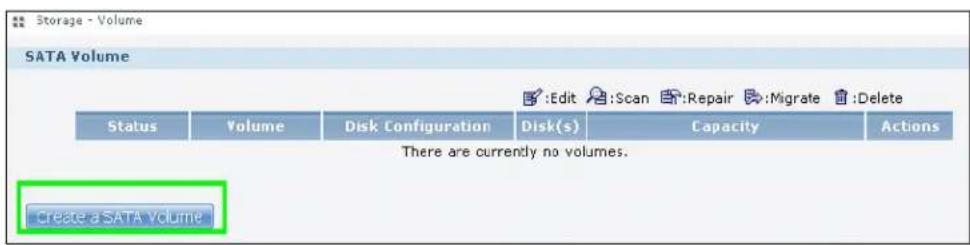
2 In the Disk Configuration screen, you can select the storage method.
- Type in the Volume Name for your RAID 1 volume. The volume name can be 1 to 31 characters (a-z, 0-9, " [spaces], "_", and ".").
- Choose RAID 1 and click Apply.
This deletes all existing data in the eSATA hard disk. Make sure you have a backup of any existing data in the hard disk.
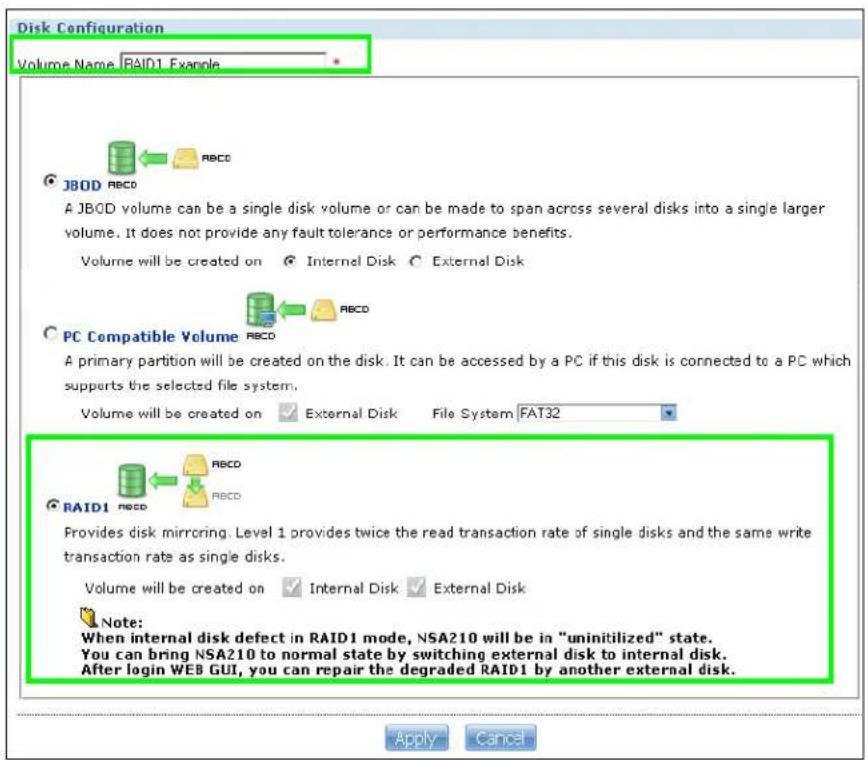
The NSA starts creating the volume and you can see the following progress bar. Wait for 2 minutes for the RAID 1 volume to be created.
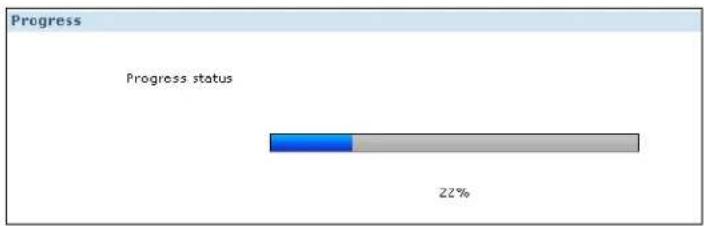
bar
Progress | Progress status | Percentage (%) | | :--- | :--- | | Segment 1 | 22 |3 The Storage > Volume screen displays with your RAID 1 volume.
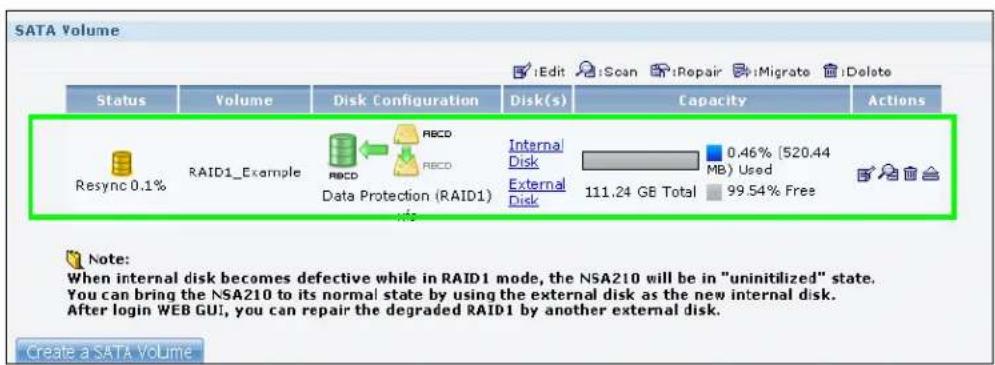
4.7.4 Creating a PC Compatible Volume
You can use your eSATA hard disk as a separate storage volume. The following section shows you how to create a PC Compatible Volume. Use this storage method if you have an eSATA hard disk that will be connected to a Windows computer when it is not connected to the NSA. However, the computer's platform (for example, Windows XP SP2) should support the file system you selected for the eSATA hard disk.
1 Connect the eSATA hard disk to your NSA and go to the Storage > Volume screen. Click Create a SATA Volume.
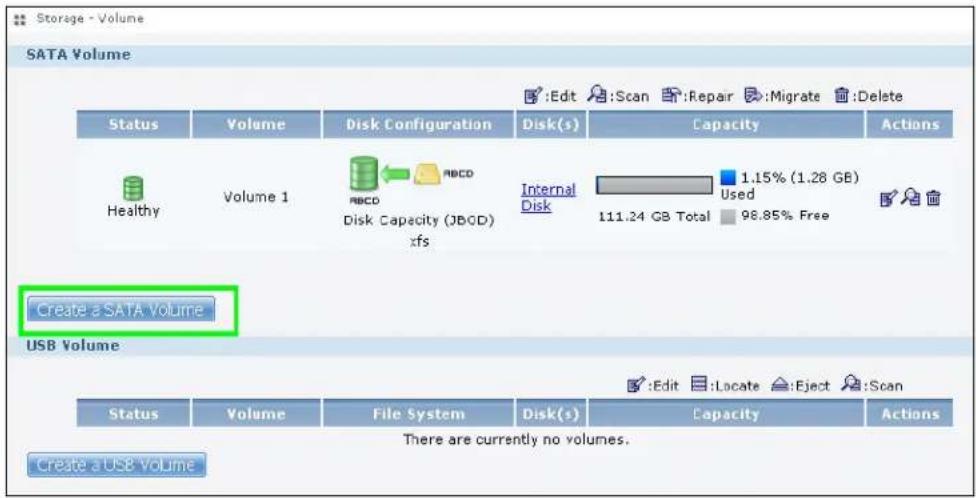
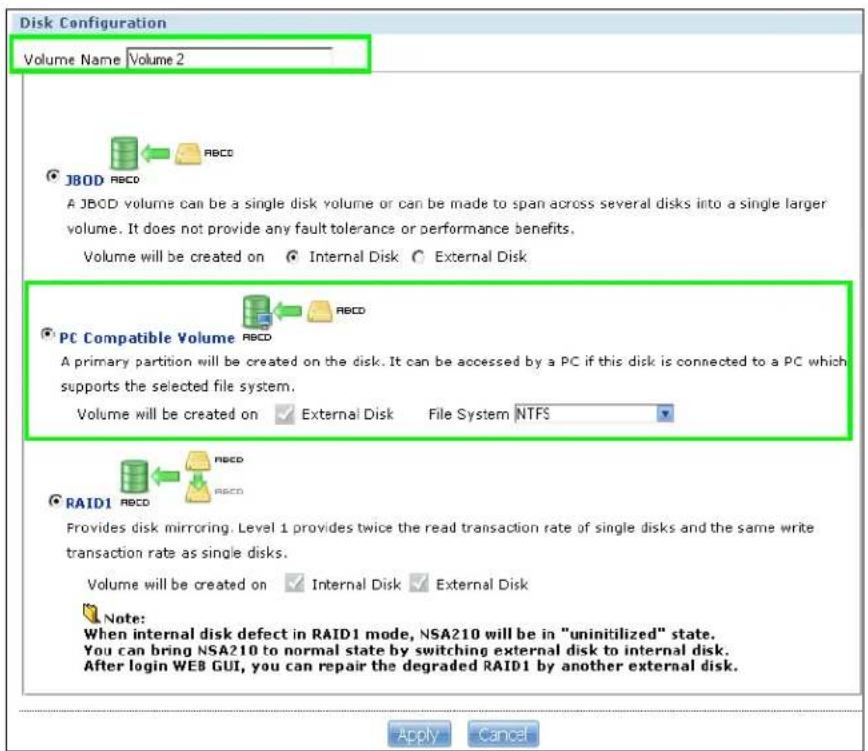
2 In the Disk Configuration screen, you can select the storage method.
- Type in the Volume Name for your PC Compatible volume. The volume name can be 1 to 31 characters (a-z, 0-9, " " [spaces], "_", and ".").
- Choose PC Compatible Volume.
- Select the File System you want to use (NTFS in this example). Make sure this file system is supported by the Windows platform you are using in your computer. Refer to Table 26 on page 159 for file systems supported by your NSA. Click Apply.
This deletes all existing data in the eSATA hard disk. Make sure you have a backup of any existing data in the hard disk.
The NSA starts creating the volume and you can see the following progress bar. Wait for 2 minutes for the volume to be created.
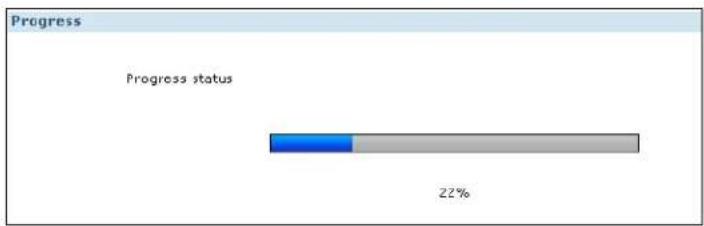
bar
Progress Progress status | Progress | Percentage (%) | | :--- | :--- | | Blue Segment | 22 | | Grey Segment | 78 |3 The Storage > Volume screen displays with your PC Compatible Volume.
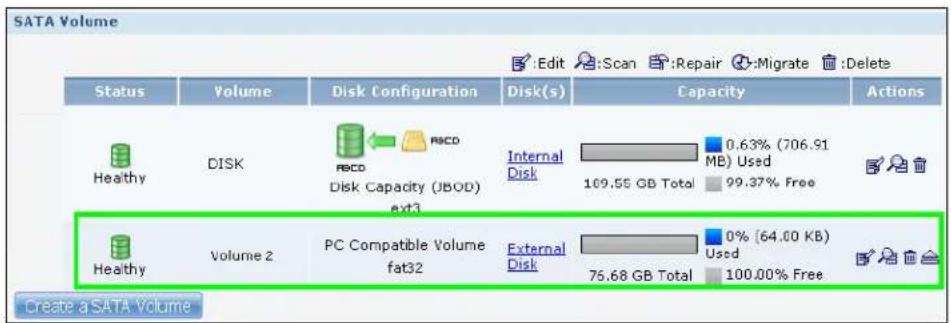
4.7.4.1 Checking Your PC Compatible Volume
The files in the eSATA hard disk that you configured as a PC Compatible Volume should be accessible when you connect the eSATA hard disk to your computer.
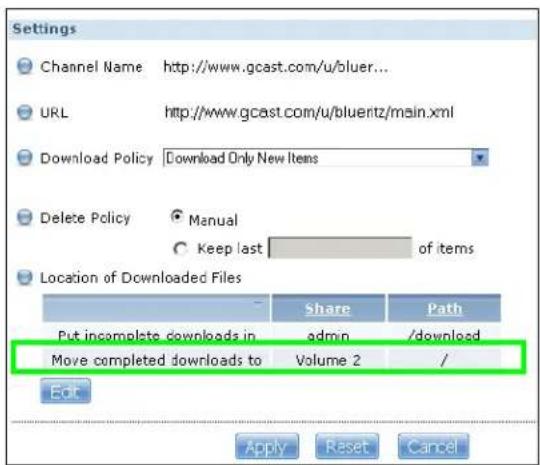
You can configure the features of your NSA to save files to your eSATA hard disk. For example, you can refer to Section 4.11 on page 95 to use the Broadcasting feature of your NSA to download files to your eSATA disk.
1 When asked for the Location of Downloaded Files, make sure you save the completed files to the eSATA hard disk (Volume 2 in this example).
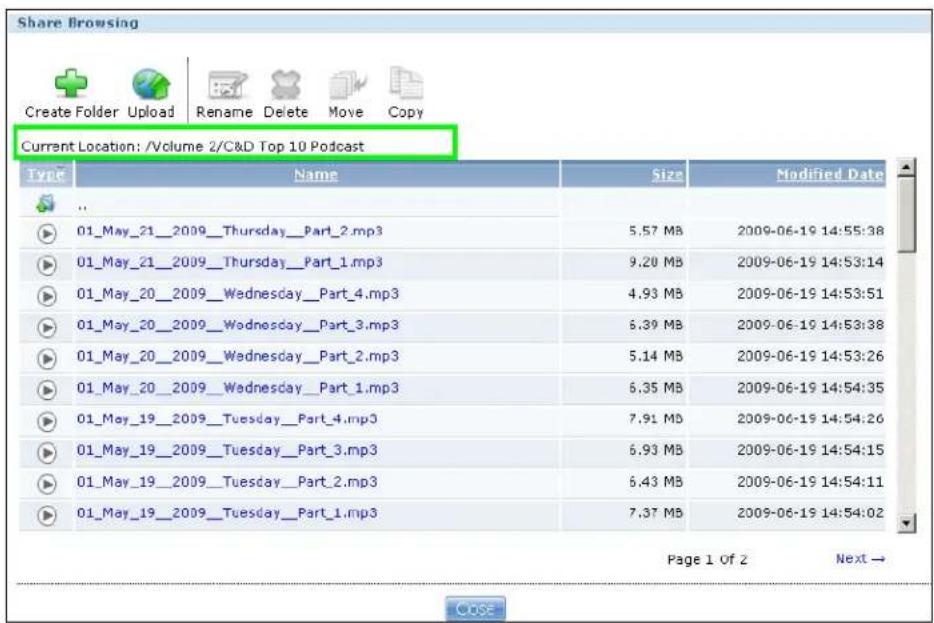
2 The files downloaded by the NSA should be in the Volume 2 folder. You can check this when you access the Volume 2 folder from My NSA > Share Browser screen as follows.
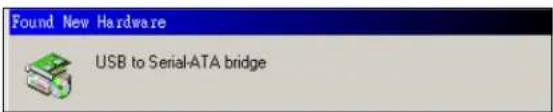
3 Disconnect the eSATA hard disk from the NSA. Connect the eSATA hard disk to your computer. On some systems, you can see the following notification.
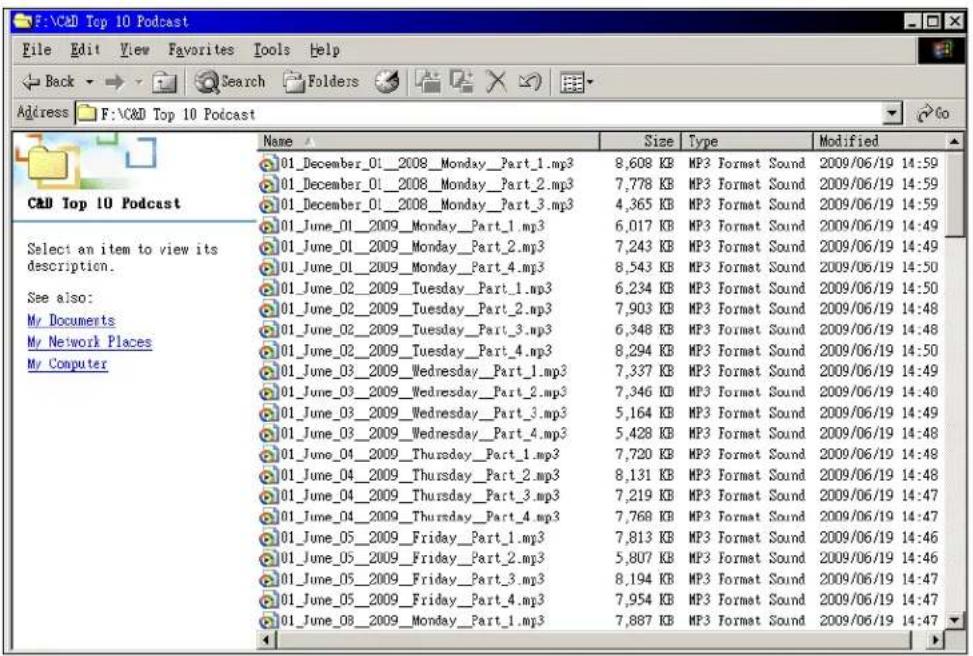
4 The computer assigns a letter to the eSATA hard disk (drive F in this example) that is accessible from the My Computer screen. Double click the eSATA drive and check your files. They should be the same files that are in the My NSA > Share Browser screen.
4.8 Deleting a Volume
Delete an existing volume in your NSA by doing the following steps.
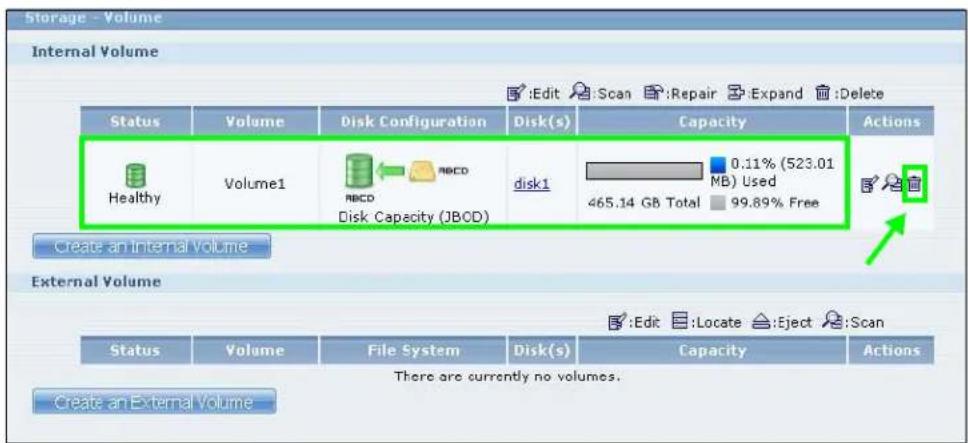
1 In the Storage > Volume screen, select the volume you want to delete and click the delete icon.
2 A confirmation window appears as follows. Click Yes.
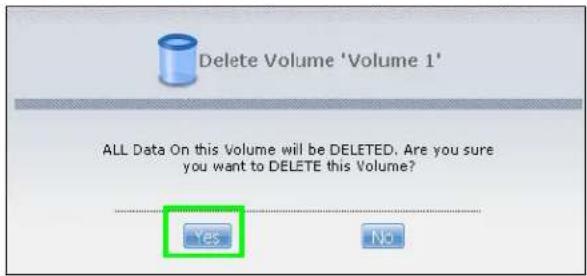
This deletes all existing data in the volume. Make sure you have a backup of any existing data in the hard disk.
4.9 File Sharing Tutorials
The following sections cover using the NSA for file sharing. This chapter assumes you have already followed the Quick Start Guide instructions to perform initial setup and configuration (so you have a working volume). See the rest of this User's Guide for details on configuring the NSA's various screens.
4.9.1 Creating a User Account
Bob wants to create accounts for his sons Jimmy and Kevin. This is how he would do it.
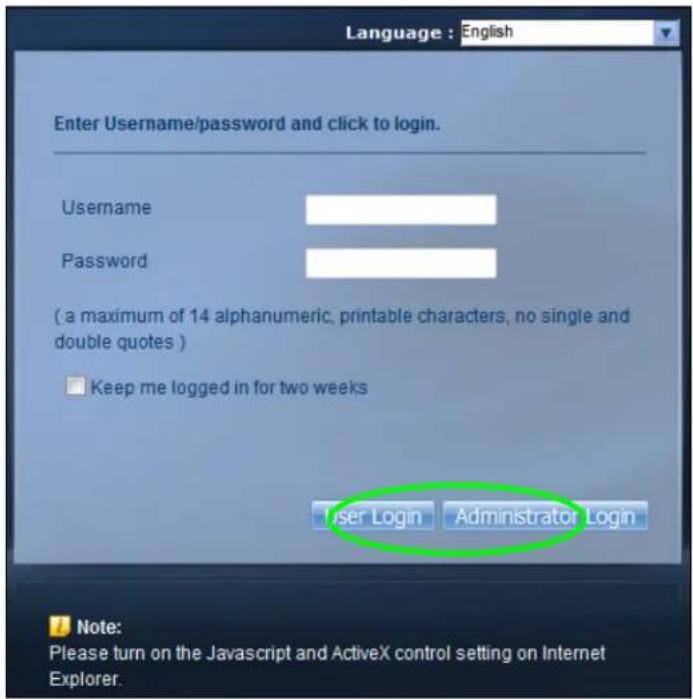
1 At the NSA web configurator login screen enter the administrator account and password and click Administrator Login to go to the advanced administration screens.
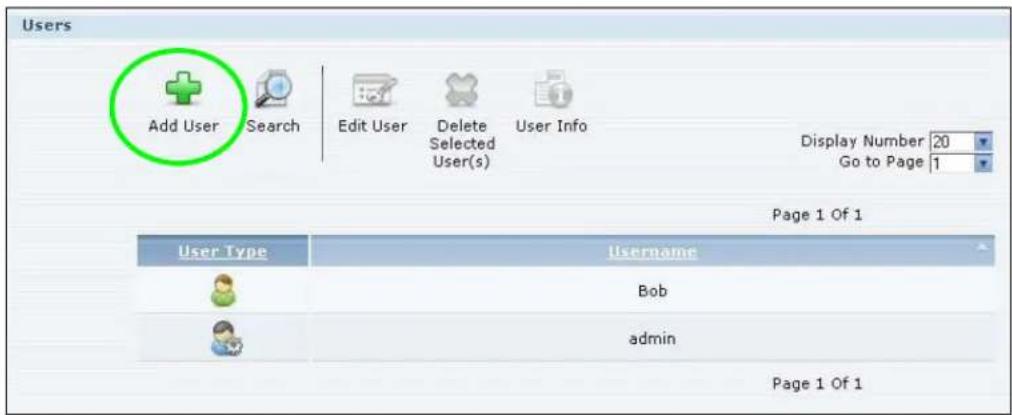
2 Click Sharing > Users to open the Users screen. Then click Add User.
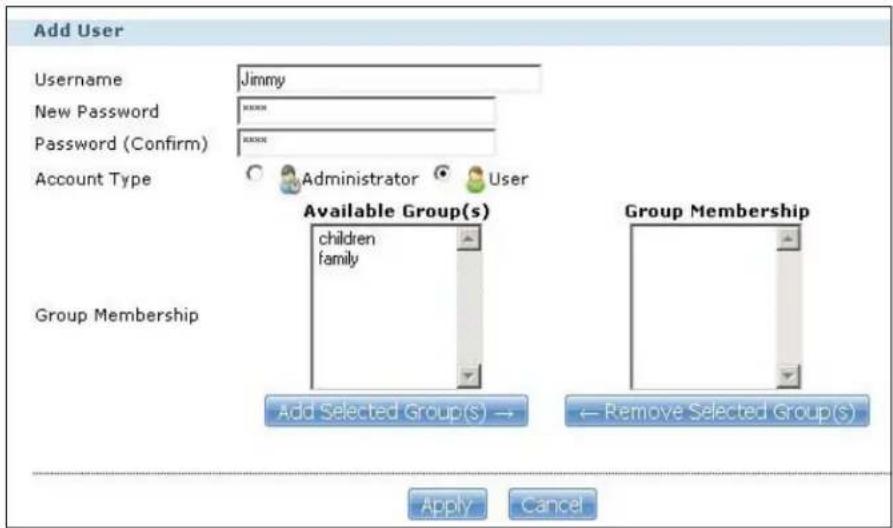
3 Configure the screen as follows and write down the username and password to give to Jimmy. If the username and password are the same as Jimmy's Windows login, Jimmy will not need to enter a username and password when he logs into his share from his computer. Set the Account Type to User so Jimmy doesn't get to configure the whole NSA. Click Apply to create the account.
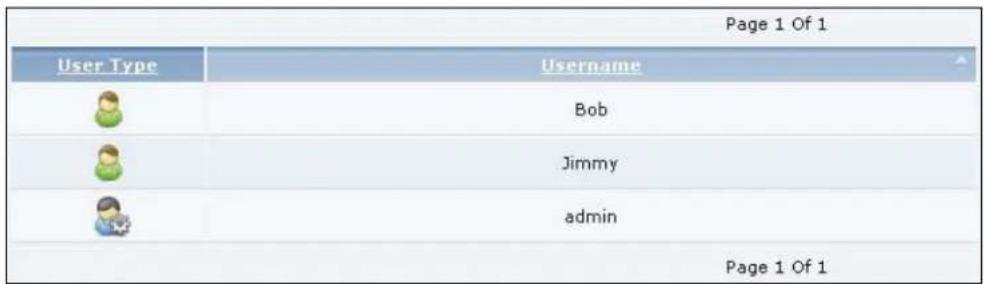
4 The account now displays in the Users screen.
Now that Bob has created Jimmy's account, he can go through the steps again to create another account for Kevin. After both accounts are created, he can go to Section 4.9.2 on page 73 to create shares for Jimmy and Kevin.
4.9.2 Creating a Share
Suppose Bob has already created separate accounts for his sons Jimmy and Kevin. Now Bob wants to create a share for each son. He also wants to make sure that each son can only access his own share (to keep them from deleting each other's files). This is how he would do it.
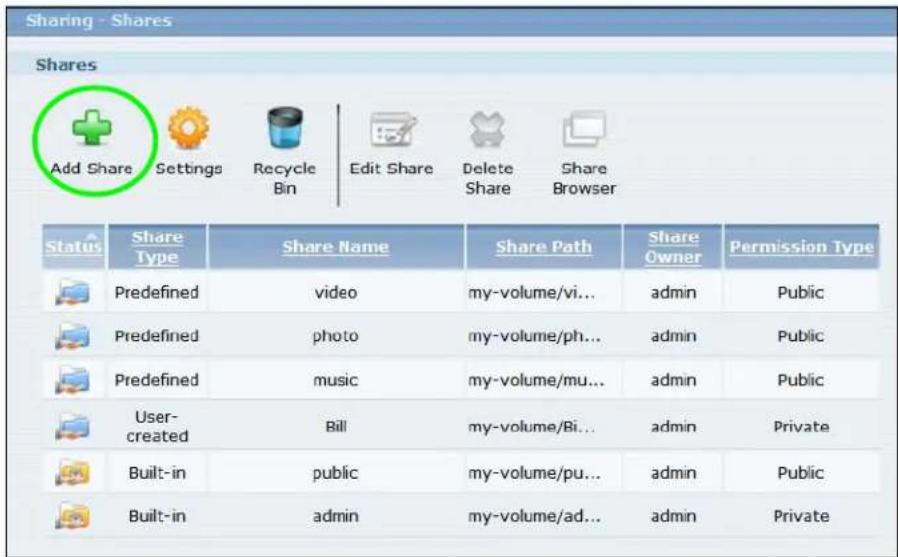
1 In the NSA's administration web configurator screens, click Shares > Add Share. Click Add Share to create a new share.
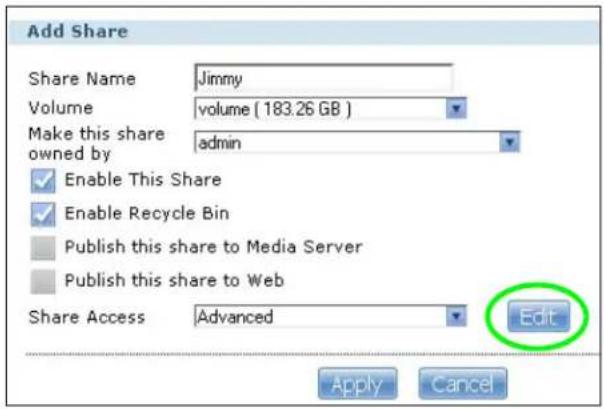
2 Specify a name for the share and select which volume it should be on. Configure the screen as follows. Then click Edit.
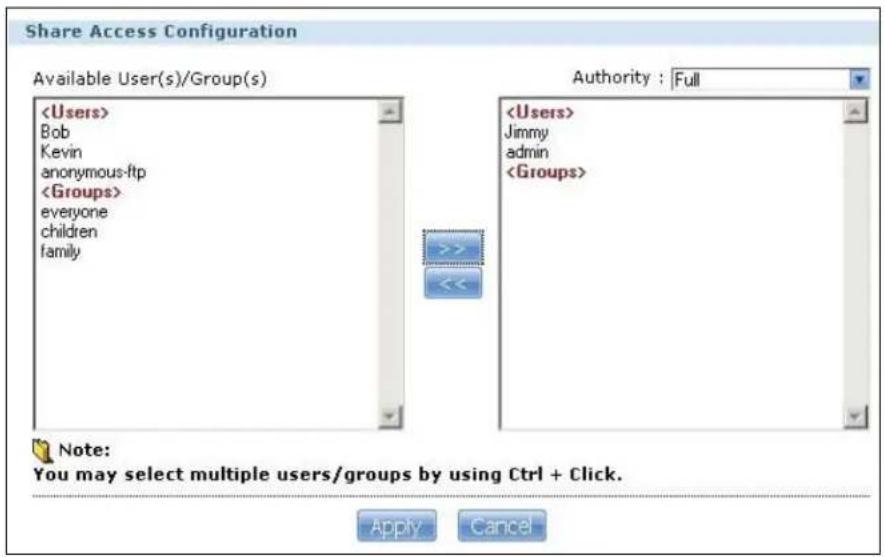
3 Configure the screen as follows to give Jimmy full access right to the share. Then click Apply to create the share.
Now that Bob has created Jimmy's share, he can go through the steps again to create another share for Kevin.
4.9.3 Creating a Group
After creating user accounts for Jimmy and Kevin, Bob wants to create a group for his sons and another one for the parents. Bob can assign access rights to his sons' group for certain shares such as a cartoons share and allow only the parents' group to access the scary movie share. This is how he would create the group.
1 In the NSA's administration web configurator screen, click Groups > Add Group.
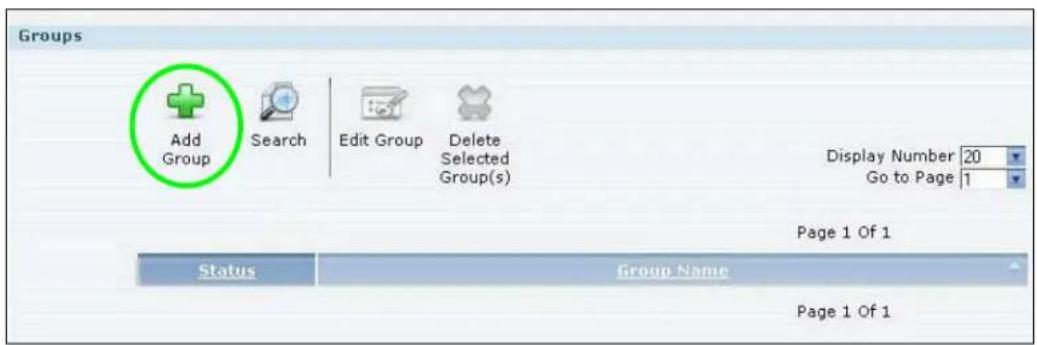
2 Specify a name for the group. Select the user(s) you want to add to the group from the Available User(s) list and click Add Selected User(s). Configure the screen as follows. Then click Apply to create the group.
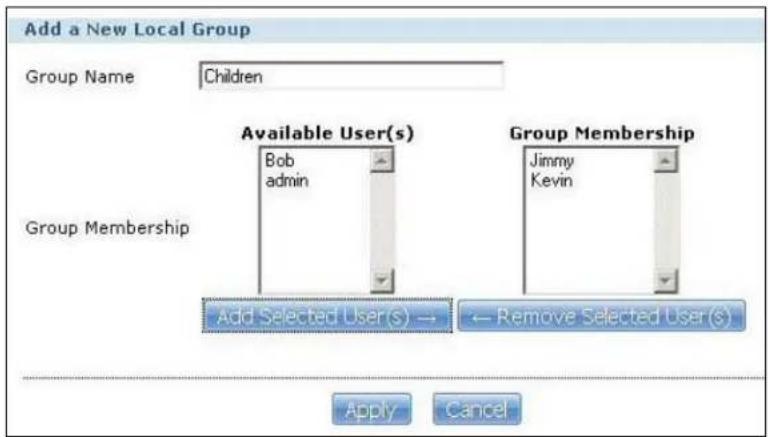
Now that Bob has created a group for Jimmy and Kevin, he can go through the steps again to create another group for the parents. Then he can see the rest of the tutorials for how to use the groups in assigning access rights to shares.
4.9.4 Accessing a Share From Windows Explorer
If you map a NSA share (where data is stored) to a Windows network drive, you can use Windows Explorer to transfer files to and from the NSA as if it was another folder on your computer. Here he maps Jimmy's share to Jimmy's computer.
1 Start Windows Explorer and go to the NSA's server name. The default is 'nsa' followed by the number of your model ('nsa320' for example).
2 Click Tools > Map Network Drive.
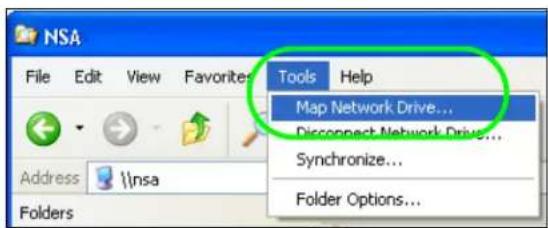
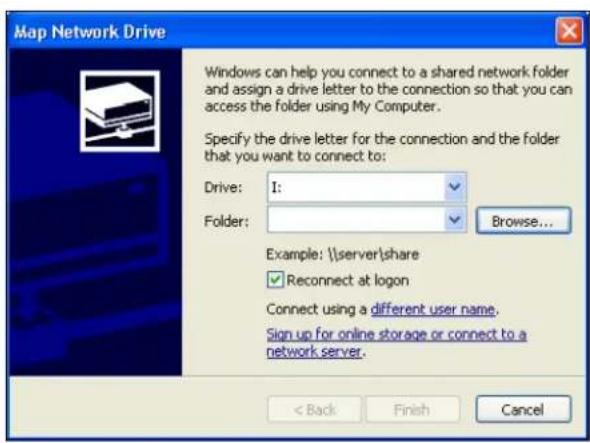
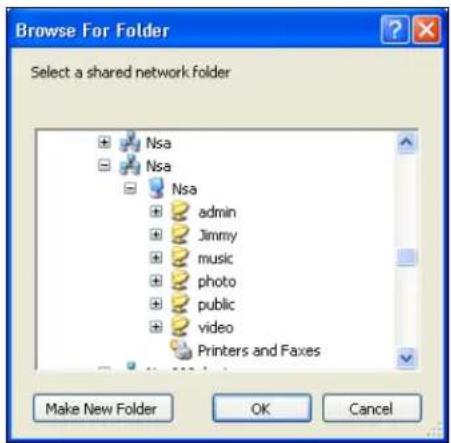
3 Select the network drive that you want to map the NSA to from the Drive list box. This example uses I. Then browse to and select the share on the NSA. Click Finish.
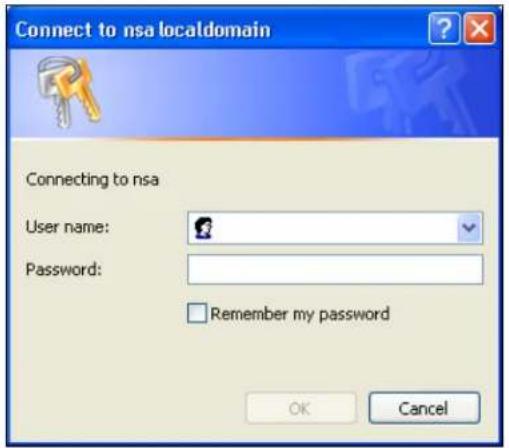
4 Enter the username and password for Jimmy's account and click OK. You do not need to do this if the username and password are the same as Jimmy's Windows login.
5 After the mapping is done, you can then simply copy and paste or drag and drop files from/to your local computer's drives to or from this network folder. Just like the NSA's share was another folder on your computer.
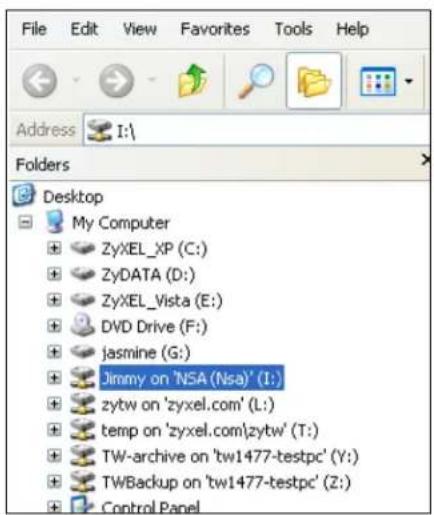
Now that Bob has mapped Jimmy's share to Jimmy's computer, he can go through the steps again to map Kevin's share to Kevin's computer.
4.9.5 Accessing a Share Using FTP
You can also use FTP to access the NSA. Suppose Jimmy is temporarily using a different computer and wants to access his share without mapping it to the computer. This is how he would do it.
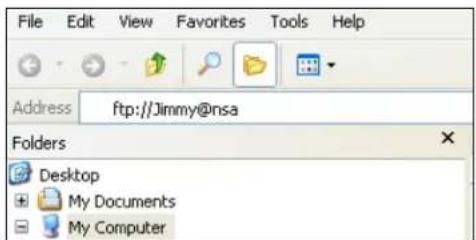
1 Open the FTP client (Windows Explorer is used here) and type "ftp://username@server" where "username" is the account's username and "server" is the NSA's IP address or server name.
2 Enter your password and click Login.
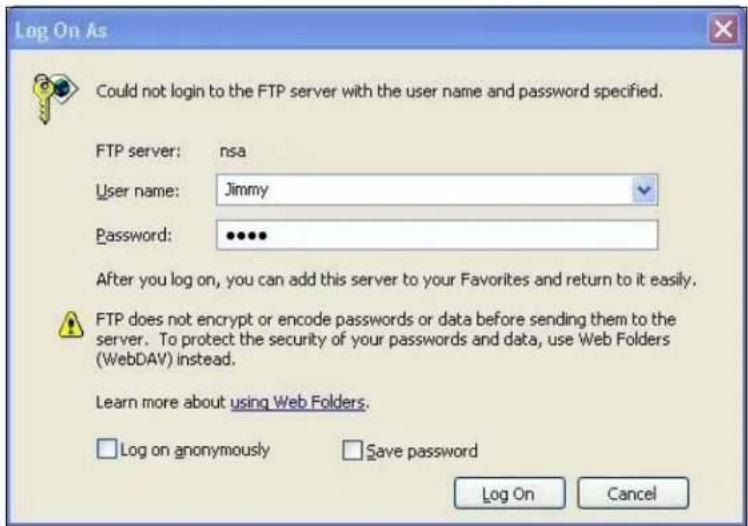
3 Now you can access files and copy files from/to your local computer's drives to or from this network folder.
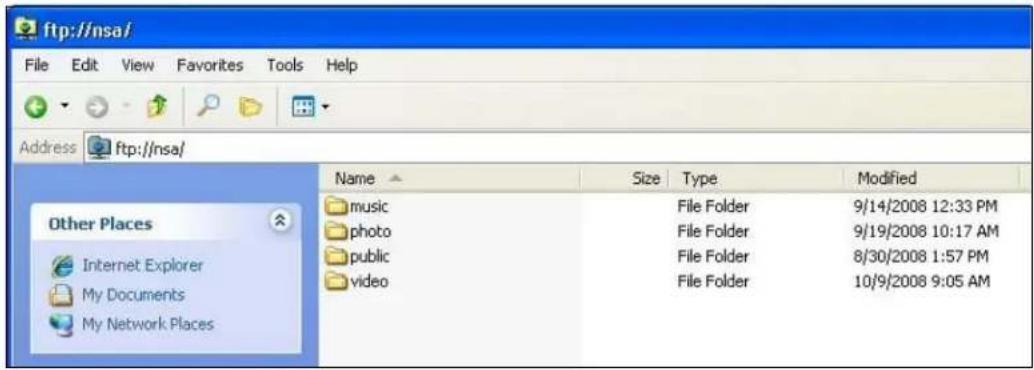
4.9.6 Accessing a Share Through the Web Configurator
You can browse and access files through the web configurator.
1 Log into the NSA web configurator (see Section 3.3 on page 31) using the appropriate user name and password (this example uses Jimmy's) and click File Browser. Click a share (the Jimmy share in this example) to see the top level of the share's contents.
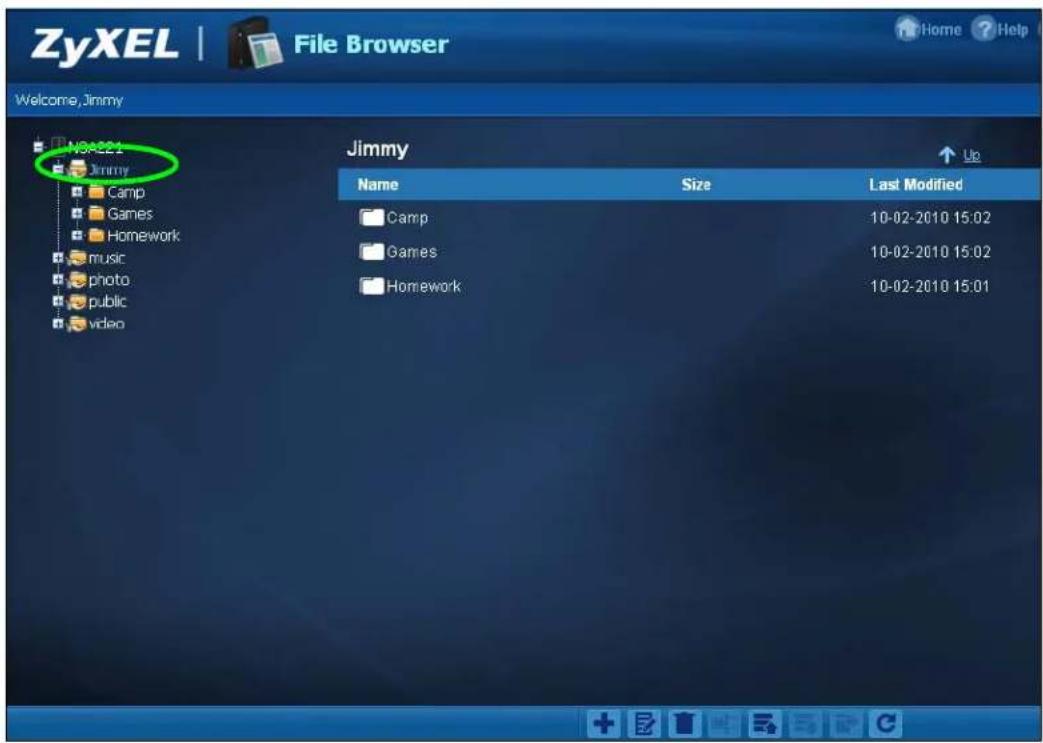
2 Click a folder's file name to browse the folder. You can open files or copy them to your computer. You can also create new folders and upload additional files to the share.
3 Click the logout icon when your are done.
4.10 Download Service Tutorial
This tutorial covers using the NSA to download a file from the Internet. Use this same procedure for P2P downloads as well as regular HTTP (web) and FTP downloads. See Section 9.12.2 on page 204 for more on the download service.
4.10.1 Copying/Pasting a Download Link
1 Open your Internet browser (this example uses Internet Explorer).
2 Find a download link for the file you want. In this example, www.zyxel.com has a Download Now link for downloading a datasheet for ZyXEL's GS-2024 (a device for making phone calls over the Internet).
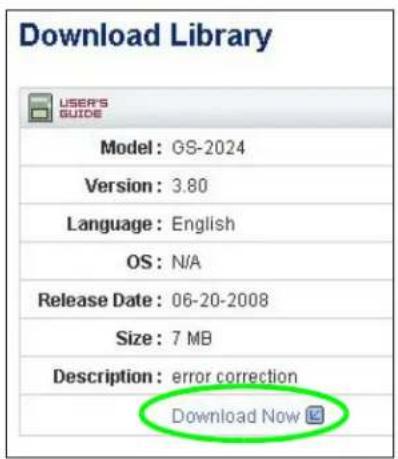
Note: Make sure the link opens either the file you want or a pop-up window about how to handle the file.
Note: It is also OK for the link to open a .torrent file. If you are redirected to a screen that says the download should start in a few seconds, there may be a link to click if the download does not start automatically. See if that link opens the file or the pop-up window.
3 Right-click the download link and select Copy Shortcut in Internet Explorer (or Copy Link Location in Firefox).
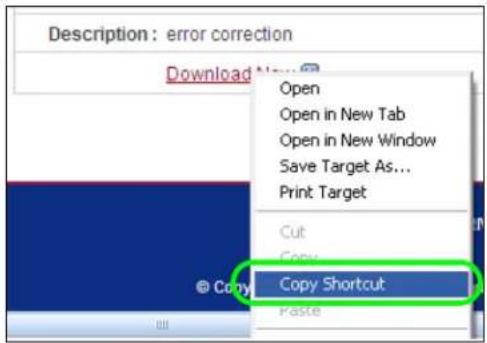
4 Log into the NSA web configurator (see Section 3.3 on page 31) using the administrator account and click Application Zone and the Application Zone > Download Service link.
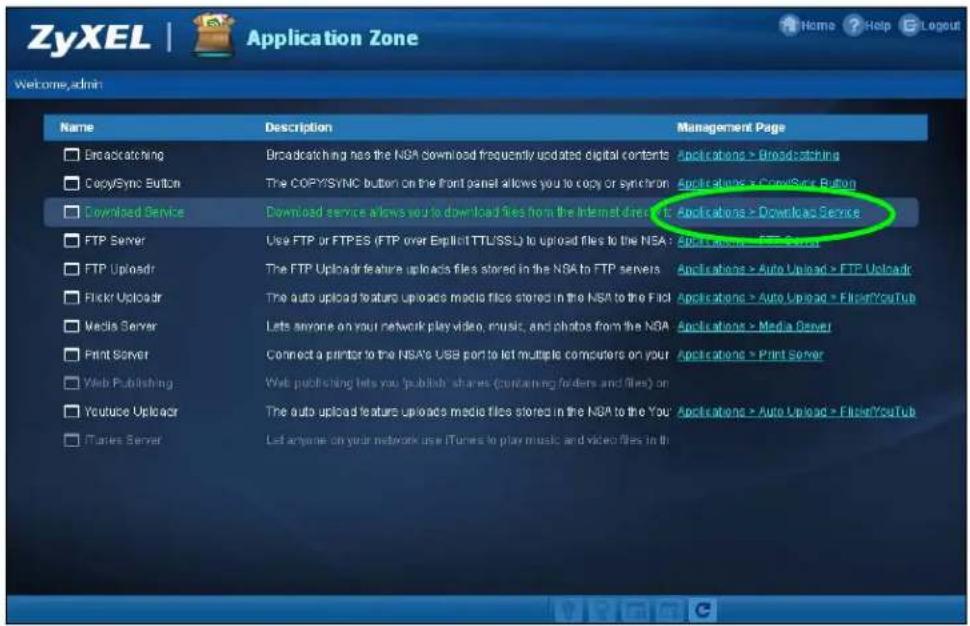
5 Click Add.
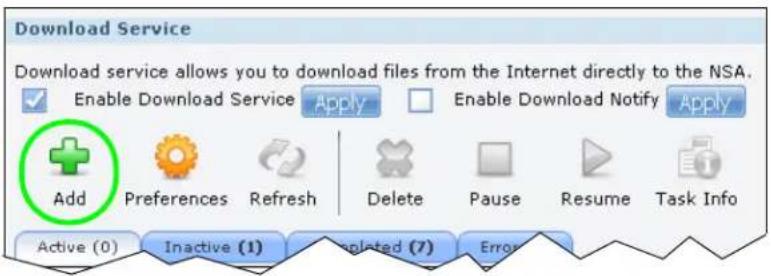
6 Right-click the URL field and select Paste.
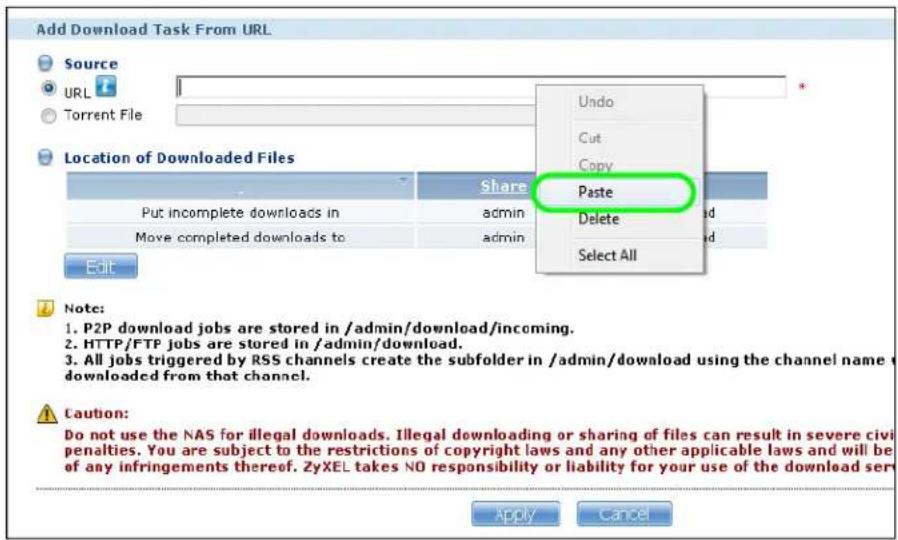
7 The URL displays in the URL field. Click Apply.
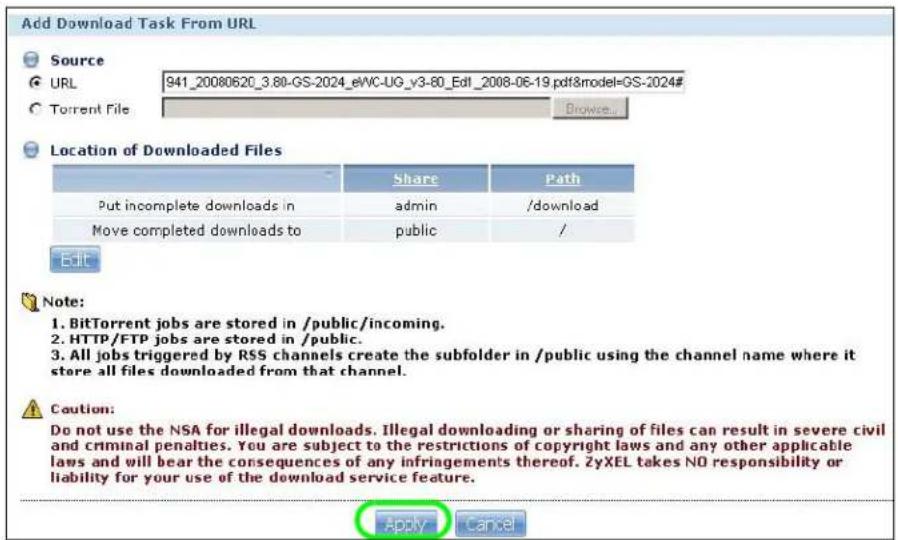
8 After a few moments, the download task appears in the Download Service screen's Active tab.
The download appears in the Completed tab when it is done. By default the NSA stores all downloads in the admin share's download folder. See Section 4.9.4 on page 76, Section 4.9.5 on page 78, or Section 4.9.6 on page 79 for how to access a share.
4.10.2 Installing the Link Capture Browser Plugin
In addition to copying and pasting a download link to the Download Service screen, you can also install a link capture browser plugin in your web browser. Use the plugin to easily add a download link to the NSA's download service. See Section 9.12.3 on page 205 for more on the link capture browser plugin.
Note: At the time of writing the plugin supports Internet Explorer 6.0/7.0 and Mozilla Firefox 2.0/3.0; it does not support Windows 7.
Internet Explorer
1 Open the folder containing the link capture browser plugin.
2 Double-click on the plugin to display the following screen. Click I Agree to begin installation.
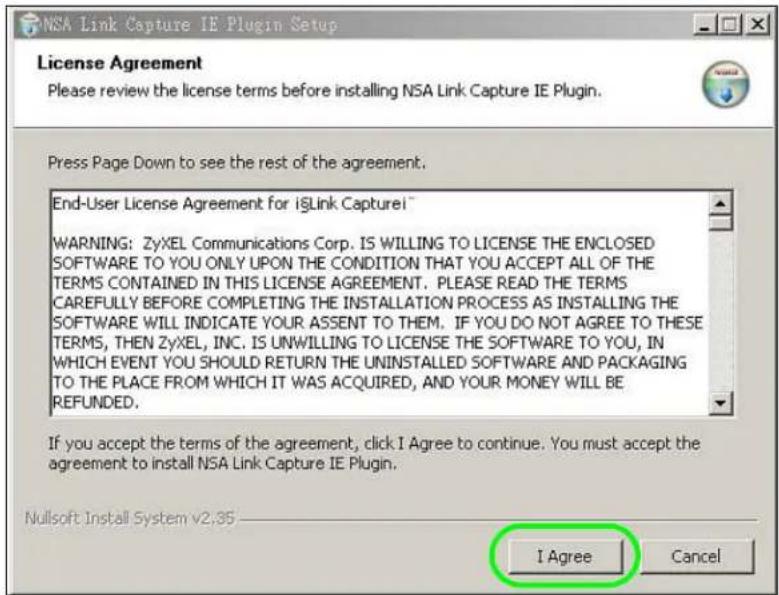
3 Select a location to save the plugin and click Install. Close the screen once the installation is complete.
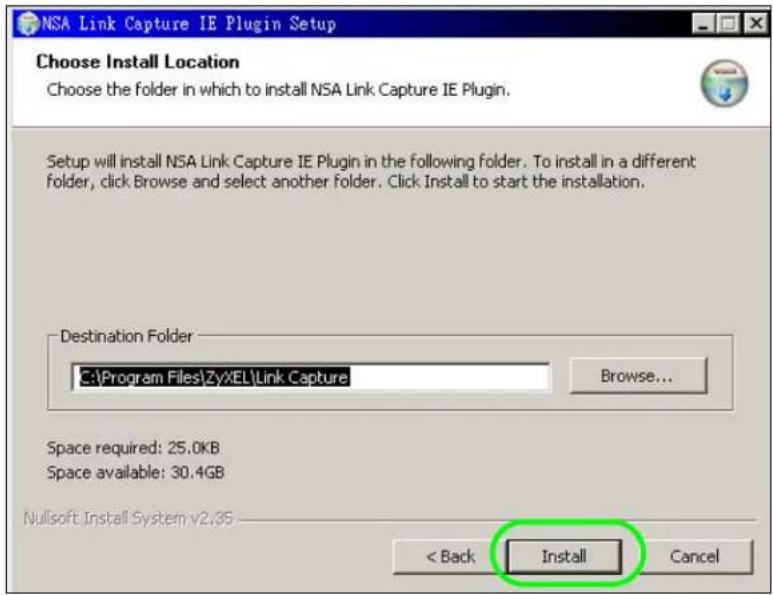
4 Open Internet Explorer and locate a download link. In this example, www.zyxel.com has a Download Now link for downloading a user's guide for ZyXEL's NBG410W3G (a 3G wireless router). Right-click on the download link and select NSA Setting.
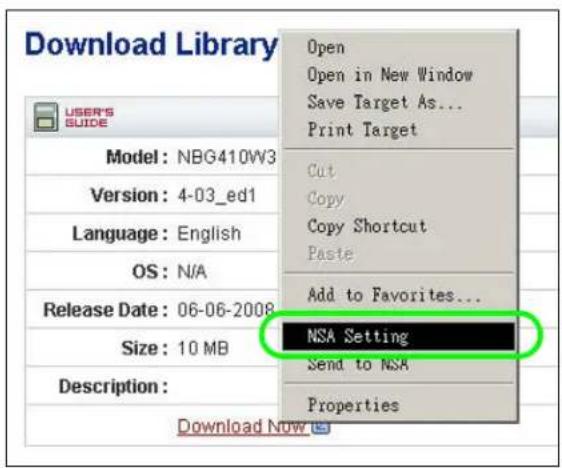
5 Enter the NSA's web address. The default is 'nsa' followed by the number of your model ('nsa320' for example). Then click Apply. A warning message displays asking for confirmation. Click OK to apply the setting.
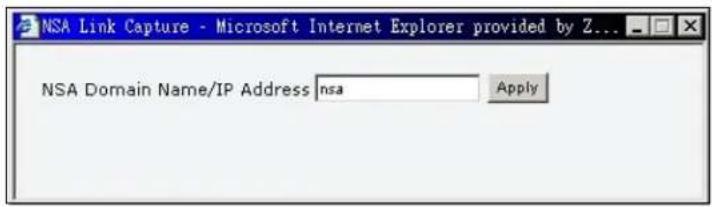
Firefox
1 Open Firefox.
2 Open the folder containing the link capture browser plugin.
3 To install the plugin, drag and drop the plugin to Firefox.
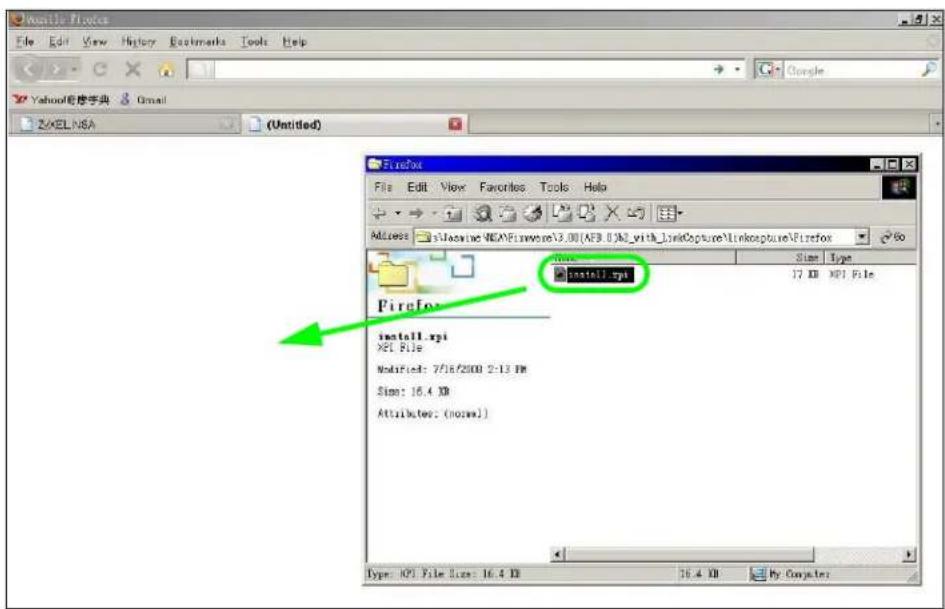
4 The following screen displays. Click Install Now.
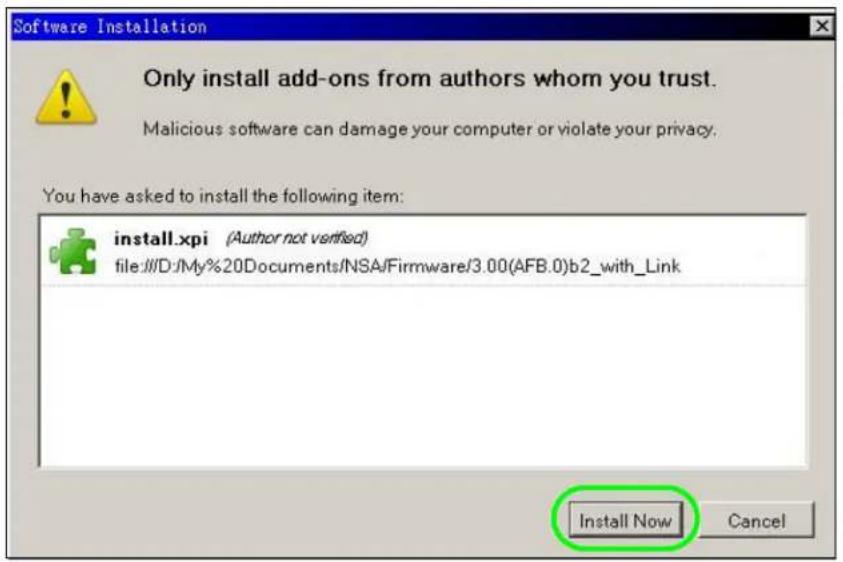
5 You need to restart Firefox after the installation.
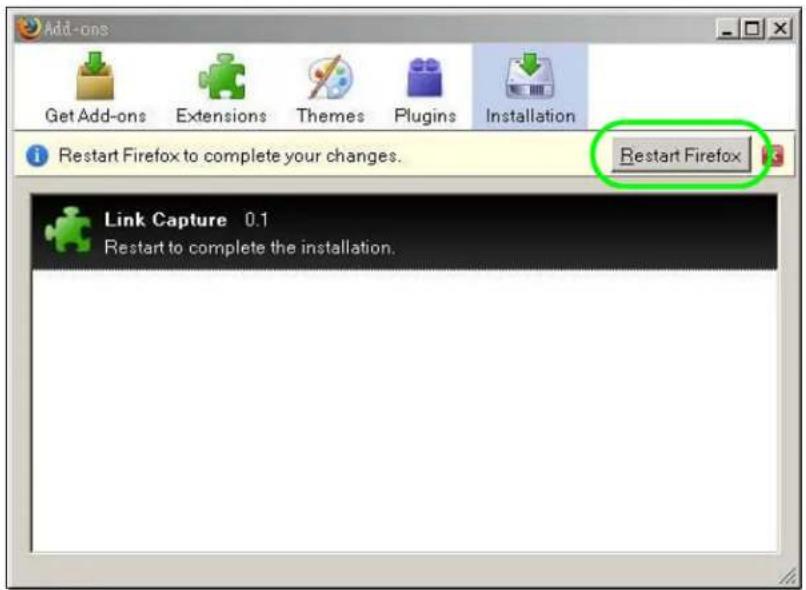
6 When Firefox restarts, a message displays to show the installation succeeded. The plugin is installed as an extension in Add-ons. Click Options to configure the NSA's web address.
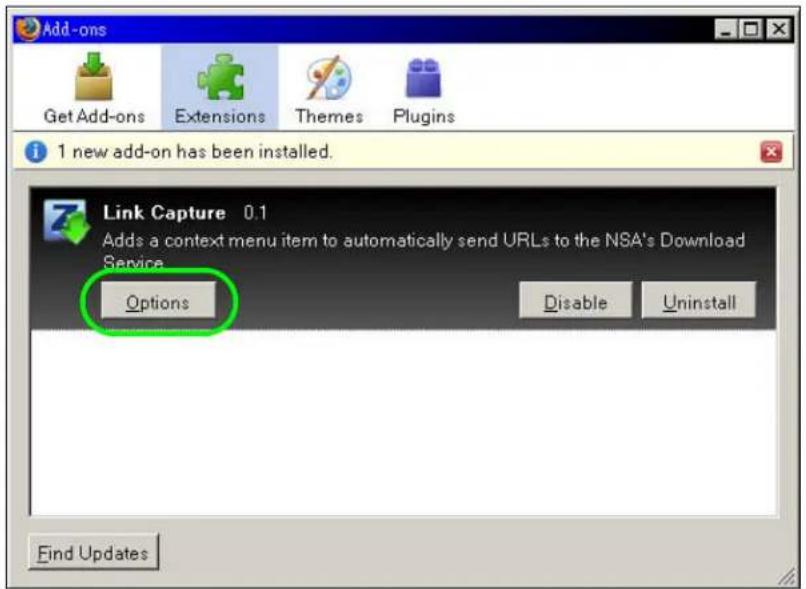
7 Enter the NSA's web address. The default is 'nsa' followed by the number of your model ('nsa320' for example). Then click OK.
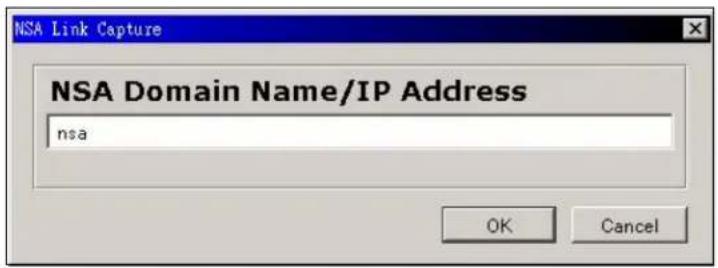
4.10.3 Using the Link Capture Browser Plugin
Once you install the plugin, you may begin sending download links to the NSA from your web browser. This example shows how to send a download link to the NSA's download service using the link capture browser plugin.
1 Open your Internet browser (this example uses Firefox).
2 Find a download link for the file you want. In this example, www.zyxel.com has a Download Now link for downloading a user's guide for ZyXEL's P-660W-T1 (an ADSL router).
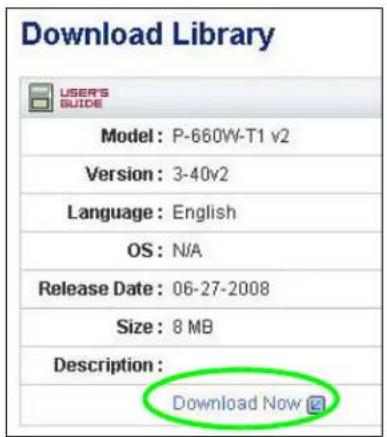
3 Right-click on the download link and select Send to NSA.
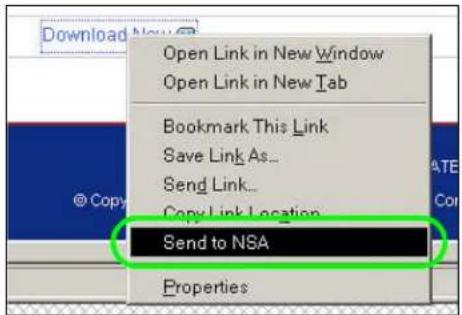
4 The login screen shows up. Enter your NSA's login information and click Login to send the link to the download service. A confirmation message displays.
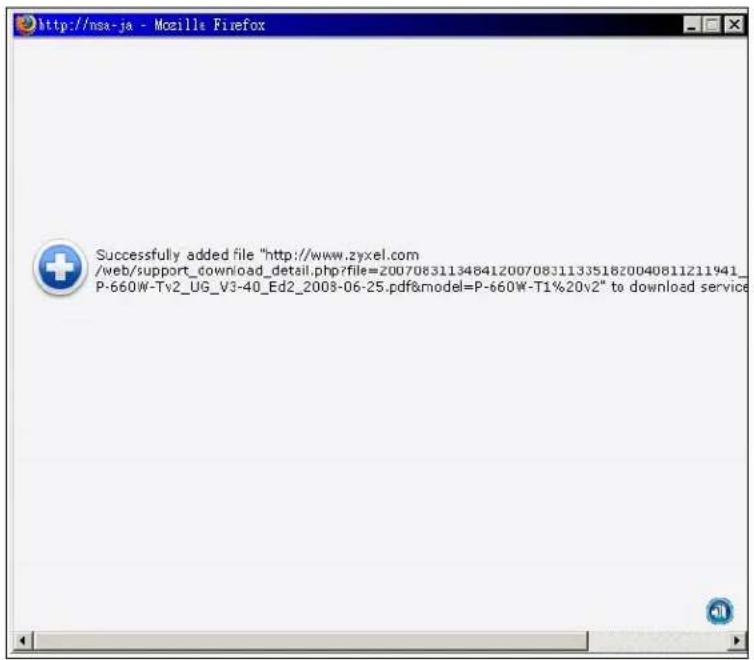
5 Log into the NSA web configurator (see Section 3.3 on page 31) using the administrator account and click Application Zone and the Application Zone > Download Service link.
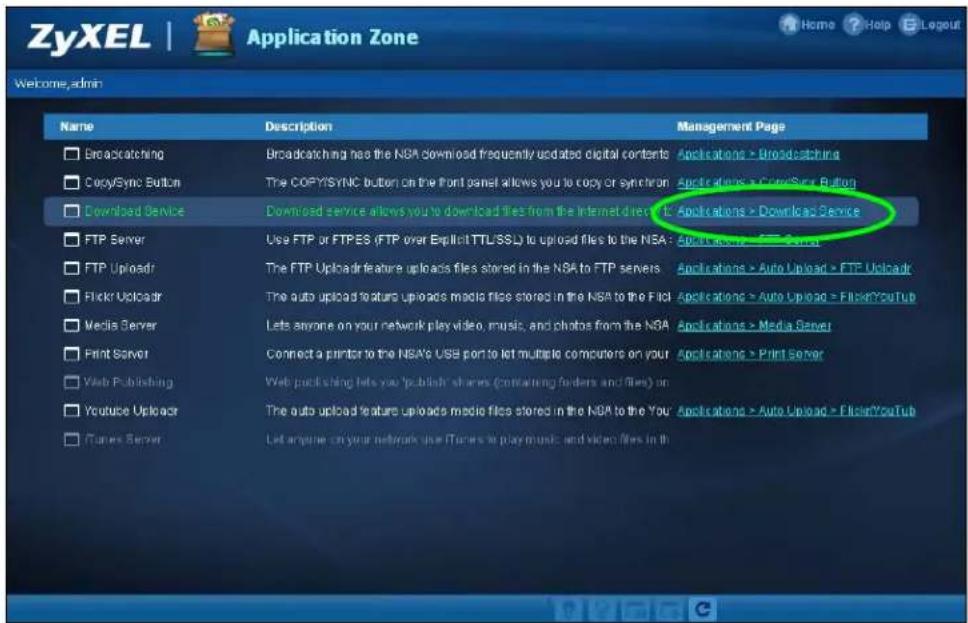
6 The download task appears in the Download Service screen's Active or Queue tab. It may appear in the Completed tab if the NSA already finished downloading the file or it may appear in the Error tab if the NSA failed to download the file.
By default the NSA stores all downloads in the admin share's download folder. See Section 4.9.4 on page 76, Section 4.9.5 on page 78, or Section 4.9.6 on page 79 for how to access a share.
4.10.4 Configuring the Download Service Preferences
Once you added a list of download tasks to the NSA (see Section 4.10.1 on page 80 and Section 4.10.3 on page 88), you can have the NSA download files during a specific time period of the day. You can also configure the P2P download settings to control bandwidth and optimize download efficiency.
Say you have the NSA turned on all the time, but you only want the NSA download files at night. Here is how you use the download period control feature to set the time range.
1 Click Applications > Download Service > Preferences to open the General Settings screen.
2 Select Enable Download Period Control and use the arrows to adjust the time period from 23:30 to 09:00. Click Apply to save your changes. The NSA only downloads files within this 9.5-hour period every day.
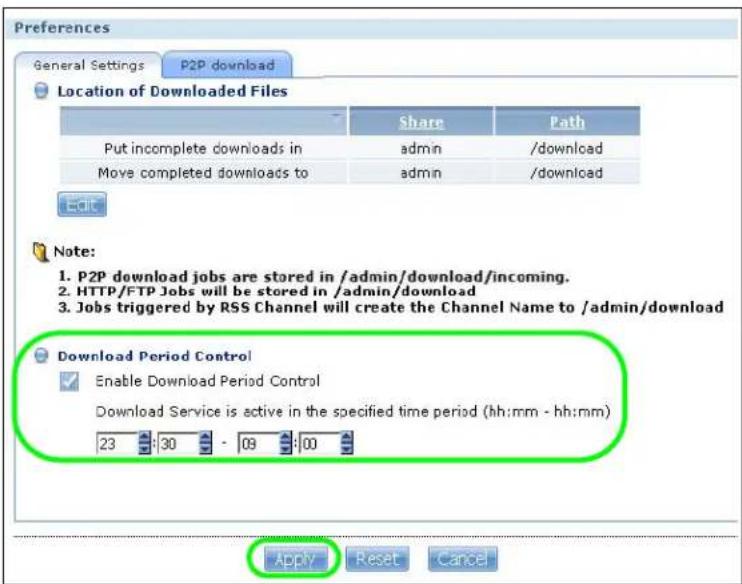
Note: If you configure the Power On/ Off Schedule feature in the Power Management screen, make sure your active download period does not conflict with the power-off period.
Note: If power failure occurs during the active download period, the NSA will verify whether the downloaded files were damaged. If a file is corrupted, the NSA will download the file again. If the file is intact but not completely downloaded, the NSA will resume the download task after it restarts.
3 When it is not the download time, you see a message in the Download Service screen, indicating the active download period.
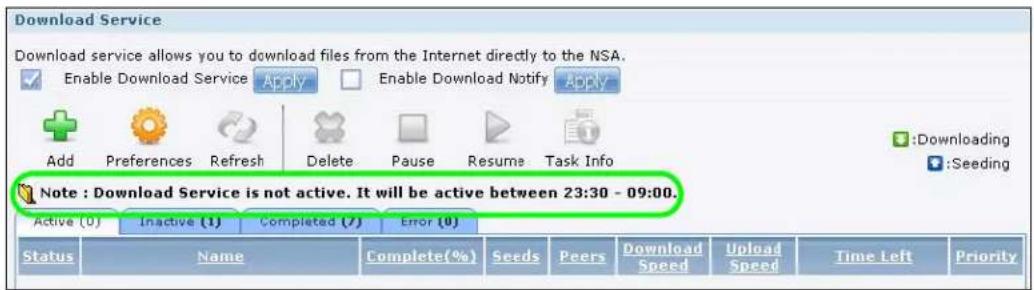
Click Applications > Download Service > Preferences > P2P download to open the following screen. Enter the information below and then click Apply.
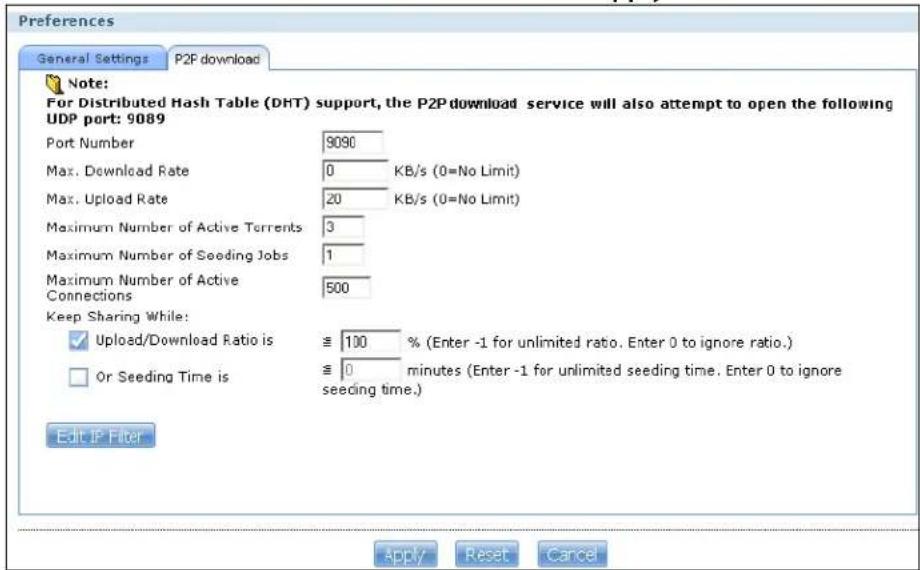
Here is a list of P2P download settings you want to configure for your NSA:
- Limit the maximum upload rate to 20 KB/s.
Enter this value in the Max. upload rate field.
- Actively download three torrent files but only upload one at a time.
Enter 3 in the Maximum Number of Active Torrents field and enter 1 in the Maximum Number of Seeding Jobs field.
- Keep sharing until the NSA has shared equal or greater amount of the downloaded files.
Select the check box and enter 100 in the Upload/ Download Ratio field.
- Click Edit IP Filter. Use an online IP filter table from http://www.bluetack.co.uk/config/level1.gz for example to protect P2P downloads.
Enter the URL in the Update IP Filter from the Internet Every Week field.
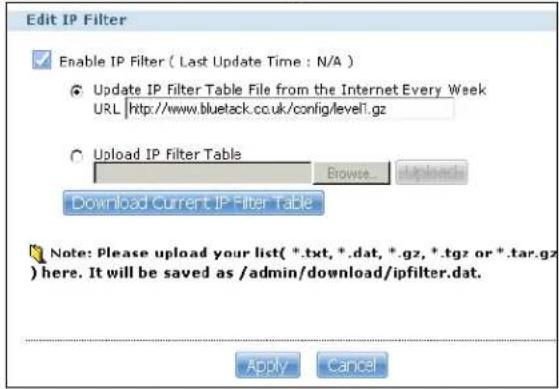
4.10.5 Using Download Service Notification
Use an RSS feed reader on your computer to keep track of files the NSA has downloaded. The following examples show how to subscribe to the NSA's download service notifications. See Section 9.12.4 on page 205 for more on download service notifications.
Some RSS readers may not support the NSA's download service notifications. For example, Google Reader cannot support this feature if the NSA has a private IP address.
Note: It is recommended to subscribe to the download service notifications using the built-in reader in Internet Explorer 7 or higher, or Firefox.
You have to activate this feature in the Download Service screen. Click Applications > Download Service to open the following screen. Select Enable Download Notify and click Apply.
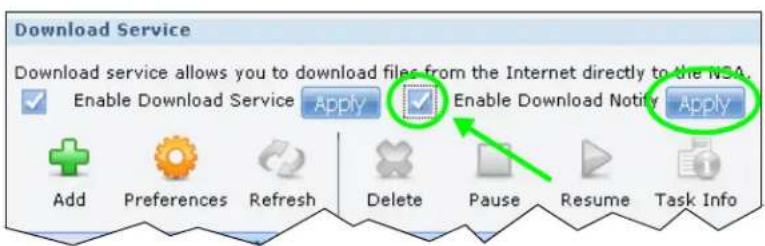
Internet Explorer 7 Example
1 After you activate download service notification, click the RSS feed icon.
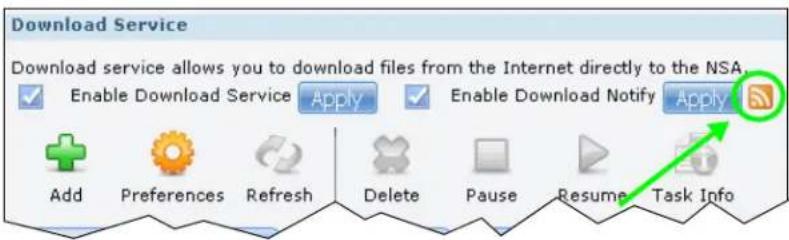
2 The following screen displays. Select Subscribe to this feed.
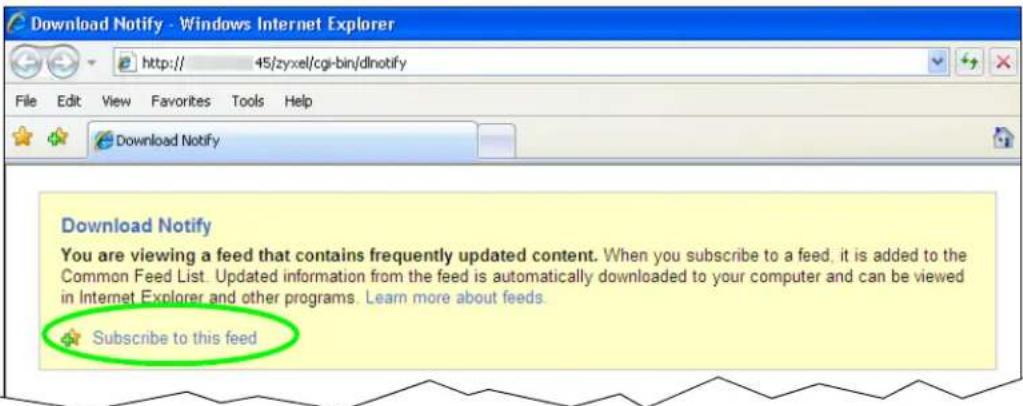
3 The following screen displays. Click Subscribe.
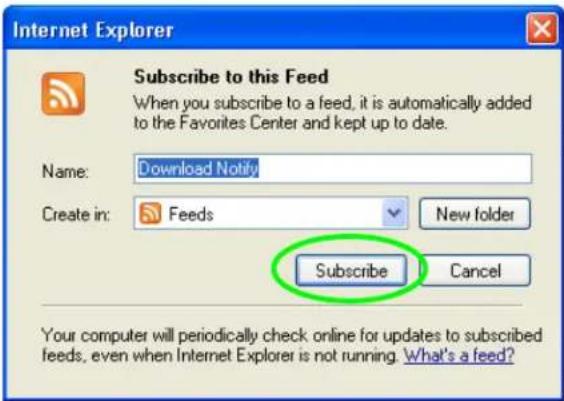
4 Click the Favorite icon on your browser and select the Feeds tab to check the updates of your NSA's download list.
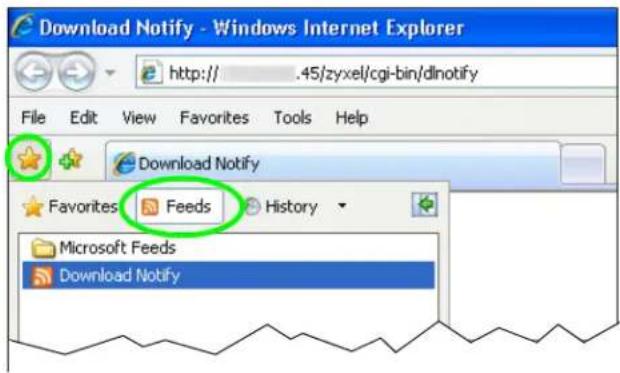
Firefox Example
1 After you activate download service notification, click the RSS feed icon.
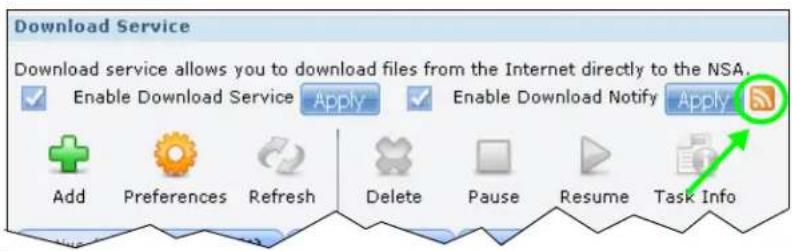
2 The following screen displays. Select Live Bookmarks from the drop-down list and click Subscribe Now.
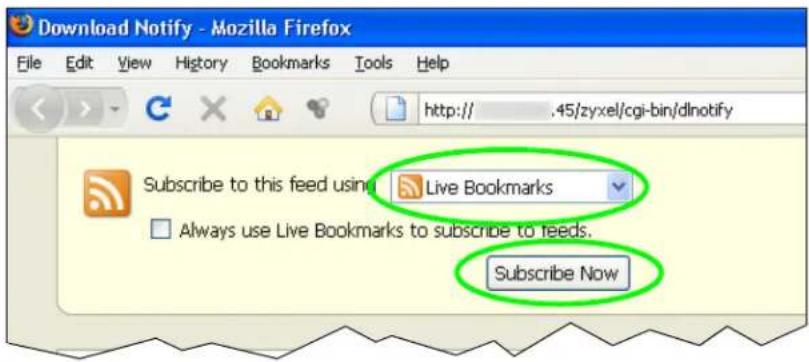
3 The following screen displays. Select Bookmarks Menu and click Add.
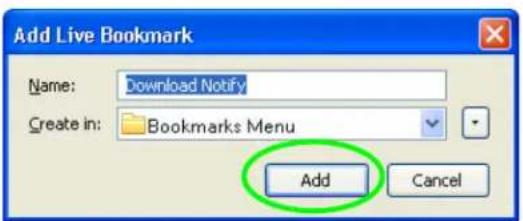
4 From the Firefox's Bookmarks Menu, select Download Notify to check the updates of your NSA's download list.
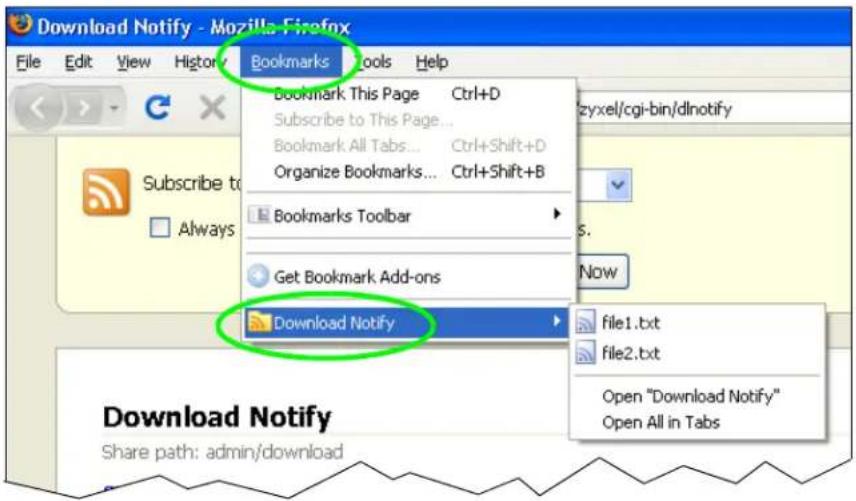
4.11 Broadcasting Tutorial
Use broadcatching to have the NSA download frequently updated digital content like TV programs, radio talk shows, Podcasts (audio files), and blogs. This example shows how to subscribe the NSA to the CNET TV Internet television channel. See Section 9.9 on page 194 for more on the broadcatching service.
1 Open your Internet browser (this example uses Firefox).
2 Find the link for the RSS feed containing the channel you want to add. In this example, http://reviews.cnet.com/4520-11455_7-6333605-1.html has an RSS link for subscribing to the CNET Live podcast. However this is not the link for the actual RSS feed. Click the link to go to another screen that has RSS feed links.
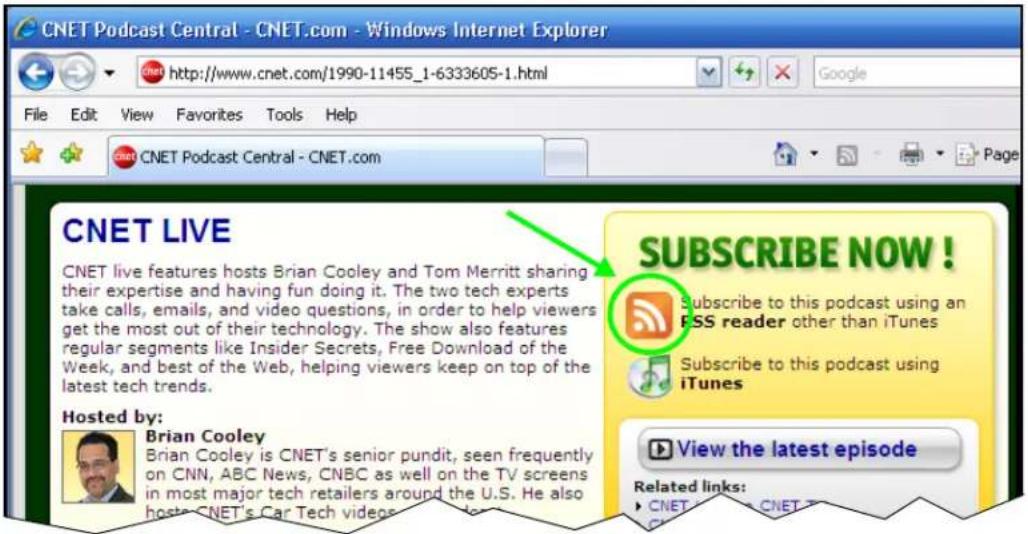
Note: Make sure the link goes to the actual RSS feed instead of to another list of links or information about the channel.
One way to test this is by clicking the link. Clicking an actual RSS feed link opens a screen of XML code (in browsers without an RSS feed aggregator) or a window where you can add the RSS feed (in browsers with an RSS feed aggregator).
3 Right-click the download link and select Copy Link Location in Firefox (or Copy Shortcut in Internet Explorer).
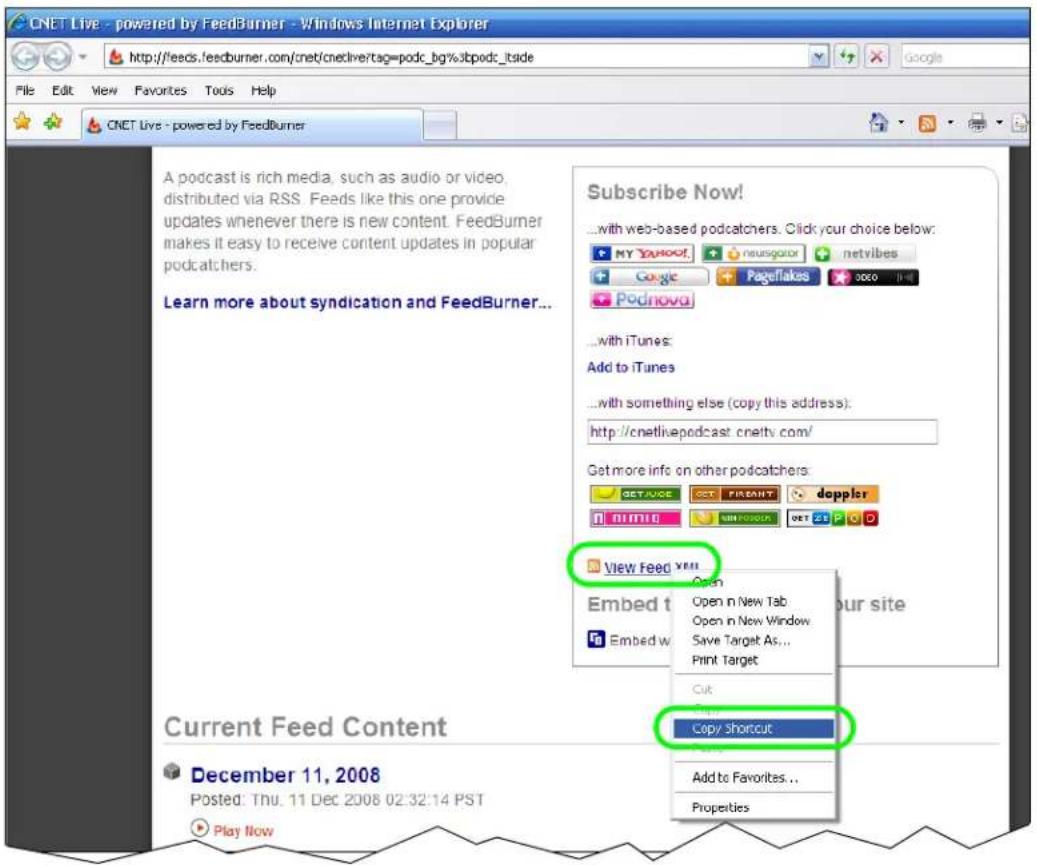
4 Log into the NSA web configurator (see Section 3.3 on page 31) using the administrator account and click Administration > Applications > Broadcasting.
5 Click Add Channel.
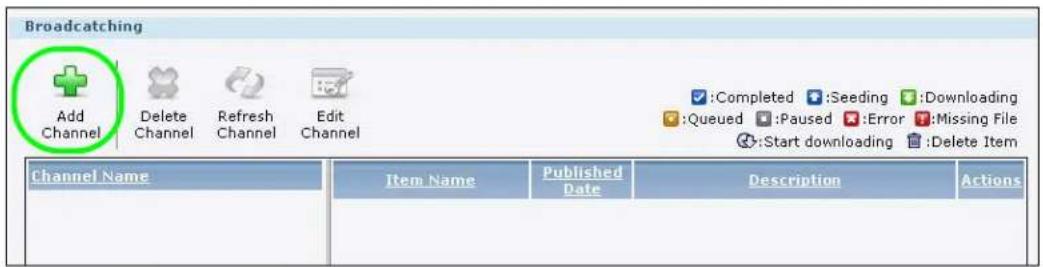
6 Right-click the URL field and select Paste.
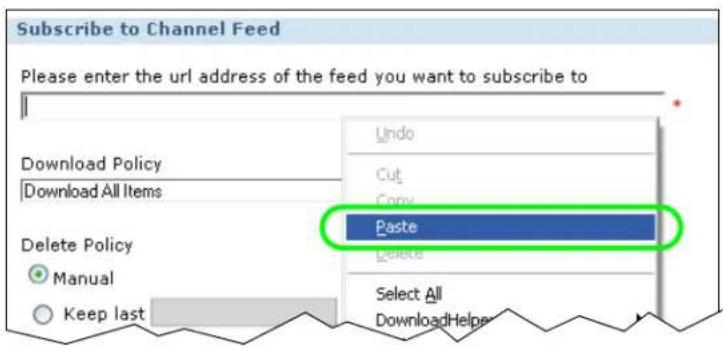
7 The URL displays in the URL field.
8 Select a policy for what items to download. This example uses Manually Choose Items for Download so you will be able to select individual items to download later.
9 Select a policy for what items to delete. This example keeps the most recent 10 items.
10 Click Apply.
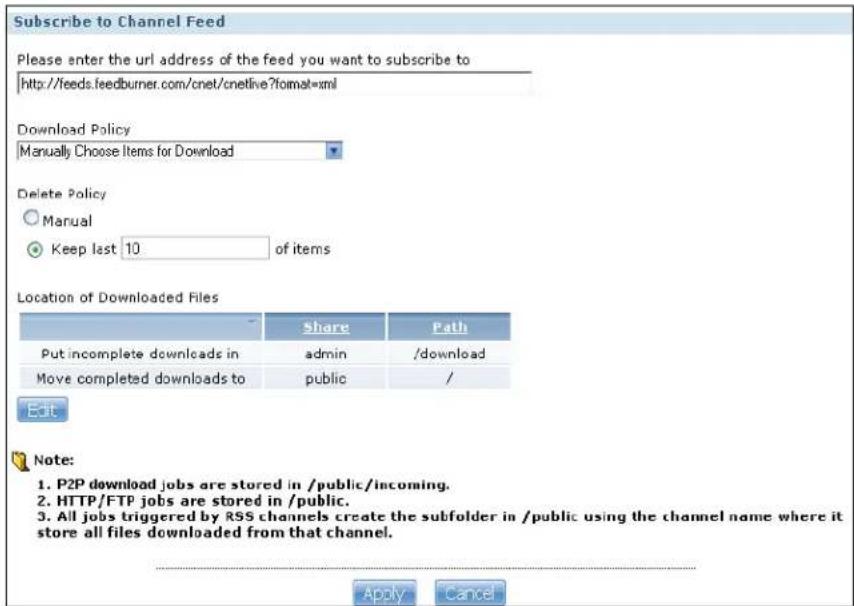
11 After a few moments, the channel appears in the Broadcasting screen where you can select items you want to download. The NSA saves the items you download in a folder named after the channel. By default, the channel folders are created in the admin share's download folder. The NSA's media server feature makes it easy for users on your network to play the broadcasting files you download. See Section 9.12.1 on page 203 for more on the media server.
4.12 Printer Server Tutorial
Do the following to have the NSA let computers on your network share a printer. See www.zyxel.com for a list of compatible printers.
1 Make sure the NSA is on and the SYS light is on steady (not blinking).
2 Use a USB cable to connect the printer's USB port to one of the NSA's USB ports. Make sure the printer is also connected to an appropriate power source.
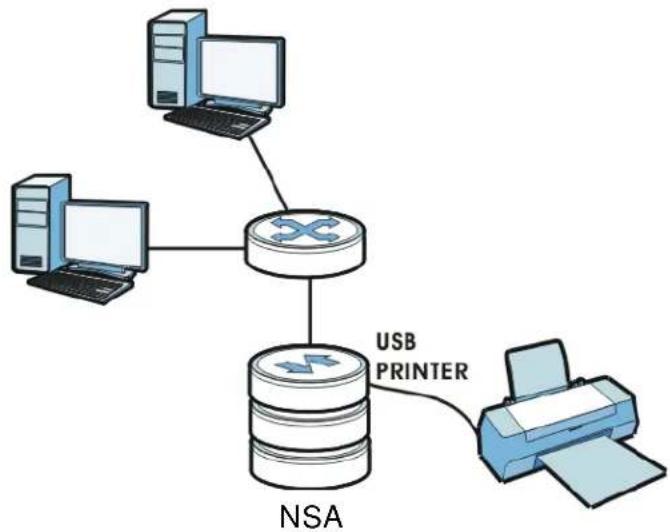
flowchart
graph TD
    A["Server"] --> B["Router"]
    C["Server"] --> B
    D["Server"] --> B
    B --> E["USB PRINTER"]
    E --> F["Printer"]
    style B fill:#f9f,stroke:#333
    style E fill:#ccf,stroke:#333
3 Turn on the printer.
4 The NSA detects the printer after a few moments.
5 On your computer, open your CIFS file sharing program (Windows Explorer for example) and browse to the NSA. Double-click the printer's icon.
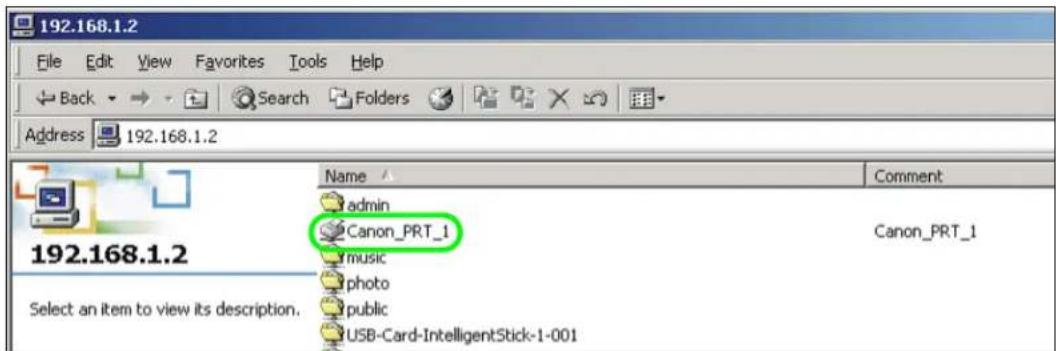
6 If you get a warning screen, click the option that lets you continue (Yes in this example).

7 If your computer does not already have the printer's driver installed, you will need to install it. In this example, click OK.

8 Use the wizard screens to install the printer driver on the computer. You may need to get the file from the printer's CD or the printer manufacturer's website (the driver is not installed on the NSA).
Note: You must install the printer driver on each computer that will use the printer.
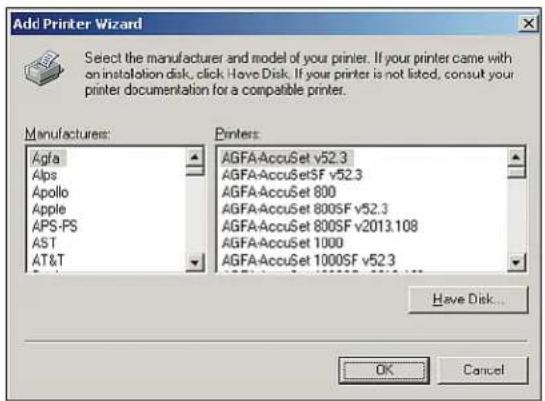
After the driver installation finishes, the computer is ready to use the printer. Select the printer in an application to use it to print. Browse to the NSA using a CIFS program (like Windows Explorer) and double-click the printer's icon to open the printer's queue of print jobs.
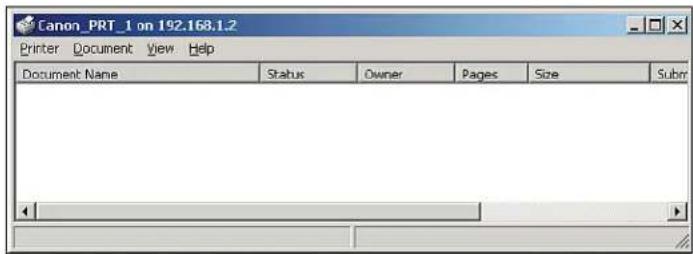
Note: Repeat steps 5 to 8 on your other computers so they can also use the printer.
4.13 Copy and Flickr Auto Upload Tutorial
Amy received some photos taken during her best friend's wedding and saved the files on a USB disk. She wants to save a copy of the photos in the NSA and upload the photos to her Flickr account.
Amy has to activate the NSA's auto upload feature. See Section 11.4 on page 265 for more details on setting up a Flickr account for auto upload. In this example Amy select the NSA's photo share for auto upload.
This is how Amy would transfer the files from her USB disk to the NSA.
1 Click Applications > Copy/ Sync Button in the navigation panel to open the screen.
2 Configure the copy settings as shown and click Apply.
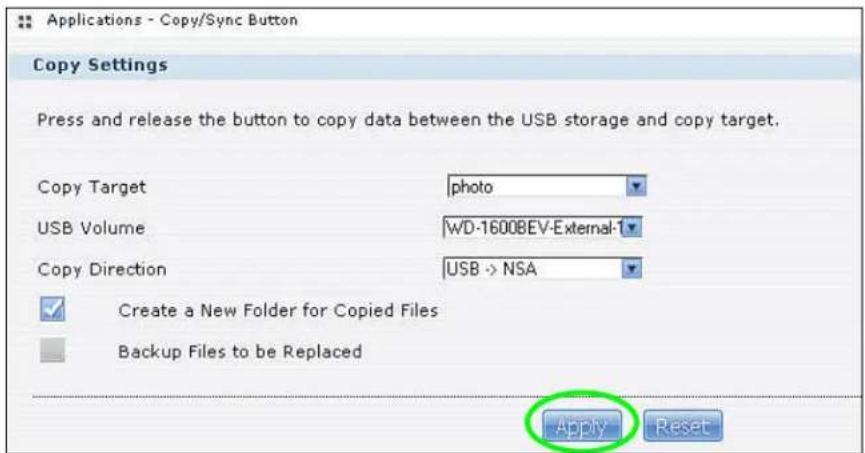
3 Press and release the COPY/ SYNC button on the NSA's front panel to start copying files.
4 The copied files can be found in a new folder in the photo share. The name of this folder is the date (yyyy-mm-dd) and time (hh-mm-ss) when the folder is created.
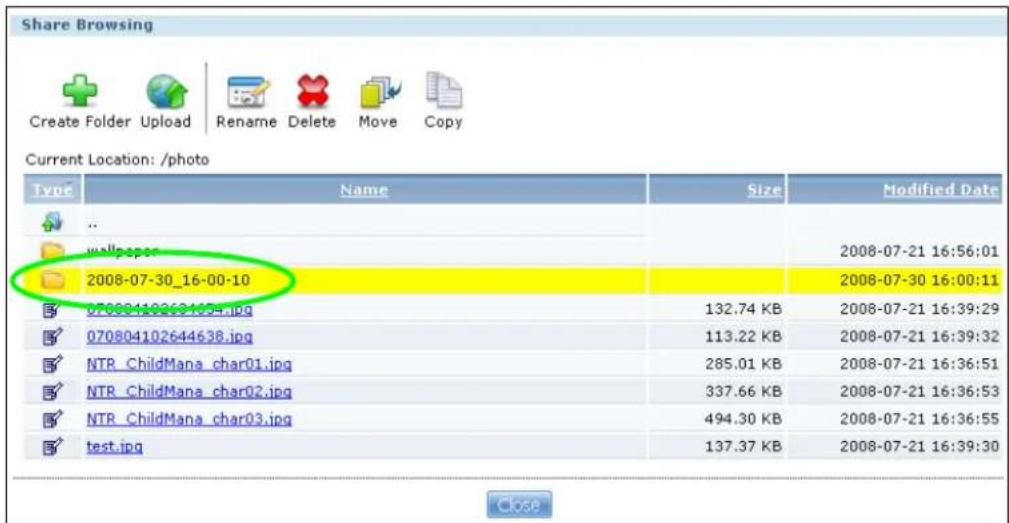
5 The NSA also automatically uploads the copied files to Flickr.
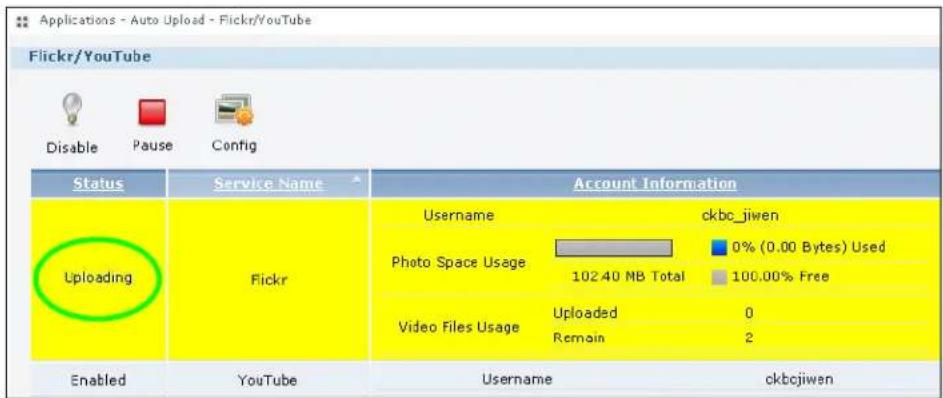
4.14 FTP Uploadr Tutorial
FTP Uploadr can automatically upload files saved on the NSA to a remote FTP server. Amy wants to share files on her NSA with Susan. They each have an NSA at home, so Susan has to set her NSA as an FTP server for Amy to automatically send files using FTP Uploadr.
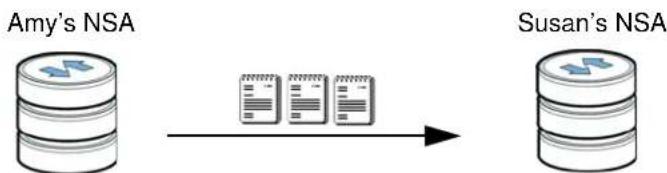
flowchart
graph LR
    A["Amy's NSA"] --> B["List entry"]
    B --> C["Susan's NSA"]
To set the NSA as an FTP server, click Applications > FTP to open the FTP screen. Select Enable FTP and click Apply.
![FTP Enable FTP Connection Limit 10 Idle Timeout 15 minutes Port Number 21 Enable Anonymous FTP Access Customize the port range for data transfer. Note: To configure a share to allow anonymous FTP access go to the configure shares page and modify a share's access rights to allow the user 'Anonymous FTP'. Character Set [UTF-8] Apply Reset](/content/2026/05/844675/images/41bf73c61bb633e8a4c4aae6ba4565481075cdfb74b574f3e729275e17fa1a99.jpg)
Susan also has to create a user account and share on her NSA for Amy to upload files. The share is used for files uploaded from Amy's NSA. Amy will then use the following information to configure FTP Uploadr on her NSA.
Table 15 FTP Uploadr Tutorial: FTP Server Information
| FTP Domain Name or IP Address example2.com | |
| FTP User Name Amy | |
| FTP Password xxxxx | |
| Share (Remote Path) Amy | |
This is how Amy would set up the NSA's FTP Uploadr.
1 Click Applications > Auto Upload > FTP Uploadr to open the FTP Uploadr screen. Select Enable FTP Uploadr and click Apply to turn on FTP Uploadr.
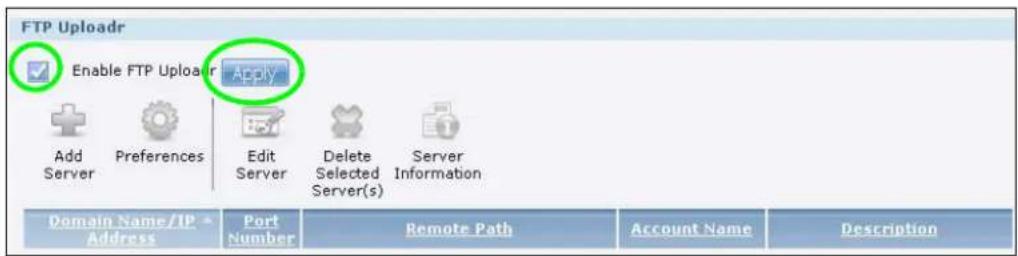
2 Click Add Server.
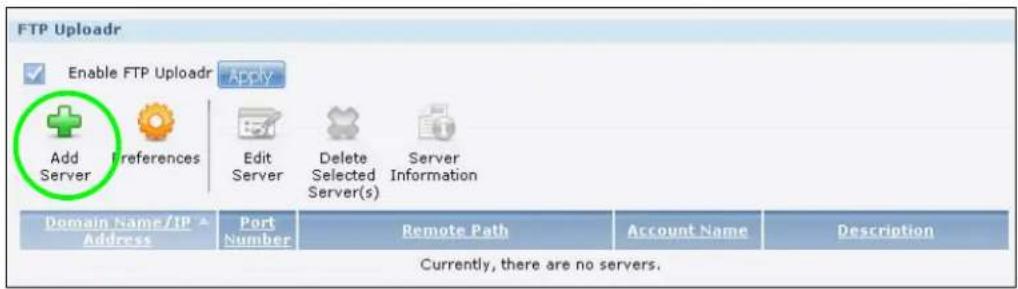
3 Enter the information as describe in Table 15 on page 103. Click Apply to add the server.
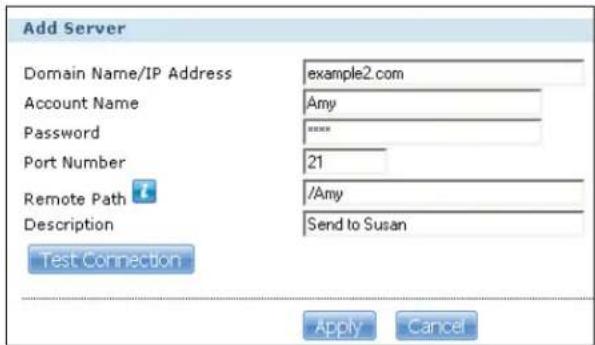
4 In the FTP Uploadr screen, click Preferences to configure the auto upload settings.
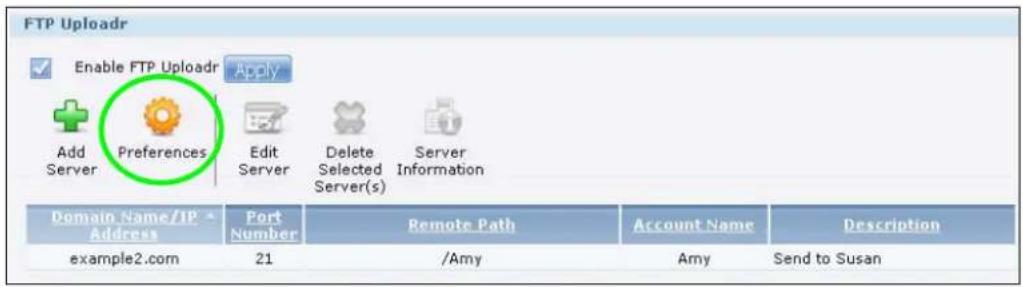
5 Amy wants to share video files with Susan. In the Preferences screen, click the Add button and select video from the Shares drop-down list box, enter a forward slash in the Path field and click Apply to add the share to the Folder Watch List.
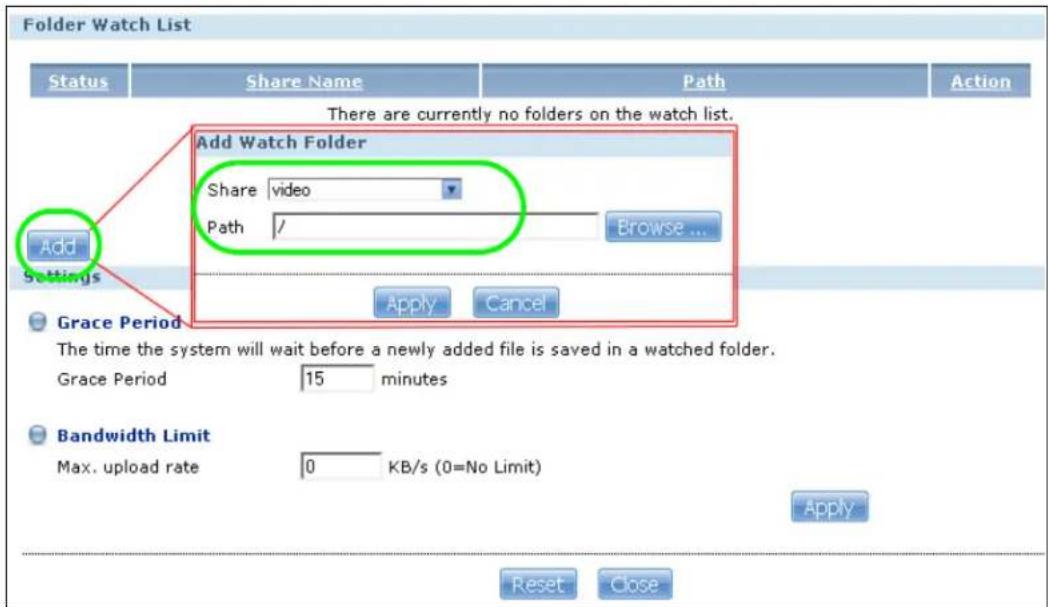
6 Amy also set the Bandwidth Limit to 20 KB/s so that the upload doesn't slow down her Internet connection.
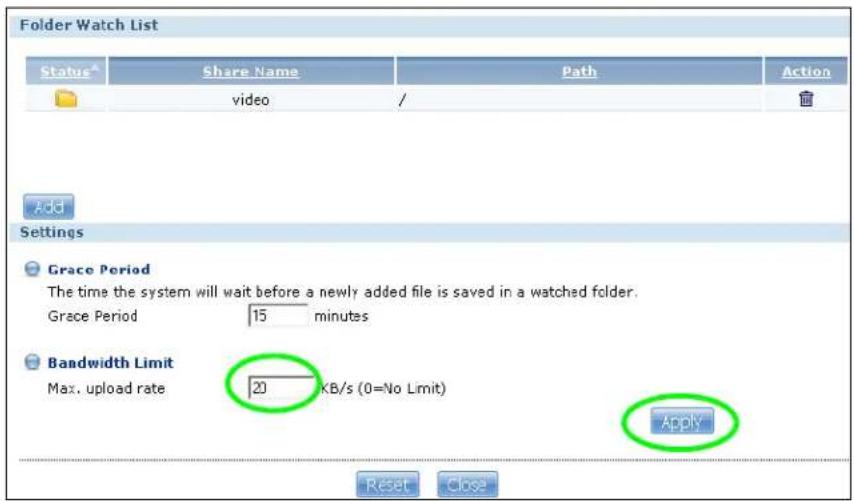
Now Amy has set up FTP Uploadr to send files to Susan's NSA. Every time Amy adds new files or renames files in the video share, these new or modified files will be uploaded automatically to the Amy share on Susan's NSA.
Similarly, Susan can go through the steps described above to configure FTP Uploadr on her NSA. Once Susan completes the setup, Amy can also receive files from Susan's NSA.
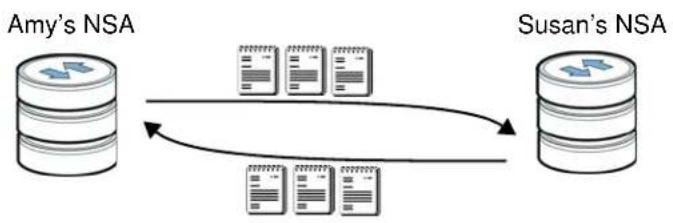
flowchart
graph LR
    A["Amy's NSA"] --> B["Susan's NSA"]
    B --> C["Document with two files"]
    C --> D["Document with three files"]
    D --> E["Document with four files"]
    E --> F["Document with five files"]
    F --> G["Document with six files"]
    G --> H["Document with seven files"]
    H --> I["Document with eight files"]
    I --> J["Document with nine files"]
4.15 Web Configurator's Security Sessions
These tutorials show you how to configure security for the NSA's Web Configurator sessions. You will customize the NSA's self-signed SSL certificate and distribute it to your users.
4.15.1 Customizing the NSA's Certificate
1 Click Maintenance > SSL and then select Edit a self-signed CA certificate and click Edit.
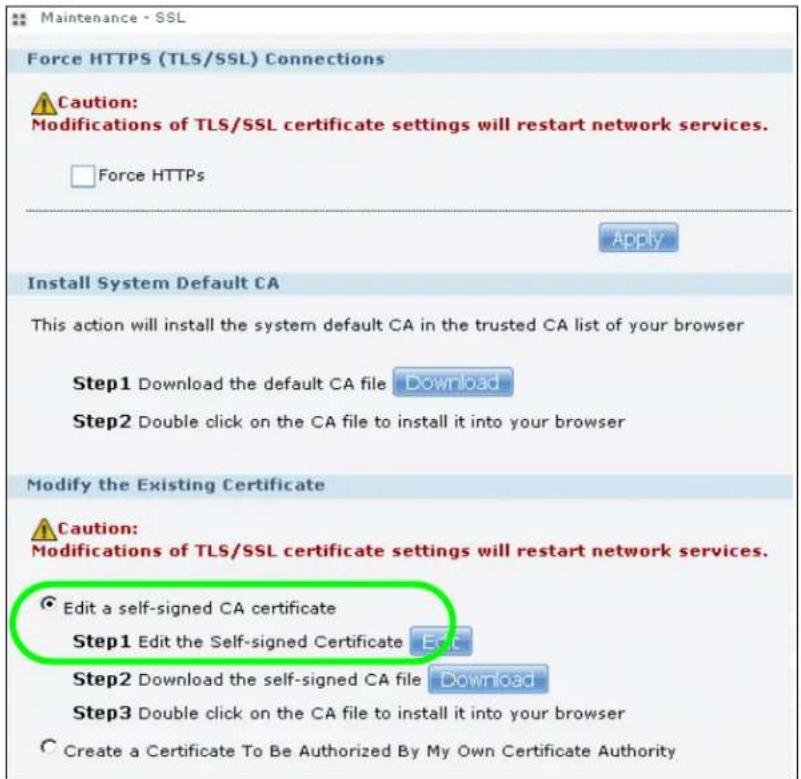
2 Next, let's modify the certificate by changing the Common Name to this NSA's host name of "nsa", the Organization to "ZyXEL" and the Key Length to 2048.
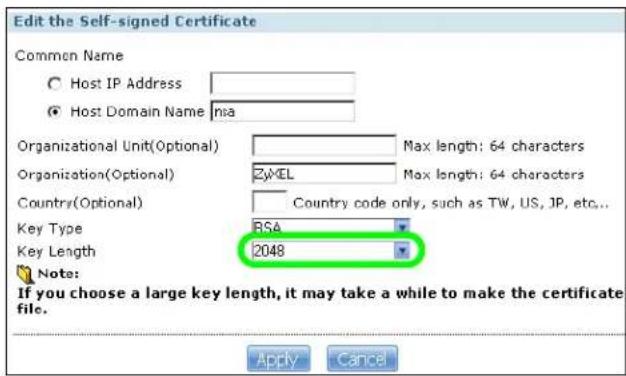
3 The NSA restarts its network services and returns you to the login screen.
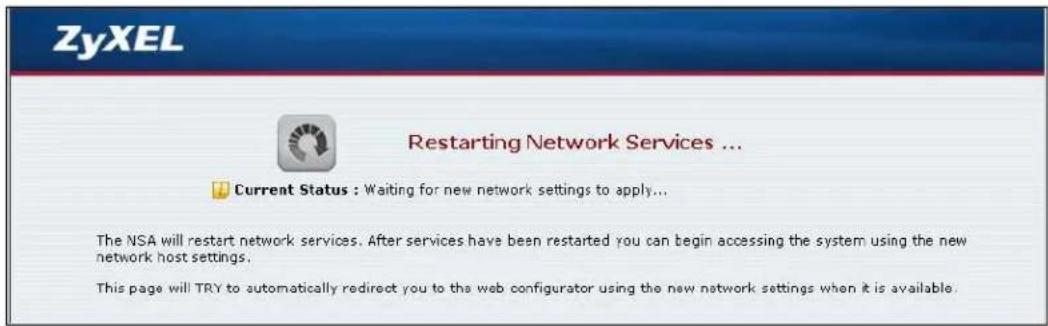
4.15.2 Downloading and Installing Customized Certificate
1 Log in and return to Maintenance > SSL. Under Modify the Existing Certificate, click Download.
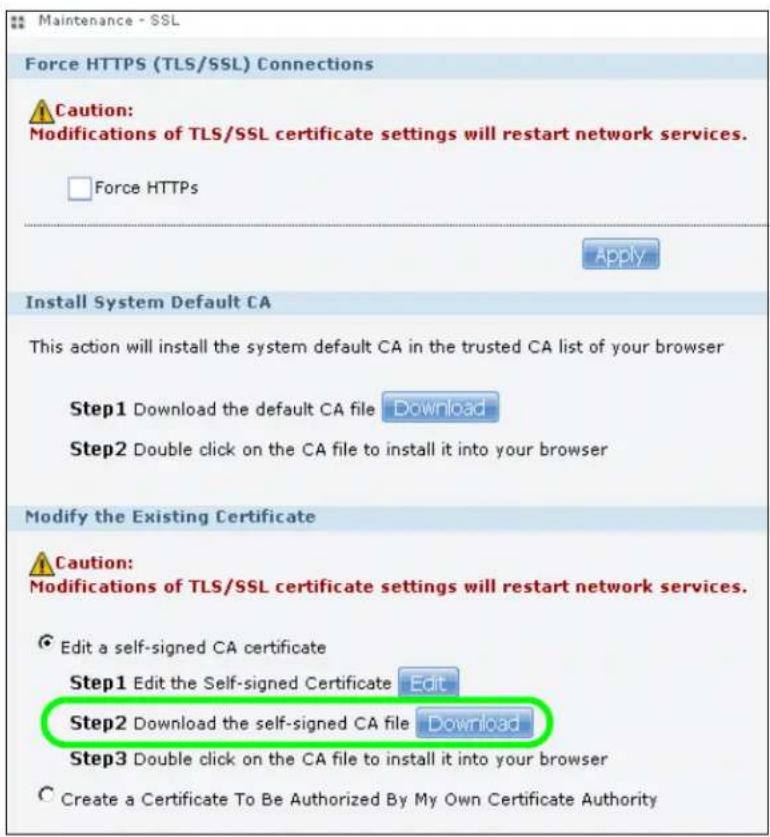
2 Save the file to your computer.
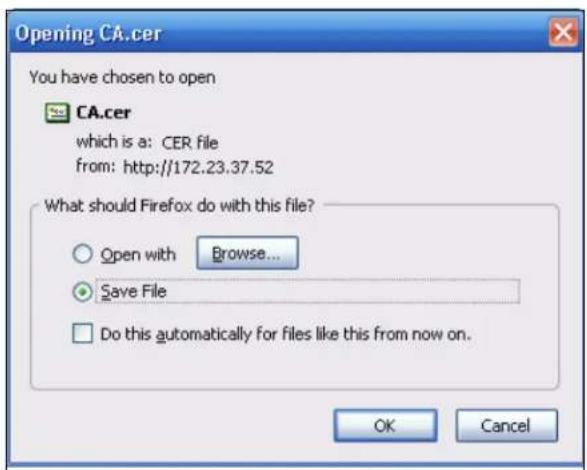
3 Find the certificate file on your computer and double-click it.
4 Install the certificate. The rest of the steps in this section are an example of installing a certificate in Windows. In the Certificate dialog box, click Install Certificate.
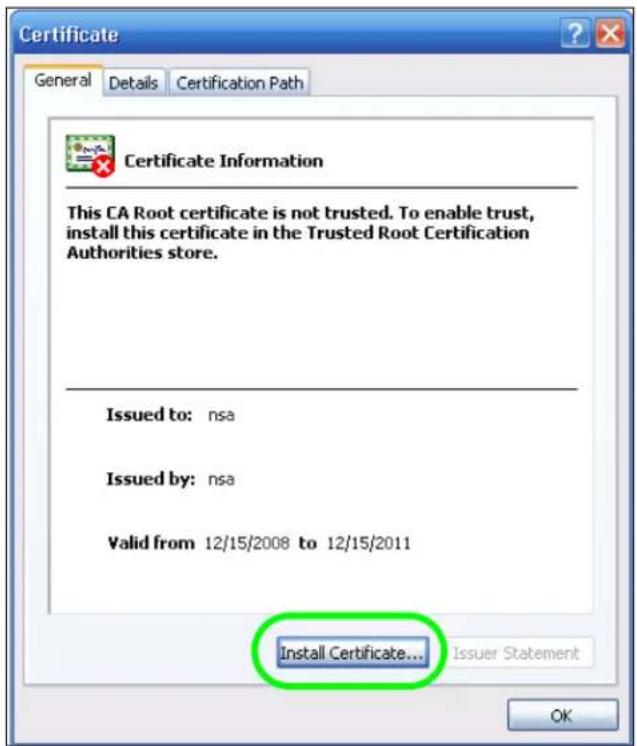
5 In the Certificate Import Wizard, click Next.
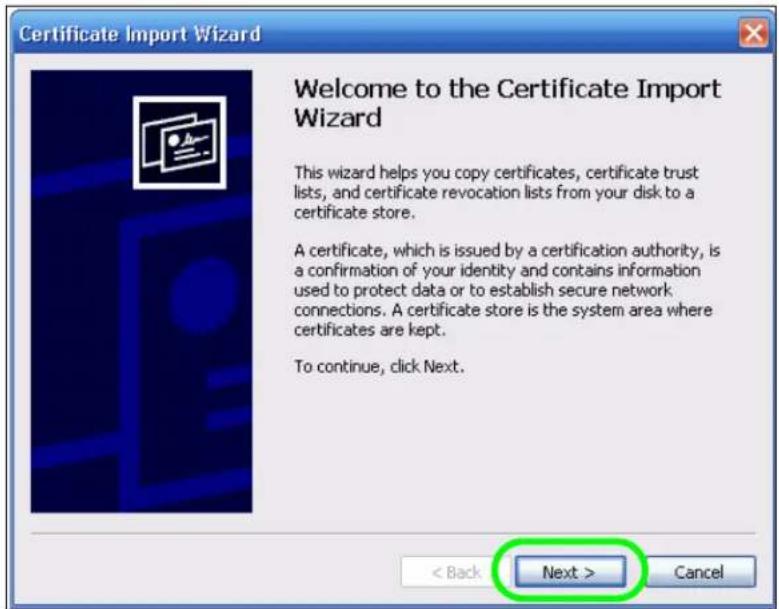
6 Leave Automatically select certificate store based on the type of certificate selected and click Next.
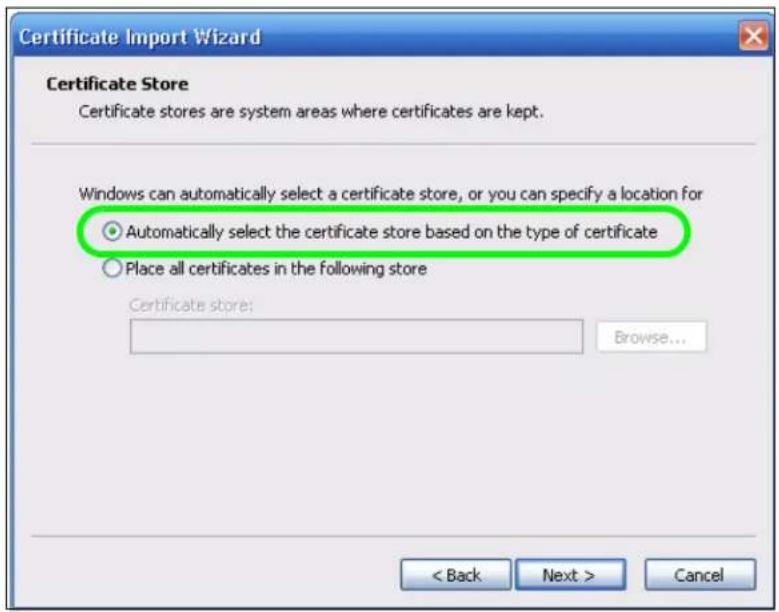
7 In the Completing the Certificate Import Wizard screen, click Finish.
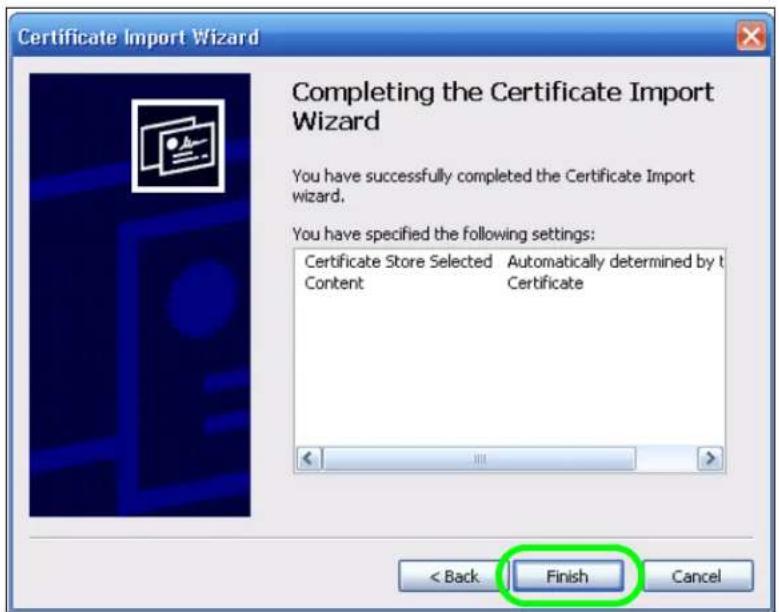
8 If you are presented with another Security Warning, click Yes.
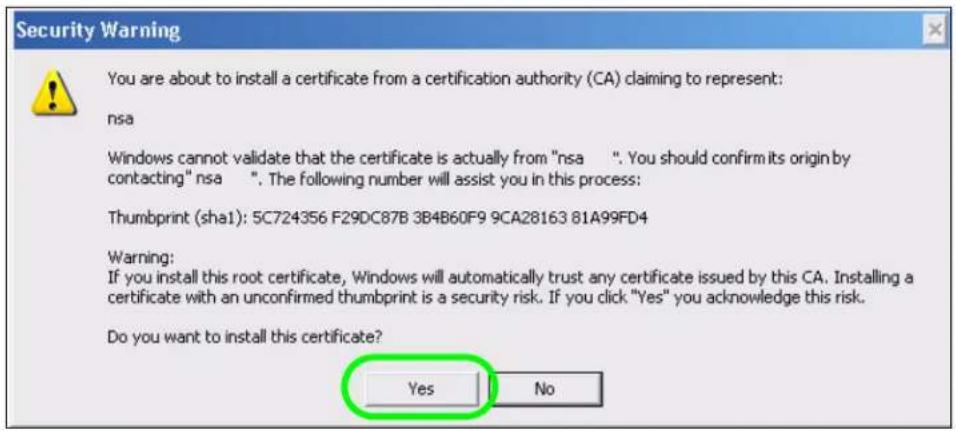
9 Finally, click OK when presented with the successful certificate installation message.
4.15.3 Turn on the NSA's Web Security
Now that you have customized the NSA's certificate and installed it in your computer, you can turn on security for your Web Configurator sessions. This example uses Firefox 3.0.
1 Close your web browser and open it again to reset its session with the NSA. Log in and click Maintenance > SSL. Select Force HTTPS and click Apply.
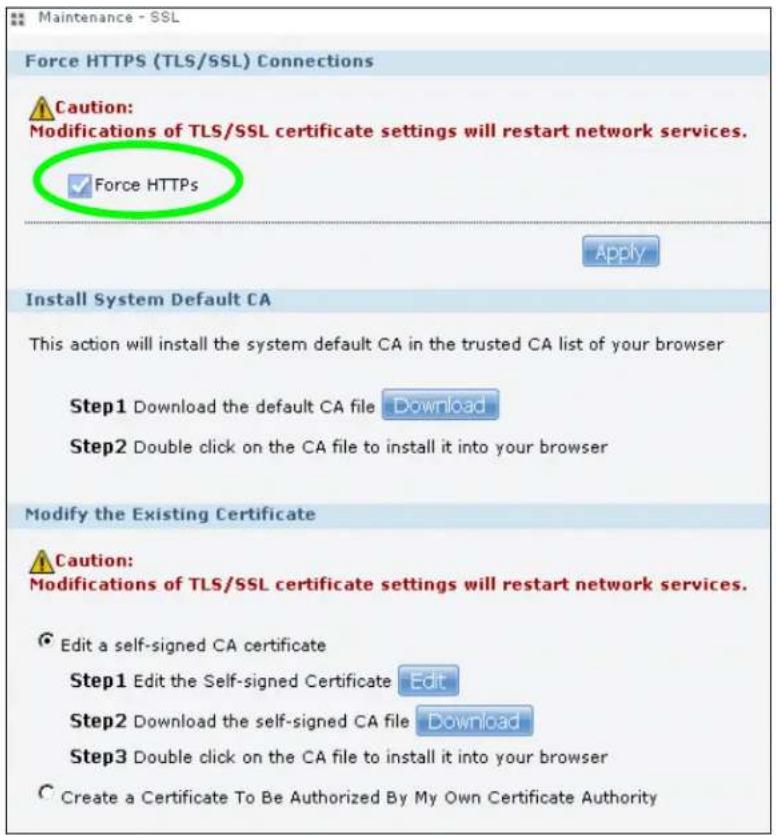
2 A warning screen pops up if applying your change may disconnect some users. Click Apply to continue.
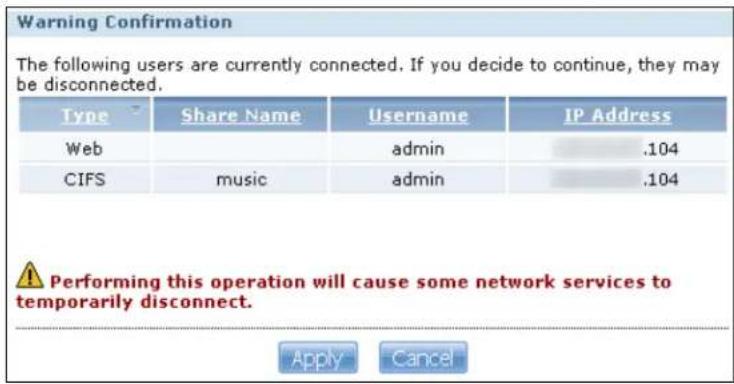
3 The NSA logs you out and automatically redirects your formerly non-secure (HTTP) connection to a secure (HTTPS) connection. Your browser may give you a warning about the device's public key certificate. Add an exception to allow your browser to bypass the warning.
Secure Connection Failed
- uses an invalid security certificate.
The certificate is not trusted because it is self signed. The certificate is only valid for nsa
(Error code: sec_error_untrusted_issuer)
- This could be a problem with the server's configuration, or it could be someone trying to impersonate the server.
- If you have connected to this server successfully in the past, the error may be temporary, and you can try again later.
Or you can add an exception...
4 Click Add Exception.

Secure Connection Failed
- uses an invalid security certificate.
The certificate is not trusted because it is self signed. The certificate is only valid for nsa
(Error code: sec_error_untrusted_issuer)
- This could be a problem with the server's configuration, or it could be someone trying to impersonate the server.
- If you have connected to this server successfully in the past, the error may be temporary, and you can try again later.
You should not add an exception if you are using an internet connection that you do not trust completely or if you are not used to seeing a warning for this server.
Get me out of here!
Add Exception.
5 Click Get Certificate.
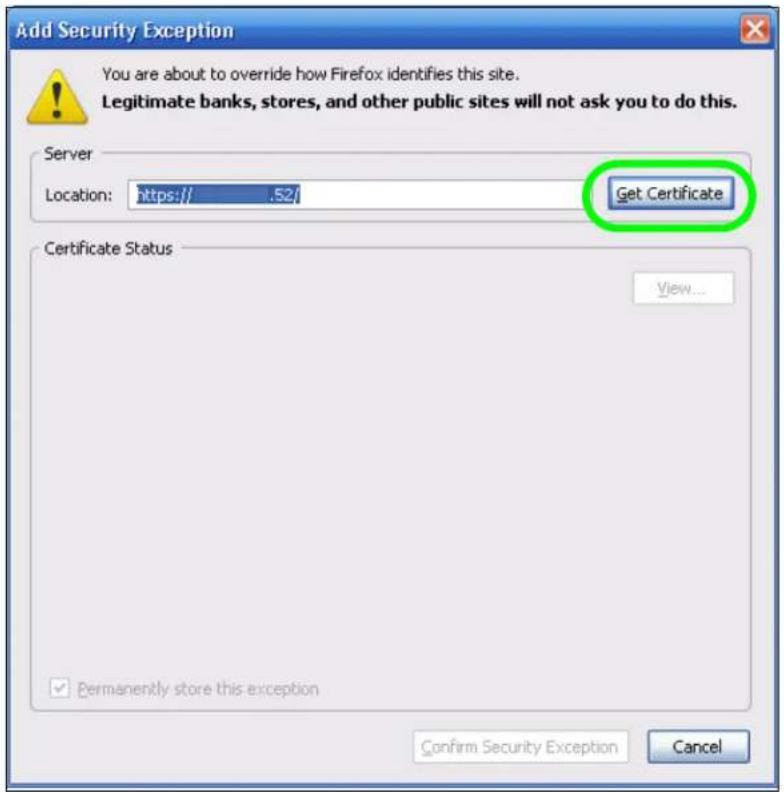
6 Before you add an exception, verify that the device to which you are trying to connect is providing the correct certificate. Click View.
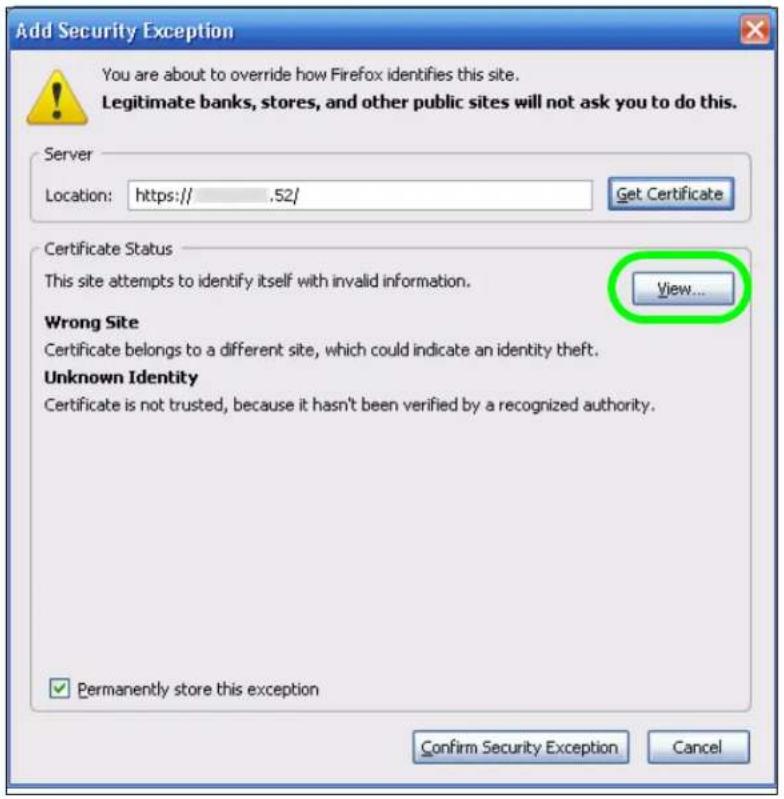
7 The SHA1 fingerprint must match the NSA's certificate you downloaded from the NSA to your computer. (Double-click the NSA's certificate file and then click Details and look at the Thumbprint). Click Close.
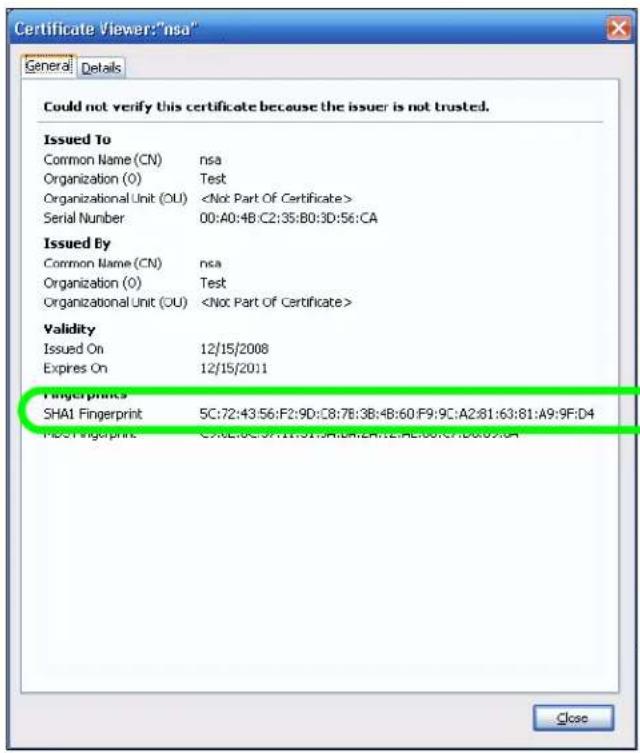
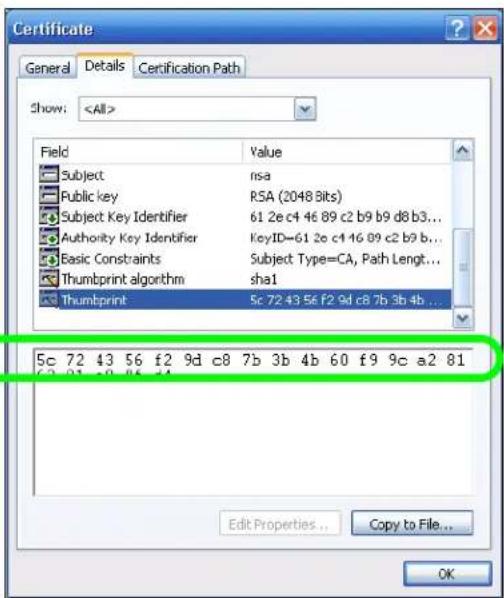
8 If the certificate fingerprints match, click Confirm Security Exception, otherwise click Cancel.
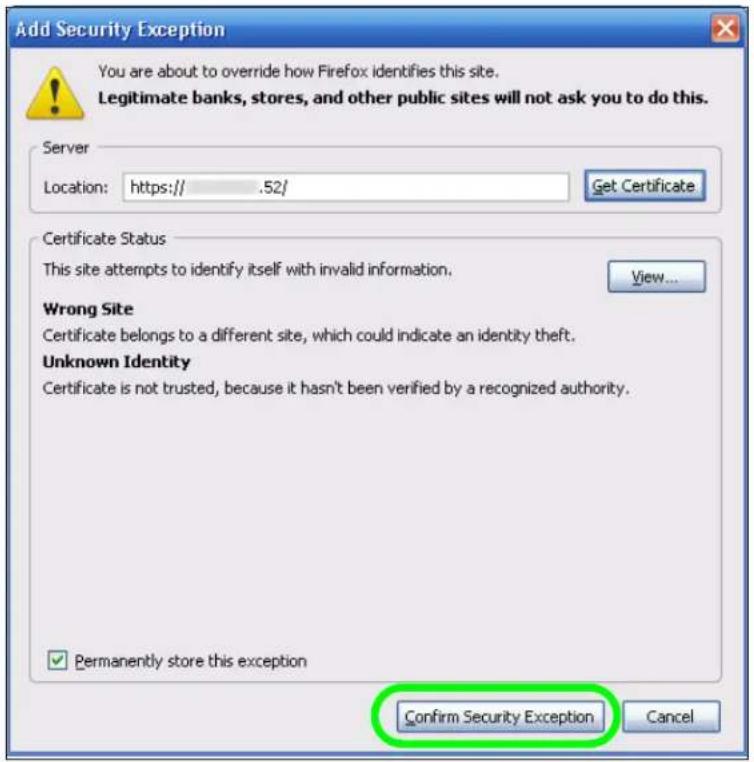
9 The login screen displays.
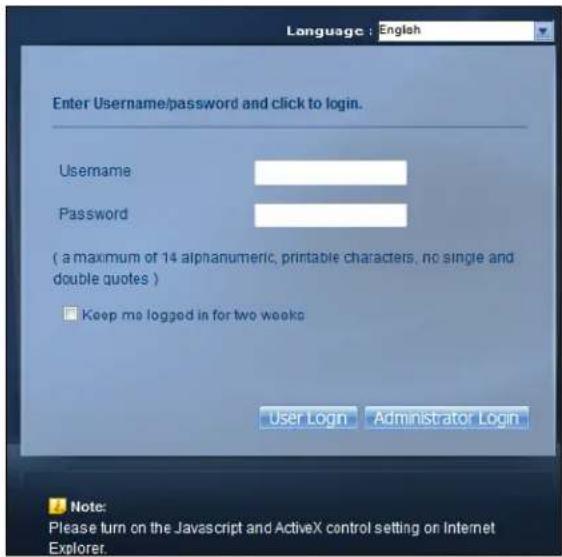
Now, anyone who connects to the NSA's Web Configurator screens will automatically do so by HTTPS. Use a secure method to let your users know the correct fingerprint for the NSA's certificate so they can check it before adding a security exception (as in steps 6 to 7 on pages 115 to 116). See the next section for how to use FTPES with the NSA for secure FTP transfers.
4.16 Using FTPES to Connect to the NSA
This section covers how to use FTP over Explicit TLS/SSL with the NSA for secure FTP transfers. Before you go through this section, read Section 4.15 on page 105 to configure HTTPS. This example uses FileZilla.
1 Open FileZilla and click File > Site Manager > New Site.
- Configure the Host field with the NSA's address.
- Set the Servertype to FTPES - FTP over explicit TLS/ SSL.
- Configure the account name and password.
- Click Connect.
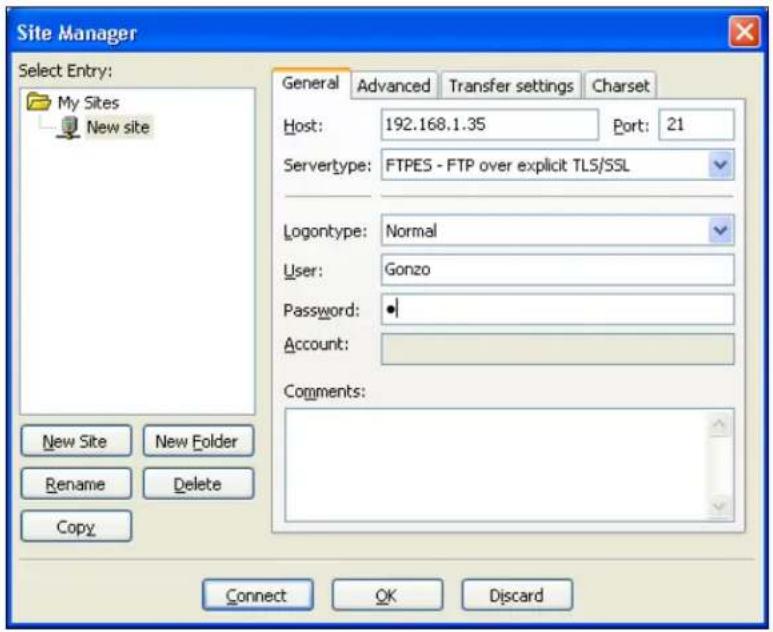
2 A security warning screen displays. The SHA1 fingerprint must match the NSA's certificate you downloaded from the NSA to your computer. (Double-click the NSA's certificate file and then click Details and look at the Thumbprint). If they match, click OK.
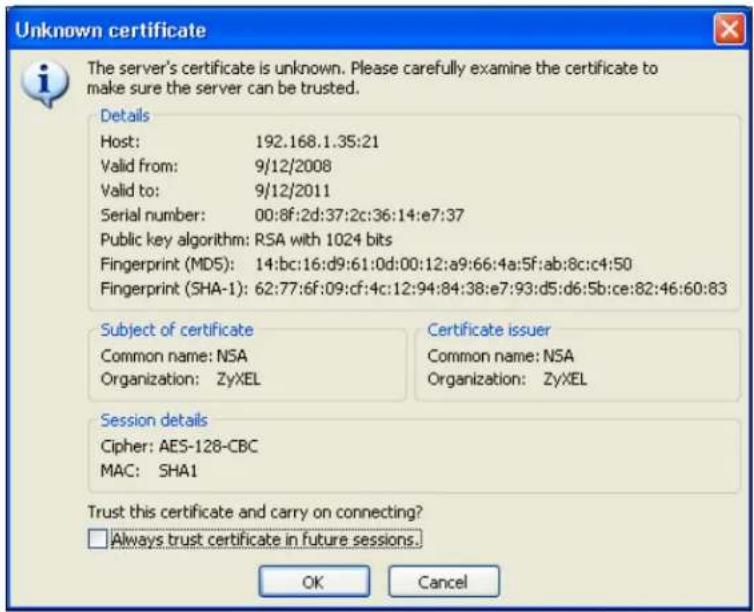
The shares and folders to which Gonzo has access display. Now you can use FTP to securely transfer files to or from the NSA. Use a secure method to let your users know the correct fingerprint for the NSA's certificate so they can check it before adding a security exception.
4.17 Using a Mac to Access the NSA
This tutorial shows you how to find the NSA on Mac OS X 10.5 (Leopard).
You can access the NSA in two ways:
- Use the Finder to browse for the NSA, or
- Use the Finder > Go option to connect to the NSA.
4.17.1 Finder
1 Open a new Finder window.
2 Select All under the SHARED sidebar. Look for the NSA from the Network list.
3 Expand the NSA to display the shares you may access.
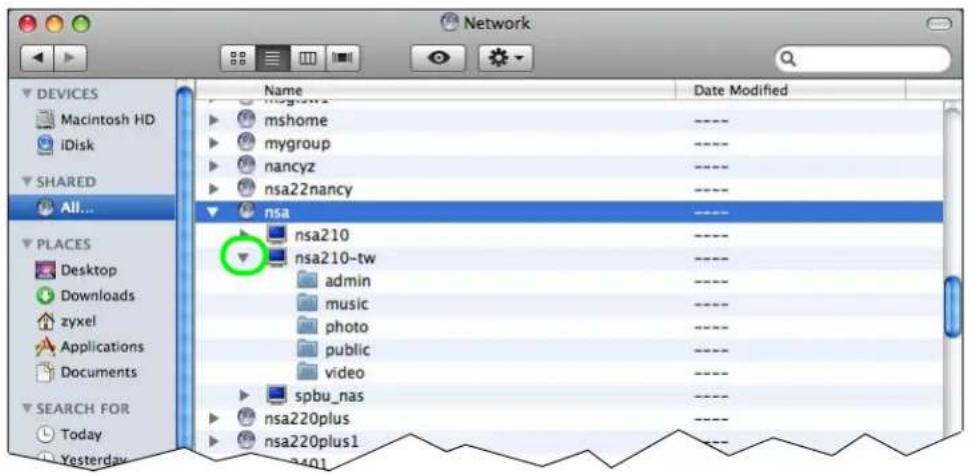
4.17.2 Go Menu
4 In the Finder, click Go > Connect to Server.
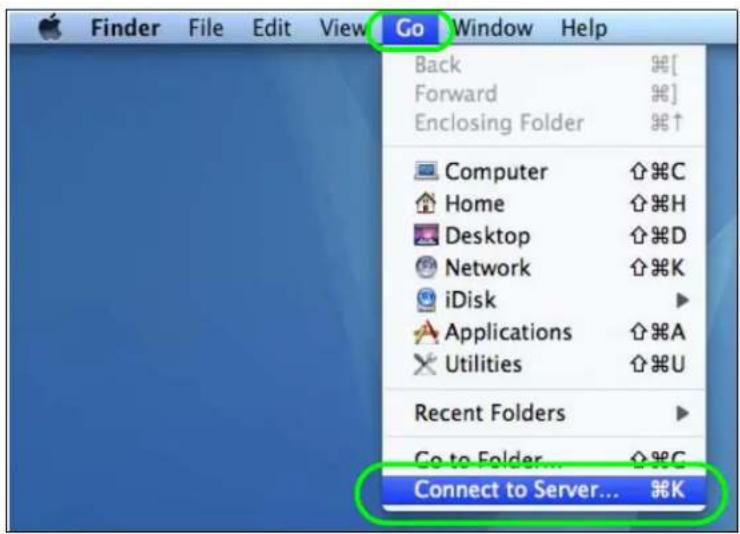
5 When the Connect to Server dialog box opens, enter smb:// and the NSA's IP address in the Server Address field. You may also click Browse to have the Mac search for the NSA. Click Connect.
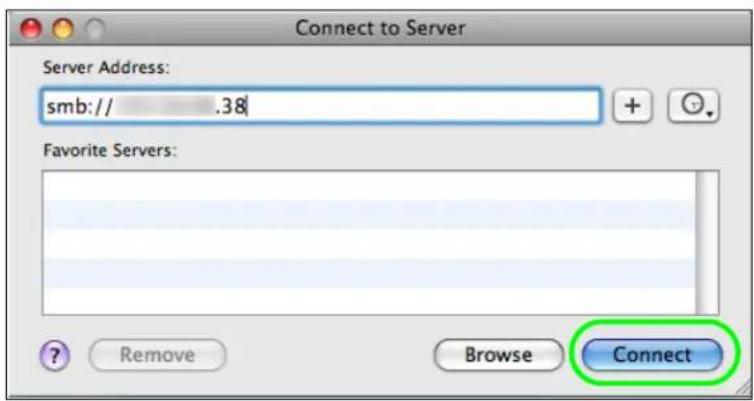
6 Once you establish the connection, you can access the NSA from the Finder or directly from the desktop.
4.18 How to Use the BackupPlanner
Note: The screens and links in this section appear only after you have installed and enabled BackupPlanner. BackupPlanner is an application that you can install using Package Management (see Chapter 10 on page 215.)
Use the NSA's BackupPlanner to have a backup of your files and folders.
Schedule backups for times when the network is not busy (like at night or on weekends). For example, you might do daily backups of important individual files or folders and a weekly general archive. You can save backups to another location so your files can survive even if the original RAID or NSA fails.
4.18.1 Creating an Archive Backup
To backup the NSA every week to a remote NSA:
1 Click Protect > Backup > Add Job.
Figure 32 Protect > Backup
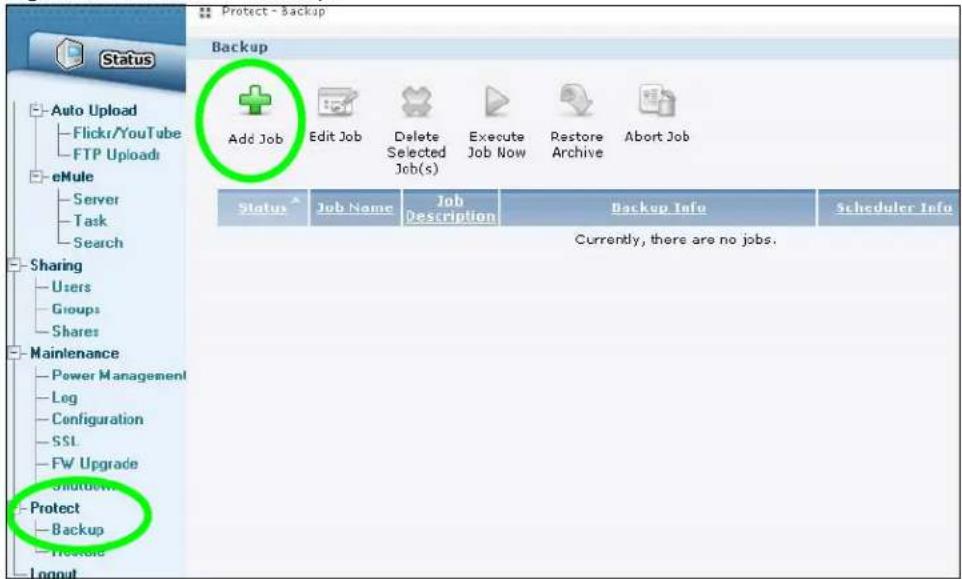
2 Identify the backup job and select Archive.
New files are often added to the shares that you need to back up and existing files are not frequently changed so select Incremental. The NSA does a full backup first and later only copies source files that are new and/or modified since the last backup. This example sets the NSA to do another full backup after every four incremental backups.
Figure 33 Protect > Backup > Add Job: Step 1
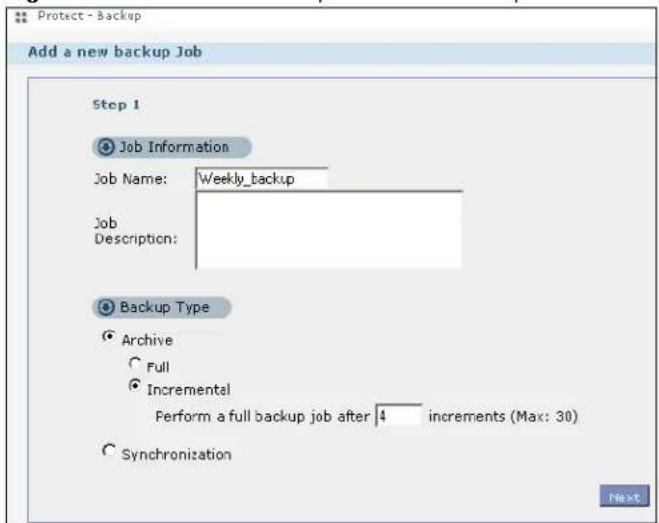
3 Select the volume1 check box to select all the folders and files.
Select Remote and enter the other NSA's address, username, password, and share name. If you want to make sure the remote NSA is reachable, click Test Connection.
Figure 34 Protect > Backup > Add Job: Step 2
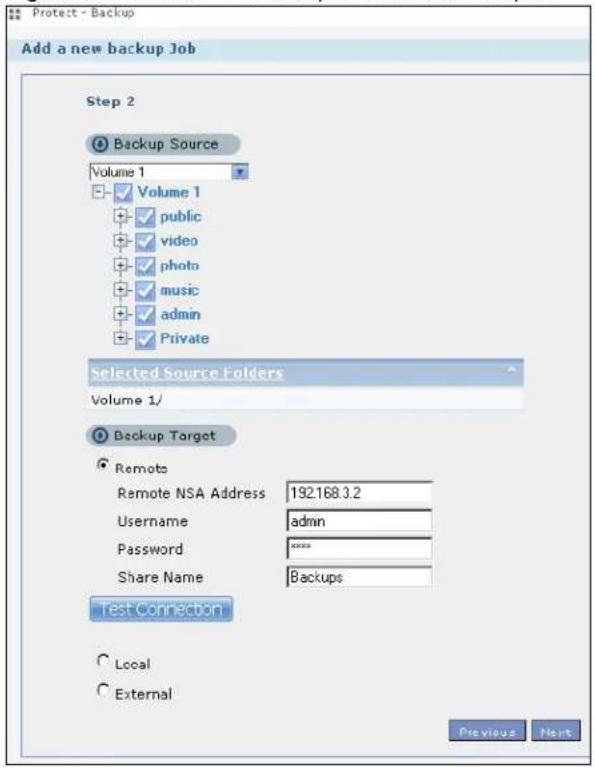
4 In this example, the target NSA is on the LAN so leave the compression off.
Security is already configured on the target NSA so you can leave the encryption off, too.
Have the NSA keep 3 backups.
Figure 35 Protect > Backup > Add Job: Step 3
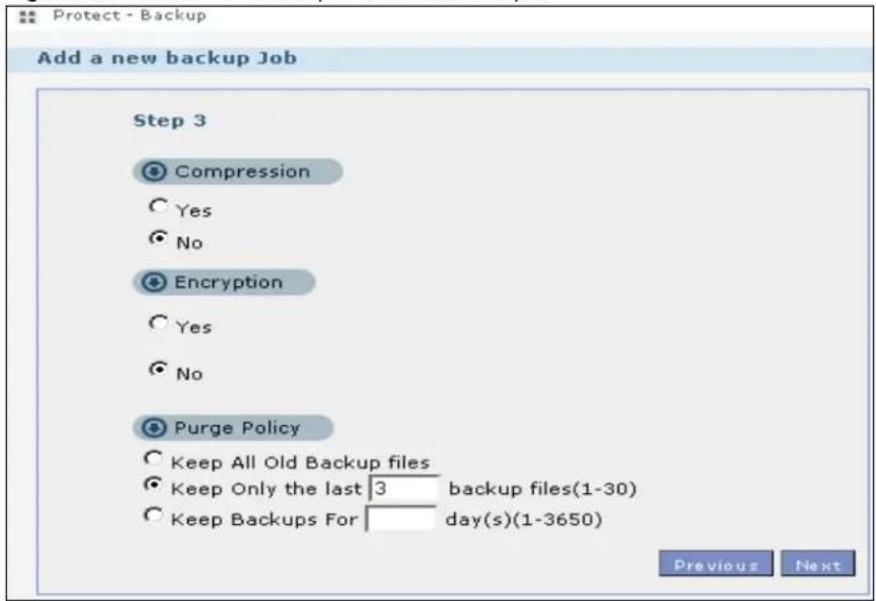
5 Set the frequency to Weekly. Schedule the backup for 5:00 every Saturday morning.
Protect > Backup > Add Job: Step 4
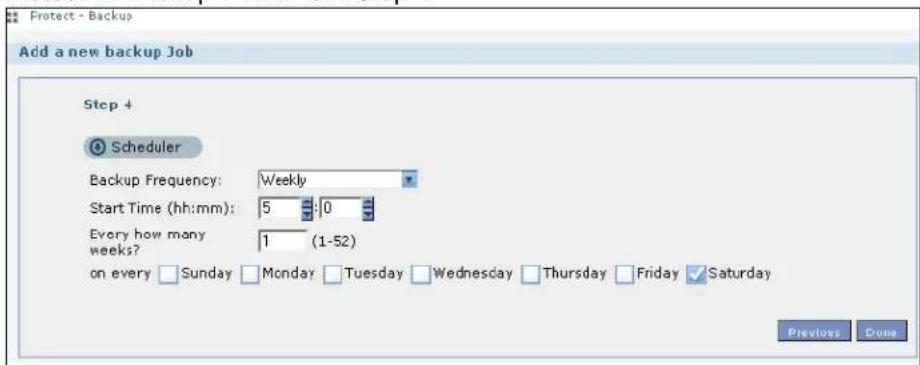
4.18.2 Creating a Synchronization Backup
To create a synchronization backup:
1 Click Protect > Backup > Add Job.
Figure 36 Protect > Backup
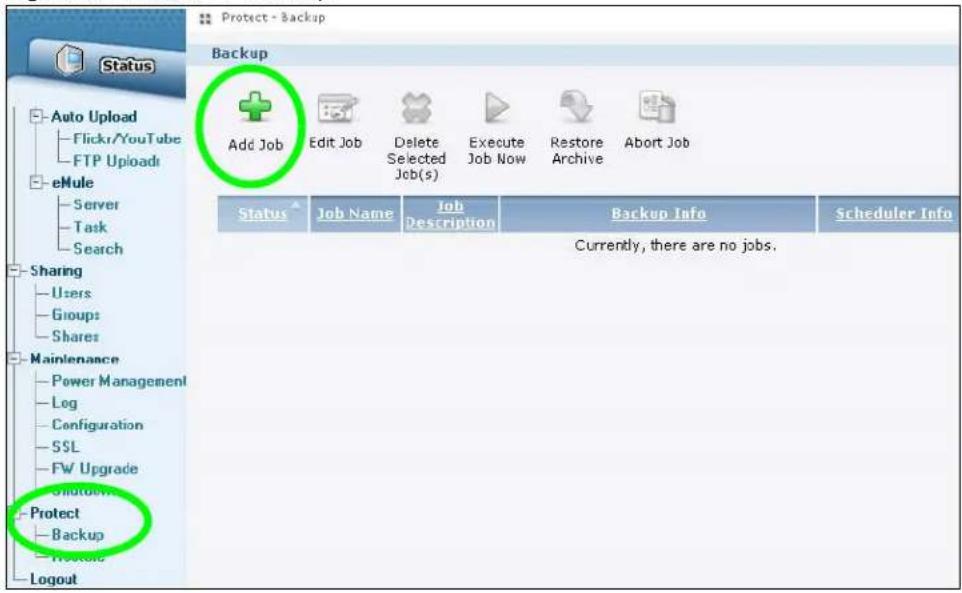
Name the backup job and select Synchronization.
You want only your current set of files in the remote NSA's folder, so you select Mirror to make the target folder identical to the source folder. The NSA deletes any other files in the target folder.
Figure 37 Protect > Backup > Add Job: Step 1
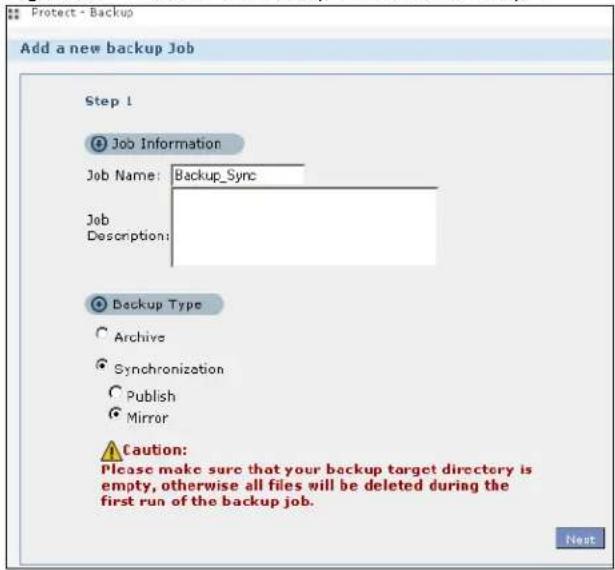
2 Select the folder that needs to be mirrored (your Private folder in this example) and Remote.
- Enter the other NSA's address and administrator password.
- Click Show target content to display the remote NSA's contents.
- Select the destination on the remote NSA (Backups in this example).
- Click Next.
Figure 38 Protect > Backup > Add Job: Step 2
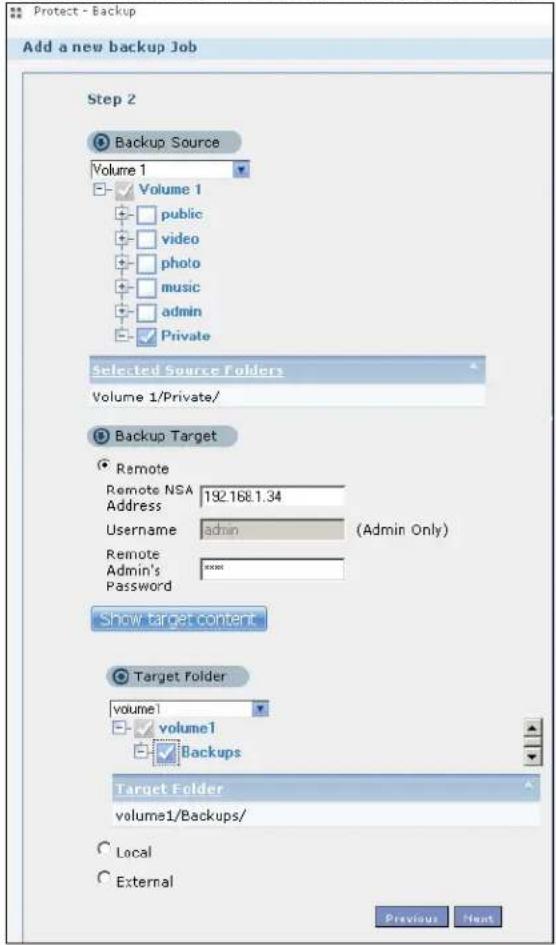
3 Click OK in the warning dialog box.
Figure 39 Protect > Backup > Add Job: Step 3
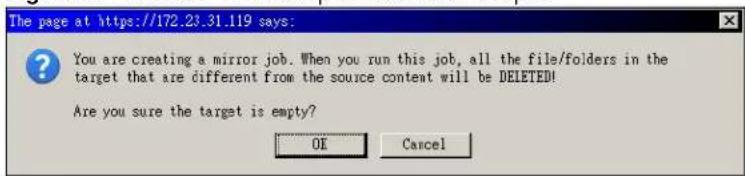
4 For this example, assume the connection to the German branch office is a good one and not many files need to be backed up so leave the compression off.
- Turn on the encryption to protect these sensitive files during the transfer. The final files stored on the remote NSA will be unencrypted (usable).
- Restrict the bandwidth usage to 256 KB/s to stop the archives from using all of your network connection's available bandwidth.
- You don't have to configure a purge policy for a synchronization backup.
- Click Next.
Figure 40 Protect > Backup > Add Job: Step 3
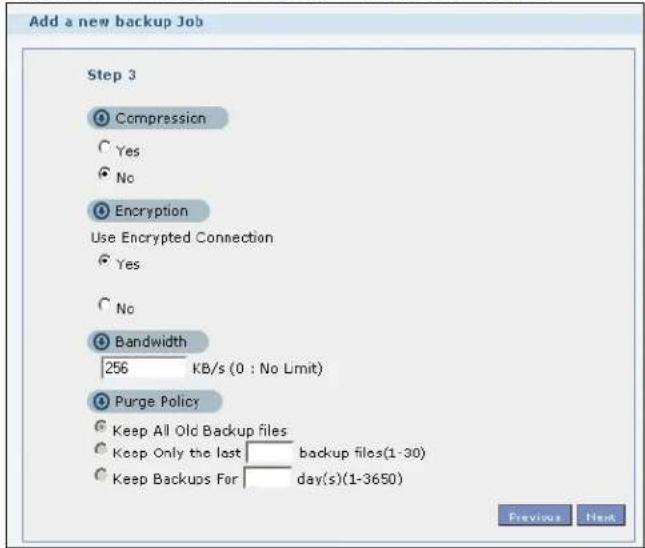
5 Schedule the backup to occur every morning at 3:00 and click Done.
Figure 41 Protect > Backup > Add Job: Step 4
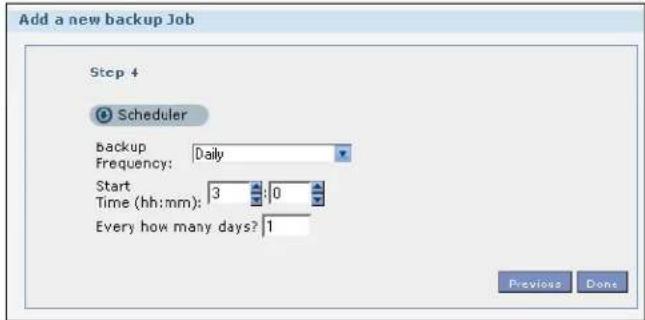
You do not need to use a special restore process to use the files a synchronization backup creates. The copy of files that the NSA creates on the other NSA's Backups share can be used directly by anyone with access to that share.
4.18.3 Restoring Archived Files by Backup Job
If you have backup jobs for which the NSA has already performed backups, you can restore the files based on the backup job. Do the following:
1 Click Protect > Backup screen, select a backup job and click Restore Archive.
Figure 42 Protect > Backup
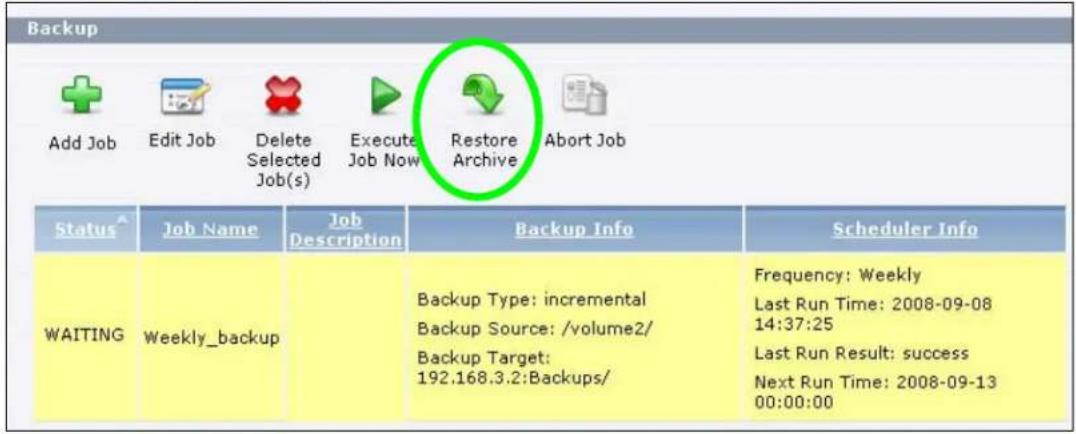
2 Select which backup to use and click Next.
Figure 43 Protect > Backup > Restore Archive: Step 1
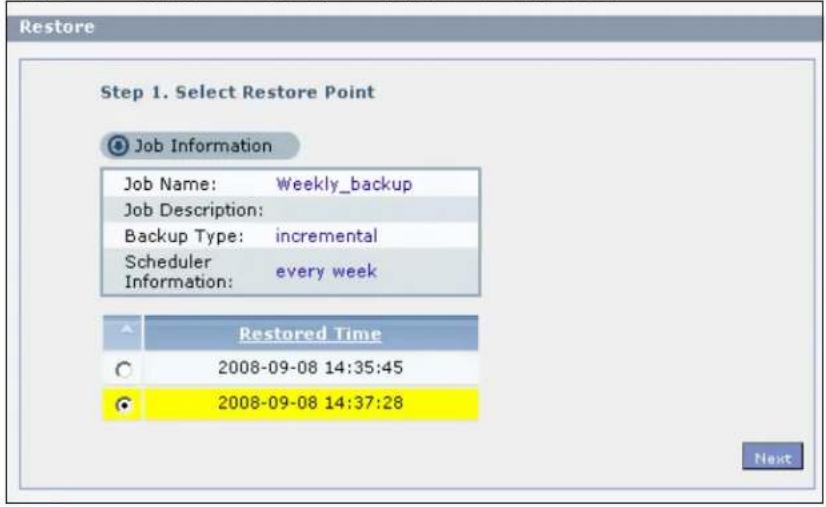
3 Select the files and folders you want to restore and click Next.
Figure 44 Protect > Backup > Restore Archive: Step 2
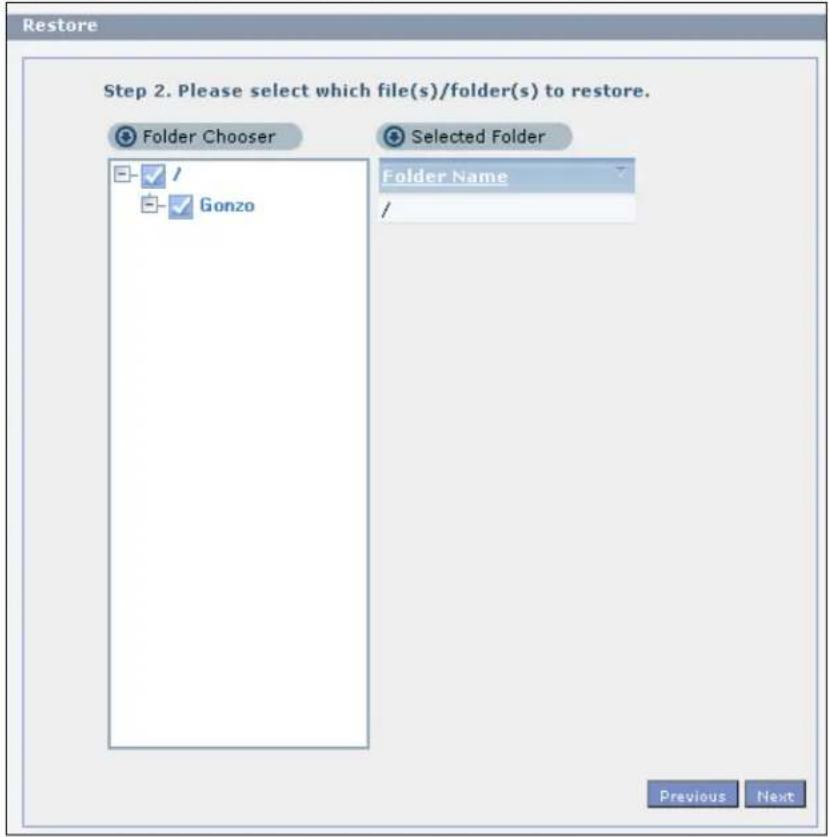
4 Select the original location and click Done.
Figure 45 Protect > Backup > Restore Archive: Step 3
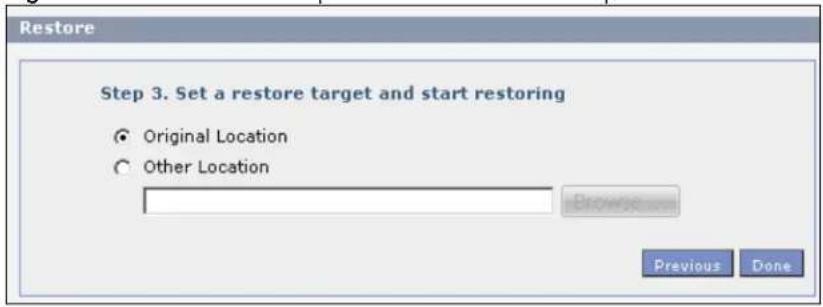
5 The NSA restores the files into the share. When it finishes you can access the files.
Figure 46 Protect > Backup > Restore Archive: Progress
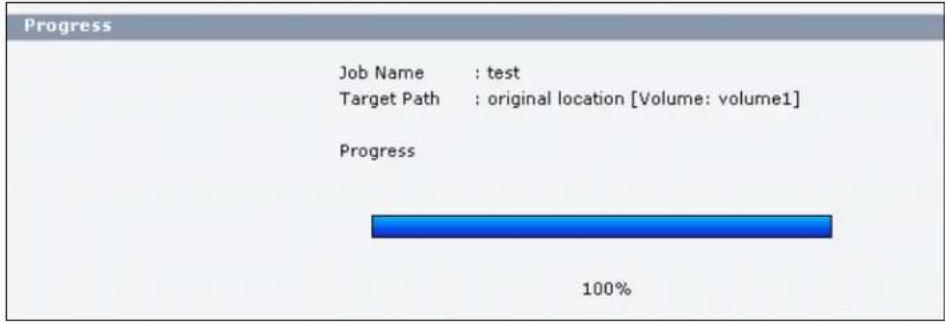
bar
Progress | Category | Progress (%) | |---|---| | Job Name | test | | Target Path | original location [Volume: volume1] | | Progress | 100% |4.18.4 Restoring by Backup Files
If you deleted an archive backup job or the NSA or the RAID array containing the backup job failed you cannot restore archived files by the backup job. In this example, the NSA's RAID array failed. You've replaced the hard drives and re-configured the RAID. To restore by backup files:
1 Click Protect > Restore. Specify where the archive files are located. In this example, enter "192.168.3.2" as the IP address, "admin" as the account name, "1234" as the password, and "Backups" as the share name. Click Test Connection. Click Next.
Figure 47 Protect > Restore: Step 1
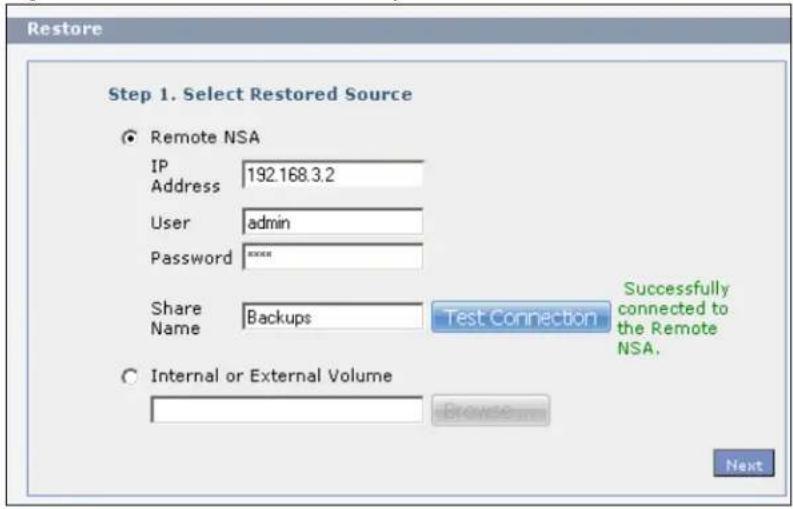
2 Select the backup job and backup time and click Next.
Figure 48 Protect > Restore: Step 2
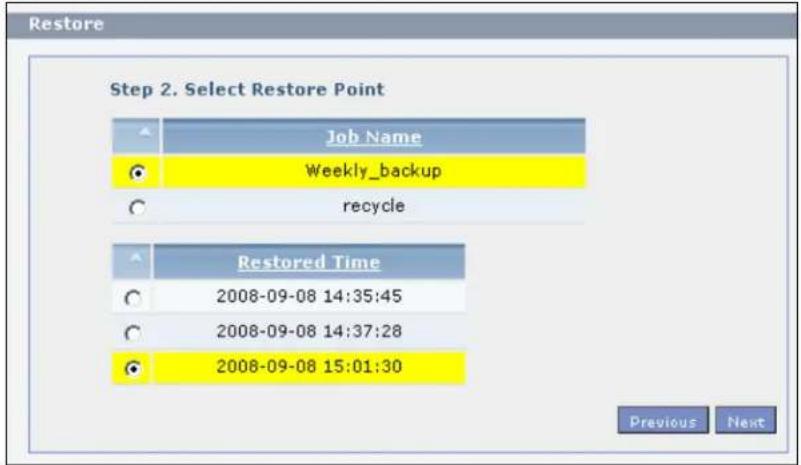
3 Select everything in the share except the recycle folder. Click Next.
Figure 49 Protect > Restore: Step 3
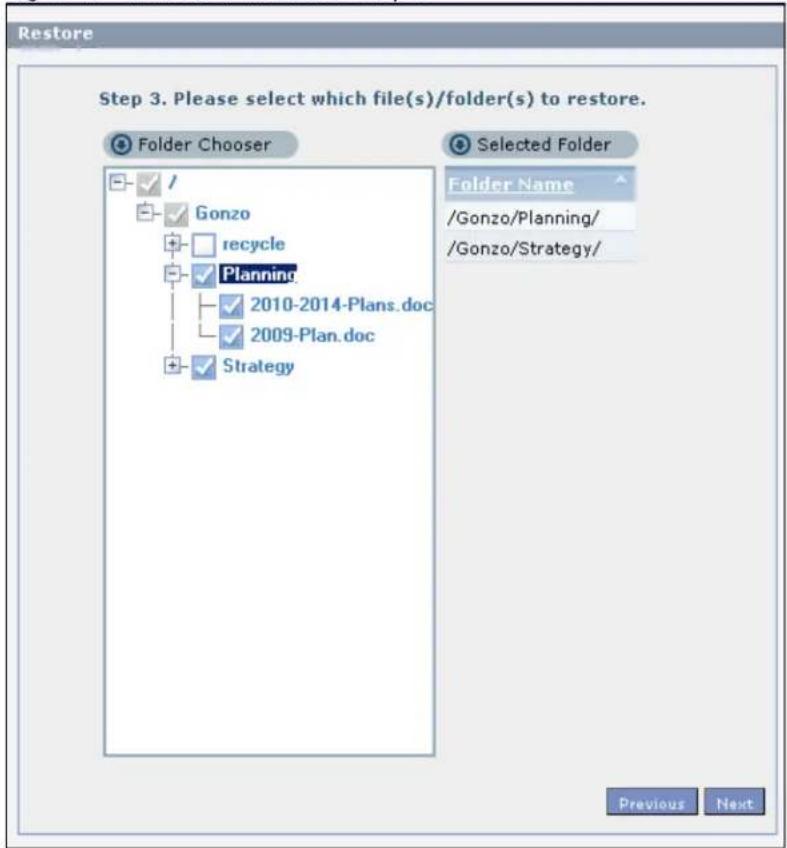
4 Browse to the folder where you want to put the files. Click Done.
Figure 50 Protect > Restore: Step 4
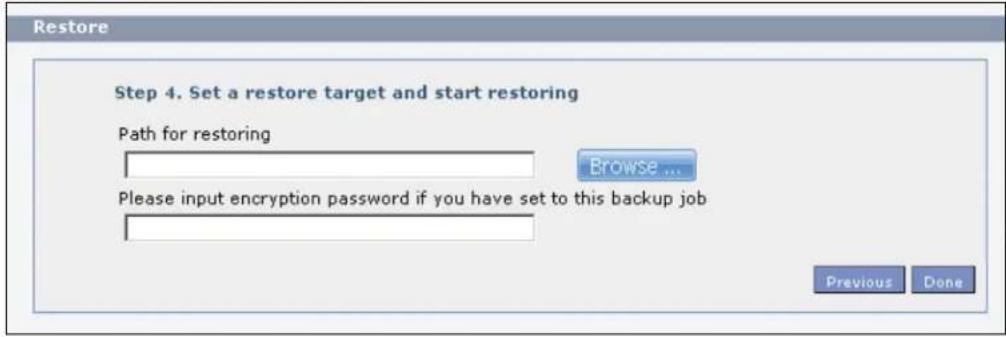
5 The NSA restores the files and you can use them again.
PART II
Technical Reference
5.1 Overview
This chapter describes the Status screen, which is the first advanced administration screen that displays.
5.2 The Status Screen
Click Administration in the Home screens (Section 3.5 on page 44) to open the Web Configurator. You can also view the status screen, by clicking Status on the top-left of the navigation panel.
Figure 51 Status
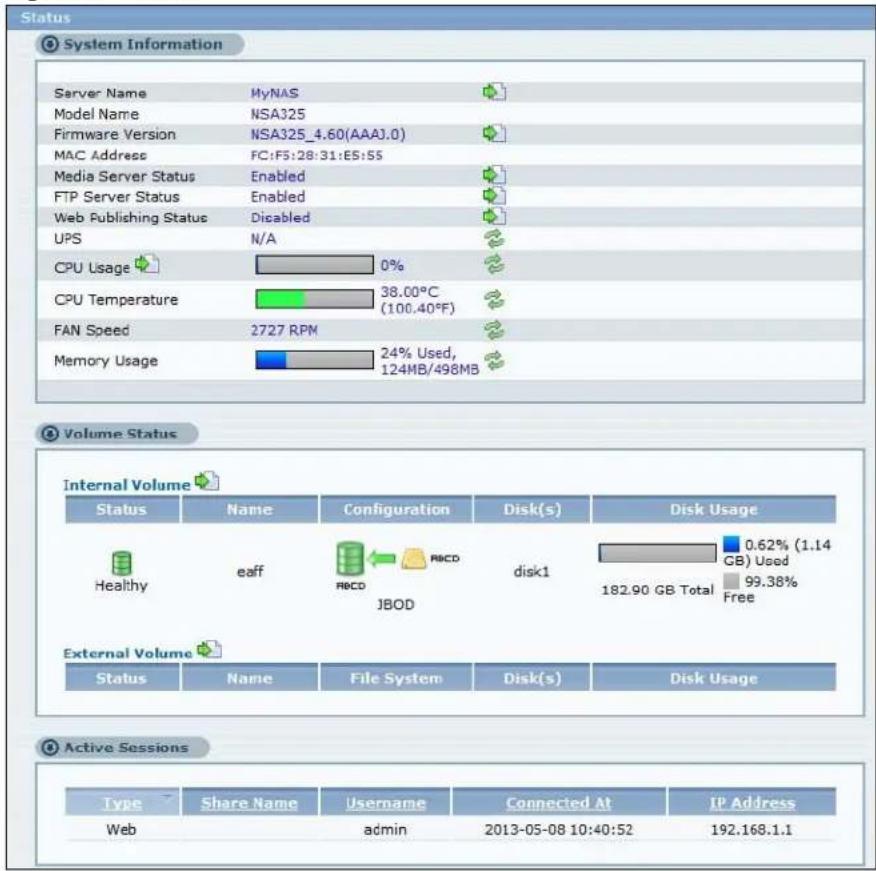
bar
| Status | Name | Configuration | Disk(s) | Disk Usage | | :--- | :--- | :--- | :--- | :--- | | Healthy | eaff | PBCD JBOD | disk1 | 0.62% (1.14 GB) Used | | External Volume | | | | 99.38% Free | | Server Name | MyNAS | | | | | Model Name | NSA325 | | | | | Firmware Version | NSA325_4.60(AAA).0 | | | | | MAC Address | FC:F5:28:31:E5:55 | | | | | Media Server Status | Enabled | | | | | FTP Server Status | Enabled | | | | | Web Publishing Status | Disabled | | | | | UPS | N/A | | | | | CPU Usage | 0% | | | | | CPU Temperature | 38.00°C (100.40°F) | | | | | FAN Speed | 2727 RPM | | | | | Memory Usage | 24% Used, 124MB/498MB | | | | Status: Type: Share Name: Username: Connected At: IP Address Web: admin: 2013-05-08 10:40:52: 192.168.1.1The following table describes the labels in this screen.
Table 16 Status
| LABEL DESCRIPTION | |
| Status Click this to refresh | the status screen statistics. |
| System Information | |
| Server Name This displays the name which helps you find the NSA on the network. Click the Edit icon to go to the screen where you can configure this. | |
| Model Name This displays which model this NSA device is. | |
| Firmware Version | This is the NSA firmware version. Click the Edit icon to go to the Maintenance > FW Upgrade screen from which you can upload/upgrade new firmware. |
| MAC Address This displays the NSA's unique physical hardware address (MAC). You need the MAC address to register the product at myZyXEL.com. Customer support may also request it for troubleshooting purposes. | |
| Media Server Status | This shows whether the media server function is enabled or disabled. It must be enabled for media clients to play content files stored on the NSA. Click the Edit icon to go to the screen where you can configure this. |
| FTP Server Status | This shows whether the FTP server function is enabled or disabled. It must be enabled to use FTP file transfer to/from the NSA. Click the edit icon to go to the screen where you can configure this. |
| Web Publishing Status | This shows whether the Web server function is enabled or disabled. It must be enabled to use HTTP to access shares on the NSA. Click the Edit icon to go to the screen where you can configure this. |
| UPS | This shows the Uninterruptible Power Supply (UPS) capacity. Click the Edit icon to go to the screen where you can configure this. |
| CPU Usage | This displays a summary of CPU usage by all current processes.Click the Show CPU Info icon to display the ten processes currently using the most CPU capacity.Click the Refresh icon to update this display. It also automatically updates itself every 10 seconds.Note: If too many users are using the NSA then the NSA may appear sluggish. |
| CPU Temperature This displays the current temperature near the NSA's CPU. The NSA generates an emergency log if the temperature goes out of the normal operating range. If the temperature goes even higher, the NSA shuts down automatically to avoid damage from overheating. If the NSA overheats, make sure the fans are working and it is in a well ventilated place.Click the Refresh icon to update this display. It also automatically updates itself every 60 seconds. | |
| Fan Speed This is the RPM (Rotations Per Minute) of the NSA's fans.Click the Refresh icon to update this display. It also automatically updates itself every 60 seconds. | |
| Memory Usage This shows how much of the NSA's total memory is being used.Click the Refresh icon to update this display. It also automatically updates itself every 10 seconds. | |
| Volume Status | A volume is a storage area on a single disk or spread across a number of disks within a single file system. |
| Internal Volume (or SATA Volume) | This displays the volumes created on the hard drives installed in the NSA.Click the Edit icon to open the Storage screen. You can create and edit the NSA's internal volume. See Chapter 7 on page 151 for more details. |
| External Volume (or USB Volume) | This displays the volumes created on USB hard drives connected to the NSA. USB disks are numbered in the order that you insert USB devices.Click the Edit icon to open the Storage screen. You can create and edit the external volume. See Chapter 7 on page 151 for more details. |
| Status This icon indicates whether the volume is healthy, degraded, or down. | |
| Name This field shows the name for the volume. | |
| Configuration | This field (also known as Type) shows what type of data storage system (a RAID type or JBOD) an internal volume is using. |
| File System | This field shows what file system an external (USB) volume is using. |
| Disk(s) For internal drives, this shows which hard drive bays are included in the volume.For external drives, this field shows front USB for the front USB port and rear USB1 and rear USB2 for the rear USB ports. | |
| Disk Usage | This field shows total disk size, the percentage of the disk being used and the percentage that is available. |
| Active Sessions This shows how many users are currently connected to the NSA. | |
| Type This shows whether it's a Windows/CIFS, web (web configurator), or FTP connection to the NSA. | |
| Share Name | This displays the shared folder name on the NSA that the user is connected to for CIFS sessions and is blank for FTP and web sessions. |
| Username | This displays the name of the user connected to the NSA if one is defined.ANONYMOUS FTP displays if a username is not defined for the user's connection. |
| Connected At | This displays the date and time the user last connected to the NSA in year, month, day, hour, minute, second format. |
| IP Address | This displays the IP address of the computer connected to the NSA. |
6.1 Overview
This chapter gives an overview of the various features included in the system setting screens. Upgrade the NSA firmware. Use package management to add more useful applications in your NSA. Identify your NSA on the network and set the time that the NSA follows for its scheduled tasks/logs.
6.2 What You Can Do
- Use the Firmware / Packages screens (Section 6.4 on page 143 to Section 6.5 on page 143) to upload new firmware and download and install applications from the web.
- Use the Server Name screen (Section 6.6 on page 147) to specify the NSA's server and workgroup names.
- Use the Date/ Time screen (Section 6.7 on page 147) to set up date/time and choose a time zone for the NSA.
6.3 What You Need to Know
Package Management
This feature enables you to install and use the following applications:
- BackupPlanner - Use this to schedule and run backup jobs for files stored in your NSA to an internal drive, external storage device or to another NSA in the network.
- DyDNS - This gives your NSA a domain name with a dynamic IP address. At the time of writing, this package supports accounts from the following service providers: DynDNS, NoIP, 3322, ZoneEdit, and DHS.
- Gallery - This web-based application allows your NSA to host pictures. You can upload images in your local computer or shares to this application. Use the administrator account of your NSA to log in to the Gallery console. The administrator can then create accounts for other users.
- NFS - NFS (Network File System) is a file-sharing protocol most commonly implemented on Unix-like systems.
- NZBGet - This news grabber helps download files from UseNet.
-
PHP-MySQL-phpMyAdmin - This tool can be used to manage MySQL through the web. Enter 'root' as the username and '1234' as the password to log in. This includes MySQL 5.1.30, PHP 5.2.8 and phpMyAdmin 3.1.1.
-
SMART - Use S.M.A.R.T. (Self Monitoring, Analysis, and Reporting Technology) to monitor hard disks. It detects and reports the reliability of hard disks using standard indicators, enabling administrators to anticipate possible disk failures.
- SqueezeCenter - This enables you to manage a Logitech's Squeezebox device connected to the NSA.
- Syslog - Use this to configure the NSA to accept syslog logs from syslog clients.
- TFTP - Use this to configure the NSA to accept log files from TFTP clients.
- Transmission - This Bit Torrent client supports adding tasks through torrent files and magnet links.
- WordPress - This allows you to create and manage a blog. Use the NSA administrator credentials to log in. The administrator can then create accounts for other users.
- eMule - eMule is an open-source peer-to-peer (P2P) file-sharing application similar to eDonkey, which can be used to download files from the Internet. It uses the Kad protocol.
- carbohydrate - Use this to have the NAS manage your downloads including those from one-click hosting sites. One-click hosting sites allow Internet users to easily upload files to the one-click host's server so others can download them.
The following applications come with their own configuration screens and documentation:
- Gallery
• NZBGet - PHP-MySQL-phpMyAdmin
- Squeeze Center
- Transmission
- WordPress
Windows/CIFS
Common Internet File System (CIFS) is a standard protocol supported by most operating systems in order to share files across the network.
- CIFS is included by default in Windows operating systems.
- You can use Samba with Linux to use CIFS.
• CIFS transfers use security.
Time Lag
Time lag occurs when the time on the NSA falls behind the time on the time server. This may happen if:
- the time server is no longer reachable
- if the NSA is shut down often (the NSA internal battery keeps time when the NSA is shut down and this may cause possible variance)
- power surges occur.
The NSA gives no warning if time lag occurs. You should resynchronize the time after a power surge or after you have shut down the NSA several times.
6.4 The Firmware Upgrade Screen
Use this screen to upgrade the NSA firmware. You should first have downloaded the latest firmware files from the ZyXEL website.
Do not turn off the NSA while it is upgrading the firmware or you may render it unusable.
Click System Setting > Firmware / Packages to open the following screen.
Figure 52 System Setting > Firmware / Packages
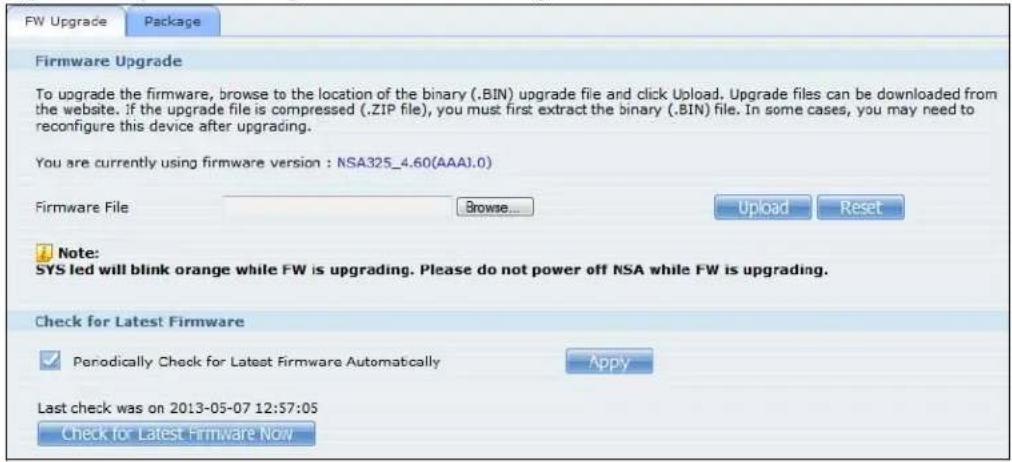
The following table describes the labels in this screen.
Table 17 System Setting > Firmware / Packages
| LABEL DESCRIPTION | |
| Firmware File Type the | location of the firmware file you want to upload |
| Browse Click this to | find the file on your computer |
| Upload Click this to up | load the new firmware. The NSA automatically restarts after you upgrade. Wait until the restart completes before accessing the NSA again. If you interrupt the upgrade, then the NSA may become unusable. See Section 20.1 on page 345 for your model's LED behavior during firmware upgrade. |
| Reset Click this to refresh the screen. | |
| Periodically Check for Latest Firmware Automatically | Select this to have the NSA regularly check ZyXEL's server for updated firmware. The NSA notifies you at login if a new firmware is available.Click Apply to save this field's setting. |
| Check for Latest Firmware Now | Click this to check ZyXEL's server for updated firmware. |
6.5 Package Management Screen
Use this screen to download and install applications from the web. See Chapter 10 on page 215 for more about the features you can add to the NSA by installing packages.
Click System Setting > Firmware / Packages > Package Management to open the following screen.
Figure 53 System Setting > Firmware / Packages > Package Management
| Status | Package Name | Requires | Version | Description | Management Page |
| Built-in | BackupPlanner | 001zypkg009 | Use this to schedule and run backup jobs for files stored in your NAS to an internal drive, external storage device or to another NAS in the network. | Protect > Backup Protect > Restore | |
| Built-in | DyDNS | 001zypkg007 | This gives your NAS a domain name with a dynamic IP address. | Network > DvDNS | |
| Enabled | Gallery | PHP-MySQL- phpMyAdmin | 3.0.4zypkg006 | This web-based application allows your NAS to host pictures. Use the NAS administrator credentials to log in. The administrator can then create accounts for other users. | http://192.168.1.1/pkg/gallery/ |
| Built-in | NFS | 1.1.4zypkg004 | NFS (Network File System) is a file-sharing protocol most commonly implemented on Unix-like systems. | Network > NFS | |
| Enabled | NZBGet | 9.1zypkg001 | This package downloads .nzb file from Usenet. Default username:nzoget password:1234 | http://192.168.1.1:6789/ | |
| Enabled | PHP-MySQL- phpMyAdmin | 1.0zypkg006 | This tool can be used to manage MySQL through the web. Enter 'root' as the username and '1234' as the password to log in. | http://192.168.1.1/pkg/phpmyadmin/ | |
| Built-in | SMART | 5.39zypkg005 | Use S.M.A.R.T. (Self Monitoring, Analysis, and Reporting Technology) to monitor hard disks. It notifies you ahead of time of any issues that can result to the hard disk's poor performance or failure. | Storage > S.M.A.R.T | |
| Enabled | SqueezeCenter | PHP-MySQL- phpMyAdmin | 7.7zypkg005 | This enables you to manage a Logitech's Squeezebox device connected to the NAS. | http://192.168.1.1:9000 |
| Built-in | Syslog | 2.0.10zypkg004 | The syslog protocol allows devices to send logs across an IP network to syslog servers where they can be stored for later analysis. | Applications > Syslog Server |
The following table describes the labels in this screen.
Table 18 System Setting > Firmware / Packages > Package Management
| LABEL DESCRIPTION | |
| Package Management | |
| Retrieve List From Internet | Click this to retrieve a list of available packages from the ZyXEL website. |
| Install/Upgrade | Choose the item(s) on the list and click this to install the selected application(s) on your system or upgrade to the latest version if you have previously installed the application. |
| Uninstall/Cancel Installation | Choose the item(s) on the list and click this to uninstall the selected application(s) from your system or cancel their active download(s) or install process/es.This is only available if you have previously installed the package. |
| Enable This option is | only for non built-in packages.Choose the item(s) on the list and click this to enable the application(s) on your system.This is only available if you have previously installed the package. |
Table 18 System Setting > Firmware / Packages > Package Management
| LABEL DESCRIPTION | |
| Disable This option is | only for non built-in packages.Choose the item(s) on the list and click this to disable the application on your system. You have to enable the application again in order to use it.This is only available if you have previously installed the package. |
| Package Info | Select an item on the list and click this to display information about the package. See Section 6.5.1 on page 146 for more details. |
| Status | This is the current status of the application. It shows:Not Installed- This displays for applications that have not been installed by the NSA.Installing (%) - This displays when the application is being installed. It also shows the percent of the package already installed.Built-in- This displays for applications installed by the NSA that you can configure in the NSA Web Configurator.Enabled- This displays for applications installed and enabled by the NSA that have their own web configurators.Disabled- This displays for applications installed and disabled by the NSA that have their own web configurators.Unknown- It is possible to get this status if the web location for the application is unavailable. |
| Package Name This is the name of the application. | |
| Requires | This shows the other packages required in order to run this application.Note: A package would be disabled/enabled simultaneously if its prerequisite package(s) has been disabled/enabled. For example, when you enable WordPress, this also enables PHP-MySQL-phpMyAdmin automatically. However when you enable PHP-MySQL-phpMyAdmin, this does not automatically enable WordPress. |
| Version This is the | version number of the item.The icon indicates that the application has a newer version available. Move your mouse over this icon to see the latest version number. Choose this item and click Install/ Upgrade. |
| Description | This shows a brief description of the application. |
| Management Page | This shows the location of the screens or web configurator where you can manage the application (after the package has been installed on the system). |
Note: Once you install an application and enable it, additional links show up in the navigation panel. This applies to eMule, DyDNS, NFS, SMART, Syslog Server, TFTP Server, pyLoad, and BackupPlanner. For Gallery, PHP-MySQL-phpMyAdmin, SqueezeCenter and WordPress, you can access the applications' web configurators through the Package Management screen.
6.5.1 Displaying the Package Information
Select an item on the list and click Package Info. Use this screen to check detailed information about the task.
Figure 54 System Setting > Firmware / Packages > Package Management > Package Info
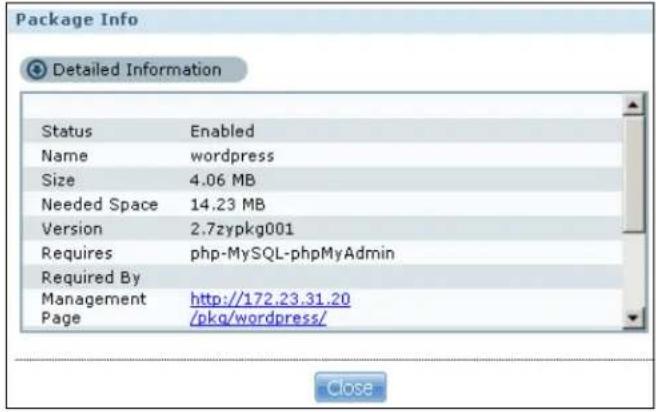
The following table describes the labels in this screen.
Table 19 System Setting > Firmware / Packages > Package Management > Package Info
| LABEL DESCRIPTION | |
| Status This is the current status of the application. It shows:Not Installed- This displays for applications that have not been installed by the NSA.Installing (%)- This displays when the application is being installed. It also shows the percent of the package already installed.Built-in- This displays for applications installed by the NSA that you can configure in the NSA Web Configurator.Enabled- This displays for applications installed and enabled by the NSA that have their own web configurators.Disabled- This displays for applications installed and disabled by the NSA that have their own web configurators. | |
| Name This is the name of the application. | |
| Size This is the size of the application at initial download. | |
| Needed Space This is the needed space to complete the installation of the application. | |
| Version This is the version number of the application. | |
| Requires This shows other package/s required to run this application. | |
| Required By | This shows which other packages require this application in order to be usable. |
| Management Page | This shows the location of the screens, console or web configurator where you can manage the application (after the package has been installed on the system). |
| Source This shows the location of the installed files of the application. | |
| Description This shows a brief description of the item. | |
| Close | Click this to close the screen. |
6.6 The Server Name Screen
Click System Setting > Server Name to open the following screen. Use this screen to configure your CIFS settings. In this screen you can set your server name and specify if your NSA is a part of a workgroup.
Note: CIFS cannot be disabled on the NSA.
Figure 55 System Setting > Server Name
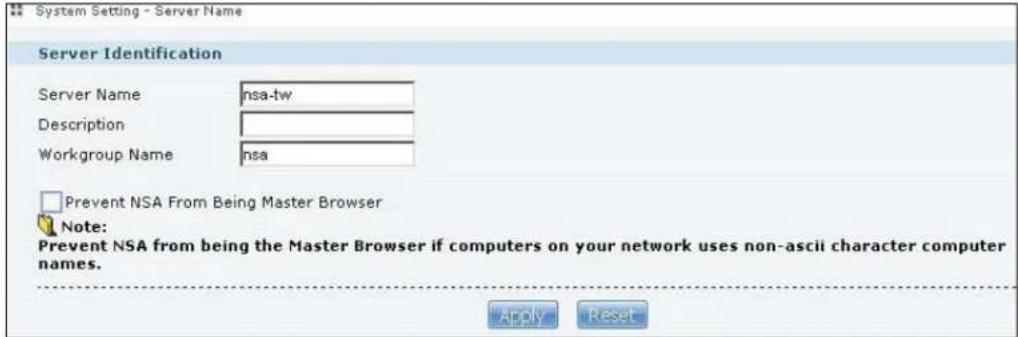
The following table describes the labels in these screens.
Table 20 System Setting > Server Name
| LABEL DESCRIPTION | |
| Server Name Enter | a name to identify your NSA on the network in this field.You can enter up to 15 alphanumeric characters with minus signs allowed but not as the last character. The name must begin with an alphabet (a-z) and is NOT case sensitive. |
| Description | Add text here to describe the NSA if the Server Name field is not enough. Use up to 61 characters. You can use all characters except the following: / |[]<>+;,?='~'. |
| Workgroup Name | Type your workgroup name in this field. A workgroup is a group of computers on a network that can share files. These user accounts are maintained on the NSA.You can enter up to 15 alphanumeric characters with minus signs allowed but not as the last character. The name must begin with an alphabet (a-z) and is NOT case sensitive. |
| Prevent NSA From Being Master Browser | Select this option if computers in your workgroup are named with non-English characters (such as Chinese and Russian). When you perform a search in the workgroup, this option allows you to locate computers named with non-English characters. |
| Apply Click this to | save your changes. |
| Reset Click this to | restore previously saved settings. |
6.7 The Date/Time Screen
Use this screen to select a time zone and a time server from which your NSA can get the time and date. This time is then used in NSA logs and alerts.
Click the System Setting link in the navigation panel and then click the Date/ Time link to access the Date/ Time screen.
Figure 56 System Setting > Date/Time
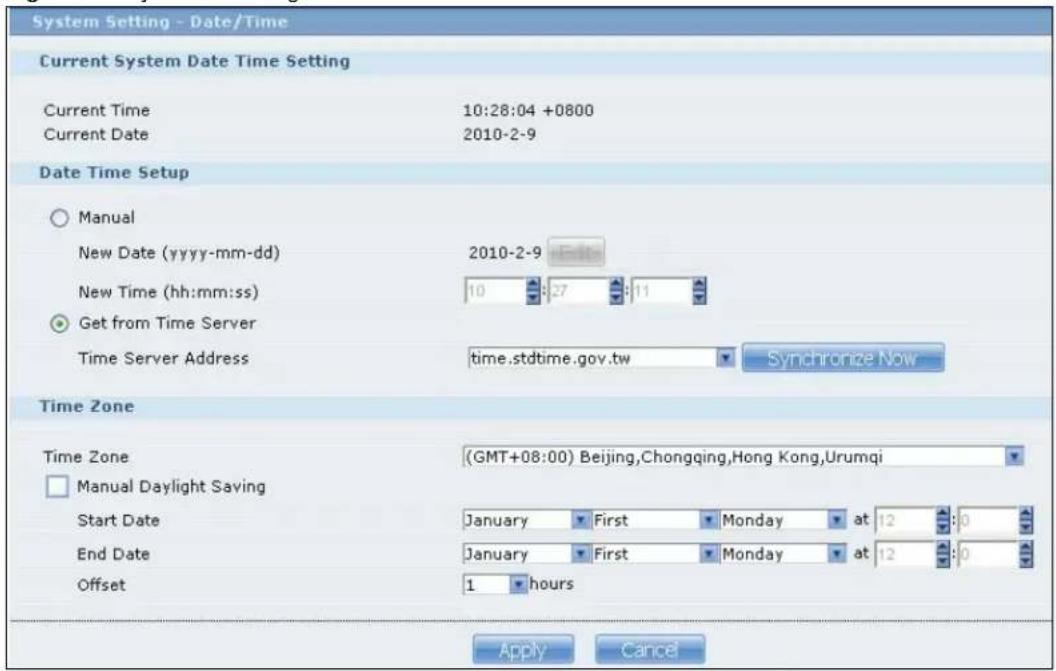
The following table describes the labels in this screen.
Table 21 System Setting > Date/Time
| LABEL DESCRIPTION | |
| Current System Date Time Setting | |
| Current Time This field displays the time used by your NSA for its logs and alerts. | |
| Current Date This field displays the date used by your NSA for its logs and alerts. | |
| Date Time Setup | |
| Manual Select this radio button to enter the time and date manually.When you enter the time settings manually, the NSA uses the new setting once you click Apply.Note: If you enter time settings manually, they revert to their defaults when power is lost. | |
| New Date (yyyy-mm-dd) | This field displays the last updated date from the time server or the last date configured manually.When you set Time and Date Setup to Manual, enter the new date in this field and then click Apply. |
| New Time (hh:mm:ss) | This field displays the last updated time from the time server or the last time configured manually.When you set Time and Date Setup to Manual, enter the new time in this field and then click Apply. |
| Get from Time Server | Select this check box to have the NSA get the time and date from the time server you select in the Time Server Address field. |
| Time Server Address | Select a time server from the drop-down list box or select Specify my own time server and enter the time server you wish to use in the field below. Check with your ISP/network administrator if you are unsure of this information. |
| Synchronize Now | Click this for the NSA to retrieve the correct time from the configured time server right away. |
| Time Zone | |
| Time Zone | Choose the time zone of your location. This will set the time difference between your time zone and Greenwich Mean Time (GMT). |
| Manual Daylight Saving | Daylight saving is a period from late spring to fall when many countries set their clocks ahead of normal local time by one hour to give more daytime light in the evening.Select this option to manually enter Daylight Saving Time settings. Clear this option to have the NSA automatically retrieve Daylight Saving Time settings from the Internet. The NSA will download a new daylight saving resource file from the Internet every month. |
| Start Date | Configure the day and time when Daylight Saving Time starts if you selected Enable Daylight Saving. The hour field uses the 24 hour format. Here are a couple of examples:Daylight Saving Time starts in most parts of the United States on the second Sunday of March. Each time zone in the United States starts using Daylight Saving Time at 2 A.M. local time. So in the United States you would use March, Second, Sunday, at 2:00.Daylight Saving Time starts in the European Union on the last Sunday of March. All of the time zones in the European Union start using Daylight Saving Time at the same moment (1 A.M. GMT or UTC). So in the European Union you would select March, Last, Sunday. The time you specify depends on your time zone. In Germany for instance, you would type 2 because Germany's time zone is one hour ahead of GMT or UTC (GMT+1). |
| End Date | Configure the day and time when Daylight Saving Time ends if you selected Enable Daylight Saving. The o'clock field uses the 24 hour format. Here are a couple of examples:Daylight Saving Time ends in the United States on the first Sunday of November. Each time zone in the United States stops using Daylight Saving Time at 2 A.M. local time. So in the United States you would select November, First, Sunday, at 2:00.Daylight Saving Time ends in the European Union on the last Sunday of October. All of the time zones in the European Union stop using Daylight Saving Time at the same moment (1 A.M. GMT or UTC). So in the European Union you would select October, Last, Sunday. The time you specify depends on your time zone. In Germany for instance, you would type 2 because Germany's time zone is one hour ahead of GMT or UTC (GMT+1). |
| Offset | Specify by how many hours to change the time for Daylight Saving Time. |
| Apply | Click this to save your changes. If you configured a new time and date, Time Zone and Daylight Saving at the same time, all of the settings take affect. |
| Cancel Click this to | restore your previously saved settings. |
7.1 Overview
Several NSA features require a valid internal volume. This chapter covers the management of volumes and disks (both internal and external).
Use the Storage screen (Section 7.2 on page 152) to display information on all volumes, create internal and external volumes, and configure the volume's properties.
7.1.1 What You Need to Know About Storage
Disk
SATA or Serial ATA (Advanced Technology Attachment) is a computer bus technology that allows high-speed data transfer to and from hard disks.
1-bay NSA models include an eSATA port. An eSATA (external SATA) hard disk has the same specifications as a SATA hard disk but is attached to the NSA using a cable. It can be used either to expand storage or backup data. The eSATA hard disk is optional. You can attach one SATA and one eSATA to the NSA hard disk tray. Both SATA and eSATA hard disks are treated as internal disks/volumes (refer to Section 7.3 on page 155).
USB-attached storage disks are treated as external disks/volumes.
Volume
A volume is a storage area on a disk or disks. You can create volumes on the internal disks and external disks attached to the USB port(s). You can spread a volume across internal disks but not between internal and external disks.
Storage Methods
The NSA uses the following storage methods:
• RAID (Redundant Array of Independent Disks)
• PC Compatible Volume (1-bay models)
• JBOD (Just a Bunch of Disks)
The storage method you use depends on how many disks you have and how many volumes you want to create. It's important that you consider this carefully as all data is deleted when you recreate a volume. See Figure 7.6.2 on page 160 for details on choosing a storage method.
Note: 1-bay models configure the internal hard disk (SATA) as JBOD by default. You can modify it if you attach a second internal hard disk (an eSATA hard disk).
Finding Out More
See Section 7.6 on page 160 for more technical background information on storage.
7.2 The Storage Screen
The Storage screen allows you to create and edit volumes in the NSA.
7.2.1 Disk Replacement Restrictions
See the Quick Start Guide for information on replacing disks in the NSA. When replacing a disk in a degraded or down RAID volume, the new disk must be at least the same size or bigger than the other disks that are already in the RAID volume, so as all data in the volume can be restored.
For example, if you have RAID with 250 GB disks, you must put in a 250 GB or bigger disk as a replacement in order to restore all original data in that volume. If the replacement disk is of a higher capacity, the extra space on the disk will not be used except if it is for a RAID 1 volume and you follow the Expanding a RAID 1 Volume procedure.
Note: The NSA automatically repairs a degraded RAID volume if you insert an empty disk without an existing file system. Otherwise, when you replace a disk you must go to the Storage > Internal Volume > RAID screen, select the degraded array, and click Repair.
Resynchronizing or Recovering a RAID 1 Volume
Resynchronizing or recovering a RAID 1 volume that was down is done block-by-block, so the time it takes depends more on the size of your hard drive(s) than the amount of data you have on them.
Note: Do not restart the NSA while the NSA is resynchronizing or recovering a volume as this will cause the synchronization to begin again after the NSA fully reboots.
Note: You can access data on a RAID volume while it is resynchronizing or recovering, but it is not recommended.
Expanding a RAID 1 Volume
Replace a RAID 1 volume's hard disks with higher capacity hard disks to be able to increase the RAID 1 volume's capacity. For example, you have two 500 GB hard disks. You replace one 500 GB hard disk with a 1 TB hard disk and repair the volume. After the NSA finishes resynchronizing the volume, you replace the second 500 GB hard disk with another 1 TB hard disk and repair the volume again. After the NSA finishes the second repair, use the Expand icon to have the RAID1 volume use the rest of the hard disk capacity.
7.2.2 Storage Screen
Click Storage > Volume in the navigation panel to display the following screen. Use this screen to display internal and external volumes on the NSA.
Note: It is recommended to scan the volume every three months or 32 reboots.
Figure 57 Storage > Volume
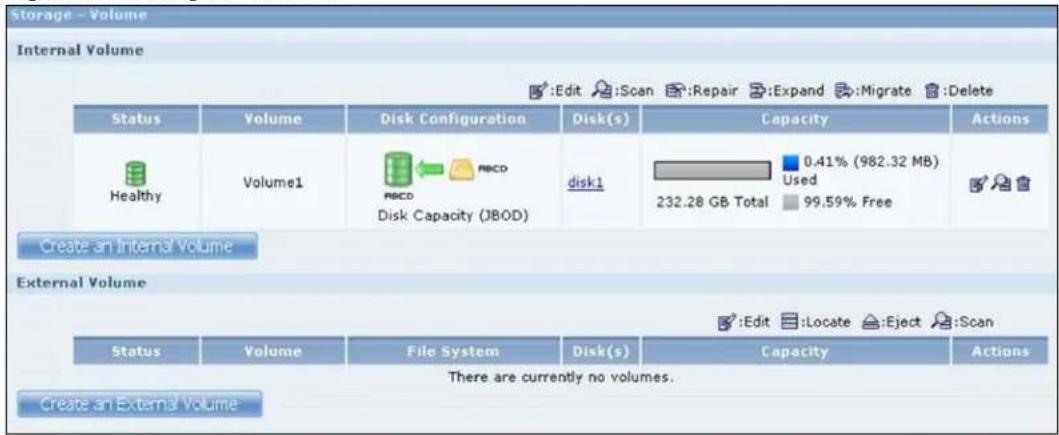
The following table describes the labels in this screen.
Table 22 Storage > Volume
| LABEL DESCRIPTION | |
| Internal/External Volume | These tables display information on all internal volumes (created on NSA internal disk drives) and external volumes (created on external disk drives attached to the NSA USB ports). |
| Create an Internal Volume | Click this to format internal hard drives and create a new volume. All data on the disk(s) will be lost. |
| Create an External Volume | Click this to format an external hard drive and create a new volume. All data on the disk will be lost. |
| SATA/USB Volume (NSA310) These tables display information on all internal SATA volumes (created on NSA internal disk drives) and external volumes (created on external disk drives attached to the NSA USB ports). | |
| Create a SATA Volume | (NSA310) Click this to format internal hard drives and create a new volume. All data on the disk(s) will be lost. |
| Create a USB Volume | (NSA310) Click this to format an external hard drive and create a new volume. All data on the disk will be lost. |
| Status | This field shows whether the volume is Healthy, Resync, Recovering, Degraded, or Down. See Section 7.4 on page 157 for details on a volume's status. |
| Volume The NSA creates the volume name automatically. You can edit it. | |
| Disk Configuration This field shows which disks and data storage system the volume is using. | |
| File System | This field displays the file system that an external (USB) volume is using. |
| Disk(s) Click or roll your mouse over a link in this column to display the following details about the hard drive located in the corresponding hard drive bay.Type: Whether it is an internal or external (USB) hard drive.Model Name: This is the hard disk number that identifies the disk.File System: The file system that an external volume is usingCapacity: The total storage space on the disk. | |
| Capacity | This field shows total disk size, the percentage of the volume being used and the percentage that is available. |
| Actions | This field displays icons allowing you to edit, scan, repair, expand, migrate, or delete a volume. You can also locate or eject an external volume.Note: If you delete a volume, all data in the volume disk(s) is erased. |
You see a warning screen before you delete a volume.
Figure 58 Delete a Volume Warning Screen
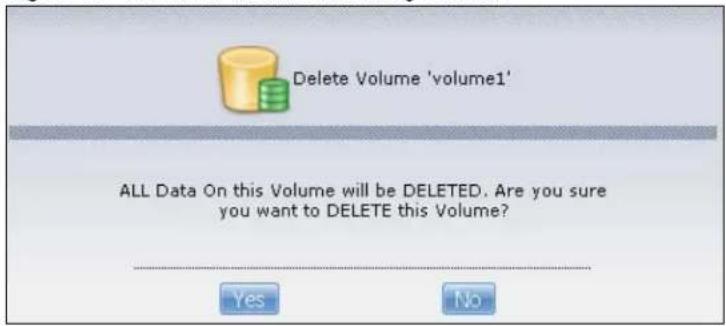
7.2.3 Volume Status
You (the administrator) can see the status of a volume in the Status or Storage screens.
The NSA has the following classifications for the status of a volume:
- Healthy if all disks in the volume are OK and the file system is functioning properly.
- OK means the USB connected device is functioning properly.
- Resync when you create a RAID volume.
- Recovering appears when repairing a RAID 1 volume. (A RAID1 volume was once degraded, but you have installed a new disk and the NSA is restoring the RAID1 volume to a healthy state.)
- Degraded when a volume is currently down, but can be fixed. Data access may be slower from a degraded volume, so it's recommended that you replace the faulty disk and repair the volume as soon as you can.
- Inactive when a disk is missing from a RAID 0 volume or a two-disk JBOD volume. The volume is unusable. If you removed one of the disks you should be able to re-install it and use the volume again (as long as you did not change anything on the disk). If a disk has failed, you need to replace it and re-create the whole volume. All data will be lost. See page 328 for how to install or replace a hard drive.
- Down when a volume is down and can not be fixed.
A down RAID volume cannot be used until you repair or replace the faulty disk(s) in the volume. Degraded means one of the disks in the RAID volume is not available but the volume can still be used. For a degraded volume, you should replace the faulty disk as soon as possible to obtain previous performance. See your Quick Start Guide for more information on replacing a disk.
If it's down, then the only indication is that you can no longer transfer files to/from the shares in the down volume. If it's degraded, then file transfer to/from the shares in the degraded volume will be slower.
Note: There is no explicit message from CIFS that tells users their volume is degraded or down.
7.3 Creating an Internal (SATA) Volume
In the Storage screen (Figure 57 on page 153), click the Create an Internal Volume or Create a SATA Volume button (depending on your model) to open the following screen. Use this screen to create a new NSA internal disk drive volume.
Note: Creating a volume formats the hard drive. All data on the disk will be lost.
Figure 59 Storage > Create an Internal Volume
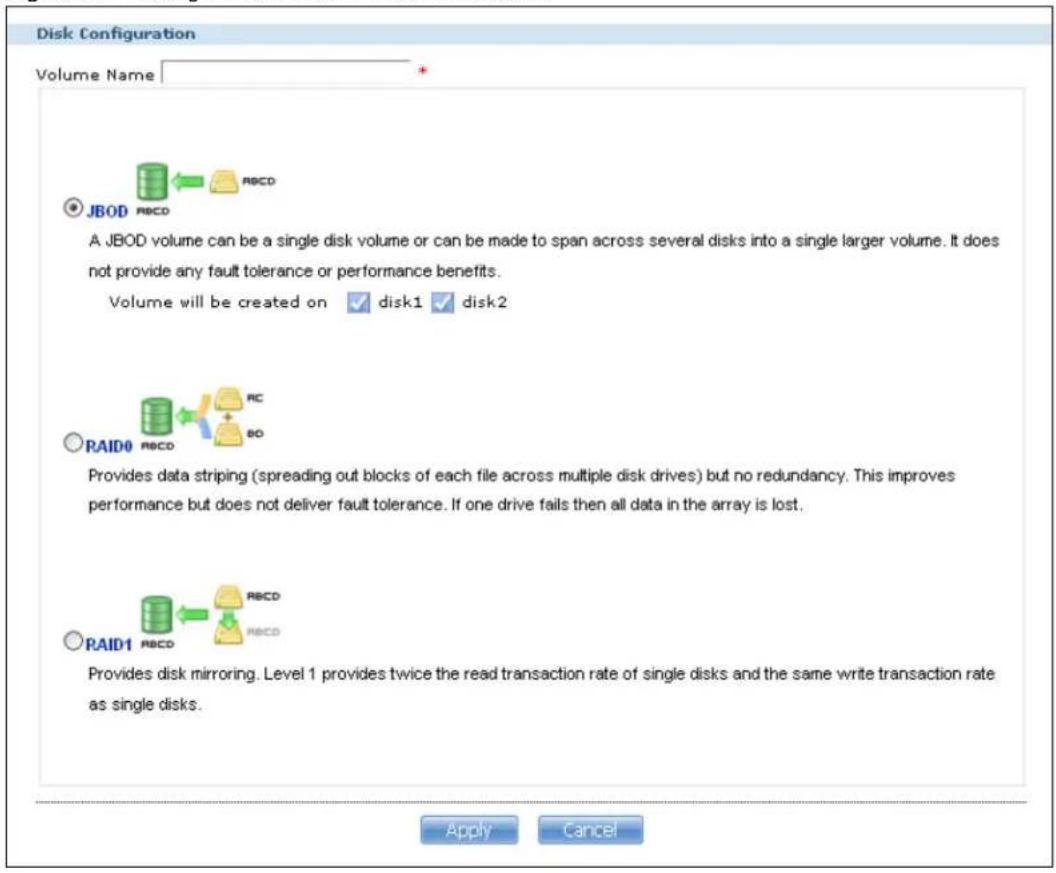
The following table describes the labels in this screen.
Table 23 Storage > Create an Internal Volume
| LABEL DESCRIPTION | |
| Volume Name | Type a volume name from 1 to 31 characters. To avoid confusion, it is highly recommended that each volume use a unique name.Acceptable characters are all alphanumeric characters, " " [spaces], "_" [underscores], and "." [periods].The first character must be alphanumeric (A-Z 0-9).The last character cannot be a space " ".For an external volume, type a volume name from 1 to 32 single-byte (no Chinese characters allowed for example) ASCII characters. The name cannot be the same as another existing external volume. |
| JBOD | Use this if you want maximum storage capacity and/or you have other means of protecting your data. JBOD is the only option if you only have one disk installed. With two disks, you can choose to create a JBOD volume on one of the disks or both. JBOD is the only option for the NSA310S.Select which disks to use for this volume (disk1, disk2, or disk1 and disk2). A disk can only belong to one volume. You do not need to select anything if only one hard disk is installed.For the NSA310:Internal Disk - Is the hard disk inside an NSA310.External Disk - Is the eSATA hard disk connected to an NSA310. |
| PC Compatible Volume | (NSA310 only)This type is only available if you have attached an eSATA hard disk to your NSA.A primary partition is created on the eSATA hard disk.Use this to make your eSATA hard disk readable by other computer systems. However, the computer's platform (for example, Windows XP SP2) should support the file system you selected for the eSATA hard disk.External Disk - This is checked automatically. It refers to the eSATA hard disk that you can attach as a second drive to your NSA310.File System - Select the file system you want the new volume to use.Windows file systems include:NTFS: Recommended for volumes greater than 40 GB.FAT32: Newer, and more efficient than FAT16. Supports a volume size of up to 32 GB (Giga Bytes) and individual file sizes of up to 4 GB.FAT16: Compatible with older Windows operating systems. Supports volume and file sizes of up to 2 GB.Linux file systems include:EXT2: Most commonly used on Linux platforms.EXT3: The same as EXT2, but adds a journaled file system and is more robust.EXT4: Supports larger files and better performance than EXT3.ReiserFS: Offers better performance for small files.XFS: Allows expansion for mounted volumes. |
| RAID 0 (2-bay models only) | Use this if you want maximum speed for your disks, and/or you have other means of protecting your data. This is only available when you have two hard disks installed. |
| RAID 1 Use this | if you want to mirror all data on one disk to the other disk. This is only available when you have two hard disks installed. |
| Volume will be created on | This field lists all hard disks installed inside the NSA. Select which disks should make up this volume. A disk can only belong to one volume. You do not need to select anything if only one hard disk is installed. |
| Apply Click this | to save your changes and create the volume. |
| Cancel Click this | to exit this screen without saving your changes or creating a volume. |
Note: Once you create the first volume on the NSA, it is recommended to restart the NSA for better performance.
7.4 Editing a Volume
Click an internal volume's Edit icon in the Storage screen as shown in Figure 57 on page 153 to open the following screen. Use this screen to change the volume's name.
Figure 60 Storage > Edit
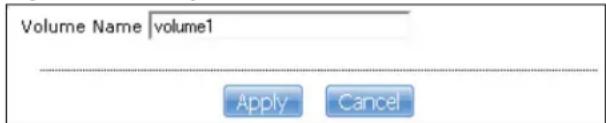
The following table describes the labels in this screen.
Table 24 Storage > Edit
| LABEL DESCRIPTION | |
| Volume Name | For an internal volume, type a volume name from 1 to 31 characters. To avoid confusion, it is highly recommended that each volume use a unique name.Acceptable characters are all alphanumeric characters and " " [spaces], "_" [underscores], and "." [periods].The first character must be alphanumeric (A-Z 0-9).The last character cannot be a space " ".For an external volume, type a volume name from 1 to 32 single-byte (no Chinese characters allowed for example) ASCII characters. The name cannot be the same as another existing external volume. |
| Apply Click this to save your changes and rename the volume. | |
| Cancel Click this to close this screen without saving your changes. | |
7.4.1 Scanning a Volume
Select a volume in the Storage > Volume screen (Section 7.2 on page 152) and click Scan to open the following screen. Use this screen to scan the volume for errors and select whether or not to have the NSA automatically repair them.
Figure 61 Storage > Volume > Scan
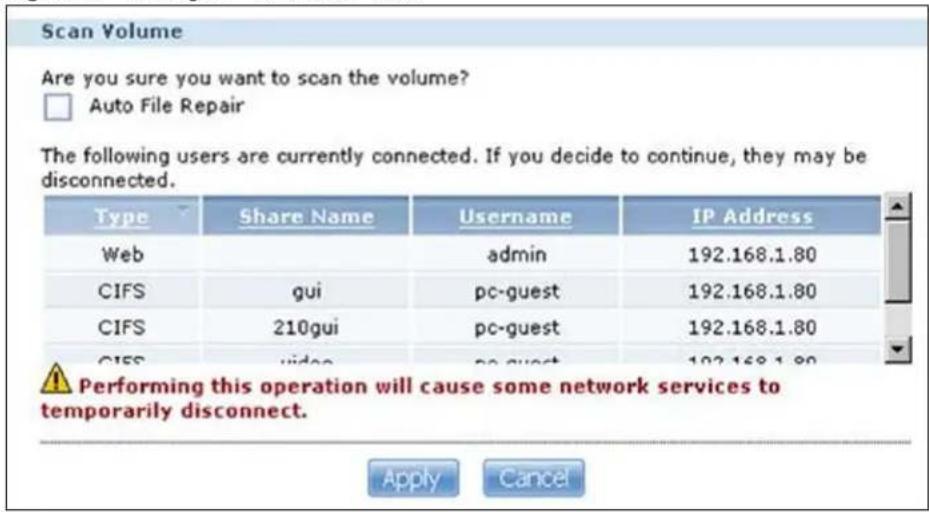
The following table describes the labels in this screen.
Table 25 Storage > Volume > Scan
| LABEL DESCRIPTION | |
| Auto File Repair Select this to have the NSA automatically attempt to repair any errored files it detects during the scan. This may also result in the NSA finding some files and placing them in the Lost and Found share. | |
| The rest of the screen shows which users are currently connected to the NSA. They will be disconnected if you perform the scan. | |
| Type | This shows whether it's a Windows/CIFS, web (Web Configurator), or FTP connection to the NSA. |
| Share Name | This displays the shared folder name on the NSA that the user is connected to for CIFS sessions and is blank for FTP and web sessions. |
| Username | This displays the name of the user connected to the NSA if one is defined.ANONYMOUS FTP displays if a username is not defined for the user's connection. |
| IP Address | This displays the IP address of the computer connected to the NSA. |
| Apply Click this to | have the NSA scan the volume. |
| Cancel Click this to | to close this screen without scanning the volume. |
7.5 Creating an External (USB) Volume
Click the Create a New External Volume button (or the Create a USB Volume button depending on your model) in the Storage screen as shown in Figure 57 on page 153 to open the following screen. Use this screen to create a new NSA external disk drive volume.
Note: Creating a volume formats the drive. All data on the disk will be lost.
Figure 62 Storage > Create an External Volume
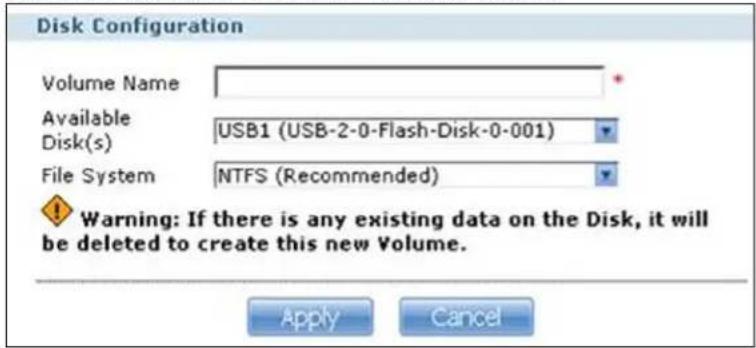
The following table describes the labels in this screen.
Table 26 Storage > Create an External Volume
| LABEL DESCRIPTION | |
| Volume Name | Type a volume name from 1 to 31 characters. The name cannot be the same as another existing external volume.Acceptable characters are all alphanumeric characters and " " [spaces], "_" [underscores], and "." [periods].The first character must be alphanumeric (A-Z 0-9).The last character cannot be a space " ". |
| Available Disk(s) Select the external (USB) device upon which you want to create the volume. | |
| File System Select | the file system you want the new volume to use.Windows file systemsNTFS: Recommended.FAT32: Newer, and more efficient than FAT16. Supports a volume size of up to 2 TB (Tera Bytes) and individual file sizes of up to 4 GB.FAT16: Compatible with older Windows operating systems. Supports volume and file sizes of up to 2 GB.Linux file systemsEXT2: Older file system.EXT3: The same as EXT2, but adds a journaled file system and is more robust.EXT4: Supports larger files and better performance than EXT3.ReiserFS: Offers better performance for small files.XFS: Allows expansion for mounted volumes. |
| Apply Click this to | save your changes and create the volume. |
| Cancel Click this to | exit this screen without saving changes. |
7.5.1 External Disks
You may connect USB storage devices that support the following file systems to the NSA.
- Windows File Systems: NTFS, FAT32 and FAT16.
- Linux File Systems: ReiserFS, EXT2, EXT3, and XFS.
7.6 Storage Technical Reference
This section provides some background information about the topics covered in this chapter.
7.6.1 Volumes and RAID
A volume is a storage area on a disk or disks. You can create volumes on the internal disks and external disks attached to the USB port(s). You can spread a volume across internal disks but not between internal and external disks.
RAID (Redundant Array of Independent Disks) or JBOD is the storage method that the NSA uses. The storage method you use depends on how many disks you have and how many volumes you want to create. It's important that you consider this carefully as all data is deleted when you recreate a volume.
Note: Back up your data before deleting or re-creating a volume!
Below is a table that summarizes some attributes of the various RAID levels as supported on the NSA. For capacity and storage efficiency, "S" is the size of the smallest drive in the array, and "N" is the number of drives in the array.
Storage efficiency assumes all drives are of identical size.
Performance rankings are approximations.
Table 27 RAID Quick Comparison
| RAID Level 0 1 | ||
| Number of Disks 2 2 | ||
| Capacity S* N S* N/2 | ||
| Storage Efficiency 100% 50% | ||
| Fault Tolerance None YYYY | ||
| Availability Y YYYY | ||
| Read Performance YYYY | YYY | |
| Write Performance YYYY | YYY |
7.6.2 Choosing a Storage Method for a Volume
The following is a guide to help you choose a storage method for the various number of disks supported on the NSA. See Section 7.6.3 on page 161 for theoretical background on JBOD and the RAID levels used on the NSA. Typical applications for each method are also shown there.
One Disk
If you only have one disk, you must use JBOD. All disk space is used for your data - none is used for backup. If the disk fails, then you lose all the data on that volume (disk). You can add another disk to your one-disk JBOD volume later without having to re-create shares, access rights, and so on. Alternatively, you could create a different JBOD volume if you install a second disk. (and create new shares, access rights and so on).
Two Disks:
You may choose JBOD, RAID 0 or RAID 1. With two disks you could create:
- up to two JBOD volumes
- one RAID 0 or RAID 1 volume
- Choose JBOD for flexibility and maximum usage of disk space for data.
- If you have a 2-bay model, you can choose RAID 0 if performance matters more than data security. RAID 0 has the fastest read and write performance but if one disk fails you lose all your data on the volume. It has fast performance as it can read and write to two disks simultaneously. Performance may matter more than data security to gamers for example. This method may also be acceptable for data that is already backed up somewhere else.
- Choose RAID 1 if data security is more important than performance. Since RAID 1 mirrors data onto a second disk, you can recover all data even if one disk fails, but the performance is slower than RAID 0.
7.6.3 Storage Methods
This section contains theoretical background on JBOD and the RAID levels used on the NSA. Redundant Array of Independent Disks (RAID) is a method of storing data on multiple disks to provide a combination of greater capacity, reliability, and/or speed. JBOD (Just a Bunch Of Disks) is not a RAID storage method but it is included in this discussion.
These are some terms that you need to know in order to understand storage systems.
-
Mirroring
In a RAID system using mirroring, all data in the system is written simultaneously to two hard disks instead of one. This provides 100% data redundancy as if one disk fails the other has the duplicated data. Mirroring setups always require an even number of drives. -
Duplexing
Like in mirroring, all data is duplicated onto two distinct physical hard drives but in addition it also duplicates the hardware that controls the two hard drives (one of the drives would be connected to one adapter and the other to a second adapter).
- Striping
Striping is the breaking up of data and storing different data pieces on each of the drives in an array. This allows faster reading and writing as it can be done simultaneously across disks. Striping can be done at the byte level, or in blocks. Byte-level striping means that the first byte of the file is sent to the first drive, then the second to the second drive, and so on. Block-level striping means that each file is split into blocks of a certain size and those are distributed to the various drives. The size of the blocks used is also called the stripe size (or block size).
- Parity
In mirroring 50% of the drives in the array are reserved for duplicate data. Parity is another way to allow data recovery in the event of disk failure using calculations rather than duplicating the data. If you have 'n' pieces of data, parity computes an extra piece of data. The 'n+1' pieces of data are stored on 'n+1' drives. If you lose any one of the 'n+1' pieces of data, you can recreate it from the 'n' that remain, regardless of which piece is lost. Parity protection is used with striping, and the "n" pieces of data are typically the blocks or bytes distributed across the drives in the array. The parity information can either be stored on a separate, dedicated drive, or be mixed with the data across all the drives in the array.
Note: In the following figures, A1, A2, A3 and so on are blocks of data from the A file. Similarly, B1, B2, B3 and C1, C2, C3 are blocks of data from the B and C files.
JBOD
JBOD allows you to combine multiple physical disk drives into a single virtual one, so they appear as a single large disk. JBOD can be used to turn multiple different-sized drives into one big drive. For example, JBOD could convert 80 GB and 100 GB drives into one large logical drive of 180 GB. If you have two JBOD volumes (with one disk in each), a failure of one disk (volume) should not affect the other volume (disk). JBOD read performance is not as good as RAID as only one disk can be read at a time and they must be read sequentially. The following figure shows disks in a single JBOD volume. Data is not written across disks but written sequentially to each disk until it's full.
Table 28 JBOD
| A1 B1 | |
| A2 B2 | |
| A3 B3 | |
| A4 B4 | |
| DISK 1 DISK 2 |
RAID 0
RAID 0 spreads data evenly across two or more disks (data striping) with no mirroring nor parity for data redundancy, so if one disk fails the entire volume will be lost. The major benefit of RAID 0 is performance. The following figure shows two disks in a single RAID 0 volume. Data can be written and read across disks simultaneously for faster performance.
Table 29 RAID 0
| A1 A2 | |
| A3 A4 | |
| A5 A6 | |
| A7 A8 | |
| DISK 1 DISK 2 |
RAID 0 capacity is the size of the smallest disk multiplied by the number of disks you have configured at RAID 0 on the NSA. For example, if you have two disks of sizes 100 GB and 200 GB respectively in a RAID 0 volume, then the maximum capacity is 200 GB (2 * 100 GB, the smallest disk size) and the remaining space (100 GB) is unused.
Typical applications for RAID 0 are non-critical data (or data that changes infrequently and is backed up regularly) requiring high write speed such as audio, video, graphics, games and so on.
RAID 1
RAID 1 creates an exact copy (or mirror) of a set of data on another disk. This is useful when data backup is more important than data capacity. The following figure shows two disks in a single RAID 1 volume with mirrored data. Data is duplicated across two disks, so if one disk fails, there is still a copy of the data.
Table 30 RAID 1
| A1 A1 | |
| A2 A2 | |
| A3 A3 | |
| A4 A4 | |
| DISK 1 DISK 2 |
As RAID 1 uses mirroring and duplexing, a RAID 1 volume needs an even number of disks (two or four for the NSA).
RAID 1 capacity is limited to the size of the smallest disk in the RAID array. For example, if you have two disks of sizes 150 GB and 200 GB respectively in one RAID 1 volume, then the maximum capacity is 150 GB and the remaining space (50 GB) is unused.
Typical applications for RAID 1 are those requiring high fault tolerance without need of large amounts of storage capacity or top performance, for example, accounting and financial data, small database systems, and enterprise servers.
RAID and Data Protection
If a hard disk fails and you're using a RAID 1 volume, then your data will still be available (but at degraded speeds until you replace the hard disk that failed and resynchronize the volume). However, RAID cannot protect against file corruption, virus attacks, files incorrectly deleted or modified, or the NSA malfunctioning. Here are some suggestions for helping to protect your data.
- Place the NSA behind a hardware-based firewall. It should have stateful packet inspection, IDP (Intrusion Detection and Prevention), and anti-virus (like ZyXEL's ZyWALL UTM products for example).
- Use anti-virus software on your computer to scan files from others before saving the files on the NSA.
- Keep another copy of important files (preferably in another location).
8.1 Overview
This chapter discusses the network configuration screens. The Network screens allow you to configure TCP/IP and PPPoE settings for the NSA.
8.2 What You Can Do
- Use the TCP/IP screen (Section 8.4 on page 166) to assign the NSA a dynamic or static IP address and DNS information.
- Use UPnP port mapping (Section 8.5 on page 169) to automatically configure your Internet gateway's firewall and Network Address Translation (NAT) to allow access to the NSA from the Internet.
- Use the PPPoE screen (Section 8.6 on page 172) to configure PPPoE settings for a direct Internet connection.
- Use the Telnet screen (Section 8.7 on page 173) to enable or disable Telnet access.
8.3 What You Need to Know
IP Address
The NSA needs an IP address to communicate with other devices on your network. The NSA can get an IP address automatically if you have a device on your network that gives them out. Or you can assign the NSA a static (fixed) IP address.
DNS Server Address
A DNS (Domain Name System) server maps domain names (like www.zyxel.com) to their corresponding numerical IP addresses. This lets you use domain names to access web sites without having to know their IP addresses. The NSA can receive the IP address of a DNS server automatically (along with the NSA's own IP address). You can also manually enter a DNS server IP address in the NSA.
PPPoE
Point-to-Point Protocol over Ethernet (PPPoE) allows the NSA to establish a direct Internet connection if you do not have a router. PPPoE is a dial-up connection. You need a username and password from your Internet Service Provider (ISP) to set up the connection.
Jumbo Frames
Jumbo frames are Ethernet frames larger than 1500 bytes. They enable data transfer with less overhead. The bigger the frame, the better the network performance. Your network equipment such as computers, switches and routers must be capable of supporting jumbo frames. You also need to enable jumbo frames in all related network devices.
To use jumbo frames, your LAN must support 1 Gbps transmissions (Gigabit Ethernet). All of your network devices (computer Ethernet cards and switches, hubs, or routers) must also support the same size of jumbo frames that you specify in the NSA.
Note: If you enable jumbo frames on the NSA in a network that does not support them, you will lose access to the NSA. If this occurs, you will have to restore the factory default configuration. Push the RESET button on the NSA's rear panel and release it after you hear a beep.
In the following example, the NSA has jumbo frames enabled and set to 8KB frames. This means the computer, notebook computer, and switch must also have jumbo frames enabled and be capable of supporting 8KB frames.
Figure 63 Jumbo Frames
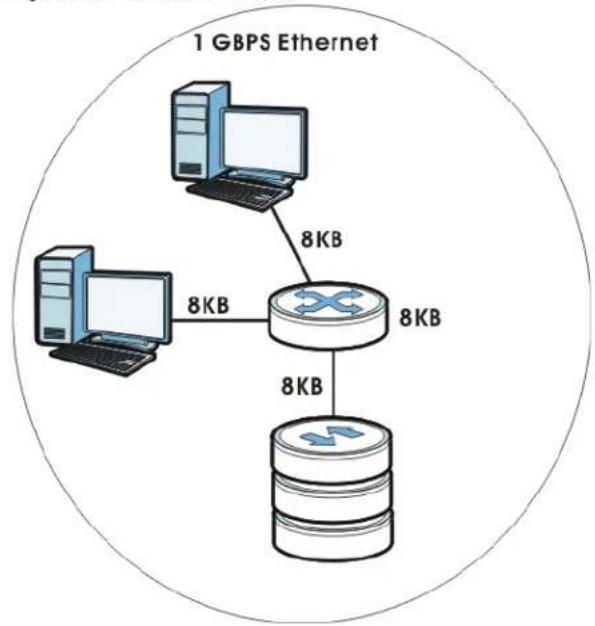
flowchart
graph TD
    A["1 GBPS Ethernet"] -->|8KB| B["Router"]
    B -->|8KB| C["Server"]
    D["Computer"] -->|8KB| B
    E["Computer"] -->|8KB| B
8.4 The TCP/IP Screen
Use the TCP/IP screen to have the NSA use a dynamic or static IP address, subnet mask, default gateway and DNS servers.
Click Network > TCP/IP in the navigation panel to open the following screen.
Note: If you change the NSA's IP address, you need to log in again after you apply changes.
Figure 64 Network > TCP/IP
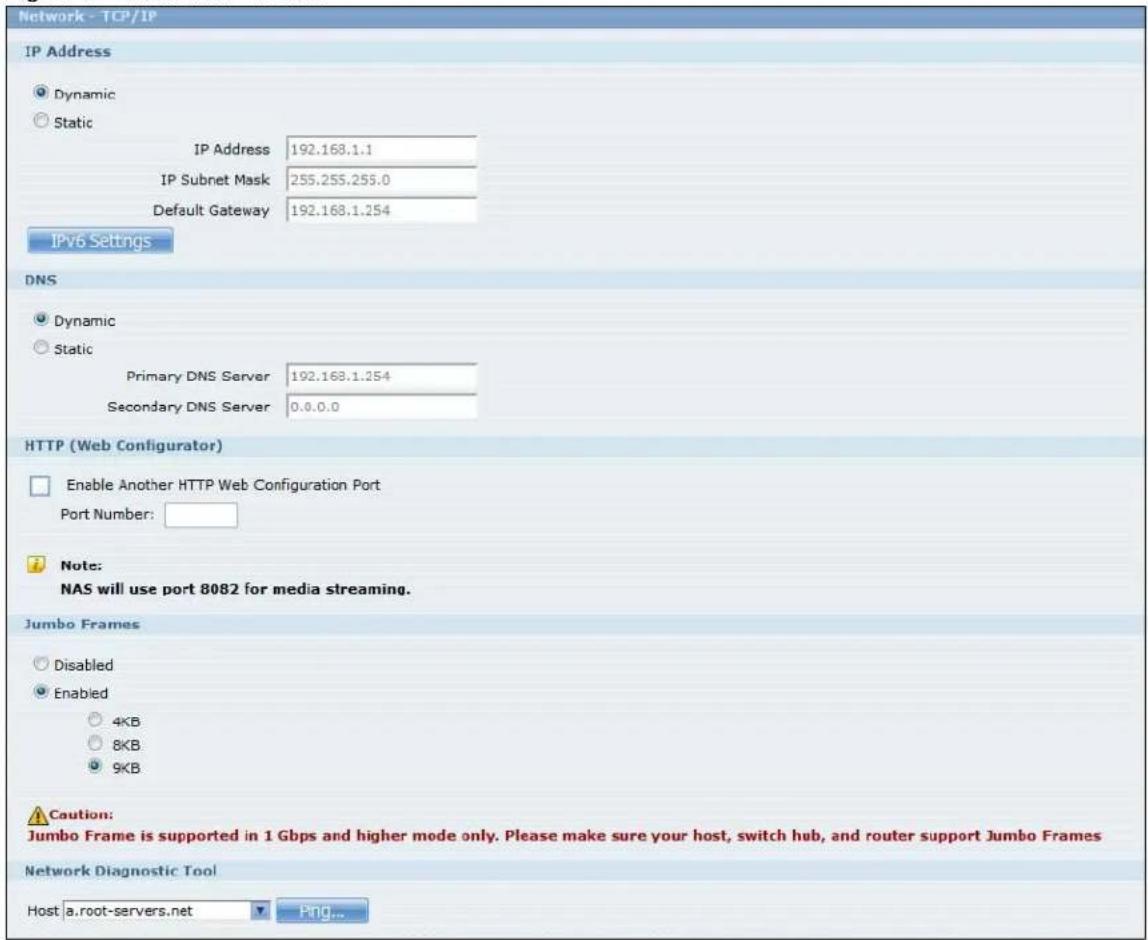
The following table describes the labels in this screen.
Table 31 Network > TCP/IP
| LABEL DESCRIPTION | |
| IP Address | |
| Dynamic Select this option to have the NSA get IP address information automatically. | |
| Static | Select this option for the NSA to use fixed TCP/IP information. You must fill in the following fields. |
| IP Address Type an IP address in this field. | |
| IP Subnet Mask Type an IP subnet mask in this field. | |
| Default Gateway Type a default gateway address in this field. | |
| LABEL DESCRIPTION | |
| IPv6 Settings Click | this to configure the following IPv6 settings. Mode - Select Auto to have the Device use the IPv6 prefix from the connected router's Router Advertisement (RA) to generate an IPv6 address. Select Static if you have a fixed IPv6 address assigned by your ISP. Select Disable to not assign any IPv6 address for the NSA. Address - Enter the IPv6 address assigned by your ISP. Subnet prefix length - Enter the address prefix length to specify how many most significant bits in an IPv6 address compose the network address. The range is 0 to 128 Default Gateway - Enter the IP address of the next-hop gateway. The gateway is a router or switch on the same segment as your Device's interface(s). The gateway helps forward packets to their destinations. |
| DNS | DNS (Domain Name System) is for mapping a domain name to its corresponding IP address and vice versa. If you have the IP address(es) of the DNS server(s), enter them. |
| Dynamic Select the option to have the NSA get a DNS server address automatically. | |
| Static Select this option to choose a static DNS server address. Type the DNS server IP address(es) into the fields below. | |
| Primary DNS Server | Type a primary DNS server IP address. |
| Secondary DNS Server | Type a secondary DNS server IP address. |
| HTTP (Web Configurator) | |
| Enable Another Web Configuration Port | Select this to configure an additional HTTP port for accessing the web configurator. Specify a number in the Port Number field. |
| Jumbo Frames Jumbo | frames improve network performance. You must have a 1 Gbps (Gigabit Ethernet) network that supports jumbo frames. Select the largest size of frame that all of your network devices (including computer Ethernet cards and switches, hubs, or routers) support.When enabled, you can choose between 4 KB, 8 KB, and 9 KB frame sizes.Note: If you enable jumbo frames on the NSA in a network that does not support them, you will lose access to the NSA. If this occurs, you will have to restore the factory default configuration. Push the RESET button on the NSA's rear panel and release it after you hear a beep. |
| Network Diagnostic Tool | Use this section to test the network connection to a particular IP address or domain name. Select an address or type it into the field. Then click Ping to have the NSA send a packet to test the network connection. Successfully pinged host - The NSA is able to "ping" the host, the network connection is OK. Unable to ping host - The NSA is able to "ping" the selected host. |
| Apply | Click this to save your TCP/IP configurations. After you click Apply, the NSA restarts. Wait until you see the Login screen or until the NSA fully boots and then use the NAS Starter Utility to rediscover it. |
| Reset Click this to restore your previously saved settings. | |
8.5 UPnP Port Mapping Screen
Use UPnP (Universal Plug and Play) port mapping to allow access from the WAN to services you select on the NSA. It is recommended that you place the NSA behind an Internet gateway firewall device to protect the NSA from attacks from the Internet (see RAID and Data Protection on page 163 for firewall type suggestions). Many such Internet gateways use UPnP to simplify peer-to-peer network connectivity between devices. UPnP can automatically configure the Internet gateway's firewall and Network Address Translation (NAT) to allow access to the NSA from the Internet.
Figure 65 UPnP for FTP Access

flowchart
graph LR
    A["192.168.1.20"] -->|TCP: 21| B["Router"]
    B -->|TCP: 21| C["INTERNET"]
    C --> D["Computer"]
In the above example, UPnP creates a firewall rule and NAT port forwarding mapping to send FTP traffic (using TCP port number 21) from the public IP address a.b.c.d to the NSA's private IP address of 192.168.1.20.
Use the NSA's UPnP Port Mapping screen to configure the UPnP settings your Internet gateway uses to allow access from the WAN (Internet) to services you select on the NSA. You can also set which port Internet users need to use in order to access a specific service on the NSA.
Note: To use UPnP port mapping, your Internet gateway must have UPnP enabled.
If your Internet gateway supports Port Address Translation (PAT is sometimes included with a port forwarding feature), you can have the Internet users use a different TCP port number from the one the NSA uses for the service.
Figure 66 UPnP Port Address Translation for FTP Example

In the above example, the Internet gateway uses PAT to accept Internet user FTP sessions on port 2100, translate them to port 21, and forward them to the NSA.
8.5.1 UPnP and the NSA's IP Address
It is recommended that the NSA use a static IP address (or a static DHCP IP address) if you will allow access to the NSA from the Internet. The UPnP-created NAT mappings keep the IP address the NSA had when you applied your settings in the UPnP Port Mapping screen. They do not automatically update if the NSA's IP address changes.
Note: WAN access stops working if the NSA's IP address changes.
For example, if the NSA's IP address was 192.168.1.33 when you applied the UPnP Port Mapping screen's settings and the NSA later gets a new IP address of 192.168.1.34 through DHCP, WAN access stops working because the Internet gateway still tries to forward traffic to IP address 192.168.1.33. Since you can no longer access the NSA from the WAN, you would have to access the NSA from the LAN and re-apply your UPnP Port Mapping screen settings to update the Internet gateway's UPnP port mappings.
Figure 67 UPnP Using the Wrong IP Address
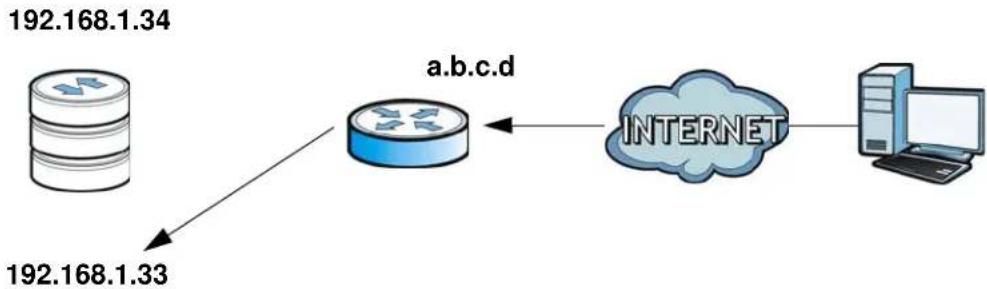
flowchart
graph LR
    A["192.168.1.34"] --> B["a.b.c.d"]
    C["192.168.1.33"] --> B
    B <--> D["INTERNET"]
    D --> E["Computer"]
8.5.2 UPnP and Security
UPnP's automated nature makes it easier to use than manually configuring firewall and NAT rules, but it is also less secure. Using UPnP may make your network more susceptible to snooping and hacking attacks.
8.5.3 The NSA's Services and UPnP
This section introduces the NSA's services which an Internet gateway can use UPnP to allow access to from the Internet.
CIFS (Windows File Sharing)
Common Internet File System (CIFS) is a standard protocol supported by most operating systems in order to share files across the network. Using UPnP port mapping for CIFS allows users to connect from the Internet and use programs like Windows Explorer to access the NSA's shares to copy files from the NSA, delete files on the NSA, or upload files to the NSA from the Internet.
If you configure UPnP port mapping to allow CIFS access from the WAN but cannot get it to work, you may also have to configure the Internet gateway to also allow NetBIOS traffic. See Section 6.3 on page 141 for more on CIFS.
FTP
File Transfer Protocol is a standard file transfer service used on the Internet. Using UPnP port mapping for FTP allows remote users to use FTP from the Internet to access the NSA's shares. A user with read and write access to a share can copy files from the share, delete files from the share, or upload files to the share. See Section 9.4 on page 177 for more on FTP. If you use UPnP to allow FTP access from the WAN, you may want to use a different WAN port number (instead of the default of port 21) to make it more secure. Remember to tell the remote users to use the custom port number when using FTP to access the NSA.
HTTP (Web Configurator)
You can use UPnP port mapping to allow access to the NSA's management screens. If you use UPnP to allow web configurator access from the WAN, you may want to use a different WAN port number (instead of the default of port 80) to make it more secure. Remember to use the custom port number when accessing the NSA's web configurator from the Internet.
HTTP (Web Published Shares)
This is the NSA's web publishing feature that lets people access files using a web browser without having to log into the Home screens. Use UPnP port mapping to allow access to these files from the Internet without having to enter a user name or password. See Section 9.8 on page 193 for more on web publishing.
8.5.4 Configuring UPnP Port Mapping
Click Network > UPnP > Port Mapping to display the UPnP Port Mapping screen.
Use this screen to set how the Internet gateway's UPnP feature configure's the Internet gateway's NAT IP address mapping and port mapping settings. These settings allow Internet users connected to the Internet gateway's WAN interface to access services on the NSA. You can set which port Internet users need to use to access a specific service on the NSA.
Note: Some Internet gateways will delete all UPnP mappings after reboot. So if the Internet gateway reboots, you may need to use this screen again to re-apply the UPnP port mapping.
Figure 68 Network > UPnP > Port Mapping
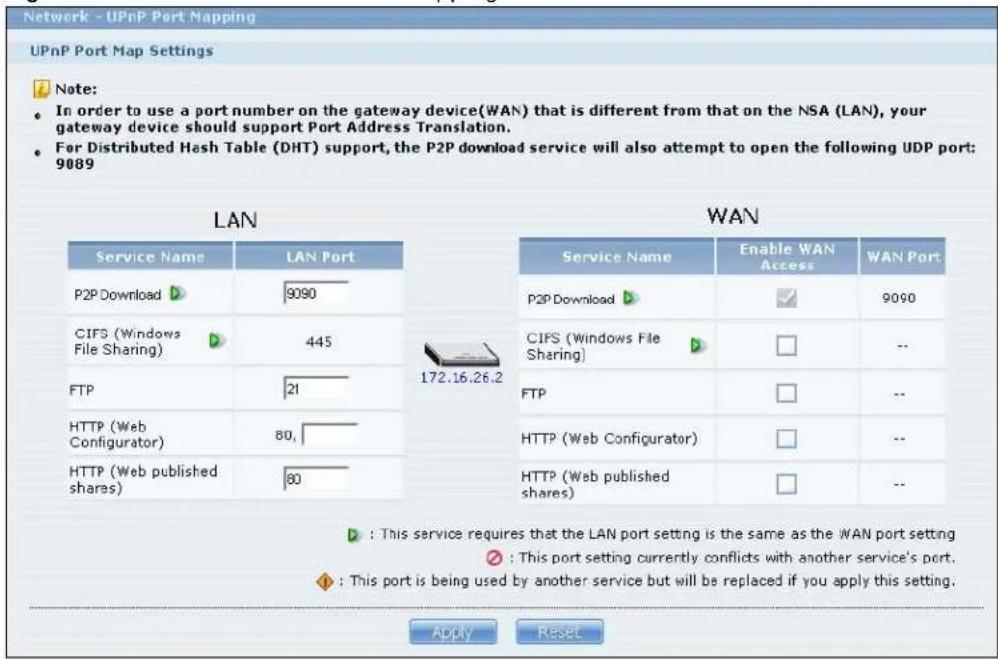
The following table describes the labels in this screen.
Table 32 Network > UPnP > Port Mapping
| LABEL DESCRIPTION | |
| LAN | Use these fields to specify what port the Internet gateway uses to connect from its LAN port to the service on the NSA. |
| Service Name | This read-only field identifies a service on the NSA. |
| LAN Port | Specify the port number (1~65,536) the Internet gateway needs to use to connect from its LAN port to the service on the NSA. This is the NSA's internal port number for the service. Changing a service's port number in this screen also changes it in other NSA screens that display it. Similarly, changing a service's port number in another NSA screen also changes it here. |
 | The number below this icon is your Internet gateway's WAN IP address (the IP address your Internet gateway uses for connecting to the Internet). |
| WAN | Use these fields to specify what port Internet users must use to connect to the Internet gateway's WAN port in order to connect to the service on the NSA. |
| Service Name | This read-only field identifies a service on the NSA. |
| Enable WAN Access | Select this check box to have UPnP configure your Internet gateway to allow access from the Internet to the NSA's service.If you clear this check box, people will not be able to access the NSA's service from the Internet unless you manually configure the Internet gateway's firewall and NAT rules to allow access. |
| WAN Port | When you enable WAN access for one of the NSA's services, specify the port number (1~65,536) Internet uses need to use to connect to the Internet gateway's WAN port in order to access the service on the NSA. Whoever wants to access a service on the NSA from the Internet must use this port number.P2P download's WAN port must be the same as the LAN port.Make sure there is not another service using TCP protocol with the same port number.If another device is using the same port (the Internet gateway has the same port number mapped to another LAN IP address), the NSA overwrites it when you apply the setting and WAN users can no longer access the other device. |
| This icon means the service's LAN and WAN port numbers must be the same. | |
| This icon means another service is using the same port number as this service. Change the port number of one of the services so they use different port numbers. | |
| This icon means another service is using the listed port, but the port the other service is using will be replaced if you apply the setting. The other service will no longer be accessible from the listed port. | |
| Apply | Click Apply to save your changes back to the NSA. |
| Reset | Click Reset to begin configuring this screen afresh. |
8.6 The PPPoE Screen
Use this screen to configure PPPoE settings for a direct Internet connection.
Click Network > PPPoE in the navigation panel to open the following screen.
Figure 69 Network > PPPoE
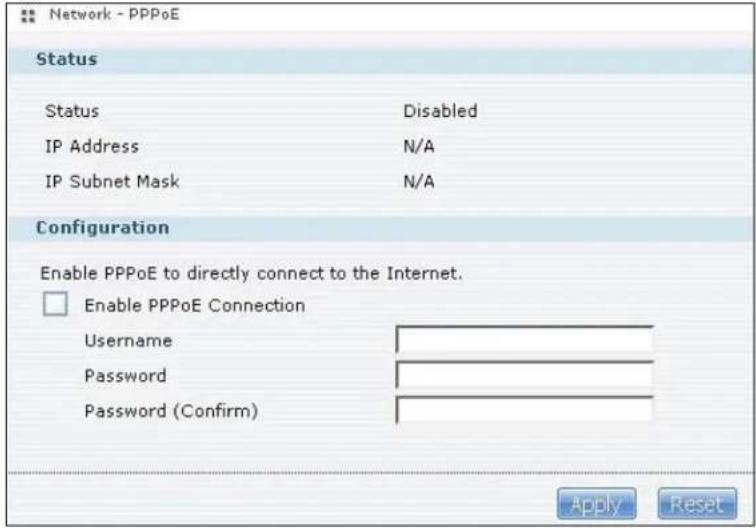
The following table describes the labels in this screen.
Table 33 Network > PPPoE
| LABEL DESCRIPTION | |
| Status | |
| Status This field displays the status of PPPoE connection. | |
| IP Address | This field displays the IP address of your PPPoE connection. |
| IP Subnet Mask This field displays the IP subnet mask of your PPPoE connection. | |
| Configuration | |
| Enable PPPoE Connection | Select this option to establish a direct Internet connection for the NSA. You need to enter the username and password as given by your ISP. |
| Username Enter | the username exactly as your ISP assigned. If assigned a name in the form user@domain where domain identifies a service name, then enter both components exactly as given. |
| Password Enter | the password associated with the username above. |
| Password (Confirm) | Retype the password for confirmation. |
| Apply Click this to save your changes. | |
| Reset Click this to restore previously saved settings. | |
8.7 Telnet Screen
Use this screen to enable or disable Telnet access to the NSA. Telnet is available in the NSA310S, NSA325, and NSA325 v2.
Telnet access lets you use line commands to configure the NSA. Use these commands at your own risk. The vendor takes no responsibility for any changes you make using the commands.
Click Network > Telnet in the navigation panel to open the following screen.
Figure 70 Network > Telnet
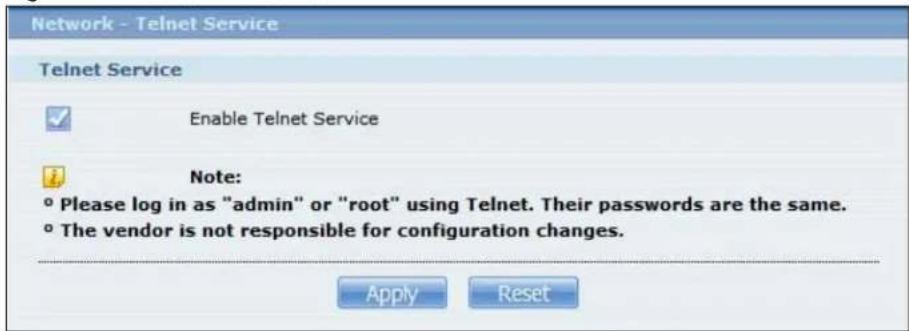
The following table describes the labels in this screen.
Table 34 Network > Telnet
| LABEL DESCRIPTION | |
| Enable Telnet Service | Select this to enable Telnet access to the NSA. Clear it to not allow Telnet access to the NSA.To use Telnet, log in as “admin” or “root” and use the admin password. |
| Apply Click this to save your changes. | |
| Reset Click this to restore previously saved settings. | |
9.1 Overview
This chapter discusses the features in the Application screens. The NSA contains various applications for file sharing and downloading.
9.2 What You Can Do
- Use the FTP Server screen (Section 9.4 on page 177) to configure settings for FTP file transfers to/from the NSA.
- Use the Media Server screens (Section 9.5 on page 178) to share files with media clients.
- Use the iTunes Server screens (Section 9.6 on page 180) to share files with iTunes users on your network.
- Use the Download Service screen (Section 9.7 on page 181) to download files from the Internet.
- Use the Web Publishing screen (Section 9.8 on page 193) to publish shares for people to access files using a web browser.
- Use the Broadcatching screen (Section 9.9 on page 194) to download frequently updated digital content like TV programs, radio talk shows, Podcasts (audio files), and blogs.
- Use the Print Server screen (Section 9.10 on page 200) to share a printer.
- Use the Copy/ Sync Button screen (Section 9.11 on page 202) to transfer files between a USB device and the NSA.
- Use the Auto Upload screens (Chapter 11 on page 265) to upload files in selected shares to your Flickr and/or YouTube accounts.
9.3 What You Need to Know
FTP
File Transfer Protocol (FTP) is a file transfer service that operates on the Internet. A system running the FTP server accepts commands from a system running an FTP client. FTP is not a secure protocol. Your file transfers could be subject to snooping.
FTPES (File Transfer Protocol over Explicit TLS/SSL)
File Transfer Protocol over Explicit TLS/SSL (FTPES) is a file transfer service that uses either TLS (Transport Layer Security) or SSL (Secure Sockets Layer) for secure transfers across the Internet.
It requests for a mutual method of encryption from the FTP server for its file transfer sessions. Your FTP client must be set to use FTPES as in the following example.
Figure 71 FTP Client Example
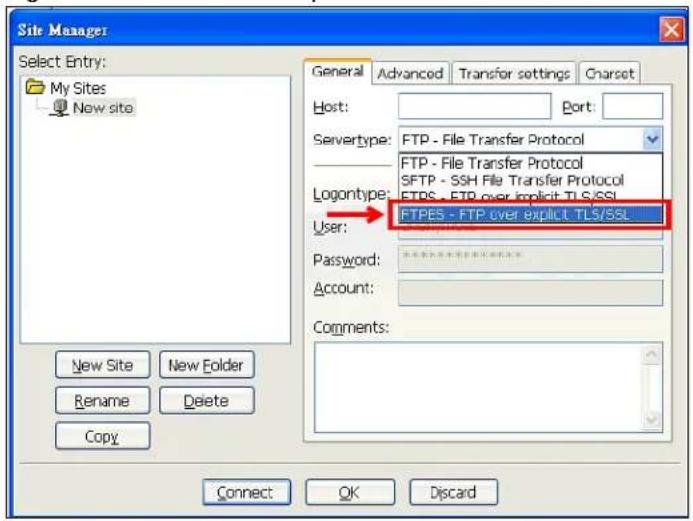
Media Server
The media server feature lets anyone on your network play video, music, and photos from the NSA (without having to copy them to another computer). The NSA can function as a DLNA-compliant media server and/or an iTunes server. The NSA streams files to DLNA-compliant media clients or computers using iTunes. The Digital Living Network Alliance (DLNA) is a group of personal computer and electronics companies that works to make products compatible in a home network.
iTunes Server
The NSA iTunes server feature lets you use Apple's iTunes software on a computer to play music and video files stored on the NSA. You can download iTunes from www.apple.com.
Download Service
The NSA's download service downloads files from the Internet directly to the NSA. You do not have to download to your computer and then copy to the NSA. This can free up your computer's system resources.
The NSA can download using these protocols.
- HTTP: The standard protocol for web pages.
- FTP: A standard Internet file transfer service.
- P2P download: Peer-to-peer files sharing protocol.
Web Publishing
Web publishing lets you "publish" shares (containing folders and files) on the NSA so people can access the files using a web browser without having to log into the Home screens. This way you can share files with others without them having to know and enter a username and password.
For example, if you want to share photos in a FamilyPhotos share, you could "web publish" it and others could use a web browser to access the photos at http://my-NSA's-IP-Address/MyWeb/FamilyPhotos.
Broadcatching
Broadcasting is the downloading of digital content from Internet feeds. Use broadcasting to have the NSA download frequently updated digital content like TV programs, radio shows, podcasts (audio files), and blogs.
RSS
RSS (Really Simple Syndication) is a format for delivering frequently updated digital content. A channel uses a feed to deliver its contents (items). Subscribe the NSA to a feed to be able to download the contents.
9.4 FTP Server
Use FTP or FTPES (FTP over Explicit TTL/SSL) to upload files to the NSA and download files from the NSA. Click Applications > FTP to open the following screen.
Figure 72 Applications > FTP
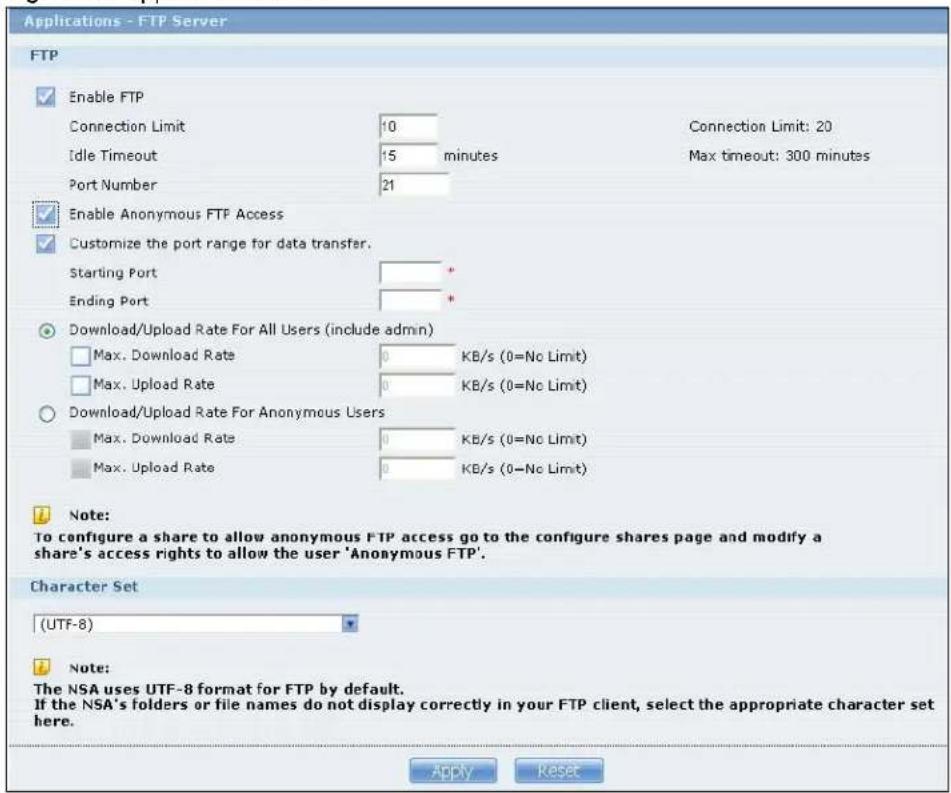
The following table describes the labels in this screen.
Table 35 Applications > FTP
| LABEL DESCRIPTION | |
| FTP | |
| Enable FTP You can use FTP to send files to the NSA or get files from the NSA. Select this check box to allow users to connect to the NSA via FTP; otherwise clear the check box. | |
| Connection Limit | Enter the maximum number of concurrent FTP connections allowed on the NSA in this field. See your screen for your model's connection limit. |
| Idle Timeout | Enter the length of time that an FTP connection can be idle before timing out. The timeout limit is 300 minutes. |
| Port Number This | is the port number used by the NSA for FTP traffic. |
| Enable Anonymous FTP Access | Select this check box to allow any user to log into the NSA using 'FTP' or 'anonymous' as a username and no password. Any other name is considered a username, so must be valid and have a corresponding correct password. |
| Customize the port range for data transfer | Select this check box to assign a port range for FTP clients to use when downloading files from the NSA using passive mode.The connection limit is restricted to half of the port numbers within the range if this value is smaller than the one configured in theConnection Limitfield. For example, you specified a port range from 1024 to 1029 and configured 10 in theConnection Limitfield. The FTP connection limit will only be 3 (6 ports in the range divided by 2) because it is the smaller value. |
| Starting Port Enter | the first port number in the range. Choose from 1024 to 65535. |
| Ending Port Enter | the last port number in the range. Choose from 1024 to 65535. |
| Download/Upload Rate For All Users (include admin) | Select this if you want to limit the download/upload bandwidth for all users who are logged into the NSA, including the administrator.Max. Download Rate - Enter the download speed (in kilobytes/s) that the NSA allows for users who are logged into the NSA.Max. Upload Rate - Enter the upload speed (in kilobytes/s) that the NSA allows for users who are logged into the NSA. |
| Download/Upload Rate For Anonymous Users | Select this if you want to limit the download/upload bandwidth for users who log into the NSA using 'FTP' or 'anonymous' as a username and no password.Max. Download Rate - Enter the download speed (in kilobytes/s) that the NSA allows for users who are logged into the NSA.Max. Upload Rate - Enter the upload speed (in kilobytes/s) that the NSA allows for users who are logged into the NSA. |
| Character Set | The NSA uses UTF-8 (8-bit UCS/Unicode Transformation Format) format for FTP by default. If the NSA's folders, or file names do not display correctly in your FTP client, select the appropriate language encoding here.This setting applies to all FTP client connections to the NSA. It does not affect your Windows/CIFS connections (it will not correct the character display in Windows Explorer). |
| Apply Click this to save your changes. | |
| Reset | Click this to restore your previously saved settings. |
9.5 The Media Server Screens
The media server application allows you to share media files with media clients.
Click Applications > Media Server to open the following screen. Use this screen to view the media server's status and rebuild the media server database.
Figure 73 Applications > Media Server > Media Server
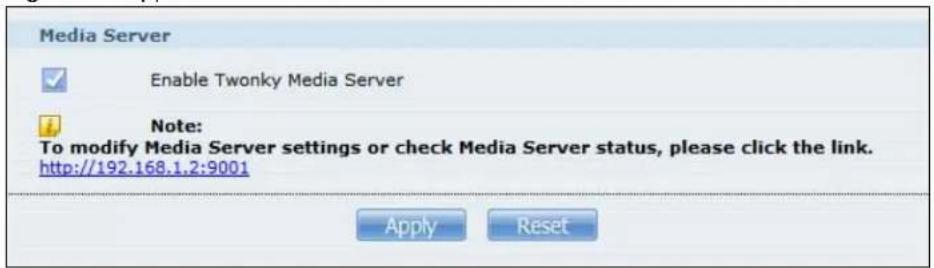
The following table describes the labels in this screen.
Table 36 Applications > Media Server > Media Server
| LABEL DESCRIPTION | |
| Enable Twonky Media Server | Select this to have the NSA share the media files in the shares selected in the Share Publish tab. Clear it to stop the NSA from sharing media files through the Home screens or media players.Click the hyper link to open the Twonky media server configuration screens to check media server status or modify media server settings. See the help center in the Twonky screens for details. |
| Apply Click this to save your changes. | |
| Reset Click this to restore your previously saved settings. | |
9.5.1 The Media Server Share Publish Screen
Click Applications > Media Server > Share Publish to open the following screen. Use this screen to select shares to publish (share with media clients like a media player or iTunes).
Figure 74 Applications > Media Server > Share Publish
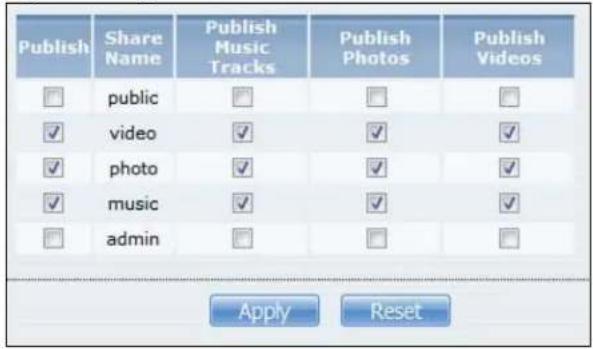
The following table describes the labels in this screen.
Table 37 Applications > Media Server > Share Publish
| LABEL DESCRIPTION | |
| Publish | Select this to have the media server share a share's media files with media clients. |
| Share Name This column lists names of shares on the NSA. | |
| Publish Music Tracks Select this to give media clients access to the share's music files. | |
Table 37 Applications > Media Server > Share Publish
| LABEL DESCRIPTION | |
| Publish Photos Select | this to give media clients access to the share's photo files. |
| Publish Videos Select | this to give media clients access to the share's video files. |
| Apply Click this to save your changes. | |
| Reset Click this to restore your previously saved settings. | |
9.5.2 The Media Server SqueezeCenter Screen
SqueezeCenter enables you to manage a Logitech's Squeezebox device connected to the NSA.
Click Applications > Media Server > SqueezeCenter to open the following screen. This screen is available when the SqueezeCenter application is installed using Package Management (see Section 6.5 on page 143). Use this screen to turn the SqueezeCenter application on or off.
Figure 75 Applications > Media Server > SqueezeCenter
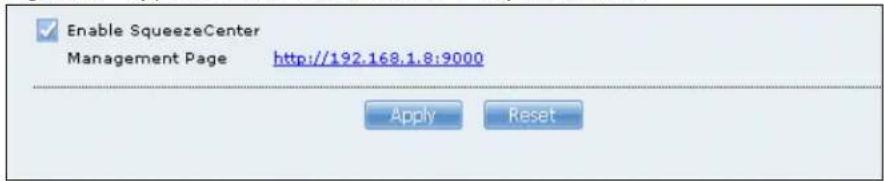
The following table describes the labels in this screen.
Table 38 Applications > Media Server > SqueezeCenter
| LABEL DESCRIPTION | |
| Enable SqueezeCenter | Check this to enable SqueezeCenter.Click the hyper link to open the Logitech media server screens where you can play files and change settings See the help center in the Logitech media server screens for details. |
| Apply Click this to save your changes. | |
| Reset Click this to restore your previously saved settings. | |
9.6 The iTunes Server Screen
Click Applications > iTunes Server to open the following screen. Use this screen to turn the iTunes server on or off.
Figure 76 Applications > iTunes Server

The following table describes the labels in this screen.
Table 39 Applications > iTunes Server
| LABEL DESCRIPTION | |
| Enable iTunes Server | Check this to let anyone on your network use iTunes to play music files in the published shares. |
| Apply Click this | to save your changes. |
| Reset Click this | to restore your previously saved settings. |
9.7 The Download Service Screen
The Download Service screen allows you to download files from the Internet.
Click Applications > Download Service to open the following screen. Use this screen to manage the NSA's file downloads.
Note: By default, the NSA saves downloads in the admin share's download folder.
Figure 77 Applications > Download Service
![Download Service Download service allows you to download files from the Internet directly to the NSA. Enable Download Service Apply Enable Download Notify Apply Add Preferences Refresh Select Files Delete Pause Resume Task Info Active (1) Inactive (3) Completed (4) Error (0) Status Name Complete(%) Seeds Peers Download Speed Upload Speed Time Left Rihanna - Loud 2010 (Explicit..) 0.00 % 1(0) 0(0)[0.0000] -- -- --](/content/2026/05/844675/images/6191cb682199ff630a241122561f2448b24d7beca98b7376ee624ec917cddf89.jpg)
The following table describes the labels in this screen.
Table 40 Applications > Download Service
| LABEL DESCRIPTION | |
| Enable Download Service | Use this option (and click theApplybutton) to turn the download service off or on. If you turn off the service, all downloads are paused. Files currently downloading are queued.Turning on the download service resumes downloads (or restarts them if they are not able to resume). |
| Enable Download Notify | Use this option (and click theApplybutton) to turn the download service notification off or on. SeeSection 9.12.4 on page 205for more details about this feature. |
| At the time of writing, the NSA supports RSS 2.0 feeds.Click this to get and subscribe to the NSA channel feed. This enables you to keep track and download the NSA's new contents (items). | |
| Add After you find | a file to download, copy the file's URL. Then log into the NSA web configurator and go to theApplications > Download Serverscreen and click this button. A screen opens where you create a new download task. You can paste the file's URL or use a P2P download file. |
| Preferences | Click this to open a screen where you can set the default location for saving downloads and configure your P2P download settings. |
| Refresh Click this to update the information displayed on the screen. | |
| Select Files | A single P2P download torrent file is often for multiple files. If you do not need all of the files the torrent file specifies, click this to select which files to download. |
| Delete To delete download tasks (or manually clear out completed download tasks), select a download task and click this to remove it from the list. A pop-up screen asks you to confirm. Click Apply to delete or Cancel to quit. When you delete a download task, you are given the option to delete the associated files. Selecting this option deletes a downloaded file and in the case of a P2P download task, also deletes the related .torrent file.Use your keyboard's [SHIFT] key to select a range of download tasks. Use the [CTRL] key and click individual download tasks to select multiple individual download tasks. | |
| Pause | Select a downloading item and click this to temporarily stop the download. Paused downloads appear in the Download Service screen's Inactive tab.Use your keyboard's [SHIFT] key to select a range of download tasks. Use the [CTRL] key and click individual download tasks to select multiple individual download tasks. |
| Resume | Select a paused item and click this to continue downloading the file.Select a completed item and click this to re-seed a P2P file or download a file again. If you want to re-seed a P2P task, keep the P2P file and the completed file in their original locations. |
| Task Info | Select an item on the list and click this to display information about the download task.See Section 9.7.6 on page 192 for more details. |
| The table lists your downloads. Click a column's heading to sort the entries by that criteria. | |
| Active Click this to see the list of files the NSA is currently downloading or sharing with other P2P users. The NSA handles a maximum of 10 active tasks at a time (or fewer depending on how much of the NSA's system memory is available). If you add more, they appear in the Inactive tab.P2P downloads may appear in the Inactive tab for a while before showing in the Downloading tab. The NSA automatically moves completed tasks to the Completed tab. | |
| Inactive | Click this to see the list of files that are queued (waiting in line) for the NSA to download or the downloads that have been manually paused. |
| Completed Click this to see the list of files that the NSA has finished downloading.The Location column shows where a downloaded file is saved on the NSA. Click on the location link to open the share browser and access the file. | |
| Error Click this to see the list of files that the NSA was not able to download. The NSA automatically retries unsuccessful download attempts. The download displays in the error tab when the re-attempts are also unsuccessful and the NSA stops trying to download the file. To try the download again, use the Add button to create a new download task. | |
| Status The following icons show the download's status.☑:Completed ☑:Seeding ☑:Downloading☐:Queued ☑:Paused ☑:Error ☑:Missing File☒:Start downloading ☑:Delete ItemCompleted: The NSA has downloaded the whole file.Seeding: The download is finished and the NSA is allowing other P2P users to download it.Downloading: The NSA is getting the file.Queued: The download is waiting in line for the NSA to download it.Pause: The download has been manually stopped. Select it and clickResumeto continue it.Error: The NSA was not able to complete the download. Select it and clickResumeto reattempt the download. | |
| Name | This identifies the download file. A “...” indicates an abbreviated name. Hold your cursor over the name to display the full name. |
| Complete(%) | This is the percentage of the file that the NSA has downloaded. |
| Location | This appears in theCompletedtab.It displays the path for where the file is saved. Click on the location link to open the share browser and access the file. |
| Seeds | Seeds apply to P2P downloads. This is the number of computers that are sharing the complete file that you are downloading.This value is in the format “Leeches(Seeds)” where Leeches refer to peers that do not have a complete copy of the file yet and are still downloading; Seeds refer to peers that have the complete file. |
| Peers Peers apply to P2P downloads. This is the number of other computers that are also downloading (and sharing) the file you are downloading.This value is in the format “ConnectedPeers(AllPeers)[Health]” where Connected Peers is the number of computers to which the NSA is connected in order to download the file; AllPeers refer to the total number of computers to which the NSA can connect in order to download the file; Health indicates the availability of the file. | |
| DownloadSpeed | This is how fast the NSA is getting the file.It is normal for a P2P download to start out with a slow download speed since it has to set up numerous connections. The speed should increase as the download progresses and decrease near the end of the download. |
| Upload Speed | This is how fast the NSA is sending the file to other P2P users. |
| Time Left | This is how much longer (in hours, minutes, and seconds) it should take to finish the download at the current download speed. |
| Priority | This is the download’s priority on the NSA. You can set a currently downloading or queued download to high or automatic priority. You can set a download to high priority to have the NSA try to download it before the other files. However the actual download speed depends more on factors like the speed of you Internet connection, the speed of the download source’s Internet connection, how many others are trying to download at the same time, the peers and seeds available and general network conditions. |
| Error Code | This appears in theErrortab.This shows the tag for the error that occurred. |
| ErrorMessage | This appears in theErrortab.This message states what went wrong with the download. |
9.7.1 Adding a Download Task
Click Applications > Download Service > Add to open the following screen. Use this screen to specify a file for the NSA to download. Section 4.10 on page 80 provides a tutorial on adding a download task.
Figure 78 Applications > Download Service > Add
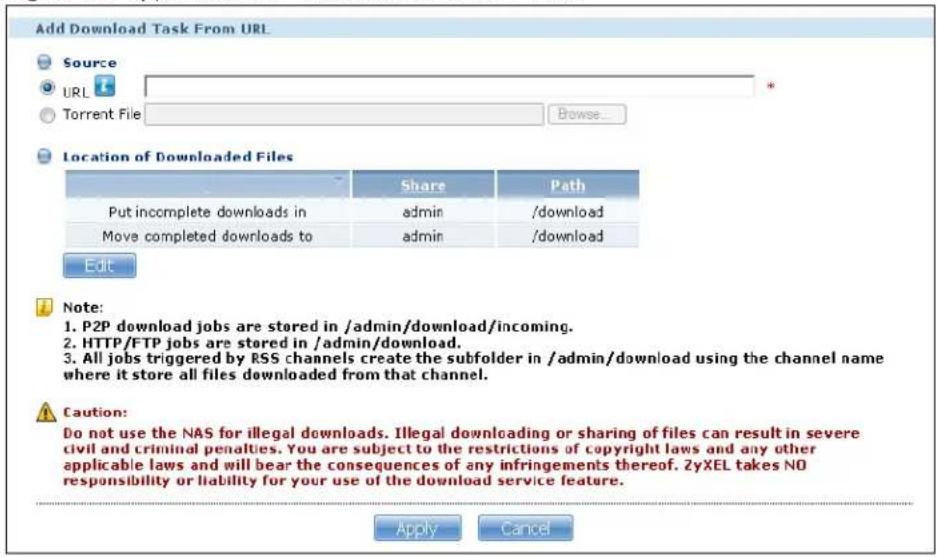
The following table describes the labels in this screen.
Table 41 Applications > Download Service > Add
| LABEL DESCRIPTION | |
| Source | |
| URL Paste the URL or magnet link of the file you want to download into this field. The URL can be for an HTTP, FTP, or P2P download. A magnet link is for a P2P download.For a P2P download using a magnet link the NSA automatically downloads the file related to the magnet link.For a P2P download using a .torrent file, you can copy and paste the URL of the .torrent file. The NSA will automatically download the .torrent file and use it. You do not have to manually download the .torrent file or save it to your computer.Note: Make sure the link opens either the file you want or a pop-up window about how to handle the file.It is also OK for the link to open a .torrent file. If you are redirected to a screen that says the download should start in a few seconds, there may be a link to click if the download does not start automatically. See if that link opens the file or the pop-up window. | |
| Torrent File | A “torrent” file has information the NSA uses to do a P2P download. A torrent file uses a .torrent extension. If you already have a torrent file saved on your computer, select the Torrent File option and specify its path or click Browse and look for its location. |
Table 41 Applications > Download Service > Add
| LABEL DESCRIPTION | |
| Location of Downloaded Files | This shows where the NSA stores new downloads (Put incomplete downloads in) and where the NSA moves completed downloads (Move completed downloads to).The Share column shows the name of the share where the file is downloaded.The Path column points to the location in the share where the NSA will save the downloaded files.P2P download jobs are stored in */incoming (where “*” is a folder that you have set.)HTTP/FTP jobs are stored in /* (where “*” is a folder that you have set.)All jobs triggered by RSS channels create the subfolder in /* using the channel name where it store all files downloaded from that channel (where “*” is a folder that you have set.) |
| Edit | Click this to open the following screen where you can set the default folder location where you “Put incomplete downloads in” and “Move complete downloads to”: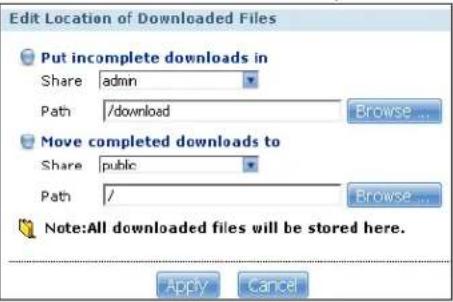 Share - Select the share from the list.Path - Type the folder location in the share directly or click Browse to open the following screen and navigate to the file’s location. Share - Select the share from the list.Path - Type the folder location in the share directly or click Browse to open the following screen and navigate to the file’s location.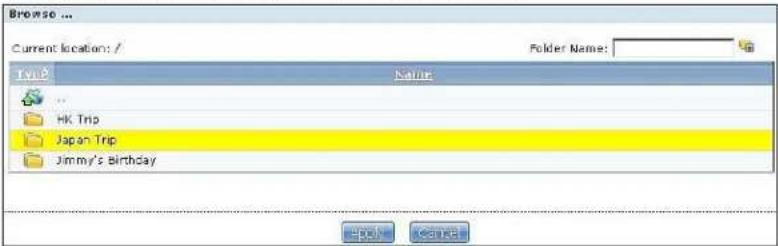 Current Location - This is the location of the selected folder.Folder Name - Enter a new folder name and click 📋 to create it.Type - This identifies the item as a folder or file.Name - This is the name of the folder/file.Select a folder. If you don’t select a folder, a forward slash (/) displays in the Path field. All contents within the specified share are automatically selected.Click Apply to save your settings and Cancel to close the screen. Current Location - This is the location of the selected folder.Folder Name - Enter a new folder name and click 📋 to create it.Type - This identifies the item as a folder or file.Name - This is the name of the folder/file.Select a folder. If you don’t select a folder, a forward slash (/) displays in the Path field. All contents within the specified share are automatically selected.Click Apply to save your settings and Cancel to close the screen. |
| Apply Click this to save your changes. | |
| Cancel | Click this to return to the previous screen without saving. |
9.7.2 Configuring General Download Settings
Click Applications > Download Service > Preferences to open the following screen. Use this screen to set the default location for saving downloads and configure the download period.
Figure 79 Applications > Download Service > Preferences > General Settings
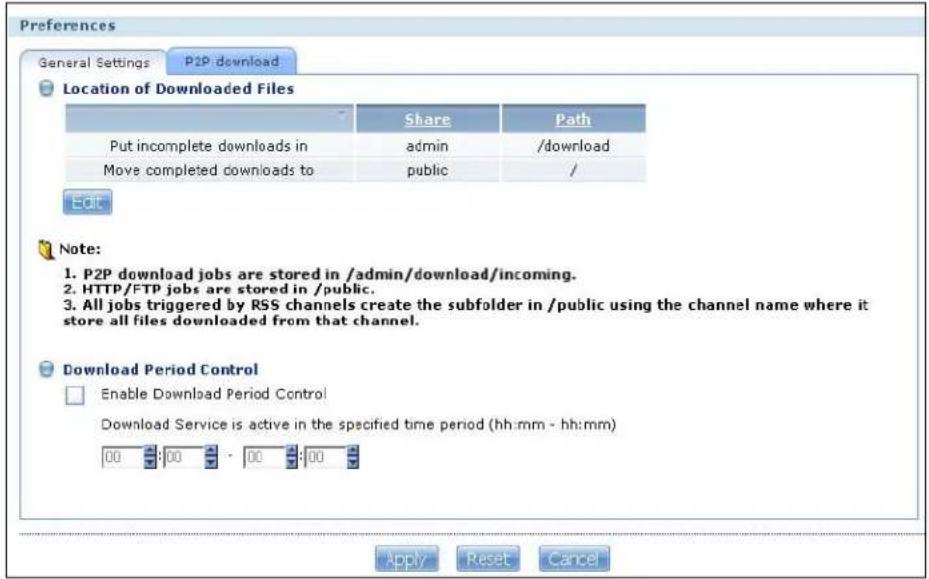
The following table describes the labels in this screen.
Table 42 Applications > Download Service > Preferences > General Settings
| LABEL DESCRIPTION | |
| Location of Downloaded Files | This shows where the NSA stores new downloads (Put incomplete downloads in) and where the NSA moves completed downloads (Move completed downloads to).The Share column shows the name of the share where the file is downloaded.The Path column points to the location in the share where the NSA will save the downloaded files.P2P download jobs are stored in */incoming (where **' is a folder that you have set.)HTTP/FTP jobs are stored in */ (where **' is a folder that you have set.)All jobs triggered by RSS channels create the subfolder in */ using the channel name where it store all files downloaded from that channel (where **' is a folder that you have set.) |
Edit Click this to open the following screen where you can set the default folder location where you "Put incomplete downloads in" and "Move complete downloads to".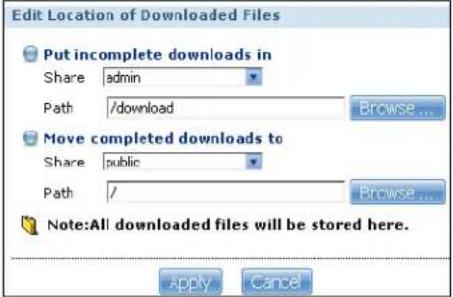 Share - Select the share from the list.Path - Type the folder location in the share directly or click Browse to open the following screen and navigate to the file's location. Share - Select the share from the list.Path - Type the folder location in the share directly or click Browse to open the following screen and navigate to the file's location. | |
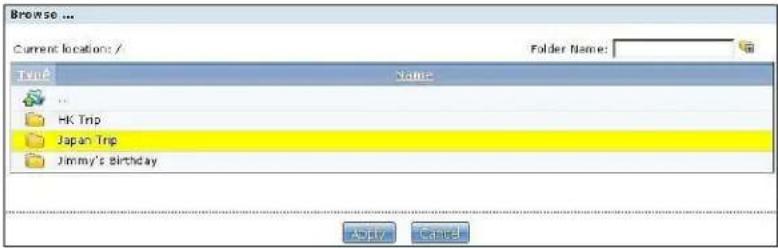 Current Location - This is the location of the selected folder.Folder Name - Enter a new folder name and click 📄 to create it.Type - This identifies the item as a file or folder.Name - This is the name of the folder/file.Select a folder. If you don't select a folder, a forward slash (/) displays in the Path field. All contents within the specified share are automatically selected.Click Apply to save your settings and Cancel to close the screen. Current Location - This is the location of the selected folder.Folder Name - Enter a new folder name and click 📄 to create it.Type - This identifies the item as a file or folder.Name - This is the name of the folder/file.Select a folder. If you don't select a folder, a forward slash (/) displays in the Path field. All contents within the specified share are automatically selected.Click Apply to save your settings and Cancel to close the screen. | |
| Download Period Control | This feature sets the NSA to download files only within a specified time period. |
| Enable Download Period Control | Use the check box to turn the download period control on or off. |
Table 42 Applications > Download Service > Preferences > General Settings
| LABEL DESCRIPTION | |
| Download Service is active in the time period (hh:mm - hh:mm) | Specify the time period for the NSA to download files.Note: If you also configured the Power On/Off Schedule feature in the Power Management screen, make sure your active download period does not conflict with the power-off period. |
| Apply Click this to save your changes. | |
| Reset Click this to restore your previously saved settings. | |
| Cancel Click this to return to the previous screen without saving. | |
9.7.3 Configuring the P2P Download Settings
Click Applications > Download Service > Preferences > P2P download to open the following screen. Use this screen to configure P2P download settings.
Figure 80 Applications > Download Service > Preferences > P2P download
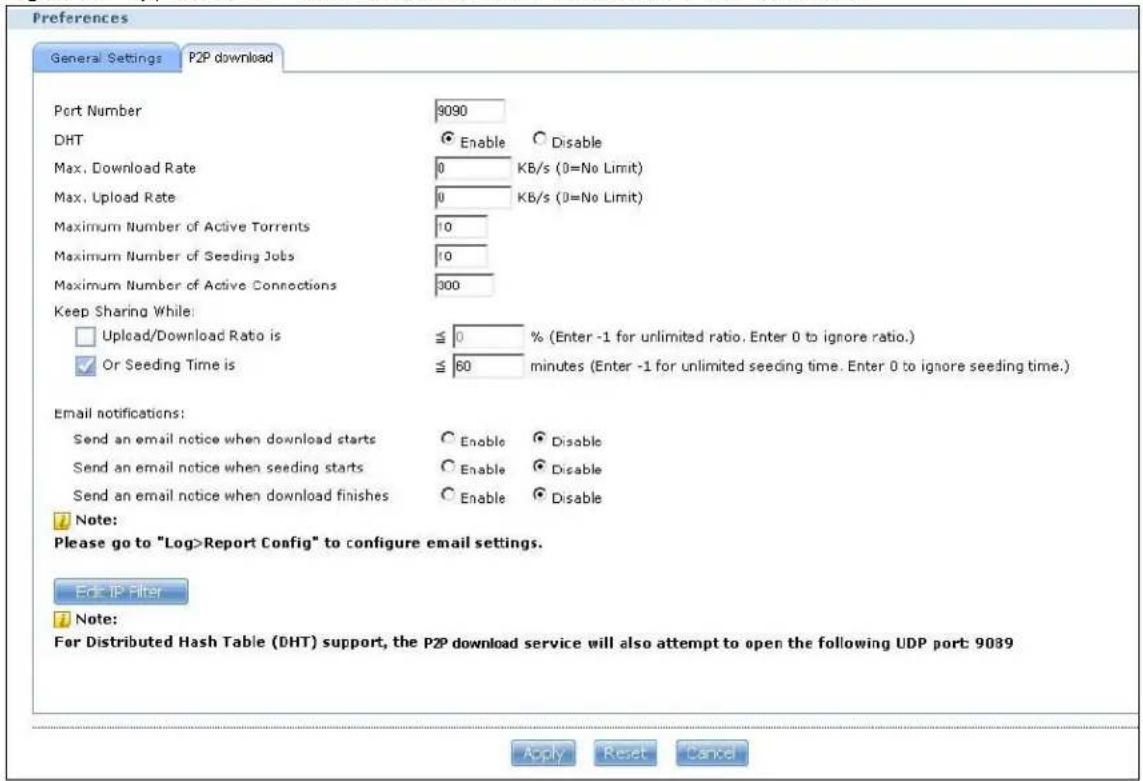
The following table describes the labels in this screen.
Table 43 Applications > Download Service > Preferences > P2P download
| LABEL DESCRIPTION | |
| Port Number | Assign a port number for P2P downloads. You can select a number from 2 to 65536. It is recommended to use a port number greater than 1025. |
| DHT | Select Enable or Disable to use Distributed Hash Table (DHT) or not.Note: When you use DHT, the NSA will also attempt to open a UDP port one number smaller than the P2P download port number. So if the P2P download port number is 9090, the NSA uses UDP port 9089. |
| Max. download rate | You may need to limit the bandwidth the NSA uses for P2P downloads if your network's other Internet applications are not getting enough downstream bandwidth. 0 has the NSA impose no restriction. |
| Max. upload rate You | may need to limit the bandwidth the NSA uses to share files through P2P download if your network's other Internet applications are not getting enough upstream bandwidth. 0 has the NSA impose no restriction.If you do not allow any uploads, (for example, you set a limit of 1 KB/s) you will not have a good standing in the P2P download community.Note: The settings for maximum download/upload rates would not affect peers accessing the NSA from the same LAN. |
| Maximum Number of Active Torrents | Specify how many simultaneous P2P downloads are allowed on the NSA. You can enter a number from 1 to 10. |
| Maximum Number of Seeding Jobs | Specify how many simultaneous seeds are allowed on the NSA. Enter a number from 1 to 10. This value cannot exceed the one you configured in the Maximum Number of Active Torrents field. |
| Maximum Number of Active Connections | Specify how many active connections are allowed on the NSA. Enter a number from 1 to 500. This specifies the number of computers that can connect to the NSA to download files being shared by the NSA. |
| Keep Sharing While | With P2P download, the NSA starts sharing a file while you are downloading it. Set how long to continue sharing a file after the NSA finishes the download.Select Upload/ Download Ratio to keep sharing a file until the NSA has uploaded a specific percent compared to the download.Select Seeding Time to keep sharing a file for a specific number of minutes after the download finishes.Continuing to share a file helps other P2P download users finish downloading it. Sharing out at least as much as you download helps keep you in good standing in the P2P download community.Enter -1 to share a file indefinitely. Leave both check boxes blank to have the NSA stop sharing the file as soon as the download finishes.If you select both options, the NSA keeps sharing a file until both conditions exceed the values you configure. For example, you entered 150% in the Upload/ Download Ratio field and 120 minutes in the Seeding Time field. The NSA keeps sharing a file until it has shared 1.5 times the size of the file and has passed 120 minutes. |
| Email notifications | Select whether or not to send emails to the email address configured for emailing log reports (see Section 17.4.2 on page 311) when the NSA starts downloading the file, seeding the file, and/or finishes downloading the file. |
| Edit IP Filter Click this | to enable or disable IP filtering for P2P downloads.Refer to Section 9.7.4 on page 190 for information about the fields in this screen. |
| Apply Click this to save your changes. | |
Table 43 Applications > Download Service > Preferences > P2P download
| LABEL DESCRIPTION | |
| Reset Click this to restore your previously saved settings. | |
| Cancel | Click this to return to the previous screen without saving. |
9.7.4 Edit IP Filter
Use this screen to enable or disable IP filtering for P2P downloads. IP filtering blocks IP addresses known to share fake files. You can either get an IP filter table from a website or use your own table.
Click Edit IP Filter in the Applications > Download Service > Preferences > P2P download screen.
Figure 81 Applications > Download Service > Preferences > P2P download > Edit IP Filter
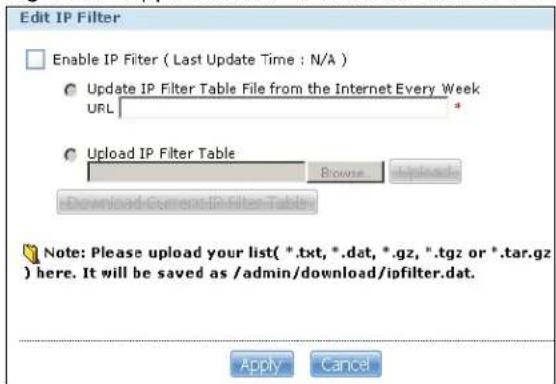
The following table describes the labels in this screen.
Table 44 Applications > Download Service > Preferences > P2P download > Edit IP Filter
| LABEL DESCRIPTION | |
| Enable IP Filter | Click this to enable or disable IP filtering for P2P downloads. |
| Update IP Filter Table File from the Internet Every Week | Select this option and enter a URL to use an online IP filter table. You can find an online IP filter table in websites such as http://www.bluetack.co.uk/config/level1.gz.When you change the URL of the online IP filter table, the NSA also performs an update after you clickApply. |
| Upload IP Filter Table | Select this option to upload your own IP filter table. Use theBrowsebutton to locate the file and clickUploadto save it on the NSA.The NSA supports .txt, .dat, .gz, .tgz, and .tar.gz file extensions. The NSA saves the IP filter table as /admin/ download/ ipfilter.dat. |
| Download Current IP Filter Table | Click this to save a copy of the IP filter table on your computer. |
| Apply | ClickApplyto update the IP filter table from the specified URL. |
| Cancel | Click this to return to the previous screen without saving. |
9.7.5 Selecting Files to Download
Select an item in the Applications > Download Service screen's list and click Select Files to open the following screen. Use this screen to select which of the torrent's files to download. Section 4.10 on page 80 provides a tutorial on adding a download task.
Figure 82 Applications > Download Service > Select Files
![Select Files ✓ File Name Size ✓ Rihanna - Loud 2010 (Explicit) 320kbps iTunesRip [BY LM]/10 - Skin.mp3 11.74 MB ✓ Rihanna - Loud 2010 (Explicit) 320kbps iTunesRip [BY LM]/11 - Love The Way You Lie (Part II) (feat. Eminem).mp3 11.46 MB ✓ Rihanna - Loud 2010 (Explicit) 320kbps iTunesRip [BY LM]/08 - Raining Men (feat. Nicki Minaj).mp3 8.74 MB ✓ Rihanna - Loud 2010 (Explicit) 320kbps iTunesRip [BY LM]/04 - Fading.mp3 7.78 MB ✓ Rihanna - Loud 2010 (Explicit) 320kbps iTunesRip [BY LM]/Digital Booklet - Loud.pdf 4.21 MB ✓ Rihanna - Loud 2010 (Explicit) 320kbps iTunesRip [BY LM]/Loud (Bonus Track Version).jpg 151.06 KB ✓ Rihanna - Loud 2010 (Explicit) 320kbps iTunesRip [BY LM]/00. Rihanna - Loud (Bonus Track Version).nfo 1.73 KB ✓ Rihanna - Loud 2010 (Explicit) 320kbps iTunesRip [BY LM]/00. Rihanna - Loud (Bonus Track Version).m3u 924.00 Bytes OK Cancel](/content/2026/05/844675/images/ed972c5c61b5bb2e5f231114678b2a9bc3bc1c88bc6729c846599fefbafef7d6.jpg)
The following table describes the labels in this screen.
Table 45 Applications > Download Service > Select Files
| LABEL DESCRIPTION | |
| Select Files | |
| File Name | This is the name of a file specified in the torrent file. Select the check boxes of the files you want to download. |
| Size This is the size of the file to be downloaded. | |
| OK Click this to save your changes. | |
| Cancel Click this to return to the previous screen without saving. | |
9.7.6 Displaying the Task Information
Select an item on the list and click Task Info. Use this screen to check detailed information about the task.
Figure 83 Applications > Download Service > Task Info
![Task Info Detailed Information Status: Pause Name: Christmas Adventure Screensaver (Christmas Adventure Screensaver [mininova].torrent) Size: 3.42 MB Uploaded/Downloaded Ratio: NaN (0.00 Bytes/0.00 Bytes) Complete(%): 0.00 % Seeds: -- Peers: -- Download Speed: -- Upload Speed: -- Health: 0.000000 Time Left: -- Priority: Auto Comment: Auto-generated torrent by Minino Start Time: 2008-Dec-03 17:11:14 Completed On: 1970-Jan-01 08:00:00 Info-Hash: 52c15b1ba6daa21aac1516145e68c26a2be0c59f Tracker: -- Close](/content/2026/05/844675/images/7d050be91894c8959379a5fc29e7cf9230ea8e056391d53fde408d04dc711b7f.jpg)
The following table describes the labels in this screen.
Table 46 Applications > Download Service > Task Info
| LABEL DESCRIPTION | |
| Status This is the current status of the task. | |
| Name This is the name of the task. | |
| Size This is the size of the file to be downloaded. | |
| Uploaded/Downloaded Ratio | This is the ratio of total uploaded data to downloaded data. |
| Complete(%) This field displays how much has been downloaded to the NSA. | |
| Seeds This is the number of computers that are sharing the complete file that you are downloading. | |
| Peers | This is the number of other computers that are also downloading (and sharing) the file you are downloading. |
| Download Speed This field displays how fast the NSA downloads the file. | |
| Upload Speed This field displays how fast the NSA uploads the file. | |
| Health This field displays how many full copies of the file are available for this task. The NSA can download a file with a higher health value more efficiently. If the health value is less than 1 (0.65 for example), there is no full copy of the file, and the NSA may not be able to complete downloading the file. | |
| Time Left This is the time remaining to complete the task. | |
Table 46 Applications > Download Service > Task Info
| LABEL DESCRIPTION | |
| Priority Use this field | to set the priority for downloading the task.Select Auto to have the NSA automatically determine the task's priority.Select High to have the NSA download this file before the other files. |
| Comment | Enter a description for this task. Click Apply to save the description. |
| Start Time This field | displays when the NSA started to download files. |
| Completed on | This field displays when the file was successfully downloaded to the NSA. |
| Info-Hash This information is used to verify the torrent file. | |
| Tracker | This field displays the tracker that NSA is currently connected to. A tracker is a server used for finding peers sharing the file. |
| Close Click this to close the screen. | |
9.8 The Web Publishing Screen
Use this screen to turn web publishing on or off and select shares to publish. Click Applications > Web Publishing to open the following screen.
Figure 84 Applications > Web Publishing
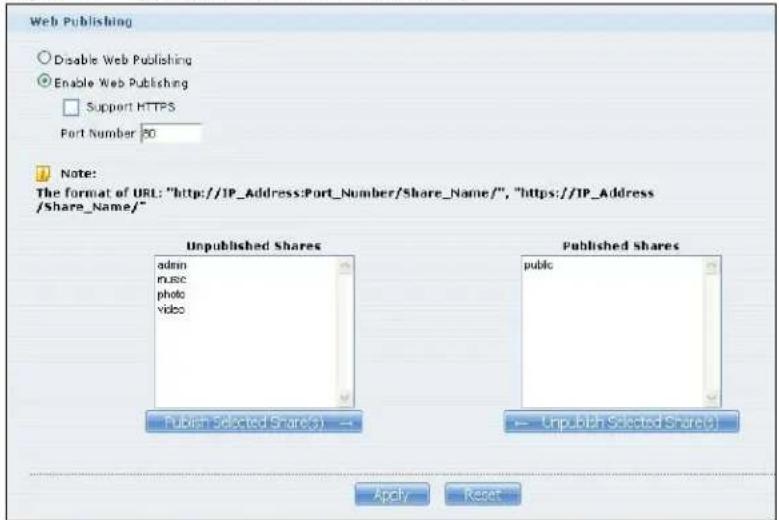
The following table describes the labels in this screen.
Table 47 Applications > Web Publishing
| LABEL DESCRIPTION | |
| Web Publishing | |
| Disable / Enable Web Publishing | Turn on web publishing to let people access files in the published shares using a web browser, without having to log into the Home screens. |
| Support HTTPS | Select this to allow users to use web browser security for connections to the web-published shares. In order to use secured connections users must use “https://” in the NSA’s web address and install the NSA’s public key certificate. |
Table 47 Applications > Web Publishing
| LABEL DESCRIPTION | |
| Port Number | Specify a port number for accessing the published share websites hosted on the NSA. If you enter a number other than 80, make sure you include it when telling others how to access the web-published share. For example, say you specified port 8080, the NSA's IP address is 192.168.1.23, and the name of the web-published share is FamilyPhotos. You would have to enter "http://192.168.1.23:8080/MyWeb/FamilyPhotos/" in your browser's address bar to access the share's web page. |
| Unpublished Shares | This list box displays the shares that the NSA does not publish for web browser access. |
| Publish Selected Share(s) | Select shares in the Unpublished Shares box and click this to let people access files in the published shares using a web browser, without logging into the Home screens. Use the [SHIFT] key to select a range of entries. Hold down the [CTRL] key to select multiple individual entries. |
| Published Shares | This list box displays the shares people can access using a web browser, without logging into the Home screens. |
| Unpublish Selected Share(s) | Select shares in the Published Shares box and click this to not let people access using a web browser without logging into the Home screens. Use the [SHIFT] key to select a range of entries. Hold down the [CTRL] key to select multiple individual entries. |
| Apply Click this to save your changes. | |
| Reset | Click this to restore your previously saved settings. |
Note: If you installed php-MySQL-phpMyAdmin through the Package Management screen (Section 6.5 on page 143) and enable it, you can use PHP and MySQL in your published web page.
9.9 The Broadcatching Screen
This screen displays the NSA's subscribed channels and the associated contents.
- The NSA saves a channel's downloaded items in a folder named after the channel.
- The NSA creates the channel folders in the same destination as the download service. See Section 9.7.2 on page 186 to change the destination for saving downloads.
- The NSA's media server feature makes it easy for users on your network to play the broadcatching files you download. See Section 9.12.1 on page 203 for more on the media server.
- If you add a channel that contains a torrent file, the NSA downloads the torrent file (.torrent) and transfers it to Download Service (Section 9.7 on page 181) and start the P2P download task accordingly.
Click Applications > Broadcasting to open the following screen.
Figure 85 Applications > Broadcasting
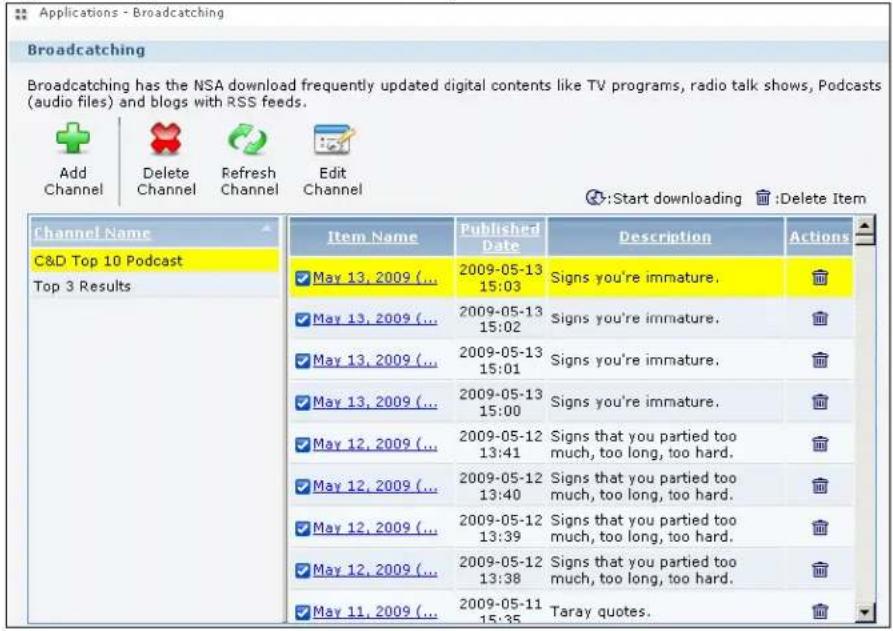
The following table describes the labels in this screen.
Table 48 Applications > Broadcasting
| LABEL DESCRIPTION | |
| Add Channel | When you find a channel to subscribe to, copy the URL of the channel's feed and click this button. A screen opens for you to subscribe to the feed. When you are done, the feed's channel and contents display in the Applications > Broadcasting screen. |
| Delete Channel | Select a channel and click Delete Channel to remove the channel from the NSA. Any of the channel's items that you have already downloaded stay in the channel's folder (in the admin share's download folder). |
| Refresh Channel | Select a channel and click Refresh Channel to check for new files. |
| Edit Channel | Select a channel and click Edit Channel to open a screen where you can set the channel's download and delete policies. |
| The table lists channels and their files. Click a column's heading to sort the entries by that criteria. | |
| Channel Name | This identifies the channel. A channel displays in red if there was an error the last time the NSA attempted to connect to it. When this happens, you can select the channel and click Refresh Channel to have the NSA reattempt to connect to it. Select a channel to see its available files. A “...” indicates an abbreviated name. Hold your cursor over the name to display the full name. |
Table 48 Applications > Broadcasting
| LABEL DESCRIPTION | |
| Item Name These are the downloadable files. The following icons show the file's status in the NSA.☑:Completed ☑:Seeding ☑:Downloading☐:Queued ☑:Paused ☑:Error ☑:Missing File☐:Start downloading ☑:Delete ItemCompleted:The NSA has downloaded the whole file. Double-click the item to go to the Download Service screen where you can see the file's name and location.Seeding:The NSA downloaded the complete file and NSA is sharing it with other P2P download users. Double-click the item to go to theDownload Servicescreen.Downloading:The NSA is downloading the file. Double-click the item to go to the Download Service screen.Queued:The file is waiting in line for the NSA to download it. Double-click the item to go to theDownload Servicescreen.Pause:The download has been manually stopped. Double-click the item to go to the Download Service screen.Missing File:The NSA could not find the file.Error:The NSA automatically retries unsuccessful download attempts. The status displays as error when the re-attempts are also unsuccessful and the NSA stops trying to download the file. To try the download again, use theAddbutton to create a new task.Note:A ... indicates an abbreviated file name. Hold your cursor over the name to display the full name. | |
| Published Date This is when the file was made available for download. | |
| Description This is the publishers introduction for the file. | |
| Actions | Start Downloading:Click this to add the file to the NSA's download queue or check the file's status in the NSA's download service.Click theDeleteicon to remove the file from the channel's list. |
9.9.1 Adding a Broadcatching Channel
At the time of writing, the NSA supports RSS 2.0 feeds. Websites with a feed usually display a feed icon (shown next). Copy and paste the feed's URL into the Applications > Broadcasting > Add Channel screen and you can download new files as they are added.
Figure 86 Feed Icon

A channel uses a feed to deliver its contents (items). Subscribe the NSA to a feed to be able to download the contents.
Click Applications > Broadcatching > Add Channel to open the following screen. Use the Add Channel screen to subscribe the NSA to a channel's feed so you can view the channel. You also
select policies for downloading and deleting the channel's items. Section 4.11 on page 95 provides a tutorial on adding a broadcatching channel.
Figure 87 Applications > Broadcasting > Add Channel
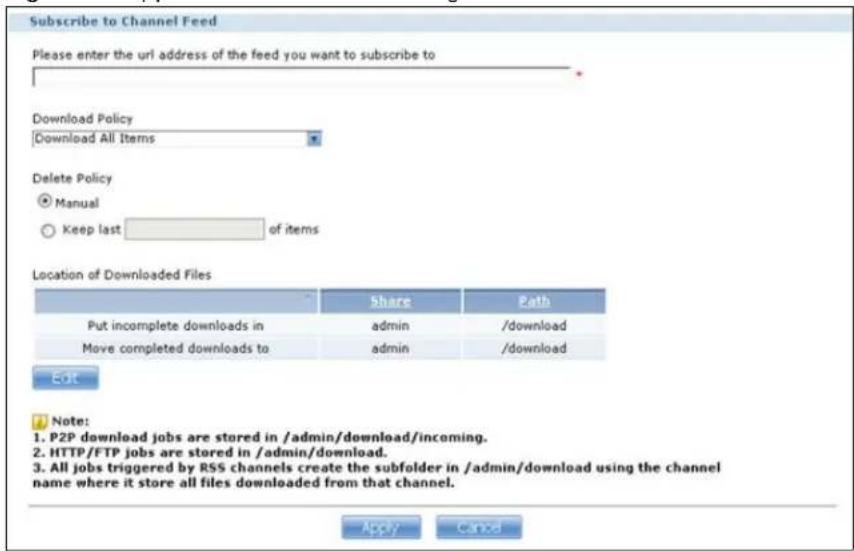
The following table describes the labels in this screen.
Table 49 Applications > Broadcasting > Add Channel
| LABEL DESCRIPTION | |
| Subscribe to Channel Feed | Paste (or type) the URL of the feed for the channel to which you want to subscribe into this field. This is read-only in the Preferences screen.Note: Make sure the link goes to the actual RSS feed instead of to another list of links or information about the channel.One way to test this is by clicking the link. Clicking an actual RSS feed link opens a screen of XML code (in browsers without an RSS feed aggregator) or a window where you can add the RSS feed (in browsers with an RSS feed aggregator). |
| Download Policy Set which of the channel's items the NSA downloads.Download All Items: Download every file in the feed.Download Only New Items: Download new files from today on.Manually Choose Items for Download: Only download individual files you select later in the Broadcatching screen. | |
| Delete Policy Set how the NSA handles deleting the items downloaded from the channel.Manual: Only delete individual files you select later in the Broadcatching screen.Keep last N of items: Select this to set the NSA to only keep a number of the channel's most recent files. When this number has been reached, if the NSA downloads another file from the channel, it deletes the oldest file from the NSA. | |
Table 49 Applications > Broadcasting > Add Channel
| LABEL DESCRIPTION | |
| Location of Downloaded Files | This shows where the NSA stores new downloads (Put incomplete downloads in) and where the NSA moves completed downloads (Move completed downloads to).The Share column shows the name of the share where the file is downloaded.The Path column points to the location in the share where the NSA will save the downloaded files.P2P download jobs are stored in */incoming (where '*' is a folder that you have set.)HTTP/FTP jobs are stored in /* (where '*' is a folder that you have set.)All jobs triggered by RSS channels create the subfolder in /* using the channel name where it store all files downloaded from that channel (where '*' is a folder that you have set.) |
| Edit | Click this to open the following screen where you can set the default folder location where you “Put incomplete downloads in” and “Move complete downloads to”: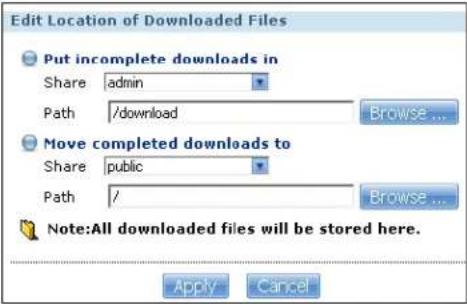 Share - Select the share from the list.Path - Type the folder location in the share directly or click Browse to open the following screen and navigate to the file’s location. Share - Select the share from the list.Path - Type the folder location in the share directly or click Browse to open the following screen and navigate to the file’s location.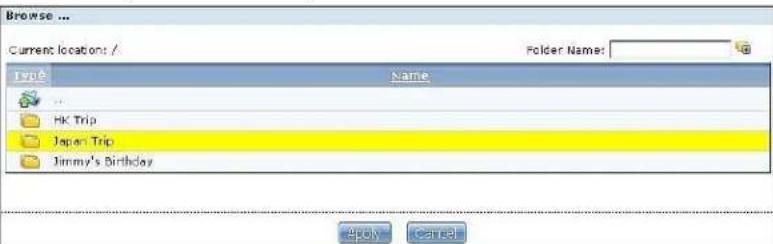 Current Location - This is the location of the selected folder.Folder Name - Enter a new folder name and click 📄 to create it.Type - This identifies the item as a file or folder.Name - This is the name of the folder/file.Select a folder. If you don’t select a folder, a forward slash (/) displays in the Path field. All contents within the specified share are automatically selected.Click Apply to save your settings and Cancel to close the screen. Current Location - This is the location of the selected folder.Folder Name - Enter a new folder name and click 📄 to create it.Type - This identifies the item as a file or folder.Name - This is the name of the folder/file.Select a folder. If you don’t select a folder, a forward slash (/) displays in the Path field. All contents within the specified share are automatically selected.Click Apply to save your settings and Cancel to close the screen. |
| Apply Click this to | save your changes. |
| Cancel | Click this to return to the previous screen without saving. |
9.9.2 Editing a Broadcatching Channel
Click Applications > Broadcasting, then select a channel and click Edit Channel to open a similar Edit screen. Use the Edit Channel screen to change the download or delete policies.
Figure 88 Applications > Broadcasting > Edit Channel
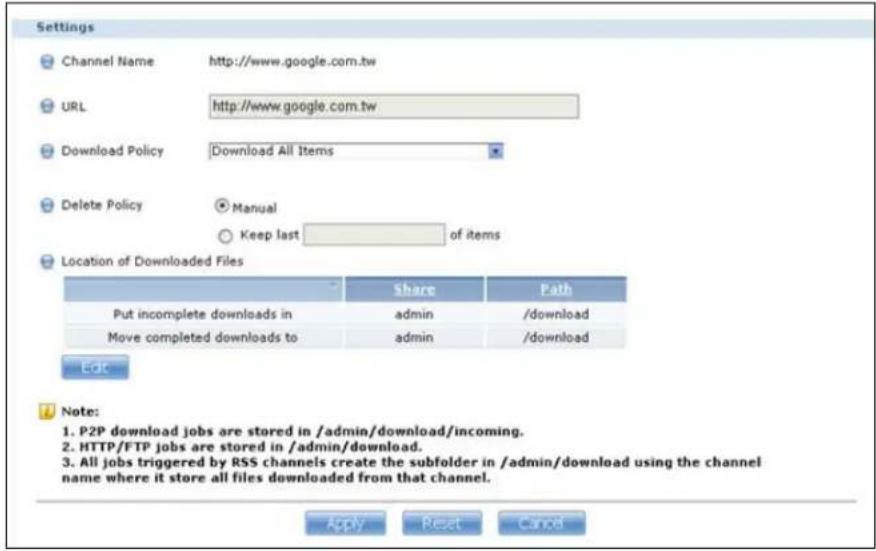
The following table describes the labels in this screen.
Table 50 Applications > Broadcasting > Edit Channel
| LABEL DESCRIPTION | |
| Channel Name This is the name of the feed for the channel to which you want to subscribe into this field.This is read-only. | |
| URL This is the address of the channel. | |
| Download Policy Set which of the channel's items the NSA downloads.Download All Items: Download every file in the feed.Download Only New Items: Download new files from today on.Manually Choose Items for Download: Only download individual files you select later in the Broadcasting screen. | |
| Delete Policy Set how the NSA handles deleting the items downloaded from the channel.Manual: Only delete individual files you select later in the Broadcasting screen.Keep last N of items: Select this to set the NSA to only keep a number of the channel's most recent files. When this number has been reached, if the NSA downloads another file from the channel, it deletes the oldest file from the NSA. |
Table 50 Applications > Broadcasting > Edit Channel
| LABEL DESCRIPTION | |
| Location of Downloaded Files | This shows where the NSA stores new downloads (Put incomplete downloads in) and where the NSA moves completed downloads (Move completed downloads to).TheSharecolumn shows the name of the share where the file is downloaded.ThePathcolumn points to the location in the share where the NSA will save the downloaded files.P2P download jobs are stored in /*/incoming (where '*' is a folder that you have set.)HTTP/FTP jobs are stored in /* (where '*' is a folder that you have set.)All jobs triggered by RSS channels create the subfolder in /* using the channel name where it store all files downloaded from that channel (where '*' is a folder that you have set.) |
| Edit | Click this to open the following screen where you can set the default folder location where you "Put incomplete downloads in" and "Move complete downloads to":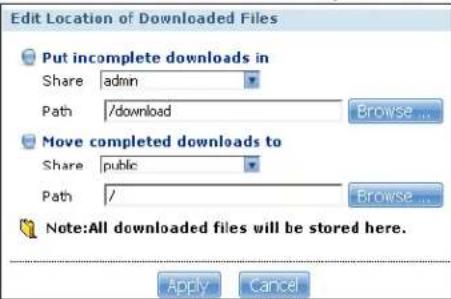 Share- Select the share from the list.Path-Type the folder location in the share directly or clickBrowseto open the following screen and navigate to the file's location. Share- Select the share from the list.Path-Type the folder location in the share directly or clickBrowseto open the following screen and navigate to the file's location.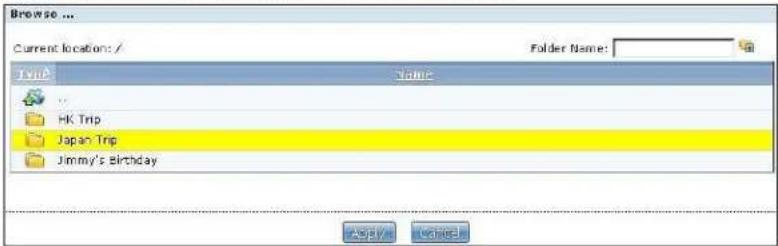 Current Location- This is the location of the selected folder.Folder Name- Enter a new folder name and click 📋 to create it.Type- This identifies the item as a file or folder.Name- This is the name of the folder/file.Select a folder. If you don't select a folder, a forward slash (/) displays in thePathfield. All contents within the specified share are automatically selected.ClickApplyto save your settings andCancelto close the screen. Current Location- This is the location of the selected folder.Folder Name- Enter a new folder name and click 📋 to create it.Type- This identifies the item as a file or folder.Name- This is the name of the folder/file.Select a folder. If you don't select a folder, a forward slash (/) displays in thePathfield. All contents within the specified share are automatically selected.ClickApplyto save your settings andCancelto close the screen. |
| Apply Click this to | save your changes. |
| Cancel | Click this to return to the previous screen without saving. |
9.10 The Print Server Screen
Use the Print Server screen to view and manage the NSA's list of printers and print jobs.
Click Applications > Print Server to open the following screen.
Figure 89 Applications > Print Server
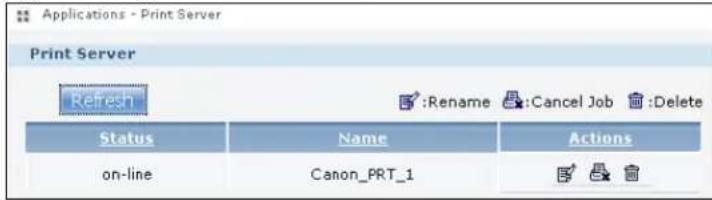
The following table describes the labels in this screen.
Table 51 Applications > Print Server
| LABEL DESCRIPTION | |
| Refresh Click | this to update the list of printers and print jobs. |
| The table lists printers and their queued print jobs. Click a column's heading to sort the entries by that criteria. | |
| Status | This fields shows whether the printer is connected and turned on (on-line) or not (off-line). |
| Name | This identifies the printer. Each printer connected to the NSA must use a unique name. |
| Actions | Rename: Click this to change the name the NSA uses for the printer.Cancel Job: Click this to remove all print jobs from the NSA queue for a particular printer. However, since the NSA sends print jobs to the printer as soon as it can, this button may only have an effect if there are very large or many print jobs in the queue. To stop a print job that has already started, you may have to turn off the printer.Delete: Click this to remove a printer from the NSA's printer list. To add the printer back into the list, disconnect the printer from the NSA's USB port and reconnect it. If that does not work, disconnect the USB port and turn off the printer's power. Then reconnect the printer and turn it back on. |
9.10.1 Print Server Rename
Click Applications > Print Server and a printer's Rename icon to open the following screen. Use this screen to change the name the NSA uses for the printer.
Figure 90 Applications > Print Server > Rename
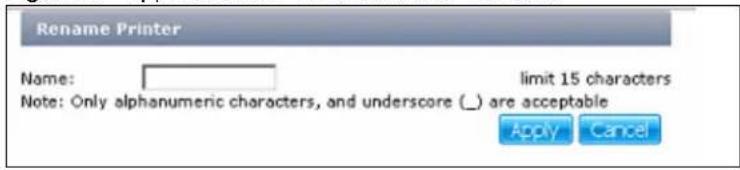
The following table describes the labels in this screen.
Table 52 Applications > Print Server > Rename
| LABEL DESCRIPTION | |
| Name | Type a new name to identify the printer. The name must be unique from all the other names of printers connected to the NSA. |
| Apply Click | this to save your changes. |
| Cancel | Click this to return to the previous screen without saving. |
9.11 The Copy/Sync Button Screen
The Copy/ Sync button on the front panel allows you to copy or synchronize files between a connected USB device and the NSA.
Click Applications > Copy/ Sync Button to open the following screen.
Figure 91 Applications > Copy/Sync Button
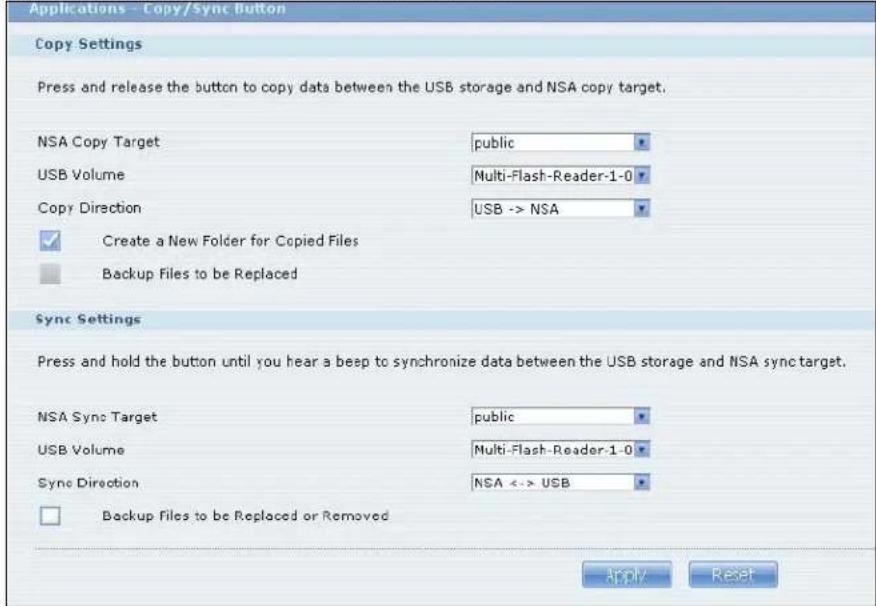
The following table describes the labels in this screen.
Table 53 Applications > Copy/Sync Button
| LABEL DESCRIPTION | |
| Copy Settings | |
| NSA Copy Target Select the NSA share to use with the copy function. | |
| USB Volume | If your USB device has multiple partitions, select which partition to use with the copy function. |
| Copy Direction | Select USB -> NSA to copy files from your USB device to the NSA.Select NSA -> USB to copy files from the NSA to your USB device. |
| Create a New Folder for Copied Files | Select this option to place the copied files in a new folder.The name of the folder created for the copied files consists of the date and time of the copy in year_month_day_hour_minute_second format. |
| Backup Files to be Replaced | This option is only available if you do not select Create a New Folder for Copied Files. Select this option to save the files that will be replaced by the source files. |
| Backup Target Select a share in which to save the backup files.Note: The NSA will not create a new folder to store the backup files. It is recommended to create a specific share (such as “backup”) for backup purposes. | |
| Sync Settings | |
| NSA Sync Target Select the NSA share to use with the synchronization function. | |
Table 53 Applications > Copy/Sync Button
| LABEL DESCRIPTION | |
| USB Volume | If your USB device has multiple partitions, select which partition to use with the synchronization function. |
| Sync Direction | Select USB -> NSA to synchronize files from your USB device to the NSA.Select NSA -> USB to synchronize files from the NSA to your USB device.Select NSA < -> USB to synchronize files in both directions simultaneously. |
| Backup Files to be Replaced or Removed | Select this option to save the files that will be replaced by the source files. |
| Backup Target Select a share in which to save the backup files.Note: The NSA will not create a new folder to store the backup files. It is recommended to create a specific share (such as “backup”) for backup purposes. | |
| Apply Click this to save your changes.The configuration file is saved on the USB device. | |
| Reset | Click this to restore your previously saved settings. |
9.12 Technical Reference
This section provides technical background information on the topics discussed in this chapter.
9.12.1 Sharing Media Files on Your Network
The media server feature lets anyone on your network play video, music, and photos from the NSA (without having to copy them to another computer). The NSA can function as a DLNA-compliant media server and/or an iTunes server. The NSA streams files to DLNA-compliant media clients or computers using iTunes. The Digital Living Network Alliance (DLNA) is a group of personal computer and electronics companies that works to make products compatible in a home network.
- Publish shares to let others play the contained media files.
- The media server is a convenient way to share files you download using the broadcasting service (see Section 9.9 on page 194).
- Hardware-based media players can also play the files. See Section 20.2 on page 346 for the supported multimedia file formats.
Note: Anyone on your network can play the media files in the published shares. No user name and password or other form of security is used. The media server is enabled by default with the video, photo, and music shares published.
Songs from the iTunes Store
After using iTunes on your computer to download songs from Apple's iTunes Store, you can copy them to the NSA. Many of these songs have DRM (Digital Rights Management). At the time of writing, you can use your Apple account ID and password to authorize up to a total of five computers to play the files. To authorize a computer, open iTunes and click Store > Authorize Computer.
A link for the NSA in iTunes under SHARED. Click it to display the NSA's published media files as shown next.
Figure 92 NSA link in iTunes
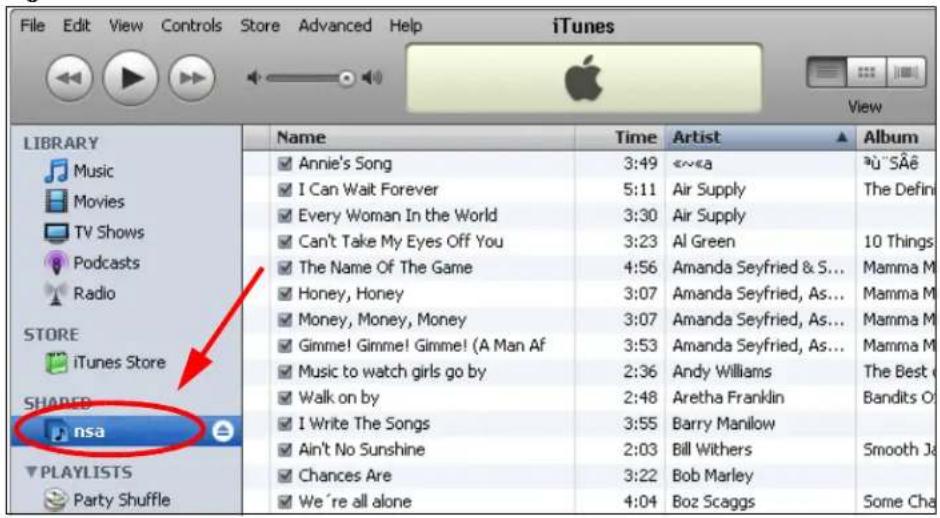
9.12.2 Download Service
The NSA's download service downloads files from the Internet directly to the NSA. You do not have to download to your computer and then copy to the NSA. This can free up your computer's system resources. The download service also handles your broadcatching downloads. See Section 9.9 on page 194 for information on broadcatching.
The NSA can download using these protocols.
- HTTP: The standard protocol for web pages.
- FTP: A standard Internet file transfer service.
- P2P download: Peer-to-peer files sharing protocol.
Note: Do not use the NSA for illegal purposes. Illegal downloading or sharing of files can result in severe civil and criminal penalties. You are subject to the restrictions of copyright laws and any other applicable laws and will bear the consequences of any infringements thereof. ZyXEL bears NO responsibility or liability for your use of the download service feature.
Torrent Files
The NSA needs a “.torrent” file for P2P download to download a file. The torrent file gives the NSA information about the file to be downloaded (and shared) and the tracker(s) (computers) that coordinates the distribution of the file.
When you add a P2P download task in the NSA's web configurator screens, you can copy and paste the URL of the torrent file. The NSA automatically downloads the torrent file and saves it in a torrent folder within the folder where the NSA stores downloaded files (the admin share's download folder by default).
If you already have the torrent file saved on your computer, you can just specify its location when adding a download task through the web configurator. Another method is to use FTP or a CIFS program (Windows Explorer for example) to copy the torrent file into the torrent folder. The NSA automatically uses the torrent file.
After your P2P download and sharing are finished, you can go to the incoming folder within the destination share or folder and delete the .torrent file if you need to free up hard disk space.
9.12.3 Link Capture Browser Plugin
The link capture browser plugin is an add-on feature for your web browser. Use the plugin to directly add a file's URL to the NSA's download service.
Note: The link capture browser plugin is located in the included CD.
The following screen displays how the plugin works.
Figure 93 Link Capture Browser Plugin
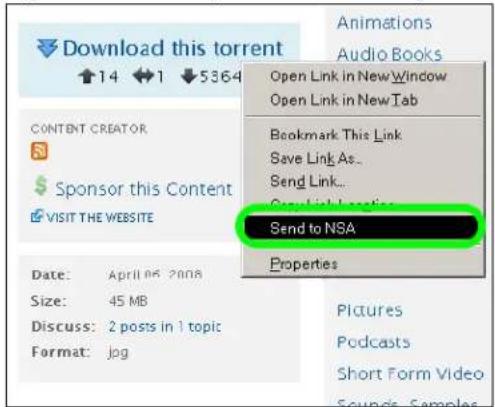
Instead of copying and pasting a file's URL to the NSA's download service, you can right-click on the URL in the web browser and select Send to NSA. The URL is then added to the NSA's download service list.
See Section 4.10.2 on page 83 and Section 4.10.3 on page 88 for tutorials about installing and using the link capture browser plugin.
Note: At the time of writing the plugin supports Internet Explorer 6.0/7.0/8.0 and Mozilla Firefox 2.0/3.0.
9.12.4 Download Service Notification
Use the download service notification to keep track of downloaded files on the NSA. You can subscribe to the NSA's download list on your computer. When the NSA finishes downloading new files, your RSS reader displays the information and links for the files. You can also download the files from the RSS reader to your computer.
See Section 4.10.5 on page 92 for a tutorial about using the download service notification.
In the Download Service screen, select Enable Download Notify and click Apply. An RSS feed icon appears. Click the icon to subscribe to the NSA's download list.
Note: The download service notification only keeps track of files downloaded via P2P download.
Figure 94 Download Service Notification
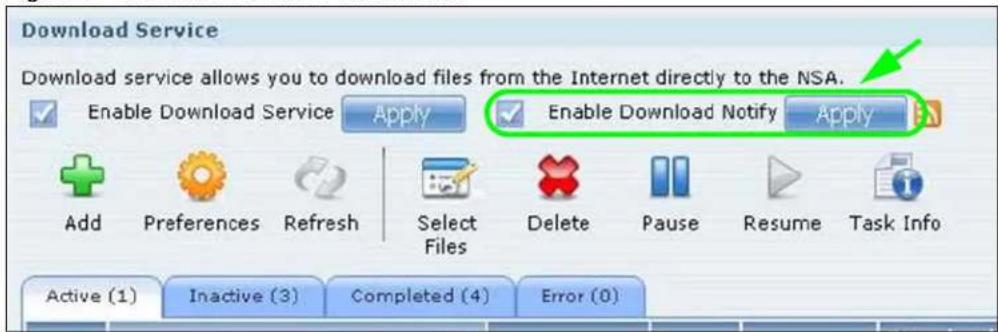
9.12.5 P2P Download Security
When you download using P2P, you reveal your IP address. This increases the risk of hacking attacks, which can be protected against by a good firewall.
Use a Hardware-based Firewall
Place a hardware-based firewall between your network and the Internet (a software-based firewall on your computer would just protect the computer itself, not the NSA since your computer is not between your NSA and the Internet).
Figure 95 Firewall
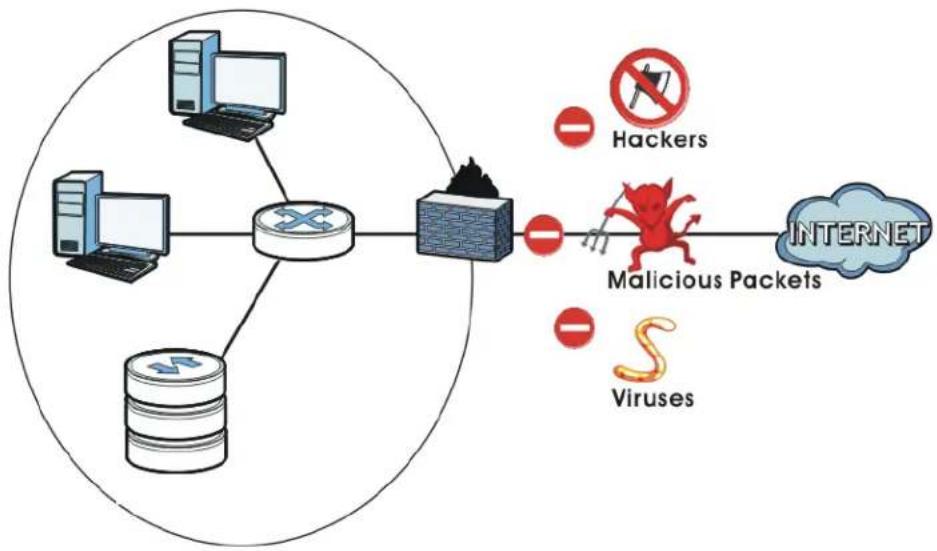
flowchart
graph LR
    A["Router"] --> B["Switch"]
    C["Server"] --> A
    D["Stacked Server"] --> A
    E["Internet"] --> F["Malicious Packets"]
    G["Hackers"] --> F
    H["Viruses"] --> F
    I["Red circle with crossed-out arrow"] --> F
Ideally your firewall should have the following:
- Stateful packet inspection to control access between the Internet and your network and protect your NSA (and computers) from hacking attacks.
- IDP (Intrusion Detection and Prevention) to detect malicious packets within normal network traffic and take immediate action against them.
- Anti-virus to check files you download for computer viruses.
P2P Download and Your Firewall
The anti-virus feature on a firewall probably cannot check P2P downloads for viruses, so use anti-virus software on your computer to scan the NSA for viruses.
When you download using P2P download, many other P2P download users are also trying to download the file from you. The firewall slows this down because by default, it only allows traffic from the Internet in response to a request that originated on the LAN (it lets you get files from the Internet and blocks those on the Internet from getting files from you).
Figure 96 Firewall Blocking Incoming P2P Download Requests
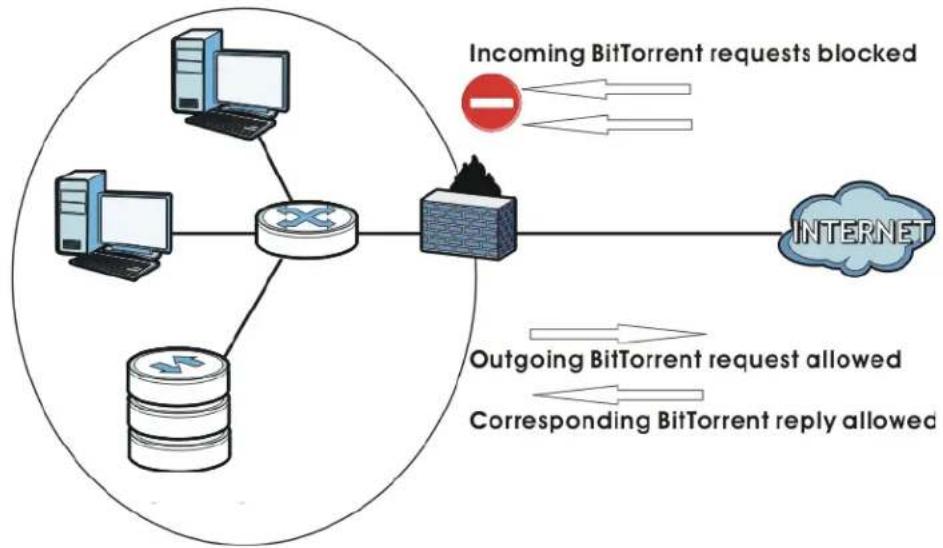
flowchart
graph TD
    A["Incoming BitTorrent requests blocked"] --> B["Router"]
    C["Outgoing BitTorrent request allowed"] --> B
    D["Corresponding BitTorrent reply allowed"] --> B
    B --> E["INTERNET"]
    F["Computer 1"] --> G["Computer"]
    H["Computer 2"] --> I["Computer"]
    J["Computer 3"] --> K["Computer"]
    L["Computer 4"] --> M["Computer"]
    N["Computer 5"] --> O["Computer"]
    P["Computer 6"] --> Q["Computer"]
    R["Computer 7"] --> S["Computer"]
    T["Computer 8"] --> U["Computer"]
    V["Computer 9"] --> W["Computer"]
    X["Computer 10"] --> Y["Computer"]
To speed up P2P download file transfers, configure your firewall's port forwarding to send incoming TCP port 9090 and UDP port 9089 connections to the NSA. You probably need to use your firewall's
HTML (web-based) configuration interface to set this up (see the firewall's manual for details). You may also have to configure a corresponding firewall rule.
Figure 97 Firewall Configured to Allow Incoming P2P Download Requests
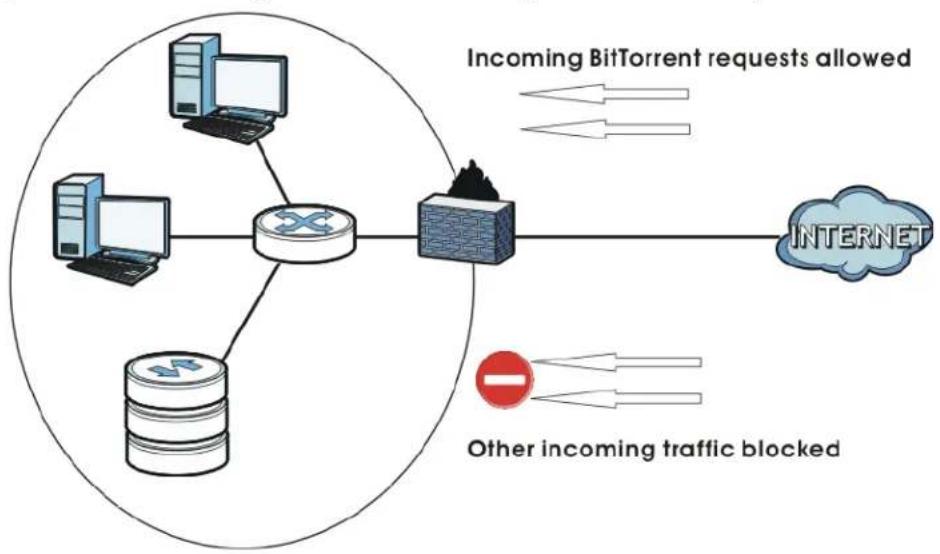
flowchart
graph TD
    A["Computer"] --> B["Switch"]
    C["Computer"] --> B
    D["Server"] --> B
    B --> E["Internet"]
    F["Other traffic blocked"] --> G["Internet"]
    style A fill:#cce5ff,stroke:#333
    style C fill:#cce5ff,stroke:#333
    style D fill:#cce5ff,stroke:#333
    style F fill:#cce5ff,stroke:#333
    style B fill:#ccffcc,stroke:#333
    style E fill:#ccffcc,stroke:#333
    note right of B: Incoming BitTorrent requests allowed
    note right of E: Other incoming traffic blocked
9.12.6 Web Publishing Example
This example covers how to configure the Web Publishing screen to let people use a web browser to access a share named FamilyPhotos without logging into the Home screens and shows how to access the share through the Internet.
1 Click Applications > Web Publishing and configure the screen as shown (enable the web publishing and move FamilyPhotos over to Published Shares) and click Apply.
Figure 98 Applications > Web Publishing (Example)
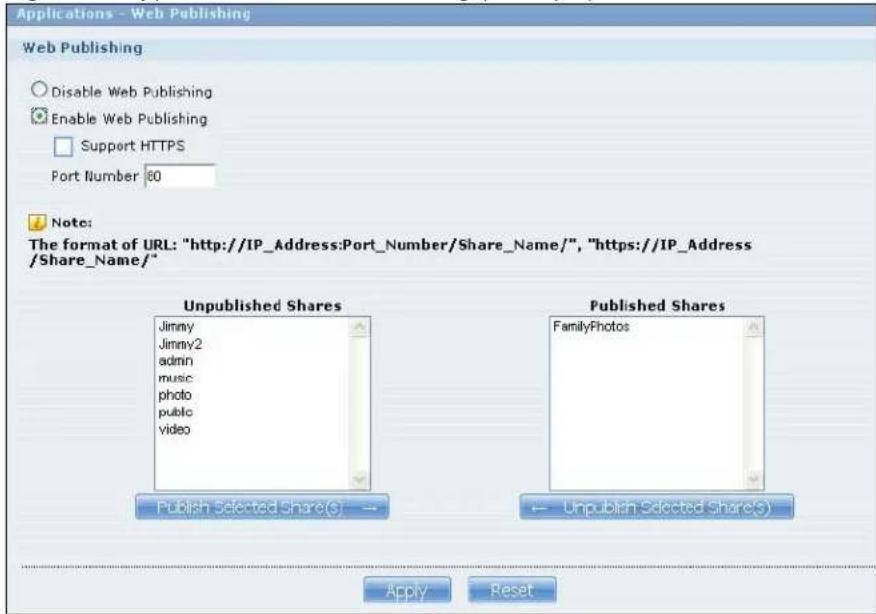
2 Now open your web browser and type in the address of the NSA's FamilyPhotos web page. In this example, the NSA's IP address is 192.168.1.33, and the name of the web-published share is FamilyPhotos. So you would enter "http://192.168.1.33/MyWeb/FamilyPhotos/" in your browser's address bar. Then press [ENTER] or click Go. A screen displays listing the share's files.
Figure 99 Browsing to an NSA Share Example
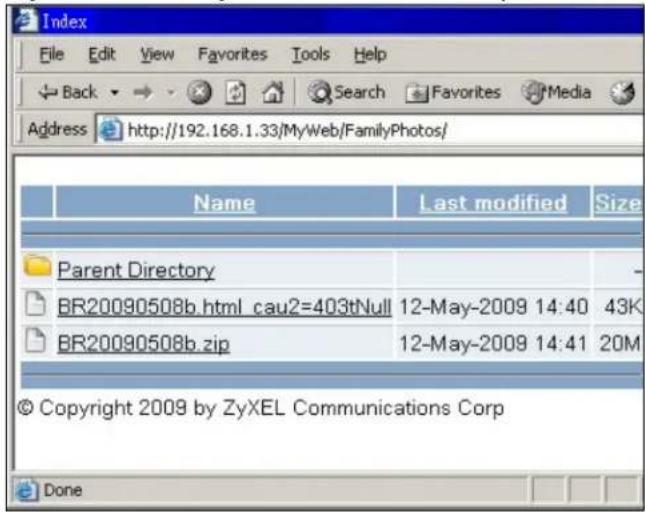
- Click a file's link to open the file.
- Right-click a file's link and select Save Target As.. (in Internet Explorer) to save a copy of the file.
- Click a label in the heading row to sort the files by that criteria.
- To customize how the page looks and works, create an index.html or index.htm file and store it in the share.
9.12.7 Web Publishing
Web publishing lets you "publish" shares (containing folders and files) on the NSA so people can access the files using a web browser without having to log into the Home screens. This way you can share files with others without them having to know and enter a user name and password.
For example, if you want to share photos in a FamilyPhotos share, you could "web publish" it and others could use a web browser to access the photos at http://my-NSA's-IP-Address/MyWeb/FamilyPhotos.
Note: The NSA does not use any security for the files in the published folders. It is not recommended to publish shares if you do not have the NSA behind a good hardware-based firewall. See page 206 for more on firewalls.
Additionally, you can use HTML editing software (not included) to create an index.html or index.htm file to define and customize how your website works and looks.
Accessing Web-published Shares from the Internet
You need to use a public address to access the NSA's web-published shares from the Internet. If your NSA uses a private IP address, you may need to use the public IP address of your Internet gateway and configure NAT or port forwarding on your Internet gateway and possibly firewall rules in order to let people access the NSA's web-published shares from the Internet.
Web Publishing Port Number
If the web-published shares use a port number other than 80 (the normal port for web traffic), users must include it after the NSA's IP address in order to access the NSA's web-published shares. For example, say you specified port 8080, the NSA's IP address is 192.168.1.23, and the name of the web-published share is FamilyPhotos. You would have to enter "http://192.168.1.23:8080/MyWeb/FamilyPhotos/" in your browser's address bar to access the share's web page.
The NSA's web configurator uses port 80. To make the web configurator more secure, you can have the web-published shares use another port number. Then you can configure one set of firewall rules and NAT or port forwarding settings on your Internet gateway specifically for allowing access to the web-published shares and another separate set of rules for accessing the NSA's web configurator.
9.12.8 Channel Guides for Broadcasting
Here are some popular broadcatching channel guide web sites.
Note: ZyXEL does not endorse these web sites and is not responsible for any of their contents. Use these or any other web sites at your own risk and discretion.
- http://www.zencast.com/
- http://www.miroguide.com/
- http://www.vuze.com/
- http://www.mefeedia.com/
- http://www.vodstock.com/
- http://www.mininova.org
In the following example, the Internet gateway's firewall is configured to allow anyone to access the NSA's web-published screens using port 8080. Web configurator access (port 80) however, is only allowed from IP address a.b.c.d.
Figure 100 Web Publishing Port Number Example
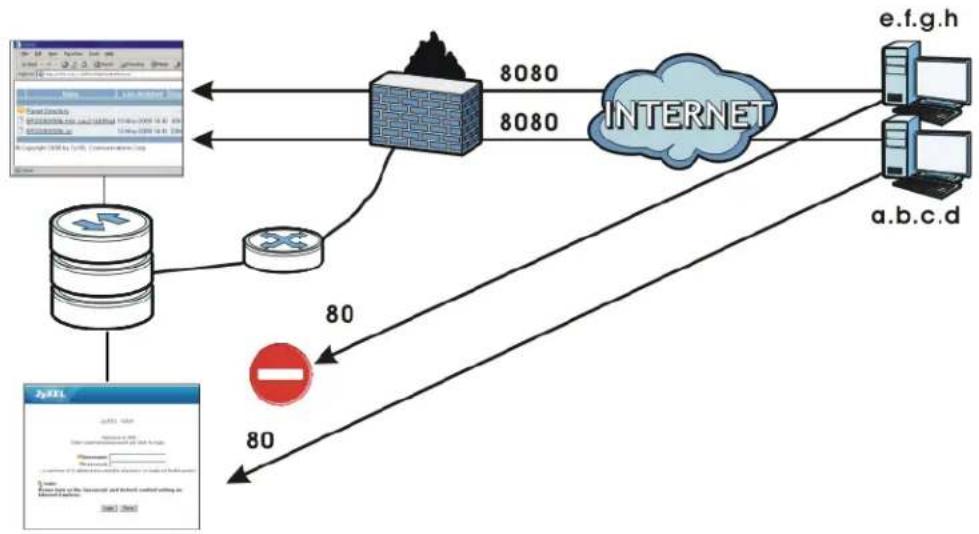
flowchart
graph TD
    A["Server"] --> B["Router"]
    B --> C["Internet"]
    C --> D["Cloud Service"]
    D --> E["e.f.g.h"]
    D --> F["a.b.c.d"]
    G["Data Input"] --> H["Server"]
    H --> I["Router"]
    I --> J["Internet"]
    J --> K["Cloud Service"]
    K --> L["e.f.g.h"]
    style A fill:#f9f,stroke:#333
    style B fill:#ccf,stroke:#333
    style C fill:#cfc,stroke:#333
    style D fill:#fcc,stroke:#333
    style E fill:#cff,stroke:#333
    style F fill:#ffc,stroke:#333
    style G fill:#cfc,stroke:#333
    style H fill:#fcc,stroke:#333
    style I fill:#cfc,stroke:#333
    style J fill:#fcc,stroke:#333
    style K fill:#cfc,stroke:#333
    style L fill:#fcc,stroke:#333
9.12.9 Printer Sharing
The NSA can act as a print server. A print server lets multiple computers share a printer. Connect a printer to the NSA's USB port to let multiple computers on your network use it. See www.zyxel.com for a list of compatible printers.
Figure 101 Printer Sharing
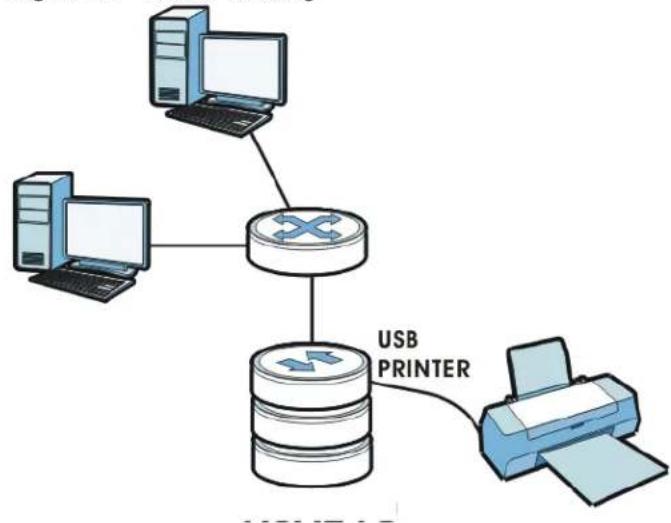
You can copy files from a USB device to the NSA or from the NSA to a USB device. Simply press and release the COPY/ SYNC button to start copying files. See Section 9.11 on page 202 for details about configuring the copy settings.
The following figure illustrates how copying files works when you copy files from a USB device to the NSA. The same concept applies when you copy files from the NSA to a USB device.
Figure 102 Copying Files Example
Before Copy
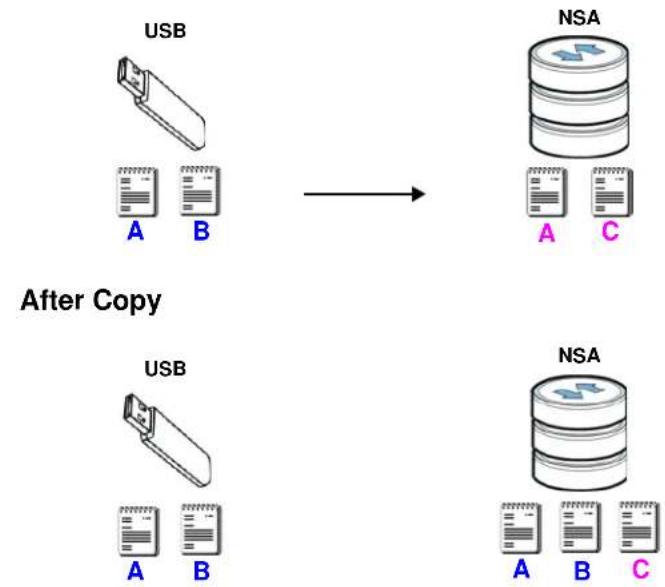
Both storage devices contain file A.
• A copy of files A and B from the USB device is transferred to the NSA.
- File A from the USB device replaces file A on the NSA.
9.12.11 Synchronizing Files
Synchronization makes the contents on the target device identical to the ones on the source device. You can synchronize files from a USB device to the NSA or from the NSA to a USB device. In addition, you may also synchronize files in both directions simultaneously.
Press and hold the COPY/ SYNC button until you hear a beep to synchronize files. See Section 9.11 on page 202 for details about configuring the synchronization settings.
USB -> NSA or USB <- NSA
When you synchronize files in one direction, contents on the source device replace the files on the target device.
The following figure illustrates how synchronization works when you synchronize files from a USB device to the NSA. The same concept applies when you synchronize files from the NSA to a USB device.
Figure 103 Synchronizing Files Example 1
Before Sync
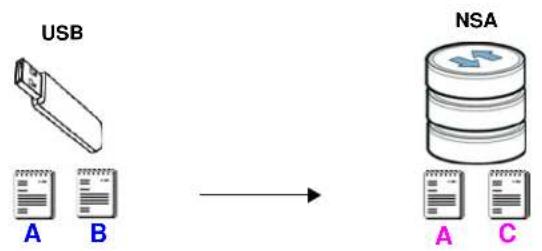
flowchart
graph LR
    A["USB"] --> B["NSA"]
    style A fill:#f9f,stroke:#333
    style B fill:#bbf,stroke:#333
After Sync
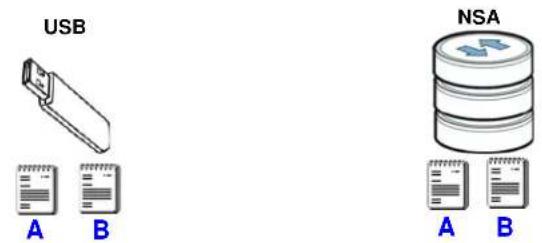
Both storage devices contain A.
- A copy of files A and B from the USB device is transferred to the NSA.
- File A from the USB device replaces file A on the NSA.
- File C on the NSA is deleted.
USB <-> NSA
When you synchronize files in both directions simultaneously, both storage devices transfer unique files to one another. Files with the same file name are synchronized according to their modification date/time. The difference in modification time between the two files has to be greater than five minutes. More recently modified files overwrite the older ones during synchronization.
The following figure illustrates how synchronization works when you synchronize files in both directions simultaneously.
Figure 104 Synchronizing Files Example 2
Before Sync
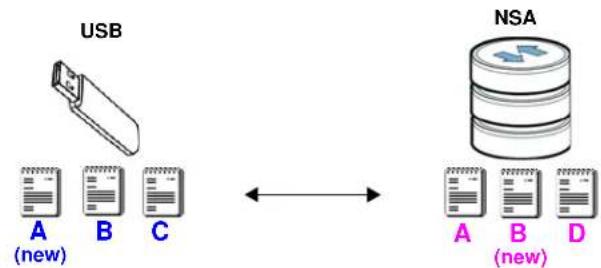
flowchart
graph LR
    A["USB"] --> B["NSA"]
    subgraph USB
        A1["A (new)"]
        B1["B"]
        C1["C"]
    end
    subgraph NSA
        A2["A (new)"]
        B2["B"]
        D2["D"]
    end
    A1 <--> B1
    B1 <--> NSA
After Sync
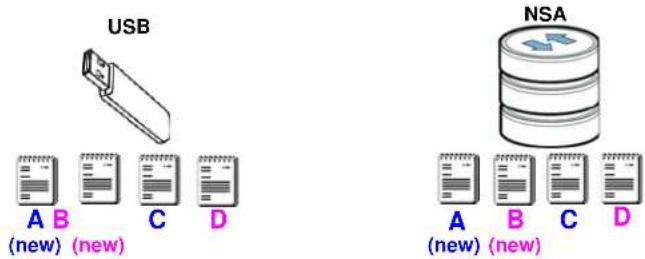
A on the USB device and B on the NSA are modified more recently.
- File A from the USB device replaces file A on the NSA.
- File B from the NSA replaces file B on the USB device.
- A copy of file C from the USB device is transferred to the NSA.
• A copy of file D from the NSA is transferred to the USB device.
10.1 Overview
This chapter describes features you can add to the NSA by installing packages. See Section 6.5 on page 143 for how to manage packages.
10.2 What You Can Do
- Use the SMART screens (Section 10.3 on page 215) to view your NSA hard disk(s) statistics and monitor their performance.
- Use the DyDNS screen (Section 10.4 on page 219) to configure the domain name settings of your NSA.
- Use the NFS screen (Section 10.5 on page 220) to configure the Network File System (NFS) settings of your NSA.
- Use the Syslog Server screen (Section 10.6 on page 223) to configure the NSA to accept syslog logs from syslog clients.
- Use the TFTP Server screen (Section 10.7 on page 225) to configure the NSA to accept log files from TFTP clients.
- Use the eMule screens (Section 10.8 on page 226) to configure the server, task and search settings for the eMule application.
- Use theillus screen (Section 10.9 on page 240) to configure the NAS so you can have it manage your downloads including those from one-click hosting sites.
- Use Polkast (Section 10.10 on page 241) for fast, secure, direct access to your NSA from your iPad, iPhone or Android device.
- Use the Protect screens (Section 10.11 on page 245) to configure and schedule the backup and restore jobs of your NSA.
10.3 SMART Screen
Use this screen to view indicators of your NSA's hard disk(s) health.
Self Monitoring, Analysis, and Reporting Technology (S.M.A.R.T) detects and reports the reliability of hard disks using standard indicators (called “attributes”), to help you anticipate possible disk failures.
Note: The fields included the screens may vary depending on the hard disk that you use.
Click Storage > S.M.A.R.T to open the following screen.
Figure 105 Storage > S.M.A.R.T
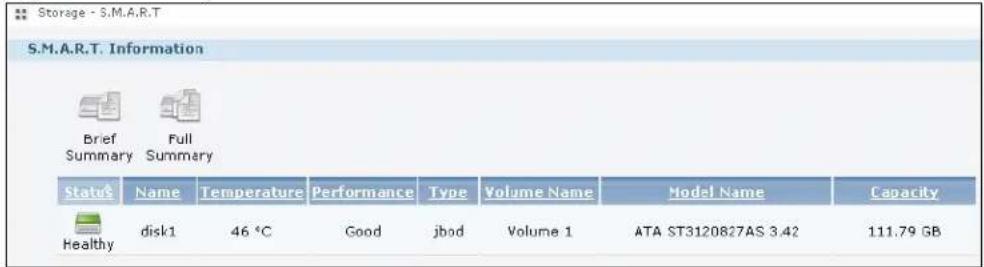
The following table describes the labels in this screen.
Table 54 Storage > S.M.A.R.T
| LABEL DESCRIPTION | |
| S.M.A.R.T. Information | |
| Brief Summary | Select a hard disk volume from the list and click this to display information about the volume, such as the hard disk vendor, specific model, hard disk capacity and so on.See Section 10.3.1 on page 216 to view the Brief Summary screen. |
| Full Summary | Select a volume and click this to display more detailed information about the volume.See Section 10.3.1 on page 216 to view the Full Summary screen. |
| The table lists your hard disks. Click a column's heading to sort the entries by that criteria. | |
| Status | This shows the condition of the hard disk volume. Go to Section 7.4 on page 157 for more information. |
| Name This shows the | name assigned to the hard disk. |
| Temperature This shows the temperature of the hard disk in degrees celsius. | |
| Performance | This shows your hard disk's performance. Refer to Section 10.3.2 on page 217 for more information on how S.M.A.R.T determines your hard disk's condition. This displays:Good- This shows when you compare each Value with the Threshold Value and all the Value is greater than the Threshold Value.Bad- This shows when you compare each Value with the Threshold Value and at least one Value is less than or equal to the Threshold Value. |
| Type | This shows volume type or file system that the hard disk is using, such as JBOD, PC Compatible Volume and RAID or FAT32, FAT16 and NTFS.See Section 7.6.3 on page 161 for descriptions of the volume types. |
| Volume Name This shows the name of the hard disk volume. | |
| Model Name This shows the factory model of the hard disk. | |
| Capacity This shows the total hard disk space of the hard disk volume. | |
10.3.1 SMART Brief Summary
Use this screen to display information about the volume, such as the hard disk vendor, specific model, hard disk capacity and so on.
Click Brief Summary in the Storage > S.M.A.R.T screen to display the following.
Figure 106 Storage > S.M.A.R.T: Brief Summary
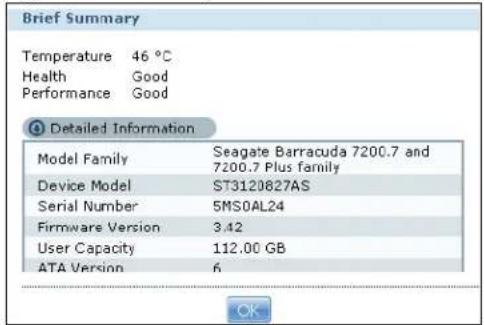
The following table describes the labels in this screen.
Table 55 Storage > S.M.A.R.T: Brief Summary
| LABEL DESCRIPTION | |
| Brief Summary | |
| Temperature This shows the current temperature of the hard disk in degrees celsius. | |
| Health | This describes the overall health of the volume based on S.M.A.R.T diagnostics. |
| Performance | This shows your hard disk's performance. Refer to Section 10.3.2 on page 217 for more information on how S.M.A.R.T determines your hard disk's condition. This displays:Good- This shows when you compare each Value with the Threshold Value and all the Value is greater than the Threshold Value.Bad- This shows when you compare each Value with the Threshold Value and at least one Value is less than or equal to the Threshold Value. |
| Detailed Information | |
| Model Family This shows the vendor and product family of the hard disk. | |
| Device Model This shows the factory model of the hard disk. | |
| Serial Number This shows the serial number of the hard disk. | |
| Firmware Version This shows the firmware version installed in the hard disk. | |
| User Capacity This shows the total hard disk space of the hard disk volume. | |
| ATA Version | This shows the ATA version of the hard disk, which refers to an industry standard category for storage devices and connectors used. |
| ATA Standard | This field displays the Advanced Technology Attachment standard the hard drive supports. |
| Local Time This field displays the local time that the hard drive is using. | |
| SMART support | This field displays whether or not the hard drive is SMART-capable. |
| SMART support | This field displays whether or not the hard drive has SMART monitoring turned on. |
| OK | Click this to close the window. |
10.3.2 SMART Full Summary
Use this screen to display more details information about the volume.
Click Full Summary in the Storage > S.M.A.R.T screen to display the following.
Figure 107 Storage > S.M.A.R.T: Full Summary
| Full Summary | ||||||||
| ID | Attribute_Name | Flag | Value | Worst | Threshold | Type | Undated | When Failed |
| 197 | Current_Pending_Sector | 0x0012 | 100 | 100 | 000 | Old_age | Always | - |
| 195 | Hardware_ECC_Recovered | 0x001a | 063 | 045 | 000 | Old_age | Always | - |
| 200 | Multi_Zone_Error_Rate | 0x0000 | 100 | 253 | 000 | Old_age | Offline | - |
| 198 | Offline_Uncorrectable | 0x0010 | 100 | 100 | 000 | Old_age | Offline | - |
| 12 | Power_Cycle_Count | 0x0032 | 100 | 100 | 020 | Old_age | Always | - |
| 9 | Power_On_Hours | 0x0032 | 097 | 097 | 000 | Old_age | Always | - |
| 1 | Raw_Read_Error_Rate | 0x000f | 063 | 045 | 006 | Pre-fail | Always | - |
| 5 | Reallocated_Sector_Ct | 0x0033 | 100 | 100 | 036 | Pre-fail | Always | - |
| Seek_Error_Rate | 0x000f | 082 | 060 | 030 | Pre-fail | Always | ||
The following table describes the labels in this screen.
Table 56 Storage > S.M.A.R.T: Full Summary
| LABEL DESCRIPTION | |
| ID This is the identification number used to tag a hard disk attribute.This is standard across all S.M.A.R.T-enabled storage devices. However it depends on the storage vendor which attributes it will allow S.M.A.R.T to diagnose. | |
| Attribute Name | This refers to an attribute of the hard disk that S.M.A.R.T can assess. Attributes describe the hard disk's physical state, performance, wear-and-tear, and so on. |
| Flag | This shows a code that S.M.A.R.T uses to determine the current state of the hard disk. |
| Value | This is a value that corresponds to the Raw Value. Compare this with the Threshold Value.S.M.A.R.T compresses the raw value(s) into a digit from 1 to 253, where 1 indicates the worst scenario while 253 indicates the best scenario.The values 100 or 200 usually represent the mean or normal value. |
| Worst This is the lowest value attained by the hard disk since S.M.A.R.T started its assessment of the hard disk. | |
| Threshold This is the attribute's threshold value. If the attribute's current normalized value is less than or equal to the threshold, the attribute has failed. An attribute value close to or below the threshold indicates the hard drive is no longer reliable. | |
| Type This shows S.M.A.R.T's assessment of the hard disk.Old_age indicates end-of-product life from old-age (normal wearing out) if the attribute value is less than or equal to the threshold.Pre-fail indicate imminent hard drive failure if the attribute value is less than or equal to the threshold.Note that just because an attribute is of the Pre-fail type does not mean your hard drive is ready to fail. It only means this if the current normalized value of the attribute is less than or equal to the threshold. | |
| Updated | This indicates when the hard drive updates the value for this attribute.Always means the hard drive updates this attribute during normal operation and during offline activities.Offline means the hard drive only updates this attribute when no one is accessing the hard drive. |
Table 56 Storage > S.M.A.R.T: Full Summary
| LABEL DESCRIPTION | |
| When Failed This column indicates when (if ever) the attribute failed. An attribute has failed if the normalized value is less than or equal to the threshold.-: This displays if the attribute is not failing now and has never failed in the past.FAI LING_NOW: This displays if the attribute's current normalized value is less than or equal to the threshold.In_the_past: This displays if the attribute's current normalized value is greater than the threshold but the worst recorded value is less than or equal to the threshold. | |
| Raw Value | This is the attribute's unprocessed raw data. These values show exact amounts of time or numbers of attempts or errors. The meaning to the raw values is specific to the hard drive manufacturer. Table 42 on page 156 has some information about whether a higher or lower individual raw S.M.A.R.T. attribute value is better. |
| OK Click this to close this window. | |
10.4 DyDNS Screen
Use this to enable and configure DyDNS.
Dynamic DNS allows you to update your current dynamic IP address with a dynamic DNS service so that anyone can contact you (such as through NetMeeting or CUSeeMe). You can also access your FTP server or Web site on your own computer using a domain name (for instance myhost.dhs.org, where myhost is a name of your choice) that will never change instead of using an IP address that changes each time you reconnect. Your friends or relatives will always be able to call you even if they don't know your IP address.
Click Network > DyDNS to open the following screen.
Figure 108 Network > DyDNS
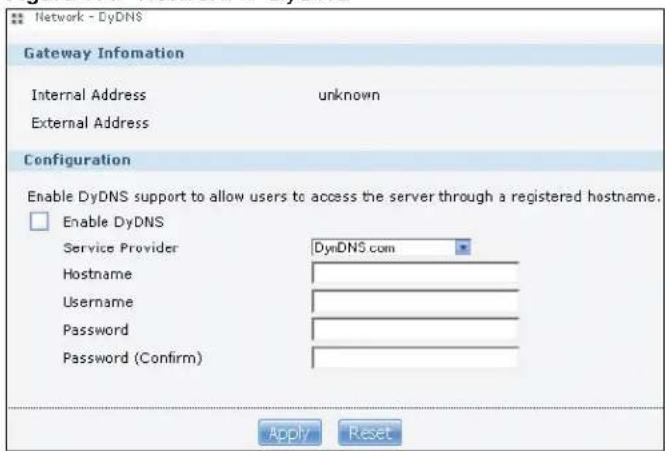
The following table describes the labels in this screen.
Table 57 Network > DyDNS
| LABEL DESCRIPTION | |
| Gateway Information | |
| Internal Address | This shows the IP address assigned to the NSA by the gateway in your local network. |
Table 57 Network > DyDNS
| LABEL DESCRIPTION | |
| External Address This | shows the IP address of the NSA that can be accessed in the Wide Area Network (WAN). Note that this is not assigned by the DyDNS server. |
| Configuration | |
| Enable DyDNS Select | this to use dynamic DNS.You need to have registered a dynamic DNS account with a service provider such as www.dyndns.org. The Dynamic DNS service provider will give you a password or key. |
| Service Provider Select | your Dynamic DNS service provider. |
| Hostname Enter your | host name provided by the Dynamic DNS service. |
| Username Enter your | user name for your DNS account. |
| Password Enter the p | password assigned to your DNS account. |
| Password (Confirm) | Confirm the password you entered. |
| Apply Click this to save your changes. | |
| Reset Click this to clear the fields. | |
10.5 NFS Screen
Use this screen to enable and configure Network File System (NFS) settings on your NSA.
NFS is a client/server distributed file service that provides transparent file sharing for network environments. This allows shared folders in your NSA to be accessible like a local folder in a user's computer.
Click Network > NFS to open the following screen.
Figure 109 Network > NFS
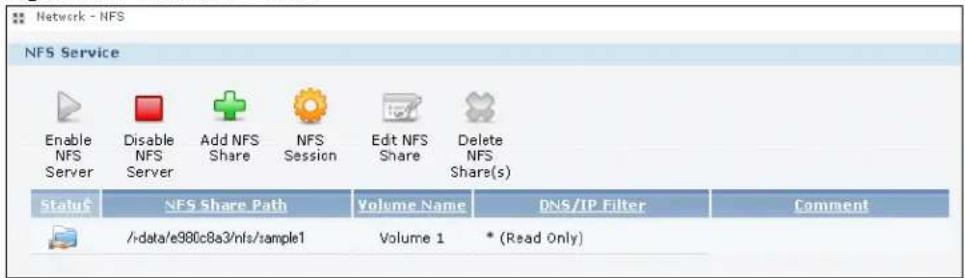
The following table describes the labels in this screen.
Table 58 Network > NFS
| LABEL DESCRIPTION | |
| NFS Service | |
| Enable NFS Server Click this to employ NFS in your NSA. | |
| Disable NFS Server Click this to stop using NFS.This makes all NFS shares unavailable. | |
| Add NFS Share Click this to add an NFS share.Refer to Section 10.5.1 on page 221 for the Add NFS Share screen. |
Table 58 Network > NFS
| LABEL DESCRIPTION | |
| NFS Session Click this | to view active NFS sessions. You can see the list of users who have access to the NFS shares.Refer to Section 10.5.2 on page 222 for the NFS Session screen. |
| Edit NFS Share Select | an NFS share from the list and click this to edit it.Refer to Section 10.5.1 on page 221 for the Edit NFS Share screen. |
| Delete NFS Share (s) | Select an NFS share from the list and click this to delete it. |
| The table lists your NFS shares. Click a column's heading to sort the entries by that criteria. | |
| Status This shows wh | ether the share is active or not. |
| NFS Share Path This | shows the location of the share in the NSA. |
| Volume Name This sh | ows the volume where the NFS share is located. |
| DN/IP Filter This shows | which domain name(s) or IP address(es) have read/write access to the NFS shares.Refer to Section 10.5.1 on page 221 for the screen where you can configure this. |
| Comment This shows | a short description of the share. |
You see a warning screen before you delete a volume.
Figure 110 Delete an NFS Share
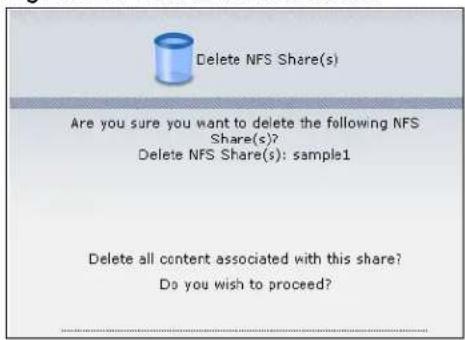
10.5.1 Add/Edit NFS Share
Use this screen to add or edit an NFS share.
Note: Some attributes of the NFS share cannot be edited.
Click Add or Edit in the Network > NFS screen to open the following:
Figure 111 Network > NFS: Add/Edit
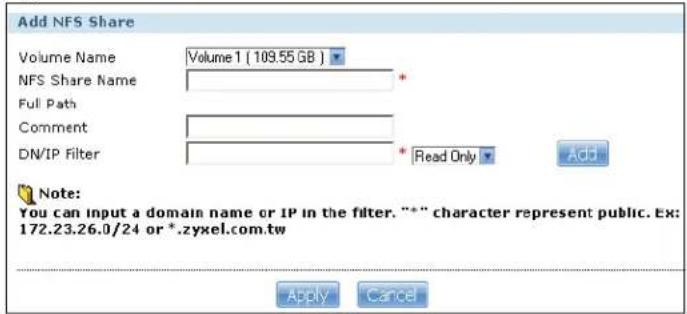
The following table describes the labels in this screen.
Table 59 Network > NFS: Add/Edit
| LABEL DESCRIPTION | |
| Volume Name Select | the volume where the folder you want to add as an NFS share is located. |
| NFS Share Name Enter | the name you want to give to the NFS share. |
| Full Path This shows | the location of the NFS share in the NSA.The NFS server assigns this path to the share folder you input. |
| Comment Enter a short description for the share. | |
| DN/IP Filter Enter the | domain name(s) or IP address(es) that can have access to the NFS share.Enter ‘*’ to make the share available to all users in the network. You can also enter a wildcard, such as ‘*.domain.com’ to indicate that all users within that network have access to the share.Select the access rights you want to grant to each domain name or IP address you enter and click Add.Read Only- Users with this access right can only view and copy files in the NFS share but cannot modify or delete them.Read/Write- Users with this access right can view, edit or delete files in the NFS share. |
| Apply Click this to save your changes. | |
| Cancel Click this to return to the previous screen without saving. | |
10.5.2 NFS Session
Use this screen to view a list of active NFS sessions. You can see which users are connected the NFS shares.
Click NFS Session in the Network > NFS screen to open the following.
Figure 112 Network > NFS: NFS Session
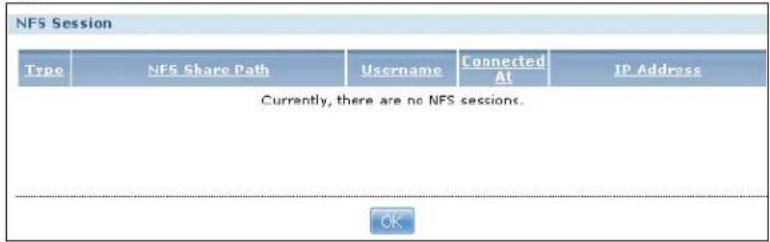
The following table describes the labels in this screen.
Table 60 Network > NFS: NFS Session
| LABEL DESCRIPTION | |
| Type This shows if the NFS share is active or not. | |
| NFS Share Path This shows the location of the share in the NSA. | |
| Username This shows the username of the active user connected to the NFS share. | |
| Connected At This displays the date and time the user last connected to the NSA in year, month, day, hour, minute, second format. | |
| IP Address This shows the IP address of the user accessing the NFS share. | |
| OK Click this to close the window. | |
10.6 Syslog Server Screen
Use this screen to configure the NSA to accept syslog logs from syslog clients such as ZyXEL's G-4100 v2.
Note: You may need to configure any firewalls between the NSA and the syslog clients in order to let the syslog traffic go to the NSA.
Click Applications > Syslog Server to open the following screen.
Figure 113 Applications > Syslog Server
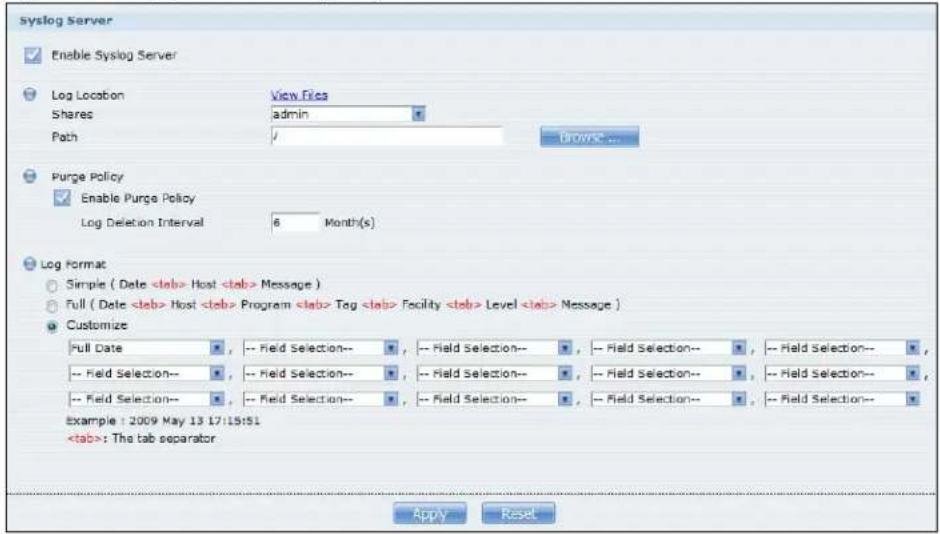
The following table describes the labels in this screen.
Table 61 Applications > Syslog Server
| LABEL DESCRIPTION | |
| Enable Syslog Server | Select this to have the NSA accept syslog logs from syslog clients. Clear it to stop the NSA from accepting syslog logs from syslog clients. |
| Log Location | ClickView Filesto browse to where you want to store the syslog logs on the NSA. |
| Shares Select the share in which to store the syslog logs. | |
Path Use this if you want to further specify a folder within the share. This field displays the share folder's path. Type the location of the folder using forward slashes as branch separators or useBrowseto find or create a folder on the NSA.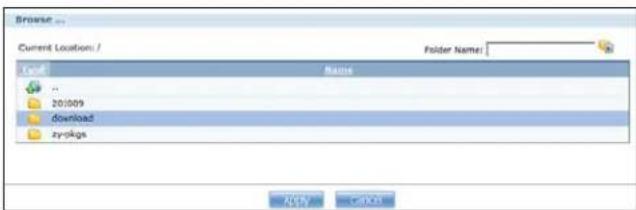 After you clickApplyin theSyslog Serverscreen the NSA creates a folder for the current month's logs. The folder's name uses the year and month in YYYYMM format. After you clickApplyin theSyslog Serverscreen the NSA creates a folder for the current month's logs. The folder's name uses the year and month in YYYYMM format. | |
| Purge Policy | SelectEnable Purge Policyand set a number of months in theLog Deletion Intervalfield that displays to have the NSA delete the syslog messages after keeping them for the specified period of time.Regardless of how you set the purge policy, to save hard disk space the NSA archives the syslog logs in a .tgz file on the second day of each month and deletes the original folder and syslog files. The NSA creates a new folder for the syslog logs it receives after that. You can use a zip program such as 7-zip to open the archives. |
Table 61 Applications > Syslog Server
| LABEL DESCRIPTION | |
| Log Format Select the | format you want to use for recording the received logs. |
| The Example item below the drop-down list boxes displays how the selected custom format looks. For example, if you select Full Date, the individual log entries would display with something like 2009 May 13 17:15:51 in front of them. | |
| Apply Click this to save your changes. | |
| Reset | Click this to restore the screen's last-saved settings. |
10.7 TFTP Server Screen
Trivial File Transfer Protocol (TFTP) is an Internet file transfer protocol similar to FTP and often used for transmitting large numbers of small files. Use this screen to configure the NSA to accept log files from TFTP clients such as ZyXEL's G-4100 v2.
Note: You may need to configure any firewalls between the NSA and the TFTP clients in order to let the log files go to the NSA.
Click Applications > TFTP Server to open the following screen.
Figure 114 Applications > TFTP Server
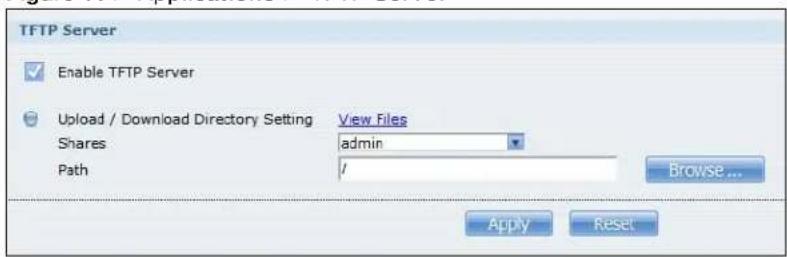
The following table describes the labels in this screen.
Table 62 Applications > TFTP Server
| LABEL DESCRIPTION | |
| Enable TFTP Server | Select this to have the NSA accept log files from TFTP clients. Clear it to stop the NSA from accepting log files from TFTP clients. |
| Upload / Download Directory Setting | Click View Files to browse to where you want to store the log files on the NSA. |
| Shares Select the share in which to store the log files. | |
Table 62 Applications > TFTP Server
| LABEL DESCRIPTION | |
Path Use this if you want to further specify a folder within the share This field displays the share folder's path. Type the location of the folder using forward slashes as branch separators or useBrowseto find or create a folder on the NSA.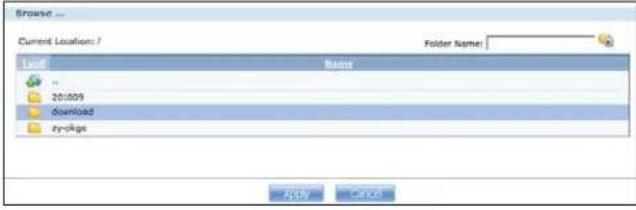 | |
| Apply Click this to save your changes. | |
| Reset | Click this to restore the screen's last-saved settings. |
10.8 eMule Screens
Use these screens to manage the eMule application in your NSA. eMule is a peer-to-peer (P2P) file-sharing console that lets you download files from the Internet. It works with eDonkey and Kad networks.
10.8.1 eMule Server Screen
Use this screen to configure the eMule server.
Click Applications > eMule > Server to open the following screen.
Figure 115 Applications > eMule > Server
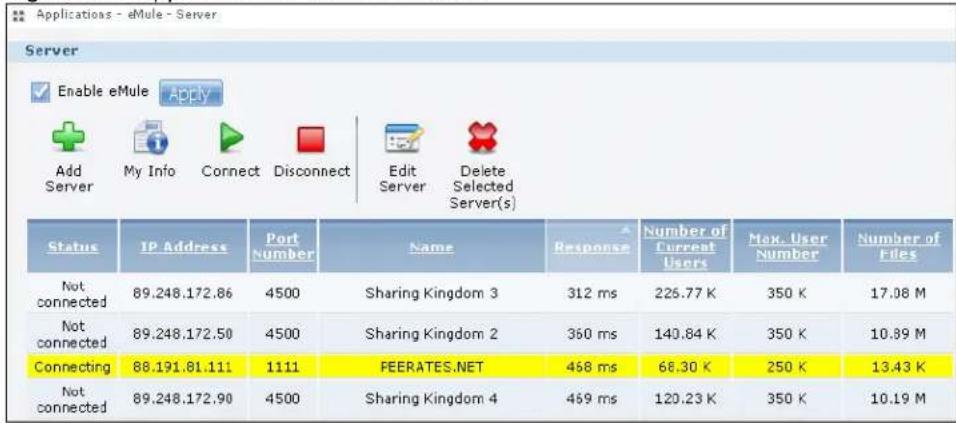
The following table describes the labels in this screen.
Table 63 Applications > eMule > Server
| LABEL DESCRIPTION | |
| Server - You can add multiple servers in this screen. However, the NSA can only connect to one eMule server at a time. | |
| Enable eMule | Check this and clickApplyto enable the eMule application. |
| Add Server | Click this to add an eMule server. A server provides a list of available files for download, users sharing them and other information.Refer toSection 10.8.2 on page 228for theAdd Serverscreen. |
| My Info | Select a server from the list and click this to view the details and connection status of the server.Refer toSection 10.8.4 on page 229for theMy Infoscreen. |
| Connect | Click this to connect to the selected server or a random server if no server is selected. |
| Disconnect Select | a server from the list and click this to disconnect from the server. |
| Edit Server | Select a server from the list and click this to edit the server's information, including the server name and IP address.Refer toSection 10.8.3 on page 228for theEdit Serverscreen. |
| Delete Selected Server(s) | Select the server(s) from the list and click this to delete the server(s) from the list. |
| The table lists your servers. Click a column's heading to sort the entries by that criteria. | |
| Status | This shows the status of the NSA's connection to the server:Connected, Connecting or Not Connected. |
| IP Address This shows the IP address of the server. | |
| Port Number This shows the port number used by the server for file-sharing. | |
| Name This shows the name of the server. | |
| Response This shows the length of time (in milliseconds) that the server took to reply to the NSA. | |
| Number of Current Users | This shows the number of users currently connected to the server. |
| Max. User Number | This shows the total number of users that can connect to the server at the same time. |
| Number of Files | This shows the number of files available for download in the server. |
You see a warning screen before you delete a server.
Figure 116 Delete a Server
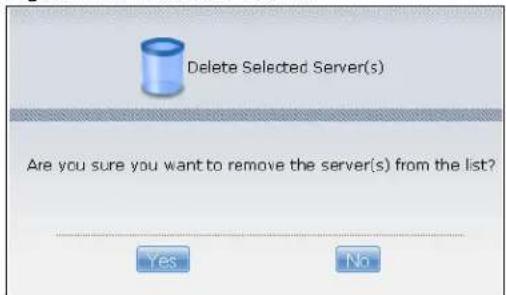
10.8.2 Add Server
Use this screen to add a server for the eMule application.
Click Add in the Applications > eMule > Server screen to add a server.
Figure 117 Applications > eMule > Server: Add
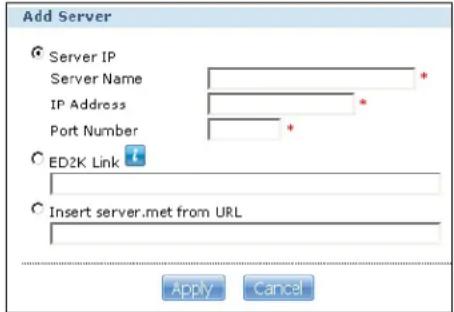
The following table describes the labels in this screen.
Table 64 Applications > eMule > Server: Add
| LABEL DESCRIPTION | |
| Server IP | Select this if you know the server name, IP address and port number of the eMule server you want to add. |
| Server Name Enter | the server name. |
| IP Address Enter th | the IP address of the server. |
| Port Number Enter | the port number used by the server for file-sharing. |
| ED2K Link | Select this and enter the ED2K link for the eMule server you want to add.The ED2K link is used within the eMule network and contains information about the server. |
| Insert server.met from URL | Select this and enter the URL from which you want to download the server list that you want the NSA to use. |
| Apply Click this to apply your changes. | |
| Cancel | Click this to return to the previous screen without saving. |
10.8.3 Edit Server
Use this screen to edit a server for the eMule application.
Click Edit in the Applications > eMule > Server screen to edit a server.
Figure 118 Applications > eMule > Server: Edit
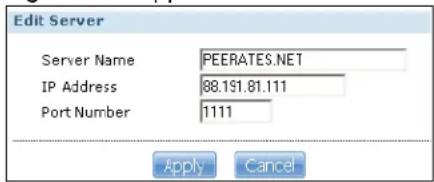
The following table describes the labels in this screen.
Table 65 Applications > eMule > Server: Edit
| LABEL DESCRIPTION | |
| Server Name Enter the server name. | |
| IP Address Enter the IP address of the server. | |
| Port Number Enter the port number of the server. | |
| Apply Click this to apply your changes. | |
| Cancel | Click this to return to the previous screen without saving. |
10.8.4 My Info
Use this screen to view the server details, including the status, IP address and download/upload speeds.
Click MyInfo in the Applications > eMule > Server screen to view the server details.
Figure 119 Applications > eMule > Server: MyInfo
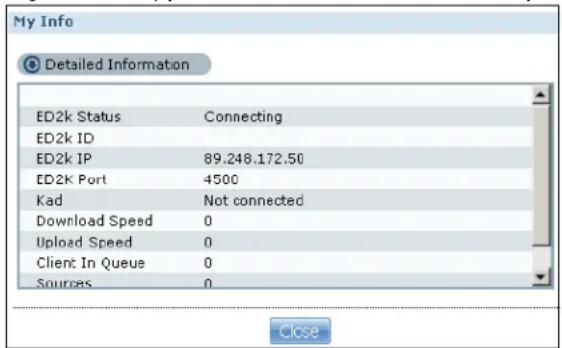
The following table describes the labels in this screen.
Table 66 Applications > eMule > Server: MyInfo
| LABEL DESCRIPTION | |
| ED2k Status | This shows the status of the NSA's connection to the server: Connected, Connecting or Not Connected. |
| ED2k ID | This is the identification given to the NSA by the eMule server. The ID comes in two types:High ID - The NSA connects to the server directly.Low ID - The NSA connects to the server from behind a firewall. |
| ED2k IP This is the IP | address of the eMule server to which the NSA is connected. |
| ED2k Port This is the | port number of the eMule server to which the NSA is connected. |
| Kad | This shows the status of the NSA's connection to the Kad network: Connected or Not Connected.Kad is a shortcut for Kademlia network, which does not use servers to store files or user information in order to run a peer-to-peer network. Instead it employs peers/clients as small “servers” and runs queries through these peers. |
| Download Speed | This shows the current download speed of the eMule client. |
| Upload Speed | This shows the current upload speed of the eMule client. |
| Client in Queue | This shows the number of peers waiting to connect to the NSA to download its file (s). |
Table 66 Applications > eMule > Server: MyInfo
| LABEL DESCRIPTION | |
| Sources | This shows the total number of peers that can share the required files to the NSA eMule client. |
| Close Click this to exit | the screen. |
10.8.5 eMule Task Screen
Use this screen to view tasks, including completed, downloading, uploading and shared tasks, that are being handled by the NSA.
Click Applications > eMule > Task screen to view the task details.
Figure 120 Applications > eMule > Task
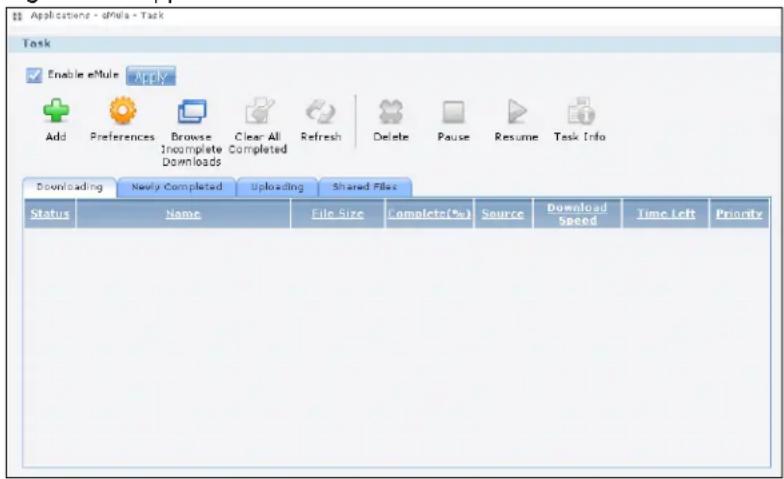
The following table describes the labels in this screen.
Table 67 Applications > eMule > Task
| LABEL DESCRIPTION | |
| Task | |
| Enable eMule | Check this and clickApplyto enable the eMule application. |
| Add Click this to add | a download task (ED2K link) to the list.Refer toSection 10.8.6 on page 232for theAdd Taskscreen. |
| Preferences | Click this to open a screen where you can set the default location for saving downloaded files. You can also configure your eMule download settings.Refer toSection 10.8.7 on page 233for thePreferencesscreen. |
| Browse Incomplete Downloads | Click this to open a screen where you can see a list of *.part.met files that the NSA is still in the process of downloading.Refer toSection 10.8.9 on page 236for theShare Browsingscreen. |
| Clear All Completed | Click this to remove all completed downloads from the task list. This only removes the newly completed task(s) in this session. |
| Refresh Click this to | refresh the task screen. |
| Delete Select an item | from the list and click this to delete the task. |
| Pause Select an item | from the list and click this to pause the task. |
Table 67 Applications > eMule > Task
| LABEL | DESCRIPTION |
| Resume | Select a paused item from the list and click this to resume the task. |
| Task Info | Select an item from the list and click this to view the details and status of the task. |
| The table lists your tasks. Click a column's heading to sort the entries by that criteria. | |
| Downloading This table | e shows a list of download tasks that are still in progress. |
| Newly Completed | This table shows a list of tasks that have been completed but have not been cleared from the list. |
| Uploading This table | shows a list of upload tasks that are still in progress. |
| Shared Files | This table shows a list of files on the NSA that are available for download by other peers in the network. |
| Status | This shows the current status of the task: Waiting or Downloading. |
| Name/File Name This | shows the name of the file(s) associated to the task. |
| File Size/Size This shows the size of the file(s) associated in the task. | |
| Complete (%) | This shows the percentage of the file that has been downloaded by the NSA. It also indicates what percent of the file still needs to be downloaded. |
| Source | This shows the total number of peers that can share the required files to the NSA eMule client. |
| Download Speed This | shows the download speed of the NSA for the task. |
| Time Left | This shows how much more time the NSA needs to complete the file's download. |
| Priority | Use this field to set the priority for the task. Choose from Auto, Low, Normal or High.Select Auto to have the NSA automatically determine the task's priority.Select High to have the NSA complete this task before the others. |
| Transferred | This shows what percent of the file the NSA has uploaded to other peers.This column is available in the Uploading tab. |
| Upload Speed | This shows the upload speed of the NSA.This column is available in the Uploading tab. |
| Requests This shows | the number of requests for a shared file.This column is available in the Shared Files tab. |
| Accepted Requests | This shows the number of file requests granted by the NSA.This column is available in the Shared Files tab. |
Note: Download tasks initially appear in the Downloading tab of the eMule Task screen. Depending on its status, it can eventually show up in the other tabs (Newly Completed, Uploading or Shared Files tabs).
You see a warning screen before you delete a task.
Figure 121 Delete a Task
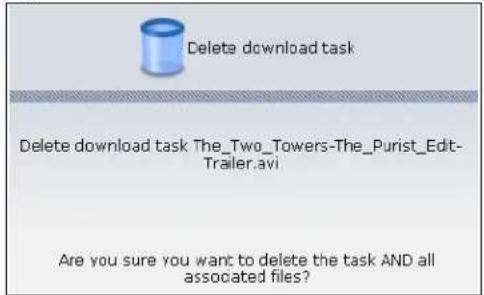
10.8.6 Add Task
Use this to add a download task to the NSA.
Click Add in the Applications > eMule > Task screen to add a task.
Figure 122 Applications > eMule > Task: Add
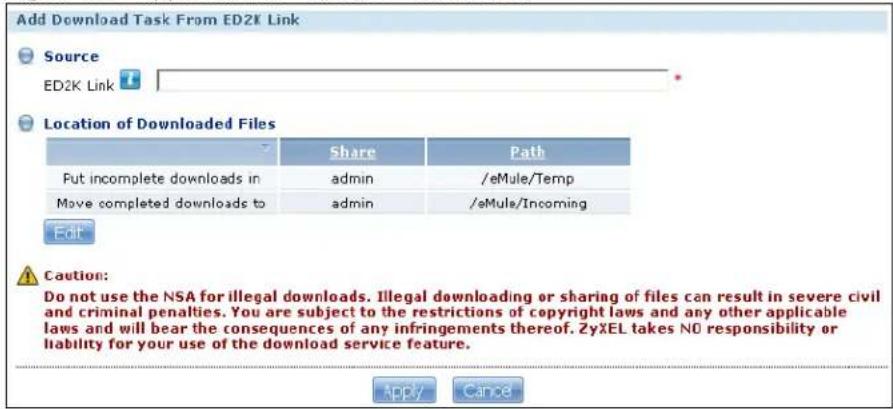
The following table describes the labels in this screen.
Table 68 Applications > eMule > Task: Add
| LABEL DESCRIPTION | |
| Source | |
| ED2K Link Paste the | ED2K link of the file you want to download into this field.The ED2K link identifies files in the eMule network. It starts with ed2k:// and may contain the name and size of the file you want to download. |
| Location of Downloaded Files | This shows where the NSA stores new downloads (Put incomplete downloads in) and where the NSA moves completed downloads (Move completed downloads to).The Share column shows the name of the share where the file is downloaded.The Path column points to the location in the share where the NSA will save the downloaded files. |
Table 68 Applications > eMule > Task: Add
| LABEL DESCRIPTION | |
| Edit | Click this to open the following screen where you can set the default folder location where you “Put incomplete downloads in” and “Move complete downloads to”: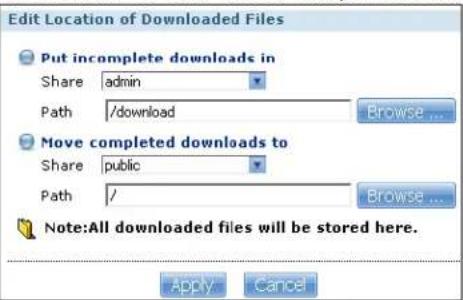 Share - Select the destination share from the drop-down list.Path - This field displays the share folder’s path. You can useBrowse to find or create a folder on the NSA or type the location of the folder using forward slashes as branch separators. Share - Select the destination share from the drop-down list.Path - This field displays the share folder’s path. You can useBrowse to find or create a folder on the NSA or type the location of the folder using forward slashes as branch separators.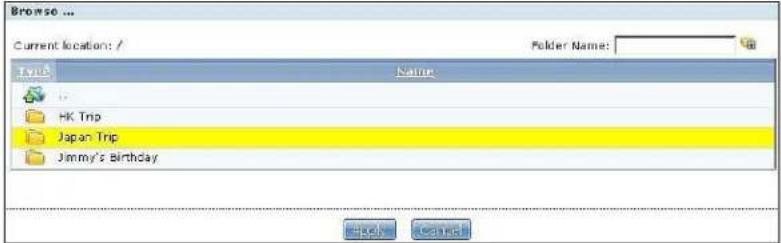 Current Location- This is the location of the selected folder.Folder Name- Enter a new folder name and clickto create it.Type- This identifies the item as a folder or file.Name- This is the name of the folder/file.Select a folder. If you don’t select a folder, a forward slash (/) displays in thePathfield. All contents within the specified share are automatically selected.ClickApplyto save your settings andCancelto close the screen. Current Location- This is the location of the selected folder.Folder Name- Enter a new folder name and clickto create it.Type- This identifies the item as a folder or file.Name- This is the name of the folder/file.Select a folder. If you don’t select a folder, a forward slash (/) displays in thePathfield. All contents within the specified share are automatically selected.ClickApplyto save your settings andCancelto close the screen. |
| Apply Click this to save your changes. | |
| Cancel | Click this to return to the previous screen without saving. |
10.8.7 Preferences
Use this screen to configure your eMule settings, such as port numbers to use, its download/upload rates and the maximum number of peers allowed to connect to the NSA.
Click Applications > eMule > Task > Preferences to open the following screen.
Figure 123 Applications > eMule > Task > Preferences
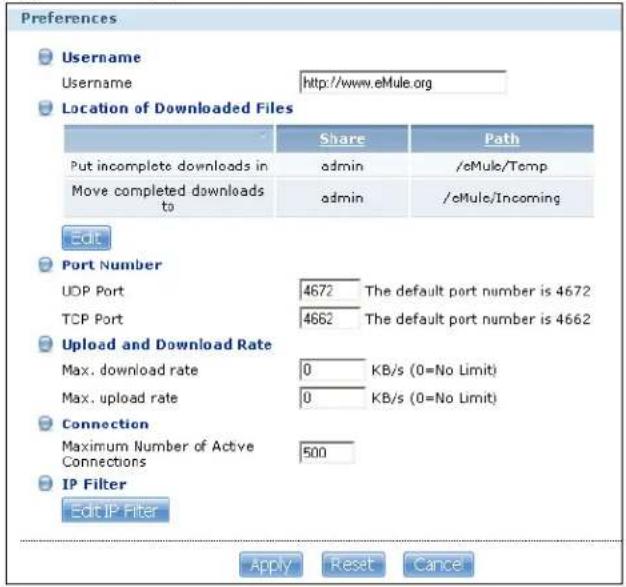
The following table describes the labels in this screen.
Table 69 Applications > eMule > Task > Preferences
| LABEL DESCRIPTION | |
| Username | |
| Username Enter your | user name that identifies the NSA in the eMule network. |
| Location of Downloaded Files | This shows where the NSA stores new downloads (Put incomplete downloads in) and where the NSA moves completed downloads (Move completed downloads to).The Share column shows the name of the share where the file is downloaded.The Path column points to the location in the share where the NSA will save the downloaded files. |
Table 69 Applications > eMule > Task > Preferences
| LABEL DESCRIPTION | |
Edit Click this to open the following screen where you can set the default folder locationwhere you “Put incomplete downloads in” and “Move complete downloads to”:.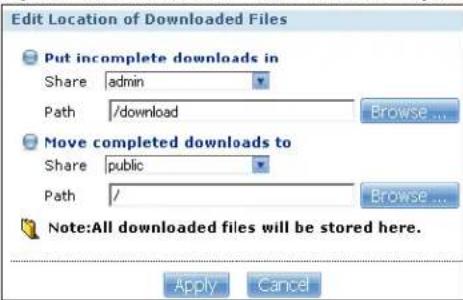 Share - Select the destination share from the drop-down list.Path - This field displays the share folder’s path. You can useBrowse to find or create a folder on the NSA or type the location of the folder using forward slashes as branch separators. Share - Select the destination share from the drop-down list.Path - This field displays the share folder’s path. You can useBrowse to find or create a folder on the NSA or type the location of the folder using forward slashes as branch separators.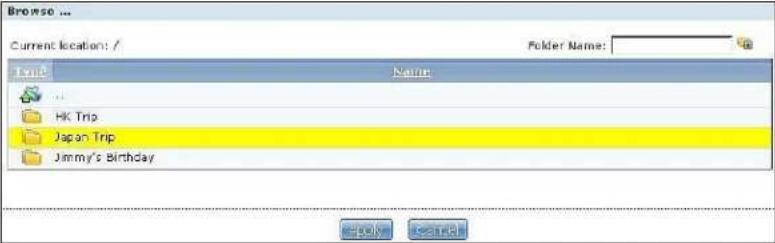 Current Location- This is the location of the selected folder.Folder Name- Enter a new folder name and clickto create it.Type- This identifies the item as a folder or file.Name- This is the name of the folder/file.Select a folder. If you don’t select a folder, a forward slash (/) displays in thePathfield. All contents within the specified share are automatically selected.ClickApplyto save your settings andCancelto close the screen. Current Location- This is the location of the selected folder.Folder Name- Enter a new folder name and clickto create it.Type- This identifies the item as a folder or file.Name- This is the name of the folder/file.Select a folder. If you don’t select a folder, a forward slash (/) displays in thePathfield. All contents within the specified share are automatically selected.ClickApplyto save your settings andCancelto close the screen. | |
| Port Number | |
| UDP Port | Enter the UDP port number you want to use for file transfers. |
| TCP Port | Enter the TCP port number you want to use for file transfers. |
| Upload and Download Rate | |
| Max. download rate Enter the maximum download rate for download tasks. | |
| Max. upload rate Enter the maximum upload rate for upload tasks. | |
| Connection | |
| Maximum Numberof ActiveConnections | Enter the maximum number of eMule peer-to-peer connections. |
| IP Filter | |
| Edit IP Filter Click this to edit the IP Filter.IP filtering prevents your NSA from accessing certain networks and IP addresses that may be hosting malicious programs.Refer toSection 10.8.8 on page 236to view and configure theEdit IP Filterscreen. | |
| Apply Click this to save your changes. | |
Table 69 Applications > eMule > Task > Preferences
| LABEL DESCRIPTION | |
| Reset Click this to clear the fields. | |
| Cancel | Click this to return to the previous screen without saving. |
10.8.8 Edit IP Filter
Use this screen to enable IP filtering which prevents your NSA from accessing certain networks and IP addresses that may be hosting malicious programs.
Figure 124 Applications > eMule > Task > Preferences: Edit IP Filter
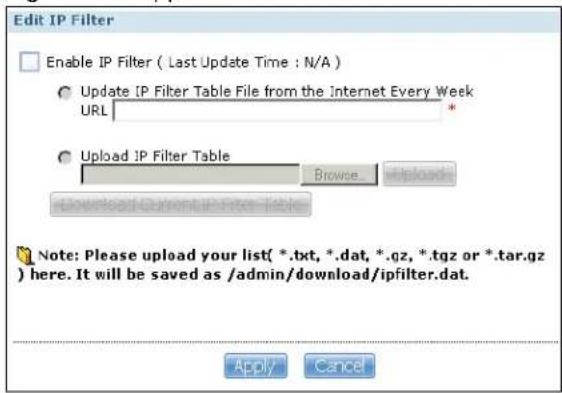
The following table describes the labels in this screen.
Table 70 Applications > eMule > Task > Preferences: Edit IP Filter
| LABEL DESCRIPTION | |
| Enable IP Filter | Click this to enable IP filtering. This prevents your NSA from accessing certain networks and IP addresses that may be hosting malicious programs.SelectUpdate IP Filter Table File from the Internet Every Weekif you know the web location of the IP filter table you want to use. Enter the link where your NSA can acquire the list of networks and IP addresses. The NSA checks this link every week and uses the latest IP filter table available.SelectUpload IP Filter Tableif you want to use an IP filter table from your local computer. |
| Apply Click this to | save your changes. |
| Reset Click this to | return to the previous screen without saving. |
10.8.9 Share Browsing
Use this screen to view a list of files that are still being downloaded by the NSA. The files are located in the eMule\Temp folder in the Admin share by default.
Click Applications > eMule > Task > Browse Incomplete Downloads to open the following screen.
Figure 125 Applications > eMule > Task > Browse Incomplete Downloads
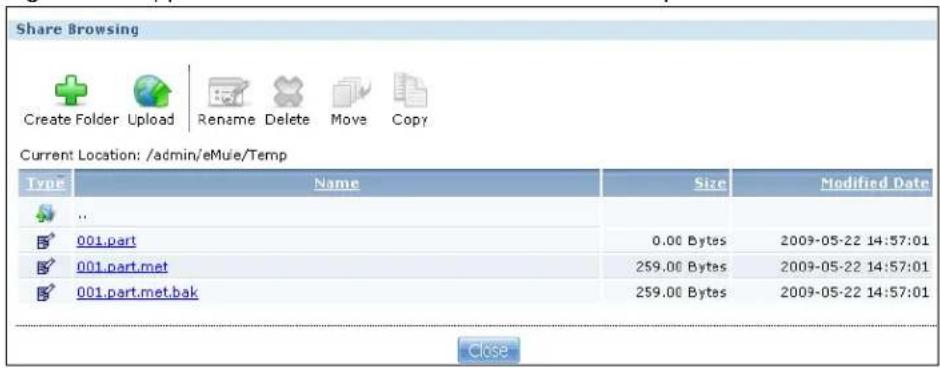
The following table describes the labels in this screen.
Table 71 Sharing > Shares > Share Browser
| LABEL DESCRIPTION | |
| Create Folder | Type a folder name and clickApplyto make a new folder. The name can be 1 to 239 single-byte (no Chinese characters allowed for example) ASCII characters. The name cannot be the same as another existing folder in the same path. SeeSection 3.4.6 on page 41 for more information on folder names. |
| Upload | Click this to add files to the share. UseBrowse to locate a file and clickApplyto upload the file. Note that the size of each file should be less than 2 GB.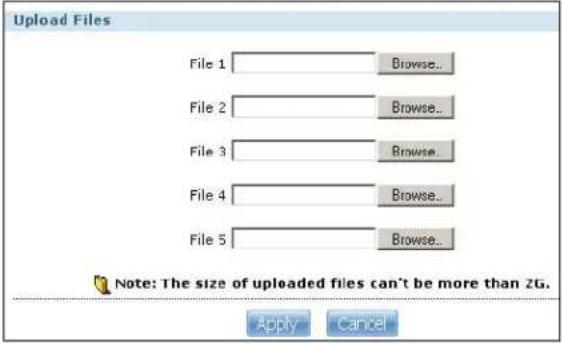 |
| Rename Select a | folder or file and click this to open a screen. Enter the name you want and click OK to make the changes.Note: When you change a file name, make sure you keep the file extension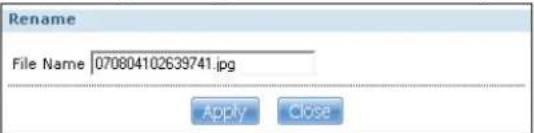 |
| Delete | Select a file/folder from the list and click this to open a warning screen. Click Yes to delete the file/folder, or click No to close the screen. |
| Move | Select a file/folder from the list and click this to relocate the file/folder to another share. |
| Copy | Select a file/folder from the list and click this to make a duplicate of the file/folder to another share. |
| Current location | This is the name of the share and folder path that you are in. |
| Type The icon in | this column identifies the entry as a folder or a file.The folder with an arrow pointing up is for the link that takes you to the next higher layer in the share's folder tree. |
| Name | This section lists the share's existing folders or files. Click to the right of the file/folder name to select the file/folder. You can also click the folder's name to navigate to a sub-folder within the folder. |
| Size This field displays size of the file. | |
| Modified Date This field displays a file's latest modification date. | |
| Close Click this to close the screen. | |
10.8.10 Task Info
Use this screen to view eMule task details, such as status, file name, file size and its download progress.
Click Task Info in Applications > eMule > Task screen to open the following.
Figure 126 Applications > eMule > Task: Task Info
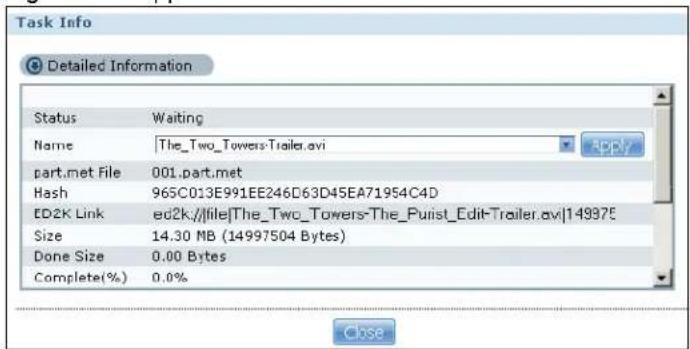
The following table describes the labels in this screen.
Table 72 Applications > eMule > Task: Task Info
| LABEL DESCRIPTION | |
| Status | This shows the current status of the task - Waiting or Downloading. |
| Name This shows the file name of the file associated with the task.You can change this file name by entering the new name and clicking Apply. | |
| part.met File This shows the temporary file name for an incomplete file.Files in peer-to-peer networks can be divided into several parts for easier download. Once all the parts have been downloaded, you can run one part and the file automatically rebuilds itself. If the download of the file(s) is not completed, the file parts cannot open on their own. | |
| Hash This shows the hash value of the download file.This is a text string that can be interpreted by eMule to check the downloaded file's integrity. | |
| ED2K Link This shows the ED2K link for this file.The ED2K link identifies files in the eMule network. It starts with ed2k:// and may contain the name and size of the file you want to download. | |
| Size This shows the size of the file associated with the task. | |
| Done Size This shows the size of the file that has been downloaded so far. | |
| Complete (%) This shows what percent of the file has been downloaded so far. | |
| Source | This shows the total number of peers that can share the required files to the NSA eMule client. |
| Download Speed This shows the download speed for the task. | |
| Time Left This shows how much time is needed to complete the task. | |
| Priority | This shows the priority of this task.You can set this in Section 10.8.5 on page 230. |
| Seen Complete | This shows the last time a source with the complete file was online. |
| Close | Click this to exit the screen. |
10.8.11 eMule Search Screen
Use this screen to search for files available in an eMule server using keywords and other parameters, such as file type, file size, and extension names.
Click Applications > eMule > Search to open the following screen.
Figure 127 Applications > eMule > Search
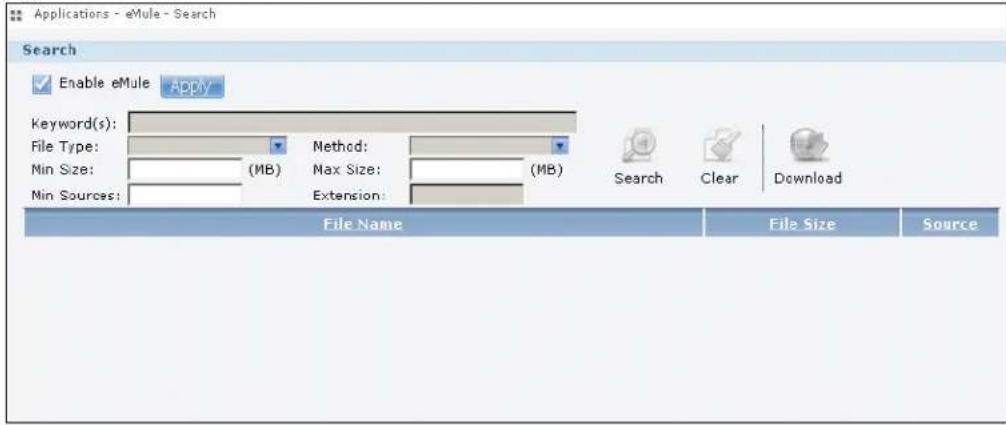
The following table describes the labels in this screen.
Table 73 Applications > eMule > Search
| LABEL DESCRIPTION | |
| Search | |
| Enable eMule | Check this and clickApplyto enable the eMule application. |
| Keyword(s) Enter words that are related to the file you want to download. | |
| File Type Select the file type that you want to download. | |
| Method Select the search method you want eMule to employ. | |
| Min Size Enter the minimum file size you want included in the search results. | |
| Max Size | Enter the maximum file size you want included in the search results. |
| Min Sources Enter the minimum number of peers sharing the file you want to download. | |
| Extension | Enter the file extensions separated by commas of files you want included in the search results. |
| Search Click this to have the NSA search the eMule network for files that match the criteria you have set. | |
| Clear Click this to clear the fields. | |
| Download Select a file from the results and click this to start downloading the file. | |
| This table shows the results of the search. | |
| File Name This shows the name of the file(s) that match the criteria you have set. | |
| File Size | This shows the size of the file(s) that match the criteria you have set. |
| Source | This shows how many peers are currently available to share this file so that the NSA can download it. |
10.9 pyLoad Screen
Use this screen to configure the NAS so you can use pointer to manage your downloads, including those from one-click hosting sites.
Click Applications >illus to open the following screen.
Figure 128 Applications >pyLoad
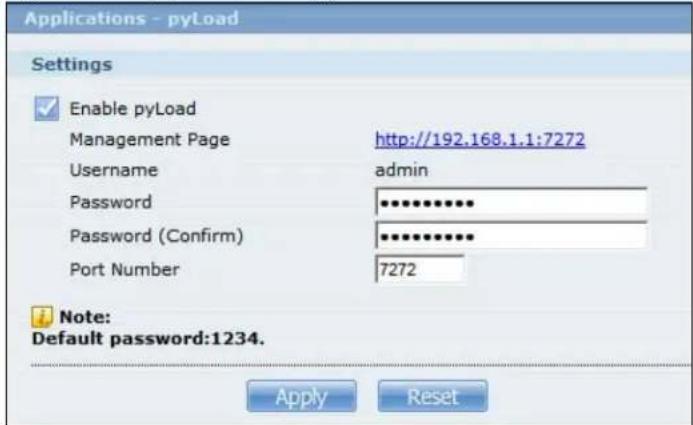
The following table describes the labels in this screen.
Table 74 Applications >pyLoad
| LABEL DESCRIPTION | |
| Enable pyLoad | Select this to have the NSA manage your downloads. Clear it to turn the feature off. |
| Management Page This is the IP address and port number of the NSA's pyLoad management login screen. The pyLoad management login screen uses the NSA's IPv4 address and the port number you configure. Click this link to go to it. | |
| Username | Only the admin account can log into the pyLoad management screen. |
| Password You can configure a separate password for using the admin account to access the NSA's pyLoad management screen. | |
| Password (Confirm) | Type the same password again to make sure you entered it correctly. |
| Port Number | Set the pyLoad management page's port number. The range of valid port numbers is 1024~65536. Include this port number after the IP address when manually entering the pyLoad management login page's address in your browser's address bar. For example, 192.168.1.2:7272. |
| Apply Click this to save your changes. | |
| Reset | Click this to restore the screen's last-saved settings. |
10.10 Polkast Setup
Use the Package Management screen to install the Polkast package. Use Polkast for fast, secure, direct access to your Media Server from your iPad, iPhone or Android device. Use the following procedure to install the Polkast package.
1 Click Applications > Package and select Polkast. Then select the Install/ Upgrade icon.
Note: If Polkast does not appear, click the Retrieve List from Internet icon to update the list.
Figure 129 Polkast Installation Step 1
| Status | Package Name^ | Requires | Version | Description | Management Page |
| Not Installed | BackupPlanner | 001zypkg008 | Use this to schedule and run backup jots for files stored in your NAS to an internal drive, external storage device or to another NAS in the network. | ||
| Not Installed | DyDNS | 001zypkg005 | This gives your NAS a domain name with a dynamic IP address. | ||
| Not Installed | Gallery | PHP-NySQL- phpMyAdmin | 3.0.2zypkg005 | This web-based application allows your NAS to host pictures. Use the NAS administrator credentials to log in. The administrator can then create accounts for other users. | |
| Not Installed | NFS | 1.1.4zypkg004 | NFS (Network File System) is a file-sharing protocol most commonly implemented on Unix-like systems. | ||
| Not Installed | PHP-MySQL- phpMyAdmin | 1.0zypkg005 | This tool can be used to manage MySQL through the web. Enter 'root' as the username and '1234' as the password to log in. | ||
| Not Installed | Polkaet | 001zypkg076 | Fast, secure, direct access to your Media Server from your iPad, iPhone or Android device. | ||
| Not Installed | SMART | 5.39zypkg005 | Use S.M.A.R.T. (Self-Monitoring, Analysis, and Reporting Technology) to monitor hard disks. It notifies you ahead of time of any issues that can result to the hard disk's poor performance or failure. |
2 The following confirmation screen appears. Click Apply. The NSA must have a connection to the Internet to download the Polkast package.
Figure 130 Polkast Installation Step 2
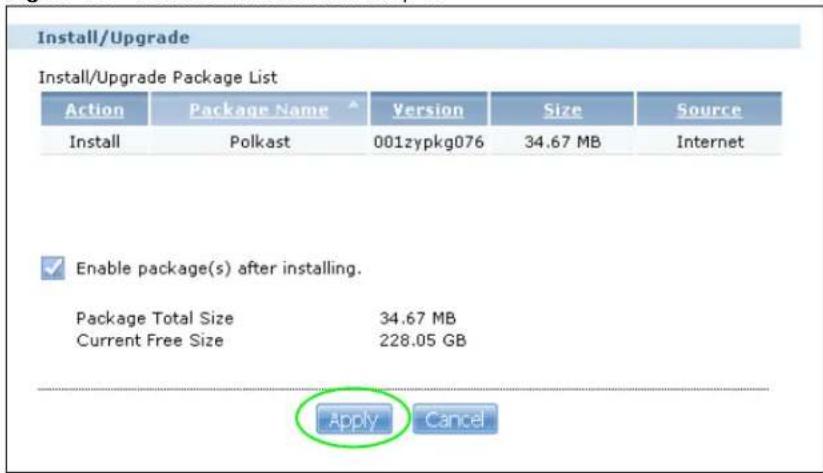
3 The installation progress appears in the Polkast row.
Figure 131 Polkast Installation Step 3
| Status | Package Name^ | Requires | Version | Description | Management Page |
| Not Installed | BackupPlanner | 001zypkg008 | Use this to schedule and run backup jobs for files stored in your NAS to an internal drive, external storage device or to another NAS in the network. | ||
| Not Installed | DyDNS | 001zypkg005 | This gives your NAS a domain name with a dynamic IP address. | ||
| Not Installed | Gallery | PHP-MySQL- phpMyAdmin | 3.0.2zypkg005 | This web-based application allows your NAS to host pictures. Use the NAS administrator credentials to log in. The administrator can then create accounts for other users. | |
| Not Installed | NFS | 1.1.4zypkg004 | NFS (Network File System) is a file-sharing protocol most commonly implemented on Unix-like systems. | ||
| Not Installed | PHP-MySQL- phpMyAdmin | 1.0zypkg005 | This tool can be used to manage MySQL through the web. Enter 'root' as the username and '1234' as the password to log in. | ||
| Installing 25% | Polkast | 001zypkg075 | Fast, secure, direct access to your Media Server from your iPad, iPhone or Android device. | ||
| Not Installed | SMART | 5.39zypkg005 | Use S.M.A.R.T. (Self Monitoring, Analysis, and Reporting Technology) to monitor hard disks. It notifies you ahead of time of any issues that can result to the hard disk's poor performance or failure. |
4 A link appears in the Management Page column after installation finishes. Click this link.
Figure 132 Polkast Installation Step 4
| Status | Package Name | Requires | Version | Description | Management Page |
| Not Installed | BackupPlanner | 001zypkg008 | Use this to schedule and run backup jobs for files stored in your NAS to an internal drive, external storage device or to another NAS in the network. | ||
| Not Installed | DyDNS | 001zypkg005 | This gives your NAS a domain name with a dynamic IP address. | ||
| Not Installed | Gallery | PHP-MySQL- phpMyAdmin | 3.0.2zypkg005 | This web-based application allows your NAS to host pictures. Use the NAS administrator credentials to log in. The administrator can then create accounts for other users. | |
| Not Installed | NFS | 1.1.4zypkg004 | NFS (Network File System) is a file-sharing protocol most commonly implemented on Unix-like systems. | ||
| Not Installed | PHP-MySQL- phpMyAdmin | 1.0zypkg005 | This tool can be used to manage MySQL through the web. Enter 'root' as the username and '1234' as the password to log in. | http://172.23.25.13/pkg'Polkaet | |
| Enabled | Polkaet | 001zypkg076 | Fast, secure, direct access to your Media Server from your iPad, iPhone or Android device. | ||
| Not Installed | SMART | 5.39zypkg005 | Use S.M.A.R.T. (Self Monitoring, Analysis, and Reporting Technology) to monitor hard disks. It notifies you ahead of time of any issues that can result to the hard disk's poor performance or failure. | ||
5 The Polkast login screen appears. Click the link to create a new account or enter your login information for an existing account.
Figure 133 Polkast Login
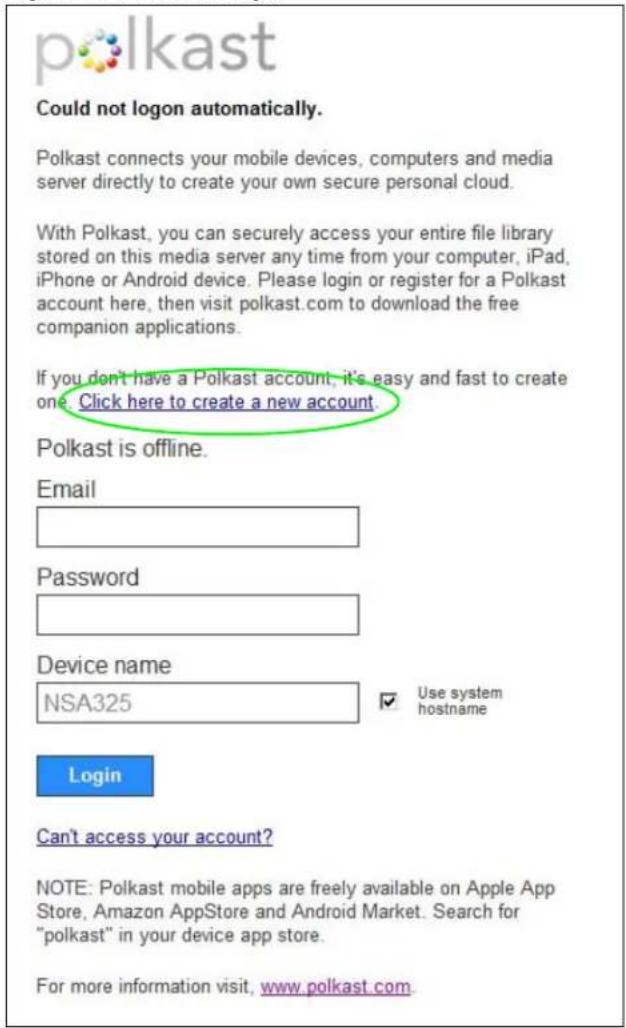
Note: For more information on using Polkast, visit www.polkast.com. Get free Polkast mobile apps from the Apple App Store, Amazon AppStore, and Android Market. For Polkast Pro users the NSA does not count as a second homebase for pricing purposes.
10.11 Protect Screens
The Protect screens include:
- Backup screens - These include steps to create and customize backup jobs.
- Restore screens - These include steps to restore previous backups made with the NSA.
10.12 Backup Screens
Use this screen to create and customize scheduled backup jobs for your files.
You can have several backup jobs for specific folders and time periods.
Click Protect > Backup to open the following screen.
Figure 134 Protect > Backup
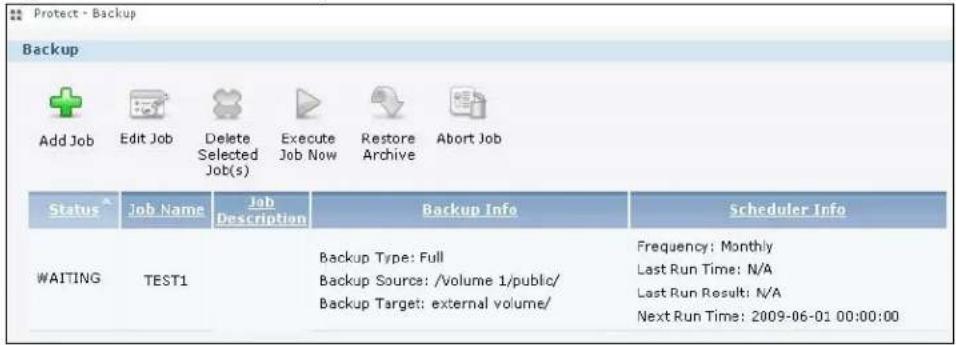
The following table describes the labels in this screen.
Table 75 Protect > Backup
| LABEL DESCRIPTION | |
| Backup | |
| Add Job Click this to create and customize a backup job. | |
| Edit Job Select a backup job in the list and click this to make some changes to it. | |
| Delete Selected Job(s) | Select a backup job in the list and click this to delete it. |
| Execute Job Now Select a backup job in the list and click this to run the backup job immediately. | |
| Restore Archive Select a backup job in the list and click this to restore the file(s) included in that backup job to the NSA.This applies to Archive backups only. Refer to Section 10.12.8 on page 255 to see the screens. | |
| Abort Job Select a backup job in the list and click this to stop the process if the backup job is currently active. | |
| Status This shows the current state of the backup job.Waiting means the backup job is not active but is scheduled to run at some time.Running indicates that the NSA is currently doing the backup job. When the backup job is running, you can also see a progress bar. | |
| Job Name This identifies the backup job. | |
| Job Description This is a short description of the backup job. | |
| Backup Info | This lists down the backup job details: type, source and target. Refer to Section 10.12.1 on page 247 and Section 10.12.2 on page 248. |
| Scheduler Info | This shows the backup schedule, including the frequency, the time it was last run in (and whether or not it succeeded), and when it is scheduled to run again. The times use yyyy-mm-dd hh:mm:ss format.Refer to Section 10.12.4 on page 251. |
10.12.1 Backup: Step 1
Use this screen to specify the job information and back up type.
Click Add Job in the Protect > Backup screen to open the following:
Figure 135 Protect > Backup: Step 1
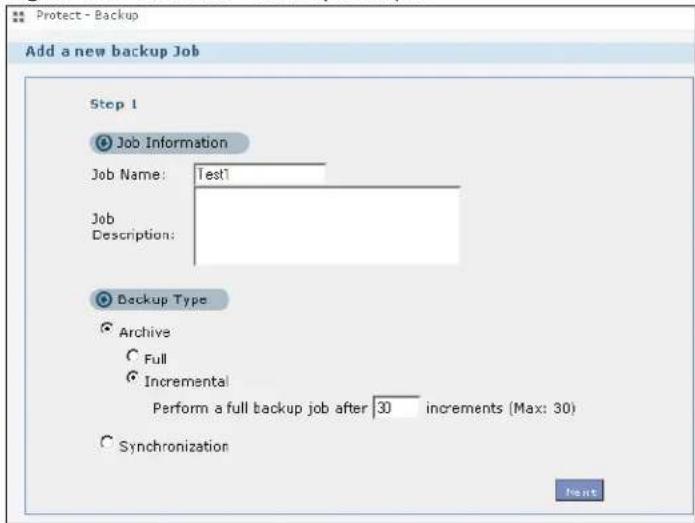
The following table describes the labels in this screen.
Table 76 Protect > Backup: Step 1
| LABEL DESCRIPTION | |
| Job Information | |
| Job Name Enter a | name to identify the backup job. |
| Job Description | Enter a short description (up to 100 keyboard characters) for the backup job. |
| Backup Type Choose | se the backup type that you want the NSA to implement for the backup job.Archive- This is a backup of the source folder in an archive format. Once you backup your files in the target folder, you cannot access the files individually unless you have the extracting tool used by the NSA. If there are existing files in the target folder prior to the NSA's backup job, the files remain undisturbed. You can also choose between the following types of archive:Full- The NSA does a fresh backup each time. This provides the most protection but also requires the most storage space.Incremental- The NSA backs up new or modified files from the source folder since the last backup. The first backup is a full backup. You can also do a full backup after several incremental backups. Enter how many incremental backups the NSA runs before it performs a full backup of the source folder. You must keep the latest full backup to be able to restore the files later.Synchronization- This does a backup of individual files. If you use this type, you cannot use theRestorefeature of the NSA. You can also choose between the following types of synchronization:Mirror- The NSA deletes all data in the target folder before running the backup. It makes the target folder identical to the source folder.Publish- The NSA does a backup of individual files to the target folder without overwriting existing files in that folder. It makes a copy of the source files. |
| Next Click this to go to the next step. | |
10.12.2 Backup: Step 2
Use this screen to specify where the files you want to backup are located and set where you want the backup to be stored.
Figure 136 Protect > Backup: Step 2
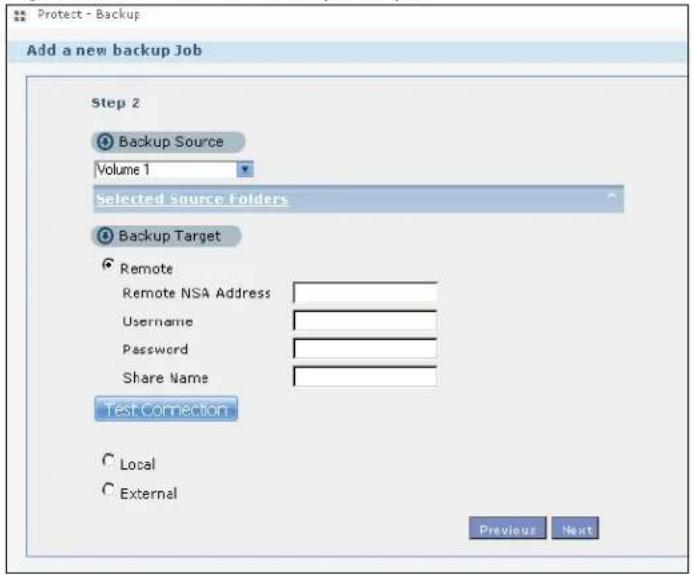
The following table describes the labels in this screen.
Table 77 Protect > Backup: Step 2
| LABEL DESCRIPTION | |
| Backup Source | Select an (internal) volume and the folders and files to back up using this tree interface.Clickto browse through folders, sub-folders and files.Clickto close a folder in the tree. This is useful if there are many folders or files that you wish to hide from view.Clickto select a folder or file to back up. This also selects all sub-folders and files.Clickto deselect the folder or file. This also deselects all sub-folders and files.More...andMappearwhen there are too many folders/files to display. Click the arrows to scroll up or down through the folders/files.for a folder means all sub-folders and files and new folders/files added later will be backed up.for a file means the file will be backed up.(a grayed out check box) for a folder means that only some sub-folders and files under the folder will be backed up. Newly added folders/files will NOT be backed up.means the file structure is still loading. Please wait for the folders/files to display.Note: If you select to back up an entire folderand then de-select a sub-folder or file within that folder, the main folder icon will turnand any new sub-folders and files added to this main folder after the initial backup configuration willNOTbe backed up.A list of your select folders and files displays below the selection fields. |
| Selected Source Folders | This shows the path of the backup source folder you selected. |
| Backup Target Select the target folder where you want to place your backup. | |
| Remote Select this to back up to another device.For Archives:The remote device can be another NSA in the network. Fill in the following fields in order to be able to access it.Remote NSA AddressUser namePasswordShare NameClickTest Connectionto see if your NSA can communicate with the remote device.For Synchronization:The remote device must be another NSA compatible with the NSA's synchronization feature. Fill in the following fields in order to be able to access it.Remote NSA AddressUsername (always "admin")Remote Admin's PasswordClickShow target contentto connect to the remote NSA so you can select the target share for the backup. | |
| Local | Select this if you want to place your backup in another volume in the NSA. Select the folder where you want to place the backup. |
| External | Select this if you have a USB hard disk connected to the NSA that you want to use for your backup. Select the folder where you want to place the backup. |
Table 77 Protect > Backup: Step 2
| LABEL DESCRIPTION | |
| Previous Click this | to go back to the previous screen. |
| Next Click this to go to the next screen. | |
10.12.3 Backup: Step 3
Use this screen to specify compression, encryption and purge policies for the backup job. This step is only available if you are doing an archive backup or a synchronization backup to a remote target.
Figure 137 Protect > Backup: Step 3
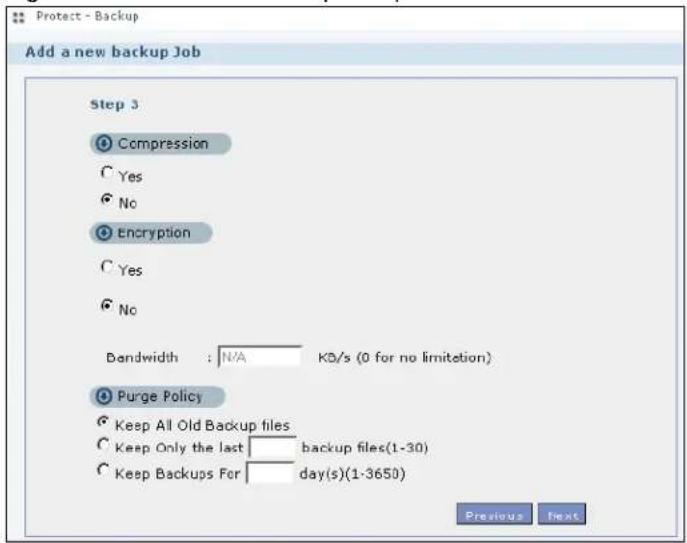
The following table describes the labels in this screen.
Table 78 Protect > Backup: Step 3
| LABEL DESCRIPTION | |
| Compression | Select Yes if you want NSA to compress the files for your backup. Otherwise, choose No.In an Archive backup, compression is a method of packing computing files in a way that saves hard disk space.For a Synchronization backup (to a remote target), the source data will be compressed before the transmission to reduce the transmission time. It is used in slow networks only. |
| Encryption | Select Yes if you want NSA to encrypt the files for your backup. Otherwise, choose No.In an Archive backup, this means using a password to secure files.For a Synchronization backup (to a remote target), this means securing the file transfer session. However the final file stored on the remote NSA is unencrypted. This takes a long time. Make sure you really need this feature before enabling it. |
| Bandwidth | Restrict the bandwidth of synchronization backups to help stop them from using all of your network connection's available bandwidth. This is more important when backing up to a remote NSA or computer through the Internet. |
Table 78 Protect > Backup: Step 3
| LABEL DESCRIPTION | |
| Purge Policy | The NSA maintains the files that have been included in your backups. However to save hard disk space, you can choose to delete files that have been included in previous backups.Select Keep All Old Backup files to store all files that have been included in previous backups.If you want to store a certain number of backup files, select Keep Only the last n backup files (1-30). Enter a value (n) from 1 to 30 to specify how many backups the NSA stores. All backup files older than the last one are deleted. You will not be able to recover files that existed (only) in those previous backups. Select this if backup space is limited and recovery of old files is not important.If you want to store all backups for a certain time period, select Keep Backups for n day(s)(1-3650). Enter a value (n) from 1 to 3650 to specify how many days the NSA stores all backup files. After this day has expired, all backup files will be deleted. |
| Previous Click | this to go back to the previous screen. |
| Next Click this | to go to the next screen. |
10.12.4 Backup: Step 4
Click this to specify the schedule for the backup job. The backup job automatically runs according to the schedule that you set in this screen.
Figure 138 Protect > Backup: Step 4
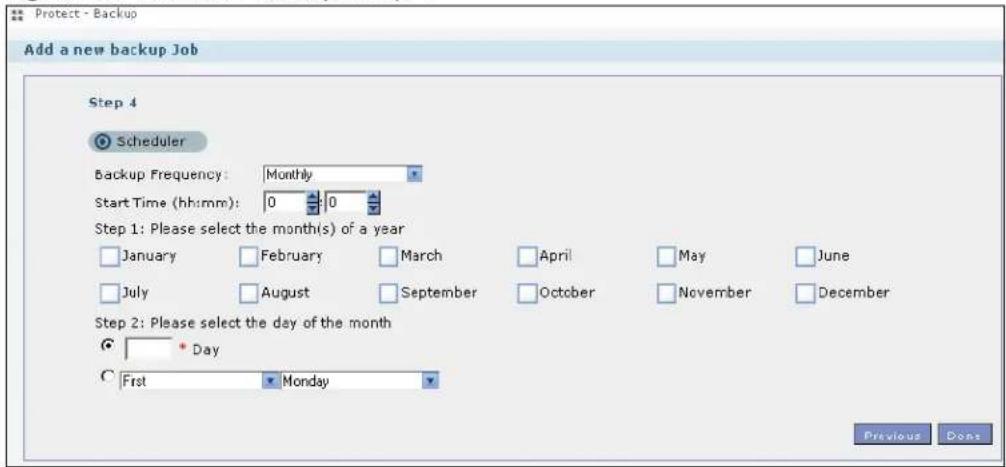
The following table describes the labels in this screen.
Table 79 Protect > Backup: Step 4
| LABEL DESCRIPTION | |
| Scheduler | |
| Backup Frequency | Select from Hourly, Daily, Weekly and Monthly backup intervals. The screen changes depending on the item you select. |
| Every how many hours? | This is only available if you selected Hourly as your backup frequency.Select every how many hours the NSA performs the backup job. |
| On which minute of the hour? | This is only available if you selected Hourly as your backup frequency.Select the minute (from 0 to 59) in an hour when the NSA performs the backup job. |
Table 79 Protect > Backup: Step 4
| LABEL DESCRIPTION | |
| Start Time (hh:mm) | This is available if you selectedDaily, Weekly or Monthlyas your backup frequency.Select the time in hour:minute format when you want the NSA to perform the backup job. |
| Every how many days? | This is only available if you selectedDailyas your backup frequency.Enter the interval between days when the NSA performs the backup job. |
| Every how many weeks? | This is only available if you selectedWeeklyas your backup frequency.Enter the interval between weeks when NSA performs the backup job. |
| Step 1: Please select the month(s) of a year | This is only available if you selectedMonthlyas your backup frequency.Select the month(s) when you want the NSA to perform the backup job. |
| Step 2: Please select the day of the month | This is only available if you selectedMonthlyas your backup frequency.Select the day in a month when you want the NSA to perform the backup job. |
| Previous Click this to | go back to the previous screen. |
| Done Click this to close the screen. | |
10.12.5 Edit Job Screen
Use this screen to edit an existing backup job. Some attributes of the backup job cannot be changed, such as the name, backup type, source folder and so on.
10.12.6 Edit Job: Step 1
Click Protect > Backup. Select a backup job from the list and click Edit Job to open the following.
Figure 139 Protect > Backup > Edit: Step 1
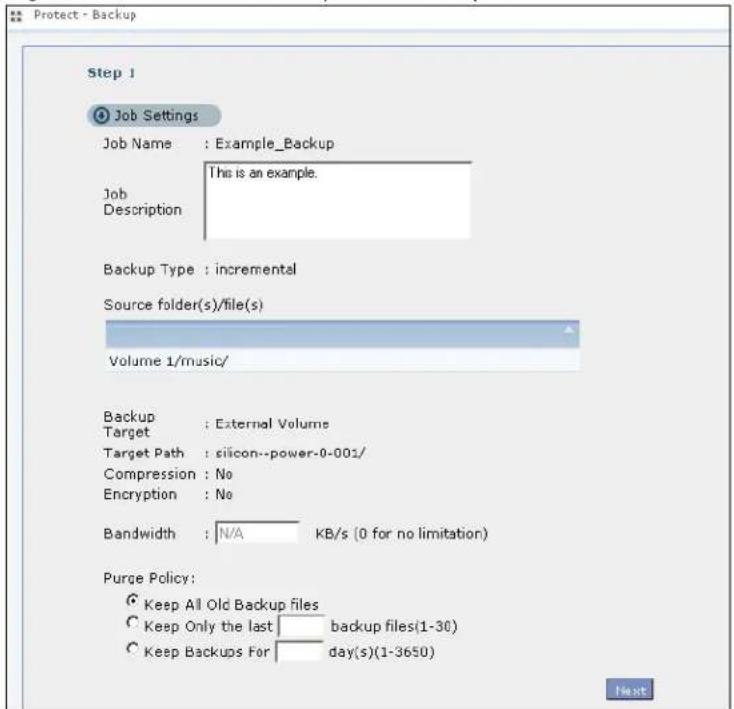
The following table describes the labels in this screen.
Table 80 Protect > Backup > Edit: Step 1
| LABEL DESCRIPTION | |
| Job Settings | |
| Job Name This field is | read-only and shows the name of the backup job. |
| Job Description Enter | a short description for the backup job. |
| Backup Type This field | d is read-only and shows the backup type. |
| Source folder(s)/file(s) | This is read-only and shows the path of the source folder for backup. |
| Backup Target | This field is read-only and shows on which volume (whether internal or external) the backup files are stored. If the target location is a remote NSA, this shows the remote IP address. |
| Target Path This field | is read-only and shows the target folder for the backup files. |
| Compression This field | d is read-only and shows whether the backup employs compression.Compression reduces the size of the file that you want to back up. Backup is then faster, but restoring may be slower, so if backup space is not a concern and recovery speed is, then turn off compression. |
| Encryption | This field is read-only and shows whether the backup employs encryption.You can have the NSA use a password to encrypt the backup files. |
Table 80 Protect > Backup > Edit: Step 1
| LABEL DESCRIPTION | |
| Bandwidth For backups | to a remote NSA, you can restrict the bandwidth to help prevent the backups from using all of your network connection's available bandwidth. This is more important when backing up to a remote NSA or computer through the Internet. |
| Purge Policy | The NSA maintains the files that have been included in your backups. However to save hard disk space, you can choose to delete files that have been included in previous backups.Select Keep All Old Backup files to store all files that have been included in previous backups.If you want to store a certain number of backup files, select Keep Only the last n backup files (1-30). Enter a value (n) from 1 to 30 to specify how many backups the NSA stores. All backup files older than the last one are deleted. You will not be able to recover files that existed (only) in those previous backups. Select this if backup space is limited and recovery of old files is not important.If you want to store all backups for a certain time period, select Keep Backups for n day(s)(1-3650). Enter a value (n) from 1 to 3650 to specify how many days the NSA stores all backup files. After this day has expired, all backup files will be deleted. |
| Next Click this to go | to the next screen. |
10.12.7 Edit Job: Step 2
Use this screen to edit the schedule for the backup job.
Figure 140 Protect > Backup > Edit: Step 2
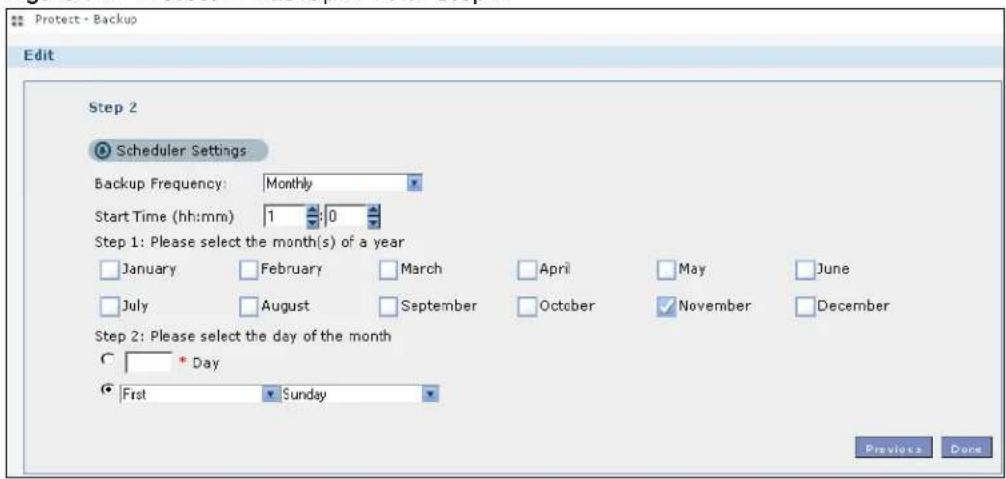
The following table describes the labels in this screen.
Table 81 Protect > Backup > Edit: Step 2
| LABEL DESCRIPTION | |
| Scheduler Settings | |
| Backup Frequency | Edit this by selecting from Hourly, Daily, Weekly and Monthly backup intervals. The screen changes depending on the item you select. |
| Every how many hours? | This is only available if you selected Hourly as your backup frequency.Select every how many hours the NSA performs the backup job. |
| On which minute of the hour? | This is only available if you selected Hourly as your backup frequency.Select the minute (from 0 to 59) in an hour when the NSA performs the backup job. |
Table 81 Protect > Backup > Edit: Step 2
| LABEL DESCRIPTION | |
| Start Time (hh:mm) | This is available if you selectedDaily, Weekly or Monthlyas your backup frequency.Select the time in hour:minute format when you want the NSA to perform the backup job. |
| Every how many days? | This is only available if you selectedDailyas your backup frequency.Enter the interval between days when the NSA performs the backup job. |
| Every how many weeks? | This is only available if you selectedWeeklyas your backup frequency.Enter the interval between weeks when NSA performs the backup job. |
| Step 1: Please select the month(s) of a year | This is only available if you selectedMonthlyas your backup frequency.Select the month(s) when you want the NSA to perform the backup job. |
| Step 2: Please select the day of the month | This is only available if you selectedMonthlyas your backup frequency.Select the day in a month when you want the NSA to perform the backup job. |
| Previous Click this to close | go back to the previous screen. |
| Done Click this to close | the screen. |
10.12.8 Restore Archive Screen
Use this screen to restore previous backups made with the NSA.
Click Protect > Backup screen (Section 10.12 on page 246). You can restore a previous backup job by selecting a backup job from the list and clicking Restore Archive.
Figure 141 Protect > Backup > Restore Archive: Step 1
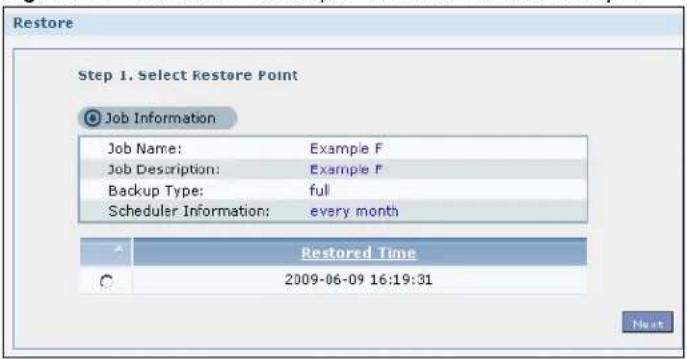
The following table describes the labels in this screen.
Table 82 Protect > Backup > Restore Archive: Step 1
| LABEL DESCRIPTION | |
| Step 1. Select Restore Source | Select a previous archive backup that you want to restore to the NSA. |
| Job Information | |
| Job Name This is the | name to identify the backup job. |
Table 82 Protect > Backup > Restore Archive: Step 1
| LABEL DESCRIPTION | |
| Job Description | This is a short description (up to 100 keyboard characters) for the backup job. |
| Backup Type This is the type of backup implemented for the backup job. | |
| Scheduler Information | This field displays the backup's frequency. |
| Restored Time Select | a previous backup in the list that you want to restore to your NSA. |
| Next Click this to go | to the next screen. |
10.12.10 Restore Archive: Step 2
Use this screen to select the folder where the archive you want to restore is located.
Figure 142 Protect > Backup > Restore Archive: Step 2
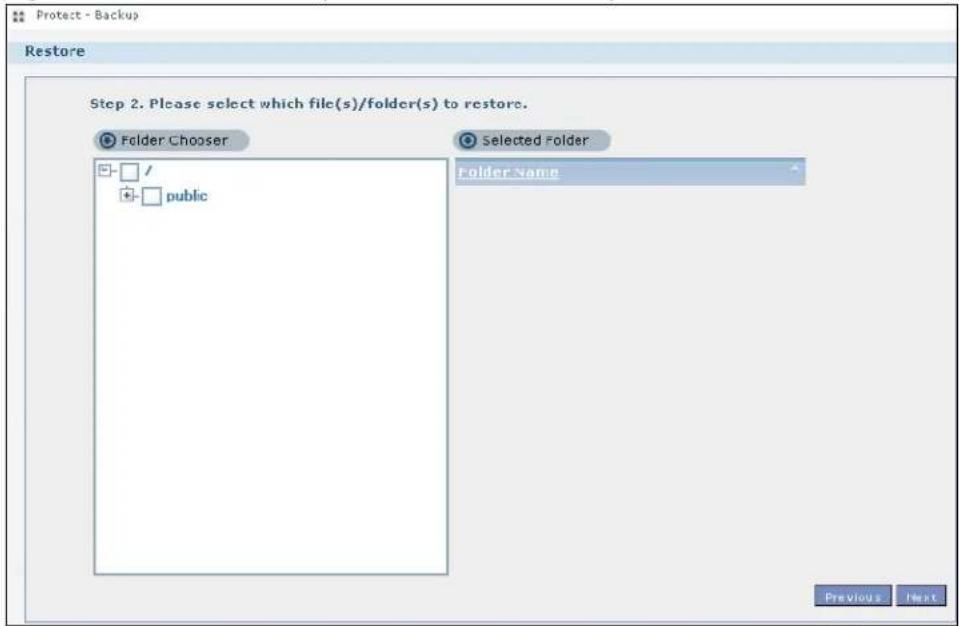
The following table describes the labels in this screen.
Table 83 Protect > Backup > Restore Archive: Step 2
| LABEL DESCRIPTION | |
| Step 2. Please select which file(s)/folder(s) to restore. | |
| Folder Chooser Select | the folder where the backup you want to restore is located. |
| Selected Folder This shows the path of the folder you selected. | |
| Previous Click this to go back to the previous screen. | |
| Next Click this to go to the next screen. | |
10.12.11 Restore Archive: Step 3
Use this screen to select the location in the NSA where you want to restore your backup.
Figure 143 Protect > Backup > Restore Archive: Step 3
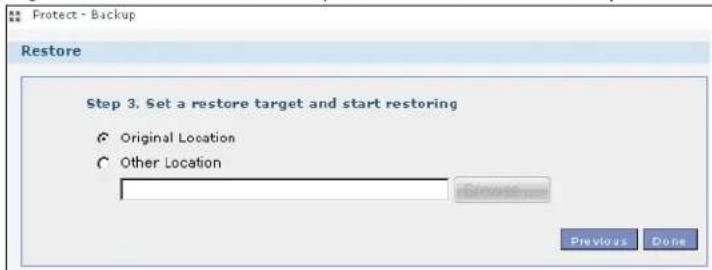
The following table describes the labels in this screen.
Table 84 Protect > Backup > Restore Archive: Step 3
| LABEL DESCRIPTION | |
| Step 3. Set a restore target and start restoring | |
| Original Location Select this to restore the files to their original location in the NSA. | |
| Other Location | Click this to select a folder where you want to place the restored files. ClickBrowseto open the following screen.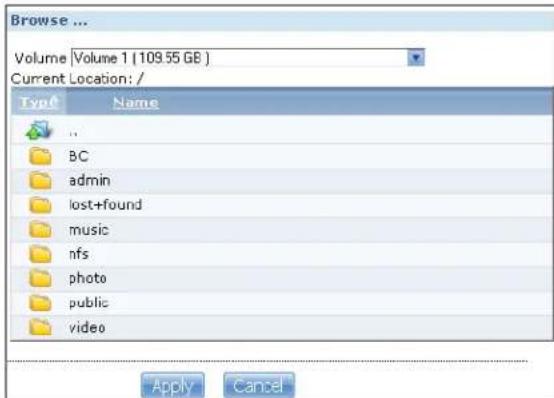 Volume- Select a volume from the list.Current Location- This is the location of the selected folder.Type- This identifies the item as a file or folder.Name- This is the name of the folder/file.ClickApplyto save your settings andCancelto close the screen. Volume- Select a volume from the list.Current Location- This is the location of the selected folder.Type- This identifies the item as a file or folder.Name- This is the name of the folder/file.ClickApplyto save your settings andCancelto close the screen. |
| Previous Click this to | go back to the previous screen. |
| Done | Click this to run the restore process and go back to theBackupscreen. |
Use this screen to restore previous backups made with the NSA, including archives and folders from internal, external or remote NSAs to the NSA.
You can access this screen by clicking Protect > Restore.
Figure 144 Protect > Restore: Step 1
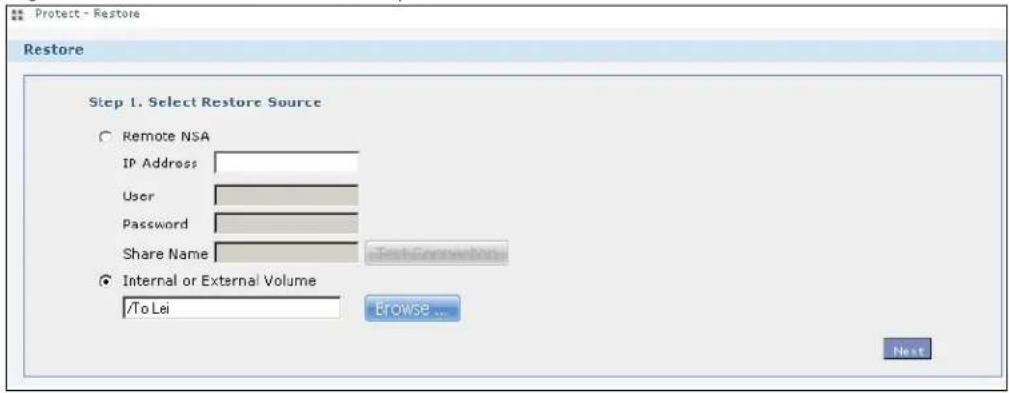
The following table describes the labels in this screen.
| LABEL DESCRIPTION | |
| Step 1. Select Restore Source | Select a previous archive backup that you want to restore to the NSA.Select Remote NSA if the file is in another NSA in the network that you used for your backup. Fill in the fields below when you choose this option.Select Internal or External Volume if you want to use another volume in the NSA or an attached USB hard disk for your backup. Click Browse to select the backup file. |
| IP Address Enter the address of the NSA you want to use. | |
| User Enter the user name you use to access the NSA. | |
| Password Enter the password of your NSA account. | |
| Share Name Enter the name of the share you want to use. | |
| Test Connection | Click this to test your connection to the remote NSA that you have specified in the fields above. |
| LABEL DESCRIPTION | |
| Browse | Click this to select where the previous backup that you want to restore is located. |
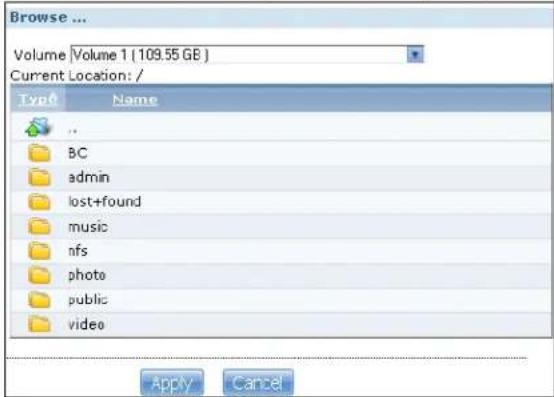 | |
| • Volume - Select a volume from the list.• Current Location - This is the location of the selected folder.• Type - This identifies the item as a file or folder.• Name - This is the name of the folder/file.Click Apply to save your settings and Cancel to close the screen. | |
| Next Click this to go to the next screen. | |
Select a previous archive backup that you want to restore to the NSA.
Figure 145 Protect > Restore: Step 2
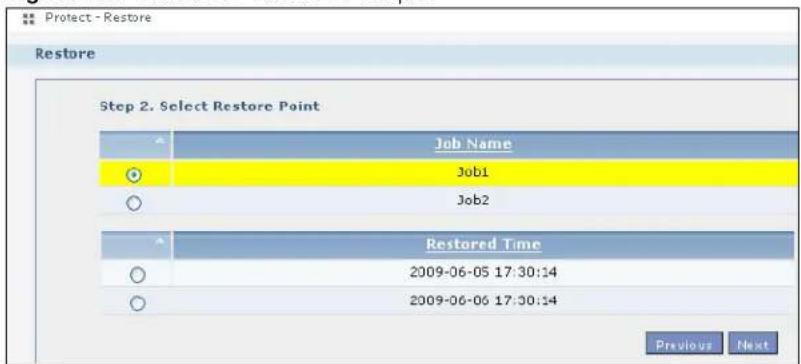
The following table describes the labels in this screen.
Table 86 Protect > Restore: Step 2
| LABEL DESCRIPTION | |
| Step 2. Select Restore Point | If you selected Remote NSA for the backup you want to restore, you can see a list of all the backups you performed in the Job Name table.If you selected Internal or External Volume for the backup you want to restore, you can see a list of restore times for the backups you performed in the Restored Time table. |
| Job Name | Select a previous backup job in the list that you want to restore to your NSA. Once you choose a job name, all available restore times for that backup job shows in the Restored Time table. |
Table 86 Protect > Restore: Step 2
| LABEL DESCRIPTION | |
| Restored Time | Select a previous backup job in the list that you want to restore to your NSA. |
| Previous Click this to go back to the previous screen. | |
| Next Click this to go to the next screen. | |
Use this screen to select the folder where the archive you want to restore is located.
Figure 146 Protect > Restore: Step 3
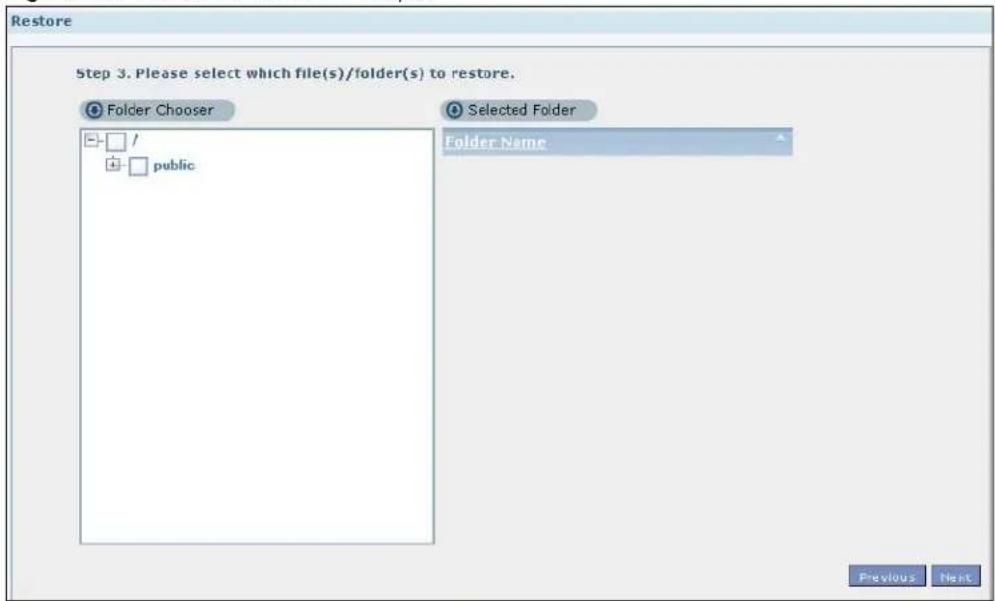
The following table describes the labels in this screen.
Table 87 Protect > Restore: Step 3
| LABEL DESCRIPTION | |
| Step 3. Please select which file(s)/folder(s) to restore. | |
| Folder Chooser Select | the folder where the backup you want to restore is located. |
| Selected Folder This shows the path of the folder you selected. | |
| Previous Click this to go back to the previous screen. | |
| Next Click this to go to the next screen. | |
Use this screen to select the location in the NSA where you want to restore your backup.
Figure 147 Protect > Restore: Step 4
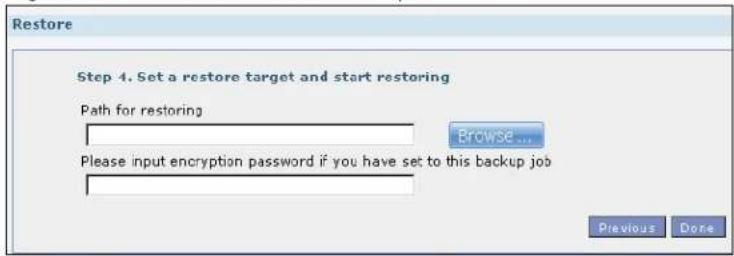
The following table describes the labels in this screen.
| LABEL DESCRIPTION | |
| Step 3. Set a restore target and start restoring | |
| Browse | Click this to select a folder where you want to place the restored files.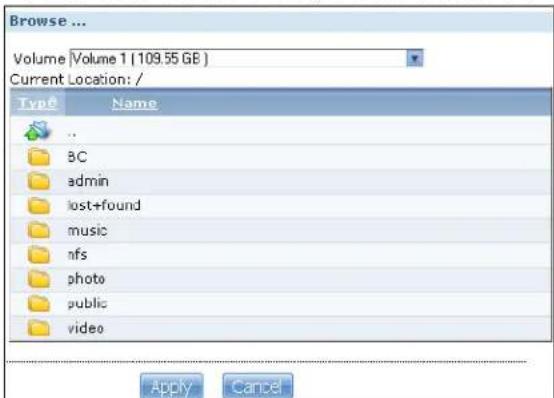 Volume - Select a volume from the list.Current Location - This is the location of the selected folder.Type - This identifies the item as a file or folder.Name - This is the name of the folder/file.Click Apply to save your settings and Cancel to close the screen. Volume - Select a volume from the list.Current Location - This is the location of the selected folder.Type - This identifies the item as a file or folder.Name - This is the name of the folder/file.Click Apply to save your settings and Cancel to close the screen. |
| Previous Click | this to go back to the previous screen. |
| Done | Click this to run the restore process and go back to the Backup screen. |
10.14 Technical Reference
This section provides technical background information on the topics discussed in this chapter.
10.14.1 S.M.A.R.T Attributes
The following table describes some common S.M.A.R.T. attributes. If a higher or lower raw attribute value is better, it is indicated in the BETTER column. Since S.M.A.R.T. attributes and their definitions vary by manufacturer, refer to the hard drive manufacturer for details about the attributes your hard drive supports.
Table 89 S.M.A.R.T. Attributes
| ID | ATTRIBUTE NAME | BETTER | DESCRIPTION |
| 01 | Read Error Rate | Low | Shows the rate of hardware read errors. If this is not zero, there is a problem with the disk surface or the read/write heads. |
| 02 Throughput Performance | High | This is the hard drive's general (overall) throughput performance. A decreasing value indicates a problem. | |
| 03 Spin-Up Time Low This is the average number of milliseconds the hard drive took for spindle spin up (from zero RPM to fully operational). | |||
| 04 Start/Stop Count The total number of spindle start and stop cycles. | |||
| 05 Reallocated Sectors Count | Low Total number of reallocated sectors on the hard drive. When the hard drive detects a read/write/verification error, it marks the sector as "reallocated" and transfers the data to a specially reserved (spare) area. The process is also known as remapping with "reallocated" sectors known as remaps. The more sectors the hard drive has to reallocate, the slower read and write speeds become. | ||
| 06 Read Channel Margin | This is the margin of a channel when it reads data. | ||
| 07 | Seek Error Rate | Low | This is the rate of the magnetic heads' seek errors. A failure in the mechanical positioning system, such as servo damage or a thermal widening of the disk, results in seek errors. An increasing number of seek errors indicate the condition of the disk surface and the mechanical subsystem are worsening. |
| 08 Seek Time Performance | High This is an average performance indicator for the seek operations of the magnetic heads. Mechanical subsystem problems cause this value to decrease. | ||
| 09 Power-On Hours (POH) | Low This is how many hours the hard drive has been in a power-on state. The raw value lists the total number of hours (or minutes, or seconds depending on the manufacturer). | ||
| 10 | Spin Retry Count | Low | This is the total number of spin start retry attempts. This is the number of attempts to spin up to fully operational speed the hard drive has made when the first attempt did not succeed. An increase in this value is an indicator of hard disk mechanical subsystem problems. |
| 11 Recalibration Retries | High This is the number of times recalibration was requested when the first attempt did not succeed. A decrease in this value is an indicator of hard disk mechanical subsystem problems. | ||
| 12 Device Power Cycle Count | This is the number of times the hard drive has gone through a full power on and power off. | ||
| 13 Soft Read Error Rate | Low This is the number of uncorrected read errors the hard drive has reported. If this is not zero, back up your data. | ||
| 190 Airflow Temperature | Low This indicates the temperature of the airflow measured by a Western Digital hard drive. | ||
| 190 | Temperature Difference from 100 | High This | indicates the value of 100 - the temperature in degrees Celsius.Manufacturers can set a minimum threshold that corresponds to a maximum temperature. |
| 191 | G-sense error rate | Low This is | the number of mistakes caused by impact loads. |
| 192 | Power-off Retract Count | Low This is | how many times the heads are loaded off the media. |
| 193 | Load/Unload Cycle | Low This is | the number of load and unload cycles into head landing zone position. |
| 194 | Temperature Low | This is the | hard drive's internal temperature. |
| 195 | Hardware ECC Recovered | High This is | the time between ECC (Error Correction Code)-corrected errors. |
| 196 | Reallocation Event Count | Low This is | the total number of reallocation (remap) operations. The raw value is the total attempts to move data from reallocated sectors to a spare area. Successful and unsuccessful attempts are both included. |
| 197 | Current Pending Sector Count | Low This is | the number of unstable sectors awaiting reallocation. If the sector is later successfully written or read, this value decreases and reallocation is not performed. Only failed write attempts cause a reallocation, not read errors. This can be difficult to test since only direct I/O writes to the disk cause reallocations, not cached writes. |
| 198 | Uncorrectable Sector Count | Low This is | the number of errors reading or writing a sector that were not correctable. An increase in this value is an indicator of disk surface defects or mechanical subsystem problems. |
| 199 | UltraDMA CRC Error Count | Low This is | the number of data transfer errors through the interface cable according to the ICRC (Interface Cyclic Redundancy Check). |
| 200 | Write Error Rate / Multi-Zone Error Rate | Low This is | the total number of errors in writing sectors. |
| 201 | Soft Read Error Rate | Low | This is the number of read/write head off-track errors. If the value is not zero, make a backup. |
| 202 | Data Address Mark Errors | Low This is | the number of data address mark errors. This could also be a different, manufacturer-specific attribute. |
| 203 | Run Out Cancel Low | This is the | number of ECC (Error Correction Code) errors. |
| 204 | Soft ECC Correction | Low This is | the number of errors corrected by software ECC (Error Correction Code). |
| 205 | Thermal Asperity Rate (TAR) | Low This is | the number of thermal asperity errors. Thermal asperity is a read signal spike caused by sensor temperature rise due to touching the disk surface or contaminant particles. |
| 206 | Flying Height | This is the height of the hard drive's read/write heads above the disk surface. | |
| 207 | Spin High Current | This is the quantity of high current used to spin up the drive. | |
| 208 | Spin Buzz This is the number of buzz routines to spin up the drive. When the arm holding the read/write heads is stuck, the motor driving it tries to oscillate the arm to free it. This causes an audible vibration. | ||
| 209 | Offline Seek Performance | This is the hard drive's seek performance during offline operations. Offline operations are tests the drive does itself as opposed to those that an external diagnostic tool has it do. Seek performance is how quickly the drive moves from track to track. | |
| 220 | Disk Shift Low This | is how far | the disk has moved relative to the spindle (this kind of shift is usually due to shock). |
| 221 | G-Sense Error Rate | Low This is | the number of errors that have resulted from external vibration and shock. |
| 222 | Loaded Hours This is | is how long | the hard drive has operated under data load (this requires movement of the magnetic head armature). |
| 223 | Load/Unload Retry Count | This is how many time the magnetic head has changed position. | |
| 224 | Load Friction | Low | This is resistance caused by friction in mechanical parts during operation. |
| 225 | Load/Unload Cycle Count | Low This is | the total number of load cycles. |
| 226 | Load 'In'-time | This is the total time that the magnetic heads actuator has had a load (not been in the parking area). | |
| 227 | Torque Amplification Count | Low This is | the number of attempts to compensate for variations in platter speed. |
| 228 | Power-Off Retract Cycle | Low This is | how many times the magnetic armature was automatically retracted because the power was cut. |
| 230 | GMR Head Amplitude | This is the amplitude of thrashing (or the distance of repetitive forward and reverse head motion). | |
| 231 | Temperature Low This is the hard drive's temperature. | ||
| 240 | Head Flying Hours | This is the total time that the head has been positioning. | |
| 250 | Read Error Retry Rate | Low This is | the number of errors in reading from the disk. |
11.1 Overview
This chapter discusses the features in the Auto Upload screens.
The auto upload feature uploads media files stored in the NSA to the Flickr and/or YouTube sharing websites. Besides web publishing and media server, auto upload is another convenient way to share media files with your friends and family. You can link the NSA to your Flickr and/or YouTube account and select shares for the NSA to upload. The NSA uploads the media files stored in the specified shares to your Flickr and/or YouTube account. When you add new files to the specified shares, the NSA also automatically uploads the new files to your Flickr and/or YouTube account.
11.2 What You Can Do
- Use the Flickr/ YouTube screen (Section 11.4 on page 265) to upload photos and videos to your Flickr and YouTube accounts.
- Use the FTP Uploadr screen (Section 11.5 on page 274) to upload files to FTP servers.
11.3 What You Need to Know
FTP
File Transfer Protocol (FTP) is a file transfer service that operates on the Internet. A system running the FTP server accepts commands from a system running an FTP client. FTP is not a secure protocol. Your file transfers could be subject to snooping.
FTPES (File Transfer Protocol over Explicit TLS/SSL)
File Transfer Protocol over Explicit TLS/SSL (FTPES) is a file transfer service that uses TLS (Transport Layer Security) or Secure Socket Layer (SSL) for secure transfers across the Internet.
11.4 The Flickr/YouTube Screen
Use this screen to upload photos and videos to your Flickr and YouTube accounts.
Click Applications > Auto Upload > Flickr/ YouTube to open the following screen.
Figure 148 Applications > Auto Upload > Flickr/YouTube
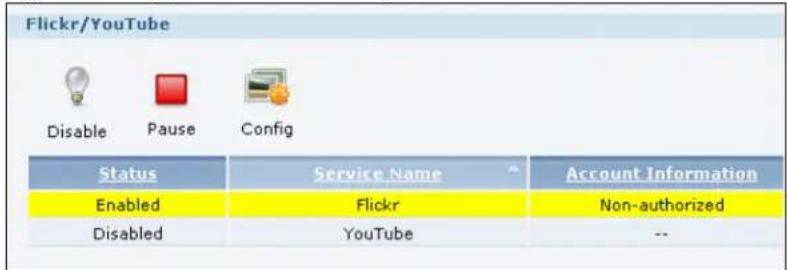
The following table describes the labels in this screen.
Table 90 Applications > Auto Upload > Flickr/YouTube
| LABEL DESCRIPTION | |
| Flickr/YouTube | |
| Disable/Enable | Select a service from the list and click this to turn the service on or off.If you disable the service and add more files to the watch folder(s), the NSA will not auto upload these files. However, the NSA still uploads any files added before you turned off the service. |
| Pause/Resume | Select a service from the list and click this to pause or resume the auto upload feature. |
| Config | Select a service from the list and click this to manage the service's settings. |
| Status This field displays the service's status.The service may be Enabled, Disabled, Uploading or Paused. | |
| Service Name | This field displays the name of a sharing website to which the NSA can automatically upload files. |
| Account Information | This field displays the username and related information of the account to use with the auto upload feature. |
11.4.1 Configuring the Flickr Settings
In the Applications > Auto Upload > Flickr/YouTube screen, select Flickr from the list and then click the Config button.
The following screen displays if you have not authorized the NSA to use a Flickr account. Click OK to continue the authorization process.
Figure 149 Linking NSA to Flickr

The web browser opens the Yahoo! Flickr login page. Enter your Yahoo account's information and click Sign In.
Figure 150 Yahoo! Flickr Login Page
YAHOO! flickr
Yahoo! - Help
Welcome to Yahoo!
Enjoy all the benefits of Yahoo! Flickr.
- Access all your digital images in one place.
• Show off your favorite photos to the world. - Share photos with your friends and family - it's easy!
Get all the best with one Yahoo! ID.
Your Yahoo! ID gives you access to powerful communications tools like mail and instant messaging, security features like email AntiVirus and Pop-Up Blocker, and favorites like online photos and music — all for free.
Sign in to Yahoo!

Are you protected? Create your sign-in seal. (Why?)
Yahoo! ID
(e.g. free2rhyme@yahoo.com)
Password:

Keep me signed in
for 2 weeks unless I sign out. Info [Uncheck if on a shared computer]
Sign In
Forget your ID or password? | Help
Don't have a Yahoo! ID?
Signing up is easy.
Sign Up
Copyright © 2008 Yahoo! Inc. All rights reserved. Copyright/IP Policy | Terms of Service | Guide to Online Security NOTICE: We collect personal information on this site. To learn more about how we use your information, see our Privacy Policy
The following page displays asking for your authorization. Click OK, I'LL ALLOW IT to establish a link between the NSA and your Flickr account.
Figure 151 Flickr Authorization
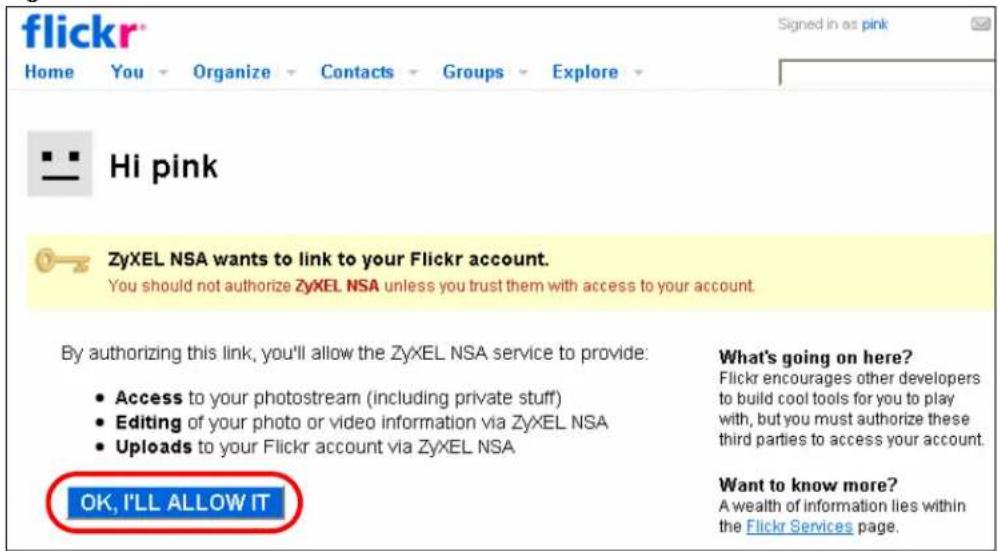
A confirmation page displays indicating successful authorization. Return to the NSA web configurator. Click Get Ready in the following screen to complete the authorization process.
Figure 152 Confirming Flickr Authorization

Once the NSA is associated with your Flickr account, you can configure auto upload settings in the following screen.
Figure 153 Applications > Auto Upload > Flickr/YouTube > Config (Flickr)
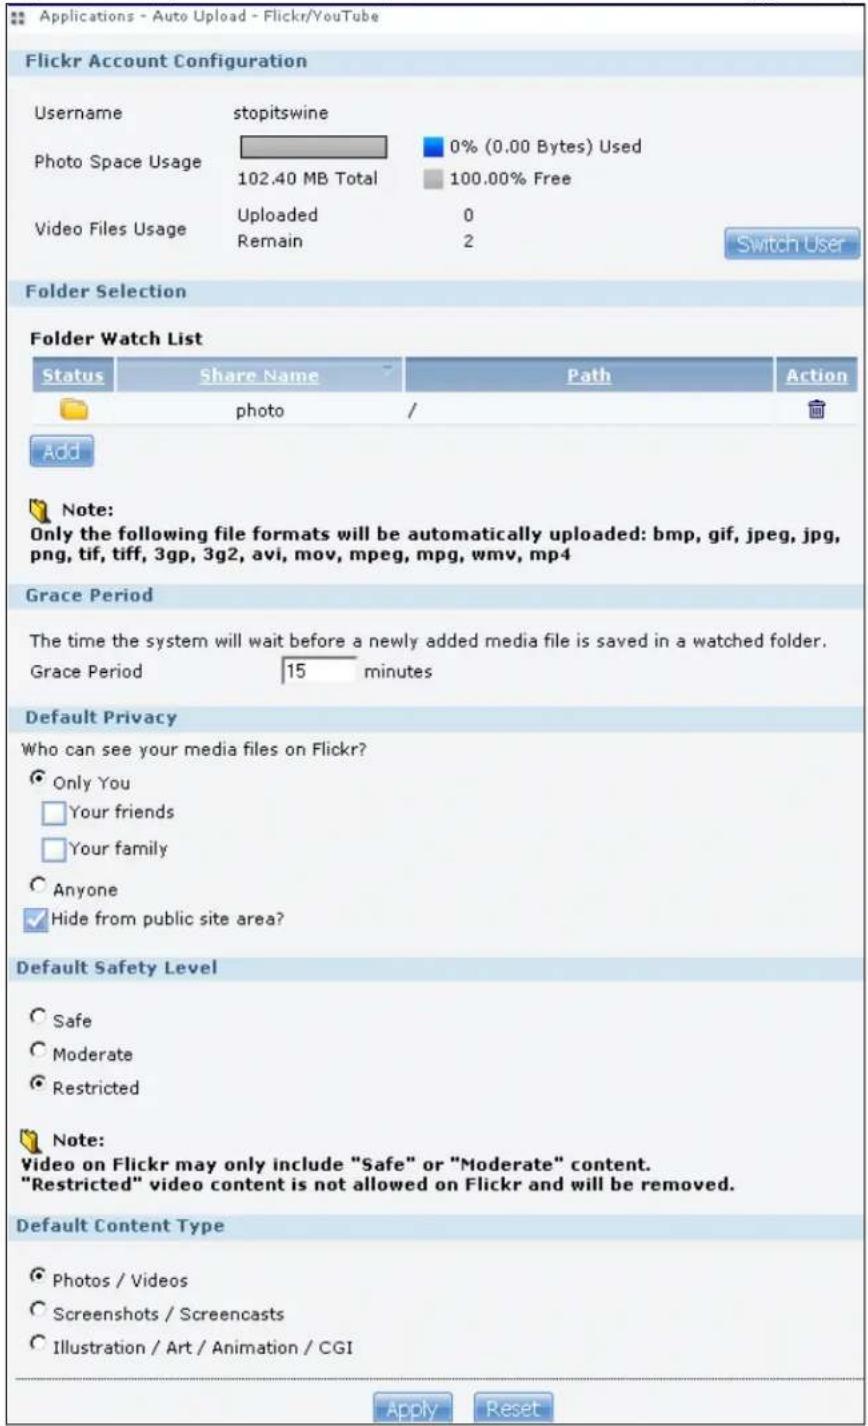
The following table describes the labels in this screen.
Table 91 Applications > Auto Upload > Flickr/YouTube > Config (Flickr)
| LABEL DESCRIPTION | |
| Flickr Account Configuration | |
| Username | This field displays the Flickr account authorized for the auto upload feature. |
| Photo Space Usage This | this shows how much storage space for photos (in size and percentage) you have used and how much space is still available on your Flickr account. |
| Video Files Usage | This shows how many videos you have uploaded and how many videos you can still upload to your Flickr account. |
| Switch User Click | this to use a different Flickr account for the auto upload feature. |
| Folder Selection | |
| Folder Watch List | This table displays a list of shares and folders selected for auto upload. Files stored in these locations are uploaded to your Flickr account. |
| Status This indicates whether the folder or share is available.represents a valid folder. The folder is available for auto upload.represents a missing folder. The share may be deleted from the NSA, or the hard disk was removed from the NSA. | |
| Share Name This is the share selected for auto upload. | |
| Path | This is the path of a folder selected for auto upload. The NSA only uploads files stored in the specified share or folder to your Flickr account. |
| Action | Use the Remove icon to remove a folder from the Folder Watch List. |
| Add | Click this to open the following screen where you can set a folder that contains files you want the NSA to automatically upload.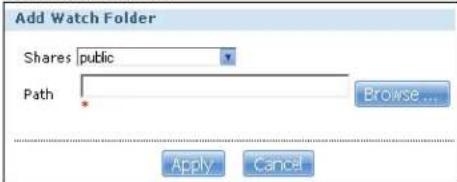 Share - Select the share from the list.Path - Type the folder location in the share directly or click Browse to open the following screen and navigate to the folder's location. Share - Select the share from the list.Path - Type the folder location in the share directly or click Browse to open the following screen and navigate to the folder's location.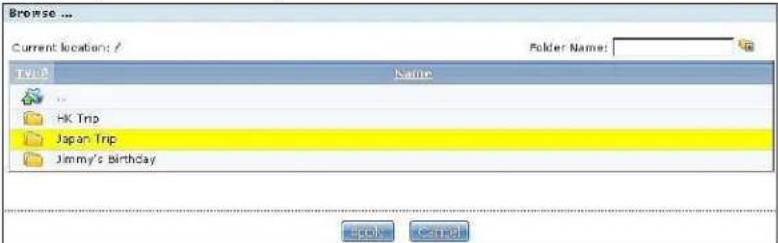 Current Location - This is the location of the selected folder.Folder Name - Enter a new folder name and click to create it.Type - This is the type of the folder/file.Name - This is the name of the folder/file.Select a folder. If you don't select a folder, a forward slash (/) displays in the Path field. All contents within the specified share are automatically selected.Click Apply to save your settings and Cancel to close the screen. Current Location - This is the location of the selected folder.Folder Name - Enter a new folder name and click to create it.Type - This is the type of the folder/file.Name - This is the name of the folder/file.Select a folder. If you don't select a folder, a forward slash (/) displays in the Path field. All contents within the specified share are automatically selected.Click Apply to save your settings and Cancel to close the screen. |
| Grace Period | |
| Grace Period N minutes | Specify how long the NSA should wait when you add a new file for auto upload. For example, if you set the grace period to 5 minutes, the NSA uploads a new file after it has been in a watched folder for 5 minutes. You can choose from a range of 1 to 10080 minutes (up to one week). |
| Default Privacy | |
| Who can see your media files on Flickr? | Determine who has the right to see files uploaded to your Flickr account.SelectOnly Youif you do not want anyone else to see your files. You may also restrict the access toYour friendsand/orYour family. You can set up a friend/family list in your Flickr account.SelectAnyoneto allow everyone to see your files. |
| Hide from public site area | Check this option to prevent others from finding your files when they perform a search in the Flickr website. |
| Default Safety Level | Assign a safety level to your files.SelectSafeif the contents of your files are suitable for the general public.SelectModerateif the contents of your files may be offensive to some people.SelectRestrictedif the contents of your files are not suitable for certain people, such as children or your colleagues. |
| Default Content Type | Select a content type for your files. You can choosePhoto/ Video, Screenshots/Screencasts, or Illustration/ Art/ Animation/ CGI. |
| Apply Click this to save your changes. | |
| Reset Click this to restore previously saved settings. | |
11.4.2 Configuring the YouTube Settings
In the Applications > Auto Upload > Flickr/ YouTube screen, select YouTube from the list and then click the Config button.
Note: Your YouTube account must be associated with a Google account.
Get a Google account and use it to log into YouTube. You can then merge the existing YouTube account to your Google account.
If you have not authorized a YouTube account on the NSA, the following screen displays. Enter your Google account's e-mail address and password in the fields and click OK to authorize the service.
Figure 154 YouTube Account Settings
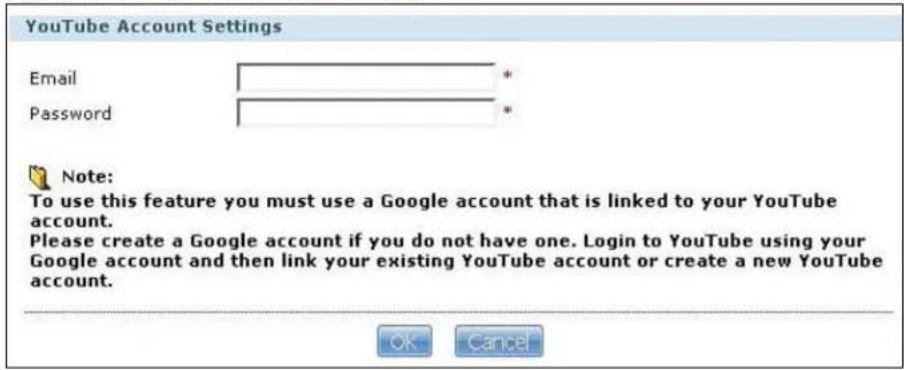
Once the NSA is associated with your YouTube account, you can configure auto upload settings in the following screen.
Figure 155 Applications > Auto Upload > Flickr/YouTube > Config (YouTube)
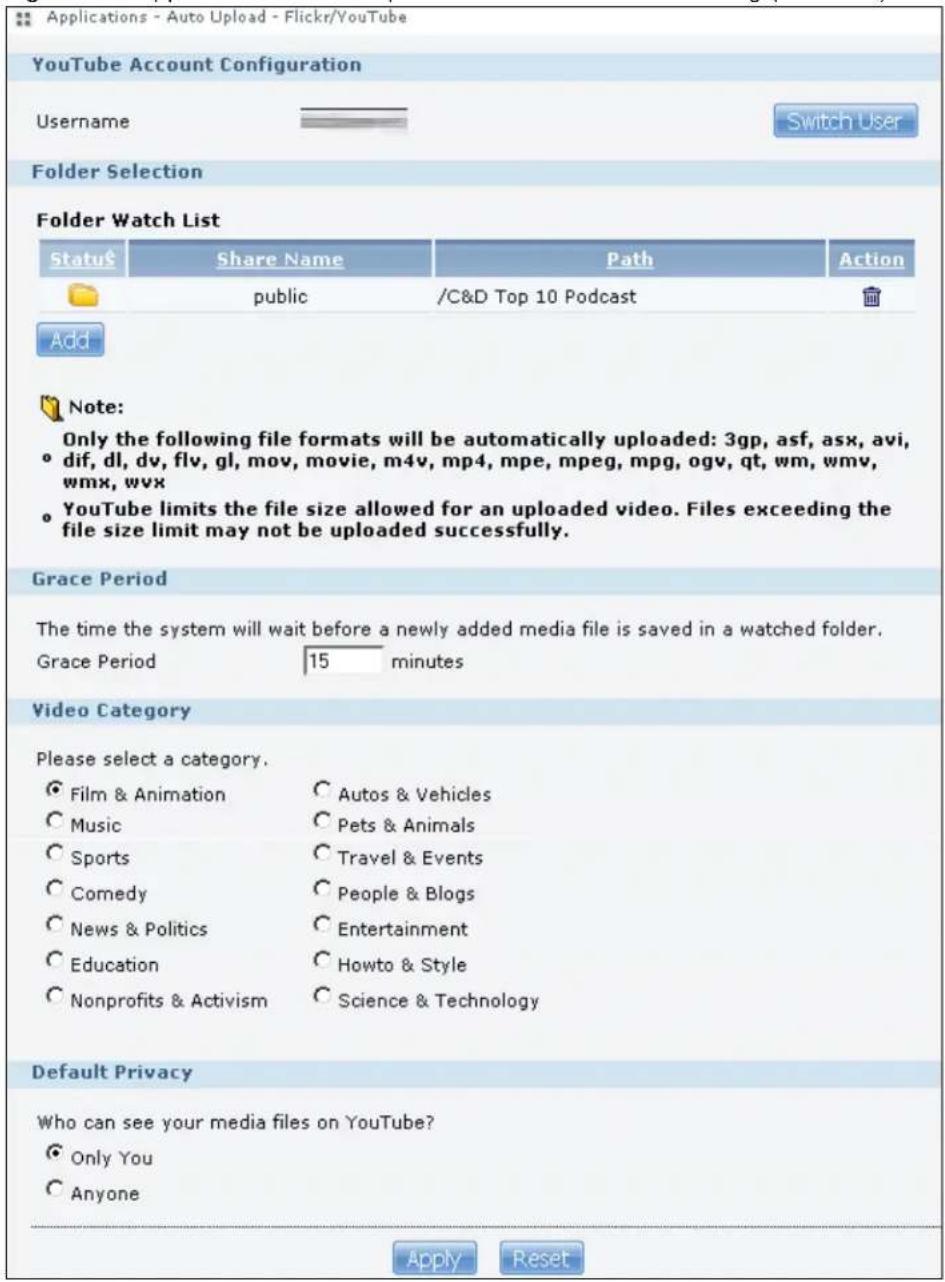
The following table describes the labels in this screen.
Table 92 Applications > Auto Upload > Config (YouTube)
| LABEL DESCRIPTION | |
| Youtube Account Configuration | |
| Username This field displays the Youtube account authorized for the auto upload feature. | |
| LABEL DESCRIPTION | |
| Switch User | Click this to use a different YouTube account for the auto upload feature. |
| Folder Selection | |
| Folder Watch List | This table displays a list of shares and folders selected for auto upload. Files stored in these locations are uploaded to your YouTube account. |
| Status | This field indicates whether the share or folder is available.represents a valid folder. The folder is available for auto upload.represents a missing folder. The share may be deleted from the NSA, or the hard disk was removed from the NSA. |
| Share Name | This field displays the share selected for auto upload. |
| Path | This field displays the path of a folder selected for auto upload. The NSA only uploads the files stored in the specified share or folder to your YouTube account. |
| Action | Use theRemoveicon to delete a folder from theFolder Watch List. |
| Add Click this to open | the following screen where you can set a folder that contains files you want the NSA to automatically upload.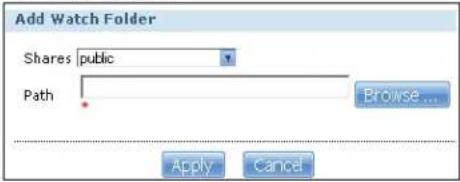 Share - Select the share from the list.Path - Type the folder location in the share directly or clickBrowseto open the following screen and navigate to the folder's location. Share - Select the share from the list.Path - Type the folder location in the share directly or clickBrowseto open the following screen and navigate to the folder's location.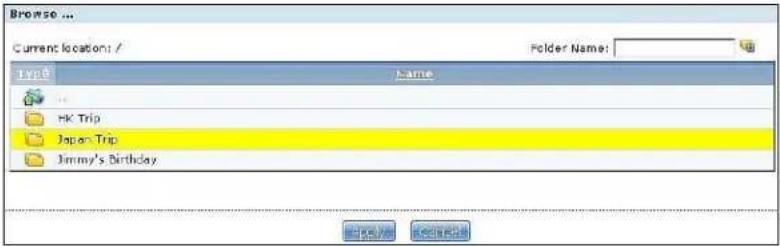 Current Location- This is the location of the selected folder.Folder Name- Enter a new folder name and clickto create it.Type - This is the type of the folder/file.Name - This is the name of the folder/file.Select a folder. If you don't select a folder, a forward slash (/) displays in thePathfield. All contents within the specified share are automatically selected.ClickApplyto save your settings andCancelto close the screen. Current Location- This is the location of the selected folder.Folder Name- Enter a new folder name and clickto create it.Type - This is the type of the folder/file.Name - This is the name of the folder/file.Select a folder. If you don't select a folder, a forward slash (/) displays in thePathfield. All contents within the specified share are automatically selected.ClickApplyto save your settings andCancelto close the screen. |
| Grace Period | |
| Grace Period N minutes | Specify how long the NSA should wait when you add a new file for auto upload. For example, if you set the grace period to 5 minutes, the NSA uploads a new file after it has been in a watched folder for 5 minutes. You can choose from a range of 1 to 10080 minutes (up to one week). |
| Video Category | Select the category that best describes the media files you want to upload. |
| Default Privacy | |
| Who can see your media files on YouTube? | Determine who has the right to see files uploaded to your YouTube account.SelectOnly Youif you do not want anyone else to see your files.SelectAnyoneto allow everyone to see your files. |
| Apply Click this to save your changes. | |
| Reset | Click this to restore your previously stored settings. |
11.5 The FTP Uploadr Screen
The FTP Uploadr feature uploads files stored in the NSA to FTP servers. Besides web publishing and media server, auto upload is another convenient way to share media files with your friends and family. You can link the NSA to the FTP server or the FTP server on another NSA and select shares or folders for the NSA to upload. The NSA uploads the files stored in the specified shares to the FTP server. When you add new files to the specified shares, the NSA also automatically uploads the new files to the FTP server.
Use this screen to configure the FTP Uploadr.
Click Applications > Auto Upload > FTP Uploadr to open the screen shown next.
Figure 156 Applications > Auto Upload > FTP Uploadr
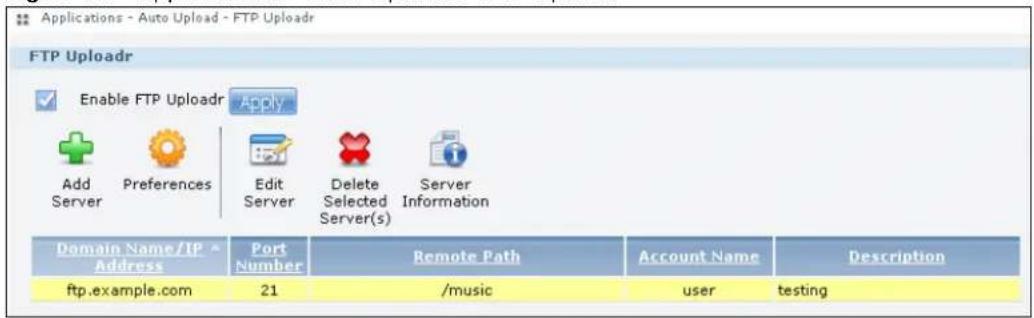
The following table describes the labels in this screen.
Table 93 Applications > Auto Upload > FTP Uploadr
| LABEL DESCRIPTION | |
| Enable FTP Uploadr | Use the check box to enable or disable the FTP Uploadr. ClickApplyto save your changes.When you disable the FTP Uploadr, a screen opens requesting confirmation. Select the check box to stop any current or queued uploads. If you do not select the check box, theFTP Uploadr will finish uploading the files that are already in the queue list. ClickingYeswill disable the FTP Uploadr.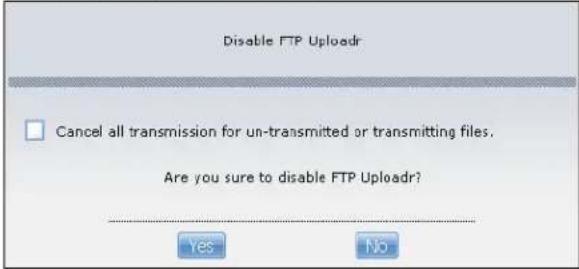 |
| Add Server | Click this to add a target FTP server entry. SeeSection 11.5.1 on page 275 for more details. |
| Preferences Click this | to manage the settings of the FTP Uploadr. |
| Edit Server Select a server from the list and click this to edit the FTP server entry. | |
| Delete Selected Server(s) | Select a server from the list and click this to remove the FTP server entry.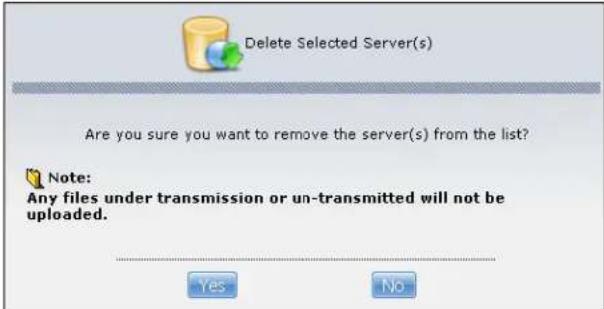 |
| Server Information | Select a server from the list and click this to display the status and settings about the FTP server. |
| Domain Name/IP Address | This is the domain name or IP address of the FTP server. |
| Port Number This is the port number used by the FTP server. | |
| Remote Path The NSA | automatically uploads files to this location of the FTP server. |
| Account Name This is the login account for the FTP server. | |
| Description This is the information related to the FTP server. | |
11.5.1 Adding or Editing an FTP Server Entry
Use this screen to add or edit an FTP server entry for auto upload.
In the FTP Uploadr screen, click the Add Server or Edit Server button to open the following screen.
Figure 157 Applications > Auto Upload > FTP Uploadr > Add or Edit a Server
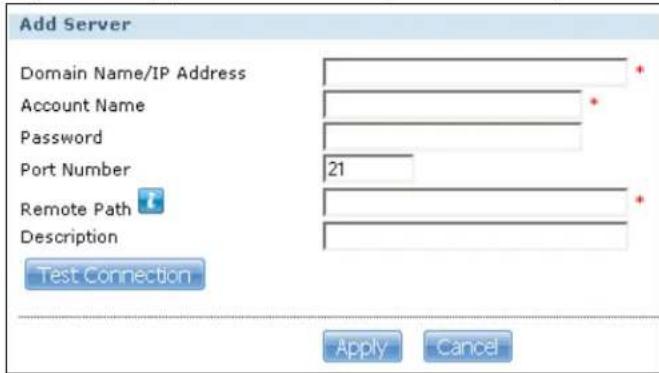
The following table describes the labels in this screen.
Table 94 Applications > Auto Upload > FTP Uploadr > Add or Edit a Server
| LABEL DESCRIPTION | |
| Domain Name/IP Address | Enter the domain name or IP address of the FTP server. |
| Account Name Enter the account name used to access the FTP server. | |
| Password Enter the password associated with the account name. | |
| Port Number Enter the port number for the FTP server. | |
| Remote Path Enter the path of the FTP server where the NSA automatically uploads files. | |
| Description Enter additional information about this FTP server. | |
| Test Connection Click this to test your settings and check whether you can use the settings to connect to the FTP server. | |
| Apply Click this to save your changes. | |
| Cancel Click this to return to the previous screen without saving. | |
11.5.2 The FTP Uploadr Preferences Screen
Use this screen to configure the general settings for the FTP Uploadr.
In the FTP Uploadr screen, click the Preferences icon to open the following screen.
Figure 158 Applications > Auto Upload > FTP Uploadr > Preferences
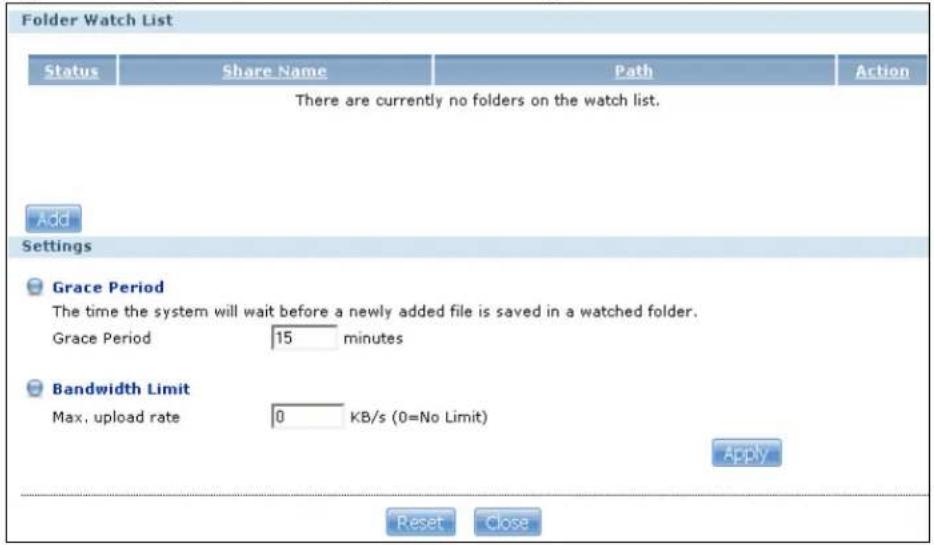
The following table describes the labels in this screen.
Table 95 Applications > Auto Upload > FTP Uploadr > Preferences
| LABEL DESCRIPTION | |
| Folder Watch List | |
| Status | This field indicates whether the share or folder is available.represents a valid folder. The folder is available for auto upload.represents a missing folder. The share may be deleted from the NSA, or the hard disk was removed from the NSA. |
| Share Name This is the share selected for auto upload. | |
| Path | This is the path of a folder selected for auto upload. The NSA only uploads files stored in the specified share or folder to your FTP server. |
| Action | Use theRemoveicon to delete a folder from theFolder Watch List. |
| Add Click this to open | the following screen where you can set a folder that contains files you want the NSA to automatically upload.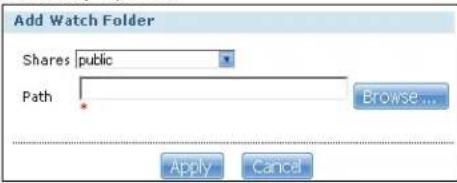 Share - Select the share from the list.Path - Type the folder location in the share directly or clickBrowse to open the following screen and navigate to the folder's location. Share - Select the share from the list.Path - Type the folder location in the share directly or clickBrowse to open the following screen and navigate to the folder's location.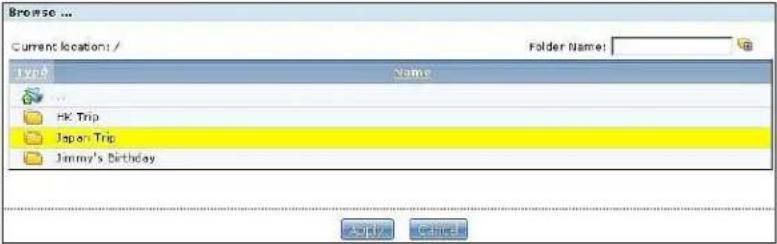 Current Location- This is the location of the selected folder.Folder Name- Enter a new folder name and clickto create it.Type- This is the type of the folder/file.Name- This is the name of the folder/file.Select a folder. If you don't select a folder, a forward slash (/) displays in thePathfield. All contents within the specified share are automatically selected.ClickApplyto save your settings andCancelto close the screen. Current Location- This is the location of the selected folder.Folder Name- Enter a new folder name and clickto create it.Type- This is the type of the folder/file.Name- This is the name of the folder/file.Select a folder. If you don't select a folder, a forward slash (/) displays in thePathfield. All contents within the specified share are automatically selected.ClickApplyto save your settings andCancelto close the screen. |
| Settings | |
| Grace Period | Specify how long the NSA should wait when you add a new file for auto upload. For example, if you set the grace period to 5 minutes, the NSA uploads a new file after it has been in a watched folder for 5 minutes. You can choose from a range of 1 to 10080 minutes (up to one week). |
| Bandwidth Limit | Enter the maximum upload rate for auto upload. You can choose from a range of 0 to 100,000 KB/s. Enter 0 if you do not want to set any limit.Use this to leave bandwidth on your network connection for other traffic, especially if your Internet connection has restricted upload speed. |
| Apply Click this to | save your changes in this section. |
| Reset Click this to restore previously saved settings. | |
| Close Click this to return to the previous screen without saving. | |
12.1 Overview
The Dropbox Web-based file hosting service uses cloud computing to let you use file synchronization to store and share files and folders with others across the Internet. Use your Dropbox account to easily move files to your NSA and have the NSA download *.torrent files.
12.2 Dropbox Screen
Use the Dropbox screen to log the NSA into your Dropbox account. This creates Drop2NAS and zDownload folders in your Dropbox account. See Section 12.3 on page 281 for how to use the folders to move files to your NSA and have the NSA download *.torrent files. The NSA checks the Dropbox account's Drop2NAS and zDownload folders every three minutes.
Click Applications > Dropbox to open the following screen.
Figure 159 Applications > Dropbox
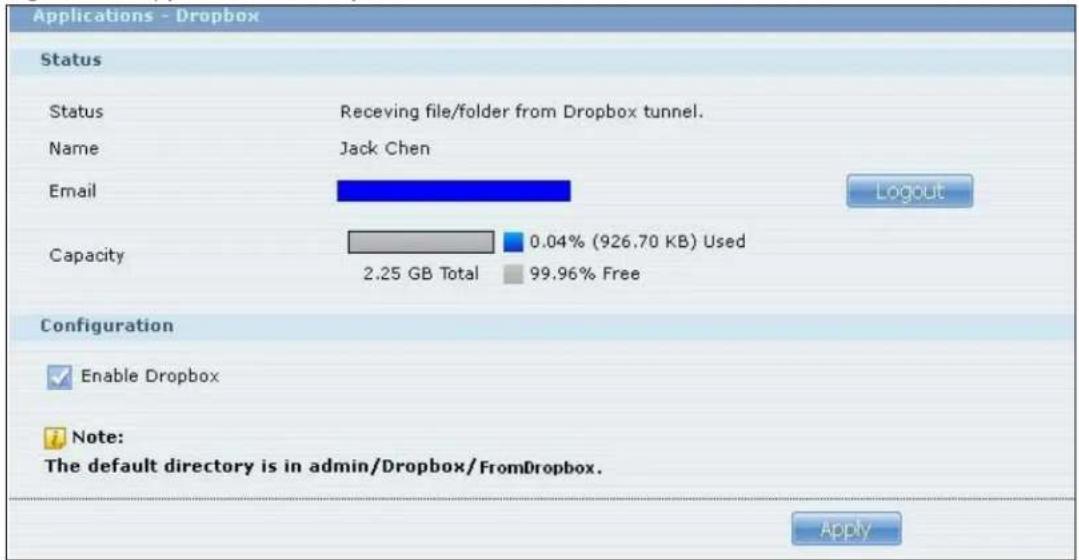
The following table describes the labels in this screen.
Table 96 Applications > Dropbox
| LABEL DESCRIPTION | |
| Status This shows the | status of the NSA Dropbox application's interaction with the Dropbox server. |
| Disable: The NSA Dropbox application is turned off. | |
| Ready: The NSA Dropbox application has authenticated with the Dropbox server and is ready to use. | |
| Authenticating with Dropbox. Please wait.: The NSA Dropbox application is logging into the Dropbox server. | |
| Failed to negotiate link with Dropbox. Please contact your vendor.: The NSA cannot find the Dropbox server at the normal address. | |
| Receiving file/ folder from Dropbox tunnel.: The NSA is getting a file from your Dropbox account. | |
| Dropbox account has been already used on other NAS.: One Dropbox account can only work with one NSA at a time. Log the other NSA out of your Dropbox account to be able to use the account with this NSA. | |
| Name This is the owner | of the Dropbox account the NSA is configured to use. |
| This is the e-mail address of the owner of the Dropbox account the NSA is configured to use. | |
| Logout | This displays after the NSA connects to Dropbox. Click Logout to stop syncing your files with Dropbox and have the NSA log out from your Dropbox account. Use this to be able to use the NSA with another Dropbox account. If you only want to stop syncing your files with Dropbox, you can just clear the Enable Dropbox option and click Apply. |
| Capacity | This shows how much total storage space is available on the NSA to use for Dropbox as well as the amounts already in use and still available. |
| Enable Dropbox | Select this to synchronize and back up your Dropbox account. The first time you do this a Dropbox screen prompts you to log into your Dropbox account.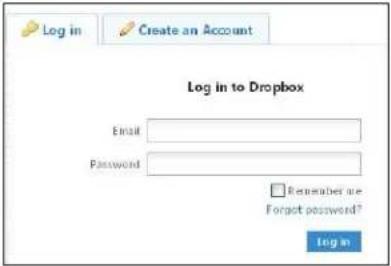 Then a NSA pop-up opens. Click Get Ready. Then a NSA pop-up opens. Click Get Ready. Click Allow when the Dropbox screen notifies you of the NSA's DropNAS application trying to connect to your Dropbox account. Click Allow when the Dropbox screen notifies you of the NSA's DropNAS application trying to connect to your Dropbox account.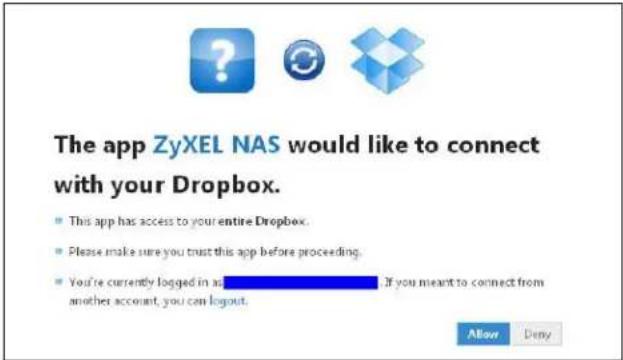 After the NSA connects to Dropbox, clear the Enable Dropbox option and click Apply to stop syncing your files with Dropbox without logging out from your Dropbox account. Click Logout instead to be able to use the NSA with another Dropbox account. After the NSA connects to Dropbox, clear the Enable Dropbox option and click Apply to stop syncing your files with Dropbox without logging out from your Dropbox account. Click Logout instead to be able to use the NSA with another Dropbox account. |
| Apply Click this to save your changes. | |
12.3 How to Use Dropbox with the NSA
Here is how to use the Drop2NAS and zDownload folders the NSA creates in your Dropbox account.
Using the Drop2NAS Folder
The NSA connects to Dropbox and copies files in the Drop2NAS folder to the NSA's admin\Dropbox\FromDropbox folder and empties the Drop2NAS folder. The NSA initiates connections to the Dropbox server so you do not need to configure rules on a firewall in front of the NSA to allow access to the NSA. Dropbox is not connecting to the NSA. When you upload files of the same name to the Drop2NAS folder, the NSA adds a number to the names of the files in the NSA's
admin\Dropbox\FromDropbox folder in the format of "filename(n).extension". Here is an example of the Drop2NAS folder.
Note: Do not delete the NAStoken file as it is needed for your NSA to work with the Dropbox account.
Figure 160 Dropbox\Drop2NAS
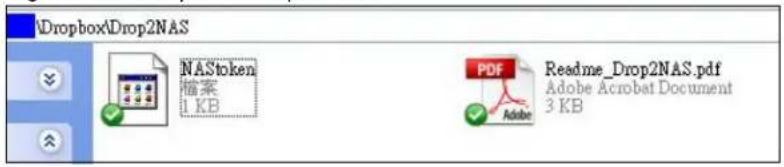
Using the zDownload Folder
The NSA copies *.torrent files in the zDownload folder to the NSA's admin\download\torrents folder and automatically starts downloading them. The NSA adds a suffix to the name of each torrent file in the Dropbox account's zDownload folder and keeps updating it to show the job's state (downloading, queued, paused, canceled, uploading, finished, error, or retrying). The NSA does not take any action for folders nor other types of files in the zDownload folder. Here is an example of torrent files in the zDownload folder.
Figure 161 Dropbox\zDownload
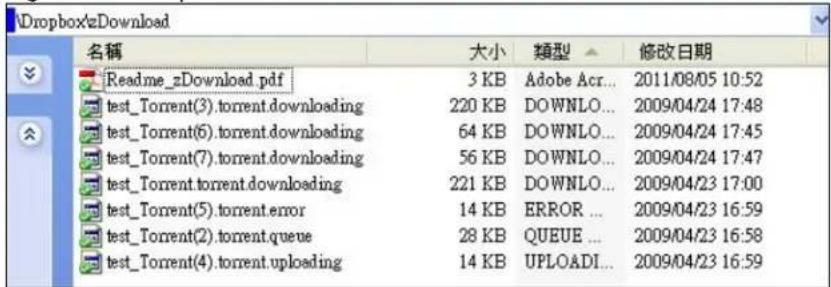
Using Time Machine with the NSA
13.1 Overview
Time Machine is a backup system provided by Mac OS X. It automatically backs up everything on your Mac, including pictures, music, videos, documents, applications, and settings. This chapter helps you to enable Time Machine in OS X to use your NSA as a backup volume.
13.2 Time Machine Screen
Use the Time Machine screen to turn Time Machine support on or off, and designate the share for Time Machine backups.
Click Applications > Time Machine to open the following screen.
Figure 162 Applications > Time Machine
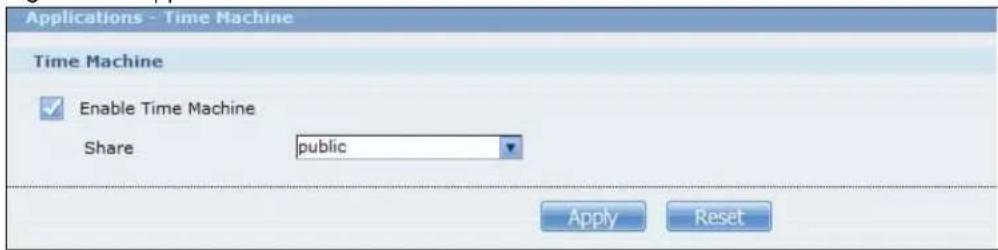
The following table describes the labels in this screen.
Table 97 Applications > Time Machine
| LABEL DESCRIPTION | |
| Enable Time Machine | Select this to allow Macs to use Time Machine to back up to the NSA. Clear it to turn off Time Machine support. |
| Share Select the share | the NSA uses to store Time Machine backups. |
| Apply Click this to save your changes. | |
| Reset | Click this to restore the screen's last-saved settings. |
13.3 Using Time Machine
After enabling Time Machine on the NSA, follow the steps below to set up Time Machine on your Mac to use your NSA for backup.
1 Click Apple > System Preferences. Then go to System and select Time Machine.
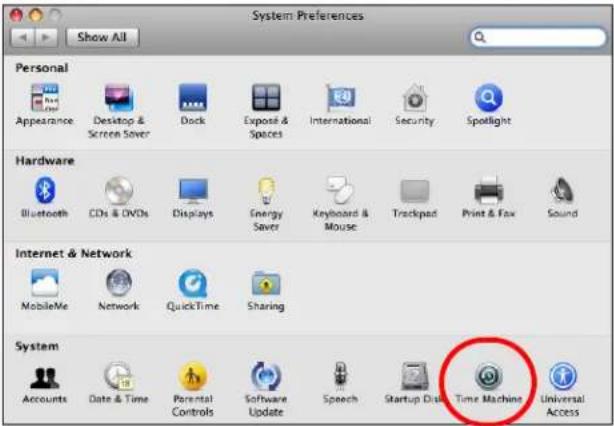
2 Turn Time Machine ON. Then click Change Disk.
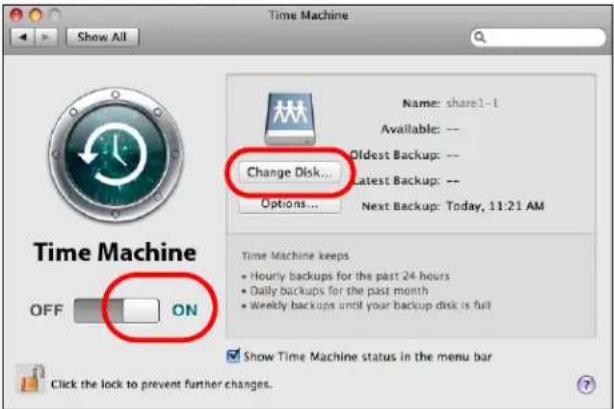
3 Select share01 as the backup disk. Then click Use for Backup.
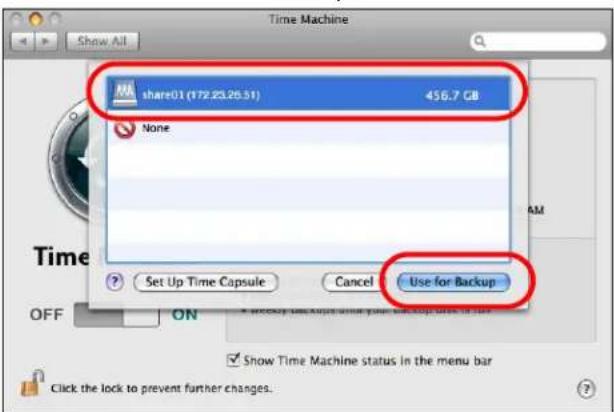
4 When prompted for the username and password of share01, enter the login information for an existing user account with write access permission on share01 (for information on configuring user accounts and shares see Section 4.9 on page 71). In this example user1/12345 is used. Then click Connect.
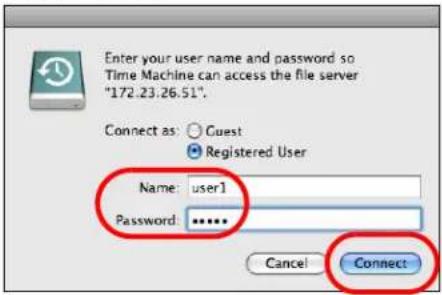
5 Time Machine starts backing up files to share01 after 120 seconds. If you want to backup immediately, click Time Machine icon and select Back Up Now.
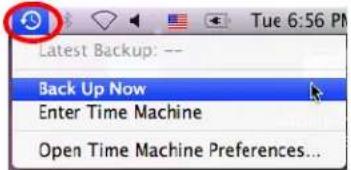
6 The screen shows the status of the backup once the process begins.
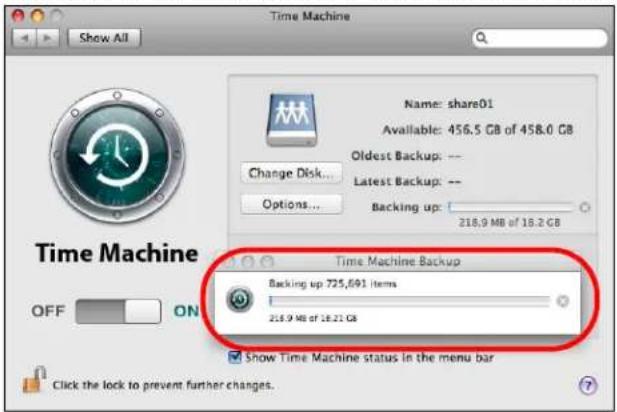
7 To stop the backup process, click the Time Machine icon and select Stop Backing Up. Then turn Time Machine OFF.
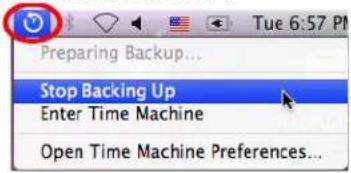
14.1 Overview
This chapter introduces the Users screens of the NSA. Use the Users screens to create and manage administrator and user accounts.
Administrators can:
- Configure and manage the NSA.
- Create volumes, shares, and user accounts.
- Assign individual users specific access rights for specific shares.
Users are people who have access rights to the NSA and can store files there for later retrieval. A user can:
- Manage shares that he owns.
- Change his own password.
- Access the contents of other shares to which he is given access rights.
14.2 What You Can Do
- Use the main Users screen (Section 14.3 on page 287) to display a list of user accounts created on the NSA.
- Use the Add User screen (Section 14.3.2 on page 289) to create new user accounts.
- Use the Edit User screen (Section 14.3.2 on page 289) to edit the properties of an existing account.
- Use the User Info screen (Section 14.4 on page 292) to display the amount of volume space used by a selected account and the account's membership in any groups.
14.3 The Users Screen
Click Sharing > Users to display the screen shown next.
Use this screen to create and manage accounts for users who can store files on the NSA.
Figure 163 Sharing > Users
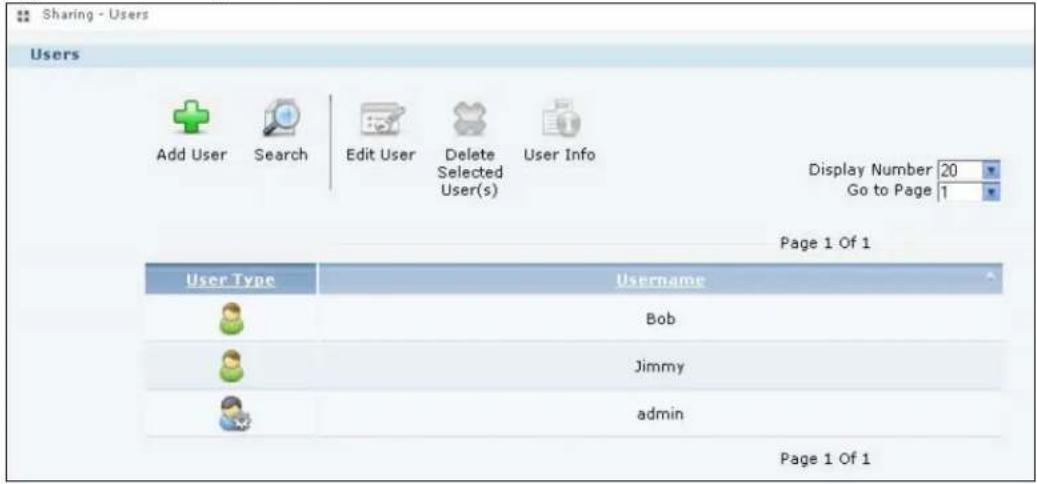
The following table describes the labels in this screen.
Table 98 Sharing > Users
| LABEL DESCRIPTION | |
| Add User Click this to | open a screen where you can configure a new user account.Refer to Section 14.3.2 on page 289 to see the screen. |
| Search Click this to | display a search field. Type in the name of an account and then clickSearch to look up the account you specified. ClickClear to close the search function. |
| Edit User Select an account and click this to open a screen where you can edit the properties of the account.Refer to Section 14.3.2 on page 289 to see the screen. | |
| Delete Selected Users | Select an account and click this to open a screen where you can delete the user account.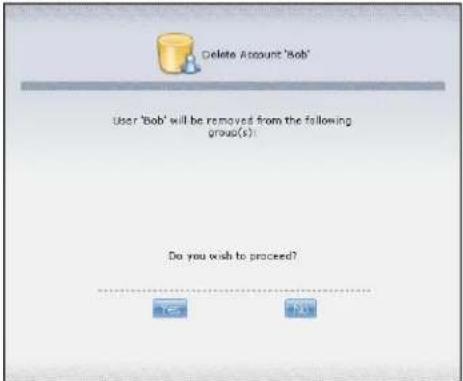 |
| User Info | Select an account and click this to open a screen displaying the amount of storage space used by the account. You can also check the account's membership in any groups.Refer to Section 14.4 on page 292 to see the screen. |
| Display Number Click | the drop-down menu to set how many accounts you want to display in one screen. |
| Go to Page Click the | drop-down menu to display and access more user accounts. |
| User Type | This field displays whether the account is an administrator account or a user account. |
| Username This field | displays the username of each account. |
14.3.1 User Icons
The following table describes the user icons.
Table 99 User Icons
| ICON DESCRIPTION | |
 | The blue icon is for an administrator account. |
 | The green icon is for a user account. |
14.3.2 Adding or Editing an Account
Use this screen to create or edit a NSA user account with NSA access password.
Click the Add User button in the Users screen to open the following screens. Click the Edit User button in the screen shown previously to edit an existing account.
Figure 164 Sharing > Users > Add or Edit a User: General Settings
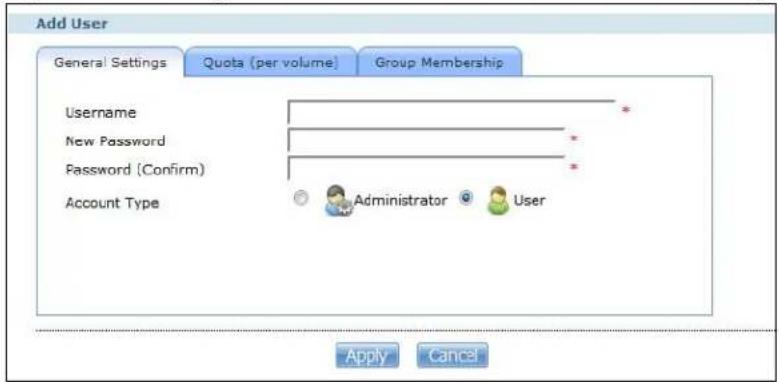
Figure 165 Sharing > Users > Add or Edit a User: Quota (per volume)
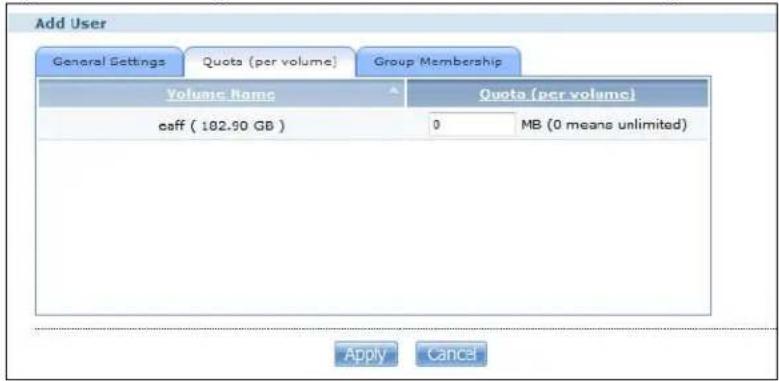
Figure 166 Sharing > Users > Add or Edit a User: General Settings
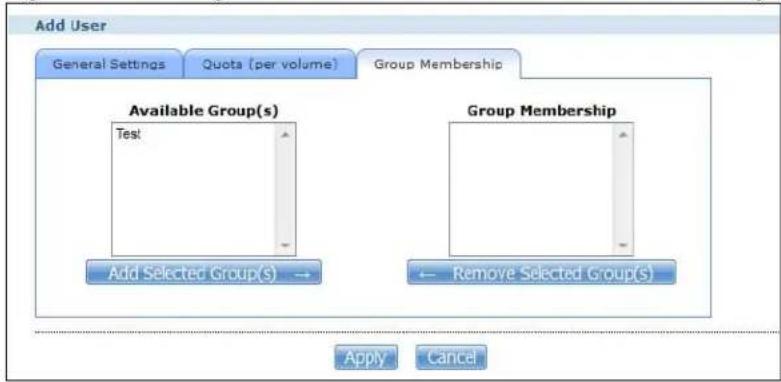
flowchart
graph TD
    A["Add User"] --> B["General Settings"]
    A --> C["Quota (per volume)"]
    A --> D["Group Membership"]
    E["Available Group(s)\nTest"] --> F["Add Selected Group(s) →"]
    G["Group Membership"] --> H["Remove Selected Group(s)"]
    I["Apply"] --> J["Cancel"]
The following table describes the labels in these screens.
Table 100 Users > Add or Edit a User
| LABEL DESCRIPTION | |
| General Settings Click this to configure the user's user name and password. | |
| Username | Type a name from 1 to 32 single-byte (no Chinese characters allowed for example)ASCII characters. See Section 14.3.3 on page 291 for more details on usernames. |
| New Password | Create a password associated with this user. You can type from one to 14 single-byte (no Chinese characters allowed for example) ASCII characters. |
| LABEL | DESCRIPTION |
| Password (Confirm) | You must type the exact same password that you just typed in the above field. |
| Account Type | Select Administrator to give the account full configuration and management access to the NSA.Select User to give the account basic access rights to the NSA and allow the user to manage his own shares, change his own password, and access the contents of other shares to which he is given access rights. |
| Quota (per volume) | Click this to configure which volume the user can use and the allowed storage space. |
| Volume Name Select | the volume in which you want the user's files to be stored. |
| Quota (per volume) | Enter how much space (in megabytes) you want to allow for the user to store files. |
| Group Membership Click | this to configure to which groups on the NSA the user belongs. |
| Available Group(s) | This field lists the groups created on the NSA to which the selected account does not belong. |
| Group Membership This | this field lists the groups that the selected account belongs to. |
| Add Selected Group(s) | Select a group from the Available Groups list and click this to add the account to that group. |
| Remove Selected Group(s) | Select a group from the Group Membership list and click this to remove the account from that group. |
| Apply | Click this to save your changes. |
| Cancel | Click this to return to the previous screen without saving. |
14.3.3 Usernames
Enter a username from one to 32 characters. The first character must be alphabetical (case insensitive, [A-Z a-z]); numeric characters are not allowed as the first character.
The username can only contain the following characters:
- Alphanumeric A-z 0-9. Unicode usernames are supported with CIFS logins, but not FTP or web configurator logins.
- Spaces
- _ [underscores]
• . [ periods ] - [ d a s h e s ]
Other limitations on usernames are:
- All leading and trailing spaces are removed automatically.
- Multiple spaces within names are converted to a single space.
- Usernames are case insensitive. The username cannot be the same (no matter the letter case) as an existing user. For example, if a user exists with the name 'BOB', you cannot create a user named 'bob'. If you enter a user 'bob' but use 'BOB' when connecting via CIFS or FTP, it will use the account settings used for 'bob'.
- The username cannot be the same as a system username such as ANONYMOUS-FTP nor be the same as an existing user. Other reserved usernames that are not allowed are:
- bin
- daemon
- ftp
- anonymous-ftp
- anonymous
- nobody
- root
- pc - guest
- admin
- password
14.4 Displaying User Info
Use this screen to display a user's information.
In the Users screen, select an account and click User Info to open the following screen.
Figure 167 Sharing > Users > User Info
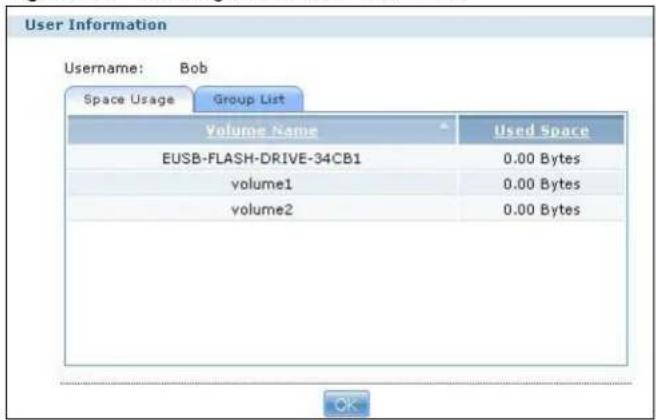
The following table describes the labels in this screen.
Table 101 Sharing > Users > User Info
| LABEL DESCRIPTION | |
| Username This field displays the selected username. | |
| Space Usage Click this to display the amount of volume space used by the selected account. | |
| Group List Click this to display the selected user's group membership. | |
| Volume Name This field displays the volume(s) created on the NSA. | |
| Used Space This field displays how much storage space the selected account is currently using. This only applies for files that the user saved onto the NSA while logged in with that username. | |
| Group Name | This shows when you click the Group List tab.This displays the list of groups to which the selected user belongs. |
| OK Click this to close the current screen. | |
15.1 Overview
This chapter introduces the Groups screens. Use the Groups screens to create and manage groups. You can assign users to groups and grant individual groups access rights to specific shares.
15.2 What You Can Do
- Use the main Groups screen (Section 15.3 on page 293) to display and manage a list of groups created on the NSA.
- Use the Add Group screen (Section 15.3.1 on page 294) to create new groups.
- Use the Edit Group screen (Section 15.3.1 on page 294) to edit the properties of an existing group.
15.3 The Groups Screen
Use this screen to create and manage groups.
Click Sharing > Groups to display the screen shown next.
Figure 168 Sharing > Groups
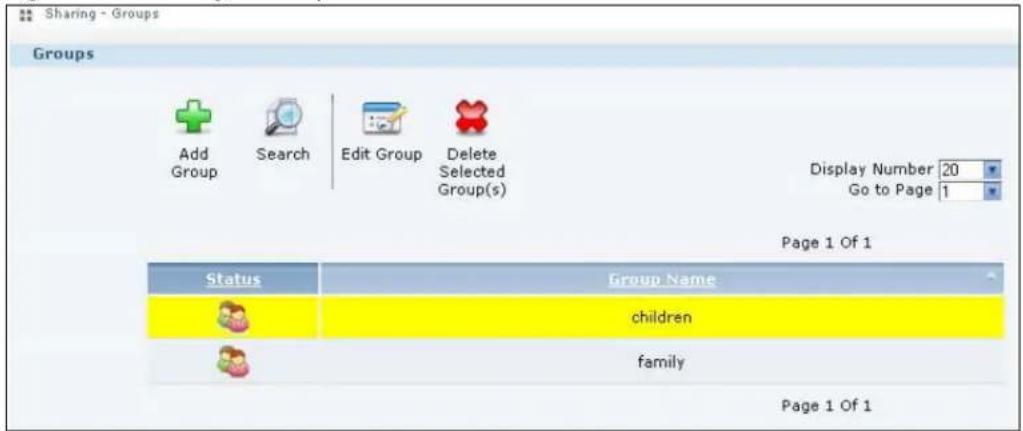
The following table describes the labels in this screen.
Table 102 Sharing > Groups
| LABEL DESCRIPTION | |
| Add Group Click this to open | a screen where you can configure a new group. |
| Search Click this to display | a search field. Type the name of a group and then clickSearch to look up the group you specified. Click Clear to close the search function.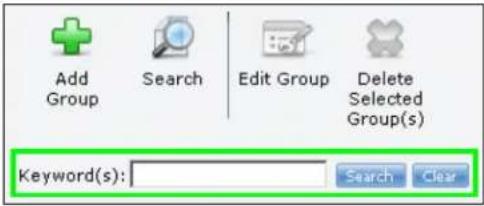 |
| Edit Group Select a group and click this to open a screen where you can edit the properties of the selected group. | |
| Delete Selected Group(s) | Select a group and click this to open a screen where you can delete the group.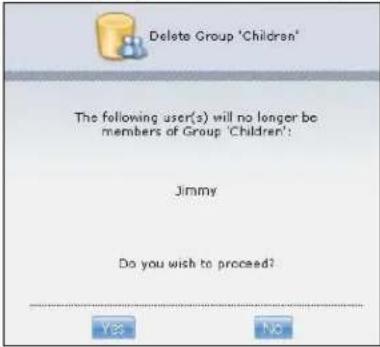 |
| Display Number Click the drop-down menu to set how many groups you want to display in one screen. | |
| Go to Page Click the drop-down menu to select a page number. Jump to a different page to display and access more groups. | |
| Status This field displays the group icon. | |
| Group Name This field displays the group names created on the NSA. | |
15.3.1 Adding or Editing a Group
Use this screen to create or edit a NSA group.
Click the Add Group button in the Groups screen to open the following screen. Click the Edit Group button in the screen shown previously to edit an existing group.
Figure 169 Sharing > Groups > Add or Edit a Group
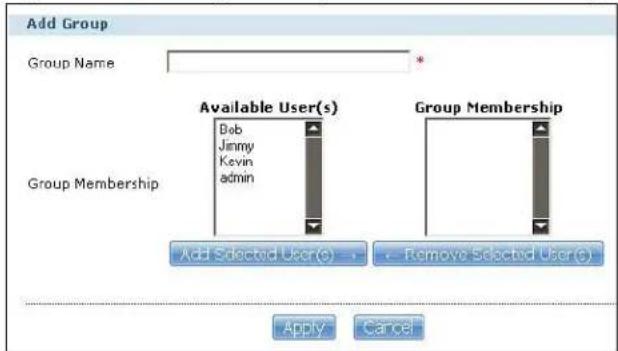
The following table describes the labels in this screen.
Table 103 Sharing > Groups > Add or Edit a Group
| LABEL DESCRIPTION | |
| Group Name | Type a name from 1 to 32 single-byte (no Chinese characters allowed for example) ASCII characters. See Section 15.3.2 on page 295 for more details on group names. |
| Group Membership | Use this field to assign group membership to individual users. |
| Available User(s) This field lists the user accounts created on the NSA that are not members of the current group. | |
| Group Membership This field lists the user accounts added to the group. | |
| Add Selected User(s) | Select a user account from the Available Users list and click this to add the account to the group. |
| Remove Selected User(s) | Select a user account from the Group Membership list and click this to remove the account from the group. |
| Apply Click this to save your changes. | |
| Cancel Click this to return to the previous screen without saving. | |
15.3.2 Group Names
Enter a group name from 1 to 32 characters. The first character must be alphabetical (case insensitive, [A-Z a-z]); numeric characters are not allowed as the first character.
The group name can only contain the following characters:
- Alphanumeric A-z 0-9. Unicode usernames are supported with CIFS logins, but not FTP or web configurator logins.
- Spaces
- _ [underscores]
• . [ periods ] - [ d a s h e s ]
Other limitations on group names are:
- All leading and trailing spaces are removed automatically.
- Multiple spaces within names are converted to a single space.
- Group names are case insensitive. The group name cannot be the same (no matter the letter case) as an existing group. For example, if a group exists with the name 'FAMILY', you cannot create a group named 'family'.
-
The group name cannot be the same as a system group name such as EVERYONE nor be the same as an existing group. Other reserved groups names that are not allowed are:
-
nobody
- root
- every one
16.1 Overview
A share is a set of access permissions mapped to a specific folder on a volume. It is equivalent to the Windows concept of a shared folder. You can map a share to a network drive for easy and familiar file transfer for Windows users.
16.2 What You Can Do
- Use the Shares screen (Section 16.3 on page 297) to navigate a list of shares created on the NSA.
- Use the Add Shares screen (Section 16.3.1 on page 299) to create additional shares on the NSA.
- Use the Recycle Bin screen (Section 16.4 on page 301) to configure and clean up the recycle bins.
- Use the Edit Share screen (Section 16.3.1 on page 299) to edit a share's properties.
- Use the Share Browser screen (Section 16.5 on page 302) to navigate, add and edit the contents in a share.
16.3 The Shares Screen
Click Sharing > Shares in the navigation panel to open the following screen. This screen lists all shares created on the NSA.
Figure 170 Sharing > Shares
| Status | Share Type | Share Name | Share Path | Share Owner | Permission Type |
| Predefined | video | Volume1/video | admin | Public | |
| Predefined | photo | Volume1/photo | admin | Public | |
| Predefined | music | Volume1/music | admin | Public | |
| Auto-SATA | Volume1 | Volume1/ | admin | Private | |
| Built-in | public | Volume1/public | admin | Public | |
| Built-in | admin | Volume1/admin | admin | Private |
The following table describes the labels in this screen.
Table 104 Sharing > Shares
| LABEL DESCRIPTION | |
| Add Share Click this to create a new share. | |
| Recycle Bin Click this to configure recycle bins. | |
| Edit Share Select a share and click this to edit the share. | |
| Delete Share | Select a share and click this to remove or restrict access to the share. Disable Share "photo"I only want to disable this share so that no users are allowed access but the files continue to exist on the volume.I want to permanently delete all content associated with this share.Do you wish to proceed?[SKWZ] [XW5S] Disable Share "photo"I only want to disable this share so that no users are allowed access but the files continue to exist on the volume.I want to permanently delete all content associated with this share.Do you wish to proceed?[SKWZ] [XW5S] |
| Share Browser Select a share and click this to browse the share's contents. | |
| Status This field displays the share icons.represents aBuilt-inshare on a volume on the internal hard drives.represents anAuto-SATA, Predefined, or User-Createdshare on a volume on the internal hard drives.represents anAutoorUser-Createdshare on a volume on the external (USB) devices.represents a disabled share that no user can access.represents a missing share. The NSA cannot find the hard disk associated with the share (the disk may be removed from the NSA for example). You may install the disk back to the NSA to recover the share, or you may delete the share from the NSA. | |
| Share Type | The NSA automatically creates anAuto-SATAshare for each internal SATA volume. The auto-SATA share has the same name as the volume and is the volume's root (or "master") share. It contains all of the volume's shares. All new shares you create on the volume are also automatically included in the auto-SATA share. You cannot delete, edit, or use the share browser with the auto-SATA share.Note: Use the admin account to map the auto SATA share to a Windows network drive. This gives the administrator convenient access to all of the volume's shares through a single Windows network drive. External disk (volume) shares must still be mapped individually.This field displaysBuilt-infor system shares. You cannot delete these shares. These are the public and admin shares.This field displaysPredefinedfor default shares. You cannot delete these shares. These are the video, music, and photo shares.This field displaysUser-createdfor shares that an administrator has created. You can delete these shares.This field displaysAutofor shares that are automatically created on an external (USB) device when a user plugs in the device. |
| Share Name This field displays the share's names. | |
| Share Path | This field displays the share's file path, for example, volume1/music. |
| Share Owner This is the name of the user account to which this share belongs. | |
| Permission Type This field displays the access permission of a share.Everyone on the network can access a Public share.Only the share owner can access a Private share.An Advanced share allows you to assign specific access rights (read-only for example) to individual users/groups. | |
16.3.1 Adding or Editing Share
Click Add Share to create a new share. In the Shares screen, select a share and click Edit Share to open the following screen. Use this screen to create or edit a share.
Figure 171 Shares > Add Share (or Edit Share)
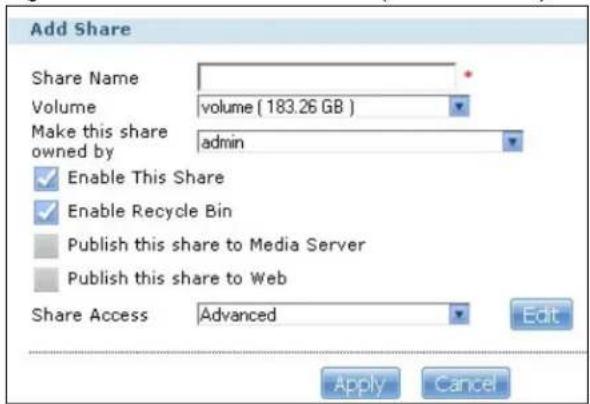
The following table describes the labels in this screen.
Table 105 Shares > Add Share (or Edit Share)
| LABEL DESCRIPTION | |
| Share Name | Type a share name from 1 to 239 single-byte (no Chinese characters allowed for example) ASCII characters. The name cannot be the same as another existing share. See Section 3.4.6 on page 41 for more information on share names. |
| Volume | You should have already created volumes (a single accessible storage area with a single file system) on the NSA. Select the one that contains the folder that you want to share out.You cannot modify this when editing a share. |
| Make this share owned by | Select the administrator or user account that can own (manage) this share. The share owner controls access rights to the share. |
| Enable this share | Click this to allow access to this share. |
| Enable Recycle Bin | Click this to activate the recycle bin. When you delete a file from this share, a recycle folder is created to store the deleted item. |
| Publish this share to Media Server | This shows only when you enable the Media Server (Section 9.5 on page 178).Select this option to have the NSA share files in this folder with media clients. When you publish a share, you can also select whether or not to publish music tracks, photos, and videos. The media clients do not have to use a password to play the shares you publish. |
| Publish this share to Web | This shows only when you enable theWeb Publish(Section 9.8 on page 193).Select this option to let people use a web browser to access this share's files without logging into theHome screens. |
| Share Access | Assign access rights (full, read only or deny) to users or groups. If you publish the share to the media server or the web, all users will have at least read-only access to the share, regardless of what you configure here.Keep it private to ownermeans only the share owner (selected above) can access the share.Make it Publicmeans every user (including people who do not have accounts on the NSA) can access the share.Advancedallows you to assign specific access rights (full, read only or deny) to individual users/groups. |
| Edit | This button is available only when you selectAdvancedshare access. Click this to configure advanced share access rights. |
| Apply Click this to | save your changes. |
| Cancel Click this to | return to the previous screen without saving. |
16.3.2 Configuring Advanced Share Access
In the Sharing > Shares > Add Share or Edit Share screen, select Advanced from the Share Access drop-down list. Click Edit to open the following screen. Use this screen to configure share access rights for individual users and groups.
Figure 172 Sharing > Shares > Add Share (or Edit Share) > Advanced
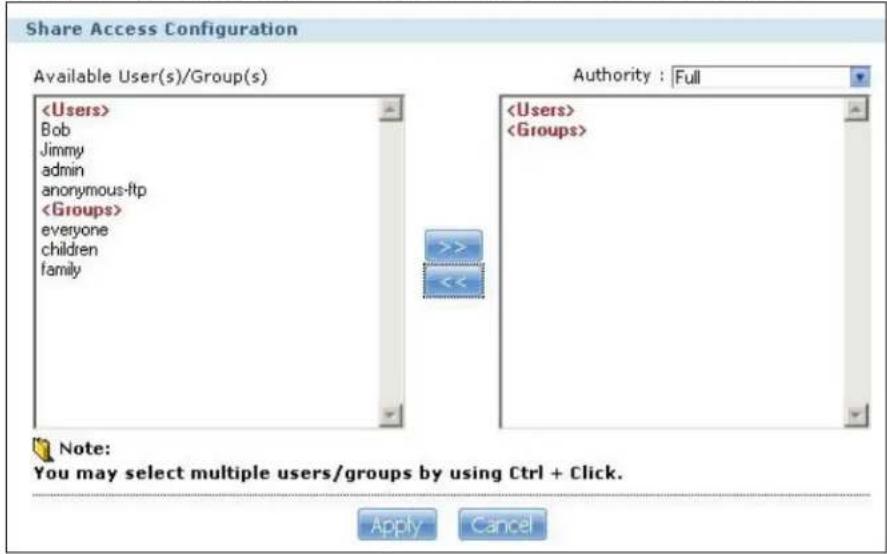
The following table describes the labels in this screen.
Table 106 Sharing > Shares > Add Share (or Edit Share) > Advanced
| LABEL DESCRIPTION | |
| Available Users/Groups | This field lists the users/groups to which you can assign access rights. |
| Authority Use this field to assign access rights to users/groups.Full Control gives users/groups full access (read, write and execute) to all files contained within this share.Read-Only gives users/groups read-only access (they cannot modify nor execute) to all files contained within this share.Deny blocks access (users/groups cannot read, modify, nor execute) to all files contained within this share.Among all access rights, Deny has the highest priority. For example, User A belongs to Group 1. You assign User A full access rights to the Music share but deny access rights to Group 1. Then User A cannot access the Music share.Note: If you deny access to all users, no-one can use the share, not even the administrator. | |
  | Click an arrow button to move users/groups between the left and right fields. Use the arrow buttons to assign access rights to users/groups. |
| Apply Click this to save your changes. | |
| Cancel Click this to return to the previous screen without saving. | |
16.3.3 Public and ANONYMOUS Share Access Rights
If you make a share public, users do not need to log in.
With ANONYMOUS FTP, you must enter either 'anonymous' or 'ftp' as the username. Any other name is considered a username, so must be valid and have a corresponding correct password.
16.4 The Recycle Bin Configuration Screen
Use this screen to periodically clean up items in all recycle bins.
16.4.1 Recycle Bins
Recycle bins in the NSA help users recover accidentally deleted files or folders in the shares. When you delete an item, a recycle folder is created within the share to hold the deleted item.
Every share can have its own recycle folder. You must enable the recycle-bin function to recycle deleted items. You can configure this setting when you add or edit a share. See Section 16.3.1 on page 299 for details on activating the recycle bin in a share.
Later if you want to retrieve a deleted item, you can locate the item in the recycle folder. You may move or copy the deleted item to another share.
16.4.2 Configuring Recycle Bins
In the Sharing > Shares screen, click Recycle Bin to open the following screen.
Figure 173 Sharing > Shares > Recycle Bin
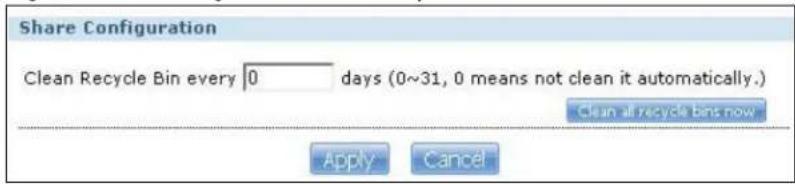
The following table describes the labels in this screen.
Table 107 Sharing > Shares > Recycle Bin
| LABEL DESCRIPTION | |
| Clean Recycle Bin every N days | Specify how often you want to clear the contents in all recycle bins. The specified days correspond to how long a file has been stored in a recycle bin. For example, if you set the interval to be 3 days, recycle bins will clean up items deleted or not accessed for 3 days.Note: Cleaning up recycle bins permanently removes the files from the NSA. |
| Clean all recycle bins now | Click this to immediately remove contents from all recycle bins. |
| Apply Click this to save your changes. | |
| Cancel Click this to return to the previous screen without saving. | |
16.5 The Share Browser Screen
Use this screen to create folders, upload files, and edit files within the share.
Figure 174 Sharing > Shares > Share Browser
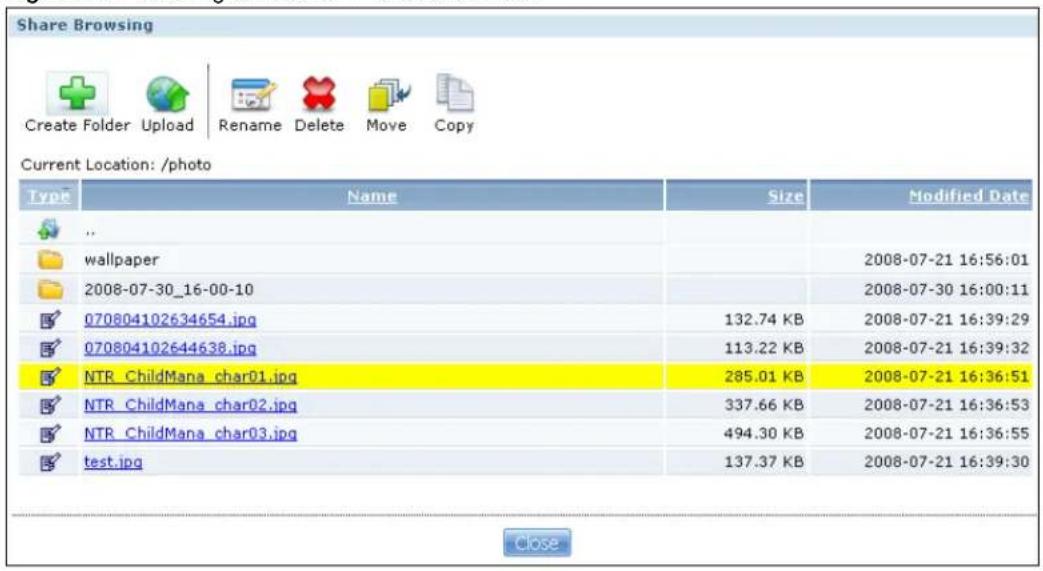
The following table describes the labels in this screen.
Table 108 Sharing > Shares > Share Browser
| LABEL DESCRIPTION | |
| Create Folder | Type a folder name and clickApplyto make a new folder. The name can be 1 to 239 single-byte (no Chinese characters allowed for example) ASCII characters. The name cannot be the same as another existing folder in the same path. SeeSection 3.4.6 on page 41for more information on folder names. |
| Upload | Click this to add files to the share. UseBrowseto locate a file and clickApplyto upload the file. Note that the size of each file should be less than 2 GB.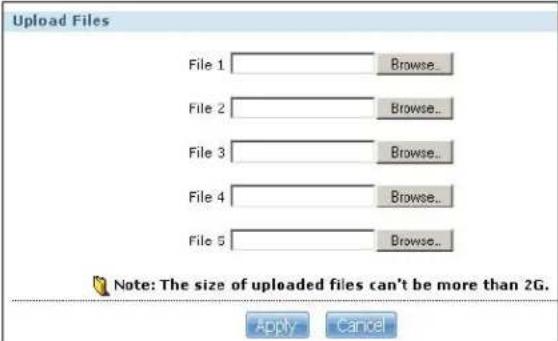 |
| Rename | Select a folder or file and click this to open a screen. Enter the name you want and click OK to make the changes.Note: When you change a file name, make sure you keep the file extension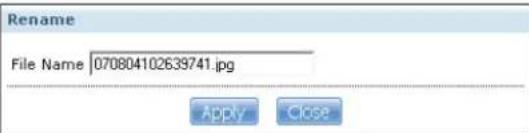 |
| Delete | Select a file/folder from the list and click this to open a warning screen. ClickYesto delete the file/folder, or clickNoto close the screen.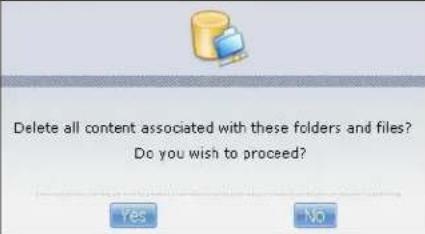 |
| Move | Select a file/folder from the list and click this to relocate the file/folder to another share. |
| Copy | Select a file/folder from the list and click this to make a duplicate of the file/folder to another share. |
| Current location | This is the name of the share and folder path that you are in. |
| Type | The icon in this column identifies the entry as a folder or a file. Click a music or video file's play icon to play the file.The folder with an arrow pointing up is for the link that takes you to the next higher layer in the share's folder tree. |
| Name This section | lists the share's existing folders or files. Click to the right of the file/folder nameto select the file/folder. You can also click the folder's name to navigate to a sub-folder within the folder. |
| Size This field displays size of the file. | |
| Modified Date This field displays a file's latest modification date. | |
| Close Click this to close the screen. | |
16.5.1 Moving or Copying Files
Use this screen to move or copy files to another share.
In the Share Browser screen, select a file or folder and click Move or Copy to open the following screen.
Figure 175 Sharing > Shares > Share Browser > Move (or Copy)
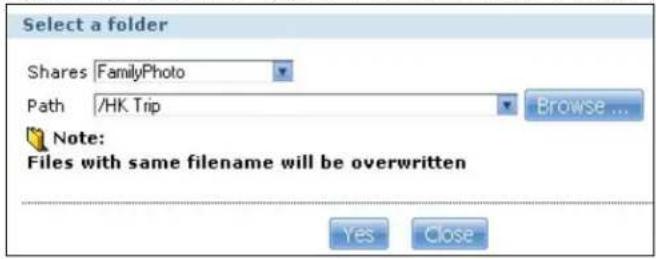
The following table describes the labels in this screen.
Table 109 Sharing > Shares > Share Browser > Move (or Copy)
| LABEL DESCRIPTION | |
| Shares Select the destination share from the drop-down list. | |
| Path | This field displays the share folder's path. You can useBrowse to find or create a folder on the NSA or type the location of the folder using forward slashes as branch separators. |
Browse Click this to open the following screen and navigate to the location of the file/folder.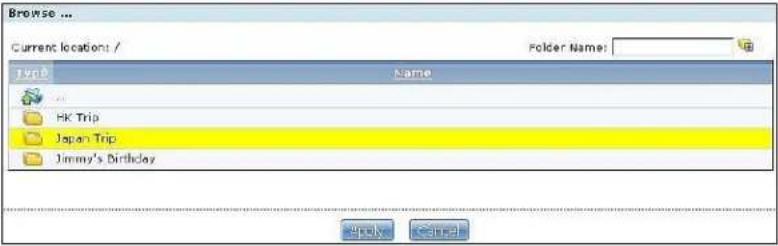 Current Location - This is the location of the selected folder.Folder Name - Enter a new folder name and clickto create it.Type - This identifies the item as a folder or file.Name - This is the name of the folder/file.Select a folder. If you don't select a folder, a forward slash (/) displays in thePathfield. All contents within the specified share are automatically selected.ClickApplyto save your settings andCancelto close the screen. Current Location - This is the location of the selected folder.Folder Name - Enter a new folder name and clickto create it.Type - This identifies the item as a folder or file.Name - This is the name of the folder/file.Select a folder. If you don't select a folder, a forward slash (/) displays in thePathfield. All contents within the specified share are automatically selected.ClickApplyto save your settings andCancelto close the screen. | |
| Yes | Click this to move or copy the file/folder to the designated share. |
| Close | Click this to return to theShare Browserscreen. |
Maintenance Screens
17.1 Overview
This chapter discusses the Maintenance screens. The Maintenance screens allow you to manage system configurations.
17.2 What You Can Do
- Use the Power screen (Section 17.3 on page 305) to configure power settings for the NSA, including power saving, UPS, power on/off after power failure, power on/off schedule, and Wake on LAN.
- Use the Log screen (Section 17.4 on page 309) to check the system's logs.
- Use the Configuration screen (Section 17.5 on page 313) to backup or restore the NSA configuration file.
- Use the SSL screen (Section 17.6 on page 314) to configure HTTPS and the NSA's SSL certificate.
- Use the Shutdown screen (Section 17.7 on page 316) to restart or shut down your NSA.
17.3 The Power Screen
Use this screen to manage power settings for the NSA.
17.3.1 Notes on NSA-310
Note: The NSA-310 does not power on after power failure.
Note: You cannot configure a schedule to power on the NSA-310.
Click Maintenance > Power to display the following screen.
Figure 176 Maintenance > Power
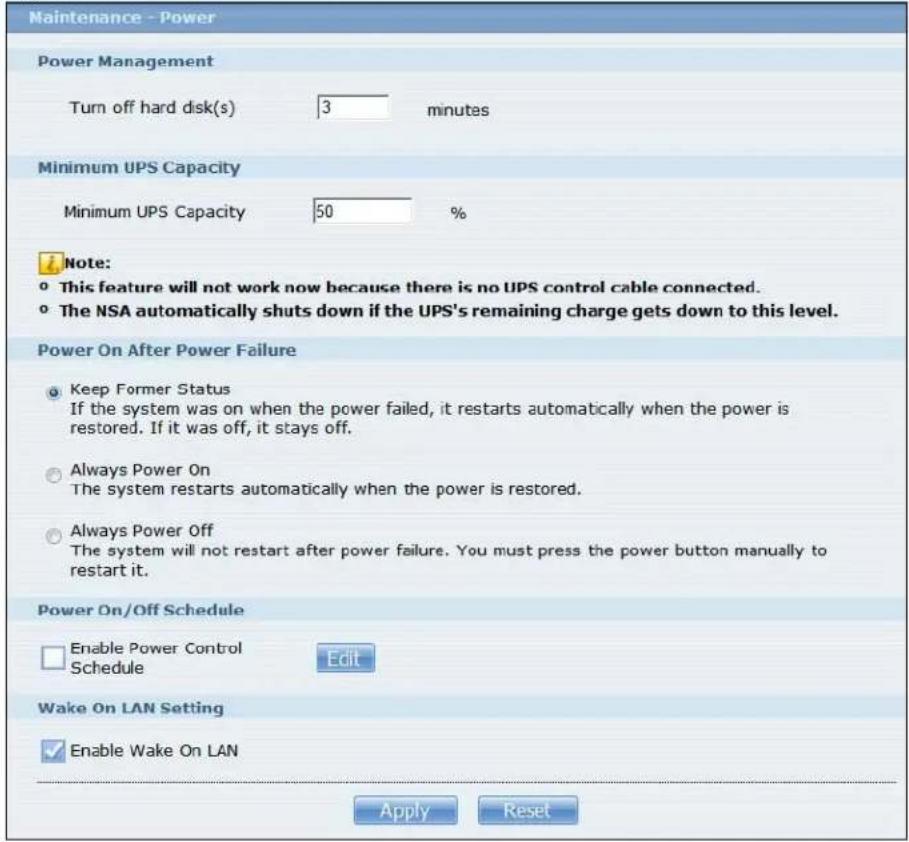
The following table describes the labels in this screen.
Table 110 Maintenance > Power
| LABEL DESCRIPTION | |
| Power Management | |
| Turn off hard disk(s) | Enter the number of minutes to wait when the NSA is idle before spinning the hard disks down to sleep (hibernation). The default time is 15 minutes. |
| Minimum UPS Capacity | |
| Minimum UPS Capacity | When you use an APC Uninterruptible Power Supply (UPS) with a USB connection to the NSA, the NSA shuts itself down if the APC UPS's battery charge gets down to the percentage you specify in this field. This allows the NSA to shut down properly and avoid data loss caused by a power failure when the UPS stops supplying power.A setting around 50% is recommended. A setting close to 100% is not recommended since it would cause the NSA to shut down whenever the UPS is charging. A setting close to 0 is also not recommended since the UPS would not have enough power to allow the NSA to shutdown properly. |
| Power On After Power Failure | Select an option to set whether or not the NSA restarts when the power is restored after a power failure.Note: This feature is not supported on NSA310. |
| Keep Former Status | Select this option to have the NSA automatically restart only if it was operating when the power failed. The NSA remains off if it was already off when the power failed. |
| Always Power On | Select this option to keep the NSA operating as much of the time as possible. The NSA restarts automatically even if it was turned off when the power failed. |
| Always Power Off | Select this option to keep the NSA from automatically restarting when the power is restored after a power failure. This is a computer's “traditional” behavior. Select this if you have other servers such as a domain controller or DNS server that you want to start or check after a power failure before the NSA turns on. |
| Power On/Off Schedule | |
| Enable Power Control Schedule | Select this option to have the NSA turn itself off and on or reboot according to the schedules you configured.Click Edit to go to the screen where you can configure the power control schedules.Refer to Section 17.3.2 on page 308 for this screen.Note: This feature is not supported on NSA310. |
| Enable Wake On LAN | Enable Wake On LAN to be able to turn on the NSA through its wired Ethernet connection.You must have a computer or router on your LAN that supports sending Wake On LAN “magic packets” to turn on the NSA.To use Wake On LAN from a computer on your LAN, install a program such as Wake On LAN EX or another Wake On LAN program that supports sending magic packets.You can use Wake On LAN from a remote location if the router in front of the NSA supports sending magic packets.Use the NSA’s power button or the Web Configurator’s Maintenance > Shutdown menu to turn off the NSA. |
| Apply Click this to | save your changes. |
| Reset Click this to | restore previously saved settings. |
17.3.2 Editing the Power Control Schedule Screen
Click Maintenance > Power Management > Edit to open this screen. Use this screen to configure power control schedules to have the NSA turn on, turn off, or reboot at specified times.
Figure 177 Maintenance > Power Management > Edit
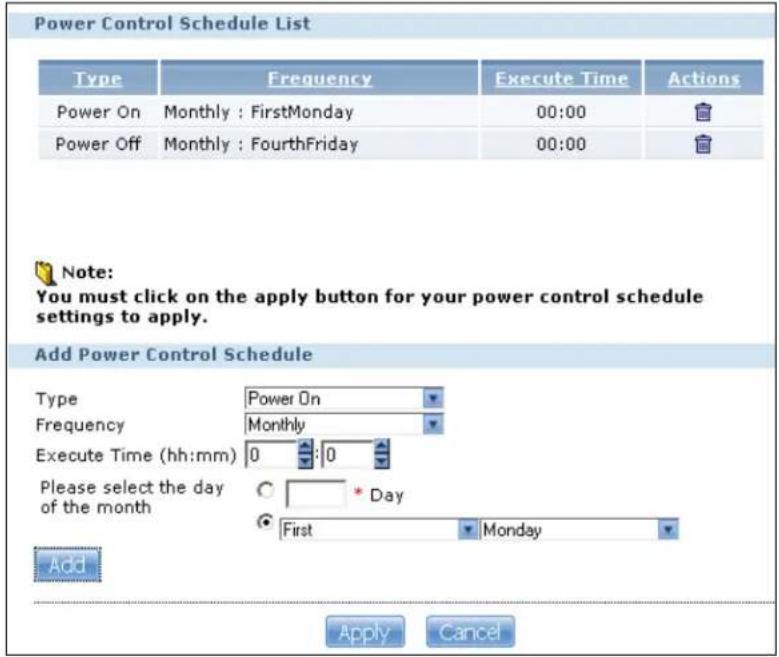
The following table describes the labels in this screen.
Table 111 Maintenance > Power Management > Edit
| LABEL DESCRIPTION | |
| Power Control Schedule List | This table lists the power on, power off, and reboot schedules. For example, you could have one schedule to turn the NSA on every morning, at 8:00, another schedule to turn it off every evening at 18:00, and a third schedule to have it reboot every Friday at 14:00.Click a column's heading cell to sort the schedules by that column's criteria. Click the heading cell again to reverse the sort order. |
| Type | This field displays whether the power control schedule has the NSA turn on, turn off, or reboot. |
| Frequency | This field shows how often (monthly, weekly, or daily) the NSA is to apply this power control schedule. |
| Execute Time | This field shows when the NSA is to use this power control schedule (when the NSA is to turn on, turn off, or reboot). |
| Actions | Click the Delete icon to remove a power control schedule from the list. |
| Add Power Control Schedule | Use this part of the screen to configure power on, power off, and reboot times. |
| Type | Select whether this power control schedule has the NSA turn on, turn off, or reboot. |
| Frequency Select | whether the NSA is to apply this power control schedule entry on a monthly, weekly, or daily basis. |
| LABEL DESCRIPTION | |
| Execute Time (hh:mm) | Enter the time, day, and/or day of the month as appropriate for this power control schedule entry. Leave more than 10 minutes between the execution times of the entries.If the NSA turns off or restarts while a user is transferring files to or from the NSA, the transfer fails. The user will need to restart the transfer.The NSA skips a scheduled restart or power off if the execution time comes while the NSA is doing any of the following:Resynchronizing a RAIDUpgrading firmwareReplacing the configuration fileIf the NSA is turned off at the time when a restart or power off is scheduled, the NSA does not perform the restart or power off.If the NSA is turned on at the time when a power on is scheduled, the NSA does not perform the power on. |
| Use this part of the screen to configure power on, power off, and reboot times. | |
| Please select the day of the month | This is only available if you set the Frequency to Monthly.Choose the day of each month for the power control schedule entry. |
| Every how many weeks? | This is only available if you set the Frequency to Weekly.Enter the interval between weeks and choose the day of the week for the power control schedule entry. |
| Every how many days? | This is only available if you set the Frequency to Daily.Enter the interval between days for the power control schedule entry. |
| Add Click this to add the power control schedule to the list. | |
| Apply Click this to save your changes. | |
| Cancel Click this to return to the previous screen without saving. | |
17.4 The Log Screen
Click Maintenance > Log to open the following screen.
Use this screen to display all NSA logs. There are at most 512 entries in the log. Older logs are removed by the system. You cannot download the log file via FTP or CIFS.
Figure 178 Maintenance > Log
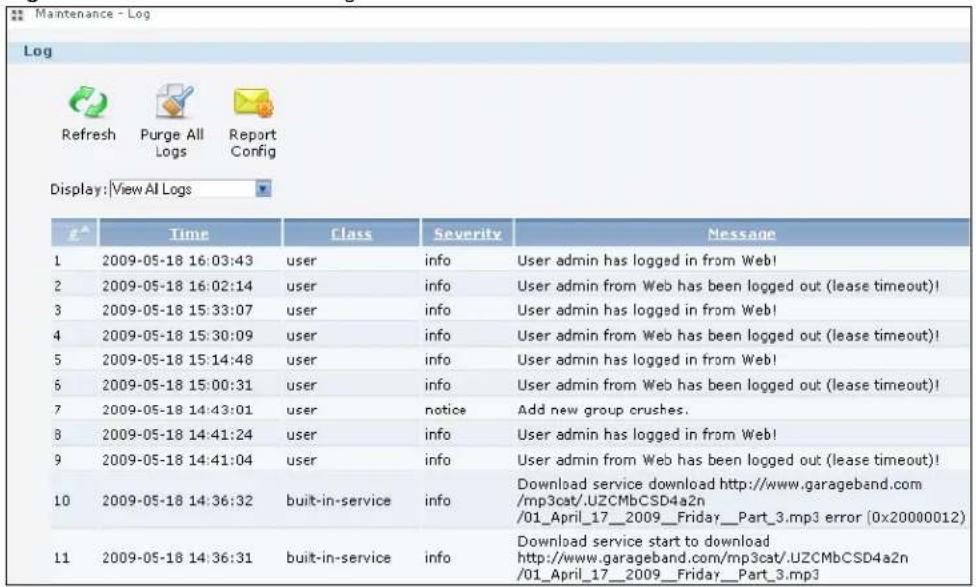
The following table describes the labels in this screen.
Table 112 Maintenance > Log
| LABEL DESCRIPTION | |
| Refresh Click this to update the log display. | |
| Purge all Logs Click this to erase all logs from the NSA. | |
| Report Config Click this to open a screen where you can configure email alerts for logs.Refer to Section 17.4.1 on page 310 to see the screens for this. | |
| Display | The screen always shows all logs by default. Choose a specific log category to view logs for just that category. |
| # This is the log entry's number in the list according to the currently selected sort order. | |
| Time | This shows the date and time the log was created. Click the top of the column to sort by oldest or newest. |
| Class | This displays the log category; see Table 120 on page 317for details. |
| Severity | This displays how serious the log is rated by the NSA. See Table 121 on page 318for more information. |
| Message | This displays a description of the log. Click the top of the column to sort by alphabetical or reverse alphabetical order. |
17.4.1 Report Config Screen
In the Log screen, click Report Config to do the following:
- Use the Email Setting screen (Section 17.4.2 on page 311) to enable and configure e-mail alerts from the NSA.
- Use the Report Setting screen (Section 17.4.3 on page 312) to select the type of alerts you want to receive through e-mail and schedule when the NSA e-mails the alerts.
- Use the Syslog Server Setting screen (Section 17.4.4 on page 312) to enable the syslog server and select the categories to include in the log report.
17.4.2 Email Setting
You can enable and configure e-mail alerts from the NSA. In the Report Config screen, click the Email Setting tab to open the following screen.
Figure 179 Maintenance > Log > Report Config: Email Setting
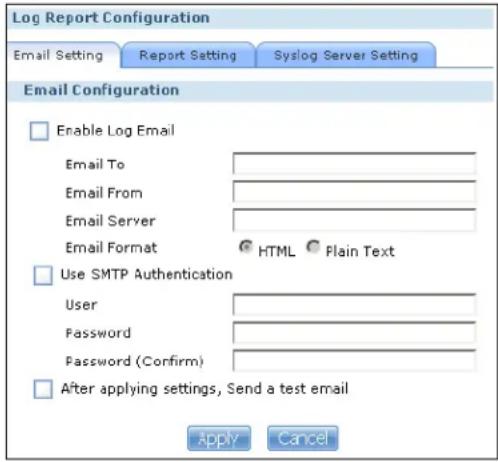
The following table describes the labels in this screen.
Table 113 Maintenance > Log > Report Config: Email Setting
| LABEL DESCRIPTION | |
| Enable Log Email Click this to have the NSA e-mail log alerts to your e-mail account. | |
| Email To Enter the e-mail address where you want to receive the log alerts. | |
| Email From Enter the e-mail address the NSA uses in the From field of the e-mail header for its log alerts. | |
| Email Server Enter the e-mail server address the NSA uses to send e-mail alerts, | |
| Email Format Select the e-mail format you want the NSA to use in its e-mail alerts. | |
| Use SMTP Authentication | Click this if the e-mail server you want the NSA to use for its e-mail alerts requires a username and password. |
| User Enter the username for the e-mail server. | |
| Password Enter the password for the e-mail server. | |
| Password (Confirm) | Re-enter the password to confirm it. |
| After apply settings, send a test email | Click this to have the NSA send a test e-mail to the settings you have entered. |
| Apply Click this to save your changes. | |
| Cancel Click this to return to the previous screen without saving. | |
17.4.3 Report Setting
You can select the type of alerts you want to receive through e-mail and schedule when the NSA e-mails the alerts. In the Report Config screen, click the Report Setting tab to open the following screen.
Figure 180 Maintenance > Log > Report Config: Report Setting
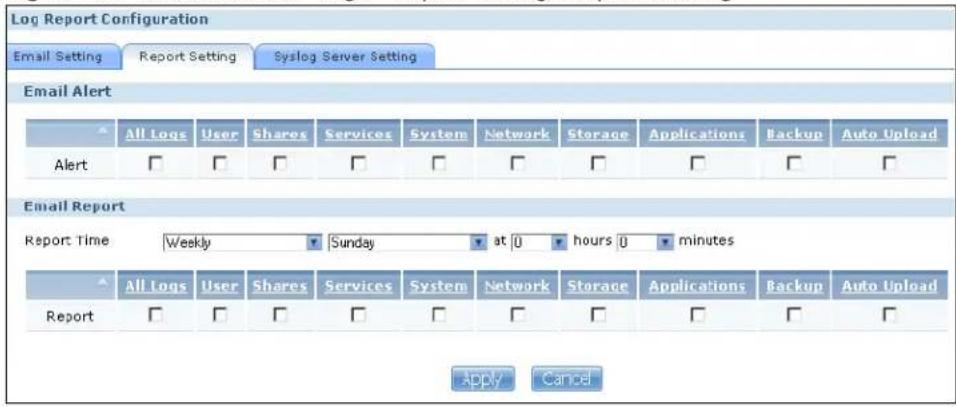
The following table describes the labels in this screen.
Table 114 Maintenance > Log > Report Config: Report Setting
| LABEL DESCRIPTION | |
| Email Alert Check the type of log alerts you want to receive in your e-mail.Select All Log to include all types of log alerts. | |
| Email Report Check the type of log alerts you want to receive in your e-mail.Select All Log to include all types of log alerts. | |
| Report Time | Select how often (Weekly, Daily or Hourly), what day in the week (Monday to Sunday) and which time (hour:minutes) the NSA delivers its e-mail alerts. |
| Apply Click this to save your changes. | |
| Cancel Click this to return to the previous screen without saving. | |
17.4.4 Syslog Server Setting
You can enable the syslog server and select the categories to include in the log report. In the Report Config screen, click the Syslog Server Setting tab to open the following screen.
Figure 181 Maintenance > Log > Report Config: Syslog Server Setting
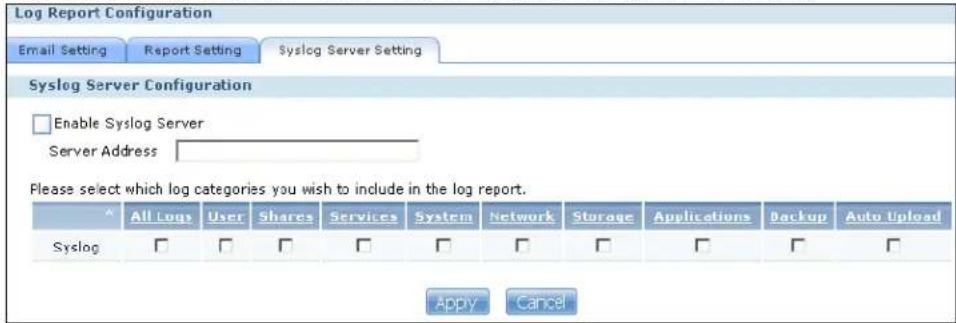
The following table describes the labels in this screen.
Table 115 Maintenance > Log > Report Config: Syslog Server Setting
| LABEL DESCRIPTION | |
| Enable Syslog Server | Check this to enable syslog server. |
| Server Address Enter the syslog server address you want the NSA to use for its log alerts. | |
| In the table below, check the type of log alerts you want to receive in your e-mail. Select All Log to include all types of log alerts. | |
| Apply Click this to | save your changes. |
| Cancel Click this to | return to the previous screen without saving. |
17.5 The Configuration Screen
Click Maintenance > Configuration to open the following screen. Use this screen to backup or restore the NSA configuration settings.
Figure 182 Maintenance > Configuration
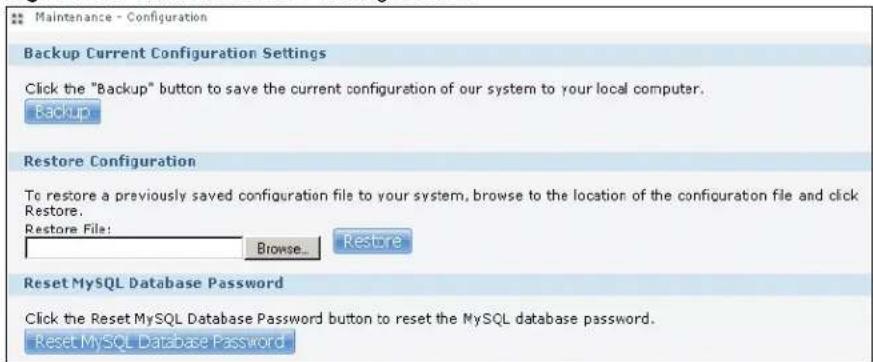
The following table describes the labels in this screen.
Table 116 Maintenance > Configuration
| LABEL DESCRIPTION | |
| Backup Current Configuration Settings | |
| Backup | Click this to save the current configuration of the NSA to your computer. A pop-up screen appears asking you to confirm. Click OK to continue or Cancel to quit. |
| Restore Configuration | When you restore a file configuration, the NSA checks the volumes/share paths on the NSA and the configuration file.If the volume exists but the share path is missing in the NSA, the NSA automatically creates this share path.If the volume does not exist on the NSA, the Status of the share will show “missing share icon” in Shares screen (see Table 104 on page 298). |
| Browse Click this to locate a previously-saved configuration file. | |
Table 116 Maintenance > Configuration
| LABEL DESCRIPTION | |
| Restore | Click this to load the previously-saved configuration file to the NSA. This replaces your current NSA configuration settings with the settings in the previously-saved configuration file.A pop-up screen appears asking you to confirm. Click OK to continue or Cancel to quit. |
| Reset MySQL Database Password | Click this to reset the password for your MySQL database. |
17.6 SSL Certification
Click Maintenance > SSL to open this screen, where you can turn on HTTPS, create a public key certificate, or upload a public key certificate that was issued by a known certificate authority.
Figure 183 Maintenance > SSL
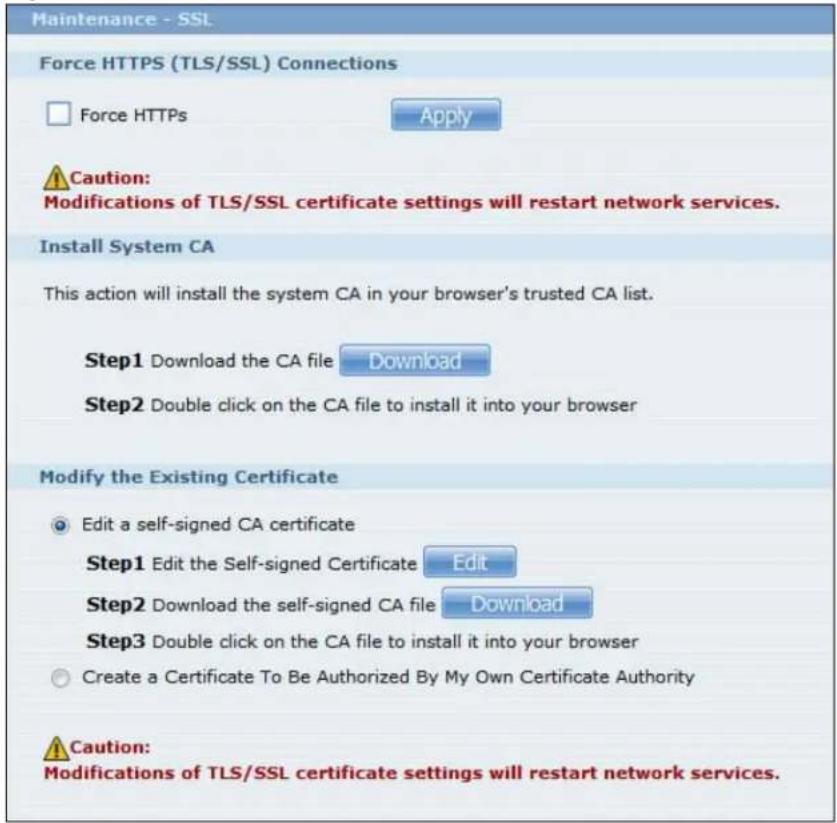
The following table describes the labels in this screen.
Table 117 Maintenance > SSL
| LABEL DESCRIPTION | ||||
| Force HTTPS | Select theForce HTTPsoption to turn on the NSA's web browser security.Anyone who connects via HTTPS to the NSA must install the public key certificate associated with it.Note: The NSA will restart the web configurator after you clickApply.The NSA displays a warning screen if applying your change may disconnect some users. ClickApplyif you wantto continue.Warning ConfirmationThe following users are currently connected. If you decide to continue, they may be disconnected.Type Share Name Username IP AddressWeb admin 172.23.37.104CIFS music admin 172.23.37.104Performing this operation will cause some network services to temporarily disconnect.Apply Cancel | |||
| Install System Default CA | ClickDownloadbutton to save a copy of the NSA's public key certificate to your local computer. This is useful for installing the certificate without having to connect to the NSA, or for sending by email to other users for them to install prior to logging into the NSA for the first time. After saving the certificate to your computer, double-click it to install it.Note: Each web browser handles certificate installation differently. | |||
| Modify the Existing Certificate | SelectEdit a self-signed CA certificate, then follow the on-screen instructions for creating a public key certificate signed by the NSA as the local certificate authority.Note: Use certificates created and signed by the NSA if the device is not open to external access.SelectCreate a certificate authorized by other CA, then follow the on-screen instructions to install a certificate that has been authorized by a third-party certificate authority.Note: Use this method if the device is open to external access, such as allowing users to connect through the Internet using FTP over TLS or HTTPS. | |||
17.6.1 Modifying or Creating a Certificate
When you select the Edit a self-signed CA certificate option, then click the Edit button, a screen opens to allow you to make adjustments to the NSA's public key certificate.
The screen is also the same for the Create a certificate authorized by other CA option.
Figure 184 Maintenance > SSL > Create or Edit a Certificate
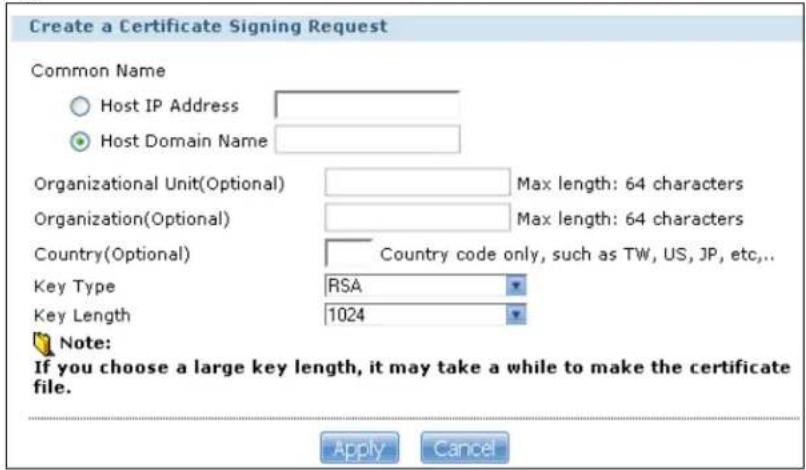
The following table describes the labels in this screen.
Table 118 Maintenance > SSL > Create or Edit a Certificate
| LABEL DESCRIPTION | |
| Common Name | This name describes the certificate's origin, either in the form of an IP address or a domain name. |
| Host IP Address | Select this option and enter the NSA's IP address if you want to use this for the common name. |
| Host Domain Name | Select this option and enter the NSA's domain name if you want to use this for the common name |
| Organizational Unit (Optional) | Enter this name of the organizational unit which owns or maintains the NSA. This is an optional field. |
| Organization (Optional) | Enter this name of the organization or company which owns or maintains the NSA. This is an optional field. |
| Country (Optional) | Enter this name of the country in which the NSA is located. This is an optional field. |
| Key Type | Select the certificate's key type, either RSA or DSA. RSA is a public-key encryption and digital signature algorithm, while DSA is only a digital signature algorithm. |
| Key Length Select the encryption key length. The longer the key, the better the encryption security. The only drawback to having a long key is that the file encrypted with it swells in size as well. | |
| Apply Click this to save your changes. | |
| Cancel Click this to discard changes and close the window. | |
17.7 The Shutdown Screen
Use this screen to turn off the NSA or perform a software restart. A software restart is faster than turning the NSA off and then turning it on again. Before shutting down or restarting, check the System Status > Active Sessions screen to make sure that no one is logged into the NSA or transferring files to or from the NSA.
Click Maintenance > Shutdown to open the following screen.
Figure 185 Maintenance > Shutdown

The following table describes the labels in this screen.
Table 119 Maintenance > Shutdown
| LABEL DESCRIPTION | |
| Restart | Click this to have the device perform a software restart. |
| Shutdown Click this to | shut down the system and restart it again later. |
When you click the Restart button a pop-up screen will appear asking you to confirm. Click OK to continue or Cancel to quit the restart.
Figure 186 Maintenance > Shutdown > Confirm Restart
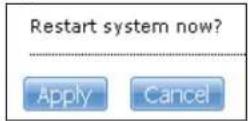
When you click the Shutdown button a pop-up screen will appear asking you to confirm. Click OK to continue or Cancel to quit the shutdown.
Figure 187 Maintenance > Shutdown > Confirm Shutdown
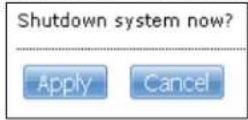
17.8 Technical Reference
This section provides technical background information on the topics discussed in this chapter.
17.8.1 Log Classes
The following table shows information on log classes.
Table 120 Log Classes
| LOG CATEGORY | DESCRIPTION |
| Users This log class shows information on user access to the NSA. | |
| Shares This log class shows information on shares being created or deleted. | |
| Services This log class shows information on the operation of the NSA's built-in services. | |
| System This log class shows all other system related messages. | |
| Network This log class shows information on network configuration, setting changes and so on. | |
| Storage | This log class shows information on the NSA's internal and external storage activities. |
| Backup This log class shows information on all backup-related activities. | |
| Auto Upload This log class shows information on automatic uploads done by the NSA. | |
17.8.2 Log Severity Levels
The following table shows information on log severity levels. Levels range from 0 to 6 with 0 being the most severe level log and 6 being an informational log only. Log levels are not displayed in the logs and are for your reference only.
Table 121 Log Severity Levels
| LEVEL DESCRIPTION | |||||||||
| 0 | E | m | e | r | g | e | n | c | y |
| 1 | A | l | e | r | t | ||||
| 2 | C | r | i | t | i | c | a | l | |
| 3 Error | |||||||||
| 4 Warning | |||||||||
| 5 | N | o | t | i | c | e | |||
| 6 | l | n | f | o | |||||
17.8.3 Log Messages
Here are some example log messages.
Table 122 Log Messages
| CLASS SEVERITY MESSAGE | ||
| Auto upload INFO %s is queued. | ||
| Auto upload INFO %s uploaded (Flickr or YouTube Upload). | ||
| Auto upload WARNING error uploading "%s" (%s): %s | ||
| Auto upload | INFO | %s will not be uploaded to %s for there is already a duplicate file. |
| Auto upload | INFO Failed to upload %s to %s (FTP Upload) : %s | |
| Auto upload | INFO Successfully upload %s to %s (FTP Upload) | |
| Copy/Sync Button | ERROR | [USB %s] Backup Folder Does Not Exist. |
| Copy/Sync Button | ERROR | [USB %s] Target Folder Does Not Exist. |
| Copy/Sync Button | ERROR | [USB Sync] Failed at %s: It is a Folder in Internal Volume. But It is not a Folder in USB. |
| Copy/Sync Button | ERROR | [USB Sync] Failed at %s: It is a Folder in USB. But It is not a Folder in Internal Volume. |
| Copy/Sync Button | ERROR | [USB Sync] Failed at File %s. |
| Copy/Sync Button | ERROR [USB Sync] Sync Failed at Folder %s. | |
| Copy/Sync Button | ERROR Modify COPY/SYNC Button Configuration: %s | |
| Copy/Sync Button | ERROR Please Change Your Folder Name. Invalid Path: %s | |
| Copy/Sync Button | INFO [USB ync] Copying %s from Internal Volume to Backup Folder. | |
| Copy/Sync Button | INFO [USBync] Copying %s from Internal Volume to USB. | |
| Copy/Sync Button | INFO [USB ync] Copying %s from USB to Backup Folder. | |
| Copy/Sync Button | INFO [USBync] Copying %s from USB to Internal Volume. | |
| Copy/Sync Button | INFO [USB ync] Deleting %s from Internal Volume. | |
| Copy/Sync Button | INFO [USBync] Deleting %s from USB. | |
| Copy/Sync Button | INFO [USB ync] Deleting %s from USB Recursively. | |
| Copy/Sync Button | INFO [USBync] Finished. Elapsed Time %s Seconds. | |
| Copy/Sync Button | INFO [USB ync] Moving %s from Internal Volume to Backup Folder. | |
| Copy/Sync Button | INFO [USBync] Moving %s from USB to Backup Folder | |
| Copy/Sync Button | INFO [USB ync] Skip %s: File not Exist | |
| Copy/Sync Button | INFO [USBync] Skip %s: Not a Regular File. | |
| Copy/Sync Button | INFO [USB $ync] Start Pre-Processing: Generating File Lists. | |
| Copy/Sync Button | NOTICE [USB Sync] Start Copying Files. | |
| Download Service | ERROR Download service cannot find a volume | |
| Download Service | ERROR Download service failed to find ipfilter.dat | |
| Download Service | INFO Download service add a URL download job %s | |
| Download Service | INFO Download service delete %s by user | |
| Download Service | INFO Download service download %s error (0x%08x) | |
| Download Service | INFO Download service download %s finished in %s | |
| Download Service | INFO Download service found a new torrent file %s | |
| Download Service | INFO Download service initialized | |
| Download Service | INFO Download service pause %s by user | |
| Download Service | INFO Download service set %s to %s priority by user | |
| Download Service | INFO Download service set default download location to %s | |
| Download Service | INFO Download service set max P2P download rate to %d KB/s by user | |
| Download Service | INFO Download service set max P2P upload rate to %d KB/s by user | |
| Download Service | INFO Download service set max download slot to %d | |
| Download Service | INFO Download service set seeding time to %d minutes | |
| Download Service | INFO Download service set TCP port to %d and UDP port to %d | |
| Download Service | INFO Download service set torrent monitor location to %s | |
| Download Service | INFO Download service start to download %s | |
| Download Service | INFO Download service stopped | |
| Download Service | INFO Download service suspend %s because of no data income detected or to limit max download slot | |
| Download Service | INFO Download service add comment %s to %s by user | |
| Download Service | INFO Download service set min upload/download ratio to %d% | |
| Download Service | INFO Download service set max seed slot to %d | |
| Download Service | INFO Download service start loading ipfilter.dat | |
| Download Service | INFO Download service clear all ipfilter rules | |
| Download Service | INFO Download service blocked peer removed from peer list | |
| Download Service | INFO Download service disconnected blocked peer | |
| Download Service | INFO Download service incoming connection blocked by IP filter | |
| Download Service | INFO Download service peer from tracker blocked by IP filter | |
| Download Service | INFO Download service abort loading ipfilter.dat | |
| Download Service | INFO Download service will update ipfilter.dat from %s after %d day(s) | |
| Download Service | INFO Download service added %d rules from ipfilter.dat | |
| Download Service | INFO Download service detected invalid ip range %s in ipfilter.dat | |
| Download Service | WARNING Download service default location does not exist. Load default | |
| Download Service | WARNING Download service default torrent location does not exist. Load default | |
| Groups NOTICE | Add new group %s. | |
| Groups NOTICE | Delete group %s. | |
| Network NOTICE %s is active because of changing Port Group. Enable DHCP client. | ||
| Network NOTICE %s is inactive because of changing Port Group. Disable DHCP client. | ||
| Network NOTICE %s MTU > (%s MTU - 8), %s may not work correctly. | ||
| Network NOTICE (%s MTU - 8) < %s MTU, %s may not work correctly. | ||
| Network NOTICE Add interface %s. | ||
| Network | NOTICE | Because %s link down. Default route will not apply until %s link up. |
| Network | NOTICE | Because base interface %s will be disabled. Interface %s is disabled now., base_ud_iface |
| Network NOTICE Network Config setting is changed | ||
| Network NOTICE Interface %s was disabled. | ||
| Network NOTICE Interface %s was enabled. | ||
| Network | NOTICE | Port Group on %s is changed. Renew DHCP client. |
| Network NOTICE Account pppoe was changed | ||
| Network NOTICE Add account pppoe | ||
| Network NOTICE ADD interface ppp0 | ||
| Network | NOTICE | Interface ppp0 will reapply because Device-Ha become active status. |
| Network | NOTICE | Interface ppp0 will reapply because Device-Ha is not running. |
| Network NOTICE Network port is disabled | ||
| Network NOTICE Network port is enabled | ||
| Services INFO HTTP management port has changed to %s | ||
| Services INFO Clock timezone is set to GMT%s | ||
| Services INFO Clock timezone is set to default | ||
| Services INFO Clock daylight saving is enabled | ||
| Services INFO Clock daylight saving is disabled | ||
| Services INFO Clock has disable daylight saving | ||
| Services INFO MyClock has enable daylight saving | ||
| Services INFO MyClock has set timezone to %s | ||
| Services INFO MyClock has set timezone to default | ||
| Services INFO The date and time are updated from NTP server. | ||
| Services INFO The date and time are updated manually. | ||
| Services INFO The time is updated manually. | ||
| Services NOTICE FTP server stops | ||
| Services NOTICE FTP server starts | ||
| Services NOTICE MyClock has changed daylight saving interval | ||
| Services NOTICE MyClock has disabled daylight saving interval | ||
| Services NOTICE NTP server has set to '%s' | ||
| Services NOTICE NTP server has set to null | ||
| Services NOTICE The NTP service is disabled. | ||
| Services NOTICE The NTP service is enabled. | ||
| Services WARNING Reaching Maximum Allowed Rules | ||
| Services WARNING Rule is empty | ||
| Services WARNING The Rule Does Not Exist | ||
| Shares INFO Ex-pire recycle-bin finish for share %s, process time: %s seconds, remove %s file (%s bytes) | ||
| Shares NOTICE Add new disabled share %s for unshared folder: %s in volume: %s. | ||
| Shares NOTICE Add new share %s. | ||
| Shares NOTICE Delete share %s. | ||
| Shares NOTICE Purge all files in recycle-bin folder in share: %s. | ||
| Shares NOTICE Recycle-bin disabled. Remove recycle-bin folder in share: %s. | ||
| Storage ERROR Eject External Disk (%s): FAILED | ||
| Storage INFO Eject External Disk (%s): SUCCESS | ||
| Storage ERROR Relabel Raid to [%s]: FAILED | ||
| Storage ERROR Start Repairing Degraded Raid by disk%s: FAILED | ||
| Storage INFO Relabel Raid to [%s]: SUCCESS | ||
| Storage INFO Start Repairing Degraded Raid by disk%s: SUCCESS | ||
| Storage NOTICE Auto Repair Degraded RAID by disk%s. | ||
| Storage NOTICE There is a RAID Degraded. | ||
| Storage ERROR Cancel External Volume Scan: FAILED | ||
| Storage ERROR Cancel Internal Volume Scan: FAILED | ||
| Storage ERROR Cannot Unmount Volume and RAID. System Busy Using Volume and RAID: Please Reboot and Try Again | ||
| Storage ERROR Create External Normal Volume [%s] (%s): FAILED | ||
| Storage ERROR Create Internal Volume [%s] (%s): FAILED | ||
| Storage ERROR Rename External Volume to [%s]: FAILED | ||
| Storage ERROR Scan External Volume: FAILED | ||
| Storage ERROR Scan Internal Volume (%s operation): FAILED | ||
| Storage INFO Cancel Internal Volume Scan: SUCCESS | ||
| Storage INFO Create External Normal Volume [%s] (%s): SUCCESS | ||
| Storage INFO Create Internal Volume [%s] (%s): SUCCESS | ||
| Storage INFO Create External Volume [%s] (%s): SUCCESS | ||
| Storage INFO Create External Volume [%s] (%s): SUCCESS | ||
| Storage INFO Create External Volume [%s] (%s): SUCCESS | ||
| Storage INFO Create External Volume [%s] (%s): SUCCESS | ||
| Storage INFO Create External Volume [%s] (%s): SUCCESS | ||
| Storage INFO Create External Volume [%s] (%s): SUCCESS | ||
| Storage Information Update Failed | ||
| System INFO NTP update failed | ||
| System INFO NTP updates successfully from %s | ||
| System INFO NTP fails to update from %s | ||
| System INFO Device is rebooted by administrator! | ||
| System INFO Device is shutdown by administrator! | ||
| System NOTICE DNS server is changed. | ||
| System NOTICE Hostname is cleared. | ||
| System NOTICE Hostname is set to '%s'. | ||
| System NOTICE System description is changed. | ||
| System NOTICE System description is empty now. | ||
| System NOTICE DNS server setting is changed | ||
| System NOTICE DNS server address is changed to be given from DHCP server | ||
| System NOTICE DNS server address is changed to be assigned by user | ||
| System NOTICE Name server is changed. | ||
| USB NOTICE An external APC UPS device is plugged/unplugged. | ||
| USB | NOTICE | An external Mass Storage device is plugged/unplugged. |
| USB NOTICE An external Printer device is plugged/unplugged. | ||
| USB NOTICE An external USB hub device is plugged/unplugged. | ||
| Users ALERT Failed %s login attempt (incorrect password or inexistent username) | ||
| Users ALERT Failed %s login attempt (incorrect password or inexistent username) | ||
| Users INFO User %s has logged in from %s! | ||
| Users INFO User %s has logged out from %s! | ||
| Users INFO User %s from %s has been logged out (re-auth timeout)! | ||
| Users INFO User %s from %s has been logged out (lease timeout)! | ||
| Users NOTICE Add new user %s by %s from %s. | ||
| Users NOTICE User %s password has been changed. | ||
| Users NOTICE Delete user %s by %s from %s. | ||
| Users | NOTICE | The user %s from %s has attempted to change the user %s password but old password verification fail. |
| Users NOTICE User %s on %u.%u.%u.%u has been denied access from %s | ||
| Users NOTICE User %s password has been changed by %s from %s. | ||
| Backup/Restore | ERROR When query remote target [%s]: %s | |
| Backup/Restore | INFO Backup job [%s] successfully | |
| Backup/Restore | ERROR When backup [%s]: %s | |
| Backup/Restore | ERROR When backup [%s], error happens: %s | |
| Backup/Restore | INFO Start to restore backup job [%s]. | |
| Backup/Restore | INFO Restore backup job [%s] successfully. | |
| Backup/Restore | ERROR Restore backup job [%s] failed: %s | |
| Backup/Restore | INFO Start to restore backup job [%s] from [%s]. | |
| Backup/Restore | INFO Restore from [%s] successfully. | |
| Backup/Restore | ERROR Restore from [%s] failed: %s | |
| Backup/Restore | ERROR When restore [%s]: %s | |
| Backup/Restore | ERROR When restore job [%s], error happens: %s | |
| Power Management | INFO Job [%s] is triggered by schedule | |
| Power Management | INFO Job [%s] is triggered by user | |
| Power Management | ERROR Job [%s] is resulted as failed | |
| Power Management | INFO Job [%s] is finished successfully | |
| Power Management | INFO Job [%s] is pending because other job is running | |
| Power Management | INFO Job [%s] is canceled by user | |
| Power Management | INFO Restore job [%s] is triggered by user | |
| Power Management | INFO [Power On] schedule is triggered. | |
| Power Management | INFO [Power Off] schedule is triggered. | |
| Power Management | INFO [Reboot] schedule is triggered. | |
Protecting Your Data
18.1 Overview
This chapter compares the different ways of protecting data on the NSA and explains how to use backup management software included on the CD.
18.2 Protection Methods
There are a variety of ways to protect your data on the NSA. Below is a summary table of what can be done in each situation.
Table 123 Overview of Protection Methods
| SITUATION ACTION | |
| Unexpected NSA behavior after configuration changes | Back up the NSA configuration file before you make major configuration changes. |
| Need to transfer data from your computer to the NSA after volume(s) have been created | Backup your data to a computer or other storage devices. |
| Data infected by virus Use anti-virus software on your computer to scan files before saving them onto the NSA. Although this may be slow so you may want to schedule it to occur while no one is using the NSA.Use a firewall with anti-virus capability on your network. | |
| Hard drive malfunction. Use RAID. | |
| NSA malfunctionNetwork downNatural disaster such as a fire or earthquake occurs where your NSA is located | Back up data to another NSA or external USB hard drive. |
The following sections describe these methods in more detail. See Section 7.6.3 on page 161 for more information on RAID.
18.3 Configuration File Backup and Restoration
Use the Maintenance > Configuration menus to create a file of your NSA configurations such as passwords, shares and volumes created, network settings and so on. If you're going to do some major configuration changes, then it is advisable to create a configuration backup file. If things go wrong after you make the configuration changes, you can always go back to the previous configuration by restoring an earlier configuration file.
If you forgot the NSA password, then use the RESET button (see Section 1.1.4 on page 19) to return the NSA to the factory default configuration.
Note: Configuration File Backup and Restoration does not affect data (your files and folders), volumes on the NSA.
19.1 Troubleshooting Overview
This chapter offers some suggestions to solve problems you might encounter. The potential problems are divided into the following categories.
• Power, Hardware, Connections, and LEDs
• NAS Starter Utility
• NSA Login and Access
• I Cannot Access The NSA
- Users Cannot Access the NSA
- External USB Drives
- Firmware
- File Transfer
- Networking
- Some Features' Screens Do Not Display
• Media Server Functions
- Download Service and Broadcatching Functions
- Web Publishing
- Auto Upload
• Package Management
- Backups
19.2 Power, Hardware, Connections, and LEDs
The NSA PWR LED does not turn on (no LEDs are on).
- Make sure the NSA is turned on.
- Make sure you are using the power adaptor or cord included with the NSA.
- Make sure the power adaptor or cord is connected to the NSA and plugged in to an appropriate power source. Make sure the power source is turned on.
- Turn the NSA off and on.
- If the problem continues, contact the vendor.
An HDD LED is off.
The HDD LED is off when the NSA cannot detect a hard drive in the drive bay. Replace or install a hard drive. See Installing or replacing a hard disk.
An HDD LED is red.
Red means that the NSA detected an error on the hard drive (like a bad sector for example). The NSA automatically tries to recover a bad sector, but the LED stays red until the NSA restarts. Even if the hard drive still functions, it is recommended that you replace it since errors are a sign that the hard drive may fail soon. See Installing or replacing a hard disk.
Installing or replacing a hard disk.
Do not remove or install a hard disk while the NSA is turned on. The NSA must be turned off before you remove or install the hard disk.
1 Turn the NSA off, remove the front panel and make sure:
- there is a SATA I or SATA II (3.0 Gbit/s) compatible hard disk installed.
- the hard disk is installed correctly in the disk bay. Push the disk back into the NSA disk bay until the hard disk is fitted snugly inside the NSA (see the NSA Quick Start Guide and Section 7.2.1 on page 152).
- the hard disk could be faulty. Try a different hard drive or test the original hard disk in a different NSA or computer.
2 If you had to replace the drive, turn on the NSA and go to the Storage screen.
- If you have a RAID I volume click the Repair icon next to the new drive.
- If you are using RAID 0 you will need to recreate the whole volume. All of your data is lost.
- If you are using a single-disk JBOD volume, you need to create a new volume on the new drive.
- If you are using a two-disk JBOD volume, you need to create a whole new volume on both drives.
The LAN LED (by the LAN port) is off.
- Make sure the Ethernet cable is connected properly to the NSA and connected to another (Ethernet) device. Make sure the other device is turned on. If it's connected directly to a computer, make sure that the computer network card is working (ping 127.0.0.1 on the computer).
- Use another Ethernet cable. If you're connecting to a Gigabit Ethernet, make sure you're using an 8-wire Ethernet cable.
- If the problem continues, contact the vendor.
See Section 20.1 on page 345 for a description of NSA LEDs.
The NSA turns off or reboots by itself.
Check the Power Management screen. This is where you configure power settings for the NSA, including power saving, UPS, power on/off during power failure and power on/off schedule. The NSA may be set to turn off under certain conditions.
A power failure occurred while the NSA is downloading files.
- If power failure occurs during the active download period, the NSA will verify whether the downloaded files were damaged.
- If a file is corrupted, the NSA will download the file again.
- If the file is intact but not completely downloaded, the NSA will resume the download task after it restarts.
19.3 NAS Starter Utility
The NAS Starter Utility cannot discover my NSA.
- Close the NAS Starter Utility and reopen it.
- Check your hardware connections and make sure they are set up correctly.
- Only one instance of the NAS Starter Utility can run on your computer. Make sure you close any duplicate windows for this application.
- Wait for the SYS LED to stop blinking before clicking Discover.
- Confirm that the computer running the NAS Starter Utility has a network connection. See the section on the NSA's LAN connection for related information.
- The computer running the NAS Starter Utility can only discover NSAs in the same subnet. NSAs connected to the same switch or router as your NAS Starter Utility computer are usually in the same subnet unless the router is doing subnetting or the switch is implementing VLAN.
The NAS Starter Utility discovered my NSA but the status is always unreachable, even though I can access it.
You may need to add the NAS Starter Utility to your software firewall's allow list or lower your software firewall or anti-virus scanner's security level. Alternatively you may have to configure your software firewall or other security software to allow UDP port 50127 traffic from the NSA. If there is a hardware firewall between you and the NSA, configure it to allow UDP port 50127 traffic from the NSA.
I was able to access the NSA on a previous attempt but I cannot access the NSA anymore.
If you enable jumbo frames on the NSA in a network that does not support them, you will lose access to the NSA. If this occurs, you will have to restore the factory default configuration. The reset process does NOT affect the volume settings, nor data stored on the NSA. Press the RESET button until you hear two beeps. After the second beep, continue pressing the button for five more seconds, then release it. You will hear three quick beeps after you release the button.
I have at least two NSAs in my network, how do I identify which one I want to configure in the NAS Starter Utility screens.
If you have several NSAs connected to your computer/network, give each a unique name. You may have to disconnect all but one and use the NAS Starter Utility to rename it. Then connect another NSA and rename it and continue to connect and rename the NSAs one-by-one until they are all connected and each has a unique name.
Alternatively, if you have a DHCP server on your network and you can access it's list of assigned IP addresses, you could see which IP address belongs to which NSA. You can check the MAC address of your NSA by checking the attached sticker in the device housing.
19.4 NSA Login and Access
I forgot the server name of the NSA.
- The default server name is 'nsa' followed by the number of your model ('nsa320' for example).
- Use the NAS Starter Utility to discover your NSA. If you have admin privileges, you can directly change the IP address of the NSA using the NAS Starter Utility.
- If the server name has changed and you don't have the NAS Starter Utility, see Section 1.1.4 on page 19 to use the RESET button to return to the default setting.
I cannot get to the NSA login screen.
- Use the NAS Starter Utility to discover your NSA. If you have admin privileges, you can directly change the IP address of the NSA using the NAS Starter Utility.
- Make sure you have used the NAS Starter Utility to initialize your NSA.
- If you used the RESET button, the NSA may have a new IP address. Close and reopen the NAS Starter Utility to discover the NSA.
- Make sure the NSA is turned on.
- If you are trying to login directly by typing the server name into your web browser's address field, make sure you are using the correct server name as the web site address.
- The default server name is 'nsa' followed by the number of your model ('nsa320' for example). If you have changed the server name, use the new one.
- If the server name has been changed and you do not know the new server name, see the troubleshooting suggestions for I forgot the server name of the NSA.
- If it still doesn't work, try using the NAS Starter Utility.
- Check the hardware connections, and make sure the LEDs are behaving as expected. See the Quick Start Guide and Section 20.1 on page 345.
- By default, the NSA gets an IP address automatically. The NSA assigns itself an IP address if no device assigns one. If your computer is also set to get an IP address automatically, the computer and the NSA can both assign themselves IP addresses and communicate. See Section 8.4 on page 166 if you need to configure the NSA with a static IP address.
- If you are connecting to the NSA by its IP address, make sure you use the correct one. If the NSA has a wired Ethernet connection and a wireless connection through an attached USB wireless dongle, the NSA has a different IP address for each connection. To connect through the wired Ethernet connection, use the wired Ethernet connection's IP address. To connect through the wireless connection, use the wireless connection's IP address.
- Make sure your computer's IP address is in the same subnet as the NSA's IP address. You can use the NAS Starter Utility to find the NSA's IP address. Skip this if you know that there are routers between your computer and the NSA.
- Ping the NSA from your computer. Make sure your computer's Ethernet adapter is installed and functioning properly. In a (Windows) computer, click Start, (All) Programs, Accessories and then Command Prompt. In the Command Prompt window, type "ping" followed by the NSA's IP address (use the NAS Starter Utility to find the NSA's IP address if you don't know it) and then press [ENTER].
- Make sure you are using Internet Explorer 6.0 (and later) or Firefox 1.07 (and later).
- Make sure your Internet browser does not block pop-up windows and has JavaScript and Java enabled. With Internet Explorer 6, you may also have to enable scripting of safe ActiveX controls. See Section 19.4.1 on page 332.
I forgot the password.
• The default password is 1234.
- If you have changed the password and forgotten it, you will have to reset the NSA.
19.4.1 Enabling Scripting of Safe ActiveX Controls
If pages of the web configurator do not display properly in Internet Explorer, check that scripting of safe ActiveX controls is enabled.
1 In Internet Explorer, click Tools, Internet Options and then the Security tab.
Figure 188 Internet Options: Security
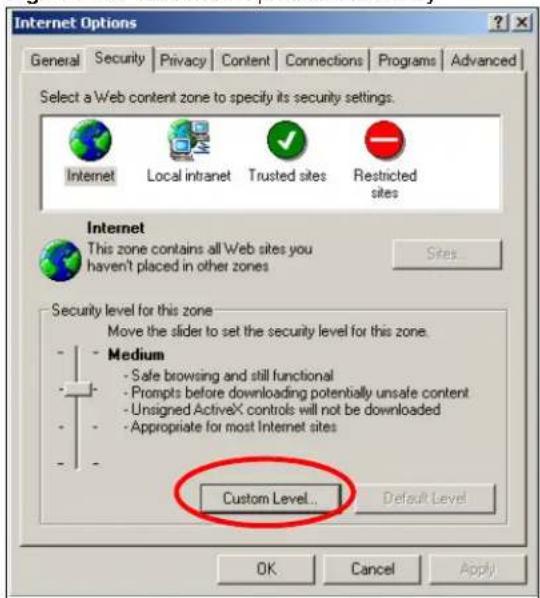
2 Click the Custom Level... button.
3 Under Script ActiveX controls marked safe for scripting, make sure that Enable is selected (the default).
4 Click OK to close the window.
Figure 189 Security Settings - Script Safe ActiveX Controls
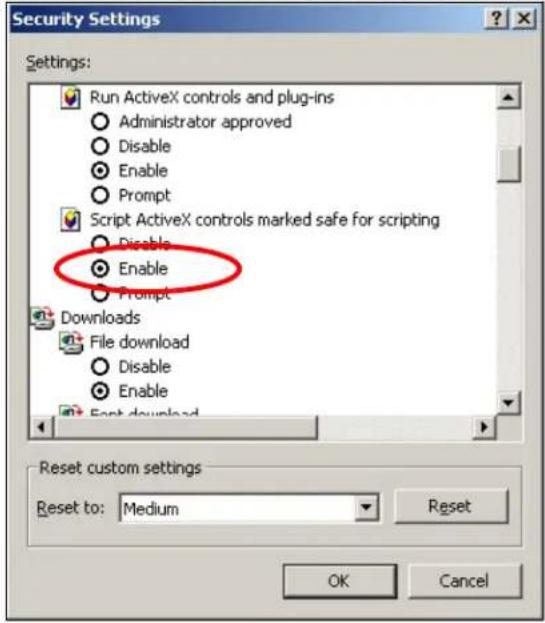
I can see the login screen, but I cannot log in to the NSA.
- Make sure you have entered the username and password correctly. The default username is admin, and the default password is 1234. These fields are case-sensitive, so make sure [Caps Lock] is not on.
- Turn the NSA off and on.
- If this does not work, see Section 1.1.4 on page 19 to reset the device.
I cannot see the multi-language web configurator screens while using Internet Explorer.
Use Section 19.4.1 on page 332 to enable the scripting of safe ActiveX controls.
The Web Configurator logs out by itself.
The web configurator management session automatically times out if it is left idle for 15 minutes. Simply log back into the NSA if this happens to you.
19.5 I Cannot Access The NSA
I cannot access a share.
- Check that the NSA is turned on and connected to the network. Try to ping the NSA or use the NAS Starter Utility to discover it.
- Make sure you have used the NAS Starter Utility to initialize your NSA. See Chapter 2 on page 21 for more information.
- Check that you entered your login name and password correctly.
- Check that the share exists and check its access settings.
- Check if the shared folder is a subfolder of another (parent) share. Check that the parent share's access rights do not conflict with the subfolder share. It is recommended that you do not create subfolder shares.
- Check if there are any existing mapped network drives to the NSA. You may need to disconnect existing mapped network drives as a new mapped network drive connection may use (different) previously-saved login information. To do this, open Windows Explorer and click Tools > Disconnect Mapped Network Drives.
- Check that the volume in which the share resides, exists and is not down or degraded. If it is down or degraded, see Section 19.2 on page 327.
- Make sure you have the client for Microsoft networks installed and enabled in your network connection's properties.
- In Windows XP or 2000, click Start > Settings > Control Panel > Network Connections (Network and Dial-up Connections in Windows 2000/NT) > Local Area Connection > Properties.
- Check that Client for Microsoft Networks is in the list of components and has its check box selected.
19.6 Users Cannot Access the NSA
A local user cannot access a share
- Check that the NSA is turned on and connected to the network. The local user should try to ping the NSA or use the NAS Starter Utility to discover it.
- The local user should check that he entered his login name and password correctly.
- Check if the share exists and has the correct access settings for this user.
-
Check the Access Control List (ACL) of read/write permissions associated with specific files and/or folders. Account names added to the list are linked to the files and folders that they are allowed to access, along with what kinds of actions they are allowed to perform with those files and folders (delete, move, rename, and so on).
-
The user's computer may already be connected to another of the NSA's shares using a different user name and/or password. This can happen without the user realizing it if the user's computer automatically connects to a share at logon. Right-click any other connected shares and click Disconnect. Then re-attempt to connect to the desired share.
- Check if the share has an ANONYMOUS or EVERYONE access right. If the user is already logged into a share using her username and password, she will NOT be able to access a share that has ANONYMOUS FTP only access rights (as these require 'no login'). In this case she should log out and try to access the share again without logging in. See Section 9.4 on page 177 for more details.
- Check if the shared folder is a subfolder of another (parent) share. Check that the parent share's access rights do not conflict with the subfolder share. It is recommended that you do not create subfolder shares.
- Check if the user belongs to a group with conflicting access rights. DENY always takes precedence. If you allow a user FULL access to a share but set his group to DENY, then he will NOT be able to access the share.
- The local user should check if there are any existing mapped network drives to the NSA. He may need to disconnect existing CIFS connections as new CIFS connection may use previously-saved login information that may be different to NSA login.
- Check that the array in which the share resides, exists and is not down or degraded. If the array is down or degraded, see Section 19.2 on page 327.
- If the user is using DFS links, then he can only access the NSA using CIFS and not FTP.
- Check that the share has not been disabled.
I cannot import domain user or user group information even though testing of the connection to the domain controller is OK.
- Check the NSA's DNS setting. The DNS server the NSA is using must be able to resolve the domain controller's address. If the domain controller uses a private IP address, the NSA needs to use a private DNS server. If the domain controller uses a public IP address, the NSA needs to use a public DNS server.
- Leave the domain and re-join it.
A domain user can't access a share.
In addition to the checks listed previously for local users, check that the domain controller is turned on and connected to the network.
A user can access a share but cannot access individual folders or files within the share.
- Check the Access Control List (ACL) of read/write permissions associated with the share's specific files and/or folders. Account names added to the list are linked to the files and folders that they are allowed to access, along with what kinds of actions they are allowed to perform with those files and folders (delete, move, rename, and so on).
19.7 External USB Drives
The COPY LED is red.
Copying files from a USB device failed. The USB device may not be compatible with the NSA. Try to save the files onto a computer and then from the computer to the NSA (through the network connection).
19.8 Firmware
I want to know the firmware version on the NSA.
Go to the Status screen. The Firmware field shows you the current firmware version running.
19.9 File Transfer
I want to transfer my file(s) from my local computer or storage device to the NSA.
- After you initialize your hard disk, you can directly access the folders in your NSA and transfer files in the same way you transfer files in your local computer:
1 On your Windows computer, click Start > Run or open a web browser.
2 Enter \ nsa followed by the number of your model (320 for example) or the Server Name you assigned the NSA. This shows you the folders in the NSA.
3 Use drag-and-drop or copy-and-paste to transfer files over to your NSA.
- Use the COPY/ SYNC button to transfer files from an external (USB) storage device to the NSA.
- If the file you want to transfer is less than or equal to 2 GB, you can use the NSA Starter Utility's zPilot screen (see Section 2.5 on page 25).
I want to transfer my file(s) from the NSA to my local computer or storage device.
- After you initialize your hard disk, you can directly access the folders in your NSA and transfer files in the same way you transfer files in your local computer:
1 On your Windows computer, click Start > Run or open a web browser.
2 Enter \ nsa followed by the number of your model (320 for example) or the Server Name you assigned the NSA. This shows you the folders in the NSA.
3 Use drag-and-drop or copy-and-paste to transfer files from your NSA to your local computer's folder or your storage device.
- You can download the files from your NSA. Just click on the file(s) in the Share Browsing screen (Section 3.4.5 on page 37). Your computer will prompt you for the location where you want to save the file.
19.10 Networking
I want to control who can access my folder(s)/file(s).
- If you are an administrator, you can configure a user's access rights. Use the Shares screen (Section 16.3 on page 297) to do this.
- If you enabled Web Publishing for a folder, anyone on your network can play the media files in the published shares. No user name and password or other form of security is used. The media server is enabled by default with the video, photo, and music shares published.
One of the computers in my network cannot use the printer I connected to the NSA.
- You must install the printer driver on each computer that will use the printer.
- Check Section 19.4 on page 330 and check for related connectivity issues.
19.11 Some Features' Screens Do Not Display
Many NSA features require a valid internal volume.
Features like the print server, download service, broadcasting, FTP and Windows/CIFS access will not work without a valid internal volume. Make sure you have a volume on an internal disk and that the volume is in the healthy state.
- Install an internal disk if one is not installed yet or has failed. See the Quick Start Guide for how to install an internal disk.
- Create a new volume if you do not have one on the internal disk yet.
- Make sure the volume on the installed internal disk is in a healthy state.
I cannot use some applications in the Web Configurator.
- The firmware installed in your NSA includes the features mentioned in Section 3.5.2 on page 46. This does not include the applications you can install using the Package Management screen.
- You can use the Package Management screen (Chapter 10 on page 215) to install more applications from a web location (specified in the firmware) to your NSA.
- If you have installed the application and can see the application's configuration screen but still cannot use it, check that you have Enabled the application.
19.12 Media Server Functions
I set the media server function to publish a folder, but some of the files in the folder do not display in the list on the media client.
Files with formats that are not supported on the media server may not display in the list. See Section 20.2 on page 346 for the file formats that the media server supports.
I published a folder with the media server function, but the media client does not play some of the files (or does not play them properly).
1 Files with formats that are not supported on the media server may not display in the list. See Section 20.2 on page 346 for the file formats that the media server supports.
2 If you are using media client software, you may need to install codecs on your computer. Since the media client software uses your computer's installed codecs, files do not play if the required codec is not installed on your computer.
3 The media client may not support the file's format.
iTunes does not display the names of all the music files I just put on the NSA.
1 Make sure the files are a format supported by iTunes. See Section 20.3 on page 346.
2 Go to Applications > Media Server. Make sure the share containing the music files is published and the iTunes server option is enabled.
3 If an iTunes client is connected, the NSA's iTunes server function scans the published media server folders for files every three minutes. Leave iTunes connected to the NSA for three minutes. Then use the NSA's eject button (as shown next) to disconnect.
Figure 190 iTunes Eject Button
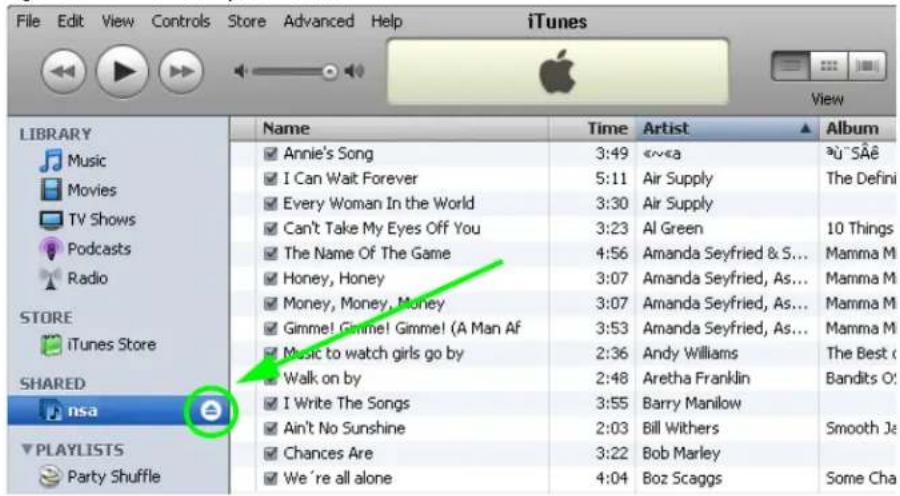
4 Then click the NSA's link to reconnect.
Figure 191 iTunes Reconnected
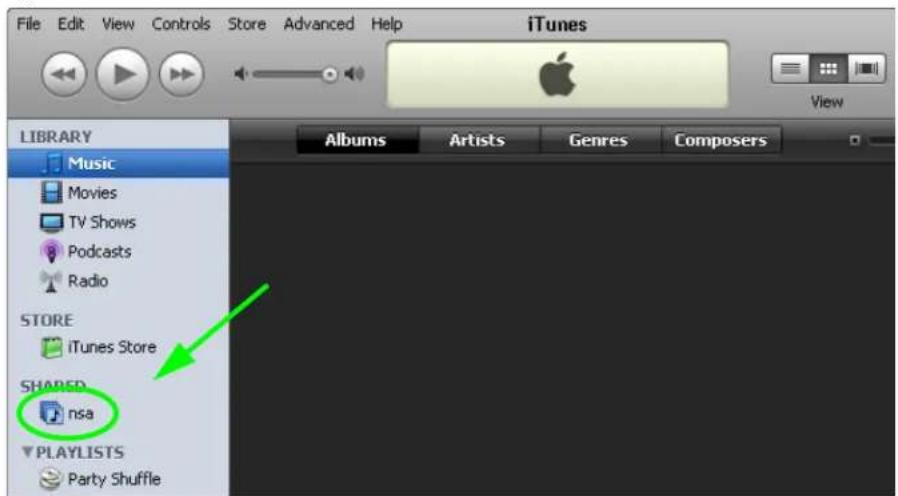
5 Another way to get the NSA's iTunes server function to scan the published media server folders for files is to go to Applications > Media Server and disable and re-enable the iTunes server option. If you uploaded many files, it may take awhile for the NSA to find and list all of them. Then try reconnecting your iTunes client.
I cannot use iTunes to play files located on my NSA.
1 Make sure the files are a format supported by iTunes. See Section 20.3 on page 346.
2 If you have files from the iTunes Store that use DRM, you need to use your Apple account ID and password to authorize other computers to play the files. Apple permits you to authorize up to five computers at a time. To authorize a computer, open iTunes and click Store > Authorize Computer.
3 If you are connecting through a NAT router, make sure that TCP port 3689 and UDP port 5353 are open for traffic on both the server and the client and all points in between (especially the NAT router). If your router includes a firewall, make sure it also allows TCP port 3689 and UDP port 5353 traffic.
19.13 Download Service and Broadcasting Functions
The download list or broadcatching items are missing after I removed a hard drive.
The NSA's download and broadcasting lists are stored on the system volume. If you have two JBOD volumes, it is possible to remove one and still use the other. However if you remove the system volume, you may lose the download and broadcasting lists. With two JBOD volumes, the hard disk that was installed first is usually the system volume.
The channel I added in the Broadcasting screen is active but no files are downloaded to the NSA.
Check the Download Policy for that channel (see Section 9.9.1 on page 196). It may be set to manual download. You can configure your NSA to download all items or only new items automatically once the channel is updated.
I cannot find the download files.
By default, the Download Service and Broadcasting features store downloaded files as follows:
- P2P download jobs are stored in /*/incoming (where '*' is a folder that you have set.)
- HTTP/FTP jobs are stored in /* (where '*' is a folder that you have set.)
- All jobs triggered by RSS channels create the subfolder in /* using the channel name where it store all files downloaded from that channel (where '*' is a folder that you have set.)
Check your Preferences in the Download Service (Section 9.7 on page 181) and Broadcasting (Section 9.9 on page 194) screens to know or configure where downloaded files are stored.
19.14 Web Publishing
A web-published share cannot be accessed by web browser from the Internet.
- Make sure the person trying to access the share is using the correct web address (and port number if the NSA's web publishing feature is not using port 80). See page 210 for details.
• Make sure the publishing feature is turned on and the share is in the list of published shares. - Make sure the person trying to access the share is using Internet Explorer 6.0 (and later) or Firefox 1.07 (and later).
- You need to use a public address to access the NSA's web-published shares from the Internet. If your NSA uses a private IP address, use the public IP address of your Internet gateway (firewall) and configure NAT or port forwarding on your Internet gateway and possibly firewall rules in order to let people access the NSA's web-published shares from the Internet.
- Make sure the firewall's public IP address is static or that the firewall uses a Dynamic Domain Name (DDNS).
- Web publishing uses TCP protocol and the port number you specify. Make sure there is not another service using TCP protocol with the same port number.
- If Firefox access to the share does not work, check that you did not set the Web publishing feature to use one of the following ports. (Firefox blocks these ports by default.)
Table 124 Ports Blocked By Default in Firefox
| PORT SERVICE PORT SERVICE PORT SERVICE | ||||||
| 1 tcpmux | 95 supdup 513 login | |||||
| 7 echo | 101 | hostriame | 514 shell | |||
| 9 discard | 102 | iso-tsap | 515 printer | |||
| 11 | systat | 103 | gppitnp | 526 | tempo | |
| 13 | daytime | 104 | acr-nema 530 courier | |||
| 15 | netstat | 109 | POP2 | 531 | chat | |
| 17 | qotd | 110 | POP3 | 532 | netnews | |
| 19 | chargen | 111 | sunrpc | 540 | uucp | |
| 20 | ftp data | 113 | auth | 556 | remotefs | |
| 21 | ftp control | 115 | sftp | 563 | NNTP+ SSL | |
| 22 | ssh | 117 | uucp-path | 587 | submission | |
| 23 | telnet | 119 | NNTP | 601 | syslog | |
| 25 | smtp | 123 | NTP | 636 | LDAP+ SSL | |
| 37 | time | 135 | loc-srv epmap | 993 | IMAP+ SSL | |
| 42 | name | 139 | netbios 995 POP3+ SSL | |||
| 43 | nicname | 143 | IMAP2 | 2049 | nfs | |
| 53 | domain | 179 | BGP | 4045 | lockd | |
| 77 | priv-rjs | 389 | LDAP | 6000 | X11 | |
| 79 | finger | 465 | SMTP+ SSL | |||
| 87 | ttylink | 512 | print exec | |||
- Make sure your ISP allows you to run a server and is not blocking the port number of the NSA's web publishing feature.
19.15 Auto Upload
The NSA does not automatically upload files to Flickr or YouTube.
1 Make sure the NSA is connected to the Internet. See Section 8.4 on page 166 for details about testing network connections.
2 Click Maintenance > Log to check the NSA's log for a message about the file.
2a If the log message displays "no such file or directory", the file may have been removed from the NSA. Make sure the file still exists in the watch folder.
2b If the log message displays "filename is queued", the file may still be waiting for auto upload. Check the grace period setting in the service's Configuration screen. You can set a smaller grace period to shorten the queue time.
2c If you cannot find any log messages about the file:
- Make sure the Folder Watch List includes the folder containing the file. You can upload the file to the watch folder again.
- Make sure the file's format is supported by Flickr or YouTube. You can find the supported file extensions in the Folder Watch List.
2d If the log message displays "not authorized yet", check if you can enter the NSA's Configuration screen for the service. If you changed the password of your Flickr or YouTube account, you cannot access the service's Configuration screen, and the NSA cannot auto upload files. Make sure you also update the account information in the NSA.
3 Make sure the file size does not exceed the limit imposed by the service. At the time of writing, Flickr restricts the file size to 10 MB, and YouTube restricts the file size to 100 MB.
4 Make sure you did not exceed the service's upload quota. Flickr and YouTube have different policies about how much you can upload within a certain period, for example, 100 MB/week.
5 The NSA may have temporarily failed to connect to the service. You can upload the file to the watch folder again.
19.16 Package Management
The NSA won't install the package(s) I selected in the Package Management screen.
- The web location of the package may be undergoing maintenance. Try again at a later time. Upgrade the firmware of the NSA.
- If a new firmware is available, do an upgrade and try installing the package(s) again.
The eMule Search screen does not work.
You need to be connected to an eMule server before you can use the Search screen. Wait for the NSA to connect to a server before configuring the Search screen.
I want to know how my hard disk is performing.
Use S.M.A.R.T. (Self Monitoring, Analysis, and Reporting Technology) to monitor hard disks. It detects and reports the reliability of hard disks using standard indicators, enabling administrators to anticipate possible disk failures. Go to the Package Management screen to install the S.M.A.R.T. application.
19.17 Backups
I cannot make a backup.
- Check that enough space is available on the external disk. If there isn't you may need to purge older backups or delete other files on the backup USB disk or NSA (see Section 10.11 on page 245).
- If you are using BackupPlanner (Section 10.12 on page 246):
- You can look at the Backup screen's Last Run Result display.
- If you're backing up to another NSA, another NSA, or a computer, check that it allows the NSA to write files to it. For a synchronization backup, the target must be another NSA or another compatible model.
- Check that the NSA is not performing another backup job. Scheduler queues backups when a different backup is already going on at the time a backup is scheduled.
The backup does not run at the time configured.
- Check that the correct time is configured on the NSA.
- Check that the NSA is able to access the time server from which it gets the time; see Section 6.7 on page 147.
Product Specifications
See also Chapter 1 on page 17 for a general overview of the key features.
20.1 LEDs
This table describes the NSA's LEDs.
Table 125 LEDs
| LED | NAME | COLOR | STATUS | DESCRIPTION |
 | POWER B | Blue On The | NSA is turned on and receiving power. | |
| Off The NSA is turned off. | ||||
 | SYSTEM | Green On | The NSA has fully started and is operating normally. | |
| Blinking The NSA is starting up. | ||||
| Orange B | Linking The NSA is upgrading the firmware. | |||
 | HDD | Green | On | The hard disk drive is connected properly to the NSA. This LED also stays on green when the hard disk drive is in hibernation. |
| Blinking | The NSA is saving data to the hard disk drive. | |||
| Red | On | The NSA detected an error on the hard disk drive (like a bad sector for example). The NSA automatically tries to recover a bad sector, but the LED stays red until the NSA restarts. | ||
| Off The NSA cannot detect a hard disk in the disk bay. | ||||
 | USB | Green On | The USB device is connected properly to the NSA. | |
| Blinking | The NSA is saving data to the USB device. | |||
| Red | On The USB device has failed and the NSA can no longer detect it. | |||
| Off No USB device connected to the USB port. | ||||
 | LAN | Green | On | The NSA has a successful 10/100 Mbps Ethernet connection. |
| Blinking | The 100M LAN is sending or receiving packets. | |||
| Off | The NSA does not have a 10/100 Mbps Ethernet connection. | |||
| Amber On | The NSA has a successful 1000 Mbps Ethernet connection. | |||
| Blinking | The 1000 M LAN is sending or receiving packets. | |||
| Off The NSA does not have a 1000 Mbps Ethernet connection. | ||||
 | COPY/SYNC | Green On | A USB device is connected to the NSA. | |
| Blinking The NSA is copying or synchronizing files to or from the USB device. | ||||
| Red On On | Copying or synchronizing files to or from the USB device failed. | |||
| Off No USB device is connected. | ||||
20.2 Supported Media Server Content Formats
The following describes the details about the files that the NSA media server can publish.
- Audio: LPCM (not supported as a file format), MP3, WMA, M4A, M4B, MP4, 3GP, WAV, OGG, FLAC, AAC, MP2, AC3, MPA, MP1, AIF, ASF
- Images: JPEG, PNG, TIF, TIFF, BMP, GIF
- Video: WMV, MPEG2, MP1, MPG, SPTS, MP4, AVI, VOB, DivX, 3GP, VDR, MPE, DVR-MS, Xvid, M1V, M4V, MOV, MPV, MKV, FLV, MTS
Note: Not all published file types can be viewed by all client applications.
20.3 Supported iTunes Server Content Formats
At the time of writing, the NSA supports iTunes publishing audio files of the following formats: mp3, m4a, m4p, wav, and mp4.
Legal Information
Copyright
Copyright © 2013 by ZyXEL Communications Corporation.
The contents of this publication may not be reproduced in any part or as a whole, transcribed, stored in a retrieval system, translated into any language, or transmitted in any form or by any means, electronic, mechanical, magnetic, optical, chemical, photocopying, manual, or otherwise, without the prior written permission of ZyXEL Communications Corporation.
Published by ZyXEL Communications Corporation. All rights reserved.
Disclaimers
ZyXEL does not assume any liability arising out of the application or use of any products, or software described herein. Neither does it convey any license under its patent rights nor the patent rights of others. ZyXEL further reserves the right to make changes in any products described herein without notice. This publication is subject to change without notice.
Do not use the NSA for illegal purposes. Illegal downloading or sharing of files can result in severe civil and criminal penalties. You are subject to the restrictions of copyright laws and any other applicable laws and will bear the consequences of any infringements thereof. ZyXEL bears NO responsibility or liability for your use of the download service feature.
Make sure all data and programs on the NSA are also stored elsewhere. ZyXEL is not responsible for any loss of or damage to any data, programs, or storage media resulting from the use, misuse, or disuse of this or any other ZyXEL product.
Certifications
Federal Communications Commission (FCC) Interference Statement
The device complies with Part 15 of FCC rules. Operation is subject to the following two conditions:
- This device may not cause harmful interference.
- This device must accept any interference received, including interference that may cause undesired operations.
This device has been tested and found to comply with the limits for a Class B digital device pursuant to Part 15 of the FCC Rules. These limits are designed to provide reasonable protection against harmful interference in a residential installation. This device generates, uses, and can radiate radio frequency energy, and if not installed and used in accordance with the instructions, may cause harmful interference to radio communications. However, there is no guarantee that interference will not occur in a particular installation.
Notices
Changes or modifications not expressly approved by the party responsible for compliance could void the user's authority to operate the equipment.
This Class B digital apparatus complies with Canadian ICES-003.
Viewing Certifications
1 Go to http://www.zyxel.com.
2 Select your product on the ZyXEL home page to go to that product's page.
3 Select the certification you wish to view from this page.
ZyXEL warrants to the original end user (purchaser) that this product is free from any defects in materials or workmanship for a period of up to two years from the date of purchase. During the warranty period, and upon proof of purchase, should the product have indications of failure due to faulty workmanship and/or materials, ZyXEL will, at its discretion, repair or replace the defective products or components without charge for either parts or labor, and to whatever extent it shall deem necessary to restore the product or components to proper operating condition. Any replacement will consist of a new or re-manufactured functionally equivalent product of equal or higher value, and will be solely at the discretion of ZyXEL. This warranty shall not apply if the product has been modified, misused, tampered with, damaged by an act of God, or subjected to abnormal working conditions.
Note
Repair or replacement, as provided under this warranty, is the exclusive remedy of the purchaser. This warranty is in lieu of all other warranties, express or implied, including any implied warranty of merchantability or fitness for a particular use or purpose. ZyXEL shall in no event be held liable for indirect or consequential damages of any kind to the purchaser.
To obtain the services of this warranty, contact your vendor. You may also refer to the warranty policy for the region in which you bought the device at http://www.zyxel.com/web/support_warranty_info.php.
Registration
Register your product online to receive e-mail notices of firmware upgrades and information at www.zyxel.com for global products, or at www.us.zyxel.com for North American products.
Safety Warnings
- Do NOT use this product near water, for example, in a wet basement or near a swimming pool.
- Do NOT expose your device to dampness, dust or corrosive liquids.
- Do NOT store things on the device.
- Do NOT install, use, or service this device during a thunderstorm. There is a remote risk of electric shock from lightning.
-
Connect ONLY suitable accessories to the device.
-
Do NOT open the device or unit. Opening or removing covers can expose you to dangerous high voltage points or other risks. ONLY qualified service personnel should service or disassemble this device. Please contact your vendor for further information.
- ONLY qualified service personnel should service or disassemble this device.
- Make sure to connect the cables to the correct ports.
- Place connecting cables carefully so that no one will step on them or stumble over them.
• Always disconnect all cables from this device before servicing or disassembling. - Use ONLY an appropriate power adaptor or cord for your device.
- Connect the power adaptor or cord to the right supply voltage (for example, 110V AC in North America or 230V AC in Europe).
- Do NOT allow anything to rest on the power adaptor or cord and do NOT place the product where anyone can walk on the power adaptor or cord.
- Do NOT use the device if the power adaptor or cord is damaged as it might cause electrocution.
- If the power adaptor or cord is damaged, remove it from the power outlet.
- Do NOT attempt to repair the power adaptor or cord. Contact your local vendor to order a new one.
- Do not use the device outside, and make sure all the connections are indoors. There is a remote risk of electric shock from lightning.
- CAUTION: RISK OF EXPLOSION IF BATTERY (on the motherboard) IS REPLACED BY AN INCORRECT TYPE. DISPOSE OF USED BATTERIES ACCORDING TO THE INSTRUCTIONS. Dispose them at the applicable collection point for the recycling of electrical and electronic equipment. For detailed information about recycling of this product, please contact your local city office, your household waste disposal service or the store where you purchased the product.
- Do NOT obstruct the device ventilation slots, as insufficient airflow may harm your device.
Your product is marked with this symbol, which is known as the WEEE mark. WEEE stands for Waste Electronics and Electrical Equipment. It means that used electrical and electronic products should not be mixed with general waste. Used electrical and electronic equipment should be treated separately.

download service 181
Flickr/YouTube 266
FTP 178
FTP Uploadr 275
recycle bins 40, 299
web publishing 193
ANONYMOUS FTP 335
anonymous FTP access 178
application zone 42
applications 175, 265
auto upload
Flickr/YouTube 265
FTP Uploadr 274
broadcatching 177, 194
adding channels 181, 195, 196
channel guides 210
RSS 177
COPY/SYNC button 202
configuration 202
example 212
synchronization 212
download service 176, 204
activation 181
adding a task 184, 191
configuration 181
link capture browser plugin 205
notifications 205
P2P download 184, 204
preferences 186
protection 206, 207
status 183
URL 184, 232
FTP 175, 177, 265
activation 178
anonymous access 178
passive mode transfer 178
media server 176, 178
configuration 179
iTunes server 176, 203, 204
print server 211
configuration 201
name 201
web publishing 176, 193, 209
activation 193
example 208
port number 210
archive 122
authorization
Flickr 266, 268
YouTube 271
auto upload
Flickr/YouTube 265
activation 266
authorization 266, 271
configuration 270, 271
FTP Uploadr 274
activation 275
bandwidth limit 278
configuration 276
serverentry275
grace period 271, 273, 278
B
backup 122
archive 122
synchronization tutorial 125
tutorial 125
backup files
restoring files by 131
backup job
restoring files by 128
backup settings 313
bandwidth limit 278
broadcatching 177, 194
adding channels 181, 195, 196
channel guides 210
RSS 177
browser plugin, capturing link 205
browsing shares 37
C
capturing download links 205
certificate 315
editing 315
tutorial 106
verifying 116
changing password 32
channel guides 210
CIFS 142
configuration
COPY/SYNC button 202
download service 181
Flickr 270
FTP Uploadr 276
print server 201
recycle bins 302
YouTube 271, 272
COPY/SYNC button 19, 202
configuration 202
example 212
synchronization 212
copying contents 304
CPU
temperature 138
usage 138
creating
groups 294, 295
shares 298, 299
users 288, 289
volumes 155, 158
D
data protection 163
date 147
diagnostic tool 168
diagnostic tools 168
discovery 21
disk
S.M.A.R.T. attributes 262
disk replacement 152
displaying user information 292
DLNA 176, 203
DNS 165, 168
documentation
related 2
Domain Name System, see DNS
domain user
troubleshooting 335
troubleshooting share access 335
download period control 187
download service 176, 204
activation 181
adding a task 184, 191
configuration 181
download period control 187
link capture browser plugin 205
notifications 205
activation 181
P2P download
IP filtering 189, 190
protection 206, 207
re-seeding 182
settings 188
torrent files 184, 204
preferences 186
status 183
URL, download service 184, 232
downloading files 39
duplexing 161
E
Exchangeable image file format, see Exif
Exif 35
explicit TLS/SSL 118
external volumes 158
F
fan speed 138
file
troubleshooting access 335
file browser
configure share 40
share browser 37
File Transfer Protocol over Explicit TLS, see FTPES
File Transfer Protocol over TLS, see FTPS
files
downloading 39
uploading 39
FileZilla 118
fingerprint 116
firmware, upgrading 143
Flickr 265
access rights 271
activation 266
authorization 266, 268
grace period 271
safety level 271
folder
troubleshooting access 335
folder creation 38
FTP 118, 175, 177, 265
activation 178
anonymous access 178
over TLS 118
passive mode transfer 178
FTP Uploadr 274
activation 275
bandwidth limit 278
configuration 276
grace period 278
server entry 275
FTPES 175
FTPES - FTP over explicit TLS/SSL 118
FTPS 118, 265
membership 291, 295
names 295
searching 294
Guide
Quick Start 2
H
Home
icons 33
HTTP port 168
HTTPS 111, 314
|
icons 33, 45, 48
global 33, 45
users 289
IP address 165
IP filtering 189, 190
iTunes server 176, 180, 203, 204
J
JBOD 156, 160, 162
jumbo frames 166, 168
K
Ken Burns 43
L
lag, time 142
language 44
latitude 36
link capture browser plugin 205
login 31
Logitech SqueezeCenter 180
G
global icons 33, 45
GMT 28, 149
Google Maps 36
GPS 36
grace period 271, 273, 278
groups 293
adding 294, 295
editing 295
logs 309
longitude 36
M
maintenance 305
backup settings 313
logs 309
power management 305
failure 306
resume 306
schedule 308
UPS 306
reset 313
restoring settings 313
shutdown 317
upgrading firmware 143
master browser 147
media server 176, 178
configuration 179
iTunes server 176, 180, 204
rebuild database 178
share publish 179
SqueezeCenter 180
status 178
membership 291
groups 291, 295
mirroring 161
moving contents 304
N
naming
server 147
shares 41
volumes 157
workgroup 147
NAS Starter Utility 21, 30
navigation panel 46
network 165
diagnostic tools 168
DNS 165, 168
HTTP port 168
IP address 165
jumbo frames 166, 168
PPPoE 165, 173, 174
activation 173
TCP/IP 166
network connection test 168
notifications
download service
activation 181
notifications, download service 205
0
other documentation 2
P
P2P download
IP filtering 189, 190
protection 206, 207
re-seeding 182
settings 188
torrent files 184, 204
health 192
info-hash 193
trackers 193
parity 161
passive mode transfer 178
password 32, 43
ping 168
Play Next 44
port mapping 169
port, HTTP 168
power management 305
failure 306
resume 306
schedule 308
UPS 306
PPPoE 165, 173, 174
activation 173
preferences, download service 186
print server 211
configuration 201
name 201
protect 122
backup 122
backup tutorial 125
protection, download service 206, 207
public key certificate 315
editing 315
publishing shares 179
Q
Quick Start Guide 2
R
RAID 156, 160
degraded 154
RAID 0 161, 162
RAID 1 161, 163
recovering 152
replacing disks 152
resynchronization 152
rebuild media server database 178
recycle bins 301
activation 40, 299
configuration 298, 302
related documentation 2
replacing disks 152
reset 19, 313
restoring
by backup files tutorial 131
by backup job tutorial 128
files 128
restoring settings 313
RSS 177
download service notifications 205
s
S.M.A.R.T.
attributes 262
safety level, Flickr 271
scanning volumes 158
schedule, power management 308
scheduling, download service 187
secure connections 111
server
Syslog 223
TFTP 225
server entry, FTP Uploadr 275
server name 147
setup
COPY/SYNC button 202
download service 181
Flickr 270
FTP Uploadr 276
media server 179
P2P download 188
print server 201
YouTube 271, 272
share
configuration 40
troubleshooting local user access 334
share publishing 179
shares 37, 297
access rights 41, 300, 301
adding 298, 299
browser 37
copying contents 304
downloading files 39
editing 299
folder creation 38
moving contents 304
names 41
recycle bins 298, 301
activation 299
configuration 302
share browser 298, 302
status 298
types 298
uploading files 39, 237, 303
shutdown 317
SqueezeCenter 180
SSL 118, 314
certificate 315
editing 315
tutorial 106
status 45, 138
download service 183
shares 298
volume 153, 154
storage 151
creating volumes 155
disk replacement 152
JBOD 151, 156, 160, 162
methods 160
duplexing 161
mirroring 161
parity 161
striping 161
naming volumes 157
RAID 151, 156, 160
degraded 154
RAID 0 161, 162
RAID 1 161, 163
recovering 152
resynchronization 152
status 153, 154
USB devices 158, 159
volumes 151, 160
striping 161
synchronization 202, 212
configuration 202
directions 203
single direction 212
tutorial 125
two directions 213
Syslog server 223
system
date/time 147
login 31
master browser 147
password 32
reset 19
server name 147
settings 141
status 138
time lag 142
workgroup name 147
system settings 43
T
TCP/IP 166
temperature
CPU 138
TFTP server 225
thumbprint 116
time 147
lag 142
server 148
zone 28, 149
Time Machine 283
TLS 118, 175, 265
torrent files 184, 204
health 192
info-hash 193
trackers 193
Transport Layer Security, see TLS
troubleshooting
domain user 335
domain user share access 335
file access 335
folder access 335
forgot password 330, 331
LED indicators 327
LAN 328
local user share access 334
login 333
media files 338
NAS Starter Utility 329
overview 327
user share access 334
web configurator access 331
U
Universal Plug and Play. See UPnP.
upgrading firmware 143
uploading files 39, 237, 303
UPnP 169
port mapping 169
UPS 306
URL 184, 232
USB devices 158, 159
User Name 220
usernames 291
users 287
adding an account 288, 289
displaying information 289, 292
editing an account 289
group membership 291, 295
icons 289
search 288
usernames 291
V
video category, YouTube 273
video playback 44
volumes 151, 160
creation 155, 158
JBOD 151, 156, 160, 162
names 157
RAID 151, 156, 160
degraded 154
RAID 0 161, 162
RAID 1 161, 163
recovering 152
resynchronization 152
scanning 158
status 153, 154
storage methods 160
duplexing 161
mirroring 161
parity 161
striping 161
grace period 273
video category 273
Z
zPilot 25
W
web configurator 29
icons 33
login 31
navigation panel 46
password 32, 43
status 45
web publishing 176, 193, 209
activation 193
example 208
port number 210
troubleshooting 341
web security 111
workgroup name 147
Y
YouTube 265
access rights 274
activation 266
authorization 271
configuration 271, 272


- KEEP THIS GUIDE FOR FUTURE REFERENCE.
- Related Documentation
- Contents Overview
- User's Guide 15
- Technical Reference 135
- Table of Contents
- Chapter 4 Tutorials....51
- Part II: Technical Reference.... 135
- Chapter 5
- Status Screen 137
- Chapter 6
- System Setting....141
- Chapter 7
- Storage 151
- Chapter 8 Network 165
- Chapter 9 Applications ...... 175
- Chapter 10 Packages ......215
- Chapter 13
- Using Time Machine with the NSA 283
- Chapter 14
- Users....287
- Chapter 15
- Groups 293
- er 16
- Shares......297
- er 17
- Maintenance Screens 305
- Chapter 18
- Protecting Your Data 325
- Chapter 19
- Troubleshooting....327
- Chapter 20
- Product Specifications....345
- Appendix A Legal Information....347
- Index 351
- PART I
- User's Guide
- Getting to Know Your NSA
- Overview
- Hard Disks for 2-Bay Models
- Hard Disks for 1-Bay Models
- COPY/SYNC Button
- RESET Button
- Overview
- Make sure you have a backup of any existing data in the hard disk before installing it in the NSA. Using the initialization wizard formats the hard disk and deletes all data in the process.
- Starting the NAS Starter Utility
- NAS Seeker Screen
- Main NAS Starter Utility Screen
- Directory of the NAS
- Import Files or Folders with zPilot
- Network Drive
- Manage the Device
- Configure System Settings
- Web Configurator Basics
- Overview
- Accessing the NSA Web Configurator
- Access the NSA Via NAS Starter Utility
- Web Browser Access
- Login
- Home Screens
- Now Playing (Music)
- Exif and Google Maps (Photos)
- Favorite
- File Browser
- Configure Share Screen
- Share and Folder Names
- Application Zone
- System Settings
- Administration Screens
- Global Administration Icons
- Navigation Panel
- Main Window
- Status Messages
- Common Screen Icons
- Session Example (Windows)
- Overview
- Windows 7 Network
- If the NSA Icon Does Not Display
- NSA Icon Right-click Options
- Windows 7 Network Map
- Playing Media Files in Windows 7
- Windows 7 Devices and Printers
- Windows 7 Desktop Shortcut
- Creating a Volume in a 2-Bay NSA
- Creating a volume deletes all existing data in the hard disk. Make sure you have a backup of your existing data before following the steps in this section.
- Creating a RAID 1 Volume
- Migrate Button
- Create an Internal Volume Button
- Creating a Volume in a 1-Bay NSA
- Creating a RAID 1 Volume
- Migrate Button
- Create a SATA Volume Button
- Creating a PC Compatible Volume
- Checking Your PC Compatible Volume
- Deleting a Volume
- File Sharing Tutorials
- Creating a User Account
- Creating a Share
- Creating a Group
- Accessing a Share From Windows Explorer
- Accessing a Share Using FTP
- Accessing a Share Through the Web Configurator
- Download Service Tutorial
- Copying/Pasting a Download Link
- Right-click the URL field and select Paste.
- The URL displays in the URL field. Click Apply.
- After a few moments, the download task appears in the Download Service screen's Active tab.
- Installing the Link Capture Browser Plugin
- Internet Explorer
- Firefox
- Using the Link Capture Browser Plugin
- Configuring the Download Service Preferences
- Using Download Service Notification
- Internet Explorer 7 Example
- Firefox Example
- Broadcasting Tutorial
- Printer Server Tutorial
- Copy and Flickr Auto Upload Tutorial
- FTP Uploadr Tutorial
- Web Configurator's Security Sessions
- Customizing the NSA's Certificate
- Downloading and Installing Customized Certificate
- Turn on the NSA's Web Security
- Secure Connection Failed
- Using FTPES to Connect to the NSA
- Using a Mac to Access the NSA
- Finder
- Go Menu
- How to Use the BackupPlanner
- Creating an Archive Backup
- Click Protect > Backup > Add Job.
- Identify the backup job and select Archive.
- Creating a Synchronization Backup
- Select the folder that needs to be mirrored (your Private folder in this example) and Remote.
- Restoring Archived Files by Backup Job
- Restoring by Backup Files
- PART II
- Technical Reference
- Overview
- The Status Screen
- Overview
- What You Can Do
- What You Need to Know
- Package Management
- Windows/CIFS
- Time Lag
- The Firmware Upgrade Screen
- Do not turn off the NSA while it is upgrading the firmware or you may render it unusable.
- Package Management Screen
- Displaying the Package Information
- The Server Name Screen
- The Date/Time Screen
- Overview
- What You Need to Know About Storage
- Disk
- Volume
- Storage Methods
- Finding Out More
- The Storage Screen
- Disk Replacement Restrictions
- Resynchronizing or Recovering a RAID 1 Volume
- Expanding a RAID 1 Volume
- Storage Screen
- Volume Status
- Creating an Internal (SATA) Volume
- Editing a Volume
- Scanning a Volume
- Creating an External (USB) Volume
- External Disks
- Storage Technical Reference
- Volumes and RAID
- Choosing a Storage Method for a Volume
- One Disk
- Two Disks:
- Storage Methods
- JBOD
- RAID 0
- RAID 1
- RAID and Data Protection
- Overview
- What You Can Do
- What You Need to Know
- IP Address
- DNS Server Address
- PPPoE
- Jumbo Frames
- The TCP/IP Screen
- UPnP Port Mapping Screen
- UPnP and the NSA's IP Address
- UPnP and Security
- The NSA's Services and UPnP
- CIFS (Windows File Sharing)
- FTP
- HTTP (Web Configurator)
- HTTP (Web Published Shares)
- Configuring UPnP Port Mapping
- The PPPoE Screen
- Telnet Screen
- Overview
- What You Can Do
- What You Need to Know
- FTPES (File Transfer Protocol over Explicit TLS/SSL)
- Media Server
- iTunes Server
- Download Service
- Web Publishing
- Broadcatching
- RSS
- FTP Server
- The Media Server Screens
- The Media Server Share Publish Screen
- The Media Server SqueezeCenter Screen
- The iTunes Server Screen
- The Download Service Screen
- Adding a Download Task
- Configuring General Download Settings
- Configuring the P2P Download Settings
- Edit IP Filter
- Selecting Files to Download
- Displaying the Task Information
- The Web Publishing Screen
- The Broadcatching Screen
- Adding a Broadcatching Channel
- Editing a Broadcatching Channel
- The Print Server Screen
- Print Server Rename
- The Copy/Sync Button Screen
- Technical Reference
- Sharing Media Files on Your Network
- Songs from the iTunes Store
- Download Service
- Torrent Files
- Link Capture Browser Plugin
- Download Service Notification
- P2P Download Security
- Use a Hardware-based Firewall
- P2P Download and Your Firewall
- Web Publishing Example
- Web Publishing
- Accessing Web-published Shares from the Internet
- Web Publishing Port Number
- Channel Guides for Broadcasting
- Printer Sharing
- Synchronizing Files
- USB -> NSA or USB <- NSA
- USB <-> NSA
- Overview
- What You Can Do
- SMART Screen
- SMART Brief Summary
- SMART Full Summary
- DyDNS Screen
- NFS Screen
- Add/Edit NFS Share
- NFS Session
- Syslog Server Screen
- TFTP Server Screen
- eMule Screens
- eMule Server Screen
- Add Server
- Edit Server
- My Info
- eMule Task Screen
- Add Task
- Preferences
- Edit IP Filter
- Share Browsing
- Task Info
- eMule Search Screen
- pyLoad Screen
- Polkast Setup
- Protect Screens
- Backup Screens
- Backup: Step 1
- Backup: Step 2
- Backup: Step 3
- Backup: Step 4
- Edit Job Screen
- Edit Job: Step 1
- Edit Job: Step 2
- Restore Archive Screen
- Restore Archive: Step 2
- Restore Archive: Step 3
- Technical Reference
- S.M.A.R.T Attributes
- Overview
- What You Can Do
- What You Need to Know
- The Flickr/YouTube Screen
- Configuring the Flickr Settings
- YAHOO! flickr
- Enjoy all the benefits of Yahoo! Flickr.
- Get all the best with one Yahoo! ID.
- Sign in to Yahoo!
- Configuring the YouTube Settings
- The FTP Uploadr Screen
- Adding or Editing an FTP Server Entry
- The FTP Uploadr Preferences Screen
- Overview
- Dropbox Screen
- How to Use Dropbox with the NSA
- Using the Drop2NAS Folder
- Using the zDownload Folder
- Using Time Machine with the NSA
- Overview
- Time Machine Screen
- Using Time Machine
- Overview
- What You Can Do
- The Users Screen
- User Icons
- Adding or Editing an Account
- Usernames
- Displaying User Info
- Overview
- What You Can Do
- The Groups Screen
- Adding or Editing a Group
- Group Names
- Overview
- What You Can Do
- The Shares Screen
- Adding or Editing Share
- Configuring Advanced Share Access
- Public and ANONYMOUS Share Access Rights
- The Recycle Bin Configuration Screen
- Recycle Bins
- Configuring Recycle Bins
- The Share Browser Screen
- Moving or Copying Files
- Maintenance Screens
- Overview
- What You Can Do
- The Power Screen
- Notes on NSA-310
- Editing the Power Control Schedule Screen
- The Log Screen
- Report Config Screen
- Email Setting
- Report Setting
- Syslog Server Setting
- The Configuration Screen
- SSL Certification
- Modifying or Creating a Certificate
- The Shutdown Screen
- Technical Reference
- Log Classes
- Log Severity Levels
- Log Messages
- Protecting Your Data
- Overview
- Protection Methods
- Configuration File Backup and Restoration
- Troubleshooting Overview
- Power, Hardware, Connections, and LEDs
- Do not remove or install a hard disk while the NSA is turned on. The NSA must be turned off before you remove or install the hard disk.
- The NSA turns off or reboots by itself.
- A power failure occurred while the NSA is downloading files.
- NAS Starter Utility
- The NAS Starter Utility cannot discover my NSA.
- NSA Login and Access
- I forgot the server name of the NSA.
- I cannot get to the NSA login screen.
- I forgot the password.
- Enabling Scripting of Safe ActiveX Controls
- I Cannot Access The NSA
- I cannot access a share.
- Users Cannot Access the NSA
- A local user cannot access a share
- External USB Drives
- Firmware
- File Transfer
- Networking
- Some Features' Screens Do Not Display
- Media Server Functions
- Download Service and Broadcasting Functions
- Web Publishing
- Auto Upload
- The NSA does not automatically upload files to Flickr or YouTube.
- Package Management
- Backups
- Product Specifications
- LEDs
- Supported Media Server Content Formats
- Supported iTunes Server Content Formats
- Legal Information
- Copyright
- Disclaimers
- Certifications
- Federal Communications Commission (FCC) Interference Statement
- Notices
- Viewing Certifications
- Note
- Registration
- Safety Warnings
- B
- C
- D
- E
- F
- H
- |
- J
- K
- L
- G
- M
- N
- 0
- P
- Q
- R
- s
- T
- U
- V
- Z
- W
- Y
Brand : ZYXEL
Model : NSA320S-2T
Category : Server