
Nimbly - Stroller GRACO - Free user manual and instructions
Find the device manual for free Nimbly GRACO in PDF.


| Product Type | Stroller (pushchair) |
| Brand | Graco |
| Model | Nimbly |
| Age Range | 6 to 36 months |
| Maximum Child Weight | 15 kg (33 lbs) |
| Dimensions (Approx.) | Not specified; typical compact stroller |
| Weight (Approx.) | Not specified; lightweight frame |
| Power Source | Manual (no batteries) |
| Main Functions | Reclining backrest, adjustable legrest, swivel front wheels, foot brake, foldable frame, removable rain cover and boot (specific models) |
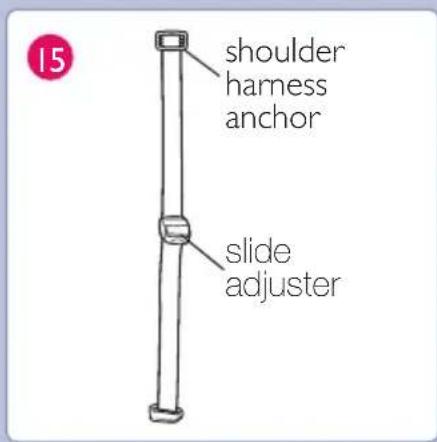
| Harness Type | 5-point harness with shoulder harness anchor and slide adjuster |
| Brake System | Rear wheel foot brake (push to lock, pull to unlock) |
| Wheel Configuration | 4 wheels: rear fixed, front swivel with lock option |
| Hood | Attachable hood with open/close function |
| Accessories Included | Rain cover and boot (on certain models) |
| Folding Mechanism | One-hand fold with lever and hook |
| Seat Pad Cleaning | Removable, machine wash cold, delicate cycle, drip dry |
| Frame Cleaning | Household soap or detergent with warm water; no bleach, spirits or abrasives |
| Maintenance | Lubricate moving parts sparingly with light machine oil; check for loose screws, worn parts regularly |
| Safety Standards | Complies with EN1888:2003 |
| Warnings | Do not leave child unattended; always use harness; no extra loads on handle; not for running or skating; avoid stairs with child in stroller |
Frequently Asked Questions - Nimbly GRACO
User questions about Nimbly GRACO
0 question about this device. Answer the ones you know or ask your own.
Ask a new question about this device
Download the instructions for your Stroller in PDF format for free! Find your manual Nimbly - GRACO and take your electronic device back in hand. On this page are published all the documents necessary for the use of your device. Nimbly by GRACO.
USER MANUAL Nimbly GRACO
natural_image
Line drawing of a stroller with four wheels and a dome-shaped head (no text or symbols)
INSTRUCTIONS
IMPORTANT: READ THESE INSTRUCTIONS CAREFULLY BEFORE USE AND KEEP THEM FOR FUTURE REFERENCE. YOUR CHILD'S SAFETY MAY BE EFFECTED IF YOU DO NOT FOLLOW THESE INSTRUCTIONS.
PARTS ACCESSORIES (certain models only)
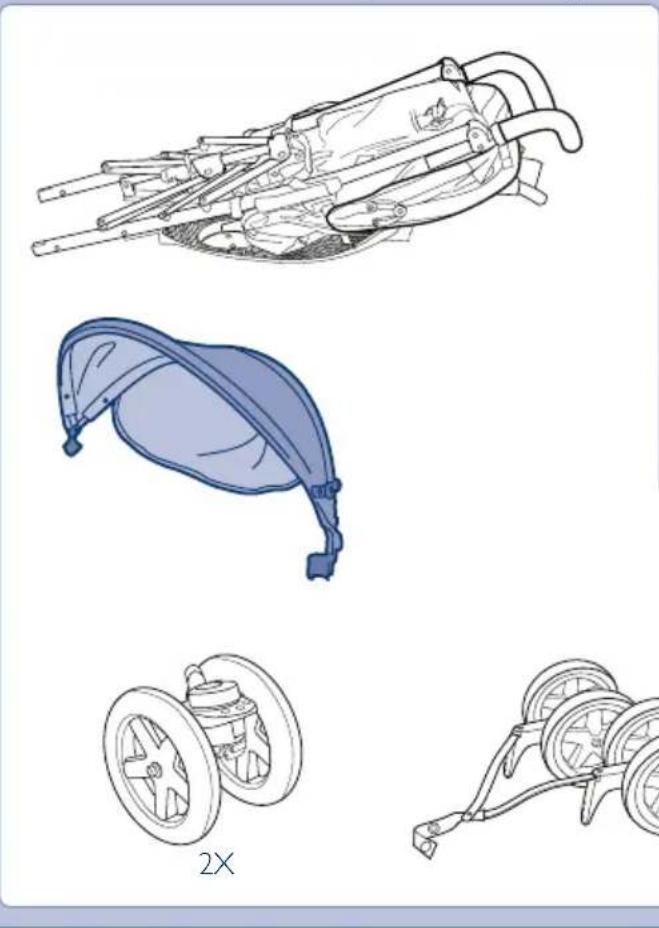
natural_image
Technical line drawings of mechanical components including a cam, cap, and wheels (no text or symbols)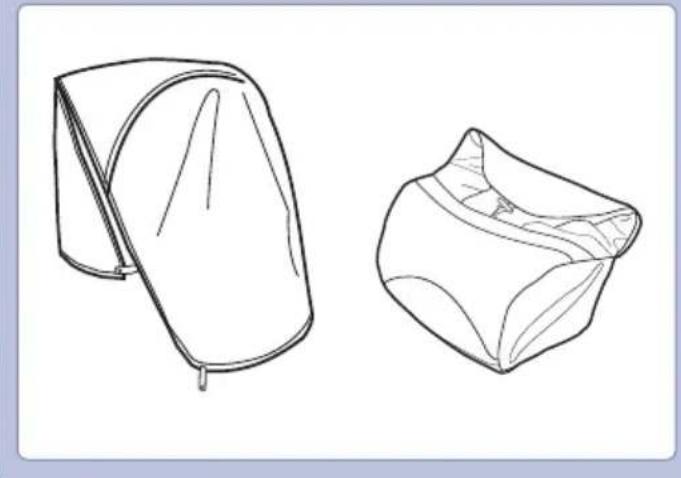
natural_image
Line drawings of two different types of hats or pouches, one open and one closed, with no text or symbols present.Opening Pushchair
natural_image
Line drawing of a hand holding a curved tool or tool, with no visible text or symbols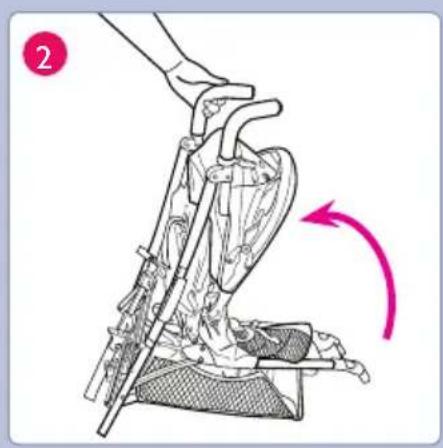
natural_image
Illustration of a hand using a tool to lift a mechanical device, showing motion direction (no text or symbols)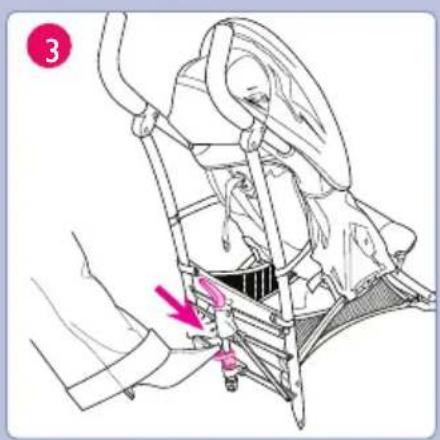
Rear wheels
Front wheels
Hood
natural_image
Illustration of a hand using a tool to adjust or install a component, no text or symbols present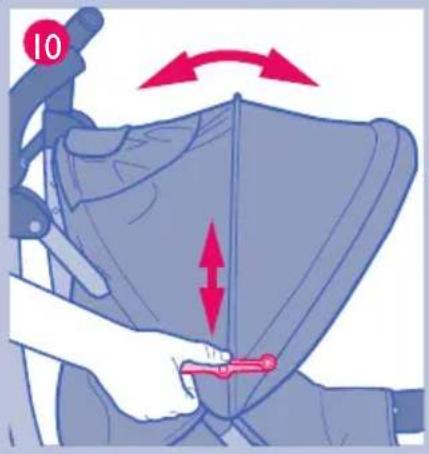
Securing Child
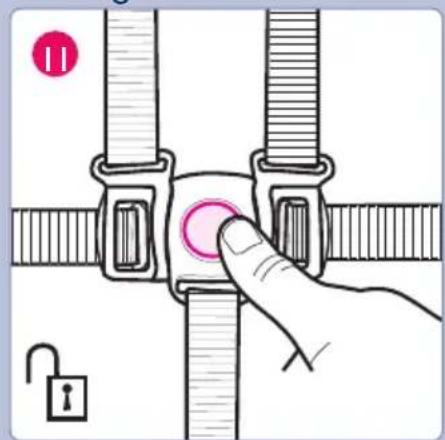
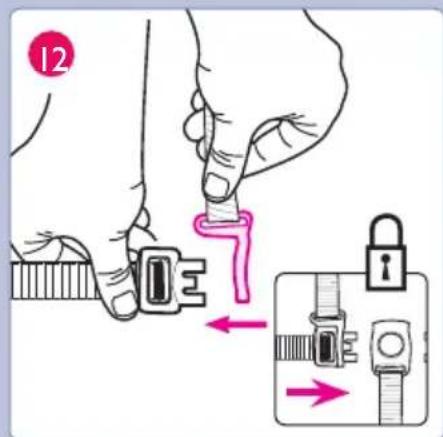
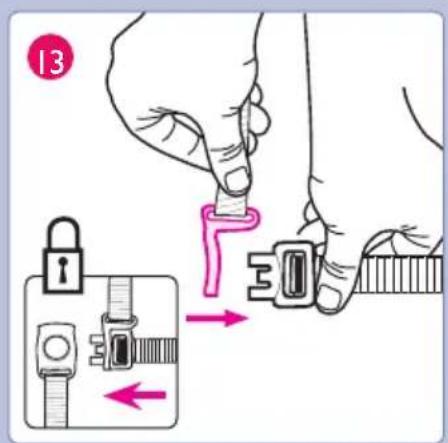
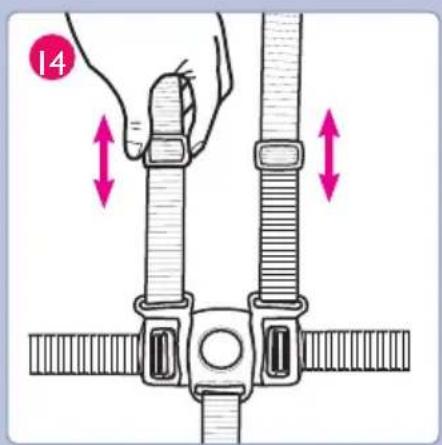
To recline back
natural_image
Illustration of a person climbing stairs with a red arrow indicating the seatbelt (no text or symbols present)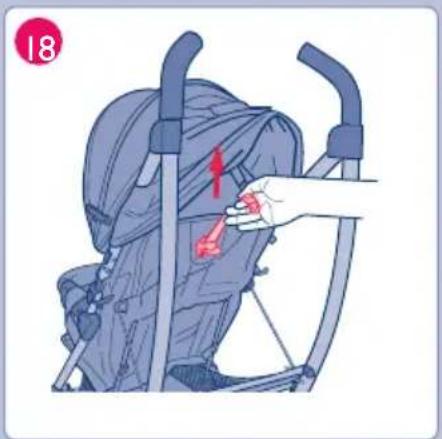
natural_image
Illustration of a person climbing a backpack with a red arrow indicating the motion (no text or symbols)To raise and lower seat
natural_image
Illustration of a stroller with a pink arm and motion arrow indicating rotation (no text or symbols)Brakes
Swivel wheels
To fold stroller
natural_image
Line drawing of a baby stroller with a hand holding the basket, showing no text or symbols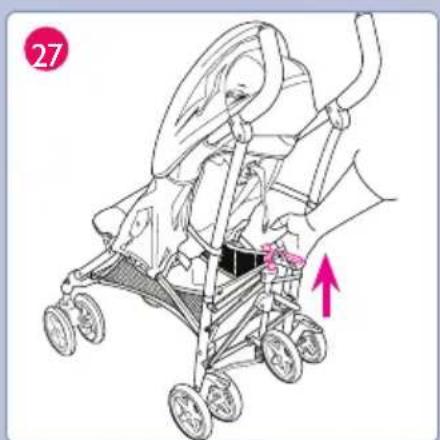
natural_image
Line drawing of a baby stroller with a pink arrow pointing to the seat area (no text or symbols)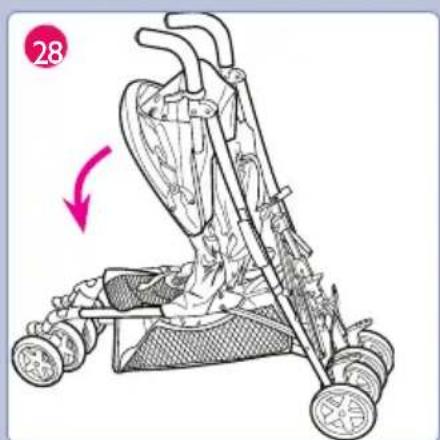
natural_image
Illustration of a stroller with a pink arrow indicating motion, no text or symbols present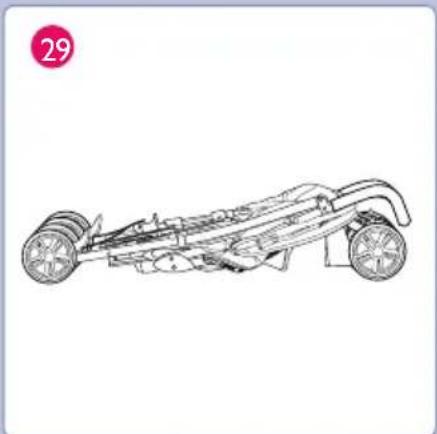
natural_image
Line drawing of a car chassis with wheels and suspension components (no text or symbols)Rain Cover (certain models only)
Boot (certain models only)
natural_image
Line drawing of a stroller with wheels and a back cover, no text or symbols presentGB
WARNINGS
WARNING: Remember a child's safety is your responsibility.
WARNING: This seat unit is not suitable for children under 6 months.
WARNING: It may be dangerous to leave your child unattended.
Children should be harnessed in at all times and should never be left unattended.
The child should be clear of all moving parts while making adjustments.
This vehicle requires regular maintenance by the user.
Overloading, incorrect folding and the use of non-approved accessories may damage or break this vehicle.
Read the instructions.
Do not hang shopping bags from the handle or carry shopping bags on the pushchair except in a Graco-approved shopping tray. Maximum load 5 kg. NEVER ON THE FOOTREST.
It may be unsafe to use accessories e.g. child seats, bag hooks, rain covers, etc. other than those approved by Graco®.
It may be unsafe to use replacement parts other than those approved by Graco.
This vehicle is intended for one child only.
Use of this pushchair with a child weighing more than 15 kg will cause excessive wear and stress on this pushchair.
This vehicle is intended for children from 6 months and up to 15kg.
WARNING: This product is not suitable for running or skating.
WARNING: Ensure that all the locking devices are engaged before use.
WARNING: Check that the pram body or seat unit attachment devices are correctly engaged before use.
WARNING: Use a harness as soon as your child can sit unaided.
WARNING: Always use the crotch strap in combination with the waist belt.
WARNING: Any load attached to the handle affects the stability of the pram/pushchair.
WARNING: Regularly lubricate all moving parts sparingly with a light general purpose machine oil, making sure that the oil penetrates between the components where these move against each other in use.
Check the various safety devices and use them correctly.
Keep your child away from the folded free-standing unit so that it does not fall and injure your child.
Pushchairs should be serviced after an extended period of no use.
If your pushchair is used by anyone unfamiliar with it, e.g. grandparents, always show them how it works. D rings are provided at the ends of the waist belts on either side of the seat for the
attachment of a safety harness approved to BS 6684 or EN13210.
Do not use a PVC rain hood indoors, in a hot atmosphere or near a direct heat source - baby may overheat.
Do not let go of your pushchair when close to moving road vehicles or trains, even with the brake on, the draught from the vehicle or train may move a free standing pushchair.
When ascending or descending stairs or escalators, always remove your child and fold the puschchair.
Avoid strangulation. DO NOT suspend strings from your pushchair or place items with strings on your child.
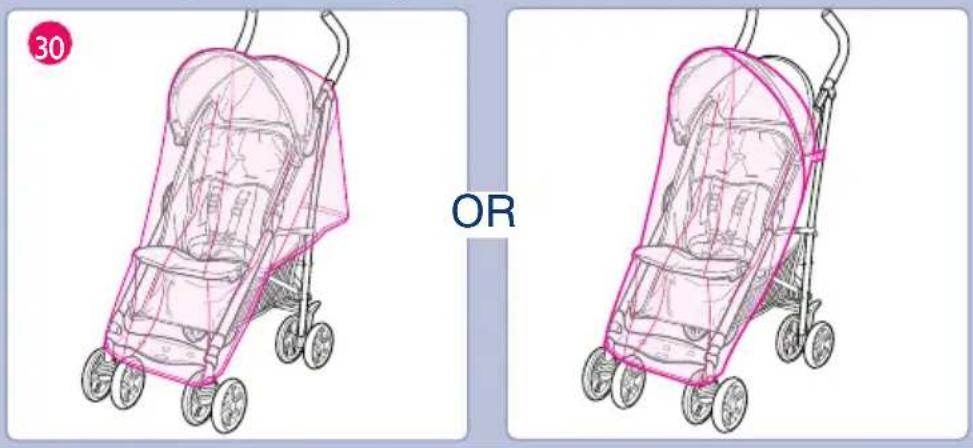
Please fully remove raincover before folding the pushchair.
CARE AND MAINTENANCE
REMOVABLE SEAT PAD may be machine washed in cold water on delicate cycle and drip-dried.
WHEN USING YOUR PUSHCHAIR at the beach, completely clean your pushchair afterwards to remove sand and salt from the wheel assemblies.
FROM TIME TO TIME CHECK YOUR PUSHCHAIR for loose screws, worn parts, torn material or stitching. Replace or repair the parts as needed.
DISCONTINUE USING YOUR PUSHCHAIR should it become damaged or broken.
TO CLEAN PUSHCHAIR FRAME, use only household soap or detergent and warm water. NO BLEACH, SPIRIT OR ABRASIVE CLEANERS. Allow to dry before storing.
EXCESSIVE EXPOSURE TO THE SUN could cause premature fading of pushchair plastic and fabric.

Instructions
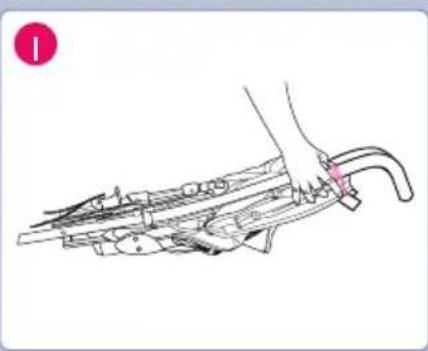
Opening pushchair
See images 1 - 3
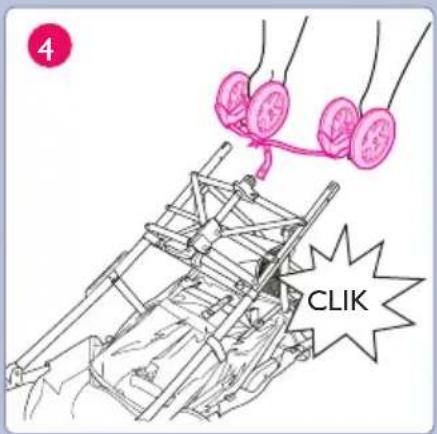
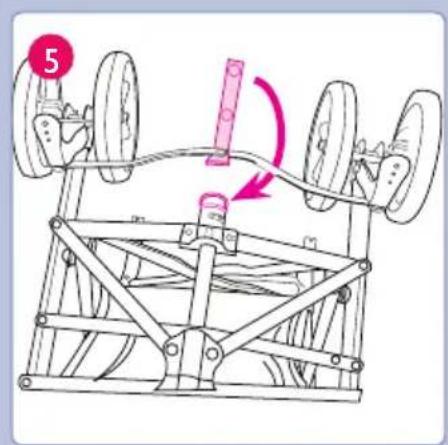
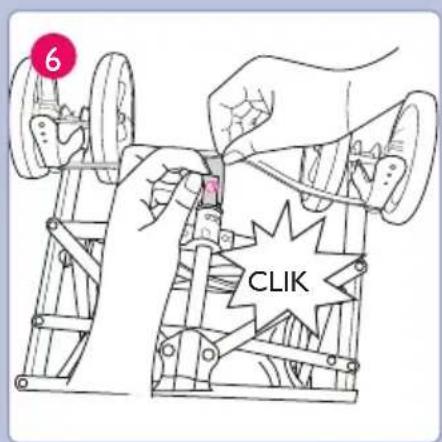
Rear wheels
4 Snap rear wheel assembly onto frame. Make sure brake levers are pointing to rear of pushchair.
5 Wrap strap with snaps under brake bar and insert into hole as shown.
6 Fasten snap.
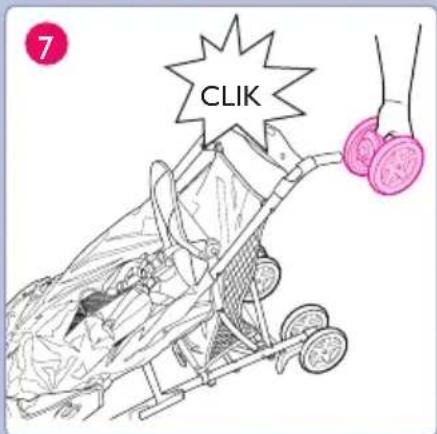
Front wheels
7 Snap front wheel onto leg tubes as shown. Repeat on other leg.
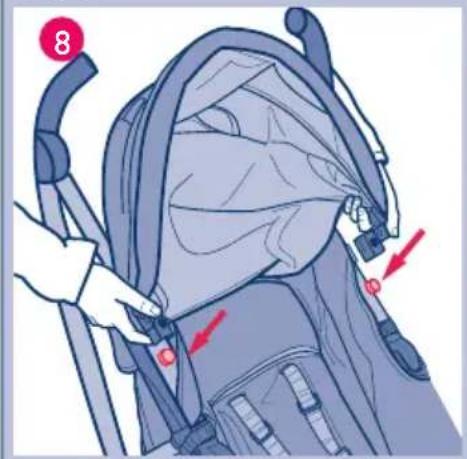
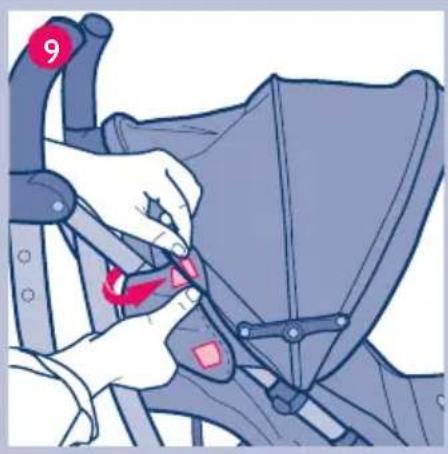
Hood
8 Attach hood onto connectors on the sides of pushchair as shown.
9 Wrap hood around frame and fasten tape.
10 To open or close hood.
To secure your child
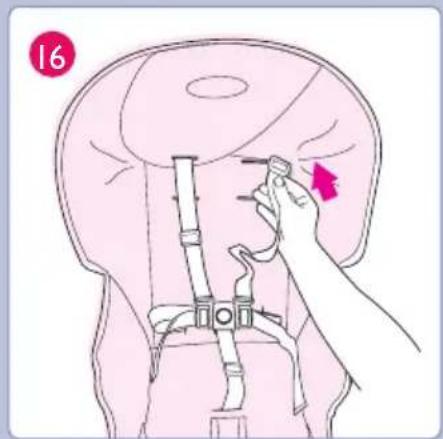
See images 11-16 To adjust Use either shoulder harness anchor in the slots that are closest to child's shoulder height. Use slide adjuster for further adjustment.
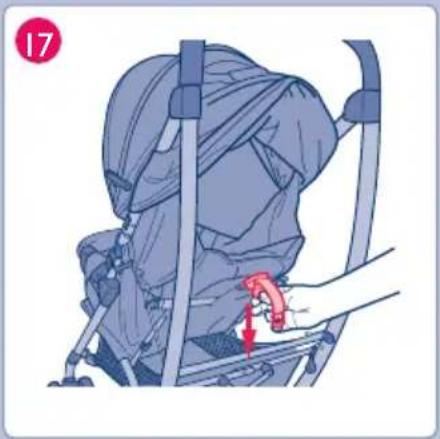
To recline or raise backrest
17 Pull on tab to lower seat back.
18 Pull strap up to raise seat back.
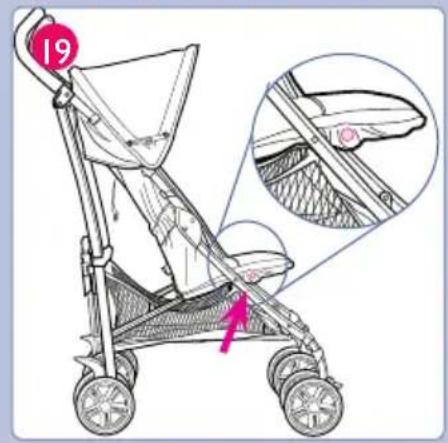
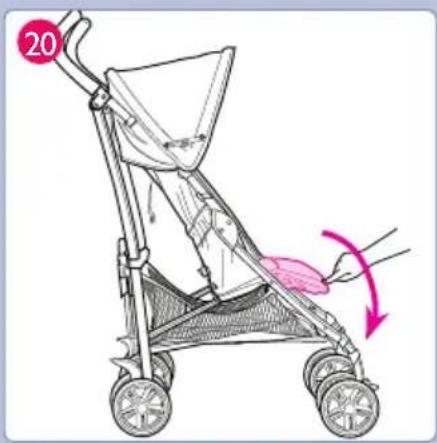
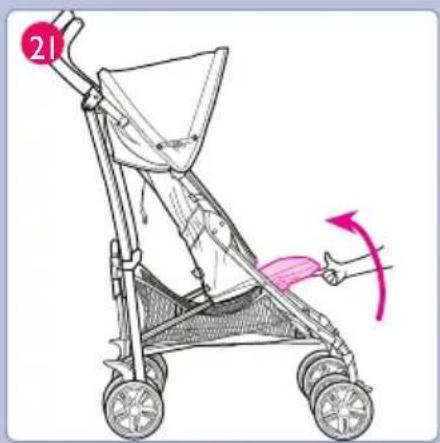
To raise and lower legrest
19 Press buttons on side of seat to
20 lower legrest.
21 Pull legrest up to raise or push in buttons on side of seat to raise legrest.
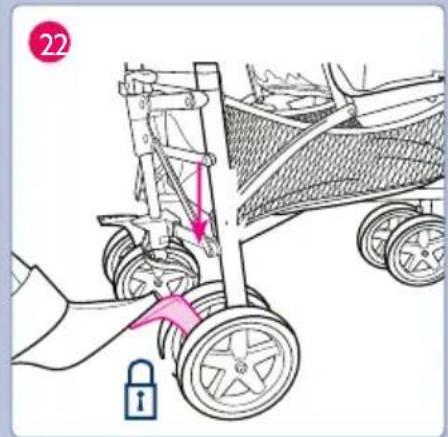
Brakes
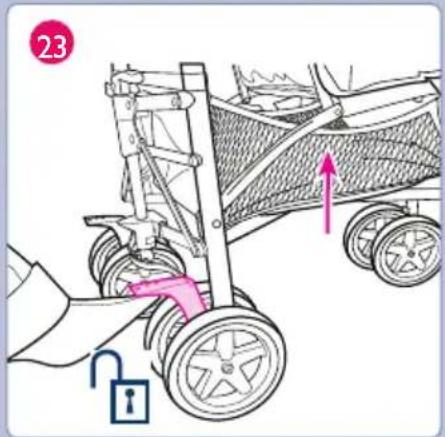
22 Push down on lever to lock.
23 Push up on lever to unlock.
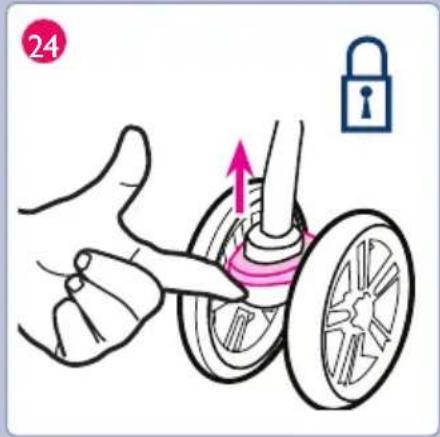
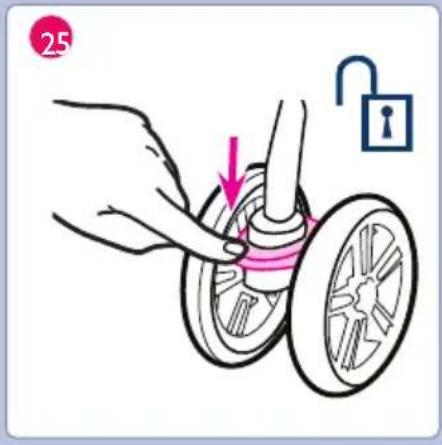
Swivel wheels
24 See images.
25
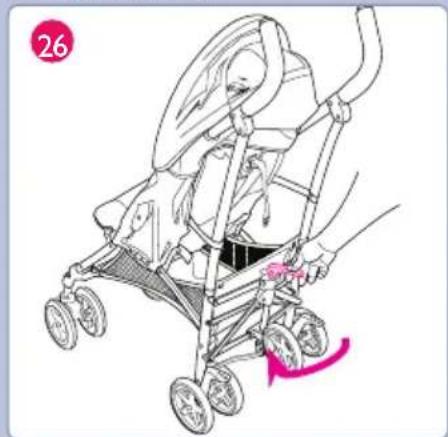
Fold pushchair
26 Rotate lever as shown.
27 Place finger under hook and pull up on lever.
28 Push pushchair forward to fold.
29
Raincover (certain models only)
See 30
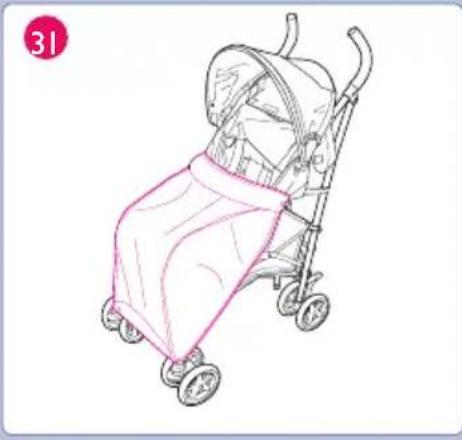
Boot (certain models only)
See 31
Complies with the EN1888:2003
Newell Rubbermaid aco Children's Product
Halifax Avenue
Fradley Park Lichfield WSI3 8SS
United Kingdom
44844 412 1212
GRACO CONTINENTAL EUROPE
Newell Rubbermaid Luxembourg SARL
I rue Edmond Reuter
L-5326 CONTERN
Luxembourg

Brand : GRACO
Model : Nimbly
Category : Stroller