
DVBX 2716 CI - TV Trevi - Free user manual and instructions
Find the device manual for free DVBX 2716 CI Trevi in PDF.


| Product Type | LCD TV with DVD Player |
| Brand | Trevi |
| Model | DVBX 2716 CI |
| Screen Size | 15.6 inches (482.6 mm diagonal) |
| Display Type | LCD |
| Dimensions (W x D x H) | 381.6 x 158 x 329.2 mm |
| Net Weight | 1.95 kg |
| Power Supply | AC 110-240V, 50/60Hz via AC-DC adapter |
| Power Consumption | 30W (typical), <1W (standby) |
| Receiving Systems | B/G, D/K, I (Analog); DVB-T (Digital) |
| Color Systems | PAL, SECAM |
| Audio Output | 2 x 3W (8 Ohm speakers) |
| Inputs/Outputs | HDMI, VGA, AV (composite), YPbPr, SCART, USB, CI slot, Earphone, Antenna (75 Ohm) |
| DVD Playback | DVD, VCD, CD (playback, not recording) |
| USB Media Playback | Video, Music, Photo |
| Special Features | Teletext, EPG, PVR (USB recording), Timeshift, Parental Lock, Sleep Timer, Built-in Games |
| Remote Control | Infrared, requires 2 x AAA batteries (not included) |
| Cleaning and Maintenance | Unplug power; wipe with a soft dry cloth; do not use liquids or abrasives |
| Safety Warnings | Do not expose to rain or moisture; no user-serviceable parts; refer servicing to qualified personnel |
| Repairability | No user-serviceable parts; contact authorized service center for repairs |
Frequently Asked Questions - DVBX 2716 CI Trevi
User questions about DVBX 2716 CI Trevi
0 question about this device. Answer the ones you know or ask your own.
Ask a new question about this device
Download the instructions for your TV in PDF format for free! Find your manual DVBX 2716 CI - Trevi and take your electronic device back in hand. On this page are published all the documents necessary for the use of your device. DVBX 2716 CI by Trevi.
USER MANUAL DVBX 2716 CI Trevi
Important Safety Instruction 4
Warnings and Cautions 5-7
Functional Parts(TV) 8
Rear View Of TV Set 9
Connecting External Equipment 10-12
Operation-Remote Control 13-15
Basic Operation 16-20
Advanced Functions 21-31
Initial Settings(DVD) 32-34
Specifications
| Receiving System: | B/G, D/K, I |
| Colour System: | PAL,SECAM |
| LCD Panel: | 482.6mm(15.6 inch) diagonal |
| Ext.Antenna: | 75 Ohm Coaxial Cable |
| Ext. In/Out: | HDMI, AV, YPbPr, SCART, PC(VGA/AUDIO)IN, EARPHONE |
| Speaker: | 8 OHM |
| Audio Output: | < 3W X 2 |
| Power consumption: | 30W |
| Standby power consumption: | <1W |
| Power Supply: | AC 110-240V 50/60Hz |
| Dimension: | L381.6XW158XH329.2(mm) |
| Net Weight: | 1.95KG |

Note: Design and specifications are subject to change without prior notice.
Installation
Thank you very much for your purchase of this product, the most natural Colour Television Receiver. To enjoy your set to the full from the very beginning, read this manual carefully and keep it handy for ready reference.
INSTALLATION
- Locate the receiver in the room where direct light does not strike the screen.
Total darkness or a reflection on the picture screen can cause eyestrain. Soft and indirect lighting is recommended for comfortable viewing. - Allow enough space between the receiver and the wall to permit ventilation.
- Avoid excessively warm locations to prevent possible damage to the cabinet or premature component failure.
- This TV operates on a DC supply provided by the AC-DC adaptor. The voltage is as indicated on the label on the back cover. Only use the AC-DC adaptor supplied with the TV and never apply an AC mains to the TV directly. The AC-DC adaptor operates on and AC mains supply, the voltage is as indicated on the label of the AC-DC adaptor. Connect the DC plug of the AC-DC adaptor to the DC 12V socket at the back of the TV. Connect the AC-DC adaptor and its mains cord. Insert the mains plug in the wall socket having a mains voltage of 110-240V.
- Do not install the receiver in a location near heat sources such as radiator, air ducts, direct sunlight, or in a place somewhere like close compartment and close area.
- Do not cover the ventilation openings when using the set.
CAUTION
Never tamper with any components inside your set, or any other adjustment controls not mentioned in this manual. The LCD panel used in this product is made of glass. Therefore, it can break When the product is dropped or applied with impact. Be careful not to be injured by broken glass pieces in case the LCD panel breaks. When you clean up dust or stick of a water drop on the LCD panel. The power cord should be pulled out from the plug receptacle, then wipe the receiver with dried soft cloth. During thunder and lighting, unplug the power cord and antenna cord to prevent your TV set from damage. All television receivers are high voltage instruments. All "inside work" on your receiver should be performed only by the TV service personnel.
If some abnormal phenomena happens, may be you have some mis-opertion, please take off power and restart your TV set.
Important Safety Instruction

WARNING
RISK OF ELECTRIC SHOCK DO NOT OPEN

WARNING: TO REDUCE THE RISK OF ELECTRIC SHOCK DO NOT REMOVE COVER OR BACK. NO USER-SERVICEABLE PARTS INSIDE. REFER SERVICING TO QUALIFIED SERVICE PERSONNEL.

The lighting flash with arrow head within a triangle is intended to tell the user that parts inside the product are a risk of electric shock to persons.

The exclamation point within a triangle is intended to tell the user that important operating and servicing instructions are in the papers with the appliance.
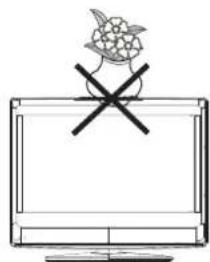
WARNING: TO REDUCE THE RISK OF ELECTRIC SHOCK DO NOT EXPOSE THIS APPARATUS TO RAIN OR MOISTURE AND OBJECTS FILLED WITH LIQUIDS, SUCH AS VASES, SHOULD NOT BE PLACED ON THIS APPARATUS.
CAUTION
Never tamper with any components inside your set, or any other adjustment controls not mentioned in this manual. The LCD panel used in this product is made of glass. Therefore, it can break When the product is dropped or applied with impact. Be careful not to be injured by broken glass pieces in case the LCD panel breaks. When you clean up dust or stick of a water drop on the LCD panel. The power cord should be pulled out from the plug receptacle, then wipe the receiver with dried soft Cloth. During thunder and lighting, unplug the power cord and antenna cord to prevent your TV set from damage. All television receivers are high voltage instruments. All "inside work" on your receiver should be performed only by the TV service personnel.
If some abnormal phenomena happens, may be you have some mis-opertion, please take off power and restart your TV set.
Warnings And Cautions
natural_image
Illustration of a television set with a crossed-out black star and stars (no text or symbols)
Caution
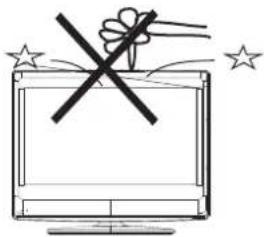
Do not drop or push objects into the television cabinet slots or openings. Never spill any kind of liquid on the television receiver.

Caution
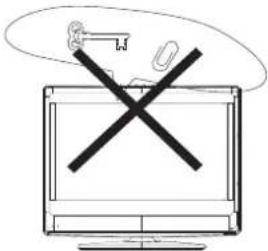
Do not insert anything in the ventilation holes. If metal or something flammable enters, it may result in fire or electric shock.
natural_image
Line drawing of a computer monitor with a Raspberry Pi logo above it (no text or symbols)
Caution
Do not place objects on this unit, it may damage the screen surface.
natural_image
Simple line drawing of a monitor with a black X mark on the side (no text or symbols)
Caution
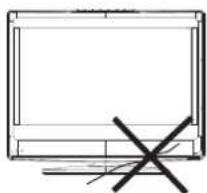
Do not squash power supply cord under the television receiver.
natural_image
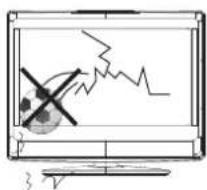
Illustration of a computer monitor displaying a broken light bulb and lightning bolts (no text or symbols)
Caution
Do not throw anything at the set. The screen glass may explode by impact and cause serious injury.
Warnings And Cautions
natural_image
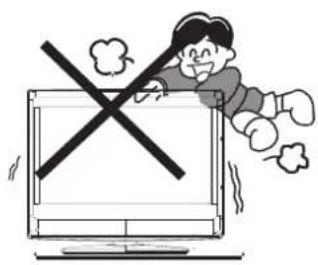
Cartoon illustration of a child lying on a computer monitor with a crossed-out X symbol (no text or symbols present)
Caution
Never stand on, lean on, or suddenly push the television or its stand. You should pay special attention to children. Serious injury may result if it should fall.
natural_image
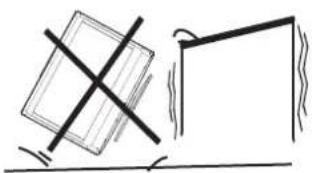
Simple line drawing of a box being dropped with a cross mark, no text or symbols present
Caution
Do not place your television on an unstable cart, stand, shelf or table. Serious injury to an individual, and damage to the television, may result if it should fall.
natural_image
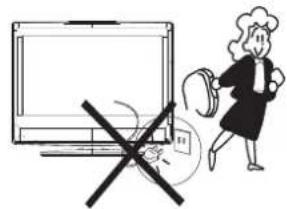
Illustration of a person running away from a computer monitor with a crossed-out X symbol (no text or symbols present)
Caution
When the television receiver is not used for an extended period of time, it is advisable to disconnect the AC power cord from the AC outlet.
natural_image
Simple line drawing of a heating element with steam rising (no text or symbols)
Caution
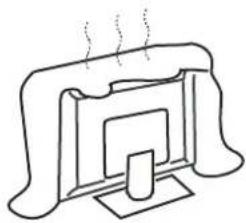
Do not block the ventilation holes in the back cover. Adequate ventilation is essential to prevent failure of electrical component.
natural_image
Simple line drawing of a monitor with a cross symbol crossed out, under a sun and steam (no text or symbols)

Warning
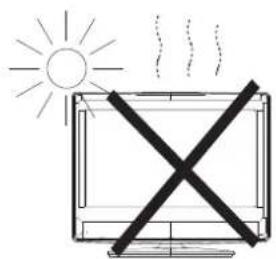
Avoid exposing the television receiver to direct sunlight and other ource of the heat. Do not stand the television receiver directly on ther produces which give off heat .E.g.video cassette players. Audio amplifiers. Do not place naked flame sources, such as lighted candle on the television. Do not expose the LCD screen surface to the sun, it may damage the screen surface.
Warnings And Cautions

Warning
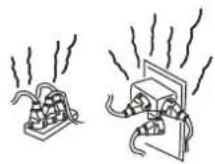
Take care not to connect many appliances to the same mains socket as this could result in fire or electric shock.
natural_image
Illustration of a computer monitor with an electrical warning symbol (no text or labels)
Warning
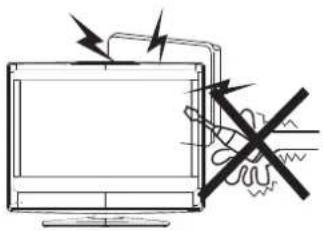
High voltages are used in the operation of this television receiver. Do not remove the cabinet back from your set. Refer servicing to qualified service personnel.
natural_image
Simple line drawing of a monitor with a cross mark and a cloth, no text or symbols present
Warning
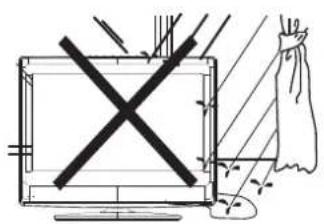
To prevent fire or electrical shock hazard, Do not expose the television receiver to rain or moisture.
natural_image
Illustration of a computer monitor with broken electrical lines and a bag attached to it (no text or symbols)
Warning
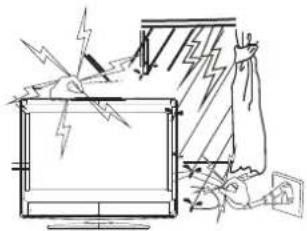
For you own safety, Do not touch any part of the set, main lead or aerial lead during lighting storms.

Caution
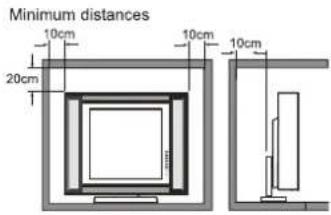
If the television is to be built into a Compartment or similarly enclosed, the minimum distances must be maintained. Heat build-up can reduce the service life of your television, and can also be dangerous.
Functional Parts( TV )
Front View of LCD Set
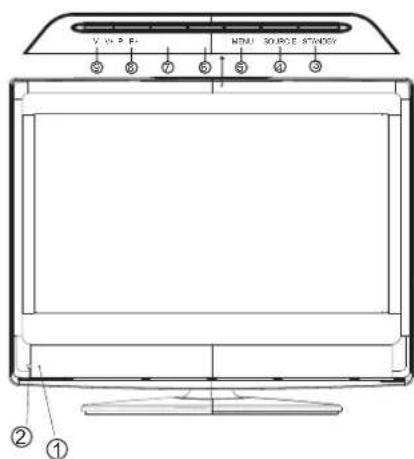
- LED indicator lamp
- Remote Sensor
- Standby Button
- SOURCE Button
- MENU Button
- P+ Button
- P- Button
- V+Button
- V-Button
NOTE
If TV is the selected input without signal received and NO operation is performed for about 5 minutes continuously, the TV set will enter standby mode. For any inputs other than TV, the TV set will not enter standby mode automatically without users' instruction. If you are not going to use this TV set for a long time, switch off the set and disconnect the power plug from the wall outlet.
To turn the TV power ON
Put the TV set on the correct place, then connect the DC plug of the AC-DC adaptor to the DC 12V socket at the back of the TV set. Connect the adaptor main cord to the wall outlet, then the LED indicator lamp turns red/green and the TV set is at Standby/work Mode. At Standby Mode, if Standby Button is pressed the power indicator will change to green. It takes a few seconds before the picture appears.
To turn the TV power OFF
Press the Standby Button to make the TV set in Standby Mode, then disconnect the power plug from the wall outlet.
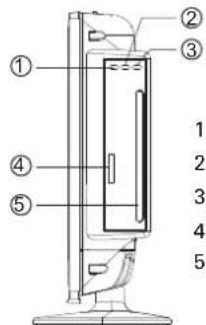
Place your CD/DVD, with the label backwards.
- Play/Pause
- Stop
- Open/Close
- Card Reader
- DVD Slot
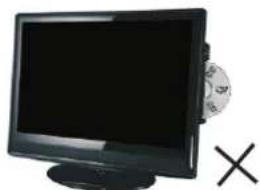
natural_image
Black-and-white photo of a flat-screen monitor with a circular disc and an 'X' symbol beside it (no text or symbols on the device itself)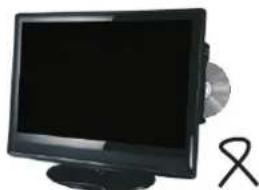
natural_image
Black desktop computer monitor with CD and a ribbon symbol beside it (no visible text or labels)Once you insert the disk to DVDslot, the player will suck it in, and the current source will be switched to DVD status automatically.
Notes:
1.Do not attach any seal or label to either side (the labeled side or the recorded side) of a disc. 2.Do not use irregularly shaped CDs (e.g., Heartshaped or octagonal) since they may result in malfunctions.
3. Some playback operations of DVDs and Video CDs may be intentionally programmed by software manufacturers. This unit plays DVDS and Video CDs according to disc content designed by the software manufacturer, therefore some playback features may not be available or other functions may be added.
Rear View Of TV Set
EARPHONE
HDMI
VGA
VIDEO
YPbPr
SCART
TUNER
USB
Cl

natural_image
Pure geometric shapes including circles, rectangles, and polygons without any text or symbols| Ω | ANT. | CI | SCART | USB | L | R | VIDEO | PC-A IN | VGA | HDMI | DC-12V |
| Pr | Pb | Y |

NOTE:
Precautions when connecting to other equipment
When using external equipment with this TV set, please read the instruction manual of the external equipment.
Switch off all power supplies to the equipment and TV set before connection.
Always ensure that the input and output terminals are correctly connected.
The UPDATE terminals just use to update the system software.
Connecting External Equipment
Connecting a PC
When your PC is connected to the TV with D-SUB cable and audio cable.
You can view and listen to the PC's video and audio output on the TV. Use the VASE 1440 X 900@60Hz
format to obtain the best image quality for your TV.
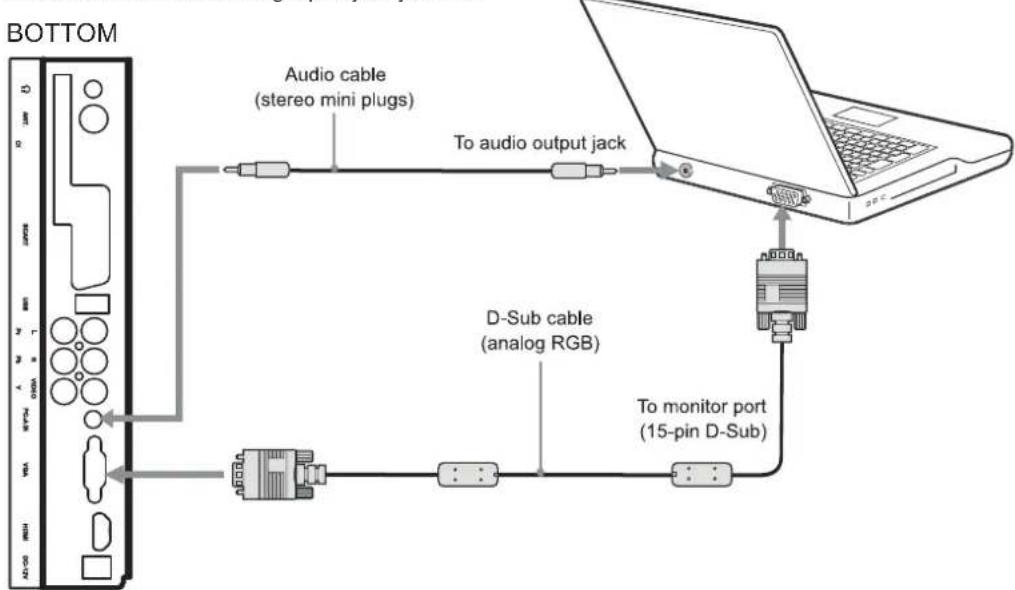
flowchart
graph TD
    A["Bottom Port"] -->|Audio cable (stereo mini plugs)| B["Laptop"]
    B -->|To audio output jack| C["D-Sub cable (analog RGB)"]
    C -->|To monitor port (15-pin D-Sub)| D["Monitor Port"]
    D -->|Audio cable| A
Connecting a VCR or other device(E.G. DVD/Digital cable Box/Satellite Receiver) with composite video connectors.
Connect the video output of the device to the composite video input (yellow RCA) on the TV. Connect the line-level audio output of the device to the audio inputs( Red and White RCA) on the TV with AV cable.
BOTTOM
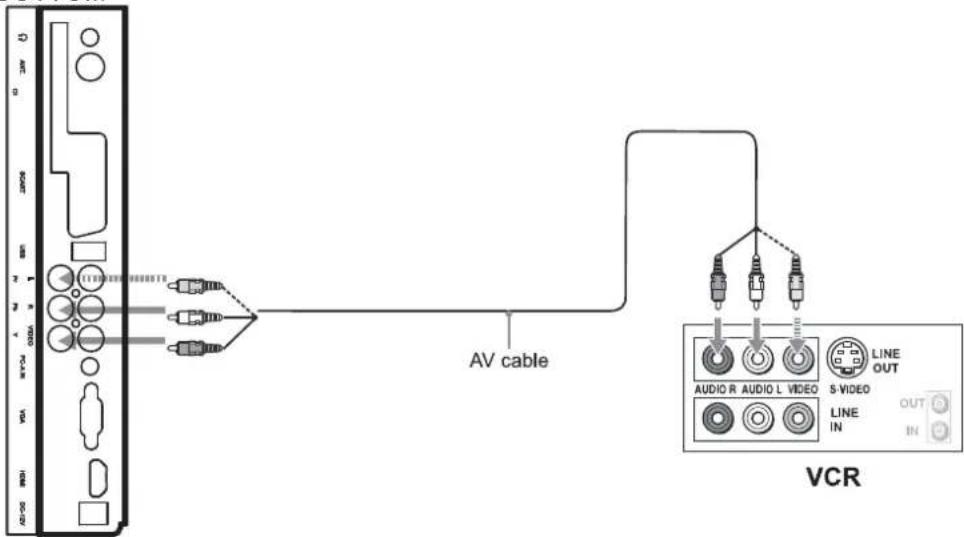

Note: Cable are often color-coded to connectors. Connect red to red, white to white, etc.
Connecting External Equipment
Connecting a DVD Player or other device (E.G. VCR/Digital cable Box/Satellite Receiver) with Component .Video Connectors
Use a component video cable to connect the DVD player's YPbPr jacks to the TV's YPbPr jacks. Use an audio cable to connect the DVD player's AUDIO OUT jacks to the TV's AUIDOIN jacks. Be sure to use the same row of input that you used for the video connection.

Note: The YPbPr jacks on your DVD player are sometimes labeled YCbCr, or Y, connect the cables to like colors.
B-Y and R-Y. if so,
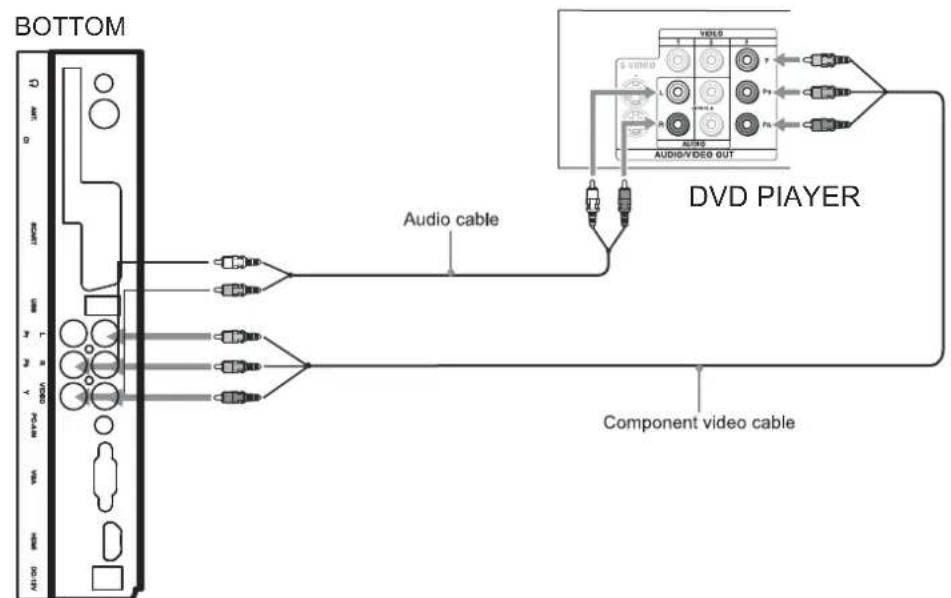

Note: Cable are often color-corded to connectors. Connect red to red, white to white, etc.
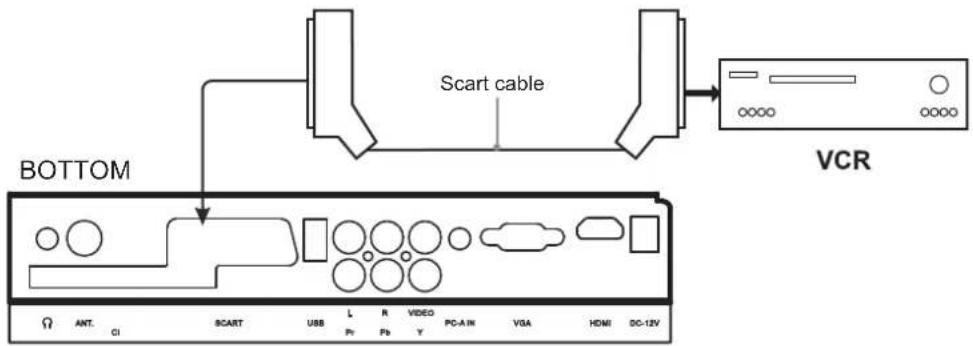
Connecting a VCR or other device (E.G. DVD/Digital Cable Box/ Satellite Receiver) with Scart connectors
Use a SCART video cable to connect the VCR SCART jacks to the TV'S SCART jacks.
Connecting External Equipment
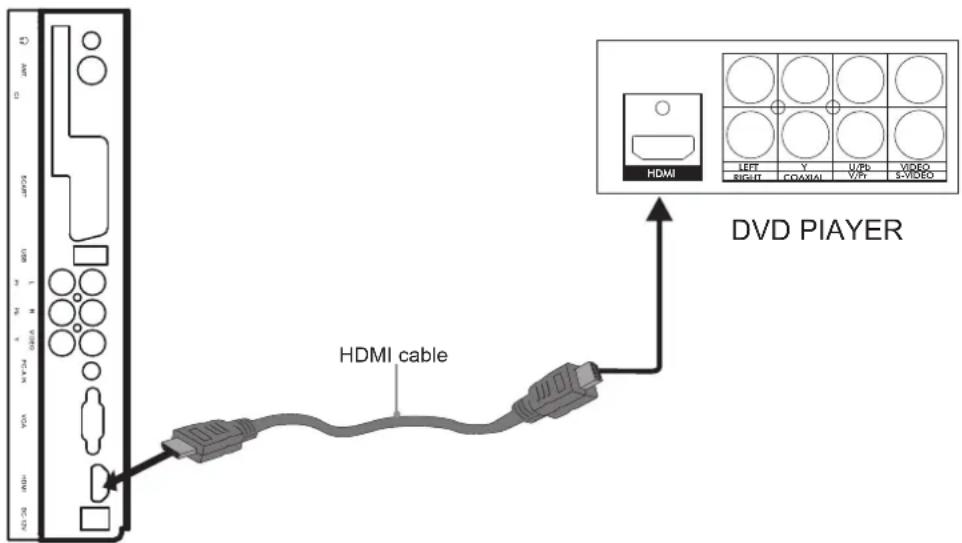
Connecting a DVD with High-definition multimedia connectors
Use HDMI cable connect the DVD HDMI jack to the TV's HDMI jack.
BOTTOM
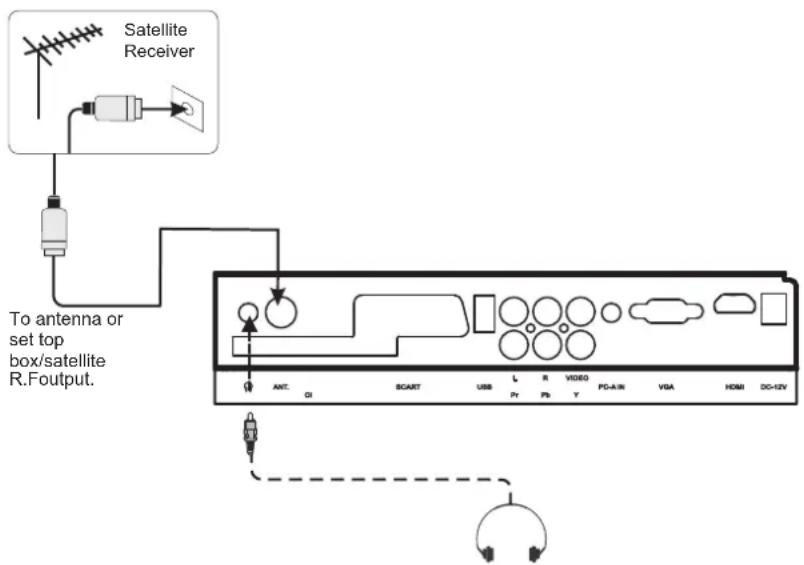
Connecting a television system and earphone
Use RF cable connect the antenna / set top box /satellite R.F output jack to the TV's TUNER jack.
Use stereo audio cable to connect the earphone to the TV's earphone jack.
Operation-Remote Control
Insert Batteries into the Remote Control
Insert two size AAA batteries by matching the and on the batteries to the diagram inside the battery compartment.

natural_image
Technical line drawing of a mechanical component with no visible text or symbolsPrecaution on battery use
Improper use of batteries can result in a leakage of chemicals and/or explosion. Be sure to follow the instructions below.
- Place batteries with their terminals corresponding to the (+) and (-) indications.
- Different types of batteries have different characteristics. Do not mix batteries of different types.
- Do not mix old and new batteries. Mixing old and new batteries can shorten the life of new batteries and/or cause old batteries to leak chemicals.
- Remove batteries as soon as they are non-operable. Chemicals that leak from batteries can cause a rash. If chemical leakage is found, wipe with the product may have a shorter life expectancy due to storage conditions.
- If the remote control is not used for an extended period of time, remove the batteries from the remote control.
Using the Remote Control
Use the remote control by control by pointing it towards the remote sensor window of the set. Objects between the remote control and sensor window may prevent proper operation.
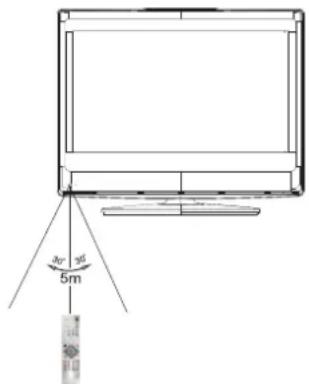
Cautions regarding use of remote control:
- Do not expose the remote control to shock. In addition, do not expose the remote control to liquids, and do not place in an area with high humidity.
- Do not install or place the remote control under direct sunlight. The heat may cause deformation of the unit.
- The remote control may not work properly if the remote sensor window of the main unit is under direct sunlight or strong lighting. In such a case, change the angle of the lighting or TV set, or operate the remote control closer to the remote sensor window.
Note: This above illustration is for reference only. The remote sensor may be in different locations on different models.
Operation-Remote Control
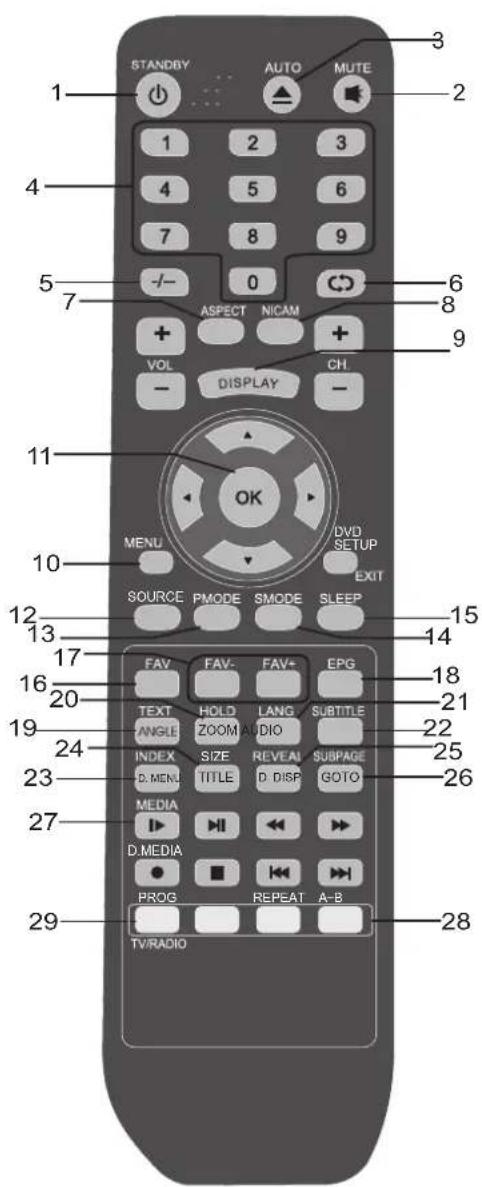
1.STANDBY
Turn the unit on or off
2. AUTO Button
Press this button to auto adjust in PC
3.MUTE:
Press this button to mute or restore sound
4.0-9 number buttons
Use these number button to select channel or input password
5.-/--
This TV allows you to select channels from 1t0 200.
Press this button to select one-digit, two digit or three -digital channels input options.
To select a one-digit channel(e.g.Channel 8),press
this"-/--" botton to change channel selection to "-
on screen display and press the "8" button only.
To select a two-digit channel(e.g.Channel 28). Press
This --" button to change channel selection to --"
on screen display and press "2" and "8" buttons.
To select a three-digit channel(e.g. Channel 128). press this "-/-" on screen display and press "1", "2" and "8" buttons.
6.RETURN:
Press this button, can back to last channel
7.ASPECT:
To choose a proper screen aspect ratio
8.NICAM:
To change stereo sound mode in ATV channels
9.DISPLAY:
To access the program information(or DVB info)
10.LCD MENU:
To access the Menu main page
11.0K
To confirm or alter the settings of the selected menu item
12.SOURCE:
To select the signal input source
13.PMODE:
Use to change the desired picture mode
14.SMODE:
To change the desired sound mode
15.SLEEP:
To set the time of television to automatically turn off
16.FAV:
To display a desired favorite channel list
17.FAV-. FAV+
Press FAV-/FAV+ Button to choose the channel in favorite list
18.EPG:
Turn on/off the EPG in DVBT mode.
19.TEXT:
Press to enter or exit the teletext mode.
20.HOLD:
To stop the automatic page change from Teletext
21.LANG:
change the audio language of current service if available.
22.SUBTITLE:
Turn on/off the subtitle
23.INDEX
To go to the index page in the teletext mode
24.SIZE
Press repeatedly to change the screen display mode in the teletext mode.
25.REVEAL:
To reveal answers the hidden information for some teletext page(e.g answers to puzzles or riddles).Press again to hide information.
26.SUBPAGE
To enter or exit the subpaage in the teletext mode
27.MEDIA
To enter the Media mode
28.COLOUR Buttons(RED/YELLOW/GREEN/BLUE):
Press this button to access directly to the corresponding pages, displayed at the lower part of the teletext screen
29.TV/Radio Button
Switches to TV and Radio in DVBT mode.
Operation-Remote Control(DVD and USB)
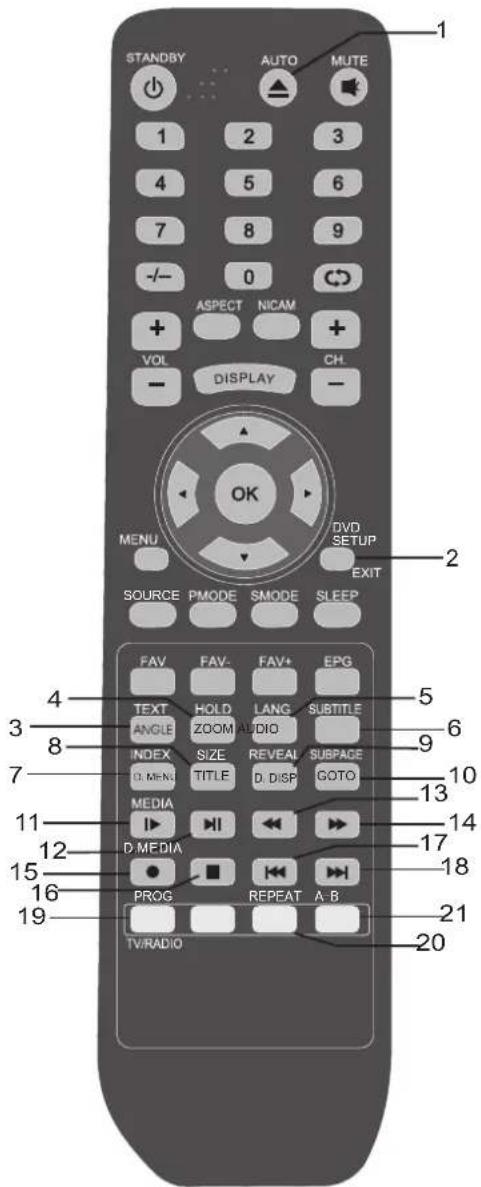

Press OPEN/CLOSE button to load disc on disc tray.
2. DVD SETUP Button
Accesses or removes setup menu.

If the disc contains scenes recorded at different camera angle, you can change to a different camera angle during playback. Note: The angle indicator will blink on the TV screen during scenes recorded at different angles as an indication that angle

Press ZOON during playback or still playback to activate the Zoom function. Note: Zoom may not work on some DVDs.

To press this button, you can change the audio language form the one selected at settings to a different language, if available.
6.SUBTITLE
To press this button, you can change the subtitoe language form one selected to the initial settings to a different language, if available.

If play some DVD discs, press this button back to root menu screen.

DVD disc:
Press TITLE button, then you can use " * and enter button to select programs. VCD disc:
Press TITLE button, you can switch PBC on/off

To display player OSD.

Press this button to go to desired position.

Press this button during playback to activate the slow function.

Press this button to start playback. Press this button again to pause playback.


These buttons allow skipping ahead/back at 5-level speed. Press "PLAY" Button to return to normal playback.

:Press this button record or pause. D.MEDIA:press this button to select the DVD/CARD in DVD mode.

Press this button stop player.


Press these button to go to the previous/next chapter.
19.PROG Button
Place a track on the program list.
20.REPEAT Button
To press this button you can repeatedly play a title or all tracks.
21.A-B
Repeat sequence.
BASIC OPERATION
ATV
- Press INPUT button to display the input source list;
- Press ▼ / ▲ button to select the input source you want to watch;
- Press ENTER button to enter the input source.
SOURCE
DTV
ATV
DVD
AV
SCART
YPBPR
HDMI
PC
MEDIA
First Time Installation
Country
Press ▼ / ▲ button and then use ◀ / ▶ to select the country which you live in.
Language
Press ▼ / ▲ button and then use ◀ / ▶ to select the OSD language. The language you choose will be used in the following settles.
Delete Program
Press ▼ / ▲ button and then use ◀ / ▶ to select whether to delete all the programs.
Search Program
Press ▼ / ▲ button and then use ◀/▶ to select whether to start searching programs. The channel search setting can be found in the AUTO TUNING part.
FIRST TIME INSTALLATION
COUNTRY
LANGUAGE
DELETE PROGRAM
SEARCH PROGRAM
YES
↓↑
MOVE
←
ADJUST
MENU
EXIT
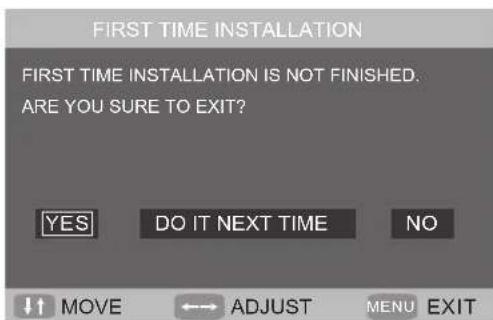
• After setting the items, select OK to finish the first time installation, or select Cancel to exit this menu.
- If you cancelled the first time installation, it will remind you whether to set the first time installation next time.
TV
002
PAL
DK
TV INFORMATION
Press DISPLAY button.
Show topics when you enter TV mode without scan program. You will see the TV information just as the picture in the right, which include the CHANNEL
COLOR SYSTEM and SOUND SYSTEM you have chosen in the MANUAL TUNING.
BASIC OPERATION
VIDEO MENU OPTIONS (picture)
- Press button on the front panel or LCD-MENU on the remote control to display the main menu.
- Press ◀/▶ button to select PICTURE in the main menu.
- Press ▼ / ▲ button to select the option that you want to adjust in the PICTURE menu.
- Press ◀/▶ button to adjust.
- When you are satisfied with your adjustment, press the LCD-MENU button to return to the previous menu.
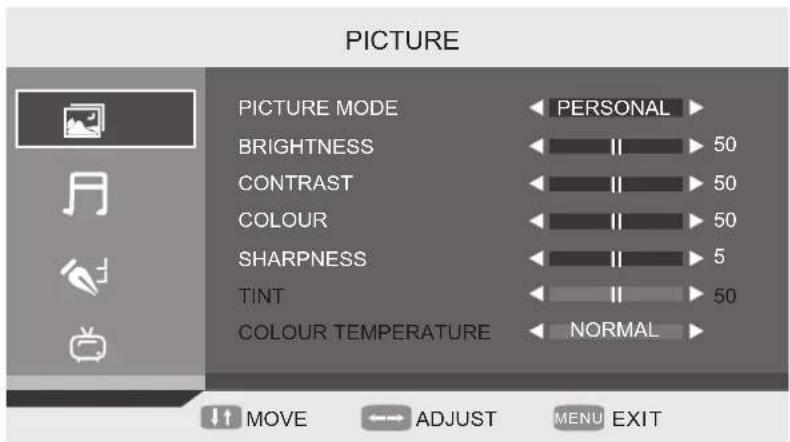
Picture Model
Select Picture Mode in PICTURE menu.
Available picture mode:
Personal: You can adjust the Brightness, Contrast, Colour, Sharpness to your own taste.
Standard: A normal use mode which usually used in a unchangeable light environment.
Movie: This mode is better used in a dark environment. The brightness is higher than other modes.
Mild: This mode is better used in a place which is bright, the brightness, colour and sharpness are lower than those of other modes.
Game:Usually used when you play games, the brightness is just lower than that of MOVIE mode.
- If you change the value of Contrast, Brightness, Colour, Tint, Sharpness or Colour temperature on the picture menu, the picture mode will be changed to "Personal" automatically.
EASY WAY: You may select the picture mode directly by pressing PMODE button repeatedly.
PICTURE
PERSONAL
BASIC OPERATION
Brightness
Press ▼ / ▲ button and then use ◀/▶ to adjust the brightness of the picture.
After adjust the value you want, press LCD-MENU button to return to the preview MENU.
Contrast
Press ▼ / ▲ button and then use ◀/▶ to adjust the contrast of the picture
Sharpness
Press ▼ / ▲ button and then use◀ / ▶ to adjust the sharpness of your TV. The suitable sharpness can make the picture look more clearer.
Colour
Press ▼ / ▲ button and then use ◀ / ▶ to adjust the colour saturation
NOTE: This option is invalid in PC mode, and it will be shown in gray.
Tint
Press ▼ / ▲ button and then use ◀/▶ to adjust the tone of colour when your system is in NTSC.
Color temperature
Press ▼ / ▲ button and then use ◀ / ▶ to adjust the . optimum colour temperature mode to suit your eyes for viewing . The picture looks more brighter when the COLOUR TEMPERATURE is higher.
AUDIO MENU OPTIONS (SOUND)
Press MENU button on the front panel or LCD-MENU on the remote control to display the main menu.
- Press the ◀ / ▶ button to select SOUND in the main menu.
- Press the ▼ / ▲ button to select the option that you want to adjust in the SOUND menu.
- Press the ◀ / ▶ button to adjust.
- When you are satisfied with your adjustment, press the LCD-MENU button to return to the previous menu.
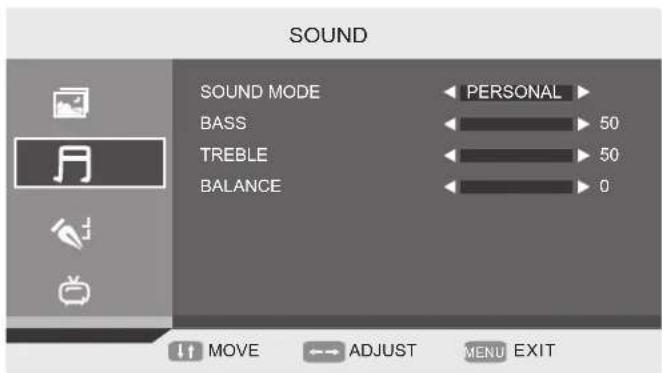
SOUND MODE
- Select Sound Mode in SOUND menu. (Available sound mode: Personal, MasterThe Music)
If you change the value of Bass and Treble on the Sound menu, the sound mode will be changed to "Personal"
automatically.
EASY WAY: You can press SMODE button repeatedly. on the remote control to select the Sound Mode directly.
SOUND
PERSONAL
BASS
Press ▼ / ▲ button and then use ◀ / ▶ to increase or decrease the level of the lower-pitched sounds.
TREBLE
Press ▼ / ▲ button and then use ◀ / ▶ to increase or decrease the level of the higher-pitched sounds.
BALANCE
Press ▼ / ▲ button and then use ◀ / ▶ to adjust the audio output between left and right speakers.
BASIC OPERATION
FUNCTION MENU OPTIONS
Press MENU button on the front panel or LCD-MENU on the remote control to display the main menu.
- Press the ◀ / ▶ button to select FUNCTION in the main menu.
- Press the ▼ / ▲ button to select your option what you want to adjust in the FUNCTION menu.
- Press the ◀ / ▶ button to adjust
- When you are satisfied with your adjustment, press the LCD-MENU button to return to the previous menu or press the EXIT button to exit the main menu.
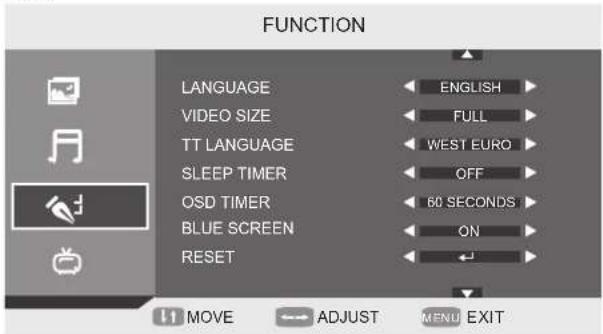
LANGUAGE
Use ◀/▶ to select the language in the language menu (available language: English, Italian, Espanol, Portuguese, French, German). It also can be selected in the First Time Installation.
VIDEO SIZE
This option allows you to select the screen display mode which best corresponds to your viewing requirements. Note: The available aspect mode may be different in different input signal.
TT LANGUAGE
Use ◀/▶ to select TT(Teletext) Language (Available TT Language: West Euro, East Euro, Russian, Arabic, Farsi, Greek, Cyrillic, Hebrew)
SLEEP TIMER
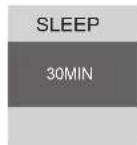
Select the sleep time to put automatically the TV in standby mode, for example, the TV will be in standby mode 30min after you set the SLEEP TIMER 30 min. Timer can be selected as 0min(off) to 120min.

OSD TIMER: You can select the time when the OSD display on the screen from 5Sec to 60 sec.
BLUE SCREEN: This option allows you to select the blue background on or off. If on, the screen background will turn blue at very weak or no signal condition
RESET : Press ENTER or ▶ button to reset the TV to the factory default.
CHILD LOCK: Press ENTER or ▶ button to set the child lock. You need to enter the PIN code. If the Child lock is set "on", and the default PIN code is empty, you can press ENTER button directly to enter.
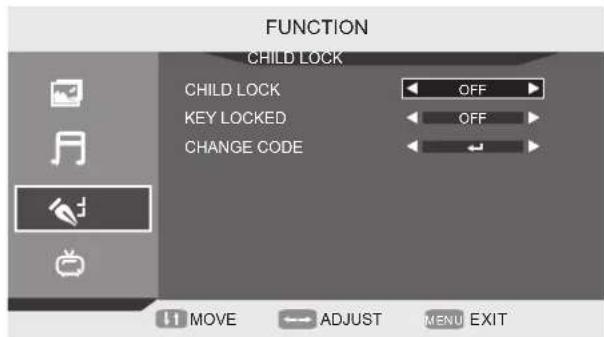
TIPS: Super user's (administrator's) password is 0000.
BASIC OPERATION
Child Lock: Press ENTER or ▶ button to set the child lock.
Key Lock: Press ENTER or ▶ button to set the key lock.
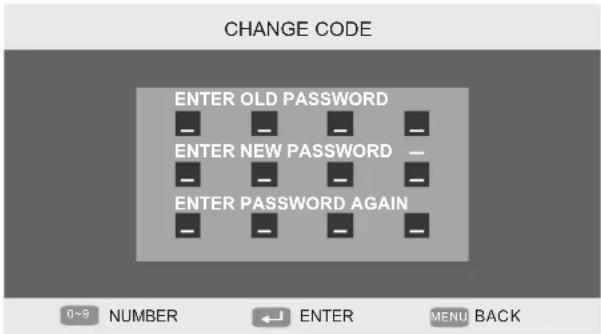
Change Code: Press ▶ button to enter Change Code menu.
Installation
Press ▶ button to open the first time installation menu, and the operation of this menu is in page 16.
Note: If you set the CHILD LOCK "ON", you can't enter the INSTALLATION(It's in gray).
ATV
Press MENU button on the front panel or LCD-MENU on the remote control to display the main menu.
-
Press the ◀ / ▶ button to select in the TV main menu.
-
Press the ▼ / ▲ button to select your option what you want to adjust in the TV menu.
-
Press the ◀ / ▶ button to adjust.
-
When you are satisfied with your adjustment, press the LCD-MENU button to return to the previous menu or press the EXIT button to exit the main menu.
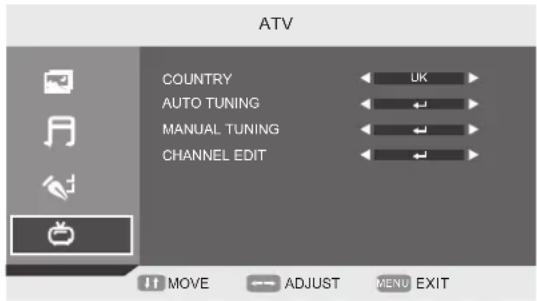
COUNTRY: This option allows you to select the country. (Spain, Pain, France, Italy, Germany, UK, Other)
AUTO TUNING: This option allows you to tune the channels that can be received automatically.
Note: Before you perform Auto Tuning, you must choose the country where you are by selecting COUNTRY option
- Press ENTER key to start. You can see the child lock if you set the child lock "ON" before, press enter password 0000 and choose "Yes", Press MENU to cancel and NO to back.
You can press LCD-MENU button to stop auto tuning and close the OSD menu .
MANUAL TUNING :
This option allows you to perform Manual Tuning. Press ◀ / ▶ to select the suitable option.
This option has two functions:
-
Set the frequency of channel for AFT option.
-
Press ▶ button for 3+ seconds and it will start auto tuning from this frequency.
Note: Before you perform Manual Tuning, you must choose the country where you are by selecting Country option in the FUNCTION menu.
ADVANCED FUNCTIONS
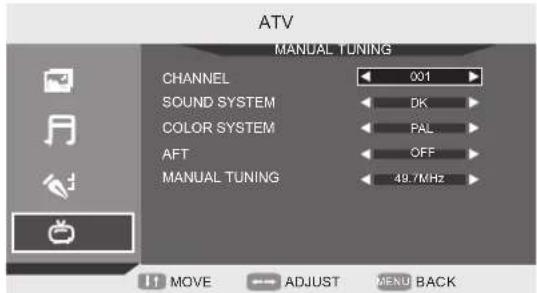
Press ▼ / ▲ to perform your selection, Press the password 0000 to enter the CHANNEL menu. the menu of Manual tuning will display on the screen.
Channel: Press ◀ / ▶ to select Manual tuning in TV menu.
Sound System: Press ◀ / ▶ to select a corresponding sound system, such as DK, I,L,BG.;
Colour System: Press ◀ / ▶ to select a corresponding colour system, such as Auto, PAL,
AFT (auto fine tune): Due to weak signals or a wrong antenna configuration, some of the channels may not be tuned to the best reception condition. AFT function allows you to fine tune channel selected (the frequency of channel is around the value in Manual Search option).
CHANNEL EDIT :
This function allows you to sort the TV programs according to your preferences, as following :
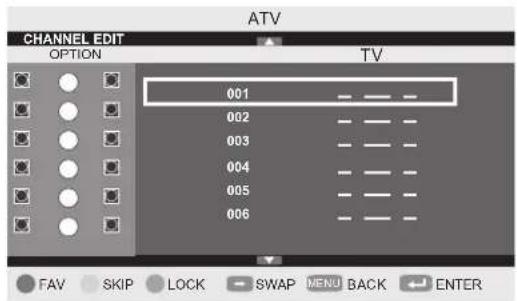
This option has four functions:
- Press Green button to set the current channel to your favorite channel. If the current channel already be one of your favorite channel, press Green button again will set it to a normal channel.
- Press blue button to set the current channel to lock. If the current channel already lock, press blue button again will unlock.
- Press yellow button to skip the current channel.
- Press ◀ / ▶ button to select the channel in the list .Press ENTER button to display as follows:
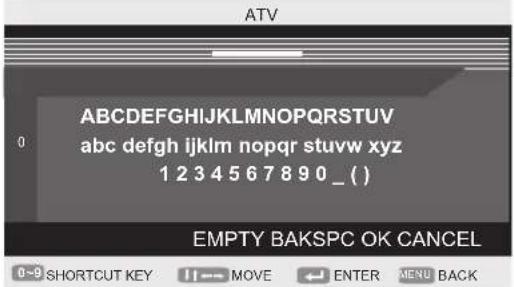
Press ▼ / ▲ button to select the location you would like to place the channel. Input channel name"____".
Press ◀ / ▶ button to select OK save and return back to the previous menu.
Press ENTER button to perform your selection.
ADVANCED FUNCTIONS
DTV
Press MENU button on the front panel or LCD-MENU on the remote control to display the main menu.
- Press ▼ / ▲ button to select DTV in the main menu.
- Press ▼ / ▲ button to select the option that you want to adjust in the DTV menu.
- Press ◀ / ▶ button to adjust.
- When you are satisfied with your adjustment, press the LCD-MENU button to return to the previous menu.
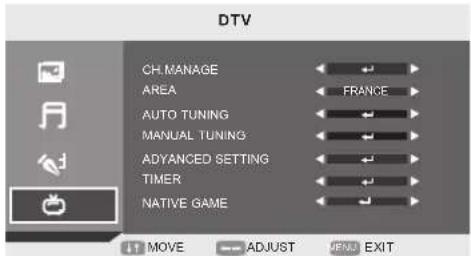
CH.MANAGE: Select the CH.MANAGE (Available options:
CH.ORGN\CH.SORT\CH.GROUP\DEL TV CH.\DEL RADIO CH)
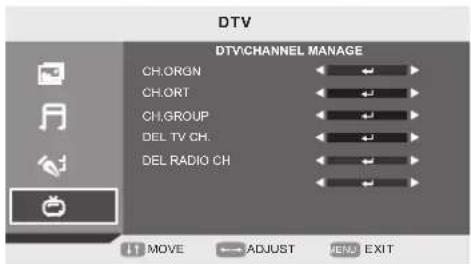
CH.ORGN : Press ▼ / ▲ button to select CH.ORGN and press OK button to come to the Channel Organizer Menu.
-
Press ▼ / ▲ button to select the option that you want to adjust.
-
Press RED button to label it as you favorite channel;
-
Press GREEN button to delete the chosen channel
-
Press YELLOW button to move it to the number you want to sign it and then press ▼ / ▲ button to select other channel, and press OK button to confirm it;
-
Press BLUE button to LOCK the chosen channel (You need to press password to watch the channel if you lock the channel)
-
Press ◀ / ▶ button to set the channel name
Press RED button to set the input out of number or Capital letters
Press YELLOW button to set the input out of Lowercase letters or Capital letters
Press BLUE button to the next position for your position.
Press YELLOW button to delete the input if you want to delete it.
- Press EXIT or LCD MENU button to out of the current page and back to the upper page.
CH.SORT:
Press ▼ / ▲ button to select CH.SORT and press OK button to come to the Channel Sorting menu.
-
Press ◀ / ▶ button to select the language of your First Option;
-
Press ▼ / ▲ button to select All/Free or Scramble as your Second Option;
-
Press ▼ / ▲ button to select All/A to Z or Z to A.
-
Press OK button to Confirm it.
-
Press RED button to the above page or GREEN button to the bottom page. The bottom page is the list of the channels you have set on the above page.
-
Press EXIT to come back to the previous menu.
CH.GROUP:
Press ▼ / ▲ button to select CH.GROUP and press OK button to come to The Channel Grouping Menu.
-
Press ▼ / ▲ button to select the channel you want to adjust and press the number(1\~8) which stand for the group(you can see it on the right).
-
Press EXIT or LCD MENU to back to the upper page.
DEL TV CH
Press ▼ / ▲ button to select DEL TV CH and press OK button to come to the a Dialog box to decide whether to delete or not. Press "NO" back to the previous page.
DEL RADIO CH
Press ▼ / ▲ button to select DEL RADIO CH and press OK button to come to a Dialog box to decide whether to delete or not. Press "NO" back to the previous page.
AREA: Press ◀ / ▶ button to select the suitable area. (UK, Span, France, Italy, Germany, Other)
AUTO TUNING: Press ENTER, then start channel search.
ADVANCED FUNCTIONS
MANUAL TUNING: Press ENTER to set the Manual Tuning, use ◀ / ▶ button to select the channel to start the manual search.
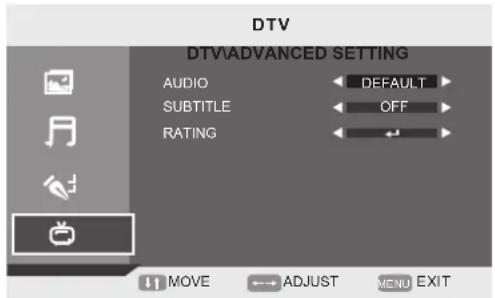
ADVANCED SETTING:
Press ENTER or ▶ button to enter the menu.
AUDIO: Press ◀ / ▶ button to select the audio language (Available options: English, Dutch, Finnish, Swedish, Greek, Russian, Welsh, Gaelic, Default)
SUBTITLE: Press ◀ / ▶ button to select the language of the subtitle (Available options: Off, English, French, German, Italian, Spanish, Danish, Czech).
RATING: Press enter password, you will see the System setup menu.- Press ▼ / ▲ button to select the Parental Rating.
TIMER
GMT Offset: Press ▶ button to come to right page, then press ▼ / ▲ button to select the time that you want to use .and press OK button to confirm it.
Summer Time : Press ◀ / ▶ button settle the Summer Time on or off. Press OK button to confirm it. NOTE: You can't select the Summer Time ON or OFF if you choose the GMT Offset "Auto".
NATIVE GAME: You can select the game what you want to play (Available games: BOX MAN, TETRIS, HITRAT) PC
SETUP menu of VGA input (for setting the PC picture position):
PICTURE: Picture menu is the same as that of TV mode expect the COLOUR, SBARPNESS and INT are invalid (in gray), and COLOUR TEMPERATURE is valid( Available options: WARM,COLD and NORMAL)
The Sound menu and FUNCTION menu are the same as those of TV mode.(video size, TT language are invalid in function and they are in gray).
PC MENU
Press MENU button on the front of panel or LCD-MENU on the remote control to display the main menu. Press ▼ / ▲ button to select the PC in the main menu, then press ▶ button to enter.
- Press ◀ / ▶ button to select DTV in the main menu.
- Press ▼ / ▲ button to select the option that you want to adjust in the DTV menu.
- Press ◀ / ▶ button to adjust
- When you are satisfied with your adjustment, press the LCD-MENU button
H Position: Press ▼ / ▲ button to select the H Position, you can adjust the horizon position of the picture by pressing ◀ / ▶ button.
V Position: Press ▼ / ▲ button to select the V Position, you can adjust the vertical position of the picture by pressing ◀ / ▶ button.
PHASE: Press ▼ / ▲ button to select the PHASE, Press ◀ / ▶ button to adjust the picture apply to the LCD(The picture will shake if the PHASE sets unsuitable)
CLOCK: Press ▼ / ▲ button to select the CLOCK, Press ◀ / ▶ button to adjust the signal's transfer speed to make the picture looks well. AUTO SYNC Press ▼ / ▲ button to select the
AUTO SYNC: Press ENTER button to adjust. This option can set the above setting well automatically.
HDMI/YPBPR:
SETUP menu of HDMI input (for setting the HDMI picture position):
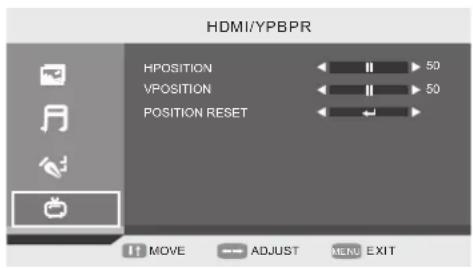
PICTURE MENU、SOUND MENU and FUNCTION MENU are the same as those of TV mode.
ADVANCED FUNCTIONS
AV/S-VIDEO/ SCART /DVD :
PICTURE MENU、SOUND MENU and FUNCTION MENU are the same as those of TV mode.
MEDIA
Press INPUT button and ▼ / ▲ button to select the MEDIA in the Source menu.
- Press ◀ / ▶ button to select MEDIA in the main menu.
- Press ▼ / ▲ button to select the option that you want to adjust in the MEDIA menu.
- Press ◀ / ▶ button to adjust.
Note: You need switch the channels to out of the MEDIA MENU.
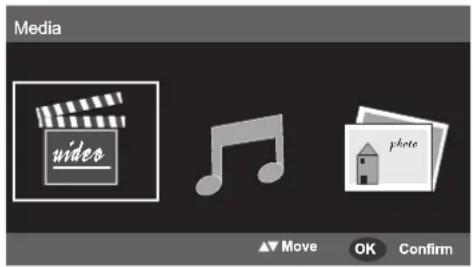
Movie
Press ◀ / ▶ button to select Video and press OK button to enter in. Select the option you want to play.
Press Exit to back to the previous page.
Music
Press ◀ / ▶ button to select Music and press OK button to enter in. Select the option you want to play .
Press Exit to back to the previous page
Photo
Press ◀ / ▶ button to select Photo and press OK button to enter in. Select the option you want to play.
Press Exit to back to the previous page.
RECORDER
- Press the Record button ☐ on your remote control to enter the RECORD MENU.
Note: You should Insert the mobile hard disk or USB before you start to record.
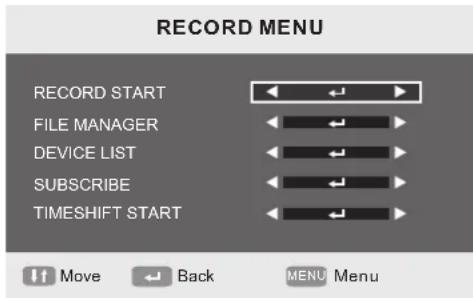
RECORD START:
Press ENTER button to start record the current playing program. There will be a photo on the left.

- If you want to stop RECORDING, press stop button on you remote control. Then you'll see the picture below to decide whether to stop.
FILE MANAGER
Delete one file by pressing GREEN button;
Delete all files by pressing YELLOW button;
Press BLUE button to zoom the picture or out of ZOOM.
- Press OK button to enter the FILE MANAGE.
DEVICE LIST
Press enter button to see the Device List to see what devices on your TV. press EXIT to back to the previous menu.
SUBSCRIBE
Press enter button to set the Wakeup Timer.
- You can sort the channels you want to record by setting Timer No.
- Choose the Timer Mode as Off, Once, Daily, Weekly.
3.Choose the Wakeup Date ,Time and how long you want to record by setting Duration. - Press Exit to back to the previous page.
24
ADVANCED FUNCTIONS
TIMESIFT START
Press enter button to choose TIMESHIFT or not. It's used when you out or want to watch the game again. You can continue to watch the game from where you missed.
There will be a Prompt box on the left when you start to time shift. Press STOP button to stop timeshift.
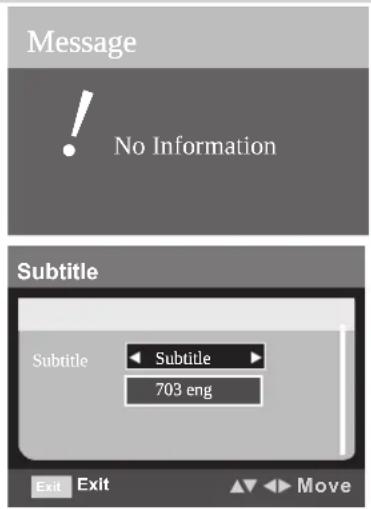
Subtitle
Press SUBTITLE button on your remote control to enter the Subtitle Menu. If this channel has no subtitle, you'll see the picture
Else you'll see this picture
Press ◀ / ▶ button to choose Off, subtitle.
Press ▼ / ▲ button to choose type of subtitle.
Press OK button to confirm it.
EPG
- Press EPG button on your remote control to enter the Daily Mode.
- Press Red button to enter the Daily Mode.
Press Green button to enter the Weekly Mode.
- Press ◀ / ▶ button to switch program with channel
- Press ▼ / ▲ button to choose channel and program.
- Press Yellow button in program list to enter the Extended Mode.
- Press Blue button in program list to set wakeup timer.
Favourite LIST
Press ▼ / ▲ button to choose the channel. Press OK button to play what you choose. Press FAV button on your remote control to enter the Favourite List.
Multiaudio
Press LANG button on your remote control to enter the Multiaudio.
Press ◀ / ▶ button to choose Left, Right, Stereo. Press ▼ / ▲ button to adjust. Press OK button to confirm it.
QUICK SELECT
Press OK button on your remote control to enter the Quick Select. Press ◀ / ▶ button to choose group, then the channels in the group will show in the center. Press ▼ / ▲ button to choose channel. Press OK button to play what you choose.
Teletext
Press TEXT button on your remote control to enter the Teletext. Press OK button to confirm it.
PREPARE TO TIEMSHIFT
INITAL SETTINGS(DVD)
COMMON PROCEDURES OF INITIAL SETTINGS
Press SETUP button to get the setup menu. Use direction buttons " " to select the preferred item. After finishing settings press SETUP again to TV display.
The following menu items can be changed:
GENERAL: Selects the GENERAL SETUP PAGE menu.
AUDIO : Selects the AUDIO SETUP PAGE menu.
DOLBY : Selects the DOLBY DIGITAL SETUP PAGE menu.
PREFERENCE: Selects the PREFERENCE SETUP PAGE menu.
PASSWORD: Selects the PASSWORD SETUP PAGE menu.
GENERAL SETUP PAGE
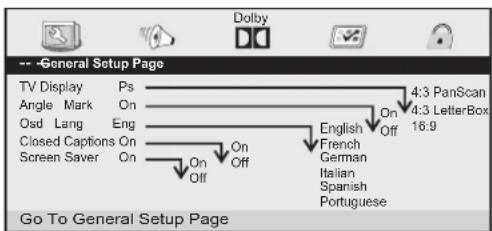
The following menu items can be changed:
TV DISPLAY: Selects the aspect ratio of the playback picture.
4:3 PanScan: Pan & Scan display.
4:3 LetterBox: LetterBox display.
16:9: widescreen display.
ANGLE MARK: Viewing angles change option (if available).
CLOSED CAPTIONS: Closed captions are data that are hidden in the video signal of some discs. Before you select this function, please ensure that the disc contains closed captions information and your TV set also has this function.
SCREEN SAVER: This is to turn on/off screen saver.
AUDIO SETUP PAGE
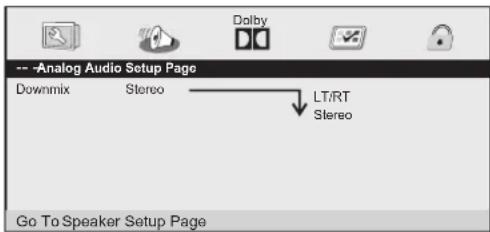
This page is for setup speaker output.
DOWNMIX Stereo
LT/RT: 2ch output, main channel with surround. STEREO: 2ch output, main right channel with right surround; main left channel with left surround.
DOLBY DIGITALSETUP PAGE
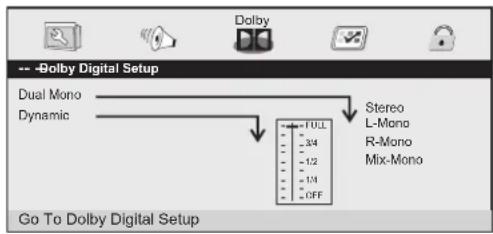
The following menu items can be changed:
DUAL MONO: Reproduction mode, used only when the input consists of two independent audio channels(1/1 mode). Possible selections are: STEREO: Reproduce both channels as is. L-MONO: Reproduce the left channel only. R-MONO: Reproduce the right channel only. The default is STEREO.
DYNAMIC: Dynamic range compression.
flowchart
graph TD
    A["Audio"] --> B["English"]
    C["Subtitle"] --> D["English"]
    E["Disc Menu"] --> F["English"]
    G["Parental Default"] --> H["Reset"]
    I["1 Kid 2 G 3 Pg 4 Pg 13 5 Pgr 6 R 7 Nc17 8 Adult"] --> J["English French Spanish Chinese Japanese Korean Russian"]
    K["English French Spanish Chinese Japanese Korean Russian"] --> L["English French Spanish Chinese Japanese Korean Russian"]
The following menu items can be changed:
AUDIO: Selects a language for audio(if available).
SUBTITLE: Selects a language for subtitles(if available).
DISC MENU: Selects a language for DISC menus (if available).
PARENTAL[DVD only]: This is to disable the playing of specified DVDs which are unsuitable for children. Some DVDs are encoded with specific rating level. If the rating level of the disc is higher than that preset in the setup operation, playback of the disc will be prohibited. After selecting one of the PARENTAL items the screen will change to the PASSWORD page, and password is required, The factory initial setting is 1369.
DEFAULT: Back to the factory setting.
PASSWORD SETUP PAGE
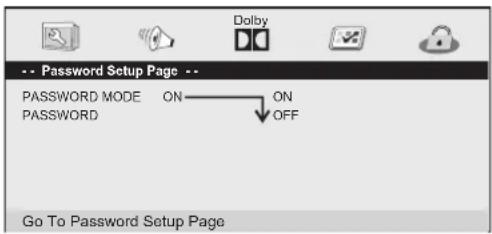
PASSWORD MODE: Set password mode on/off. If set to off, change parental level will not check password. PASSWORD: Select the menu password change page.
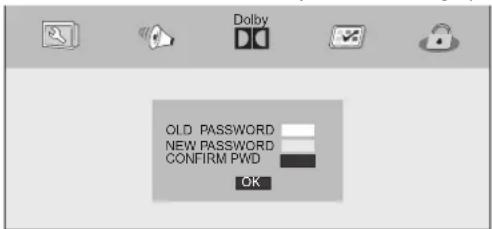
OLD PASSWORD: Enter the OLD password, (Factory setting is 1369), and the cursor will jump automatically to NEW PASSWORD
NEW PASSWORD: Enter the NEW password. Enter 4 digits from the remote control unit numeric buttons, and the cursor will automatically jump to CONFIRM PASSWORD.
CONFIRM PASSWORD: Confirm the NEW password by entering it again. If the confirmation is incorrect, the cursor will stay in this column. After entering, the correct new password again, the cursor will jump automatically to OK.
OK: When cursor is on this button, press ENTER key to confirm setting.
Note: If the password has been changed, the parental and disc lock code will also be changed.
The default password(1369)is always active even the password has been changed.
Troubleshooting Tips
Before calling for service, you can check the following items on symptoms and solutions.
No picture:
Check other channel, maybe station problem.
Adjust the tuning control.
Ensure that the input setting is at TV state.
Ensure that the LCD is on.
Ensure that the equipment is connected properly.
No sound and distorted sound:
Ensure that the input settings for the TV and sound are proper.
Adjust the tuning control.
Probably local interference, such as an appliance.
Re-orient aerial(if indoor type).
Ensure that the equipment is connected properly.
No remote Control:
Check the battery are installed with the correct polarity.
Point the remote control unit at the remote control sensor and operate.
Remove the obstacles between the remote control and the remote control sensor.
Operate the remote control unit at a distance of not more than 8 meters from the remote control sensor.
NO SIGNAL displayed (PC mode)
Check if the wire is connected correctly.
Ensure the computer or other equipments are at power on mode.
Ensure the TV input setting is at pc mode.
INVALID FORMAT displayed (PC mode)
Check if the input setting is compatible to the monitor specification.
Led lamp indicator on but no picture
Check the monitor setting :contrast ,brightness.
Check if the wire is connected correctly.
Some unusual spots on screen:
Some dot defects may appear on the screen, like red, green or blue, Spots, However, this will have no impact or effect on the monitor performance.
Lost password:
On the password screen, enter the following master password: 4886
You may use the master password to set a new password as desired.
Please remember your password and keep it carefully.


- Installation
- CAUTION
- Important Safety Instruction
- WARNING
- Warnings And Cautions
- Functional Parts( TV )
- NOTE
- Notes:
- Rear View Of TV Set
- NOTE:
- Connecting External Equipment
- Operation-Remote Control
- Insert Batteries into the Remote Control
- Precaution on battery use
- Using the Remote Control
- Cautions regarding use of remote control:
- 1.STANDBY
- AUTO Button
- 3.MUTE:
- 4.0-9 number buttons
- 5.-/--
- 6.RETURN:
- 7.ASPECT:
- 8.NICAM:
- 9.DISPLAY:
- 10.LCD MENU:
- 11.0K
- 12.SOURCE:
- 13.PMODE:
- 14.SMODE:
- 15.SLEEP:
- 16.FAV:
- 17.FAV-. FAV+
- 18.EPG:
- 19.TEXT:
- 20.HOLD:
- 21.LANG:
- 22.SUBTITLE:
- 23.INDEX
- 24.SIZE
- 25.REVEAL:
- 26.SUBPAGE
- 27.MEDIA
- 29.TV/Radio Button
- Operation-Remote Control(DVD and USB)
- DVD SETUP Button
- 6.SUBTITLE
- 19.PROG Button
- 20.REPEAT Button
- 21.A-B
- BASIC OPERATION
- ATV
- SOURCE
- First Time Installation
- Country
- Language
- Delete Program
- Search Program
- TV INFORMATION
- VIDEO MENU OPTIONS (picture)
- Picture Model
- Brightness
- AUDIO MENU OPTIONS (SOUND)
- SOUND MODE
- BASS
- TREBLE
- BALANCE
- FUNCTION MENU OPTIONS
- MANUAL TUNING :
- ADVANCED FUNCTIONS
- CHANNEL EDIT :
- DTV
- CH.SORT:
- DEL TV CH
- DEL RADIO CH
- ADVANCED SETTING:
- TIMER
- PC MENU
- HDMI/YPBPR:
- AV/S-VIDEO/ SCART /DVD :
- MEDIA
- Movie
- Music
- Photo
- RECORDER
- RECORD START:
- FILE MANAGER
- DEVICE LIST
- SUBSCRIBE
- 24
- TIMESIFT START
- Subtitle
- EPG
- Favourite LIST
- Multiaudio
- QUICK SELECT
- Teletext
- INITAL SETTINGS(DVD)
- COMMON PROCEDURES OF INITIAL SETTINGS
- DOWNMIX Stereo
- Troubleshooting Tips
- No picture:
- No sound and distorted sound:
- No remote Control:
- NO SIGNAL displayed (PC mode)
- INVALID FORMAT displayed (PC mode)
- Led lamp indicator on but no picture
- Some unusual spots on screen:
- Lost password:
Brand : Trevi
Model : DVBX 2716 CI
Category : TV