
WA 5710 - Washing machine BOMANN - Free user manual and instructions
Find the device manual for free WA 5710 BOMANN in PDF.


| Brand | Bomann |
| Model | WA 5710 |
| Product Type | Freestanding front-loading washing machine |
| Rated Capacity | 6 kg |
| Maximum Spin Speed | 1000 rpm |
| Energy Efficiency Class | A+ |
| Washing Efficiency Class | A |
| Spinning Efficiency Class | C |
| Dimensions (H x W x D) | 84.5 x 59.5 x 53.0 cm |
| Net Weight | 64.0 kg |
| Gross Weight | 68.0 kg |
| Connection Voltage | 220-240 V / 50 Hz |
| Connection Power | 2100 W |
| Fuse Protection | 10 A |
| Water Pressure Range | 0.02 - 0.8 MPa |
| Noise Level (Wash / Spin) | 60 / 73 dBA |
| Annual Energy Consumption | 180 kWh |
| Annual Water Consumption | 9460 liters |
| Number of Washing Programs | 8 (Intensive, Cotton, Quick Wash, Synthetic, Wool, Delicate, Sterilization, Spin) |
| Temperature Settings | Cold, 20°C, 40°C, 60°C, 90°C (depending on program) |
| Control Type | Rotary knob + push buttons (Power, Temperature, Start/Pause) |
| Door Lock | Automatic lock during operation; unlocks ~2 minutes after end or power off (if temperature and water level safe) |
| Transit Bolts | Must be removed before use (4 bolts, keep for future transport) |
| Drain Pump Filter | Cleanable; located behind lower cover |
| Water Inlet Filter | Cleanable; located at water inlet valve |
| Detergent Drawer | Removable for cleaning |
| Drum Cleaning | Use Sterilization program (90°C) every 3 months |
| Safety Features | Earthing required; child lock; overheat protection; unbalanced load detection |
| Spare Parts Availability | Inlet valve, door lock, drain pump filter, heating tube, temperature sensor (contact service center) |
| Repairability | Only qualified specialists should perform repairs; user can clean filters and drain pump |
Frequently Asked Questions - WA 5710 BOMANN
User questions about WA 5710 BOMANN
0 question about this device. Answer the ones you know or ask your own.
Ask a new question about this device
Download the instructions for your Washing machine in PDF format for free! Find your manual WA 5710 - BOMANN and take your electronic device back in hand. On this page are published all the documents necessary for the use of your device. WA 5710 by BOMANN.
USER MANUAL WA 5710 BOMANN
natural_image
Line drawing of a front-loading washing machine with control panel and side vent (no text or symbols)Please read this manual carefully and keep for future reference!
TABLE OF CONTENT
| OVERVIEW | 2 |
| IMPORTANT USE AND SAFETY INSTRUCTIONS | 2 |
| DISPOSAL OF USED DEVICES | 4 |
| PRODUT DESCRIPTION | 5 |
| Delivery scope 5 | |
| Specifications 5 | |
| INSTALLATION | 6 |
| Remove the Transit Bolts 6 | |
| Location 6 | |
| Water Connection 7 | |
| Power Connection 8 | |
| STARTUP / OPERATION | 8 |
| Prior to First Use 8 | |
| Control Panel 10 | |
| Table of Washing Cycles 11 | |
| Start up the Washing Machine 12 | |
| End of Washing 13 | |
| TIPS FOR SAVING ENERGY | 13 |
| MAINTENANCE AND CLEANING | 13 |
| Cleaning and care | 13 |
| Repairs | 14 |
OVERVIEW
Thank you for choosing this device. This user manual contains important information for installation, operation and maintenance. Please read all instructions carefully, so that you can make use of all functions and the device is kept in good order. The warranty does not cover defects due to overstraining, improper use or maintenance.
Please keep all documents in a safe place for future reference. If you have any doubt, please contact your distributor or the nearest authorized specialist.
IMPORTANT USE AND SAFETY INSTRUCTIONS
All safety information in this user manual are marked with a warning symbol. They indicate possible dangers precociously. It is imperative to read and follow this information.
Prevent Electric Shocks
- Disassembly, reparation or modification cannot be carried out by people other than professional maintenance staffs.
- The household electrical supply system (the current, the voltage, the cable) such as a fuse with suitable specifications should be provided and should meet requirements of the device.
- The power plug must be connected to a three-core socket with an earth wire and is grounded properly and reliably.
- If the supply cord is damaged, it must be replaced by an authorized specialist or similarly qualified persons in order to avoid a hazard.
- Do not disconnect the power plug by pulling the supply cord. Hold the power plug with your hand.
- Do not use the supply cord when connection of the power plug and the supply cord is loose.
- Do not touch the power plug with wet hands. Wipe dust or water drops over the power plug off with dry cloth in advance.
- Do not over-bend the supply cord or put it under heavy weight.
- Do not use the supply cord / socket / power plug if it is damaged or broken.
Possible Explosions
- Do not put combustible liquid such as gasoline, petrol and alcohol into the appliance or nearby.
Do not put clothes with that liquid into the appliance. - Do not use flammable cleaning agents or chemicals such as those used for chemical cleanings.
- Do not connect / disconnect the power plug when leakage of gas or other combustible gas occurs.
Fire Danger / Short Circuit or Electric Leakage may occur
- Do not install the appliance close to fire sources or heat sources.
- Do not rest any burning candles or cigarettes on the appliance.
- Do not install the appliances in places with high dampness or extreme wetness, lest igniting damages or other accident occur easily due to gathered water drops on electrical components.
- Do not install the device in places under direct sunshine, lest the plastic components and rubber components become aged.
- Do not use water shooting at the appliance when cleaning it.
Danger of Injury
- This machine is not intended for use by persons (including children) with reduced physical, sensory or mental capabilities, or lack of experience and knowledge, unless they have been given supervision and/or instruction concerning use of the machine by a person responsible for their safety.
- Packing materials may be dangerous to the children. Please keep all packing materials (plastic bags, foams etc) far away from the children.
- Children and pets must be supervised to ensure that they are not playing with the appliance. They can climb into the washing machine. Check the appliance before use.
- Please check whether the water inside the drum has been drained before opening its door. Please do not open the door if there is any water visible.
- Glass door may be very hot during the operation. Keep kids and pets far away from the machine during the operation.
- The drain pipe will be very hot under high temperatures during washing, resulting in a spin cycle. Be careful and do not burn your hands.
WARNING
- This appliance can be used by children aged from 8 years and above if they have been given supervision or instruction concerning the safe use of the appliance understands the hazards involved.
- Cleaning and maintenance by the user shall not be made by children unless they are older 8 years and supervised.
- Keep the appliance and its cord out of reach of children less than 8 years.
- Children shall not play with the appliance.
- Appliances can be used by persons with reduced physical, sensory or mental capabilities or lack of experience and knowledge if they have been given supervision or instruction concerning use of the appliance in a safe way and if they understand the hazards involved.
- If washing is done at high temperatures, keep in mind that the glass door could become very hot, so keep children away from touching it.
General instructions / Intended use
- This device is intended for private use. The manufacturer is not reliable for any damage resulting from improper or other then intended use.
- For safety reasons, alterations or modifications of the device are prohibited. Use the device only for its intended function.
- Any electrical and water connection work required to install this appliance should be carried out by a qualified electrician or competent person.
- The appliance is to be connected to the water mains using new hose sets and that old hose-sets should not be reused.
- This washing machine is for indoor use only.
- Do not climb onto the device or rest heavy objects / heating devices or items with water or liquid leakage on it, lest deformation of the surface and the plastic component occur.
- Before operating this machine, transport bolts must be removed from the backside of this machine. Otherwise the washing machine may be seriously damaged while washing (see selection ‘Remove the Transit Bolts’).
- After having installed the appliance, check that it is not pressing or standing on its electrical supply cable or water hose.
- Before washing the first time, the washing machine shall be operated in one round of the whole procedures without the clothes inside (see section ‘Prior to First Use’).
- Do not overload the appliance (see section 'Table of Washing Cycles').
-
Any objects such as coins, safety pins, nails, screws. Stones or any other hard, sharp material can cause extensive damage and must not be placed into the machine.
-
Inflammable and explosive or toxic solvents are forbidden. Do not use detergents containing gasoline or alcohol. Only use detergents for washing machines.
- Do not wash any waterproof items such as raincoats, car sun protection cloth and sleeping bags.
- We do not recommend washing carpets.
- The drain pump filter has to be cleaned frequently.
- After each use unplug the power cord and turn off the water supply after each use.
Unpacking
Check the device for any possible transport damage. Do not install a damaged device. In case of damage, please contact your distributor.
DISPOSAL OF USED DEVICES
This product is marked in accordance with the European waste regulation
2002 / 96 / EC - WEEE
It regulates the proper disposal of the product. Environmentally friendly disposal will prevent possible negative consequences to health caused by improper disposal.
This symbol on the product or its packaging indicates that this product must not be dis-
posed of with the regular household waste. The user has to return the product to a collection point for the recycling of electric and electronic equipment.
The disposal must comply with the local regulations in place.
For further information please contact your local authorities or waste collection service.
Disable Waste Equipment before Disposal:
- Disconnect the mains plug from the wall socket.
- Disconnect the plug from the mains cable.
- Remove or disable any existing spring or latch locks.
This will prevent children from locking themselves (risk of suffocation!) or from getting into perilous situations. Children might not understand the risks that arise from handling household devices. Therefore, observe children and make sure they do not play with the device.
Environmental Protection
- Do not use excessive detergents.
- Decontaminant and bleacher can be used to pre-treat the stains on the clothes only when very necessary.
Packaging Material
The packaging for transportation of the device and individual parts is produced of recyclable materials.
- corrugated cardboard / paperboard (mainly of waste paper)
- form part of PS (foamed, CFC-free polystyrene)
- Films and bags of PE (polyethylene)
- Strapping strips of PP (polypropylene)

IMPORTANT
Make sure you dispose of packaging materials environmentally friendly.
PRODUCT DESCRIPTION
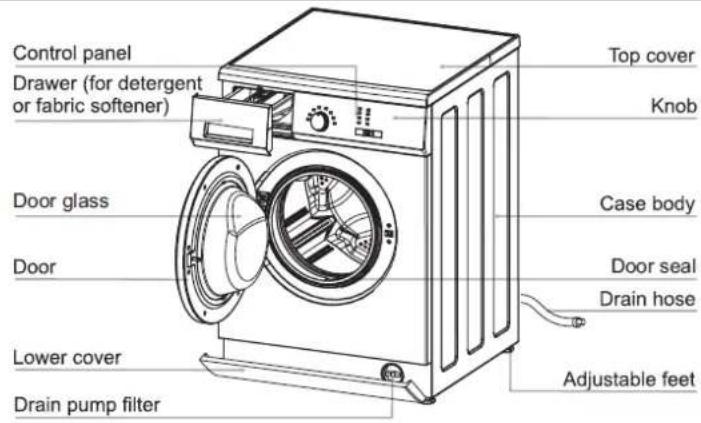
IMPORTANT: Unscrew the drain pump filter to let water run out when the machine is not used for a long time.
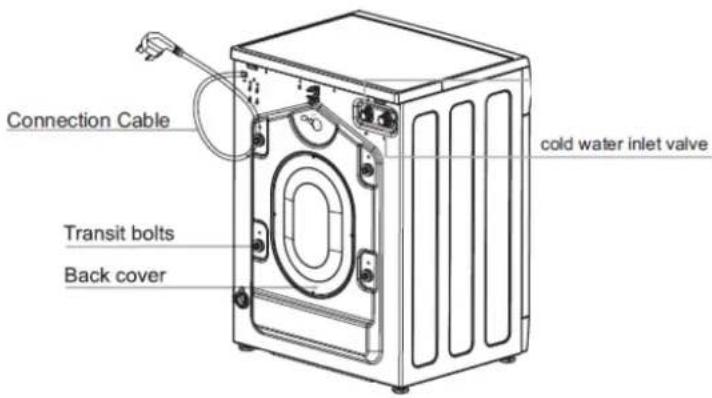
NOTE: The drawings in the manual are only used for instruction. It may be vary from the model you buy.
Delivery Scope
| Accessoires Name Qyt. Accessoires Name Qty. | ||||||
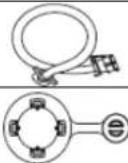 | Water inlet hose 1 | 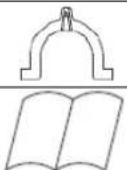 | Hose holder 1 | |||
| Transit bolts caps 4 | User manual 1 | |||||
Specifications
| Model | WA 5710 |
| Type Freestanding, Front-loading Washing Machine | |
| Spin speed 1000 rpm | |
| Capacity 6 kg | |
| Energy Efficiency Class ^1) – Washing Efficiency Class – Spinning Efficiency Class | A+ – A – C |
| Estimated annual consumption ^2) 9.460 l / 180 kWh | |
| Noise level washing / spinning 60 / 73 dBA | |
| Connection voltage | 220-240 V / 50 Hz |
| Connection power | 2.100 W |
| Fuse protection | 10 A |
| Water pressure | 0.02 MPa – 0.8 MPa |
| Power consumption of off-mode | 0.1 W |
| Power consumption of left-on mode | 0.3 W |
| Unit sizes (HxWxD) | 84.5 x 59.5 x 53.0 cm |
| Gross / net -weight | 68.0 / 64.0 kg |
Energy-test program in accordance with EU 1061/2010; Annex II:
Cotton 60°C/40°C, Standard Cotton. With complete filling and partial filling these standard washing cycles are for the data determination on the energy label. These programs are suitable for washing normal soiled laundry and on the combined energy and water consumption at the most efficient.
^1) The energy efficiency class is specified according to EU 1061/2010, Annex VI point 1.
^2) The weighted annual energy consumption in kWh/year and water consumption in l/year was calculated on the basis of 220 standard washing cycles according to the EU 1061/2010, Annex II.
MANUFACTURER DATA: Product is subject to changes and improvements.
INSTALLATION
Remove the transport bolts
Before using this washing machine, the transport bolts must be removed from the backside of the machine. Loosen all bolts with spanner and then remove them and keep the transport bolts properly for future use/transport. Plug the holes with the transit bolts caps supplied.
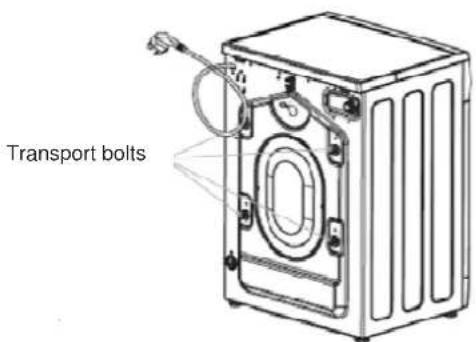
WARNING: Should the bolts aren't removed; there could be serious damages during operation.
NOTE: Keep the transit bolts for future transportation. Whenever the machine is transported, the transit bolts must be refitted.
Installation – place requirements -
- The device must be installed in a clean place, where dirty does not build up.
- A concrete floor is the most suitable installation surface for a washing machine, being far less prone to vibration during the spin cycle than wooden floorboards or a carpeted surface.
- The machine must be level and securely positioned.
- Do not expose the device to direct sunlight.
- Do not place near heaters, next to a stove or any other heat sources.
- Avoid installation at locations with high humidity (e.g. outdoors), as metal parts would be susceptible to corrosion under such circumstances.
- Do not install in rooms where the temperature could drop below freezing. Do not expose the device any weather.
- Do not place the device near volatile or combustible materials (e.g. gas, fuel, alcohol, paint, etc.).
- Only place on a steady and safe surface in order to reduce vibration and noise to a minimum.
- If the ground is evidently uneven (the maximum allowed tilt angle is 2^ ), it must be balanced; otherwise the unit is wrong, vibrates or moves.

natural_image
Three identical diagrams showing a container with a cross mark, placed on a surface with no text or symbols.- If the floor is uneven, adjust the adjustable feet.
- Good ventilation around the unit is required so the heat can be derived correctly. The distance between the machine and wall must be more than 10 cm.
- The mains plug must be freely accessible.
Feet Adjustment (level adjustment)
Take care to a firm and horizontal position of the washing machine. If the machine moves, adjusts the feet.
Loosen the locknuts with a spanner.
Adjust the feet:
The machine must stand perfectly level on all four feet to ensure safe and proper operation.
Incorrect installation may increase electricity and water consumption and may cause the machine to move about.
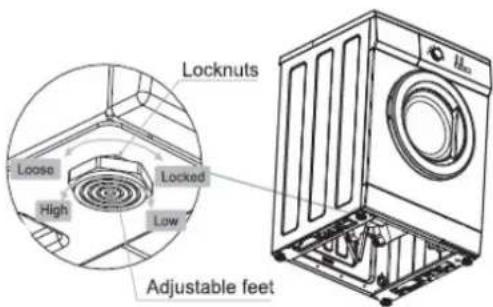
To do these when the machine is not level:
- Using the spanner, turn it locknut in a clockwise direction. Then turn locknuts together with adjust feet to unscrew.
- Use a spirit level to check the machine is standing level.
Hold adjusts feet securely with a pipe wrench. Turn locknut again using the spanner until it sits firmly up against the housing.
NOTE:
- The locknuts must be tightened after adjustment. Any looseness can cause vibration and noise.
- The feet must never be removed. Do not restrict the floor clearance through deep pile carpets, strips of wood or similar. This might cause heat build-up which would interfere with the operation of the appliance.
Water Connection
Install the Water Drain Hose
There are two ways to place the end of drain hose:
-
- Hang into a sink or trough.
-
- Connect it to the branch drain pipe of the trough.
-
If the outlet spigot has not been used before, remove any blanking plug that may be in place. Push the drain hose onto the spigot and secure with a clip if required, ensure a loop is formed in the drain hose to prevent waste from the sink entering the washing machine.
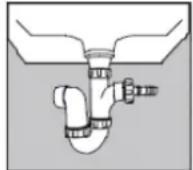
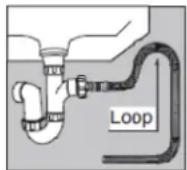
If you need a drain hose extension, make sure to use a similar drain hose, but it must be no longer than 4 meters; otherwise the washing effect could be reduced.
- It can drain the water up and down, the drain hose shall be installed at a height of min. 60 cm and max. 90 cm about the ground and its end shall not be immersed in water. Please use the supplied hose holder for flexible hoses to get a proper angle and secure it well to avoid a change in position.
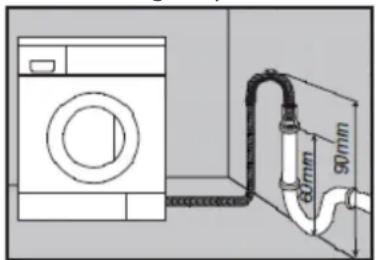
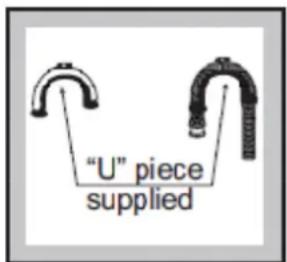
⚠ WARNING: Do not pinch the drain hose and do not place heavy objects on it: an uncontrolled water flow can cause the machine to stop working.
Install the Water Inlet Hose (Cold Water)
Use the new included inlet hose to connect the machine at the water supply (cold water). Old hose-sets should not be reused. Installation should comply with local water authority and building regulation requirements.
| Min. inlet water pressure 0.02 | MPa |
| Max. inlet water pressure 0.8 | MPa |
- Connect the water supply hose to the tap with a 3/4"thread and tighten it firmly to the right.
- Connect the other end of the inlet hose to the inlet valve on the back of the device and tighten it firmly to the right too.
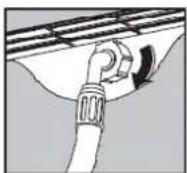
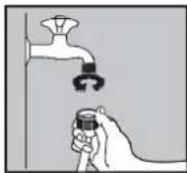

NOTE: If a leak develops remove the inlet hose and reconnect. Connect to a standard water tap.
Power Connection

WARNING: for your personal safety:
- Before setting up the washing machine, check it for any external visible damage. Don not install or use a damaged washing machine.
- Do not use an extension cord or an adapter plug with this appliance.
- Do not, under any circumstances, cut or remove the earth connection from the power cord.
Electrical Requirements
Please look at the rating label to know the rating voltage and connect the appliance to the appropriate power supply. The voltage is 220-240V. Use the required fuse is max. 10 amp.
Electrical Connection
Ensure the voltage and frequency of the power being corresponds to those on the rating plate.
Only insert the plug into an electrical socket which is earthed properly! If the electrical socket to which the appliance must be connected is not appropriate for the plug, let replace the socket by a specialist, rather than using an adaptors or the like as they could cause overheating and burns.
Grounding Instructions
This appliance must be earthed. In the event of a malfunction or breakdown, earthing will reduce the risk of electric shock by providing a path of least resistance for the electric current. This appliance is equipped with a cord having an equipment-earthing conductor and an earthing plug. The plug must be plugged into an appropriate outlet that is installed and earthed in accordance with all local standards and requirements.

WARNING:
- Improper connection of the equipment earthing conductor can result in the risk of an electric shock.
- Check with a qualified electrician if you are in doubt whether the appliance is properly earthed.
- Do not modify the plug provided with the appliance. If the plug does not fit properly to the outlet, please have a qualified electrician to install a proper outlet.
- If power cord is damaged or has any sign of being broken, special power cord must be selected or purchased from its manufacturer or service for replacement.
- Protect the mains cable. Ensure that it does not turn into a trip hazard. The wall outlet must be freely accessible at all times.
- Do not overload the wall outlet; do not use an extension cable. Overloaded cables can cause fire and electric shock.
- Do not touch the plug with wet hands.
STARTUP / OPERATION
Prior to First Use
- Make sure the power voltage at your place is same to the rating label at the device.
- Remove the accessories and any material from the drum.
- Clean the drum (see 'Cleaning and Care')
- Before using your washing machine for the first time let it run one washing cycle without laundry:
- Connect the power and turn on the tap.
- Fill a little detergent into the drawer and close it.
- Press the 'Power' (4) button, and then turn the knob to programme position 'Intensive'.
- Press the 'Start/Pause ▷' button.
It can remove the water which is left in the tube because of manufacturer's checking out.
Preparation of Clothes
- Check the pockets of the clothes to be washed, empty the rigid items such as decorations and coins, otherwise washing machine may be damaged or have abnormal troubles.
- Sort your laundry before placing it in the washing machine.
- Consider the symbols in the washing instructions on care label. Clothes are differentiated in cotton, blended fabric, synthetics, silk, wool and synthetic fibers.
- Separate in white and colored laundry. Wash all new clothing separately.
- Wash clothes of similar size together for better economy.
- Wash delicate clothes separately. New wool fabrics, curtains and silk must be treated like delicates. Observe the washing instructions in all clothes.
- Remove hooks from curtains.
- Decorations on clothes can damage your washing machine. Turn buttons and embroidery inside out.
- Close zippers, buttons and hooks. Tie bands and ribbons together.
- We recommend placing for instance bras inside a pillowcase to prevent damage.
- Delicate textiles such as laced curtains, straightjackets, small articles (tight socks, handkerchiefs, ties etc.) shall be put into string bag for washing.
- Washing large and heavy parts such as bath towels, jeans, lined jackets and the like can cause the drum to run unbalanced. We recommend adding one or two smaller parts; this especially helps with the spinning cycle.
- The clothes which easily get fuzzed shall be washed separately; otherwise the other articles can be stained with dust and thrum etc. Preferably, black clothes and cotton clothes shall be washed separately because they can easily get stained with the thrums of other colors when being washed together.
- Clean away dusts, stains and pet hairs from the clothes.
Please pay attention with regard to detergents
- Use only “slightly foaming” detergent for washing machines according to type of fabric (cotton, synthetics, lined or woolen products), color, washing temperature and degree of soiling. Otherwise foaming can cause overflowing.
- Bleach is alkaline and can damage your clothing, preferably does not use bleach.
- Detergents often leave residue in the clothes, which can cause bad odor if not rinsed properly.
- Detergent cannot easily get dissolved completely if there is too much detergent or water temperature is rather low. It can remain in clothes, pipes and washing machines to pollute the clothes.
Washing shall follow the weight of clothes, dirty degrees, local water hardness as well as the recommendations from the detergent manufacturers. Please consult the water company if you are not clear of water hardness.

ATTENTION: Keep detergents and additives in safe and dry places out of touch by kids.
Using the detergent drawer
- Open the drawer and add adequate detergent into main wash compartment marked "☐ or "II".
- Add the fabric softener into compartment marked “/” or “Do not exceed the maximum level mark.
- Add the detergent into the pre-wash compartment marked "⊥" or "I" according to the programme you select.
- Close the detergent drawer.

NOTE:
- The dispenser is suitable for the use of washing powder in pre- and main-wash cycle!
- To avoid overflowing dissolve your washing powder in a bit of water in case it is clotted.
The right amount to dispenser will depend on the following:
• The quantity of laundry
• The soiling level of the laundry
- Lightly soiled. No visible dirt or stains. Possible slightly body odour.
- Normally soiled. Visibly dirty and/or just a few slightly stains.
- Heavily soiled. Visibly dirt and stains and/or dried on soiling.
• The water hardness level.
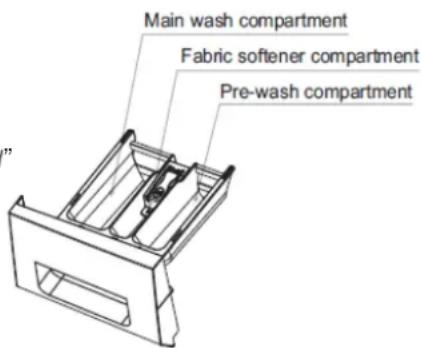

NOTE: It is recommended to use low foaming powder.
Clothing, which are not suitable for the washing machines:
- Ties, waistcoats, outerwear, etc. can shrink.
- Colored clothes can discolor.
- Pleated clothes, embossed or synthetic fibers can also shrink. Cotton and wool, silk and fur can shrink and crease;
- Ornamented evening attire and traditional clothing easily discolors.
- Do not wash clothes without washing instructions.
- Washing machine shall not wash water-proof materials (ski suits, outside napkin pads, curtains): As for the fiber products that water cannot get soaked easily into such as water-proof cushions, and clothes, it is better not to wash. Otherwise there will be water bursting out or abnormal vibration to cause danger while rinsing and draining so that the clothes also may be damaged.

ATTENTION: Do not wash clothes soaked in petrol, thinners, alcohol or solvents.
Fill in the Laundry
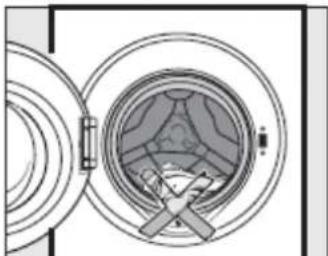
- Unravel the clothes before putting them into the machine.
- Unfold the laundry and load loosely in the drum. Mixing both large and small items gives better wash results and also helps distribute the load evenly during spinning.
- Each loading should correspond to the rated capacity of the machine. Do not overload the machine.
- Different strengths / sizes / types of laundry can affect the actual loading capacity of the machine. It is advisable to load the machine with only the amount of clothes that normal circulation is possible during washing.
- The most efficient use of energy and water is achieved when a full load is washed. However, do not overload as this causes creases and reduces cleaning efficiency.
- Make sure that no laundries are caught between the door and the seal.
natural_image
Diagram of a circular mechanical or electrical component with internal structure and no visible text or symbols
NOTE: The machine is fitted with a balance control device, which ensures the machine is stable in the spin. To protect the machine, it will cut in if the laundry is not evenly distributed in the drum.
The laundry is redistributed by reverse rotation of the drum. This may happen several times before the unbalance disappears and normal spinning can resume.
Control Panel
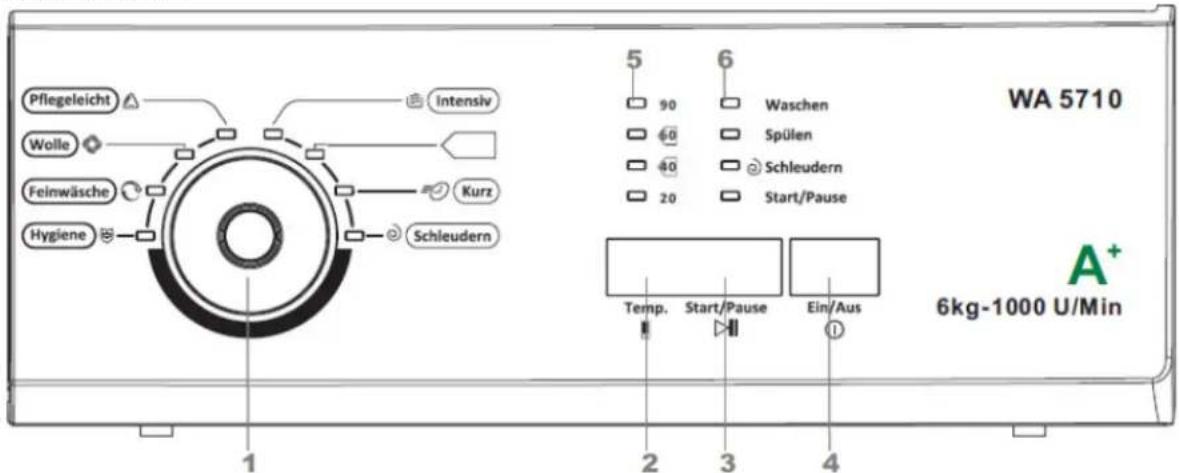
Turn this knob clockwise or anticlockwise to select a required washing programme. The available washing programmes are:
- Intensive cold/20/40/60°C
- Cotton (Standard programme) cold/20/40/60°C
- Quick Wash cold/20/40°C
- Synthetic cold/20/40/60°C
- Wool cold/20/40°C
- Delicate cold/20/40°C
- Sterilization 90°
- Spin

ATTENTION: For your safety, please not turn the knob to other position and get clothes while the machine is running. Because the temperature of water may be high and it may scald you. The door lock will open automatically at the end of a wash cycle while the temperature of the drum is cool down.
2. Temperature
Press this button and select a required wash temperature: 20^ C – 40^ C – 60^ C – 90^ C.
When all lights of temperature (5) are off, the washing temperature is 'cold'.
3. Start/Pause ▷II
Press this button to start or pause the machine. The LED of 'Start/Pause' flickers when the machine is in Standby mode or pauses, and it is lighted when running.
Once the 'Start/Pause' button is pressed and the machine is running, the programme cannot be changed.
4. Power
Press this button to switch the machine on or off.
⚠️ Important
Be sure to switch the machine off at the end of a wash cycle.
6. LED control lamps
Indicate the programme running: -wash (waschen) -rinse (spülen) -spin (schleudern).
Note:
' □ ' is for Standard Cotton program.
Standard Cotton at 60 °C and 40 °C are suitable to clean normally soiled cotton laundry and they are the most efficient programs in terms of combined energy and water consumptions for washing that type of cotton laundry; in addition, the actual water temperature may differ from the declared cycle temperature.
Table of Washing Cycles
Below listed values are approximate values with standard conditions and therefore not binding.
| Programme | Temperature °C kg | Rinse times | Time (min) | Spin speed (rpm) | ||
| Cotton | Cold/20/40/60°C 6 2 | 75/78/85 | /228 1000 | |||
| Standard Cotton | Cold/20/40/60°C 6 2 | 108/111 | 179/189 | 1000 | ||
| Quick Wash | Cold/20/40°C | 1.5 | 2 14 | /17/25 | 1000 | |
| Sterilization | 90°C | 3.5 | 2 13 | 8 | 1000 | |
| Delicate | Cold/20/40°C | 2.0 | 2 50 | /53/60 | 1000 | |
| Wool | Cold/20/40°C | 1.5 | 2 48 | /51/58 | 1000 | |
| Synthetic | Cold/20/40/60°C | 3.5 | 2 | 49/52/59/74 | 1000 | |
| Spin | - | 6.0 | - | 13 | 1000 |
NOTE:
The running time above is for the default programs, which is only for reference, and it may different because of different laundries, weights and washing temperature.
Select the Programme
| Programme | Explanation |
| Cotton Intensive | Cottons, linens or cotton mix fabrics, e.g. table linen, toweling, underwear, T-shirts etc. or baby clothes. |
| Cotton Standard | You can select this procedure to wash the daily washable clothes. The washing period is quite long. It is recommended to wash the daily cotton articles, for example: bed sheets, quilt covers, pillowcases, gowns, underwear etc. |
| Quick Wash | Small loads of items which require freshening up, not very dirty and which can be washed in a cotton programme. |
| Sterilization | This function is using 90°C to antibacterial protect people's health. |
| Delicate | For delicate garments made of synthetic fibres, mixed fibres, rayon and easy care cottons. Also suitable for machine-washable silks. |
| Wool | You can select this procedure to wash the wool textiles labeled with “Machine wash”. Please select the proper washing temperature according to the label on the articles to be washed. Furthermore, the proper detergent shall be selected for wool textiles. |
| Synthetic | Synthetic or mixed fabrics, underwear, coloured garments, non-shrink shirts. |
| Spin | Separate spin procedure. Separate spin for cotton and linen items.Soap water or rinse water shall be drained out before spinning. |
The proper washing procedures shall be selected according to the types, quantities, dirtiness and textile label of the clothes to be washed in combination with the following washing temperature table.
| 90°C | Seriously besmirched, pure white cotton or flax (for example: coffee, table cloths, canteen table cloths, towels, bed sheets). |
| 60°C | Moderately besmirched, colorful flax, cotton and synthetic articles with certain decolorizing degree (for example: shirts, night pajamas; slightly besmirched, pure white flax (for example: underwear). |
| 40°C, 20°C, cold | Normally besmirched articles (incl. Synthetic and wool). |
Select the washing program and temperature according to the fabrics and soiling degree. Generally applies: as higher the temperature setting, as higher the energy consumption.
Capacity
Do not overload the washing machine; otherwise the laundry will not get clean.
The 'table of washing cycles' shows the capacities.
Start up the Washing Machine
- Connect the power.
- Check if water pipes are connected properly. Open the tap completely.
- Open the door, and put the clothes into the drum one by one.
- Close the door, and fill suitable amount of detergent and fabric softener into dispenser.
Close the drawer.
- Press the 'Power' button, and select a washing programme you need by turning the knob.
- Select the temperature by pressing the 'Temperature' button.
- Press 'Start/Pause' button to start the washing machine.
- When the washing cycle is finished, there is an acoustic warning signal.
NOTE:
Once the 'Start/Pause' button is pressed and the machine is running, the programme cannot be changed.
Door Lock
When the machine is started, the door lock is locked though you press the "Start/Pause" button.
Press the "power" button to switch off the machine and the door lock is unlocked in two minutes.
- When the temperature inside the drum is above 53°C, the door lock is locked.
- When the water is above a certain level, the door lock is locked.
- When the washing cycle is finished, the door lock is unlocked after two minutes.
ATTENTION:
Do not try to open the door when the washing cycle is not finished or power supply is cut off during the washing cycle, because the temperature may be high and you may be scalded.
End of Washing
When washing cycle is finished, you hear a short melody, the machine will change to a standby status and the power will be off after 10 minutes without any control on the control panel.
Turn Off the Washing Machine
- Turn off the device by positioning the program selector knob to position '0' (Off) and press the 'Power' button.
- Close the water supply!
TIPS FOR ENERGY SAVING
To save energy and to help protect the environment, we recommend that you follow these tips:
- Do not select the high temperature program casually.
- Select the washing program according to the type of laundry and the required degree of washing.
- Clean the filters regularly to avoid excessive washing times and high electricity consumption.
- Ventilate the room well. The room temperature should not exceed +35°C.
MAINTENANCE AND CLEANING
Care and Cleaning

CAUTION:
- You must disconnect the appliance from the electricity supply, before you can carry out any cleaning or maintenance work.
- Do not use steam cleaners for cleaning the device; moisture could enter electrical components. Risk of electric shock! Hot steam could damage the plastic parts. The device must be dry before restarting operation.
- Essential oils and organic solvents, such as the juice of lemon or orange skin, butanoic-acid or cleaning agents containing acetic acid can damage plastic parts. Prevent contact of any part with such substances. Do not use abrasive cleaning agents.
- The washing machine must not be hosed down.
Cleaning the Exterior
Proper maintenance on the washing machine can extend its working life. The surface can be cleaned with diluted non-abrasive neutral detergents when necessary. If there is any water overflow, use the wet cloth to wipe it off immediately. No sharp items are allowed to strike the cabinet.

ATTENTION:
Do not use solvents, abrasive cleaners, glass cleaners or all-purpose cleaning agents. These might damage plastic surfaces and other components because of the chemicals they contain. Formic acid and its diluted solvents or equivalent are forbidden.
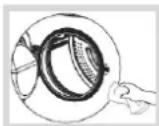
Cleaning the Door and Drum
Clean the inside of the door and the drum regularly, you can do like that:
- Clean with a cloth to remove dirt or fiber residues.
- Clean the drum every 3 months by using the programme "Sterilization".
Cleaning the Gasket
Fiber residues in the sealing ring can lead to a loss of water. Therefore remove fiber residues and other textiles.
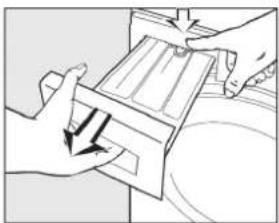
Cleaning the detergent drawer and drawer housing
- Press down on the release catch and at the same time pull the drawer right out of the machine and take out the drawer, wash all parts carefully with warm water. Use a brush for cleaning.
- To clean the detergent housing use a bottle brush to remove detergent residues inside the drawer housing.
- After cleaning replace the detergent drawer.
natural_image
Illustration of hands using a device to press or adjust a surface, showing a downward arrow (no text or symbols present)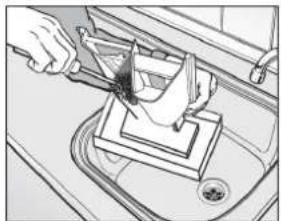
natural_image
Line drawing of a hand using a tool to clean or store items on a machine (no text or symbols visible)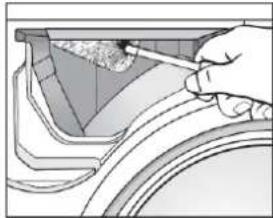
natural_image
Illustration of a hand inserting a component into a container with a mesh pattern (no text or symbols)Cleaning the Water Inlet Filter
natural_image
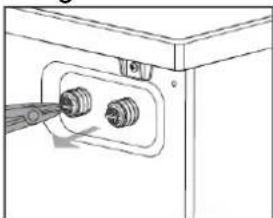
Technical line drawing of a mechanical component with two connectors (no text or symbols)Use pointed nose pliers to withdraw the plastic filter. Cleaning put back and secure. This filter should be checked every 6 months or so, or more often if there are frequent interruptions to the water supply.
NOTE: The filter must be put back in place after cleaning.
Cleaning the Drain Pump Filter, Remove Foreign Bodies
The foreign body trap in the drain pump prevents that rinsed parts blocks the drain pump system. Clean the trap periodically to ensure the normal operation of washing machine.
Check the foreign body trap if the water in the wash cycle will not drain or increased noise can be heard during the pumping.

CAUTION: First, drain the water and then open the trap to clean away foreign bodies.
Take care if the drained water is hot.
natural_image
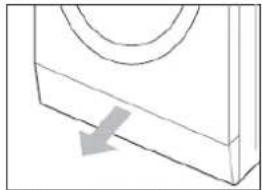
Simple line drawing of a mechanical component with an arrow indicating direction (no text or symbols)- Disconnect the machine From the mains electricity supply and open the pump cover with a screwdriver.
natural_image
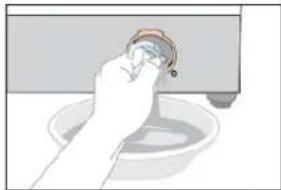
Illustration of a hand cleaning a sink with a pipe (no text or symbols)- Place a container under the pump. Turn the fastener of the trap to the left. Look for water leaks!
natural_image
Line drawing of two hands holding a small object with a tool, no text or symbols present-
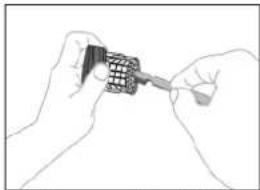
Remove the filter and clean it carefully from any foreign body.
-
Reattach the filter again and look for a tight fit so that no water can escape. Close the bottom cover plate.
The filter should be cleaned every 2 months or so, or when there is fault that the "Rinse" and "Spin" LEDs flicker.

ATTENTION: Never operate the appliance without filter.
Cold conditions
If the machine is exposed to temperatures below 0°C, certain precautions should be taken.
- Turn off the water tap.
- Unscrew the inlet hose.
- Unhook the drain hose from the rear support and position the end of this hose and that of the inlet hose in a bowl. Run the spin programme.
- Disconnect the appliance.
- Screw the inlet hose and reposition the drain hose.
- When you intend to start the machine up again, make sure that the room temperature is above 0^ C.
Repairs

CAUTION
Servicing of electric devices must be conducted by qualified experts only. Incorrect or improper repairs constitute a risk for the user and will void the warranty!
What if ... Troubleshooting
Certain problems are due to lack of simple maintenance or oversights.
Before contacting your local Service-Centre, please carry out the checks listed below.
| Problem Error Code Possible Cause Solutions | |||
| The machine fills overtime. | “Spin” LED flickers. | 1. The water tap is not open.2. The drain hose is put down.3. The water inlet valve is damaged. | 1. Open the water tap.2. Hook up the hose.3. Change the water inlet valve. |
| There is a Door lock alarm. | “Rinse” LED flickers. | 1. The door is not locked well.2. Garment is caught between the door and the seal.3. The door lock is damaged. | 1. Lock the door well.2. Put the garment into the drum.3. Change the door lock. |
| The machine drains overtime. | “Rinse” and “Spin” LEDs flicker. | 1. The drain hose is squashed or kinked.2. The drain pump filter is block.3. The drainage system pipes are blocked. | 1. Check the drain hose.2. Clean the filter.3. Check the drainage system and clean it. |
| Water overflows the machine. / Water sensor works abnormal. | “Washing” LED flickers. | 1. The water inlet valve is damaged.2. The connection between the water sensor and wire is not secure.3. The water sensor is damaged. | 1. Change the water inlet.2. Contact your local service- centre.3. Contact your local service-centre. |
| The motor does not work. | “Washing” and “Spin” LEDs flicker. | 1. The connection between the motor and wire is not secure.2. The motor is protected because of over-heat.3. The motor is damaged. | Contact your local service-centre. |
| There is a heating tube fault. | “Washing” and “Rinse” LEDs flicker. | 1. The connection between the heating tube and wire is not secure.- 2. The heating tube is damaged. | Contact your local service-centre. |
| There is a temperature sensor fault. | “Washing”, “Rinse” and “Spin” LEDs flicker. | 1. The connection between the temperature sensor and wire is not secure.2. The temperature sensor is damaged. | Contact your local service-centre. |
Are you interested in other Bomann products? Please visit our website:
www.bomann.de
Data sheet of household washing machines according to EU Directive 1061/2010:
| Brand | Bomann | |
| Model | WA 5710 | |
| Rated capacity | 6 kg | |
| Energy efficiency class ^1) | A+ | |
| Consumption data | ||
| Weighted annual energy consumption ^2) | kWh | 180.0 |
| Consumption data standard programme | ||
| - cotton 60°C at full load kWh 0.93 | ||
| - cotton 60°C at partial load kWh 0.81 | ||
| - cotton 40°C at partial load kWh 0.61 | ||
| Off mode power consumption W 0.1 | ||
| Left-on mode power consumption W 0.3 | ||
| Weighted annual water consumption ^3) I 9.460 | ||
| Spin drying efficiency class ^4) | C | |
| Maximum spin speed rpm 1000 | ||
| Standard programme ^5) Cotton 60°C / 40°C | ||
| Time of standard programme | ||
| - cotton 60°C at full load | Min. | 195 |
| - cotton 60°C at partial load | Min. | 195 |
| - cotton 40°C at partial load | Min. | 182 |
| Airborne acoustical noise (wash) | dB(A) re1pW | 60 |
| Airborne acoustical noise (spinning) | dB(A) re1pW | 73 |
| Type | Freestanding | |
| Measures and weights | ||
| Height | cm | 84.5 |
| Width | cm | 59.5 |
| Depth | cm | 53.0 |
| Net weight | kg | 64.0 |
| Electrical connection | ||
| Connection power: 2.150 W | W | 2100 |
| Connection voltage: 220-240 V~ | V | 220-240 V~ |
| Fuse protection | A | 10 |
| Water pressure | Mpa | 0.02 - 0.8 (0.2 - 8 bar) |
1) A+++ (highest efficiency) to D (lowest efficiency).
2) Weighted annual energy consumption in kWh per year based on 220 standard washing cycles for cotton programmes at 60°C and 40°C at full and partial load, and the consumption of the low-power modes. Actual energy consumption will depend on how the appliance is used.
3) Weighted annual water consumption in litres per year based on 220 standard washing cycles for cotton programmes at 60°C and 40°C at full and partial load.
Actual water consumption will depend on how the appliance is used.
4) G (lowest efficiency) to A (highest efficiency).
5) The standard 60^ C cotton programme and the standard 40^ C cotton programme are the standard washing programmes. These programmes are suitable to clean normally soiled cotton laundry and that they are the most efficient programmes in terms of combined energy and water consumption.
The devices meets the European standards and directives in the current version at delivery:
- Low Voltage Directive (LVD) 2006/95/EC
- Electromagnetic Compatibility (EMC) Legislation Directive 2004/108/EC
- Ecodesign requirements for household washing machines Directive 1015/2010/EU
BOMANN®
C. Bomann GmbH
www.bomann.de
- OVERVIEW
- IMPORTANT USE AND SAFETY INSTRUCTIONS
- Prevent Electric Shocks
- Possible Explosions
- Fire Danger / Short Circuit or Electric Leakage may occur
- Danger of Injury
- WARNING
- General instructions / Intended use
- Unpacking
- DISPOSAL OF USED DEVICES
- Disable Waste Equipment before Disposal:
- Environmental Protection
- Packaging Material
- IMPORTANT
- PRODUCT DESCRIPTION
- INSTALLATION
- Remove the transport bolts
- Installation – place requirements -
- Feet Adjustment (level adjustment)
- Adjust the feet:
- To do these when the machine is not level:
- NOTE:
- Water Connection
- Install the Water Drain Hose
- Install the Water Inlet Hose (Cold Water)
- Power Connection
- Electrical Requirements
- Electrical Connection
- Grounding Instructions
- WARNING:
- STARTUP / OPERATION
- Prior to First Use
- Preparation of Clothes
- Please pay attention with regard to detergents
- Using the detergent drawer
- The right amount to dispenser will depend on the following:
- Clothing, which are not suitable for the washing machines:
- Fill in the Laundry
- Control Panel
- Temperature
- Start/Pause ▷II
- Power
- ⚠️ Important
- LED control lamps
- ' □ ' is for Standard Cotton program.
- Select the Programme
- Capacity
- Start up the Washing Machine
- Door Lock
- ATTENTION:
- End of Washing
- Turn Off the Washing Machine
- TIPS FOR ENERGY SAVING
- MAINTENANCE AND CLEANING
- Care and Cleaning
- CAUTION:
- Cleaning the Exterior
- Cleaning the Door and Drum
- Cleaning the Gasket
- Cleaning the detergent drawer and drawer housing
- Cleaning the Water Inlet Filter
- Cleaning the Drain Pump Filter, Remove Foreign Bodies
- Cold conditions
- Repairs
- CAUTION
- What if ... Troubleshooting
- BOMANN®
Brand : BOMANN
Model : WA 5710
Category : Washing machine