
CL-S700R - Label printer CITIZEN - Free user manual and instructions
Find the device manual for free CL-S700R CITIZEN in PDF.


| Product Type | Thermal Transfer / Direct Thermal Label Printer |
| Model | CL-S700R |
| Print Resolution | 203 dpi (8 dots/mm) |
| Print Speed | 2 – 10 inches per second |
| Max Print Width | 104 mm (4.1 in) |
| Max Print Length | 812.8 mm (32 in) |
| Media Width | 25.4 mm – 118.0 mm (1.0 – 4.65 in) |
| Media Thickness | 0.0635 – 0.254 mm (0.0025 – 0.01 in) |
| Ribbon Width | 25.4 – 114.0 mm (1.0 – 4.5 in) |
| Ribbon Length | Up to 450 m (1476 ft) |
| Interfaces | Parallel (IEEE1284), Serial (RS232C), USB 1.1; optional Ethernet/WLAN |
| Emulations | Datamax® and Zebra® (selectable with auto-detect) |
| Display | Backlit LCD, 128x64 dots |
| Special Features | Hi-Lift metal print head, ARCP ribbon control, adjustable media sensor, internal rewinder (S700R) |
| Power Supply | 100-240V AC, 50/60 Hz, 3.0-1.5 A |
| Dimensions (W x D x H) | 254 x 480 x 375 mm (10.2 x 19.2 x 15 in) |
| Weight | Approx. 17.6 kg (38.7 lb) |
| Safety Certifications | CE, FCC Class A, UL 60950-1, CSA No.950, WEEE |
| Included Accessories | Test media & ribbon, CD-ROM, quick start guide, head cleaner, power cord, media holder bar/guide, ribbon holders, paper core |
| Optional Accessories | Auto-cutter, peeler unit, Ethernet interface, rewinder kit |
| Maintenance | Clean printhead with supplied head cleaner; platen with ethyl alcohol |
Frequently Asked Questions - CL-S700R CITIZEN
User questions about CL-S700R CITIZEN
0 question about this device. Answer the ones you know or ask your own.
Ask a new question about this device
Download the instructions for your Label printer in PDF format for free! Find your manual CL-S700R - CITIZEN and take your electronic device back in hand. On this page are published all the documents necessary for the use of your device. CL-S700R by CITIZEN.
USER MANUAL CL-S700R CITIZEN
Thermal Transfer Barcode & Label Printer
CL-S700 Series
USER'S MANUAL
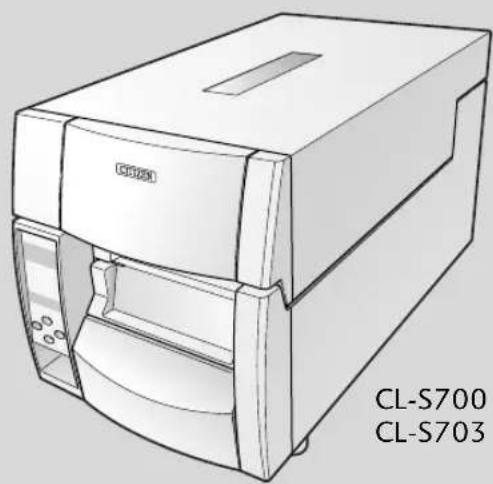
natural_image
Line drawing of a CD858 printer with front panel and side ports, no text or symbols on the device itself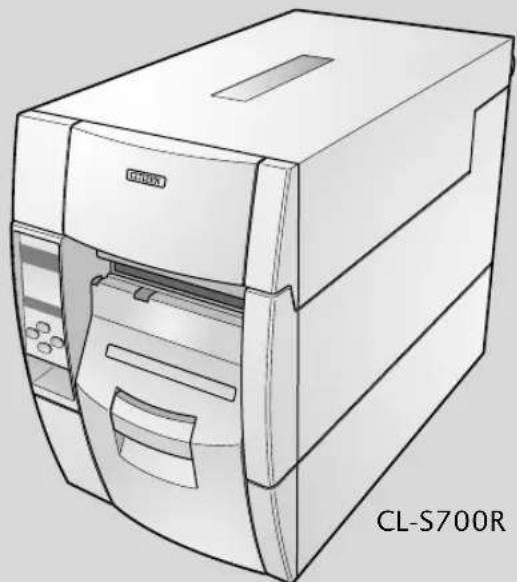
natural_image
Line drawing of a CL-S700R printer with no visible text or symbols on the device itselfCONTENTS
Before Operation
INTRODUCTION 3
COMPLIANCE STATEMENT FOR EUROPEAN USERS 4
FCC COMPLIANCE STATEMENT FOR AMERICAN USERS 4
EMI COMPLIANCE STATEMENT FOR CANADIAN USERS---- 5
ETAT DE CONFORMITE EMI A L'USAGE DES UTILISATEURS CANADIENS ---- 5
IMPORTANT SAFETY INSTRUCTIONS---- 6
NOTICE 7
SAFETY INSTRUCTIONS 8
Chapter 1 Setup
Confirmation of Carton Contents 10
Part Names and Functions 11
Connection to Power 18
Driver Installation 18
Connection to a Computer 19
Chapter 2 Printer Operation
Power ON/OFF 20
Normal Operating Mode 21
Setting the Media 23
Setting the Ribbon 32
Mode Settings 35
Quick Setup of the Print Method 51
Emulation Auto-Detection 52
Setting the menu for the Rewinder (CL-S700R only) 53
Chapter 3 Printer Adjustments
Sensor Adjustments and Calibration 54
Media Thickness Adjustment 57
Media Width Adjustment 58
Adjusting the Ribbon 59
Moving the Adjustable Sensor 61
Cleaning 62
Chapter 4 Troubleshooting 64
Appendixes
Specifications 66
Interfaces 70
Replacing the Interface Board 76
INTRODUCTION
Thank you for purchasing a Citizen CL-series label printer offering high performance printing at up to 10 inches per second on media up to 4.65 inches wide.
Main Features
The printer is designed for all day-to-day operations to be accessible from the front of the printer so there is no need to move items near to the printer for access for media loading.
The main printer's case lifts directly upwards meaning that no space is needed on either side of the printer. The power switch is located in a recessed panel at the front of the printer so it can be easily accessed without moving the printer.
(The Easiest Media Loading>
The Hi-Lift ^™ metal print head mechanism opens so that it is completely clear of the media path so that the paper and ribbons can be loaded without any part of the printer in the way.
The clear, easy-to-see backlit LCD makes both configuration and operation easy with simple messages about the printer's status and also the ability for quick configuration when needed.
The printer features an adjustable media sensor which allows the customer to use any type of media. The media (label) rolls can be inside or outside would. Similarly, the ink ribbon can be wound either way: 'ink in' or 'in out'.
The patented ARCP ^™ function - Active Ribbon Control and Positioning - maintains even ribbon tension from beginning to end of a ribbon. This eliminates ribbon wrinkle and improves print positioning, especially for small labels. Smudging caused by ribbon slippage is also removed.
This printer contains both the Datamax ^® and Zebra ^® emulations. By using the keys on the operation panel, it is easy to simply switch between the two emulations to meet your program.
Parallel, Serial and USB interfaces are supplied as standard and optional Ethernet and Wireless LAN boards can be fitted quickly and easily. An auto-cutter and peeler option is also available and can be easily installed.
(CL-S700R only)
The internal rewinder is easily accessed from the front of the printer and it can be used for winding liner or printed batches of labels.
COMPLIANCE STATEMENT FOR EUROPEAN USERS
CE marking shows conformity to the following criteria and provisions:
Low Voltage Directive (73/23/EEC)/EN60950-1
EMC Directive (2004/108/EC, formerly 89/336/EEC)/EN55022, EN55024, EN61000-3-2 & EN61000-3-3
This product has been tested under EN ISO 7779 and has an acoustic level output no higher than 55db(A).
This device is not intended for use at a video workstation in compliance with Bildscharb V.
FCC COMPLIANCE STATEMENT FOR AMERICAN USERS
This equipment has been tested and found to comply with the limits for a Class A digital device, pursuant to Part 15 of the FCC Rules. These limits are designed to provide reasonable protection against harmful interference when the equipment is operated in a commercial environment. This equipment generates, uses, and can radiate radio frequency energy and, if not installed and used in accordance with the instruction manual, may cause harmful interference to radio communications.
Operation of this equipment in a residential area is likely to cause harmful interference in which case the user will be required to correct the interference at his own expense.
EMI COMPLIANCE STATEMENT FOR CANADIAN USERS
This Class A digital apparatus complies with Canadian ICES-003.
This equipment generates and uses radio frequency energy and if not installed and used properly, that is, in strict accordance with the manufacturer's instructions, may cause interference to radio and television reception. This digital apparatus does not exceed the Class A limits for radio noise emissions from digital apparatus set out in the Radio Interference Regulations of the Canadian Department of Communications. This equipment is designed to provide reasonable protection against such interference in a residential installation. However, there is no guarantee that interference will not occur in a particular installation. If this equipment does cause interference to radio or television reception, which can be determined by turning the equipment off and on, the user is encouraged to try to correct the interference by one or more of the following measures:
- Reorient or relocate the receiving antenna.
- Increase the separation between the equipment and receiver.
- Connect the equipment into an outlet on a circuit different from that to which the receiver is connected.
- Consult the dealer or an experienced radio/TV technician for help.
CAUTION: Use shielded cables to connect this device to computers.
Any changes or modifications not expressly approved by the grantee of this device could void the user's authority to operate the equipment.
ETAT DE CONFORMITE EMI A L'USAGE DES UTILISATEURS CANADIENS
IMPORTANT SAFETY INSTRUCTIONS
- Read all of these instructions and save them for later reference.
- Follow all warnings and instructions marked on the product.
- Unplug this product from the wall outlet before cleaning. Do not use liquid or aerosol cleaners. Use a damp cloth for cleaning.
- Do not use this product near water.
- Do not place this product on an unstable cart, stand or table. The product may fall, causing serious damage to the product.
- Slots and openings on the cabinet and the back or bottom are provided for ventilation.
To ensure reliable operation of the product and to protect it from overheating, do not block or cover these openings. The openings should never be blocked by placing the product on a bed, sofa, rug or other similar surface. This product should never be placed near or over a radiator or heat register. This product should not be placed in a built-in installation unless proper ventilation is provided.
- This product should be operated from the type of power source indicated on the marking label. If you are not sure of the type of power available, consult your dealer or local power company.
- This product is equipped with a three-pronged plug, a plug having a third (grounding) pin. This plug will only fit into a grounding-type power outlet. This is a safety feature. If you are unable to insert the plug into the outlet, contact your electrician to replace your obsolete outlet. Do not defeat the safety purpose of the grounding-type plug.
- Do not allow anything to rest on the power cord. Do not locate this product where the cord will be walked on.
- If an extension cord is used with this product, make sure that the total of the ampere ratings on the products plugged into the extension cord do not exceed the extension cord ampere rating. Also, make sure that the total of all products plugged into the wall outlet does not exceed 15 amperes for 120V outlet and 7.5 amperes for 220V-240V outlet.
- Never push objects of any kind into this product through cabinet slots as they may touch dangerous voltage points or short out parts that could result in a risk of fire or electric shock. Never spill liquid of any kind on the product.
- Except as explained elsewhere in this manual, don't attempt to service this product yourself. Opening and removing those covers that are marked "Do Not Remove" may expose you to dangerous voltage points or other risks. Refer all servicing on those compartments to service personnel.
- The mains plug on this equipment must be used to disconnect mains power. Please ensure that the socket outlet is installed near the equipment and shall be easily accessible.
- Unplug this product from the wall outlet and refer servicing to qualified service personnel under the following conditions:
A. When the power cord or plug is damaged or frayed.
B. If liquid has been spilled into the product.
C. If the product has been exposed to rain or water.
D. If the product does not operate normally when the operating instructions are followed. Adjust only those controls that are covered by the operating instructions since improper adjustment of other controls may result in damage and will often require extensive work by a qualified technician to restore the product to normal operation.
E. If the product has been dropped or the cabinet has been damaged.
F. If the product exhibits a distinct change in performance, indicating a need for service.
NOTICE
- Before use, be sure to read this manual. And keep it handy for reference when needed.
- The contents of this manual may change without prior notice.
- Reproduction, transfer, or transmission of the contents of this manual without prior consent is strictly prohibited.
- We are not liable for any damage resulting from the use of the information contained herein, regardless of errors, omissions, or misprints.
- We are not liable for any problems resulting from the use of optional products and consumable supplies other than the designated products contained herein.
- Do not handle, disassemble or repair the parts other than those specified in this manual.
- We are not liable for any damage caused by user's erroneous use of the printer and inadequate environment.
- Data residing in the printer is temporary. Therefore, all data will be lost if power is lost. We are not liable for any damage or loss of profits caused by data loss due to failures, repairs, inspections, etc.
- Please contact us if there are any mistakes or ambiguities within this manual.
- If there are missing or incorrectly collated pages in this manual, contact us to obtain a new manual.
CITIZEN is a registered trademark of CITIZEN HOLDINGS CO., Japan.
Copyright © 2008 by CITIZEN SYSTEMS JAPAN CO., LTD.
SAFETY INSTRUCTIONS
which must be strictly observed !
- To prevent personal injury or property damage, the following shall be strictly observed.
- The degree of possible injury and damage due to incorrect use or improperly following instructions is described below.
| Warning | Indicates a situation which, if not observed and handled properly, could result in death or serious injury. |
| Caution | Indicates a situation which, if not observed and handled properly, could result in injury. |

: This is a mark to call attention to the reader.

Warning
Never perform the following. If not avoided, these may cause damage or trouble to the printer or cause the printer to overheat and release smoke and cause burns or an electrical shock. If the printer is damaged or is malfunctioning, be sure to turn the printer off immediately and remove the power cord from the outlet, then consult our service personnel.
- Do not place the printer in a poorly ventilated area, or shut off the air vent of the printer.
- Do not place the printer where chemical reactions occur, such as in laboratories or where air is mixed with salt or gas.
- Do not use a power voltage or frequency other than those specified.
- Do not plug/unplug the power cord or attach/detach the interface cable by simply grabbing the power cord or interface cable. Do not pull or carry the printer when the tension of the power cord or interface cable is increased.
- Do not drop or put foreign matter such as clips and pins into the printer. This may cause problems.
- Do not plug the power cord into an outlet with many loads.
- Do not spill drinks such as tea, coffee and juice on the printer or spray insecticide on the printer. If drink or water is spilled, first be sure to turn the power off and remove the power cord from the outlet, then consult our service personnel.
- Do not disassemble or modify the printer.
Discard or safely store the plastic packing bag. This bag should be kept away from children. If the bag is pulled over a child's head, it may cause suffocation.
General Precautions

Caution
- Prior to operation, read the safety instructions carefully and observe them.
- Do not drop or put foreign matter such as clips and pins into the printer. This may cause problems.
- Be careful when moving or carrying the printer. Dropping the printer may cause injury or property damage.
- Make sure if you open the top cover, it is opened all the way. If only partially open, the cover could slam shut, possibly causing injury.
- When the cover is open, be careful of the corners of the cover. They could cause injury.
- Do not open the printer during printing.
- When cleaning the surface of the printer case, do not use the cloth that is soaked in thinner, trichloroethylene, benzine, ketone or similar chemicals.
- Do not use the printer where there is a lot of oil, iron particles, or dust.
- Do not spill liquids or spray insecticide on the printer.
- Do not jolt or impact to the printer by stepping on, dropping or hitting the printer.
- Operate the control panel properly. A careless, rough handling may cause problems or malfunction. Do not use such sharp-edged tool as a ballpoint pen for operation.
- Be careful of the edges of the plates so injury or property damage is possible.
- If a problem occurs during printing, stop the printer immediately and unplug the power cord from the outlet.
- When printer trouble occurs, do not try to dissemble it. Instead, consult our service personnel.
Precautions When Installing the Printer

Caution
- Prior to operation, read the safety instructions carefully and observe them.
- Do not use or store the printer near fire, excessive moisture, in direct sunlight, near an air conditioner or heater or other source of unusually high or low temperature or humidity or excessive dust.
- Do not place the printer where chemical reactions occur, such as in a laboratory.
- Do not place the printer where air is mixed with salt or gas.
- The printer must sit on a firm, level surface where there is ample ventilation. Never allow the printer's air vent to be blocked by a wall or other object.
- Do not put anything on the top of printer.
- Do not place the printer near a radio or television, and do not use the same wall outlet for the printer and radio or television. Radio or television reception could be adversely affected.
- Use the power cord supplied with the product. Never use the power cord for other product.
- Do not put anything on the power cord or step on it.
- Do not drag or carry the printer with the power cord or interface cable.
- Avoid plugging the power cord into an outlet with many loads.
- Do not bundle the power cord when inserting the plug.
- Always grip the plug housing, not the cord, to plug/unplug the power cord.
- Make certain the power is turned off before connecting/disconnecting the interface cable.
- Avoid lengthening the signal cable or connecting it to any noise-producing device. If it is unavoidable, use the shielded cable or twisted pair for each signal.
- Place the printer near the outlet where the power cord can be unplugged easily to shut off power.
- Use the AC outlet that accepts a three-pronged plug. Otherwise, static electricity may be generated and there will be danger of electric shock.
Confirmation of Carton Contents
Removing the Packing Material
The printer is shipped with adhesive tape in place to hold the top cover closed. Simply remove the two pieces of tape on either side of the top cover. Then simply open the cover by lifting up and tipping it backwards.
There is another strip of adhesive tape that must be removed which holds the mechanism closed for shipping. Remove the tape and attached paper by carefully peeling from the plastic case.
Retain the tape should you need to transport the printer again. A further piece of packing paper is inside the mechanism and you can remove this when the head is opened as explained later in the manual.
Check that the following accessories are included with the printer in the carton.
![Head cleaner Sample ribbonRibbon holdePaper core (for ribbon) Media holder barMedia holder guide Test label media Power cord CD-ROM Quick-start guide Printer [Model CL-S700/CL-S703]](/content/2026/05/843535/images/c0579eb602ef91a3d8ec49d9b31953e3929f2faf38bbff673e9aad48f53a4fd4.jpg)
Note: The empty carton and packing materials should be stored for future shipping of the printer. When removing the CL-S700R from the box, there is the extra cardboard "sling" to make lifting easier.

Caution
- Be careful when moving or carrying the printer and when taking the printer out of the carton. The printer may cause injury or property damage if dropped. Be sure to grip the printer housing firmly when taking it out of the carton. Do not grip the printer by the foam packing material which may break, causing the printer to drop.
- When opening the cover, open it all the way. If only part way open, the cover could slam shut, possibly causing injury.
- Be careful of the edge of the cover when the cover is opened. It may cause injury or property damage.
- Be careful of the edges of the metal plates as injury or property damage is possible.
Part Names and Functions
Inside the printer
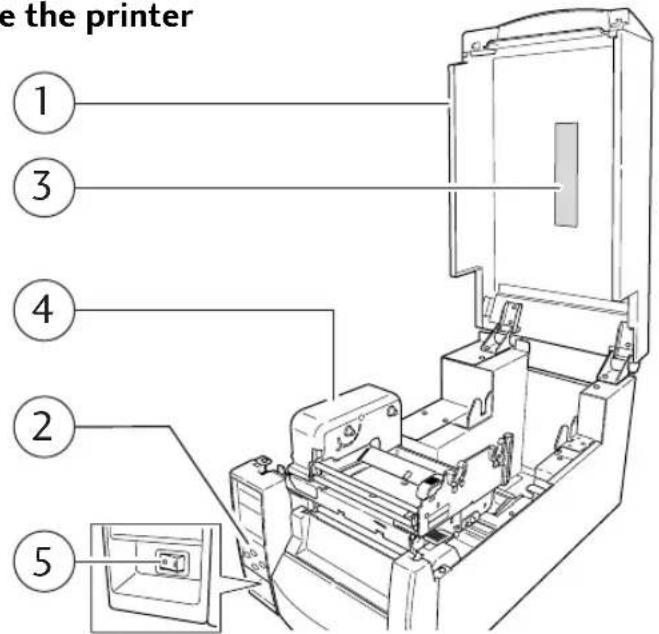
Operation Panel (p.16)
Setting the Ribbon (p.32)
Power ON/OFF (p.20)
①Top cover
Is opened vertically to set media or ribbon.
②Operation panel
This is used to make changes and adjustments to the printer and its configuration.
③Top cover window
The amount of ribbon and media remaining can be checked through this window.
④Ribbon drive unit
⑤Power switch
This is the power switch for the printer.
1
Setup
Part Names and Functions
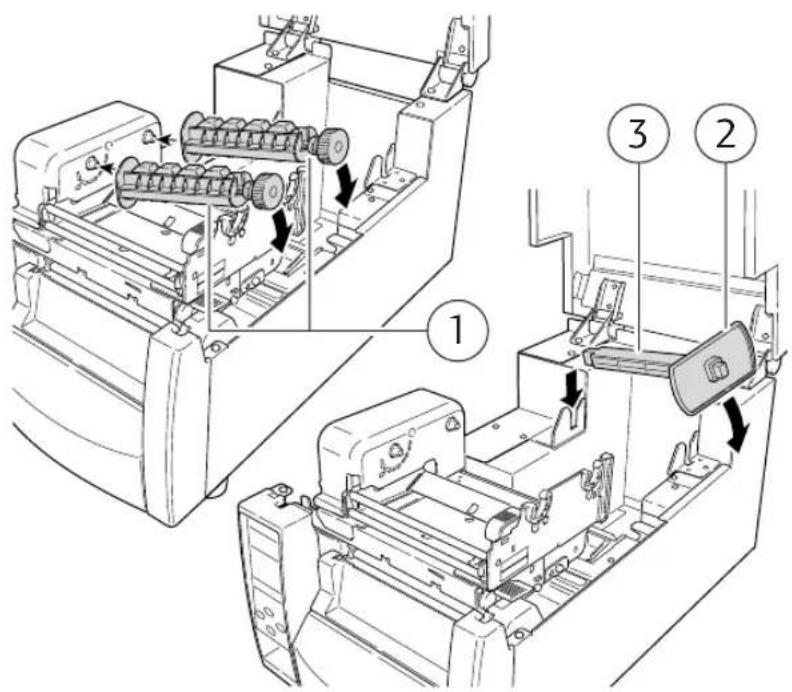
①Ribbon holder
It is used to attach the ribbon and paper core.
②Media holder guide
This guide is moved horizontally to match the media size.
The guide can be sliding it from the holder bar.
③Media holder bar
The media is supported by the media holder bar when installed in the printer.
Part Names and Functions
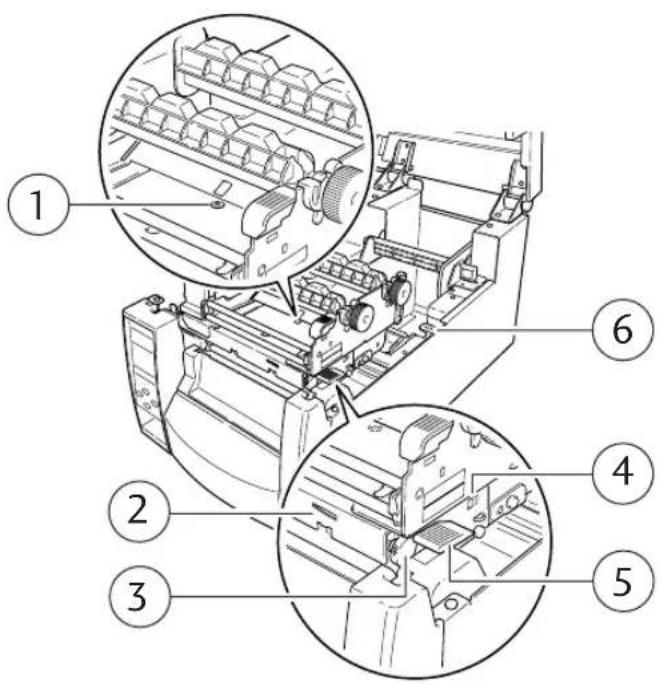
Media Thickness Adjustment (p.57)
Media Width Adjustment (p.58)
①Media thickness adjustment screw
It is adjusted to match the thickness of the media.
②Media width adjustment indicator
③Media width adjustment knob
It is adjusted to match the width of the media.
④Media thickness adjustment indicator
⑤Head open lever
The head unit can be raised to install media by pushing this lever. It locks the head unit during printing.
⑥Sensor arm open lever
The sensor arm can be raised to install media by pushing this lever.
Part Names and Functions
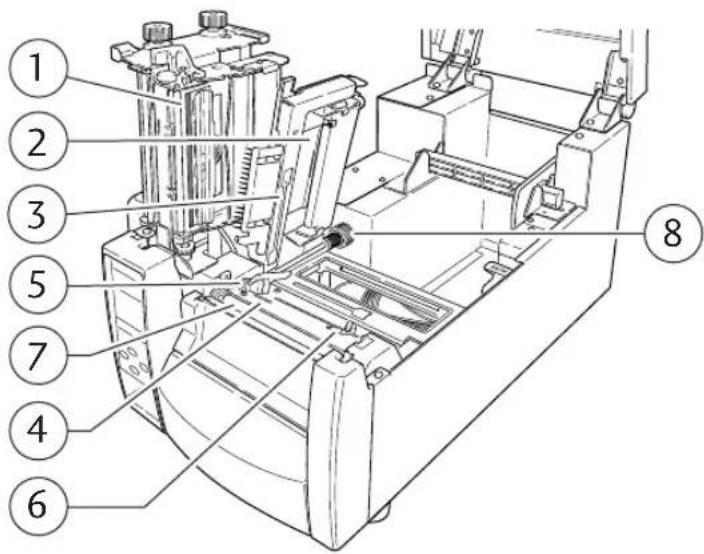
Sensor Adjustments and Calibration (p.54)
Installing the Media (p.26, p33)
①Thermal printhead
This is the printhead. Avoid touching this with your fingertips and leaving grease or dirt on the printhead surface.
②Sensor arm
The media can be installed by raising this arm.
The media can be held in place by lowering this arm.
③Adjustable (rear) sensor
Detects the label or tag position. This sensor is switched "on" by default.
④Fixed media sensor
Alternative method to detect the label or tag position. This sensor is more accurate for small labels as it is closer to the print head. It is switch "off" by default.
⑤Left media guide
This is a fixed part of the printer. The left side of the media (labels, tags) as viewed from the from of the printer should be placed against this media guide.
⑥Right, movable media guide
Slide the right media guide so that it just touches the media. It should "guide" the media through the printer. It should not hold it firmly otherwise the media will jam.
⑦Platen
Interlocked with the thermal printhead, it feeds media backwards or forwards.
⑧Adjustable sensor position knob
This is used to change the left-to-right position of the adjustable media sensor across the media. See Chapter 3, Printer Adjustments for more details.
Part Names and Functions
![[Model CL-S700R] 1 2 3 4 5](/content/2026/05/843535/images/84136e730029daca06620012f5270405460f472cdef05814bc66e8898399ef03.jpg)
①Rewinder cover
When using the rewinder function, open the door by pulling the opening handle on the front.
②Media entry slit cover
When rewinding the printed batches of media, remove the Media Entry Slit Cover and insert the media from the head unit through the slit. It should then be rewound around the Rewinder Flange.
③Rewinder paper guide (available as an option from your supplier)
When the printer is being used in Peel mode, this curved guide is not needed. In batch mode, when rewinding printed media, this curved guide must be installed to guide the media through the media slit.
④Peeler rollers
The peeler rollers provide the pressure on the liner to cause the printer to peel off labels one-by-one.
⑤Rewinder flange
The liner or batches of printed media are wrapped around the central core of the rewinder flange.
Part Names and Functions
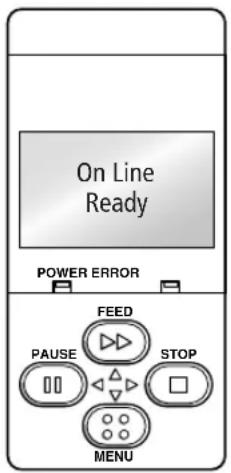
Operation Panel
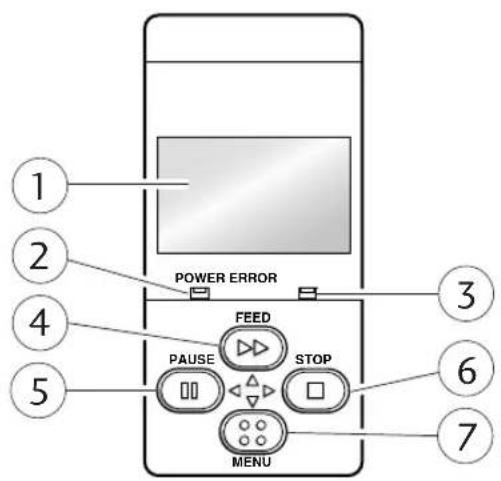
LED Functions (p.22)
①LCD display
This displays the operational status of the printer.
②POWER LED
This is lit when the printer power is on. (green)
③ERROR LED
This is lit or flashes when the printer is in an alarm or error status. (orange)
④FEED key
This key feeds the media to the top of the next label or form.
Normal Operating Mode (p.21)
⑤PAUSE key
This temporarily stops printing.
⑥ STOP key
This stops printing or cancels the alarm.
Menu Setup Mode (p.37)
⑦MENU key
In normal operation, this key will enter the menu configuration mode. It can be configured to repeat the previous label, if preferred.
Part Names and Functions
Rear View
![[Model CL-S700/CL-S703]](/content/2026/05/843535/images/f3d916b516390184860a15ffc9386f37fe2a4a594b28ee014fd86c10404bd14a.jpg)
Parallel Interface (p.72)
Serial Interface (p.70)
USB Interface (p.75)
Connection to Power (p.18)
①Parallel interface (Centronics parallel or IEEE1284)
This receives parallel transmission of data from a host computer.
②Serial interface (RS232C)
This receives serial transmission of data from a host computer.
③USB interface
This receives USB transmission of data from a host computer.
④ Heat air opening
It allows warm air to vent from the printer.
Be sure not to block it with media etc.
⑤Power cord inlet
The connector of the enclosed power cord is connected here.
Connection to Power
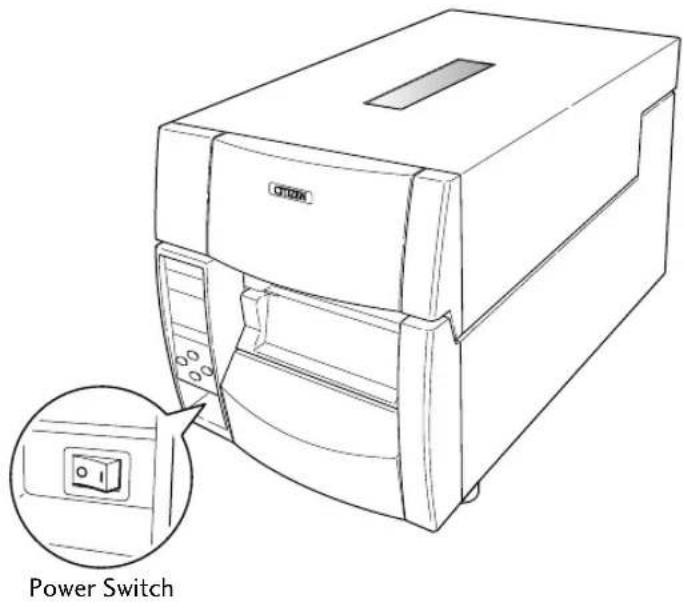
- The power switch is located on the front of the printer recessed below the control panel. Check that the power switch is turned OFF.
- Insert the power cord in to the inlet on the printer.
- Insert the plug of the power cord in the AC outlet.
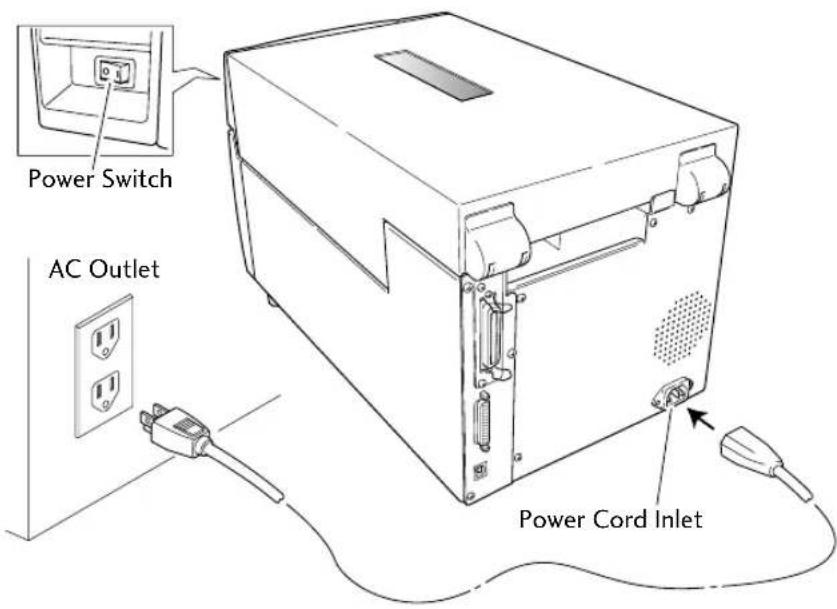

Caution
Use an AC outlet that accepts a three-pronged plug. Otherwise, static electricity may be generated and there will be danger of electric shock.
Driver Installation
The computer may automatically detect the presence of the new printer when it is first started, depending on the computer type, interface and operating system. Follow any on-screen instruction and also instructions supplied with any additional CD-ROM or floppy disk included with your printer.
Your supplier will assist you with the correct drivers and software which are compatible with your particular computer system.
Connection to a Computer
This product has three interfaces that can be used to receive printing data: a serial port (RS232C), parallel port (IEEE1284, Non-L. P. S.), and a USB port (USB1.1). An optional internal network interface can be added by your dealer.
To connect the cable, proceed as follows:
- Turn OFF both power switches of the printer and the computer.
- Connect one end of the interface cable to the interface connector on the back of the printer and secure it with locks or locking screws, where available.
- Connect the other end of the interface cable to the interface connector on the computer and secure it with locks or locking screws, where available.
Serial Interface (p.70)
Parallel Interface (p.72)
USB Interface (p.75)
Replacing the Interface
Board (p.76)
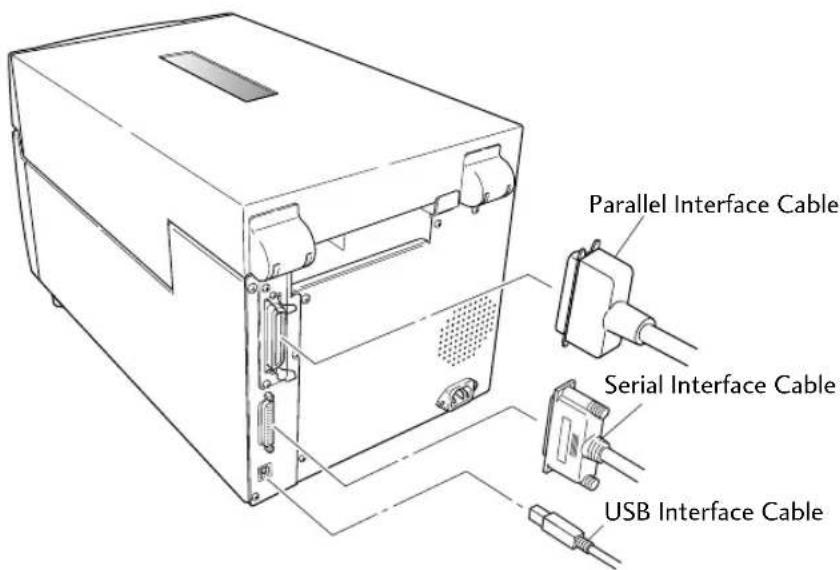
Note: If an optional network interface is used, the standard parallel port is removed from the printer, so the parallel interface cannot be used.
Power ON/OFF
Turning on the power
- The power switch is conveniently located at the front of the printer for easy access during normal operation. It is in the recess underneath the control panel so it cannot be accidentally operated by mistake.
- The POWER LED is lit.
![Operation Panel POWER ERROR FEED Power Switch [Model CL-S700/CL-S703]](/content/2026/05/843535/images/dd9210983dde7e585102e2f40795770f4bd06b4def152d382ce7186c769ac9e5.jpg)
Turning off the power
- Turn off the power switch of the printer.
- The POWER LED goes off.
Menu Setup Mode (p.37)
Normal Operating Mode
When the power is turned on, the printer enters normal operating mode. The control keys activate the following functions.
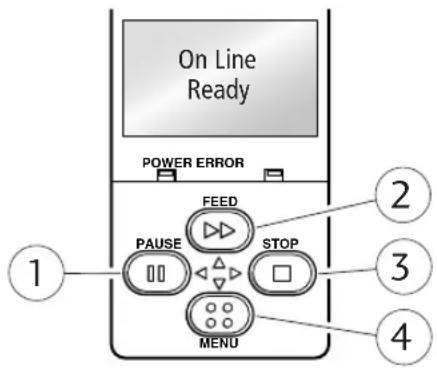
①PAUSE key: Temporarily pauses printing
- When this key is pushed once, the LCD indicates "Pause" and the printer temporarily pauses.
- When it is pushed during printing, the printer pauses after the label currently being printed is issued. Pressing the key a second time restarts printing and the remaining number of designated labels are printed.
②FEED key: Feeds media
- Pressing this key feeds media to the print start position. The distance it is fed is determined by automatically detecting the front end of the media when using label media, and when continuous media has been designated, a fixed quantity is fed, then feeding stops.
- When the TEAR OFF setting is effective, feeding stops when the media has been fed to the TEAR OFF location.
- When the optional cutter unit is installed, the media is fed to the cut position then it is cut.
- If the optional peeler unit is installed, the media is fed to the peeling location. When the media is pausing at the peeling position, feeding does not occur, even if the FEED key is pushed.
③STOP key: It stops printing and cancels the alarm
Pushing this key once during printing puts the printer in pause mode after the label is issued. It is possible to cancel 1 batch of label issuing data by pressing the STOP key for 4 seconds or longer in pause status. (The LCD indicates "Job Clear" during cancel.)
④MENU key:
In normal operation, this key will enter the menu configuration mode. It can be configured to repeat the previous label, if preferred.
Menu Setup Mode (p.37)
LED Functions
① POWER LED
It lights up when printer power is turned on. (green)
②ERROR LED
This is lit or flashes when the printer is in error status. (orange)
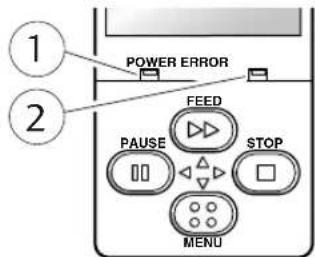
Table of Alarm and Error Indications
In addition to normal operating mode, when an abnormal condition is detected in the printer, an alarm sounds and ERROR LED either lights up or flashes to indicate the type of error. The LCD indicates the error message.
| Item ERROR LED LCD | ||
| Printing possible (no error) OFF On Line | ||
| Stop or Pause key on operation panel pressed OFF Pause | ||
| Head temperature - high temperature abnormality Flashing | Alarm Head Hot | |
| Head temperature - low temperature abnormality Flashing | Error Head Cold | |
| PF motor temperature abnormality | Flashing | Alarm PFMotor Hot |
| Fan motor malfunction | Flashing | Error Fan Lock |
| Cutter motor temperature abnormality | Flashing | Alarm Cutter Hot |
| Head open | Flashing | Error Head Open |
| Paper end | Flashing | Error Paper End |
| Paper out (paper position undetectable) | Flashing | Error Paper Load |
| Paper jam | Flashing | Error Paper Jam |
| Head low resistance value abnormality | Flashing | Alarm Head Check |
| Ribbon end | Flashing | Error Ribbon End |
| Communication error (receiving buffer overrun) | Flashing | Error Serial Over Run |
| Communication error (parity) | Flashing | Error Serial Parity |
| Communication error (framing) | Flashing | Error Serial Framing |
| Cover open | Flashing | Error Cover Open |
| *Auto-cutter abnormality (foreign object etc.) | Flashing | Error Cutter Fail |
| **Rewinder full (CL-S700R only) | Flashing | Error Rewinder Full |
| **Rewinder cover open (CL-S700R only) | Flashing | Error Rewinder Open |
| **Rewind fail (CL-S700R only) | Flashing | Error Rewind Fail |
| **Rewinder Hot (CL-S700R only) | Flashing | Alarm Rewinder Hot |
* Applicable only when using the optional auto cutter
** Applicable only with the rewinder version
Setting the Media
Media Sizes
The position of label and tag media is sensed by either a transparent sensor or a reflective sensor.
Transparent sensor: Detects the gaps between label media and notches of tag media
Reflective sensor: Detects the black mark
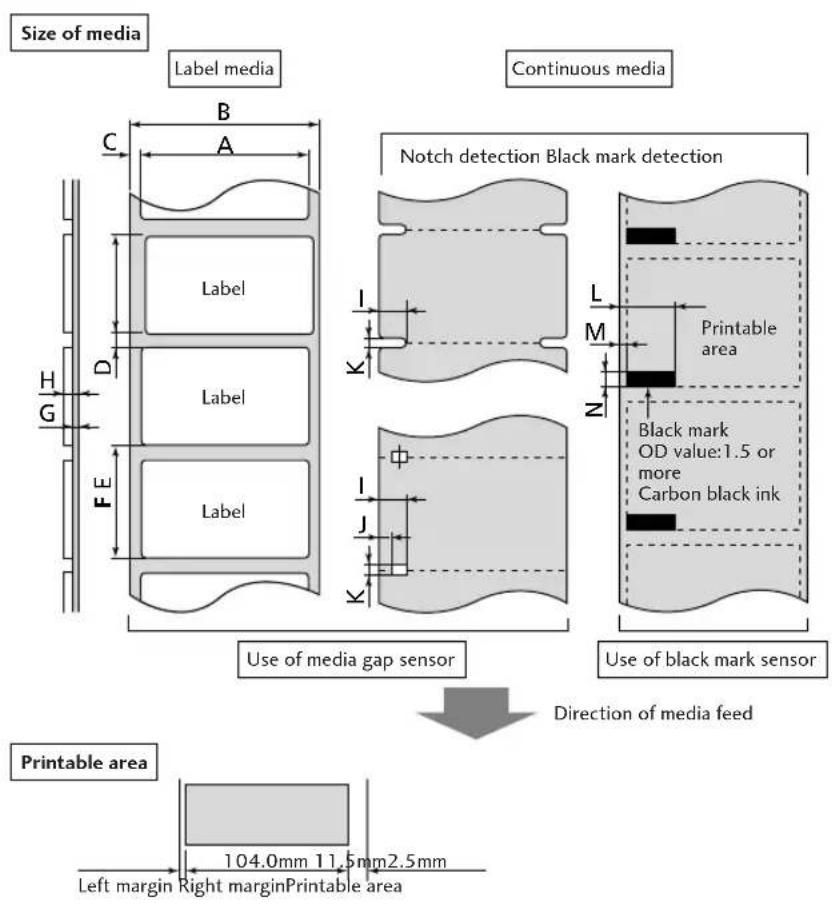
Setting the Media
Menu Setting Table (p.43)
Menu Setting Table (p.43)
When Using Front Sensors
| Minimum value mm (in) | Maximum value mm (in) | ||||
| A L | label width 7.62 (0.3) 118.00 (4.65) | ||||
| B L | ner width 25.40 (1.0) 118.00 (4.65) | ||||
| C L | left end of label 0 (0) | 2.54 (0.10) | 0 | ||
| D | Gap between labels | 2.54 (0.10) | 812.80 (32.00) | ||
| E | Label length | 6.35 (0.25) | 812.80 (32.00) | ||
| F | Label pitch | 6.35 (0.25) | 812.80 (32.00) | ||
| G | Liner thickness | 0.06 (0.0025) | 0.125 (0.0049) | ||
| H | Media thickness | 0.06 (0.0025) | 0.25 (0.01) | ||
| I | Right end of notch | 8.3 (0.32) | 11 (0.43) | ||
| J | Left end of notch | 0 (0) | 4.7 (0.19) | ||
| K | Notch length | 2.54 (0.10) | 17.80 (0.70) | ||
| L | Right end of black mark | 15.00 (0.59) | — — | ||
| M | Left end of black mark | 0 (0) | 1.5 (0.06) | ||
| N | Black mark width | 3.18 (0.125) | 17.80 (0.70) | ||
* Use a transparent sensor for label media gaps and media with black marks.
* Use a transparent sensor for fan fold media.
* If the label pitch is 1 inch or less, set the Small Media Adjustment menu to ON and match it to the label that uses the value of the Small Media Length menu.
When Using Adjustable Sensor
| Minimum value mm (in) | Maximum value mm (in) | ||||
| A Label width | 25.24 (1.0) 118.00 (4.65) | ||||
| B Liner width | 25.24 (1.0) 118.00 (4.65) | ||||
| C Left end of label 0 (0) 2.54 (0.10) | |||||
| D | Gap between labels | 2.54 (0.10) | 812.80 (32.00) | ||
| E | Label length | 12.70 (0.50) | 812.80 (32.00) | ||
| F | Label pitch | 12.70 (0.50) | 812.80 (32.00) | ||
| G | Liner thickness | 0.05 (0.0025) | 0.125 (0.0049) | ||
| H | Media thickness | 0.05 (0.0025) | 0.25 (0.01) | ||
| I | Right end of notch | 3.6 (0.14) | 60.8 (2.39) | ||
| J | Left end of notch | 0 (0) | 57.2 (2.25) | ||
| K | Notch length | 2.54 (0.10) | 17.80 (0.70) | ||
| L | Right end of black mark | 15.00 (0.59) | 66.5 (2.62) | ||
| M | Left end of black mark | 0 (0) | 51.5 (2.02) | ||
| N | Black mark width | 3.18 (0.125) | 17.80 (0.70) | ||
* Use a transparent sensor for label media gaps and media with black marks.
* Use a transparent sensor for fan fold media.
* If the label pitch is 1 inch or less, set the Small Media Adjustment menu to ON and match it to the label that uses the value of the Small Media Length menu.
Setting the Media
Installing the Media
- Push the large blue head-open lever to release the head unit, and then lift the sensor arm by hand as shown below.
![Head unit Sensor arm open lever Large blue-head open lever Sensor arm [Model CL-S700/CL-S703]](/content/2026/05/843535/images/4b651730054f312fa382d5671015bc3e4dd4a6200537143fc40fc59608c70286.jpg)
Media Sizes (p.23)
-
Firstly, slide the two black plastic parts of the media holder assembly together. Ensure correct alignment of the guide with the bar as it can only be installed in one direction.
-
Slide the roll of media over the media bar. The media guide must be on the right side of the roll of media (as viewed from the front of the printer) with the flat surface of the media guide touching the roll.
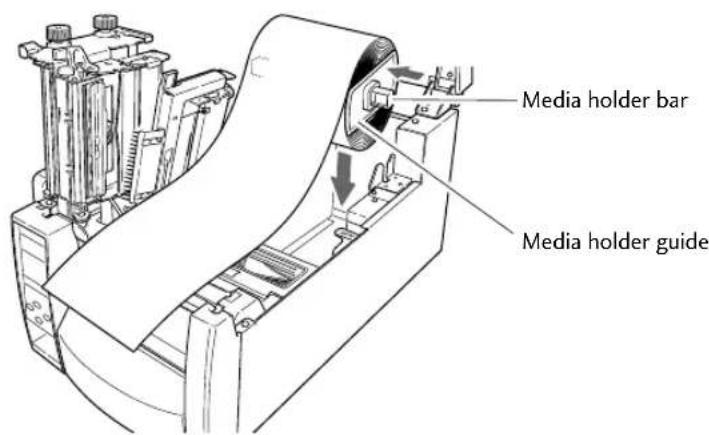
Setting the Media
Media Thickness Adjustment (p.57)
Media Width Adjustment (p.58)
- Set the media roll and media holder in to the printer as shown above. It is advisable to pull a length of media forwards and through the mechanism ready for later positioning.
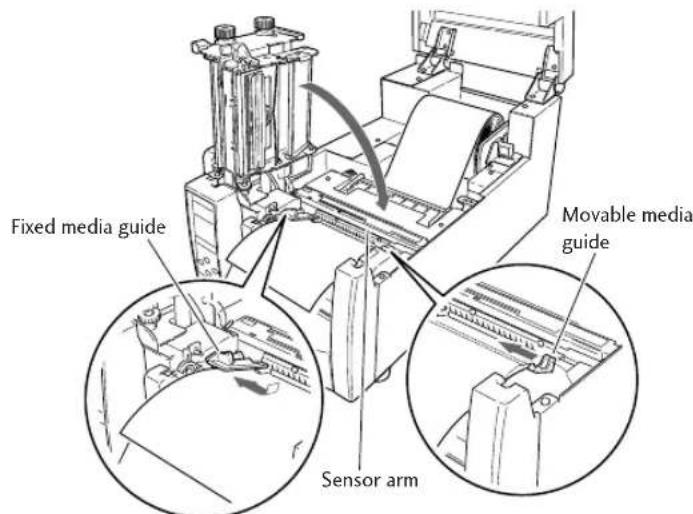
- Move the media roll so it is touching the left side of the housing. Then slide the black movable media guide so it is touching the media on the right side.
Note: Do not try to hold the media too tightly with these guides as it will cause the printer to jam during printing.
- Align the media with the left fixed media guide (2 locations), align the right movable media guide with the media width, and lower the sensor arm which loosely holds the media in position.
- Lower the head unit back down to the closed position. Push the head close knob firmly to close and lock the mechanism. The mechanism is only locked correctly when you head a "click". Align it with the width of the media that has been set, then set the media width adjustment screw and the media thickness adjustment knob. See "Chapter 3 Printer Adjustments".
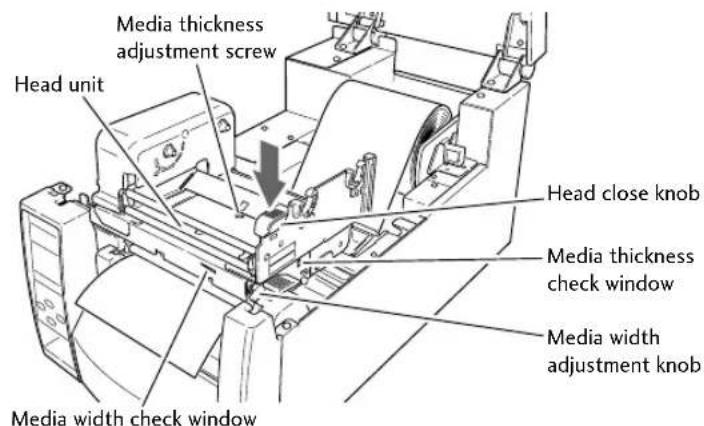
- With the power switched on, push the FEED key to feed the media. It will halt at the next print start position.
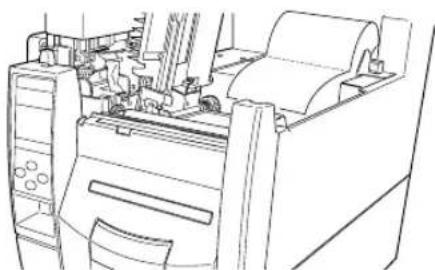
Using the Rewinder as a Peeler (CL-S700R models/Peeling Mode)
- Ensure that the optional rewinder paper guide is not installed.
natural_image
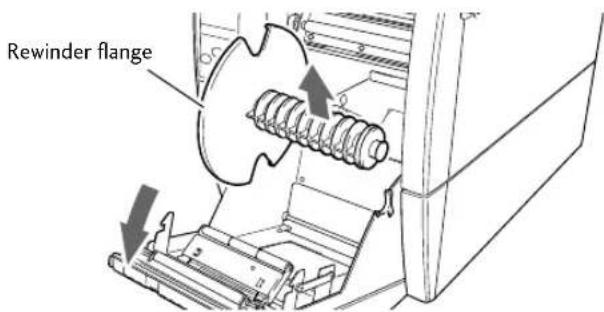
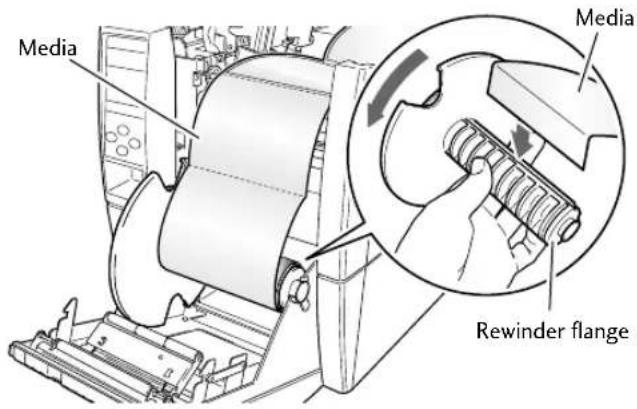
Line drawing of a printer with paper spool and mechanical components (no text or symbols)- Open the rewinder cover and remove the rewinder flange.
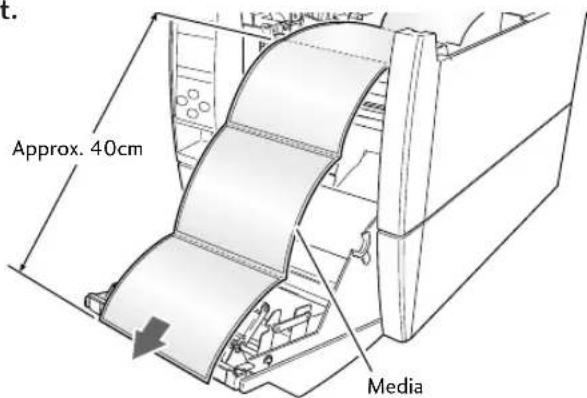
- Pull out approximately 40cm length of the media from the head unit.
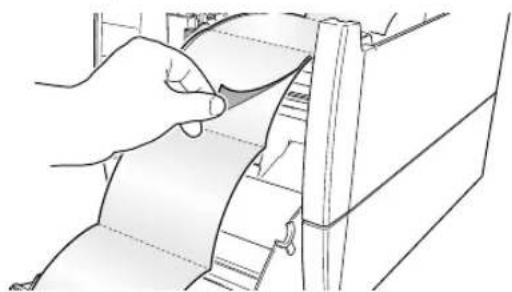
- Peel off a number of labels at the tip part of the media from the liner so that the liner unit is in contact with the peeler roller when closing the rewinder cover.
natural_image
Line drawing of a hand inserting a component into a machine (no text or symbols)2
Printer Operation
Setting the Media
Installing the Media (P.25)
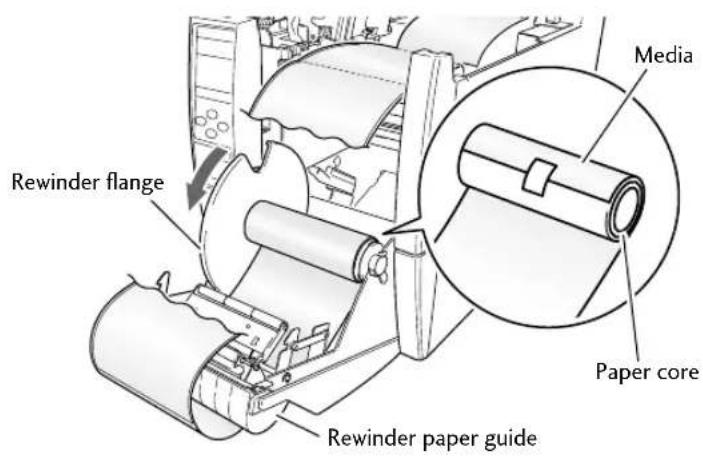
- Insert the end of the liner in to the slot in the rewinder flange and wind the liner on to itself with two or three turns to ensure it is held properly. Set the rewinder flange back in to the printer.
- Confirm that the liner unit is in place in the peeler roller and close the rewinder cover.
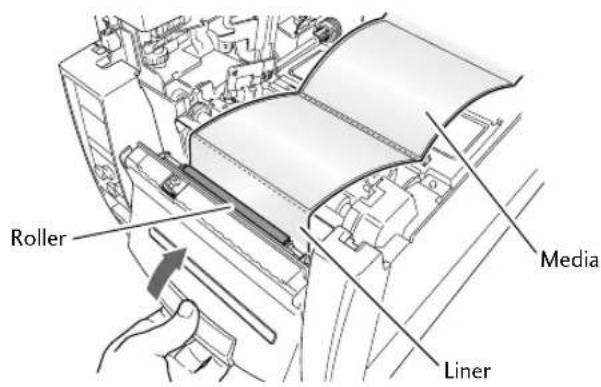

Caution
When closing the rewinder cover, be careful not to catch any foreign objects or fingers in the mechanism.
Setting the Media
Using the Rewinder for Batches of Printed Media (CL-S700R models/Rewind Mode)
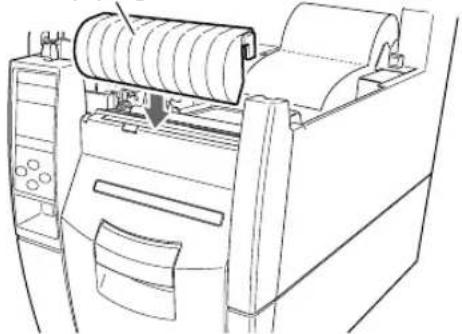
The optional Rewinder Paper Guide is necessary for batch mode rewinding. The optional Adjustable Rewinder Flange is necessary if a paper core is to be installed to receive the media.
- Hook the rewinder paper guide on the top of the rewinder cover.
Rewinder paper guide
natural_image
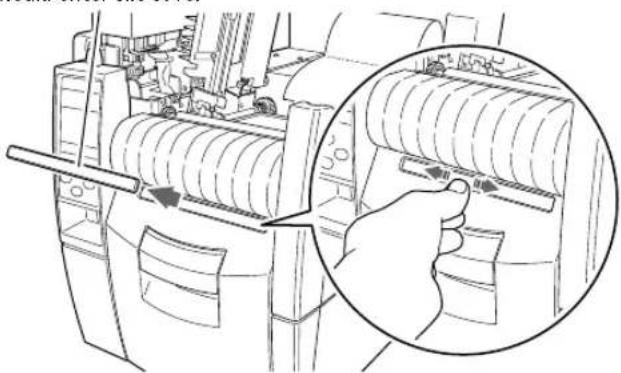
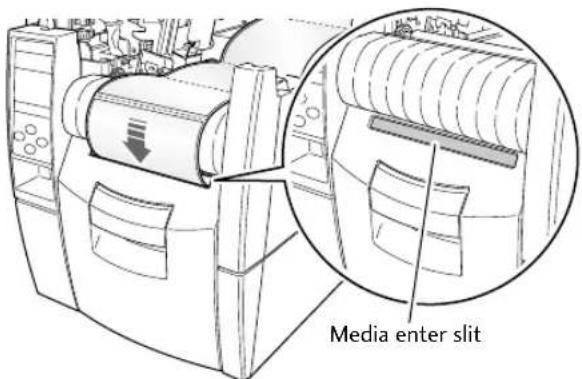
Line drawing of a mechanical device with rollers and a paper clip, no text or symbols present- Slide the media enter slit cover above the rewinder cover to the left or right while pressing down on its center and remove.
Media enter slit cover
natural_image
Technical line drawing of a mechanical assembly with a hand operating a tool, showing internal components and motion direction (no text or symbols)- Open the rewinder cover and remove the rewinder flange.
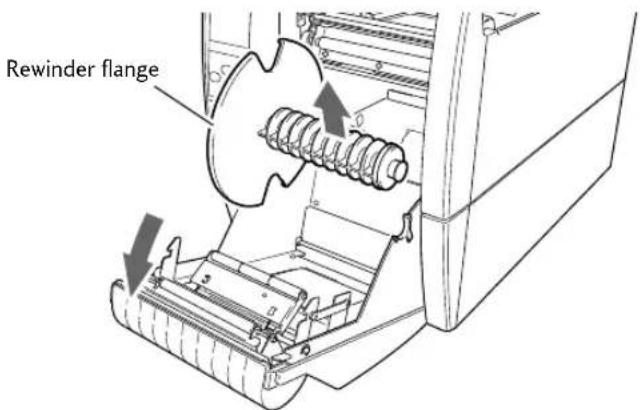
2
Printer Operation
Setting the Media
- Pull out approximately 80cm length of media from the head unit.
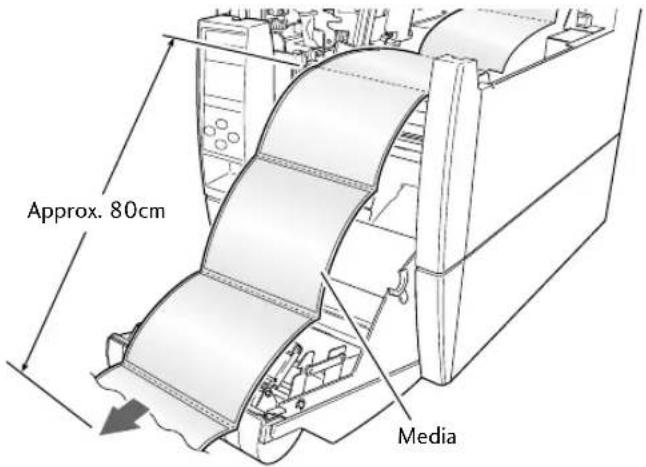
- Insert the tip of the media through the media enter slit from the external side of rewinder cover.
- Insert the end of the media in to the slot in the rewinder flange and wind the media on to itself with two or three turns to ensure it is held properly. Set the rewinder flange back in to the printer.
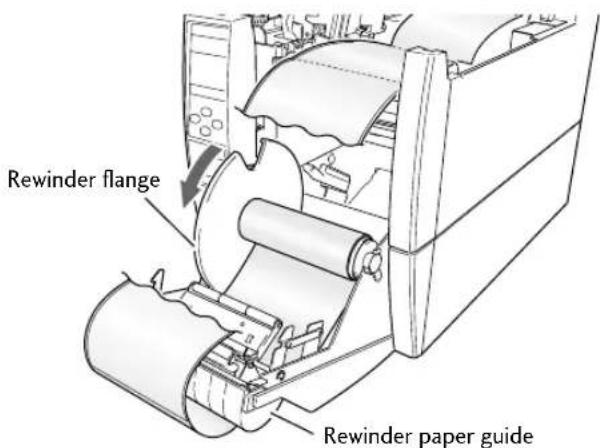
- If the optional adjustable rewinder flange is being used with a paper core, the media can be attached to the paper core directly with tape or glue. Then the flange is set in the printer. For details on installing and removing the cardboard refer to the instructions contained with the adjustable flange.
Setting the Ribbon
The following kinds and sizes of ribbons can be used.
Types ......Inside wound and outside wound ribbon
Max. ribbon width 114.0 mm (4.50 inch)
Min. ribbon width 25.4 mm (1.00 inch)
Max. ribbon length.... 450.0 m (1,476 ft)
Max. roll diameter 86.5 mm (3.40 inch)
Inner diameter of the paper core .... 25.4 ± 0.25 mm (1.00 ± 0.01 inch)
Lead tape length.... Less than 80.0 mm
Setting method
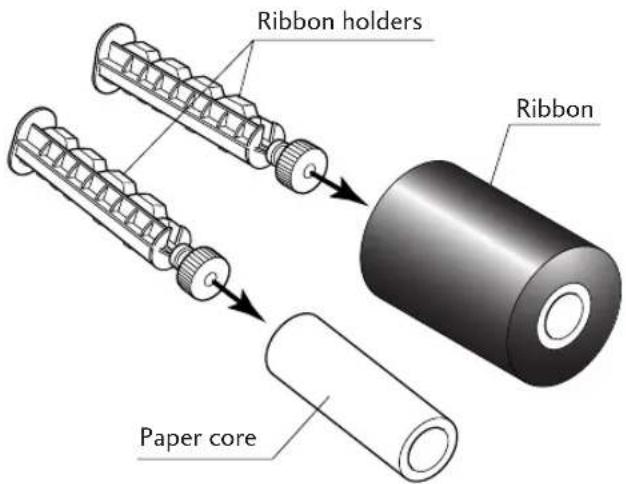
- Place the attached ribbon and paper core separately on one of the two attached ribbon holders. Insert the two ribbon holders into the ribbon and paper cores ensuring that they are pushed in all the way.
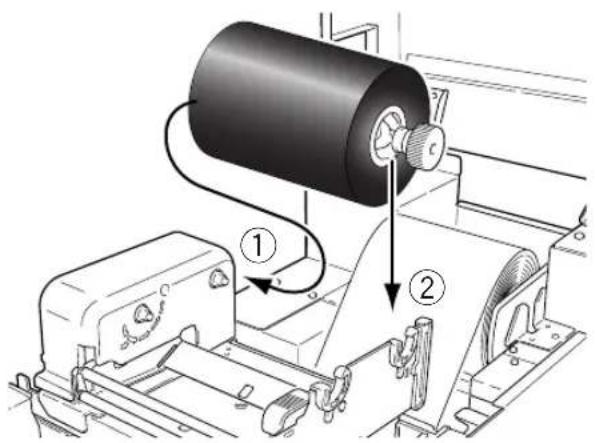
- Install the unused ribbon and holder in to the rear ribbon drive unit. The splines on the ribbon drive gear mechanism engage with the end of the ribbon holder.
Setting the Ribbon
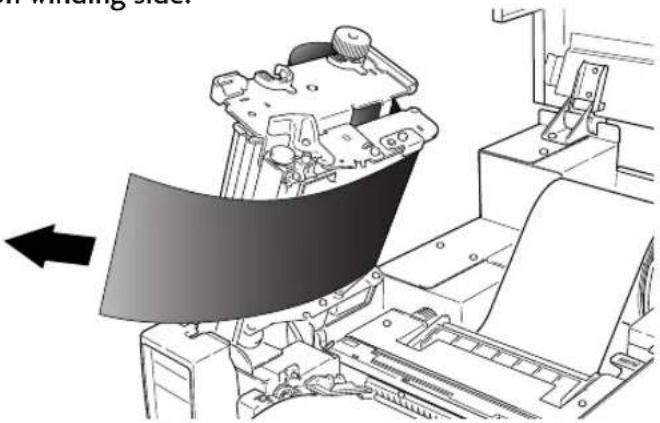
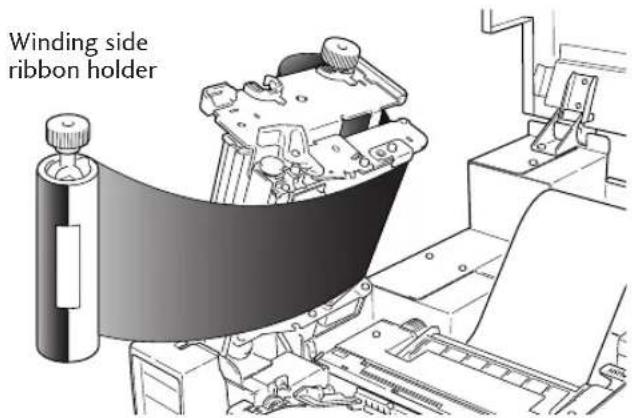
- Push the large blue head-open lever to release the head unit. Pull out the ribbon from the bottom of the head unit to the ribbon winding side.
natural_image
Mechanical assembly diagram showing a printer or printer with a curved cover and directional arrow (no text or symbols)- Using tape etc., fix the ribbon that you have pulled out on the ribbon holder on which the paper core has been set and wind it on the ribbon holder.
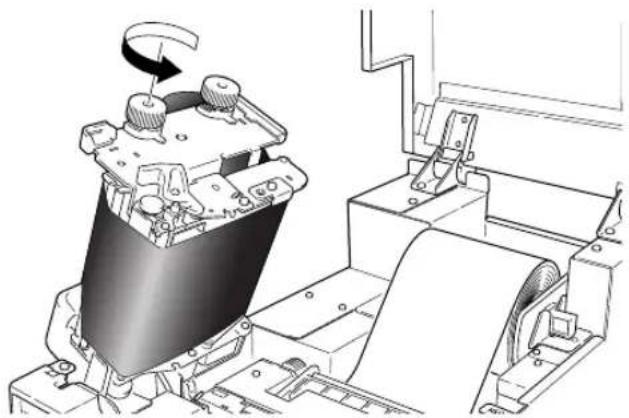
- Set the ribbon holder on which the paper core has been set in the ribbon drive unit, then rotate it in the direction shown by the arrow to remove slack and wrinkles from the ribbon.
natural_image
Technical line drawing of a mechanical assembly with no visible text or symbolsSetting the Ribbon
Adjusting the Ribbon (p.59)
- Lower the head unit back down to the closed position. Push the head close knob firmly to close and lock the mechanism. The mechanism is only locked correctly when you head a "click". If the ribbon is wrinkled, push the FEED key until the wrinkles disappear. If the wrinkles do not disappear or if it slips, perform ribbon tension adjustment and media width adjustment. See "Chapter 3 Printer Adjustments" for these adjustment methods.
![Head close knob [Model CL-S700/CL-S703]](/content/2026/05/843535/images/2acfeb5e8a86c17593bfddb7403cdf49e943896016009759aa9362208b1e1720.jpg)
Operation Panel (P.16)
Mode Settings
Turning on the power while pressing keys in the following combinations starts various functions.
| Mode Key operation | |
| HEX dump mode Turning | power on while pushing the STOP key. |
| Self print mode Turning | power on while pushing the FEED key. |
| Menu list print mode and Menu setup mode | Turning power on while pushing the MENU key. |
HEX Dump Mode
- When using label media
Turn on printer power while pushing the STOP key. If the POWER LED is lit and the LCD indicates "Hex Dump Mode" and "Label Media", release the STOP key, and then the printer enters HEX DUMP mode.
●When using continuous media
Turn on printer power while pushing the STOP key. If the POWER LED is lit and the LCD indicates "Hex Dump Mode" and "Label Media", and then changed to "Hex Dump Mode" and "Cont. Media", release the STOP key, and then the printer enters HEX dump mode.
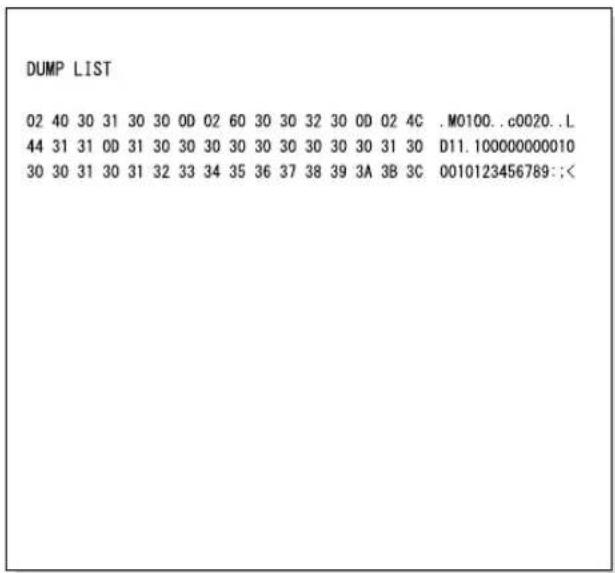
DUMP LIST
* To exit HEX Dump Mode, turn off the power to the printer then turn the power on again (restart).
2
Printer Operation
Mode Settings
Setting the Media (P.23)
Media Thickness Adjustment (p.57)
Media Width Adjustment (p.58)
Self Print Mode
Performing a self test print is an easy way to check on the state of printer settings and printing quality. Install the media as explained in "Installing the Media" and then operate the printer as follows.
●Case of label media
Turn on printer power while pushing the FEED key. When the LCD indicates "Self Print Mode" and "Label Media", release the FEED key. After it enters TEST MODE and media has fed, two labels print then printing stops. To repeat printing, press the FEED key once more.
●Case of continuous media
Turn on printer power while pushing the FEED key. When the LCD indicates "Self Print Mode" and "Label Media", and then changed to "Self Print Mode" and "Cont. Media", release the FEED key. After it enters TEST MODE and it prints then printing stops. To repeat printing, press the FEED key once more.
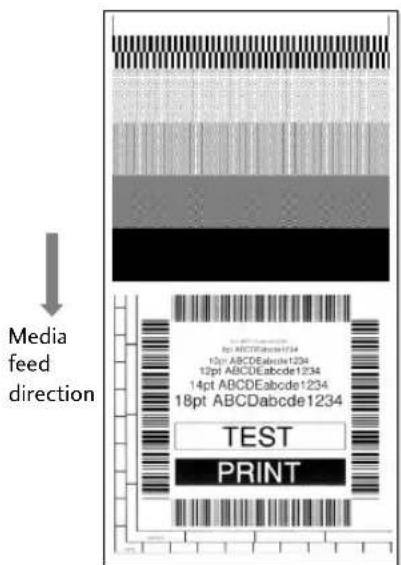
Self print pattern
Media Adjustments
Using the Self Test Print shown above, you can make adjustments to the printer settings such as media width and media thickness (printhead pressure). For more details of the adjustment, refer to "Chapter 3 Printer Adjustments."
natural_image
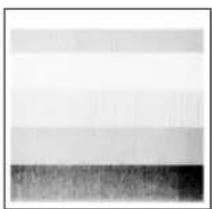
Abstract grayscale gradient with horizontal bands and a dark bottom band (no text or symbols)The first sample, left, shows an incorrectly set "media thickness adjustment". For standard label media, the media thickness adjustment indicator should be set to the center scale in the window.
natural_image
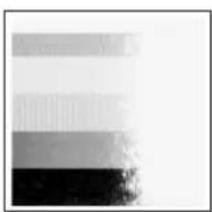
Abstract grayscale gradient with horizontal bands and a dark bottom layer (no text or symbols)The second sample, left, shows an incorrectly set "media width adjustment". For 4-inch or 100mm wide media, the adjuster should be set to the scale of 100 mm in the window.
The settings shown above are for general label media and may not apply to specialist media.
Menu Setup Mode
If the MENU key is pressed while the printer is in the On Line Ready state, the printer enters menu setup mode. In this mode, the printer's configuration can be changed using the operation panel. During menu setting mode, the LCD indicates the current menu settings and the key function.
Functions of the keys
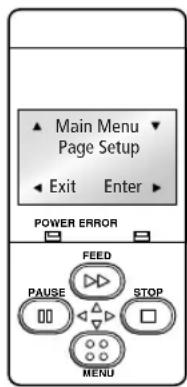
When you enter Menu Setup Mode, the LCD displays "Main Menu" on the top line and Page Setup below.
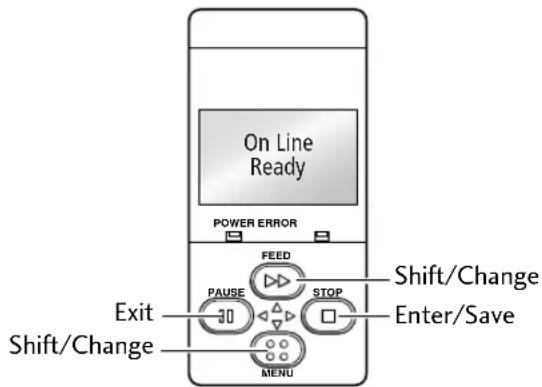
In the menu setup mode, the four keys become “cursor keys” to navigate the menu. Refer to the four small arrows in the centre of the keypad rather than the names of the keys.
FEED key (Shift/Change)
The ▲ key (Feed key) goes up the menu system or selects a higher value
MENU key (Shift/Change)
The ▼ key (Menu key) goes down the menu system or selects a lower value
STOP key (Enter/Save)
The ▶ key (Stop key) selects or saves the item or enters a menu
PAUSE key (Exit)
The ◀ key (Pause key) exits the current item (goes back) and eventually exits the menu system
The menu settings are stored temporarily in the printer's memory. They are only permanently stored in the printer setup when you exit the menu system and say "Yes" to the "Save Settings" question.

Caution
Turning the power off while the printer is performing the "Save Settings" function could cause a mis-save. Do not do this! If the power is accidentally turned off, first reset the printer to factory defaults.
Example of changing a menu
This is an explanation of the method of changing the set value of print darkness from "12" to "14" in a case where the main menu is "Page Setup" and the sub menu is "Print Darkness".
1. Entering Menu Setup Mode.
Ensure LCD displays "On Line Ready". Then press the MENU key to enter 'menu setup mode' where the printers settings can be changed or confirmed.
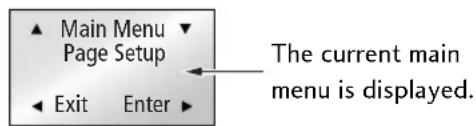
The following are the functions of each key.
▲ key: displays the previous menu item
▼ key: displays the next menu item
▶ key: enters the Page Setup menu
◀ key: enters the Save Settings section
flowchart
graph TD
    A["Page Setup"] -->|Press FEED| B["System Setup"]
    B --> C["After Print"]
    C --> D["Interface"]
    D --> E["Machine Info"]
    E --> F["Test Mode"]
    F --> G["Global Config"]
    H["Press MENU"] --> I["Press FEED"]
    I --> A
    J["Press MENU"] --> K["Press FEED"]
    K --> A
    L["Displays/changes System Setup"] --> B
    M["Displays/changes After-Print Action Setup"] --> C
    N["Displays/machine information"] --> E
    O["Press MENU"] --> P["Press FEED"]
    Q["Displays/changes set numbers"] --> R["Press MENU"]
Mode Settings
2. Entering Sub menu.
Press the ▶ key. The currently set item, "Print Speed", is displayed.  The following are the functions of each key. ▲ key: displays the previous sub menu ▼ key: displays the next sub menu ▶ key: displays the values set by the selected sub menu ◀ key: returns to the main menu3. Selecting "Print Darkness" from the sub menu.
Press the ▼ key one time to display "Print Darkness". It is the second item within "Page Setup". 4. Displaying the set value of "Print Darkness".
Press the ▶ key and the value "12" - the currently set value - is displayed.  The following are the functions of each key. ▲ key: displays the higher value (13, in this case) ▼ key: displays the lower value (11, in this case) ▶ key: the current value is temporarily saved ◀ key: exits "Print Darkness" and ignores any value changes5. To change the value of Print Darkness to 14.
Press the ▲ key two times to display “14” on the screen. Then press the ▶ key to temporarily save the value into the printer RAM. 2
Printer Operation
Mode Settings6. Save Changes to Settings.
Unless you save your settings, your changes will be lost when you turn off the printer.To Save Changes
① Press the ◀ key twice to display the message "Save Settings No-Discard". ▲ Save Settings ▼ No-Discard Exit Enter ② Press the ▲ key or the ▼ key to display the message "Save Settings Yes-Save". ▲ Save Settings ▼ Yes-Save ◀ Exit Enter ▶ ③Press the ▶ key. The new settings will be saved and the printer will return to the "On Line Ready" screen. On Line Ready■ Changing the Interface and Emulation Settings
Changes to interface or emulation settings require a printer restart (or reboot) to take effect. The printer will offer to do this when needed by displaying the following message after saving the settings: \- The screen shown on the right will be displayed when "Save Settings Yes-Save" is selected. ▲Reboot System▼ No ◀ Exit Enter ▶ \- Press the ▲ key or the ▼ key to display the message "Reboot System Yes". ▲Reboot System▼ Yes \- Press the ▶ key and reboot the printer. ◀ Exit Enter ▶To Discard Changes
① Press the ◀ key twice to display the message "Save Settings No-Discard". ▲ Save Settings ▼ No-Discard Exit Enter ②Press the ▶ key. The printer will return to the "On Line Ready" screen. The new settings will be lost when the printer is turned off. On Line ReadyMode Settings
Example of changing a menu (p.38)Printing a List of Settings
You can get a list of the configuration settings in two ways: - Press MENU key whilst turning the printer on. The Power LED flashes and "Print Settings" is displayed on the LCD. After printing, the printer will enter Menu Setup Mode. - You can access the configuration print via the "Test Mode, Print Pattern, Current Config" from the setup menu.Machine Information
Model Number : CL-S700 Boot Version : \*\*\*\* ROM Version : \*\*\*\*\* ROM Date(DD//MM//YY) : XX/XX/XX ROMCheck Sum : \*\*\*\* Head Check : OK Print Counter : 0002.234km Service Counter : 0002.234km Sensor Monitor : 1.50V Option Interface : NoneCurrent Menu Setting
[PageSetup Menu] Print Speed : 7 IPS Print Darkness : 12 Darkness Adjust : 00 Print Method : Thermal Transfer Continuous Media Length : 4.00 inch Vertical Position : 0.00 inch Horizontal Shift : 0.00 inch Vertical Image Shift : 0.00 inch Sensor Select : Rear Adj Sensor Media Sensor : See Through Small Media Adjustment : Off Small Media Length : 1.00 inch Symbol Set : PM [System Setup Menu] Sensor Level : 1.7 V Paper End Level : 2.80 V Error Reporting : On Printing Cover Open Sensor : Off Buzzer Select : On Metric/Inch : Inch Max Media Length : 10.00 inch Setting Lock : Off Keyboard Lock : Off Control Cod : STD Emulation Select : DM4 [After Print Menu] AutoConfigure : On Function Select : Tear Cutter Action : Backfeed Paper Position : 0.00 inch Menu Key Action : Enters Menu [Interface Menu] RS-232C Baudrate : 9600 RS-232C Parity : None RS-232C Length : 8 bit RS-232C Stop bit : 1 bit RS-232C X-ON : Yes IEEE1284 : On USB Device Class : Printer USB VCOM Protocol : AutoMode Settings
Global Configuration Sets
The printer can store three sets of configuration settings that can be recalled quickly and easily. Each "Config Set" (1, 2 or 3) can contain completely different configuration settings for all menu parameters. For example, "Config Set 1" could be configured for 5 ips print speed, thermal transfer labels, print darkness 18. "Config Set 2" next could be 8 ips continuous card media with black mark, print darkness 12. The ability of having three sets of settings is ideal for someone who prints on different media types regularly, for example in a label printing bureau. Global config settings can be printed using the "Test Menu, Print Pattern, Global Config" menu option. It will also display the currently active "Config Set": Menu Setting Table
Page Setup Menu - allows you to change settings related to the media or print quality. System Setup Menu - allows you to change settings for the printer hardware and basic control systems. After Print Menu - changes how the printer reacts after the label has been printed. Interfaces - changes interface parameters such as baud rate. Machine Information, Test Mode - allows you to check and/or print test pages and information about the printer. Global Config menu - allows you to switch between 3 complete 'config sets' contained within the printer.Menu Setting
Press the MENU key in print possible status to enter MENU Setup Mode. Use the keys on the operation panel according to the LCD display to setup the printer. The contents that can be setup on the printer are shown below. And the items that are actually displayed on the LCD are shown in [ ].■ Datamax® Emulation
Top Menu Sub Menu Default Menu Remarks| Page Setup Print Speed* 7 IPS 2 to 10 IPS [For CL-S700/CL-S700R] | |||
| 7 IPS 2 to 8 IPS [For CL-S703] | Printing speed setting. | ||
| Printing speed setting. | |||
| Print Darkness 12 00 to 30 | Adjusting print darkness. | ||
| Darkness Adjust [Darkness Adj] | 00 | -10 to 10 | Fine adjustment of darkness commands. |
| Print Method | TT | TT (Thermal Transfer) DT (Direct Thermal) | Selection of Thermal Transfer (ribbon) or Direct Thermal. |
| Continuous Media Length [Cont Media Len] | 4.00 inch 101.6 mm | 0.25 to 32.00 inch 6.4 to 812.8 mm | Setting media length of continuous media. Lower level = during mm mode. |
| Vertical Position [Vertical Pos] 0.0 mm | 0.00 inch -25.4 to 25.4mm | -1.00 to 1.00 inch | Adjusting printing start position. |
| Horizontal Shift [Horizontal Shif] | 0.00 inch 0.0 mm | -1.00 to 1.00 inch -25.4 to 25.4mm | Adjusting horizontal image position. |
| Vertical Image Shift [Vertical Image] | 0.00 inch 0.0 mm | 0.00 to 32.00 inch 0.0 to 812.8mm | Adjust the off set value in vertical when mapping data on a RAM. |
| Sensor Select | Rear Adj Sensor | Rear Adj Sensor Front Fixed Sen | Selecting front fixed/rear adj. sensor. |
| Media Sensor | See Through | See Through Selecting media sensor. Reflect None | |
| Small Media Adjustment [Small Media Adj] | Off | On Off | Setting for small media. |
| Small Media Length [Small Media Len] | 1.00 inch 25.4 mm | 0.25 to 1.00 inch 6.4 to 25.4mm | Setting media length for small media. |
| Symbol Set | PM | 50 symbols | Setting symbol set. |
| System Setup | Sensor Monitor | - | Displays level of sensor that is currently selected. |
| Sensor Level | 1.4 V | 0.0 V to 3.0 V Selects threshold of the sensor. | |
| Paper End Level | 2.80 V | 0.01 V to 3.00 V Sets the paper end level. | |
| Error Reporting [Error Report] | On Printing | On Printing Immediate Setting for error report. | |
Mode Settings
[Datamax® Emulation]
Top Menu Sub Menu Default Menu Remarks| Cover Open Sensor Off On Sets the cover open sensor.[Cover Sensor] Off | ||||
| Buzzer Select Exec/Err Exec/Err Setting buzzer sounding conditions. | ||||
| All | ||||
| Error | ||||
| Key | ||||
| None | ||||
| Metric/Inch Inch Sets the units.[Metric/Inch Sel] | mm | |||
| Max Media Length[Max Media Len] | 10.00 inch254.0 mm | 1.00 to 50.00 inch25.4 to 1270.0 mm | Sets the maximum media length. | |
| Settings Lock Off On Prevents a command changing the set value.Off | ||||
| Keyboard Lock | Off On Prevents a change by a key operation.Off | Note: Hold down the Menu Key for at least 4 seconds to enter the Menu Setup Mode when setting the “On” menu. | ||
| Control Code | STD | STD Switches command mode of DMX mode.ALT | ||
| Emulation Select[Emulation Sel] DMI | DM4DM4: DataMax | DM4DPP DMI: DataMaxZPI2 | Selects DataMax^®/Zebra^® compatibility ^® 400 ^® IClassDPP: DataMax^®Prodigy Plus^® ZPI2: Zebra ^® 2844Z | |
| Emulation Auto Detect[Emulation Auto] | On On Setting emulation (as above) auto detection.Off | |||
| After Print | AutoConfigure[Auto Config] | On | OnOff | Automatically configures optional devices.On .... AutoConfigure enabled (Regardless of whether Function Select is set, if a peeler or cutter is installed, each mode is set automatically.)Off ... AutoConfigure disabled (A peeler of cutter is installed, but to not operate the peeler or cutter, turn it Off and the operation is selected by Function Select.) |
| Function Select[Function Sel] | Tear Off | Selects the operation when theTear AutoConfigure is set to Off. Designates the Peel On*cut On** operation of this device is enabled during Rewind*** | paper position based on each option. The selection. At the same time, the parameters of the f command of Prodigy Plus are emulated for each optional device. | |
| Cutter Action | Backfeed Backfeed | Sets the cutter action.Through With the optional AutoConfigure On, printingis executed only when the cutter is installed or only when Cut is selected by Function Select.Backfeed is always set after cutting.Through is set at the rear end of sheets 1 to n-1 when the number of copies = n, and the rear end of the final page of single sheet and the copy is backfeed. | ||
| Rewinder Auto Off On [CL-S700R only] Online*** Off Sets the Rewinder Auto Online. [Rew Auto Online] In the case in which the setting is On, when | ||||
| Rewinder Online 2 sec 1 to 10 sec Delay*** [Rew OnlineDelay] | [CL-S700R only] Sets the Rewinder Online Delay. Sets the time until the Rewinder restarts after the Rewinder Cover is closed when the above Rewinder Auto Online is On. | |||
| Rewinder Torque*** | 4 | 1 to 7 | [CL-S700R only] Sets the Rewinder Torque. | |
| Peel Wait Delay** | 0.1 sec | 0.1 to 2.0 sec | Sets the Peel Wait Delay. Displays only machines with a peeler installed. | |
| Paper Position | 0.00 inch 0.00 mm | Peel/Cut/Tear Off 0.00 to 2.00 inch 0.0 to 50.8 mm Peel/Cut/Tear On -1.00 to 1.00 inch -25.4 to 25.4 mm | Adjusts the stop position. It is based on the inch/millimeter setting. There are initial values of the stop position for each device set above, and later, relative values are set. | |
| Menu Key Action | Enters Menu | Enters Menu Repeat Last Set Enters Repeat Last One | Sets the menu key action. Enter the menu setup mode. Repeat Last Set: Repeats the number of copies. Repeat Last One: Last one is issued only for the final page. In the case of a count, afterwards, only last one is issued. Note: Hold down the MENU key for at least 4 seconds in order to enter the Menu Setup Mode when setting the "Repeat Last Set" or "Repeat Last One" menus. | |
| Interfaces | RS-232C Baud | 9600 | 115200 57600 38400 19200 9600 4800 2400 | Setting the baud rate of the serial interface. • All settings related to the interface are enabled after the power is reconnected. |
| RS-232C Parity | None None | Odd Even | Setting the communication parity for the serial interface. | |
| RS-232C Length | 8 bits | 8 bits 7 bits | Setting the character length for the serial interface. | |
| RS-232C Stop bit [RS-232C Stopbit] | 1 bit | 1 bit 2 bits | Setting the stop bit for the serial interface. | |
| RS-232C X-ON | On Yes | On Yes Off No | Selectively setting the X-ON flow control of the serial interface. | |
| IEEE1284 | On | On Off Interface. | Setting both direction of the Centro | |
| USB Device Class [USB Device Clas] | Printer | Printer VCOM | Selects the USB device class. | |
Mode Settings
[Datamax® Emulation]
Top Menu Sub Menu Default Menu Remarks| USB VCOM Protocol Auto Auto Selects the protocol (flow control) when [VCOM Protocol] DTR operating USB VCOM. X-ON | ||||
| Machine Model Information [Machine Info] | Number - CL-S*** | Displays the model name. | ||
| Boot Version | - *.* | Displays the boot version. | ||
| ROM Version | - ***** | Displays the ROM version. | ||
| ROM Date | - **/**/** | Displays the date the ROM was prepared. | ||
| ROM CheckSum | - **** | Displays the check sum of the ROM. | ||
| Head Check | - OK | Displays the results of the head check. NG | ||
| Print Counter | - ****.*** km | Displays the print counter. | ||
| Service Counter | - ****.*** km | Displays the service counter. | ||
| Sensor Monitor | - *.* V | Displays the sensor level. | ||
| Option Interface [Option I/F] | - None | Displays the presence/absence of the LAN optional interface. | ||
| Test Mode | Print Pattern | Current Config | Current Config Global Config Sample | Executes the test pattern. |
| Head Check | No | Yes No | Executes head check. | |
| Factory Default | No | Yes No | Initializes the set values of the configuration set to the state when the unit was shipped from the factory. | |
| Hex Dump | No | Yes No | Sets the hex dump mode. | |
| Serial Monitor | -- | Displays the state of the serial interface. | ||
| Auto Calibration [Auto Cal] | See Through | See Through Reflect | Executes the calibration of the sensor. | |
| Sensor Monitor | See Through | See Through Reflect | Displays the level of the sensor. | |
| Global configuration [Global Config] | - | Config Set 1 | Config Set 1 Config Set 2 Config Set 3 | Sets the Config Set. |
■ Zebra® Emulation
Top Menu Sub Menu Default Menu Remarks| Page Setup Print Speed* 7 IPS 2 to 10 IPS [For CL-S700/CL-S700R] | ||||
| 7 IPS 2 to 8 IPS [For CL-S703] | Printing speed setting. | |||
| Printing speed setting. | ||||
| Print Darkness 12 00 to 30 Adjusting print darkness. | ||||
| Darkness Adjust [Darkness Adj] | 00 | -10 to 10 | Fine adjustment of darkness commands. | |
| Print Method | TT | TT (Thermal Transfer) DT (Direct Thermal) | Selection of Thermal Transfer (ribbon) or Direct Thermal. | |
| Continuous Media Length [Cont Media Len] | 4.00 inch 101.6 mm | 0.25 to 32.00 inch 6.4 to 812.8 mm | Setting media length of continuous media. Lower level = during mm mode. | |
| Vertical Position [Vertical Pos] 0.0 mm | 0.00 inch -25.4 to 25.4mm | -1.00 to 1.00 inch | Adjusting printing start position. | |
| Horizontal Shift [Horizontal Shif] | 0.00 inch 0.0 mm | -1.00 to 1.00 inch -25.4 to 25.4mm | Adjusting horizontal image position. | |
| Sensor Select | Rear Adj Sensor | Rear Adj Sensor Front Fixed Sen | Selecting front fixed/rear adj. sensor. | |
| Media Sensor | See Through | See Through Selecting media sensor. Reflect None | ||
| Small Media Off Adjustment [Small Media Adj] | On | Off Setting for small media. | ||
| Small Media Length [Small Media Len] | 1.00 inch 25.4 mm | 0.25 to 1.00 inch 6.4 to 25.4mm | Setting media length for small media. | |
| Symbol Set | PM | 50 symbols | Setting symbol set. | |
| System Setup | Sensor Monitor | - | - | Displays level of sensor that is currently selected. |
| Sensor Level | 1.4 V | 0.0 V to 3.0 V | Selects threshold of the sensor. | |
| Paper End Level | 2.80 V | 0.01 V to 3.00 V | Sets the paper end level. | |
| Error Reporting [Error Report] | On Printing | On Printing Immediate | Setting for error report. | |
| Cover Open Sensor [Cover Sensor] | Off | On Off | Sets the cover open sensor. | |
| Buzzer Select | Exec/Err | Exec/Err All Error Key None | Setting buzzer sounding conditions. | |
| Metric/Inch [Metric/Inch Sel] | Inch Inch | Sets the units. mm | ||
| Max Media Length [Max Media Len] | 10.00 inch 254.0 mm | 1.00 to 50.00 inch 25.4 to 1270.0 mm | Sets the maximum media length. | |
| Settings Lock Off | On | Prevents a command changing the set value. | ||
| Keyboard Lock | Off | On Off | Prevents a change by a key operation. Note: Hold down the Menu Key for at least 4 seconds to enter the Menu Setup Mode when setting the “On” menu. | |
Mode Settings
[Zebra® Emulation]
Top Menu Sub Menu Default Menu Remarks| Media Power Up Off On Selects whether or not to initiate mediaOff measurement when the power in ON. | ||||
| CI Lock Off On Activates/deactivates the CI command.Off | ||||
| Emulation Select ZPI2 DM4 Selects DataMax®/Zebra® compatibility[Emulation Sel] | DMI | DM4: DataMax® 400 | ||
| DPP | DMI: DataMax®IClass | |||
| ZPI2 | DPP: DataMax®Prodigy Plus®ZPI2: Zebra® 2844Z | |||
| Emulation Auto Detect | On | On Setting emulation (as above) auto detection.Off | ||
| [Emulation Auto] | ||||
| After Print | AutoConfigure [Auto Config] | On | On | Automatically configures optional devices.On.... AutoConfigure enabled (Regardless of whether Function Select is set, if a peeler or cutter is installed, each mode is set automatically.)Off ... AutoConfigure disabled (A peeler of cutter is installed, but to not operate the peeler or cutter, turn it Off and the operation is selected by Function Select.) |
| Function Select [Function Sel] | Tear Off Selects the operation when the Tear Peel On* Cut On** operation of Rewind*** | AutoConfigure is set to Off. Designates the paper position based on each option. The this device is enabled during selection. At the same time, the parameters of the f command of Prodigy Plus are emulated for each optional device. | ||
| Cutter Action | Backfeed Backfeed Through | Sets the cutter action.With the optional AutoConfigure On, printing is executed only when the cutter is installed or only when Cut is selected by Function Select.Backfeed is always set after cutting.Through is set at the rear end of sheets 1 to n-1 when the number of copies = n, and the rear end of the final page of single sheet and the copy is backfeed. | ||
| Rewinder Auto Online*** [Rew Auto Online] | Off On [CL-S700R only]Off Sets the Rewinder Auto Online. | |||
| Rewinder Online 2 sec Delay*** [Rew OnlineDelay] | 1 to 10 sec | [CL-S700R only]Sets the Rewinder Online Delay.Sets the time until the Rewinder restarts after the Rewinder Cover is closed when the above Rewinder Auto Online is On. | ||
| Rewinder Torque*** | 4 1 to 7 | [CL-S700R only]Sets the Rewinder Torque. | ||
| Peel Wait Delay** | 0.1 sec | 0.1 to 2.0 sec | Sets the Peel Wait Delay.Displays only machines with a peeler installed. | |
Mode Settings
[Zebra® Emulation]
Top Menu Sub Menu Default Menu Remarks| Paper Position 0.00 inch Peel/Cut/Tear Off Adjusts the stop position. It is based on the 0.00 mm 0.00 to 2.00 inch/in millimeter setting. There are initial 0.0 to 50.8 mm values of the stop position for each device Peel/Cut/Tear On set above, and later, relative values are set. -1.00 to 1.00 inch -25.4 to 25.4 mm | ||||
| Menu Key Action Enters Menu Enters Menu Sets the menu key action. Repeat Last One Enters Menu: Enters the menu setup mode. Repeat Last One: Last one is issued only for the final page. In the case of a count, afterwards, only last one is issued. Note: Hold down the MENU key for at least 4 seconds in order to enter the Menu Setup Mode when setting the "Repeat Last One" menu. | ||||
| Interfaces | RS-232C Baud | 9600 | 115200 57600 38400 19200 9600 4800 2400 | Setting the baud rate of the serial interface. All settings related to the interface are enabled after the power is reconnected. |
| RS-232C Parity | None | None Odd Even | Setting the communication parity for the serial interface. | |
| RS-232C Length | 8 bits | 8 bits 7 bits | Setting the character length for the serial interface. | |
| RS-232C Stop bit [RS-232C Stopbit] | 1 bit | 1 bit 2 bits | Setting the stop bit for the serial interface. | |
| RS-232C X-ON | On Yes | On Yes Off No | Selectively setting the X-ON flow control of the serial interface. | |
| IEEE1284 | On | On Off | Setting both direction of the Centro Interface. | |
| USB Device Class [USB Device Clas] | Printer | Printer VCOM | Selects the USB device class. | |
| USB VCOM Protocol [VCOM Protocol] | Auto | Auto DTR X-ON | Selects the protocol (flow control) when operating USB VCOM. | |
| Machine Information [Machine Info] | Model Number | - | CL-S*** | Displays the model name. |
| Boot Version | - | *.* | Displays the boot version. | |
| ROM Version | - | ********** | Displays the ROM version. | |
| ROM Date | - | **/**/** | Displays the date the ROM was prepared. | |
| ROM CheckSum | - | **** | Displays the check sum of the ROM. | |
| Head Check | - | OK NG | Displays the results of the head check. | |
| Print Counter | - | ****.*** km | Displays the print counter. | |
| Service Counter | - | ****.*** km | Displays the service counter. | |
| Sensor Monitor | - | *.* V | Displays the sensor level. | |
| Option Interface - [Option I/F] | None LAN | Displays the presence/absence of the optional interface. | ||
Mode Settings
[Zebra® Emulation]
Top Menu Sub Menu Default Menu Remarks| Test Mode Print Pattern Current Config Current Config Executes the test pattern.Global ConfigSample | |||
| Head Check No Yes | Executes head check.No | ||
| Factory Default | No | YesNo | Initializes the set values of the configurationset to the state when the unit was shippedfrom the factory. |
| Hex Dump | No Yes | Sets the hex dump mode.No | |
| Serial Monitor | - | - | Displays the state of the serial interface. |
| Auto Calibration[Auto Cal] | See Through | See ThroughReflect | Executes the calibration of the sensor. |
| Sensor Monitor See Through | See Through Displays the level of the sensor.Reflect | ||
| Globalconfiguration[Global Config] | Config Set 1 | Config Set 1Config Set 2Config Set 3 | Sets the Config Set. |
Quick Setup of the Print Method
The print method (thermal transfer method/direct thermal method) can be set using operation panel in addition to menu setting mode. Caution
Be sure to always shut off the operation of print before changing a setting. You cannot change a setting during printing (including pause).Setting method
Keep the MENU key held down. Each time the PAUSE key is pushed, the printer switches between thermal transfer mode and direct thermal mode.  Hold Press/Release ■If thermal transfer is selected, the buzzer sounds once and the LCD briefly displays "Print Method, TT" before returning on-line. ■If direct thermal is selected, the buzzer sounds twice and the LCD briefly displays "Print Method, DT" before returning on-line. Note: If you just press the MENU button on its own and do not press PAUSE, you will enter the full Menu Setup Mode. Menu Setup Mode (p.27, p43, p47)Emulation Auto-Detection
Ordinarily emulation switching is conducted in the Menu Setup mode. However, switching can also be conducted using the Emulation Auto-Detection function outlined below. The following message is displayed on the LCD when the Zebra® emulation (ZPI2) command is detected during Datamax® emulation.  By selecting "Yes" the printer will reboot and automatically switch to ZPI2 emulation. The printer will return to the On Line Ready status if "No" is selected. The following message is displayed in the LCD when the Datamax® command is detected during Zebra® emulation.  By selecting "Yes" the printer will reboot and automatically switch to Datamax® emulation (DM4/DMI/DPP). The printer will return to the On Line Ready status if "No" is selected. Note: • The Emulation Auto-Detection function will not work if the "Emulation Auto Detect" command in the Sub Menu in the "System Setup" in the Top Menu is set to "Off". (The command is set to "On" when shipped from the factory) - After the Emulation Auto-Detection function is activated, this function will not work unless the printer is turned Off and then turned On again. Menu Setup Mode (p.37) Menu Setting Table (p.43)Setting the menu for the Rewinder (CL-S700R only)
Set the Menu Setup Mode as follows to use the rewinder function.When rewinding the liner using the peeler
Ensure that the "Function Sel (sub menu)" is set to "Peel On". When the "Auto Config (sub menu)" is set to "On", "Peel On" mode is automatically selected.When rewinding printed media without using the peeler
Set the "Function Sel (sub menu)" is set to "Rewind".IMPORTANT!
If the "Rewind" operation is to be used permanently, you must switch the "Auto Config" menu option to "Off". Otherwise, when the printer is switched on again, the Auto Configuration selects Peel mode by default.Rewinder Capacity Display
The LCD shows how much liner or media is on the rewinder flange at any given time. If the rewinder is full, an error will be displayed on the LCD. flowchart
graph TD
    A["On Line Ready"] --> B["Rewind"]
    B --> C{0 to 33%}
    C --> D["0 to 33%"]
    C --> E["33 to 66%"]
    C --> F["66 to 99%"]
    C --> G["100% (The LCD will indicate an error if you attempt to print in this state)"]
    H["--- When the door is released"] --> I["0 to 33%"]
    I --> J["0 to 33%"]
    I --> K["33 to 66%"]
    I --> L["66 to 99%"]
    I --> M["100% (The LCD will indicate an error if you attempt to print in this state)"]
    N["Off Rewinder function off"] --> O["0 to 33%"]
Sensor Adjustments and Calibration
The sensing level of both the transparent (see thru) and reflective sensors is adjusted separately and independently. Firstly, the sensor type must be selected using the Sensor Method Selection shown below. Then the adjustment and calibration of the sensor can be made. The front sensor or adjustable sensor is selected using the Adjustable sensor on the sub menu that is in Page Setup on the main menu. (See “Chapter 2. Printer Operation”). The adjustable rear sensor is set by Factory Default.Entering Sensor Adjustment Mode
1. Turn on the power while pushing the PAUSE key, FEED key, and STOP key simultaneously.  2. After "Sensor Cal Mode" lights up, release the keys to change the printer to sensor adjustment setting mode.  Installing the Media (p.25, p27)Quick Sensor Selection Method (Transparent Reflective)
To switch from transparent to reflective sensor, hold down the MENU key and then press the STOP key. Each time you press the STOP key, you switch to back and forth between the two sensor types. If the transparent sensor is selected, "See Through" is displayed and the buzzer sounds once. If the reflective sensor is selected, "Reflect" is displayed and the buzzer sounds twice.  Sensor Adjustments and Calibration
Installing the Media (p.25, p27) Quick Sensor Selection Method (Transparent ↔ Reflective) (p.54)Adjusting the Transparent sensor
1. The transparent sensor is selected. 2. Install only the liner media (label backing paper) with the label media removed so that it will pass between the platen roller and the media sensor. (Be careful that media with black marks does not pass the media sensor.) Then close the sensor arm and the printhead.  3. If the Pause Key is pressed then released while the MENU key is continually pressed, the sensor is automatically adjusted.   4. When automatic adjustment stops normally, "Succeeded" is displayed by the LCD. If it stops abnormally (adjustment is impossible), ERROR LED flashes and "Failed" is displayed on the LCD.  5. If the STOP key is pressed, the Printer completes sensor adjustment and the printer restarts.Sensor Adjustments and Calibration
Quick Sensor Selection Method (Transparent Reflective) (p.54)Adjusting the Reflective sensor
1. The reflective sensor is selected. 2. With the reflective sensor selected, install the label media so that it is between the platen roller and the media sensor. Be careful that black mark and media gap do not pass the media sensor. Then close the sensor arm and the printhead.  3. If the Pause Key is pressed then released while the MENU key is continually pressed, the sensor is automatically adjusted. Sensor Cal Mode Executing 4. When automatic adjustment stops normally, "Succeeded" is displayed by the LCD. If it stops abnormally (adjustment is impossible), ERROR LED flashes and "Failed" is displayed on the LCD. Sensor Cal Mode Succeeded 5. If the Cancel (STOP) key is pressed, the Printer completes sensor adjustment and the printer restarts. Installing the Media (p.25, p.27) Self Print Mode (p.36) Self Print Mode (p.36)Media Thickness Adjustment
The printer is already factory-set to the requirements of proper print quality while using the recommended labels. If the print quality is inferior because of the different type of media, adjust the printhead position in the following manner:When using standard labels, or thermal media
1. Looking in at the media thickness check window, reset the printhead offset so that it comes to the center line (middle of the three lines) by turning the media thickness adjustment screw with a screwdriver. Then turn the media thickness adjustment screw two to four times counterclockwise with a screwdriver. (Factory setting: two turns.) 2. Make fine adjustments by checking the self-test print.When using thick media (tags or other media)
1. Looking in at the media thickness check window, reset the printhead position so that it comes to the center line (middle of the three lines) by turning the media thickness adjustment screw with a screwdriver. 2. Then turn the media thickness adjustment screw two to four times clockwise with a screwdriver. 3. Make fine adjustments by checking the self-test print.  The relationship between the printhead heating element and the media thickness check window is shown below:   Installing the Media (p.25, p27) Self Print Mode (p.36)Media Width Adjustment
The printer is already factory-set to the value of media width: 112 mm (4.4 in). When you use narrow media, adjust the printhead pressure in the following: 1. Looking in at the check window on the upper frame, align the mark (the left end of white plastic) with the width of media by turning the media width adjustment knob. (The printhead must be closed.) 2. Make fine adjustments by checking the self-test print. When the print on right side is too light: Move the mark (white) to the right side by turning the media width adjustment knob clockwise. When the print on the left side is too light: Move the mark to the left side by turning the media width adjustment knob counterclockwise. | Check window Width of media | ||
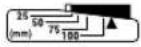 | 25.4 mm | 1 in |
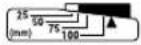 | 50.8 mm | 2 in |
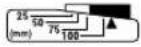 | 76.2 mm | 3 in |
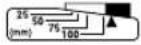 | 101.6 mm | 4 in |
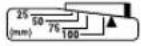 | When ribbon wrinkles or media screws with media width of 4 in or more | |
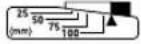 | Factory setting | |
Adjusting the Ribbon
Ribbon tension in this printer is already adjusted for the recommended ink ribbon and media and is very tolerant to different types of media. However, it may slip due to imperfect combinations of ribbon and media and it is possible that you will see a "Ribbon End" message even though the ribbon is not finished. This is more likely to happen with narrow width ribbons, especially those less than 50mm (2 inches). To resolve this problem and obtain the optimum printing condition, make adjustments in the following manner (this should be done after the printhead pressure adjustments on the previous page are made):Adjusting Places
 When turning adjust-screw, use a flat-tip screwdriver.Adjusting Method
1. General ribbon and media
Factory setting: both marks on winding and feeding sections are set to STANDARD so as to obtain the optimum printing condition for the recommended ink ribbon and media. 2. Easy-to-slip ribbon and media
If a message ‘Ribbon Out’ is shown, set the mark on the feeding section to LOW by turning the adjust-screw. 3. Especially-easy-to-slip ribbon and media
If a message ‘Ribbon Out’ is still shown, although Step 2 has been performed, set the mark on the feeding section to SUPER LOW by turning the adjust-screw. 4. When ribbon is broken during printing
Ribbon may be broken if it is narrow in width and printhead heat temperature is high. In that case, set the mark on the feeding section to SUPER LOW and set the mark on the winding section to LOW by turning adjust-screw respectively. Note: If the problem is still not resolved, please contact our service personnel.  Menu Setting Table (p.43) Ensure the adjustable sensor is selected.Moving the Adjustable Sensor
Operating procedure
Measure your required detection position beforehand, using the scale on the upper guide rail. Move the adjustable sensor to the required detection position by tuning the adjustable knob; it is useful to align the yellow mark on the top of the adjustable sensor with the scale showing the required detection position. Cleaning
Wipe off any foreign objects such as media dust, dirt and adhesive substances built up around the printhead and platen with the head cleaning pen (head cleaner) provided, and use a soft cloth soaked in ethyl alcohol for the platen etc. It is particularly important to clean the thermal printhead after printing on thermal media for long periods, which will guarantee the print quality and extend the life of the thermal printhead. Note: Always use the head cleaner when cleaning the thermal printhead.  To clean the entire surface of the platen, rotate the platen little by little with your thumb using a cheese cloth. Do not touch the platen with your bare hands.  Cleaning If the glue of the label media adheres to the roller, the peeled liner will stick and can cause a jam. Remove the glue adhered to the roller by using a cloth or something similar soaked in alcohol.  Caution
Do not use any solvent other than ethyl alcohol. Solvents such as benzene, acetone and thinner will dissolve plastic parts and destroy the thermal printhead, platen and much of the printer! Try to avoid using "excessive amounts" of ethyl alcohol to clean the platen. Excessive use will harden the platen surface prematurely. Connection to Power (p.18) Cleaning (p.62) Setting the Ribbon (p.32) Installing the Media (p.25, p27) Setting method (p.32) Menu Setting Table (p.43) Cleaning (p.62) This chapter explains corrective actions taken when the printer malfunctions or when an error message is displayed.Items to check when a malfunction occurs
When the printer malfunctions during operation, take corrective action with reference to the following table. If the corrective action does not solve the problem, consult with the service personnel at the dealer where you purchased the printer.| Indication | Check | Corrective action |
| The LED do not light up when printer power is connected. | 1) Is the plug of the power cord correctly inserted into the electric outlet? | 1) Insert the plug of the power cord correctly in the electric outlet. |
| 2) Is the connector of the power cord correctly inserted into the power inlet of the printer? | 2) Insert the connector of the power cord correctly into the power inlet of the printer. | |
| 3) Is the power cord damaged? | 3) Replace the power cord. Consult with the dealer where the printer was purchased to make sure you obtain a cord made especially for the printer.Note: Do not use any power cord except one made especially for the printer. | |
| 4) Is power supplied to the electric outlet the printer is connected to? | 4) Check to make sure power is supplied to the outlet. If there are any problems, make sure power is supplied to the building. Or find out if a power failure has occurred. | |
| 5) Is the main fuse in the building's fuse box burnt out? | 5) If necessary, replace the main fuse in the building's fuse box, and reset the main breaker. Ask a qualified serviceman to carry out the replacement. | |
| Paper is feeding, but nothing is printed. | 1) Is the thermal printhead dirty?Is a label stuck to the head? | 1) If it is dirty, remove the dirt with the attached head cleaner.If a label is stuck to the thermal printhead remove it.Note: Do not use a metal object to remove a label stuck to the inside of the printer. (This may damage the thermal printhead.) If adhesive label material is stuck to the thermal printhead, remove it with a soft cloth soaked in ethyl alcohol. |
| 2) Is the recommended ribbon or a ribbon of the same type used? | 2) Use the recommended ribbon or a ribbon of the same type. | |
| The printer is not printing neatly. | 1) Are the media and the ribbon correctly set? | 1) Correctly set the media and the ribbon. |
| 2) Is the printing density too high or too low? | 2) Set the appropriate printing density using the menu or control software. | |
| 3) Is the platen dirty?Is it deformed? | 3) If it is dirty, clean it with ethyl alcohol. If it is deformed, replace it.Note: Consult with the dealer that supplied the printer concerning the replacement. |
| Indication | Check | Corrective action |
| The printer is not printing neatly. | 4) Is the thermal printhead dirty?Is a label stuck to the head. | 4) If it is dirty, remove the dirt with the attached head cleaner.If a label is stuck to the head, remove it.Note: Do not use a metal object to remove a label stuck to the inside of the printer. (This may damage the thermal printhead.) If adhesive label material is stuck to the print head, remove it with a soft cloth soaked in ethyl alcohol. |
| 5) Is the recommended ribbon or a ribbon of the same type used? | 5) Use the recommended ribbon or a ribbon of the same type. | |
| 6) Is the thermal printhead in the correct position for the media that is used? | 6) Adjust the offset of the thermal printhead with the media thickness adjustment dial. | |
| 7) Is the printer's head pressure balance correct for the width of the media that is used? | 7) Adjust the thermal printhead pressure with the media width adjustment dial. | |
| The printing position changes. | 1) Are the media and the ribbon correctly set? | 1) Correctly set the media and the ribbon. |
| 2) Is the platen dirty?Is it deformed? | 2) If it is dirty, clean it with ethyl alcohol.If it is deformed, replace it.Note: Consult with the dealer that supplied the printer concerning the replacement. | |
| 3) Are the data contents and the command signals from the host appropriate? | 3) If an error message is displayed, check the content of the software and the communication status set by the host computer. | |
| 4) Are the menu values set appropriately? | 4) Set the correct menu values using the operating panel or the host computer. | |
| 5) Are the sensitivities of the media sensors appropriate for the media that is used? | 5) Set the media sensitivity to appropriate values.If this does not solve the problem, change the “Sensor level” that is set in the “System setup.” | |
| The ribbon is wrinkled | 1) Is the ribbon tension suitable for the ribbon that is used? | 1) Adjust the tension with the adjust-screw. |
| 2) Is the ribbon used correctly balanced to the right and left? | 2) Adjust the left - right balance with the media width adjustment knob. | |
| 3) Is the printing density too high? | 3) Set the appropriate printing density using the menu or control software. | |
| 4) Are the media and ribbon the recommended products or equivalent products? | 4) Use the recommended products or equivalent products. If this does not correct the problem, contact a service representative. | |
| The ribbon slips (ribbon dirt is produced.) | 1) Is the ribbon tension suitable for the ribbon that is used? | 1) Adjust the tension with the adjust-screw. |
| The ribbon does not wind. | 1) Is the ribbon set in the correct course? | 1) Set the ribbon in the correct course. |
| 2) Is the ribbon winding direction reversed? | 2) Set the correct winding direction. |
| Printing Printing method Thermal transfer/Direct thermal | |||
| Resolution Main scanning line density: 203 dots/inch (8 dots/mm) (CL-S700/CL-S700R)300 dots/inch (11.8 dots/mm) (CL-S703) | |||
| Sub-scanning line density: 203 dots/inch (8 dots/mm) (CL-S700/CL-S700R)300 dots/inch (11.8 dots/mm) (CL-S703) | |||
| Head 864 dots (printable dots: 832 dots) (CL-S700/CL-S700R)1275 dots (printable dots: 1240 dots) (CL-S703) | |||
| Max.print width 104 mm (CL-S700/CL-S700R) 4.1 inch (CL-S700/CL-S700R)105 mm (CL-S703) 4.1 inch (CL-S703) | |||
| Max.print length 812.8 mm 32 inch | |||
| Print density | Print density is adjustable with software | ||
| Printing speed Printing speed setting 2 - 10 inches per second (CL-S700/CL-S700R)2 - 8 inches per second (CL-S703)• 2-7 inches per second for CL-S700/CL-S703 with optional peeler. | |||
| Print mode | Batch mode | Normal printing (single or multiple sheets) | |
| Tear off mode | Feeds back media to the tear-off position after printing is completed. | ||
| Cut mode*1 | Prints while cutting at designated sheet units.The following two kinds of cut mode operations are done.• Backfeed• Cut through(Cut through refers to stopping part-way through printing the 'next label' to make the cut. After cutting, printing restarts but there is a chance of a small gap or mark at the temporary stop position.) | ||
| Peel mode*2 | Peels labels from the liners after printing them. | ||
| Media | Types of media | Roll, fanfold(continuous media, die-cuts, continuous tags, paper or tickets) | |
| Recommended media | Thermal transfer: label media (RPR-W Ricoh)Direct thermal media: label media (150LA-1 Ricoh), tag media (TB2E0V, Mitsubishi Paper) | ||
| Max. media width | 118.0 mm | 4.65 inch | |
| Min. media width 25.4 mm 1.00 inch | |||
| Min. label width | 7.62 mm | 0.30 inch | |
| Min. label pitch*3 | 6.35 mm | 0.25 inch | |
| Max. media thickness | 0.254 mm | 0.01 inch | |
| Max. media length | 812.8 mm | 32 inch | |
| Min. media length | 6.35 mm | 0.25 inch | |
| Min. media thickness | 0.0635 mm | 0.0025 inch | |
| On-board roll media diameter | Max. outside diameter: 203mm 8 inch | ||
| Media core: 38 to 76 mm 1.5 to 3 inch | |||
| Rewinding roll media diameter (CL-S700R only) | Media core: 26, 40, 45 mm | 1.02, 1.57, 1.77 inch | |
| Ribbon | Recommended ribbon B110A Ricoh | ||
| Max. ribbon width | 114.0 mm | 4.50 inch | |
| Min. ribbon width | 25.4 mm | 1.00 inch | |
| Max. ribbon length | 450.0 m | 1,476 ft | |
| Max. roll diameter | 86.5 mm | 3.40 inch | |
| Inner diameter of the paper core | 25.4 ± 0.25 mm | 1.00 ± 0.01 inch | |
| Ribbon end tape length | Max. 80.0 mm | 3.15 inch | |
| Ribbon end detection | Ribbon out is detected by the ribbon sensor | ||
| Bar code One-dimension • Code 3 of 9 • UPC-A • UPC-E • EAN-13 (JAN-13)(for Datamax® emulation) • EAN-8 (JAN-8) • Interleaved 2 of 5 • Code 128• HIBC (Modulus 43-used code 3 of 9) • Codabar (NW-7)• Int 2 of 5 (Modulus10-used Interleaved 2 of 5) • Plessey• Case Code • UPC 2DIG ADD • UPC 5DIG ADD• Code 93 • Telepen • ZIP • UCC/EAN128• UCC/EAN128 (for K-MART)• UCC/EAN128 Random Weight • FIM | |
| Two-dimension UPS Maxi Code, PDF-417, Data Matrix, QR Code,Aztec, RSS | |
| Bar code One-dimension • Code 11 • Interleaved 2 of 5 • Code 39 • EAN-8 • UPC-E • Code 93(for Zebra® emulation) • Code 128 • EAN-13 • Industrial 2 of 5 • Standard 2 of 5• ANSI CODABAR • LOGMARS • MSI • Plessey • UPC/EAN Extensions• UPC-A • POSTNET • Planet | |
| Two-dimension • Code 49 • PDF-417 • CODA BLOCK • UPS Maxi Code• Micro PDF-417 • Data Matrix • QR Code • RSS • TLC39 | |
| Font 1. Seven kinds of fixed pitch font(for Datamax® emulation) • Overseas, English fonts and European fonts2. OCR fonts OCR-A*4, OCR-B*43. Proportional fontsCG Triumvirate smooth fontCG Triumvirate Bold smooth font(6, 8, 10, 12, 14, 18, 24, 30, 36, 48 points) (CL-S700/CL-S700R)(4, 5, 6, 8, 10, 12, 14, 18, 24, 30, 36, 48 points) (CL-S703)• Character set: Conforms with code page 850 standards4. True typeTM rasterizer5 | |
| Font 1. Five kinds of fixed pitch font(for Zebra® emulation) • Overseas, English fonts and European fonts2. OCR fontsOCR-A, OCR-B3. Proportional fontCG Triumvirate Condensed Bold4. True typeTM rasterizer5 | |
| Symbol set PC866U Ukraine, PC Cyrillic, ISO 60 Danish/Norwegian, DeskTop, ISO8859/1 Latin 1, ISO 8859/2 Latin 2, ISO 8859/9 Latin 5, ISO 8859/10Latin 6, ISO 8859/7 Latin/Greek, ISO 8859/15 Latin 9, ISO 8859/5Latin/Cyrillic, ISO 69: French, ISO 21: German, ISO 15: Italian, Legal, Math-8, Macintosh, Math, PC-858 Multilingual, Microsoft Publishing,PC-8, Code Page 437, PC-8 D/N, Code Page 437N, PC-852 Latin 2,PC-851 Latin/Greek, PC-862 Latin/Hebrew, Pi Font, PC-850 Multilingual,PC-864 Latin/Arabic, PC-8 TK, Code Page 437T, PC-1004, PC-775Baltic, Non-UGL, Generic Pi Font, Roman-8, Roman-9, ISO 17: Spanish,ISO 11: Swedish, Symbol, PS Text, ISO 4: United Kingdom, ISO 6: ASCII,Ventura International, Ventura Math, Ventura US, Windows 3.1 Latin 1,Wingdings, Windows 3.1 Latin 2, Windows 3.1 Baltic (Latv, Lith), Windows3.0 Latin 1, Windows Latin/Cyrillic, Windows 3.1 Latin 5 | |
| Control language | Conforms to Datamax® programming language6and Zebra® programming language*7 |
| Outline of electronic devicesCPU | 32Bit RISC CPU |
| ROM | Standard equipment: FLASH ROM 4MBytes (User area: 1MByte) |
| RAM (for Datamax® L.)RAM (for Zebra® L.) | Standard equipment: SDRAM 16MBytes (User area: 1MByte)Standard equipment: SDRAM 16MBytes (User area: 4MByte) |
Specifications
Item Description| Media detection Transparent sensor Detects media gap between labels, notches on tags, and media out sensors | ||
| Communication Parallel interfaces | ^*§ | IEEE1284 (compatible, Nibble, ECP mode) |
| Serial 2400 4800 9600 19200 38400 57600 115200bps | ||
| USB FULL Speed USB1.1 | ||
| Communication Network Wired ethernet (10-BASE-T/ 100-BASE-TX) or Wireless LAN interface options | ||
| Indications and switches | LCD | 128 X 64 dots, STN graphic type |
| LED | POWER, ERROR | |
| Buzzer | Alarms, errors, etc. | |
| Operating panel keys | PAUSE, FEED, STOP, MENU | |
| Head-up detection sensor | Detects head open | |
| Power switch | Turns power on and off | |
| Accoustic noise | 55 dB (by EN ISO7779) | |
| Power (standards) | 100-240V (-10%+6%), 3.0-1.5A (for CL-S700/CL-S700R), 3.5-1.5A (for CL-S703), 50/60Hz | |
| U.S.A./Canada: UL 60950-1, CSA No.950, FCC Part15 SubpartB (ClassA) | ||
| Europe: EN 60950-1, EN 55022 (ClassA), EN 55024, EN 61000-3-2, EN 61000-3-3 | ||
| Environment | Operating temperature conditions:Storage temperature conditions: | Operating temp. 0 to 40°C, humidity 30 to 80%, condensation free (Conditions: ventilation, and natural convection)Temp. -20 to 60°C, humidity 5 to 85%(Conditions: ventilation, and natural convection) 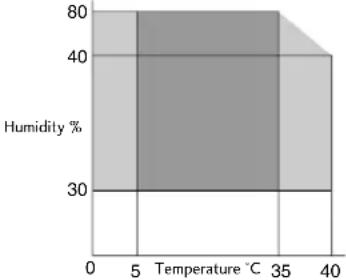 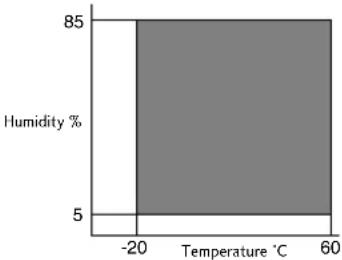 Conditions assuring operation and printing Storage assurance temperature Conditions assuring operation and printing Storage assurance temperature |
| External dimensions(for CL-S700/CL-S703) | Approx. 255(W) X 490 (D) X 265 (H) mm10(W) X 19.3 (D) X 10.4 (H) inchUnit: mm (inch)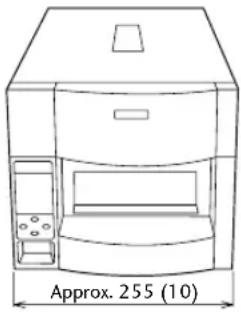 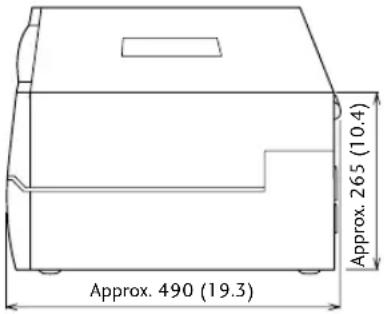 | |
Interfaces
This printer is connected to a computer and prints according to commands sent from the computer. There are three types of computer interfaces, and these are connected to devices suited to each type of interface. The printer can also be connected to a computer by the optional Ethernet.Serial Interface
Specifications| System Start/stop asynchronous duplex communication | |
| Signal level RS-232C | |
| Baud rate 2400, 4800, 9600, 19200, 38400,57600, 115200bps | |
| Bit length 7Bit, 8Bit | |
| Stop bit 1Bit, 2Bit | |
| Parity Odd, even, none | |
| Connector D-SUB 25PIN | |
| Pin No. | Signal code | Signal name Function | |
| 1 | FG | Protective grounding | Protective grounding |
| 2 | TXD | Transmitted data | Signal line that transmits data from the printer to other devices |
| 3 | RXD | Received data | Signal line that transmits data from other devices to the printer |
| 4 | RTS | Transmission request | Pull up to +5.4V through 3.3kΩ |
| 5 | NC | ---- | Not used |
| 6 | DSR | Data set relay | Signal line that is active when an external device can interface with the printer |
| 7 | SGND | Signal line ground | Shows the ground level of the signal line |
| 8-13 | NC | ---- | Not used |
| 14 | VCC | +5V | (FACTORY USE ONLY) |
| 15-19 | NC | ---- | Not used |
| 20 | DTR | Data terminal relay | Signal line that is active when an external device can interface with the printer |
| 21-25 | NC | ---- | Not used |
XON/XOFF Protocol
Requirements to output X-ON code
- Communication is possible when the power is on. - When the receive buffer has less than 128 bytes available, XOFF code is output, then the receive buffer has at least at least 1024 bytes available.Requirements to output the X-OFF code
\- When the receive buffer has less than 128 bytes available DTR Protocol
Conditions when the DTR signal is "Ready (High)"
All the following conditions are satisfied. - The receive buffer is 128 bytes or more available capacity. \* When the receive buffer has less than 128 bytes available and the DTR signal has changed to BUSY (Low) status, BUSY status is maintained until the capacity of the receive buffer has reached 1024 bytes or more.Conditions when DTR signal is "Busy (Low)"
\- When the receive buffer has fallen to less than 128 bytes available.Parallel Interface
Specifications| Transmission mode 8 | -bit parallel data |
| Receive buffer size 16K bytes | |
| Transmission modes | Compatible modeIt is an asynchronous forward direction of the byte width (from host to printer) channel, and the interface line of the data is operated in accordance with signal line definitions of Centronics.NIBBLE modeNibble mode is asynchronous reverse channel communication with data transmission controlled by the host computer. In reverse channel transmission, the data is nibble transmitted in two parts using four status lines (Fault Select, PE, and Busy). And nibble mode can be used along with compatible mode to send data in two directions.ECP modeECP mode permits bi-directional asynchronous data transmission, and thanks to its interlock handshake, it does not require the timing necessary with compatible mode. |
| Signal level IEEE1284 | standard |
| Pin No. | Signal name I/O Function | ||
| 1 *STROBE Input Strobe signal to read in 8-bit data | |||
| 2-9 DATA1-8 Input 8-bit parallel signal | |||
| 10 | *ACKNLG | Output | 8-bit data request signal |
| 11 | BUSY | Output | Signal specifying printer busy |
| 12 | PERROR Output Signal specifying media out | ||
| 13 | SELECT | Output | Signal specifying if the printer is on-line (printing enabled) or off-line (pausing) |
| 14 | AUTOFD | Input Invalid (ignored) | |
| 15 | NC | --- | Not used |
| 16 | GND | --- | Signal ground |
| 17 | FGND | --- | Frame ground |
| 18 | P.L.H | Output | Peripheral logic high (pull up to +5V at 1kΩ) |
| 19-30 | GND | --- | Ground for twisted pair return |
| 31 | *INIT | Input Printer reset | |
| 32 | *FAULT Output Signal specifying printer error | ||
| 33-35 | NC | --- | Not used |
| 36 SELECTIN Input Invalid (ignored) | |||
Parallel port status signals when an error occurs
The status of a signal line will not be changed in bi-directional mode such as nibble or ECP mode.| Error Change in the status of a signal line in compatible mode | |
| Paper end | Busy : L → HPError : L →HSelect : H →LnFault : H →L |
| Error other than paper end• Head open PError : L →unchanged• Other Select : H →L | Busy : L →HnFault : H →L |
| Conditions for Busy • Receive buffer full• Data being read• Error | |
Compatible timing specification
[When power is on] (Time it goes off-line)  [While receiving data]  Note: Busy rises when \*Strobe signal starts, and data is latched with \*Strobe signal starts. Interfaces [While receiving INIT signal] other
| Signal | Time Interval | |--------|--------------| | Init | 10 to 15μsec | | BUSY | 10 to 15μsec | | Ack | 10 to 15μsec | | Fault | 10 to 15μsec | | SELECT | 10 to 15μsec |USB Interface
Specifications| Standards Complies with Universal Serial Bus Specification | |
| Transmission speed Compatible with 12Mbps (full speed) transmission | |
| Receive buffer 16K bytes | |
| Connector DUSB DUSB-BRA42-T11 (DDK) |
| Pin No. | Signal code | Signal Function | |
| 1 | VBUS | USB power (+5V) | |
| 2 | D+ | Signal line + + signal line | |
| 3 | D- | Signal line - - signal line | |
| 4 | GND | GND | |
Replacing the Interface Board
Caution
Always turn off the power to the printer before replacing the interface board. Do not pull it out with unnecessary force. This will cause an accident.Replacement Method
1. Remove the screws (2) that anchor the bracket of the interface board then pull the interface board towards you. When you do this, be careful not to perform any unreasonable operations that will damage the connecting cable and do not pull the cable too much. If you do, it will cause a malfunction.  2. Remove the connecting cable from the interface board and reconnect the cable to the connector of the replacement interface board Replacing the Interface Board
3. Insert the interface board into the printer so that the connecting cable does not catch on the printer, then use the screws (2) that you removed to anchor the bracket. WEEE MARK
If you want to dispose this product, do not mix with general household waste. There is a separate collection systems for used electronics products in accordance with legislation under the WEEE Directive (Directive 2002/96/EC) and is effective only within European Union. Wenn Sie dieses Produkt entsorgen wollen, dann tun Sie dies bitte nicht zusammen mit dem Haushaltsmüll. Es gibt im Rahmen der WEEE-Direktive innerhalb der Europäischen Union (Direktive 2002/96/EC) gesetzliche Bestimmungen für separate Sammelsysteme für gebrauchte elektronische Geräte und Produkte. Si vous souhaitez vous débarrasser de cet appareil, ne le mettez pas à la poubelle avec vos ordures ménagères. Il existe un système de récupération distinct pour les vieux appareils électroniques conformément à la législation WEEE sur le recyclage des déchets des équipements électriques et électroniques (Directive 2002/96/EC) qui est uniquement valable dans les pays de l'Union européenne. Les appareils et les machines électriques et électroniques contiennent souvent des matières dangereuses pour l'homme et l'environnement si vous les utilisez et vous vous en débarrassez de façon inappropriée. Si desea deshacerse de este producto, no lo mezcle con residuos domésticos de carácter general. Existe un sistema de recogida selectiva de aparatos electrónicos usados, según establece la legislación prevista por la Directiva 2002/96/CE sobre residuos de aparatos eléctricos y electrónicos (RAEE), vigente únicamente en la Unión Europea. Se desiderate gettare via questo prodotto, non mescolatelo ai rifiuti generici di casa. Esiste un sistema di raccolta separato per i prodotti elettronici usati in conformità alla legislazione RAEE (Direttiva 2002/96/CE), valida solo all'interno dell'Unione Europea. Deponeer dit product niet bij het gewone huishoudelijk afval wanneer u het wilt verwijderen. Er bestaat ingevolge de WEEE-richtlijn (Richtlijn 2002/96/EG) een speciaal wettelijk voorgeschreven verzamelsysteem voor gebruikte elektronische producten, welk alleen geldt binnen de Europese Unie. Hvis du vil skille dig af med dette produkt, må du ikke smide det ud sammen med dit almindelige husholdningsaffald. Der findes et separat indsamlingssystem for udtjente elektroniske produkter i overensstemmelse med lovgivningen under WEEE-direktivet (direktiv 2002/96/EC), som kun er gældende i den Europæiske Union. Se quiser deitar fora este produto, não o misture com o lixo comum. De acordo com a legislação que decorre da Directiva REEE – Resíduos de Equipamentos Eléctricos e Electrónicos (2002/96/CE), existe um sistema de recolha separado para os equipamentos electrónicos fora de uso, em vigor apenas na União Europeia. Jeżeli zamierzasz pozbyć się tego produktu, nie wyrzucaj go razem ze zwykłymi domowymi odpadkami. Według dyrektywy WEEE (Dyrektywa 2002/96/EC) obowiązującej w Unii Europejskiej dla używanych produktów elektronicznych należy stosować oddzielne sposoby utylizacji.En
Ge
Fr
Sp
It
Du
Da
Por
Pol
 CITIZEN SYSTEMS AMERICA CORPORATION
363 Van Ness Way, Suite 404 Torrance, CA 90501. USA Tel: (310) 781-1460 Fax:(310) 781-9152 http://www.citizen-systems.comCITIZEN SYSTEMS EUROPE GmbH
Mettinger Strasse 11 Park House, 643-651 Staines Road D-73728, Esslingen Feltham, Middlesex, TW14 8PA Germany United Kingdom Tel: +49 (0) 711 3906 420 Tel: +44 (0) 20 8893 1900 Fax:+49 (0) 711 3906 405 Fax:+44 (0) 20 8893 0080 http://www.citizen-europe.comCITIZEN SYSTEMS JAPAN CO., LTD.
6-1-12, Tanashi-cho, Nishi-Tokyo-shi Tokyo, 188-8511. Japan Tel: +81 (0) 42 468 4608 Fax:+81 (0) 42 468 4996 http://www.citizen-systems.co.jp
- CL-S700 Series
- USER'S MANUAL
- CONTENTS
- Before Operation
- Chapter 1 Setup
- Chapter 2 Printer Operation
- Chapter 3 Printer Adjustments
- Chapter 4 Troubleshooting 64
- Appendixes
- INTRODUCTION
- Main Features
- (The Easiest Media Loading>
- (CL-S700R only)
- COMPLIANCE STATEMENT FOR EUROPEAN USERS
- FCC COMPLIANCE STATEMENT FOR AMERICAN USERS
- EMI COMPLIANCE STATEMENT FOR CANADIAN USERS
- This Class A digital apparatus complies with Canadian ICES-003.
- ETAT DE CONFORMITE EMI A L'USAGE DES UTILISATEURS CANADIENS
- IMPORTANT SAFETY INSTRUCTIONS
- NOTICE
- SAFETY INSTRUCTIONS
- which must be strictly observed !
- Warning
- General Precautions
- Caution
- Precautions When Installing the Printer
- Confirmation of Carton Contents
- Removing the Packing Material
- Part Names and Functions
- ①Top cover
- ②Operation panel
- ③Top cover window
- ④Ribbon drive unit
- ⑤Power switch
- 1
- Setup
- Rear View
- Connection to Power
- Driver Installation
- Connection to a Computer
- Power ON/OFF
- Turning on the power
- Turning off the power
- Normal Operating Mode
- ①PAUSE key: Temporarily pauses printing
- ②FEED key: Feeds media
- ③STOP key: It stops printing and cancels the alarm
- ④MENU key:
- LED Functions
- ① POWER LED
- ②ERROR LED
- Table of Alarm and Error Indications
- Setting the Media
- Media Sizes
- Installing the Media
- Using the Rewinder as a Peeler (CL-S700R models/Peeling Mode)
- 2
- Printer Operation
- Using the Rewinder for Batches of Printed Media (CL-S700R models/Rewind Mode)
- Setting the Ribbon
- Setting method
- Mode Settings
- HEX Dump Mode
- - When using label media
- ●When using continuous media
- Self Print Mode
- ●Case of label media
- ●Case of continuous media
- Media Adjustments
- Menu Setup Mode
- Functions of the keys
- FEED key (Shift/Change)
- MENU key (Shift/Change)
- STOP key (Enter/Save)
- PAUSE key (Exit)
- Example of changing a menu
- Entering Menu Setup Mode.
- Entering Sub menu.
- Selecting "Print Darkness" from the sub menu.
- Displaying the set value of "Print Darkness".
- To change the value of Print Darkness to 14.
- Save Changes to Settings.
- To Save Changes
- ■ Changing the Interface and Emulation Settings
- To Discard Changes
- Printing a List of Settings
- Machine Information
- Current Menu Setting
- Global Configuration Sets
- Menu Setting Table
- Menu Setting
- ■ Datamax® Emulation
- [Datamax® Emulation]
- ■ Zebra® Emulation
- [Zebra® Emulation]
- Quick Setup of the Print Method
- Emulation Auto-Detection
- Setting the menu for the Rewinder (CL-S700R only)
- When rewinding the liner using the peeler
- When rewinding printed media without using the peeler
- IMPORTANT!
- Rewinder Capacity Display
- Sensor Adjustments and Calibration
- Entering Sensor Adjustment Mode
- Quick Sensor Selection Method (Transparent ↔ Reflective)
- Adjusting the Transparent sensor
- Adjusting the Reflective sensor
- Media Thickness Adjustment
- When using standard labels, or thermal media
- When using thick media (tags or other media)
- Media Width Adjustment
- Adjusting the Ribbon
- Adjusting Places
- Adjusting Method
- General ribbon and media
- Easy-to-slip ribbon and media
- Especially-easy-to-slip ribbon and media
- When ribbon is broken during printing
- Moving the Adjustable Sensor
- Operating procedure
- Cleaning
- Items to check when a malfunction occurs
- Specifications
- Interfaces
- Serial Interface
- XON/XOFF Protocol
- Requirements to output X-ON code
- Requirements to output the X-OFF code
- DTR Protocol
- Conditions when the DTR signal is "Ready (High)"
- Conditions when DTR signal is "Busy (Low)"
- Parallel Interface
- Parallel port status signals when an error occurs
- Compatible timing specification
- USB Interface
- Replacing the Interface Board
- Replacement Method
- WEEE MARK
- En
- Ge
- Fr
- Sp
- It
- Du
- Da
- Por
- Pol
- CITIZEN SYSTEMS AMERICA CORPORATION
- CITIZEN SYSTEMS EUROPE GmbH
- CITIZEN SYSTEMS JAPAN CO., LTD.
Brand : CITIZEN
Model : CL-S700R
Category : Label printer