
SA 3370 - Belt sander GRAEF - Free user manual and instructions
Find the device manual for free SA 3370 GRAEF in PDF.


| Product Type | Automatic Slicing Machine |
| Brand | Graef |
| Model | SA 3370 |
| Dimensions (L x W x H) | 660 x 620 x 510 mm |
| Work Space (L x W x H) | 910 x 700 x 730 mm |
| Weight | Approx. 50 kg |
| Blade Diameter | 330 mm |
| Blade Speed | 229 rpm |
| Slicing Length | 295 mm |
| Slicing Height | 244 mm |
| Slice Thickness Range | 0 – 24 mm |
| Maximum Slicing Speed | 80 strokes/min |
| Noise Level (idling) | < 69 dB(A) |
| Vibration Total Value | < 2.5 m/s² |
| Power Supply Voltage | 230 V or 400 V (see type plate) |
| Frequency | 50/60 Hz |
| Power Consumption | See type plate |
| Intended Use | Slicing sausage, meat, ham, slicing cheese |
| Features | Automatic carriage drive, digital display, adjustable stroke length and speed, caliber detection, blade sharpener, safety devices |
| Cleaning | Use approved cleaners, no abrasive cleaners, no high-pressure cleaner, no dishwasher for removable parts |
| Maintenance | Blade sharpening with supplied sharpener, lubricate guide rod with H1 certified oil |
| Safety Devices | Emergency stop, blade guard ring, limit stop lock, carriage drive starting lockout, thumb/finger guard, undervoltage mechanism |
| Spare Parts | Use only genuine GRAEF spare parts |
| Warranty | Warranty void if not installed by authorized dealer or if modified |
Frequently Asked Questions - SA 3370 GRAEF
User questions about SA 3370 GRAEF
0 question about this device. Answer the ones you know or ask your own.
Ask a new question about this device
Download the instructions for your Belt sander in PDF format for free! Find your manual SA 3370 - GRAEF and take your electronic device back in hand. On this page are published all the documents necessary for the use of your device. SA 3370 by GRAEF.
USER MANUAL SA 3370 GRAEF
OPERATING MANUAL (Original)
Automatic Slicing Machine
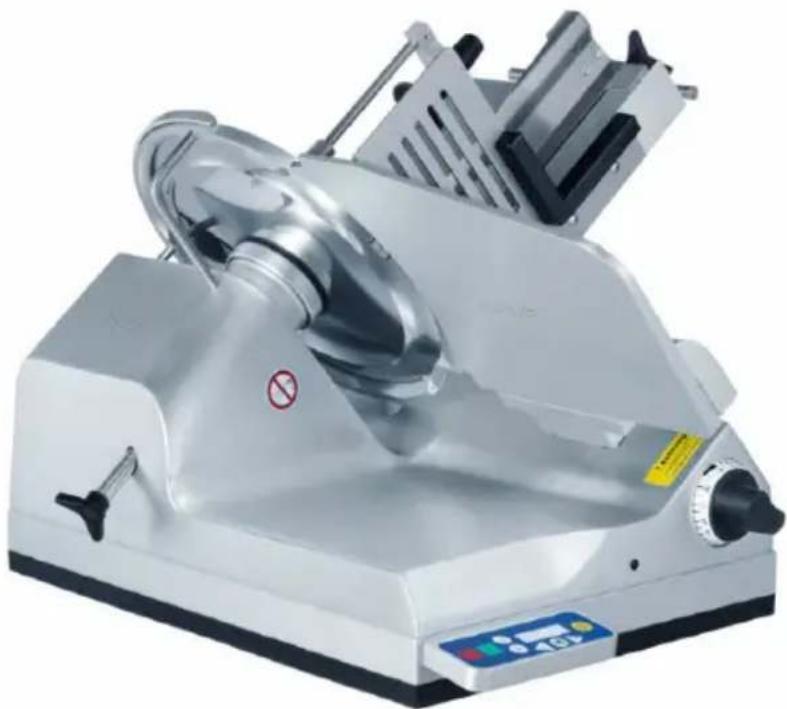
natural_image
Exterior view of a silver cutting machine with no visible text or symbols on the device itself.SA 3370
Machine No.: :
Year of construction :
1 General Information ....4
1.1 Safety – Notes on the Warranty.... 4
1.1.1. Set-up and Instruction.... 4
1.1.2. Proper Use 6
1.1.3. Natural Wear 6
1.1.4. Potential Sources of Danger....7
1.1.5. Workplace....8
1.1.6. Authorised Users....8
1.1.7. Protective Clothing and Equipment....8
2 Description 9
2.1 Designation of the Machine Parts....9
2.2 Protective Devices....10
2.3 Technical Dimensions.... 10
3 Operation ....11
3.1 Operating Controls.... 11
3.1.1. Operating Terminal 11
3.2 Slicing 14
4 Cleaning 16
4.1 Preparing for Cleaning 16
4.1.1. Disassembly of the Removable Parts 17
4.2 Cleaning the Different Parts of the Machine.... 19
4.1.2. Blade and Blade Ring.... 19
4.1.3. Carriage 20
4.3 Cleaning Schedule.... 21
4.4 Cleaning items 22
5 Maintenance....23
5.1 Sharpening the Blade.... 23
5.1.1.Description of the Blade Sharpener 23
5.1.2. Preparing the Machine.... 24
5.1.3. Sharpening the Blade.... 24
5.2 Changing the Blade 26
5.3 Lubricating 26
6. Faults and Operating Errors....27
7. Service 28
GEBR. GRAEF GMBH + CO. KG, DONNERFELD 6, D-59757 ARNSBERG
We herewith declare that the design of the machine specified below
Slicing Machine
Of the types
SA 3370
in the design supplied by us complies with the provisions of the following EC directives:
EC Machinery Directive 2006/42/EC
EC EMC Directive 2004/108/EC
EC Low Voltage Directive 2006/95/EC
The following harmonized standards and technical specifications have been applied:
EN 1974
EN 61000-6-2
EN 61000-6-3
EN 61000-4-[2,3,4,5,6,11]
EN 61000-3-2
EN 55022
EN 55011
Name of the authorized representative: Reinhard Graef Address of the authorized representative: see manufacturer's address
Changes to the machine that are not authorized by GRAEF invalidate the present declaration.
Arnsberg, 11 November 2010
- Managing Director -
Hermann Graef
1 General Information
1.1 Safety – Notes on the Warranty
Automatic model SA 3370 are fitted with safety equipment. They have been tested for safety.
Nevertheless, if the machine is used improperly or not as intended, there can be hazards to.
• The health of the user
- The machine and other property of the operator
All persons charged with installing, operating, servicing and repairing the machine must
- Be trained/instructed for the task.
- Follow these operating instructions to the letter.
1.1.1. Set-up and Instruction
Store and transport machines in their original packaging until they are set up. The GRAEF dealer is responsible for set-up and start-up as well as for providing instructions on how to operate, clean and service the machine.
Customer installation and start-up, incorrect operation, modifications and removal of the safety equipment will invalidate our liability.
Important!
The installation and instruction must be confirmed by your authorised
GRAEF dealer.
Depending on the design, the slicing machines weigh more than 50 kg.
Two adults are required to lift and carry the machine.
The centre of gravity is in the rear third of the machine, where the motor is located.
Always lift and carry the machine by the machine housing.
- For longer company-internal transport routes.
Use a suitable handcart.
- Fasten the carriage by inserting paper or cardboard between the thumb and the stop plate
- Set the slicing thickness below "0" before transport by turning the slicing thickness
1.1.1.1. Set-up site requirements
The base must fulfil the following requirements:
- It must be sufficiently stable, strong, level, flat and non-slip.
- It must be of sufficient height to allow slicing while standing.
- It must meet the space requirements listed in "Workspace" (see Technical Dimensions).
- It must be located away from busy corridors.
- It must not be close to any doors.
- It may not be in the swinging area of a door, nor in the entrance area of a door.
- When using Nirosta tables, Resopal supports or similar materials: Ensure that there is no oil or grease on the surface.
- Ensure sufficient lighting of at least 300 lux
1.1.1.2. Unpacking the machine
Caution!
The machine may only be unpacked and set up by authorised customer service / sales
■ personnel. Check the required working space (with the machine switched off!):
- Hold the last slice clamp by the handle.
- Lift up the last slice clamp
- Move the carriage all the way forward and back
If the carriage or last slice clamp comes into contact with other objects, you must provide a larger work space.
1.1.1.3. Electrical connection
- Check if the local supply voltage conforms to the specifications indicated on the rating plate. If it does not, you may not connect the machine.
- The electrical socket must comply with the VDE regulations (Association of German Electricians).
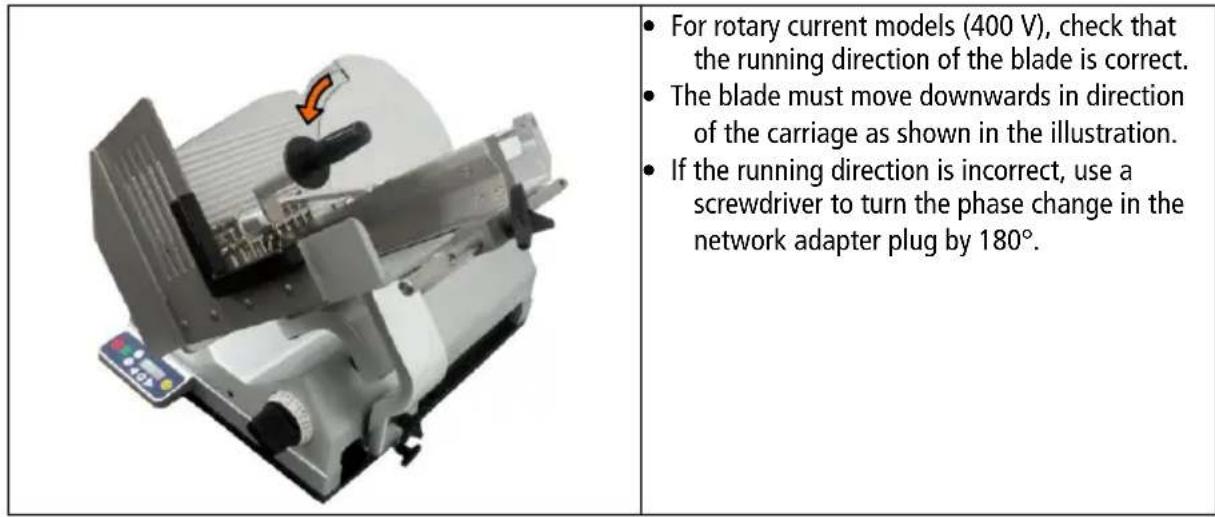
- Moisture: High humidity or condensation can damage the machine.
- Lay and connect the power supply cord so that no-one can fall or trip over it.
- The machine is designed for use in sales rooms.
1.1.2. Proper Use
The automatic slicer SA 3370 are designed to slice only the following types of food: Sausage / meat / ham / slicing cheese
Do not attempt to slice frozen foods. Do not attempt to slice vegetables or food that has bones. Remove any metal braces on the goods to be sliced.
Unauthorised modifications to the machine are prohibited for safety reasons.
The operating, maintenance and service instructions described in this instruction manual must be strictly observed.
1.1.3. Natural Wear
Natural wear is not covered by our warranty or liability.
1.1.4. Potential Sources of Danger

Caution!
Danger of injury!
Never reach into the area of the moving carriage.

Caution!
Danger of injury!
The blade is sharp and can sever body parts.
Your fingers, and especially your thumb, are at risk. For this reason, never reach into the space between the last slice clamp and the blade or the limit stop if the limit stop plate is not completely closed. When the machine is not in use, the stop plate must always be set to the zero position.

Caution!
Injury through electric shock.
The machine operates with a mains voltage of 230 V or 400 V and must therefore not be opened. The protective earth conductor system must be connected in any case, otherwise there is a risk of severe electric shocks.

Caution!
Risk of injury.
In the area of the food holder, there is a risk of injury posed by the spikes and the food holder suddenly dropping when inserting the product.

Caution!
Risk of injury.
When mounting parts which can be removed for cleaning.

Caution! Risk of injury.
The carriage drive must be unlocked before "sharpening" for preventing the carriage drive to be switched on accidentally during sharpening of the blades.
1.1.5. Workplace
Only operate the machine if you are standing in a secure position.
Stand in front of the machine so that the power on/off button is facing you.
Keep your workplace clean at all times.
The machine must be positioned on a solid, even and stable base that can support the weight of the machine and the dynamic forces of the moving parts.
1.1.6. Authorised Users
The machine may only be operated by people who:
Have read and understood the operating instructions
Have been instructed thoroughly by the operator
Have been instructed on the dangers of the machine and the hygiene regulations
The machine may only be serviced and repaired by specialists.
Take precautions to prevent unauthorised persons from using, cleaning or servicing the machine.
1.1.7. Protective Clothing and Equipment
Wear close-fitting clothes when operating the machine. Please also observe the hygiene regulations.
When executing cleaning or maintenance work in the area of the knife, be sure to wear cut-resistant gloves with pulse protection.
When transporting the machine, be sure to always wear steel-toe boots.
2 Description
2.1 Designation of the Machine Parts
| Stop plate Blade cover | plate | 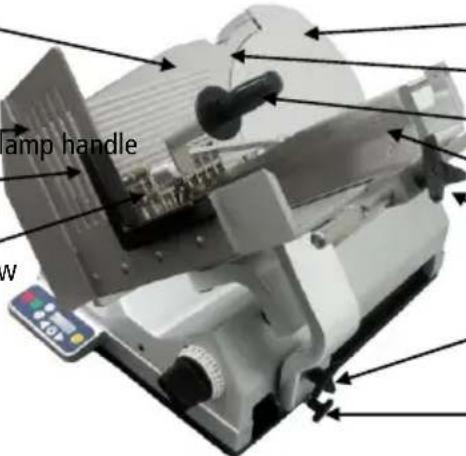 | |
| Blade | |||
| Thumb/finger guard Last slice cl | |||
| Carriage handle Guide rail | |||
| Last slice clamp Clamping screw | |||
| Carriage star grip | |||
| Coupling T-handle | |||
| Blade guard ring | 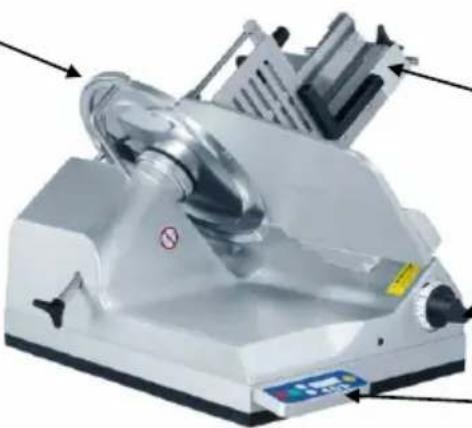 | ||
| Carriage | |||
| Slicing thickness control | |||
| Knurled knob of blade cover plate | Operating terminal | ||
2.2 Protective Devices
| Device Function | |
| Off button | Switches the machine off immediately |
| Blade guard ring | Prevents accidental contact with the blade |
| Limit stop lock | Locks the limit stop when the carriage has been tipped off the machine |
| Carriage drive starting lockout | Prevents the carriage and blade drive from switching on when the slicing thickness is below "Zero" or the carriage has been tipped off (cleaning mode) |
| Thumb/finger guard | Prevents accidental contact with the blade |
| Undervoltage mechanism | Prevents the machine from starting up again after an interruption to the power supply, such as a "power cut" |
| Blade sharpener with guard cover | Prevents accidental contact with the blade |
| Unlock carriage coupling prior to sharpening (coupling T-handle) | Prevents the carriage drive to be switched on accidentally during the sharpening process. The blade drive unit can be operated via the ON/OFF button. |
2.3 Technical Dimensions
| SA 3370 | ||
| Dimensions | L x W x H | 660 x 620 x 510 mm |
| Workspace | L x W x H | 910 x 700 x 730 mm |
| Space occupied | L x W | 585 x 440 mm |
| Weight | W | Approx. 50 kg |
| Blade diameter | D | 330 mm |
| Blade speed | N | 229 rpm |
| Slicing length | L | 295 mm |
| Slicing height H 244 mm | ||
| Carriage dimensions L x B 300 | x 340 mm | |
| Slice thickness | T | 0 - 24 mm |
| Slicing speed maximum | V | Max. 80 strokes per minute |
| Emissions – noise level acc. to EN ISO 11204, at idling | Leq | < 69 dB (A) |
| Vibration total value < 2,5m/s2 | ||
| Power consumption | P_1 [W] | See type plate |
| Frequency | f [Hz] | |
| Current | I [A] | |
| Voltage | U_N [V] |
3 Operation
3.1 Operating Controls
3.1.1. Operating Terminal
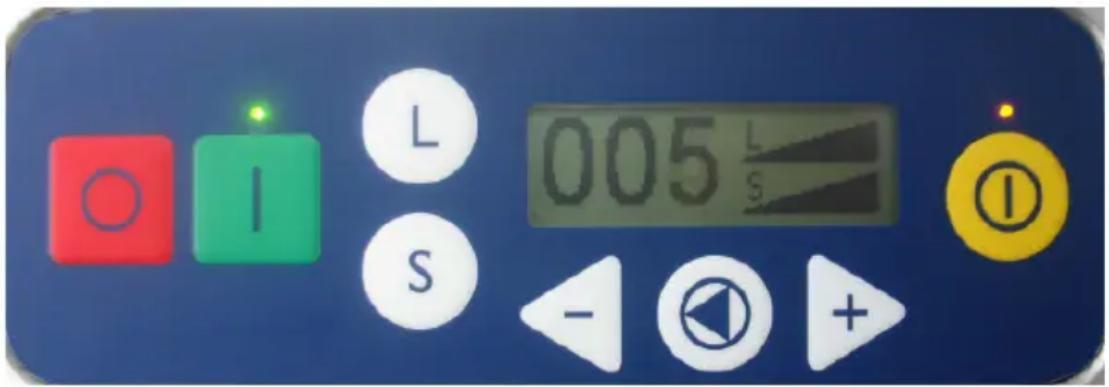
| Symbol | Description Function | |
 | Master switch "OFF", red | • Stops the machine. |
 | Master switch "ON", green | • Starts up the machine. The machine is ready for slicing. |
 | Signal lamp, green | • Signals that the machine is ready for operation. |
| Graphic display (only display!) | • Displays number of slices, stroke length, stroke speed | |
 | Minus button | • Reduces the set number of slices |
 | Reset button | • Sets number of slices to zero |
| Plus button | • Increases the set number of slices | |
 | Carriage drive button | • Carriage is driven automatically and stopped when pressed again |
 | Signal lamp, yellow | • Signals automatic carriage drive |
| Stroke length button (function without caliber detection) | • Changes the stroke length within 2 seconds when pressed again. Adjustable in three steps (short, medium and long) | |
| S | Stroke speed button | • Changes the stroke speed within 2 seconds when pressed again. Adjustable in three steps depending on the stroke length. |
If the machine is switched "ON", the carriage automatically travels into the "starting position" when the carriage coupling is engaged.
If the stop is closed (< 0), "stop closed" is shown in the display and the carriage drive is disabled.
| Explanation of values and symbols shown in the display with opened stop and without caliber detection | ||
| Number of slices | 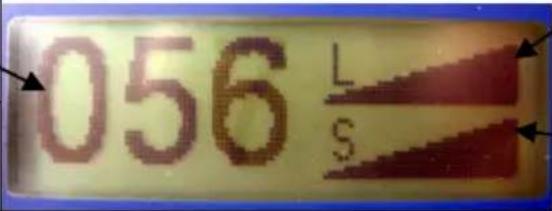 | "L" = stroke length displayed in three steps, e.g. longest stroke |
| "S" = stroke speed displayed in three steps, e.g. highest speed | ||
With caliber detection and mounted guide rod, the stroke length is hidden after the 1st stroke and only the stroke speed and the number of slices is shown in the display. The stroke length is automatically set for the items to be sliced.
| Explanation of values and symbols shown in the display with opened stop, with caliber detection and guide rod | ||
| Number of slices | 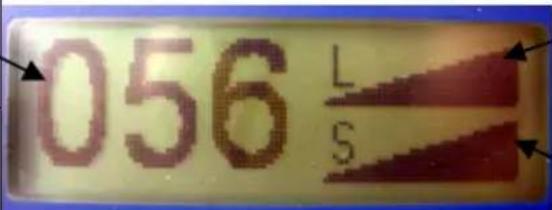 | "L" = stroke length not applicable, is set automatically |
| "S" = stroke speed displayed in three steps, e.g. highest speed | ||
For manual slicing:
Carriage coupling is engaged and is to be disengaged!
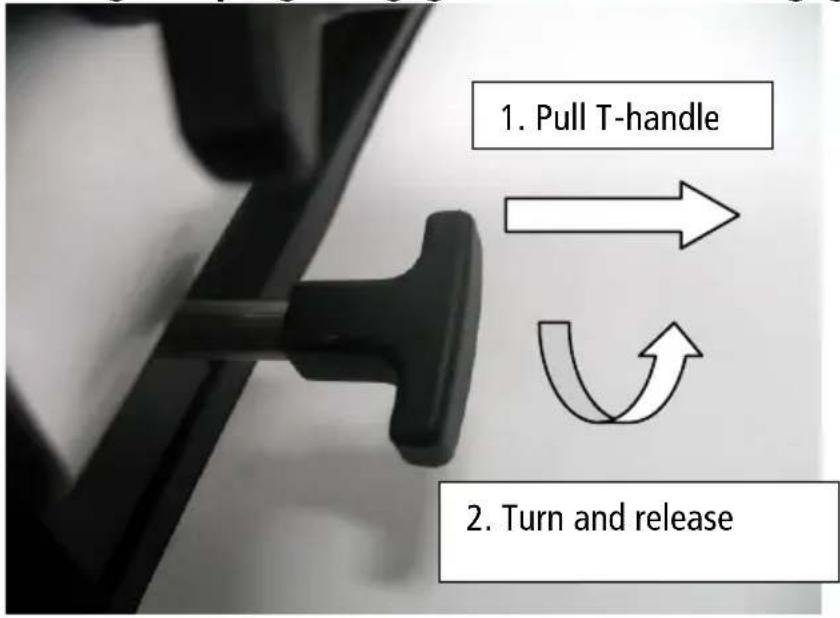
For automatic slicing:
Carriage coupling is disengaged and is to be engaged!
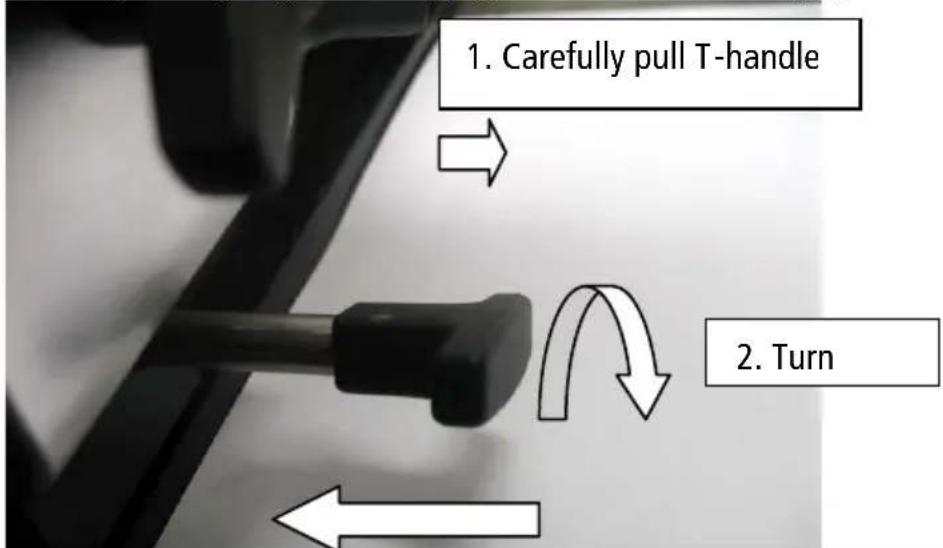
-
Let glide into the direction of the machine and release.
-
Pull the carriage into the position of the coupling until it is audibly engaged
3.2 Slicing
Carriage with food holder in automatic mode
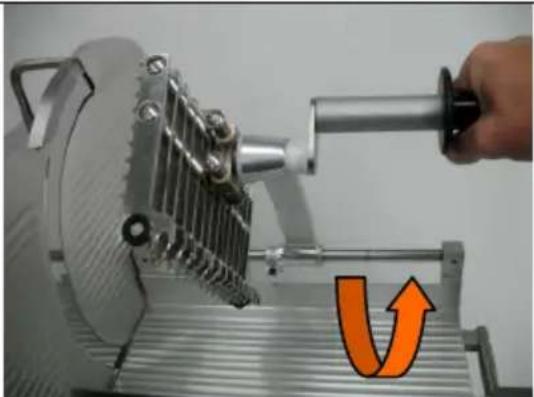 | ·Hold last slice clamp by the handle and swing it upwards | |
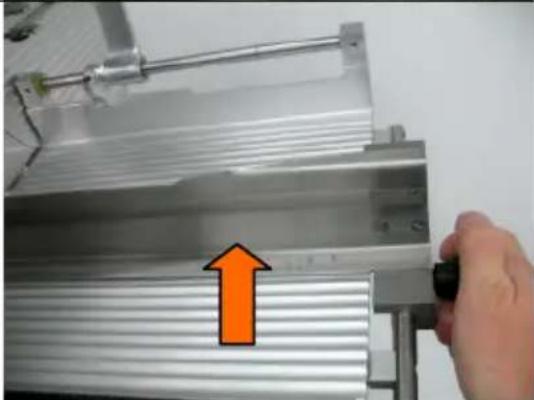 | ·Move guide rail according to the size of the items to be sliced into the direction of the last slice clamp | |
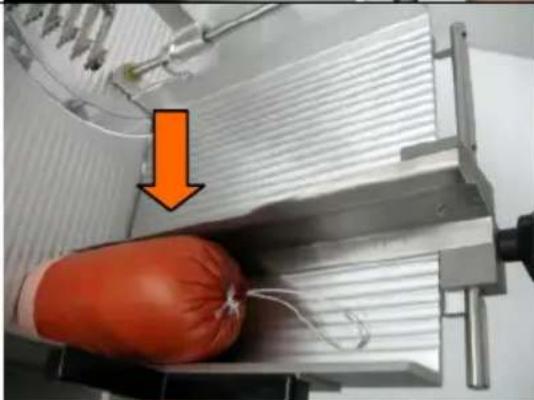 | ·Place the items to be sliced on the carriage wall and use your left hand to hold it in position·Use your right hand to slightly press the guide rail against the items to be sliced and tighten the clamping screw. | |
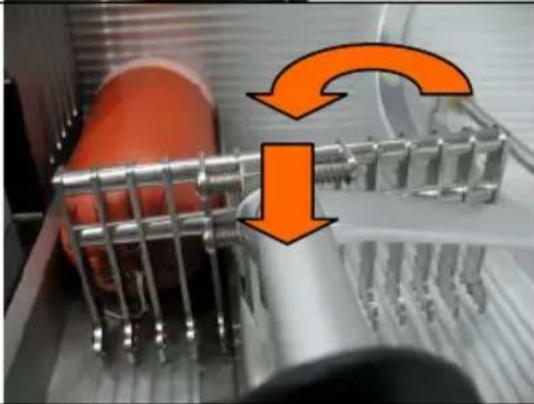 | ·Hold the last slice clamp on the handle and swing back into the "bottom" position. Arrange last slice clamp with a straight movement.·Set slicing thickness·Move last slice clamp against the items to be sliced by applying a slight pressure |
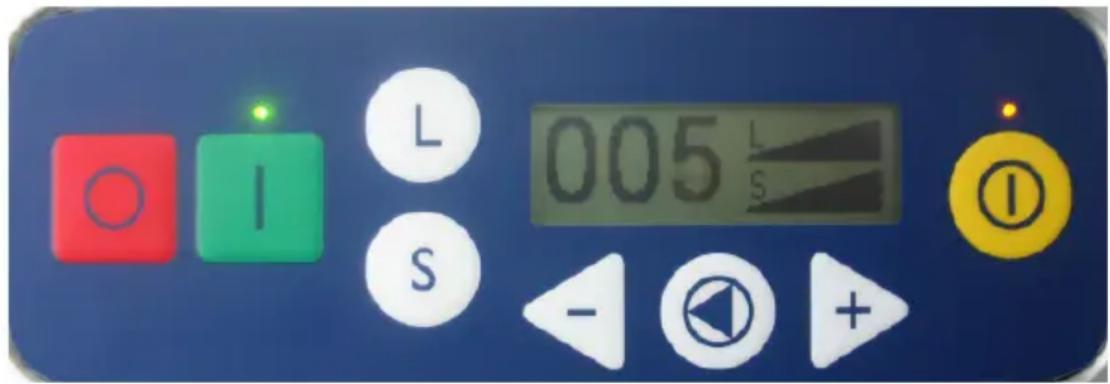
- Start up the machine by pressing the green ON button and the blade starts rotating.
- After start-up, the carriage slowly travels into its starting position. If the carriage is already located in this position prior to start-up, there will be no positioning.
- Either set the desired number of slices by using the +/- button or set to zero by using the reset button for being able to cut numerous slices.
- "S" button: Changes the stroke speed within 2 seconds when pressed again. Adjustable in three steps depending on the stroke length.
- "L" button: Changes the stroke length within 2 seconds when pressed again. Adjustable in three steps (short, medium and long).
- Press yellow carriage drive button and the carriage is driven automatically. When pressing the button again, the carriage stops in the starting position and a new item can be inserted for slicing.
- When pressing the red OFF button, the machine is stopped immediately.
4 Cleaning
The cleaning schedule is the basis for all cleaning procedures.

WARNING!
Rotating blade can cause serious injuries!
Do not reach into the blade. For this reason:
Switch off the machine and pull out the mains plug before cleaning.
When cleaning the blade, always wear protective gloves with wrist guards.

CAUTION!
The carriage is a moving part.
IMPORTANT!
Follow the specified sequence when cleaning. Do not use any abrasive cleaners when cleaning the machine. These scratch metallic surfaces and impair hygiene and slicing performance. Use only the cleaners and disinfectants that have been approved by us, diluted as specified. Do not use any harsh or abrasive cleaners or disinfectants. Never use a high-pressure or steam cleaner.
Failure to observe any of these points will invalidate any warranty claims.
4.1 Preparing for Cleaning
- Press the red off button (0 button).
- Pull the mains cable from the electrical socket.
- Turn the adjusting knob for setting the slicing thickness clockwise past "0" to the limit stop.

CAUTION!
The spikes on the last slice clamp can cause injury.
IMPORTANT!

Do not lay removed parts on top of each other. Parts may be damaged.
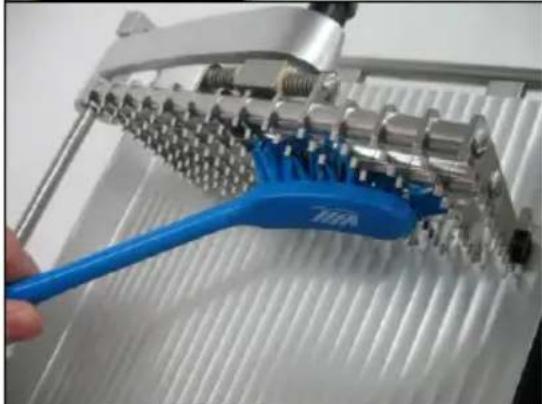
Only clean the last slice clamp with the brush provided. Do not press too hard.
4.1.1. Disassembly of the Removable Parts
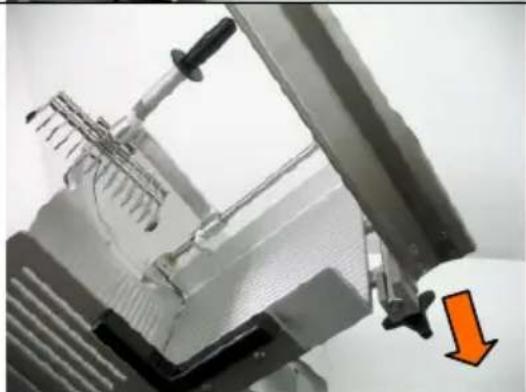
natural_image
Close-up of a mechanical device with a highlighted orange arrow pointing to a component (no visible text or symbols)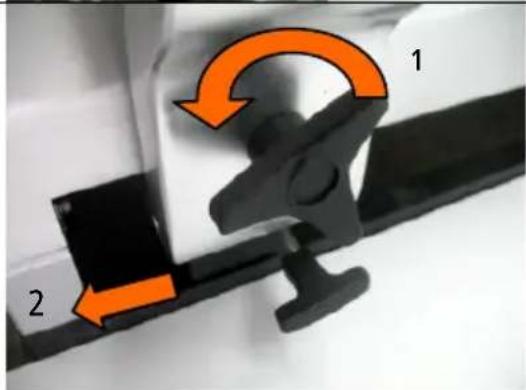
natural_image
Mechanical component with orange curved arrow indicating rotation, no visible text or symbolsGuide rod:
- Swing last slice clamp upwards
- Release clamping and remove item to be sliced
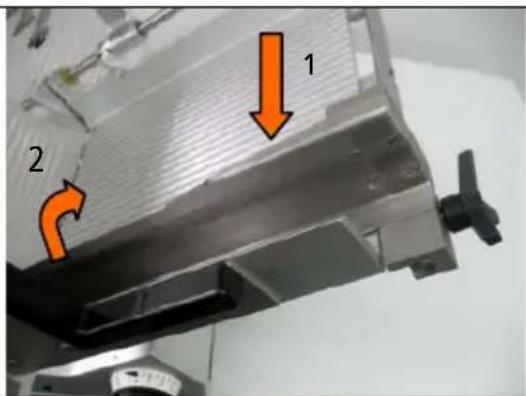
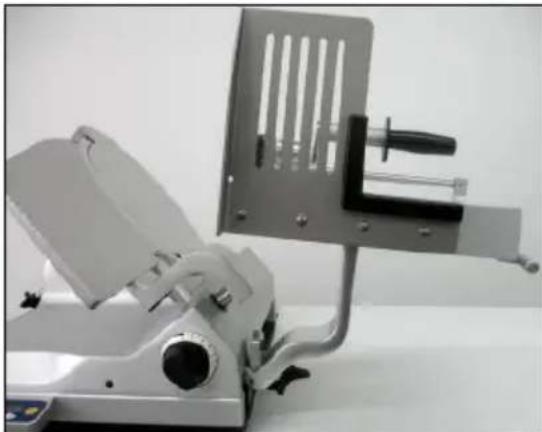
- Pull guide rail in the direction of the operator and swing upwards until it is in vertical position
- Pull off guide rail into the direction of the operator
Swing down carriage:
• The stop must be closed completely
- Loosen star grip and move carriage from the blade to the outmost position (press into spring)
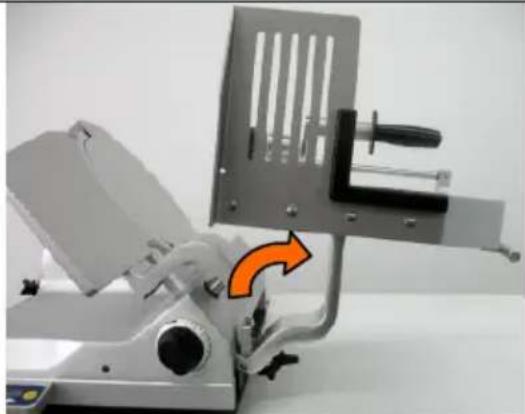 | • Carefully tilt carriage |
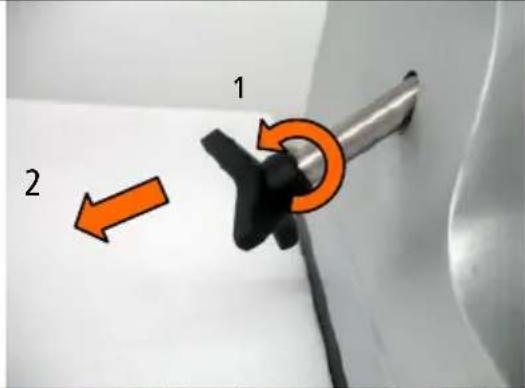 | Blade cover plate:• Use your right hand to secure the blade cover plate against falling down accidentally• Loosen knurled knob and pull away from the guide a little bit |
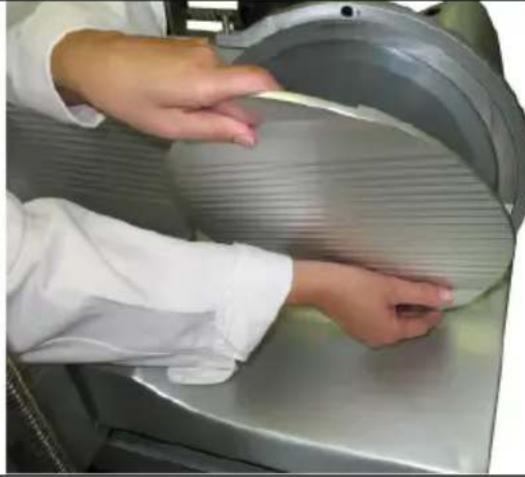 | • Now carefully move the blade cover plate from the blade by using both hands and put aside |
4.2 Cleaning the Different Parts of the Machine
4.1.2. Blade and Blade Ring
 WARNING!The blade is sharp!Only clean it when the carriage is tilted out and the limit stop is closed.Push a dampened cleaning cloth between blade and blade protection ring from the front.Using both hands, pull the cleaning cloth against the blade guard ring once or twice. WARNING!The blade is sharp!Only clean it when the carriage is tilted out and the limit stop is closed.Push a dampened cleaning cloth between blade and blade protection ring from the front.Using both hands, pull the cleaning cloth against the blade guard ring once or twice. | |
| Press a damp cloth against the blade surface and wipe off the blade slowly from the centre to the edges.Clean the rear side of the blade in the same way.Rub the blade dry with a clean cloth in a similar fashion. |
4.1.3. Carriage
natural_image
Medical imaging device with metallic frame and clamping mechanism (no visible text or symbols)- Clean the bottom of the carriage with a damp cleaning cloth when it is tilted out. - Remove the food remains from the carriage surface and then clean it according to the cleaning plan.
natural_image
Close-up of a robotic arm gripping a mechanical component with metallic parts and a blue-handled tool (no visible text or symbols)- Last slice clamp: - Use the brush to clean the spiked side. - Wipe the smooth back with a cleaning cloth.
Clean the removable and non-removable parts according to the cleaning schedule.
4.3 Cleaning Schedule
| Work Steps | Cleansers | Procedures | Cleaning Equipment | Note | |
| 1 | Precautionary measures | Close the slicing thickness control. Pull out the mains plug. | |||
| 2 | Disassembly of the removable parts | See operating instructions | |||
| 3 | Rough manual cleaning | Remove remaining food with plastic spatula | Plastic spatula; start directly after the end of slicing; also for the removable parts. | Start directly after the end of slicing, also for the removable parts | |
| 4 | Cleaning | 2% e.g. Henkel "P3 sterile" Goldschmidt "Somplex detsan" "Somplex F" | Pre-rinse thoroughly with water (max. 40 °C), wait approx. 20 min | brush, pan, cleaning cloth, hand spraying device | All detached and fixed machine parts |
| 4a | Disinfection as additional measure | e.g. Henkel P3 alcodes or Goldschmidt 0.5-2% TEGO 2000 TEGO IMC | Spray manually Do not exceed the time specified in its data sheet for allowing the product to act | Disposable cleaning cloth, hand sprayer | Additional fuse distance when spraying approx. 30 cm |
| 4b | Acid cleaning additional measure | Max. 3% e.g. Henkel "P3-riskan" Goldschmidt "Somplex Schaum sauer" | Foam up manually, Let it act for max. 12 min | Brush Hand sprayer | To remove lime scale if necessary |
| 5 | Rinse | Tap water | Max. temperature 50 °C | Disposable cleaning cloth | Rest of machine |
| Hand sprayer | Detached parts | ||||
| Water hose | Detached parts | ||||
| 6 | Check | Look for visible dirt | |||
| 7 | Dry | Rub dry, | allow to dry in the air | Disposable cleaning cloth | Machine, detached parts, keep separate where possible |
| 8 | Care | Oils for use in the food industry with H1 certification, e.g. Henkel P3 oil | Apply by spraying or rubbing | Disposable cleaning cloth, hand sprayer | Rinse all components that have touched food before you start work |
| 9 | Assembly | In reverse order to disassembly (operating manual) | disassembly | Personnel must | have clean and disinfected hands |
| 10 | Precautionary measures | Cover machine if the surrounding area is to be cleaned with spraying devices or high-pressure equipment to protect it from water | |||
4.4 Cleaning items
Take appropriate action to prevent pollution to the environment when you use hand sprayers.
The information refers to single-shift operation.
You must also observe the safety and product data sheets that were included with the cleansers and disinfecting agents.
If you do not observe them you may damage the machine.
We will not accept any warranty claims if cleaning agents and disinfectants not approved by Graef are used.
Never clean detachable parts in a dishwasher.
Assembling the removed machine parts:
Assemble all the removed parts in the reverse order after cleaning.
Check carefully that all parts are fitted and fixed correctly. Parts that have been improperly fastened can become loose during operation and cause damage to the machine, or, even worse, injure the operator.
5 Maintenance
5.1 Sharpening the Blade

Caution! Danger of injury!
Rotating blade can sever fingers! Only sharpen the blade with the sharpener provided. The sharpener has been adjusted for this machine and must be used for this machine only.
The machine number and the number on the sharpening device are identical. The blade may only be sharpened by personnel who have been trained to do so.

Caution! Danger of injury!
The carriage drive must be unlocked before "sharpening" for preventing the carriage drive to be switched on accidentally during sharpening of the blades.
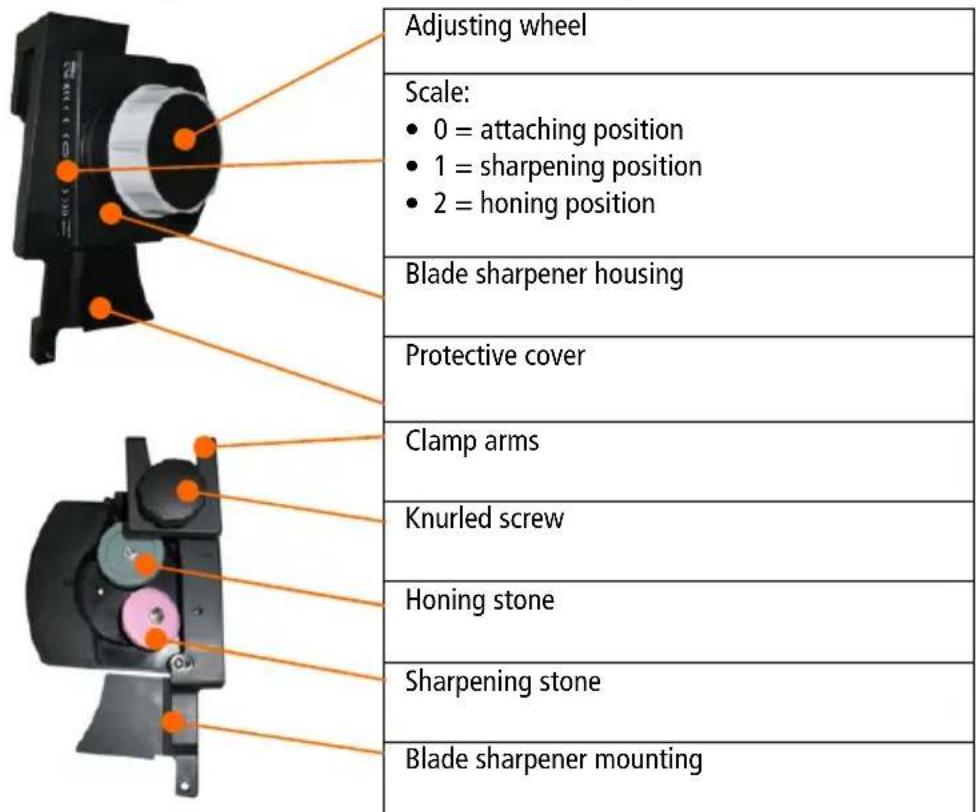
5.1.1. Description of the Blade Sharpener
5.1.2. Preparing the Machine
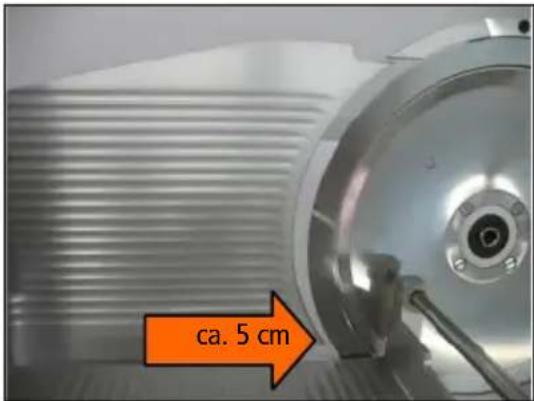
• Thoroughly clean the machine and the blade.
- Remove the guide rail and the blade cover plate.
- Put the last slice clamp down on the carriage.
- Push the carriage about 5 cm towards the blade.
- Turn the slice thickness control for the slice thickness to the "S" marking for sharpening.
5.1.3. Sharpening the Blade
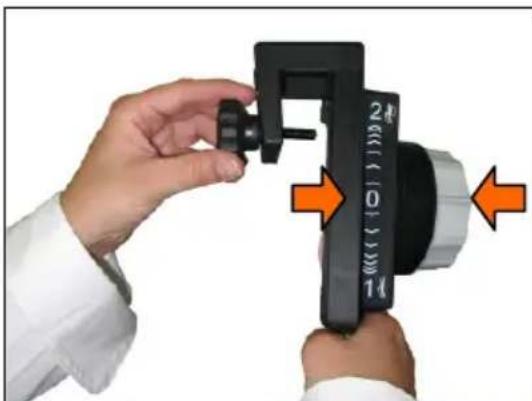
natural_image
Close-up of hands holding a black handheld device with orange arrows indicating direction (no text or symbols visible)- Set the blade sharpener to position "0" using the adjusting knob.
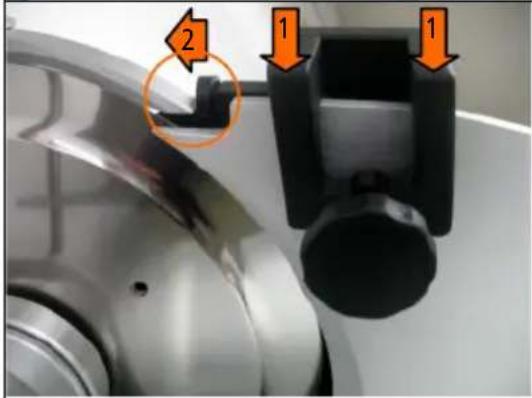
- Put the blade sharpener on the limit stop.
- Both clamp arms (1) must touch the stop edge at the top.
- Push the sharpener towards the blade until the bolt head (2) touches the blade ring.
- Place the blade sharpener with the thumb wheel on the limit stop.
! IMPORTANT!
The blade can only be sharpened accurately if the sharpener is positioned exactly.
- Switch on the machine with the green on button.
- Turn the adjusting knob to the grinding position "1".
- Grinding begins.
- The duration of grinding depends on the condition of the blade.
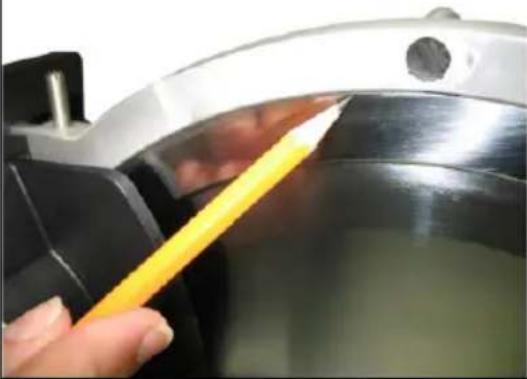 | Grind until a slight cutting ridge is formed.Switch off the machine with the red Off button.Slide a sharpened pencil slowly to the cutting edge as illustrated.Do you feel any resistance at the blade cutting edge? That is the cutting ridge produced from sharpening.If there is no cutting ridge, repeat the steps described above. |
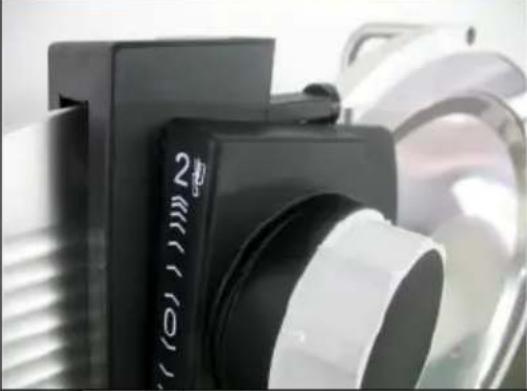 | If a cutting ridge has formed on the blade edge, turn the adjusting knob to the deburring position 2.Allow the machine to run for a few revolutions (2-3 seconds) until the ridge is removed.After deburring, switch off the machine with the red Off button. |
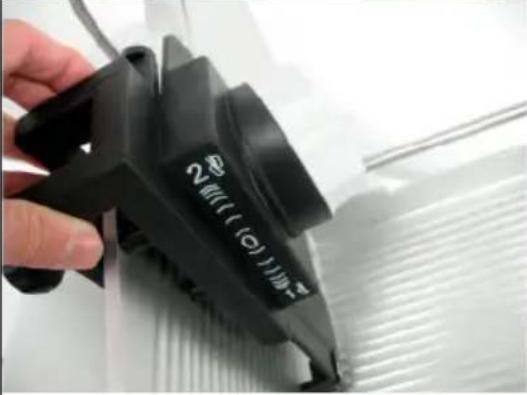 | Taking off the blade sharpener:Turn the adjusting knob of the blade sharpener to position "0".IMPORTANT!The blade sharpener may only be taken off in this position. Otherwise the blade and the sharpener could be damaged!Undo the knurled screw on the blade sharpener and carefully lift it off.Turn the slice thickness control as far as it will go in a clockwise direction.Clean the blade and the machine.Put the detached blade cover plate and guide rail back on the machine. |
5.2 Changing the Blade

WARNING!
The blade is sharp! It can cause serious injury even when it is not moving. The blade may only be replaced by authorised GRAEF service personnel.
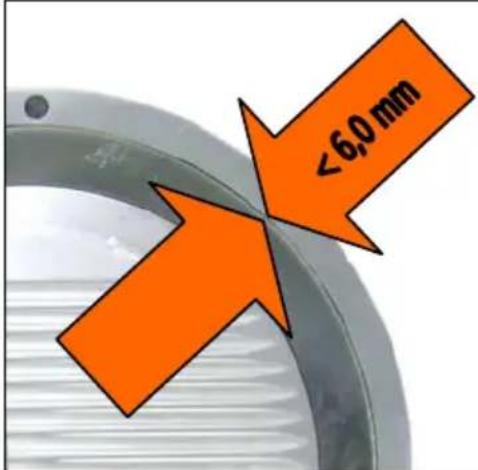

CAUTION!
The blade must be replaced when the distance between the blade guard ring and the blade is larger than 6 mm.
5.3 Lubricating
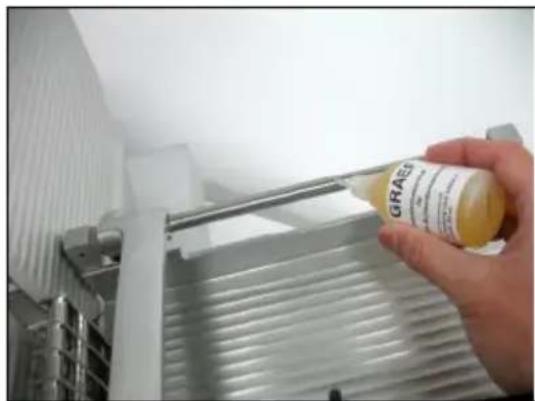
Use only the GRAEF special lubricating oil with H1 certification that is included in delivery.
natural_image
Hand holding a small glass bottle labeled 'GRASS' against a metallic industrial background (no readable text or symbols on the bottle itself)Linear guide rod:
- Drip some lubricant onto the surface of the rod and rub in with a cotton cloth.
- Lubricating interval: as required, whenever the last slice clamp is difficult to move
6. Faults and Operating Errors

CAUTION!
Switch off the machine immediately if it emits unusual noises, malfunctions or if you suspect it could cause injuries.
Call customer service if you cannot solve the problem yourself.
| Fault Cause | Measure | |
| Carriage stops during operation | Carriage blocked, for example by bone | Switch off the machine and pull out the mains plug. Pull back the carriage. Remove the blockage. |
| Carriage cannot be tipped off | The carriage is not in the tilt positionSlicing thickness control not below "0" | First, the handgrip-carriages are solved, then pull the slide back to the server in the spring. Until the slide can be tilted.The slicing thickness control completely close |
| Bad slicing, slices are frayed | Blade is blunt | Sharpen the blade |
| Poor sharpening results | You are using the wrong blade sharpenerGrinding disks are greasy | Use the blade sharpener that was supplied with the machine The correct blade sharpener will have the same serial number as the machine!Replace the grinding discs with new original ones. Clean the blade and machine completely before you start slicing. |
| The slices are uneven | · The food is not held properly in place by the food holding bar | · Use the guide rail |
| Calibre recognition without function | · Guide rail is not placed on the carriage | · Mount the guide rail |
| Slicing process won't start | · Slicing thickness control below "0"· The carriage is not locked into the driver | · Set the required slice thickness· Switch off the machine, set the T handle to a vertical position and move the carriage by hand until it engages. Switch the machine on again. |
| Yellow button flashes - but the carriage does not move | · T handle is in the wrong position, so the carriage drive can not move the carriage | · Switch off the machine, set the T handle to a vertical position and move the carriage by hand until it engages. Switch the machine on again. |
7. Service
IMPORTANT!
Only use genuine GRAEF spare parts.
The use of other parts will invalidate the warranty (see also the declaration of
■ conformity).
Contact your GRAEF customer service If you require service or spare parts.
- OPERATING MANUAL (Original)
- Automatic Slicing Machine
- General Information ....4
- Safety – Notes on the Warranty.... 4
- Description 9
- Operation ....11
- Cleaning 16
- Maintenance....23
- Faults and Operating Errors....27
- Service 28
- Slicing Machine
- General Information
- Safety – Notes on the Warranty
- Set-up and Instruction
- Set-up site requirements
- Unpacking the machine
- Electrical connection
- Proper Use
- Natural Wear
- Potential Sources of Danger
- Caution!
- Caution! Risk of injury.
- Workplace
- Authorised Users
- Protective Clothing and Equipment
- Description
- Designation of the Machine Parts
- Protective Devices
- Technical Dimensions
- Operation
- Operating Controls
- Operating Terminal
- For manual slicing:
- For automatic slicing:
- Slicing
- Cleaning
- WARNING!
- IMPORTANT!
- Preparing for Cleaning
- Disassembly of the Removable Parts
- Guide rod:
- Swing down carriage:
- Cleaning the Different Parts of the Machine
- Blade and Blade Ring
- Carriage
- Cleaning items
- Maintenance
- Sharpening the Blade
- Caution! Danger of injury!
- Description of the Blade Sharpener
- Preparing the Machine
- Sharpening the Blade
- Changing the Blade
- Lubricating
- Linear guide rod:
- Faults and Operating Errors
- Service
Brand : GRAEF
Model : SA 3370
Category : Belt sander