X21 nano - Bike rack Uebler - Free user manual and instructions
Find the device manual for free X21 nano Uebler in PDF.


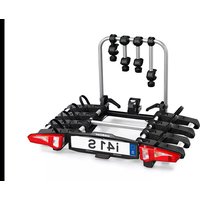
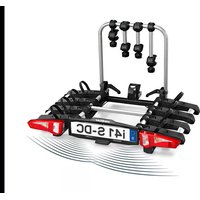
| Product Type | Trailer hitch bicycle rack for 2 bicycles |
| Model | Uebler X21 nano |
| Order Number | 15650 |
| Weight | Approx. 13 kg |
| Maximum Load Capacity | 35 kg (D-value ≥ 5.3 kN), 37 kg (D-value ≥ 6.7 kN, min. tow bar load 50 kg), 60 kg (D-value ≥ 6.7 kN, min. tow bar load 75 kg) |
| Max. Bicycle Weight per Bicycle | 30 kg |
| Max. Tube Diameter (Round) | 80 mm |
| Max. Tube Diameter (Oval) | 80 x 45 mm |
| Power Supply | 13-pin, 12 V |
| Number of Wheel Rails | 4 |
| Tail Lamps | 2 (foldable) |
| Number Plate Holder | Included |
| Folding Mechanism | Quick release clamp for foldable rack frame |
| Tilting Mechanism | Foot lever for tilting back/forward |
| Bicycle Brackets | 2 (bracket for 1st and 2nd bicycle), lockable with key |
| Security Features | Lockable clamping lever and brackets; lashing straps for wheels |
| Maximum Speed | 130 km/h |
| D-value Requirement | Minimum 5.3 kN (see trailer hitch type label) |
| Material | Steel (frame), plastic (rails) |
| Included Accessories | Bag, key for clamping lever (2 pcs), key for bracket (4 pcs), number plate holder, plug for lighting system |
Frequently Asked Questions - X21 nano Uebler
User questions about X21 nano Uebler
0 question about this device. Answer the ones you know or ask your own.
Ask a new question about this device
Download the instructions for your Bike rack in PDF format for free! Find your manual X21 nano - Uebler and take your electronic device back in hand. On this page are published all the documents necessary for the use of your device. X21 nano by Uebler.
USER MANUAL X21 nano Uebler
natural_image
Technical line drawing of two robotic vehicle chassis components with attached sensors and wiring (no text or symbols)Hinweis
natural_image
Technical line drawing of a mechanical device with multiple rollers and a support structure (no text or symbols)natural_image
Line drawing of a bicycle frame with labeled components (no text or symbols beyond labels)Mounting and Operating Instructions
Trailer hitch bicycle rack
- Uebler X21 nano, for 2 bicycles, order no. 15650
- Uebler X31 nano, for 3 bicycles, order no. 15660


Dear customer,
Thank you for choosing an UEBLER bicycle rack. The operating steps and safety instructions described in these Mounting and Operating Instructions must be adhered to. UEBLER shall not accept liability for damage resulting from the failure to do so.
natural_image
Technical line drawing of two robotic vehicle chassis components with attached sensors and wiring (no text or symbols)Note
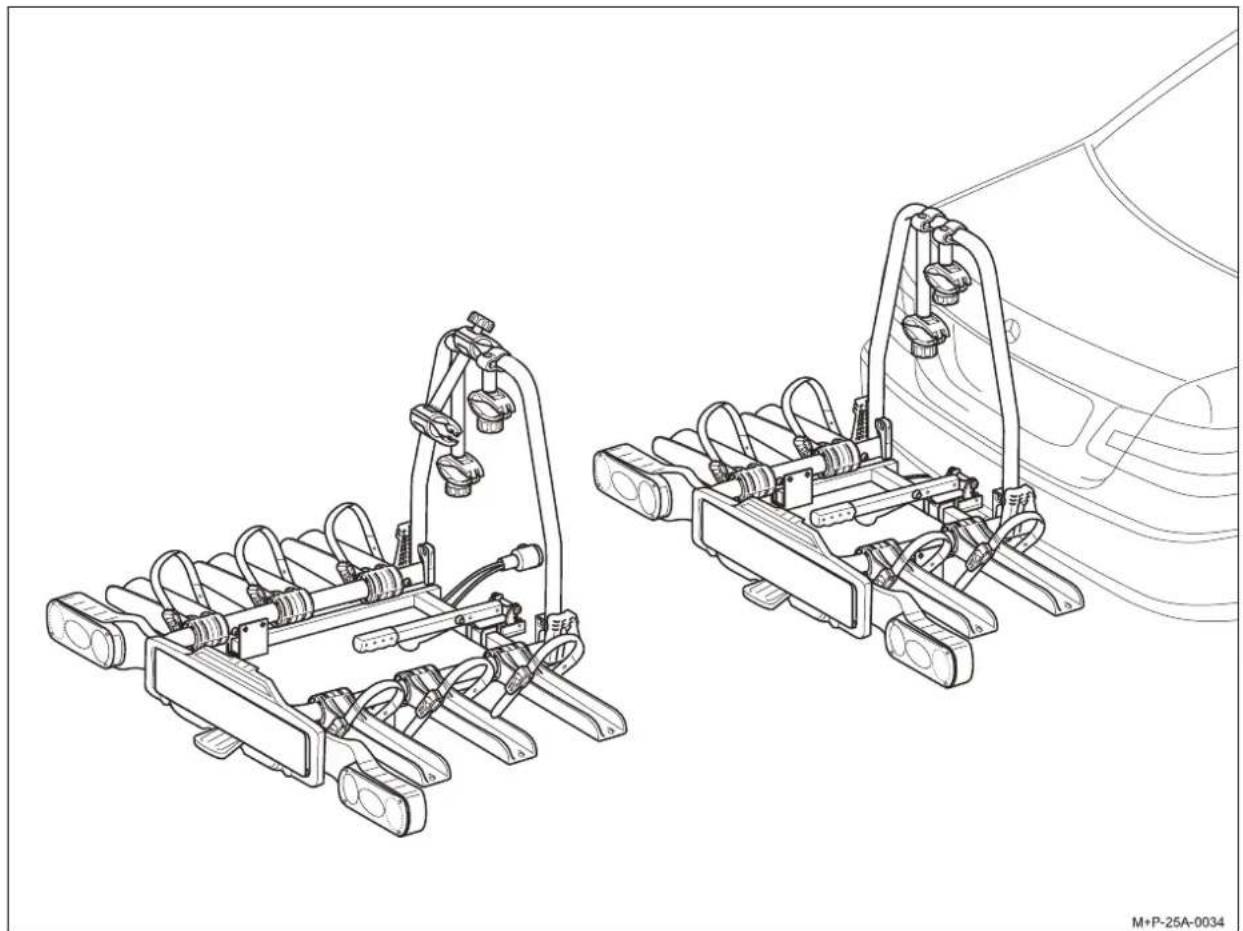
This section describes and illustrates how to mount and operate the Uebler X21 nano bicycle rack. Proceed in a similar manner for the Uebler X31 nano bicycle rack.
Parts overview

Item no.
Hitch rack Uebler X21 nano for 2 bicycles
Order no. 15650
Hitch rack Uebler X31 nano for 3 bicycles
Order no. 15660
EEC type approval number
e11*74/483*2007/15*0234*00
Scope of delivery
| Description | X21 nano X31 nano | |
| Number of items | Number of items | |
| 1 Bag 1 1 | ||
| 2 Bicycle rack 1 1 | ||
| 3 Bracket, 3rd bicycle – 1 | ||
| 4 Key for clamping lever | 2 | 2 |
| 5 Key for bracket 4 6 | ||
Notes
The scope of delivery is subject to change.
Have repairs or part replacements performed by a specialist. Only original spare parts from your bike specialist may be used.
Part description
| Description | X21 nano | X31 nano |
| Number of items | Numberof items | |
| 6 Quick release clamp | 2 | 2 |
| 7 Rack frame | 1 | 1 |
| 8 Wheel rails | 4 | 6 |
| 9 Tail lamps | 2 | 2 |
| 10 Bracket, 1st bicycle | 1 | 1 |
| 11 Bracket, 2nd bicycle | 1 | 1 |
| 12 Clamping lever | 1 | 1 |
| 13 Plug for lighting system | 1 | 1 |
| 14 Number plate holder | 1 | 1 |
Technical data
| Rack weight | |
| Uebler X21 nano, for max. 2 bicycles | Approx. 13 kg |
| Uebler X31 nano, for max. 3 bicycles | Approx. 16 kg |
| Maximum load (load capacity) | |
| Uebler X21 nano, D-value ^1 5.3 kN and higher- min. tow bar load of 50 kg | 35 kg |
| Uebler X21 nano, D-value ^1 6.7 kN and higher- min. tow bar load of 50 kg- min. tow bar load of 75 kg | 37 kg60 kg |
| Uebler X31 nano, D-value ^1 5.3 kN and higher | -^2 |
| Uebler X31 nano, D-value ^1 6.7 kN and higher- min. tow bar load of 50 kg- min. tow bar load of 75 kg | 34 kg54 kg |
| Power supply | |
| Uebler X21 nano, for max. 2 bicycles | 13-pin, 12 V |
| Uebler X31 nano, for max. 3 bicycles | 13-pin, 12 V |
| Maximum tube diameter of bicycle frames | |
| Round tube | 80 mm |
| Oval tube | 80x45 mm |
1 See type label on trailer hitch
2 Not permissible
Required auxiliary materials
- Screw driver 1
- For attaching the number plate.
Folding open the bicycle rack

- Take the bicycle rack (2) out of the bag (1).

- Fold out the tail lamps (9) and engage.
- Swing the brackets (10 and 11) forward and slide along the rack frame (7) into the required position.
Attention
The plate number on the bicycle rack must match the plate number of the vehicle and be clearly legible.

- Open the quick release clamp (6).
- Fold up the rack frame (7) and close the quick release clamp (6). If necessary, turn the quick release clamp (6) clockwise if the rack frame (7) is too loose.
Note
If the quick release clamps cannot be closed, turn anticlockwise.

- Insert the number plate in the number plate holder (14). Turn the locking pin (15) by 180^ using a screw driver to prevent the number plate from slipping.

- Fold out the wheel rails (8) and engage.
Note
To insert higher number plates, press the stoppers (arrows) back and slide the plate into the number plate holder.
Collapsing the bicycle rack
The bicycle rack (2) is collapsed in reverse order.
Attaching the bicycle rack to the vehicle
Attention
The trailer hitch must be suitable for mounting a bicycle rack.
• D-value of the ball head (see "Technical data")
- Material of trailer hitch at least St 52-3 (see type label on trailer hitch).
The ball head must be cleaned and degreased prior to mounting.
Attention
When the bicycle rack is attached to the vehicle, the tail lamps must always be folded out.
The bicycle rack is not permitted to be used with the tail lamps folded in. The lighting system must be checked to ensure it is correctly positioned and working properly before every trip.
Attention
When driving through entrances and narrow passages, note that the vehicle dimensions have changed (width, height, depth). Exercise care when reversing.
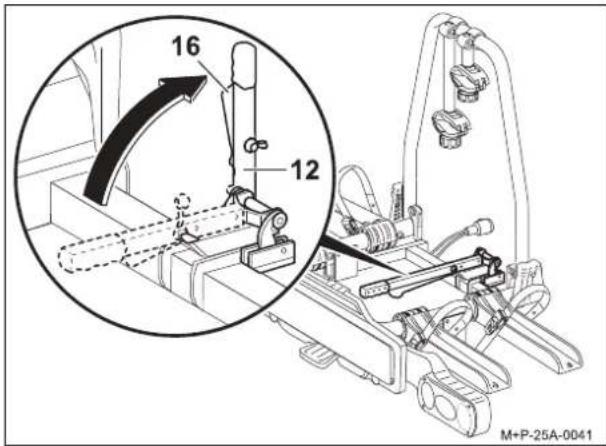
- Unlock the clamping lever (12) with the lever (16) and move up.
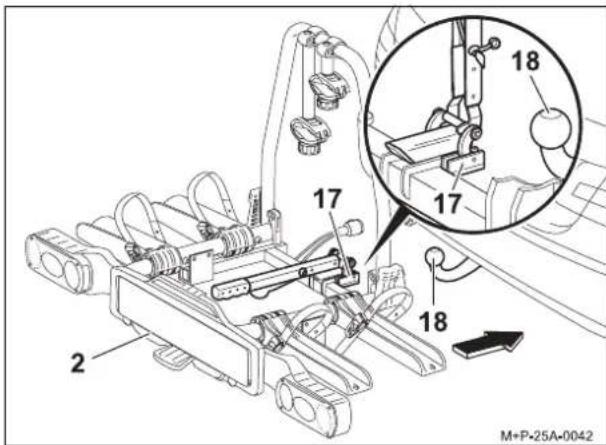
- Slide the support (17) onto the ball head (18) and secure against tilting.

- Align the bicycle rack parallel to the bumper and move the clamping lever (12) down so that the lever (16) engages.
- Lock the clamping lever (12) with the key (4). Pull out the key (4).
- Jiggle the bicycle rack (2) to ensure it is seated firmly. If necessary, remove the bicycle rack (2) and reattach.

- Remove the plug (13) from the bracket on the bicycle rack (2), insert it in the socket (19) of the trailer hitch electrical system and turn clockwise all the way.
- Check that the lighting system is functioning properly.
Removing the bicycle rack
The bicycle rack (2) is removed from the vehicle in reverse order.
Mounting/removing bicycles
Danger of accident and injury!
The bicycle rack for the trailer hitch is only intended for transporting bicycles.
Only bicycles with a max. weight of 30 kg each may be transported on the bicycle rack.
The maximum allowable load capacity of the bicycle rack, the tow bar load of the trailer hitch, the allowable total vehicle weight and the maximum allowable vehicle axle load (see vehicle owner's manual) must not be exceeded. If these instructions are not followed, the bicycle rack together with the mounted bicycles may come loose from the vehicle and cause injury to you or to other persons, or may result in an accident.
Danger of accident and injury!
The bicycles must be mounted evenly and with a low centre of gravity on the bicycle rack. Each must be secured against falling off using a bracket on the bicycle frame and lashing straps on the front and rear wheels.
Before mounting, remove child seats and all lose parts, such as water bottles, saddlebags, etc., from the bicycles and stow them.
If this is not adhered to, the bicycles and/or the loose parts could come loose from the vehicle during a trip and lead to an accident, causing injury and property damage.
Danger of injury!
Mount and dismount the bicycles together with another person. Secure the bicycles against slipping off/tilting.

- Press the latch (20) and pull out the lashing straps (21).
- Unscrew the clamps (22) with the rotary handles (23) until the tube diameter of the bicycle frame is reached.
Attention
Mount heavy bicycles close to the vehicle and light bicycles (e. g. children's bikes) farther out on the bicycle rack. Mount the first bicycle with the toothed gear wheel facing the vehicle.
- Place the bicycle on the wheel rails (8) closest to the vehicle and secure against tilting.
Attention
Only attach the bracket to the bicycle frame. Do not pinch components such as shifting or brake cables. Faulty clamps must be replaced immediately.

- Attach the bracket (10) at a suitable location on the bicycle. Tighten the clamp (22) with the rotary handle (23) and lock with the key (5). Pull out the key (5).
- Pass the lashing strap (21) between two wheel spokes, thread into the buckles (24) and tighten (arrow) with the tensioning lever (25).
Note
Tightening the lashing straps (21) places these under tension. To loosen the straps, the latch (20) needs to be pressed firmly.
Mounting the second bicycle
natural_image
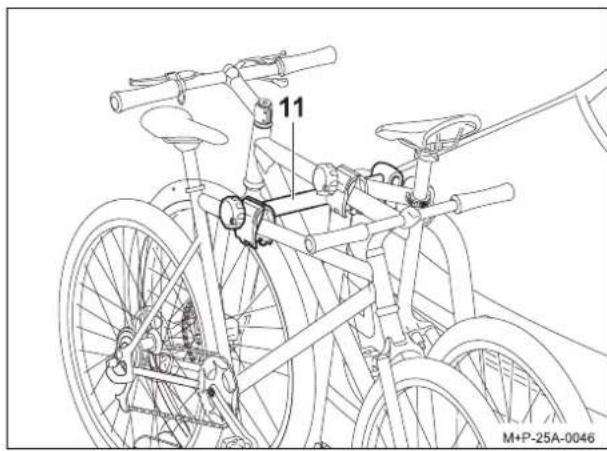
Line drawing of a bicycle frame with labeled components (no text or symbols beyond labels)The second bicycle is mounted in the same manner as the first. Note that the bicycles are mounted in opposite directions.
The second bicycle is attached using the long bracket (11).
Mounting the third bicycle ^1
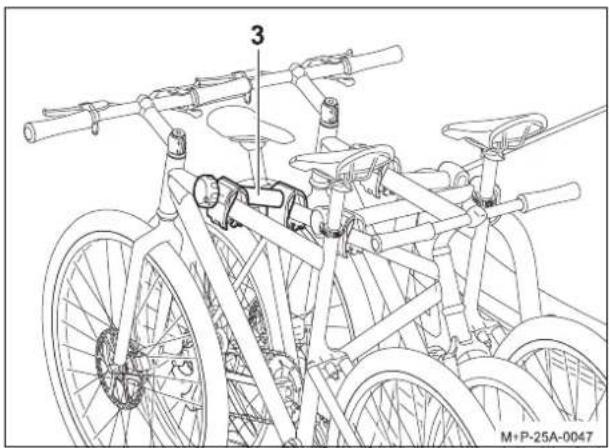
The third bicycle is mounted in the same manner as the first. Note that all bicycles are mounted in opposite directions to each other. The third bicycle is attached to the second bicycle with an additional bracket (3).
Tilting the bicycle rack back/forward
The bicycle rack can be tilted back away from the vehicle to load or unload the vehicle.
Danger of injury!
Slowly tilt the bicycle rack back while ensuring that no persons or objects are located in the tilting area.
There is a danger of crushing for people and objects in the tilting area.
Ensure that the bicycle rack fully engages with both hooks and locks when it is tilted forward. Otherwise, the bicycle rack could tilt back during a trip and result in injury to you or others and/or in property damage.
Tilting the bicycle rack back

Activate the foot lever (26) and tilt the bicycle rack (2) back by pulling on the rack/bicycle frame.
Tilting the bicycle rack forward

- Tilt the bicycle rack (2) forward so that both hooks (27) are full engaged in the frame (28) and locked.
- Jiggle the bicycle rack (2) to ensure it is seated firmly. If necessary, tilt the bicycle rack (2) back and forward again.
Preparations before driving
Danger of accident and injury!
All screw connections and attachments of the bicycle rack and the bicycles must be checked before assembly, before every trip and during lengthy trips to ensure they are firmly seated, and they must be retightened if necessary. This measure must be repeated at regular intervals regardless of the condition of the road. In addition, the lighting system must be checked to ensure it is working properly before every trip. If these instructions are not followed, the bicycle rack together with the mounted bicycles may come loose from the vehicle and cause injury to you or to other persons, or may result in an accident.
Attention
The license plate and the lighting system of the bicycle rack must not be covered.
If the bicycle is not fully loaded, it must ensured that:
- Brackets that are not in use are screwed closed and locked
• All keys are removed and stored
• The bracket for the third bicycle is stowed
• The lashing straps of all wheel rails are closed
Removing the bicycles
The bicycles are removed in the reverse order.
General safety instructions
The vehicle owner is responsible for assuring that his or her field of view and hearing are not impaired by the load or the condition of the vehicle. It must be ensured that the vehicle and load are in accordance with regulations and that vehicle road safety is not impaired by the load.
The required lighting and lighting systems must also be present and functional during the day.
These Mounting and Operating Instructions contains the general approval of the bicycle rack for trailer hitches and must always the kept in the vehicle when the rack is mounted.
Follow the legal regulations regarding use of the bicycle rack in the country of use.
Danger of accident and injury!
The operating steps and safety instructions described in these Mounting and Operating Instructions must be followed.
The bicycle rack for the trailer hitch is only intended for transporting bicycles. The bicycle rack is not suitable for use on rough terrain.
All screw connections and attachments of the bicycle rack and the bicycles must be checked before assembly, before every trip and during lengthy trips to ensure they are firmly seated, and they must be retightened if necessary. This measure must be repeated at regular intervals regardless of the condition of the road.
During the trip, the driver should check the bicycle rack and bicycles for shifting/changes in position by glancing in the rear view mirror. If changes are noticed, proceed to the next possible stopping area at reduced speed and retighten the screw connections and attachments of the bicycle rack or bicycles.
If these instructions are not followed, the bicycle rack and/or the load may come loose from the vehicle and cause injury to you or to other persons, or may result in an accident.
Danger of accident and injury!
Do not use lubricants on the pre-mounted screw connections. This could cause the screw connections to loosen and the bicycle rack together with the mounted bicycles may come loose from the vehicle; this may cause injury to you or to other person, or may result in an accident.
Danger of accident!
Before starting a trip, check that the lighting system is functioning properly. When the rear fog lamp on the bicycle rack is switched on, the rear fog lamp of the vehicle must be switched off;
In vehicle models whose type approval was initially issued after 01 October 1998, the mounted rear rack system and the load must not cover the third brake lamp of the vehicle. The third brake lamp of the vehicle must be visible: on the left and right, relative to the longitudinal vehicle axis, at a horizontal angle of 10^ ; at the top relative to the top edge of the lamp, at a vertical angle of 10^ ; and at the bottom, relative to the lower edge of the lamp, at a vertical angle of 5^ . If these values are not met, a "third" replacement brake lamp must be installed.
Danger of accident!
The mounted bicycle rack and bicycles alter the driving and braking characteristics and the lateral wind sensitivity of the vehicle. A maximum speed of 130 km/h must not be exceeded.
Do not cover the bicycles with tarps, protective covers or similar since this greatly influences the areas exposed to the wind and the driving behaviour.
Slide any heavy cargo in the luggage compartment as far forward as possible to avoid excessively loading down the rear of the vehicle.
Always adjust your driving style to the road, traffic and weather conditions and exercise special care when driving with a loaded bicycle rack.
Danger of accident!
If the load extends more than 40 cm beyond the outer edge of the lit area of the side-marker lamps or tail lamps of the rear rack system, the load must be marked at most 40 cm from the edge and at most 150 cm above the road surface.
Separately mark the bicycle wheels extending out laterally during transport.
When driving at night, cover the rear lights and reflectors of the bicycles to prevent confusion with the rearward-facing vehicle lighting and to avoid hindering or confusing other road users.
Attention
If the vehicle is equipped with an electrical luggage compartment lid, allow for the necessary clearance when mounting the bicycle rack. If possible, the electrical luggage compartment lid should be de-activated and operated manually.
Remove the bicycle rack before using automatic car washes. Otherwise, the bicycle rack, the vehicle and/or the car wash could be damaged.
Environmental protection notice
Remove the bicycle rack when not in use to lower fuel consumption.
Uebler GmbH
Sandäcker 7
91301 Forchheim, Germany
Tel.: +49 (0)9191 7362-0
Fax: +49 (0)9191 7362-77
E-mail: info@uebler.com
Internet: www.uebler.com
Status: 02.2010
- Hinweis
- Mounting and Operating Instructions
- Trailer hitch bicycle rack
- Note
- Parts overview
- Item no.
- EEC type approval number
- Scope of delivery
- Notes
- Technical data
- Required auxiliary materials
- Folding open the bicycle rack
- Attention
- Collapsing the bicycle rack
- Attaching the bicycle rack to the vehicle
- Removing the bicycle rack
- Mounting/removing bicycles
- Danger of accident and injury!
- Danger of injury!
- Tilting the bicycle rack back/forward
- Preparations before driving
- Removing the bicycles
- General safety instructions
- Danger of accident!
- Environmental protection notice
Brand : Uebler
Model : X21 nano
Category : Bike rack