
CH-437C - Pressure gauge CITIZEN - Free user manual and instructions
Find the device manual for free CH-437C CITIZEN in PDF.


| Product Type | Pressure Gauge (Manometer) |
| Brand | Citizen |
| Model | CH-437C |
| Display | LCD with backlight |
| Measuring Range | 0 to 100 kPa (0 to 14.5 psi) |
| Accuracy | ±1% of full scale |
| Resolution | 0.01 kPa |
| Units | kPa, psi, bar, mmHg, inHg |
| Power Supply | 9V battery (6F22 or 6LR61) |
| Battery Life | Approximately 50 hours continuous use |
| Dimensions | 150 x 80 x 30 mm |
| Weight | 200 g (including battery) |
| Operating Temperature | 0°C to 50°C |
| Storage Temperature | -10°C to 60°C |
| Functions | Pressure measurement, data hold, min/max recording, auto power off |
| Connection | Barb fitting for 6 mm hose |
| Maintenance | Clean with a soft, dry cloth; do not use solvents |
| Safety | Do not exceed maximum rated pressure; avoid dropping |
| Spare Parts | 9V battery, replacement hose connector |
| Repairability | Battery and fuse replaceable by user; other repairs by qualified technician |
| Accessories Included | Battery, user manual, hose adapter |
Frequently Asked Questions - CH-437C CITIZEN
User questions about CH-437C CITIZEN
0 question about this device. Answer the ones you know or ask your own.
Ask a new question about this device
Download the instructions for your Pressure gauge in PDF format for free! Find your manual CH-437C - CITIZEN and take your electronic device back in hand. On this page are published all the documents necessary for the use of your device. CH-437C by CITIZEN.
USER MANUAL CH-437C CITIZEN
General remarks on blood pressure and blood pressure measurement
- If the cuff is to be deflated quickly, depress "POWER" switch.
- The attached cuff is suited for an arm circumstance of 22 cm to 32 cm.
- When attaching the cuff, the air hose should be placed on the inside of your arm on top of the arterial.
- Self measurement is not therapy! In no case may you change the dosage of medication prescribed by your physician.
- In preparation for blood pressure measurement, you should urinate and then remain relatively still for 10 to 15 minutes prior to measurement.
- Exercising, eating, drinking, smoking, etc., prior to measurement may affect the results.
- Blood pressure varies constantly throughout the day. Measurement should be made regularly at the same time each day.
- DO NOT be too impressed by the results of one measurement. Keep a record of blood pressure variations. Many reading tell a story.
- Emotional stress may tend to cause blood pressure to rise.
For proper measure of blood pressure
- Take a deep breath five or six times and then relax before measuring your blood pressure. If you are tense when taking the measurement, you will not get a valid reading.
- Blood pressure will be elevated when you are in a worrisome or irritated state, suffering from lack of sleep or constipation, or after exercise or a meal.
- Wrap the cuff around the arm and tighten it so that one finger may be inserted between the cuff and arm. (See page 15)
- DO NOT measure blood pressure after bathing or drinking.
- When you feel like relieving yourself, you should do so before measuring your blood pressure.
-
Measure your blood pressure where the room temperature is about 20^ C. DO NOT measure blood pressure when it is too cold (below 10^ C) or too hot (above 40^ C) in the room.
-
DO NOT try to measure blood pressure immediately after drinking coffee or tea or smoking.
- Measure blood pressure with a relaxed and quiet posture. Keep the center of the cuff at the level of your heart, and DO NOT move your arm or talk.
- DO NOT measure blood pressure after the cuff has been on for a few minute, as your arm will have built up higher blood pressure, and you will not get valid reading.
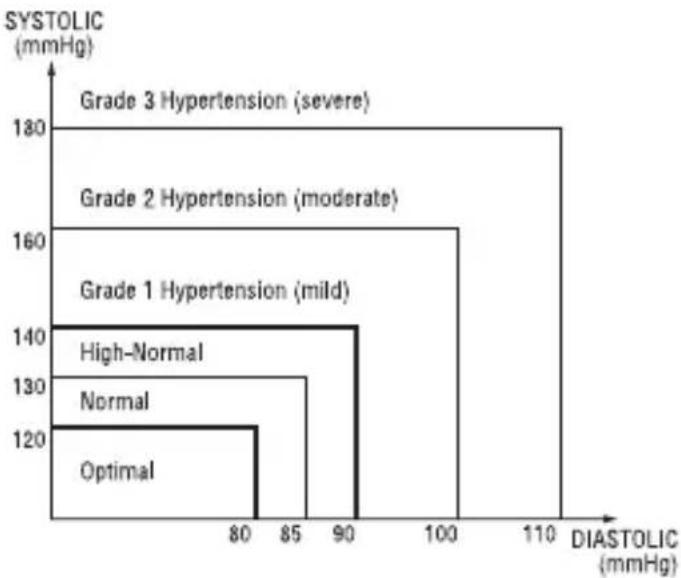
- Next figure shows the classification of blood pressure according to WHO-standard.
bar
| Hypertension Level | Diastolic (mmHg) | | :--- | :--- | | Optimal | 80 | | Normal | 85 | | High-Normal | 90 | | Grade 1 Hypertension (mild) | 90 | | Grade 2 Hypertension (moderate) | 90 | | Grade 3 Hypertension (severe) | 110 |Remarks:
The graph is not exact, but may be used as a guide in understanding non-invasive blood pressure measurements. The device intended for use in adult population.
Definition and Classification of Blood Pressure Levels
Measure your blood pressure at the same time on a daily basis.
* The blood pressure changes at all times. This means that data gathered over a long period has great significance instead of data on just one measurement. It is therefore necessary to measure your blood pressure on a daily basis. Ideally, you should measure your blood pressure daily at the same time as far as possible.
PRECAUTION FOR USE AND MAINTENANCE
Precaution for use
- If you suffer from heart disease, high blood pressure or other circulatory disease, please consult your doctor first.
- If you feel abnormal pressure of the cuff during use or any other irregularity, reduce the pressure by immediately switching off the power or remove the batteries and consult the sales outlet where purchased.
- If you think the measured value is abnormal or if measuring makes you feel unwell, discontinue use and consult your doctor.
- Measurement of blood pressure may not be possible for someone with a weak pulse or arrhythmia.
- If blood pressure is measured repeatedly, congestion, swelling, etc. may occur in some people.
- If blood pressure is measured repeatedly, an accurate result will not be achieved. An interval of about 10 minutes should be allowed.
- Consult your physician before use if you suffer a severe disorder of blood circulation in the arms. Failure to do so may cause health hazards.
- Measurement may not be possible for someone with an insufficient blood flow in the area to be measured or frequent irregular heartbeats. Consult your physician for judgment.
- DO NOT wrap the arm cuff around an injured arm.
- DO NOT wrap the arm cuff to the arm where a drip (intravenous infusion) or blood transfusion under medical treatment. Failure to do so may cause an injury or a serious accident.
- DO NOT use in the vicinity of flammable gases such as anesthetic gases because of the risk of ignition and explosion.
- DO NOT use in enriched oxygen environments such as a hospital's hyperbaric chamber or oxygen tent because of the risk of ignition and fire.
-
DO NOT use a mobile phone near the unit. Doing so may result in malfunction.
-
If you use a cardiac pacemaker, consult your doctor before use.
- Be sure to use this unit only for measuring blood pressure. DO NOT use it for any other purpose.
- DO NOT use this unit on an infant.
- Blood pressure measurement may not be possible for anyone with common arrhythmias such as atrial or ventricular premature beats or atrial fibrillation.
Precaution for maintenance
- DO NOT store the blood pressure monitor where it will be exposed to direct sunlight, high temperature (over 60^ C), low temperature (below -20^ C), high relative humidity (over 95%) or in a dusty place.
- DO NOT drop or expose the blood pressure monitor to under force or vibration.
- Remove the battery/batteries when not in use for a long period.
- DO NOT disassemble the apparatus.
- DO NOT bend the cuff unnecessarily.
- NEVER wipe the blood pressure monitor with thinner or benzene, as they may damage it.
- When the monitor is very dirty, wipe it clean with a cloth moistened with sterilizing alcohol or a neutral detergent, and then wipe it with a dry cloth. DO NOT use thinner or benzene.
- To clean the cuff, wipe it with a moist cloth. Avoid hard rubbing as this will cause air leakages. Take care also not to get water into the air hose.
Nature and frequency of maintenance:
This product is designed for use over an extended period of time; however, it is generally recommended that it be inspected every two years to ensure proper function and performance.
Protect the nature environment:
Please help protect natural environment by respecting natural and/or local recycling regulations when disposing of the batteries and the products at the end of their useful lives.
WEEE MARK
If you want to dispose this product, do not mix with general household waste. There is a separate collection systems for used electronics products in accordance with legislation under the WEEE Directive (Directive 2002/96/EC) and is effective only within European Union.
Reference European standard:
The blood pressure measuring device corresponds to regulation EN60601-1-2.
CITIZEN SYSTEMS (H.K.) LIMITED
AT A-B, 4TH FLOOR, HUNG MOU INDUSTRIAL
BUILDING, 62 HUNG TO ROAD, KWUN TONG, KOWLOON, HONG KONG
* For technical data, please contact our European Representative.
Symbols Explanation
CE Device compiles with the requirements of the EC Directive 93/42/EEC. Registered with the CE Marking.
: Type B applied part
Attention, consult accompanying documents.
Appliance compliance WEEE directive
Manufacturer
ECREP European Representative
LOT : Batch Code
| Warning | The device has been tested and homologated in accordance with EN60601-1-2 for EMC. This does not guarantee in any way that the device will not be affected by electromagnetic interference. Avoid using the device in high electromagnetic environment. |
Safety Precautions before Using AC Adapter
When you use the blood pressure monitor connected to the AC adapter (Ref. AC-230CZ), pay attention to the following remarks.
- DO NOT remove or insert the AC adapter with a wet hand. DO NOT get the AC adapter wet or DO NOT wash it in water. Failure to do so will cause an injury, electric shock, short circuit or failure.
- DO NOT use an AC adapter other than the specified one. Failure to do so may cause a fire or an electric shock.
- DO NOT use the AC adapter (Ref AC-230CZ) with a power supply voltage other than the specified one. Failure to do so will cause a fire or an electric shock.
- DO NOT damage the cord of the AC adapter, pull it by force or put a something heavy over it. Failure to do so will cause a fire or an electric shock.
- DO NOT use a receptacle where the plug is loosely inserted. Failure to do so will cause a fire or an electric shock.
- Be sure to remove the AC adapter before cleaning. Clean the unit with the AC adapter inserted will cause an electric shock or an ignition.
- When unplugging the AC adapter, DO NOT pull on the power cord but pull on the plug itself. Pulling the cord will cause an injury or an ignition.
- DO NOT allow dust to collect over the AC adapter or DO NOT lock the power cord with a pin. Failure to do so will cause an electric shock, ignition or short circuit.
- Be sure to pull the AC adapter from the wall socket if the blood pressure monitor is left unused. Not doing so will deteriorate the insulator, resulting in a fire caused by electrical leak or an electrical shock.
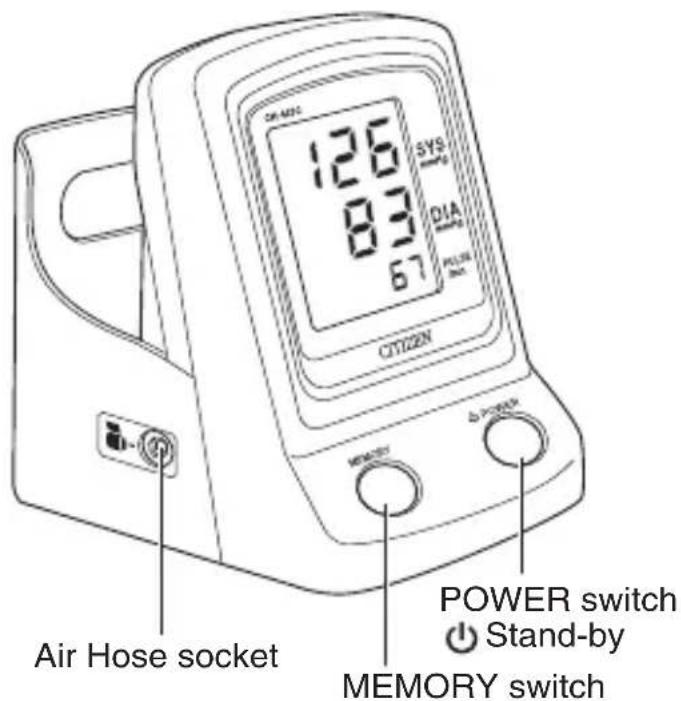
IDENTIFICATION OF PARTS
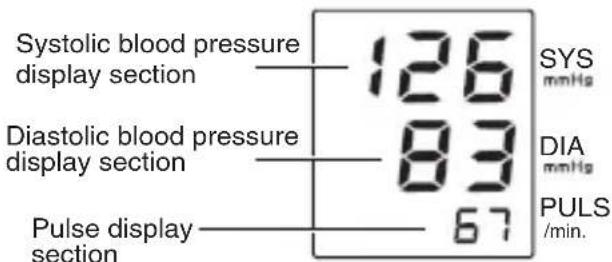
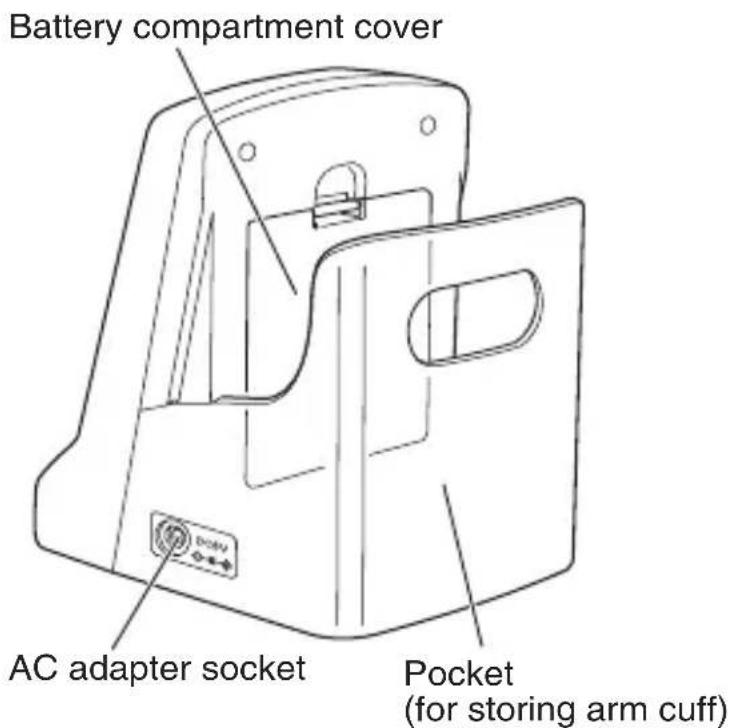
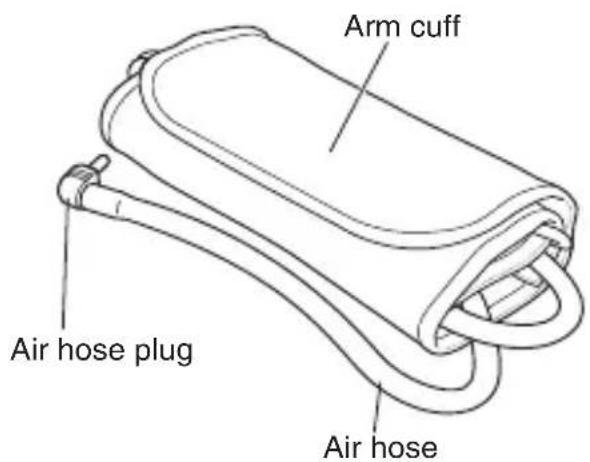
HOW TO LOAD BATTERIES
1 Remove the plugs.
Remove the air hose plug and AC adapter plug.
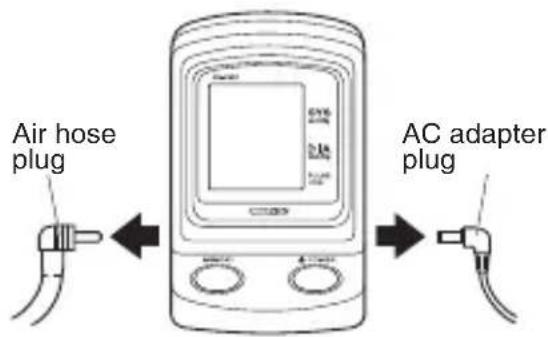
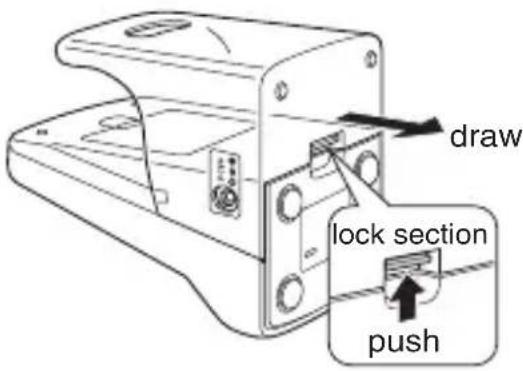
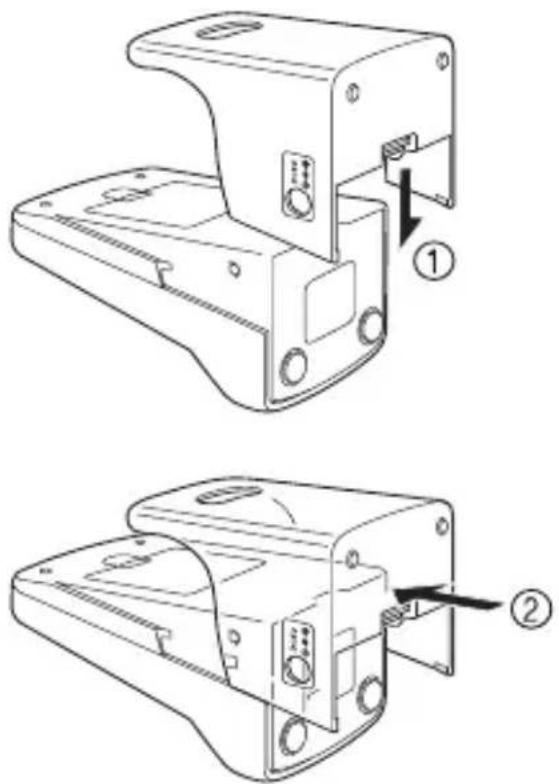
2 Remove the Pocket.
While pressing the lock section on the bottom of the pocket, pull the pocket in the direction of the arrow.
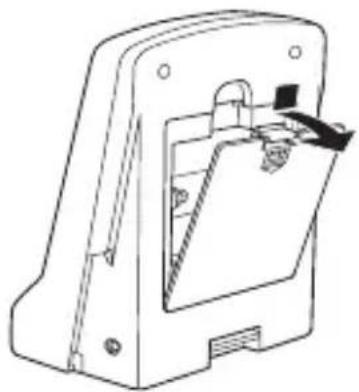
3 Op en the battery y com part m ent cover.
While pressing the lock section of the battery compartment cover, pull the cover toward you to open.
natural_image
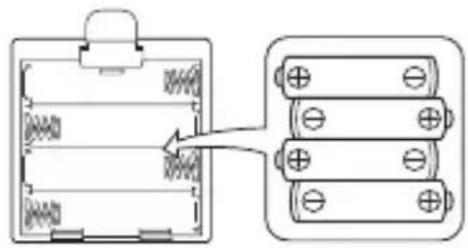
Technical line drawing of a mechanical device with no visible text or symbols4 Place the batteries in the compartment.
Fit the batteries paying attention to the positive ⊕ and negative ⊖ terminals.
* If the blood pressure monitor is left unused for an extended period of time, the batteries should be removed from the compartment.
natural_image
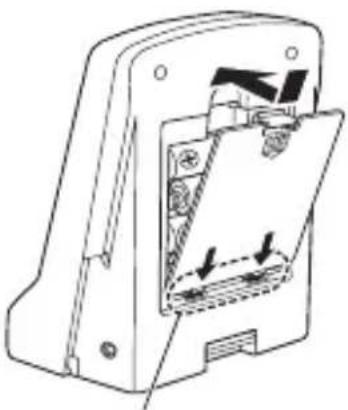
Diagram of a battery pack with two stacked batteries and a switch, showing internal components without any text or symbols.5 Close the battery compartment cover.
Fit the lugs of the cover at the mating recesses of the battery compartment body and push the cover in the direction of the arrow.
natural_image
Technical line drawing of a mechanical device with internal components and directional arrows (no text or symbols)Fit the lugs (projections) at the recesses.
6 Re-attach the pocket.
Match the guides at the right and left sides of the pocket with those on the monitor body and slide the pocket till it clicks.
HOW TO UNLOAD THE BATTERIES
1 Remove the plug, pocket and battery compartment cover.
( See page 9 "HOW TO LOAD BATTERIES".)
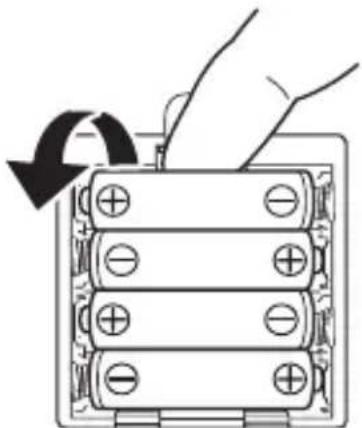
2 Remove each battery from top to bottom by lifting up its end, rotating it in the direction of the arrow with your fingertip.
natural_image
Diagram of a battery pack with three stacked plates and a hand inserting a cable, showing no text or symbols.3 Re-attach the battery compartment cover and the pocket.
( See page 9 "HOW TO LOAD BATTERIES".)
Replacing the batteries
- Replace the batteries with four new "AA" alkaline batteries when appears on the display, or when nothing appears on the display when the POWER switch is pressed.
- Replace all four batteries with new ones.
- Do not use the alkaline dry battery and manganese dry battery together.
- Batteries included are for demonstration purposes only. Battery life may be shorter than specified.
- Dispose of used batteries properly in accordance with local regulations.
HOW TO USE AC ADAPTER (OPTION)
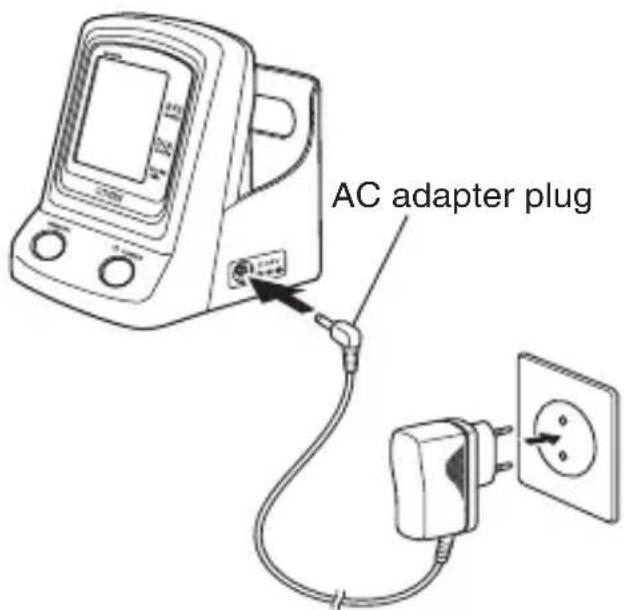
When the optional AC adapter, exclusive for the Citizen blood pressure monitor (CH-437C) is used, you can measure blood pressure without paying attention to the residue of the batteries.
1 In ser t the AC ada pter r pl ug into the socket on the blood pressure monitor body.
2 Insert the AC adapter into the receptacle for the power supply.
AC adapter(Option)
Ref.: AC-230CZ
Input: AC100\~240V\~50/60Hz
Output: DC6V 600mA
* When the AC adapter is used for an extended period of time, the batteries should be removed.
If the batteries are left in the compartment, electrolyte may leak, causing a failure of the blood pressure monitor.
* When only the AC adapter is used for the power supply, the data stored in memory will be erased by pulling the AC adapter from the wall socket. It is recommended to write down the data.
- When only batteries are used for the power supply, the AC adapter plug should unplug. If the AC adapter plug into the socket on blood pressure monitor, it might be cause of malfunction.
The AC adapter exclusive for the CH-437C is an option.
The AC adapter is available from retailers stocking Citizen digital blood pressure monitors.
POINTS FOR ACCURATE MEASUREMENT
Blood pressure varies with posture, the time of day or numerous other factors. It is recommended to measure blood pressure at the same time each day in the same posture.
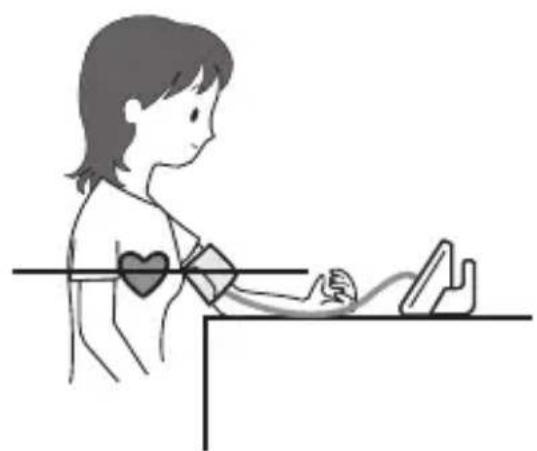
■ Measurement in sitting posture
natural_image
Illustration of a person sitting at a desk with heart symbols on her chest, no text or symbols present① Place your arm on a table or similar surface stretching out the portion from the elbow to the hand.
② It is important to keep the arm cuff level to your heart.
③ Lightly open your hand on the table with palm up and relax your fingers.
④ Do not move your body or talk during Measurement.
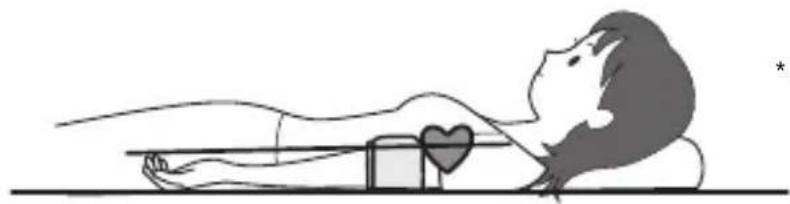
■ Measurement in laying posture
natural_image
Illustration of a person lying on their back with a heart symbol on the chest (no text or symbols present)* Relax yourself not to apply
① Lie down your head facing the ceiling.
② Lightly open your hand with palm up and straighten your arm.
③ Relax your body, arm and fingers.
④ Do not move your body or talk during measurement.
HOW TO WRAP THE ARM CUFF
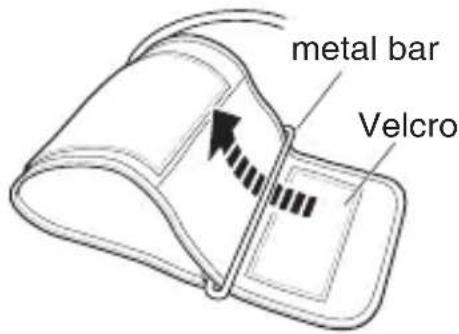
1 Unroll the arm cuff.
- When the arm cuff comes off, pass it through metal bar, directing the Velcro-attached side to the outer surface.
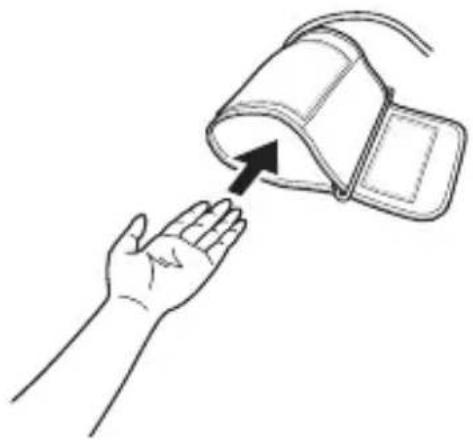
2 Put the arm cuff around your arm so that the air hose comes to the left palm side.
- The arm cuff should be put on the bare arm or over a light-weight clothing. If you wear a heavy-weight top, remove it. - Be aware that if you roll up sleeves the upper arm may be compressed resulting in incorrect measurements.
natural_image
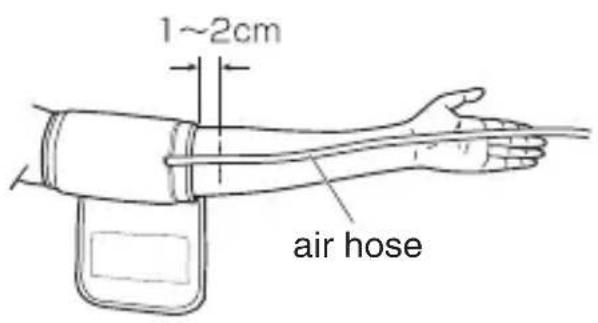
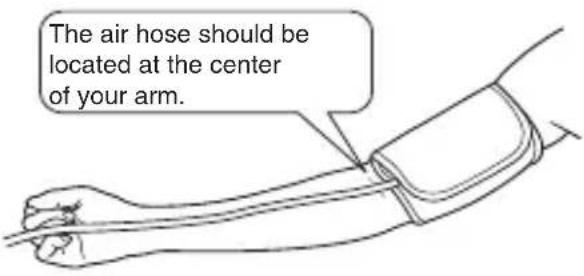
Line drawing of a hand holding a blood pressure monitor with an arrow indicating the insertion point (no text or symbols present)3 Adjust the arm cuff position as that the air hose is located at the center of your arm and so that the hem section of the cuff is spaced 1 to 2 ~cm from the elbow joint.
- Eng 15 -
4 Draw the end of the arm cuff to fit it on the arm and secure with Velcro.
- Carefully place the arm taking care to obtain adequate tightness, not too tight or loose. Adequate tightness is obtained when you can place a finger between the cuff and your arm.
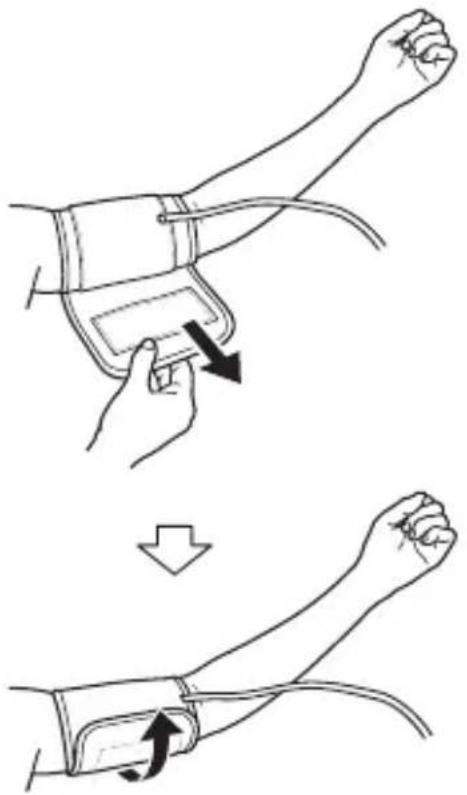
When you put the arm cuff around your right arm
You may measure your blood pressure on your right arm. Adjust the arm cuff position so that the air hose is located at the center of your right arm exactly as shown in the procedure for the left arm.
However blood pressure reading may differ by about 10 mmHg between the right and left arms. It is recommended to use the same arm for measurement thereby ensuring a consistent reading.
HOW TO MEASURE YOUR BLOOD PRESSURE
To get an accurate blood pressure measurement, you need to start by setting the pressure cuff on your arm to the correct starting pressure. The correct starting pressure level for you is your systolic blood pressure (the higher of your two blood pressure readings) plus 40 mmHg. You can select between "Auto" and "Manual" techniques for pressurizing the cuff. Select Auto if you are the only one using the unit, and select Manual if several people are sharing the unit with you.
For use by only one person:
AUTO
(See page 20 "Automatic Pressurizing mode")
Sets the starting pressure automatically to your correct starting level, according to previous measurements.
* When you use the unit the first time after replacing the batteries, the pressure will be set to 160 mmHg.
For shared use by several people:
MANUAL
(See page 22 "Manual Pressurizing mode")
You can change the pressure setting by pressing the Ⓧ until the desired level is reached. Set the
pressure manually to your systolic blood pressure value (the higher of your two blood pressure readings) +40 mmHg. Then measure your blood pressure.
In either Auto or Manual setting, you can measure your blood pressure by simply pressing one button.
1 Wrap the arm cuff tightly around your arm.

See page 15 "HOW TO WRAP THE ARM CUFF".)
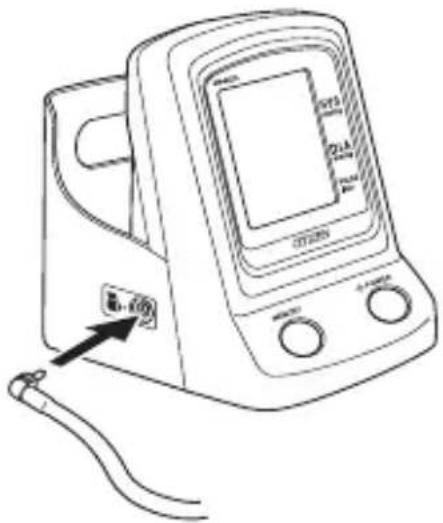
2 Insert the air hose plug into the case of the unit.
3 Sit in the recommended position.
( See page 14 "POINTS FOR ACCURATE MEASUREMENTS".)
4 Measure your blood pressure.
Press to start inflating the cuff. You can select either the "AUTO" or "MANUAL" mode to set the correct starting pressure. Use the mode appropriate for your style of use: personal or shared.
◆ For personal use: Use "AUTO" to measure your blood pressure. ( See page 20 "Automatic Pressurizing mode".)
For shared use by several people: Use "MANUAL" to measure your blood pressure. ( See page 22 "Manual Pressurizing mode".)
- If you want to cancel measuring during use, press ⏻. The air pressure inside the arm cuff will be released and the power will be turned off.
- When the measurement has been obtained, it will be stored in the memory in the monitor unit, automatically.
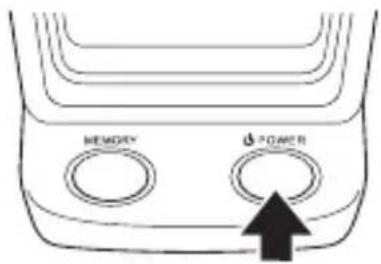
5 After a measurement is obtained,
The power will be turned off.
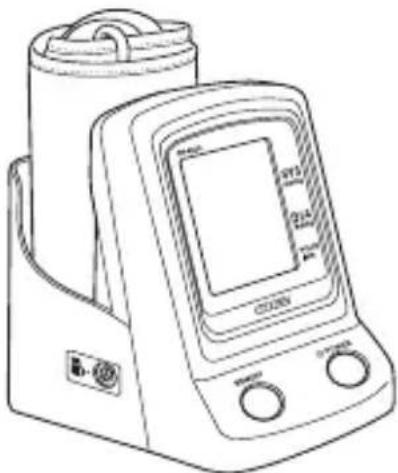
6 Store the arm cuff in the pocket.
Wind the air hose around the arm cuff and store the cuff in the pocket.
natural_image
Line drawing of a digital water meter device with control buttons and display screen (no text or symbols)Automatic Power Off Function
About 3 minutes after the last measurement was obtained, the power will be turned off, automatically.
◆Automatic Pressurizing mode
In this mode, the pressure in the cuff is raised to the correct level automatically, according to the previous measurement stored in memory, and your blood pressure is measured.
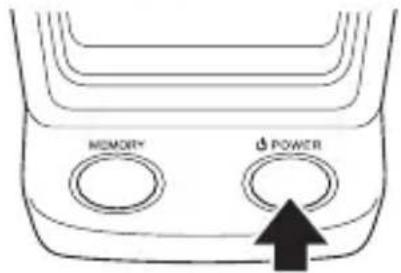
1 Press
The cuff is inflated immediately after the heart mark is turned on and then off.
The starting pressure is set automatically, based on the last measurement taken, which is stored in memory.
- The first time you use the blood pressure monitor after replacing the battery, the pressure will be set to 160mmHg.
- If the level of the pressure is not enough, the pressure is automatically heightened to the level for measurement of the blood pressure again.
* If the pressure is still too low, "Err1" will appear and the measurement will be cancelled. If this happens, use the Manual Pressurizing mode to measure your blood pressure. Then, the blood pressure reading will be stored and you will be able to measure your blood pressure easily the next time, using the Automatic Pressurizing mode.
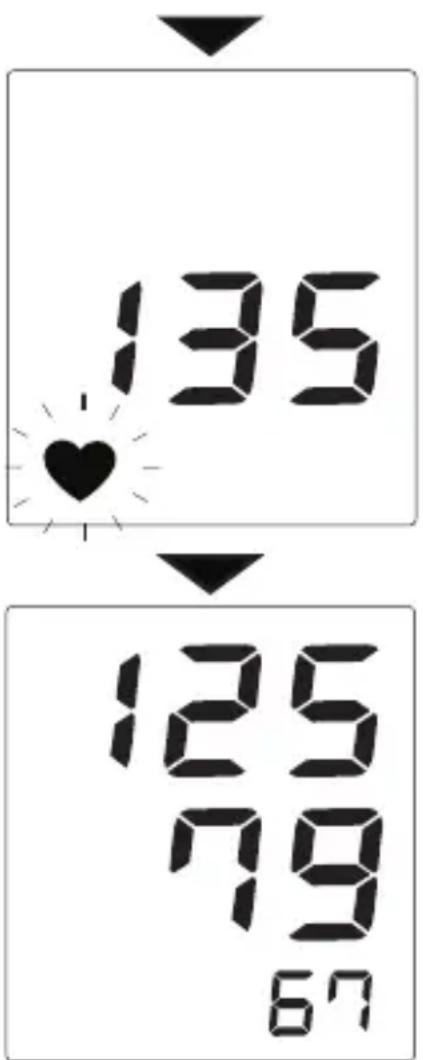
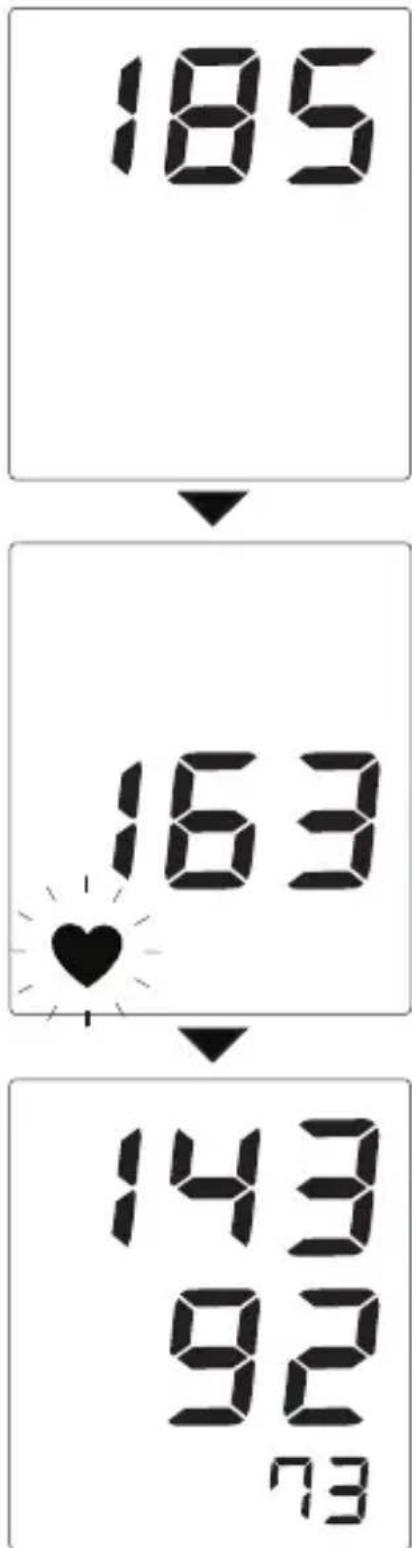
A little while after the starting pressure reaches the correct level, the mark will be lit and the measurement will start automatically.
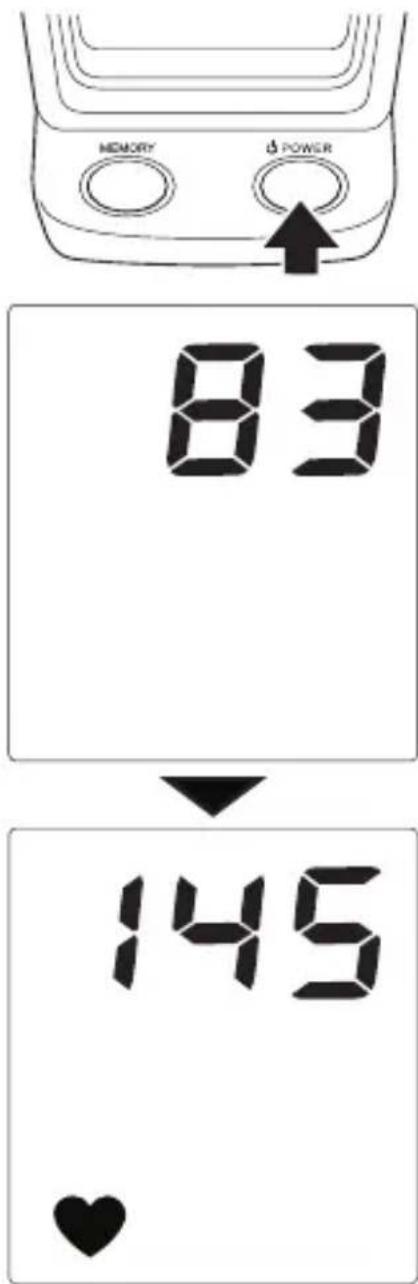
When your pulse is detected, the heartmark will blink and pressure will be shown in the Diastolic Blood Pressure readout. (Diastolic blood pressure is the lower number of your two blood pressure readings).
After the measurement has been taken and recorded, the air inside the arm cuff will be released and the measurement results (Systolic/Diastolic blood pressure and pulse rate) will appear.
* When the measurement is completed, the measurement results will be stored in the memory in the monitor unit, automatically.
NOTICE!
The starting pressure setting used is based on the last measurement taken. If you share the blood pressure monitor with other people and measure your blood pressure using the Automatic Pressurizing mode after a person with higher blood pressure, the starting pressure setting may be unnecessarily high. Therefore, use the Manual Pressurizing mode if you share the blood pressure monitor with other people.
◆Manual Pressurizing mode
You can change the starting pressure setting by pressing the
1 Press
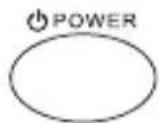
The cuff starts to inflate. The pressure will continue to increase while the is pressed.
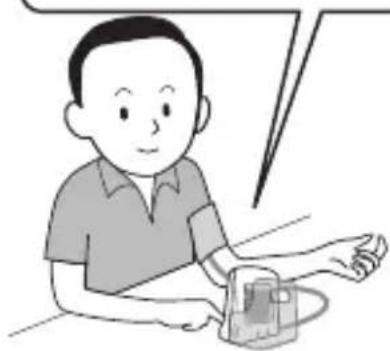
2 When the pressure indicator reaches the correct starting pressure for you, stop
pressing the
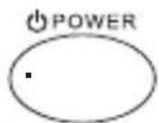
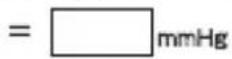
Raise the pressure in the cuff manually to roughly your systolic blood pressure plus 40 mmHg. Then measure your blood pressure.
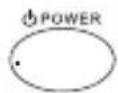
Your systolic blood pressure

Starting pressure for you
natural_image
Illustration of a person using a handheld device (no text or symbols visible)The cuff pressure will be set the pressure value you decided when you stop pressing the , and the monitor will start measuring your blood pressure.
- The starting pressure can be set between 160 and 280 mmHg manually.
- If the level of the pressure is not enough, the pressure is automatically heightened to the level for measurement of the blood pressure again.
* If you stop pushing the ☐ while the pressure is less than 160 mmHg, the pressure will be set to 160 mmHg, automatically.
A little while after the cuff is at the correct pressure, the heart mark will be lit and the measurement will start automatically.
When your pulse is detected, the ♥ mark will blink and a pressure reading will appear in the diastolic blood pressure readout.
After the measurement is taken and recorded, the air in side the arm cuff will be released and the measurement results (Systolic/Diastolic blood pressure and pulse rate) will appear.
- When the measurement is complete, the results will be stored in the memory in the monitor unit, automatically.
bar
| Item | Value | |---|---| | 185 | 185 | | 163 | 163 | | 143 | 143 | | 92 | 92 | 73 | 73 |HOW TO CALL UP DATA STORED IN MEMORY
The automatically stored data (measurement results) can be called up for reference.
* The data stored in memory cannot be called up during measurement.
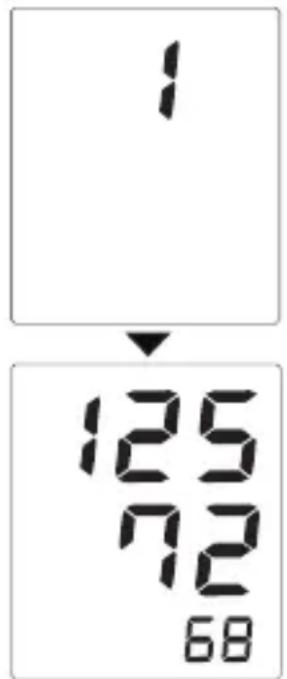
● Measurements stored in memory are assigned "a memory number" in the order of measurement and up to 7 measurements can be stored in the memory. When more than 7 measurements have been taken, the oldest measurement will be erased to make room for the recent measurement. This means when 7 measurements are stored in memory, the measurement having a memory number of 1 is the most recent.
1 Press.

After the most recent memory number appears, the data in memory (systolic/diastolic blood pressure and pulse rate readings) will appear on the display.
• Each press will move ONE memory number backward.
HOW TO DELETE ALL DATA IN MEMORY
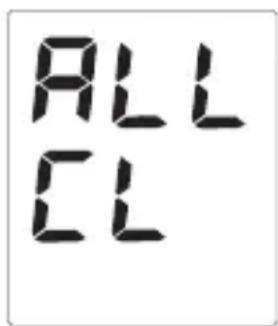
1 Press and hold for more than 3 seconds.
The "ALL CL" indication appears on the display to clear all data in memory.
* This step will permanently clear all data from memory and after that you cannot be recall the data. Before proceeding, make sure you want to clear all data from Memory.
ERROR INDICATIONS
| DISPLAY MARK CONDITION | N/CASE CORRECTIVE ACTION | |
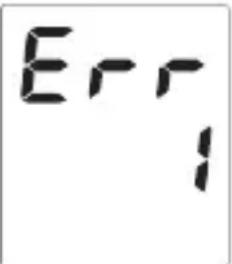 | Pressure was insufficient. | Wrap the cuff around your arm again and measure your blood pressure using the Manual Pressurizing mode.(See page 22 "Manual Pressurizing mode".) |
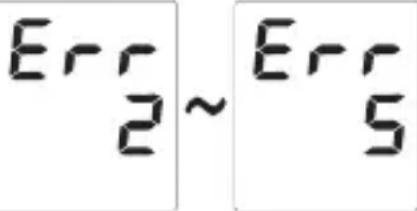 | Pressure was insufficient. Appears when the blood pressure could not be measured accurately. | Re-wrap the arm cuff snugly. Take another reading, making sure you remain still. (See page 15 "HOW TO WRAP THE ARM CUFF".) |
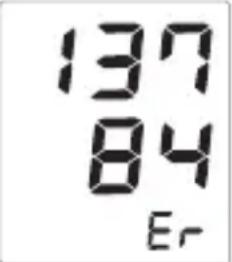 | Appears when the pulse could not be measured accurately.* When the pulse reading is lower than 40 of 181 and more, "Er" will appear. | Re-wrap the arm cuff snugly. Take another reading, making sure you remain still. (See page 15 "HOW TO WRAP THE ARM CUFF".) |
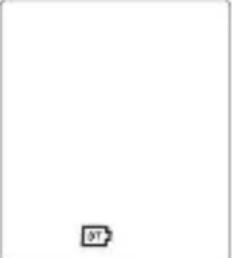 | Appears when batteries become weak. | Replace all four alkali in batteries with new ones.(See page 11 "HOW TO UNLOAD BATTERIES".) |
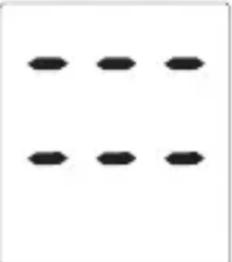 | The unit does not function properly. | Contact the store where it was purchased or your local service center.(See page 28 "BEFORE ASKING FOR REPAIR/INSPECTION".) |
ABOUT "BLOOD PRESSURE"
What is blood pressure?
The heart is a pump that circulates blood throughout your body. Blood is pumped from the heart at a constant pressure into arteries. This pressure is called the arterial blood pressure, which represents, in general, blood pressure. Blood pressure is indicated by several kinds of pressures such as: systolic pressure that occurs when the heart pumps blood; and diastolic pressure that occurs just when blood returns to the heart.
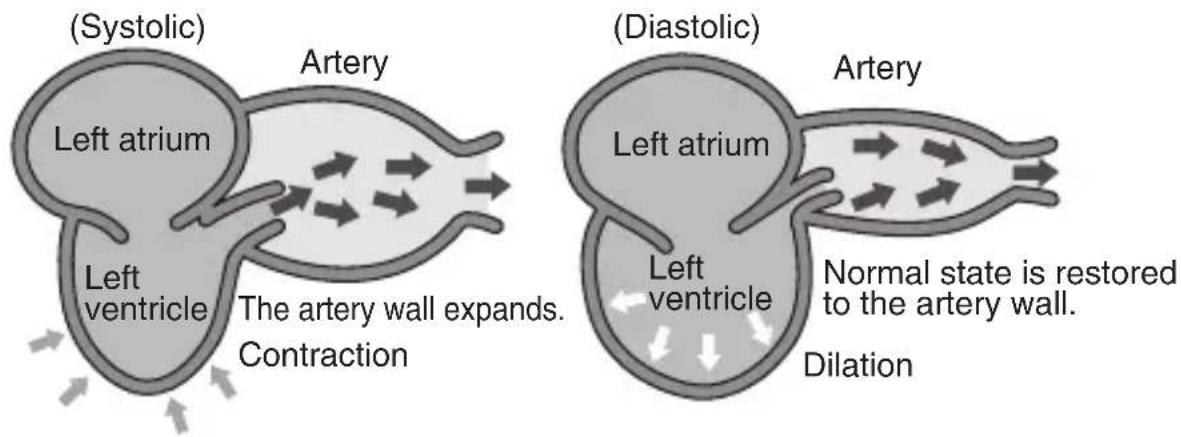
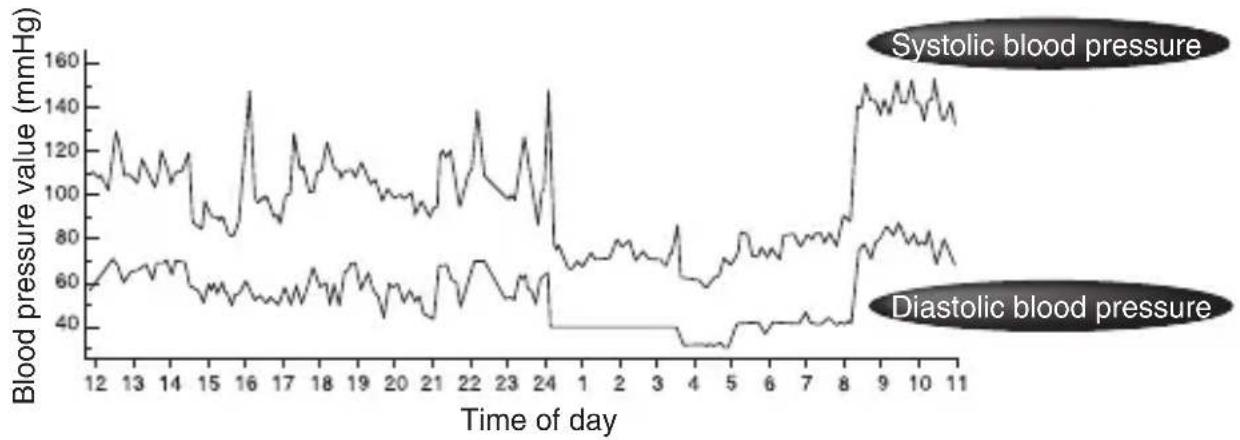
Blood pressure changes at all times. Blood pressure differs with age, gender and other factors. Blood pressure of one person is likely to be affected by biorhythm of a day, posture, physical activities, mental activities, stress and atmospheric temperatures. It is said that blood pressure of a healthy person varies by 20 to 50 mmHg within a day.
line
| Time of day | Systolic blood pressure (mmHg) | Diastolic blood pressure (mmHg) | | ----------- | ------------------------------ | ------------------------------- | | 12 | ~100 | ~60 | | 13 | ~110 | ~65 | | 14 | ~105 | ~60 | | 15 | ~95 | ~55 | | 16 | ~145 | ~50 | | 17 | ~100 | ~55 | | 18 | ~110 | ~60 | | 19 | ~105 | ~65 | | 20 | ~100 | ~60 | | 21 | ~105 | ~65 | | 22 | ~135 | ~70 | | 23 | ~100 | ~65 | | 24 | ~145 | ~40 | | 1 | ~70 | ~35 | | 2 | ~75 | ~35 | | 3 | ~70 | ~35 | | 4 | ~60 | ~30 | | 5 | ~65 | ~35 | | 6 | ~70 | ~40 | | 7 | ~75 | ~45 | | 8 | ~80 | ~50 | | 9 | ~145 | ~80 | | 10 | ~140 | ~85 | | 11 | ~135 | ~80 |- Eng 26 -
QUESTIONS AND ANSWERS ON BLOOD PRESSURE

Why is the blood pressure measured at home different from that measured at the doctor or a hospital?

Blood pressure may vary with exercising, ambient temperature or mental states. When you have a doctor or nurse measure your blood pressure, the pressure value is likely to be 10 to 20 mmHg higher than usual because of concern and nervousness. To know what affects blood pressure is helpful to your health monitoring.

What is the benefit of measuring blood pressure at Home?

Blood pressure measured at home is reliable since it can be measured in a stable and relaxed condition. Doctors lay important on blood pressure measurements taken at home. It is recommended to measure your blood pressure at the same time on a daily basis and to record blood pressure variation.
natural_image
Illustration of a person with arms and a question mark bubble, no text or symbols present
Always consult your physician for interpretation of your blood pressure readings and proper treatment.
BEFORE ASKING FOR REPAIR/INSPECTION
Be sure to check the following before sending your blood pressure monitor for repair/inspection.
| Phenomenon | Point to be checked | How to repair | |
| Display gives no indication even when you press Power switch. | Check whether batteries are dead. | Replace all batteries with new ones. | |
| Check whether batteries are installed with incorrect polarity (⊕⊖). | Load the batteries with correct polarity. | ||
| No measurement is possible. | Check if the ♥ mark has come on. | Wrap the arm cuff properly. | |
| Check if the arm cuff is wrapped properly. | |||
| Did you stay calm during measurement? | Measure again, making sure to remain still. | ||
| Note that measurement of blood pressure may not be possible for someone with an extremely weak pulse or cardiac arrhythmia (irregular pulses). | |||
| If your blood pressure readings are abnormally higher or lower than those taken in hospital: | See page 27. | ||
| If your blood pressure readings are abnormally high or low: | See pages 14 to 16. | ||
Calibration:
The blood pressure measuring device is generally recommended to have the monitor inspected every two years to ensure correct functioning and accuracy. Please contact a distributor.
SPECIFICATIONS
| Measurement Principle Oscillometric Method | ||
| Display Digital Display | ||
| Measuring Range Pressure 40 to 180 beats/min. | ure 0 to 280 mmHg (in 1 mmHg increments) | |
| min. | ||
| Accuracy Pressure ±3 mmHg | ||
| Pulse ±5% of Reading | ||
| Inflation Automatic Inflation by Internal Pump | ||
| Inflation setting Auto inflation setting (140 to 250 mmHg) | ||
| Manual inflation setting (160 to 280 mmHg) | ||
| Memory function Up to 7 memories | ||
| (Systolic blood pressure, Diastolic blood pressure and pulse) | ||
| Decompression Constant exhaust valve system | ||
| Power Source Four "AA" batteries (R6P, LR6) or optional AC/DC adopter (6V ---4W) | ||
| Battery Life Alkaline batteries: Approx. 700 times | ||
| Manganese batteries: Approx. 200 times | ||
| (160 mmHg, 1 time/day, 22°C) | ||
| Rated Voltage DC 6V | ---4W (---:Direct Current) | |
| Operating Environment Humidity 30 to | Temperature | 10 to 40°C |
| 85% | ||
| Storage Environment Humidity 10 to | Temperature | -20 to 60°C |
| 95% | ||
| Dimensions 130(H) x 95(W) x 118(D) mm | ||
| Weight 300g (Including Arm Cuff and Body without batteries) | ||
| Electrical shock protection Internal power unit | ||
| Safety classifications Type B Equipment | ||
| Mode of operation Continuous operation | ||
| Protection against ingress of water IPX0 | ||
| Accessories A set of arm cuff, Four "AA" Batteries for Monitor (R6P), Instruction Manual | cuff, Four "AA" Batteries for Monitor | |

Attention, consult accompanying documents.
- Specifications and design may be subject to change without notice for improvement purposes.
● CITIZEN is a registered trademark of CITIZEN Holdings CO., Japan. CITIZEN es una marca registrada de CITIZEN Holdings CO., Japón. “CITIZEN” 和 “西鐵城” 是日本法人西鐵城控股株式會社的注册商標
● Design and Specification are subject to change without notice.


- General remarks on blood pressure and blood pressure measurement
- For proper measure of blood pressure
- Remarks:
- Definition and Classification of Blood Pressure Levels
- Measure your blood pressure at the same time on a daily basis.
- PRECAUTION FOR USE AND MAINTENANCE
- Precaution for use
- Precaution for maintenance
- Nature and frequency of maintenance:
- Protect the nature environment:
- WEEE MARK
- Reference European standard:
- CITIZEN SYSTEMS (H.K.) LIMITED
- Symbols Explanation
- : Type B applied part
- Safety Precautions before Using AC Adapter
- IDENTIFICATION OF PARTS
- HOW TO LOAD BATTERIES
- Remove the plugs.
- Remove the Pocket.
- Op en the battery y com part m ent cover.
- Place the batteries in the compartment.
- Close the battery compartment cover.
- Re-attach the pocket.
- HOW TO UNLOAD THE BATTERIES
- Remove the plug, pocket and battery compartment cover.
- Replacing the batteries
- HOW TO USE AC ADAPTER (OPTION)
- POINTS FOR ACCURATE MEASUREMENT
- ■ Measurement in sitting posture
- ■ Measurement in laying posture
- HOW TO WRAP THE ARM CUFF
- Unroll the arm cuff.
- Put the arm cuff around your arm so that the air hose comes to the left palm side.
- Adjust the arm cuff position as that the air hose is located at the center of your arm and so that the hem section of the cuff is spaced 1 to 2 ~cm from the elbow joint.
- Draw the end of the arm cuff to fit it on the arm and secure with Velcro.
- When you put the arm cuff around your right arm
- HOW TO MEASURE YOUR BLOOD PRESSURE
- AUTO
- MANUAL
- Wrap the arm cuff tightly around your arm.
- After a measurement is obtained,
- Store the arm cuff in the pocket.
- Automatic Power Off Function
- ◆Automatic Pressurizing mode
- Press
- NOTICE!
- ◆Manual Pressurizing mode
- When the pressure indicator reaches the correct starting pressure for you, stop
- pressing the
- HOW TO CALL UP DATA STORED IN MEMORY
- Press.
- HOW TO DELETE ALL DATA IN MEMORY
- Press and hold for more than 3 seconds.
- ERROR INDICATIONS
- ABOUT "BLOOD PRESSURE"
- What is blood pressure?
- QUESTIONS AND ANSWERS ON BLOOD PRESSURE
- BEFORE ASKING FOR REPAIR/INSPECTION
- Calibration:
Brand : CITIZEN
Model : CH-437C
Category : Pressure gauge