
X-tatic Pro - Headphones Sharkoon - Free user manual and instructions
Find the device manual for free X-tatic Pro Sharkoon in PDF.


| Product Type | Gaming Headset |
| Brand | Sharkoon |
| Model | X-tatic Pro |
| Connectivity | Wired (3.5 mm jack + USB) |
| Driver Diameter | 40 mm |
| Impedance | 32 Ω |
| Frequency Response | 20 Hz - 20 kHz |
| Sensitivity | 100 dB |
| Microphone | Noise-cancelling, detachable |
| Cable Length | 2.5 m |
| Weight | 350 g (without cable) |
| Dimensions (folded) | 200 x 180 x 80 mm |
| Controls | Volume wheel and mute switch on cable |
| Compatibility | PC, PS4, Xbox One, Nintendo Switch, mobile devices |
| Power Supply | USB-powered for virtual surround sound (if enabled) |
| Cleaning | Wipe ear pads and headband with a soft, dry cloth; remove microphone before cleaning |
| Safety | Avoid prolonged high volume to prevent hearing damage |
| Spare Parts | Ear pads, microphone, and cable available from Sharkoon support |
| Repairability | User-replaceable ear pads and cable; other repairs by authorized service |
| Warranty | 2 years limited |
Frequently Asked Questions - X-tatic Pro Sharkoon
User questions about X-tatic Pro Sharkoon
0 question about this device. Answer the ones you know or ask your own.
Ask a new question about this device
Download the instructions for your Headphones in PDF format for free! Find your manual X-tatic Pro - Sharkoon and take your electronic device back in hand. On this page are published all the documents necessary for the use of your device. X-tatic Pro by Sharkoon.
USER MANUAL X-tatic Pro Sharkoon
For more detailed information, please refer to the printed X-Tatic Digital manual.
PACKAGE CONTENTS
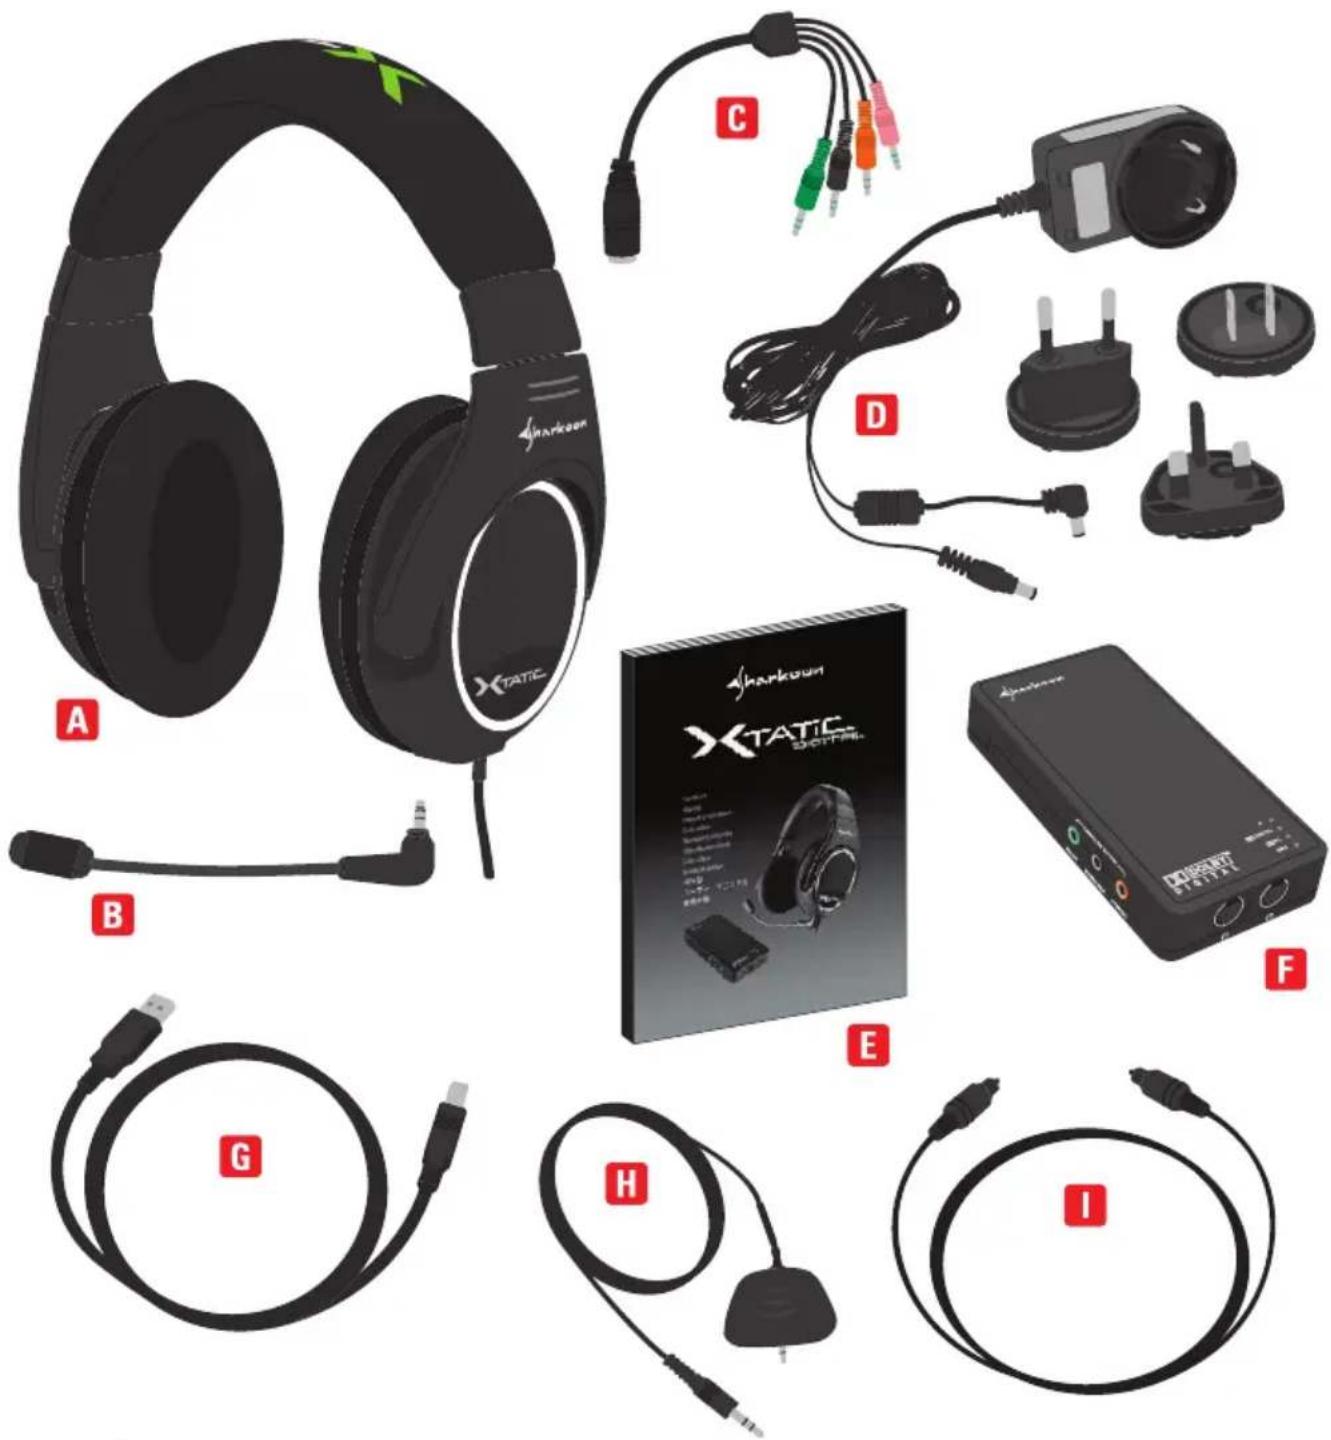
A X-Tatic Digital 5.1 headset
B Microphone
Cable adapter (9-pin analogue plug > 4 x 3.5 mm)
D Power supply incl. travel adapter
E Manual
F X-Tatic Sound Control Unit (SCU)
USB microphone cable for PS3® and PC
H Microphone connection cable for Xbox® 360 (3.5 mm jack > 2.5 mm jack)
Optical connection cable (S/PDIF)
BASIC INFORMATION
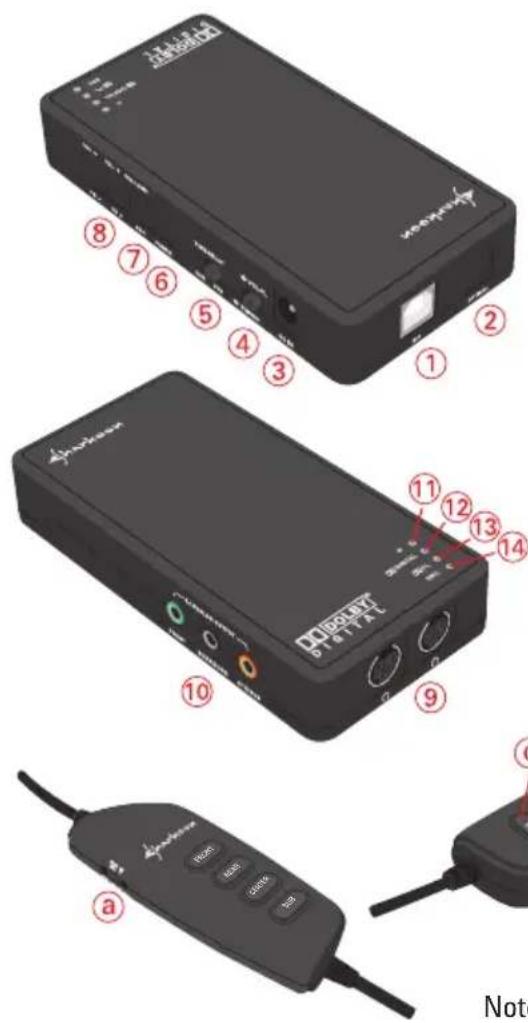
Sound Control Unit (SCU)
① USB connector (for PS3® and PC with optical microphone)
② Optical audio input (S/PDIF)
③ ISO power connector
④ Switch between VOL / PL and TD / DRC
⑤ Time-Delay between surround and center speaker switch
⑥ SCU power on / off button
⑦ On / off button for Pro Logic resp. DRC
⑧ Button for Volume (- / +) resp. Time-Delay (- / +)
⑨ Headphone connectors
⑩ Analogue audio outputs for speakers
⑪ Power on / off LED
⑫ Dolby Digital on / off LED
⑬ Dolby ProLogic on / off LED
⑭ DRC on / off LED
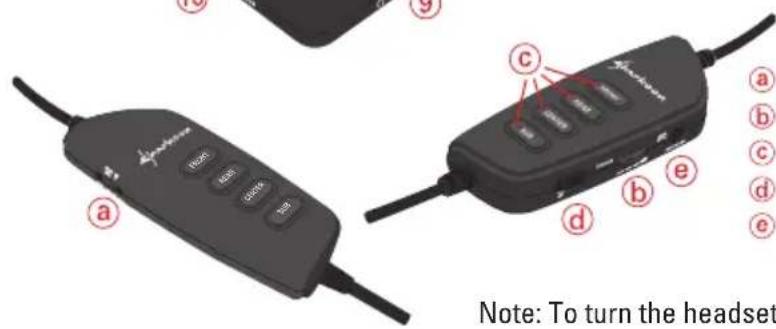
Inline Volume Controller
a Volume on / off and adjustment controller
⑥ Microphone volume controller
© Volume control buttons for different speakers
d Microphone on / off
e Connection for Xbox® 360 microphone
Note: To turn the headset on or off, press the volume on / off button in combination with the front speaker button for 3\~5 seconds.
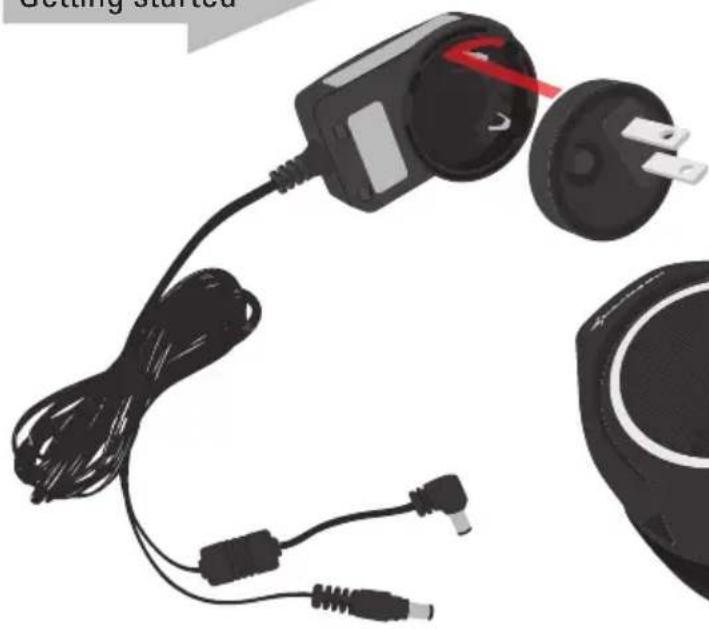
Getting started
natural_image
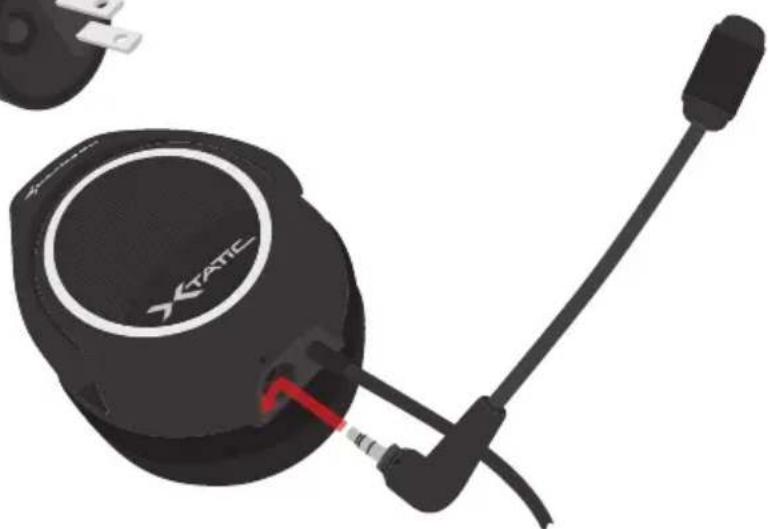
Close-up of a black electronic device with attached wires and a small inset showing a red cable and power outlet (no text or symbols visible)Attach the head to the power adaptor Turn clockwise to lock the head in place
natural_image
Close-up of a black XTATIC audio headset with attached microphone and cable (no visible text or symbols)Insert the microphone by lining up the dot on the microphone and the dot on the headset Turn the microphone so the two dots are not lined up to lock in the microphone
NOTE:
The X-Tatic Analog, the X-Tatic Digital and the X-Tatic Sound Control Unit are not compatible to the X-Tatic Revision I, the X-Tatic Revision II and the respective control boxes! To avoid damage do not use the older versions with the new one and vice versa.
WARNING:
Avoid listening at a high volume level for a longer period of time.
Doing so may harm your hearing.
Before using the headset, set the volume control in a low position and adjust them to moderate and safe level when wearing the headset.
If you experience any discomfort, stop listening to the device.
Xbox ^® , Xbox ^® 360, Xbox ^® Advanced AV Pack, Xbox ^® Communicator, Xbox ^® Live and the respective images/logos are registered trademarks or trademarks of Microsoft Corporation in the U.S. and/or other countries.
PlayStation ^® , PlayStation 2 ^® , PlayStation 3 ^® , PS2 ^® , PS3 ^® and the respective images/logos are registered trademarks or trademarks of Sony Computer Entertainment Inc.
Dolby ^® , Pro Logic ^® , the double-D symbol and the respective images/logos are registered trademarks or trademarks of Dolby Laboratories.
All named products and descriptions are trademarks and / or registered trademarks of the respective manufacturers and are accepted as protected.
As a continuing policy of product improvement at SHARKOON, the design and specifications are subject to change without prior notice. National product specifications may vary.
All rights reserved especially (also in extracts) for translation, reprinting, reproduction by copying or other technical means. Infringements will lead to compensation.
All rights reserved especially in case of assignation of patent or utility patent. Means of delivery and technical modifications reserved.
© SHARKOON Technologies 2010
www.sharkoon.com
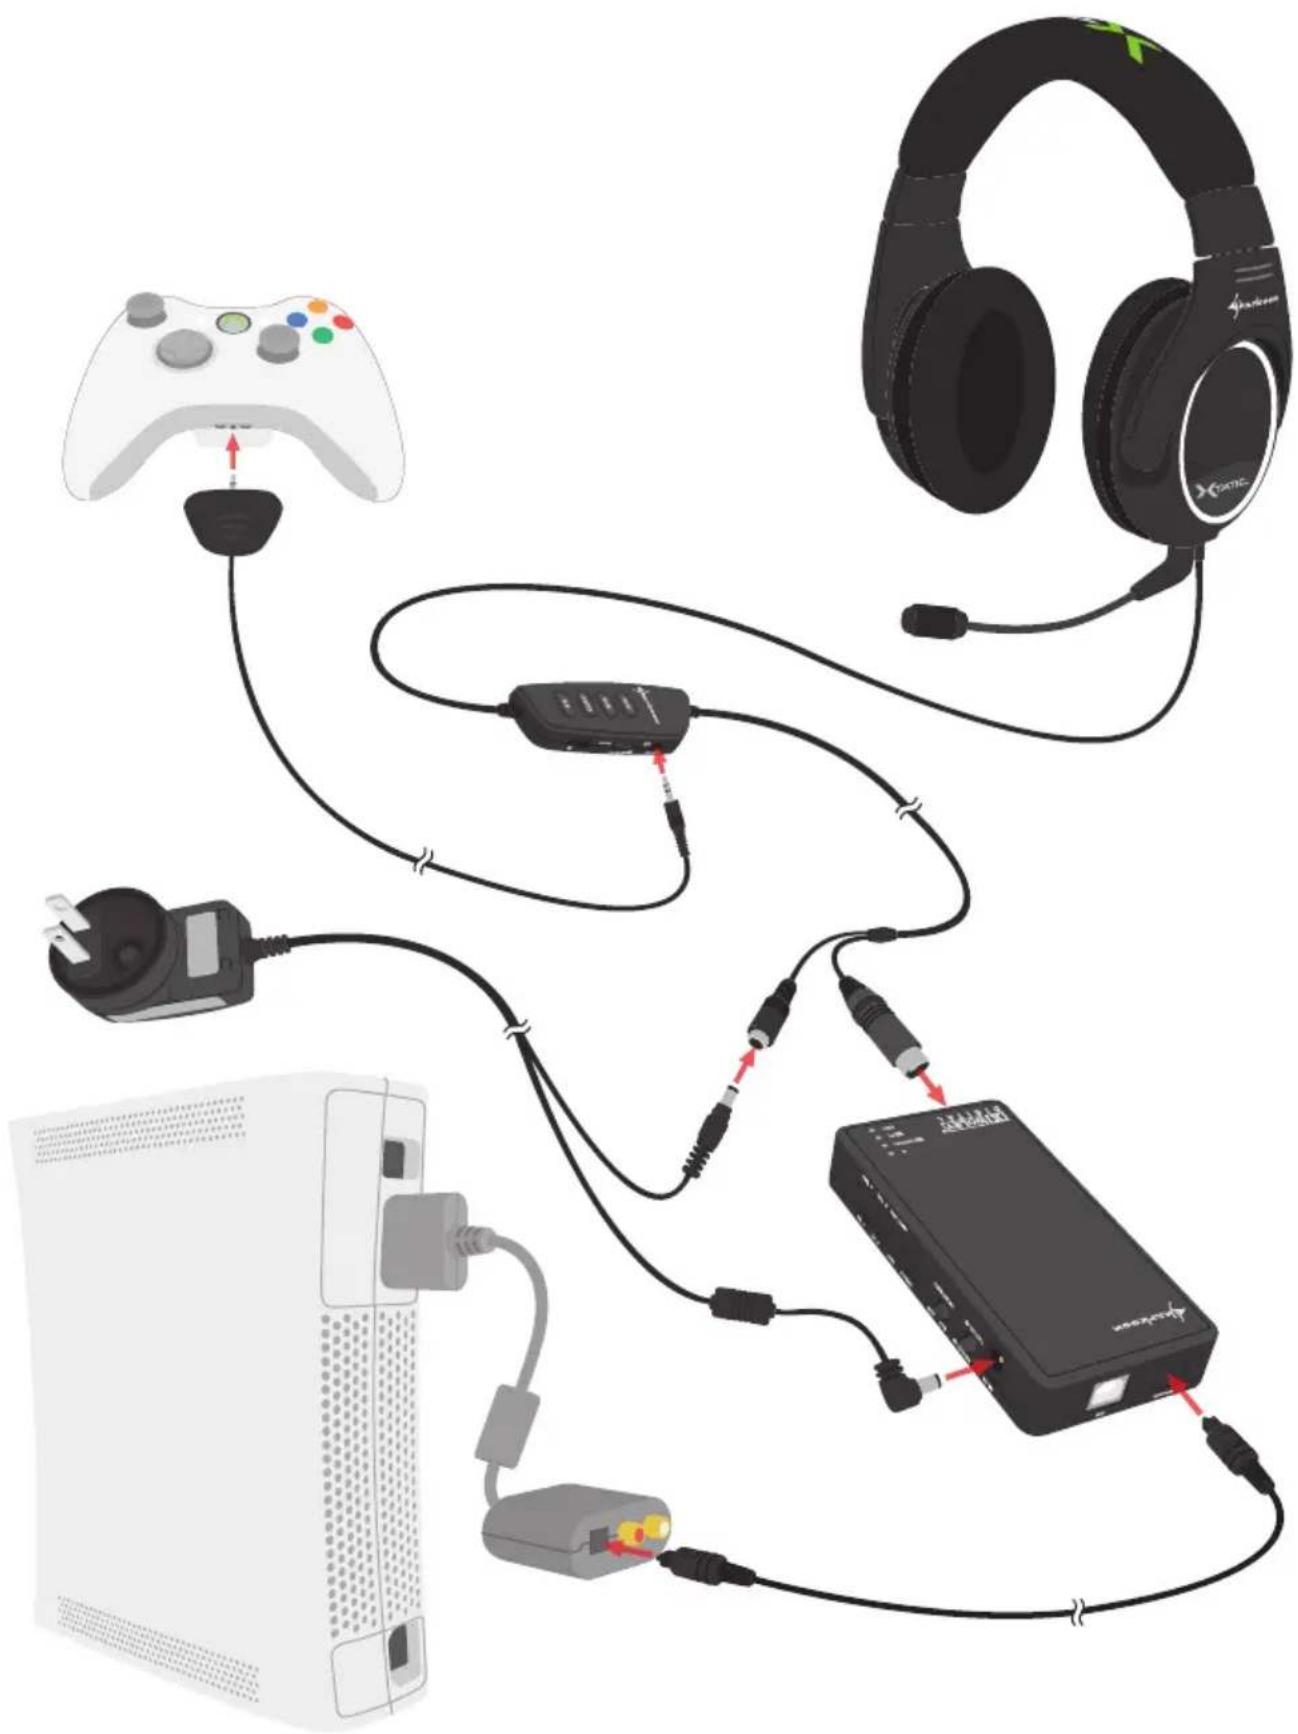
Connecting to Xbox® 360
natural_image
Illustration of a game controller connected to a device via cable, showing key components like a game controller, headphones, and power supply (no text or symbols present)Note:
From the Xbox® settings menu select Dolby® Digital 5.1 as output format
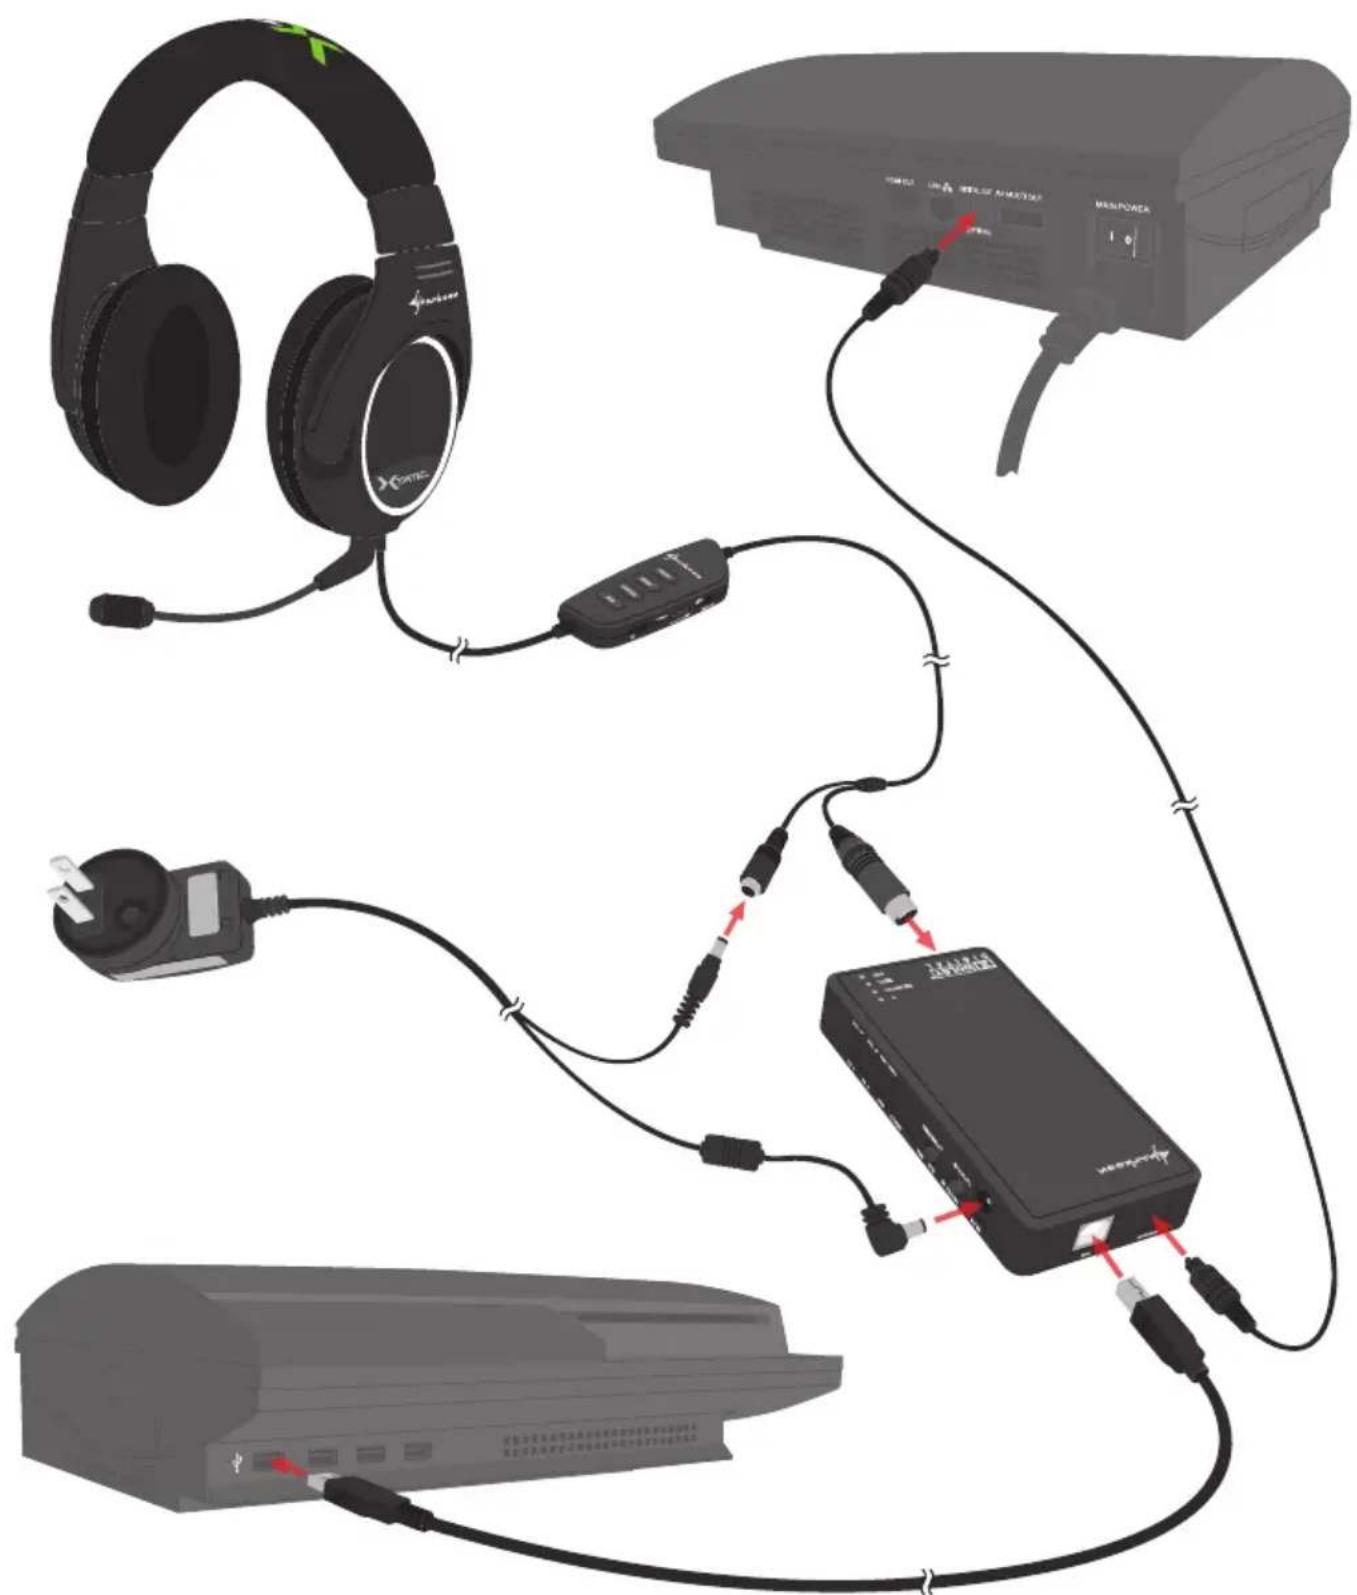
Connecting to PlayStation 3®
natural_image
Illustration of audio equipment connections including headphones, audio jack, and a device with red signal lines (no text or symbols)Note:
From the PS3® settings menu, select Dolby® Digital 5.1 as output format and define
"C-Media USB Audio device" as input device and "System Default Device" as output device.
Connecting to PC
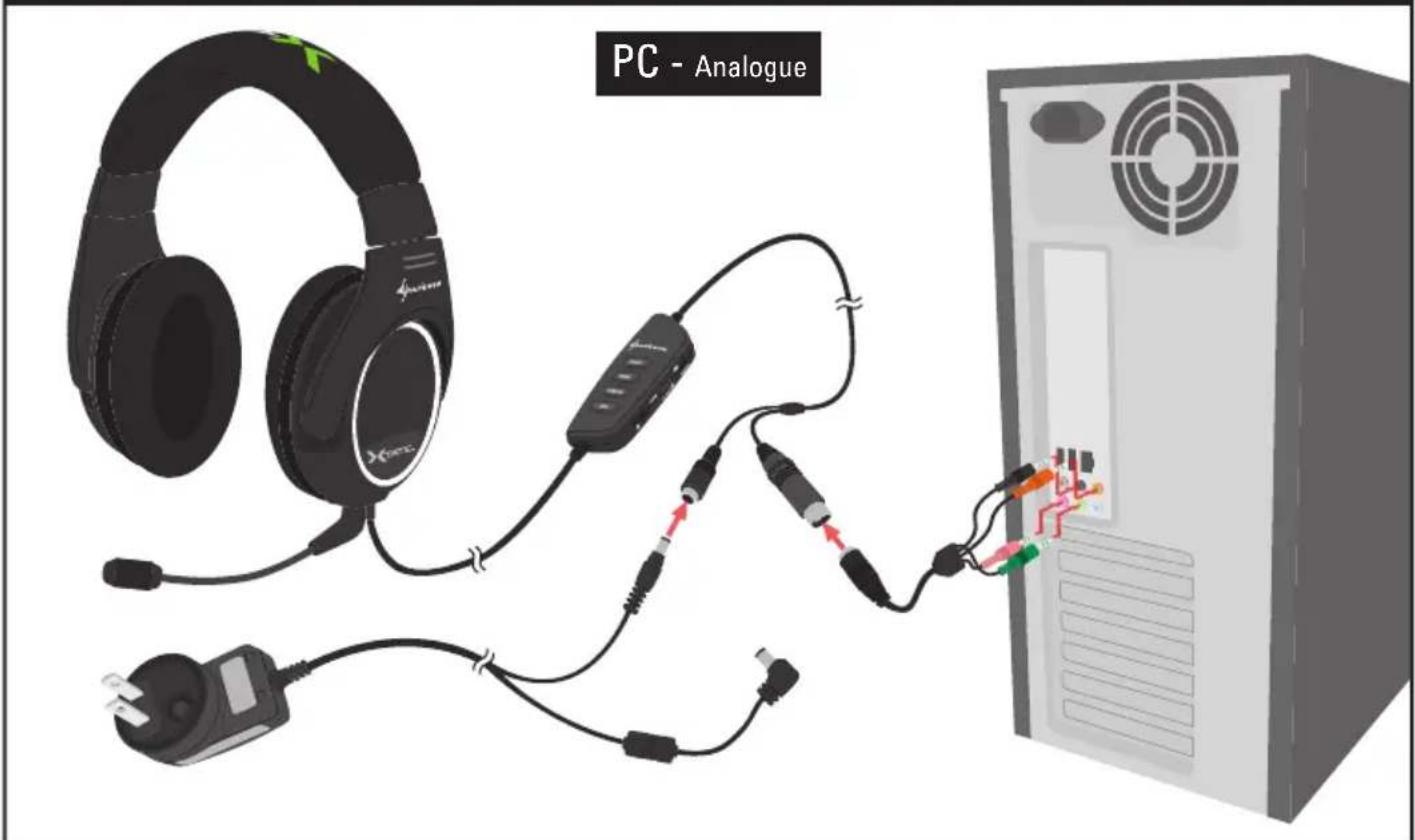
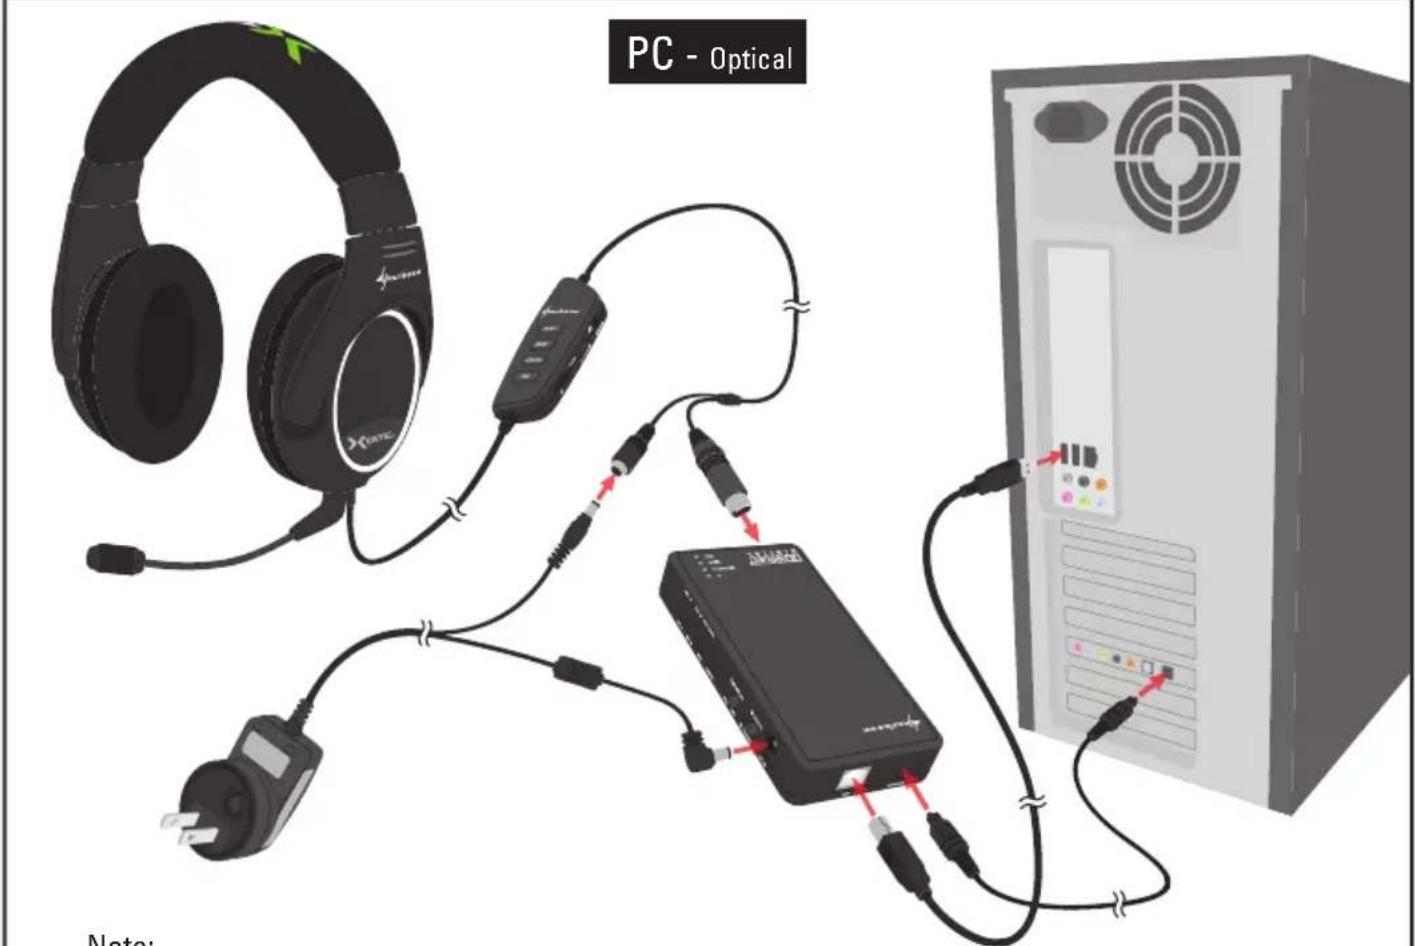
Note: If you are facing any failures using the microphone function via USB we recommend to check your audio settings and define the soundcard as output device and the USB microphone as input device.
Connecting to DVD Player
natural_image
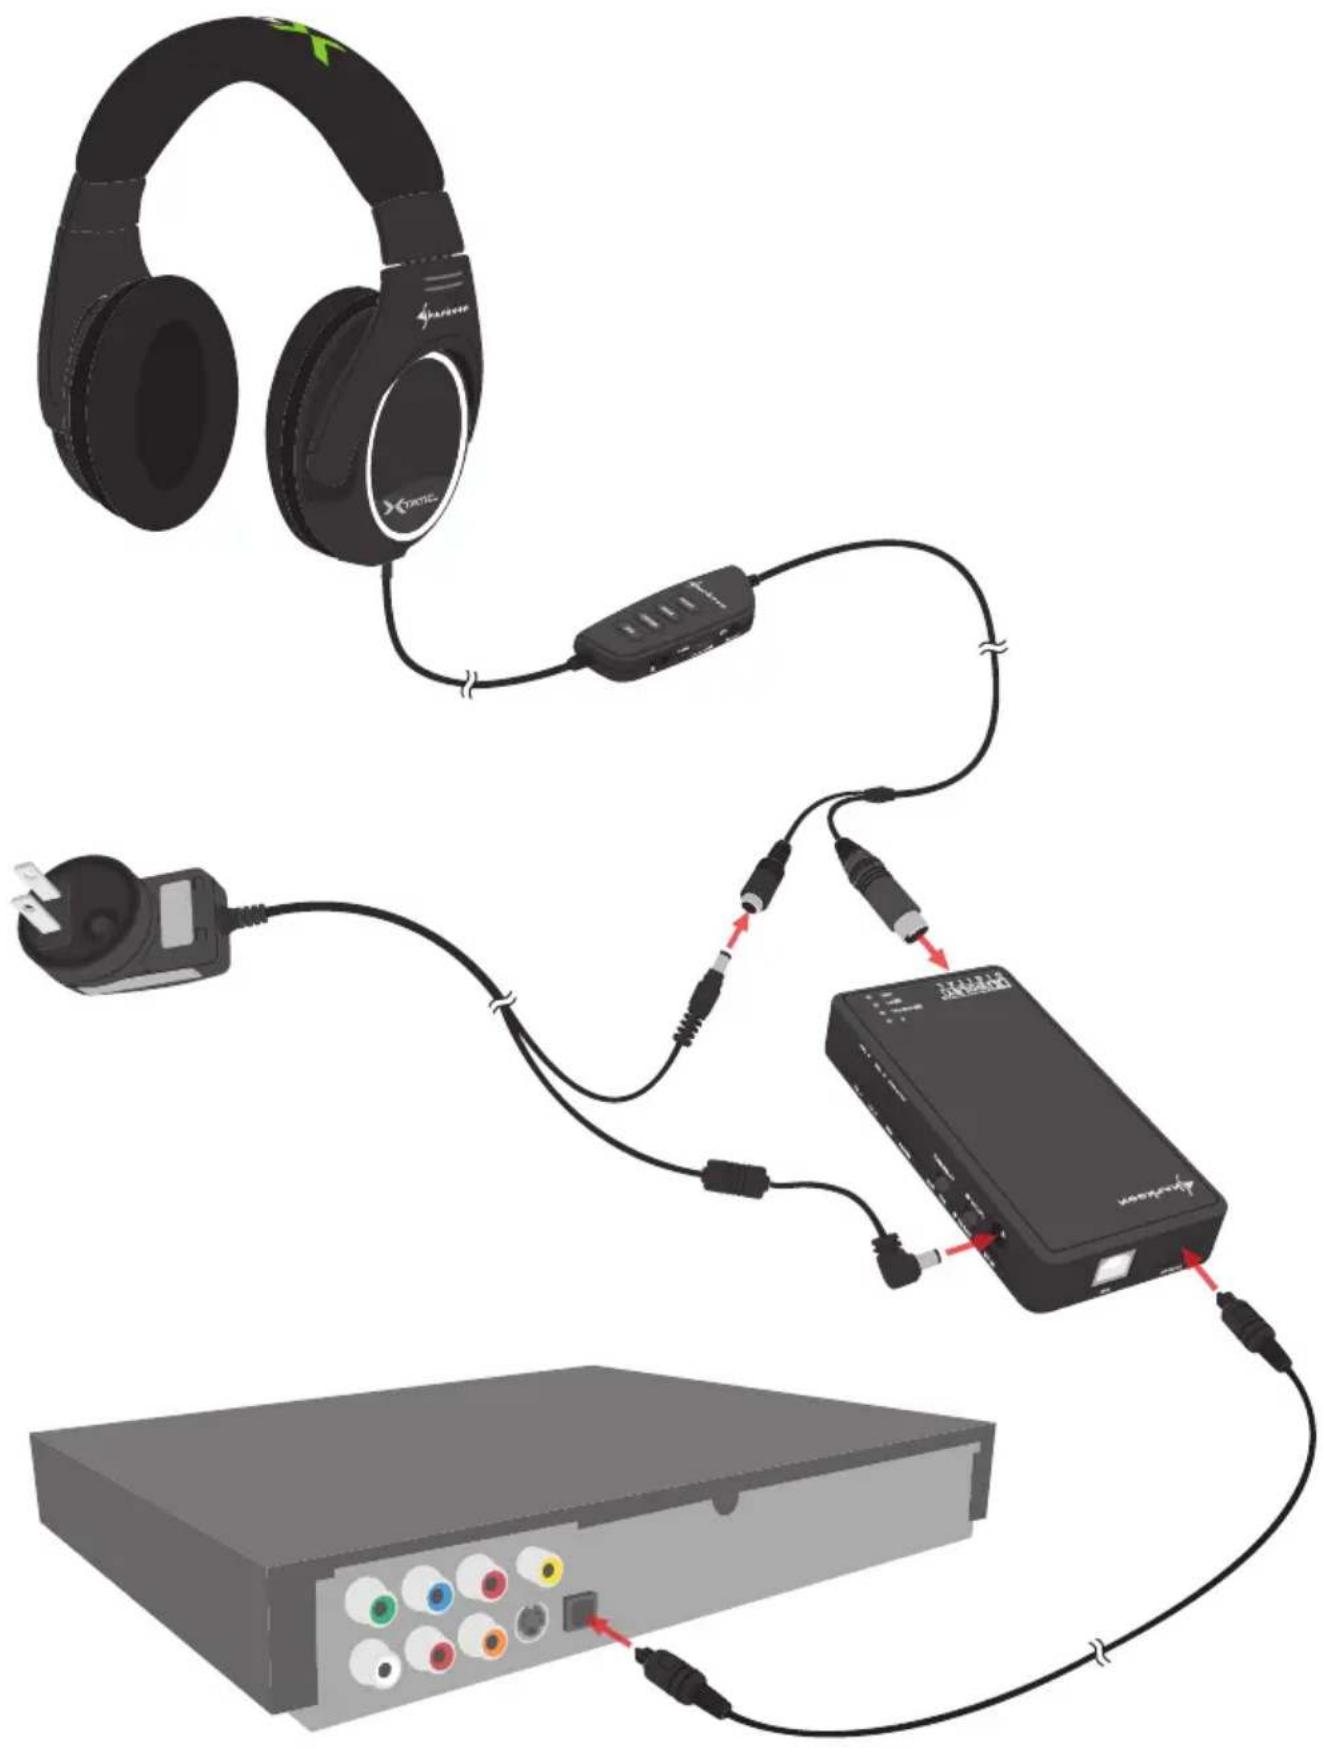
Illustration of a wireless audio equipment setup with headphones, cable, and an external CD-ROM (no text or symbols visible)Brand : Sharkoon
Model : X-tatic Pro
Category : Headphones