
QuickTime Gourmet Grill - Contact grill Kleva - Free user manual and instructions
Find the device manual for free QuickTime Gourmet Grill Kleva in PDF.


| Product Type | Contact Grill |
| Model | QuickTime Gourmet Grill |
| Brand | Kleva |
| Power Supply | 220-240V AC, 50/60 Hz |
| Power Consumption | 2000W |
| Grilling Area | 340 mm x 240 mm (each plate) |
| Temperature Range | 80°C to 240°C (170°F to 460°F) in 5°C (10°F) steps |
| Pre-defined Programs | 6 programs: Vegetables, Meat, Burger/Panini, Poultry, Kebab/Sausage, Fish/Seafood |
| Timer | 1 to 60 minutes with countdown and acoustic signal |
| Auto Shut-off | After 1 hour of inactivity |
| Core Temperature Probe | Integrated, with 6 target temperatures (45°C to 75°C) |
| Height Control | 5 positions, 2 cm to 5.5 cm |
| Lid Positions | Closed, open (90°), flat (180°) |
| Plate Material | Non-stick coated grill plates |
| Drip Tray | Removable, slide-out |
| Weight | Approx. 8.2 kg |
| Power Cord Length | Approx. 90 cm |
| Dishwasher Safe Parts | Grill plates, drip tray, inner tray |
| Safety Features | Auto shut-off, lockable lid, cool-touch handles, overheat protection |
Frequently Asked Questions - QuickTime Gourmet Grill Kleva
User questions about QuickTime Gourmet Grill Kleva
0 question about this device. Answer the ones you know or ask your own.
Ask a new question about this device
Download the instructions for your Contact grill in PDF format for free! Find your manual QuickTime Gourmet Grill - Kleva and take your electronic device back in hand. On this page are published all the documents necessary for the use of your device. QuickTime Gourmet Grill by Kleva.
USER MANUAL QuickTime Gourmet Grill Kleva
USER GUIDE
Please read this User Guide carefully before use and keep for future guidance.

line
| X | Y | |---|---| | 0 | 0 | | 1 | 1 | | 2 | 2 | | 3 | 3 | | 4 | 4 | | 5 | 5 | | 6 | 6 | | 7 | 7 | | 8 | 8 | | 9 | 9 | | 10 | 10 | | 11 | 11 | | 12 | 12 | | 13 | 13 | | 14 | 14 | | 15 | 15 | | 16 | 16 | | 17 | 17 | | 18 | 18 | | 19 | 19 | | 20 | 20 | | 21 | 21 | | 22 | 22 | | 23 | 23 | | 24 | 24 | | 25 | 25 | | 26 | 26 | | 27 | 27 | | 28 | 28 | | 29 | 29 | | 30 | 30 | | 31 | 31 | | 32 | 32 | | 33 | 33 | | 34 | 34 | | 35 | 35 | | 36 | 36 | | 37 | 37 | | 38 | 38 | | 39 | 39 | | 40 | 40 | | 41 | 41 | | 42 | 42 | | 43 | 43 | | 44 | 44 | | 45 | 45 | | 46 | 46 | | 47 | 47 | | 48 | 48 | | 49 | 49 | | 50 | 50 | | 51 | 51 | | 52 | 52 | | 53 | 53 | | 54 | 54 | | 55 | 55 | | 56 | 56 | | 57 | 57 | | 58 | 58 | | 59 | 59 | | 60 | 60 | | 61 | 61 | | 62 | 62 | | 63 | 63 | | 64 | 64 | | 65 | 65 | | 66 | 66 | | 67 | 67 | | 68 | 68 | | 69 | 69 | | 70 | 70 | | 71 | 71 | | 72 | 72 | | 73 | 73 | | 74 | 74 | | 75 | 75 | | 76 | 76 | | 77 | 77 | | 78 | 78 | | 79 | 79 | | 80 | 80 | | 81 | 81 | | 82 | 82 | | 83 | 83 | | 84 | 84 | | 85 | 85 | | 86 | 86 | | 87 | 87 | | 88 | 88 | | 89 | 89 | | 90 | 90 | | 91 | 91 | | 92 | 92 | | 93 | 93 | | 94 | 94 | | 95 | 95 | | 96 | 96 | | 97 | 97 | | 98 | 98 | | 99 | 99 | | Note: The actual values for 'Y' and 'X' are not provided in the code. The code generates a single line from (0,0) to (10,10).TABLE OF CONTENTS
GENERAL SAFETY 2-3
General safety instructions 2
Caution 2
Special instructions 3
Technical specs 3
GRILL PROPERTIES 4
OVERVIEW 5
BEFORE USE 6
USING YOUR GRILL 7-12
Locking the lid 7
Lid positions 7
Height control 8
Lid swivel 8
Temperature probe 8
Programs 9
Timer 9
Auto shut off 9
Using your grill instructions 10-12
Temperature probe whist cooking 12
HINTS AND TIPS 13
CARE AND CLEANING 14
Cleaning 14
Storage 14
SOLVING ISSUES 15-16
ERROR MESSAGES 17
GENERAL SAFETY

Carefully read all instructions, before operating the QUICKTIME GOURMET GRILL™ and save this manual for further reference. Do not attempt to use this appliance in any other way or any other purpose other than described in these instructions (intended use). Any other use, especially misuse, can cause severe injuries or damage by electric shock, heat, or fire.

WARNING: DO NOT let young children play with the appliance, or any part of it, or the packaging! Always unplug and leave the appliance to cool down, before cleaning, moving, or assembling/disassembling any parts of the appliance. Do not immerse the housing (lid and base) or power cord in water or other liquids or spill any liquids on or in the housing or power cord. Do not place the housing or power cord in an automatic dishwasher. Even the exterior of the housing (lid and base) may get hot during operation. Only touch the appliance at the handles and operating elements during operation and while the appliance is still hot.
GENERAL SAFETY INSTRUCTIONS:
- Do not touch hot surfaces. Use the Handle
- Do not immerse the Power Cord, Plug, or Base in water/liquid.
- Unplug the Power Cord from the electrical outlet when the product is not in use and before cleaning it. Allow to cool before putting on or taking off parts.
- Do not use attachments not recommended for use with this product by the product manufacturer. Attachments may become hot during use, so allow them to cool before handling.
- Do not place the product on or near a hot gas or electric burner, or in a heated oven.
- Use extreme caution when moving a product containing hot oil or other hot liquids.
- Do not leave unattended while in use.
- Do not plug or unplug the product into/from an electrical outlet with a wet hand.
- Take proper precautions to prevent the risk of burns, fire, or other personal or property damage, as this product generates heat during use.
- If the product falls into water, immediately unplug it from the electrical outlet. Do not touch or reach into the water.
- Use in a well-ventilated area. Keep at least 4-6 inches of space on all sides to allow adequate air circulation.
- If the supply cord is damaged, it must be replaced by the manufacturer, its service agent or similarly qualified persons in order to avoid a hazard.
- This product has no user-serviceable parts. Do not attempt to examine or repair it yourself. Only qualified service personnel should perform any servicing; take the product to the appliance repair shop of your choice for inspection and repair.
- This appliance can be used by children aged from 8 years and above and persons with reduced physical, sensory or mental capabilities or lack of experience and knowledge if they have been given supervision or instruction concerning use of the appliance in a safe way and understand the hazards involved. Children shall not play with the appliance. Cleaning and user maintenance shall not be made by children unless they are older than 8 and supervised.
- Keep the appliance and its cord out of reach of children less than 8 years.
- This appliance is not intended to be operated by means of external timer or separate remote-control system.
- Caution, hot surface.
- This appliance is intended to be used in household and similar applications such as: Staff kitchen areas in shops, offices and other working environments, farmhouses, by clients in hotels, motels, bed and breakfasts and other residential type environments.
GENERAL SAFETY
CAUTION:
- This product is intended solely for indoor, non-commercial, non-industrial, household use in cooking/heating food for human consumption. Do not use the product outdoors or for any other purpose.
- Do not allow the Power Cord to hang where it may be tripped over or pulled (e.g. over the edge of a table or counter), and do not allow the Cord to touch hot surfaces.
- Always wear protective oven mitts or heat-resistant gloves when using this product and use utensils.
- To disconnect from the electrical outlet, pull directly on the Plug; do not pull on the Power Cord.
- Always use the product on a flat, level, stable, heat-resistant surface.
SPECIAL INSTRUCTIONS:
A short power-supply cord is provided to reduce the risk resulting from becoming entangled in or tripping over a longer cord. Extension cords are available and may be used if care is exercised in their use. If an extension cord is used:
- The marked electrical rating of the extension cord must be at least as great as that of the product;
- The cord should be arranged so that it will not drape over the counter top or tabletop where it can be pulled on by children or tripped over unintentionally.
- The extension cord must be a grounding-type 3-wire cord.
NOTE: When using the Grill Plates for the first time, spray or apply a thin layer of cooking oil onto the non-stick surfaces of the Plates with a paper towel in order to season the non-stick surface. As necessary, re-apply a thin layer of cooking oil throughout the life of the Plates to maintain best non-stick performance.
TECHNICAL SPECS
| POWER SUPPLY | 220-240V AC, 50/60 Hz |
| POWER CONSUMPTION | 2000W |
| LENGTH OF POWER CORD | approx. 90 cm |
| WEIGHT | approx. 8.2 kg |
| SIZE OF GRILLING AREA | Base/Lid 340mm x 240mm |
| TEMPERATURE | 80°C - 240°C (170°F - 460°F) Variable steps of 5°C (10°F) |
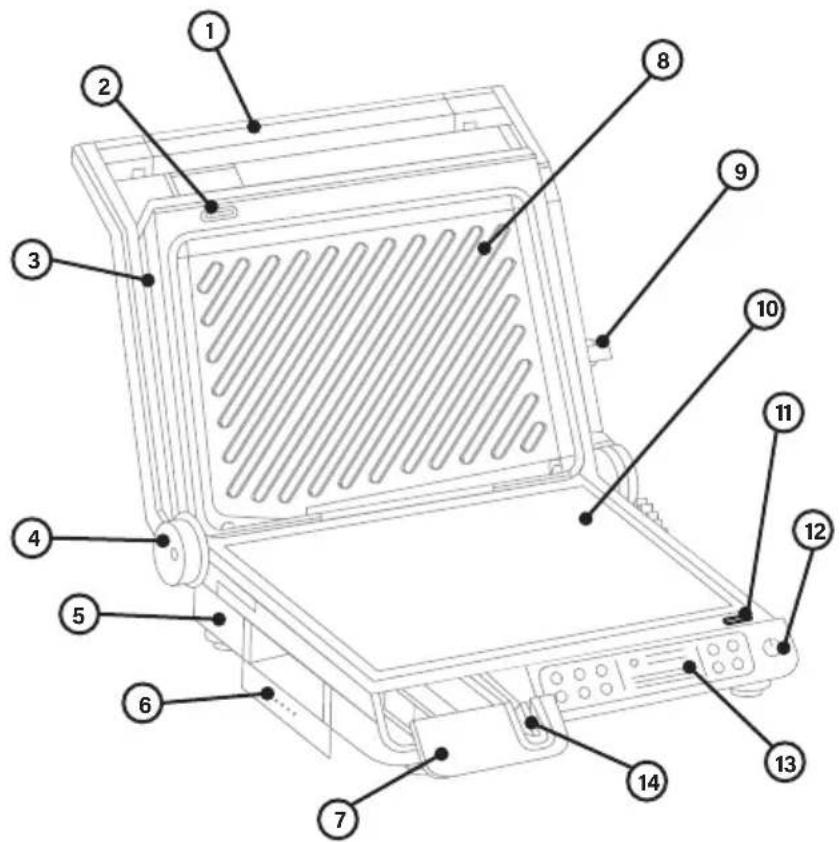
GRILL PROPERTIES
① Handle
② Top Plate Release Button
③ Upper Cover
④ Hinge
⑤ Base
⑥ Oil Drip Tray
⑦ Probe Storage Chamber
⑧ Upper Grill
⑨ Height Control Clip
⑩ Lower Grill
⑪ Bottom Plate Release Button
⑫ Power Switch
⑬ Control Panel
⑭ Temperature Probe

flowchart
graph TD
    A["15 16 17"] --> B["probe temp"]
    B --> C["88"]
    C --> D["21 22 23"]
    D --> E["26 27"]
    E --> F["24 25"]
    F --> G["28 29"]
    style A fill:#000,stroke:#fff,color:#fff
    style B fill:#f9f,stroke:#000
    style C fill:#ccf,stroke:#000
    style D fill:#cfc,stroke:#000
    style E fill:#fcc,stroke:#000
    style F fill:#ffc,stroke:#000
    style G fill:#cfc,stroke:#000
A Program Area
B Display Area
C Control Area
⑮ Vegetables
⑯ Meat
⑰ Burger/Panini
⑱ Poultry
⑲ 19 Kebab/Sausage
⑳ Fish/Seafood
②1 Probe Button
22 Current Core Temperature
②3 Set Core Temperature
24 Grilling Time
25 Grilling Temperature
②6 Unit Button
27 + Increase Control
28 Timer Control Button
29 - Decrease Control
OVERVIEW
Your new QUICKTIME GOURMET GRILL™ is perfectly suited for preparing a wide variety of delicate grilling dishes. Even thin pancakes, omelettes and waffles can be made on the flat grilling surface, while getting the typical grilling marks on the structured grilling surface
OVERVIEW:
- 6 pre-defined programs for various types of food provide useful grilling temperature settings as a start-up. However, you can adapt the grilling temperature within a reasonable range to your liking at any time during operation.
- You may select the temperature unit at any time you like during operation: °C or °F. However, the internal procedures of the appliance are operated on the °C scale. Any values given in °F are computed via an internal conversion term, causing small and unimportant deviations.
- Due to the height control feature, the appliance may be used as a contact grill, even when grilling delicate food like fish or tomatoes. Alternatively, you may leave the lid in the stable upright position or use the full grilling area (approx. 1632cm2) by folding back the lid and placing food on the grilling surface of the lid too.
- When folding back the lid or closing the lid for grilling, the lines of the structured grilling plate will apply the typical grilling texture to your food. The level grilling plate is perfect for preparing meals such as flap jacks, crepes and potato fritters.
- With its highly powerful heating element, the grilling surface heats up within a matter of minutes, even at highest heating and grilling temperature setting (max. 6 minutes with the lid closed).
- Via the timer (max. 60 minutes), an acoustic signal can remind you, to take or turn your food in time.
- Use the integrated temperature probe to monitor the core temperature in the centre of your food, thus always getting the desired tenderness and optimum consistency of your food.
- The heating elements are integrated in the grilling plates. Due to this the Gourmet Grill™ is energy efficient.
- The high performance non-stick coating of the grilling plates enable low fat cooking and ease the cleaning effort.
- Juices accumulated in the drip tray can be easily removed by pulling the tray out sideways, either to be discarded or used for making a variety of delicious sauces, dips and gravies.
FOR HELPFUL VIDEOS, RECIPES AND MORE HINTS AND TIPS FOR YOUR
KLEVA
QUICKTIME™
GOURMET GRILL
Scan this QR code or visit
www.klevarange.com.au
SCAN ME

BEFORE FIRST USE
- Unpack the appliance and all accessories carefully. Check that no parts are damaged or missing. (Please check on page 4 to see you have all parts)
- Remove all shipping materials and promotional materials, but DO NOT remove the model label.
- Slide the height control clip at the right side of the lid support to the "OPEN" position. Then grasp the lid of the appliance by the handle and fold the lid up until it rests in the open position. Especially ensure that there are no foreign objects (e.g. promotional material, packaging) on the grilling surfaces.

CAUTION: For moving, the lid of the appliance may be locked to the base (see: 'Locking the Lid to the Base'). Do not attempt to open the lid violently. Always ensure that the height control clip is set to the "OPEN" position, before opening the lid.
- Before first use and after a longer period of storage, clean the appliance and its parts.
- When using the appliance for the first time, you may notice a fine smoke haze and some smoke may escape. This is caused by heating the components of the appliance. There is no need for concern. To avoid any influence on the taste of your food, you should let the appliance operate approx. 10 Minutes on maximum temperature (240°C/460°F) without any food on it. If the smoke haze persists on further use, unplug the appliance and leave it cool down to room temperature. Then clean the appliance thoroughly, especially ensuring that no residues of food stick to the grilling plates.
- Wipe the grilling surfaces with a clean damp kitchen towel, then wipe dry thoroughly.
- Drizzle some oil on a clean dry kitchen towel and wipe this on the grilling surfaces of the appliance to prepare the non-stick coatings for use. Once this step is completed the appliance is now ready for use. (Please visit www.klevarange.com.au to see the pre seasoning steps)


USING YOUR GRILL
LOCKING THE LID TO THE BASE:
The lid of the Gourmet Grill™ can be set to lock position via the sliding height control clip located on the side of the upper cover by sliding to the "LOCK" position. When set to "LOCK", the lid will not open.
NOTE: The "LOCK" position of the height control feature may only be used for moving and storing the appliance. For operation or cleaning, do not forget to unlock the lid by sliding the height control clip to the "OPEN" position first. With the height control clip in the OPEN" position, the lid will open easily and without effort. Do not attempt to apply any force for opening the lid to avoid damage.
POSSIBLE POSITIONS OF THE LID:
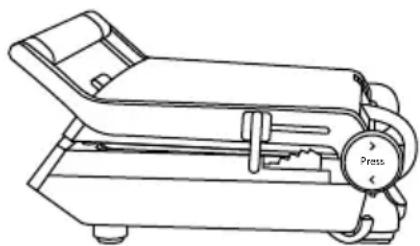
The QUICKTIME GOURMET GRILL™ can be used with the lid settled in three different positions;
Closed Position Perfect for: Burgers / Boneless slices of meat / Fish / Vegetables / Grilling any combination of ingredients (e.g. vegetables, meats, and cheeses) layered between two pieces of bread or folded tortilla and pita.
The closed lid position is perfect for pre-heating the grilling surfaces and for grilling most types of food that can be cooked on both sides such as meats, sandwiches and vegetables. After placing your food onto the base of the grilling surface fold the lid down carefully onto your food and if required adjust the lid via the height control feature located on the right hand side of the top plate to accommodate to the thickness of your food. Using this method your food will be cooked in the quickest way possible saving time and energy, with both sides being cooked simultaneously. Please see above examples of some yummy meals that can be made in this position.
natural_image
Line drawing of a portable electronic device with a press knob (no text or symbols)Open Position Perfect for: Kebab / Fish / Pizza / Items with soft toppings / Thick foods (e.g. Burgers).
The open position is used when the lid is folded upright to a 90 degree angle. After the grill has heated up, by the handle of the top lid carefully fold the lid up until it remains in a stable upper position. Then place your food onto the grilling surface of the base and leave the lid in its upright position while it begins to cook your desired meal. Please scan the QR code to see example recipes and tips.

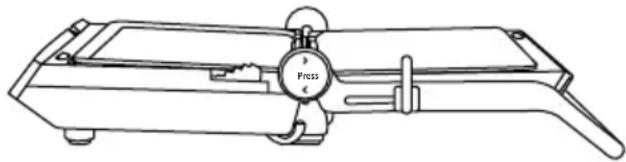
Flat Position Perfect for: Large amounts of food of different thicknesses / Grilled French Toast / Bacon & Eggs / Hash Browns / Open Sandwiches & Kebabs.
In the flat position, the lid is folded back completely in a 180 degree angle lying level to the base offering a second grilling surface. Use the flat position to double the grilling area as an additional benefit to this appliance. You can use a structured grilling surface for applying the typical grilling marks, while simultaneously grilling other types of food on the flat grilling plate.
natural_image
Line drawing of a mechanical device with a central pressure gauge (no text or symbols)USING YOUR GRILL
HEIGHT CONTROL FEATURE:
The lid of the QUICKTIME GOURMET GRILL™ can be adjusted to accommodate the thickness of your food using the height control feature. This way delicate and tender ingredients (e.g. fish, burger, or tomatoes) will not be compressed, when lowering the lid for contact grilling. With the height control feature, the lid will be locked in the selected distance to the lower grilling surface: from approx. 2cm (position 1) to up to 5.5cm (position 5). Due to the swivel bearings of the lid, the lid can be adjusted parallel to the lower grilling surface, thus cooking your food evenly.
NOTE: You cannot open the lid of the QUICKTIME GOURMET GRILL™ with the height control clip in the "LOCK" position. Before use, always slide the height control clip to the "OPEN" position first. Do not attempt to open the lid violently.
SWIVEL BEARINGS OF THE LID:
The lid can be rotated within the lid support. For contact grilling, the lid can be adjusted to slightly touch the food evenly on the complete grilling area. Therefore, those parts near the lid hinge are not squeezed, when lowering the lid onto the food. The lid is not fixed in the swivel bearings and may turn freely. Especially, when grilling cuts of tough meat (e.g. beef steaks, cutlet), the lid adjusts according to your food automatically.
TEMPERATURE PROBE:
The storage tray holding the temperature probe is located on the left side of the control panel. After pulling out and removing the storage tray, the probe connector is accessible. Use the temperature probe for monitoring the core temperature of your food.
Immediately after selecting the core temperature control via the probe button, you may set the desired core temperature. When the set core temperature is reached, an acoustic signal is given.
The actual core temperature within your food is shown via a line of dashes in the upper half of the display area.
The dashes will flash and then illuminate continuously one by one while the actual core temperature is rising.
Each dash is assigned to a temperature value: 45^ C ( 113^ F), 50^ C ( 122^ F), 55^ C ( 131^ F), 60^ C ( 140^ F), 65^ C
(149°F), 75°C (167°F). Each one of these core temperature values can be set as the desired core temperature.

flowchart
graph TD
    A["45°C (113°F)"] --> B["60°C (140°F)"]
    C["50°C (122°F)"] --> B
    D["55°C (131°F)"] --> B
    E["65°C (149°F)"] --> B
    F["75°C (167°F)"] --> B
NOTE: Some programs limit the range of possible core temperature values. If you wish to set another core temperature, select another program or deactivate the current selected program.
NOTE: The temperature probe is inserted in an inner tray that can be removed from the storage tray. You may place the inner tray beside the appliance and use it for laying the temperature probe aside. If the temperature probe is not in use during grilling, you should leave the storage tray inserted in the control panel. This way the probe connector is protected against pollution.
USING YOUR GRILL
PRE-DEFINED PROGRAMS:
6 pre-defined programs are provided for various types of food, holding appropriate settings for the grilling temperature.
| Program | Icon | Grilling Temperature | Range | Used For |
| Vegetables |  | 160°C / 320°F | 130 - 190°C270 - 370°F | All types of vegetables and fruit |
| Meat |  | 230°C / 450°F | 200 - 240°C390 - 460°F | Cuts of meat: beef, veal, pork, lamb, game, venison and meatballs |
| Burger/Panini |  | 210°C / 410°F | 180 - 240°C360 - 460°F | Any type of vegetables or pre-cooked meat between slices of bread or buns: burger and panini, french bread, sandwich, toast, pancake, flap-jack and waffles |
| Poultry |  | 210°C / 410°F | 180 - 240°C360 - 460°F | Each type of poultry: chicken, turkey, duck and goose |
| Kebab |  | 210°C / 410°F | 180 - 240°C360 - 460°F | Spits with meat, sausage and vegetables |
| Fish |  | 230°C / 450°F | 200 - 240°C390 - 460°F | Fish and seafood |
GRILLING TIMER:
The appliance offers a timer function for setting the desired grilling time. With a grilling time set, the remaining time duration until the set grilling time elapses, is shown as a countdown. A signal sounds, as soon as the set grilling time runs out. You may select a grilling time from 1 minute to 60 minutes. For deselecting the grilling timer, set the grilling time to zero ("00 M").
NOTE: The grilling timer simply reminds you of the grilling time. The heating elements will continue keeping the grilling surfaces hot to enable grilling various types of different food simultaneously, while setting the grilling time according to the food that will be done first. Accordingly, there is no need to restart the appliance, if there are further pieces of food to be cooked yet. This way the grilling timer can assist you in keeping the desired grilling times of different types of food without effort.
AUTOMATIC SHUT-OFF:
After one hour of operation without any input via the touchscreen, a time-out counter will automatically shut off the appliance. This way unnecessary energy consumption is avoided, if you have forgotten to switch off the appliance after use. The time-out counter re-starts with every command, you enter via the touchscreen.
After the automatic shut-off has been triggered, you may simply press the power button to restart the appliance immediately.
Important: Do not leave the appliance unattended, while it is connected to the power supply. Always switch off and unplug the appliance, when it is not in use and/or when leaving the appliance unattended.
USING YOUR GRILL
1. Turning On The Unit:
First close the unit, unwind the power cord completely and insert the power plug into a grounded wall outlet, the operation panel shows the following figure.
OFF
Press the power switch to turn on the grill which will display the following figure.

The grill will began to preheat automatically to 200^ C unless another temperature is selected. The temperature display will continue flashing, then once the temperature is reached a buzzer will ring, and the display will stop flashing.
2. Cooking Vegetables:
When cooking vegetables, you can select the preset Vegetables program (Icon Shown Below) and the automatic temperature selected will be 160°C. You are able to increase or decrease the temperature by using the increase and decrease buttons if you do not wish to use the selected program.
The temperature icon will flash until the selected temperature has been reached.
Then to select the desired cooking time press the timer button, 30 minutes will automatically be selected. To adjust the time use the increase and decrease buttons. Once you have finished selecting the time, the timer icon will flash 3 times, then a buzzer will ring and the icon will stop flashing. The timer will now begin to countdown.


3. Cooking Meat:
When cooking meat (including beef, pork, lamb, etc.), you can select the preset Meat program (Icon Shown Below) and the automatic temperature selected will be 230^ C. You are able to increase or decrease the temperature by using the increase and decrease buttons if you do not wish to use the selected program.
The temperature icon will flash until the selected temperature has been reached.
To select the desired cooking time press the timer button, 30 minutes will automatically be selected. To adjust the time use the increase and decrease buttons. Once you have finished selecting the time, the timer icon will flash 3 times, then a buzzer will ring and the icon will stop flashing. The timer will now begin to countdown.


USING YOUR GRILL
4. Cooking Burger/Panini:
When cooking burgers or paninis, you can select the preset Burger/Panini program (Icon Shown Below) and the automatic temperature selected will be 210°C. You are able to increase or decrease the temperature by using the increase and decrease buttons if you do not wish to use the selected program.
The temperature icon will flash until the selected temperature has been reached.
To select the desired cooking time press the timer button, 30 minutes will automatically be selected. To adjust the time use the increase and decrease buttons. Once you have finished selecting the time, the timer icon will flash 3 times, then a buzzer will ring and the icon will stop flashing. The timer will now begin to countdown.

5. Cooking Poultry:
When cooking poultry, you can select the preset Poultry program (Icon Shown Below) and the automatic temperature selected will be 210^ C. You are able to increase or decrease the temperature by using the increase and decrease buttons if you do not wish to use the selected program.
The temperature icon will flash until the selected temperature has been reached.
To select the desired cooking time press the timer button, 30 minutes will automatically be selected. To adjust the time use the increase and decrease buttons. Once you have finished selecting the time, the timer icon will flash 3 times, then a buzzer will ring and the icon will stop flashing. The timer will now begin to countdown.

6. Cooking Kebab/Sausages:
When cooking kebabs or sausages, you can select the preset Kebab/Sausage program (Icon Shown Below) and the automatic temperature selected will be 210^ . You are able to increase or decrease the temperature by using the increase and decrease buttons if you do not wish to use the selected program.
The temperature icon will flash until the selected temperature has been reached.
To select the desired cooking time press the timer button, 30 minutes will automatically be selected. To adjust the time use the increase and decrease buttons. Once you have finished selecting the time, the timer icon will flash 3 times, then a buzzer will ring and the icon will stop flashing. The timer will now begin to countdown.

USING YOUR GRILL
7. Cooking Fish/Seafood:
When cooking fish or seafood, you can select the preset Fish/Seafood program (Icon Shown Below) and the automatic temperature selected will be 230^ C. You are able to increase or decrease the temperature by using the increase and decrease buttons if you do not wish to use the selected program.
The temperature icon will flash until the selected temperature has been reached.
To select the desired cooking time press the timer button, 30 minutes will automatically be selected. To adjust the time use the increase and decrease buttons. Once you have finished selecting the time, the timer icon will flash 3 times, then a buzzer will ring and the icon will stop flashing. The timer will now begin to countdown.

8. Using the temperature probe whilst cooking:
The inbuilt temperature probe can be used to measure the exact core temperature of the food whilst it cooks.
- To use the temperature probe ensure that the probe wire is connected, then select the probe button and select the desired core temperature.
- Insert the probe into the largest part of the food item about to be cooked.
- Now that the cooking temperature, cooking time and core temperature have been set you can begin the cooking process.
The actual core temperature within your food is shown via a line of dashes in the upper half of the display area. The dashes will flash and then illuminate continuously one by one while the actual core temperature is rising.

flowchart
graph TD
    A["45°C (113°F)"] --> B["60°C (140°F)"]
    C["50°C (122°F)"] --> B
    D["55°C (131°F)"] --> B
    E["65°C (149°F)"] --> B
    F["75°C (167°F)"] --> B
- When the set core temperature is reached, an acoustic signal is given.
- If the acoustic signal is given before the timer has finished, remove the food from the grill as the desired inner core temperature has been reached.
NOTE: Some programs limit the range of possible core temperature values. If you wish to set another core temperature, select another program or deactivate the currently selected program.
NOTE: When the food is cooked, remove from the cooking plates using heat proof plastic or wooden utensils.
NOTE: The grill features a 1-Hour Auto Shut-Off feature. This ensures the grill is not accidentally left on for an extended period of time. If the temperature or timer dials are not adjusted within 1 hour, the Auto Shut-off feature will automatically stop heating the cooking plates. The LCD screen will display OFF, the default '0' zero time and cease to illuminate after 3 minutes. To re-activate the grill, adjust the temperature or timer dials.
TIPS AND HINTS


GRILLING MEAT AND FISH
- For best grilling results, use cuts of meat of approx. 1 to 3cm.
- It is recommended not to cook cuts with thick bones such as T-bone steaks or cutlets. You should remove the bone before grilling.
- Tougher cuts such as beef blade, topside steak, lamb forequarter or neck chops can be used, when marinated with wine or vinegar to help break down the connective tissue. After marinating, drain the marinade off and dab with kitchen paper before placing on the grilling surface. Ingredients of the marinade could burn easily on the hot grilling surface.
- Do not overcook meat. However, chicken, pork and turkey should always be thoroughly cooked through.
- Do not pierce meat with a fork or cut meat during cooking. This will let the juices escape, giving a tougher and dry result.
- Only add salt after grilling. Salt while cooking dehydrates the meat, making it tough and dry.
- Some ingredients are heat-sensitive and should be added belatedly. E.g. capsicum may get a bitter taste, when heated on a high temperature.
- For turning and removing meat, it is best to use barbecue tongs. When grilling fish, use a flat heat-resistant plastic spatula or plastic grill shovel to support the fish, as cooked fish breaks up easily.
GRILLING SANDWICHES
- Bread: Most types of bread can be used (white, wholemeal, wholegrain, raisin loaf, etc). The closed position is ideal for grilling foccacia, Turkish bread, baguettes as well as bread rolls. Raisin bread, brioche or other sweet breads, which contain high sugar content, will tend to brown quicker.
- Fillings: Canned or pre-cooked fruit is recommended, as fresh fruit may give off excessive juices when heated. Be careful when biting into sandwiches containing fillings such as cheese and tomatoes or jam. This type of food retains heat and could burn if eaten too quickly.
- Fat Free Snacks: Due to the non-stick coating, it is unnecessary to use any additional fat on the outside of your grilled snacks.
CARE & CLEANING
NOTE: Do not use abrasive cleansers or metal scouring pads on any of the interior or exterior surfaces of the grill. These will scratch the surfaces and damage the non-stick coating on the cooking plates.
Cleaning Your Grill:
- Before cleaning, always ensure that the appliance is unplugged, and has completely cooled down. Then disassemble the appliance.
- Clean the drip tray, inner tray and grilling plates in warm soapy water using a soft nylon brush. NOTE: These parts can also be washed in the dishwasher.
- Wipe the temperature probe (tip, handle, and cable) using a soft cloth moistened with warm water. Stubborn residues on the tip of the temperature probe may be soaked. For this, fill some warm water into a small cup or mug with a little dishwater liquid and immerse only the tip of the temperature probe for approx. 10 minutes. Thereafter, wipe the tip with a soft damp cloth.
- Slide the height control clip to the "OPEN" position and lift the lid to the upright open position.
- Wipe the exterior of the appliance using a damp cloth. Always ensure not to drip water into the interior or onto the front plate of the appliance. Check, whether the heating chambers (below the grilling plates) are completely clean. If required, remove any residues with a damp cloth to avoid it burning on, when the appliance is next in use.
- Thoroughly dry all parts of the appliance after cleaning. Then, leaving the lid of the appliance in the upper open position, let all parts dry naturally for approx. 30 minutes, with all parts out of reach of young children.
- After cleaning, reassemble the appliance to avoid loss and damage to the parts.
Storage:
- Always clean the appliance and all its parts before storing to ensure any dried-on food is removed.
- Reassemble the appliance completely and correctly, before storing it to avoid loss and damage to the parts. Do not use any parts or accessories of the appliance for any other purpose than operating the appliance. For storage and before lifting and/or tilting the appliance, always ensure to lock the lid of the appliance to the base. Pull the height control clip to the "OPEN" position, then close the lid completely and push the height control clip to the "LOCK" position. Ensure that the lid is securely locked to the base. You may carry the appliance by the lid handle. Wrap the power cord loosely around the cord storage at the bottom of the base.
- Ensure to store the appliance where it is clean, dry and safe from frost, direct sunlight and inadmissible strain (mechanical or electric shock, heat, moisture) and where it is out of reach of young children. Place the appliance on a clean and stable surface, where it cannot fall. If you wish to store the appliance in upright position, ensure that it has a stable stand and will not tilt or fall over.
SOLVING ISSUES
| PROBLEM | POSSIBLE REASON | SOLUTION |
| The appliance doesn't react to your input, only if you push hard. | There may be fat on your finger tip or your skin is very dry. | Wipe your finger tip with a moist cloth. Then try again. The appliances gives an acoustic signal with each accepted input. |
| After switching on the appliance, you notice a burnt smell. Maybe, smoke escapes from under the grilling plates. | The appliance is heated for the first time. In this case, there is no need to worry. | To prepare the appliance for the very first operation, select 240°C (maximum grilling temperature) and, with the lid closed, leave the appliance to operate for approx. 10 minutes. |
| The heating chambers (under the grilling plates) or the grilling plates are dirty. | Switch off and unplug the appliance immediately. Leave the appliance to cool down. Then remove the grilling plates and clean the heating chambers and grilling plates of base and lid thoroughly. When removing the grilling plates after grilling, ensure that juices from the grilling plates will not drip into the heating chambers. Ensure that the heating chambers and the bottom of the grilling plates are completely clean, before reassembling the appliance | |
| You cannot open the lid. The lid is locked to the base. Slide the height control clip to the "OPEN" position. Do not use excessive force. | ||
| You cannot close the lid completely. The height control feature is in use. Hold the lid by the handle and pull the height control clip to the "OPEN" position. Then try again. | ||
| You cannot fold back the lid to the flat position. | For operating the appliance in the open position, the lid is held in the upright position by a lock in the hinge. | Hold the lid by the handle. While pressing the hinge release button at the right side of the lid hinge, slowly fold back the lid (see: 'Positioning the Lid'). |
| The desired grilling temperature is not available. | If you have selected a program, the range of possible grilling temperature values may be restricted. | In the program area, select a program, enabling the desired temperature values. Alternatively, deselect any programs and adjust the required grilling temperature manually (range: 80°C to 240°C). |
| When using the core temperature control feature, the desired core temperature is not available. | A program is selected that does not enable the desired core temperature. | With some programs, the range of possible core temperature values is restricted. In the program area, deselect the used program or select another program. |
SOLVING ISSUES
| PROBLEM | POSSIBLE REASON | SOLUTION |
| Unexpectedly, the appliance does not work any longer. | "OFF" flashes on the touchscreen: The automatic shut-off has been triggered. | For your safety, the appliance is equipped with an automatic shut-off feature, that will be triggered after 1 hour of continuous use without any input. In this case an unusual acoustic signal sounds. If you wish to operate the appliance further on, simply press the ON/ OFF button and enter the desired settings again. |
| The touchscreen is dark: The connection to the power supply is interrupted. "Er" and a number is displayed: An error occurred. | Ensure that the power cord is still connected to the power outlet. When using an extension cord, check the connections of the extension cord. Always ensure that nobody gets entangled in the power cord or pulls at the power cord. Do not let the excess cord of the extension cord hang down from the table Solve the problem according to the hints, given below. | |
| The storage tray of the temperature probe does not fit into the control panel. | The temperature probe is not inserted in the correct orientation. | The ring in the handle of the temperature probe must face upwards, when inserted into the inner tray. |
| The cable or plug of the temperature probe is not inserted correctly. | Gently press the tip of the temperature probe into the groove of the inner tray. Wrap the cable loosely around the cable support and push the plug of the cable gently down. The parts of the temperature probe may not protrude past the rim of the inner tray. (See: 'Assembling the Appliance'). | |
| The inner tray is not installed correctly in the storage tray. | The inner tray may not protrude past the storage tray. When inserted correctly, the handle of the temperature probe will be seen in the excavation of the storage tray front plate with the ring in the handle facing upwards. | |
| TIP: If you find it difficult to insert the temperature probe correctly in the inner tray, for storage, it is best to place the inner tray holding the temperature probe beside the appliance and insert the empty storage tray into the control panel of the appliance. | ||
ERROR MESSAGES
| ERROR MESSAGE | MEANING | REQUIRED ACTION |
| Er-1 | The upper grilling plate is missing or not installed correctly. | The appliance can be operated only with both grilling plates installed properly. Ensure to insert and lock the upper grilling plate correctly.Ensure that the connectors on the underside of the grilling plate are clean, smooth, and undamaged without any corrosion. If required, clean the connectors. |
| Er-2 | The lower grilling plate is missing or not installed correctly. | The appliance can be operated only with both grilling plates installed properly. Ensure to insert and lock the lower grilling plate correctly.Ensure that the connectors on the underside of the grilling plate are clean, smooth, and undamaged without any corrosion. If required, clean the connectors. |
| Er-3 | You attempted to activate the temperature control feature, without connecting the temperature probe to the appliance. | Remove the storage tray and insert the plug of the temperature probe into the probe connector “PROBE” on the left side of the control panel. You must remove the storage tray of the temperature probe first for getting access to the probe connector. |
| The plug of the temperature probe is not installed correctly or polluted | Ensure that the plug of the temperature probe is completely undamaged, dry and clean. Insert the plug correctly into the probe connector. If required, turn the plug to and fro in the probe connector to improve the connection to the appliance. If required, clean the plug using a damp cloth, and wipe dry thoroughly. | |
| The tip or cable of the temperature probe is damaged | Replace the temperature probe. However, you can operate the appliance without the temperature probe. Touch the probe button on the display area for deactivating the temperature probe. | |
| Er-4 | A serious malfunction occurred. Immediately unplug the appliance and let the appliance cool down completely (approx. 30 Minutes). Thereafter, try to put the appliance into operation again. | |


KLEVA®
QUICKTIME™
GOURMET
GRILL

natural_image
Line drawing of a portable electric heater with ventilation grilles and control panel (no text or symbols)SCAN ME
For helpful tips and how to videos


Carefully read all instructions, before operating this appliance and save for further reference. Do not attempt to use this appliance in any other way and for any other purpose, than described in these instructions (intended use). Any other use, especially misuse, can cause severe injuries or damage by electric shock, heat, or fire.
KLEVA RANGE
www.klevarange.com.au
02 9387 4100
enquiries@klevarange.com.au
Suite 301 / 209 Oxford St
Bondi Junction NSW 2022 Australia
GENUINE KLEVA QUALITY

Kleva ^® is a registered trademark of Take Two Marketing and Events Pty Ltd.

- USER GUIDE
- TABLE OF CONTENTS
- GENERAL SAFETY 2-3
- GRILL PROPERTIES 4
- OVERVIEW 5
- BEFORE USE 6
- USING YOUR GRILL 7-12
- HINTS AND TIPS 13
- CARE AND CLEANING 14
- SOLVING ISSUES 15-16
- ERROR MESSAGES 17
- GENERAL SAFETY
- GENERAL SAFETY INSTRUCTIONS:
- CAUTION:
- SPECIAL INSTRUCTIONS:
- GRILL PROPERTIES
- OVERVIEW
- OVERVIEW:
- BEFORE FIRST USE
- USING YOUR GRILL
- LOCKING THE LID TO THE BASE:
- POSSIBLE POSITIONS OF THE LID:
- HEIGHT CONTROL FEATURE:
- SWIVEL BEARINGS OF THE LID:
- TEMPERATURE PROBE:
- PRE-DEFINED PROGRAMS:
- GRILLING TIMER:
- AUTOMATIC SHUT-OFF:
- Turning On The Unit:
- Cooking Vegetables:
- Cooking Meat:
- Cooking Burger/Panini:
- Cooking Poultry:
- Cooking Kebab/Sausages:
- Cooking Fish/Seafood:
- Using the temperature probe whilst cooking:
- TIPS AND HINTS
- GRILLING MEAT AND FISH
- GRILLING SANDWICHES
- CARE & CLEANING
- Cleaning Your Grill:
- Storage:
- SOLVING ISSUES
- ERROR MESSAGES
- KLEVA®
- QUICKTIME™
- GOURMET
- GRILL
- KLEVA RANGE
Brand : Kleva
Model : QuickTime Gourmet Grill
Category : Contact grill