
UAV-GA-V-2012TS - Drone Dahua Technology - Free user manual and instructions
Find the device manual for free UAV-GA-V-2012TS Dahua Technology in PDF.


| Product Type | Live Broadcasting PTZ Camera for Drone |
| Brand | Dahua Technology |
| Model | UAV-GA-V-2012TS |
| Dimensions (W×H×D) | 237.4 mm × 131 mm × 248.6 mm |
| Weight | 1167 g |
| Max Optical Zoom | 12X |
| Max Electronic Zoom | 16X |
| Sensor Resolution | 2 MP (1920 × 1080) |
| Field Angle (Horizontal) | 58.56° to 4.94° |
| Focal Length | 5.3 mm to 64 mm |
| Minimum Illumination (Color) | 0.0038 Lux |
| Minimum Illumination (B/W) | 0.0037 Lux |
| Digital Noise Reduction | 3D |
| Stabilization Axes | 3 (Pitch, Roll, Yaw) |
| Angle Stabilization Precision | ±0.01° |
| Pitch Rotation Range | -90° to +45° |
| Roll Rotation Range | ±90° |
| Course (Yaw) Rotation Range | ±45° |
| Max Controllable Angular Speed (Pitch/Yaw) | ±130°/s |
| Operating Temperature | -20°C to +60°C |
| Storage Support | eMMC, SD Card, SSD (cyclic overwrite) |
| Audio Output | High-decibel loudspeaker, 76 dB at 100 m |
| Installation | Via 4 screws to drone mount |
| Maintenance | Use air blower for lens; avoid liquids; do not hot-swap SD card (wait 15s after stop) |
Frequently Asked Questions - UAV-GA-V-2012TS Dahua Technology
User questions about UAV-GA-V-2012TS Dahua Technology
0 question about this device. Answer the ones you know or ask your own.
Ask a new question about this device
Download the instructions for your Drone in PDF format for free! Find your manual UAV-GA-V-2012TS - Dahua Technology and take your electronic device back in hand. On this page are published all the documents necessary for the use of your device. UAV-GA-V-2012TS by Dahua Technology.
USER MANUAL UAV-GA-V-2012TS Dahua Technology
Live Broadcasting PTZ Camera
User's Manual
Mandatory actions to be taken towards cybersecurity
1. Change Passwords and Use Strong Passwords:
The number one reason systems get "hacked" is due to having weak or default passwords. It is recommended to change default passwords immediately and choose a strong password whenever possible. A strong password should be made up of at least 8 characters and a combination of special characters, numbers, and upper and lower case letters.
2. Update Firmware
As is standard procedure in the tech-industry, we recommend keeping NVR, DVR, and IP camera firmware up-to-date to ensure the system is current with the latest security patches and fixes.
"Nice to have" recommendations to improve your network security
1. Change Passwords Regularly
Regularly change the credentials to your devices to help ensure that only authorized users are able to access the system.
2. Change Default HTTP and TCP Ports:
- Change default HTTP and TCP ports for systems. These are the two ports used to communicate and to view video feeds remotely.
- These ports can be changed to any set of numbers between 1025-65535. Avoiding the default ports reduces the risk of outsiders being able to guess which ports you are using.
3. Enable HTTPS/SSL:
Set up an SSL Certificate to enable HTTPS. This will encrypt all communication between your devices and recorder.
4. Enable IP Filter:
Enabling your IP filter will prevent everyone, except those with specified IP addresses, from accessing the system.
5. Change ONVIF Password:
On older IP Camera firmware, the ONVIF password does not change when you change the system's credentials. You will need to either update the camera's firmware to the latest revision or manually change the ONVIF password.
6. Forward Only Ports You Need:
- Only forward the HTTP and TCP ports that you need to use. Do not forward a huge range of numbers to the device. Do not DMZ the device's IP address.
- You do not need to forward any ports for individual cameras if they are all connected to a recorder on site; just the NVR is needed.
7. Disable Auto-Login on SmartPSS:
Those using SmartPSS to view their system and on a computer that is used by multiple people should disable auto-login. This adds a layer of security to prevent users without the appropriate credentials from accessing the system.
8. Use a Different Username and Password for SmartPSS:
In the event that your social media, bank, email, etc. account is compromised, you would not want someone collecting those passwords and trying them out on your video surveillance system. Using a different username and password for your security system will make it more difficult for someone to guess their way into your system.
9. Limit Features of Guest Accounts:
If your system is set up for multiple users, ensure that each user only has rights to features and functions they need to use to perform their job.
10. UPnP:
- UPnP will automatically try to forward ports in your router or modem. Normally this would be a good thing. However, if your system automatically forwards the ports and you leave the credentials defaulted, you may end up with unwanted visitors.
- If you manually forwarded the HTTP and TCP ports in your router/modem, this feature should be turned off regardless. Disabling UPnP is recommended when the function is not used in real applications.
11. SNMP:
Disable SNMP if you are not using it. If you are using SNMP, you should do so only temporarily, for tracing and testing purposes only.
12. Multicast:
Multicast is used to share video streams between two recorders. Currently there are no known issues involving Multicast, but if you are not using this feature, deactivation can enhance your network security.
13. Check the Log:
If you suspect that someone has gained unauthorized access to your system, you can check the system log. The system log will show you which IP addresses were used to login to your system and what was accessed.
14. Physically Lock Down the Device:
Ideally, you want to prevent any unauthorized physical access to your system. The best way to achieve this is to install the recorder in a lockbox, locking server rack, or in a room that is behind a lock and key.
15. Connect IP Cameras to the PoE Ports on the Back of an NVR:
Cameras connected to the PoE ports on the back of an NVR are isolated from the outside world and cannot be accessed directly.
16. Isolate NVR and IP Camera Network
The network your NVR and IP camera resides on should not be the same network as your public computer network. This will prevent any visitors or unwanted guests from getting access to the same network the security system needs in order to function properly.
General
This document elaborates on product profile, structure, installation and login.
Models
UAV-GA-V-2012TS
Safety Instructions
The following categorized signal words with defined meaning might appear in the Manual.
| Symbol Note | |
 | It means highly potential danger. It will cause severe injury or casualties if it fails to avoid. |
 | It means moderate or low potential danger. It may cause slight or moderate injury if it fails to avoid. |
 | It means potential risk. It may cause device damage, data loss, weaker performance or other unpredictable consequences if it fails to avoid. |
 | It means that it can help to solve some problems or save time. |
 | It means the additional information, which is the emphasis and supplement of the main body. |
Revision History
| No. | Version No. | Revision Content | Release Date |
| 1 | V1.0.0 | First release | 2018.2.28 |
Privacy Protection Notice
As the device user or data controller, you might collect personal data of others' such as face, fingerprints, car plate number, Email address, phone number, GPS and so on. You need to be in compliance with the local privacy protection laws and regulations to protect the legitimate rights and interests of other people by implementing measures include but not limited to: providing clear and visible identification to inform data subject the existence of surveillance area and providing related contact.
About the Manual
- The Manual is for reference only. If there is inconsistency between the Manual and the actual product, the actual product shall prevail.
• We are not liable for any loss caused by the operations that do not comply with the Manual. - The Manual would be updated according to the latest laws and regulations of related regions. For detailed information, see the paper User's Manual, CD-ROM, QR code or our official website. If there is inconsistency between paper User's Manual and the electronic version, the electronic version shall prevail.
- All the designs and software are subject to change without prior written notice. The product updates might cause some differences between the actual product and the Manual. Please contact the customer service for the latest program and supplementary documentation.
- There still might be deviation in technical data, functions and operations description, or errors in print. If there is any doubt or dispute, please refer to our final explanation.
- Upgrade the reader software or try other mainstream reader software if the Guide (in PDF format) cannot be opened.
- All trademarks, registered trademarks and the company names in the Manual are the properties of their respective owners.
- Please visit our website, contact the supplier or customer service if there is any problem occurred when using the device.
- If there is any uncertainty or controversy, please refer to our final explanation.
Important Safeguards and Warnings
The following description is the correct application method of the device. Please read the manual carefully before use, in order to prevent danger and property loss. Strictly conform to the manual during application and keep it properly after reading.
Caution
- Don't touch the lens of PTZ camera directly. Use an air blower to blow away the dust or dirt on the lens surface.
- Don't drip or splash liquids onto the device; don't put around the device anything filled with liquids, in order to prevent liquids from flowing into the device.
- Please transport, use and store the device within allowed humidity and temperature range.
- Don't compress, vibrate violently or immerse the device during transportation, storage and installation.
Warning
- Use the standard components or accessories provided by manufacturer and make sure that the device is installed and fixed by professional engineers.
- Do not provide two or more power supply sources for the device; otherwise it might damage the device.
Table of Contents
Cybersecurity Recommendations....2
Foreword......V
Important Safeguards and Warnings....VII
1 Product Profile....1
1.1 Product Overview.... 1
1.2 Product Function.... 1
2 Device Structure 3
2.1 Product Dimensions .... 3
2.2 Structural Component 5
3 Device Installation....6
4 Device Operation .... 7
4.1 Picture Acquisition Mode 7
4.1.1 SD Card....7
4.1.2 Ground Control Station....7
4.2 Broadcasting Control....8
4.2.1 Ground Control Station....8
4.2.2 Remote Control....11
5 Device Upgrade....12
6 Technical Parameters....14
7 FAQ....15
1.1 Product Overview
As the core of unmanned aircraft system, airborne live broadcasting PTZ owns high-decibel loudspeaker on basis of triaxial PTZ, adopts oriented vector control technology of permanent magnet motor rotor field, high-precision triaxial servo autostability technology, wireless remote audio transmission technology and compact portable design.
This product is mainly applied in multi-rotor drone to effectively prevent the effect of drone posture change and jitter on the video image, so PTZ camera provides clear and stable video images in all cases. When the ground control station connects broadcasting device, carry out remote high-altitude visual broadcasting with the broadcasting device. It applies to forest fire prevention and emergency event alarm scenarios.
1.2 Product Function

Note
Some functions of the product are listed for your reference. Different types of product have different functions. Please refer to actual functions of the product.
Triaxial Autostability
When pitch, roll and course axes rotate or shake, PTZ base and camera gesture are able to keep stable, so video images are clear, without jittering.
Broadcasting Function
The ground control station connects broadcasting device to realize remote visual broadcasting function. Sound pressure is 76 decibels at the distance of 100m.
Rotation Mode
Following mode: when the aircraft moves forward, backward, left and right horizontally, PTZ follows to rotate, so surveillance direction is always consistent with aircraft movement direction.
Storage Function
- Support industrial embedded multimedia card (eMMC), SD card, extended storage of solid state disk and support to resume transmission after recovering from network outage
• Cyclic coverage of storage media.
Alarm Function
Through network, give an alarm about camera abnormality, such as memory damages.
2.1 Product Dimensions
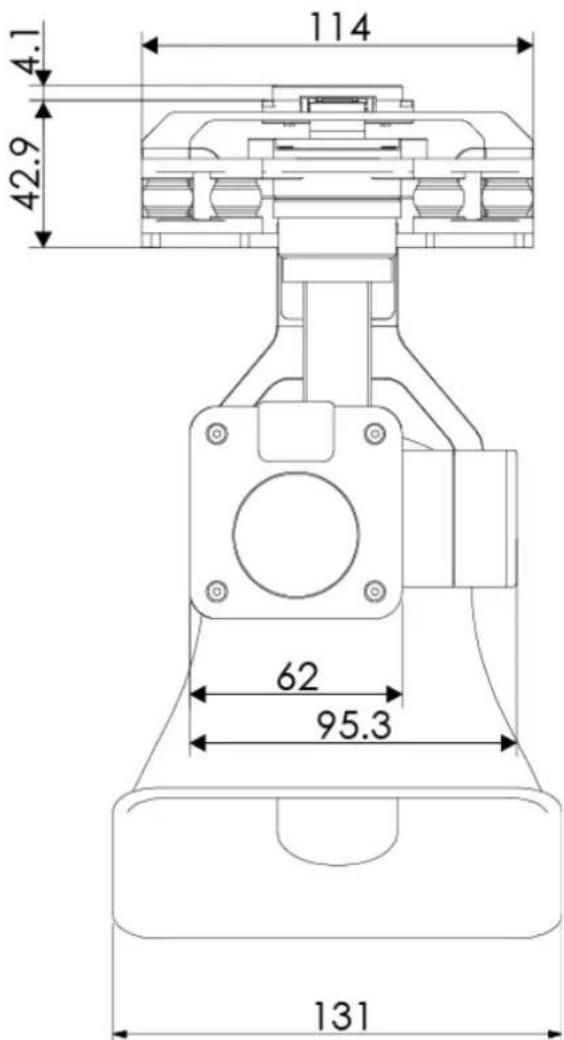
Figure 2-1 Front View (unit: mm)

Figure 2-2 Side View (unit: mm)
2.2 Structural Component

Figure 2-3
| No. | Name | Function |
| 1 Shock absorber ball | Reduce jitter of PTZ camera during flight; obtain clearer pictures. | |
| 2 Shock absorber board | ||
| 3 | Installation screw | Fix PTZ camera onto the aircraft. |
| 4 Yaw motor | Control horizontal direction of the camera. | |
| 5 | Yaw rotation arm | |
| 6 | Roll motor | Control rotation angle of roll axis. |
| 7 | Roll rotation arm | |
| 8 | Pitch motor | Control rotation angle of pitch axis. |
| 9 | Camera | Take pictures. |
| 10 Lens | ||
| 11 | SD card slot | Install SD card. |
| 12 SD card plug | Cover outside the SD card slot is used to protect SD card slot. | |
| 13 Loudspeaker | Amplify sound in a remote and real-time way; broadcast to the ground. | |
Table 2-1

Note
This chapter explains device installation by taking NAVIGATOR X820 for example. Please refer to actual product.
Step 1 Insert data cable interface at the bottom of aircraft into the interface at the top of shock absorber board, as shown in Figure 3-1.

Figure 3-1
Step 2 Align 4 installation screws with bottom holes of the aircraft, and tighten them. Fix PTZ camera onto the aircraft, as shown in Figure 3-2.

Figure 3-2
Step 3 Turn on power supply of the aircraft, and wait for IMU (Inertial Measurement Unit) calibration. After completing IMU calibration, the motor starts working while PTZ returns to the center automatically.
Thus, PTZ camera has been installed completely.
4.1 Picture Acquisition Mode
4.1.1 SD Card
Step 1 Open SD card plug with a hand, as shown in Figure 4-1.

Figure 4-1
Step 2 Press SD card gently, and SD card will pop up. Pull out SD card.
Step 3 Insert SD card into card reader, and connect the card reader with computer.
With the card reader, copy videos in SD card to the computer, and save them.
4.1.2 Ground Control Station

Note
- Ground control station and the device are in the same network segment by default, which need no configuration.
- One set of device has been paired before leaving factory, so the user doesn't need to pair again. If several devices are mixed and cannot be distinguished, please pair them before operation. For details, please refer to drone user's manual.
Step 1 Turn on power supply of ground control station, remote control and aircraft.
Wireless module of the aircraft connects wireless module of ground control station and
remote control automatically.
Step 2 During flight, through wireless module of ground control station, view pictures of PTZ camera in a real-time way.
4.2 Broadcasting Control

Note
- Please ensure that external loud-speaker has been connected; otherwise, audio cannot be broadcasted.
- Try to speak into handheld microphone directly.
- There is a broadcasting button on the left of handheld microphone. Press the button to start broadcasting; release it to stop broadcasting.
Their device components vary depending on different types of NAVIGATOR.
- Regarding NAVIGATOR X1100, ground control station is optional, whereas remote control integrates some functions of ground control station. Therefore, microphone shall be connected with remote control, in order to realize broadcasting function.
- Regarding NAVIGATOR X820, ground control station is a standard configured device, so microphone is connected with ground control station, in order to realize broadcasting function.
4.2.1 Ground Control Station

Note
- When ground control station connects broadcasting device, "Audio Acquisition Input Adjustment Bar" will be displayed in "Show Hidden Icon" on PC end of ground control station.
- In case of no sound or low volume, drag "Audio Acquisition Input Adjustment Bar" slider to adjust volume of loudspeaker.
Realize broadcasting function through ground control station. Audio is transmitted via microphone to the device; then, loudspeaker on the device will spread the audio to flight zone of the aircraft.
Step 1 Insert the external microphone connector into corresponding interface of ground control station, as shown in Figure 4-2.

Figure 4-2
Meanwhile, "Audio Acquisition Input Adjustment Bar" will be displayed in "Show Hidden Icon" on PC end of ground control station, as shown in Figure 4-3.

Figure 4-3
Step 2 Click "Speak" icon at the main interface of ground control station.
When "Speak" turns to "Speaking" and the icon becomes red, the system displays "Start Speak", the user can start speak, as shown in Figure 4-4.

Note
During speaking, loudspeaker may have a low or no sound, since audio acquisition input of ground control station is set to be minimum volume. When the icon displays "Speaking", the user can adjust audio acquisition input volume.
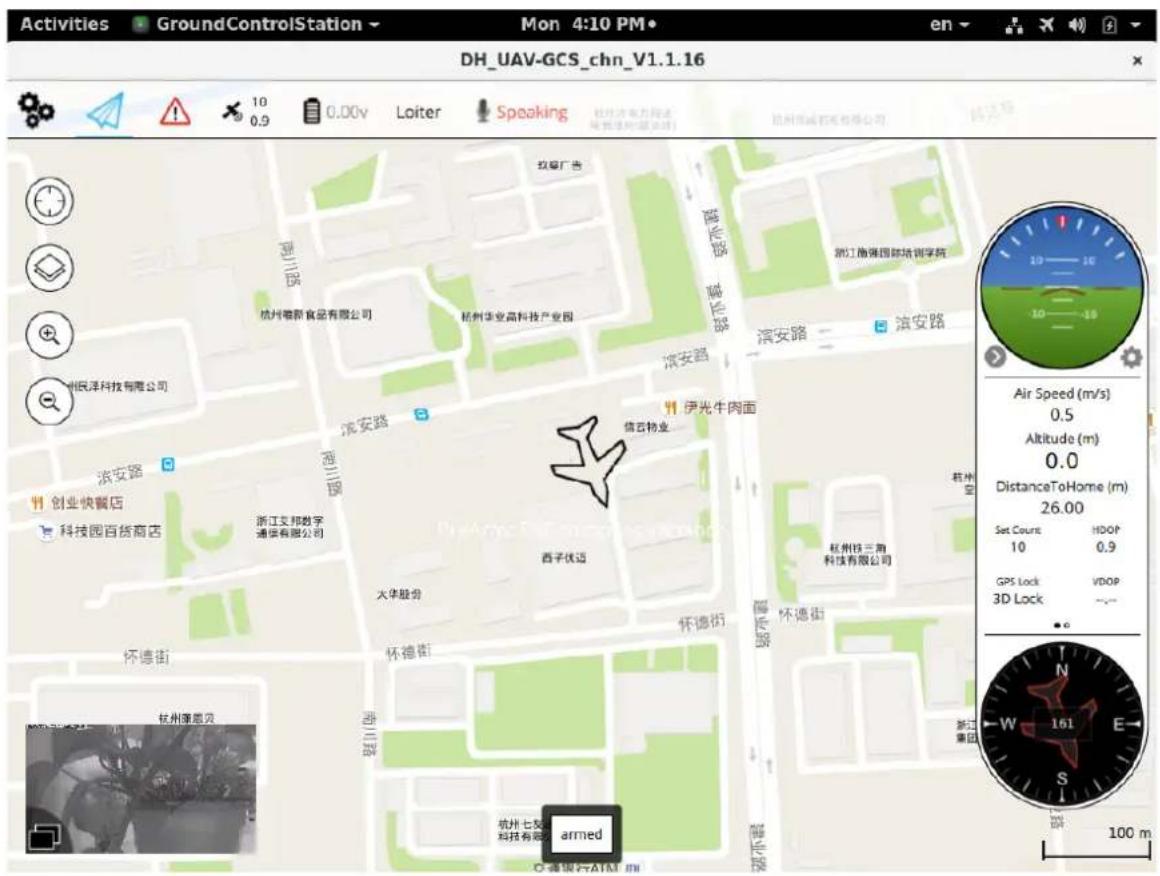
Step 3 Press the "Speak Button" of handheld microphone to speak, as shown in Figure 4-5. Live broadcasting PTZ will play the audio in a real-time way.
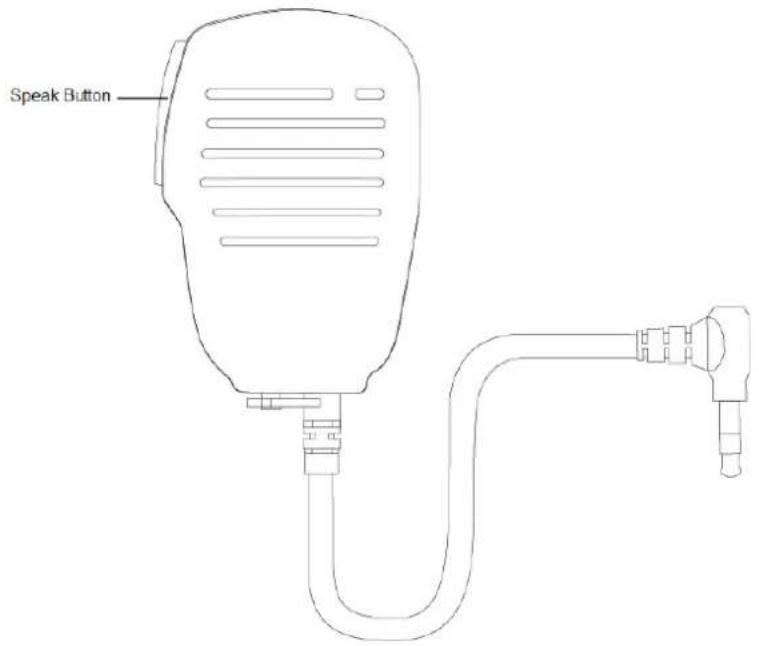
Figure 4-5
Step 4 On completion, release "Speak Button".
To speak again, press "Speak Button" again.
Step 5 After all speaking is finished, click "Speak" icon on the ground control station. The system displays "Stop Speaking!"
"Speak" icon turns to green, which means that speaking is stopped.
4.2.2 Remote Control

Note
- When ground control station is optional, resort to remote control to broadcast.
- The user doesn't need to set the volume; it has been set to be maximum volume when leaving factory.
Realize broadcasting function with remote control. The device needs to connect a patch cord to transmit the audio to the device, and spread the audio with loudspeaker to flight zone of the aircraft.
Step 1 Connect external microphone with patch cord, as shown in Figure 4-6.

Figure 4-6
Step 2 Insert the other end of patch cord into audio input interface of remote control, as shown in Figure 4-7.
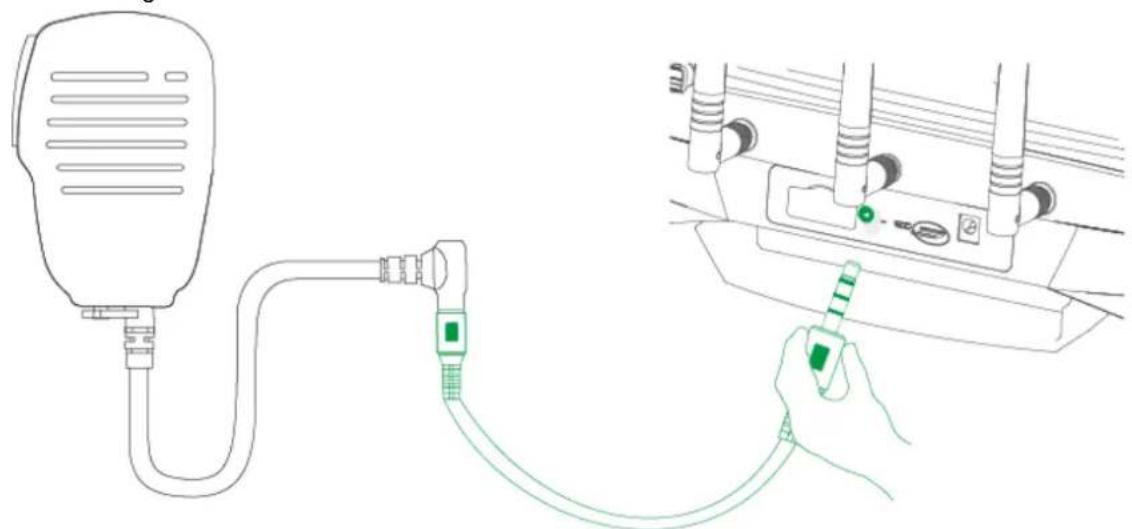
Figure 4-7
Step 3 Press "Speak Button" of handheld microphone to speak. Broadcasting PTZ of the aircraft will play the audio in a real-time way.
Step 4 On completion, release "Speak Button" to stop speaking.
Caution
• This chapter only applies to camera upgrade.
• Only one device can be upgraded each time.
Note
In case of device disconnection during upgrade, as long as ConfigTool stays at the upgrade interface, the device will continue the last upgrade when it is connected with network again.
Precondition:
• Upgrade package has been obtained.
• PC has wireless network card.
Step 1 In PC, select "Start > Control Panel > Network and Internet > Connections". The system displays "Connections" interface, to search WLAN of ground control station.
Step 2 After finding "Network Name" on the "Pair" interface, enter corresponding "Password". "Pair" interface of ground control station is shown in Figure 5-1.

Figure 5-1
Step 3 Click "Join" to join WLAN of ground control station.
Step 4 In PC, double click "ConfigTool.exe" to open quick configuration tool.
Step 5 Click and the system displays upgrade interface, as shown in Figure 5-2.

Figure 5-2
Step 6 Click "Open" corresponding to the device that shall be upgraded.
Step 7 Select upgrade file, as shown in Figure 5-3.

Figure 5-3
Step 8 Click "Upgrade". The system starts upgrading and displays the progress.
| Parameter | Description |
| Product Model | UAV-GA-V-2012TS |
| Max. optical zoom of PTZ camera 12X | |
| Max. electronic zoom of PTZ camera | 16X |
| Pixel of PTZ camera 2MP | |
| Field angle | Horizontal: 58.56°~4.94° |
| Focal length | 5.3mm~64mm |
| Image resolution | 1920×1080 |
| Digital noise reduction | 3D |
| Minimum illumination | Color: 0.0038Lux/F1.6Black and white: 0.0037Lux/F1.6 |
| Operating ambient temperature | -20°C~+60°C |
| Total weight | 1167g |
| Angle stabilization precision | ±0.01° |
| Quantity of anti-jittering axis | 3 axes |
| Pitch rotation range | -90°~+45° |
| Roll rotation range ±90° | |
| Course rotation range ±45° | |
| Max. controllable angle speed of pitch axis | ±130°/s |
| Max. controllable angle speed of course axis | ±130°/s |
| PTZ dimension | 237.4mm×131mm×248.6mm |
| PTZ function | Yaw following |
| Points for Attention | Countermeasures |
| Hot plugging of SD card | In order to guarantee data integrity, please stop recording and snapshotting; wait for about 15s before pulling out the SD card. Otherwise, all data in SD card may be lost. |
| Read-write time limitation of SD card | Please don’t set SD card to be storage medium of recording at fixed time. Otherwise, SD card may run out of read-write life and go wrong quickly. |
| Recommended SD card type | 8GB, 16GB, 32GB and 128GB high-speed card. |
| Fail to pop up installation dialog box of WEB controls webrec.cab | Please set security level of IE browser to be “Low” and “ActiveX Plug-ins and Controls” to “Enable”. |
Table 6-1
Table 7-1
- LIVE BROADCASTING PTZ CAMERA
- USER'S MANUAL
- MANDATORY ACTIONS TO BE TAKEN TOWARDS CYBERSECURITY
- CHANGE PASSWORDS AND USE STRONG PASSWORDS
- UPDATE FIRMWARE
- NICE TO HAVE" RECOMMENDATIONS TO IMPROVE YOUR NETWORK SECURITY
- CHANGE PASSWORDS REGULARLY
- CHANGE DEFAULT HTTP AND TCP PORTS
- ENABLE HTTPS/SSL
- ENABLE IP FILTER
- CHANGE ONVIF PASSWORD
- FORWARD ONLY PORTS YOU NEED
- DISABLE AUTO-LOGIN ON SMARTPSS
- USE A DIFFERENT USERNAME AND PASSWORD FOR SMARTPSS
- LIMIT FEATURES OF GUEST ACCOUNTS
- UPNP
- SNMP
- MULTICAST
- CHECK THE LOG
- PHYSICALLY LOCK DOWN THE DEVICE
- CONNECT IP CAMERAS TO THE POE PORTS ON THE BACK OF AN NVR
- ISOLATE NVR AND IP CAMERA NETWORK
- GENERAL
- MODELS
- SAFETY INSTRUCTIONS
- REVISION HISTORY
- PRIVACY PROTECTION NOTICE
- ABOUT THE MANUAL
- IMPORTANT SAFEGUARDS AND WARNINGS
- CAUTION
- WARNING
- TABLE OF CONTENTS
- 1.1 PRODUCT OVERVIEW
- 1.2 PRODUCT FUNCTION
- TRIAXIAL AUTOSTABILITY
- BROADCASTING FUNCTION
- ROTATION MODE
- STORAGE FUNCTION
- ALARM FUNCTION
- 2.1 PRODUCT DIMENSIONS
- 2.2 STRUCTURAL COMPONENT
- NOTE
- 4.1 PICTURE ACQUISITION MODE
- 4.1.1 SD CARD
- 4.1.2 GROUND CONTROL STATION
- 4.2 BROADCASTING CONTROL
- 4.2.1 GROUND CONTROL STATION
- 4.2.2 REMOTE CONTROL
Brand : Dahua Technology
Model : UAV-GA-V-2012TS
Category : Drone