XTR1 - Radio Xact - Free user manual and instructions
Find the device manual for free XTR1 Xact in PDF.


| Product Type | Portable Analog Radio |
| Brand | Xact |
| Model | XTR1 |
| Frequency Bands | AM (520-1710 kHz), FM (88-108 MHz) |
| Dimensions (W x H x D) | 200 x 130 x 80 mm |
| Weight | 500 g (including batteries) |
| Power Source | 4 x AA batteries (1.5V each) or 6V DC adapter (not included) |
| Battery Life | Approximately 30 hours with alkaline batteries |
| Antenna | Telescopic rod antenna (FM), built-in ferrite bar (AM) |
| Speaker | Built-in 3-inch dynamic speaker (8 ohms, 1W output) |
| Audio Output | 3.5 mm headphone jack |
| Controls | Volume dial, tuning knob, AM/FM band selector, power switch |
| Additional Features | Carrying handle, dial light, external antenna connector |
| Housing Material | ABS plastic |
| Color | Black or silver (depending on batch) |
| Care Instructions | Wipe with a dry, soft cloth; do not use solvents. Keep away from moisture and direct sunlight. |
| Safety Warnings | Do not disassemble or modify. Keep out of reach of children under 3 years. Avoid operation near water. |
| Spare Parts Availability | Compatible AA batteries and 3.5 mm headphones widely available; replacement antennas may be sourced from third-party suppliers. |
| Repairability Index | Repairable with basic tools; schematics not provided by manufacturer. |
| Certifications | CE, RoHS compliant |
| User Manual | Free PDF download available at notice-facile.com (44 pages, English) |
Frequently Asked Questions - XTR1 Xact
User questions about XTR1 Xact
0 question about this device. Answer the ones you know or ask your own.
Ask a new question about this device
Download the instructions for your Radio in PDF format for free! Find your manual XTR1 - Xact and take your electronic device back in hand. On this page are published all the documents necessary for the use of your device. XTR1 by Xact.
USER MANUAL XTR1 Xact
Satellite Radio Products

Instruction Manual
Model XTR1
To activate your Satellite Radio Receiver or for latest news and questions regarding SIRIUS® Satellite Radio service visit sirius.com or call 1-888-539-SIRIUS (7474).
For accessory & product information visit us at www.getxact.com.

SIRIUS SATELLITE RADIO
KEEPMOVING


This equipment has been tested and found to comply with the limits for a Class B digital device, pursuant to Part 15 of the FCC Rules. These limits are designed to provide reasonable protection against harmful interference in a residential installation. This equipment generates, uses, and can radiate radio frequency energy and, if not installed and used in accordance with the instructions, may cause harmful interference to radio communications. However, there is no guarantee that interference will not occur in a particular installation. If this equipment does cause harmful interference to radio or television reception, which can be determined by turning the equipment off and on, the user is encouraged to try to correct the interference by one or more of the following measures:
• Reorient or relocate the receiving antenna.
- Increase the separation between the equipment and receiver.
- Connect the equipment into an outlet on a circuit different from that to which the receiver is connected.
- Consult the dealer or an experienced radio/TV technician for help.
Changes or modifications not expressly approved by the Manufacturer for compliance could void the user's authority to operate the equipment
NOTE! Use only the appropriate accessories or input devices with your receiver. Use only the 12v Vehicle Adapter that is provided with the kit. It is important that you do not modify it in any way since this will result in damaging your equipment and void the warranty.
COPYRIGHT / TRADEMARKS
No part of this publication may be reproduced, stored in a retrieval system, or transmitted in any form or by any means, whether electronic, mechanical, photocopying, recording or otherwise without the prior writing of the publisher.

is a registered trademark of SIRIUS® Satellite Radio. To activate your Satellite Radio Receiver or for latest news and questions regarding SIRIUS® Satellite Radio service visit sirius.com or call 1-888-539-SIRIUS (7474).
SAFETY PRECAUTIONS

Warning
Follow these notifications to avoid any traffic accidents or personal injury:
- Installation must be performed according to this user guide.
- Do not install the device where it may obstruct your view through the windshield or of your vehicle's indicator displays.
- Do not install the device where it may hinder the function of safety devices such as an airbag. Doing so may prevent the airbag from functioning properly in the event of an accident.
- The installation and usage suggestions contained in this user guide are subject to any restrictions or limitations that may be imposed by applicable law. The purchaser should check applicable law for any restrictions or limitations before installing and/or operating this device.
- Failure to follow these safety instructions and warnings may result in a severe accident.

Danger
Be aware of the following precautions to prevent fire and avoid personal injury:
- To avoid short circuits, never put or leave any metallic objects (coins, tools, etc.) inside the device.
- If the device emits smoke or strange smells, turn the power off immediately and contact your dealer.
- Do not drop the device or subject it to strong shocks.
- If the LCD display becomes damaged or broken, do not touch the liquid crystal fluid. The fluid may be dangerous to your health or even fatal. If the liquid crystal fluid contacts your body or clothing, immediately wash it off with soap and water.

Caution
Do not operate this device in a way that might divert your attention from driving safely. As a driver, you are responsible for safely operating your vehicle in accordance with traffic safety laws at all times.
TABLE OF CONTENTS
Introduction Page 3
Product Overview Page 3
Package Contents Page 3
Components Guide Page 4
Xact Stream Jockey SIRIUS® Radio Page
Wireless Remote Control Page 5
Getting Started Page 6
Mounting Your Xact Stream Jockey Satellite Radio at Home Page 6
Mounting Your Xact Stream Jockey Satellite Radio in a Vehicle Page 6
Activating Your SIRIUS® Subscription Page 7
Basic Operations Page 12
Tuning to Different Entertainment Categories Page 12
Searching for Music Page 13
Searching For Music By Channel Page 13
Searching For Music By Artist/Composer Page 13
Searching For Music By Song Page 14
Direct Tuning Page 14
Presetting Channels Page 15
Searching for a Preset Channel/Artist/Song Page 16
S-Seek Function Memo (Memory Search) Button Page 17
Performing S-Seek Function Page 19
Menu Options Settings Page 20
Basic Setting Procedure Page 20
SIRIUS® ID Page 20
Display Settings Page 21
FM Transmitter Page 22
Channel Add/Skip Page 23
Lock Options Page 23
Audio Level Page 25
Antenna Aiming Page 26
SIRIUS® Satellite Map Page 26
Memory Options Page 27
Time Features Page 28
Clock Page 29
Format Page 29
Time Zone Page 29
TABLE OF CONTENTS
Daylight Saving Time Page 30
Alarm Clock Page 30
Time Page 30
Program Alert Page 31
Program Day/Time Page 31
Channel Selection Page 32
Auto Shutdown Page 32
Sleep Mode Page 33
Factory Default Page 33
Display Messages Page 35
Problem Solving Page 37
Warranty Page 38
INTRODUCTION
Product Overview
Thank you for purchasing this product! Your new plug and play XACT Stream Jockey satellite radio is specifically designed to mount in a vehicle or indoor/outdoor location.
In the event that any item is missing or if you find any mismatch or damage, promptly contact your dealer.
Your Xact Stream Jockey Satellite Radio Receiver must be used in conjunction with any one of the following Xact Kits, such as the Universal kit, Home kit or Boom Box as required by you specific needs.
• Xact Vehicle Kit: Model Number XS021
• Xact Home Kit: Model Number XS022
• Xact Universal Kit: Model Number XS01UK
• Xact Sound Pad Portable Boom Box: Model Number XS024
• Xact Sound System Portable Boom Box: Model Number XS025
• Xact Sound System Deluxe Portable Boom Box: Model Number XS027
• Xact Power Pod Portable Battery Pack: Model Number XS028
The easiest way to activate your Satellite Radio Receiver is to log on to sirius.com. You may also call 1-888-539-SIRIUS (7474).
COMPONENTS GUIDE
XACT Stream Jockey SIRIUS® Radio

- Earphone Socket
- LCD Monitor (Main Display)
- CH (Channel) (Ascend/Descend Buttons)
- DISP (Display)
- CAT (Category) (Left/Right Directional Buttons)
- BAND (P-TUNE)
- IR for Remote Control
- Power Button
- MENU Options List
- SELECT (OK Button)
- MEMO (S-seek)
- Numerical Keys
- Volume Adjustment
COMPONENTS GUIDE
Wireless Remote Control
The wireless remote control packed with your plug and play XACT Stream Jockey satellite radio mirrors the operations of your plug and play XACT Stream Jockey satellite radio receiver from a remote location.

- CH (Channel) (Ascend/Descend Buttons)
- MUTE
- BAND
- DISP (Display)
- P-TUNE
- MEMO
-
Power Button
-
SELECT (OK Button)
- CAT (Category) (Left/Right Directional Buttons)
- Volume Adjustment
- MENU Options List
- S-Seek
- Numerical Keys
NOTE: The Volume Adjustment buttons on the Remote Control (+) and (-) enables you to change the volume only when Earphone Socket is in use. To adjust the volume using the Remote Control when the Receiver is connected to a Boom Box or working through an FM receiver:
Press the Menu button on the Remote Control and scroll down to AUDIO LEVEL.
A 10 - segment horizontal bar graph is displayed. Press the
GETTING STARTED
Mounting Your XACT Stream Jockey Satellite Radio at Home
Find an appropriate location near your stereo receiver to install your plug and play satellite radio receiver.
Mounting Your XACT Stream Jockey Satellite Radio in a Vehicle
Find an accessible location in your vehicle to install your plug and play satellite radio receiver; usually, this is the dashboard.

Do not mount your device where it may obstruct your view through the windshield or your view of your vehicle's indicator displays.

Do not mount your device where it may impede your access to the vehicle's controls.

Do not mount your device where it may hinder the function of safety devices, such as an airbag. Doing so may prevent the airbag from functioning accordingly in the event of an accident.

Mount your satellite radio where it can be easily reached.

The device must be directly in line-of-sight of the remote controller.
NOTE! Do not modify or alter in any way the wires or connections especially to the 12v vehicle adapter. Doing so will prevent the protection provided in the circuitry from functioning properly and result in damaging your receiver. This will void your warranty
Activating Your SIRIUS® Subscription
Before beginning to use your new device, you must first register to the SIRIUS® Satellite Radio service.

There are two ways to activate the SIRIUS® Satellite Radio Service:
- Visit sirius.com and click activate, then follow the on-screen instructions.
- Call SIRIUS ^® at 1-866-845-7474. A representative will help you activate your SIRIUS ^® Satellite Radio Service.
Note: Make sure to have your identification number accessible when calling SIRIUS®.
Make Note of Your Identification Number
Activating your SIRIUS® Satellite Radio Service:
- Press MENU to enter the Menu Options settings.

- Press the ^ or CH button select SIRIUS® ID and press the SELECT button to enter the sub menu. Your own device's 12-digit SIRIUS® ID Number (ESN) will be displayed on the screen.

IF YOU HAVE PURCHASED A VEHICLE KIT
INSTALLATION
NOTE! Use only the appropriate accessories or input devices with your receiver. Use only the 12v Vehicle Adapter that is provided with the kit. It is important that you do not modify it in any way since this will result in damaging your equipment and void the warranty.



natural_image
Line drawing of a mechanical device with a hand operating a lever, no text or symbols present...ROTATE RECEIVER UNIT BACKWARDS TO ENGAGE HOOKS AND TURN KNOB CLOCKWISE TO LOCK IN THE RECEIVER

IF YOU HAVE PURCHASED A HOME KIT
INSTALLATION
1.2.

natural_image
Line drawing of a hand operating a microscope with red arrows indicating motion (no text or symbols)THUMB LATCH PULLED BACK...

natural_image
Line drawing of a hand operating a vertical cylindrical device with a red arrow indicating motion (no text or symbols)...THUMB LATCH RELEASED, BRACKET LATCH CLIPS RECEIVER SECURELY IN PLACE
3.4.

natural_image
Line drawing of a hand operating a device with a red arrow indicating direction (no text or symbols)FOR HOME DESKTOP
APPLICATION, USER PULLS OUT
FEET USING THUMB GRIP

IF YOU HAVE PURCHASED A UNIVERSAL KIT
INSTALLATION
NOTE! Use only the appropriate accessories or input devices with your receiver. Use only the 12v Vehicle Adapter that is provided with the kit. It is important that you do not modify it in any way since this will result in damaging your equipment and void the warranty.
1.

2.

natural_image
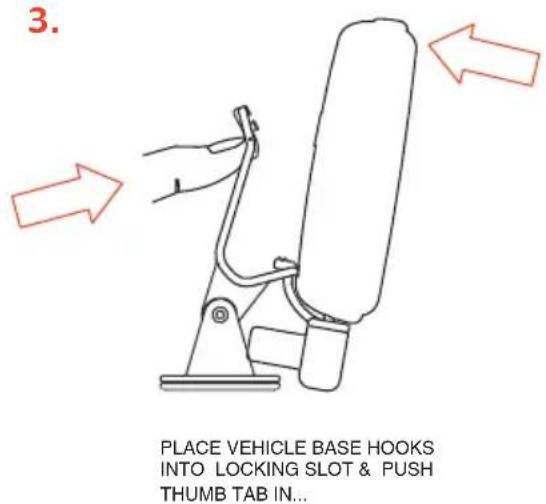
Diagram of a mechanical device with directional arrows indicating movement or force (no text or symbols)PLACE CRADLE OVER MOUNT PLATE SLIDE BACK TO LOCK FOR VEHICLE INSTALLATION
3.

natural_image
Line drawing of a hand operating a microscope with red arrows indicating motion (no text or symbols)THUMB LATCH PULLED BACK...
4.

natural_image
Line drawing of a mechanical device with a hand pointing to it, showing no text or symbols....THUMB LATCH RELEASED, BRACKET LATCH CLIPS RECEIVER SECURELY IN PLACE
5.6.
natural_image
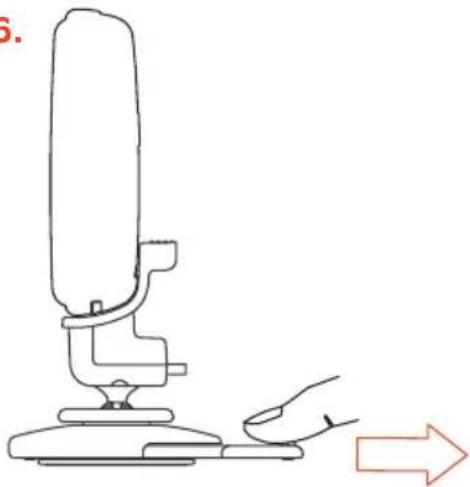
Line drawing of a hand operating a computer mouse on a stand, with an arrow indicating right motion (no text or symbols)FOR HOME DESKTOP APPLICATION, USER PULLS OUT FEET USING THUMB GRIP

IF YOU HAVE PURCHASED A Boom Box KIT
INSTALLATION
- PUSH RECEIVER ONTO CONNECTOR

natural_image
Line drawing of a mechanical device with a yellow knob and red arrow indicating a directional change (no text or symbols)- ROTATE RECEIVER AND CONNECTOR INTO BOOMBOX
natural_image
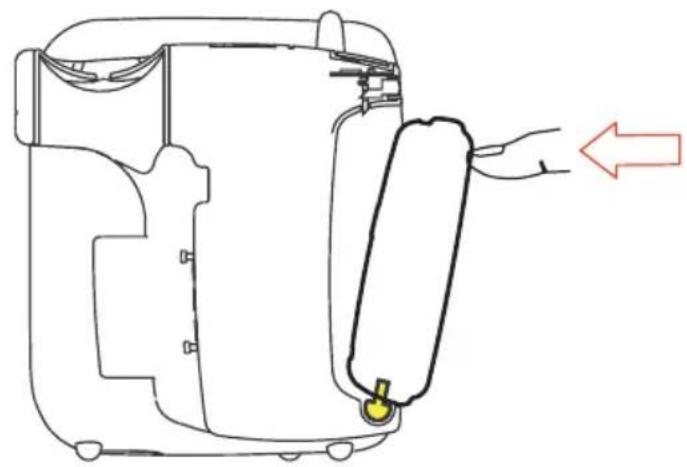
Line drawing of a device interior with a hand holding a yellow object, no text or symbols present- LATCH BOOMBOX LOCKS RECEIVER IN PLACE

natural_image
Line drawing of a device casing with a hand inserting a fire extinguisher (no text or symbols)BASIC OPERATIONS
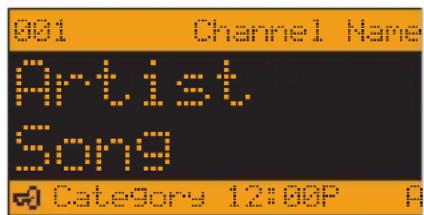
After your SIRIUS ^® subscription is activated, the Normal (default) Operation screen will pop up.

Tuning to Different Entertainment Categories
- Press the CAT button to scroll through music and entertainment categories.

- Press the CH button to search for channels.
- When the category you desire is highlighted (for example, "Jazz"), press the SELECT button to confirm the setting. The channel will change and the display will revert to the Default Screen for the new channel.

- To exit this mode without changing to a new channel, press and hold the DISP button.
Searching Music
Your satellite radio offers you three ways to seek and select music: by the channel name, by artist/composer and by song title.
Searching For Music By Channel (Channel List)
- Press and hold the DISP button while in Normal Operation mode. The Channel list screen will be displayed, numerically indicating all available channels, regardless of music category.
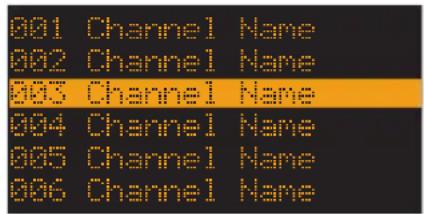
- Press the ^ or CH button continuously to choose a preferred channel and press the SELECT button to confirm the setting.
- Press and hold the DISP button again to exit from the operation.
Note: The selected channels will remain playing until you make a new change.
Searching For Music By Artist/Composer (Artist/Composer List)
- Press and hold the DISP button while in Normal Operation mode.
- You will first see the Channel list menu. Press the DISP button again. The Artist/Composer list screen will be displayed, listing all currently playing artists, regardless of category. On channels that broadcast "composer" the Composer name will be displayed with the Artist name separated by a slash "/".
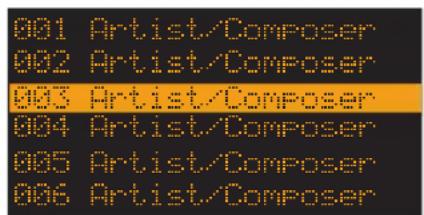
- Press the or button continuously to choose a preferred artist and press the SELECT button to confirm the setting.
- Press and hold the DISP button again to exit from the operation.
Searching For Music By Song (Song Title List)
- Press and hold the DISPbutton while in Normal Operation mode.
- Continue pressing the DISP button twice. The Song Title list screen will be displayed, indicating all currently playing songs, regardless of category. The song title data is listed in ascending order.
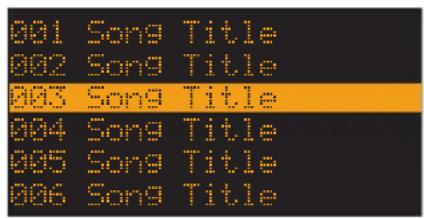
- Press the or button continuously to choose a preferred song and press the select button to confirm the setting.
- Press and hold the DISPbutton again to exit from the operation.
Direct Tuning
Your XACT Stream Jockey satellite radio enables you to access your selected channels directly.

- Press the SELECT button to activate the Direct Tuning mode.
- The corresponding window is displayed and asks you to enter the desired channel number (3 digits).
- Use the or left/right directional button until the desired digit is highlighted.
- Press the select button to confirm the setting.
Presetting Channels
Your XACT Stream Jockey satellite radio allows you to preset 18 channels. This design enables you to directly select between 6 different bands of preset channels (identified as A, B, C, D, E and F). Each band contains 3 specific channels (indicated as A-1, A-2, A-3....F-1, F-2 and F-3).
- Press the or button to search for channels.
- Press the BANDbutton to switch to your desired bands (A-F) according to your preference.

- Once the desired band is set, press and hold the 1,2 or 3 numerical button to select the specific channel. The list will then be recorded in memory.
- The selected preset number will remain lit on the display screen to demonstrate that it has been memorized.
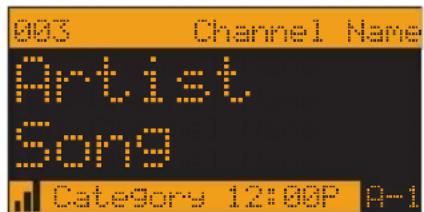
Note: If a channel is already recorded in the BAND P-Tune preset list, the new channel will overwrite the old one.
Searching for a Preset Channel/Artist/Song
- Press and hold the BAND button while in Normal Operation mode. The screen will switch between the Normal Operation mode and the Preset Tuning mode.
- Press and hold the DISP button until the Preset Channel list pops up.
- Press the DISPbutton continuously until the preferred Preset Channel list is indicated.
- Each time you press the disp button, the Preset lists switches from "Channel Name" to "Artist/Composer" to "Song Title" cyclically.
| A-1 | Channel | Name |
| A-2 | Channel | Name |
| A-3 | Channel | Name |
| B-1 | Channel | Name |
| B-2 | Channel | Name |
| B-3 | Channel | Name |
| A-1 Artist/Composer |
| A-2 Artist/Composer |
| A-3 Artist/Composer |
| B-1 Artist/Composer |
| B-2 Artist/Composer |
| B-3 Artist/Composer |
| A-1 Song Title |
| A-2 Song Title |
| A-3 Song Title |
| B-1 Song Title |
| B-2 Song Title |
| B-3 Song Title |
- Press the SELECT button to confirm the setting.
S-Seek Function\_MEMO (Memory Search) Button
When in this mode, you can activate the memory search function. This will instruct your satellite radio to search the current incoming SIRIUS ^® signal and alert you when a song you have saved is being played.
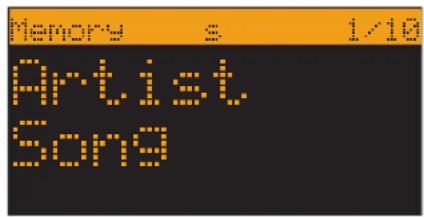
To Store the Information
Under the Normal Operation mode or the Preset Tuning mode, press the MEMO s-seek button. The current program data information is recorded in memory and the capacity status is displayed.
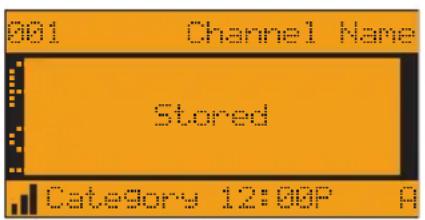
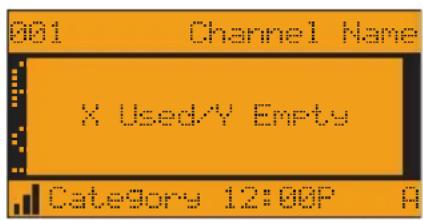
What If You Have Already Recorded the Same Artist/Song?
Your satellite radio automatically checks your recorded data information and compares it with the newly selected program. If the newly selected program has already been recorded, to avoid duplication no entry will be made.


What If the Program Storage is Full?
If the Program Storage is full, a “Memory Full” message will pop up on the screen for a moment, followed by a “Replace” or “Cancel” message.
- Under Normal Operation mode or in Preset Tuning mode, press the MEMO s-seekbutton.

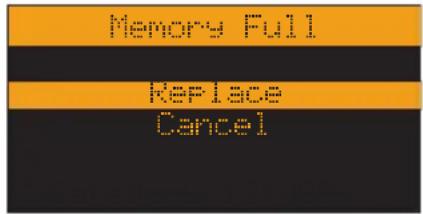
- Press the ↑ or ↓ button to select either "Replace" or "Cancel".
- Press the select button to confirm the setting.
Replace: Do the following to select the program to be overwritten with the new Artist/Composer or Song Title.
3a. Press the SELECT button, and the follow-up screen will be displayed.
| Replace |
| Artist/Song Title |
| Artist/Song Title |
| Artist/Song Title |
| Artist/Song Title |
| Artist/Song Title |
3b. Press the or button to scroll the the programs.
3c. Press the SELECTbutton to replace with the new selection.
Cancel: To avoid overwriting the stored selection, wait for the original screen to be displayed again.
Performing the S-Seek Function
Whenever you turn your satellite radio on, it automatically searches the incoming signal to determine if a match exits between the signal and the artist/composers or song titles that you have recorded in memory (except when S-seek is set to Off).
- Press and hold the MEMO s-seek button. The recorded programs lists is displayed.
- Press and release the SELECT button while in S-seek mode.
- Two selectable options displayed on the screen.
- Select "Off" (to deactivate the programs searching) or "On" (to activate the program searching) by using the ^ or CH button, then press SELECT button to confirm the setting.
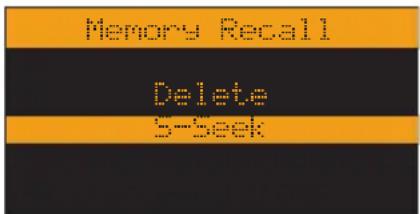

Deleting the Recorded Programs (Artist/Song)
- Press and hold the MEMO s-seek button. The recorded programs list is displayed.
- Press the _CH or button to scroll through programs.
- Press the selectbutton to enter the sub-menu.
- Press the ^ or CH button to select Delete.
- Press the SELECT button again to confirm the setting.


MENU OPTIONS SETTINGS
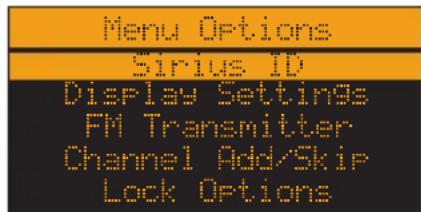
The following options are included on the Menu Options list:
• SIRIUS ^® ID
- Display Settings
• FM Transmitter
- Channel Add/Skip
- Lock Options
- Audio Level
- Antenna Aiming
- Memory Options
- Time Features
- Factory Default
BASIC SETTING PROCEDURE
- Press the Menubutton. The Menu Options list is displayed on the screen.
- Press the ^ or CH button to select a desired item
- Press the SELECT button, and the selected Option Setting pops up.
- Set the Option Setting to your preference according to the steps described below.
- To exit the Menu Options list, press and hold the MENU button.
SIRIUS® ID
Refer to "Make a Note of Your Identification Number" for details.
Display Settings

The following adjustments can be made:
- Brightness Control
- Contrast Control
Brightness Control: A 10-segment horizontal bar graph is displayed. Move the < or > left/right directional button to adjust the dimming control function accordingly. By pressing the SELECT or MENU button or by taking no action, you will return to the Menu Operations list.

Contrast Control: A 10-segment horizontal bar graph is displayed. Move the

FM Transmitter

The following adjustments can be made:
- Frequency
• FM On/Off

Frequency: enables you to select any one of the pre-programmed FM channels. Press the CH or V button to select a desired channel, then press the SELECT button to confirm the setting. To exit this function, press MENU or SELECT button.

FM On/Off: To activate/deactivate the FM transmitter.

Channel Add/Skip
You can add or skip new/unwanted channels while tuning. When you enter this option, a channel list is displayed, and the current channel playing will be highlighted.
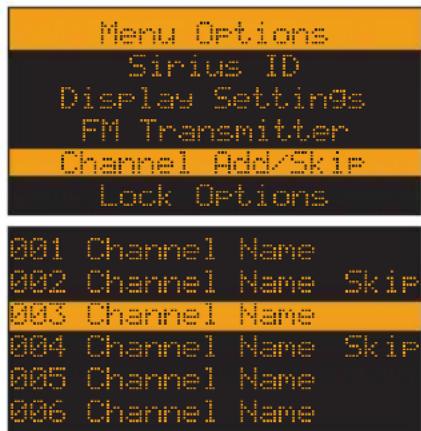
Press the ^ or ^ button to navigate the list and highlight the channel you want to skip, then press the SELECT button to confirm the setting. A "Skip" message pops up next to the channel displayed. To activate the skipped channel again, repeat the same steps and delete the "Skip" message. While adding the channel, the message "Skip" is removed from alongside the channel name, and the system will no longer skip this channel. To exit this function, press MENU button.
Lock Options
Access to particular channels can be set with codes. When you intend to tune in to these particular channels, your receiver will require you to enter the access passwords.

The following adjustments can be made:
- Lock/Unlock
- Edit Code
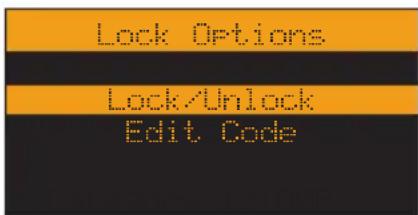
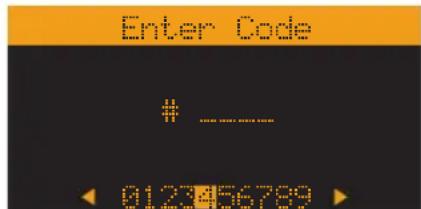
Lock/Unlock: When using Lock/Unlock for the first time, you are asked to type in the 4-digit code that is used to Lock/Unlock the channel access. Press the "0" button four times to enter the default Access Code: 0000
Thereafter, each time you enter this mode, a channel list will be displayed and the currently playing channel will be highlighted. Press the or button to select a channel you want to lock, then press the SELECT button to confirm the setting. The message “Lock” pops up next to the channel.
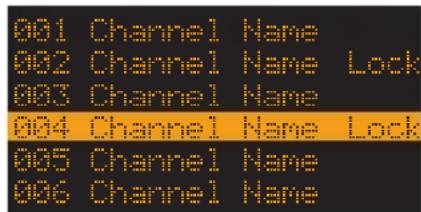
Edit Code: You may change the access password (default code: 0000) to your preference.

- When you enter this mode, press the
left/right directional button to enter the current access code (4-digit default code: 0000 or your previously entered current code) A "New Code" message pops up.

- Enter the numbers for your new access code by using the ≤_CAT or ≥_CAT left/right directional buttons. The confirmation screen will then be displayed.
- Enter the numbers for your new access code again by using ≤ or ≥ left/right directional buttons. Your new access password is now modified.

Audio Level
Your plug and play satellite radio enables you to adjust audio level. When entering this option, a 10-segment horizontal bar graph is displayed on the screen with a (-) sign to the left and a (+) sign to the right.

Press the <CAT or >CAT left/right directional button to adjust the suitable audio level, then press the SELECT button to confirm the setting.

Antenna Aiming
Note: This adjustment setting is required only when you use your device at home. This way, you can assure optimum reception when mounting your SIRIUS® antenna.

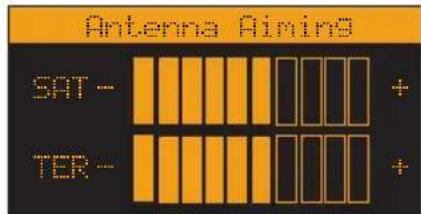
Upon entering this option, two 10-segment horizontal bar graphs are displayed with a (-) sign to the left and a (+) sign to the right. One is labeled "SAT" (satellite signal) and the other "TER" (terrestrial signal strength). The current setting is indicated on the bar graphs. Move the antenna in a location according to the SIRIUS® Satellite Map placement indicated below which provides the strongest signal indication.
SIRIUS® Satellite Map
Due to the paths of SIRIUS® satellites over the US, the best location for the antenna in your home depends on where you live. Use the map below as a general placement guideline.
Area 1 : Place the antenna at an EAST - facing window.
Area 2 : Place the antenna OUTSIDE, away from any overhead obstructions.
Area 3 : Place the antenna at a NORTH WEST - or WEST - facing window.
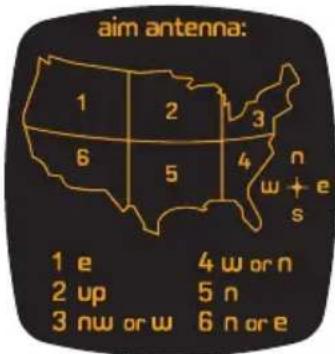
Area 4 : Place the antenna at a WEST - or NORTH - facing window.
Area 5 : Place the antenna at a NORTH - facing window.
Area 6 : Place the antenna at a NORTH - or EAST - facing window.
Memory Options
In this mode, you can activate or deactivate the Memory Search Function (S-seek). You can also remove all of the 18 memory locations.

The following adjustments can be made:
• Auto Memory Search
- Clear All

Auto Memory Search: Press the or button to select either “On” or “Off”, then press the select button to implement the setting.
On: To activate the S-seek function.
Off: To deactivate the S-seek function.

Clear All: Press the or button to select either "Yes" or "No".
The message "Are You Sure?" will pop up on the screen. Press the select button to confirm the setting.
Yes: will REMOVE all recorded channels.
No: will CANCEL the deletion.

Time Features

The following adjustments can be made:
- Clock
- Alarm Clock
- Program Alert
- Auto Shutdown
- Sleep Mode

Clock: This option enables you to set up the time to be displayed on the screen. Time is kept directly by the SIRIUS ^® satellite and is transmitted in GMT FORMAT.
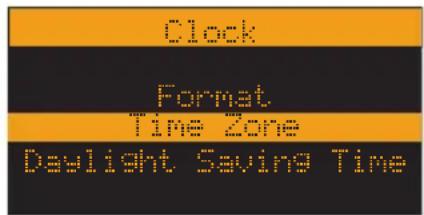
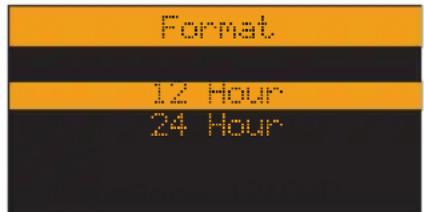
Format: Press the or button to select either the “12 Hour” (default) or the “24 Hour” mode, then press the SELECT button to confirm the setting.
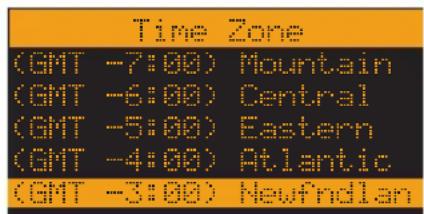
Time Zone: Press the or button to select the correct time zone for your region, then press the select button to confirm the setting.
(GMT -9:00) Alaska
(GMT -8:00) Pacific
(GMT -7:00) Mountain
(GMT -6:00) Central
(GMT -5:00) Eastern
(GMT -4:00) Atlantic
(GMT -3:30) Newfndlan
Daylight Saving Time (DST): Activate this option if your area is subject to DST. Press the ^ or CH button to select "DST Observed" (default) or "DST Not Observed" setting. Then press the SELECT button to confirm the setting.

Alarm Clock: You can set your plug and play satellite radio to turn on at a selected time.
Set Alarm: Press the or button to select either the "On" or "Off"(default) setting, then press the SELECT
button to confirm the setting.

Time: The default time is 12:00 pm. Press the ^ or CH button to adjust the hour. Press the < or > button to adjust the minute. "AM" or "PM" is indicated automatically. Press the SELECT button to confirm the setting.

Program Alert: This option allows your XACT Stream Jockey plug and play satellite radio to tune itself to a pre-selected channel at a pre-selected time.
Note: To use your programmed setting, make sure to set "Program Alert" to "Program Alert On".
The following settings can be made in this sub-menu screen:
• Program Time/Day (default-12:00 PM - Monday)
• Channel Selection (default-Currently Playing Channel)
• Program Alert (default-Off)

Program Time/Day: Press the ^ or ^ button to select either "Time" or "Day". Then press the select button to confirm the setting.

Time: Press the ^ or ^ button to adjust the minute and the < or > button to adjust the hours. Then press the select button. AM or PM displays automatically as you advance the time.

Day: Press the or to navigate the day: Monday, Tuesday, Wednesday, Thursday, Friday, Saturday, Daily or Sunday. Press the SELECT button to confirm the setting.

Channel Selection: Press the or button to scroll through the channel list and select the channel of your preference. Press the SELECT button to confirm the setting.

Program Alert: Press the or to select either the “On” or “Off” setting. Press the SELECT button to confirm the setting.

Auto Shutdown: This option will automatically turn your satellite radio off after an hour of inactivity. An audible tone will sound one minute before your device turns off. Press the or to select the “Enabled” or “Disabled” setting. Press the select button to confirm the setting.

Sleep Mode: When entering this mode, you can program your XACT Stream Jockey satellite radio to shutdown after a pre-selected period of time.
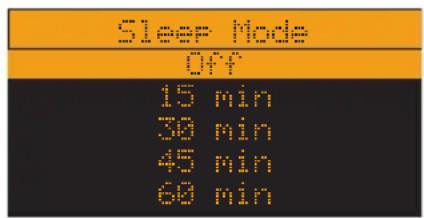
The following adjustments can be made:
Off (default)
15 min.
30 min.
45 min.
60 min.
Press the ^ or CH button to select the time. Press the SELECT button to confirm the setting. Your XACT Stream Jockey satellite radio receiver will now turn off after the selected time has passed. If "Off" is selected, the Sleep Mode will be canceled.
Factory Default
The following items can be reset to their default mode. A message will pop up that reads "Restore Settings?" before you can reset the item to its default mode.
Press the _CH or button to select either "Yes" (to reset) or "No" (to cancel the reset). Press the SELECT button to confirm the setting.
Items revert to their original factory settings as follows:
All Presets revert to empty
Display Dimming to 70%
Display Contrast to 50%
FM Transmitter to "On"
Audio Output Level to 50%
Access to all skipped streams restored
Memory Search On
Memory locations will be erased
12-Hour Clock Format
Eastern time zone
Daylight savings time observed
Alarm Off
Alarm Time 12:00pm
Program Alert Time 12:00pm
Program Alert Day Monday
Program Alert Channel Number (current)
Auto Shutdown Off
Sleep Mode Off
Default Font Size/Type "5x7"
All preset channels and stored artists/composers and songs will also be removed, and all skipped channels will become “un-skipped” (locked channels remain locked).
DISPLAY MESSAGES
Acquiring Signal
When the audio signal is lost, a pop-up window with the message “Acquiring Signal” is displayed until the signal is recovered.

Antenna Not Detected
When no antenna is detected and the signal is lost, a pop-up window with the message “Antenna Not Detected” is displayed until an antenna is detected and the signal is acquired.

Updating Channels
When a GCI (Global Control Information) update from the SIRIUS ^® broadcast system is detected, a pop-up window with the message “Updating Channels X% Completed” is displayed until the GCI update is complete.

Subscription Updated
When a subscription update (PSV) from the SIRIUS ^® broadcast system is detected, a pop-up window with the message “Subscription Updated Anykey to Continue” is displayed for at least 3 seconds.

Mute
A single press of the "Mute" button will temporarily disable all analog and digital outputs from your device. Use your remote control to implement this operation.

Keypad Lock
You can temporarily lock the panel or front panel controls of your XACT Stream Jockey satellite radio receiver. Simultaneously press the ⏻ and ⏻ volume control buttons to activate the keypad lock function.
PROBLEM SOLVING
Problem Solving Section
For your assistance, we have listed a few common problems below.
The Satellite Receiver does not work.
Please check the Power Cables. Make sure you have contacted SIRIUS ^® to activate your Satellite Radio subscription 1-888-539-SIRIUS (7474).
I have no sound from my Satellite Receiver.
Check the audio cables and make sure they are plugged in correctly.
Check the FM Transmitter Setting and make sure that your FM radio is set to the correct channel.
The LCD displays Acquiring Signal.
When the audio signal is lost, a pop-up window with the message “Acquiring Signal” is displayed until the signal is recovered.
The LCD Displays Antenna not Detected.
When no antenna is detected and the signal is lost, a pop-up window with the message “Antenna Not Detected” is displayed until an antenna is detected and the signal is acquired.
Reception is weak or the audio has static and is unclear.
Check that the satellite antenna is connected and not faulty. Change the location of the Antenna making sure it is away from obstructions, see page 26.
WARRANTY
Warranty Information
XACT Communication
One-Year Limited Warranty
This limited warranty sets forth all XACT Communication responsibilities regarding your product. There are no other expressed or implied warranties from XACT Communication.
Warranty Service Provided
If you purchased the product new from a retail vendor, XACT Communication warrants the equipment against defects in material and workmanship for a period of one (1) year from the original date of purchase. This warranty is in lieu of all other express warranties. This warranty begins when you purchase the product and continues for one (1) year unless you sell or rent the unit, in which case the warranty stops.
XACT Communication disclaims any implied warranty, including the warranty of merchantability and the warranty of fitness for a particular purpose, as of the date of one year from your original purchase of the product XACT Communication assumes no responsibility for any special, incidental, or consequential damages.
This warranty gives you specific legal rights and you may have other rights which vary from state to state. Some states do not allow the exclusion or limitations of special, incidental, or consequential damages or limitations on how long a warranty lasts, so the above exclusion or limitation may not apply to you.
Warranty Service Not Provided
This warranty does not cover damage resulting from accident, misuse, abuse, improper installation or operation, lack of reasonable care, unauthorized modification, or the affixing of any attachment not provided by XACT Communication with the equipment, and/or loss of parts. This warranty is voided in the event any unauthorized person opens, alters, or repairs the product.
All XACT Communication equipment being returned for repair must be suitably packaged.
WARRANTY
What To Do for Warranty Service
During the first thirty (30) days, a defective product is eligible for over-the-counter exchange at the retailer from whom it was purchased. After thirty (30) days, the defective product should be returned to the authorized service center. Please allow a minimum of 2-3 weeks for the return of your product. For the shipping address of the authorized service center, call one of the telephone numbers given below.
Your product will be repaired or replaced if examination by the service center determines the product is defective. Products received damaged as a result of shipping will require you to file a claim with the carrier prior to repair. A product received with missing parts or with damage due to abuse, inadequate packing or some other noncompliance with this limited warranty will be returned to you C.O.D., freight collect.
NOTE: A product received which was not made by XACT Communication or which is not defective as determined by our test procedures will not be repaired and will be returned to you C.O.D., freight collect.
To Obtain Warranty Service
- Provide proof of the date of purchase within the package.
- Prepay all shipping costs to the authorized service center.
- Include a return shipping address within the package.
Please retain your sales receipt, the carton, the packing materials, and the printed material. The original carton is the best shipping container for the Product should you have to return it.
For your reference:
Model Number
ESN Number
S/N Number
Date of Purchase ____
Name of Dealer
XACT Communication Customer Service Telephone Number: 1-866-466-XACT (9228)
OUTSIDE THE U.S.A. AND CANADA CALL: 1-212-481-7950
Visit Us on the Web: www.getxact.com
To activate your Satellite Radio Receiver or for latest news and questions regarding SIRIUS® Satellite Radio service visit sirius.com or call 1-888-539-SIRIUS (7474).


Call Toll Free 1-866-466-XACT (9228)
or Visit our Website:
www.getxact.com
- Satellite Radio Products
- Instruction Manual
- Model XTR1
- KEEPMOVING
- COPYRIGHT / TRADEMARKS
- SAFETY PRECAUTIONS
- Warning
- Danger
- Caution
- TABLE OF CONTENTS
- Introduction Page 3
- Components Guide Page 4
- Getting Started Page 6
- Searching for Music Page 13
- INTRODUCTION
- Product Overview
- COMPONENTS GUIDE
- Wireless Remote Control
- GETTING STARTED
- Mounting Your XACT Stream Jockey Satellite Radio at Home
- Mounting Your XACT Stream Jockey Satellite Radio in a Vehicle
- Activating Your SIRIUS® Subscription
- Make Note of Your Identification Number
- IF YOU HAVE PURCHASED A VEHICLE KIT
- INSTALLATION
- IF YOU HAVE PURCHASED A HOME KIT
- IF YOU HAVE PURCHASED A UNIVERSAL KIT
- IF YOU HAVE PURCHASED A Boom Box KIT
- BASIC OPERATIONS
- Tuning to Different Entertainment Categories
- Searching Music
- Searching For Music By Channel (Channel List)
- Searching For Music By Artist/Composer (Artist/Composer List)
- Searching For Music By Song (Song Title List)
- Direct Tuning
- __
- Presetting Channels
- Searching for a Preset Channel/Artist/Song
- S-Seek Function\_MEMO (Memory Search) Button
- To Store the Information
- What If You Have Already Recorded the Same Artist/Song?
- What If the Program Storage is Full?
- Performing the S-Seek Function
- MENU OPTIONS SETTINGS
- BASIC SETTING PROCEDURE
- SIRIUS® ID
- Display Settings
- FM Transmitter
- Channel Add/Skip
- Lock Options
- ......
- Audio Level
- Antenna Aiming
- SIRIUS® Satellite Map
- Memory Options
- Time Features
- Factory Default
- DISPLAY MESSAGES
- Acquiring Signal
- Antenna Not Detected
- Updating Channels
- Subscription Updated
- Mute
- Keypad Lock
- PROBLEM SOLVING
- Problem Solving Section
- The Satellite Receiver does not work.
- I have no sound from my Satellite Receiver.
- The LCD displays Acquiring Signal.
- The LCD Displays Antenna not Detected.
- Reception is weak or the audio has static and is unclear.
- WARRANTY
- Warranty Information
- XACT Communication
- Warranty Service Provided
- Warranty Service Not Provided
- What To Do for Warranty Service
- To Obtain Warranty Service
- For your reference:
Brand : Xact
Model : XTR1
Category : Radio