
PRO CMP-3T - Vacuum Cleaner CleanMax - Free user manual and instructions
Find the device manual for free PRO CMP-3T CleanMax in PDF.


| Product Type | Upright vacuum cleaner |
| Brand | CleanMax |
| Model | PRO CMP-3T |
| Voltage | 120 V AC |
| Power Cord Length | Approx. 25 ft (7.6 m) |
| Weight | Approx. 15 lbs (6.8 kg) |
| Dimensions (H x W x D) | Approx. 44 x 12 x 12 in (112 x 30 x 30 cm) |
| Bag Type | Paper or HEPA media bag (Part # CMP-12 or CMH-6) |
| Filter Type | HEPA media filter (Part # CMPS-HEPA) + Electrostatic secondary filter (Part # CMPS-SF) |
| Bag Capacity | Approx. 3.5 L (estimated) |
| Nozzle | Automatic self-adjusting |
| Edge Cleaning | Yes (right side) |
| Handle Positions | 3 (upright, middle, low) |
| On-Board Tools | Metal wand, stretch hose, dusting brush, crevice tool |
| Thermal Protection | Manual reset thermal fuse |
| Warranty | 1 year limited |
| Grounding | 3-prong plug, grounded outlet required |
| Certifications | California Proposition 65 compliant |
Frequently Asked Questions - PRO CMP-3T CleanMax
User questions about PRO CMP-3T CleanMax
0 question about this device. Answer the ones you know or ask your own.
Ask a new question about this device
Download the instructions for your Vacuum Cleaner in PDF format for free! Find your manual PRO CMP-3T - CleanMax and take your electronic device back in hand. On this page are published all the documents necessary for the use of your device. PRO CMP-3T by CleanMax.
USER MANUAL PRO CMP-3T CleanMax
natural_image
Line drawing of a vacuum cleaner with attached armrests and control panel (no text or symbols)Before operating the vacuum, please read these instructions completely.
Important Safety Instructions.... 2
Grounding Instructions. 3
Parts Identification. 4-5
Replacement Bags/Filters. 4-5
How to Assemble and Operate the Vacuum. 6
How to Change the Vacuum Bag. 7
How to Change the Filters. 7
Handle Adjustments. 8
Automatic Self-Adjusting Nozzle. 8
On-Board Tool Cleaning. 9
How to Replace the Vacuum Belt ....10
How to Clean the Nozzle Hose. 11
Thermal Fuse Protection. 12
For Best Performance....12
Warranty. 13
Customer's Record
The model and serial number of this product may be found on the back of the unit. Register your vacuum as soon as possible at CleanMaxVacuums.com for your protection. Also, note the model and serial numbers on your vacuum in the spaces provided below, and retain this book as a permanent record of your purchase.
Model Number: ____
Serial Number: ____
Date Purchased: ____
This vacuum cleaner is a product of high-quality materials and superior workmanship. We urge you to read these operating instructions carefully before you use this vacuum cleaner in order to obtain the full performance and satisfaction it can offer you.
Save These Instructions
Before you plug in this vacuum cleaner, make sure the voltage indicated on the rating plate located on the back of the vacuum cleaner is the same as your local supply.
When using an electrical appliance, basic precautions should always be followed, including the following:
READ ALL INSTRUCTIONS BEFORE USING THIS APPLIANCE
IMPORTANT:
The manufacturer cannot accept responsibility for damage caused when the appliance is not used according to the instructions, or for uses other than those for which it was intended.
WARNING: To reduce the risk of fire, electric shock or injury:
- Do not leave appliance when plugged in. Unplug from outlet when not in use and before servicing.
- Do not use outdoors or on wet surfaces.
- Do not allow to be used as a toy. Close attention is necessary when used by or near children.
- Use only as described in this manual.
- Do not use with damaged cord or plug. If appliance is not working as it should, has been dropped, damaged, left outdoors, or dropped into water, return it to the distributor where purchased for service.
- Do not pull or carry by cord, use cord as a handle, close a door on the cord, or pull cord around sharp edges or corners. Do not run appliance over cord. Keep cord away from heated surfaces.
- Do not unplug by pulling on cord. To unplug, grasp the plug, not the cord.
- Do not handle plug or appliance with wet hands.
- Do not put any object into openings. Do not use with any opening blocked; keep free of dust, lint, hair and anything that may reduce air flow.
- Keep hair, loose clothing, fingers and all parts of body away from openings and moving parts.
- Do not pick up anything that is burning or smoking, such as cigarettes, matches or hotlashes.
-
Do not use without vacuum bag in place.
-
Turn off all controls before unplugging.
- Use extra care when cleaning on stairs.
- Do not use to pick up flammable or combustible liquids such as gasoline or use in areas where they may be present.
- Do not attempt to service the unit while appliance is plugged in.
- Connect to a properly grounded outlet only. See Grounding Instructions.
- Make sure your extension cord is in good condition and is the correct size for your appliance, i.e. 16 AWG. If in doubt, use the next heavier gage. The smaller the gage number, the heavier the cord. An undersized extension cord will cause a drop in line voltage resulting in loss of power and overheating.
- Use only three-wire outdoor extension cords that have three-prong grounding plugs and grounding receptacles that accept the appliance's plug.
- Warning - To reduce the risk of personal injury due to a loose electrical connection between the appliance's plug and extension cord, firmly and fully attach the appliance plug to the extension cord. Periodically check the connection while operating to ensure it is fully attached. Do not use an extension cord that provides a loose connection. A loose connection may result in overheating, fire, and increases the risk of a burning.
- To reduce the risk of disconnection of the appliance cord from the extension cord during operating, secure the extension cord to the appliance plug as shown or described in the Operating Instructions
This appliance must be grounded. If it should malfunction or break down, grounding provides a path of least resistance for electric current to reduce the risk of electric shock. This appliance is equipped with a cord having an equipment-grounding conductor and grounding plug. The plug must be plugged into an appropriate outlet that is properly installed and grounded in accordance with all local codes and ordinances.
This appliance is for use on a nominal 120 volt circuit and has a grounding attachment plug that looks like the plug illustrated in Fig. 1. Make sure that the appliance is connected to an outlet having the same configuration as the plug. No adapter should be used with this appliance.
Warning - Improper connection of the equipment-grounding conductor can result in a risk of electric shock. Check with a qualified electrician or service person if you are in doubt as to whether the outlet is properly grounded. Do not modify the plug provided with the appliance. If it will not fit the outlet, have a proper outlet installed by a qualified electrician.

Fig. 1
State of California Proposition 65 Warnings: WARNING: This product contains one or more chemicals known to the State of California to cause cancer. WARNING: This product contains one or more chemicals known to the State of California to cause birth defects or other reproductive harm.
Model CMP-3QD

Replacement Bags and Filters
• Genuine CleanMax Vacuum Paper Bags Part # CMP-12 (12 per package)
• Genuine CleanMax Vacuum HEPA Media Bags Part # CMH-6 (6 per package)
• Genuine CleanMax Vacuum Belt Part # B014-0714
• Genuine CleanMax Vacuum Filters Part # CMPS-HEPA (1 per package) (HEPA Media Filter)
Part # CMPS-SF (1 per package) (Electrostatic Secondary Filter)
Models CMP-3T and CMP-3N
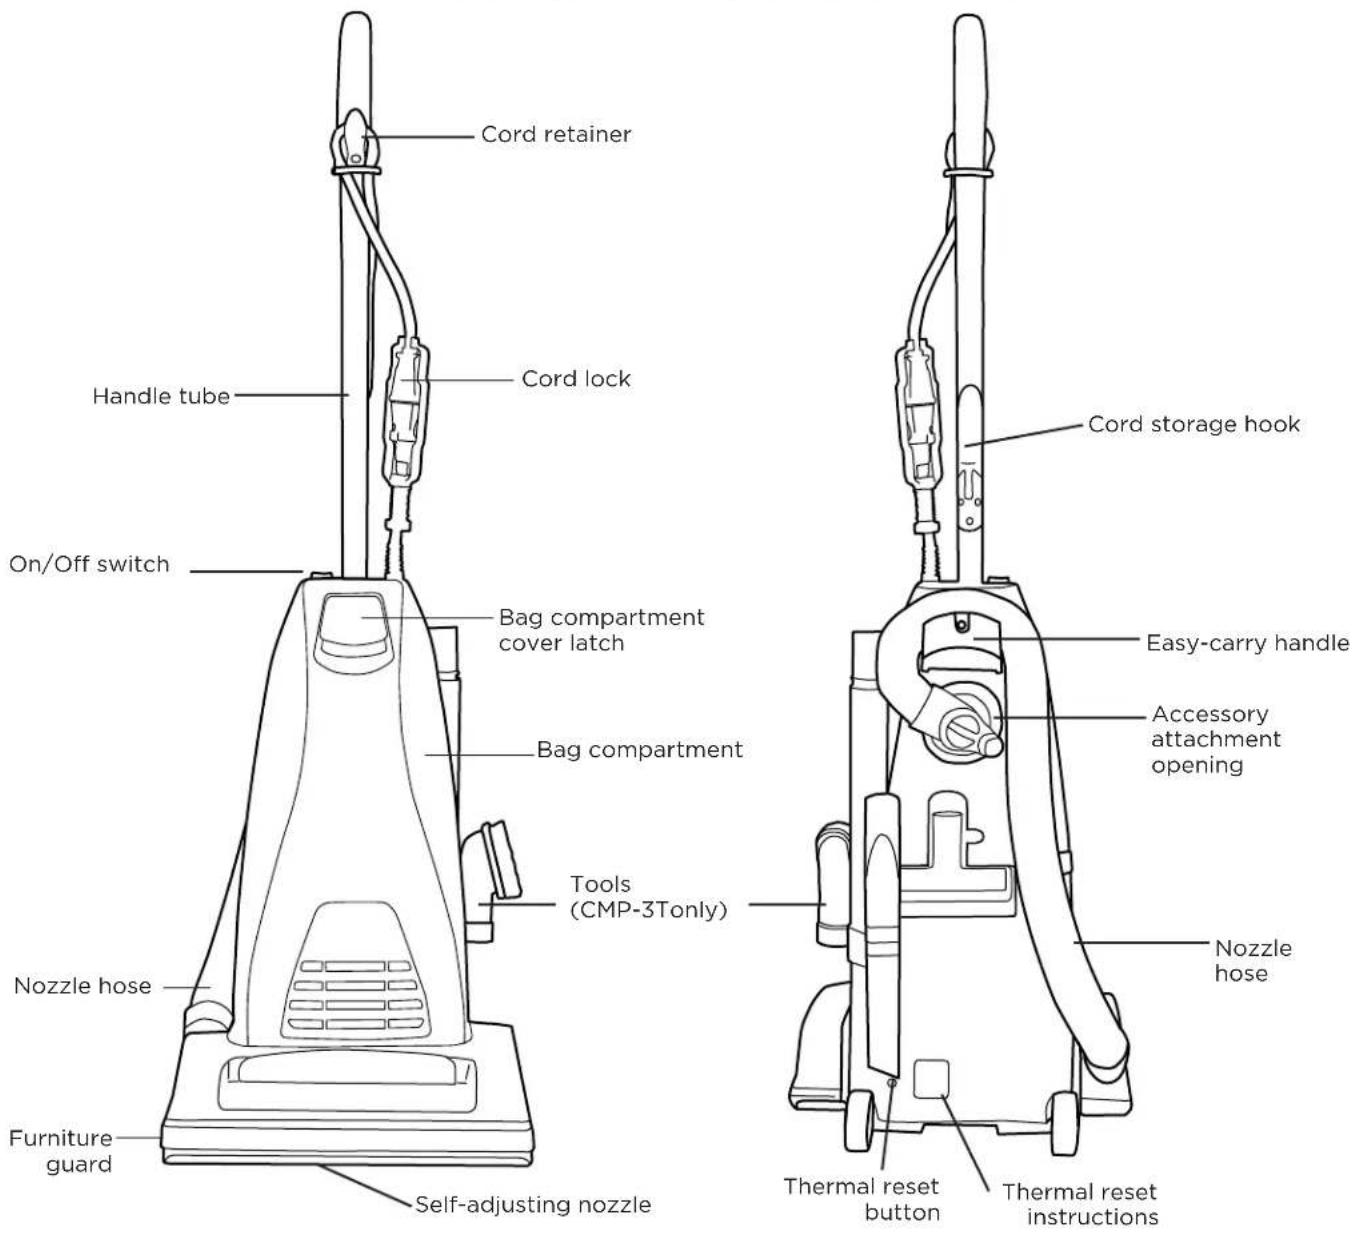
Replacement Bags and Filters
• Genuine CleanMax Vacuum Paper Bags Part # CMP-12 (12 per package)
• Genuine CleanMax Vacuum HEPA Media Bags Part # CMH-6 (6 per package)
• Genuine CleanMax Vacuum Belt Part # B014-0714
• Genuine CleanMax Vacuum Filters Part # CMPS-HEPA (1 per package) (HEPA Media Filter)
Part # CMPS-SF (1 per package) (Electrostatic Secondary Filter)
How to Attach the Handle to the Vacuum Cleaner
The vacuum cleaner and the handle are packed separately.
- Remove the handle screw, insert handle into the hole on top of the vacuum cleaner (Fig. 1).
- Line up the small hole on the handle with the small hole on the vacuum cleaner, and insert the screw. Make sure the screw is tightened securely.
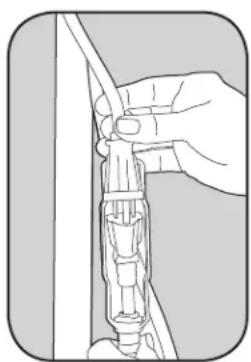
How to Attach the Extension Power Cord to the Cord Lock
- Connect the extension power cord to the pigtail cord on the vacuum.
- Snap the extension power cord into the slot on the end of the cord lock.
- Turn the knob on the bottom of the cord lock to tighten the lock and prevent the cords from pulling apart (Fig. 2).
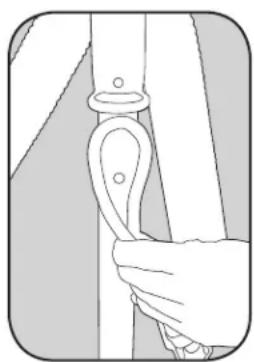
How to Attach the Cord to the Retainer Hook on the Handle
- Create a loop in the power cord, and push it through the slot and over the hook of the cord retainer (Fig. 3).
- Pull down on the power cord to remove any slack (Fig. 4).
On/Off Switch
- To turn the vacuum on, push the switch located on the dust compartment to the (1) position (Fig. 5).
- To turn the vacuum off, push the switch located on the dust compartment on the (0) position.
Full Bag Indicator (Model CMP-3QD)
The full bag indicator is designed to show when the bag is full or when there is a clog in the vacuum. (Fig. 5).
-
If the indicator light illuminates, change the vacuum bag. If the bag isn't full, check the hose for a clog.
-
When cleaning with a tool, the indicator light may illuminate. In this case, continue cleaning.

natural_image
Line drawing of a medical or laboratory tool with a curved handle and attached clip (no text or symbols)Fig. 1
natural_image
Illustration of a hand connecting a cable to a connector (no text or symbols visible)Fig. 2 Fig. 3
natural_image
Illustration of a hand holding a belt buckle (no text or symbols)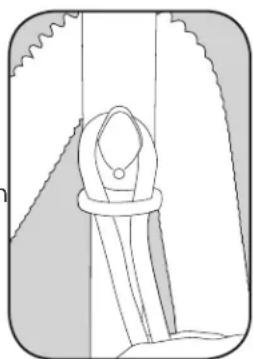
natural_image
Simple line drawing of a tool or device with a handle and blade, no text or symbols present.Fig. 4

natural_image
Diagram of a mechanical assembly with a lever and pivot point (no text or symbols)Fig. 5
Always operate the vacuum cleaner with a vacuum bag installed. Bags should be changed when they are 2/3 full.
To Change the Vacuum Bag
- Unplug the vacuum cleaner. Remove the bag compartment cover, and remove the used bag from the bag holder (Fig. 1).
- Attach the new vacuum bag onto the bag holder (Fig. 2).
- Pull the bottom corners of the new vacuum bag (Fig. 3).
- Reinsert the tabs on the end of the bag compartment cover into the grooves on the bag compartment housing. Press it into place, and fasten the bag compartment cover latch tightly (Fig. 4).

natural_image
Illustration of a person inserting a bag into a container (no text or symbols)Fig. 1

natural_image
Simple line drawing of a hand holding a bag, no text or symbols presentFig. 2

natural_image
Diagram of a folded garment with two arrows indicating measurement or direction (no text or symbols)Fig. 3

natural_image
Illustration of a hand holding a small object over a surface, possibly a container or device (no text or symbols visible)Fig. 4
How to Change the Filters
This vacuum cleaner is equipped with a secondary filter and a post filter. Filters should be changed approximately once a year, or as needed.
To Change the Secondary Filter
- Unplug the vacuum cleaner. Lift the latch to remove the bag compartment cover, and remove the bag.
- Remove the secondary filter, and replace it with a new filter (Fig. 5).
- Replace the bag and bag compartment cover.
To Change the Post Filter
- Unplug the vacuum cleaner. Lift the latch to remove the bag compartment cover.
- Remove the foam filter from the front of the bag compartment (Fig. 6).
- DO NOT THROW AWAY THE FILTER HOLDER.
- Insert a new filter, and replace the bag compartment cover.

natural_image
Line drawing of a hand holding a tray with a grid-patterned panel inside a rectangular device (no text or symbols)Fig. 5

natural_image
Line drawing of a hand holding a grid-based device with a handle (no text or symbols)Fig. 6
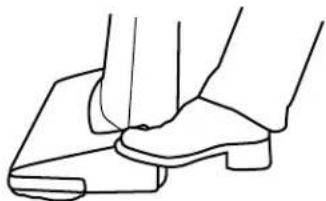
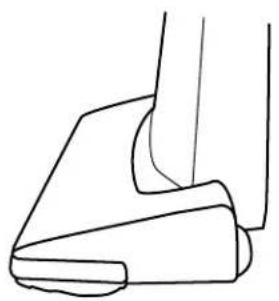
The handle on this vacuum cleaner can be set to one of three positions - upright, middle or low.
How to Adjust the Handle
- To release the handle, step on the left rear corner of the vacuum cleaner nozzle (Fig. 1).
- Upright position - when cleaning tools are being used or for storage (Fig. 2). Handle locks in this position.
- Middle position - for normal cleaning (Fig. 3).
- Low position - for cleaning under furniture (Fig. 4).
natural_image
Line drawing of a person's foot stepping on a wooden plank (no text or symbols)Fig. 1
natural_image
Line drawing of a mechanical component or bracket (no text or symbols)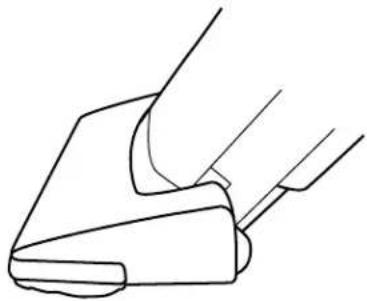
natural_image
Line drawing of a mechanical component or tool (no text or symbols)
natural_image
Pure line drawing of a mechanical component or tool (no text or symbols)The edge cleaning feature provides improved cleaning of carpets near walls and stationary furniture. For maximum edge cleaning, position the right side of the vacuum (from the user's perspective) near walls or stationary furniture.
Automatic Self-Adjusting Nozzle
This vacuum cleaner is designed with an automatic self-adjusting nozzle. No manual adjustments are required. The height of the nozzle is instantly and automatically adjusted to carpet pile height. This self-adjusting feature allows the nozzle to float evenly over all carpet pile surfaces.
Model: CMP-3QD
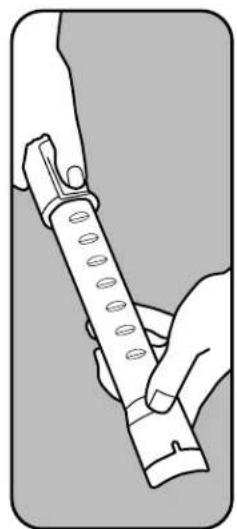
This model is equipped with on-board cleaning tools including a metal telescopic Quick Draw wand, stretch hose, dusting brush and crevice tool.
- To use the cleaning tools, lift the hose handle straight up from the vacuum (Fig. 1).
- Extend the wand by pulling the button back and pushing the end of the wand forward (Fig. 2).
- Attach any of the on-board tools to the end of the wand or directly onto the hose handle (Fig. 4) and (Fig. 5).
Model: CMP-3T
This model is equipped with on-board cleaning tools including a metal wand, stretch hose, dusting brush and crevice tool.
- Remove the stretch hose from the nozzle of the vacuum (Fig. 3).
- Attach any of the on-board tools to the end of the wand or directly onto the house cuff (Fig. 4) and (Fig. 5).

natural_image
Technical line drawing of a mechanical device with no visible text or symbolsFig. 1
natural_image
Illustration of hands holding a flutes or musical instrument (no text or symbols visible)Fig. 2

natural_image
Line drawing of a person inserting a small object into a car seat (no text or symbols)Fig. 3

natural_image
Illustration of hands performing a manual task with a tool (no text or symbols visible)Fig. 4 Fig. 5

natural_image
Illustration of hands holding a tool with a curved tube, no text or symbols presentCAUTION: Unplug the vacuum cleaner before performing any of these steps.
How to Remove the Bottom Plate
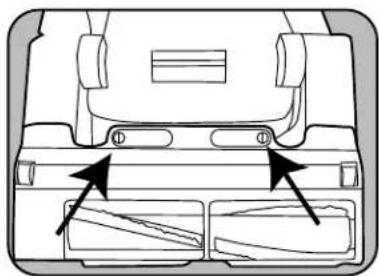
- Place the vacuum cleaner in the low position by pressing the foot pedal release twice while reclining the handle. Turn the vacuum over.
- Remove the two screws holding the bottom plate in place (Fig. 1).
- Remove the bottom plate.
How to Replace the Belt
- Turn the vacuum cleaner over and remove the bottom plate as described in the above section.
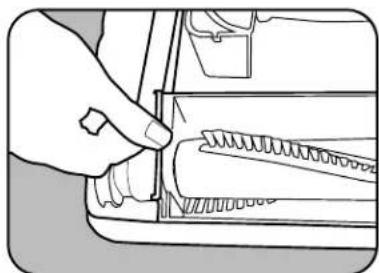
- Remove the belt guard (Fig. 2). Remove the brushroll by pulling it straight out (Fig. 3).
- Remove the belt from the brushroll.
- Loop a new belt over the motor pulley (Fig. 4) and over the end of the brushroll.
- Stretch the belt while inserting the brushroll back into the nozzle housing.
- Reinsert the belt guard.
- Spin the brushroll by hand to make sure it turns smoothly and the new belt is properly aligned.
- Replace the bottom plate by hooking the front end of the plate into the two ribs on the front end of the nozzle housing. Press the bottom plate into place and fasten it with the two screws.
NOTE: To ensure maximum cleaning efficiency, check the belt regularly to ensure it is in good condition. Replace the belt if it is stretched, cracked or if excessive slipping is occurring.
natural_image
Diagram of a vehicle rear bumper with two internal compartments and directional arrows indicating movement or force (no text or symbols)Fig. 1
natural_image
Illustration of a hand inserting a spring into a mechanical component (no text or symbols)Fig. 2

natural_image
Illustration of a hand using a tool to adjust or install a mechanical component (no text or symbols visible)Fig. 3

natural_image
Technical line drawing of a mechanical assembly with no visible text or symbolsFig. 4
CAUTION: Unplug the vacuum cleaner before performing any of these steps.
The nozzle hose carries the dirt from the nozzle to the vacuum bag. If the hose should become clogged:
Model: CMP-3QD
- Remove the wand from the wand/hose holder.
- Squeeze the tabs on both sides of the quick clean-out port and pull away from the vacuum (Fig. 1).
- Check above and below the port opening for obstructions.
- Remove any obstructions.
- Replace the quick clean-out port by squeezing both tabs and pushing the hose back into the wand/hose holder. Replace the wand.
Model: CMP-3N
- Pull out and turn the lid of the accessory attachment opening. Remove the clog or blockage (Fig. 2).
Model: CMP-3T
- Pull out and turn the lid of the accessory attachment opening. Remove the clog or blockage (Fig. 2).
- If the above step is not enough, remove hose cuff from the attachment port inlet (Fig. 3). If you haven't located the clog, turn the vacuum cleaner over and remove the bottom plate. Check nozzle inlet tube for obstructions (Fig. 4). Clear tube and reinstall the bottom plate.

natural_image
Illustration of a hand operating a mechanical component with threaded end (no text or symbols)Fig. 1

natural_image
Simple line drawing of a hand holding a circular object with a rectangular block above (no text or symbols)Fig. 2

natural_image
Illustration of a hand holding a cylindrical object with a bulb above it, no text or symbols presentFig. 3

natural_image
Technical illustration of a mechanical assembly with a hand holding a threaded component (no text or symbols visible)Fig. 4
This vacuum cleaner comes equipped with a Manual Reset Thermal Fuse Protector. The thermal protector is designed to protect the vacuum cleaner from overheating due to a cutoff in airflow (i.e. clogged hose, operating the vacuum without a bag). Should this situation occur, the thermal fuse protector will safely shut off the vacuum cleaner to avoid any potential damage.
To Reset the Thermal Fuse
- Unplug the vacuum cleaner.
- Check for problem (over-filled bag, clog in hose, clogged filters, etc.).
- Correct problem.
- Locate "tripped" fuse — the small red or white button located on the lower left side on the back of the main body (roughly one inch to the right of the left wheel).
- Using a pencil, paper clip, or other pointy object, push the reset button.
- Plug vacuum cleaner in and begin using.
Please return to a Service Center if the problem continues or if you have any questions.
For Best Performance
- Keep machine and all accessories clean and in good operating condition.
- Change vacuum bags when they are 2/3 full to maintain optimum cleaning efficiency.
- Change filters when dirt is visible on them or every six months if someone in your home suffers from allergies. Otherwise, once a year should do for replacing the filters.
- Always use genuine bags, filters and parts, as use of other products may result in poor cleaning or filtration performance. filtration products are designed for maximum performance.
- Store machine carefully in dry area.
- For optimum cleaning performance and safety, follow your owner's manual.
What Is Covered:
This warranty covers any defects in material and workmanship in your new vacuum.
How Long Coverage Lasts:
Warranty coverage for the vacuum lasts one year.
What Is Not Covered:
- Damage to the vacuum that occurs from neglect, abuse, alterations, accident, misuse or improper maintenance.
- Normal replacement items: disposable vacuum bags, disposable filters and belts.
What CleanMax Will Do:
This warranty provides, at no cost to you, all labor and parts to keep this vacuum in proper operating condition during the warranted period.
How to Get Service:
Warranty service can only be obtained by presenting the vacuum to a Service Center. A proof-of-purchase and product serial number will be required before service is rendered.
THIS WARRANTY IS EXCLUSIVE AND IN LIEU OF ANY AND ALL OTHER WARRANTIES WHETHER WRITTEN, ORAL, EXPRESSED OR IMPLIED, (INCLUDING ANY WARRANTY OF MERCHANTABILITY OR FITNESS FOR A PARTICULAR PURPOSE). THIS WARRANTY DISCLAIMS LIABILITY FOR INCIDENTAL OR CONSEQUENTIAL DAMAGES.
How State Law Applies:
This warranty gives you specific legal rights, and you may also have other rights that vary from state to state.
CLEANMAX
CleanMax Vacuum Cleaners
PO Box 730
Fenton, MO 63026
cleanmaxvacuums.com



- Customer's Record
- Save These Instructions
- READ ALL INSTRUCTIONS BEFORE USING THIS APPLIANCE
- IMPORTANT:
- WARNING: To reduce the risk of fire, electric shock or injury:
- Replacement Bags and Filters
- How to Attach the Handle to the Vacuum Cleaner
- How to Attach the Extension Power Cord to the Cord Lock
- How to Attach the Cord to the Retainer Hook on the Handle
- On/Off Switch
- Full Bag Indicator (Model CMP-3QD)
- To Change the Vacuum Bag
- How to Change the Filters
- To Change the Secondary Filter
- To Change the Post Filter
- How to Adjust the Handle
- Automatic Self-Adjusting Nozzle
- Model: CMP-3QD
- Model: CMP-3T
- How to Remove the Bottom Plate
- How to Replace the Belt
- Model: CMP-3N
- To Reset the Thermal Fuse
- For Best Performance
- What Is Covered:
- How Long Coverage Lasts:
- What Is Not Covered:
- What CleanMax Will Do:
- How to Get Service:
- How State Law Applies:
- CLEANMAX
Brand : CleanMax
Model : PRO CMP-3T
Category : Vacuum Cleaner