
Zoom ZM-800 - Vacuum Cleaner CleanMax - Free user manual and instructions
Find the device manual for free Zoom ZM-800 CleanMax in PDF.


| Product Type | Vacuum Cleaner |
| Model | Zoom ZM-800 |
| Brand | CleanMax |
| Dimensions (L x W x H) | 40 x 30 x 50 cm |
| Weight | 5.2 kg |
| Power Supply | 220-240V, 50/60Hz |
| Power Consumption | 1200 W |
| Dust Capacity | 2.5 L |
| Filtration System | HEPA 13 filter |
| Noise Level | 78 dB(A) |
| Cord Length | 8 m |
| Suction Power | 350 AW |
| Type | Canister (cylinder) |
| Main Functions | Dry vacuum cleaning for carpets and hard floors |
| Accessories Included | Crevice tool, brush nozzle, upholstery tool |
| Maintenance | Empty dust container after each use; clean filter monthly |
| Cleaning Instructions | Wipe exterior with damp cloth; do not immerse |
| Safety Features | Overheat protection, automatic shut-off |
| Spare Parts | Available: filters, dust bag, brush roll |
| Repairability | Repairable by authorized service centers |
| General Information | Designed for household use; energy class A |
Frequently Asked Questions - Zoom ZM-800 CleanMax
User questions about Zoom ZM-800 CleanMax
0 question about this device. Answer the ones you know or ask your own.
Ask a new question about this device
Download the instructions for your Vacuum Cleaner in PDF format for free! Find your manual Zoom ZM-800 - CleanMax and take your electronic device back in hand. On this page are published all the documents necessary for the use of your device. Zoom ZM-800 by CleanMax.
USER MANUAL Zoom ZM-800 CleanMax
Owner's Manual for the Cordless


Congratulations!
You have purchased a vacuum cleaner that will provide efficient, dependable service. Your CleanMax vacuum cleaner is made using high quality materials and superior workmanship. Please read these operating instructions carefully before you use your vacuum.
IMPORTANT:
To activate your warranty, within 30 days of purchase, please register your warranty online at cleanmaxvacuums.com.
Please fill out warranty information located on the Owner's Information Section and keep it for your records.
Key Replacement Parts
Genuine Zoom HEPA Media Vacuum Bags: CLH-6
Genuine Zoom Paper Vacuum Bags: B211-8800
Genuine Zoom Vacuum Belts: CMZM-B2
Getting Started
Important Safety Instructions 2
Polarization Instructions 3
Description of the Vacuum 4
Assembling the Vacuum 5
Operation
Battery Charging 6
Battery Life Display 6
Reclining the Handle 6
On/Off Switch 7
Edge Cleaning 7
Automatic Carpet Height Adjustment 7
Bare Floor Cleaning 8
Vacuuming Under Furniture 8
Maintenance and Care
Replacing the Vacuum Bag 9
Removing and Reinstalling the Battery 10
Removing and Reinstalling the Bottom Plate 11
Replacing the Vacuum Belt 12
Replacing the Squeegee 13
For Best Performance 14
Warranty 15
IMPORTANT SAFETY INSTRUCTIONS
When using an electrical appliance, basic precautions should always be followed, including the following:
READ ALL INSTRUCTIONS BEFORE USING THIS APPLIANCE. FOR COMMERCIAL USE ONLY.
IMPORTANT:
The manufacturer cannot accept responsibility for damage
caused when the appliance is not used according to the
instructions, or for uses other than those for which it was intended.
WARNING:
To reduce the risk of fire, electric shock, damage or injury:
- Fully assemble vacuum before operating.
- Use and store in a dry location.
- Do not use outdoors or on wet surfaces.
- Do not allow to be used as a toy. Close attention is necessary when used by or near children.
- Use only as described in this manual.
- Do not use charger with damaged cord or plug. If appliance or charger is not working as it should, has been dropped, damaged, left outdoors, or dropped into water, return it to your Authorized CleanMax Retailer for service.
- Do not pull or carry charger by cord, use cord as a handle, close a door on the cord, or pull cord around sharp edges or corners. Do not run appliance over cord. Keep cord away from heated surfaces.
- Do not unplug charger by pulling on cord. To unplug charger, grasp the plug, not the cord.
- Do not handle charger, including charger plug, and charger terminals with wet hands.
- Do not put any object into openings. Do not use with any opening blocked; keep free of dust, lint, hair and anything that may reduce air flow.
- Keep hair, loose clothing, fingers and all parts of the body away from openings and moving parts.
- Do not pick up anything that is burning or smoking, such as cigarettes, matches or hot ashes.
- Do not use without vacuum bag in place.
- Use extra care when cleaning on stairs.
- Do not use to pick up flammable or combustible liquids such as gasoline or use in areas where they may be present.
- Do not attempt to service the unit while charger is plugged in.
- Do not charge the unit outdoors.
- Only charge in temperatures between 0-45°C (32-113°F).
- Do not open, crush, expose to heat above 100^ C ( 212^ F) or incinerate the battery even if it is severely damaged. The battery can explode in a fire.
- Use only with the Cordless Battery Vacuum Charger supplied - P/N 10201026 Winkind. (C223-2000)
- The battery and charger have no user serviceable parts.
- Batteries must be disposed of responsibly.
- Remove the battery before removing the bottom plate.
Power Cord, 2-Wire Polarized Cord
This product is equipped with a polarized alternating current line plug (a plug having one blade wider than the other). This plug fits into the power outlet only one way. This is a safety feature. If you are unable to insert the plug fully into the outlet, try reversing the plug. If the plug should still fail to fit, contact an electrician to replace the obsolete outlet. Do not defeat the safety purpose of the polarized plug.

natural_image
Line drawing of an electrical outlet with two socket plugs (no text or symbols)State of California Proposition 65 Warnings:
WARNING: This product contains one or more chemicals known to the State of California to cause cancer.
WARNING: This product contains one or more chemicals known to the State of California to cause birth defects or other reproductive harm.


1 Ergonomic Handle
2 On/Off Power Switch
3 Bag Compartment
4 Vacuum Nozzle
5 Headlight
6 Furniture Guard
7 Handle Release Pedal
8 Battery Pack
9 Charge Point
10 Battery Life Display
11 Battery Release Button
12 Carry Handle
13 Charger

natural_image
Pure electrical circuit lines without any symbolsAttaching the Handle to the Vacuum
NOTE: Do not turn on the vacuum until it is completely assembled.
The vacuum cleaner and the handle are packed separately and require assembly.
- Remove the handle bracket by removing the two screws (Fig. 1).
- Place handle onto the back of the vacuum, aligning holes with pegs (Fig. 2).
- Place the handle bracket back into position (Fig. 3).
- Secure with two screws removed in Fig. 1. Tuck the cord into the space to the left of the handle.
- Open the bag compartment to ensure a vacuum bag is in place.
- Your vacuum is now ready for use.
Pre-Charged Battery
The battery is partially charged and will run for a short time. To fully charge the battery see Battery Charging (page 6).

natural_image
Technical line drawing of a mechanical component with mounting holes and internal brackets (no text or symbols)Fig. 1

natural_image
Technical line drawing of a mechanical device with a handle and clamped parts (no text or symbols)Fig. 2

natural_image
Technical line drawing of a mechanical device with a curved handle and clamped components (no text or symbols)Fig. 3
Battery Charging
- The battery is located on the back of the vacuum. It can be charged while installed on the vacuum, or the battery can be removed from the vacuum and charged independently (see Removing and Reinstalling the Battery (page 10).
- Plug the AC cable into the charger and into a wall socket (Fig. 1).
- Plug the charger DC cable into the Charge Point on the battery. (Fig. 2).
- The Charger LED light will be red during charging and will turn green when the battery pack is fully charged.
Battery Life Display
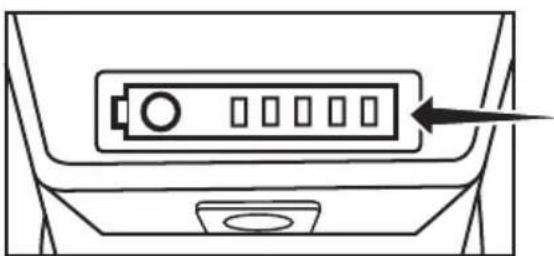
- Press the white button on the battery to illuminate the LED lights.
- When the battery is fully charged there will be four (4) green lights and one (1) red light showing (Fig. 3).
- As the battery is discharged during use, the number of green lights showing will reduce from four (4) to none (0).
- When all of the green lights are off and only the red light is showing, there is a small amount of time remaining before the battery will be fully discharged and will require recharging.
Reclining the Handle
- Press the Handle Release Pedal located on the back of the vacuum with your foot to recline the handle (Fig. 4).

natural_image
Simple line drawing of a rectangular device with a connector and a separate cable with an arrow pointing to it (no text or symbols)Fig. 1

Fig. 2
natural_image
Line drawing of a device rear panel with an arrow pointing to the button (no text or symbols)Fig. 3
natural_image
Technical line drawing of a mechanical component with a highlighted section (no text or symbols)Fig. 4
On/Off Switch
- Turn the switch On to use the vacuum. If the vacuum doesn't turn on, check that the battery is charged (see page 6).
• Always unplug the charger from the Charge Point before use.
Edge Cleaning
The edge cleaning feature provides improved cleaning near walls and stationary furniture. For maximum edge cleaning, place the left side of the nozzle, from the user's perspective, against the wall or stationary furniture (Fig. 2).
Automatic Carpet Height Adjustment
Your vacuum is designed with an automatic self-adjusting nozzle. No manual adjustments are required. The height of the nozzle automatically adjusts to the flooring surface. This self-adjusting feature allows the nozzle to float evenly over all flooring surfaces.

natural_image
Line drawing of a mechanical device with an arrow indicating direction (no text or symbols)Fig. 1

Fig. 2
Bare Floor Cleaning
Your vacuum is equipped with a squeegee to improve its effectiveness in cleaning bare floors (Fig. 1).
Vacuuming Under Furniture
Your vacuum will lay flat on the floor for effective cleaning under beds and tables.
- Press the Handle Release Pedal once for routine vacuuming (Fig. 2).
- Continue to lower the handle to enable the vacuum to lay flat on the floor for cleaning under furniture (Fig. 3).

natural_image
Technical line drawing of a mechanical component with no visible text or symbolsFig. 1

natural_image
Technical line drawing of a mechanical component with no visible text or symbolsFig. 2

natural_image
Line drawing of a mechanical component or device with no visible text or symbolsFig. 3
Replacing the Vacuum Bag
NOTE: Turn the vacuum off and remove the battery.
- Unzip the bag compartment.
- Remove the used vacuum bag by pulling the green bag collar tab away from the vacuum (Fig. 1). Slide the used bag out of the bag holder which automatically seals the bag opening (Fig. 2). Discard the used bag.
- To install a new bag, slide the bottom of the green bag collar into the bag holder until it "snaps" into place (Fig. 3).
- Push the top of the bag collar upward until the collar "snaps" into place on the vacuum (Fig. 4).
- Tuck the bag corners into the bag compartment, then zip the bag compartment closed.

natural_image
Technical line drawing of a mechanical component with an arrow indicating direction (no text or symbols)Fig. 1

natural_image
Technical line drawing of a mechanical device with an arrow indicating motion (no text or symbols)Fig. 2

natural_image
Technical line drawing of a mechanical device with directional arrows indicating movement or force (no text or symbols)Fig. 3

natural_image
Technical line drawing of a mechanical device with an arrow indicating rotation (no text or symbols)Fig. 4
Removing and Reinstalling the Battery
NOTE: Turn the vacuum off. If the battery charger is plugged into the charge point on the vacuum, remove the charger from the charge point before removing the battery.
The battery can be removed and charged independently from the vacuum.
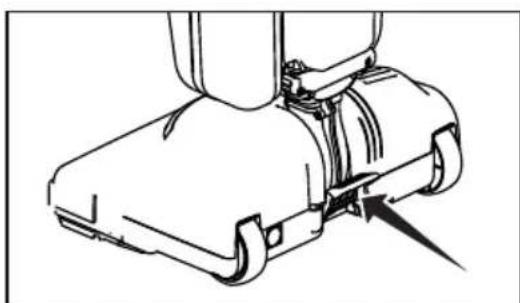
- To remove the battery push up on the release button and lift the battery off (Fig. 1).
- To replace the battery, line up the bottom of the battery with the posts at the base of the battery mount. Push the battery in until it clicks (Fig. 2).

Fig. 1

natural_image
Technical line drawing of a vacuum cleaner device with attached housing (no text or symbols)Fig. 2
Removing and Reinstalling the Bottom Plate
WARNING! To Reduce the Risk of Electrical Shock or Injury from Moving Parts, Turn the Vacuum Off and Remove the Battery Before Servicing or Cleaning the Vacuum.
To Remove the Bottom Plate:
• Make sure the vacuum is turned Off.
- Remove the battery (see Removing and Reinstalling the Battery, page 10).
- Press the handle release pedal to place the vacuum cleaner in the flat position.
- Turn the vacuum cleaner over, exposing the bottom plate.
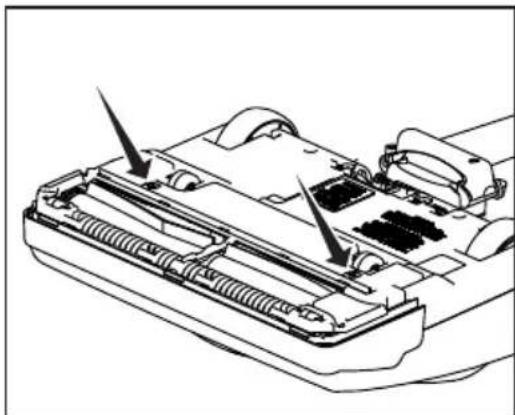
- Turn the two screws a quarter turn to release the bottom plate (Fig. 1). Remove the bottom plate.
To Reinstall the Bottom Plate:
- Align the front edge of the bottom plate into the notches inside the nozzle (Fig. 2).
- Press the bottom plate into position until the plate "clicks" on both sides. Tighten the two screws a quarter turn to secure the bottom plate.
- Replace the Battery (see Removing and Reinstalling the Battery, page 10).
natural_image
Technical line drawing of a mechanical device with internal components and arrows indicating parts (no text or symbols)Fig. 1

natural_image
Technical line drawing of a mechanical assembly with no visible text or symbolsFig. 2
Replacing the Vacuum Belt
WARNING! To Reduce the Risk of Electrical Shock or Injury from Moving Parts, Turn the Vacuum Off and Remove the Battery Before Servicing or Cleaning the Vacuum.
NOTE: To ensure maximum cleaning efficiency, the belt should be checked regularly to be sure it is in good condition. Check to see if the belt is stretched, cracked, or if excessive slipping is occurring. Replace if needed.
- Turn the vacuum off and unplug the charger from the Charge Point.
- Remove the battery (see Removing and Reinstalling the Battery, page 10).
- Remove the bottom plate (see Removing and Reinstalling the Bottom Plate, page 11).
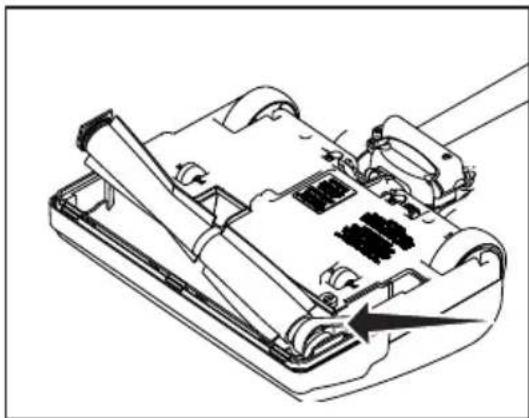
- Remove the brushroll and the worn or broken belt from the brushroll pulley and the motor drive shaft.
- Loop the new belt around the motor drive shaft and the brushroll (Fig. 1).
- Reinstall the brushroll into the nozzle. Turn the brushroll by hand, making sure the belt is not twisted and all rotating parts move smoothly (Fig. 2).
- Reinstall the bottom plate (see Removing and Reinstalling the Bottom Plate, page 11).
- Replace the battery (see Removing and Reinstalling the Battery, page 10).
natural_image
Technical line drawing of a mechanical device with internal components and an arrow indicating a specific part (no text or symbols present)Fig. 1

natural_image
Technical line drawing of a device casing with internal components and a directional arrow indicating movement (no text or symbols)Fig. 2
Replacing the Squeegee
WARNING! To Reduce the Risk of Electrical Shock or Injury from Moving Parts, Turn the Vacuum Off and Remove the Battery Before Servicing or Cleaning the Vacuum.
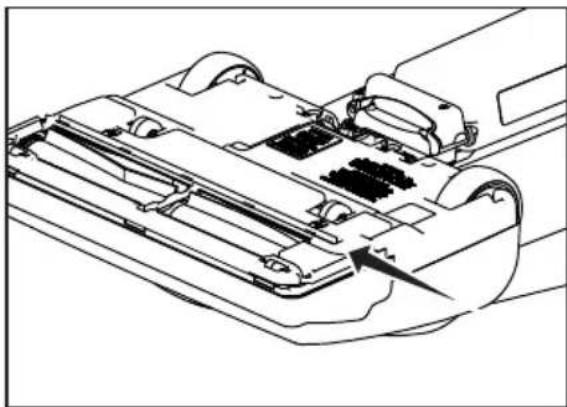
If your squeegee splits or begins to look worn, simply slide the worn squeegee from its track and slide a new one into the track. If you have trouble installing the new squeegee, please visit an Authorized CleanMax Retailer for help.
natural_image
Technical line drawing of a mechanical component with no visible text or symbolsThe model and serial number of this product may be found on the bottom of the unit. You should note the model and serial number of your unit in the spaces provided below, and retain this book as a permanent record of your purchase.
Date of purchase ____
Serial number ____
Model number ____
Purchased from:
Store Name ____
Address ____
City, State, Zip ____
Telephone ____
For Best Performance
- Keep your vacuum clean and in good operating condition.
- Change vacuum bag when the bag is 2/3 full to maximize cleaning performance.
- Always use genuine vacuum bags and replacement parts. Use of other products may result in poor cleaning performance, potential vacuum cleaner damage and may void vacuum warranty. Genuine products are designed for maximum cleaning performance.
- Store your machine carefully in a dry area.
- For optimum cleaning performance and safety, follow your owner's manual instructions.
What is Covered:
This warranty covers any defects in material and workmanship in your new CleanMax vacuum.
How Long Coverage Lasts:
Warranty coverage for your CleanMax vacuum lasts one year.
What is Not Covered:
- Damage to the vacuum which occurs from neglect, abuse, alterations, accident, misuse or improper maintenance.
- Normal replacement items: belts, squeegees, agitator brush strips and disposable bags.
What CleanMax Will Do:
This warranty provides, at no cost to you, all labor and parts to place this vacuum in correct operating condition during the warranted period.
How to Get Service:
Warranty service can only be obtained by presenting the vacuum to the retailer where original purchase was made. A proof-of-purchase and product serial number will be required before service is rendered.
THIS WARRANTY IS EXCLUSIVE AND IN LIEU OF ANY AND ALL OTHER WARRANTIES WHETHER WRITTEN, ORAL, EXPRESSED OR IMPLIED, (INCLUDING ANY WARRANTY OF MERCHANTABILITY OR FITNESS FOR A PARTICULAR PURPOSE). THIS WARRANTY DISCLAIMS LIABILITY FOR INCIDENTAL, OR CONSEQUENTIAL DAMAGES.
How State Law Applies:
This warranty gives you specific legal rights, and you may also have other rights which vary from state to state.
CLEANMAX™
CleanMax Vacuum Cleaners
PO Box 730
Fenton, MO 63026



- Congratulations!
- IMPORTANT:
- Key Replacement Parts
- Getting Started
- Operation
- Maintenance and Care
- For Best Performance 14
- IMPORTANT SAFETY INSTRUCTIONS
- READ ALL INSTRUCTIONS BEFORE USING THIS APPLIANCE. FOR COMMERCIAL USE ONLY.
- WARNING:
- Power Cord, 2-Wire Polarized Cord
- State of California Proposition 65 Warnings:
- Attaching the Handle to the Vacuum
- Pre-Charged Battery
- Battery Charging
- Battery Life Display
- Reclining the Handle
- On/Off Switch
- Edge Cleaning
- Automatic Carpet Height Adjustment
- Bare Floor Cleaning
- Vacuuming Under Furniture
- Replacing the Vacuum Bag
- Removing and Reinstalling the Battery
- Removing and Reinstalling the Bottom Plate
- To Remove the Bottom Plate:
- To Reinstall the Bottom Plate:
- Replacing the Vacuum Belt
- Replacing the Squeegee
- Purchased from:
- For Best Performance
- What is Covered:
- How Long Coverage Lasts:
- What is Not Covered:
- What CleanMax Will Do:
- How to Get Service:
- How State Law Applies:
- CLEANMAX™
Brand : CleanMax
Model : Zoom ZM-800
Category : Vacuum Cleaner