
8A50 - Montre-bracelet SEIKO - Free user manual and instructions
Find the device manual for free 8A50 SEIKO in PDF.


| Product Type | Solar-powered wristwatch with chronograph |
| Model Number | 8A50 |
| Brand | Seiko |
| Caliber | 8A50 |
| Oscillator Frequency | 32,768 Hz |
| Accuracy (Monthly Rate) | ±15 seconds (worn on wrist at 5°C to 35°C) |
| Operating Temperature Range | -10°C to +60°C |
| Driving System | Step motor (5 pieces) |
| Power Source | Secondary battery (rechargeable via solar cell under dial) |
| Charging Duration (Full Charge) | Approx. 8 hours under direct sunlight, 80 hours under fluorescent light (30W at 5 cm) |
| Power Reserve (Full Charge, Stopwatch 1h/day) | Approx. 6 months |
| Timekeeping Display | Hour and minute hands, stopwatch hands (1/100s, 1/10s, seconds, minutes) |
| Stopwatch Function | Measures up to 60 minutes in 1/100-second increments (accumulated, split, two competitors) |
| Water Resistance | Varies by model (check case back: non-water resistant, 5 BAR, 10 BAR, or 20 BAR) |
| Magnetic Resistance | Keep >10 cm from magnetic products (no indication); JIS level-1 (5 cm) or level-2 (1 cm) for marked models |
| Band Types | Metallic, leather, fabric (nylon/polyester), or silicone (depending on model) |
| Lumibrite | Luminous paint on hands and markers; stores light and glows in dark for 3-5 hours |
| Daily Care | Wipe with soft cloth; avoid water when crown is pulled; do not pour running water directly |
| Safety Precautions | Do not disassemble; keep away from babies; avoid high temperatures, strong shocks, and magnetism |
| Service & Repair | Contact Seiko retailer or customer service for overhaul every 3-4 years; use genuine parts |
Frequently Asked Questions - 8A50 SEIKO
User questions about 8A50 SEIKO
0 question about this device. Answer the ones you know or ask your own.
Ask a new question about this device
Download the instructions for your Montre-bracelet in PDF format for free! Find your manual 8A50 - SEIKO and take your electronic device back in hand. On this page are published all the documents necessary for the use of your device. 8A50 by SEIKO.
USER MANUAL 8A50 SEIKO
Copyright©2023by SEIKO WATCH CORPORATION
Printed in China
D-17
SEIKO
8A50
INSTRUCTIONSSO
日本語 JA 1
English ...... EN 1
Please refer to the Instruction Manuals of other languages by accessing "Customer Service"→ "Instruction" on our Website from PC or Smartphone.
Deutsch / Français / Italiano / Español /
Русский язык / العربية / Português /
Thank you very much for choosing a SEIKO watch. For proper and safe use of your SEIKO watch, please read carefully the instructions in this booklet before using it.
Keep this manual handy for easy reference.
* Length adjustment service for metallic bands is available at the retailer from whom the watch was purchased. If you cannot have your watch repaired by the retailer from whom the watch was purchased because you received the watch as a gift, or you moved to a distant place, please contact SEIKO CUSTOMER SERVICE CENTER. The service may also be available on a chargeable basis at other retailers, however, some retailers may not undertake the service.
* If your watch has a protective film for preventing scratches, make sure to peel it off before using the watch. If the watch is used with the film on it, dirt, sweat, dust, or moisture may be attached to the film and may cause rust.
EN 1
CONTENTS
1 HOW TO USE
Handling cautions 4
Characteristics 8
Names of the parts and their functions ..... 9
Crown 10
Toggling between displays 12
2 HOW TO SET THE TIME
How to set the time 14
3 HOW TO USE THE STOPWATCH
Stopwatch function 17
The names of the parts and functions of the
stopwatch 17
Before using the stopwatch 18
How to use the stopwatch 20
4 SOLAR CHARGING FUNCTION
Charging the battery 25
How to charge the battery 25
Guide to charging times 26
About energy 27
5 TO PRESERVE THE QUALITY OF YOUR
WATCH
Power Source 28
Daily care 30
Performance and type 31
Lumibrite 32
Water resistant performance 33
Magnetic resistant performance 34
Band 36
How to use tri-fold type clasp for leather band
(Special clasps) 39
How to use an easy adjust type clasp .... 45
After sales service 48
6 TROUBLESHOOTING
Adjusting the preliminary position of the
stopwatch hands 50
Troubleshooting 54
If the hands fail to move or move abnormally
even after recharging 57
Resetting the built-in IC 57
7 SPECIFICATIONS
Specifications 59
Handling cautions
WARNING
Please note that there is a risk of serious consequences such as severe injury if the following safety regulations are not strictly observed.
Immediately stop wearing the watch in following cases:
O If the watch body or band becomes edged by corrosion etc.
○ If the pins protrude from the band.
* Immediately consult the retailer from whom the watch was purchased or SEIKO CUSTOMER SERVICE CENTER.
Keep the watch and accessories out of the reach of babies and children.
Care should be taken to prevent a baby or a child accidentally swallowing the accessories. If a baby or child swallows the battery or accessories, immediately consult a doctor, as it will be harmful to the health of the baby or child.
Do not remove the secondary battery from the watch.
About the secondary battery → Power Source → P.28 Replacement of the secondary battery requires professional knowledge and skill. Please ask the retailer from whom the watch was purchased for replacement of the secondary battery. Installation of an ordinary silver oxide battery can generate heat that can cause bursting and ignition.
EN 4
CAUTION
Please note that there is a risk of minor injury or material damage if the following safety regulations are not strictly observed.
Avoid the following places for wearing or keeping the watch:
- Places where volatile agents (cosmetics such as polish remover, bug repellent, thinners etc.) are
- Places where the temperature drops below - Places affected by strong vibrations
5°C or rises above 35°C for a long time O Places of high humidity
- Places affected by strong magnetism or static - Dusty places
If you observe any allergic symptoms or skin irritation
Stop wearing the watch immediately and consult a specialist such as a dermatologist or an allergist
Other cautions
For adjusting the length of the metallic band, specialized knowledge and expertise are necessary. Therefore, in such a case, contact the retailer from whom the watch was purchased. If you attempt to adjust the metallic band, injury may occur to your hand or fingers, or parts of the band may be lost.
O Do not disassemble or tamper with the watch.
Please follow local government directions when disposing of the watch body and secondary battery.
Keep the watch out of the reach of babies and children. Extra care should be taken to avoid risks of any injury or allergic rash or itching that may be caused when you touch the watch.
If your watch is of the fob or pendant type, the strap or chain attached to the watch may damage your clothes, or injure the hand, neck, or other parts of your body.
EN 5
WARNING

Do not use the watch in scuba diving or saturation diving.
The various tightened inspections under simulated harsh environment, which are usually required for watches designed for scuba diving or saturation diving, have not been conducted on the water resistant watch with the BAR (barometric pressure) display. For diving, use watches specifically designed for diving.
CAUTION

Do not pour running water directly from faucet.
The water pressure of tap water from a faucet is high enough to degrade the water resistant performance of a water resistant watch for everyday life.
CAUTION
Please note that there is a risk of minor injury or material damage if the following safety regulations are not strictly observed.

Do not turn or pull out the crown when the watch is wet.
Water may get inside of the watch. * If the inner surface of the glass is clouded with condensation or water droplets appear inside of the watch for a long time, the water resistant performance of the watch is deteriorated. Immediately consult the retailer from whom the watch was purchased or SEIKO CUSTOMER SERVICE CENTER.

Do not leave moisture, sweat and dirt on the watch for a long time. Be aware of a risk that a water resistant watch may lessen its water resistant performance because of deterioration of the adhesive on the glass or gasket, or the development of rust on stainless steel.

Do not wear the watch while taking a bath or a sauna.
Steam, soap or some components of a hot spring may accelerate the deterioration of water resistant performance of the watch.
EN 6
EN 7
Characteristics
This solar watch is equipped with a stopwatch function.
- This watch is equipped with a full range of stopwatch functions, capable of measuring in increments of 1/100 of a second.
- A solar cell under the dial converts any form of light into "electrical energy" to operate the watch.
' "Chronograph" means a watch with a stopwatch function.
■ Stopwatch function.... The stopwatch can carry out measurements for up to 60 minutes in increments of 1/100 of a second. → P.17 Measurement will terminate automatically after 60 minutes.
■ Solar Charging Function......The watch charges by converting light that shines on the solar panel on the dial into electrical energy. After the battery is fully charged, the watch will operate for about six months even if the dial is not exposed to light.
EN 8
Names of the parts and their functions
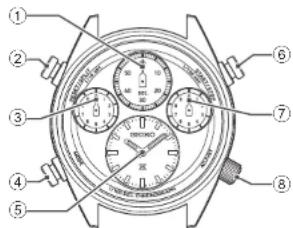
① Stopwatch seconds hand
② Button B
Measuring split time/resetting the stopwatch
③ Stopwatch 1/10-second hand
④ Button A
Toggling between displays
⑤ Hour hand/minute hand (stopwatch hands)
⑥ Button C
Starting/stopping the stopwatch
⑦ Stopwatch 1/100-second hand
⑧ Crown
• Normal position: Stopwatch
First click position: Setting the time, setting the stopwatch hands to preliminary position, and performing a system reset
* The position and design of the display may vary depending on the model.
Crown
There are two types of crowns, a normal crown and a screw down crown. Please check the type of the crown of your watch.
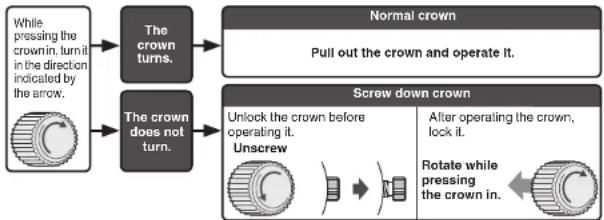
flowchart
graph TD
    A["While pressing the crown in, turn it in the direction indicated by the arrow."] --> B["The crown turns."]
    C["While pressing the crown in, turn it in the direction indicated by the arrow."] --> D["The crown does not turn."]
    B --> E["Normal crown\nPull out the crown and operate it."]
    D --> F["Screw down crown\nUnlock the crown before operating it.\nUnscrew"]
    F --> G["After operating the crown, lock it."]
    F --> H["Rotate while pressing the crown in."]
* By locking the crown by screw, a screw down crown can prevent malfunction and increase water resistance. * Be careful not to screw the crown in by force as it may damage the slots of the crown.
EN 10
EN 9
EN 11
Toggling between displays
The operation shown in the illustration below toggles between "time display" and "stopwatch display." Toggling between the displays changes the function of the hands.
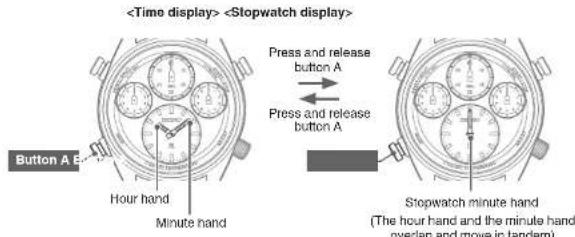
EN 12
* When logging between "time display" and "stopwatch display," the hour, minute, and stopwatch hands move. * Pressing Button A even during stopwatch operation will toggle to "time display." Stopwatch measurement continues even during time display. However, split time measurements will be released. * If the stopwatch remains in the reset state for 10 minutes, the display automatically returns to "time display." * The timings for 0 hours and 0 minutes and 12 hours and 0 minutes have the same hand positions during the stopwatch display's reset state, even in time display mode. If it is difficult to identify the display mode by the hand positions, press Button C. If the stopwatch hand moves, the watch is in stopwatch display mode.
EN 13
How to set the time
1 Press Button A to toggle between displays and make sure that the watch is working.
When the stopwatch seconds hands (1/100-second, 1/10-second, second) point to the 6 o'clock position, the energy level is low. Expose the dial to light to charge the watch.
"Charging the battery" → P.25
*Guide to charging times* - P.26
2 Press Button A to switch to time display.
"Toggling between displays" → P.12
3 Pull out the crown.
The hour and minute hands move to the position of the minute following the current time.
Ex.: When the current time is "10:08:42", the hour and minute hands move to the "10:09:00" position.
* For models with screw down crown, please unlock the crown before operating it.

EN 14
4 Turn the crown to set the time.
Turn the crown clockwise to advance the time by 1 minute. Turn the crown counterclockwise to set back the time by 1 minute. Turn the crown continuously to quickly turn the hands.
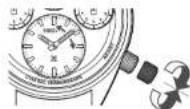
5 Push the crown back in to the normal position in accordance with a time signal.
The watch starts to operate. * The telephone time signal service is helpful for setting the seconds hand exactly. * For models with screw down crown, please be sure to lock the crown after operating it.
EN 15
Stopwatch function
The stopwatch can measure up to 60 minutes in 1/100-second increments. After measuring 60 minutes, the stopwatch hands will automatically stop at the 0 minute 0 second position.
■ The names of the parts and functions of the stopwatch
Toggle to the "stopwatch display". "Toggling between displays" - P.12
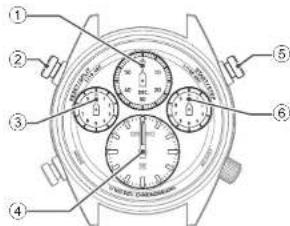
① Stopwatch seconds hand moves in one-second increments
② Button B
③ Stopwatch 1/10-second hand moves in 1/10-second increments
④ Stopwatch minute hand moves in one-minute increments
• The hour and minute hands move while overlapped.
⑤ Button C
Start/Stop
⑥ Stopwatch 1/100-second hand
moves in 1/100-second increments
■ Before using the stopwatch
Before using the stopwatch, reset it and check that the stopwatch hands (1/100-second,
1/10-second, second, minute) are stopped at "0 seconds and 0 minutes"
* When the stopwatch hands (1/100-second, 1/10-second, second) point to the 5 o'clock position, the energy is
depleted, and the stopwatch will not operate. Charge the stopwatch before use.
"About energy → P.27
• How to reset the stopwatch
* The stopwatch can be operated when the crown is at the normal position.
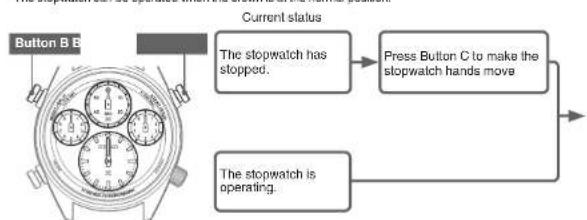
flowchart
graph TD
    A["Current status"] --> B["The stopwatch has stopped."]
    A --> C["Press Button C to make the stopwatch hands move"]
    A --> D["The stopwatch is operating."]
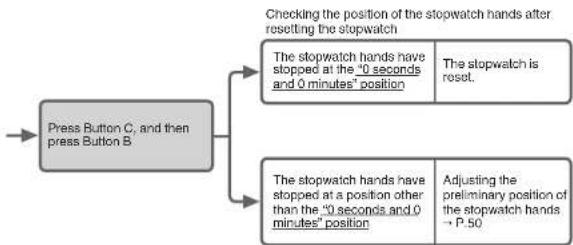
flowchart
graph TD
    A["Press Button C, and then press Button B"] --> B{Checking the position of the stopwatch hands after resetting the stopwatch}
    B -->|Yes| C["The stopwatch hands have stopped at the '0 seconds and 0 minutes' position"]
    B -->|No| D["The stopwatch hand has stopped at a position other than the '0 seconds and 0 minutes' position"]
    C --> E["The stopwatch is reset."]
    D --> F["Adjusting the preliminary position of the stopwatch hands → P.50"]
How to use the stopwatch
3
HOW TO USE THE STOPWATCH
* The 1/100-second and 1/10-second hands move for 1 minute after starting, and remain at the 12 o'clock position
thereafter. When the buttons are operated to stop the stopwatch or to measure a split time, the stopwatch seconds hand displays the measured time from the restart.
If the stopwatch is restarted or a split time measurement is released, the hands move again for 1 minute.
Pressing Button A even during stopwatch operation will toggle to "time display."
Stopwatch measurement continues even during time display. However, split time measurements will be released.
If the energy is depleted while the stopwatch is operating, the measurement may be reset. When the stopwatch hands (1/100-second, 1/10-second, second) point to the 6 o'clock position, the energy is depleted, and the stopwatch will not operate. Charge the stopwatch before use.
"About energy" → P.27
EN 20
• Accumulated elapsed time measurement Ex. Measuring the time for a soccer match

flowchart
graph LR
    A["Start Stop Start Stop Reset"] --> B["Start match. Stop match. Start again."]
    B --> C["The match ends. Reset the stopwatch"]
3
HOW TO USE THE STOPWATCH
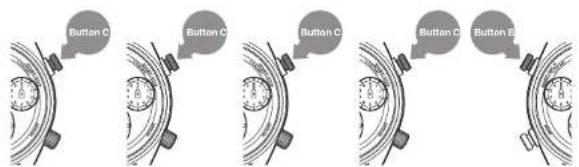
- Restart and stop of the stopwatch can be repeated.
EN 22
• Standard measurement Ex. 5,000 meters running
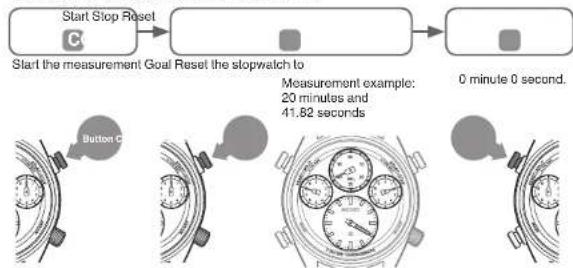
flowchart
graph LR
    A["Start Stop Reset"] --> B["Start the measurement Goal Reset the stopwatch to"]
    B --> C["0 minute 0 second."]
    D["Button C"] --> E["Measurement example: 20 minutes and 41.82 seconds"]
EN 21
- Split time (Intermediate elapsed time) measurement Ex. 5,000 meters running
* "Split time" is the time that has elapsed from the start of an activity to any given stage.
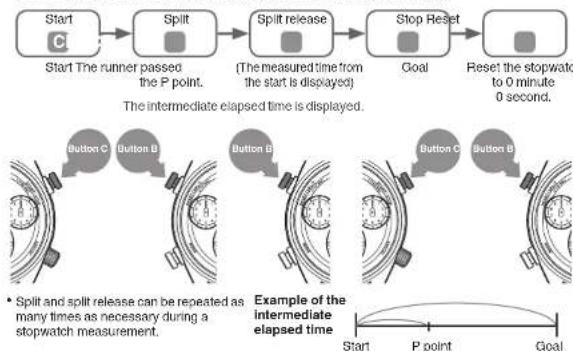
flowchart
graph LR
    A["Start"] --> B["Split"]
    B --> C["Split release"]
    C --> D["Stop Reset"]
    D --> E["Reset the stopwatch to 0 minute 0 second."]

    subgraph Time Elapsed
        F["Button C Button B"] --> G["Button B"]
        G --> H["Button C Button B"]
    end

    I["Example of the intermediate elapsed time"] --> J["Start P point Goal"]

    style I fill:#f9f,stroke:#333
    style J fill:#ccf,stroke:#333
EN 23
3
HOW TO USE THE STOPWATCH
3
HOW TO USE THE STOPWATCH
• Measurement of two competitors
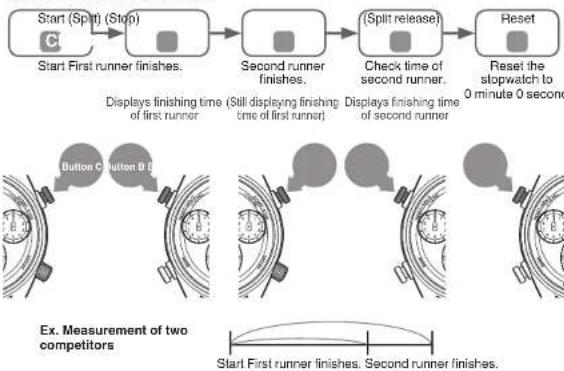
flowchart
graph LR
    A["Start (Split) (Stop)\nC\nStart First runner finishes."] --> B["Second runner finishes.\nDisplays finishing time of first runner\n(Still displaying finishing time of first runner)"]
    B --> C["(Split release)\nCheck time of second runner.\nDisplays finishing time of second runner"]
    C --> D["Reset\nReset the stopwatch to 0 minute 0 second\nButton C Button B U\nEx. Measurement of two competitors\nStart First runner finishes. Second runner finishes."]
■ Guide to charging times
Charge the watch using the times below as a guide.
| Illuminance tx (LUX) | Light source | Condition (Example) | Time required for fully charging the watch | Time required for the stopwatch function to be available | Time required for charging the watch to last for 1 day |
| 700 | Fluorescent light | General offices - 200 hours 4.5 hours | |||
| 3,000 | Fluorescent light | 30 W 20 cm 260 hours 50 hours 70 minutes | |||
| 10,000 | Fluorescent light | 30 W 5 cm 80 hours 15 hours 20 minutes | |||
| 10,000 | Sunlight | Cloudy day | 80 hours | 15 hours | 20 minutes |
| 100,000 | Sunlight | Sunny day (Under direct sunlight on a summer day) | 8 hours | 2 hours | 6 minutes |
The "Time required for the stopwatch function to be available" figure is an estimate of the amount of time required to expose the stopped watch to light and charge the watch until the stopwatch function is available. Although the function can be used without charging the watch for this amount of time, the stopwatch function may quickly become unusable. Charge the watch using these times as a guide.
* The required charging time slightly varies depending on the model of the watch.
Charging the battery
■ How to charge the battery
Expose the dial to light to charge the watch.
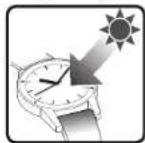
To ensure optimal performance of the watch, make sure that the watch is kept sufficiently charged at all times.
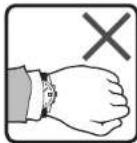
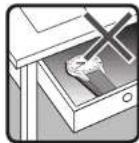
Under the following situations, the energy of the watch is likely to be depleted, resulting in stoppage of the watch: • The watch is concealed under a sleeve.
- The watch is used or stored under conditions where it cannot be exposed to light for a long time.
* Be careful to make sure that the watch does not get hot when it is charging. (The operating temperature range is -10°C to +60°C.) * When you first start using the watch or starting it after it stopped due to a lack of charge, charge the watch sufficiently using the table on P.26 as a guide.
About energy
When the energy level is low, the stopwatch
seconds hands (1/100-second, 1/10-second
second) point to the 6 o'clock position. If energy is completely depleted after that, all hands move to the 12 o'clock position and the watch stops.
When the stopwatch seconds hands (1/100-second, 1/10-second, second) point to the 6 o'clock position, sufficiently charge the battery.
How to charge the battery - P.25
Guide to charging times → P.26
- When the stopwatch hands point to the 6 o'clock position, the stopwatch will not operate. (This is not a malfunction.)
- If the energy is depleted while the stopwatch is operating, the measurement may be reset.
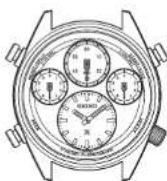
Power Source
The battery used in this watch is a special secondary battery, which is different from ordinary batteries.
Unlike an ordinary silver oxide battery, the secondary battery does not require periodic replacement.
The capacity or charging efficiency may gradually lower due to long-term use or operating environment.
In addition, long-term use may shorten the charge duration due to wear, contamination, lubricant deterioration of mechanical parts, etc. Request repair when the performance lowers.
WARNING
■ Notes on replacing the secondary battery
- Do not remove the secondary battery from the watch. Replacement of the secondary battery requires professional knowledge and skill. Please ask the retailer from whom the watch was purchased for replacement of the secondary battery.
• Installation of an ordinary silver oxide battery can generate heat that can cause bursting and ignition.
* Overcharge prevention function
When the secondary battery is fully charged, the overcharge prevention function is automatically activated to avoid further charging.
There is no need to worry about damage caused by overcharging no matter how much the secondary battery is charged in excess of the "time required for fully charging the watch."
* For the required time to fully charge the battery, see "Guide to charging times" → P.26.
WARNING
■ Notes on charging the watch
- When charging the watch, do not place the watch in close proximity to an intense light source such as lighting equipment for photography, spotlights or incandescent lights, as the watch may be excessively heated resulting in damage to its internal parts.
- When charging the watch by exposure to direct sunlight, avoid places that easily reach high temperatures, such as a car dashboard.
• Always keep the watch temperature under 60°C.
Daily care
● The watch requires good daily care
- Do not wash the watch when its crown is in the extended position.
- Wipe away moisture, sweat or dirt with a soft cloth.
- After soaking the watch in seawater, be sure to wash the watch in clean pure water and wipe it dry carefully.
Do not pour running water directly from a faucet onto the watch. Put some water into a bowl first, and then soak the watch in the water to wash it.
* If your watch is rated as "Non-water resistant" or "water resistant for daily use," please do not wash the watch. "Performance and type" → P.31
"Water resistant performance" → P.33
Performance and type
The case back shows the caliber and performance of your watch
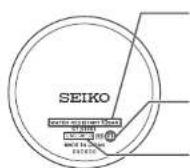
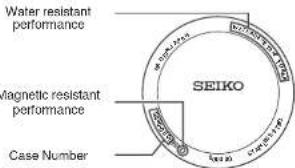
• Water resistant performance
Please refer to P.33.
- Case Number
The number to identify the type of your watch.
* The above illustration is provided as an example, therefore it may not be exactly the same as your watch.
• Magnetic resistant performance
Please refer to P.34 and P.35.
Lumibrite
If your watch has Lumibrite
Lumibrile is a luminous paint that absorbs the light energy of sunlight and lighting apparatuses in a short time and stores it to emit light in the dark. For example, if exposed to a light of more than 500 lux for approximately 10 minutes, Lumibrile can emit light for 3 to 5 hours. Please note, however, that, as Lumibrile emits the light it stores, the luminance level of the light decreases gradually over time. The duration of the emitted light may also differ slightly depending on such factors as the brightness of the place where the watch is exposed to light and the distance from the light source to the watch.
* In general, when coming from a place that is bright to a place that is dark, it takes human eyes some time to adapt to the darkness making it difficult to see objects initially. (Dark adaptation)
^ Lumibrite is luminous paint that stores and emits light, which is harmless to human beings and the environment, containing no toxic materials such as radioactive substances.
| Condition illumination | |
| Sunlight | Fine weather 100,000 lux |
| Cloudy weather 10,000 lux | |
| Indoor (Window-side during daytime) | Fine weather More than 3,000 lux |
| Cloudy weather 1,000 to 3,000 lux | |
| Rainy weather Less than 1,000 lux | |
| Lighting apparatus (40-watt daylight fluorescent light) | Distance to the watch: 1 m 1,000 lux |
| Distance to the watch: 3 m 500 lux (Average room luminance) | |
| Distance to the watch: 4 m 250 lux | |
Magnetic resistant performance
Affected by nearby magnetism,
a watch may temporarily gain or lose time or stop operating.
DANGER
| Indication on the case back | Condition of use |
| No Indication Keep the watch more than 10 cm away from magnetic products. | |
| Keep the watch more than 5 cm away from magnetic products.(JIS level-1 standard) | |
| Keep the watch more than 1 cm away from magnetic products.(JIS level-2 standard) | |
If the watch becomes magnetized and its accuracy deteriorates to an extent exceeding the specified rate under normal use, the watch needs to be demagnetized. In this case, you will be charged for demagnetization and accuracy readjustment even if it happens within the guarantee period.
The reason why a watch is affected by magnetism
The built-in motor is provided with a magnet, which may be influenced by a strong external magnetic field.
Water resistant performance
Refer the table below for the description of water resistant performance of your watch before using. (Please look at P.31.)
| Indication on the case back | Water resistant performance | Conditions of Use | |
| No indication Non-water resistance Avoid drops of water or sweat | |||
| WATER RESISTANT | Water resistance for everyday life | The watch withstands accidental contact with water in everyday life. | WARNINGPlease do not use it for swimming. |
| WATER RESISTANT 5 BAR | Water resistance for everyday life at 5-BAR water resistant | The watch is suitable for sports such as swimming. | |
| WATER RESISTANT 10 (20) BAR | Water resistance for everyday life at 10 (20)-BAR water resistant | The watch is suitable for diving not using an air cylinder. | |
EN 33

Smartphone, cellular phone, tablet terminal (Speaker, magnet of cover)


AC adapter Bag

(With magnet buckle)

AC-powered shaver

Magnetic cooking device

Portable radio (Speaker)

Magnetic necklace

Magnetic health pillow
EN 35
Band
The band touches the skin directly and becomes dirty with sweat or dust. Therefore, lack of care may accelerate deterioration of the band or cause skin irritation or stain on the sleeve edge. The watch requires a lot of attention for long usage.
● Metallic band
- Moisture, sweat or soil will cause rust even on a stainless steel band if they are left for a long time. - Lack of care may result in a rash or cause a yellowish or gold stain on the lower sleeve edge of shirts. - Wire off moisture, sweat or soil with a soft cloth as soon as possible.
• To clean the soil around the joint gaps of the band, wipe it out in water and then brush it off with a soft toothbrush.
(Protect the watch body from water splashes by wrapping it up in plastic wrap etc.) Clean it off with a soft cloth.
- Because some titan bands use pins made of stainless steel, which has outstanding strength, rust may form in the stainless steel parts.
- If rust advances, pins may poke out or drop out, and the watch case may fall off the band, or the clasp may not open.
- If a pin is poking out, personal injury may result. In such a case, refrain from using the watch and request repair.
Leather band
- A leather band is susceptible to discoloration and deterioration from moisture, sweat and direct sunlight. - Wipe off moisture and sweat as soon as possible by gently blotting them up with a dry cloth.
- Do not expose the watch to direct sunlight for a long time.
- Please take care when wearing a watch with light-colored band, as dirt is likely to show up.
- Refrain from wearing a leather band watch other than Aqua Free bands while bathing, swimming, and when working with water even if the watch itself is water resistant enforced for daily use (10-BAR/20-BAR water resistant).
● Fabric band (Nylon/Polyester)
- Natural skin oil and dirt easily adhere to the band because it has a braided structure.
- Beware of fraving, damage, etc., caused by catching this product on other things.
- Note that the band may become discolored due to friction when wet with sweat or rain and that its color may transfer to other clothing.
- Beware of static electricity caused by friction with clothing material.
- If natural skin oil or dirt adheres to the band, gently wipe it off immediately with a dry cloth, etc.
- When drying the band, dry it in an airy place out of direct sunlight.
• The texture of the band may change if it is washed in water for a long time. - Note that the band may discolor if it is left in direct sunlight.
Silicone band
- As for material characteristics, the band is easily dirtied, and may be stained and discolored.
wipe off dirt with a wet cloth or cleaning tissue. - Unlike bands of other materials, cracks may result in the band being cut. Take care not to damage the band with an edged tool.
| Notes on skin irritation and allergy | Skin irritation caused by a band may result from various factors such as allergy to metals or leathers, or skin reactions against friction on dust or the band itself. |
| Notes on the length of the band | Adjust the band to allow a little clearance with your wrist to ensure proper airflow.When wearing the watch, leave enough room to insert a finger between the band and your wrist. [4K23] |
How to use tri-fold type clasp for leather band (Special clasps)
There are 3 types of special clasps as described below;
If the clasp of the watch you purchased is one of them, please refer to the indications.
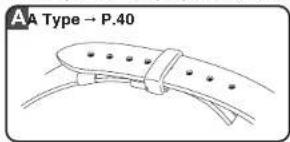
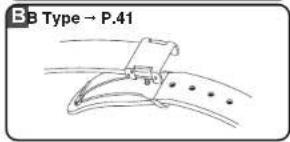
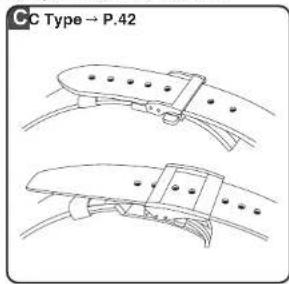

Type
1 Lift up the clasp to release the buckle.
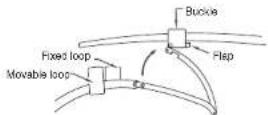

Open the flap.
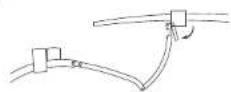
EN 40
3 Remove the pin from the adjustment hole. Side the band left and right, and reinsert the pin into the adjustment hole at an appropriate length.
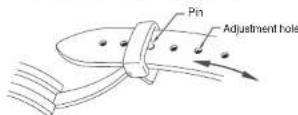

Fasten the flap.
Do not push the flap in too hard.
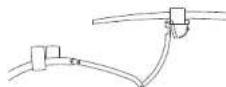
When fastening the clasp, insert the tip of the band into the movable loop and fixed loop, and then, securely tighten the clasp.

Type
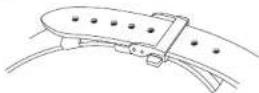
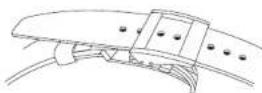
● How to wear or take off the watch
① While pressing the push buttons on both sides of the flap, pull the band out of the movable loop and fixed loop. Then open the clasp.
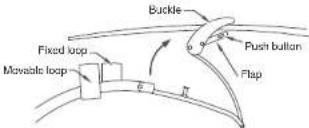
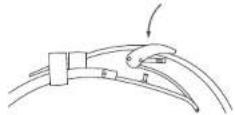
② Place the tip of the band into the movable loop and fixed loop, and fasten the clasp by pressing the frame of the buckle.
EN 42

Type
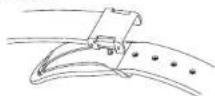
① While pressing the push buttons on both sides of the flap, lift to open the clasp.
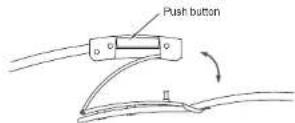
② Remove the pin from the adjustment hole. Slide the band left and right, and insert the pin into the adjustment hole at an appropriate length. Push the buckle and fasten the clasp.
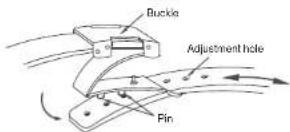
EN 41
● How to adjust the length of the band
① While pressing the push buttons on both sides of the flap, pull the band out of the movable loop and fixed loop. Then open the clasp.
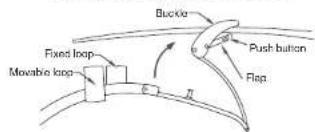
2 Press the push buttons again to unfasten the flap.
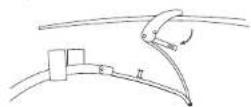
EN 43
5
TO PRESENVE THE QUALITY OF YOUR WATCH
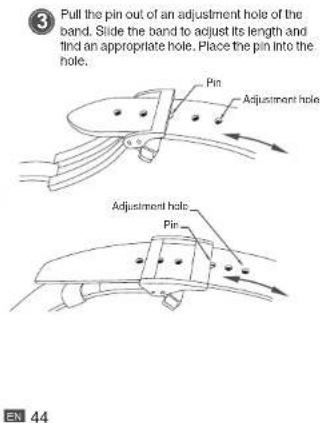
4 Fasten the flap.
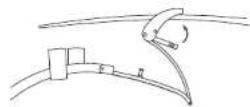
● How to wear the band (Opening and closing the clasp)
1. Lightly press the push buttons to open the clasp.
* Note that pressing the push buttons too firmly (deeply) actuates the adjuster, which lengthens the band.
2. Fasten the clasp by pressing the frame of the buckle.
5
TO RESERVE THE QUALITY OF YOUR WATCH
EN 46
How to use an easy adjust type clasp
Some bands are provided with an easy adjust type clasp for fine adjustment of the band's length. If the clasp of the watch you purchased is as follows, please refer to the following instructions.
* The band can be lengthened by up to about 5 mm. This is useful if the band feels too light or is uncomfortable for some reason.
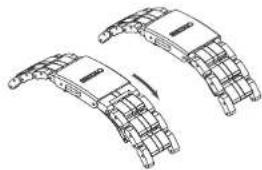
natural_image
Technical line drawing of two mechanical components with curved brackets and a central rod (no text or symbols)EN 45
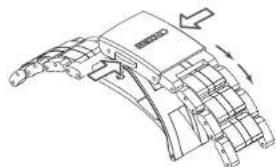
● How to adjust the length of the band
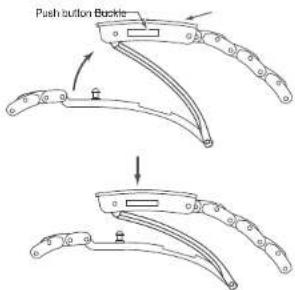
1. You can lengthen the band by up to about 5 mm (2 stages) by firmly pressing the push buttons from both sides to actuate the adjuster.
2. Fasten the clasp by pressing the frame of the buckle.
* Even while the clasp is closed, you can still retract the length of band extended by the adjuster.
natural_image
Technical line drawing of a mechanical component with curved surfaces and directional arrows indicating motion (no text or symbols)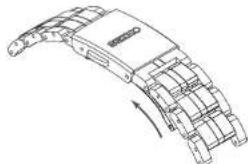
natural_image
Technical line drawing of a curved mechanical component with internal components and a rotation arrow (no text or symbols)* The above illustrations are provided as examples. Some details may differ depending on the model.
EN 47
5
TO PRESERVE THE QUALITY OF YOUR WATCH
5
TO PRESENVE THE QUALITY OF YOUR WATCH
After sales service
Notes on guarantee and repair
- Contact the retailer from whom the watch was purchased or SEIKO CUSTOMER SERVICE CENTER for repair or overhaul.
- Within the guarantee period, present the certificate of guarantee to receive repair services.
• Guarantee coverage is provided in the certificate of guarantee. Read carefully and retain it. - For repair services after the guarantee period has expired, if the functions of the watch can be restored by repair work, we will undertake repair services upon request and payment.
● Replacement with functional parts
- Please keep in mind that if original parts are not available, they may be replaced with substitutes whose outward appearance may differ from the originals.
● Inspection and adjustment by disassembly and cleaning (Overhaul)
- Periodic inspection and adjustment by disassembly and cleaning (overhaul) is recommended approximately once every 3 to 4 years in order to maintain optimal performance of the watch for a long time. According to use conditions, the oil retaining condition of your watch mechanical parts may deteriorate, abrasion of the parts may occur due to contamination of oil, which may ultimately lead the watch itself to stop.
As the parts such as gasket may deteriorate, water-resistant performance may be impaired due to intrusion of perspiration and moisture.
Please contact the retailer from whom the watch was purchased for inspection and adjustment by disassembly and cleaning (overhaul). For replacement of parts, please specify "SEIKO GENUINE PARTS." When asking for inspection and adjustment by disassembly and cleaning (overhaul), make sure that the gasket and push pin are also replaced with new ones. - When your watch is inspected and adjusted by disassembly and cleaning (overhauled), the movement of your watch may be replaced.
Adjusting the preliminary position of the stopwatch hands
If the stopwatch hands (1/100-second, 1/10-second, second, minute) do not stop at 0 minute 0 seconds and 0 minutes even after the stopwatch is reset, or if the hour and minute hands do not display the correct time, the preliminary positions may be misaligned. Adjusting the hands to the preliminary position will ensure that stopwatch measurements are correct.
The preliminary position may be misaligned due to the following reasons.
• In the case of a strong impact: Misalignment may occur when dropping or hitting the watch.
• In the case of a magnetic influence: Misalignment may occur when bringing the watch close to an object which generates magnetism.
"Examples of common magnetic products that may affect watches" → P.35
1 Press Button A to toggle between displays and make sure that the watch is working.
When the stopwatch seconds hands (1/100-second, 1/10-second, second) point to the 6 o'clock position, the energy level is low. Expose the dial to light to charge the watch.
"Charging the battery" → P.25
"Guide to charging times" → P.26
2 Press Button A to switch to stopwatch display.
*Toggling between displays" → P.12
3 Pull out the crown.
For models with screw down crown, please unlock the crown before operating it.
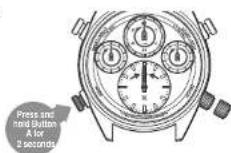
4 Press Button A (for 2 seconds) until the seconds hand moves.
All hands point to the current preliminary position. The hour hand then moves slightly.

5 Set all hands to the 12 o'clock standard position.
Check that each hand is aligned with the 12 o'clock position in the order shown below, and correct the hand positions if they are misaligned.
① Turn the crown to set the hand to the 12 o'clock position
② Press Button A to advance to the next hand position adjustment
* The selected hand moves slightly or completes a full rotation to indicate that it is ready to be aligned.
Repeat ① and ② and set all hands to the 12 o'clock position.
Adjusting the stopwatch
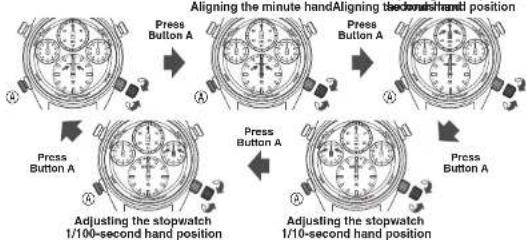
flowchart
graph TD
    A["Press Button A"] --> B["Aligning the minute hand"]
    B --> C["Adjusting the stopwatch 1/100-second hand position"]
    C --> D["Press Button A"]
    D --> E["Adjusting the stopwatch 1/10-second hand position"]
    E --> F["Press Button A"]
    F --> G["Adjusting the stopwatch 1/100-second hand position"]
    G --> H["Press Button A"]
    H --> I["Adjusting the stopwatch 1/100-second hand position"]
    I --> J["Press Button A"]
EN 52
6 Push the crown back in to the normal position.
The watch returns to stopwatch display.
Troubleshooting
| Troubles Possible causes Solutions | Reference | ||
| The watch stops operating. | The energy is depleted.If you wear the watch every day and this occurs, the most likely cause is the watch is hidden by your sleeves or other clothing when you wear it and it is not sufficiently exposed to light. | P.25 | |
| The stopwatch seconds hands (1/100-second, 1/10-second, second) point to the 6 o'clock position. | The energy is low.If you wear the watch every day and this occurs, the most likely cause is the watch is hidden by your sleeves or other clothing when you wear it and it is not sufficiently exposed to light. | Sufficiently charge the battery.When you wear the watch, try to make sure that the watch is not hidden by your sleeves or other clothing.Additionally, when you take the watch off, try to place it in a bright place. | |
| The hands move slowly when toggling between modes. | |||
EN 54
EN 53
| Troubles Possible causes Solutions | Reference | ||
| Stopwatch hands do not point to the 12 o'clock position or do not move after charging a stopped watch. | The internal watch system is unstable. | See "Resetting the built-in IC" and follow the procedure. | P.57 |
| The light is too weak.More time is required to fully charge the watch. | The time taken to charge will differ depending on the light intensity. For details on charging times, see "Guide to charging times". If the hands still fall to resume operation, follow the procedure of "Resetting the built-in IC". | P.26P.57 | |
| The watch temporarily gains/ loses time. | The watch has been left in extremely high or low temperatures for a long time. | If the watch returns to room temperature, the accuracy will return to its original state.If it does not return to its original state, contact the retailer from whom the watch was purchased. | - |
| The watch has been left close to an object with a strong magnetic field. | Correct this condition by moving and keeping the watch away from the magnetic source, and reset the time.If this action does not correct the condition, contact the retailer from whom the watch was purchased. | - | |
| You drop the watch, hit it against a hard surface, or wear it while playing active sports.The watch is exposed to strong vibrations. | If accuracy does not return after setting the time, consult the retailer from whom the watch was purchased. | - | |
EN 55
| Troubles Possible causes Solutions | Reference | ||
| Any of the stopwatch hands do not return to the 0 minute 0 second position when the stopwatch is reset. | The preliminary position of the hands is out of alignment.This happens when the stopwatch hands are out of the preliminary position as a result of external influence or system reset. | Set the preliminary hand position. P.50 | |
| The buttons do not work.(The stopwatch function is unavailable or the time/preliminary position cannot be adjusted) | The power is low. | Sufficiently charge the battery until the stopwatch function is available or the time/preliminary position can be adjusted. | P,25 |
| Blur in the display persists. | A small amount of water has got inside the watch due to deterioration of the gasket, etc. | Consult the retailer from whom the watch was purchased. | - |
' Contact the retailer from whom the watch was purchased for any other troubles.
EN 56
3 Set the stopwatch hands (1/100-second, 1/10-second, second, minute) to the preliminary position.
Carry out the operation in Procedure 5 of "Adjusting the preliminary position of the stopwatch hands" → P.52.
4 Push the crown back in to the normal position.
The watch starts to operate.
At this time, the time display shows 12 hours and 0 minutes.
When the stopwatch seconds hands (1/100-second, 1/10-second, second) point to the 6 o'clock
position, the energy level is low. Expose the dial to light to charge the watch.
"Charging the battery" → P.25
"Guide to charging times" → P.26
5 Set the time.
Carry out the operation in Procedure 3 of "How to set the time" → P.14.
Once the stopwatch hands, preliminary position, and time are set, the operation is complete.
EN 58
If the hands fail to move or move abnormally even after recharging
If the watch does not work, the stopwatch hands do not point to the 12 o'clock position even if the battery is sufficiently charged, or the watch operates irregularly, performing the following operations will return the watch to normal.
■ Resetting the built-in IC
1 Pull out the crown.
For models with screw down crown, please unlock the crown before operating it.

2 Press buttons A, B, and C at the same time for 2 seconds.
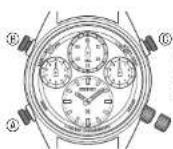
Press at the same time for 2 seconds
EN 57
Specifications
| Cal. 8A50 | |
| 1. Features | Main time with two hands (hour and minute hands), stopwatch hands(1/100-second, 1/10-second, second, and minute hands) |
| 2. Frequency of crystal oscillator | 32,768 Hz (Hz= Hertz, cycles per second) |
| 3. Loss/gain (Monthly rate) | Monthly average loss/gain ± 15 secondsOnly if worn on the wrist In a temperature range of 5°C to 35°C |
| 4. Operational temperature range | -10 °C ~ +60 °C |
| 5. Driving system Step Motor, 5 pieces | |
| 6. Power source Secondary battery, 1 piece | |
| 7. Duration Approx. 6 months (if the stopwatch is used for 1 hour per day.) | |
| 8. IC (Integrated Circuit) | Oscillator, frequency divider and driving circuit C-MOSIC, 1 piece |
* The specifications are subject to change without prior notice due to product improvements.
EN 59
- Thank you very much for choosing a SEIKO watch. For proper and safe use of your SEIKO watch, please read carefully the instructions in this booklet before using it.
- CONTENTS
- HOW TO USE
- HOW TO SET THE TIME
- HOW TO USE THE STOPWATCH
- SOLAR CHARGING FUNCTION
- TO PRESERVE THE QUALITY OF YOUR
- WATCH
- TROUBLESHOOTING
- SPECIFICATIONS
- Handling cautions
- WARNING
- CAUTION
- Characteristics
- Names of the parts and their functions
- Crown
- Toggling between displays
- How to set the time
- Stopwatch function
- ■ The names of the parts and functions of the stopwatch
- ■ Before using the stopwatch
- How to use the stopwatch
- 3
- ■ Guide to charging times
- Charging the battery
- ■ How to charge the battery
- About energy
- Power Source
- ■ Notes on replacing the secondary battery
- ■ Notes on charging the watch
- Daily care
- ● The watch requires good daily care
- Performance and type
- Lumibrite
- If your watch has Lumibrite
- Magnetic resistant performance
- Affected by nearby magnetism,
- The reason why a watch is affected by magnetism
- Water resistant performance
- Band
- ● Metallic band
- Leather band
- ● Fabric band (Nylon/Polyester)
- Silicone band
- How to use tri-fold type clasp for leather band (Special clasps)
- Type
- ● How to wear or take off the watch
- ● How to adjust the length of the band
- How to use an easy adjust type clasp
- After sales service
- Notes on guarantee and repair
- ● Replacement with functional parts
- ● Inspection and adjustment by disassembly and cleaning (Overhaul)
- Adjusting the preliminary position of the stopwatch hands
- Pull out the crown.
- Press Button A (for 2 seconds) until the seconds hand moves.
- Set all hands to the 12 o'clock standard position.
- Push the crown back in to the normal position.
- If the hands fail to move or move abnormally even after recharging
- ■ Resetting the built-in IC
- Specifications
Brand : SEIKO
Model : 8A50
Category : Montre-bracelet