
PAC5 - Alarm Clock Platinet - Free user manual and instructions
Find the device manual for free PAC5 Platinet in PDF.


| Product Type | Alarm Clock Radio |
| Brand | Platinet |
| Model | PAC5 |
| Dimensions (approx.) | 150 x 80 x 80 mm |
| Weight (approx.) | 300 g |
| Power Supply | AC 100-240V, 50/60 Hz; Backup battery (CR2032, not included) |
| Radio Bands | FM 87.5-108 MHz, AM 530-1710 kHz |
| Display | LED digital clock with adjustable brightness |
| Alarm Features | Dual alarms, wake to radio or buzzer, snooze function |
| Sleep Timer | Yes, 10-90 minutes |
| Additional Functions | Nap timer, dimmer, alarm volume control |
| Audio Output | Built-in speaker, 3.5 mm headphone jack |
| Antenna | FM wire antenna (rear); AM built-in ferrite rod |
| Care and Cleaning | Wipe with soft dry cloth; do not use liquid cleaners |
| Safety Precautions | Keep away from water and heat sources; use only supplied AC adapter |
| Spare Parts / Repairability | No official spare parts; battery door for backup battery access |
| General Information | Designed for bedside use; available in black |
Frequently Asked Questions - PAC5 Platinet
User questions about PAC5 Platinet
0 question about this device. Answer the ones you know or ask your own.
Ask a new question about this device
Download the instructions for your Alarm Clock in PDF format for free! Find your manual PAC5 - Platinet and take your electronic device back in hand. On this page are published all the documents necessary for the use of your device. PAC5 by Platinet.
USER MANUAL PAC5 Platinet
A QUICK LOOK AT YOUR DEVICE

Important Safety Precautions
When using your Alarm Clock Wireless Charger, basic safety precautions should always be followed, including
the following:
- READ ALL INSTRUCTIONS BEFORE USING YOUR ALARM CLOCK WIRELESS CHARGER.
- Do not use your alarm clock wireless charger near water. Clean using a soft cloth.
- Do not place your alarm clock wireless charger on any wet surfaces.
- Do not allow children or the infirm to play with your alarm clock wireless charger without adult supervision.
- Do not expose your alarm clock wireless charger to excessive heat, flames or fire.
- Always press all buttons or switches carefully. Do not manhandle your alarm clock wireless charger.
- Do not use in extremely dry environments, as this can lead to static discharge during usage.
- Do not expose your alarm clock wireless charger to temperatures above 45^ C or below 0^ C. Keep out of direct sunlight.
- Do not attempt to repair this product yourself.
- Do not drop, puncture or expose your alarm clock wireless charger to excessive trauma.
- Unplug your alarm clock wireless charger during lightning storms.
- Keep the distance between the implanted medical device (cardiac pacemaker, implantable cochlea, etc.) and the alarm clock wireless charger >20CM to avoid potential interference with the medical device.
Package Contents
-Alarm Clock Wireless Charger
-USB Charging Cable
-User's Manual
Specifications:
Input: 5V/2A
Wireless Charging Output: 5W (MAX)
USB Output: 5V 1A (MAX)
Charging Efficiency: 73%
Transmission distance: ≤8mm
Product Size: 140*98*75mm
○,1、Power On:
Plug the USB end of the charging cable into the power adapter and the Type-C port into the product.
○,2、Wireless Charging:
- Output power: 5W
- About the indicator light:
Turn on the power: the indicator light flashes 2 times;
Standby: No indicator light;
Charging: Indicator light keeps on;
Fully charged: Indicator light turns off (Applicable to Android mobile phone only);
FOD( Foreign Object Detection): Indicator light keeps flashing.
○,3、Clock:
3.1. Time Mode Setting:
Double-click the "M" button to switch between the 12-hour and 24-hour system; the 12-hour system has AM and PM display.
3.2. Alarm Clock and Time Setting:
- Press and hold the "M" button to set alarm clock 1 and alarm 2 respectively.
- Press and hold the "M" button for 2 seconds to set the alarm 1, when the time on the display screen start flashing, press the +/- button to set the minute of the alarm clock 1, then short press "M" button to switch to set the hour of the alarm clock 1. If no further operation within 5 seconds, the settings will be saved. You could also short press the alarm button to save the settings.
- Press and hold the "M" button for 2 seconds twice to set the alarm clock 2, when the time on the display screen start flashing, press the +/- button to set the minute of the alarm clock 2, then short press "M" button to switch to set the hour of the alarm clock 2. If no further operation within 5 seconds, the settings will be saved. You could also short press the alarm button to save the settings.
- Press and hold the "M" button for 2 seconds three times set the time of the clock. Press the +/- button to set the minute of the clock, then short press "M" button to switch to set the hour of the clock. If no further operation within 5 seconds, the settings will be saved.
3.3. Turn on/off the Alarm Clock:
- Press and hold the ALARM button to turn on the alarm 1 (Alarm Clock 1 indicator light will be on), long press the ALARM button to turn off the alarm 1(Alarm Clock 1 indicator light will be off).
- Press and hold the ALARM button twice to turn on the alarm 2 (Alarm Clock 2 indicator light will be on), long press the ALARM button to turn off the alarm 2 (Alarm Clock 2 indicator light will be on).
- When the alarm clock rings, pressing any button can turn it off.
- Ring mode: The alarm clock rings for 30 seconds, then stop for 10 seconds, repeat this for 3 times.
- When the alarm clock rings, tap the product to enter a snooze mode, it will ring again after 5 minutes for 3 times. ( Any tap during the snooze mode will turn off the snooze mode, and the alarm clock indicator light stop flashing and it will not ring again.) It has only one snooze mode chance for each alarm. When it's in the snooze mode, the alarm clock indicator flashes, and by pressing any button could exit snooze mode.
3.4. Display Screen Brightness Setting:
- The light brightness of the display screen has 3 levels: Strong / Medium / Weak / Off. It changes periodically: AM7:00-PM7:00---Strong; PM7:00-AM0:00---Medium; AM0:00-AM6:00---Weak
- You could also adjust the brightness by short pressing the “+/-” button. The light will be off after you short press “-” button when in weak brightness.
3.5. Time memory:
- Please remove the isolating sheet from the button cell before using the product to have the time memory function start working.
- The button cell battery is for memorizing the time of the clock only, when the product is out of power supply suddenly.
- To keep all functions working please keep the product power on.
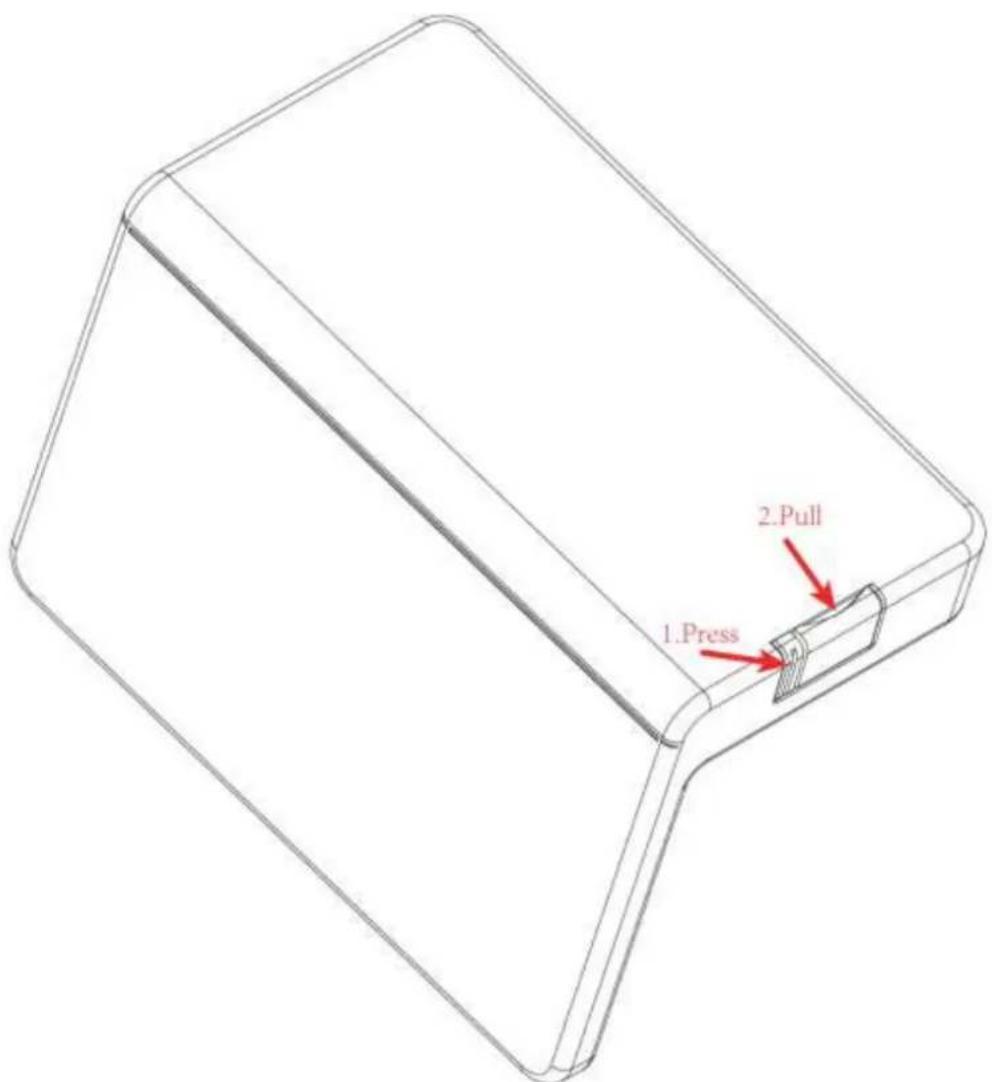
- When the button cell is running out of battery, to ensure time memorizing function please replace with a new button cell. Press the cap and then pull it out to replace a new one.
○,4、Note:
-
To ensure 5W wireless output it's necessary to use a 5V/2A power adapter.
-
The total output of the product is 5W (Max.), it's not suggested to use the wireless charging and USB charging at the same time, so to have quicker charging speed for your device.
Maintenance and Care
--Use a soft cloth or paper towel to clean your alarm clock wireless charger. Never use any harsh chemicals or detergents for cleaning. Make sure your alarm clock wireless charger is dry before charging.
--When your alarm clock wireless charger is not in use, it should be stored in a cool, dry place.
--Never tug or yank on the USB cable while it is connected to your alarm clock wireless charger. Connect and disconnect cables as carefully as possible.
--Never expose your alarm clock wireless charger to high temperatures, or extreme cold.
--Please recycle or dispose of your alarm clock wireless charger properly based on the laws and rules


Brand : Platinet
Model : PAC5
Category : Alarm Clock