
Misha - Keyboard EVENTIDE - Free user manual and instructions
Find the device manual for free Misha EVENTIDE in PDF.


| Product Type | Microtonal Keyboard Controller |
| Number of Keys | 37 |
| Key Type | Full-size, velocity-sensitive, polyphonic aftertouch |
| Connectivity | USB-C (power and data), MIDI 5-pin in/out, 1/4" sustain pedal input |
| Power Supply | USB-C bus-powered or 9V DC center-positive, 500mA minimum |
| Dimensions (W x D x H) | 19.5 x 8.0 x 2.5 inches (495 x 203 x 64 mm) |
| Weight | 7.5 lbs (3.4 kg) |
| Microtuning Support | Full programmable microtonal scales and temperaments |
| MPE Compatibility | Yes, per-note pitch, timbre, and pressure |
| Built-in Controls | Octave transpose, scale selection, modulation wheel, pitch wheel |
| Display | OLED screen for scale and parameter info |
| Included Accessories | USB-C cable, Quick Start Guide |
| Maintenance | Wipe with a soft, dry cloth; avoid liquids and abrasives |
| Safety | Low voltage device; only use supplied or equivalent power adapter |
| Spare Parts & Repairability | Contact Eventide support for key replacements or repairs |
| General Information | Designed for musicians exploring microtonal music and alternate tunings |
Frequently Asked Questions - Misha EVENTIDE
User questions about Misha EVENTIDE
0 question about this device. Answer the ones you know or ask your own.
Ask a new question about this device
Download the instructions for your Keyboard in PDF format for free! Find your manual Misha - EVENTIDE and take your electronic device back in hand. On this page are published all the documents necessary for the use of your device. Misha by EVENTIDE.
USER MANUAL Misha EVENTIDE
Eventide is a registered trademark of Eventide Inc. All other trademarks contained herein are the property of their respective owners. © 2023 Eventide Inc.
Contents
Introduction 3
What's in the box 4
Installation 4
Quickstart Guide 5
Knobs, Buttons & Display (Play Menu) 9
Menus 12
Play Menu 12
Auto Play Menu 13
Clock Menu 14
Note Range Menu 14
Scales 16
Scale Selection 16
Factory Scales 16
User-defined Scales 16
Modes 16
User-Assignable Buttons 18
Tone Row 20
What is a Tone Row? 20
Manual (non-automated - Play Menu) 22
Automated 23
Interval button sequence (Auto Play menu) 24
Play Options (Auto Play Menu) 27
Interval Button Option (Auto Play Menu) 28
Polyphony 31
Chords 31
Chord Menu 32
MIDI Out 33
CV Out 33
MIDI 34
MIDI In 34
MIDI Out 35
MIDI PassThru 35
MIDI Sync, Clock Etc. 37
USB Jack 38
Play Misha With A USB Computer Keyboard 38
Presets 39
Save 40
Load 40
Home 40
AudioOut41
Setup Menu 41
Button Functions 42
CV Outputs 42
CV Inputs 43
MIDI 46
Clocking 48
Scales 48
SD Card 50
System 51
About Misha 53
Online Help 53
Updating Firmware 54
Factory Reset 55
APPENDIX 56
Physical/Electronic Specifications 56
Default Setup Parameters 56
Default MIDI Note Map 57
Default USB Keyboard map 58
MIDI Implementation Chart 61
MIDI adapter: 5 pin DIN to stereo 3.5mm 63
LEGALESE 63
Safety and Warranty 63
Introduction
Misha™ is an innovative, interval-based musical instrument and sequencer. It's designed to be played like a keyboard instrument and yet it makes music in a way unlike any instrument before it. It's been said that Misha lets you make music in spite of yourself.
What's the advantage of this kind of approach? Misha has a way of helping you discover new musical ideas, even ones you didn't consciously create. Another advantage is to
make it easy for people with little or no musical training to create melodies on the fly. How? Keep reading and learn how easy this can be.
What's in the box
Your Misha comes with the following:
- Misha 28 HP Eurorack module
- Quick Reference Guide
- Micro USB cable
- Micro SD card
- IDC power supply cable
- Mounting screws
- Eventide sticker
Installation
- Power off your Eurorack system
- Locate 28 HP of space in your Eurorack case
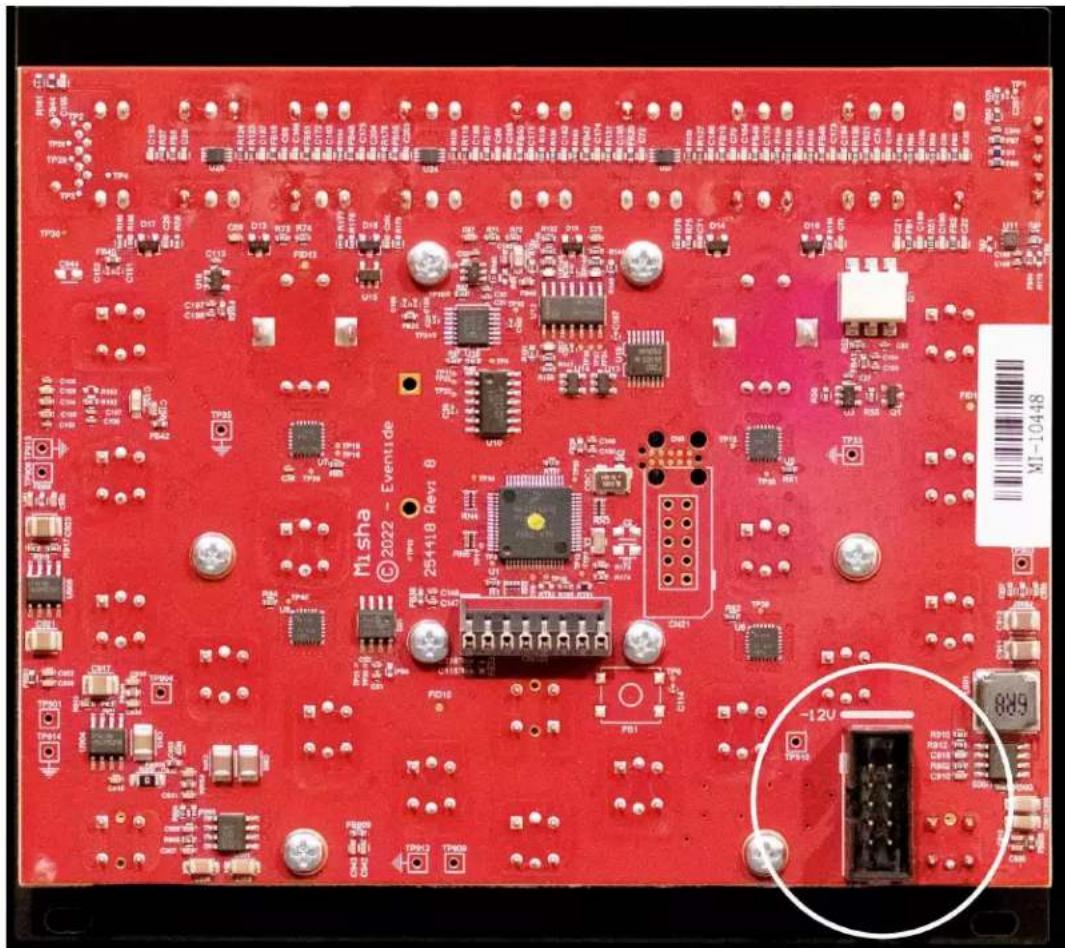
- Connect the 10 pin side of the IDC power cable to the 2x5 pin header on the back of the module, confirming that the red stripe on the power cable is connected to -12V (next to the solid white line)
- Connect the 16 pin side of the IDC power cable to the 2x8 pin header on your Eurorack power supply, confirming that the red stripe on the power cable is connected to -12V
-
Install Misha in your Eurorack case
-
Power your Eurorack synthesizer system on
Quickstart Guide
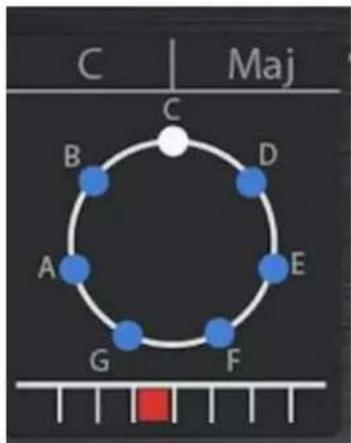
To see how Misha differs from a traditional keyboard, power up the unit and connect the audio out jack to a mixer, amplifier, or headphones to hear the unit's internal tone. By default, the unit will be in C major, starting on middle C as displayed below:
Press these buttons to play the tune, "Mary Had a Little Lamb":
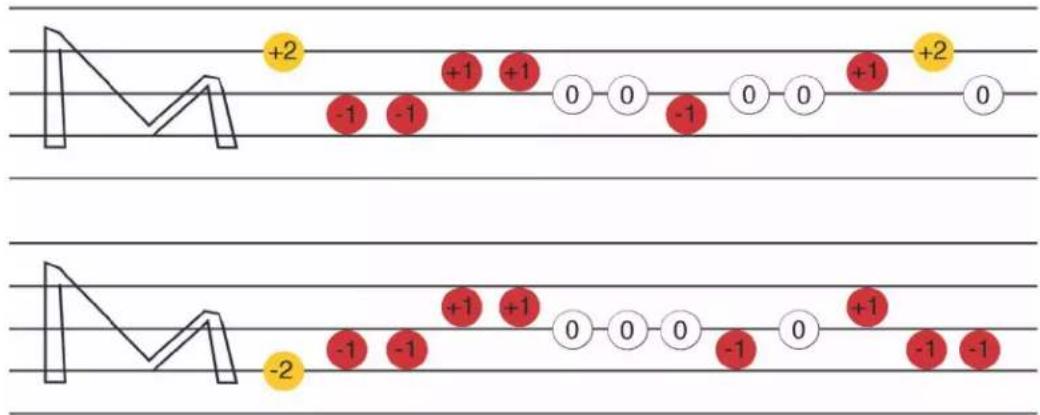
Now, play the tune on any traditional keyboard by playing these notes/piano keys.

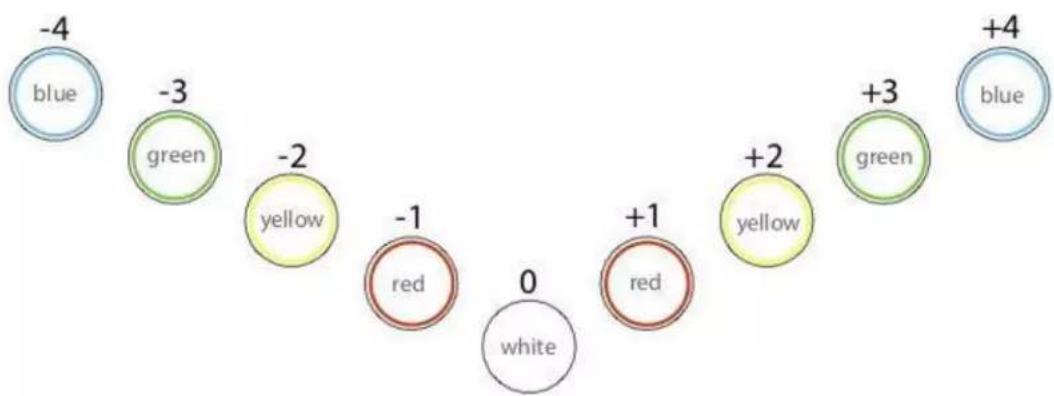
Misha's buttons are interval-based. This introduces a new perspective even for a trained musician, but offers the untrained a simple path to creating melodies. Rather than fixed tones, the buttons represent movement, up or down a given scale.
bubble
| Color | Value | |---|---| | blue | -4 | | green | -3 | | yellow | -2 | | red | -1 | | white | 0 | | red | +1 | | yellow | +2 | | green | +3 | | blue | +4 |Misha's panel has 18 control buttons and all are dedicated to performance. Nine of the control buttons are 'primary' controls and are arranged not unlike one octave of a piano keyboard. Like any other keyboard instrument, when you press a button, a note is sounded. Unlike the keys of a piano keyboard however, Misha's buttons are not 'tied' to a given note. They are 'tied' to the intervals of a musical scale.
Play middle C on a piano keyboard and you'll always hear middle C. Press Misha's middle button (labeled "0") and you'll hear the last note that you played. If you played C last, you'll hear C again.
Now return to the Misha keyboard. If you press +1, you'll hear D. If you press +1 again, you'll hear E. Try some other interval buttons, maybe alternating -2 and +1 in order to hear a simple descending pattern. Try different combinations of interval buttons to hear what comes out.
Take a look at the “solfege wheel” in the center of the display. The notes of the currently selected scale are arranged in a circle, in ascending order of pitches covering an octave. As you play, you will see your current position represented by a white dot that moves around the circle, and at the center of the display the note is spelled out (e.g. Eb). There is also an option also to use solfege symbols (“Do, Re, Mi”) in place of note names.
Misha also greatly simplifies the process of playing in different key signatures.
Try this: Turn the knob to select a new key. Now you can play the exact same sequence of intervals in a different key. Make sure you are starting at the root of the scale (the white dot needs to be at the top of the circle) and play “Mary Had A Little Lamb” again.
You can play specific melodies, as in the example above, or you can just improvise something. Play around now, and see what you discover.
While you are exploring, try out some other scales. Misha also lets you do this easily. Whatever pattern of intervals you learn to play in one scale applies equally well to other scales.
Try this: Find a pattern of interval buttons you like and then turn the Scale Knob to select a new scale. Now when you replay that same pattern, the overall “contour” of your phrase will be preserved, but Misha will play it using the notes of the new scale you picked.
Knobs, Buttons & Display (Play Menu)
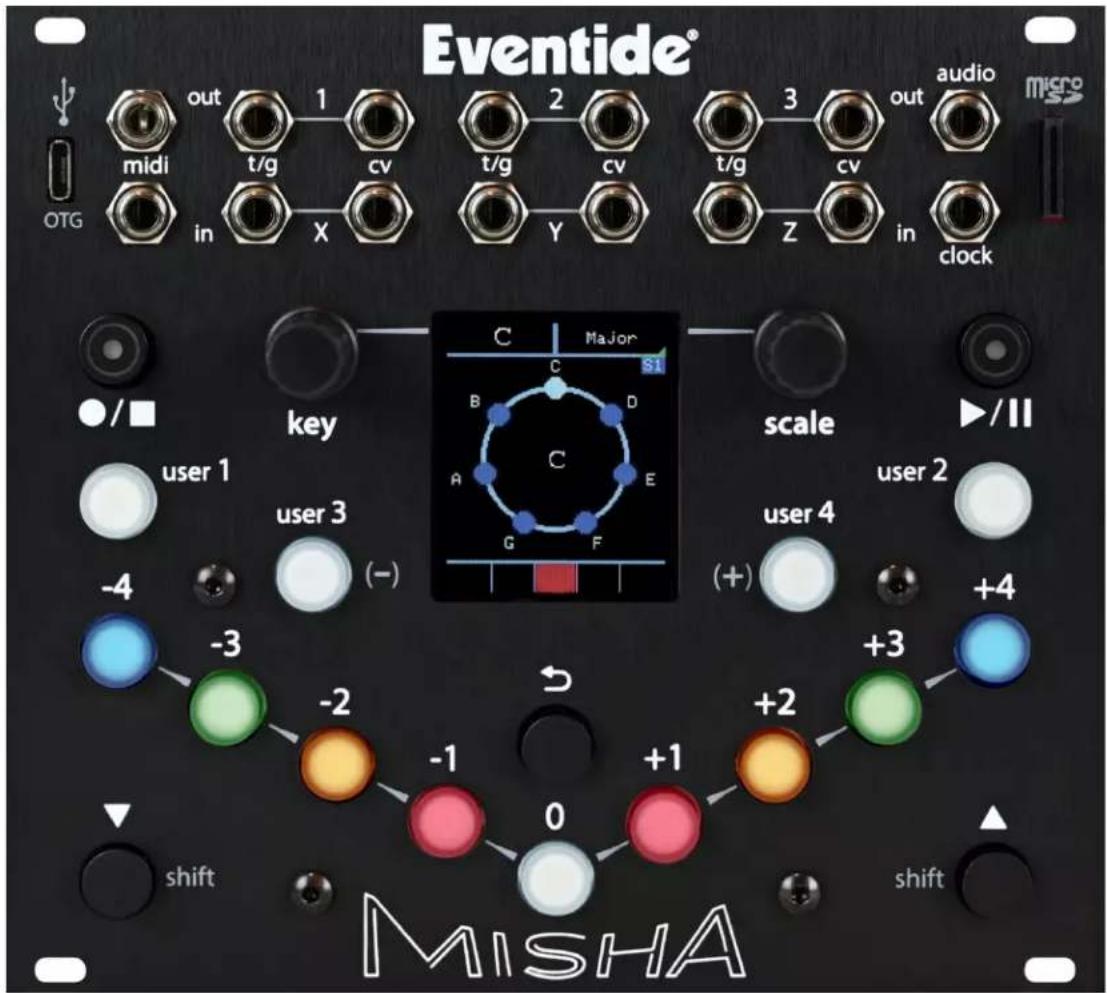
Here is a description of what the various knobs, buttons do and what the display shows when in the opening menu, "Play Menu".
Key Knob
Turn the Key Knob to set the key signature. The key signature is displayed on the LCD above the solfege wheel, on the left.
Scale Knob
Turn the Scale Knob to select a scale. The scale is displayed on the LCD above the solfge wheel, on the right. See “Scales” section below for more detail.
●/■ (Record/Stop):
Initiates recording Tone Row pattern (LED turns red), or stops and exits Tone Row playback (LED turns off). (Please see "Tone Row" section below.)
If there is a Tone Row in memory, but the tone row is neither playing nor in pause, then press and hold Scale Knob and then press to perform the Tone Row once through ("Play Once").
▶/II (Play/Pause):
Plays the Tone Row from the beginning of the sequence. If an internal or external clock is detected, then the Tone Row will continue to play automatically. If you are currently recording a Tone Row, pressing this will terminate the recording early, sending it into playback.
Once the Tone Row is playing back, /tbggles a pause in the Tone Row, leaving the user still in Tone Row playback.
LCD screen
Key And Scale Indicators
The top left and right of the display indicate the key and scale we are currently in, respectively.
Solfege Wheel
Graphically displays notes of scale, note position and name.
Octave Display
Boxes below the solfege wheel indicate current octave and number of octaves in the current note range.
User Buttons
These perform user-defined functions. See "User-Assignable Buttons" section below.
Undo ( )
This is the “undo” key; it returns you to the previous note. Besides being useful in general playing, this is also helpful in learning a new melody. If you hit the wrong note, then press and you will hear the previous (different) note and this time hopefully you can locate the correct button to press. That is, undoes the last (non-zero) move.
If in a Tone Row, restarts the Tone Row when it is pressed (when in Play or Auto Play menu).
Interval Buttons
These nine buttons (-4,-3,-2,-1,0,+1,+2,+3,+4) form a kind of keyboard - an interval keyboard. They are a good starting point for making music. Let's take a trivial example: If
the scale selected is chromatic, then pressing the +1 button repeatedly steps through all twelve notes of the scale. But one can move forwards by two, or backwards by three, etc. So one can imagine that the twelve notes are the numbers on the face of a clock, and one is moving around the clock by jumping forwards and backwards from number to number.
▲(Left Shift) and ▼(Right Shift) buttons
These decrement/increment through the 4 menus. Press and hold each one or the other to bring up various screen options as well.
Menus
There are 4 menus: Play, Auto Play, Clock, and Note Range. We've just seen the basics of what the various knobs and buttons do in the Play Menu. Let's see now in detail how they function in all four menus. (The functions of the knobs and buttons change, depending on which menu you are in.)
To cycle through this set of 4 menus, press the ▼ or ▲ button. Bounce back immediately to the Play Menu by pressing both ▼ and ▲ simultaneously. From the Play Menu, the first press of either ▼ or ▲ will bring up the last menu viewed.
Play Menu
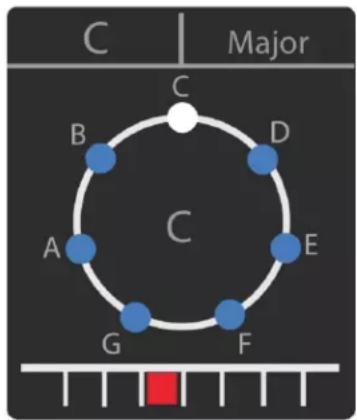
The Play menu is for real-time performance and recording your Tone Row sequences.
- Press the Interval buttons to perform the intervals -4 to +4
- The Key Knob scrolls through musical keys as you rotate it. Press and hold the Key Knob while rotating it to load a new key signature on release
- The Scale Knob scrolls through the scales as you rotate it. Misha contains 200 slots for scales: 4 banks of 50 scales, with 2 banks of factory scales and 2 banks of user scales. Press the Scale Knob to cycle through these 4 banks of scales. If the currently selected scale contains modes (indicated by a green triangle next to the scale name), press and hold Scale Knob while rotating to access the modes of that scale
- Pressing the user buttons perform user defined functions.
- The bottom row of the menu shows the octave range and current octave of note playback
-
You can press and hold Key Knob + any user button to assign functions to the user buttons
-
If a Tone Row is not playing, you can press and hold Scale Knob and then press the User 3/4 buttons to load a random key or scale.
- If a Tone Row is not playing, press and hold Scale Knob and press to go "home" (returns you to the root of the scale in the middle register).
- If a Tone Row is playing, you can press and hold Scale Knob and press ↻ to reset the Tone Row to its initial conditions: Play Option: Prime, Inverted: Normal, Sequence: +1
Auto Play Menu
(This menu appears only when a Tone Row is auto-playing.)
flowchart
graph TD
    A["A"] --> B["B"]
    B --> C["C"]
    C --> D["D"]
    D --> E["E"]
    E --> F["F"]
    F --> G["G"]
    G --> A
    style A fill:#000,stroke:#000
    style B fill:#000,stroke:#000
    style C fill:#fff,stroke:#000
    style D fill:#fff,stroke:#000
    style E fill:#fff,stroke:#000
    style F fill:#fff,stroke:#000
    style G fill:#fff,stroke:#000
    subgraph PRIME
        direction TB
        A --> B --> C --> D --> E --> F --> G
        B --> C --> D --> E --> F
    end
    subgraph TRANSLATE
        direction TB
        C --> D --> E --> F
        D --> G
        E --> F
        G --> H["MED | RESTART | 0"]
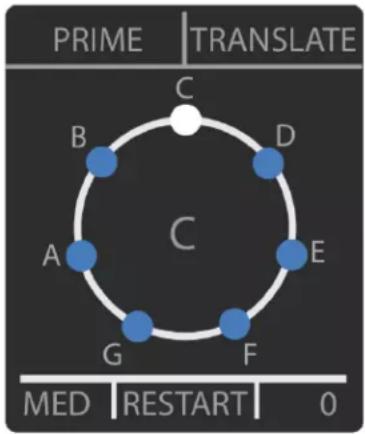
Once our Tone Row is playing back, we'll be brought automatically to the Auto Play Menu, which deals with different ways to manipulate and play back your Tone Row.
- Pressing the Button will stop the Tone Row. After pressing, I you press Your Tone Row will play from the beginning of the sequence. If instead you press again, you'll start recording a new Tone Row
- Pressing the button while the Tone Row is playing will pause the sequence. Pressing it again will resume the sequence from where you left off.
- Pressing the ∼ button will immediately play the sequence from the beginning.
- Pressing User 3/4 will shorten/lengthen the note length. The note length is displayed in the bottom left corner of the screen.
- Press and hold Key Knob + ↘ to invert the sequence.
- Rotate the Key Knob to select Play Option. Press in and rotate the Key Knob to select Play Option on release. (See “Play Options” in the “Tone Row” section below.)
- Rotate Scale Knob to select Interval Button Option. Interval buttons act according to which interval button option is chosen at top right of screen. (See “Interval Button Option” in the “Tone Row” section below.)
-
Press in and rotate Scale Knob to select value according to the Interval Button Option selected.
-
Press in Scale Knob and press user 3 to get the last value, according to Interval Button Option.
- Press in Scale Knob and press ↻ to reset the currently selected Interval Option.
Clock Menu
chemical
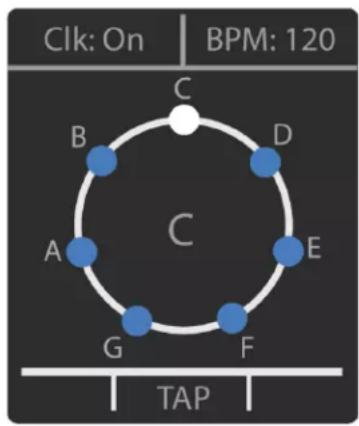
Circular DNA replication diagram with labeled positions (A–G) and time markers (Clk: On, BPM: 120)The clock menu displays the clock source/status and BPM.
- Rotate the Key Knob to turn the internal clock to "On", "Off" or "MIDI". Connecting an external clock source to the clock input automatically sets the clock to external
- Rotate the Scale Knob to adjust the BPM in increments of 1. Pressing + turning the Scale Knob will adjust the BPM in increments of 5
- Press the \~ button repeatedly in time to set a tap tempo for the internal clock
Note Range Menu
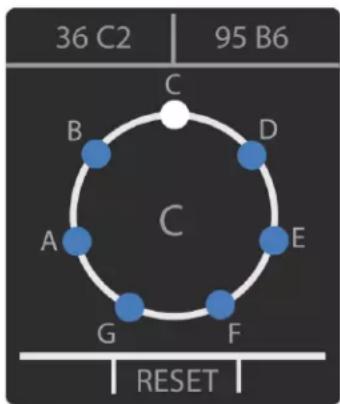
flowchart
graph TD
    A["A"] --> B["B"]
    B --> C["C"]
    C --> D["D"]
    D --> E["E"]
    E --> F["F"]
    F --> G["G"]
    G --> A
    style A fill:#000,stroke:#000
    style B fill:#000,stroke:#000
    style C fill:#fff,stroke:#000
    style D fill:#000,stroke:#000
    style E fill:#000,stroke:#000
    style F fill:#000,stroke:#000
    style G fill:#000,stroke:#000
    note right of A: 36 C2
    note right of B: 95 B6
    note right of C: RESET
The Note Range Menu allows you to optimize the note range for different sounds and scales. This can be done while the sequence is playing, which can create many interesting results.
- The Key Knob sets lowest note value
- The Scale Knob sets highest note value
- Your note Ranges are saved within the preset and Pressing the ∼ Button will reset the note range
- Press ∼ to load min/max values from last loaded preset - see System/Note Range Home for how this is defined.
Scales
Scale Selection
Make sure you are in the Play Menu, then turn the Scale Knob to select a musical scale. Press and release the Scale Knob to cycle through the 4 banks of scales, 50 scales each: S1, S2 (factory scales) and U1, U2 (user scales).
Factory Scales
Misha comes pre-loaded with 100 scales, bank S1 and S2, which are generally grouped by type of scale:
- Well Known (Major, Chromatic, Pentatonic, etc.)
- Octave-repeating subsets of the Chromatic scale (from 4 to 11 notes per scale)
- Key Modulating (non-octave repeating) subsets of the Chromatic scale
- Xenharmonic (microtonal) - various equal tempered scales, scales from around the world
The complete list of factory scales can be found in the Scales and Modes supplemental document.
User-defined Scales
User Banks U1 and U2 each contain 50 slots, and each slot can be filled with one of the factory scales, or with a scale written by the user in Scala format. (See the section below in Setup called "Scales" for more information on Scala).
By default, U1 and U2 are pre-loaded with the same scales in S1 and S2 (factory scales), but can be overwritten with either type of scale mentioned above. To load a factory scale into a particular user scale slot, use the menu item "Setup/Scales/Bank Mapping". User scales are loaded from the SD Card by means of the menu item, "Setup/Scales/Add Via SD Card".
Modes
If you see a green triangle at the bottom right of the scale name, that means there are modes available for that scale, which you can select by pushing in the Scale Knob and rotating it to the desired mode. The root note of the scale mode appears at the top of the wheel and both the root note and mode name are colored green.
The complete list of modes for the factory scales can be found in the Scales and Modes supplemental document. In the Extended Scala format for Misha supplemental document, you will find instructions on how to write a scala file for Misha that contains modes.
There are two ways Misha handles changing the key signature when you move to and from modes: "Preserve Root" and "Preserve Key". This is a setting in "Setup/System/Scale Mode", and the default is "Preserve Root".
For example, if in a Major scale, in order to get the second mode, Dorian, of the diatonic scale, you would press in the Scale Knob and rotate it once clockwise. Let's say you are in C Major. If your "Scale Mode" is set to "Preserve Root", then the display will read "C Dorian" and the notes of the scale will be C-D-Eb-F-G-A-Bb.
If instead you are set to "Preserve Key", then the display will read "D Dorian" and the notes of the scale will be D-E-F-G-A-B-C.
In either case, to return to the root, which is to say the top note of the solfege wheel, one can press 'home' - either via MIDI or pressing user 1/2/3/4 if it assigned to one of those; or, if in Play Menu and not in auto play by means of the button combination of holding the Scale Knob down and pressing the ∼ button.
User-Assignable Buttons
These four 'soft' buttons, User 1-4, perform a function defined by the user. The factory default for User 1/2 is -/+ 1 octave. I.e., when set to the default, pressing user 1 will repeat the last played note but 1 octave lower; user 2 sounds 1 octave higher. The default for User 3/4 is chr-/+ (sounds a chromatic step lower or higher).
Note that while these pairs of buttons, User 1 & User 2, and User 3 & User 4, are similar, there are a few differences.
- User 1 and User 2 are saved to and recalled by Misha presets, whereas User 3 and User 4 are global settings, unaffected by the loading of presets.
- The function ‘chromatic’ can be assigned only to User 3 and User 4.
To assign a function to one of the user buttons, one presses and holds the Key Knob and then presses the user button (1, 2, 3 or 4) which is to be assigned. This brings up the following list to choose from, which includes a range of interval buttons, as well as other functions:
- Same Interval: Repeats the interval from the last button pressed. I.e., the sequence +3, SAME results in +3, +3, whereas -2, SAME results in -2, -2
- Same Pitch: like SAME, but repeats the actual frequency ratio, rather than the number of steps, even if it results in a note not in the current scale. As an example, let's say one is in the key of C, and let's say previously that one has started on the note D and pressed +1 to go to E. SAME button will move the user to next note in the current scale, F, but SAME PITCH will repeat the whole tone interval and the user will land on F#.
- Random Interval: a random interval.
- Undo ( ): undoes the previous interval move, returns you to the previous note
- Undo -/+ 1: same as the undo function, except that it increases or decreases the interval by one step.
- Octave -/+1: moves you up or down an octave, making a tone like any other interval button
- Octave -/+2: moves you up or down two octaves, making a tone like any other interval button
- Move Pitch: -14, -13, ..., -6, -5, -4, -3, -2, -1, 0, +1, +2, +3, +4, +5, +6, ..., +13, +14
- Momentary mute: while depressed all button pushes are silenced
- Home (sounding): returns you to the root of the scale (or mode if selected) in middle register and plays that note
- Chr Shift -1, +1
Chr shift functions do not make sound when depressed, but rather flatten or
sharpen whatever other notes are sounded while they are depressed. You can think of the analogy of the chromatic shift key on a harmonica.
In addition one can also assign to User 3/4:
- Chromatic (default)
If chromatic is selected on either of these two user buttons the other will also be assigned chromatic. Chromatic buttons sound a note one step chromatically down (user 3) or up (user 4) from the previously sounded note. For a diatonic scale, “chromatic” is a half step, but more generally “chromatic” is defined in the scale data. E.g., in a microtonal scale, typically it would be halfway from the first to second note of the scale.
Tone Row
The Tone Row is the basis for Misha's sequencing functions. One can record and play back such a sequence of pitches either manually or in an automated manner.
What is a Tone Row?
Traditionally, a “Tone Row” is an ordered series of twelve notes in the standard Western chromatic scale, without any note repeated. In other words, each note is only played once within the twelve note sequence. The Tone Row is a technique used in serial composition, generally attributed to the composer Arnold Schoenberg, who developed it in the 1920’s. In serial music, the note series of the Tone Row then becomes a “motif” that is then used in various ways throughout the work.
In Misha's Tone Row mode, the user creates a Tone Row by pressing interval buttons. Misha partially automates the creation process by making sure that the next pitch hasn't been played already. Misha also extends the concept of the Tone Row by allowing a Tone Row to be created in any scale, not only the traditional twelve-tone (chromatic) scale. (As an example, one can create a Tone Row using the 20 note equal tempered scale).
There are 2 stages to Tone Row Mode: recording and playback. Once the Tone Row is recorded, the user can play back the Tone Row either manually - by pressing interval buttons (or sending in remote commands via MIDI, USB keyboard or CV Inputs) - or automatically, if there is an internal or external clock running.
Recording: Pressing the button turns Tone Row on and off. In Tone Row mode the LED lights RED while you fill up a Tone Row by pressing the interval buttons. When the Tone Row is completely populated the LED turns off and then LED lights up green. When creating the Tone Row, if the interval button you have pressed would result in a note already used in the series then the next unused pitch (in the direction of that interval) is chosen. (Bear in mind that the repetition of a note in a different octave is also generally not allowed - i.e., if you already have F#4 in the series you cannot also have F#5. However, in Setup/Tone Row Octaves one can choose an option to allow repeats in another octave.)
Note also that while recording a Tone Row, some features are disabled, including changing of key or scale, and also going into the settings menu. If you wish to leave the recording stage and abandon the creation of the Tone Row, simply does a second time to cancel out of it.
Misha will switch into the PLAY stage of Tone Row mode when the sooner of these occurs: either all the notes of the scale have been used up, o▶the button is pressed to create a Tone Row prematurely, i.e. with fewer than the total number of notes of the scale.
Playback: when in this mode the green LED of the button is on and not flashing, and the interval button lights have reversed functionality, which is to say they are blank except when that interval is triggered. If there is no clock, the user can now play back the series exactly as it was recorded, by repeatedly pressing “+1”. In addition, the user can also move through the series forwards, backwards, skipping every other note, etc. by playing other interval buttons, which in this stage are re-purposed to be steps within the series that has been recorded. Thus, a +/-n button will move +/-n steps within the recorded series, not within the current scale.
Note that while the user is in playback stage, pressing toggles a pause in the Tone Row. Pressing play a second time will resume playback from where the user left off.
If you are in either the Play or Auto Play Menu, then you can restart the sequence on the first note of the recording by pressing ↻("RESTART"). This is useful in the case of a pattern of odd length, in the case that you want to start it on the downbeat, thereby "squaring it off".
When you are finished with Tone Row Mode, pressing and releasing the button switches Misha from Tone Row mode back to performance mode. The latest recorded Tone Row can be accessed at any time by pressing the button
In the following examples it is assumed the clock - whether internal and external - is off.
Example #1
You are on middle C in the chromatic scale, and press the button. (Note that in the following description, each time you hear a note it will be added to the Tone Row.) You press 0 to start (Adds C). Then pressing +1 will move you to C#. Pressing -1 will move you to B (Skipping over C as it has been used already). Pressing +1 will now move you to D (this is because we are skipping over C and C#, which we have already heard). Pressing -1 will move you to A# (this because we have already heard all the notes between B and D). Pressing -3 will move you to G (as normal). Pressing ▶/II will bring us to stage 2, playback. (Note that in this case we have stopped the Tone Row prematurely at six of twelve notes.) Thenpressing +1 repeatedly will sound C, C#, B, D, A#, G, and then again C, C#, B, D, A#, G etc. (the sequence we recorded). Pressing button will play the first note of the Tone Row, then -1 repeatedly will sound G, A#, D, B, C#, C, G, A#, D, B, C# etc. Try other combinations of the interval buttons to obtain interesting results.
Example #2
You select the 20 tone scale and press ■ Start pressing interval buttons but this time don't press the button, letting the software decide to end the sequence automatically when all 20 notes are used up. Once in the playback stage, try different combinations of repeating interval buttons to hear some unusual patterns. By using only a few buttons in a repeated, cyclical manner, one can create complex musical patterns.
Key Knob in Tone Row Mode (Play Menu)
In the setup menu, the Key Sig Order can be configured to change keys chromatically, or by the circle of 5ths.
Chromatic
Turning the Key Knob clockwise will result in the same pattern being heard but a chromatic step higher for each click and a chromatic step lower for each click if turned counterclockwise.
Circle of 5ths
Turning the Key Knob clockwise will result in the same pattern being heard but a 5th higher for one click, then a 4th lower than that for the second click, and then repeating those two movements for each click.
Similarly, turning the Key Knob counterclockwise results in a 5th lower for each click, and then a 4th higher than that for the second click, and then those two movements repeat.
So, every two clicks the octave is adjusted so the pattern stays in more or less the same register. In fact, every two clicks the key and register will match what it would have been had it been set if the order had been set to chromatic and the knob turned two clicks in the same direction.
In either case (chromatic or circle of 5ths), turning this knob a good number of rotations is one way to move a Tone Row up or down in register.
Scale Knob in Tone Row Mode (Play Menu)
In Tone Row Mode, when the Scale Knob is turned, Misha will preserve the “melodic contour” - the interval relationships - of the original pattern, beginning on the same note (or the closest note possible) of the original pattern, but playing back in the new scale selected. Each scale has a different number of notes in it; therefore, by recording a Tone Row in a scale with many notes and playing it back in a scale with fewer notes one can create more complex patterns that one wouldn’t be able to create by recording and playing back in the second scale alone, since the maximum number of notes in a Tone Row is the number of notes in the scale.
Manual (non-automated - Play Menu)
(Note that if a Tone Row is played back from a MIDI controller into MIDI In, the MIDI velocities of the live notes will override the velocities stored with the Tone Row.)
- Record/Stop
Begins recording a Tone Row.
- Play/Pause
Plays the Tone Row from the start. This helps for playing a Tone Row live, because you can force the first note to be the beginning of the Tone Row, and therefore you can 'square' the pattern to 8 or 16 notes, etc.
- Button
Also plays the Tone Row from the start.
- Interval buttons
(including user 1/2/3/4)
As noted above, the interval buttons move the user through the Tone Row by jumps through the recorded sequence. This includes user-assigned functions such as "Same Interval".
Functions which Ignore Tone Row mode:
Other functions ignore the fact that you are in Tone Row, and may in fact take you out of the Tone Row or even the key signature/scale.
- chromatic
- same pitch
- +/-1 octaves (moves entire Tone Row up/down an octave)
- +/-2 octaves (moves entire Tone Row up/down 2 octaves)
These work as if we are not currently in a Tone Row, so they don't move through the sequence but instead they play a note the specified distance from the last note
Automated
The Tone Row will play automatically if the green light is on (Playback Stage), and it is receiving signal via Clock in or if internal clock is on)
●/■ Record/Stop
Begins recording a Tone Row.
▶/II Play
Begins Tone Row playback. The Tone Row will automatically begin playing back without pressing play if all notes of the scale are used.
▶/II Pause
If one presses ▶ while a Tone Row is playing, the instrument leaves auto play and is returned to non-auto (manual) play Tone Row Mode. The light flashes to indicate this pause. When the ▶ button is pressed a second time the Tone Row returns,
having advanced through the interval button sequence according to which buttons have been played live; if none have been played, then it picks up where it left off.
Button
Restarts the pattern at the beginning. This keypress is heard at the time the button is pushed, after which the incoming pulses dictate the timing of future notes.
Internal Clock
To access the settings of the internal clock, press and release the right shift button repeatedly until you see the Clock Menu. (Refer to Clock Menu in the Menu Navigation section). Internal Clock defaults to "on".
External Clock
Connecting an external clock source to the clock input jack automatically sets the clock to external.
Automation of Tone Row
Standard eurorack clock format is used to automate playback of the Tone Row by means of a pulse sent to "clock in" (or in the case that no cable is plugged in, if the internal clock is set to on). One first records a Tone Row as usual, and once/the button lights up to indicate we are in the playback portion of Tone Row, then (assuming an active clock is detected) the Tone Row will automatically play back at the tempo of the incoming clock signal.
Interval button sequence (Auto Play menu)
A newly recorded Tone Row will play back initially using the "Prime" play option, and in the order in which it was recorded - i.e., as if +1 were being repeatedly pressed in manual Tone Row mode. However, it is possible to change the order of intervals contained in the Tone Row, using what we are calling an interval button sequence. A newly recorded Tone Row begins with an interval button sequence of {+1}.
When a tone row begins to play Misha automatically moves the user to the Auto Play menu to start. To add or subtract from the interval button sequence, it is necessary that the user be on the Auto Play menu.
Adding to the Interval Button Sequence
If user 4 (+) is pressed and held, then pressing an interval button will cause that interval to be appended to the end of the interval button sequence. One can even add multiple instances of such sequence intervals.
That is to say, if we start with the default, +1 , and then press user 4 (+) together with “-2”, then we will hear the Tone Row being played back with this sequence +1, -2 , i.e., as if we were in manual Tone Row mode and a user pressed +1, -2, +1, -2 etc. Then,
pressing and holding user 4 (+) and then +3 will result in this sequence: {+1, -2, +3}, i.e., as if a user pressed +1, -2, +3, +1, -2, +3 etc
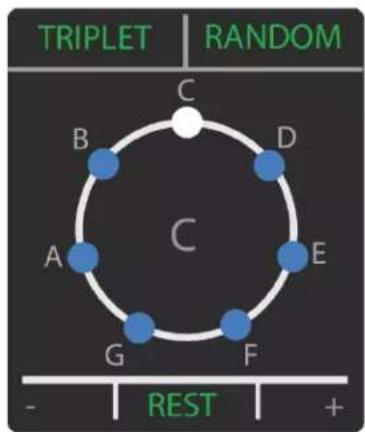
Subtracting from the Sequence
Pressing and holding user 3 (-) and then an interval button will cause all instances of that interval to be removed from that sequence. So to continue with the above example, if we then held and pressed user 3 (-) together with -2 then we would remove -2 from the sequence to yield +1, +3 . I.e., +1, +3, +1, +3 etc
Besides sequence intervals we can add other events to the interval button sequence:
Rest
This can be added to the sequence by pressing and holding user 4 and pressing ○. Puts a rest as the next event in the sequence.
"Triplet"
This can be added to the sequence by pressing and holding user 4 and pressing the Key Knob. This will play the next note in the sequence as three notes in quick succession - a “ratcheting” effect.
Random Step
This can be added/subtracted to the sequence by pressing and holding user 4 and pressing the Scale Knob. Like random play mode above, this randomly generates a step with the same parameters as above and then moves through the Tone Row using that step, always resulting in a note in the Tone Row.
User 1/2
If user 4 is pressed and held and then user 1/user 2 is pressed, then the function assigned to user 1/user 2 is added into the interval button sequence, exactly as if that function were performed live at that moment. This insertion does not affect the next note we hear from the interval button sequence.
For example, if the Random function is assigned to user 1/user 2 and one adds this into the interval button sequence with user 4, this will add a different random step to the interval button sequence each time it cycles around, before returning to normal sequence. Similarly, if for example octave + is added, then each time that comes up in the sequence we will hear an octave higher than the previous note. After this we return to the next interval in the interval button sequence.
Please note that some of these functions will sound notes that are not in the Tone Row or even the current scale.
Note: You cannot insert the following into a sequence:
- Momentarymute
- Home
- ChrShift-1
- ChrShift+1
- User3/4
Note Duration
The length of each note can be adjusted to be either short, medium or long. While in automated Tone Row mode, when in the Auto Play Menu, when user 3 (-) is pressed and released, the duration will decrease. If user 4 (+) is pressed and released, the duration will increase. If the clock division is changed the length type will remain the same (e.g., if changing the clock division from 14 to 1/16, then a medium length 1/4 note will become a medium length 1/16 note, say, which will last the same number of incoming pulses, but actually a different length of time)
Inversion
If in the Auto Play Menu, then pressing and holding the Key Knob and then pressing turns every interval in the Tone Row upside down ("INVERTED") - i.e., a positive movement becomes a negative and vice versa. Repeating this toggles you back to "NORMAL".
Play Once
If we are not currently playing a Tone Row - or in pause - but there is a Tone Row in memory, and there is an incoming pulse at "clock in" or the internal clock is on, then one can play one cycle of the Tone Row (as initially recorded, but in current scale, key and register) by pressing and holding Scale Knob and then pressing Play.
Other User Function Buttons
Same Interval, Same Pitch, Random Interval, Move -14 to +14, chromatic
All these buttons will play a note relative to the last note played but completely ignore the Tone Row. It will also play the note on the clock at the same tempo inserting before
the next step in the sequence. This allows you to manually insert random notes at desired places. A good example of this is to set a User Function button to Move Pitch 0. If you press the User button faster than the tempo, you will continue to play the last note played until you stop pressing the User button.
Play Options (Auto Play Menu)
There are eight play options: Prime, Retro, Random, Pendulum, Transpo ▲, Transpo ▼, Transla ▲, Transla ▼. To select one of these options, one must be in automated Tone Row mode, and in the Auto Play Menu. (If not, press either ▼ or ▲ repeatedly until the Auto Play Menu is visible.) Then rotate the Key Knob. The play option is displayed at top left. One can also press the Key Knob so that the play option turns green, and then rotate it, in which case the play option doesn't change until the Key Knob is released.
Prime
Misha moves forward through the interval button sequence.
Retro
Misha moves backwards through the interval button sequence.
Random
Randomly generates a sequence similar to the Tone Row, but with random variations in the interval traveled (within the Tone Row) at each step. So, for +1: the step can only be positive (0, 1, 2), and for -1 it can only be negative (0, -1, -2). So positive steps add positive randoms, and negative steps add negative randoms. The larger the step, the more random numbers to choose from.
Pendulum
Moves forward, then backwards through the Tone Row.
Note that the following four play options move the Tone Row up or down over time, so that at each cycle the Tone Row begins on a higher or lower note than the last cycle. This is an excellent way to create variation.
Transpo ▲(Auto-Transpose up)
Exactly like performing one clockwise click of Key Knob each cycle, where a cycle is the number of notes in the current Tone Row. So if the circle of 5ths setting is selected, then each cycle it adds one sharp to the key signature; if the chromatic setting is selected each cycle it raises everything by a semitone.
Transpo ▼ (Auto-Transpose down)
Exactly like performing one counter-clockwise click of the Key Knob each cycle, so if the circle of 5ths setting is selected, then each cycle it adds one flat to key
signature; if the chromatic setting is selected, then each cycle it lowers everything by a semitone.
Transla ▲(Auto-Translate up):
Similar to auto-transpose up, except it just moves the coming cycle up one step in the current scale and the key signature remains the same.
Transla ▼(Auto-Translate down):
Same as Transla ▲ but going down one step.
Interval Button Option (Auto Play Menu)
Interval Button Option defines what the interval buttons do during auto play. It is selected by rotating the Scale Knob when in the Auto Play Menu. The interval button option is displayed at top right. The interval button options are Interval, Clock Div, Transpose, Translate, Octave and Chord. This choice remains in force unless it is changed by the user, either by rotating the Scale Knob or by loading a preset with a different interval button option saved in it. These are the choices for interval button mode:
Interval
Interval buttons will temporarily insert an interval into the sequence, time-quantized to the current clock division of the sequence. The user can press as many interval buttons as he or she wants; when the notes are finished playing, the sequence returns from the position of the sequence where it was interrupted.
Clock Div
The speed of playback (relative to the Clock in tempo) can be adjusted. Below is a chart of how the interval buttons accomplish this (below d=dotted, t=triplet):
-4: 2:1 (192 pulses)
-3: 1:1 (96 pulses)
-2: 1/2d (72 pulses)
-1: 1/2 (48 pulses)
-0: 1/4 (24 pulses)
+1: 1/8d (18 pulses)
+2: 1/8 (12 pulses) *
+3: 1/16 (6 pulses) *
+4: 1/32 (3 pulses) **
This is to say, for example, that if +3 is pressed the speed will be the value of 16th notes.
And while pressing and holding the Scale Knob, you can rotate the Scale Knob to reach finer divisions of clock dividers. (Ones in bold are available by pressing an interval button):
4/1, 3/1, 5/2, 2/1, 3/2, 1/1, 7/8, 1/2d, 5/8, 9/16, 1/2, 7/16, 1/4d, 1/2t, 5/16, 1/4, 1/8d*, 1/4 t*, 1/8*, 1/16d*, 1/8t, 1/16*, 1/16t**, 1/32**, 1/32t**, 1/64t
*Currently not available in 1 PPQ
** Currently not available in 1 or 4 PPQ
Transpose
Adds flats/sharps to the playback.
-4: adds 4 flats
-3: adds 3 flats
-2: adds 2 flats
-1: adds 1 flat
0: returns to the key the Tone Row in which the Tone Row was recorded
1: adds 1 sharps
2: adds 2 sharps
3: adds 3 sharps
4: adds 4 sharps
This is the same as rotating the Key Knob, but with more immediate access
Translate
Increment/Decrements the entire Tone Row the specified scale steps. The Tone Row is shifted based on the music scale it was recorded in. Only -4, -3, -2, -1, 1, 2, 3, 4 are functional.
-4: shifts Tone Row down 4 steps within scale
-3: shifts Tone Row down 3 steps within scale
-2: shifts Tone Row down 2 steps within scale
-1: shifts Tone Row down 1 step within scale
-0: resets to original translation
+1: shifts Tone Row up 1 step within scale
+2: shifts Tone Row up 2 steps within scale
+3: shifts Tone Row up 3 steps within scale
+4: shifts Tone Row up 4 steps within scale
Octave
Like Translate, but shifts a number of octaves up or down. "0" resets to original octave.
Chord
Quick access to all the chords
-4: Octaves
-3: Third
-2: Sixth
-1: Triad
-0: Triad 2
+1: Triad 3
+2: Jazz
+3: Copland
+4: Wide
Press/hold Scale Knob for each Interval Button Option
Furthermore, if you press and hold the Scale Knob, at the bottom in green you have some options to do with the interval button option you have selected:
- User 3: Last selected
- ∽: RESET
- User 4: Random
The value that RESET sets depends on the interval button option selected:
- Interval: Resets Tone Row (Play Option=Prime, Inverted=Normal and Interval Button Sequence={+1})
- Clock Div: 14
- Transpose: original key Tone Row was recorded in
- Translate: 0
- Octave: 0
- Chord: chord off
Reset Sequence/Play Option
While in Auto Play, navigating to the Play Menu, pressing and holding the Scale Knob and then pressing will reset us to the original Tone Row settings (though in current key and scale). These settings will be set:
Play Option: Prime
Inverted: Normal
Sequence: +1
Offsets reset: Translate, Octave, and preset Last Note starting point
Polyphony
While Misha is especially good at playing single-note lines, it is not a monophonic instrument. There are multiple ways of playing several notes simultaneously.
Chords
A chord on Misha consists of up to 3 notes sounded simultaneously when a single button is pressed. A chord may be as simple as one note plus the same note one octave lower plus the same note two octaves lower. Or, two instances of the same note plus one of another note. Of course, a chord can also be a chord such as a triad - the present pitch plus a note two steps down, and a third note four steps lower. This is akin to playing a piano with the fingers fixed like the teeth of a rake.
Misha sends the three pitches simultaneously via MIDI, and also one through each of the three CV Out's.
Below is the format for the 9 chords pre-installed in Misha. The first item in the list is the top ("lead") note in relation to the button pressed - always 0 here - and then each subsequent number represents the interval (relative) move from the lead note.
The default chords are:
| Chord #/Button | Chord Name | Chord Structure |
| 1 / -4 | Octaves | {0, -1 octave, -2 octaves} |
| 2 / -3 | Third | {0, -2, 0} |
| 3 / -2 | Sixth | {0, -5, 0} |
| 4 / -1 | Triad | {0,-2,-4} |
| 5 / 0 | Triad 2 | {0, -3, -5} |
| 6 / +1 | Triad 3 | {0, -2, -5} |
| 7 / +2 | Jazz | {0, -3, -9} |
| 8 / +3 | Copland | {0,-6,-12} |
| 9 / +4 | Wide | {0, -11, -22} |
There is always a Gate and CV generated through all 3 CV Out jack pairs. If no chord is specified, then it repeats the lead note in CV Out 2 and 3.
Any one of these nine chords can be selected on the fly in performance.
With a chord selected, the LCD now shows all the notes of the chord, with the “lead” note in the center, a bit larger than the harmony notes.
When sending chords via MIDI, the velocity (volume) of the chord's non-lead notes is reduced 50% relative to the velocity of the lead note. This way the lead note is more prominent. (For CV outs this is irrelevant, as there is no volume control.)
If any chord tone is below the minimum note of the note range, it will not sound, nor will it appear in the display.
Note that if “chromatic” is assigned to user 3/4, then when user 3 or user 4 is played, each note of the chord will be lowered or raised, respectively, by a chromatic step as well.
Chord Menu
There are three ways to select a chord. In any menu, select Chord 1-9 by pressing and holding the ▲ button, then rotating the Scale Knob to browse among the chords, then pressing it in to select. Alternatively, one can press/hold ▲ and then press user 3 to decrement the chord, user 4 to increment. Finally, one can also press/hold ▲ and while holding press one of the nine interval buttons to select a chord.
Press and hold ▲ and then press ∽ to toggle between no chord and last chord selected.
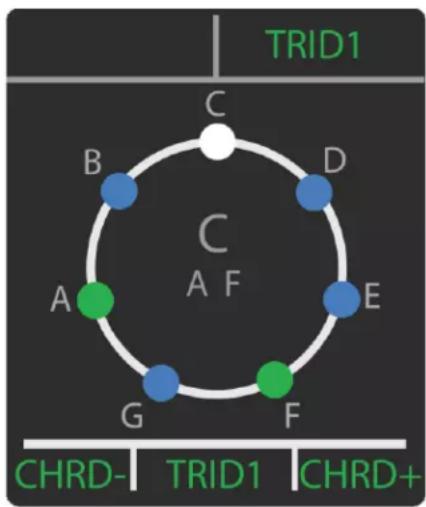
chemical
Circular DNA structure diagram with labeled positions (A–G) and TRID1/CHRD regionsTypically Misha will be used monophonically or to play fixed chords as we have been discussing here, but there are a number of cases where it could be desirable to play/hear more than one note at once that are chosen independently.
MIDI Out
As multiple buttons are pressed simultaneously, the unit will send the additional MIDI notes out (the number of such notes limited only by the polyphony of the unit receiving the MIDI note information), and note-offs will be sent when buttons are released.
CV Out
No Chord
If more than one button is pressed simultaneously, the second button pressed will cut off the first note and the second CV value will be sent. Optionally up to 3 notes can be sounded via CV Out2 and CV Out3.
CV Out, With Chord
According to the chord selected, two notes are always being sent out CV2 Out and CV3 Out.
MIDI
MIDI In
One can assign Misha functions to incoming MIDI notes from a MIDI controller, drum triggers, etc. By means of a user-defined map, an incoming MIDI note can be mapped to an interval button (or +/- ninterval up to +/-14) or any other Misha function (see full list in Setup/MIDI/MIDI Mapping/MIDI Note or MIDI CC.)
MIDI CC#s can also be mapped to any Misha function. Currently, these can be mapped to the same functions that MIDI notes can trigger in the following way: a particular MIDI CC# can be assigned to that function, and when the CC is sent it will be triggered. If it's a MOVE function it will be triggered ONLY if the value is >=64.
MIDI Notes and CC#s which are not defined in MIDI Mapping are passed through to the MIDI Out jack.
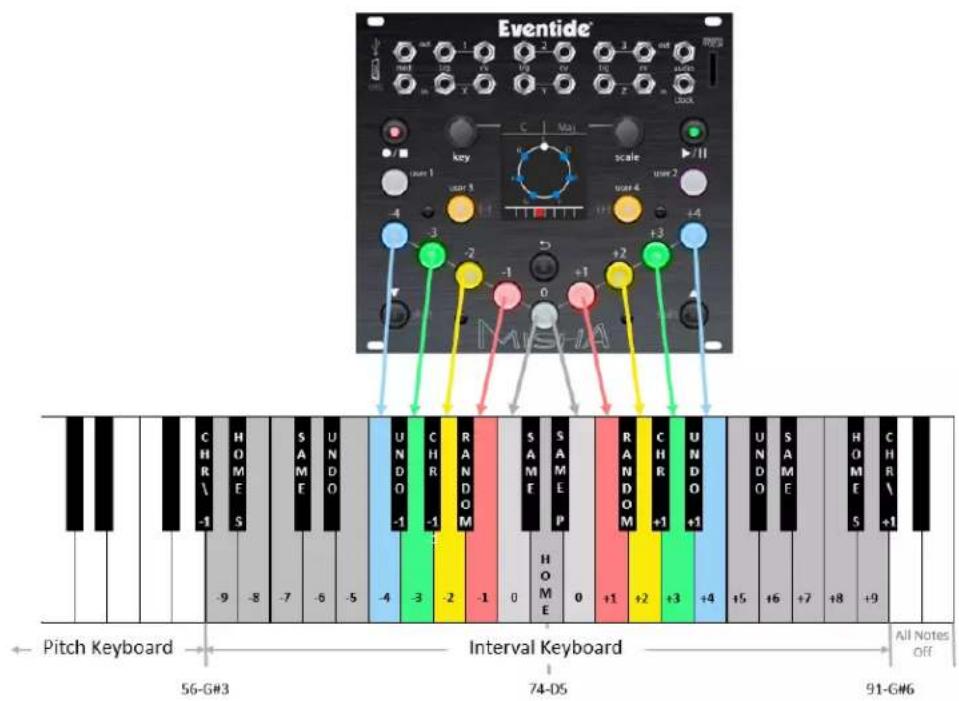
Default MIDI Note Map
Front panel buttons that play intervals are mapped to notes on a MIDI keyboard. White keys are mapped to "natural" interval steps. Black keys are mapped to User Functions that generate "conditional" interval steps.
MIDI Out
Connect Misha's MIDI Out to the MIDI In jacks of a synthesizer/oscillator etc.; or to a MIDI to CV converter unit and to a synthesizer/oscillator etc. from there.
All Notes Off
In the unlikely event of MIDI “stuck notes”, you can send an “all notes off” command by pressing both ▼ and ▲ simultaneously, and while they are both held, then pressing ▶/□.
MIDI PassThru
We've seen how to control the Misha with an external MIDI controller, using the MIDI mapping settings on the Misha. A user may also wish to switch between this usage of the MIDI controller and using that controller in the standard way – i.e., sending the MIDI notes through Misha without alteration.
Using MIDI PassThru the user can spontaneously shift between “normal” keyboard and Misha keyboard control – without disrupting real-time flow during performance. This is done by sending a continuous controller (“CC”) command as a signal to the Misha to toggle between the two states.
PassThru Modes
There are four modes: Off, Active, Active Last Note and PassThru
Off
No MIDI data (Notes, CC, Pitch Bend etc) is passed through. If a given note # has an assignment, the Misha function assigned to it will be performed and the appropriate MIDI note sent.
Active
When Active is on, the data on the MIDI Out is the “normal” MIDI Out dataset from Misha. Which is to say the MIDI data generated normally when it is operated from its front panel controls and/or any controls mapped to MIDI, plus any MIDI data passed through from MIDI In. These include MIDI velocity of incoming notes passed to outgoing intervals, and any other MIDI data coming in.
If a given note # has an assignment, then the Misha function assigned to it will be performed; if there is nothing assigned to a given note #, then when that note is played the MIDI note will be passed through.
Active Last Note
"Active Last Note" is a dynamic method of having Misha keep track of the last note that was passed-through. (Passed-through notes are MIDI notes that aren't
assigned to Misha functions in MIDI mapping). When Misha is set to "Active Last Note", Misha keeps track of the last passed-through note and when an interval is played directly after a passed-through note, that interval will be played in relation to it.
"Last Note" can be set one of two ways:
- Here, in the MIDI/MIDI PassThru/Mode menu: set to "Active Last Note"
- In mapping (CV, MIDI CC, or MIDI Note) it can be assigned in the "Special" category: Last Note = Off, On, or Toggle.
This is related to, but distinct from, the older method of achieving the same result, which was to change from Active to PassThru using a previously user-defined MIDI controller #, play a note that you wish future notes to be played in relation to, then switch back to Active and continue playing the active MIDI notes (intervals). As you may imagine, in many instances "Last Note" is a much simpler method of achieving this result.
Example:
In the MIDI/MIDI PassThru menu: set Mode to "Active Last Note"
Let's say you are using the default map in C major and have midi notes #52-86 defined, and the ones below and above that are not. Then if you press a number of notes below midi note #52, and conclude say with MIDI note #48, "C3", then that note will sound, and then if you press MIDI note 65 (F above middle C, which is defined as "+1"), you will hear D3, the next note up in the C major scale.
PassThru
The data on the MIDI Out port mirrors the signal on the MIDI In port. All MIDI data is passed through from In to Out with no changes.
Misha monitors MIDI Note On messages and updates its “Last Note” buffer and display with the Pitch and Octave of the most recently received Note On message, for use with Misha interval functions when the status is returned to “Active”. (I.e, whatever the last note is when in PassThru becomes the starting point for active status, so that a “+1” will yield one note higher in the scale than that.
PassThru/Active Transition
Selection of PassThru/Active is mapped to a specific MIDI CC configured as an On /Off switch. Turning it up past the half-way point turns it on; turning it below half-way turns it off.
Transitions between PassThru and Active handle “held over” notes gracefully. For example, if the player is holding down one or more keys when the state is changed from PassThru to Active, the notes will continue to sound until the keys are released by the player. Similarly, if the player is holding down one or more keys when the state changes from Active to PassThru, the notes will continue to sound until the keys are released by the player.
Bold is default
| Function | Settings | Comments | |
| MIDI PassThru | Mode | Off, Active, PassThru | starting state at power up |
| MIDI CC# | MIDI CC (88) | maps the CC that will control PassThru/active transitions | |
| MIDI CC# Action | Active Low, Active High, Toggle | how sending that CC# affects Active/PassThru choice | |
| Octave Offset | -3, -2, -1, 0, 1, 2, 3 | adjusts octave range of Pass-Through section of the split when active |
MIDI Sync, Clock Etc.
Misha as Main Controller
Misha can serve as the main controller. When playing from its internal clock it can send MIDI clock (at 24 PPQ) and associated bytes - see below - in order to control other devices. (See Setup/MIDI - Tx Timing Clock and Tx Real Time Msg.)
Misha as Secondary Controller
Misha can sync to MIDI Clock and play tone rows along with a sequencer running on another device, such as a DAW or drum machine. It responds to MIDI Clock bytes, as well as Start, Stop, Continue, Song Position and Song Select commands. (See Setup/Clocking/Ext Clock Source - set to MIDI Clock or MIDI Active Sense).
A Start command will begin the tone row at the top; Continue will continue where it left off. MIDI Song Select commands will select Misha's Presets 1-18.
USB Jack
Currently there are two uses of this jack: using a USB cable you can connect Misha to a computer to do firmware updates (as described in the "Updating Firmware" section below), and you can plug in an external computer keyboard to trigger Misha.
Play Misha With A USB Computer Keyboard
One can plug in a standard USB computer keyboard and control Misha by pressing the keyboard keys. (You will need an adapter to convert from the standard USB A to Misha's micro USB jack.)
There is a user-definable map in which the keyboard keys are assigned Misha functions. (In Setup/System, see "USB Kbd Mapping"). This turns Misha into a Samchillian.
Below is the default mapping:
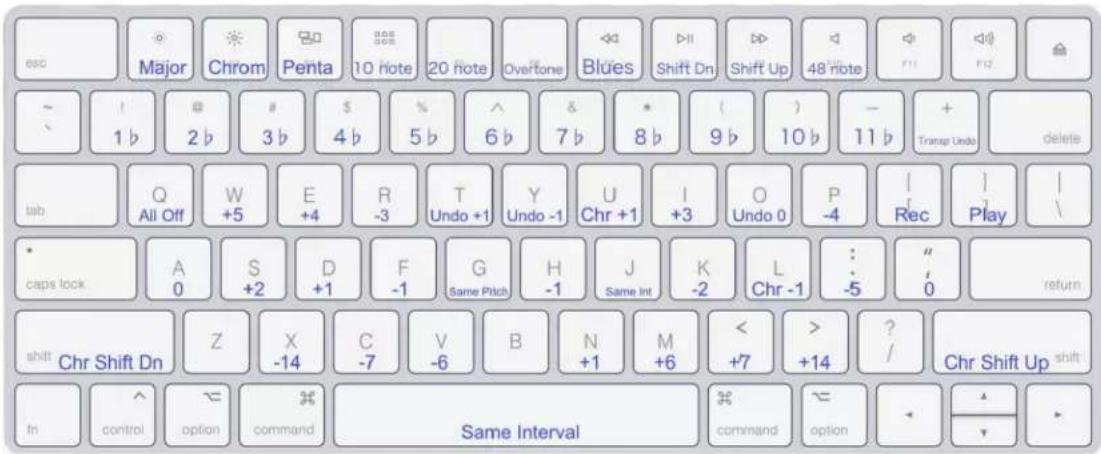
There are also various keyboard shortcuts:
- Ctrl + M = Setup Menu
• Ctrl + S = Chords Menu - Ctrl + K = Transpose Menu Enter = Okay
- Backspace = Cancel
• Home = Top Of List
• End = Bottom Of List - Escape = Works like Undo
- Up / Down Arrows = Move Up/Down or Inc/Dec
- Left Arrow = Works Like Backspace
• Right Arrow = Goes into the List Item - Numbers can be entered for Numbers
Presets
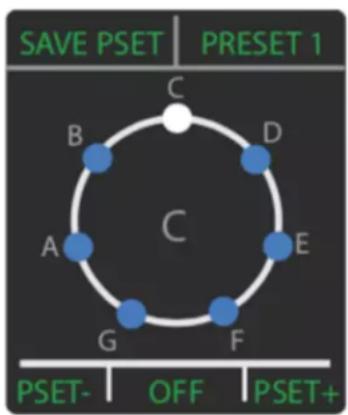
Misha can save up to 18 user-assignable presets. It comes pre-loaded with 18 examples of presets that can be overwritten by the user. Preset 1-9 contain Tone Row sequences, while presets 10-18 contain only key and scale choices for you to experiment with.
Saving a Preset saves Misha's current state, specifically the following information:
- Scale Bank/Scale
- Mode
- Last note played
- MIDI Range Min, Max
- Key Signature
- Tone Row data* (sequence of intervals, with corresponding MIDI velocities)
- Chord
- user 1/2 assignment (Note that user 3/4 are global and not saved with the preset)
- Output Mono/Poly: Monophonic or Polyphonic
- MIDI Program Change Number*
- Pitch Bend Range
- Audio Parameters (Master Lvl, level and panning for Sine, Square, Saw, Trngle)
- Play Clock Div
- Play Note Duration
- Play Option
- Play inverted: Yes/No
- interval button sequence
- interval button option (if Tone Row = Yes)
*Optional
flowchart
graph TD
    A["A"] --> B["B"]
    B --> C["C"]
    C --> D["D"]
    D --> E["E"]
    E --> F["F"]
    F --> G["G"]
    G --> H["G"]
    H --> I["E"]
    I --> J["E"]
    J --> K["D"]
    K --> L["B"]
    style A fill:#000,stroke:#000
    style B fill:#000,stroke:#000
    style C fill:#fff,stroke:#000
    style D fill:#fff,stroke:#000
    style E fill:#fff,stroke:#000
    style F fill:#fff,stroke:#000
    style G fill:#fff,stroke:#000
    style H fill:#fff,stroke:#000
    style I fill:#fff,stroke:#000
    style J fill:#fff,stroke:#000
    style K fill:#fff,stroke:#000
    subgraph SAVE_PSET
        A
        B
        C
        D
        E
        F
        G
        H
        I
        J
        K
    end
    subgraph PRESET 1
        C
        D
        E
        F
        G
        H
        I
        J
        K
    end
Save
Press/Hold ▼, then press Key Knob: save to the library location from whence it loaded, or change that location and then save.
This is where we set the program change (if desired): none, 0-127
Also under that we can optionally save the Tone Row that's currently in memory: Yes, no.
Press the Key Knob to save the preset. If that location is full, you can overwrite it. In this case LCD displays [OK] [CANCEL]. Press Key Knob for OK (save) and Scale Knob or ∽ to cancel.
Load
User Presets 1-9
Press/hold ▼. Then pressing -4 loads Preset 1, -3 loads Preset 2, and so on.
Alternatively, press/hold ▼. Then rotate Scale Knob to desired Preset and press in to load.
User Presets 10-18
Press/hold ▼. Then rotate Scale Knob to desired Preset and press in to load.
When a preset is loaded, Misha sends the program change saved in the preset, if any. If a Tone Row has been saved with the preset, it is loaded up and overwrites the current Tone Row, if there is one. If no Tone Row has been saved with the preset the current Tone Row is preserved, but played back with the key and scale stored in the preset. (It can be interesting to have a few presets saved without Tone Rows, for the purpose of hearing a particular Tone Row performed with different keys/scales/sounds as one loads different presets)
The preset number is momentarily displayed on the top of the Play Menu. At bottom is displayed preset information: on the left we see the MIDI program change number assigned to that preset (if any) and at bottom right the number of notes in the Tone Row currently in memory (if any).
One can also load Misha presets by sending standard MIDI program change commands into the MIDI In jack. MIDI Program Change numbers 0-17 load presets 1-18.
Home
In Play Menu, press/hold Scale Knob and then press ∩ to reset to starting octave and position of current scale and key ("home position"). If a mode is currently selected, this will return the user to the root of the current mode.
Audio Out
Misha contains an audio synthesizer which combines tones from 4 waveforms: sine, square, saw and triangle. To access the menu which controls the levels of each of these, as well as their panning, make sure you are in the main menu and press/hold the Key Knob, and then press the ∽ button.
Parameters are:
- Master Lvl
- Sine Lvl
- Sine Pan
- Square Lvl
- Square Pan
- Saw Lvl
- Saw Pan
- Trngle Lvl
- Trngle Pan
You can start a tone row playing, and then enter this menu and adjust these parameters to hear your changes live.
You can also control these parameters remotely by assigning them in the CV In menu. (See Setup Menu/CV Inputs, below.)
Note that the audio out volume of a given note is influenced by both the Master Lvl and the MIDI velocity assigned to that note, whether the note's velocity has been recorded in the tone row, or played live. The MIDI velocity is applied as a percentage of the Master Lvl.
All of the audio parameters are saved with the preset, so when you recall it later you will hear the same tone you were hearing when you saved the preset.
Setup Menu
Setup allows you to set global parameters, such as MIDI channel, etc.
- Enter Setup by pressing both Key and Scale Knobs simultaneously
- Press Key Knob to enter sub-menu, Scale Knob to back out
- Scroll using Key Knob to select parameter
-
Press Key Knob in to edit that parameter
-
To change parameter value: if value is obtained by selecting from a list, then turn Key Knob to change parameter value; if it's a number, turn Scale Knob to change the value.
- Press Key Knob (✓) to save
- Press Scale Knob (✗) to back out of the current level of menu without saving
- Press at any time to exit Setup altogether (escape) and return to performance
In these last two cases, the user will be prompted "Discard changes?" if changes have been made.
Setup parameters (default in bold)
Button Functions
Note that the user buttons can also be reassigned by pressing/holding the Key Knob and then pressing user 1-4)
User Function Options (for each of User 1-4 buttons)
- Same Interval
- Same Pitch
- Random Interval
- Undo ( )
- Undo -1
- Undo +1
- Octave -1 (user 1 default)
- Octave +1 (user 2 default)
- Octave -2
- Octave +2
- Move Interval -14 > -1
- Move Interval 0
- Move Interval +1 > +14
- Home (sounding)
- Momentary Mute
- Chr Shift -1
- Chr Shift +1
- Chromatic (only assignable to user 3 and user 4)
CV Outputs
CV Out 1
- Range (-5V -> +5V, 0V-> +5V, 0V->+10V)
- Tuning (MIDI note (60), Voltage (0v))
CV Out 2
same as CV Out 1
CV Out 3
same as CV Out 1
Pitch Bend Range
(1-24; defaults to 2)
CV Inputs
CV IN X
Default (relevant settings):
Linking="Linked (Trigger)"
Trigger Function="Interval Keys"
Range
$$ - 5 \mathrm{V} - > + 5 \mathrm{V}, 0 \mathrm{V} - > + 5 \mathrm{V}, 0 \mathrm{V} - > + 1 0 \mathrm{V} $$
Make sure to match this to the range of the output of the device that is sending to the CV In jack.
Linking
This is the initial selection to be made - it determines how the T/G, CV inputs are used.
Unlinked (T)
Select this if you want to use only the T/GIn- in this case it will be used as a trigger. Typically you would then select Trigger Function = "Key Mapping" and in the "Trigger Mapping" menu only the function assigned to Num = 1 will be triggered by incoming triggers. Num 2-11 will be ignored. (If instead, Trigger Function is assigned the "Interval Keys" option, an incoming trigger will trigger User 1 only.)
Unlinked (T, CV)
Select this if you want two independent controls: the trigger will perform the function assigned to Num = 1 of "Trigger Mapping" (or the User 1 button if Trigger Function = "Interval Keys"), and the CV will control whatever is assigned to CV Function. With this choice, the CV function will operate without the need for a trigger or gate.
Linked (Gate, CV)
ThischoiceisforusingCVtogetherwithagate. Whatever is assigned in "CV Function" will be performed, but only when the gate is on.
Linked (Trigger)
Whenselected, an incoming trigger will perform one of 11 functions
dependingontheCVvalue. Which function is performed depends on the voltage range that the incoming CV at that moment falls in. See Trigger Mapping below for more information and a chart of these ranges.
CV Function
This is used when either Unlinked (T, CV) or Linked (Gate, CV) is selected; otherwise it is ignored*
Pitch Bend
Pitch bends the amount set in Cv Outputs/Pitch Bend range
Transpose
Transposes according to where the voltage falls within the CV In range. Follows the Setup/System/Key Sig Order
Translate
Translates (moves up or down within the current key) according to where the voltage falls within the CV In range. (Note: this works only when there is a Tone Row playing automatedly.)
Midi Velocity
This chooses a velocity based on the incoming CV to replace the MIDI velocity of incoming MIDI notes, whether from MIDI In or the front panel buttons. If recording a Tone Row, these values will be recorded.
Audio Sine Lvl
The level of the sine waveform component of the audio out signal
Audio Square Lvl
The level of the square waveform component of the audio out signal
Audio Saw Lvl
The level of the saw waveform component of the audio out signal
Audio Trngle Lvl
The level of the triangle waveform component of the audio out signal
*Please note that if Linking = Unlinked (T, CV) or Linked (Gate, CV), then Misha will look to the CV input to apply the incoming voltage to the assigned CV function. If no cable is inserted, it will be read as if a voltage at the bottom of the range were present at the input. Therefore, if you don't plug in a cable to a CV In jack, it is not recommended you choose one of the linking options that use CV In.
T/G Active State
- Normal
- Invert
If “Normal” is selected, the trigger will act when the voltage on the T/G jack goes high; if “Invert”, when the voltage goes low.
Trigger Function
Choose Interval Keys if you wish to trigger the interval buttons with incoming gate/cv signals. If "Key Mapping" is selected, Misha will refer to the "Trigger Map" to determine which functions to perform.
Trigger Mapping
Here you assign 11 functions to be triggered, depending on the value of the CV In when the trigger comes in. The incoming voltage determines which function will be triggered, depending on which range it falls in. For example, if the CV In range is set to 0-5V, then whatever is assigned to one of Num 1-11 will be triggered when the voltage is in the range shown in the table below.
Num 1: 0-0.45 V
Num 2: 0.45-0.91 V
Num 3: 0.91-1.36 V
Num 4: 1.36-1.82 V
Num 5: 1.82-2.27 V
Num 6: 2.27-2.73 V
Num 7: 2.73-3.18 V
Num 8: 3.18-3.64 V
Num 9: 3.64-4.09 V
Num 10: 4.09-4.55 V
Num 11: 4.55-5 V
There is a comprehensive list of functions of on/off type functions available here, including changes of scale, key, chord, and sequencer operation.
CV IN Y
Menu is the same as for CV In X.
Default (relevant settings):
Linking="Linked (Gate/CV)"
CV Function="Pitch Bend"
CV IN Z
Menu is the same as for CV In X.
Default (relevant settings):
Linking="Linked (Gate/CV)"
CV Function="Transpose"
MIDI
Input Channel
(1-16, Omni*)
Output Channel
(1 ^* -16)
Output Velocity
(64*) (1-127)
Pgm Change In
Whether an incoming program change command will change the preset (Disabled, Enabled*)
Tx Timing Clock
Whether Misha will send out MIDI clock when internal sequencer running (Disabled*, Enabled)
Tx Real Time Msg
Whether Misha will send out MIDI start/stop/continue when internal sequencer running (Disabled*, Enabled)
MIDI Mapping
MIDI Note
An incoming MIDI note triggers the action assigned to it. If an incoming MIDI note triggers a sounding pitch, that pitch will have the MIDI velocity of the triggering MIDI note.
- Note (MIDI note #)
- Type (Move, Chr Shift, Scale, Key Sig, Chords, Special, Play)
- Action (parameter):
Move - Pitch (-14->+14), Undo-1, Undo, Undo+1, Same, Same Pitch, Chromatic (-1, +1), Octave (-2->+2), Random, Home (Silent, Sound)
Chr Shift - Shift (-1, +1)
Scale - Step (-1, +1), Name/Bank/Slot/Name/Mode (Major, Chroma, etc., including loaded scala scales), Random.
Key Sig - Add Flat (1->11), Add Sharp (1->11), Undo, Step (-1,+1), Key (C->B),
Random
Chords - Step (-1,+1) , Name (Octaves, Third, Sixth, ..., Wide), Random
Special - All Off, Rec/Stop, Play, Pause, Play Once, Mute All (Off, On, Toggle, Momentary), Load Prst (Step(-1,1), Number(1-18), Random), Stop, Last Note Play
- Clock Div (Step (-1, 1), Value (4/1, 3/1, 5/2, 2/1, 3/2, 1/1, 7/8, 1/2d, 5/8, 9/16, 1/2, 7/16, 1/4d, 1/2t, 5/16, 1/4, 1/8d*, 1/4 t*, 1/8*, 1/16d*, 1/8t, 1/16*, 1/16t**, 1/32**, 1/32t**, 1/64t), Random)
• Duration (Step (-1, 1), Value (Short, Medium, Long), Random) - Play Mode (Step (-1, 1), Mode(Prime, Retro, Random, Pendulum, Transpo ▲, Transpo ▼, Transla ▲, Transla ▼)
- Add Step (Step (-6-> + 6) , Rand Step, Rand Note, Rest, Triplet, Same, Same Pitch, Octave (-2-> + 2) , Chromatic (-1,+1) , Undo (-1-> + 1) , Rand Key)
- Del Step (Step (-6-> + 6) , Rand Step, Rand Note, Rest, Triplet, Same, Same Pitch, Octave (-2-> + 2) , Chromatic (-1,+1) , Undo (-1-> + 1) , Rand Key)
- Translate (Step (-4->+4), Offset (-12->+12), Random)
- Octave (Step (-4->+4), Offset (-5->+5), Random)
• Special (Reset Seq, Reset All, Invert)
(see defaults in MIDI Mapping section of default table below)
MIDI CC
Currently, MIDI CC's are used strictly as on/off triggers and not for continuous functions. An incoming MIDI CC message triggers the action assigned to it. Currently, if the action is a playable function such as Move Pitch, the CC value must be >=64 to trigger. Otherwise, any value will trigger the action.
The list of MIDI CC mappings is the same as the above MIDI note mappings.
MIDI PassThru
- Mode (Off, Active, Active Last Note, PassThru)
- MIDI CC# (0-127), default = 88*
- MIDI CC# Action (Active Low, Active High, Toggle*) Octave Offset (-2, -1, 0, 1, 2*)
Clocking
Int Clock Enable
(Off, On)
Turn internal clock on and off
Int Clock BPM
Set BPM (beats per minute) of internal clock, default=120*
Ext Clock PPQ
(1, 4, 24*)
Set parts per quarter note (PPQ). The setting you choose depends on which device is sending the clock. For example, typically if sending clock pulses from a computer, you should use "24". But if from a drum machine, use "1".
Ext Clock Source
- Clock Input (either internal sequencer or following pulse from Clock In)
- MIDI Clock (waits for incoming MIDI clock in MIDI In jack)
- MIDI Active Sense (upon sensing Active Sense coming into MIDI In jack, automatically follows MIDI Clock bytes; otherwise follows Clock Input)
Clock Output
- Off, Gate 3 Output (replaces the standard gate 3 output with a duplicate of the internal clock at 24 ppq)
Scales
Misha comes pre-loaded with 100 factory scales, grouped into 4 banks:
• S1: Factory Bank 1 (50 scales)
• S2: Factory Bank 2 (50 scales)
These encompass commonly used scales such as Major, Chromatic and Pentatonic, plus quite a variety of unusual scales composed of notes from the standard Western twelve tone equal tempered scale (Messaien modes, jazz scales, etc.), as well as some "Xenharmonic" (microtonal) scales (just intonation, international, non-standard equal-tempered, non-octave repeating, etc.).
In addition, the user can create or import his or her own scales, utilizing the “scala” format. These are loaded via the SD Card into the user banks.
• U1: User Bank 1
• U2: User Bank 2
(The user banks come preloaded with a copy of the factory bank scales, and are then overwritten as new user scales are assigned to their slots)
Scala is a versatile, standard format for defining scales that allows for both standard Western and microtonal scales, defined either by frequency or by ratios. Scales need not even repeat at the octave, as is the case with the Bohlen-Pierce scale, e.g.
A lot of the research performed to collect this group of 100 scales comes from Ian Ring's very comprehensive scale website
This page on his site allows a visitor to select a subset of the 12 notes of the scale and then tells you the name of the scale.
You can find more information on scala format here and an enormous trove of scala files here
Or you can write your own scala files. This site allows the visitor to input scale values and try them out, and then output a scala file.
Note that while any scala formatted file can be loaded, in order to bring mode information into Misha a special “Misha-extended” version of the format must be used. See the Extended Scala format for Misha supplemental document for more information.
Bank Mapping
Any of the 100 factory scales plus the user scales can be mapped to any of the 100 user slots (50 in U1, 50 in U2). The user simply selects the bank and slot, and then selects the scale name that he/she wishes to place there. Press Key Knob to save, Scale Knob to cancel.
Add Via SD Card
To load in a user scale, first create the folder MISHA/scl on your SD Card and then copy a small number of scala files from your computer to that folder on your card. Then from the system menu, select Add via SD Card and select the scale from the SD Card to test it out ("audition"). Once loaded you can use the scale as you normally would. Most features of Misha will continue to work to enable you to test out the scale fully.
The auditioned scale will remain the active scale until you attempt to move away from it, either by rotating or pressing and releasing the Scale Knob. At that point you will be prompted to either assign it to a user slot or not (or cancel). If you answer yes, then you will assign it to the user slot (U1 or U2, and the slot number), overwriting whatever was
there prior. If you answer no, the scale will be removed from memory and you will be returned to the Play Menu.
You can also proactively save your auditioned scale. If you are satisfied with the new scale you can save it into a user slot, by pressing and holding ▲ and then pressing Scale Knob. This brings up the “Save Scale” menu. Choose the slot you wish to save to and press the Key Knob.
Note that while auditioning a scale you can even enter Setup, although you must do that in this order: press the Key Knob in first and while it's depressed press the Scale Knob. (Otherwise Misha may think you are trying to change the Scale Bank.)
Shortcut to audition multiple scala files
In audition mode, if you first press and hold the Scale Knob and then press the Key Knob, you will not get the setup mode as you normally would; instead, you will be presented with the prompt asking whether you want to assign the scale to a user slot, as above. Upon answering yes or a no to this question, you are returned to the list of scala files to audition. This is a shortcut to allow you to audition multiple scala files quickly.
Remove
When selected, this will show all the user scales which have been loaded. Select the one you wish to remove and press the Key Knob to remove it from memory. When it is removed, it will no longer be assigned to the slot to which it had previously been assigned, and instead the original factory scale that was assigned there will be showing in that slot.
SD Card
All files related to Misha should reside in the MISHA folder of the root of the SD Card.
Save
- Menu Settings ("MenuSettings.xml")
- Presets ("Presets.xml")
- MIDI Note Map ("MidiNoteMap.xml")
- MIDI CC Map ("MidiCCMap.xml")
- Keyboard Map ("KbdMap.xml")
- All Maps ("KeyMaps.xml")
- All Settings ("Misha.xml")
"Saved" appears after a successful save.
Load
- Menu Settings ("MenuSettings.xml")
- Presets ("Presets.xml")
- MIDI Note Map ("MidiNoteMap.xml")
-
MIDI CC Map ("MidiCCMap.xml")
-
Keyboard Map ("KbdMap.xml")
- All Maps ("KeyMaps.xml")
- All Settings ("Misha.xml")
- All Files
"Loaded" appears after a successful load.
If you try to save over an existing file, a digit will be added to the new filename to distinguish it. Then when loading, you will see all files of the appropriate type - this is to say files with any name that begins with the file names in quotes above: for example "MidiNoteMapGenl.xml" is a valid filename to load in. If subsequently saved, it will be saved as "MidiNoteMap.xml" (or "MidiNoteMap2.xml, etc. - i.e., with the digit that is one higher than the highest # currently on the card)
System
Below, defaults are underlined.
Note Range
Min, Max (C2 36, B6 95)
Note that the Note Range can also be adjusted "live" in the Note Range Menu. (See "Menu Navigation" section.) Also, Note Range is saved in presets, so when a preset is loaded the note range will get updated.
Note Range Home
Factory Default
Last Preset
Capture Current
Solfege Wrap
Off, On
Solfege Display
Fixed Do, Moveable Do, Note Names
Key Sig Order
Chromatic Scale, Circle of Fifths
Scale Mode
Preserve Root, Preserve Key
This setting determines how modes change: either when the Scale Knob is pressed and turned when viewing a mode-capable scale, or when the appropriate MIDI commands are sent remotely.
If “preserve root”, then the root of the mode remains fixed, as shown by the note name on top of the solfege wheel. And the underlying key signature adjusts accordingly so the notes that appear around the wheel change to match
If "preserve key", then the key signature remains fixed, and the notes of that scale rotate around the solfege wheel to leave the root at the top, again.
Tone Row Octaves
Not Allowed, Allowed
Output Mono/Poly
Monophonic, Polyphonic
On Preset Load
(Root, Last Note, Ignore)
- Root: Home position is root of scale (default), in the middle octave. When a Tone Row is saved to the preset, it loads the Root Home position of the Tone Row, which is the first note in the Tone Row.
- Last Note: Home position as defined by last note played before saving the preset
- Ignore: Home position retained, i.e., loading a preset doesn't change current position
(After loading a preset, pressing 0 sounds the home position, which in the case of the "ignore" option is the last note played.)
On Startup
Factory Default, Load Last Preset
This determines whether Misha will load the last loaded preset when it is powered on, or the initial factory preset. (The factory default is C major, beginning on middle note C.)
USB Kbd Mapping
See MIDI mapping above. It's the same except that the top line, "Key" is a USB keyboard QWERTY character, not a midi note. See default mapping in the "USB Kbd Mapping" section of the defaults table below.
Calibrate
(There should be no need for the user to do this as it will be done already at the factory.)
Follow the instructions. This is a multi-part process.
- Remove all patch cables. Press Okay (Key Knob). (Says "Calibrating Step 1")
- Send 5V into CV In X. Press Okay. (Says "Calibrating Step 2")
- Send 5V into CV In Y. Press Okay. (Says "Calibrating Step 3")
- Send 5V into CV In Z. Press Okay. (Says "Calibrating Step 4")
- Connect all patch cables from CV Outputs to CV Inputs. Press Okay. (Says "Calibrating Step 5")
If all is well, will say "Calibration Done"
Factory Reset
See "Factory Reset" below
About Misha
Displays Misha firmware version, Build #, Boot version and the serial # of this Misha.
Online Help
Scan this QR code using a smartphone to bring up the Misha Product Page.
Updating Firmware
To update to a different firmware version, follow these steps:
- Download Eventide's Device Manager (EDM) (choose mac or pc)
- Turn the power off to Misha.
- With power off, press and hold down the ▼ and user 1 buttons, and then turn the power on. You should see only Misha's user 1 and user 2 keys lit up. If not, make sure no cable is connected to the micro USB port of Misha, and power down. Then try powering up again holding down the ▼ and user 1 buttons.
- Connect your computer to Misha using a USB A male to micro USB B cable. (Jack on top left side of Misha)
- Now run the EDM software.
- Your Misha - showing the serial number - should be highlighted in orange. (If the software was already running before the device was turned on you may have to click "search for device" before step #6)
- Select your device and press "OK"
- At top select the most recent available update and click "Install Update". The firmware will be installed - do not disconnect power during this procedure. When finished, the update will be verified. (Note: this updates to the latest firmware. You can update to any available update in the list you like, and If you have an update file on your computer drive, you can select that also, instead, by clicking "select file" towards the bottom and once it's selected, clicking "install file".)
- When this is complete, you will be prompted to reboot the Misha, which you do by disconnecting the cable and powering the Misha off and on, which loads the new firmware. You should see the current version as it boots up, or you can see it in the setup menu under System/About Misha screen.
Factory Reset
Caution - A factory reset will erase the following data:
1) User/Menu Settings
Resets all settings to factory defaults.
2) Key Maps: Midi Note / Midi CC / USB Keyboard
Resets all settings to factory defaults.
Note: Custom MIDI Note/CC and CV mappings will only be reset using Factory Reset Method #2.
3) Presets
All 18 presets will be overwritten with the factory installed presets.
4) Scales / Scala
All User scales loaded into memory from an SD card will be erased.
This is when a user Auditions a scale and then maps the scale.
5) Scale Maps / Banks
a) S1/S2 banks remain unchanged because these are the factory banks.
b) U1/U2 banks are reset to a copy of the factory banks.
Method #1
Go to the Setup menu by pressing both the Key Knob and Scale Knob simultaneously. Then go to System/Factory Reset. Press Key Knob to select. It will ask "Are you sure?". Press Key Knob a second time to execute.
Method #2
Power down the unit. While pressing in both Key and Scale Knobs, turn the power on again. Wait for the Play Menu to appear. This resets the unit to factory settings. There is no warning screen when using this method, so be sure you want to do this.
APPENDIX
Physical/Electronic Specifications
Misha conforms to standard eurorack specifications. Misha is 28hp.
Output CV: -5V to +5V, 0 to 5V, 0V to +10V (configurable)
Input CV: -5V to +5V, 0 to 5V, 0V to +10V (configurable)
Stereo audio out: (2 channels/stereo, DC coupled)
Default Setup Parameters
| Button Functions | usr 1 Functions | Octave -1 | |
| usr 2 Functions | Octave +1 | ||
| CV Outputs | CV Output 1 | Range | -5V -> +5V |
| Tuning | 60, 0V | ||
| CV Output 2 | Range | -5V -> +5V | |
| Tuning | 60, 0V | ||
| CV Output 3 | Range | -5V -> +5V | |
| Tuning | 60, 0V | ||
| Pitch Bend Range | 2 | ||
| CV Inputs | CV Input X (INTERVAL) | Range | 0V -> +5V |
| CV Input Y (PITCH BEND) | Range | 0V -> +5V | |
| CV Input Z Range (TRANSPOSE) | Range | 0V -> +5V | |
| MIDI | Input Channel | OMNI | |
| Output Channel | 1 | ||
| Output Velocity | 64 | ||
| Pgm Change In | Enabled | ||
| MIDI PassThru | Mode MIDI CC# MIDI CC# Action Octave Offset | Active 88 Toggle 2 | |
| Presets | Home Position | Root | |
| System | Note Range | C2=36, B6=95 | |
| Note Range Home | Capture Current | ||
| Solfege Wrap | On | ||
| Solfege Display | Note Names | ||
| Tone Row Octaves | Not Allowed | ||
| Key Sig Order | Circle of Fifths | ||
| Output Mono/Poly | Polyphonic | ||
| On Startup | Load Last Preset | ||
| 56- G#3 | Chromatic Shift -1 | 77 - F5 | +1 |
| 57 - A3 | -9 | 78 - F#5 | Random |
| 58 - A#3 | Home (Silent) | 79 - G5 | +2 |
| 59 - B3 | -8 | 80 - G#5 | Chromatic +1 |
| 60 - C4 (middle C) | -7 | 81 - A5 | +3 |
| 61 - C#4 | Same | 82 - A#5 | Undo +1 |
| 62 - D4 | -6 | 83 - B5 | +4 |
| 63 - D#4 | Undo | 84 - C6 | +5 |
| 64 - E4 | 5 | 85 - C#6 | Undo |
| 65 - F4 | -4 | 86 - D6 | +6 |
| 66 - F#4 | Undo -1 | 87 - D#6 | Same |
| 67 - G4 | -3 | 88 - E6 | +7 |
| 68 - G#4 | Chromatic-1 | 89 - F6 | +8 |
| 69 - A4 | -2 | 90 - F#6 | Home (Silent) |
| 70 - A#4 | Random | 91 - G6 | +9 |
| 71 - B4 | -1 | 92 - G#6 | Chr Sh +1 |
| 72 - C5 | 0 | 93 - A6 | All Notes Off |
| 73 - C#5 | Same | 94 - A#6 | All Notes Off |
| 74 - D5 | Home (Sound) | 95 - B6 | All Notes Off |
| 75 - D#5 | Same Pitch | 96 - C7 | All Notes Off |
| 76 - E5 | 0 |
Default USB Keyboard map
| A | Move/Pitch/0 | V | Move/Pitch/-6 | |
| B | (unassigned) | W | Move/Pitch/5 | |
| C | Move/Pitch/-7 | X | Move/Pitch/-14 | |
| D | Move/Pitch/1 | Y | Move/Undo/-1 | |
| E | Move/Pitch/4 | Z | (unassigned) | |
| F | Move/Pitch/-1 | 1 | Key Sig/Add Flat/1 | |
| G | Move/Same Pitch | 2 | Key Sig/Add Flat/2 | |
| H | Move/Pitch/-1 | 3 | Key Sig/Add Flat/3 | |
| I | Move/Pitch/3 | 4 | Key Sig/Add Flat/4 | |
| J | Move/Same Interval | 5 | Key Sig/Add Flat/5 | |
| K | Move/Pitch/-2 | 6 | Key Sig/Add Flat/6 | |
| L | Move/Chromatic/-1 | 7 | Key Sig/Add Flat/7 | |
| M | Move/Pitch/6 | 8 | Key Sig/Add Flat/8 | |
| N | Move/Pitch/1 | 9 | Key Sig/Add Flat/9 | |
| O | Mov/Undo/0 | 0 | Key Sig/Add Flat/10 | |
| P | Move/Pitch/-4 | Return | (unassigned) | |
| Q | Special/All Off | Escape | (unassigned) | |
| R | Move/Pitch/-3 | Backspace | (unassigned) | |
| S | Move/Pitch/2 | Tab | (unassigned) | |
| T | Move/Undo/1 | Space | Move/Same Interval | |
| U | Move/Chromatic/1 | - | Key Sig/Add Flat/11 | |
| V | Move/Pitch/-6 | = | Key Sig/Undo | |
| [ | Special/Record | |||
| ]\ | Special/Play(unassigned) | F10F11 | Scale/Name/48 Note | |
| (unassigned) | ||||
| (unassigned) | F12 | (unassigned) | ||
| ; | Move/Pitch/-5 | Print Screen | (unassigned) | |
| , | Move/Pitch/0 | Scroll Lock | (unassigned) | |
| 、 | (unassigned) | Pause | (unassigned) | |
| , | Move/Pitch/7 | Insert | (unassigned) | |
| . | Move/Pitch/14 | Home | (unassigned) | |
| / | (unassigned) | Page Up | Move/Octave/2 | |
| Caps Lock | (unassigned) | Delete | (unassigned) | |
| F1 | Scale/Name/Major/Ionian | End | (unassigned) | |
| F2 | Scale/Name/Chroma | Page Down | Move/Octave/-2 | |
| F3 | Scale/Name/Penta | Right | (unassigned) | |
| F4 | Scale/Name/10 Note | Left | (unassigned) | |
| F5 | Scale/Name/20 Note | Down | Move/Octave/-1 | |
| F6 | Scale/Name/Overtone | Up | Move/Octave/1 | |
| F7 | Scale/Name/Blues | |||
| F8 | Scale/Name/Shift Down | |||
| F9 | Scale/Name/Shift Up | |||
| F10 | Scale/Name/48 Equal | |||
| Transmitted | Recognized | Remarks | ||
| Basic | Channel | 1 - 16 | 1 - 16 | Memorized |
| Channel | Changed | 1 - 16 | 1 - 16 | |
| Default | 3 | 3 | Memorized | |
| Mode | Messages | X | X | |
| Altered | ********** | |||
| Note | 0 - 127 | 0 - 127 | recognized for Midi mapping ^1 ^2 | |
| Number | ' note numbers mapped to intervals are changed to match interval and scale ^2 unmapped note numbers can be transposed 1 or 2 octaves" | |||
| Velocity | Note On | O,9nH,v=0-127 | O,v=0-127 | - sending note on w 0 velocity for note off- velocity values 0-127 are passed through with mapp interval note numbers |
| Note Off | X* | X | *v=1-127 if using midi mapping | |
| After | Key's | X | O | |
| Touch | Ch's | X | O | |
| Pitch Bend | O | O | Used in traditional way, as well as specific values ser before each note in the ca of microtonal scales | |
| Control | 0 | O | O | any CC# (0-127) can be mapped to |
| Change | ... | O | O | to "CC Map" to control Misha functions |
| 127 | O | O | (See Manual) | |
| Program | - incoming program chang 1-18 selects misha patch | |||
| Change | Real # | O | O | - outgoing selects accordinto pgm chng mapping |
| System | X | X | ||
| Exclusive | ||||
| System: | Song pos. | X | X | |
| Common: | Song sel. | X | X | |
| Tune | X | X | ||
| System: | Clock | X | X | |
| Real Time: | Commands | X | X | |
| Aux: | LocalON/OFF | X | X | |
| Message: | All Note Off | O | O | |
| ActiveSensing | X | X | ||
| Reset | X | X | ||
| Mode 1: | OMNI ON,POLY OFF | Mode 2: | OMNI ON,MONO | |
| Mode 3: | OMNI OFF,POLY ON | Mode 4: | OMNI OFF,MONO | |
| O: Yes, X: No | ||||
MIDI adapter: 5 pin DIN to stereo 3.5mm
Please use "Type A" adapters, such as this:
Make Noise 0-Coast 3.5mm TRS to MIDI Cable Adapter
LEGALESE
Safety and Warranty
Safety Information
- No operator access to the internals of the unit is permitted; servicing must be performed by qualified personnel only.
- The unit must not be operated with a damaged or ungrounded power cord.
Limited Warranty
The Misha unit covered by this warranty is built to exacting quality standards and should give years of trouble free service. If you are experiencing problems which are not cleared up in this manual, your recourse is this warranty.
What the Warranty Does and Does Not Cover
Eventide Inc. warrants the above-identified unit to be free from defects in workmanship and material under normal operation and service for a period of one year from the date of purchase, as detailed below.
At our discretion within the warranty period, we may elect to repair or replace the defective unit. This means that if the unit fails under normal operation because of such defect, we will repair the defective unit at no charge for parts or labor. We also assume a limited responsibility for shipping charges, as detailed below.
The warranty does not extend beyond repair or replacement as stated herein and in no event will we be responsible for consequential or incidental damages caused by any defect, and such damages are specifically excluded from this warranty. Our sole obligation is to repair or replace the defective unit as described herein.
The warranty DOES NOT COVER any damage to the unit regardless of the cause of that damage. The unit is a complex piece of equipment that does not react well to being dropped, bounced, crushed, soaked or exposed to excessively high temperatures, voltages, electrostatic or electromagnetic fields. If the unit is damaged for these or
similar causes, and the unit is deemed to be economically repairable, we will repair it and charge our normal rates.
The warranty DOES NOT COVER shipping damage, either to or from Eventide. If you receive a new unit from us in damaged condition, notify the carrier and us; we will arrange to file an insurance claim and either repair or exchange the unit.
If you receive a new unit from a dealer in damaged condition, notify the dealer and the carrier.
If we receive the unit from you with apparent shipping damage, we will notify you and the carrier. In this case, you must arrange to collect on any insurance held by you or your carrier. We will await your instructions as to how to proceed with the unit, but we will charge you for all repairs on damaged units.
Who is Covered Under the Warranty
The warranty applies to the original purchaser of a new unit from Eventide or an Authorized Eventide Dealer. Demo units are also covered by this warranty under slightly different circumstances (see below).
Units that are used, or have been used as part of a rental program, are not covered under any circumstances.
It is your responsibility to prove or to be able to prove that you have purchased the unit under circumstances which activate the warranty. A copy of your purchase invoice is normally necessary and sufficient for this.
If you have any questions about who is an Authorized Eventide Dealer, call us. Units with the serial number plate defaced or removed will not be serviced or covered by this warranty.
When the Warranty Becomes Effective
The one-year warranty period begins on the day the unit is purchased from an Authorized Eventide Dealer or, if the unit is drop-shipped from Eventide, on the day shipped, plus a reasonable allowance for shipping delays. This applies whether or not you return your warranty registration form.
Warranty Information
When we receive a unit, this is how we determine whether it is under warranty:
- If the unit was shipped from our factory within the past calendar year, we assume that it is under warranty unless there is evidence to the contrary, such as
its having been sold as used or rented, etc.
-
If the unit was shipped from our factory more than a calendar year ago, we assume it is not under warranty unless:
-
There is a warranty registration form on file showing that it has been purchased within the past year under appropriate conditions.
-
You send a copy of your purchase invoice indicating warranty status along with the unit.
-
If the unit was used as a demo, the warranty runs from the date that it was received by the dealer. The original purchaser gets the unexpired portion of that warranty.
When you send a unit for repair, you should indicate whether or not you believe it to be under warranty. If you do not say the unit is under warranty, we will charge you for the repair and we will not refund unless the charge was caused by an error on our part. If you believe the unit to be under warranty and you do say it is but we disagree, you will not incur any charges until the dispute is resolved.
Reading the above, you can see that it is to your advantage to send in the warranty registration form when you purchase the unit. If we know who you are, we can send you updates and notifications, and advise you of our new products. It will also enable you to receive pre-shipment of certain parts.
Who Performs Warranty Work
The only company authorized to perform work under this warranty is Eventide Inc., Little Ferry, New Jersey. While you are free to give personal authorization to anyone else (or to work on it yourself), we will not honor claims for payment for parts or labor from you or from third parties.
However, we and our dealers do try to be helpful in various ways. Our dealers will assist, usually without charge during the warranty period, in:
- Determining whether there is a problem requiring return to the factory.
- Alleviating user error or interconnection problems that may be preventing the unit from operating to its full capability.
We are available for email and telephone consultation if the dealer is unable to assist.
If a part is found to be defective during the warranty period and you wish to replace it yourself, we will normally ship the part immediately at no charge, provided your warranty registration form is on file. We reserve the right to request that the defective part be returned to us.
Shipping Within the 50 United States
You are responsible for getting the unit to our door at no cost to us. We cannot accept collect or COD shipments.
We will return the unit to you prepaid, at our expense, using an expeditious shipping method, normally United Parcel Service. In areas not served by UPS we will ship by US Mail.
If you are in a hurry and want us to use a premium shipping method (such as air express, next day air, etc.), be sure you tell us and agree to pay shipping charges collect. If you specify a method that does not permit collect or COD charges, remit sufficient funds to prepay shipping.
Shipping Outside the 50 United States
If you purchased the unit from a dealer in your country, consult with the dealer before returning the unit.
If you wish to return the unit to us, please note the following:
-
The unit must be prepaid to our door. This means that you are responsible for all shipping charges, including customs brokerage and duties. When a unit is shipped to us it must be cleared through United States Customs by an authorized broker. You must make arrangements for this to be done. Normally, your freight forwarder has a branch in the United States, which can handle this transaction. If you want our assistance, you must notify us before shipping the unit for repair, giving full details of the shipment, and including a minimum of \$250.00 in US funds to cover the administrative and brokerage expenses. Any balance will be applied to the repair charges or refunded. If a balance is due to us, we will request a further prepayment.
-
All shipments will be returned to you collect. If this is impossible because of shipping regulations or money is due us, we will request prepayment from you for the appropriate amount.
-
All funds must be in US dollars. Payment may be made by check drawn on any bank in the US, or by telegraphic funds transfer to our bank. If you send US currency, be sure that it is sent by a method you can trace, such as registered mail. If you wish to pay by Letter of Credit, be sure that it affords sufficient time for work to be performed and the
L/C negotiated, and that it is free from restrictive conditions and documentation requirements.
- We reserve the right to substitute freight carriers. Although we will attempt to honor your request for a specific carrier, it is frequently necessary to select a substitute because of difficulties in communication or scheduling. This warranty gives you specific legal rights and you may also have other rights, which vary from location to location.
- Contents
- Introduction 3
- Quickstart Guide 5
- Knobs, Buttons & Display (Play Menu) 9
- Menus 12
- Scales 16
- User-Assignable Buttons 18
- Tone Row 20
- Polyphony 31
- MIDI 34
- USB Jack 38
- Presets 39
- AudioOut41
- Setup Menu 41
- Updating Firmware 54
- Factory Reset 55
- APPENDIX 56
- LEGALESE 63
- Introduction
- What's in the box
- Installation
- Quickstart Guide
- Knobs, Buttons & Display (Play Menu)
- Key Knob
- Scale Knob
- ●/■ (Record/Stop):
- ▶/II (Play/Pause):
- LCD screen
- Key And Scale Indicators
- Solfege Wheel
- Octave Display
- User Buttons
- Undo ( )
- Interval Buttons
- ▲(Left Shift) and ▼(Right Shift) buttons
- Menus
- Play Menu
- Auto Play Menu
- Clock Menu
- Note Range Menu
- Scales
- Scale Selection
- Factory Scales
- User-defined Scales
- Modes
- User-Assignable Buttons
- - Chromatic (default)
- Tone Row
- What is a Tone Row?
- Example #1
- Example #2
- Key Knob in Tone Row Mode (Play Menu)
- Chromatic
- Circle of 5ths
- Scale Knob in Tone Row Mode (Play Menu)
- Manual (non-automated - Play Menu)
- - Record/Stop
- - Play/Pause
- - Button
- - Interval buttons
- Functions which Ignore Tone Row mode:
- Automated
- ●/■ Record/Stop
- ▶/II Play
- ▶/II Pause
- Button
- Internal Clock
- External Clock
- Automation of Tone Row
- Interval button sequence (Auto Play menu)
- Adding to the Interval Button Sequence
- Subtracting from the Sequence
- Rest
- "Triplet"
- Random Step
- User 1/2
- Note Duration
- Inversion
- Play Once
- Other User Function Buttons
- Play Options (Auto Play Menu)
- Prime
- Retro
- Random
- Pendulum
- Transpo ▲(Auto-Transpose up)
- Transpo ▼ (Auto-Transpose down)
- Interval Button Option (Auto Play Menu)
- Interval
- Clock Div
- Transpose
- Translate
- Octave
- Chord
- Press/hold Scale Knob for each Interval Button Option
- Reset Sequence/Play Option
- Polyphony
- Chords
- Chord Menu
- MIDI Out
- CV Out
- No Chord
- CV Out, With Chord
- MIDI
- MIDI In
- Default MIDI Note Map
- All Notes Off
- MIDI PassThru
- PassThru Modes
- Off
- Active
- Active Last Note
- Example:
- PassThru
- PassThru/Active Transition
- MIDI Sync, Clock Etc.
- Misha as Main Controller
- Misha as Secondary Controller
- USB Jack
- Play Misha With A USB Computer Keyboard
- Presets
- Save
- Load
- User Presets 1-9
- User Presets 10-18
- Home
- Audio Out
- Parameters are:
- Setup Menu
- Button Functions
- CV Outputs
- CV Out 1
- CV Out 2
- CV Out 3
- Pitch Bend Range
- CV Inputs
- CV IN X
- Range
- Linking
- Unlinked (T)
- Unlinked (T, CV)
- Linked (Gate, CV)
- Linked (Trigger)
- CV Function
- Pitch Bend
- Midi Velocity
- Audio Sine Lvl
- Audio Square Lvl
- Audio Saw Lvl
- Audio Trngle Lvl
- T/G Active State
- Trigger Function
- Trigger Mapping
- CV IN Y
- CV IN Z
- Input Channel
- Output Channel
- Output Velocity
- Pgm Change In
- Tx Timing Clock
- Tx Real Time Msg
- MIDI Mapping
- MIDI Note
- MIDI CC
- Clocking
- Int Clock Enable
- Int Clock BPM
- Ext Clock PPQ
- Ext Clock Source
- Clock Output
- Bank Mapping
- Add Via SD Card
- Shortcut to audition multiple scala files
- Remove
- SD Card
- System
- Note Range
- Note Range Home
- Solfege Wrap
- Solfege Display
- Key Sig Order
- Scale Mode
- Tone Row Octaves
- Output Mono/Poly
- On Preset Load
- On Startup
- USB Kbd Mapping
- Calibrate
- Factory Reset
- About Misha
- Online Help
- Updating Firmware
- Method #1
- Method #2
- APPENDIX
- Physical/Electronic Specifications
- LEGALESE
- Safety and Warranty
- Safety Information
- Limited Warranty
- What the Warranty Does and Does Not Cover
- Who is Covered Under the Warranty
- When the Warranty Becomes Effective
- Warranty Information
- Who Performs Warranty Work
- Shipping Within the 50 United States
- Shipping Outside the 50 United States
Brand : EVENTIDE
Model : Misha
Category : Keyboard