 — Webcam — Mode d'emploi PDF")
LIFE P86004 (MD 86061) - Webcam MEDION - Free user manual and instructions
Find the device manual for free LIFE P86004 (MD 86061) MEDION in PDF.

| Product Type | Webcam |
| Brand | Medion |
| Model | LIFE P86004 (MD 86061) |
| Resolution | 1920 x 1080 pixels (Full HD) |
| Frame Rate | 30 fps |
| Field of View | 70° (diagonal) |
| Built-in Microphone | Yes |
| Connection | USB 2.0 |
| Compatibility | Windows, macOS, Chrome OS |
| USB Cable Length | 1.5 m |
| Dimensions (W x H x D) | 95 x 50 x 45 mm |
| Weight | 120 g |
| Power Supply | Via USB port |
| Power Consumption | 0.5 W |
| Special Features | Auto-focus, light correction |
| Care and Cleaning | Clean with a soft, dry cloth. Do not use abrasive cleaners. |
| Safety | Do not expose to moisture. Unplug before cleaning. |
| Spare Parts and Repairability | Not available separately. Repair by authorized service. |
| Warranty | 2 years |
| Box Content | Webcam, quick start guide |
Frequently Asked Questions - LIFE P86004 (MD 86061) MEDION
User questions about LIFE P86004 (MD 86061) MEDION
0 question about this device. Answer the ones you know or ask your own.
Ask a new question about this device
Download the instructions for your Webcam in PDF format for free! Find your manual LIFE P86004 (MD 86061) - MEDION and take your electronic device back in hand. On this page are published all the documents necessary for the use of your device. LIFE P86004 (MD 86061) by MEDION.
USER MANUAL LIFE P86004 (MD 86061) MEDION
2MP Webcam with Headset
MEDION® P86004 (MD 86061)
MEDION®
natural_image
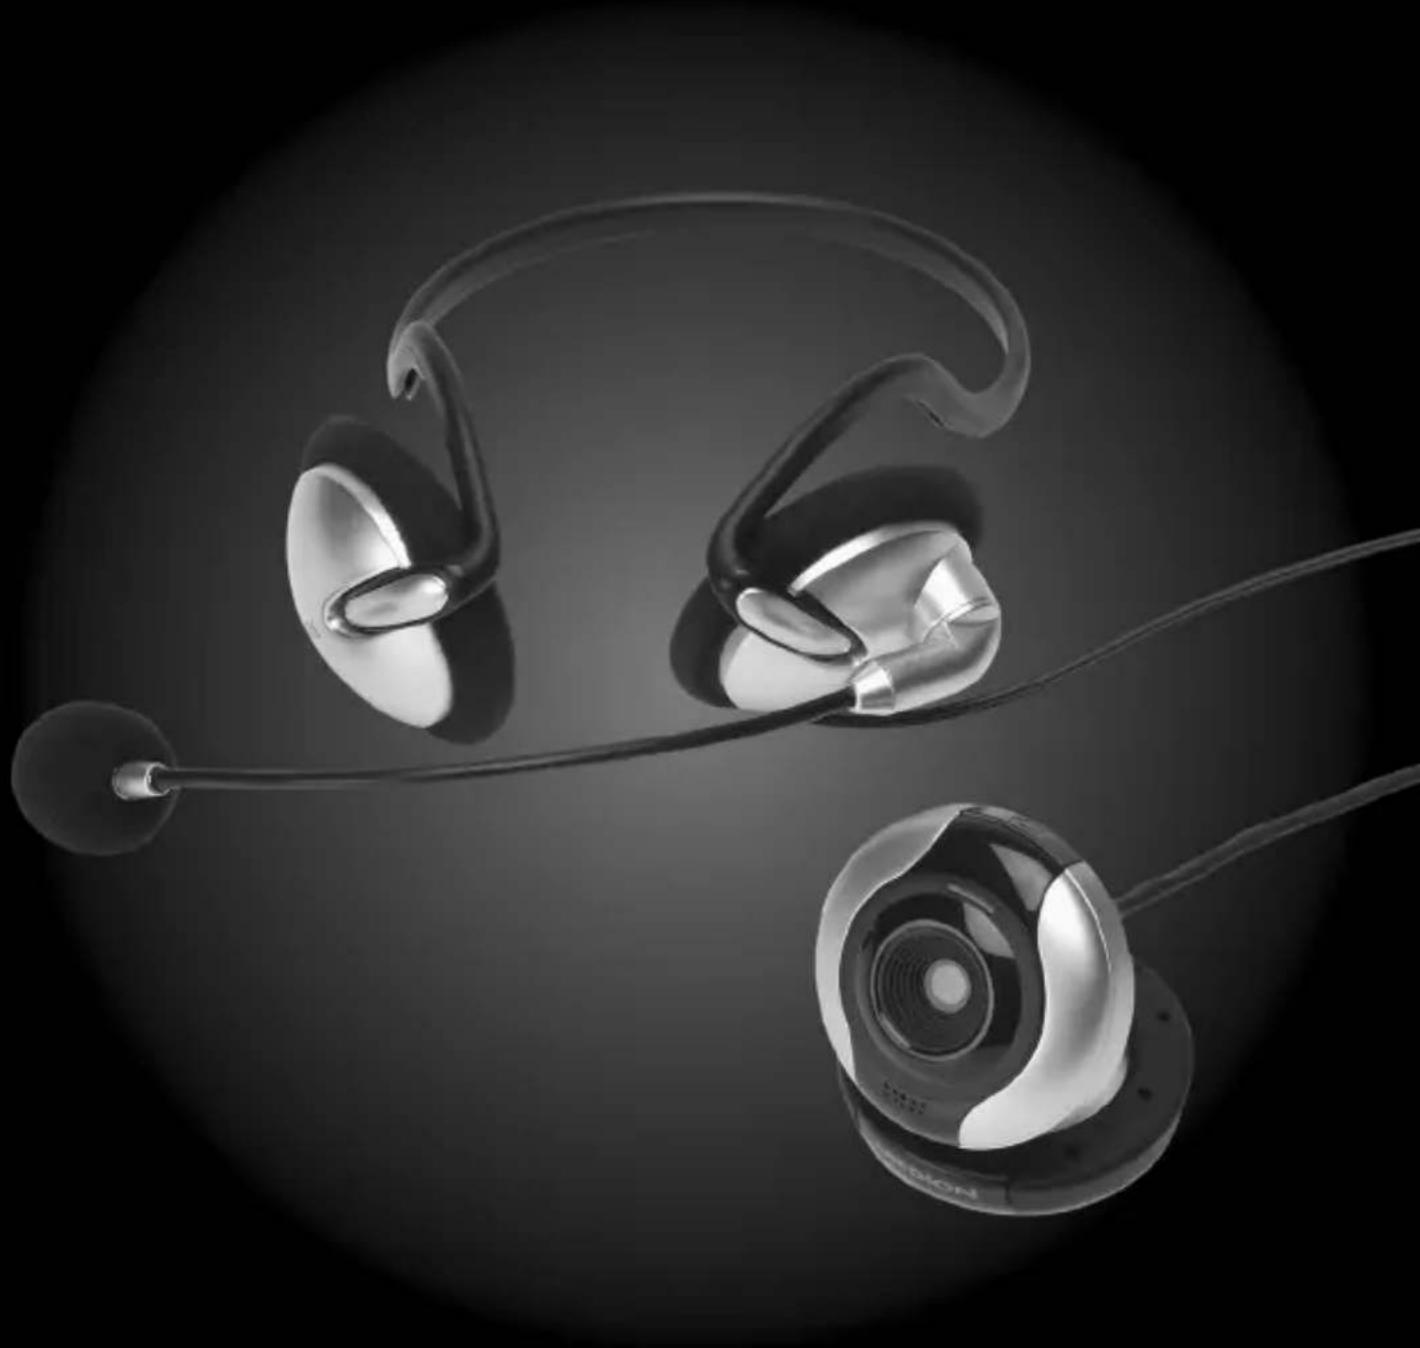
Black-and-white image of three metallic earbuds with earphones and a connecting rod, against a dark background (no text or symbols visible)Contents
What Your 1 Year Warranty Means ....4
Safety Instructions....4
Applications 5
Electromagnetic Compatibility 5
Connections......5
Repairs 5
Cleaning 6
Backup....6
Package Contents 6
System Requirements....7
View 7
Setup....9
Installing the Software 9
Connecting the Webcam to the PC 11
Setting up the Camera 11
Connecting the Stereo Headset to the PC 12
Troubleshooting 12
Technical Support 13
Disposal 13
Technical Specifications 14
Copyright © 2009
All rights reserved.
This manual is protected by copyright.
Medion® is the owner of this copyright.
Trademarks:
MS-DOS® and Windows® are registered trademarks of the Microsoft® corporation.
Pentium® is a registered trademark of Intel®.
Other trademarks are the property of their respective owners.
Subject to technical and optical changes as well as printing errors.
What Your 1 Year Warranty Means
Great care has gone into the manufacture of this product and it should therefore provide you with years of good service when used properly. In the event of product failure within its intended use over the course of the first year after the date of purchase, we will remedy the problem as quickly as possible once it has been brought to our attention. In the unlikely event of such an occurrence, or if you require any information about the product please contact us via our after sales support services, details of which can be found in this manual and on the product itself.
Safety Instructions

natural_image
Gray icon of an open book with a lowercase 'i' inside, representing information (no text or symbols)Please read this instruction manual thoroughly and please pay special attention to the safety instructions, before using the device for the first time. This device may only be used as described in the instruction manual.
In the event that you transfer ownership of these devices, please provide these instructions to the new owner.
- Never allow children to use electronic devices unsupervised. Children may not always correctly identify potential hazards.
- Keep your device away from sources of moisture.
- Place and operate the unit on a stable, even surface which is vibration-free to avoid it falling off.
- Never open the device's housing! You could receive an electric shock!
Applications
This product is intended for private use only.
Electromagnetic Compatibility
- When connecting additional or other components ensure that Guidelines for Electro-Magnetic Compatibility (EMC) are observed.
- Keep the device at a distance of at least one metre from high frequencies and magnetic sources of interference (television, loudspeaker boxes, mobile telephones etc.) to avoid malfunctioning and data loss.
- Only use a screened USB cable for connecting the webcam to your PC.

N11652
Connections
- Position the cables so that nobody is able to step on them or trip over them.
- Do not place any objects on the cables to avoid damaging them.
Repairs
- Please contact the MEDION Help Desk on 1 300 884 987 if you have technical problems with the device.
- Ensure that defective devices or damaged mains cables are repaired immediately by a specialist workshop or contact your Medion Help Desk to reduce risks.
Cleaning
- Please make sure the webcam, particularly the lens, does not get dirty.
- Use a damp cloth to clean the webcam and stereo headset.
- To clean, do not use solvents, corrosive or aerosol detergents.
Backup

Note
Always backup your data onto an external storage device (e.g. CD-R, external hard drives) after it has been changed or updated. We do not accept any liability for claims for compensation arising from loss of data or any damages incurred.
Package Contents
Please check your purchase to ensure all items are included and contact us within 7 days of purchase if any of the following components are missing:
- Webcam (with Integrated USB Cable)
- Stereo Headset (with Integrated Cable with Green and Pink 3.5mm Jacks)
- Software CD
• Instruction Manual - Warranty Certificate
- Warranty Sticker

Important
You need to enter the following serial numbers when installing the software included:
YK36941782K88364
System Requirements
- Operating system Microsoft Windows XP/Vista/7
- Processor 1.6 GHz processor or faster
• Installation CD-ROM/DVD-drive - Disk storage 200 MB or more free fixed disk storage
- Connection USB, microphone and headphones connection
View
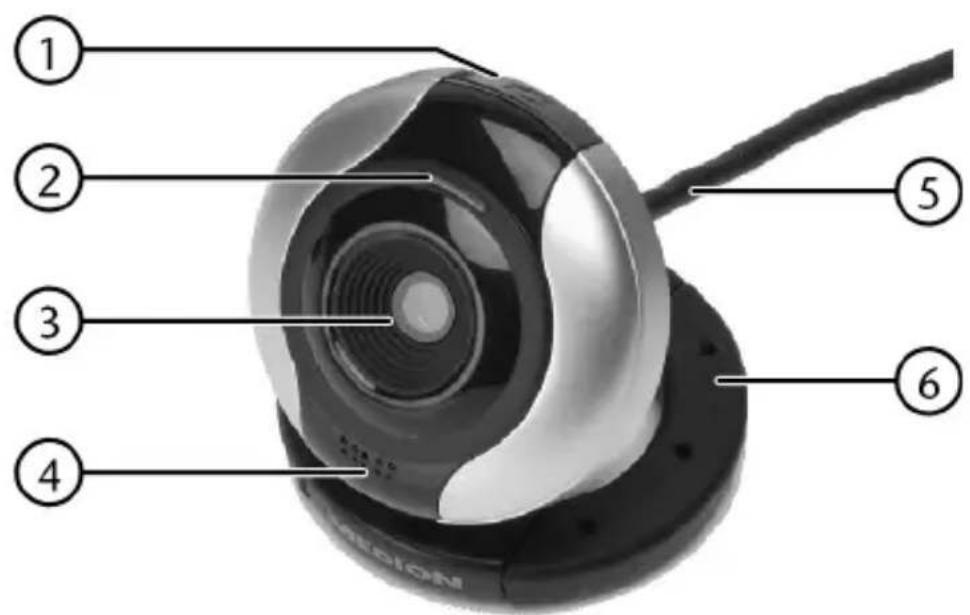
1 Snapshot button(using YouCam 3)
2 Power light
3 Lens
4 Microphone
5 Connection cable
6 Fold-out camera base
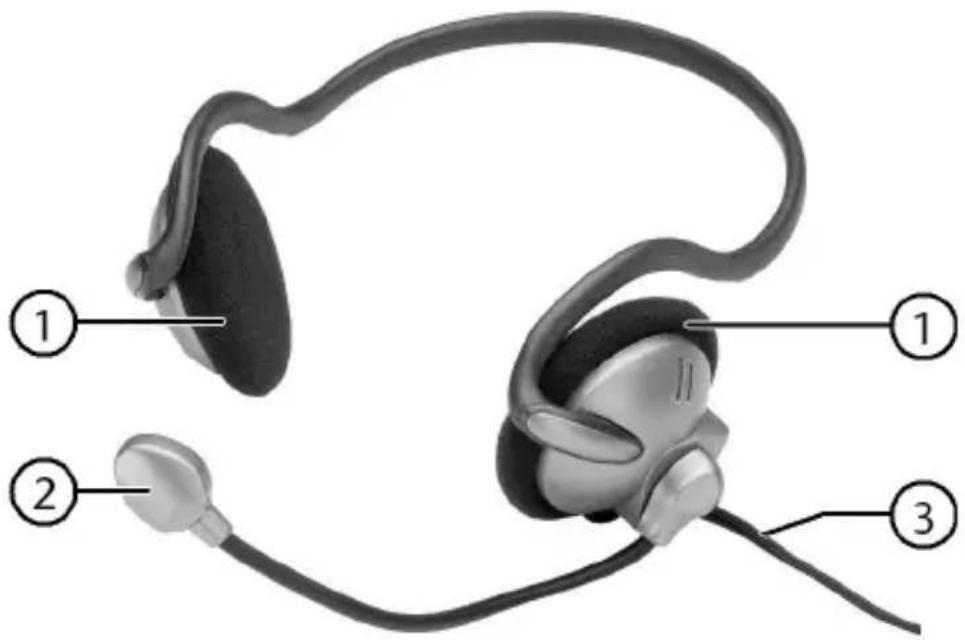
1 Ear pad
2 Microphone
3 Connection cable
Setup
Installing the Software

Caution!
Important files may be changed or overwritten when you are installing programs or drivers.
Before installing the program make a backup of your original files which you will be able to access later if problems occur after installing the software.

Note
Install the software before connecting the webcam and stereo headset.
You must install the supplied software as the webcam can only be operated in conjunction with this software.

Note
A dialogue box will appear if your system is set up to install signed software/drivers (released by Microsoft) only. The wording in the box will differ from system to system. Example: “The driver you wish to install did not pass the test”.
This does not indicate that the driver is faulty, but merely points out that there is no Microsoft signature. You can skip this screen. Click “Next” to install the driver.
- Place the CD in the drive. The installation menu will start automatically.

Note
If installation does not start automatically, the Autorun feature is deactivated.
Manual installation without Autorun:
Click "Start" and select the "Run" feature.
Now enter the name (letter) of the CD-ROM drive followed by a colon and "\autorun\demo32.exe".
▶ Confirm with "OK".
The installation menu will suggest the following items for installation:
- PC camera driver (hardware driver) - Cyberlink YouCam 3 (camera software)
▶ Install the hardware driver and the camera software in sequence. Follow the instructions on the screen.
▶ Restart your computer.

Note
To use the image processing program, please read the corresponding online help manual. Click the question mark in the program to call up the online help.
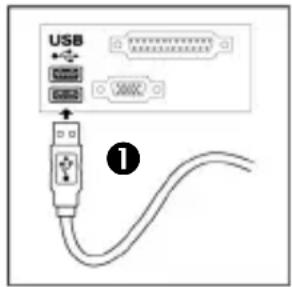
Connecting the Webcam to the PC
Connect your webcam to your computer as follows:
The driver software must already be installed.
- Switch on the computer and all peripheral devices (monitor, printer modem, etc.) and wait until operating system has finished booting.
Insert the end of the USB cable (①) into one of your computer's empty USB ports (②). - Windows® will recognise that new hardware has been connected and will complete the installation.
2

Note
Never unplug the connection cable from the computer while the camera is running. This could cause the software to crash.
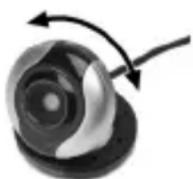
Setting up the Camera
The webcam provides the best viewing angle when mounted on the monitor. Experiment until you find the best position.

natural_image
Close-up of a white video camera with a metallic lens mounted on a black device (no visible text or symbols)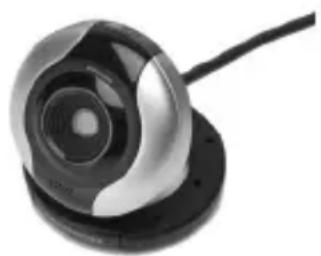
natural_image
Close-up of a black and silver camera lens with a cable, no visible text or symbolsPlease note the following:
- The ideal angle is achieved by setting up the webcam in the centre of the monitor.
- You can also set up the camera on a table or hold it in your hand.
You can turn the camera body on the base to achieve the desired angle.
Connecting the Stereo Headset to the PC
You can connect the headset while the computer is running.
▶ Insert the 3.5 mm pink jack into the microphone input on your sound card.
- Insert the 3.5 mm green jack into the output socket on the sound card.
Using headphone/earphones at high volume can result in permanent hearing damage. Before pressing play, set the volume to the lowest setting. Start playback and increase the volume to a comfortable level. Changes to the basic equaliser settings can also damage your hearing permanently.

Using headphones/earphones to listen to a device at high volumes for an extended period can damage your hearing.
Troubleshooting
The image display on the monitor is not clear.
- The lens is dirty or smeared.
The camera is not recognised. - Check all cable connections.
There is no sound from the headset. - Check all cable connections.
- The volume is too low.
Technical Support
Both webcam and headset have been vigorously tested in our laboratories in conjunction with a wide variety of devices and peripherals. However, the drivers will need to be updated from time to time. This is because there may be compatibility problems with other components which were not tested (programs, devices).
To make sure you have the latest software version for your camera we recommend downloading it from www.medion.com.au. Go to Service & Support then Drivers & Software and enter the serial number of your device, which is on the back of the unit or on the packaging.
Disposal

Device
At the end of its life, the device should not be disposed of in household rubbish. Enquire about the options for environmentally friendly disposal.

Packaging
Your device has been packaged to protect it against transportation damage. The packaging is made of environmentally friendly material which can be recycled.
Technical Specifications
Webcam
| Port | USB | 2.0 | |
| Sensor | 2.0M | CMOS | sens |
| 1600 x | 1200 | pixel |
Power supply 5 Volt (USB)
Software compatibility Windows XP /Vista/7
Stereo Headset
Port: 3.5 mm jack (green, pink)


N11652
MEDION®
MEDION Australia Pty Ltd
St. Leonards, NSW 2065
Australia
MEDION Help Desk: 1300 884 987
E-Mail: australia@medion.com
- 2MP Webcam with Headset
- MEDION®
- Contents
- What Your 1 Year Warranty Means ....4
- Safety Instructions....4
- Package Contents 6
- System Requirements....7
- View 7
- Setup....9
- Troubleshooting 12
- Disposal 13
- Technical Specifications 14
- What Your 1 Year Warranty Means
- Safety Instructions
- Applications
- Electromagnetic Compatibility
- Connections
- Repairs
- Cleaning
- Backup
- Note
- Package Contents
- Important
- System Requirements
- View
- Setup
- Installing the Software
- Caution!
- Connecting the Webcam to the PC
- Setting up the Camera
- Connecting the Stereo Headset to the PC
- Troubleshooting
- Technical Support
- Disposal
- Device
- Packaging
- Technical Specifications
- Stereo Headset
Brand : MEDION
Model : LIFE P86004 (MD 86061)
Category : Webcam