 — Media player — Mode d'emploi PDF")
E85015 (MD 86162) - Media player MEDION - Free user manual and instructions
Find the device manual for free E85015 (MD 86162) MEDION in PDF.

| Product Type | Full-HD Media Player |
| Brand | MEDION |
| Model | E85015 (MD 86162) |
| Dimensions (W x H x D) | 150 x 45 x 120 mm |
| Weight | Approx. 450 g |
| Power Supply | Mains adapter Ktec KSAD1200150W1UK; Input 230 V ~ 50 Hz; Output 12 V, 1.5 A |
| Supported File Systems | FAT16, FAT32, NTFS, UDF, EXT3 |
| Video Formats | MPG, MPEG, AVI, WMV, MP4, MOV, DAT, VOB, ISO, MKV, TS; Subtitles: SRT, SUB, SMI, IDX, SSA, ASS |
| Audio Formats | MP3, WMA, WAV, ASF, AAC, OGG, FLAC |
| Photo Formats | JPG, BMP, PNG, GIF, TIFF |
| Video Outputs | HDMI, Component (Y Pb Pr), Composite AV (RCA) |
| Audio Outputs | Analog stereo (RCA), Optical (SPDIF) |
| Connectivity | USB 2.0 (2x), RJ45 Ethernet, SD/SDHC/MMC/MS/MSPro card slot |
| Remote Control Battery | CR2025 (3 V button cell) |
| Operating Temperature | 5 °C to 35 °C |
| Humidity | 5 % to 65 % (non-condensing) |
| Supported TV Systems | PAL, NTSC, 480P, 576P, 720P (50/60 Hz), 1080i (50/60 Hz), 1080P (50/60 Hz), 1080P 24 Hz |
| Network Features | UPnP, Wired LAN (DHCP/Fixed IP) |
| Special Functions | Slideshow with background music, Resume Play, Screensaver, Zoom (up to 16x), Subtitle support, Multi-angle |
| Cleaning | Use a dry, soft cloth; no solvents or abrasive cleaners |
| Safety | Keep away from children; do not cover ventilation; use only supplied adapter; avoid moisture |
Frequently Asked Questions - E85015 (MD 86162) MEDION
User questions about E85015 (MD 86162) MEDION
0 question about this device. Answer the ones you know or ask your own.
Ask a new question about this device
Download the instructions for your Media player in PDF format for free! Find your manual E85015 (MD 86162) - MEDION and take your electronic device back in hand. On this page are published all the documents necessary for the use of your device. E85015 (MD 86162) by MEDION.
USER MANUAL E85015 (MD 86162) MEDION
Information about these Instructions ....3
Use in accordance with regulations 3
Scope of delivery....4
Safety notes 5
General information .... 10
Overview of the device....11
Front of the device....11
Back of the device 12
Remote....13
Bringing the device into operation 15
Placing the battery into the remote 15
Connecting the device....16
Bringing the device into operation for the first time ..... 22
Operation....23
Switching the device on and off....23
Setting the volume....23
Navigation in the Menus....24
The Home Menu....25
'All' option 25
'Music' option....27
'Photo' option....28
'Movies' option....29
Increasing/reducing the image 29
SETTINGS Menu – Making settings ....31
'Audio' Menu point....31
'Video' Menu....33
'Network' Menu....37
'System' Menu 38
'Photo' Menu....40
Removing problems ....42
Searching for errors....42
Do you need additional support?......45
Cleaning 45
Disposal....46
Technical Data 47
Information about these Instructions
Read these Operating Instructions through thoroughly before bringing the device into operation for the first time and follow the safety notes above all.
All activities to and with this device must only be carried out as far as they are described in these Operating Instructions.
Keep these Operating Instructions for further use. Please also hand over these Operating Instructions if you pass on the device.
Use in accordance with regulations
This device serves to replay audio, video and image files from data media that are connected with the device directly or through a network. The device can be connected to a television and/or audio equipment for the output of images and sound.
This device is only suitable for use in dry internal rooms.
This device has been conceived for private use and is not intended for industrial or commercial use. Use under extreme environmental conditions can result in damage to your device.
Scope of delivery
Please check the completeness of the delivery and inform us within 14 days after purchase if the delivery is incomplete.
You will have received the following items with the product that you have acquired:

ATTENTION!
Do not allow small children to pay with foil. There is a danger of suffocation!
- Design Full-HD Media Player MD 86162
- Plug-in power pack (Ktec KSAD1200150W1UK)
- Remote, including Type CR2025 3 V batteries
• Video/audio RCA cable
• Video cable for a component - Operating Instructions
- Guarantee card
Safety notes
In general
- Children should be supervised to ensure that they do not play with the device. This device is not intended to be used by individuals with restricted physical, sensory or intellectual abilities and/or lacking experience and/or knowledge (including children), unless they are supervised by an individual responsible for their safety or have received instructions about how the device should be used from such an individual.
- Keep the packaging material, such as foil, away from children. There will be a danger of suffocation in the case of misuse.
- Never open the casing of the device (electric shock, danger of short circuit and fire).
- Do not push any objects through the slits and openings into the inside of the device (electric shock, danger of short circuit and fire).
- The slits and opening of the device serve ventilation. Do not cover these openings (overheating, danger of fire).
- The remote has a Class 1 infra-red diode. Do not look at the LED with optical devices.
- Do not put and containers filled with liquid, such as vases, on the device or the mains adapter or in the immediate environment of the device and protect all parts against drops of water and spray. A container could tip over and liquid can impair electrical safety.
- Pull the plug out of the socket immediately in the case of damage to the plug, the connection line or the device.
- Wait to connect the power supply if the device has been brought into a warm room from a cold one. The condensation arising during this can destroy the device under certain circumstances. The device can be brought into operation safely once it has reached room temperature.
Dealing with batteries
- Batteries/rechargeable batteries can be extremely dangerous if they are swallowed. Keep the remote and the batteries inaccessible to small children for this reason. Medical help must be enlisted immediately if a battery has been swallowed.
- The remote is operated with batteries. Batteries can contain combustible materials. Batteries can leak, become very hot or even explode in the case of improper treatment.
Follow the following notes:
- Keep children away from batteries.
- Inform your doctor immediately if batteries have been swallowed.
- Never recharge batteries (unless this is expressly stated).
- Never switch the polarity.
- Never discharge the batteries by means of a high power output.
- Never short circuit the batteries.
- Never subject the batteries to excess heat such as sunshine, fire or similar.
- Do not take the batteries apart or deform them.
- Your hands or fingers could be injured or battery liquid could reach your eyes or your skin. If this happens, rinse the respective place with a large quantity of clear water and inform your doctor immediately.
-
Avoid heavy blows and vibrations.
-
Clean battery and device contacts before inserting the batteries, if necessary.
- Remove exhausted batteries from the device immediately.
- Remove the batteries from the device if it will not be used for a longer period.
- Isolate the contacts of the batteries with adhesive strips if you want to store or dispose of the batteries.
Set-up location
- Place and operate all components on a stable, level and vibration-free base, to avoid the device toppling over.
- Do not subject the device to any vibrations; they can damage the delicate electronics.
- Pay attention that no direct sources of heat (e.g. heating installation) have an effect on the device.
- No open sources of fire (e.g. burning candles) must stand on or in the vicinity of the device.
- Pay attention that the ventilation slots are not covered, so that sufficient ventilation will always be guaranteed.
- Do not put any objects on the cable, because it could be damaged otherwise.
- Maintain a minimum distance of approx. 10 cm between walls and the device or power pack. Ensure sufficient ventilation.
- Do not operate your device in the open air, because external influences, such as rain, snow, etc. can damage the device.
- Maintain at least one metre distance from high frequency and magnetic sources of interference (a television device, loudspeakers, mobile phones, etc.), in order to avoid functional disruptions.
- Moisture, which can cause an electrical short-circuit, can arise in the case of large variations in temperature and moisture, because of condensation.
Never repair the device yourself!
- Contact our Service Center if you have problems with your device.
- Do not attempt to open and/or repair the device yourself under any circumstances. There will be a danger of electric shock! Do not manipulate mains cable of the device either.
- Contact the Medion Service Center or another suitable workshop in the case of a fault, in order to avoid danger.
Cleaning and maintenance
- Always pull the power supply line from the socket first, whatever happens, before you clean the device.
- Only use a dry, soft cloth to clean the device. Do not use any chemical solutions or cleaning agents, because they can damage the surface and/or the lettering on the device.
Data back-up
- Attention! Make back-ups on external storage media after each update of your data. The assertion of compensation claims for a loss of data and consequential damage arising from it is excluded.
Electricity supply
Please pay attention to the following: Parts of the device are subject to voltage, even when the device is switched off. Separate the device from the mains completely, to interrupt the
electricity supply to your device or to release the device from voltage completely
- Only operate the plug-in power pack at an AC 100-240 V\~ 50 Hz earthed socket. Ask your energy supplier, if you are not sure about the power supply at the set-up location.
- Only use the plug-in power pack supplied with the device. (Ktec KSAD1200150W1UK). Never attempt to connect the plug of the plug-in power pack at other sockets, because damage can be caused otherwise.
- We recommend the use of protection against excess voltage for additional safety, in order to protect the device against damage by voltage peaks or a flash of lightning from the electricity network.
- Pull the plug-in power pack out of the socket to interrupt the power supply.
- The plug-in power pack must also be easily accessible after connection, so that it can be separated from the mains quickly if needed.
- Do not cover the plug-in power pack, to avoid overheating.
- Pay attention that the cable complies with the VDE requirements, if you use an extension cable. Ask your electrician if necessary.
- Lay the cable so that no-one can tread on it or trip over it.
- Do not place any objects on the cable, because it could be damaged otherwise.
General information
Formats that can be played
Many file formats can be played and written with this device. The following Table shows the file formats of different types of media that can be played.
| Type of media File formats | |
| Video MPG, MPEG | AVI, WMV, MP4, MOV, DAT, VOB, ISO,MKV, TSSubtitle formats: SRT, SUB, SMI, IDX, SSA, ASS |
| Audio MP3, WMA | WAV, ASF, AAC, OGG, FLAC |
| Photographic JPG | BMP, PNG, GIF, TIFF |
File systems
Your Design Full-HD Media Player supports the FAT16, FAT32, NTFS, UDF and EXT3 file systems.
About the display symbol
The “💡symbol, indicating that the function the respective type of operation explained in the User handbook is not available, will appear on the television screen during operation under certain circumstances.
Overview of the device
Front of the device
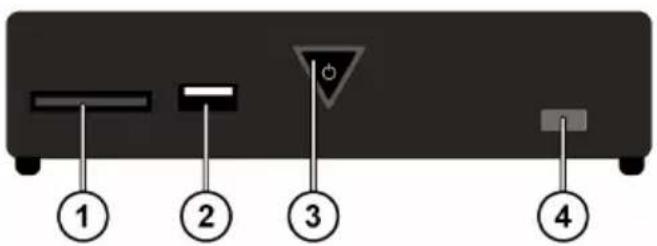
- SD/SDHC/MMC/MS/MSPro card insertion place
- USB: USB connection 1
- ⏻ ON/OFF: Switch the device on/off. Fades out when the device is switched off.
Shines red in the stand-by mode; flashes when the system is booting or shutting down; shines blue when the device is switched on; flashes blue if the remote is being used.
- Remote sensor: Point the remote to this point.
Back of the device
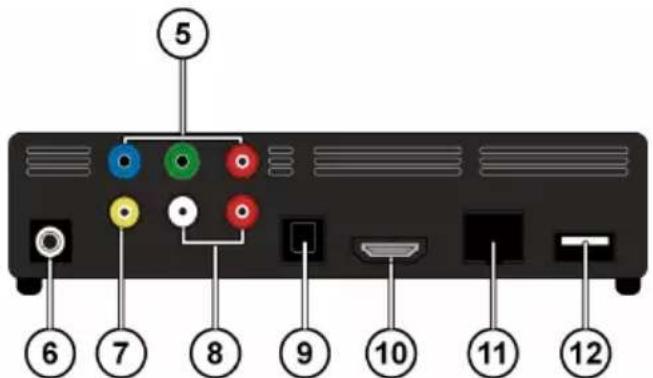
- Y Pb Pr: Component outputs
- DC: Mains input
- AV OUT: Video output
- AV OUT: Analog audio outputs (left/right)
- SPDIF: Optical digital output
- HDMI: HDMI output
- RJ45: LAN connection of the mains cable
- USB: USB connection
Remote
- HOME: Back to the HOME Menu
- PHOTO: Only display image files
- VIDEO: Only display video files
- MUSIC: Only display music files
- STANDBY/ON: Switch on the device/ switch to standby mode
- SETTINGS: Call up the Settings Menu
- SLIDESHOW: Start the slideshow
- OK: Confirm entries
- PG UP/DOWN: Leaf a page back/forward; back/forward by 10% during video replay
- AUDIO: Set audio tracks (only during video replay, if available)
- SUBTITLE: Set the subtitle (only during video replay, if available)
- ANGLE: Set the camera position (if available)
- REPEAT: Set the replay function
- VOLUME -/+ : Reduce/increase the volume
- MUTE: Switch off the sound
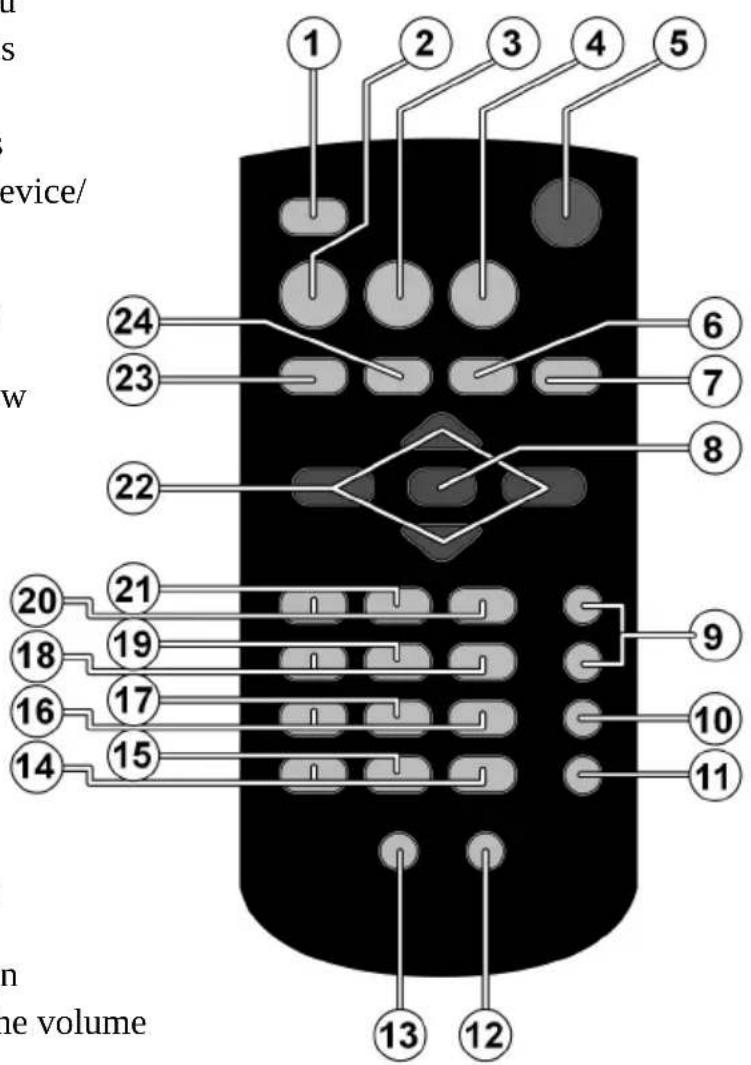
- Quick Jump <</>>: 1 minute back/5 minutes forward during video replay
- RETURN: Back to the last selection
- SKIP ◀◀/▶▶: Previous/next title
- STOP ■ Stop replay
- SEARCH ◀◀/▶▶: Search backwards/forwards
- PLAY/PAUSE ▶ Start/interrupt replay
- ◀▶Navigation buttons: Move the selection in the Menus
- INFO: Display replay list/set the video resolution (in the HOME Menu)
- ZOOM: Enlarge/reduce the picture
Bringing the device into operation

Please read the 'Safety Notes' Chapter from Page Fehler!
Textmarke nicht definiert. before bringing the remote into operation, whatever happens.
Placing the battery into the remote
The battery will already have been placed in the remote in the delivery status.
▶ Pull out the isolating strips with the label ‘Please remove before use’ on the back of the remote before activating it.
Replacing the battery
▶ The remote requires a 3 V, CR2025 button cell battery.
- Remove the cover of the battery compartment on the back of the remote.
Place a Type CR2025 (button cell) battery into the battery compartment of the remote. Pay attention to the polarity of the battery here (marked on the base of the battery compartment).
▶ Close the battery compartment.
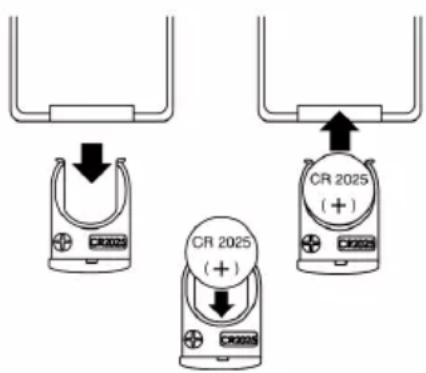

Remove the battery from the remote if the device will not be used for a longer period. The remote could be damaged by a
leaking battery.
Connecting the device
HDMI connection
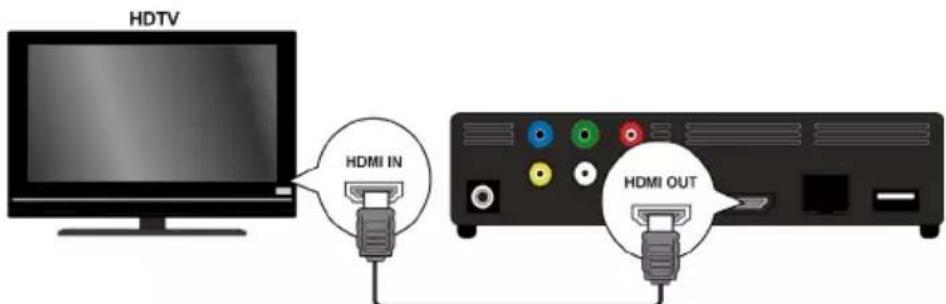
Connect the HDMI cable to the HDMI socket of the device and to the corresponding input socket on the television device.
The (PAL, 480P, 576P, 720P (50Hz), 720P (60Hz), 1080i (50Hz), 1080i (60Hz), 1080P (50Hz), 1080P (60Hz) or NTSC resolution can be set for HDMI output by pressing the INFO button several times (only in the HOME Menu) during an HDMI connection.
Notes about HDMI connection
- Set the [AUDIO] option, [DIGITAL OUTPUT] sub-menu, to [HDMI LPCM] (see Page 35) in the Settings Menu, if your television has no Dolby Digital or MPEG decoder.
- Pay attention to the following points when connecting an HDMI-compatible device:
- Switch off the HDMI device and the Media Player. Now, switch on the HDMI device, wait approx. 30 seconds, and then switch on the Media Player.
- The video input of the connected device must have been set to the Media Player.
- The connected device must support one of the PAL, 480P, 576P, 720P (50Hz), 720P (60Hz), 1080i (50Hz), 1080i (60Hz), 1080P (50Hz), 1080P (60Hz) or NTSC video input resolutions.
Connection to the AV sockets

Connect theAV jacks of the Media Player to the audio/video input sockets of the TV device by means of the audio/video cable supplied. Only PAL and NTSC resolutions are supported through this output; use the HDMI output if you want to enjoy HD content.
Connecting to the outputs of components
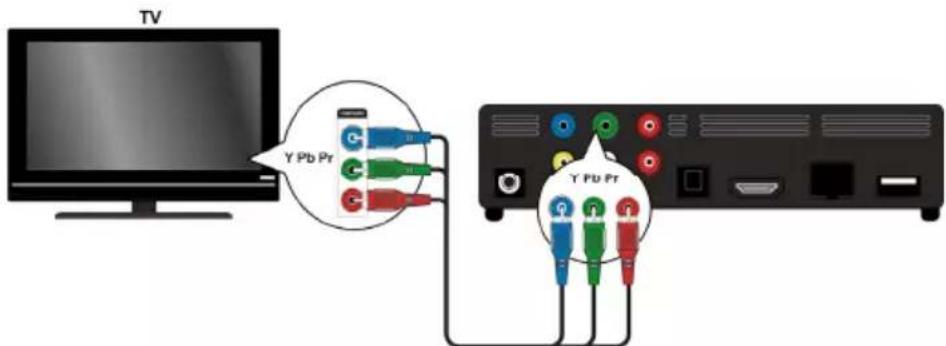
Connect theY Pb Pr jacks of the device to the corresponding input sockets of the TV device by means of the video cable supplied.
Note:
Only the picture will be output through the outputs of the component. The analog or digital connections of the Design Full-HD Media Player must be connected to the TV device or an audio device in addition, for the transmission of the sound signal.
Optical digital connection
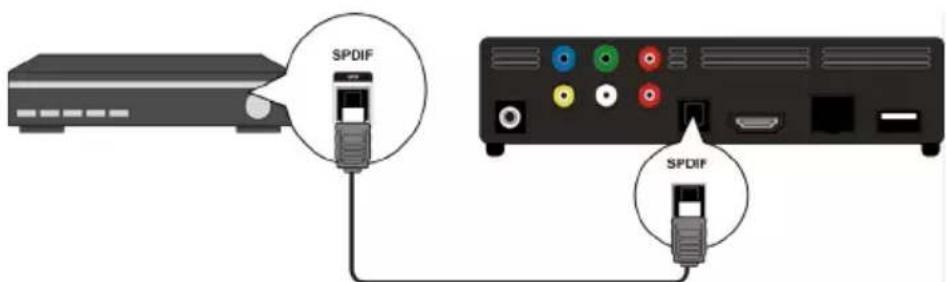
Connect the SPDIF jack of the device to the corresponding socket on the digital audio device (e.g. an A/V amplifier) by means of an optical cable, for the transmission of digital audio signals.
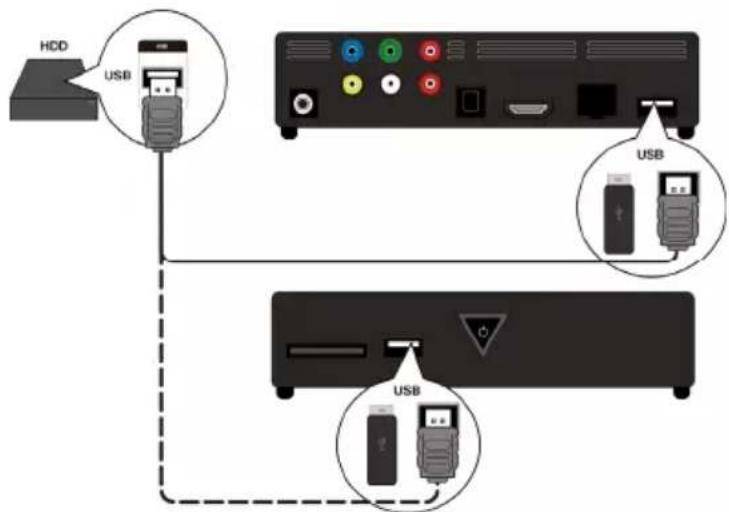
Connecting a data medium by means of USB
Connect a USB hard drive to the USB socket on the front or the back of the device by means of a USB cable. You can also plug in a USB stick at one of the sockets.
Network connection
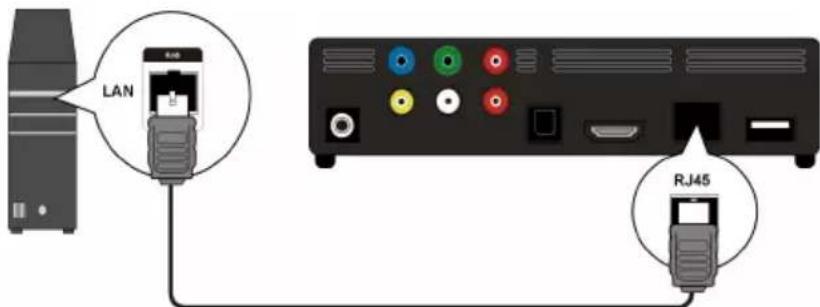
Connect the RJ45 socket on the device to a network interface (e.g. a router), by means of a cable with the corresponding jacks.
The Design Full-HD Media Player will be able to access released files in the network in this way.
Connection for memory cards
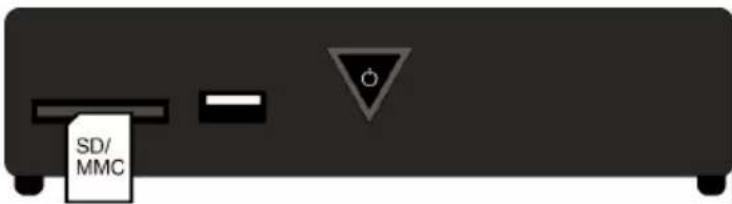
Plug a memory card (Type SD/SDHC/MMC/MS/MSPro) into the socket on the front of the device, in order to be able replay the files on the memory card.
Note:
The Design Full-HD Media Player supports SD, SDHC and MMC memory cards and MS and MSPro type memory sticks.
Connecting the power pack
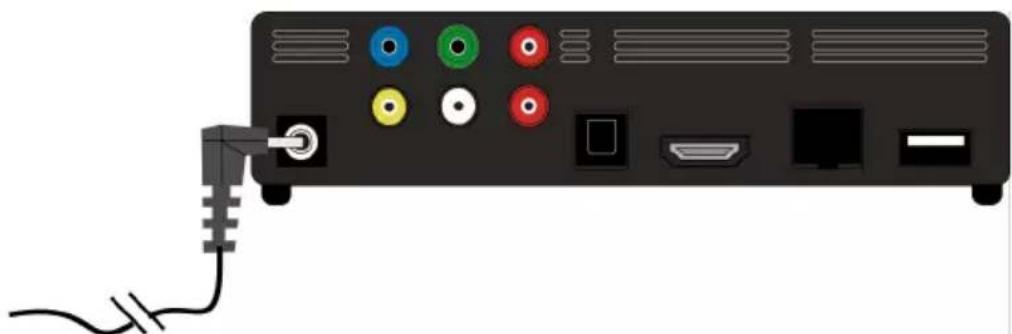
natural_image
Back panel of a black electronic device with colored buttons and ports, connected to a cable (no text or symbols visible)Connect the power supply plug of the adapter (KSAD1200150W1EU 12V DC 1.5A) supplied to the DC socket on the device.
Connect the mains adapter to a socket (AC 230 V \~ 50 Hz) when you have made all the connections. Take the details of the mains adapter from the Technical Data on Page 53.
Bringing the device into operation for the first time
An overview, in which you can make the following settings, will appear after connection to the power supply, when you put the device into operation for the first time;
Menu language
Set the Menu language here, as described on Page 38.
Time
Set the time and date here, as described on Page 39.
Setting up LAN
Set the network configuration here, as described on Page 37, if you want to connect a network cable.
Operation
Switching the device on and off
The ⏻ ON/OFF switch will initially flash blue, in order to signal that the system is booting, if you have connected the device with the electricity network through the mains adapter. After this, it will shine blue continuously and the device will be ready to operate.
Press the Standby/ON button on the remote, to switch the device to the Stand-by mode. The ON/OFF button shines red in the Stand-by mode.
▶ Press the Standby/ON button on the remote or the ON/OFF button on the device again, to switch the device out of the Stand-by mode.
▶ Press the ON/OFF button on the device briefly, to switch the device off. The ON/OFF button will fade.
▶ Press the ON/OFF button on the device briefly, to switch the device on. The ON/OFF button will flash blue, to signal that the system is booting. After this, it will shine blue continuously and the device will be ready to operate.
Setting the volume
▶ Press theVolume -/+ button, to reduce/increase the volume. The volume setting will be faded in below at the edge of the picture briefly.
Navigation in the Menus
▶ Select Menu points and change the values in the Menus with the ▶▲▼ Navigation buttons.
▶ Press theOK button to confirm a Menu point.
The Home Menu
▶ Press the HOME button to call up the media replay. The individual media and Menus are described in the following.
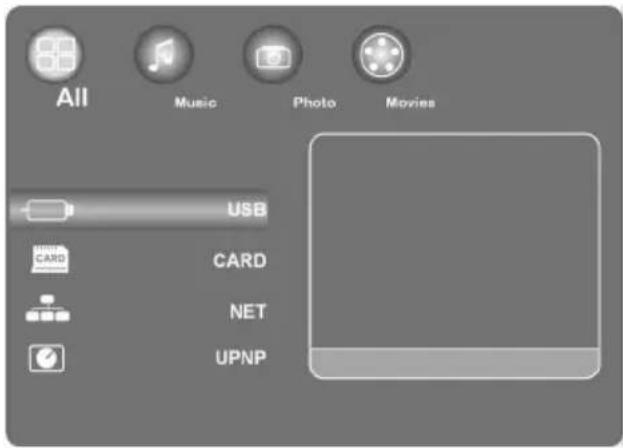
'All' option
USB
You will be able to search and play back all the media files stored on a USB data carrier, if you have connected it.
CARD
You will be able to search and play back all the media files stored on a data carrier, if you have connected it at the card insertion slot.
NET
You will be able to display files and devices released in the network, if you have connected the device to a network interface (e. g. a router).
My\_Shortcuts
All the server connections of which you have stored the access information for making a direct connection will be displayed here.
▶ Select a server and press the OK button, to make the connection.
UPnP
Universal Plug and Play (UPnP) is a protocol for the inter-manufacturer control of devices by means of an IP-based network.
You device will be recognized by Media Player and it will be possible for it to released and configured by means of the operating system, if UPnP has been activated in the Windows Media Player. Your device will also be able to receive software from a media server by means of UpnP data.
All the media content will be arranged for you according to the categories of the Windows Media Player or of media servers in the UPnP Menu point of the multi-media player.
▶ Select a media server and press the OK button, to make a connection or to open files and content.
'Music' option
The audio data and files supported will be displayed in the Music interface.
Possible controls during music replay
| Button | Function |
| PLAY/PAUSE ▶II | Start and pause replay. |
| ◀◀/▶▶Faster back/forwards. Pressing them several times will increase the speed. | |
| ▼ /▲Jump to the next or the previous music track. | |
| INFO | Display or fade out the replay strip during replay. |
| VOLUME -/+ Reduce or increase the volume. | |
Setting the Repeat function
▶ Press the REPEAT button several times, to set the following Repeat functions:
1 Repeat the current track
ALL Repeat all tracks
Repeat off No Repeat function has been set
'Photo' option
The photo data and files supported will be shown in the Photo interface.
Possible controls during the photo replay
| Button | Function |
| SKIP ◀◀◀/▶▶: Jump to the next or the previous photo. | |
| ◀/▶Rotate the photo by 90°. | |
| INFO | Display or fade out the photo replay strip during the replay. |
| STOP ■ | Stop the replay. |
Enlarging the image
- Press theZOOM button several times during replay, to set an enlargement factor of 2x, 4x, 8x or 16x. Move the enlarged section with the Navigation buttons.
The image will be represented as a single-picture in the Fit setting.
'Movies' option
The film data and files supported will be displayed in the Film Menu.
Possible controls during film replay
| Button | Function |
| PLAY/PAUSE ▶|| | Start and pause replay. |
| SKIP ◀◀/▶▶: Jump to the next or the previous chapter or film. | |
| ◀◀/▶Faster back/forwards. Pressing them several times will increase the speed. | |
| INFO | Display or fade out the film tool strip during the replay. |
| STOP ■ | Stop the replay. |
| VOLUME -/+ | Reduce or increase the volume. |
| QUICK JUMP <</> | Jump 1 minute back or 4 minutes forward in the replay. |
| PG UP/DOWN | 10% back or forward in the replay. |
Increasing/reducing the image
▶ Press theZOOM button several times during replay, to set an enlargement factor of 2x, 3x, 4x, 8x and 0.9x. Move the enlarged section with the Navigation buttons.
The video image will be shown in its original size in the 1x setting.
Setting the Repeat function
▶ Press the REPEAT button several times, to set the following Repeat functions:
Repeat Title Repeat the current title
Repeat A11 Repeat all titles
Repeat off No Repeat function has been set
Fade out the subtitles
You can fade out the sub-titles by pressing the SUBTITLE button, if the video file contains them.
▶ Press the button again, to display further subtitles (if available).
Camera position
▶ Press theANGLE button, to show the different camera positions, if they are available in the respective video file.
SETTINGS Menu – Making settings
▶ Press the SETTINGS, button, to call up the Settings Menu. The individual settings will be described in the following.
'Audio' Menu point
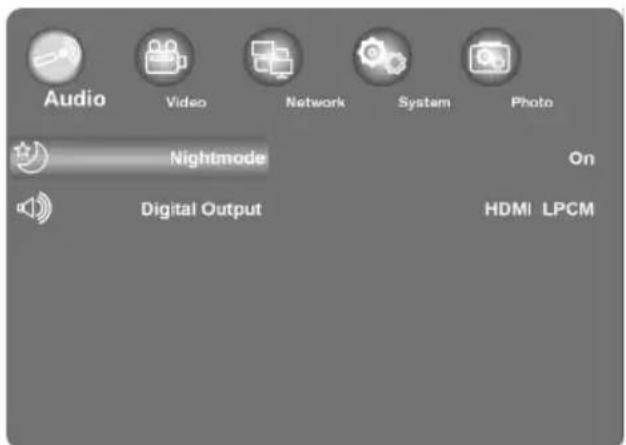
You can make the Audio settings in this Menu.
Night mode
▶ Select between on / off / comfort. The maximum volume will be reduced, to avoid noise nuisance for other people at night, for example, if this option has been activated.
Digital output
▶ Select the format for the SPDIF and HDMI audio outputs here.
HDMI LPCM Digital audio signal through the HDMI output reduced to stereo
HDMI RAW Digital audio signal through the HDMI output unchanged
SPDIF LPCM Digital audio signal through the SDPIF optical output reduced to Stereo
SPDIF RAW Digital audio signal through the SDPIF optical output unchanged
'Video' Menu
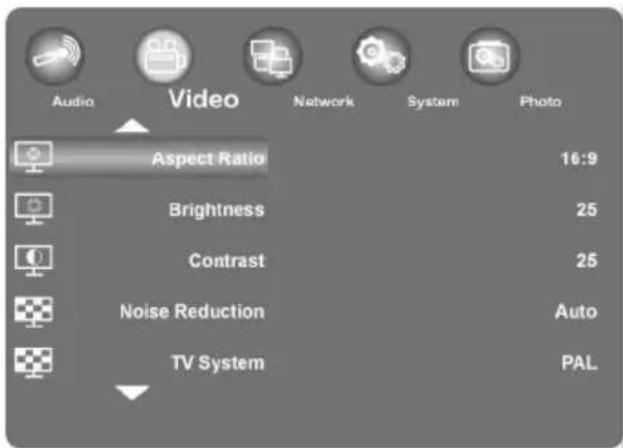
You can make the Video settings in this Menu.
Aspect Ratio
Pan Scan 4:3: Sets a wide image across the whole screen and cuts off the redundant sections. Please select this, if a standard 4:3 TV has been connected.
Letter Box 4:3: Sets a wide image with two black strips above and below on a 4:3 TV. Please select this, if a standard 4:3 TV has been connected.
16:9: Compresses the picture, to change the whole image. Please select this, if a 16:9 TV has been connected.
Brightness
▶ Set the brightness of the image from 0-50 here.
Contrast
▶ Set the contrast of the image from 0-50 here.
Noise Reduction
Set the noise reduction for the image display to on or off here.
TV system (Television norm)
▶ Set the TV system and the video resolution here. This setting will also depend on the country in which you are located:
NTSC The United States, Canada, Japan, Mexico, the Philippines, South Korea and Taiwan.
PAL Europe, Greenland, parts of Africa and South America, the Middle East, China, India, Australia and Indonesia.
480P Progressive 480 lines resolution
576P Progressive 576 lines resolution
720P 50Hz HD resolution (not for composite video output)
720P 60Hz HD resolution (not for composite video output)
1080i 50Hz HD resolution (not for composite video output)
1080i 60Hz HD resolution (not for composite video output)
1080P 50Hz HD resolution (not for composite video output)
1080P 60Hz HD resolution (not for composite video output)
1080P 24HZ
Some TV devices are able to replay with an image frequency of 24 Hz as it is present in some video formats.
▶ Select this setting to output a 24 Hz video signal through the HDMI output.
Resume Play
You can set the function for resuming films on and off here (with the help of bookmarks).
A video file will be continues at the point at which replay was interrupted if the Resume Play Function is switched on.
Confirm the ‘Resume Playback?’ query window with Confirm, after the video replay has started. The video file will be replayed from the start, if you select Cancel.
Movie Preview
You can switch the film preview on and off in the Browser Menu here.
Quick Jump
You can continue the video replay backwards or forwards at a determined time by pressing the QUICK JUMP <</>> button during the video replay.
▶ Set a time interval in minutes for the QUICK JUMP button << or QUICK JUMP >> here.
'Network' Menu
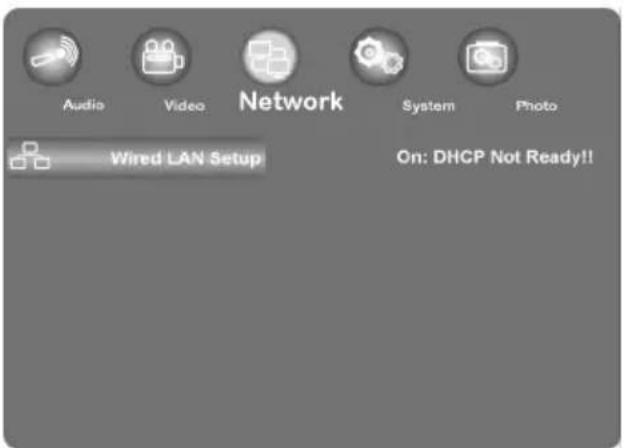
Use this Menu to make settings for the Ethernet.
Wired LAN set-up (Setting up LAN)
DHCP IP (Automatic)
▶ Select this Menu entry if the IP address is intended to be acquired from the router automatically.
▶ Enter the IP address of the DNS server in the following window, if necessary, and then select the OK entry.
▶ Confirm the 'Save Network Setting?' query window with Confirm.
Fix IP (Manual)
▶ Select this Menu entry, if you want to use a particular static IP address.
▶ Enter the IP address, the sub-network mask, the standard gateway and the IP address of the DNS server into the following window and then confirm with the OK button.
▶ Confirm the 'Save Network Setting?' query window with Confirm.
'System' Menu

Use this Menu to configure system settings.
Menu Language
▶ Select the OSD (On-Screen Display) language here.
Text Encoding
▶ Select the text encoding options (subtitle display) here.
System Information
You will receive information about the version of the software installed and the components of your Player Design Full-HD Media Player here.
System Update
You can update the firmware of your Design Full-HD Media Players through USB here.
Time
Select the Manual entry, to enter the current time and the date.
Restore Default
Select this point, to reverse all the settings entered and to recreate the delivery status of the device.
Screensaver
You can switch the screensaver on and off here.
'Photo' Menu
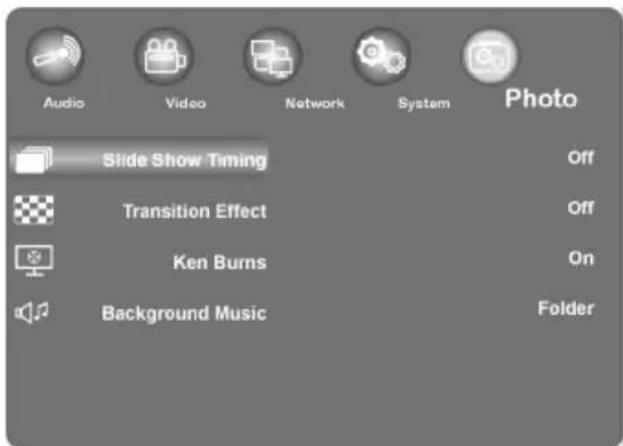
▶ Use this Menu to configure the Photo settings.
Slideshow timing
▶ Select the interval for slideshows here.
Transition effect
▶ Select the transition effect for a slideshow here.
Ken burns (image enlargement)
The image will be enlarged during replay, while the picture is swaying, in this setting.
▶ Switch the Ken burns effect for the image replay on or off.
Background (background music)
- You can establish whether background music should be played when viewing images here. The options are off / Folder.
Note:
Music files will be replayed automatically during the slideshow in the Folder setting in this setting, if they are located in the same file as the image files.
Removing problems
Malfunctions can sometimes have commonplace causes, but they can also arise from defective components. We would like to give you a basic idea to solve the problem here. We shall be glad to help you further, if the measures listed here bring no success. Just call us!
Searching for errors
General information
The device cannot be switched on.
- Connect the mains adapter to the mains socket firmly.
No picture.
- Select the correct video input mode of the television, so that the image of the device is displayed.
- Connect the video cable firmly.
- Check that a suitable setting, corresponding to the video connection, has been made for the [TV System] option in the SETUP Menu.
Distorted image.
- The file replayed has been recorded in a different colour norm to that of the television.
- Select a resolution supported by the television.
No sound.
- Connect the audio cable firmly.
- An incorrect setting has been made for the input source in the [Digital output] SETUP Menu for the amplifier or the amplifier connection.
- The device is currently carrying out a search or is in the Pause mode.
The remote does not function correctly.
- The remote is not directed to the remote sensor of the device.
- The remote is too far away from the device.
- There is an obstacle between the remote and the device.
- The battery of the remote is weak.
The camera angle cannot be changed.
- The file being replayed does not contain an additional camera angle.
- The file being replayed does not contain subtitles.
The language of the subtitles cannot be changed or is not displayed.
MP3/WMA/JPEG/DivX files cannot be replayed.
- The files have been made in a format not supported by the device.
HDMI
No image is displayed on the HDMI device connected.
- Disconnect and reconnect the HDMI cable.
- Switch the HDMI device off and on again.
- The video input of the connected device must be set to this device.
- The HDMI cable used must be completely HDMI-compatible. No image will be displayed, under certain circumstances, in the case of the connection of a non-standard cable
No sound is output on the connected HDMI device.
- Some HDMI-compatible devices do not have sound output (consult the operating instructions of the connected device).
- Set the [AUDIO] option, [DIGITAL OUTPUT] sub-menu, to [HDMI LPCM] (see Page 35) in the Settings Menu, if your television does not have a Dolby digital or MPEG decoder.
Resetting the device
One of the following problems arises:
- The display of the operating field does not function.
- The device does not operate without faults.
The device can be reset as follows:
- Call up the ‘Settings/System/Factory Settings’ Menu.
- Select this point and press OK, to reverse all the settings entered and to recreate the delivery status of the device.
Do you need additional support?
Please contact us, if the suggestions in the above sections have not remedied your problem. You would help us very much if you make the following information available to us:
- What external devices have been connected?
• What messages have appeared on the screen? - During which operating step has the problem arisen?
- If you have connected a PC to the device:
- – What is your computer configuration? - – What software were you using when the error arose?
• What steps have you taken to solve the problem?
- Give us your Customer Number if you have already received one.
Cleaning
You can lengthen the useful life of the device by the following measures:
- Always pull out the mains adapter and all connecting cables before cleaning.
- Do not use any solvents or corrosive or gaseous cleaning substances.
- Clean the device with a soft, lint-free cloth.
Please keep the packaging material well and use it exclusively to transport the device.

ATTENTION! There are no parts to be maintained or cleaned inside the device.
Disposal
Packaging

Your device is packaged to protect against damage in transport. Packaging is a raw material and is therefore re-usable or can be returned to the cycle of raw materials.
Device
Do not throw your device into the normal domestic waste at the end of its useful life by any means. Enquire about correct disposal harmless to the environment at your town or local authority administration.
Batteries
Used batteries do not belong to domestic waste. Batteries can be handed in for disposal at a collection point for old batteries or in specialist shops.
Technical Data
General information
Power supply by mains adapter
Ktec KSAD1200150W1UK
Input (primary): 230 V \~ 50 Hz
Output (secondary): 12 V 1.5 A
Dimensions (approx.) 150 x 45 x 120 mm (W x H x D)
Total weight (approx.) 450 g
Operating temperature 5°C to 35°C
Air humidity during operation 5 to 65 %

Copyright © 2009 All rights reserved.
This Handbook is protected by copyright. All rights reserved. Duplication in mechanical, electronic or any other form is forbidden without the written authorization of the manufacturer. Copyright lies with the MEDION® Company.

HDMI, the HDMI logo and High-Definition Multimedia Interface are registered trade marks of HDMI Licensing LLC.

Manufacture under licence of Dolby Laboratories. Dolby and the double-D symbol are trade marks of Dolby Laboratories.
Technical and visual changes, and printing errors, reserved.
Licence disclaimer
This product includes certain copyrighted third-party software components licensed under the terms of the GNU General Public License, PSF LICENSE AGREEMENT FOR PYTHON 2.3, and other similar license agreements offering free distribution of these software components, offered by organizations such as Free Software Foundation, Python Software Foundation and the X.Org Foundation, etc.
Copies of these license agreements can be found at this file or by visiting the respective website of these components as provided in the documentation. You may also visit http://www.gnu.org/copyleft/gpl.html for a copy of GNU General Public License Agreement. GPL components and other components listed are licensed without warranties of any kind, either express or implied warranties, including without limitation of the implied warranty of merchantability and fitness for a particular purpose. The entire risk as to the quality and performance of these components lies with you. Please check the respective license agreement for more details. Copyright holders under GPL and/or other license agreement mentioned herein shall not be responsible for any damage, general, special, incidental or consequential, arising out of the use or inability to use these components/software. Please check the respective license agreement for more details.
Downloading Source Code
You can download the machine-readable full source code of the corresponding licensed components, including any scripts to control compilation and installation of the object code, at the following website link. Please pay attention to the copyright notice, warranty disclaimer and the copy of the license agreement accompanying these source codes. http://www.medion.com

- Operation....23
- The Home Menu....25
- SETTINGS Menu – Making settings ....31
- Removing problems ....42
- Cleaning 45
- Disposal....46
- Technical Data 47
- Information about these Instructions
- Use in accordance with regulations
- Scope of delivery
- ATTENTION!
- Safety notes
- In general
- Dealing with batteries
- Follow the following notes:
- Set-up location
- Never repair the device yourself!
- Cleaning and maintenance
- Data back-up
- Electricity supply
- General information
- Formats that can be played
- File systems
- About the display symbol
- Overview of the device
- Front of the device
- Back of the device
- Remote
- Bringing the device into operation
- Placing the battery into the remote
- Replacing the battery
- Connecting the device
- HDMI connection
- Notes about HDMI connection
- Connection to the AV sockets
- Connecting to the outputs of components
- Note:
- Optical digital connection
- Connecting a data medium by means of USB
- Network connection
- Connection for memory cards
- Connecting the power pack
- Bringing the device into operation for the first time
- Menu language
- Time
- Setting up LAN
- Operation
- Switching the device on and off
- Setting the volume
- Navigation in the Menus
- The Home Menu
- 'All' option
- USB
- CARD
- NET
- My\_Shortcuts
- UPnP
- 'Music' option
- Setting the Repeat function
- 'Photo' option
- Enlarging the image
- 'Movies' option
- Increasing/reducing the image
- Fade out the subtitles
- Camera position
- SETTINGS Menu – Making settings
- 'Audio' Menu point
- Night mode
- Digital output
- 'Video' Menu
- Aspect Ratio
- Brightness
- Contrast
- Noise Reduction
- TV system (Television norm)
- 1080P 24HZ
- Resume Play
- Movie Preview
- Quick Jump
- 'Network' Menu
- Wired LAN set-up (Setting up LAN)
- DHCP IP (Automatic)
- Fix IP (Manual)
- 'System' Menu
- Text Encoding
- System Information
- System Update
- Restore Default
- Screensaver
- 'Photo' Menu
- Slideshow timing
- Transition effect
- Ken burns (image enlargement)
- Background (background music)
- Removing problems
- Searching for errors
- No picture.
- Distorted image.
- No sound.
- The remote does not function correctly.
- The camera angle cannot be changed.
- The language of the subtitles cannot be changed or is not displayed.
- MP3/WMA/JPEG/DivX files cannot be replayed.
- HDMI
- No image is displayed on the HDMI device connected.
- No sound is output on the connected HDMI device.
- Resetting the device
- Do you need additional support?
- Cleaning
- Disposal
- Packaging
- Device
- Batteries
- Technical Data
- Licence disclaimer
- Downloading Source Code
Brand : MEDION
Model : E85015 (MD 86162)
Category : Media player