
900083 - Mill Westfalia - Free user manual and instructions
Find the device manual for free 900083 Westfalia in PDF.


| Product type | Electric grinder |
| Brand | Westfalia |
| Model | 900083 |
| Power supply | 230 V ~ 50 Hz |
| Rated power | 200 W |
| Bowl capacity | 75 g |
| Bowl material | Stainless steel |
| Color | White and black |
| Dimensions (L x W x H) | 12 x 12 x 20 cm |
| Net weight | 1.0 kg |
| Power cord length | 80 cm |
| Main functions | Grinding spices, coffee, seeds |
| Sound level | ≤ 80 dB(A) |
| Safety devices | Automatic shut-off in case of overload, thermal protection |
| Maintenance and cleaning | Bowl and lid washable with water; wipe the housing with a damp cloth |
| Spare parts available | Bowl, blades, lid, seal |
| Repairability index | 7/10 |
| Warranty | 2 years |
| Included accessories | Measuring spoon, cleaning brush |
| Intended use | Indoors only, domestic use |
Frequently Asked Questions - 900083 Westfalia
User questions about 900083 Westfalia
0 question about this device. Answer the ones you know or ask your own.
Ask a new question about this device
Download the instructions for your Mill in PDF format for free! Find your manual 900083 - Westfalia and take your electronic device back in hand. On this page are published all the documents necessary for the use of your device. 900083 by Westfalia.
USER MANUAL 900083 Westfalia

Original Instructions
Disc Sander 140 Watt
Article No. 90 00 83
CE


Dear Customers
Please familiarize yourself with the proper usage of the device by reading and following each chapter of this manual, in the order presented. Keep these operating instructions for further reference.
Please read all safety instructions!
This manual contains important information on operating and handling the device. Keep these operating instructions for further reference. Please pass it on along with the machine if it is handed over to a third party.


10
11


Before first Use...... Page 14
Intended Use ...... Page 14
Selecting the Sanding Paper...... Page 14
Clamping the Sander to a Workbench Page 14
Removing the Sanding Table Assembly ...... Page 15
Removing and installing the Sandpaper ...... Page 15
ON/OFF Switch Page 16
Speed Adjusting Dial....Page 16
Adjusting the Sanding Table Angle ...... Page 16
Adjusting the Mitre Angle ...... Page 17
Sanding Page 17
Hints for Sanding....Page 18
Installing the Dust Extraction Adaptor ...... Page 19
Maintenance and Cleaning......Page 19
Technical Data Page 20
Consumables ...... Page 20

To avoid malfunction, damage, and physical injury please follow the included General Safety Notes and the following safety notes:
- Please read this manual carefully and use the unit only according to this manual.
- Dispose of used packaging material carefully or store it out of the reach of children. There is a danger of suffocation!
■ Make sure the voltage corresponds to the type label on the machine.
■ Persons with limited physical, sensorial or mental abilities are not allowed to use the machine, unless they are supervised and briefed for their safety by a qualified person.
■ Always attach the dust collection bag while working with the sander. Make sure that the integrated dust extraction system is functioning. - Attention: The sander is not designed for wet sanding.
- Do not immerse the machine in liquids.
■ Make sure the sanding paper is correctly in place before switching on. - Avoid moving parts while working. There is danger of injury!
■ Never sand materials containing asbestos. - Please note that poisonous dust may be formed e. g. when sanding paint, which contains lead, while processing some kinds of wood or metal. The dust forming during operation may be hazardous to your health, combustible or explosive. Wear safety goggles and dust protection.
- The unit is designed for operation in altitudes of up to 2000 m above sea level.
- In the case of a malfunction please do not attempt to repair the machine yourself. Contact the Westfalia customer support department or have it repaired by a professional.


Fig. 2


Betrieb


Betrieb
Remove the sander and all accessories out of the packaging and check all parts for damage in transit. Keep packaging materials out of reach of children. There is risk of suffocation!
Intended Use
The sander may only be used for dry sanding work. This sander is well suited for fine sanding work and for making minor material corrections. Materials that may be sanded with this sander include all types of wood, steel, non-ferrous and precious metals, plastics, acrylic glass and fiberglass.
Attention: After 15 minutes of operation allow the sander to cool down for at least 10 minutes.
Selecting the Sanding Paper
■ Always use abrasive papers suited to the material you want to sand. The papers must have the correct grain size.
- Depending on grain size there are degrees of coarseness. The coarseness is specified by a number on the back of the papers. The higher the number is, the finer the grain.
- It is important to use the right paper for each job. For rough sanding use grain size 60, for soft wood as larch, pine or spruce use paper with grain size 80. For dense hardwood as beech or maple, grain sizes 120 can be used.
Clamping the Sander to a Workbench
Before use the sander must be securely clamped to a workbench or similar stable surface. The sander may be clamped in a vertical position (Fig. 1) or in its normal horizontal position (Fig. 2).
To clamp the sander to the workbench in the desired position, simply open the threaded clamp screw (10), insert the top of the
clamp into the clamping cavity (A or B) and tighten the clamp screw until the sander is securely locked onto the workbench.

Fig. 1

Fig. 2
Operation
Removing the Sanding Table Assembly
The sanding table assembly must be removed before installing or replacing sandpaper on the sanding plate.
Warning: Remove the plug from the power source before removing the sanding table assembly.
-
Insert the included 5 mm hex key (A) into the sanding table mounting screw (6).
-
Turn the mounting screw counter clockwise until both the screw and the washer can be removed.
-
Slide the sanding table assembly (B) outward away from the sanding plate. Note: Once the sanding

table has been removed, the sandpaper can be removed or installed as shown in below.
-
To reinstall the sanding table assembly, place it against the bottom of the motor housing (C) and slide it toward the sanding plate. Note: Make sure the positioning tabs are fully inserted into the matching slots in the motor housing.
-
Reinstall the sanding table attachment screw and washer and tighten it using the 5 mm hex key. Note: Do not over tighten the screw. You may damage the motor housing.
Removing and Installing Sandpaper
Warning: Remove the plug from the power source before removing or installing sandpaper.
- Remove the sanding table assembly as noted above.
- Peel the old sandpaper (A) from the disc (1).
- Peel the protective paper from the new sandpaper.
- Clean all sanding dust and debris from the face of the plate.

Operation
NOTE: Any dust or debris on the plate will prevent the sandpaper from properly adhering to the plate.
- Carefully place the glued side of the new sanding disc onto the sanding plate.
Warning: The new sandpaper MUST be centred and firmly pressed onto the disc to prevent vibration and the possibility of the sandpaper flying off the plate when the sander is turned ON. Serious injury could result from flying sandpaper.
ON/OFF Switch
To turn the sander ON, set the ON/OFF switch (3) to I. To turn the sander OFF, set the ON/OFF switch to O.
The disc sander is intended for operation in the S2 mode (15 min. operation, 10 min cool-off).

Speed Adjusting Dial
The speed of the sander can be adjusted to suit the need. To set the sander speed, rotate the speed adjusting dial (4). For the fastest speed, set the speed adjusting dial to #6. For the slowest speed, set the speed adjusting dial to #1.

Adjusting the Sanding Table Angle
The sanding table can be tilted from upward 10° to downward 50° . Set the sanding table angle as follows:
- Loosen the bevel angle locking knob (5) by turning it counter clockwise. Note: If the adjustment knob does not loosen, hold the adjustment knob on the opposite side of the sanding table while loosening the adjustment knob (5).

Operation
-
When the sanding table adjustment knob is loose enough, tilt the table downward until the desired angle (A) is aligned with the indexing mark (B).
-
Tighten the sanding table adjustment knob. Note: Tighten the adjustment knob with your hand only. Do not use tools as you may overtighten and damage the knob.
-
Test sand a scrap workpiece to make sure the sanding table angle is correct.
Adjusting the Mitre Angle
The mitre angle can be set by 90° in both directions.
-
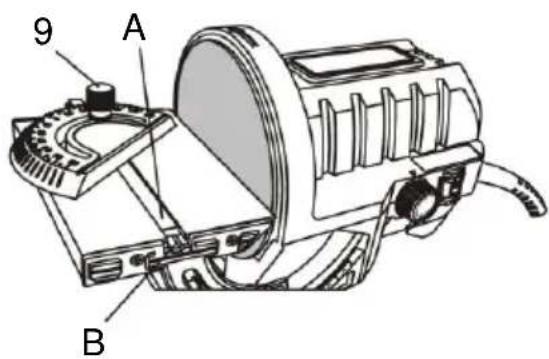
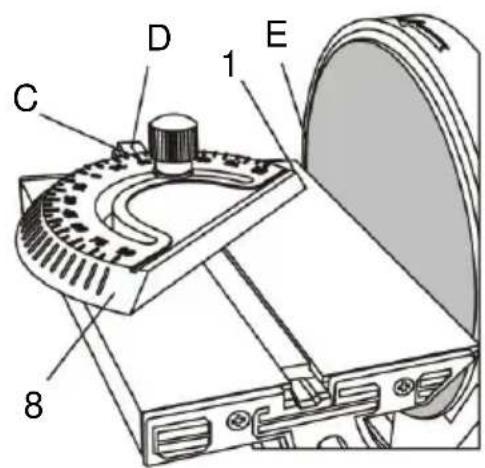
Loosen the mitre locking knob (9) by turning it counter clockwise.
-
Slide the key (A) of the mitre gauge (8) into the matching slot (B) in the sanding table.
-
Rotate the mitre gauge and align the desired angle (C) with the indexing mark (D).
-
Slide the mitre gauge assembly in the table slot so the edge of the mitre gauge closest to the sanding disc (1) is approximately 6 1/2 mm inside the outer edge (E) of the sanding disc.
-
Tighten the mitre adjusting knob to lock the mitre angle.
-
Test sand a scrap workpiece to make sure the mitre angle is correct.
Sanding
This sander is well suited for fine sanding work and for making minor material corrections. Materials that may be sanded with this sander include all types of wood, steel, non-ferrous and precious metals, plastics, acrylic glass and fiberglass.
Operation
Warning: When sanding, it is important to maintain control of the workpiece by firmly holding it down onto the sanding table. A workpiece that is not held tightly may become uncontrollable. This is particularly important when the length of the sanding surface of the workpiece exceeds 50 mm. The sanding surface of large workpieces will contact the upward moving portion of the sanding disc and the workpiece will be prone to lifting off the sanding table, possibly causing loss of control and injury to the operator. Never sand any workpiece that is too small to be firmly held.
It is usually better to use the sander at its maximum speed setting. Faster speeds will remove material faster and produce a smoother finish. Using coarse sandpaper will also facilitate faster material removal, but produce a rougher finish. When using the sander to sand soft metals and plastics, using coarser sandpaper and slower sander speeds will lower the risk of the material overheating and plugging up the sandpaper.

Hints for Sanding
■ Apply only moderate pressure on the machine. Too much pressure will lead to jamming of the mechanism and will spoil the result. Excessive pressure will overheat the machine.
■ Always select abrasive paper with coarseness suited the condition of the surface.
- Use finer papers in the consecutive sanding until the desired smoothness is reached. If you desire a very smooth finish you may slightly moisten the surface before the last sanding. This will slightly swell the fibres and allow a smoother finish.
Installing the Dust Extraction Adaptor
Always attach a suitable dust extraction system or a vacuum cleaner to the sander to help reduce the amount of dust escaping into the work area. To attach a vacuum hose to the sander, press one end of the dust extraction adaptor (11) into the port on the side of the sander. Attach the vacuum hose (A) to the other end of the vacuum hose adaptor.

Maintenance and Cleaning
■ Before undertaking any maintenance or cleaning work, disconnect the power plug from the power mains.
- Keep the ventilation openings clean and free from obstructions at all times. Clean out the slots after each use with a stiff brush or compressed air.
- Do not use water or any other liquid to clean the sander. Do not use solvents, abrasives or aggressive chemicals to clean the sander.
- Store the sander in a dry place and protect it from dirt. Store the machine out of reach of children and persons in need of supervision.


declare by our own responsibility that the product
Article No. 90 00 83
is according to the basic requirements, which are defined in the European Directives and their amendments.
2011/65/EU Restriction of the Use of certain hazardous Substances in electrical and electronic Equipment (RoHS)
2006/42/EC Machinery
EN 62841-1:2015+AC, EN ISO 12100:2010
The technical documentations are on file at the QA department of the Westfalia Werkzeug-company.
Hagen, 27 th of January, 2022
Jhomo Klingbeil
Thomas Klingbeil,
Werter Kunde,
Please help avoid waste materials.
If you at some point intend to dispose of this article, then please keep in mind that many of its components consist of valuable materials, which can be recycled.
Please do not discharge it in the rubbish bin, but check with your local council for recycling facilities in your area.


- ORIGINAL INSTRUCTIONS
- DISC SANDER 140 WATT
- DEAR CUSTOMERS
- TO AVOID MALFUNCTION, DAMAGE, AND PHYSICAL INJURY PLEASE FOLLOW THE INCLUDED GENERAL SAFETY NOTES AND THE FOLLOWING SAFETY NOTES
- BETRIEB
- INTENDED USE
- SELECTING THE SANDING PAPER
- CLAMPING THE SANDER TO A WORKBENCH
- OPERATION
- REMOVING THE SANDING TABLE ASSEMBLY
- REMOVING AND INSTALLING SANDPAPER
- ON/OFF SWITCH
- SPEED ADJUSTING DIAL
- ADJUSTING THE SANDING TABLE ANGLE
- ADJUSTING THE MITRE ANGLE
- SANDING
- HINTS FOR SANDING
- INSTALLING THE DUST EXTRACTION ADAPTOR
- MAINTENANCE AND CLEANING
- WERTER KUNDE
Brand : Westfalia
Model : 900083
Category : Mill