 — To scan — Mode d'emploi PDF")
LIFE S82005 (MD 85903) - To scan MEDION - Free user manual and instructions
Find the device manual for free LIFE S82005 (MD 85903) MEDION in PDF.

| Product Type | Photo Scanner |
| Brand | MEDION |
| Model | LIFE S82005 (MD 85903) |
| Max Scan Width | 105 mm |
| Max Scan Length | 300 mm |
| Max Photo Thickness | 1.5 mm |
| Output Image Format | JPEG (*.jpg) |
| Supported Memory Cards | SD, MMC, CF, MS, MS Pro (FAT16/FAT32) |
| File Naming Convention | MED+4-digit number (up to 9999 per folder) |
| Power Adapter Input | 100-240 V AC, 50/60 Hz |
| Power Adapter Output | 6 V DC, 1.5 A |
| Connectivity | USB 1.1/2.0 (Mini-USB) |
| Compatible Operating Systems | Windows XP, Vista, 7 |
| Software Included | Scan2PC |
| Automatic Image Trimming | Yes (edge detection) |
| Automatic Color Correction | Yes |
| Roller Cleaning | Yes (using cleaning sheet, 5-second button press) |
| Sensor Cleaning | Yes (using sensor wiper via output slot) |
| Calibration | Yes (using calibration card) |
| Package Contents | Scanner, mains adapter, USB cable, cleaning set, 3 photo protective foils, software CD, manual |
| Safety Features | Do not open casing; use only supplied adapter; keep away from moisture and children |
| Auto Power Off | After 15 minutes of inactivity |
Frequently Asked Questions - LIFE S82005 (MD 85903) MEDION
User questions about LIFE S82005 (MD 85903) MEDION
0 question about this device. Answer the ones you know or ask your own.
Ask a new question about this device
Download the instructions for your To scan in PDF format for free! Find your manual LIFE S82005 (MD 85903) - MEDION and take your electronic device back in hand. On this page are published all the documents necessary for the use of your device. LIFE S82005 (MD 85903) by MEDION.
USER MANUAL LIFE S82005 (MD 85903) MEDION
About these instructions....5
Operating safety....5
Package contents 8
Overview of the appliance 9
Front view....9
Rear view 10
LED displays....11
Note: 12
About photos 12
About memory cards.... 15
Operation 16
First operation....16
Scanning a photo....16
Software 18
Switching off....21
Transfer scans to the computer....21
System requirements 21
Data transfer 22
Cleaning, maintenance, storage 25
Cleaning the casing....25
Cleaning the roller 26
Cleaning the image sensor 27
Calibrating the scanner 28
Storage 29
In the case of faults 30
Technical specifications.... 32
Disposal....33
Copyright 33
Safety instructions
About these instructions

Please read these instructions carefully before using the device. Note the warnings on the appliance and in the operating instructions
Always keep the operating instructions close to hand. If you sell the appliance or give it away, please ensure that you also pass on these instructions.
Operating safety
- Children should be supervised to ensure that they do not play with the appliance. This unit is not intended for use by people (including children) with reduced physical, sensory or mental abilities or for those without experience and/or knowledge, unless they are supervised by a person responsible for their safety or they have been instructed on its use.
- Keep packaging material such as plastic film away from children. It may cause suffocation.
- Never open the casing of the appliance (danger of electric shock, short circuit and fire!) !
- Do not introduce any objects into the inside of the appliance through the slits and openings (danger of electric shock, short circuit and fire!).

- Check the appliance regularly for potential damage. Take it out of operation and have it repaired by an authorized customer service centre, if damage is present.
- Keep the appliance away from moisture and avoid vibrations, dust, heat and direct solar radiation, in order to avoid operational faults.
- Only use the appliance inside a building, not in the open air.
- Do not subject the appliance to any moisture or wetness.
- Do not put the appliance close to strong electro-magnetic fields (such as a microwave or TV devices), in order to avoid functional errors.
Power supply
- Do not open the casing of the mains adapter. There will be mortal danger if the casing is opened. It does not contain any parts to be serviced.
- Only use the power unit supplied with the appliance.
- The socket outlet must be close to the device and easily accessible.
- Pull the mains plug out of the socket to detach your appliance from the power supply.
• To prevent non-permissible heating up, do not cover the mains adapter. -
Do not continue to use the mains adapter if the casing or the supply line is damaged. Replace it with a mains adapter of an equivalent type. Check the mains adapter regularly for damage to the cable, plug, casing and other parts.
-
Only operate the mains adapter at sockets with 230 V \~ 50 Hz alternating voltage.
- First pull the plug out of the socket and then the connector on the appliance, if you wish to detach the mains adapter from the electricity network. A reversed sequence could damage the mains adapter or the appliance. Always hold the plug firmly when pulling it out; never pull on the line.
Cabling
- Only use the cable supplied with the appliance.
- Position the cable so that nobody is able to step on it or trip over it.
- Do not place any objects on the cable to avoid damaging it.
Package contents
Please check the completeness of the delivery and inform us within 14 days after the purchase if the delivery is incomplete. You will have received the following items with the product that you have acquired:
• Photographic scanner
- Mains adapter
- USB cable
- Cleaning set, consisting of:
Roller cleaning sheet, sensor wiper, calibration card
• 3 x Photographic protective foil
- Software CD
• These Operating Instructions and a Guarantee Card
Overview of the appliance
Front view
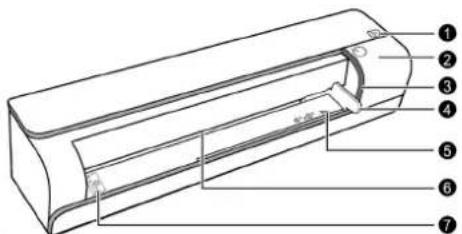
| 1 | Status and card indicator :Shows the current status of the device and memory cards. |
| 2 | Operating button: to switch the device on and off. Press for five seconds to start a cleaning process. |
| 3 | Operational display: Shows the electricity supply. |
| 4 | Sliding paper guide: Place the photo to be scanned here. |
| 5 | 4"/6" mark: Place photos sized 4" x 6" (approx. 10.2 x 15.2 cm) here. |
| 6 | Intake slit: Insert the photo with the image facing down here. |
| 7 | Mark for the upper side: Indicates that the image must face upwards. |
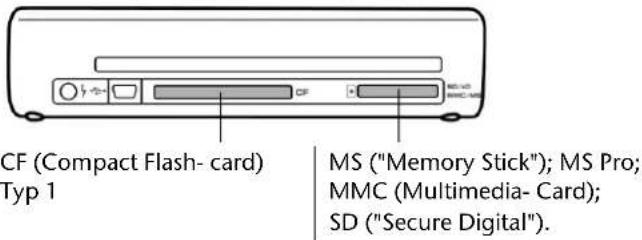
Rear view
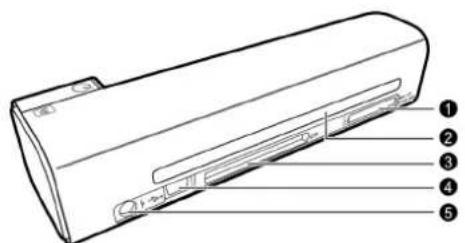
| 1 | Slot for SD/MMC/MS cards |
| 2 | Output slot: The scanned photos emerge here. |
| 3 | Slot for CF cards |
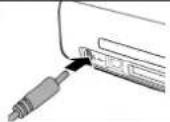
| 4 | Mini-USB connection:Connect the mini-USB connector of the USB cable supplied with the appliance here. |
| 5 | Mains connection: Connect the device connector of the mains adapter supplied with the appliance here. |
LED displays
Power light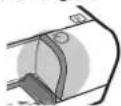 | Status/card indicator | Explanation |
| OFF OFF The scanner is switched off. | ||
| OFF Shines The scanner is ready to operate. | ||
| Flashes slowly Flashes slowly Data is being stored. | A cleaning process is being carried out.Wait until the process has finished. | |
| Flashes slowly Shines | Scanning process. Wait until the process is finished. | |
| OFF | Flashes | qu Card error. No card inserted, card full (free space below 1 MB), illegible or blocked card. |
| Flashes slowly Flashes quickly Paper blockage. | ||
Note:
About photos
Pay attention to the following with regard to the photos to be scanned:
• The photographic paper must not be thicker than 1.5 mm.
- The image must not be wider than 105 mm.
- The image must be at least 42 mm long and must not be longer than 300 mm.
- Photos with a large proportion of black or a wide black edge are unsuitable for "Automatic image trimming", see page 13 for further information.
- Do not attempt to scan newspaper or magazine images. Do not use any thin or soft paper.
- Do not use any foil, film strips or similar.
- Do not scan high gloss photos in an environment of more than 70% atmospheric moisture. The surface could adhere and cause a paper blockage.
Photographic protective foil

Photos may be damaged by minute dust and dirt particles (fine traces of scratching appear) during the scanning process. This is particularly possible in the case of high gloss photos. For this reason we recommend that you scan all photos in the protective foil supplied with this appliance.

Automatic image trimming
The scanner needs a narrow edge to establish the image data. This edge may be trimmed off during scanning in the following way:
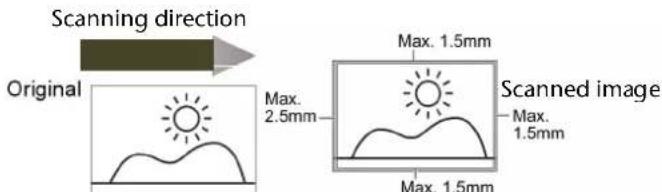

Please take account of this: the darker the image, particularly at the edge, the more will be trimmed off.
Colour correction (brightness and colour tone)
The colour will be corrected automatically during scanning. The brightness and colour tone can differ from the original to some extent.
The result of this colour correction can also depend on the direction in which the image has been scanned. Different results are not an error by the appliance.
Attempt to scan the image in a different direction if the edge has been trimmed off to wide.
About memory cards
Use unlocked, readable memory cards with at least 1 MB free memory. The FAT (FAT16) and FAT32 formats are supported, not NTFS or a different format.
The following storage media are possible:
Storage priority
Scanned images will be stored in the following priority, if several memory cards have been inserted: SD (MMC) > CF > MS.
Operation
First operation
Remove all foil from the device before bringing it into operation for the first time.
Scanning a photo
Proceed as follows:
 | Connect the mains cable.Install the software as described on page 18, to operate the device without a memory card. | |
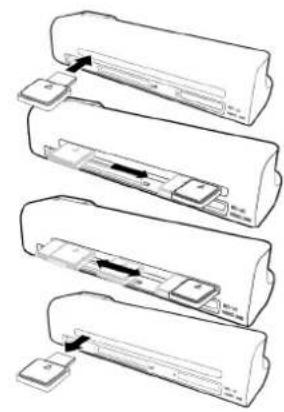
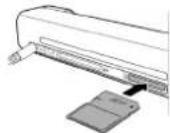 | Insert a memory card:Push in an SD or MMC card with the contacts downwards and the chamfered corner facing to the right. Push in a compact flash card (CF card) with the front side facing forwards.Pay attention to the fine pins in the appliance in the case of CF cards.They must not be damaged! | |
 | Push the photo to be scanned under the protective foil so that it is lying firmly between the two black position marks at the front. | |
 | Press the operating button. The operating display will flash quickly. Wait until the operating display has stopped flashing and the status display is shining continuously instead. The scanner is now ready to operate. | |
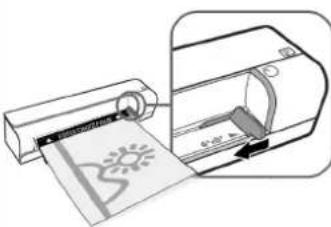 | Place the photo into the protective foil at the left edge of the intake slot with the image facing upwards. The black edge of the protective foil will lie in front. Push the paper guide to the right edge of the photo.Now push the photo into the slot. The photo will be pulled through – do not pull on the photo!The displays will flash for a short time longer, while the data is being written onto the memory card. | |
▶ Wait until the displays have stopped flashing before you scan another photo.
Software
You will be able to store photos directly on your PC with the software supplied with the device. You will not need a memory card for this. The photographic scanner must, of course, be connected to the PC.
Proceed as follows:
Place the CD in your computers CD Drive. The installation assistant (Install Shield Wizard) will be started. Choose the program to be installed and follow the instructions on the screen.
The program icon will appear on the Desktop of the computer after a successful installation.

About installation:
Select the language and follow further instructions on the screen.
If the installation process doesn't start automatically (no "auto run"), select the CD drive and double-click the file Demo32.exe in the Autorun folder.
Open the software
Double-click on the program icon. The Scan2PC dialogue will appear.
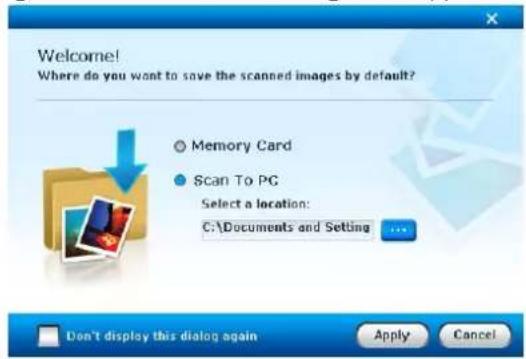
Select the "PC" storage location.
Select "Scan to PC".
Then, click on "Apply".
Scan a photo
Read the Operating Instructions from page 16 to do this, if necessary.
Of course, you do not now need to insert a memory card.
Work further directly with the photo, if appropriate
The photo will have been stored in the selected storage location after it has been scanned.
The scan will appear in the screen in a new window. The computer will access the selected storage location at the same time as:
- The PC, if "Scan to PC" has been selected.
- The memory card, if Memory Card has been selected.
Switching off
▶ Switch the appliance off with the operating button.
Now you will be able to remove the mains adapter cable and the memory card. Do not remove the mains adapter cable and the memory card during operation.

The appliance will switch off automatically if it has not been used for 15 minutes.
Transfer scans to the computer
You will be able to transfer the scanned photos (the content of the memory cards) directly to the computer.
System requirements
- Operating system:Windows XP, Vista®, Windows7®
• USB connection: 1.1 or 2.0
Data transfer
Proceed as follows:
 | Connect the mini-USB connector of the USB cable supplied with the appliance to the USB connection. |
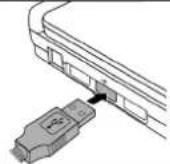 | Switch the computer on and connect the other end of the USB cable to the USB connection of the computer. |
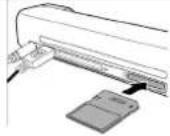 | Insert a memory card.The memory card will be recognized by the computer in the following priority, if several memory cards have been inserted: SD (MMC) > CF > MS |
Press the operating button.
The computer will now recognize the scanner as "new hardware";
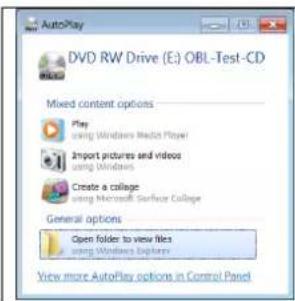
A new directory will be created in Explorer for the photos on the memory card in the scanner.
You will now be able to access the *.jpg files like all other files.
Memory system
flowchart
graph TD
    A["Memory card"] --> B["MEDIUM1"]
    B --> C["MEDIUM01.JPG"]
    B --> D["MEDIUM02.JPG"]
    B --> E["MEDIUM03.JPG"]
    C --> F["MEDIUM001.JPG"]
    C --> G["MEDIUM002.JPG"]
    C --> H["MEDIUM0999.JPG"]
    D --> I["MEDIUM0001.JPG"]
    D --> J["MEDIUM0002.JPG"]
    D --> K["MEDIUM0999.JPG"]
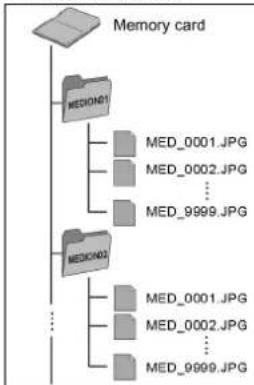
The scanner will create a directory called "MEDION01" on the level under the memory card at the first use.
The directory can contain up to 9999 images. The images will be named as "MED+recurring four-digit number".
The new images will be stored in the most recent directory during a new scanning process, until it is full.
A new directory MEDION02 will be created at the 1000th image, MEDION03 at the 2000th image, etc. Up to 10 directories can be created.
Cleaning, maintenance, storage
The casing, the image sensor and the rollers must be cleaned regularly (approx. after every 30th scanning process), to retain the image quality. Also carry out cleaning and/or calibration if lines appear on the scanned image.
A cleaning set, consisting of a roller cleaning sheet, a sensor wiper and a calibration card, is supplied with the appliance for cleaning purposes.

Use the accessories supplied with the device exclusively to clean the inner parts of the device! Any other agent can damage the scanner irreperably.
Cleaning the casing
- Detach the appliance from the electricity supply.
- Remove dust from the casing.
- Wipe the casing down with a slightly damp, soft cloth.
- Dry the casing with a dry, fluff-free cloth.

Do not use any sharp cleaning substance or solvent (e. g. alcohol). The plastic could be damaged by it.
Cleaning the roller
- First, clean the casing as described above.
- Make sure that the roller cleaning sheet is free of dust and dirt and clean it, if necessary.
- Then connect the mains adapter.
- Hold the on switch down for approx 5 seconds, while the device is switched off, until the displays light up.
- Guide the roller cleaning sheet into the intake slit with the sponge facing upwards. The sheet will be taken in and the cleaning process will start.
Both the LEDs will flash during the cleaning process. Do not interrupt it!
- The roller cleaning sheet will be ejected at the end of the cleaning process.
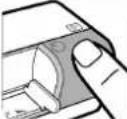
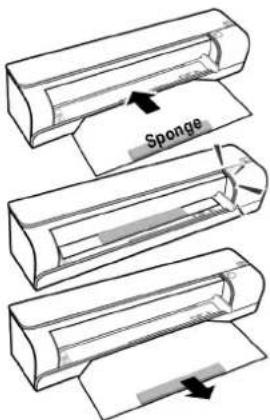
Cleaning the image sensor
- First, clean the casing as described above.
- Make sure that the sensor wiper is free of dust and dirt and clean it, if necessary.
natural_image
Diagram showing four sequential steps of a device or component being inserted into a housing (no text or symbols visible)- Switch the device off, if necessary, and pull the mains adapter off.
- Push the sensor wiper into the output slot on the left at the back of the device.
- Move with the sensor wiper from one end of the output slit to the other two or three times.
- Pull the sensor wiper out again at the left side of the output slit.
Calibrating the scanner
The scanner should be calibrated occasionally. You should calibrate it if the output image appears distorted or if lines appear, or if you have not used the appliance for a long time.
- First, clean the casing of the appliance as described above.
- Clean the roller and the image sensor as described in the previous sections.
- Prepare the scanner as if you wanted to scan an image; connect the mains adapter, insert a memory card and switch on the scanner.
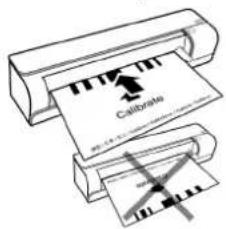
- Place the calibration card into the intake slit in the direction shown, like a photo. The card will be taken in, scanned and ejected. The scanner will have been recalibrated as a result.
The card must be inserted in the direction shown. The calibration will not function otherwise.
Storage
Keep the appliance and the cleaning set (roller cleaning sheet, sensor wiper, calibration card) in its packaging in a cool, dry, dust-free location.
In the case of faults
| Problem Explanation / suggestion for eliminating the fault | |
| The scanned images show lines or stripes, or are less clear than the original. | Scan the image with photographic protective foil.Make sure that the original is free of dust.Carry out a roller cleaning, a sensor cleaning and a calibration. |
| Paper blockage. The original is stuck firmly in the intake. | Press the operating button so that the paper is carried further.Do not pull on the original. |
| The photo is not being scanned and the status display is flashing quickly. | Insert a memory card. Check that the card is not locked (write protected) or full (has less than 1 MB free memory) and whether it corresponds to the FAT16 or FAT32 format.Do not guide the originals in too fast after each other. The storage process must have finished before the next image can be scanned.Switch the appliance off and on once again. |
| The scanner has become hot. | It is normal that the appliance heats up (approx. 30 - 45 °C) in the case of longer use. Switch the scanner off, detach it from the electricity network and let it cool down, if it does, however, become even warmer or if it is emitting a smell. |
| The transfer to a digital picture frame does not function. | If the image is distorted: the original will be adjusted to the format of the picture frame automatically.The transfer does not happen: it is possible that some digital picture frames found on the market are not compatible with the scanner. |
Technical specifications
Appliance
Voltage supply: 100 -240 V AC, 50/60 Hz
Output voltage: 6 V DC; 1,5 A
Card formats supported: MS ; MS Pro; MMC;SD, CF;
each
with
FAT
32
or
FAT
16
Image output format: JPEG (*.jpg)
Mains adapter
Model number: SL-0106-6V1, 5A.E
Input: AC 100-240 V; 0,3 A; 50-60 Hz
Output:

Disposal
Packaging

Your appliance has been packaged to protect it against transportation damage. Packaging materials are primary products and can therefore be reused or recycled.
Appliance
At the end of its life, the appliance must not be disposed of in household rubbish. Seek the advice of your local authority on environmentally friendly disposal facilities.
Copyright
Copyright © 2009
All rights reserved. This operating manual is protected by copyright.
Medion ^® is the owner of this copyright.
Pentium ^® is a registered trademark of Intel ^® . Other trademarks are the property of their respective owners.
Subject to technical and optical changes as well as printing errors.

- Safety instructions
- About these instructions
- Operating safety
- Power supply
- Cabling
- Package contents
- Overview of the appliance
- Front view
- Rear view
- Note:
- About photos
- Photographic protective foil
- Automatic image trimming
- Colour correction (brightness and colour tone)
- About memory cards
- Storage priority
- Operation
- First operation
- Scanning a photo
- Software
- Proceed as follows:
- About installation:
- Open the software
- Switching off
- Transfer scans to the computer
- System requirements
- Data transfer
- Memory system
- Cleaning, maintenance, storage
- Cleaning the casing
- Cleaning the roller
- Cleaning the image sensor
- Calibrating the scanner
- Storage
- Technical specifications
- Appliance
- Mains adapter
- Disposal
- Packaging
- Copyright
Brand : MEDION
Model : LIFE S82005 (MD 85903)
Category : To scan