
BP720B - Video projector BLAUPUNKT - Free user manual and instructions
Find the device manual for free BP720B BLAUPUNKT in PDF.

| Product Type | Video Projector |
| Brand | Blaupunkt |
| Model | BP720B |
| Native Resolution | 1280 x 720 pixels |
| Supported Resolution | Up to 1080p Full HD |
| Brightness | 80 ANSI Lumens |
| Projection Size | Up to 120 inches (diagonal) |
| Aspect Ratio | 16:9, 4:3, AUTO |
| Keystone Correction | Manual trapezoidal adjustment |
| Focus Type | Manual focus knob |
| Inputs | HDMI, USB, Micro SD, AV IN (via AV OUT jack) |
| Outputs | Earphone jack (3.5mm) |
| Built-in Speaker | Yes (mono) |
| Power Supply | 24V DC, 1.75A (via included power adapter) |
| USB Power Output | 5V, max 500mA |
| Weight (Net) | 0.5 kg |
| Dimensions (W x D x H) | 145 x 122 x 62 mm |
| Remote Control | Yes (batteries not included) |
| Multimedia Playback (USB/Micro SD) | Video: AVI, FLV, RMVB, MKV, MP4, 3GP, MOV, MPG, MPEG, TS, TP, VOB; Audio: MP3, WMA, OGG, AAC, FLAC; Photo: JPG, PNG, BMP |
| Projection Modes | Front, Front Ceiling, Rear, Rear Ceiling |
| Included Accessories | User manual, Remote control, Power adaptor, Warranty card |
Frequently Asked Questions - BP720B BLAUPUNKT
User questions about BP720B BLAUPUNKT
0 question about this device. Answer the ones you know or ask your own.
Ask a new question about this device
Download the instructions for your Video projector in PDF format for free! Find your manual BP720B - BLAUPUNKT and take your electronic device back in hand. On this page are published all the documents necessary for the use of your device. BP720B by BLAUPUNKT.
USER MANUAL BP720B BLAUPUNKT
720p HD Compact Projector - BP720B
natural_image
Black BLAUPUNKT camera module with visible lens and control buttons (no text or symbols on body)CONTENTS
| General | Safety | |
| Product | Overview | |
| Remote | Control | |
| First | Time Setup | |
| Installation | 12 | |
| Home | Dashboard | |
| Settings | ||
| Picture | ||
| Sound | ||
| Option | ||
| Time | ||
| Specifications | 19 | |
| Customer | Helpline | Last |
4
10
1
1!
16
1:
18
GENERAL SAFETY
Read this manual thoroughly before you start using the Projector.
Store this manual, the completed warranty card, your receipt and the product packaging. The safety precautions instructions reduce the risk of fire, electric shock and injury when correctly complied to.
Please follow all instructions and take notice of all warnings.
IMPORTANT INFORMATION
- Only using furniture that can safely support the Products.
- Ensure the Product is not overhanging the edge of the supporting furniture.
- Do not place the product on a high furniture without securing both the furniture and the product to a stable support.
- Do not place the product on cloth or other conductive materials.
- Warn children of the dangers of climbing on furniture to reach the projector or its controls and to call for an adult to assist.
GENERAL SAFETY (CONT.)
IMPORTANT INFORMATION
- Do not expose this appliance to rain or moisture as it may result in fire or an electric shock hazard
- Do not tamper or change or modify the product in any way.
- Only use Accessories outlined and recommended by the manufacturer.
- Please do not expose the product to splashing or water contact
- Please do not place any object on top of the product including objects filled with liquids such as vases.
Installation
Please follow instruction when installing this product in accordance with the instruction manual. This product must be positioned in a sufficiently stable location, it can be potentially hazardous due to falling and can cause injury, particularly to children if it positioned incorrectly.
- Before installing this Projector set, make sure your outlet voltage corresponds to the voltage stated on the product rating label
- Do not use a damaged power cord, plug or loose outlet. Doing so may cause an electric shock.
- Do not plug several devices into the same outlet. Doing so may cause the outlet to overheat and start a fire. Make sure the outlet is readily accessible during operation of the equipment.
- Do not bend, twist or kink the power adaptor excessively.
- Do not allow anything to rest on or roll over the power adaptor. Doing so may cause a fire or an electric shock.
- Do not run the power adaptor near heat-producing appliances such as radiators, stoves or irons. The excessive heat could melt the insulation and expose live wires, resulting in fire or electric shock.
- Unplug this Projector during lightning storms or when unused for long periods of time. Not doing so may result in fire or electric shock.
- Do not cover the ventilation openings of the product with items such as newspapers, tablecloths, curtains etc or insert objects into the slots available on the products. As this could result in the product temperature rising and could cause a fire.
- If you notice any unusual odors or smoke around the unit, immediately disconnect the unit from the outlet and contact the service center. Failure to do so may result in fire or electric shock.
- When not using the unit for long periods of time or when you are moving the unit please ensure to disconnect the power cord from the wall socket.
GENERAL SAFETY (CONT.)
- Please beware that Dust could accumulate over time on the unit and cause it to generate heat and or deteriorate insulation, which in turn may result in an electrical fire.
- The product is not intended for use by persons (including children) with reduced physical, sensory or mental capabilities, or young children of any age, They must be supervised product by a person responsible for their safety.
- Batteries from the remote control must be only removed by an adult, the adult must ensure to keep them out of reach of infants and children. Seek medical attention immediately if a child has swallowed a battery.
- Batteries (battery pack or batteries installed) shall not be exposed to excessive heat such as sunshine, fire or the like.
- To maintain the product do not use any chemical or cleaning agent or wet cloth, please only ensure to utilize a dry cloth to wipe it down from marks or dust and only after unplugging the product from the power socket.
- Please ensure to contact our call center for any repair or service required for the products.
! CAUTION !
DO NOT look directly into Project LENS. This can cause damage to a persons or children's eyes. Take all nessecary precautions to make sure that no one looks into the LENS while turned on.
MAKE SURE this project is out of reach of children or baby so that they do not stand and look into the project LENS.
DO NOT cover the vents, the vents are needed to let out hot air. Placing objects near or covering the vents can cause the product to overheat and permanently damage the projector.
GENERAL SAFETY (CONT.)
Please make sure upon positioning this product, the place is:
- Not wet or damp and Well ventilated
- Away from direct sunlight or heaters.
- Away from splashes or food.
- Protected from excessive dust or grease.
- Do not install this equipment in a confined space such as a bookcase or similar unit.
- Do not install the Projector set near heat sources such as radiators, stoves or other audio visual equipment that produce heat.
- Do not place containers with liquids, if liquid falls inside the products it may result in short-circuit, fire or electric shock.
- Do not place small metallic objects on top of the unit. Metal object falls inside the product it may result in short-circuit, fire or electric shock.
- Do not use or store flammable or combustible materials near the unit. Doing so may result in fire or explosion. Do not place any naked flame sources, such as lit candles, cigarettes or incense sticks on top of the Projector set.
• Install the unit at a reasonable distance from the wall to ensure sufficient ventilation.

HIGH-DEFINITION MULTIMEDIA INTERFACE
"HDMI, the HDMI logo and High-Definition Multimedia Interface are trademarks or registered trademarks of HDMI Licensing LLC."
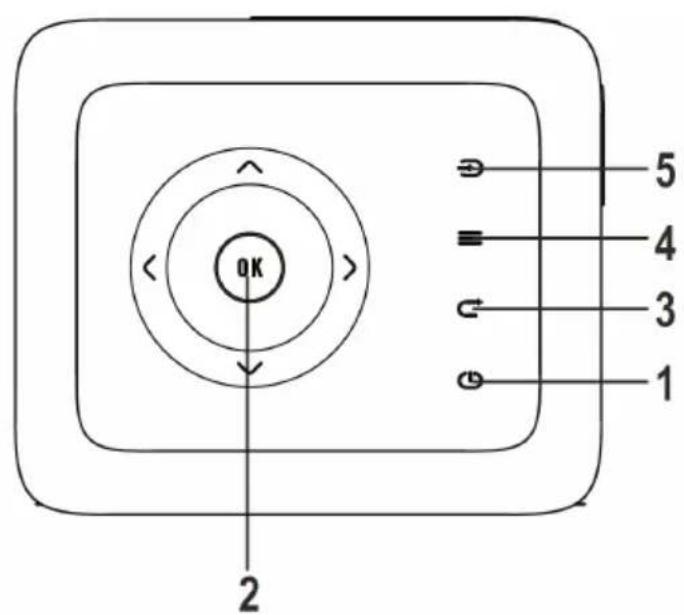
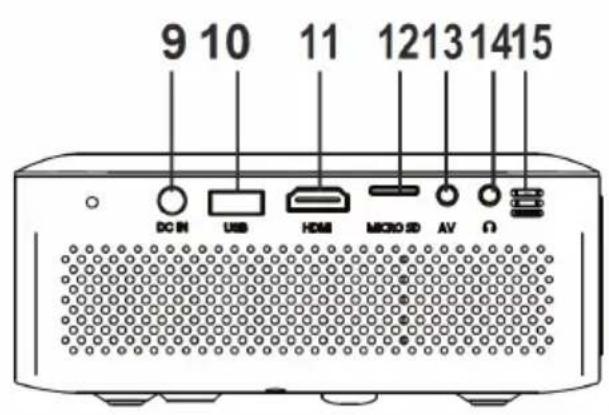
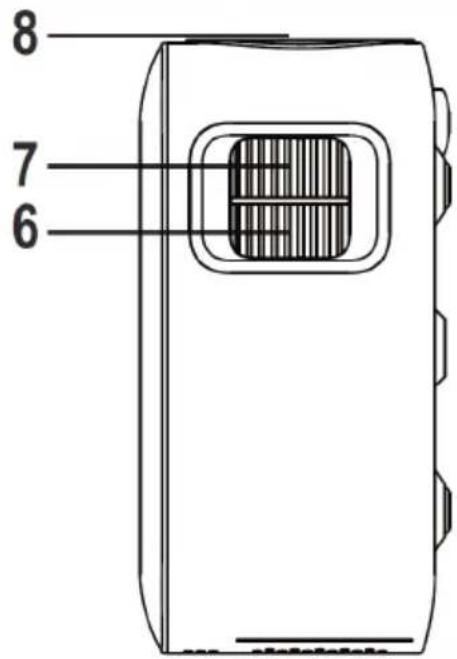
PRODUCT OVERVIEW
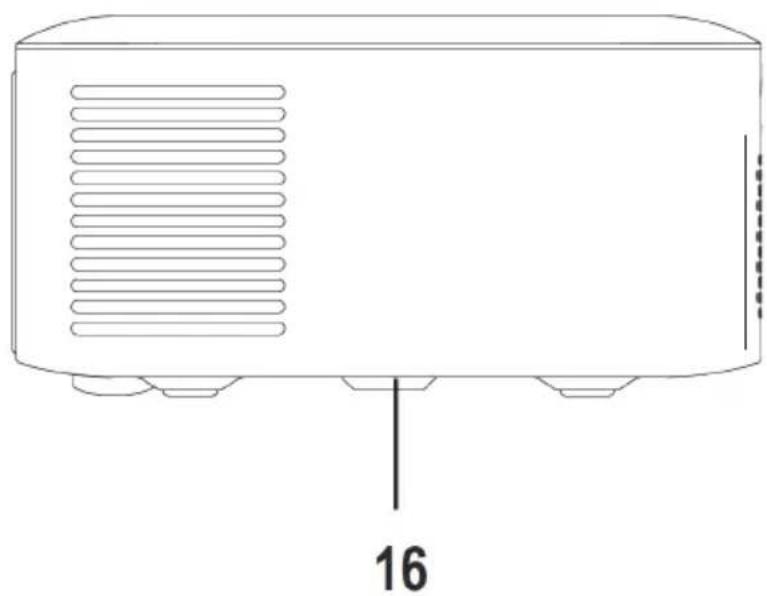
natural_image
Line drawing of a rectangular electronic device with ventilation slots and a labeled component '16' (no text or symbols on the device itself)- POWER ⏻ Button
- NETVIGATOR
Button - RETURN ⬆ Button
- MENU ≡ Button
- SOURCE ← Boutton
- TRAPEZOIDAL ADJ. Knob
- FOCUS ADJ. Knob
-
LENS
-
DC IN jack
- USB Port
- HDMI
- MICRO SD
- AV OUT Jack
- EAR PHONE Jack
- IR Window
- ANGEL ADJ. Knob
PRODUCT OVERVIEW (Cont.)

flowchart
graph TD
    A["Source Press to change media source mode."] --> B["Menu Press to access on-screen menus and options."]
    B --> C["Back Press to return to a previous page or setting in the onscreen menus."]
    C --> D["Power Press to power on the projector. Press twice to power off the unit"]
    E["Arrows/OK Press to navigate onscreen menus and make selections."] --> F["OK"]
REMOTE CONTROL
Your projector comes with a Remote Control to access and control your projector from a distance. (Batteries not included).

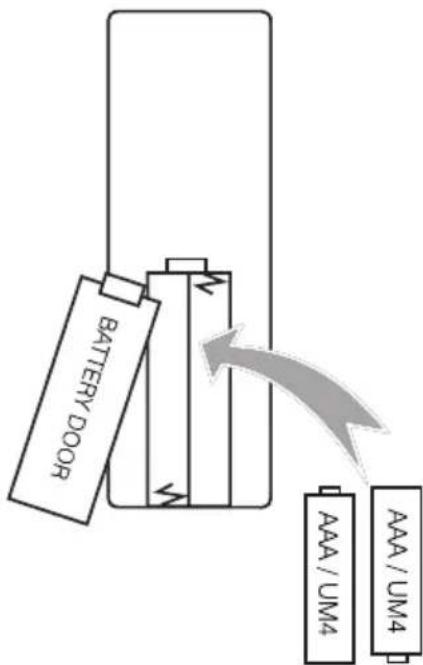
Using the Remote Control
- Do not mix old and new batteries in the remote
- Do not use different types of battery
- If you do not intend to use the unit for a long time, please remove batteries from the remote to avoid accident.
- Keep batteries away from children and pets.
- Never throw batteries into a fire.
- Do not drop, or impact the remote control as it void warranty immediately.
• The remote control operate at a range of 5 to 6M effectively - Do not expose the remote control sensor to a bright light.
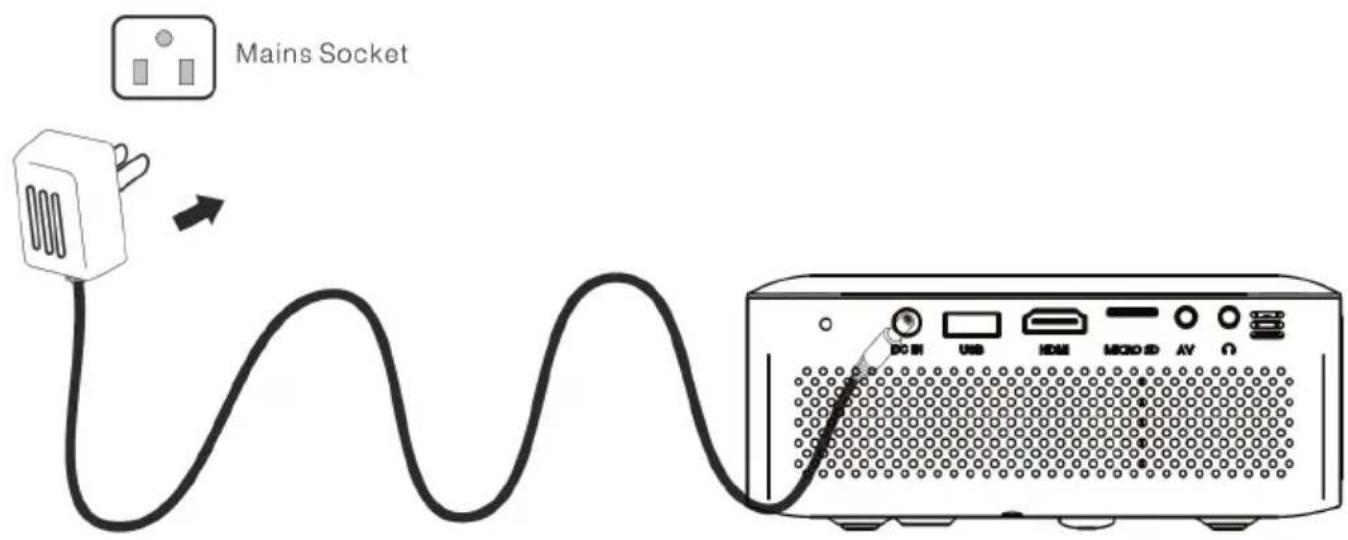
FIRST TIME SETUP
Make sure to place the projector on a flat and stable surface that is level. So that the projector projects the video/image onto the wall nice and straight.
- Plug in the power adaptor into back of unit (DC IN) and then plug in Adaptor end into wall power socket.
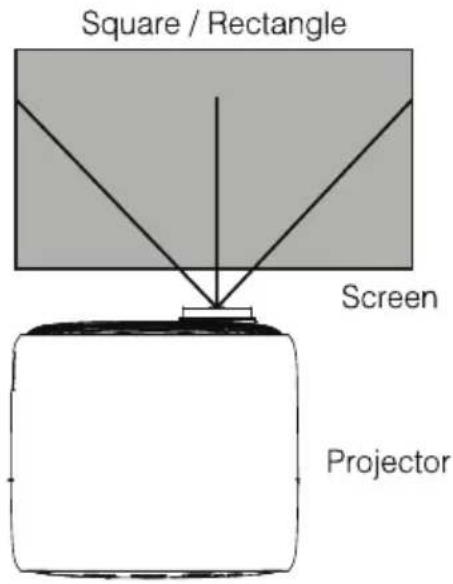
INSTALLATION
DISTANCE BETWEEN PROJECTOR AND SCREEN
| Projection Distance | 1m | 2m | 3m |
| Projection Size | 30 inch | 68 inch | 98 inch |
| Light, brightness, etc. will affect the projection distance, this data is for reference only. | |||
| Projection Position | |||
| It is recommended to place the projector in front of the center of the screen. | |||
VIEWING OPTIONS
The projector can be used to project onto a wall or screen, mounted from the ceiling or on a table. When projecting from a rear position, a special screen will be needed (not included) to display the image. Be sure to aim the remote at the sensor on the front or rear of the projector.
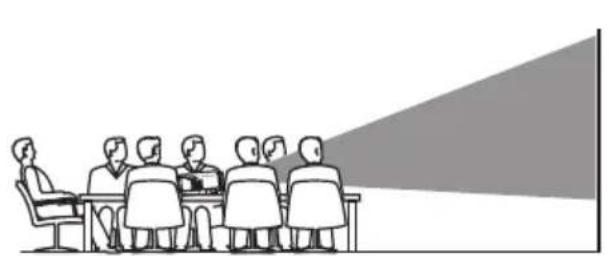
natural_image
Line drawing of a meeting with a large projection screen showing a speaker at the front (no text or symbols present)Front Table
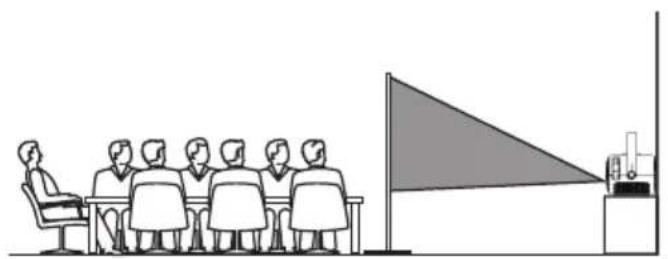
natural_image
Illustration of a meeting scene with a speaker at the front and a triangular presentation screen in the background (no text or symbols)Rear Ceiling
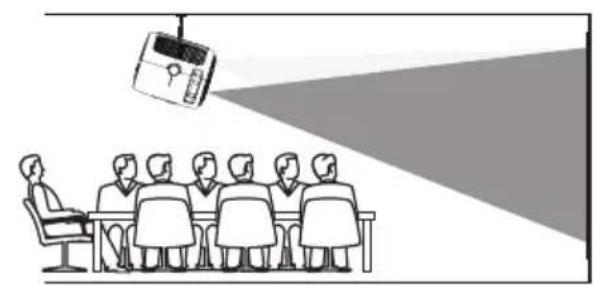
natural_image
Illustration of a meeting scene with a projection screen and audience (no text or symbols)Front Ceiling
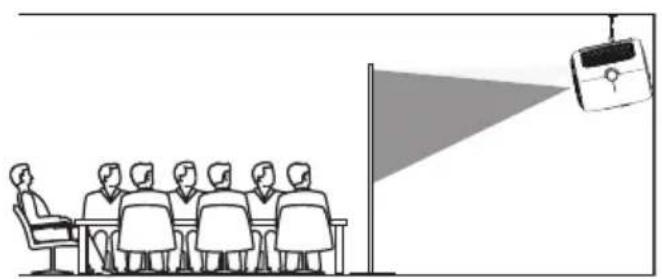
natural_image
Illustration of a meeting scene with a speaker at a podium and a projection screen showing the presentation (no text or symbols present)Rear Ceiling
INSTALLATION (Cont.)
When installing the projector in the ceiling, please purchase a projector mount recommended by an installation professional and follow the instructions that come with the mount.
Before installing the projector in the ceiling, please check to make sure the ceiling structure can support the weight of the projector and the mount. If in doubt please ask the advise from an installation professional.
NOTE: Projector Mount and Screw(s) are not included.
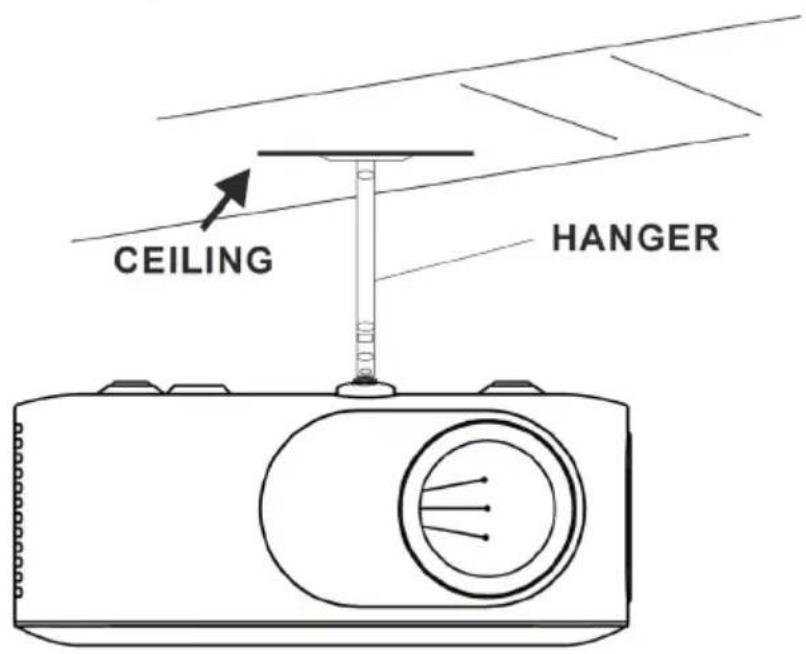
FIXED HANGER HOLE
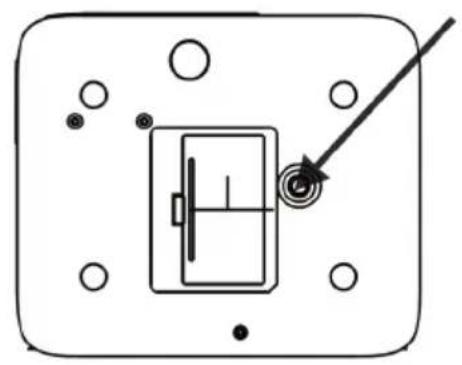
natural_image
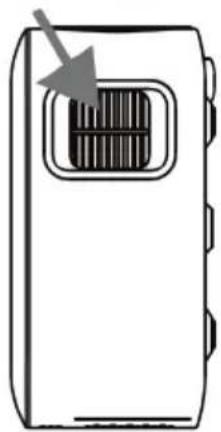
Pure electrical circuit lines without any symbolsADJUSTING FOCUS
As shown in picture, adjust the lens focus wheel until you get a clear picture.
FOCUS ADJ. KNOB
Then sharpen the image by rotating focus knob.
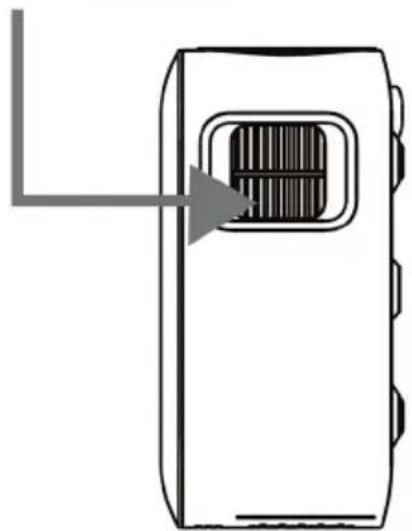
natural_image
Simple line drawing of a portable electronic device with a grid and arrow indicator (no text or symbols)TRAPEZOIDAL ADJ. KNOB
natural_image
Line drawing of a handheld device with a screen and arrow pointing to it (no text or symbols)HOME DASHBOARD
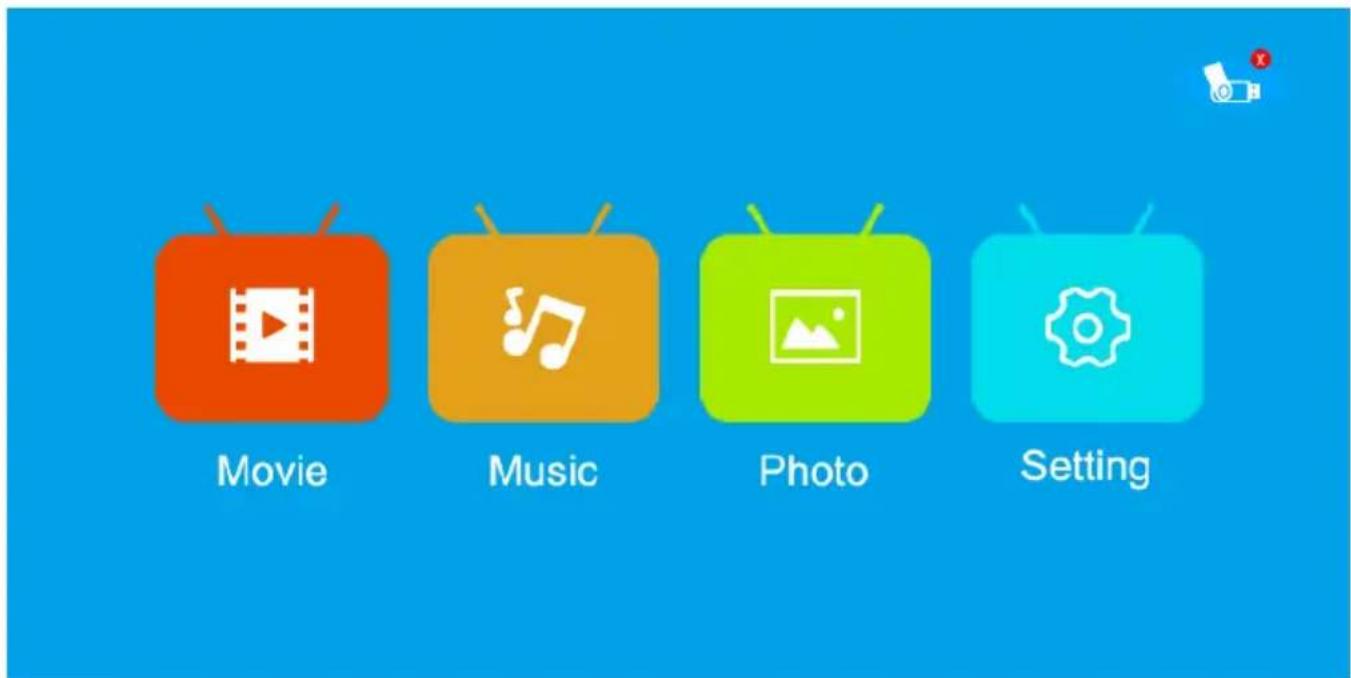
This dashboard above appears when you finish turning on your projector. From here you can select your file types to view depending the device you want to project or other media devices and menu options.
SETTING - PICTURE
To Access the setting PICTURE menu:
- Press the MENU button on the Remote Control.
- With the directional keys, Press the RIGHT PICTURE settings.
- To navigate back to PICTURE/AUDIO/OPTION, with nothing selected, Press MENU button.
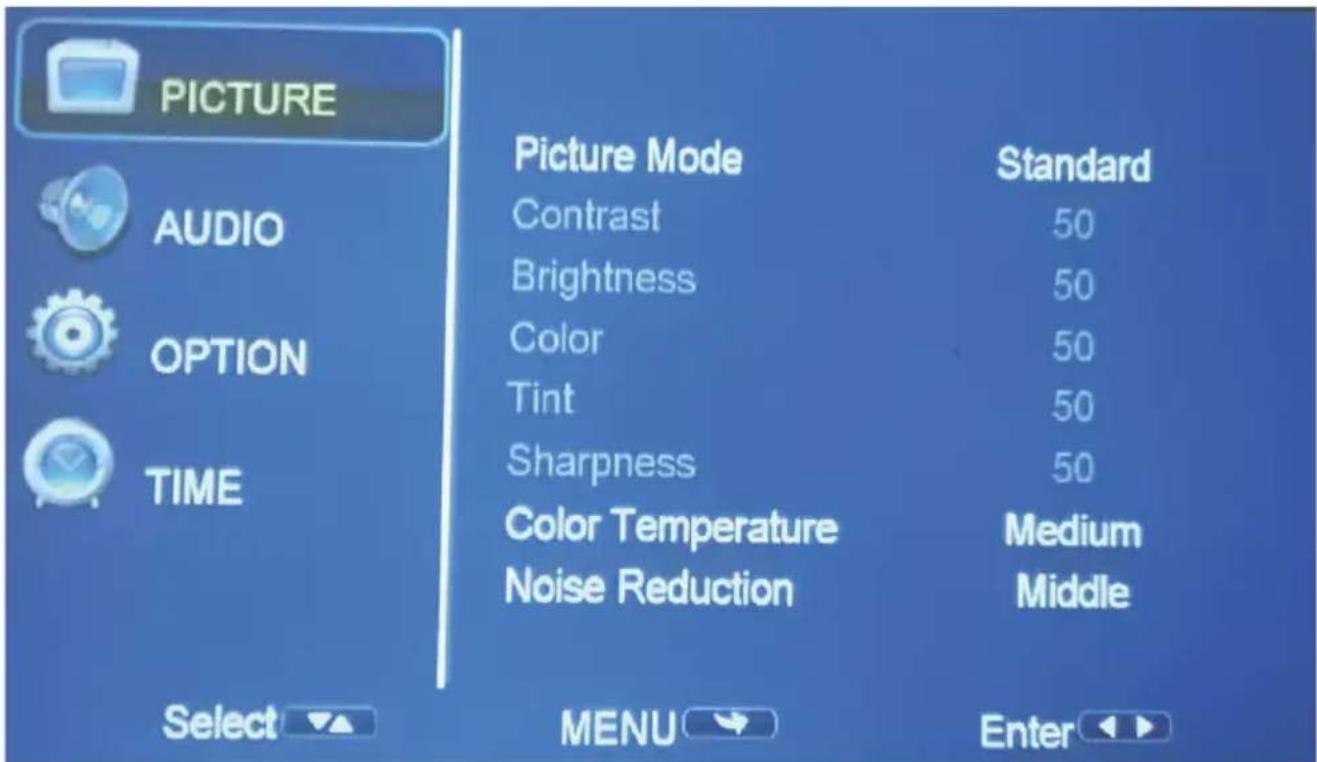
PICTURE MODES: Standard, Soft, Vivid, User (contrast, brightness, sharpness, colour).
COLOUR TEMP: Adjust between Medium, Cool, Warm.
NOISE REDUCTION: Off, Low, Middle, High, Default.
SETTING - AUDIO
To Access the setting AUDIO menu:
- Press the MENU button on the Remote Control.
- With the directional keys, Press the DOWN button, when on
AUDIO, Press the RIGHT >> arrow button to enter AUDIO settings.
- To navigate back to PICTURE/AUDIO/OPTION, with nothing selected, Press MENU button.
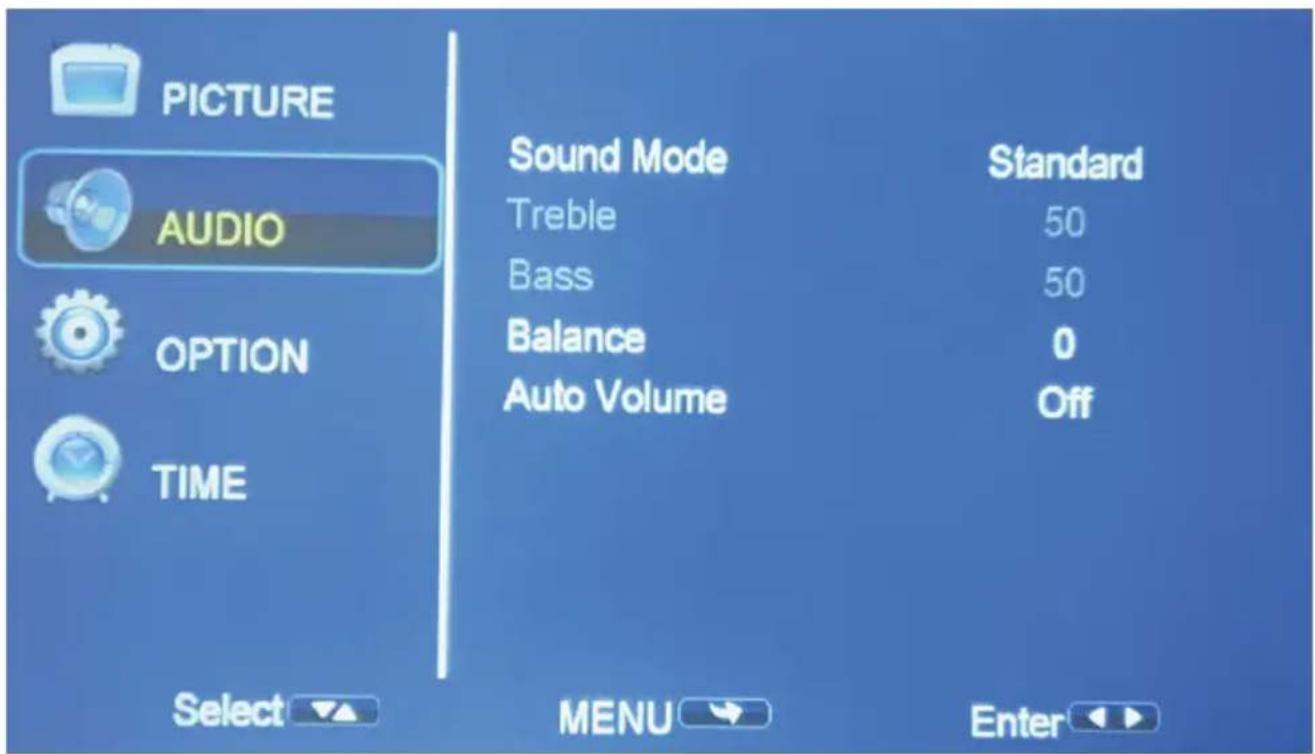
SOUND MODES: Standard, Music, Movie, Sports, User When on User mode, you can adjust more settings such as Treble & Bass.
BALANCE: Adjust the Audio Balance of the left or right speaker.
AUTO VOLUME: Adjust between ON or OFF.
SETTING - OPTION
To Access the setting OPTION menu:
- Press the MENU button on the Remote Control.
- With the directional keys, Press the DOWN ∨ button, when on OPTION, Press the RIGHT > arrow button to enter OPTION settings.
- To navigate back to PICTURE/AUDIO/OPTION, with nothing selected, Press MENU button.
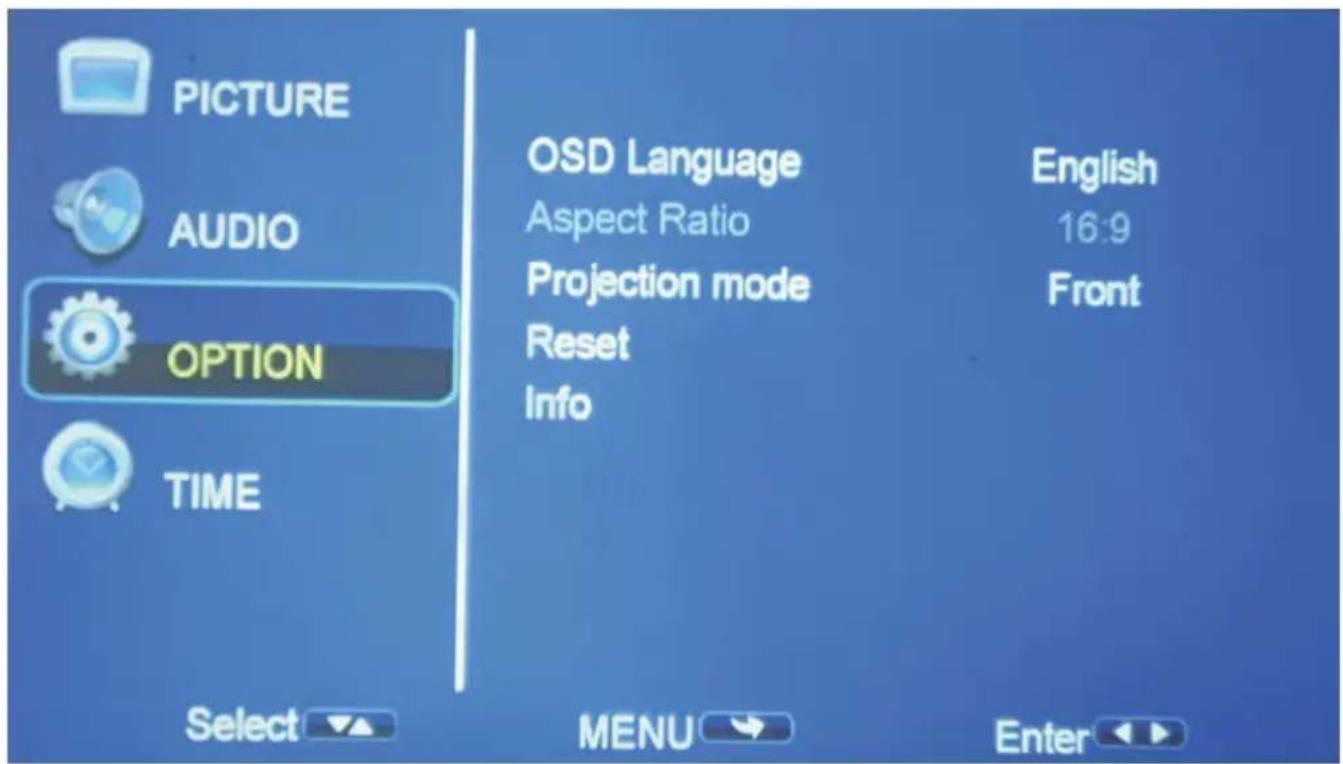
OSD LANGUAGE: Adjust between Languages English (default)
ASPECT RATIO: Adjust video aspect ratio
PROJECTION MODE: Front, F/Ceiling, Rear, Rear/ceiling
RESET: Press Yes to reset your projector settings and device.
INFO: Display information about the projector
SETTING - TIME
To Access the setting TIME menu:
- Press the MENU button on the Remote Control.
- With the directional keys, Press the DOWN √ button, when on TIME, Press the RIGHT ➞ arrow button to enter TIME settings.
- To navigate back to PICTURE/SOUND/OPTION, with nothing selected, Press MENU button.
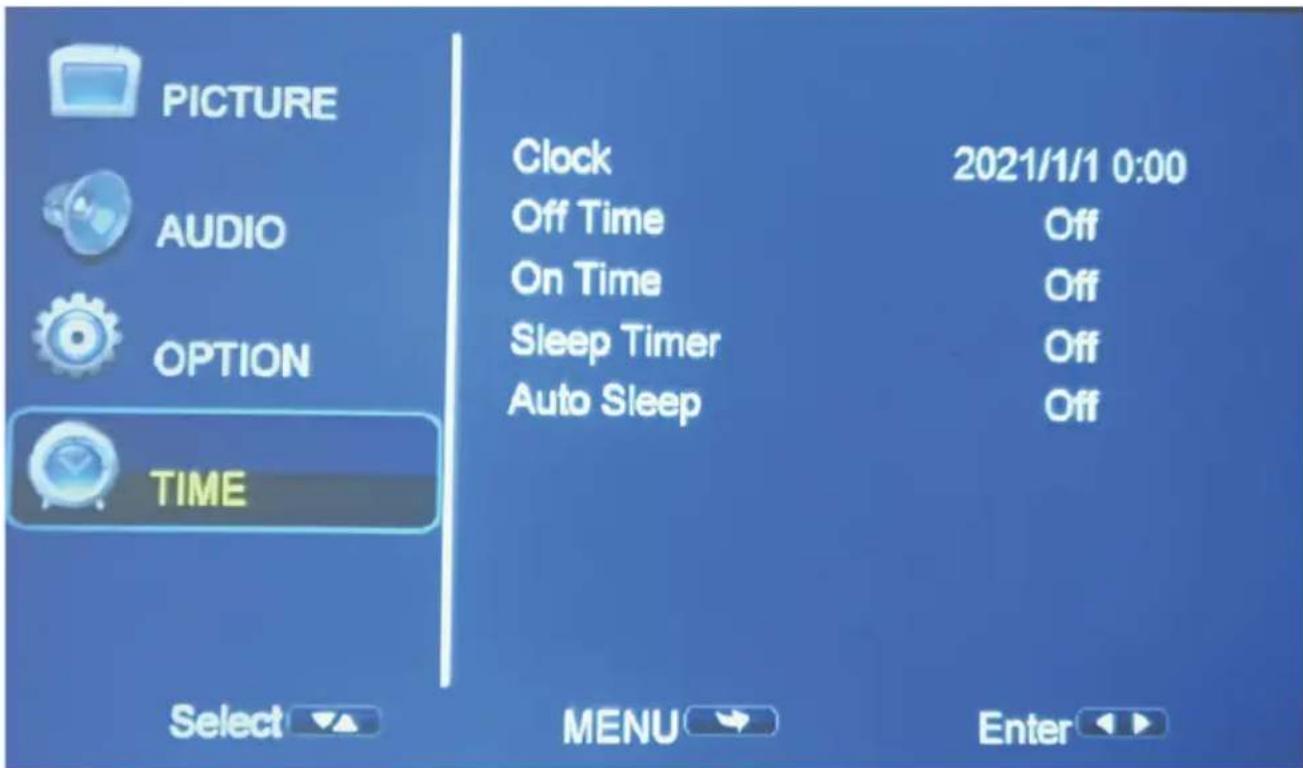
CLOCK: Select time/date for your projector.
OFF TIME: SETTING-TIME Select clock to Day, Month, Year, Hour and Minutes.
ON TIME: Select turn off time to Off, Once, Every day, Hour and Minutes.
SLEEP TIMER: Select turn off time to Off, Once, Every day, Hour and Minutes.
AUTO SLEEP: Select auto sleep function to Off, 1hour, 2hours, 4hours, 8hours.
SPECIFICATIONS
| Resolution 1280 x 720 Native Resolution (supports up to 1080p Full HD) | ||
| Projection Size Up to 120" (inches) | ||
| Lumens 80 ANSI | ||
| Aspect Ratio 16:9, 4:3, AUTO | ||
| Multimedia Playback Format under USB Mode | Movie: AVI / FLV / RMVB / MKV / MP4 / 3GP / MOV / MPG / MPEG / TS / TP / VOB | |
| Music: MP3 / WMA / OGG / AAC / FLAC | ||
| Photo: JPG / PNG / BMP | ||
| Ratings 24VDC 1.75A | ||
| USB 5V | --- max. 500mA | |
| Dimensions 145 (w) × 122 (d) × 62 (h) mm | ||
| Weight | Net: 0.5 kg | |
| Gross: 0.75 kg | ||
| Accessories | 1 x Instruction Manual 1 x Remote Control | |
| 1 x Power Adaptor 1 x Warranty Card | ||
NOTE: This document is for reference only, the operation interface is subject to software.

BLAUPUNKT
CUSTOMER HELPLINE:
info@ayonz.com
DISTRIBUTED BY:
Ayonz Pty Ltd