
VP540 - Remplisseuse sous vide Vacmaster - Free user manual and instructions
Find the device manual for free VP540 Vacmaster in PDF.


| Product Type | Commercial Chamber Vacuum Sealer |
| Brand | Vacmaster |
| Model | VP540 |
| Category | Chamber Vacuum Packaging System |
| Vacuum Pump Type | Oil vacuum pump (requires oil before first use) |
| Oil Capacity | Approximately 8 fluid ounces (1 cup) |
| Oil Change Interval | First after 25 hours; then every 60 hours |
| Supported Pouch Sizes | Up to 14" x 20" (various sizes available) |
| Bag Thickness Compatibility | 3mil (standard) or 4mil (heavy duty) |
| Adjustable Vacuum Time | Yes (0–60 seconds typical) |
| Adjustable Sealing Time | Yes (0.2 second increments) |
| Adjustable Cooling Time | Yes (2.0 seconds typical) |
| Vacuum Gauge | Yes (displays chamber vacuum level) |
| Stop Button | Yes (interrupts vacuum cycle and seals immediately) |
| Filler Plates | Included (removable to reduce chamber volume) |
| Material | Stainless steel exterior |
| Lid Lock | Yes (for storage, not during vacuum cycle) |
| Automatic Lid Release | Yes (opens after sealing cycle) |
| Cleaning Instructions | Wipe with damp cloth and mild soap; no abrasive cleaners |
| Safety Features | Grounded plug required; do not immerse; close supervision near children |
| Warranty | 1-year limited warranty |
| Certification | Patent #5,239,808 |
Frequently Asked Questions - VP540 Vacmaster
User questions about VP540 Vacmaster
0 question about this device. Answer the ones you know or ask your own.
Ask a new question about this device
Download the instructions for your Remplisseuse sous vide in PDF format for free! Find your manual VP540 - Vacmaster and take your electronic device back in hand. On this page are published all the documents necessary for the use of your device. VP540 by Vacmaster.
USER MANUAL VP540 Vacmaster
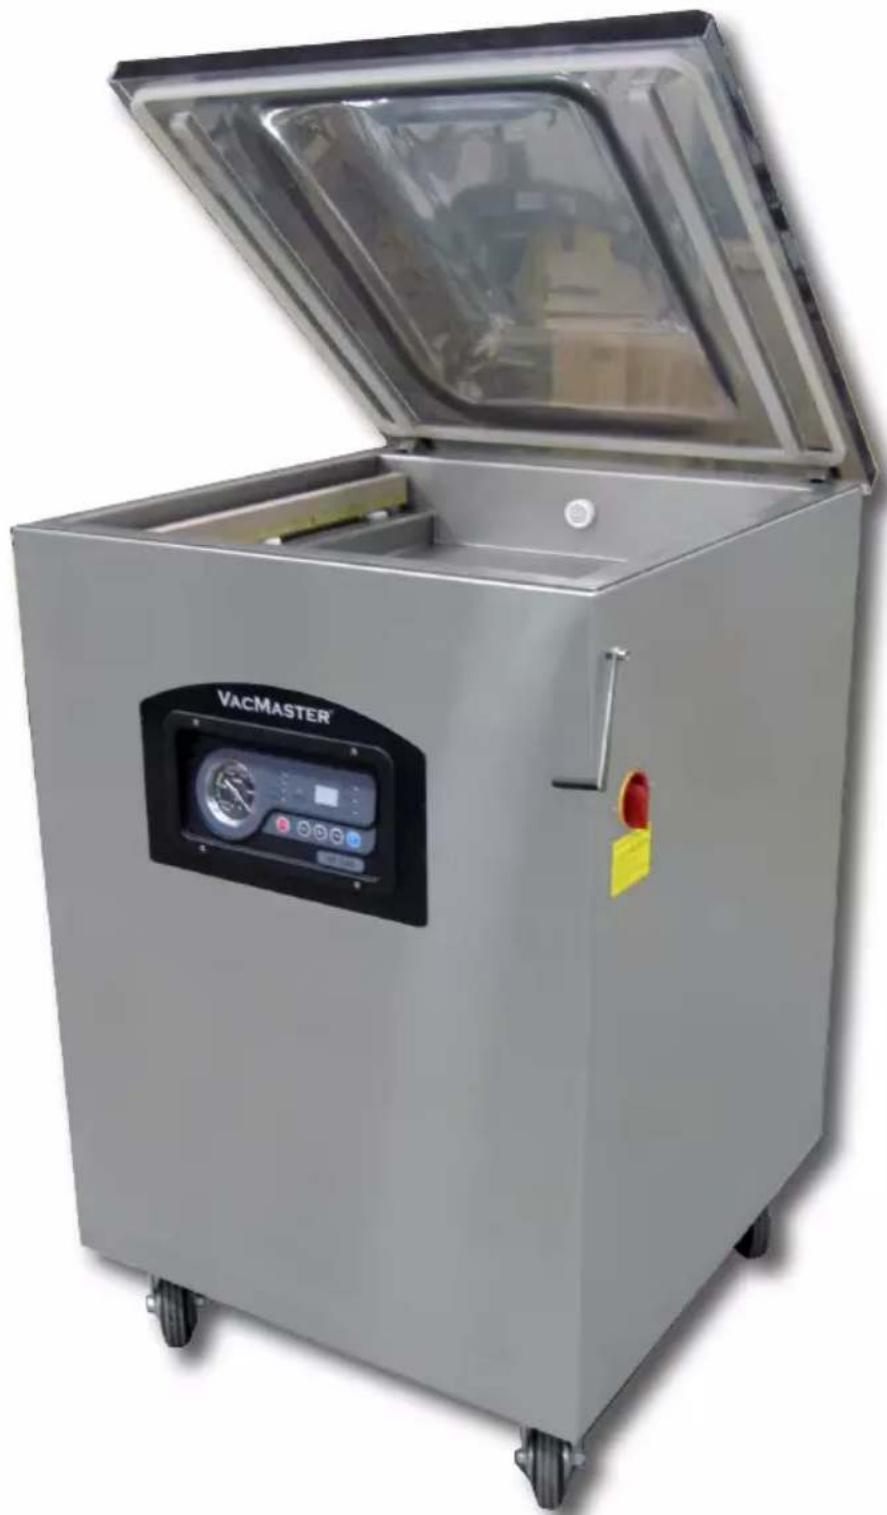
VP540 Chamber Machine Commercial Vacuum Packaging System
natural_image
Exterior view of a stainless steel vacuum cleaner with open lid and control panel (no visible text or symbols)Congratulations on your purchase of the VacMaster® VP540 Chamber Machine!
Thank you for purchasing the VacMaster® VP540 Chamber Machine. The VP540 is designed as a commercial grade vacuum packaging system and can be used for a wide variety of products. With the VP540 you can extend food life, maintain food quality, reduce freezer burn and reduce food waste and costs.
The VacMaster® VP540 is a chamber vacuum system, which offers two distinct advantages over non-chamber, external bag type units. First, a much higher level of vacuum can be achieved which means a longer shelf life for foods that you package. Secondly, liquids and liquid-rich foods can be effectively vacuum packaged. Food products like fresh meats, fish, soups, stews, etc. are no longer a problem to vacuum package. Marinated vegetables and meats are packaged quickly with ease, and no mess.
The VP540 Chamber Machine uses commercial technology. Simply place the pouch to be sealed inside the chamber and close the lid. This activates the vacuum pump and the vacuum and sealing process begins! First, the air is removed from the entire chamber and the vacuum pouch. Once the preset vacuum level is achieved, the pouch is sealed. Upon completion of the sealing cycle, the air flows back into the chamber and the lid opens automatically.
Use the VP540 to:
• Vacuum package soups, stews and other liquid foods.
- Keep fish and game meat fresh longer and free of freezer burn.
- Store meat and fish scent-free.
• Take advantage of bulk buys. Simply portion and package.
- Perfect for marinating meat and vegetables.
• Vacuum package pre-made meals.
- Prevent oxidation and damage to rare coins, silverware and important documents.
Read and follow all directions for usage and maintenance carefully and you'll benefit from years of trouble-free and cost effective vacuum packaging.
Call us at 800.821.7849 for questions regarding the machines or vacuum pouches.
STOP!!
Read and complete the following to prevent any damage. Oil must be added to the vacuum pump before using.
VacMaster® model VP540 uses an oil vacuum pump.
For shipping purposes there is no oil in the pump. Oil must be added.
Adding Oil to Vacuum Pump
Turn off and unplug machine to prevent electrocution.
- Using the included ARY approved oil, fill the enclosed plastic oil bottle.
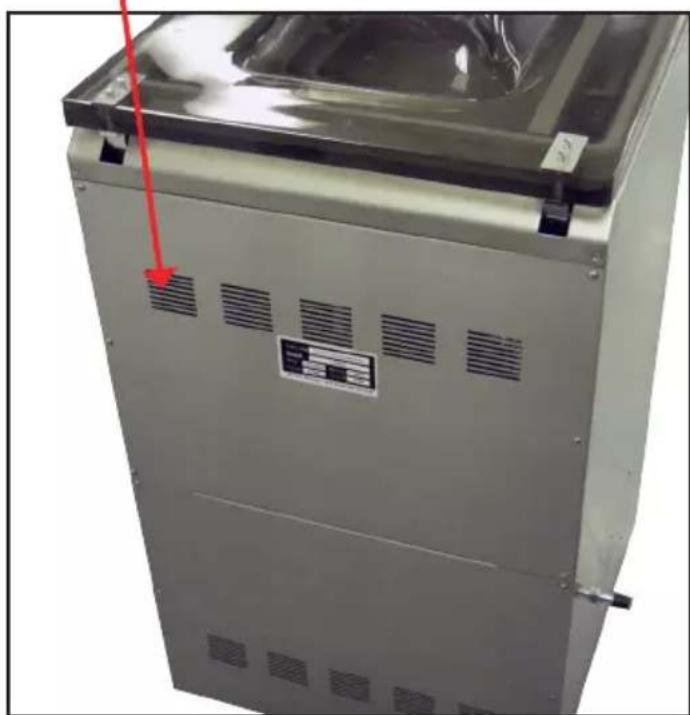
- With a phillips screwdriver, remove the 4 screws to open the back of the cabinet.
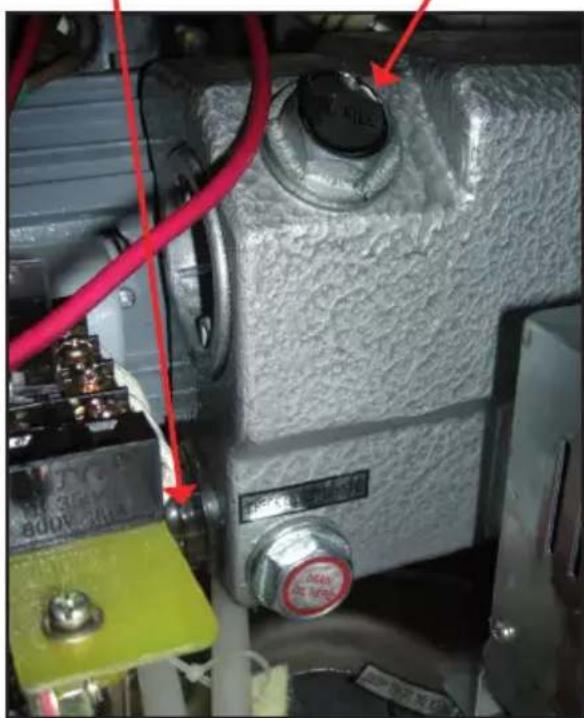
- Locate the oil fill bolt on the top of the vacuum pump.
- Remove oil fill bolt.
- Watching site glass, insert end of oil bottle into hole.
- Fill oil level between 1/2 to 3/4 of site glass.
Do not overfill. Overfill can cause damage to the vacuum pump. - Replace and tighten bolt to vacuum pump.
- Reattach back cover.
NOTE: Pump requires approximately 8 fluid ounces of oil (approx. 1 cup). Use only approved VacMaster® vacuum oil.
Back of Housing Cabinet
natural_image
Exterior view of a stainless steel industrial machine with ventilation grilles and a red arrow pointing to a component (no visible text or symbols)Oil Site Glass
natural_image
Close-up of a mechanical component with red and green wiring, no visible text or symbolsOil Fill
Packaging Information
With the VP540, you can easily package a wide variety of sizes and shapes. You can also prep and store smaller individual serving portions as well as bulk items.
- Keeps food fresh 3-5 times longer than conventional storage bags.
• Several sizes available to meet your packaging needs.
• Terrific for hundreds of applications in and out of the kitchen - Safe for freezer, refrigeration, and microwave use. Cook in bags can be boiled.
- Bag thickness available in standard 3mil or heavy duty 4mil.
- Bags are economically priced, giving you a better value.
The chamber of the VP540 can easily vacuum package the following sizes of vacuum pouches:
| Size | Quantity | Thickness | Pouch Type | Part Number |
| 2.5" x 10" | 2000 | 3mil | Standard | 30765 |
| 6" x 7" | 1000 | 3mil | Standard | 30766 |
| 6" x 8" | 1000 | 3mil | Standard | 30742 |
| 6" x 8.5" | 1000 | 3mil | Standard | 30720 |
| 6" x 8.5" | 1000 | 3mil | Cook in | 30750 |
| 6" x 10" | 1000 | 3mil | Standard | 30721 |
| 6" x 10" | 200 | 3mil | Standard | 30721RB |
| 6" x 12" | 1000 | 3mil | Standard | 30743 |
| 6" x 15" | 1000 | 3mil | Standard | 30787 |
| 7" x 9" | 1000 | 3mil | Standard | 30788 |
| 7" x 11" | 1000 | 3mil | Standard | 30789 |
| 7" x 12" | 1000 | 3mil | Standard | 30791 |
| 8" x 10" | 1000 | 3mil | Standard | 30722 |
| 8" x 10" | 200 | 3mil | Standard | 30722RB |
| 8" x 12" | 1000 | 3mil | Standard | 30723 |
| 8" x 12" | 1000 | 4mil | Standard | 30754 |
| 8" x 12" | 1000 | 3mil | Cook in | 30751 |
| 8" x 15" | 1000 | 3mil | Standard | 30744 |
| 8" x 20" | 1000 | 4mil | Standard | 30767 |
| 10" x 10" | 1000 | 3mil | Standard | 30724 |
| 10" x 13" | 1000 | 3mil | Standard | 30725 |
| Size | Quantity | Thickness | Pouch Type | Part Number |
| 10" x 13" | 100 | 3mil | Standard | 30725RB |
| 10" x 13" | 1000 | 4mil | Standard | 30778 |
| 10" x 15" | 1000 | 3mil | Standard | 30726 |
| 10" x 15" | 1000 | 3mil | Cook in | 30749 |
| 10" x 16" | 1000 | 4mil | Standard | 30755 |
| 10" x 16" | 1000 | 3mil | Cook in | 30752 |
| 10" x 18" | 500 | 3mil | Standard | 30745 |
| 10" x 20" | 500 | 4mil | Standard | 30756 |
| 10" x 22" | 500 | 3mil | Standard | 30729 |
| 12" x 12" | 1000 | 3mil | Standard | 30727 |
| 12" x 14" | 1000 | 3mil | Standard | 30728 |
| 12" x 14" | 100 | 3mil | Standard | 30728RB |
| 12" x 15" | 500 | 3mil | Standard | 30746 |
| 12" x 16" | 500 | 3mil | Standard | 30731 |
| 12" x 16" | 500 | 4mil | Standard | 30786 |
| 12" x 18" | 500 | 3mil | Standard | 30732 |
| 12" x 18" | 500 | 4mil | Standard | 30757 |
| 12" x 22" | 500 | 3mil | Standard | 30733 |
| 14" x 16" | 500 | 3mil | Standard | 30734 |
| 14" x 18" | 500 | 3mil | Cook in | 30753 |
| 14" x 20" | 500 | 3mil | Standard | 30735 |
Getting Started with Vacuum Packaging
If you are part of the food processing or food service industry, there is a good chance that you already know the advantages of vacuum packaging. It has been used with success for many years as a safe and cost effective method for extending shelf life and maintaining the quality of food products. If vacuum packaging is new to your home or business, you will soon wonder how you lived without it!
Whether you are a beginner or expert, there are certain basic guidelines that should always be followed in order to package foods safe to eat. Neglecting these basic guidelines can result in food spoilage, and in some cases, illness or death.
Once you familiarize yourself with the VP540 and the procedures, you will feel at ease using the VacMaster® Chamber Machine and enjoy a higher quality of stored foods.
- Package only fresh foods. Do not package old or rancid foods. An already bad product does not improve with vacuum packaging.
- Fresh foods (Meats, vegetables, cheeses, etc.) should be refrigerated at 34°F or below or frozen after vacuum packaging.
- Vacuum packaging removes a high percentage of air (which is 21% oxygen). This slows the growth of most living microorganisms, which degrade food, such as aerobic bacteria and molds. However, some forms of bacteria such as clostridium botulinum (responsible for botulism) are anaerobic and grow in the absence of oxygen.
- The foods susceptible to botulinum should be refrigerated for a short term and frozen for long-term storage. Consume immediately after heating.
- Vegetables such as cauliflower, broccoli and cabbage will emit gasses when vacuum sealed. To prepare these foods for vacuum packaging, you must blanch them first.
- All perishable foods must be refrigerated or frozen to prevent spoilage.
- Vacuum packaging is not a substitute for heat canning.
Safety Precautions
For your safety, follow these precautions when using your VacMaster® VP540:
- Read Operator's Guide carefully before using the machine for the first time.
- Do not use the VP540 on wet or hot surfaces, or near a heat source.
- Do not immerse machine or power cord in water or any other liquid.
- Plug VP540 into grounded power sources only.
Do not use extension cord. - To disconnect, unplug directly from power source. Do not disconnect by pulling cord.
- Do not operate machine with damaged power cord.
- Only use VacMaster® vacuum pouches and accessories.
- Do not allow to be used as a toy. Close supervision is necessary when used by or near children.
- Only use VP540 for its intended use.
Features of VP540
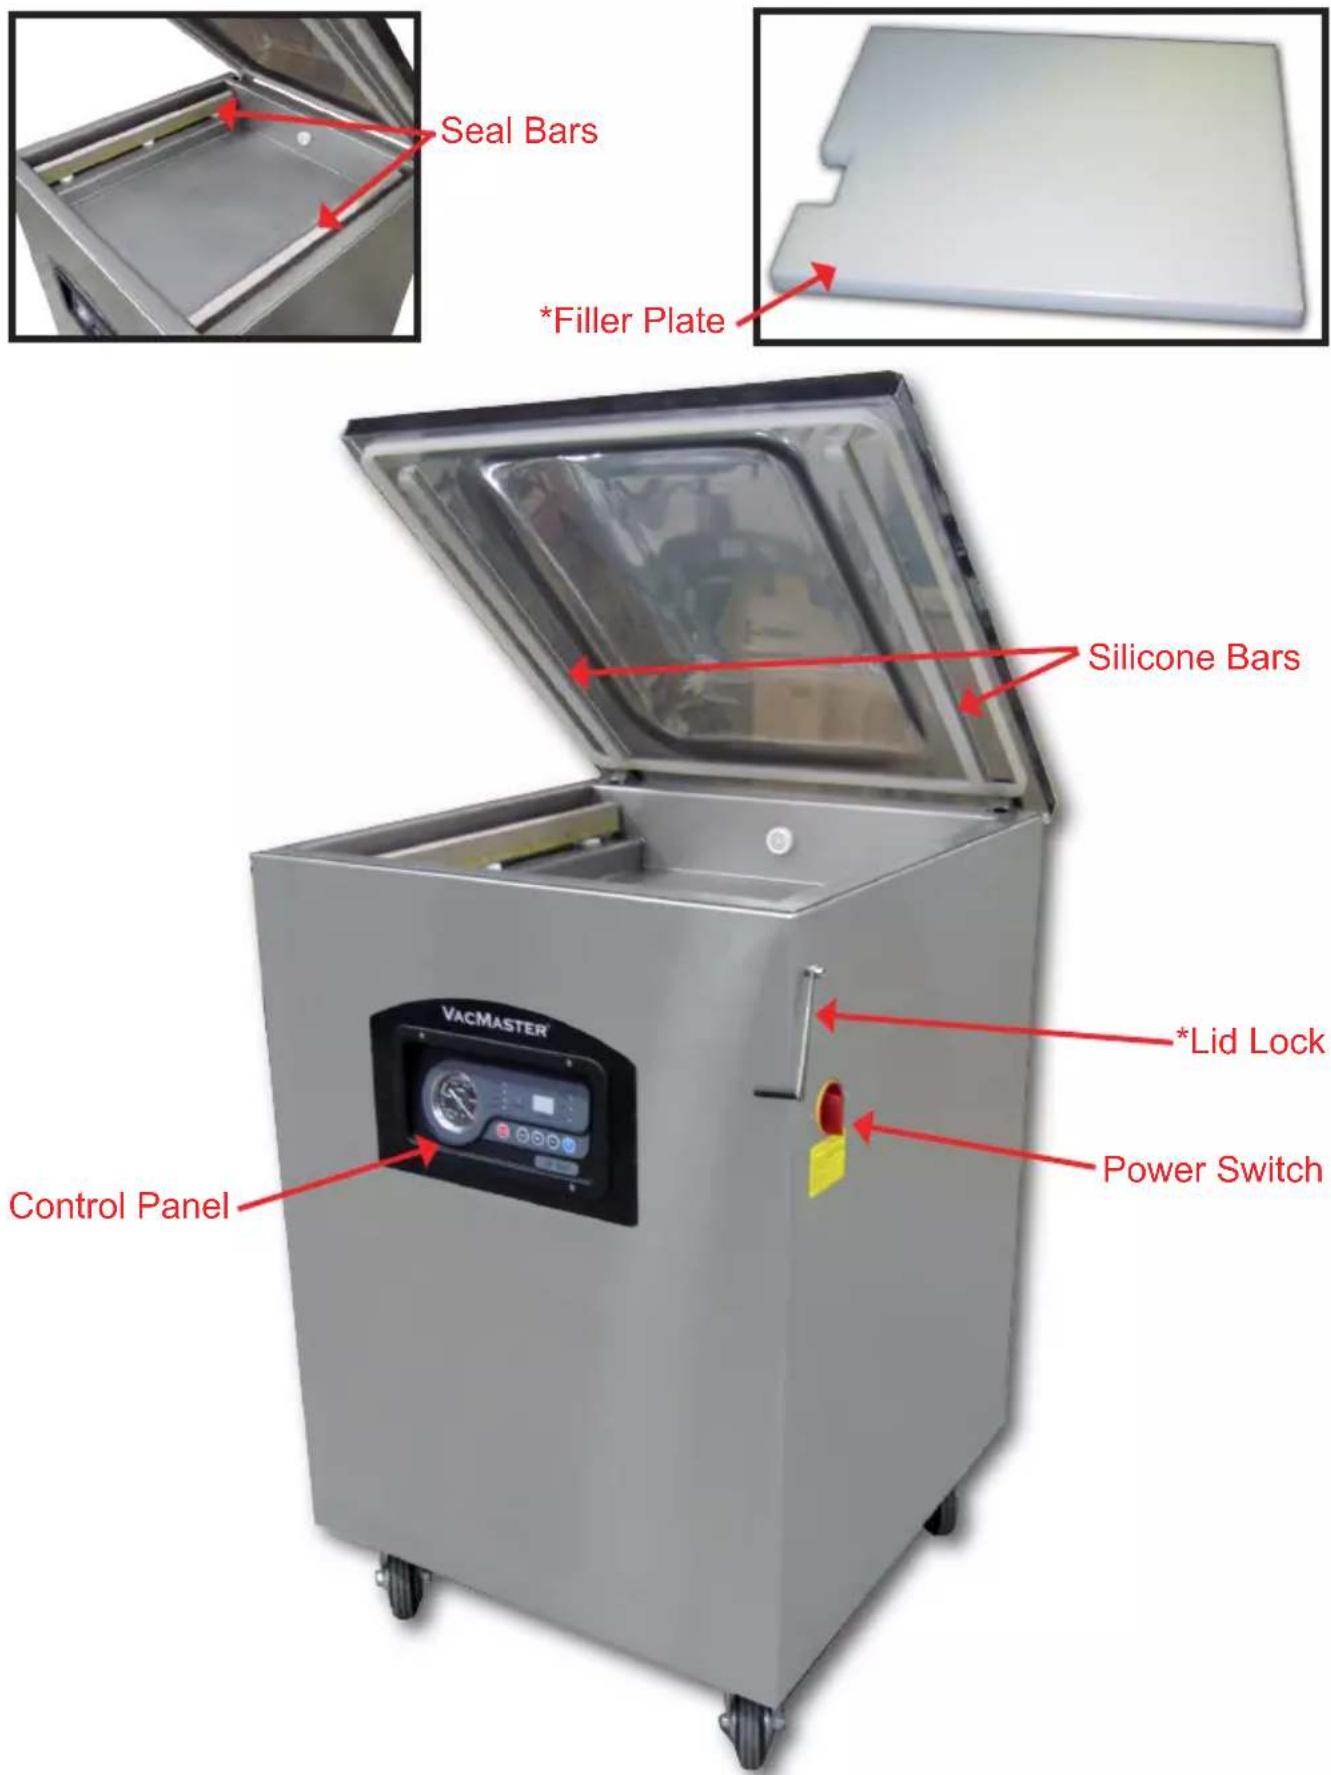
* Lid Lock Feature: not to be used during the vacuuming cycle. Used to keep lid closed when machine is not in use or while machine is in storage.
*Filler Plates: used to "take up space" in the vacuum chamber. Using the plates will result in a faster vacuum time since there is less air to be removed from chamber. Can also be used to keep product centered on the seal bar and preventing liquids from escaping.
Operating Instructions
1. Select the Pouch
Select the proper size VacMaster ^® barrier vacuum pouch. Allow a minimum of 1" to 2" of extra headspace at the top of the pouch to ensure a quality, positive seal.
2. Plug in machine and switch power "ON"
The "WORKING" indicator light on the control panel will illuminate when the power is on.
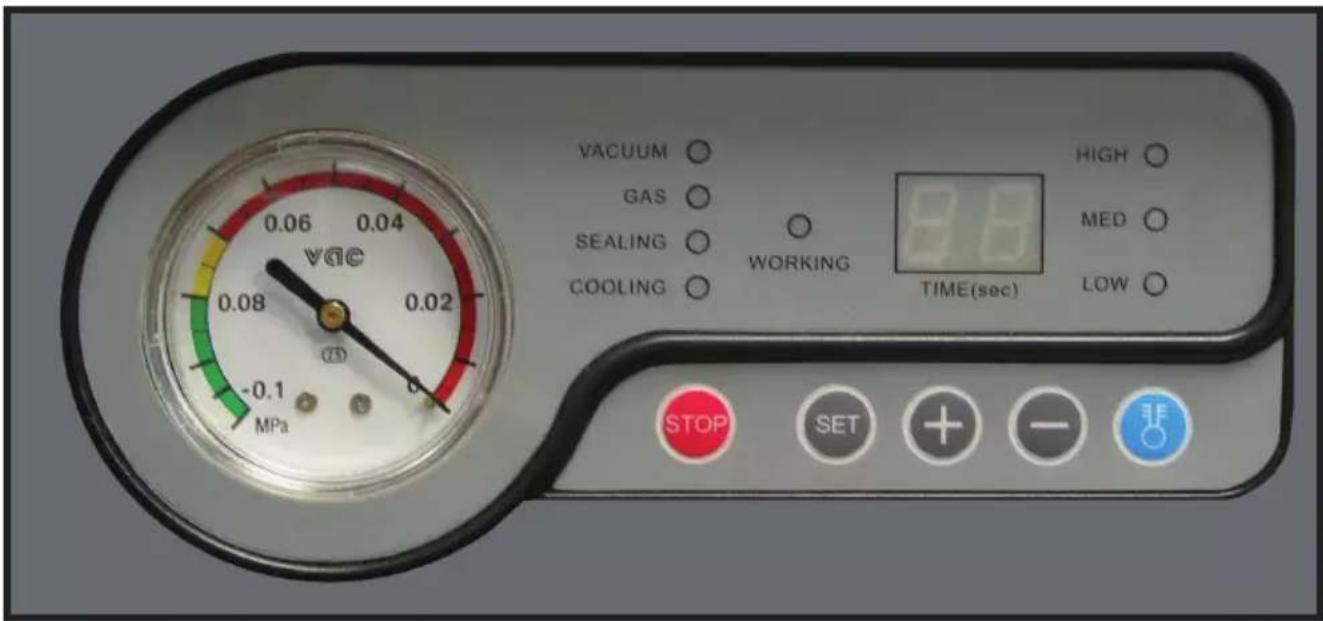
3. Adjust / Set Timing Controls
All adjustments must be made with lid in the OPEN position.
\~ Vacuum Time: Press the "SET" button once and you will notice the "VACUUM" indicator will light. Adjust the vacuum time "up" or "down" by using the "+" or "-" buttons. For initial test set the vacuum time to 40 seconds. Adjust vacuum accordingly to achieve the vacuum required.
\~ Gas Flush: This model does not offer the gas flush option, Press "SET" button and leave at 0.0 seconds.
\~ Sealing Time: Press the "SET" button until the "SEALING" indicator lights. Adjust the sealing time "up" or "down" using the "+" or "-" buttons. For initial test set the sealing time to 1.2 seconds. Adjust sealing time accordingly to achieve a positive seal.
\~ Cooling Time: Press the "SET" button until the "COOLING" indicator lights. Adjust the cooling time "up" or "down" using the "+" or "-" buttons. For initial test set the cooling time to 2.0 seconds.
\~ Press "SET" until all setting lights are clear and the machine is ready to work. "Ed" will appear on display.
4. Fill pouch and place in Chamber
- Remove or replace filler plate to accommodate the product to be vacuumed.
• Always use as many filler plates as possible. Lay the pouch flat in the chamber with the opening of the pouch across the seal bar. - Pouch opening should extend across the seal bar by 12 to 1". Make sure the opening is flat and wrinkle-free.
Note: the entire pouch must remain inside the chamber.
5. Close lid
Hold down firmly until vacuum engages.
6. Process
Closing the lid begins the vacuum cycle.
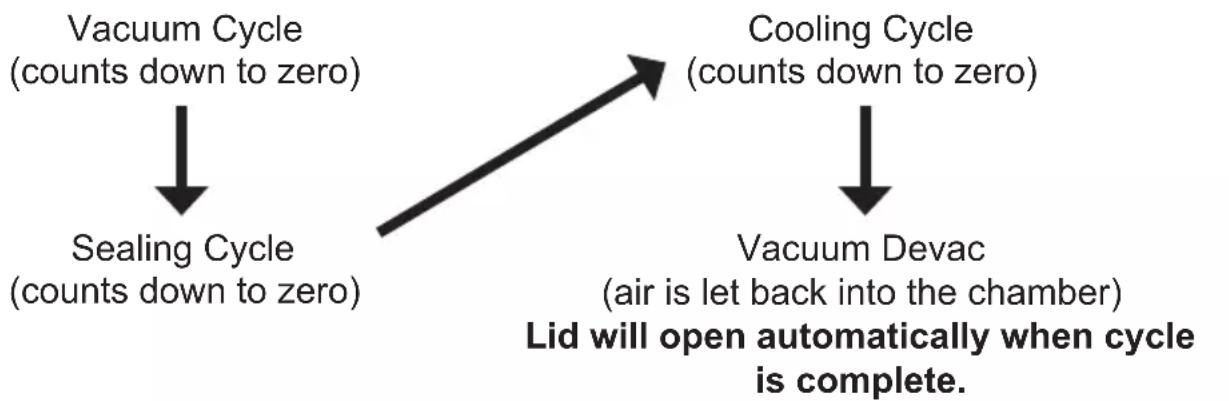
flowchart
graph TD
    A["Vacuum Cycle (counts down to zero)"] --> B["Sealing Cycle (counts down to zero)"]
    C["Cooling Cycle (counts down to zero)"] --> D["Vacuum Devac (air is let back into the chamber)"]
    style A fill:#f9f,stroke:#333
    style B fill:#ccf,stroke:#333
    style C fill:#cfc,stroke:#333
    style D fill:#fcc,stroke:#333
*Keep face and body clear of opening lid.*
7. Remove pouch & inspect
Vacuum – check the quality of the vacuum by looking at the tightness of the pouch and the product. If you notice “air pockets” increase the vacuum time by a few seconds, test again. This may take up to 60 seconds depending on pouch size and the volume of product being packaged.
Seal – Inspect the pouch seal.
Note: A positive seal will look “clear” upon inspection. If the seal is “spotty or incomplete” increase the sealing time by 0.2 seconds.
If the seal is “white or milky” decrease seal time by 0.2 seconds.
Additional Controls:
Vacuum Gauge
Represents the vacuum level inside the chamber.
STOP Button
Stops the vacuum cycle and the pouch will be sealed immediately.
STOP This feature can be used to eliminate or minimize product from escaping the pouch during the vacuum cycle. It can also be used to control the vacuum level when packaging softer, fragile items.
Seal Bar Temperature Setting
Allows quick adjustments to the sealing temperature.
Adjust the temperature upon pouch seal inspection.
Changing/Replacing Oil in Vacuum Pump
- Run vacuum process a couple of times to "warm up" the oil.
- Turn off machine and unplug to prevent electrocution.
- With a phillips screwdriver, remove the 4 screws to open the back of the cabinet.
- Locate drain bolt on underneath side of vacuum pump.
- For access and ease of draining the oil, position machine so the drain bolt is "clear" and the dirty oil can be captured.
- Oil will flow immediately when bolt is removed. Place catch cup underneath before removing drain bolt.
- Capture oil from pump. When oil is completely drained, replace and tighten bolt. (Dispose of old oil properly, according to your local and state regulations.)
- Follow the "Adding Oil to Vacuum Pump" instructions at beginning of manual. Do not use machine until oil has been added.
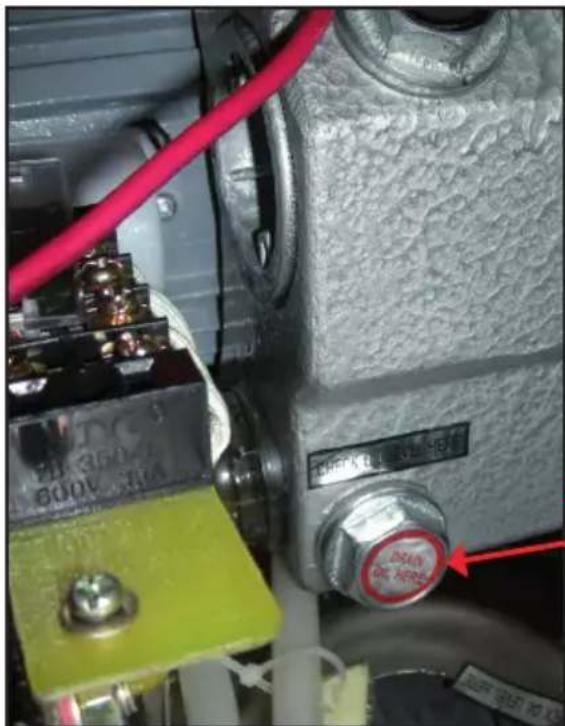
Oil Drain Bolt
Vacuum Pump Maintenance
The VP540 vacuum pump requires periodic oil changes. Required oil change schedule:
- First oil change: after 25 hours of VP540 usage.
• Future oil changes: change oil after every 60 hours of machine usage.
Using pump site glass, check the oil level and color frequently.
- Oil must remain between 1/2 and 3/4 of site glass.
- With use, the pump oil will become cloudy, dark or even "milky".
Once oil becomes discolored, change oil replacing with new VacMaster ^® vacuum oil.
Care, Maintenance & Troubleshooting
The VacMaster® VP540 has been designed with ease of use and low maintenance in mind. Follow these few points for years of trouble-free operation:
Cleaning
- UNPLUG your VP540 before cleaning.
• Regularly clean machine with damp cloth removing any food debris.
• Use only a mild soap or stainless steel cleaner. - DO NOT use any acetone-based or abrasive cleaner on the lid or other plastic parts. Parts will scratch and discolor.
- Wipe the seal bar with damp cloth only. NOTE: Seal bar is removable for safe cleaning.
Maintenance
Periodically inspect the following items:
- Seal bar – inspect the brown Teflon tape covering the seal wire. If the tape becomes burnt or torn, replace.
- Lid gasket - make sure gasket and the top of the chamber remains clean and free of debris.
Troubleshooting
Nothing happens when lid is closed:
- Make sure power cord is firmly plugged into the electrical outlet.
- Make sure the power switch is turned "ON".
- Make sure the power switch is not damaged in any way.
- Plug in a different appliance to verify outlet is good.
Low vacuum (vacuum gauge not reading in the "green"):
- Make sure the open end of the pouch is inside the chamber.
- Confirm that the lid gasket and sealing area are clean and free of debris.
- Increase the vacuum cycle time.
Please read the Operator's Guide carefully for a full understanding of your appliance.
Call 800.821.7849 for questions and troubleshooting.
Fig. 1
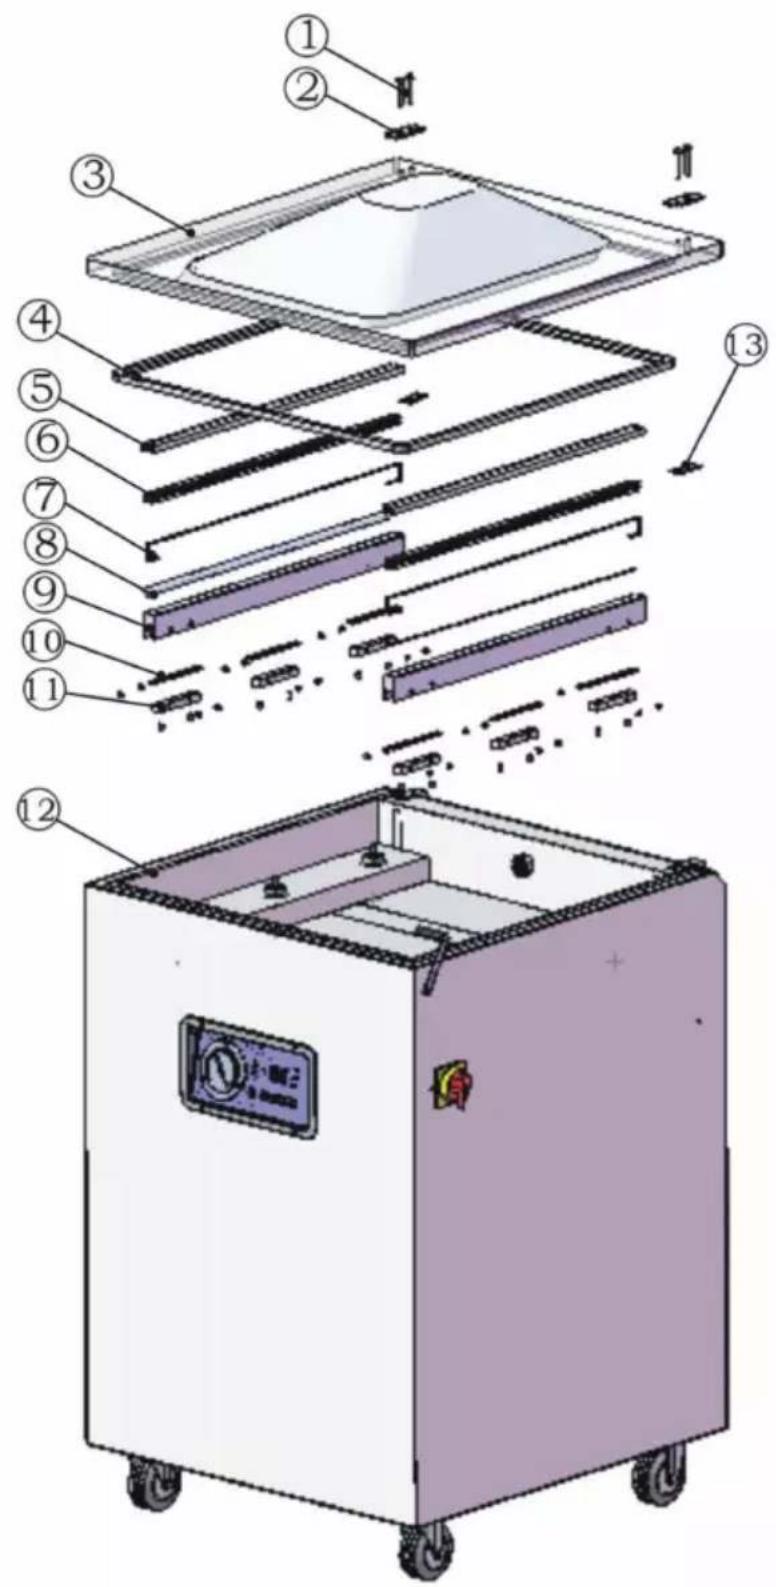
| Name Quantity | Part Number | Assembly Part Number | ||
| 1 | Hexagon Socket Cap Screw 2 | |||
| 2 | Upper Platen for Lid 1 | |||
| 3 | Chamber Lid 1 979501 | |||
| 4 | Lid Gasket 1 979202 | |||
| 5 | Top Bar 2 979505 | |||
| 6 | Seal Pad 2 976598 | |||
| 7 | Seal Wire 2 979109 | Seal Bar Assembly (979500) | ||
| 8 | Teflon Tape 4 979822 | |||
| 9 | Seal Bar 2 | |||
| 10 | Brass Contacts 6 | |||
| 11 | Seal Bar Tension Blocks 6 | |||
| 12 | Vacuum Chamber 1 | |||
| 13 | Lower Platen for Lid 2 |
Fig. 2
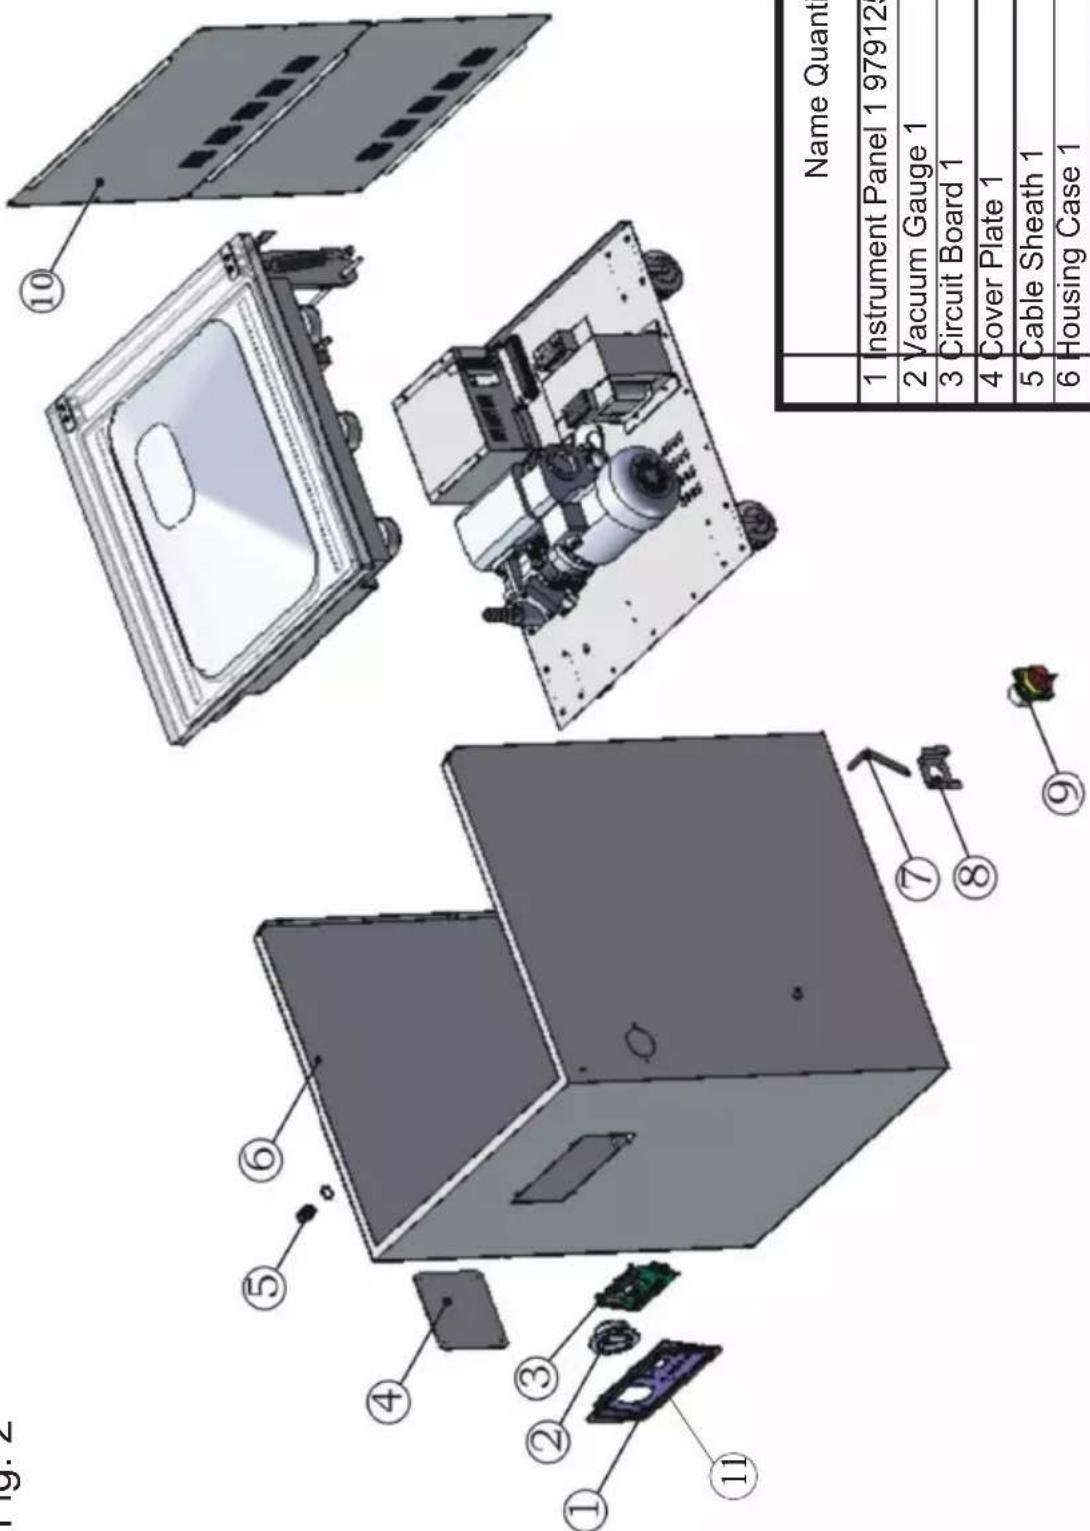
| Name Quantity | Part Number | Assembly Part Number | ||
| 1 | Instrument Panel 1 979125 | |||
| 2 | Vacuum Gauge 1 | 979126 | ||
| 3 | Circuit Board 1 | 979127 | ||
| 4 | Cover Plate 1 | |||
| 5 | Cable Sheath 1 | |||
| 6 | Housing Case 1 | |||
| 7 | Lid Latch Assembly 1 | 979170 | ||
| 8 | Power Switch Bracket 1 | 979137 | ||
| 9 | Power Switch 1 | 979138 | ||
| 10 | Rear Cover 1 | |||
| 11 | Decal, Instrument Panel 1 979 | 124 |
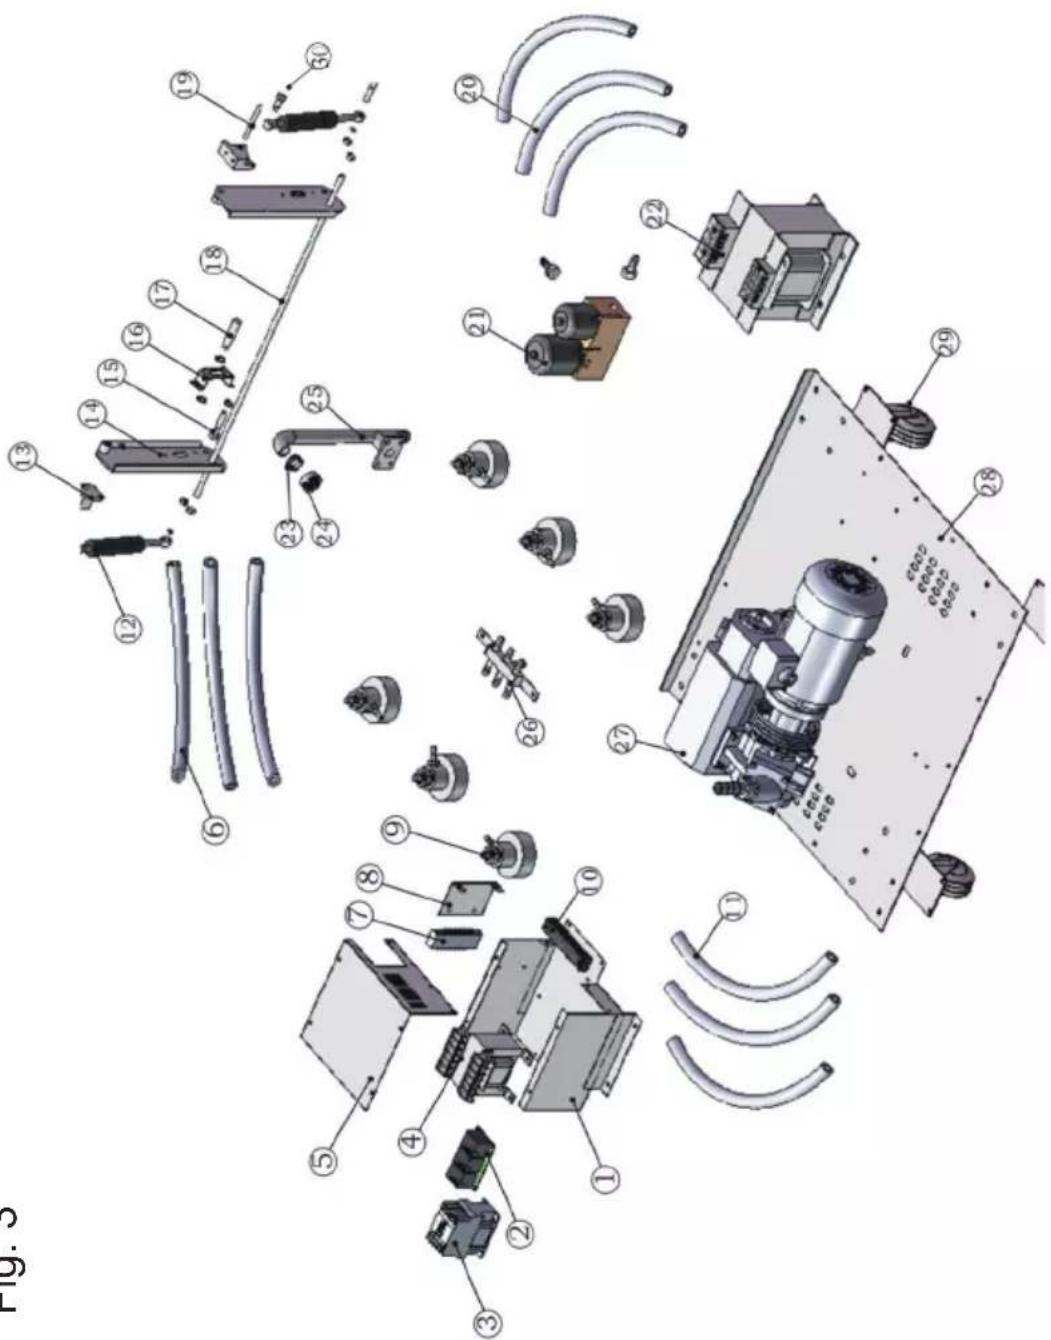
| Name Quantity | Part Number | Assembly Part Number | ||
| 1 | Housing of Electric Box 1 | |||
| 2 | Connecting Terminal 1 | |||
| 3 | Intermediate Relay 1 979141 | |||
| 4 | Control Transformer 1 979139 | |||
| 5 | Cover for Electrical Box 1 | |||
| 6 | Large Silicone Tube 1 979158 | |||
| 7 | Circuit Board Port 1 | |||
| 8 | Frame for Wire Holder 1 | |||
| 9 | Piston 4 979380 | |||
| 10 | Connecting Terminal 1 | |||
| 11 | Small Silicone Tube 1 979156 | |||
| 12 | Gas Shock 1 979356 | |||
| 13 | Lid Hinge 2 979552 | |||
| 14 | Lid Hinge Support | 2 | ||
| 15 | Screw and Nut | 2 979 | 357 | |
| 16 | Proximity Switch Seat | 1 979 | 354 | |
| 17 | Proximity Switch | 1 979 | 355 | |
| 18 | Pull Rod | 1 | ||
| 19 | Lid Hinge Pin | 2 | ||
| 20 | Small Silicone Tube 1 979156 | |||
| 21 | Combined Solenoid Valve | 1 979 | 560 | |
| 22 | Sealing Transformer | 1 979 | 540 | |
| 23 | Inner Inlet Ring | 1 | ||
| 24 | Inlet Ring 1 | |||
| 25 | Exhaust Tube | 1 | ||
| 26 | Through-Tube Connector | 1 | ||
| 27 | Vacuum Pump | 1 979 | 320 | |
| 28 | Bottom Plate | 1 | ||
| 29 | Wheel Casters | 4 979 | 395 | |
| 30 | Shoulder Bolt | 2 979 | 358 |
Notes
Limited Warranty
ARY, Inc. a distributor and manufacturer of vacuum packaging and other machines (collectively, the "Goods"), extends to the purchaser of the Goods a Limited One Year Warranty, from the receipt of the Goods, under terms and conditions set out herein.
All Goods sold by ARY, Inc. are warranted to be free from defects in material and workmanship at the time of delivery to purchaser. Defective material may be returned to ARY, Inc. after inspection by an agent of ARY, Inc. and upon receipt from ARY, Inc. of shipping instructions specific to the defective Goods authorized by ARY, Inc. to be returned. ARY, Inc. at its sole option, may either (i) replace or repair any defective materials and workmanship (and return the Goods to purchaser without charge), (ii) refund the purchase price, or (iii) grant a reasonable allowance with the foregoing procedure.
This warranty is subject to the following limitations:
i. ARY, Inc.'s responsibility and the purchaser's exclusive remedy under this warranty is limited to the repair or replacement of defects in material and workmanship, refund of the purchase price, or grant of a reasonable allowance on account of such defects, all as set forth above. ARY, Inc. is not responsible for any consequential damages resulting from the breach of this or any other express or implied warranty with respect to the Goods.
ii. This express warranty is the only warranty applicable. It excludes all other express oral or written warranties and all warranties implied by law with respect to the Goods, including any warranties or merchantability or fitness for a particular purpose.
iii. Every claim under this warranty shall be deemed waived by purchaser unless made in writing within one (1) year of the receipt of the Goods to which such claim relates.
iv. This warranty, as to the Goods, is void (a) to repairs made by anyone other than ARY, Inc. without prior authorization from ARY, Inc., (b) to performance of any system of which ARY, Inc.'s Goods are a component part, (c) to deterioration by corrosion or any cause of failure other than defect of material or workmanship, (d) to any components of the Goods, including, without limitation, Teflon tape, lid gaskets and seal wire, or (e) if any of the Goods or parts thereof have been tampered with or altered by someone other than ARY, Inc., or subjected to misuse, neglect, abuse, or misuse in application.
ARY, Inc.'s maximum liability hereunder, arising from any cause whatsoever, whether based in contract, tort (including negligence), strict liability, or any other theory of law, shall not exceed the purchase price. A suit based on any aforementioned cause of action must be commenced within one year from the date said action accrues.

A leading supplier of commercial products since 1939.
ARY, Inc.
P. O. Box 412888
Kansas City, MO 64141
800.821.7849
All Rights reserved. GameMaster ^™ , VacMaster ^® , VacStrip ^® , Total Freshness System ^™ and Commercial Culinary Concepts are trademarks or registered trademarks of ARY, Inc. in the United States and other countries.
Patent #5,239,808


- Congratulations on your purchase of the VacMaster® VP540 Chamber Machine!
- Use the VP540 to:
- STOP!!
- Adding Oil to Vacuum Pump
- Turn off and unplug machine to prevent electrocution.
- Packaging Information
- Getting Started with Vacuum Packaging
- Safety Precautions
- For your safety, follow these precautions when using your VacMaster® VP540:
- Features of VP540
- Operating Instructions
- Select the Pouch
- Plug in machine and switch power "ON"
- Adjust / Set Timing Controls
- Fill pouch and place in Chamber
- Close lid
- Process
- Remove pouch & inspect
- Additional Controls:
- Vacuum Gauge
- STOP Button
- Seal Bar Temperature Setting
- Changing/Replacing Oil in Vacuum Pump
- Vacuum Pump Maintenance
- Care, Maintenance & Troubleshooting
- Cleaning
- Maintenance
- Troubleshooting
- Limited Warranty
Brand : Vacmaster
Model : VP540
Category : Remplisseuse sous vide