
PRO360 - Remplisseuse sous vide Vacmaster - Free user manual and instructions
Find the device manual for free PRO360 Vacmaster in PDF.


| Product Type | External Suction Vacuum Sealer |
| Brand | Vacmaster |
| Model | PRO360 |
| Dimensions (L x W x H) | 19.25 x 11.5 x 6 inches (490 x 290 x 150 mm) |
| Net Weight | 16 lbs (7.3 kg) |
| Power Rating | 400W, 100-120V AC, 50/60Hz |
| Vacuum Power | Up to -0.85 Bar |
| Sealing Time (Vac/Seal) | 10-20 seconds |
| Sealing Time (Seal Only) | 6-10 seconds |
| Modes | Normal and Gentle |
| Food Settings | Dry and Moist |
| Special Functions | Pulse Vac, Marinate, Canister, Seal, Vac/Seal |
| Construction Material | Stainless Steel |
| Roll Cutter & Storage | Built-in, accommodates rolls up to 12" x 20' |
| Accessory Hose Port | Yes, for external canisters |
| Recommended Bags | VacMaster vacuum bags, rolls, and accessories |
| Cleaning Instructions | Wipe with clean, damp cloth and mild soap; do not immerse |
| Safety Features | Grounded plug, automatic shutoff, fuse protection |
| Warranty | 1-year limited warranty |
Frequently Asked Questions - PRO360 Vacmaster
User questions about PRO360 Vacmaster
0 question about this device. Answer the ones you know or ask your own.
Ask a new question about this device
Download the instructions for your Remplisseuse sous vide in PDF format for free! Find your manual PRO360 - Vacmaster and take your electronic device back in hand. On this page are published all the documents necessary for the use of your device. PRO360 by Vacmaster.
USER MANUAL PRO360 Vacmaster
Suction Vacuum Sealer
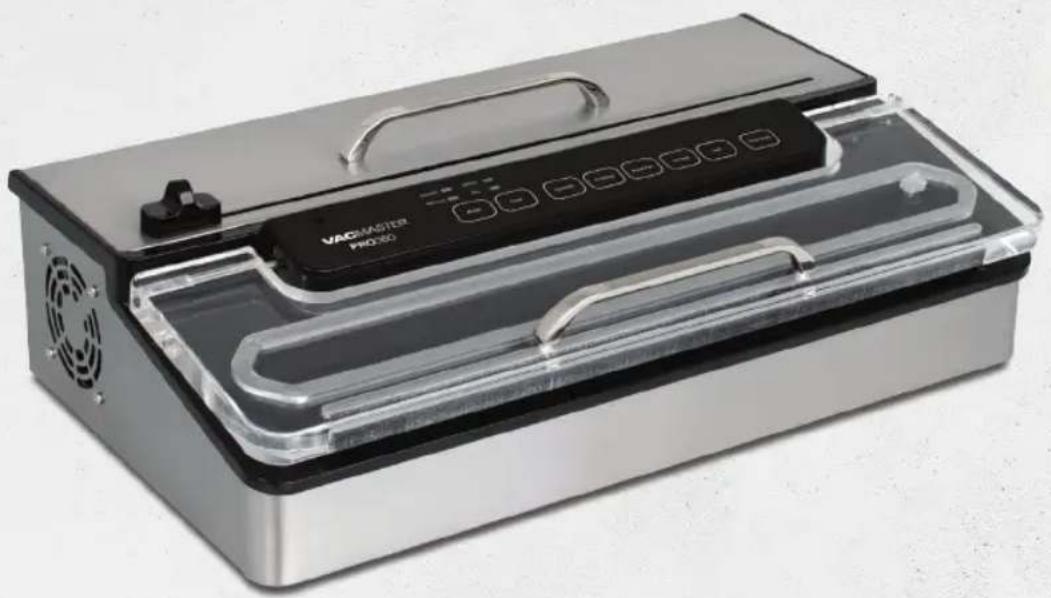
natural_image
Exterior view of a stainless steel vacuum cleaner with open lid and internal tray (no visible text or symbols)Welcome
Thank you for purchasing the VacMaster® PRO360 External Suction Vacuum Sealer. You are about to use one of the most powerful suction vacuum sealers available. With the help of the PRO360, you will now be able to keep food fresh for longer in the refrigerator, freezer or pantry. The PRO360 effectively removes air and extends freshness up to five times longer than traditional methods. Our versatile and convenient machine can also be used to preserve and organize other items, like keepsakes, or small and easy-to-lose items. Your PRO360 will quickly become invaluable to all your packaging needs; it will never leave your countertop.
The PRO360 combines a clean and simple style with a strong, compact design. This machine is fully automatic and features a variety of options that will fulfill all your packaging needs. Our machines are constructed with high-quality, fully tested, top-rated components which ensure optimum performance. Easy-to-clean, stainless steel construction will provide years of service.
For your safety and protection, carefully read and follow this guide.
For more information, please visit us at
www.VacMasterFresh.com
Contents
Safeguards....3
Tips....4
Features 5
Control Panel....6
How to Use ....7
Troubleshooting....11
Technical Specs....12
Cleaning and Care....13
Vacuum Packaging Guidelines....14
Warranty and Registration....15
Important Safeguards
For your safety, always follow these basic precautions when using a VacMaster® PRO360 Vacuum Sealer:
- Read this User's Guide carefully for operating instructions. Read all instructions in this User's Guide before use.
- Do not use the PRO360 on a wet or hot surface, or near a heat source.
- To protect against electrical shock, do not immerse any part of the vacuum sealer, power cord, or plug in water or any other liquid.
- Unplug the machine before cleaning or when not in use.
- To disconnect, unplug the power cord from the electrical outlet. Do not disconnect by pulling on the cord.
- Do not operate the PRO360 if it has a damaged cord or plug.
- Do not operate the PRO360 if it malfunctions or is damaged. Contact Customer Service at 800-821-7849.
- Use the PRO360 only for its intended use.
- Closely supervise children when using any electrical appliance. Do not allow the PRO360 to be used as a toy.
- The PRO360 has a grounded plug. Use only a grounded electrical outlet. To reduce risk of electrical shock, do not modify the plug in any way.
- Do not use an extension cord.
- The power cord should not drape over a counter or tabletop, as the cord could be tripped over or pulled on unintentionally.
- Do not place or operate near an electric or gas burner, or a heated oven.
- Extreme caution and care must be used when sealing or handling any bags containing hot liquids.
- Do not use outdoors.
SAVE THESE INSTRUCTIONS
Important Tips
□ Vacuum packaging is not a substitute for canning. All perishables still need to be refrigerated or frozen.
□ Follow all food safety regulations as outlined by the FDA at www.FDA.gov.
- Use only VacMaster® vacuum bags, rolls, containers and accessories.
☐ Some fruits and vegetables may release gases, known as outgassing. When packaging these fruits and vegetables, outgassing can cause the vacuum to be gradually lost over time. Blanching or freezing before vacuum packaging helps prevent this from occurring.
☐ Delicate foods can be frozen prior to packaging to protect them from getting crushed by the vacuum. If you are packaging fresh meats without pre-freezing, first dry the meat. Place a folded paper towel between the meat and the top of bag to help absorb any moisture.
☐ To vacuum package liquids, pre-freeze in a dish, bowl, or ice cube tray.
- Use VacMaster® Bone Guards to cover an item’s sharp edges to prevent bag punctures.
- Allow foods and liquids to cool before vacuum packaging.
☐ Avoid overfilling the bag. Leave at least 3" of space between the contents and the open end of the bag. This is called headspace. This allows room for the bag to tightly form around the content and will prevent the bag from pulling out of the vacuum chamber during the sealing process.
☐ To prevent wrinkles from forming in the seal, gently stretch the bag flat along the seal bar before closing the lid.
☐ When using accessories, leave at least 1" of space between the contents and the top of the container.
☐ Use a clean, damp cloth and mild soap to clean the PRO360.
- VacMaster® bags and rolls are boilable, freezable, and microwavable. When microwaving, it is important to pierce or make a small cut in the pouch.
PRO360 Features
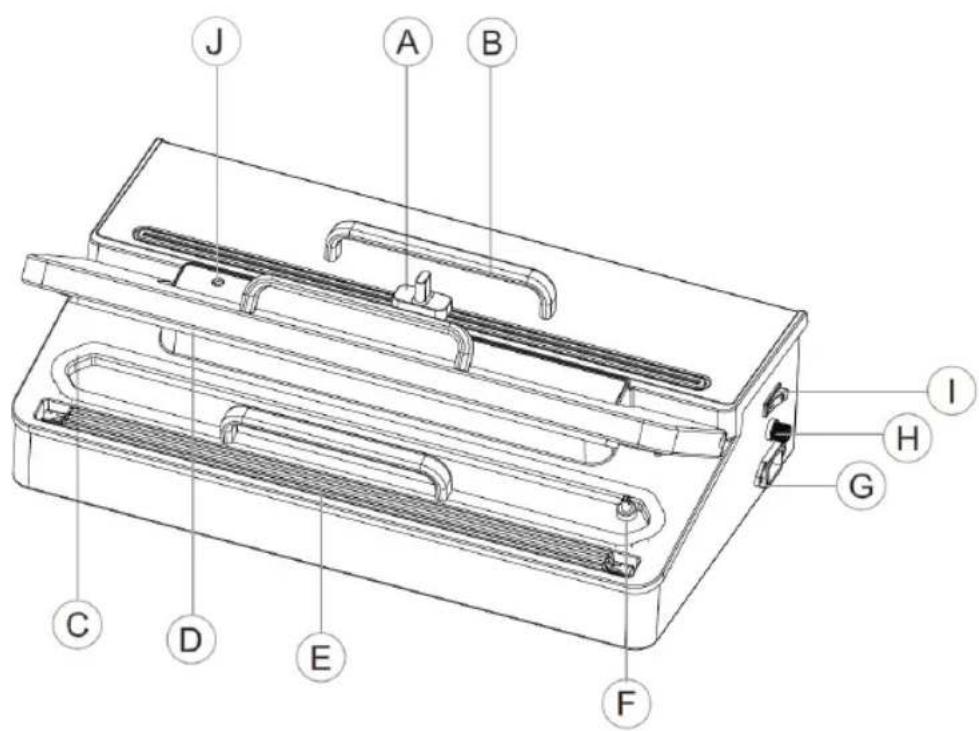
A Roll Cutter - Cuts rolls to the desired length.
B Roll Storage Compartment - Stores VacMaster ^ rolls up to 12" x 20'.
C Gasket - Seals out air between the vacuum chamber and lid.
D Rubber Lip - Makes seal flat.
E Seal Bar - Provides wide, positive seals.
F Vacuum Nozzle - Area where the vacuum process takes place.
G Power Plug Port - Power cord goes here.
H Fuse Base - Fuse holder rotates for easy fuse replacement.
I Power Switch - Press "I" to turn on, Press "O" to turn off.
J Hose Port - Can be used for vacuuming external containers.
PRO360 Control Panel
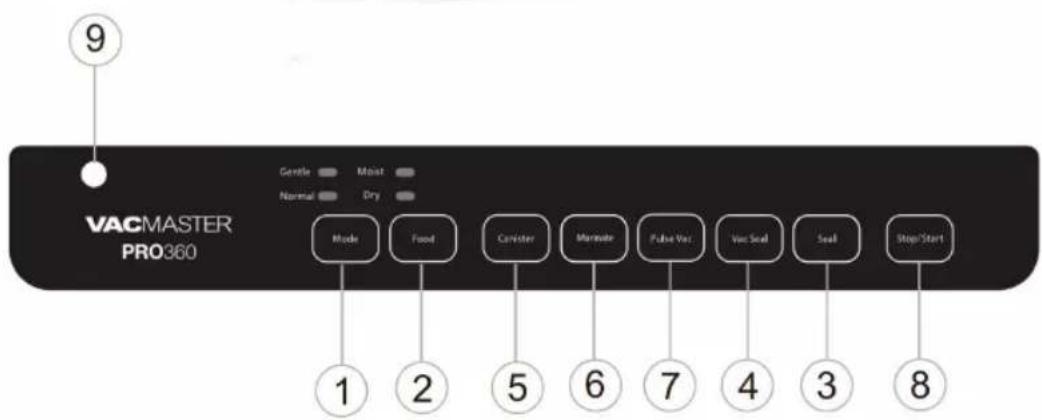
1 Mode Button Has two settings; "Normal" and "Gentle". Normal is the default mode for most applications. Gentle is for fragile foods like chips, pasta, certain fruits etc...
2 Food Button Has two settings; "Dry" and "Moist". Dry is the default for most applications. Moist is for more moist foods like stew, etc...
3 Seal Button Press this button to seal bag. 40 second intervals are recommended for optimal performance.
4 Vac/Seal Button Press this button to vacuum and seal bag. 40 second intervals are recommended for optimal performance.
5 Canister Button Press this button when using an external canister.
6 Marinate Button Press this button to marinate food via the vacuum process - get a great flavor in the shortest amount of time!
7 Pulse Vac Button Use this button to prevent crushing delicate items. Simply press once and then press again and hold to control the vacuum process manually.
8 Stop/Start Button Use this button to stop or start the vacuum process.
9 Accessory Hose Port Attach accessory hose here to vacuum canisters.
How to Use
Vacuum Packaging Pre-Cut Bags
Follow these steps when using precut vacuum packaging bags with your VacMaster® PRO360 Vacuum Sealer:
- Choose a suitable-sized vacuum packaging bag, and place the item(s) inside.
- Allow at least 3" of head space between the contents and the top of the bag.
- Using the handle, open the lid and place the open end of the bag across the seal bar, keeping the opening within the gasket area.
-
To ensure a complete seal make sure the bag is flat across the seal bar, smoothing out any wrinkles.
-
Close the lid.
-
Press the "Start" button to begin the vacuum process. Press and hold down the lid until the vacuum engages. NOTE: To prevent crushing delicate items, press the "Seal" button anytime to start the sealing process.
-
Once the bag is sealed, the machine will beep letting you know that the process is complete.
-
Open the lid. NOTE: DO NOT touch the Seal Bar area, as it may be hot after use.
-
Take the bag out and inspect the seal. A successful seal will look clear. If seal is spotty, incomplete, wrinkled, white or milky, cut the seal and repeat the vacuum sealing process.
TIP: Recommended seal time setting is 2.5 seconds
How to Use
Make a Bag from a Vacuum Roll
- Place the vacuum roll into the roll storage compartment. Press the buttons located on both sides of the machine to release the roll compartment lid. Insert the roll with the open end of material on top.
- Pull the roll material across the control panel.
- Close the lid and lower the roll cutter.
- Pull out the desired bag length. Leave at least 3" of space between the contents and open the end of the bag.
- Press down on the roll cutter and slice bag to desired length.
- Open the lid and place the open end of the bag across the seal bar, keeping the opening within the gasket area.
- Close the lid. Press the "Seal" button to create a seal. Hold down the lid until the vacuum engages.
- Follow instructions 3 - 9 under How to Use: "Vacuum Package Precut Bags" on page 6.
Package Delicate Items with Pulse
Delicate items, such as baked goods, fresh fruits, etc., can be crushed during the vacuum packaging process. To prevent this from occurring, use the "Pulse" vacuum function. When packaging liquid-rich items, you can also use this function to prevent liquid from being drawn into the machine.
- Follow instructions 1 - 4 under How to Use: "Vacuum Packaging Pre-Cut Bags" on page 7.
- Press the "Pulse" button once to activate this function. NOTE: The letter "P" will be displayed in the display window.
- Close and hold down the lid and press the "Pulse" button to begin the vacuum process. Watch the bag and release the "Pulse" button to stop the vacuum process before the contents are crushed or liquid is pulled into the machine.
- Press the "Seal" button to seal the bag.
- The machine will finish the cycle and then beep, indicating the sealing cycle is complete.
How to Use
Seal Only
To seal a bag without pulling a vacuum, use the "Seal" button on the Control Panel.
- Using the handle, open the lid and place the open end of the bag across seal bar.
- To ensure a complete seal make sure the bag is flat across the seal bar, smoothing out any wrinkles.
- Close and hold down the lid until the seal engages.
- Press "Seal".
- Once the bag is sealed, the PRO360 will beep letting you know that the seal cycle is complete.
Vacuum Seal with Canisters
Follow these steps when using storage canisters with your VacMaster® PRO360 Vacuum Sealer:
- Place the items to be sealed in the canister. Make sure the lid of the canister is dry and free of any food particles and debris. Do not overfill. Leave a minimum of 1" head space between the canister contents and the top of the canister.
- Place the lid on top of the canister. Turn the lid knob so the arrow points to "Vacuum".
NOTE: The lid sits on the rim of the canister until the vacuum packaging process begins.
- Insert one end of the Accessory Hose into the lid port and insert the other end into the Accessory Port on the PRO360.
- Press the "Accessory" button.
- When the vacuum process is complete the machine will "beep". Turn the lid knob to "Lock" position.
- Gently twist and remove the Accessory Hose from the canister and machine.
- To test the vacuum, tug on the canister lid. It should not move.
- Store the canister.
NOTE: Do not freeze the canister. Long term freezer storage in canisters will result in a loss of vacuum.
How to Use
Marinate Food with Canisters
Your PRO360 has a special marinating feature that allows foods to quickly achieve the optimum flavor infusion. While in the Marinate cycle, the PRO360 will alternate back and forth between a state of vacuum and state of rest.
NOTE: One cycle is 9 minutes (8 minutes vacuum and 1 minute rest with no vacuum). Each cycle after will add an additional 9 minutes. Marinate cycle can range from 9 minutes (one cycle) to 99 minutes (11 cycles) based on desired intensity of flavor.
- Place the food and marinade in the canister. Ensure the rim of the canister is clean and dry, and no food or liquid has been spilled on the lid.
- Turn the lid knob to "Open".
NOTE: During the Marinate cycle the knob on the canister must be in the "Open" position. - Insert one end of the Accessory Hose into the lid port and insert the other end of the Accessory Hose into the Accessory Port on the PRO360.
- Press the "Set" button to select Marinate Time.
- Using the arrow buttons to adjust Up or Down, set the marinating time (9 to 99 minutes).
- With the lid in the closed position, press the "Start" button. With the vacuum pump running, push down on the canister to ensure the vacuum is engaged.
- Your PRO360 will alternate between vacuuming and releasing air.
NOTE: The display will show both the remaining cycle time and a blinking light signaling the cycle is in process. - When the Marinate cycle is complete, the machine will "beep" and release the vacuum.
- Gently twist and remove the Accessory Hose from the canister and the machine.
NOTE: The Marinate cycle can be cancelled by pressing the "Stop" button.
For storage reference, follow "How to: Vaccum Seal with Canisters" on page 9.
Troubleshooting
☐ The PRO360 will not turn ON:
a. Make sure the unit is plugged into a grounded outlet.
b. Make sure the outlet is working.
c. Check the power cord for any tears or frays.
d. Check the fuse located in the power cord connecting outlet.
☐ The bag is not sealing properly:
a. Push and hold down the lid during the vacuum cycle.
b. Increase or decrease the Seal Time. A positive seal will look clear. If the seal is spotty, incomplete, wrinkled, white or milky, cut the seal and restart the sealing process.
c. When vacuum packaging moist / wet foods, create a second seal above the first seal to ensure a positive seal.
d. For the best results, use VacMaster ^® bags and rolls.
☐ Loss of vacuum from the bag:
a. Check for any puncture holes in the bag. Cover any sharp item edges with a VacMaster ^® Bone Guard sheet and vacuum package in a new bag.
b. Check the seal and adjust the placement and/or sealing time.
Technical Specs
Rated Voltage 100-120V AC
Rated Power 400W
Rated Frequency 50/60Hz
VAC/Sealing Time 10-20 Seconds
Sealing Time 6-10 Seconds
Vacuum Power Up to -0.85 Bar
Dimensions (L x W x H) 19.25" x 11.5" x 6" / 490mm x 290mm x 150mm
Net Weight 16 lbs / 7.3kg
Gross Weight 17.6 lbs / 8.0kg
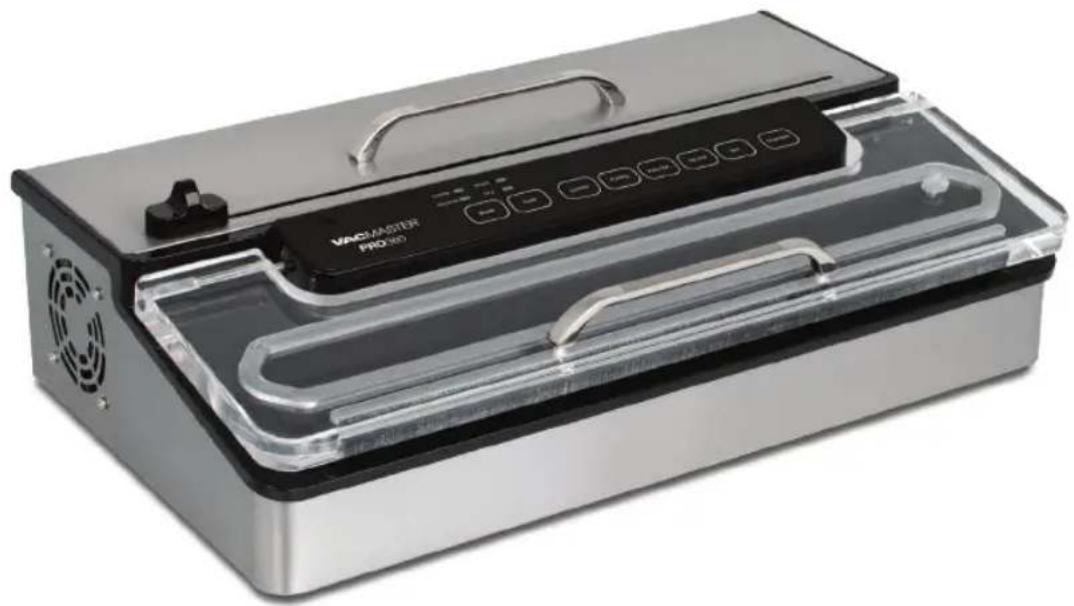
natural_image
Exterior view of a stainless steel vacuum cleaner with open lid and internal tray (no visible text or symbols)Cleaning & Care
☐ Disconnect the power cord from the electrical outlet by unplugging it. DO NOT disconnect by pulling on the cord.
☐ DO NOT immerse in water or spray directly with liquid.
☐ Check the Vacuum Chamber and Gasket making sure they are clean and free of debris. If needed use a clean cloth with mild soap.
a. Wipe the vacuum chamber clean.
b. Wipe the gasket clean.
c. Wipe the seal area clean.
NOTE: Always leave the lid in resting position when storing. DO NOT stack items on top of the lid or machine. If the lid is closed or forced down, the gasket will become compressed and the PRO360 may not operate properly.
☐ DO NOT store the PRO360 outside.
Packaging Guidelines
□ Follow all food safety regulations as outlined by the FDA at www.FDA.gov
□ Vacuum packaging is NOT a substitute for canning.
□ Vacuum packaging cannot reverse the deterioration of foods.
□ Vacuum packaging is NOT a substitute for refrigeration or freezing.
☐ Some fruits and vegetables may release gases, known as outgassing. When packaging these fruits and vegetables, outgassing can cause the vacuum to be gradually lost over time. Blanching or freezing before vacuum packaging helps prevent this from occurring.
NOTE: Due to the risk of anaerobic bacteria, soft cheeses, fresh mushrooms, garlic and onions should never be vacuum packaged.
☐ It is critical that food handling and storage are maintained at low temperatures. You can reduce the growth of microorganisms at temperatures of 40^ F or less ( 4^ C). Freezing at 0^ F will not kill microorganisms, but reduces the chances of them growing. For long-term food storage, always freeze foods that have been vacuumed packaged.
NOTE: Beef and other proteins may look darker after being vacuum packaged. This is due to the removal of oxygen and is not an indication of spoilage.
Before vacuum packaging liquids such as soups, stews, and broths, make sure to pre-freeze in a dish, bowl or ice tray until solid. Remove the frozen liquid and vacuum package. Store in your freezer until ready to use.
Limited Warranty
ARY, Inc., a distributor and manufacturer of vacuum packaging and other machines (collectively, the "Goods"), extends to the purchaser of the Goods a Limited One Year Warranty, from the receipt of the Goods, under terms and conditions set out herein.
All Goods sold by ARY, Inc. are warranted to be free from defects in material and workmanship at the time of delivery to purchaser. Defective material may be returned to ARY, Inc. after inspection by an agent of ARY, Inc. and upon receipt from ARY, Inc. of shipping instructions specific to the defective Goods authorized by ARY, Inc. to be returned. ARY, Inc. at its sole option, may either (i) replace or repair any defective materials and workmanship (and return the Goods to purchaser without charge), (ii) refund the purchase price, or (iii) grant a reasonable allowance with the foregoing procedure.
This warranty is subject to the following limitations:
i. ARY, Inc.'s responsibility and the purchaser's exclusive remedy under this warranty is limited to the repair or replacement of defects in material and workmanship, refund of the purchase price, or grant of a reasonable allowance on account of such defects, all as set forth above. ARY, Inc. is not responsible for any consequential damages resulting from the breach of this or any other express or implied warranty with respect to the Goods.
ii. This express warranty is the only warranty applicable. It excludes all other express oral or written warranties and all warranties implied by law with respect to the Goods, including any warranties or merchantability or fitness for a particular purpose.
iii. Every claim under this warranty shall be deemed waived by purchaser unless made in writing within one (1) year of the receipt of the Goods to which such claim relates.
iv. This warranty, as to the Goods, is void (a) to repairs made by anyone other than ARY, Inc. without prior authorization from ARY, Inc., (b) to performance of any system of which ARY, Inc.'s Goods are a component part, (c) to deterioration by corrosion or any cause of failure other than defect of material or workmanship, (d) to any components of the Goods, including, without limitation, Teflon tape, lid gaskets and seal wire, or (e) if any of the Good or parts thereof have been tampered with or altered by someone other than ARY, Inc., or subjected to misuse, neglect, abuse, or misuse in application.
ARY, Inc.'s maximum liability hereunder, arising from any cause whatsoever, whether based in contract, tort (including negligence), strict liability, or any other theory of law, shall not exceed the purchase price. A suit based on any aforementioned cause of action must be commenced within one year from the date said action accrues.
Register your product and get support at
www.VacMasterFresh.com/warranty.htm
A Product of
VACMASTER®
P.O. Box 412888
Kansas City, MO 64141
www.VacMasterFresh.com
800.821.7849
All Rights Reserved. VacMaster ^® is a trademark or registered trademark of ARY, Inc. in the United States and other countries.


- Suction Vacuum Sealer
- Welcome
- Contents
- Important Safeguards
- SAVE THESE INSTRUCTIONS
- Important Tips
- PRO360 Features
- PRO360 Control Panel
- How to Use
- Vacuum Packaging Pre-Cut Bags
- Make a Bag from a Vacuum Roll
- Package Delicate Items with Pulse
- Seal Only
- Vacuum Seal with Canisters
- Marinate Food with Canisters
- Troubleshooting
- Technical Specs
- Cleaning & Care
- Packaging Guidelines
- Limited Warranty
- VACMASTER®
Brand : Vacmaster
Model : PRO360
Category : Remplisseuse sous vide