
12160 - DJ Equipment Konig & Meyer - Free user manual and instructions
Find the device manual for free 12160 Konig & Meyer in PDF.


| Product Type | DJ Equipment Stand |
| Brand | Konig & Meyer |
| Model | 12160 |
| Material | Steel |
| Finish | Powder-coated black |
| Load Capacity | 20 kg |
| Height Adjustable | Yes |
| Height Range | 70 – 120 cm |
| Foldable | Yes |
| Weight | 5 kg |
| Dimensions (folded) | 60 x 40 x 10 cm |
| Color | Black |
| Assembly Required | No (tool-free) |
| Compatible Devices | DJ mixers, turntables, laptops, controllers |
| Surface Protection | Rubber anti-slip pads |
| Warranty | 2 years |
| Country of Origin | Germany |
| Usage Environment | Indoor, dry |
Frequently Asked Questions - 12160 Konig & Meyer
User questions about 12160 Konig & Meyer
0 question about this device. Answer the ones you know or ask your own.
Ask a new question about this device
Download the instructions for your DJ Equipment in PDF format for free! Find your manual 12160 - Konig & Meyer and take your electronic device back in hand. On this page are published all the documents necessary for the use of your device. 12160 by Konig & Meyer.
USER MANUAL 12160 Konig & Meyer
The generous DJ tabletop offers space for a large variety of studio or DJ equipment. The DJ desk can also be used for many other purposes, among other things as desk or side table. The height adjustment makes the DJ desk adaptable for different needs, therefore providing an ergonomic workplace. The parquet protector compensates uneven flooring and ensures a safe stand.
Foreseeable misapplication
It is not allowed to exceed the maximum load capacity. Height adjustments should be carried out without any loads.
General
▶ The DJ desk should stand on a level and stable surface.
▶ Make sure that both legs are extended equally.
The spring-loaded clamping knobs should be kept close throughout use. Always adjust the height or dismantle the tabletop without any equipment.
▶ Should the DJ desk tip over this may result in personal injury and material damage.
▶ Due to the adjustment possibilities, there is the risk of squeezing between the components.
▶ The user must be physically fit and technically competent.
The usage information is an integral part of the product and should be kept for its service life or passed on to any subsequent owner or user.

Warranty
No warranty is given for damage caused by:
▶ Non-observance of the usage information and the "General safety and assembly instructions".
▶ Unsuitable or improper use.
▶ Incorrect installation or commissioning by the buyer or third parties.
▶ Natural wear and tear.
▶ Careless handling.
▶ Improper modifications or repair work by the buyer and third parties.
▶ Impact on components of foreign origin.
▶ Use of non-original spare parts.
Modifications, additions and conversions that may impair safety are prohibited without the manufacturer's approval.
Technical data
| Material | base frame, U-frame, support tube: Steel powder-coated, blackCarriage bolt, washer, bolt, screw: Steel, galvanisedEnd caps, housing, spacer plate, clamping nut: Plastic, blackFelt pad: Felt, blackTabletop: MDF, black laminated |
| Load capacity 30 kg | |
| Dimensions and adjustment range | 1100 x 455 x 605 mmHeight: 605 - 1055 mm in 30 mm increments |
| Packaging | Base frame: 970 x 630 x 75 mmTabletop: 1184 x 454 x 37 mm |
| Weight 13.5 kg |
Mounting
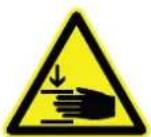
!Due to the adjustment option, there is a risk of crushing between the components!
1.) Unpack and check product for damage and completeness.

1 Accessory bag: Carriage bolt, clamping nut, washer, felt pads.
2 Accessory bag: Spring-loaded clamping knob.
3 Tabletop with quick-release clamps, support tubes.
4 U-frame, base frame.
2.) Assembly of base frame
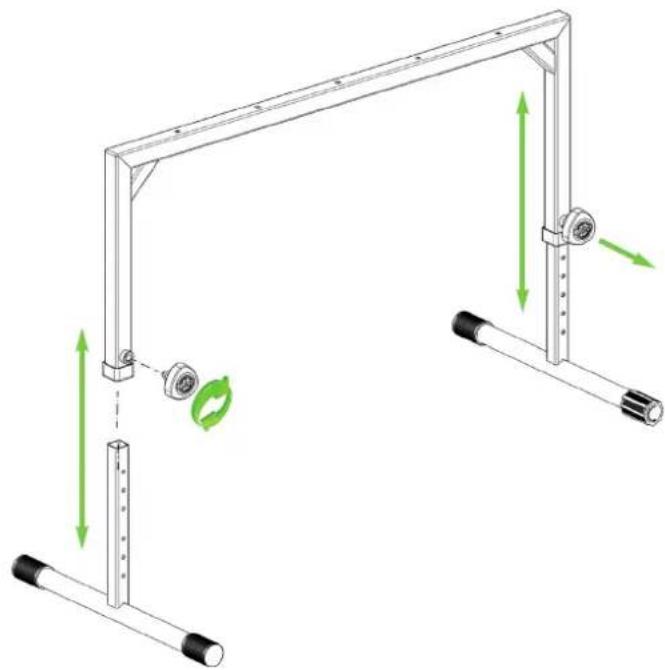
Screw spring-loaded clamping knobs into the U-frame with approx. five turns. Slide the base frame into the U-frame. Make sure that the holes in the base frame point in the direction of the locking screw. Tightening the spring-loaded clamping knobs to fix the height of the base frame.
PLEASE NOTE: In order to be able to slide the base frame into the U-frame, the spring-loaded clamping knob must be drawn backwards. By pulling the handle, the fastening bolt releases the tube. Set the desired height, release the spring-loaded clamping knob and make sure that the fastening bolt engages in a hole. Tighten the spring-loaded clamping knob hand-tight. If the base frame cannot be pushed into the U-frame despite pulling the spring-loaded clamping knob, then the clamping handle should be slightly unscrewed.
3.) Mounting the tabletop
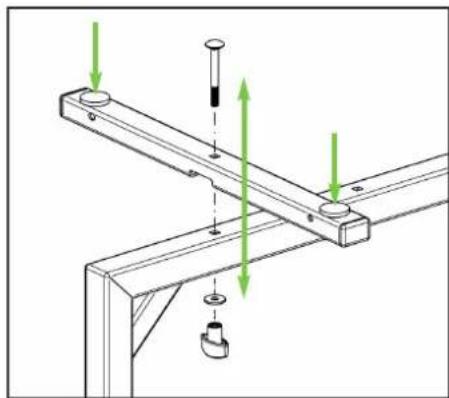
To assemble the tabletop, the support tubes must be screwed onto the U-frame. For this, place the support tube on the U-frame with the recess facing downwards. Insert the carriage bolt from above through the support tube and the U-frame. Screw the carriage bolt from below with the washer and the clamping nut. Tighten the clamping nut hand-tight. Repeat the procedure with the second support tube on the other side.
Stick two felt pads on the top of each support tube.

To place the tabletop, the four quick-release clamps must be "opened", by pressing the red button on the quick-release clamps. The locking pin snaps back and the tabletop can be mounted or dismounted. Place the tabletop on the support tubes and secure it with the support tubes by pressing the locking pins. Make sure that the locking pins are inserted into the holes and bolted.
Please note: If the locked tabletop has too much space on the U-frame, proceed as follows: Open the clamping screw from the support tube, pull the support tube outwards and close the clamping screw again. Same procedure on the opposite side.
Maintenance, cleaning and repair
▶ Maintenance: Regularly check if the screw connections are tight.
▶ Cleaning: Use a slightly damp cloth to clean the DJ desk. Do not use chlorinated or abrasive cleaning agents. These will cause damage to the surface and varnish.
▶ Repair: Immediately repair any damage that occurs and stop using the DJ desk. Maintenance work may only be carried out if you have the necessary knowledge. If any parts are missing, contact the manufacturer at www.k-m.de. Here you can find a corresponding spare parts list by entering the article number on the type label. Use this page to reorder missing or damaged components.
Fault and troubleshooting
| Fault/cause Check/Remedy | |
| Base tubes cannot be locked/secured | Check whether the holes of the base frame point in the direction of the spring-loaded clamping knobs. |
| Support tubes wobble or have space | Check the screw connection and tighten the clamping nut hand-tight. |
| Tabletop wobbles or is not firm | Check if all four quick-release clamps are fully engaged.View the position of the four felt pads. |
Storage, disposal
Store the DJ desk in a dry place.
Recycle disassembled components:
▶ Scrape all components made of metal.
▶ Recycle or reuse all plastic, paper, and cardboard components.
▶ Sort all other components according to material composition and dispose of them according to local regulations.
Contact information


Brand : Konig & Meyer
Model : 12160
Category : DJ Equipment