
M3603C-USB - Microscope Swift - Free user manual and instructions
Find the device manual for free M3603C-USB Swift in PDF.


| Product Type | Compound Microscope |
| Brand | Swift |
| Model | M3603C-USB |
| Magnification Range | 40X to 1000X (with 10X eyepiece and 4X/10X/40XRD/100XRD objectives) |
| Eyepiece Magnification | 10X with Pointmaster reticle |
| Objectives | 4X (0.10 NA), 10X (0.25 NA), 40XRD (0.65 NA), 100XRD (1.25 NA oil immersion) |
| Illumination | Built-in 0.5W LED (Part MA14788) |
| Illuminator Control | Variable intensity control |
| Focusing System | Coaxial coarse and fine focus knobs |
| Stage | Standard stage with stage clips (mechanical stage optional) |
| Condenser | Abbe condenser with iris diaphragm |
| Camera Port | Top port for digital camera (requires optional C-mount lens MA15604) |
| Power Source | AC adapter (4.5V) for cordless models; direct AC for corded models |
| Battery Life (Cordless) | Approximately 40 hours |
| Charging Time | Approximately 8 hours for initial charge |
| Warranty | Limited Lifetime Warranty (subject to conditions) |
| Standards | DIN (Deutsche Industrial Norman) objectives |
| Includes | Microscope, dust cover (recommended) |
Frequently Asked Questions - M3603C-USB Swift
User questions about M3603C-USB Swift
0 question about this device. Answer the ones you know or ask your own.
Ask a new question about this device
Download the instructions for your Microscope in PDF format for free! Find your manual M3603C-USB - Swift and take your electronic device back in hand. On this page are published all the documents necessary for the use of your device. M3603C-USB by Swift.
USER MANUAL M3603C-USB Swift
M3600 Series Instruction Manual
Motic Swiftline 3600 Series
natural_image
Close-up of a robotic arm performing a medical procedure with a blue tool and paper nearby (no visible text or symbols)Stage Clips
Microscope Components
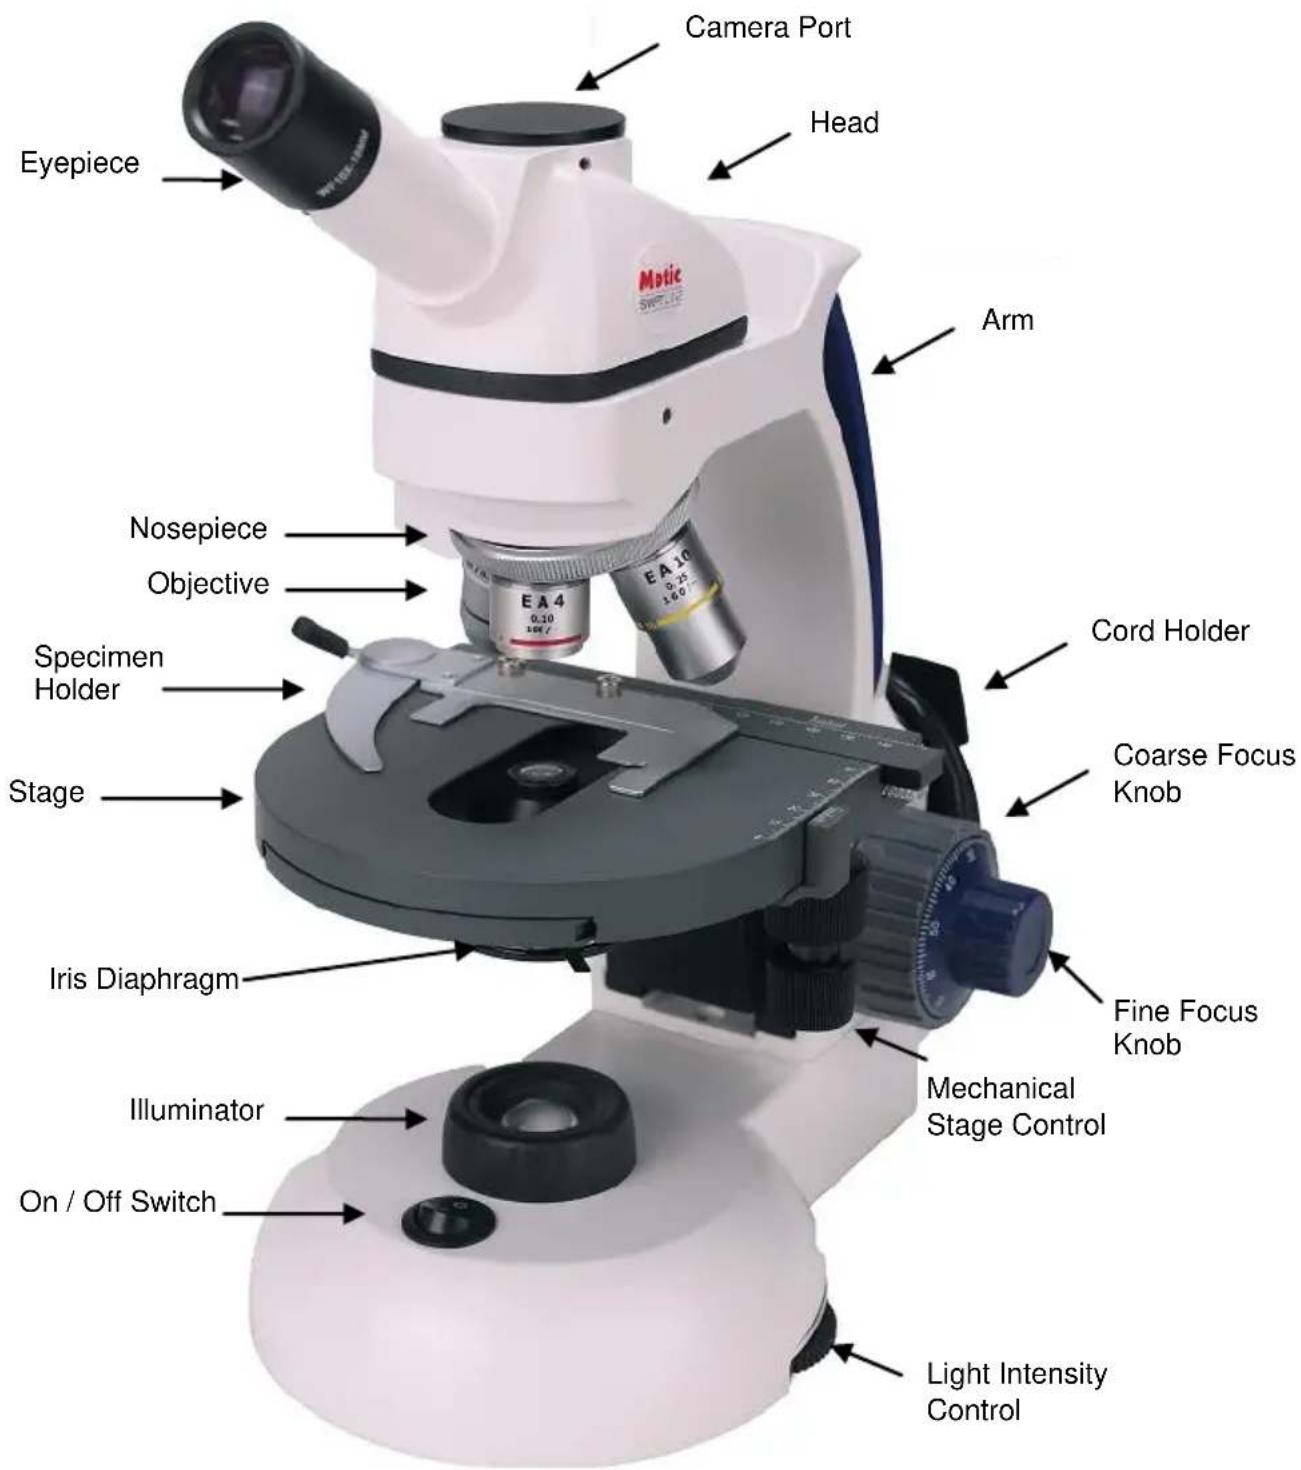
ARM - the vertical column (attached to the base) which supports the stage and contains the coarse and fine adjusting knobs and focusing mechanism.
BASE - the housing and platform of the instrument to which the arm is attached. The base stands on rubber feet and contains the illuminator assembly. The bulb replacement part number is printed on the underside of the base.
COARSE FOCUS CONTROL - the larger focus control knob located on either side of the microscope which facilitates rapid and heavy movement of the focusing mechanism.
COAXIAL CONTROLS - the focusing mechanism moves the stage up and down to bring the specimen into focus. The coaxial focusing system combines both the coarse and fine focus into one knob located on both sides of the microscope. The control is designed for a continuous operation over the range of the stage movement.
CONDENSER - the condenser is mounted in the stage and it is used in conjunction with the iris diaphragm. The function of the condenser is to provide full illumination to the specimen plane and to enhance the resolution and contrast of the object being viewed. The condenser can be raised and lowered for precise light control.
CORD HOLDER (Corded models only) - the bracket installed on the back of the arm which is used to wrap and store the electrical cord.
EYEPIECES - the upper optical element that further magnifies the primary image of the specimen and brings the light rays in focus at the eye point.
FINE FOCUS CONTROL - the fine focusing knobs, located on either side of the microscope, on the sides of the coaxial focusing control. They are used for precise focusing adjustments once the specimen has been brought into view with the coarse focus controls.
HEAD - the top portion of the microscope that contains the refracting prisms and the eyepiece tube. The eyepiece is locked onto the eyepiece tube with a set screw
CAMERA PORT - the top portion of the microscope is equipped with an optional camera port. This port allows the end user to attach a digital camera (such as a Moticam), with the purchase of the optional C-Mount camera lens (MA15604). Ask your microscope dealer for details. To remove the cap, a 1.5mm hex wrench is will be required (not provided).
ILLUMINATOR - the built-in light source which provides the optical system with light.
ILLUMINATOR INTENSITY CONTROL - Controls the illuminator's brightness.
IRIS DIAPHRAGM - a round multi-leaf device mounted below the condenser which is controlled by a lever. It is similar to a camera shutter and controls the amount of light entering the condenser, allowing the user to control contrast.
MECHANICAL STAGE - an alternative to stage clips is a mechanical stage. A mechanical stage holds the slide in place, allowing the user to move the slide on any x/y axis through the manipulation of two control knobs or a co-axial control mechanism.
NOSEPIECE - the revolving turret that holds the objective lenses, permitting changes in magnification by rotating different powered objective lenses into the optical path. The nosepiece must “click” into place for the objectives to be in proper alignment.
OBJECTIVES - the DIN objectives are standard in the industry, with large numerical aperture (N.A.) to permit maximum resolution. All objectives are color-coded and parfocaled. The 40XRD and the 100XRD are sealed to keep oil residue from seeping into the objective. These two objectives have a spring loaded tip to prevent accidental breakage of either the slide or front lens of the objective if they should come into contact with each other.
ON/ OFF SWITCH - turns the illuminator on or off.
STAGE - the table of the microscope where the slide is placed for viewing. This component moves upward and downward when the focusing knobs are turned.
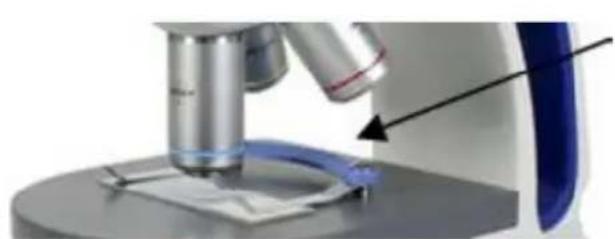
STAGE CLIPS - a pair of flexible metal clips attached by spring screws that hold the slide in position on the stage.
IMPORTANT MICROSCOPY TERMS
APERTURE, ANGULAR - the angle (or cone) of light rays capable of entering the front lens of the objective from a point in the object. By increasing the angular aperture of an objective, more light rays from the specimen can be taken in by the lens; hence the resolving power is increased.
COMPOUND MICROSCOPE - a microscope having a primary magnifier (the objective) and a second (the eyepiece) to both conduct light, amplify magnification and convert the image into a field of view easily seen by the human eye.
COVER GLASS - thin glass cut in circles, rectangles or squares, for covering the specimen, usually a thickness of 0.15 to 0.17mm. The majority of specimens should be protected by a cover glass, and must be covered when using 40XRD or 100XRD objectives.
DEPTH OF FOCUS - the ability of a lens to furnish a distinct image above and below the focal plane. Depth of focus decreases with the increase of numerical aperture or with the increase of magnification.
DIN - (Deutsche Industrial Norman) an international optical standard for the manufacturing of most quality microscope lenses. Many DIN lenses will be interchangeable from one DIN microscope to another.
EYE POINT or EYE RELIEF - the distance from the eyepiece lens to your eye where a full field of view can be seen.
FIELD OF VIEW - the area of the object seen when the image is observed. It may range in diameter from several millimeters to less than 0.1mm.
FOCAL LENGTH - parallel rays of light after refraction through a lens will converge to a focus at the focal point. The distance from the optical center of the lens to the focal point is the focal length.
NUMERICAL APERTURE (NA) - a measure of an objective's light gathering capabilities. The concept may be compared to the F-valve in photographic lenses. Generally speaking, objectives with N.A. values of less than 1.00 are "Dry" objectives. Values of 1.00 or greater require oil as a medium. Please note that condensers are part of the optical system and are also assigned an N.A. value. That value must be at least as high as that of the highest objective used.
PARFOCAL - a term applied to objectives and eyepieces when practically no change in focus has to be made when an objective of one power is substituted for another. The DIN objectives on your Swift M3600 Series Microscope are parfocaled at the factory to a standard 45mm distance, so that only a slight turn of the fine adjustment is required when a change is made from a lower to higher power.
RESOLVING POWER - the ability of a lens to clearly separate fine detail. Resolving power is directly proportional to the numerical aperture of the optical system.
WORKING DISTANCE - the distance from the lens of the objective to the cover slip on the slide, when the specimen is in focus.
CORDLESS OPERATION (Cordless models)
The rechargeable battery should be fully charged for approximately 8 hours before the initial use. It can be charged by using the 4.5 volt A/C adapter included with the microscope. The battery can be used to
power the illumination system for approximately 40 hours. If the microscope is used in the same location, the A/C adapter can remain plugged-in without damage to the battery or recharging system.
A battery power indicator meter is located in the front of the base. Each blue LED light indicates the level of remaining battery power. When the battery is fully charged, all 5 LED lights will be illuminated. The battery will need to be recharged when there is only 1 illuminated LED remaining on the meter.
USING YOUR SWIFT MICROSCOPE
- Use the stage clips or slide holder mechanism to secure the slide in place. Be sure the specimen is centered over the opening in the stage.
- Rotate the nosepiece to place the lowest power (4X) objective over the specimen. Be sure the objective “clicks” into position.
- Turn on the illumination by pressing the on/off switch towards "1"
- Open the iris diaphragm to its largest aperture.
- While viewing through the eyepiece(s), rotate the coarse focus knob slowly and carefully to bring the specimen into focus. The specimen may require some centering in the field of view at this time. By using the fine focusing knob, slowly and carefully refine the focus to clearly observe the fine details of the specimen.
- If the image of the specimen appears pale, the aperture of the iris diaphragm should be slowly closed until the details of the specimen are sharply defined. If the specimen appears dark, slightly open the diaphragm.
Please note: a smaller iris diaphragm aperture (opening) increases the contrast in the image while a larger aperture decreases the contrast. (The diaphragm is not intended for controlling the brightness of the illumination). A good procedure to follow in selecting the proper opening is to start with a large aperture and reducing it until the fine detail of the specimen is in exact focus. Using an inappropriate aperture results in a “washing out” of the image. Care must be exercised not to reduce the aperture too much to gain high contrast, as then the fine structure in the image of the specimen will be destroyed. Reducing the aperture increases contrast and depth of focus, but it also reduces resolution and causes diffraction. Example: The aperture for the 10X objective will not be the same as for the 40XRD objective, since the angle of the required light is determined by the numerical aperture (N.A.) of the objective. The proper aperture of the diaphragm can be easily achieved after minimal experience with the microscope.
- Rotate the nosepiece to the next higher power objective. A slight turn of the fine focusing knob may be required to bring the image of the specimen into sharp focus. Once the specimen is in focus with the highest power objective, it will be in focus with each lower power objective.
OIL IMMERSION (Only for models with a 100X objective)
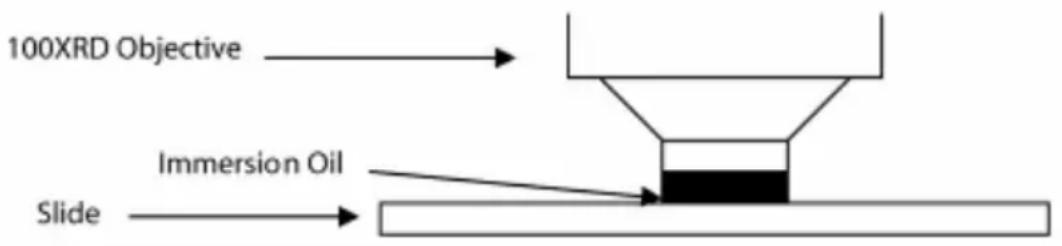
When light rays pass through air from the specimen to the objective lens, they are distorted slightly, a phenomenon known as refraction. This is usually not a problem at a magnification of 400X or lower. However, at a magnification of 1,000X and above, refraction becomes problematic. This problem is reduced significantly by placing a thin layer of very clear, viscous oil between the slide and tip of the objective lens. The result is a much clearer image at 1,000X because the oil has the same light transmitting properties as glass. Using oil slightly increases the resolution and brightness of the image. Usually a very thin slide (size #1) is used for oil immersion because at this magnification, the working distance is very small and is critical to focusing the specimen. Good quality glass (not plastic) cover slips should be used. If their thickness is over 0.17mm, the objective will not resolve properly, because the specimen cannot be moved close enough to the objective lens to be in focus.
Place a tiny amount of oil (only 1 drop should be sufficient) onto the slide prior to rotating the 100XRD objective into position. It is essential to thoroughly clean the objective tip after use to prevent damage and to ensure that an image can be seen clearly the next time the objective is used.
IMPORTANT: The working distances of the 40XRD and 100XRD objectives to the slide surface are very small and although these objectives are sealed to prevent oil contamination, it is a good practice to avoid dragging these objectives through an oiled slide. The 100XRD oil immersion lens on Swift microscopes has a spring-loaded end to prevent cracking the cover slip upon its initial contact. Once this zone of safety is exceeded by moving the slide further toward the lens, a point can be reached where damage will occur. Always make a practice of frequently checking the position of the lens on the slide. Note that a 100XRD objective requires an iris diaphragm for brightfield oil immersion microscopy.
HOW TO USE THE POINTMASTER® EYEPIECE RETICLE
Swift's patented POINTMASTER® eyepiece reticle, which is installed in the eyepiece of the microscope, enables the user to easily measure the size of the specimen
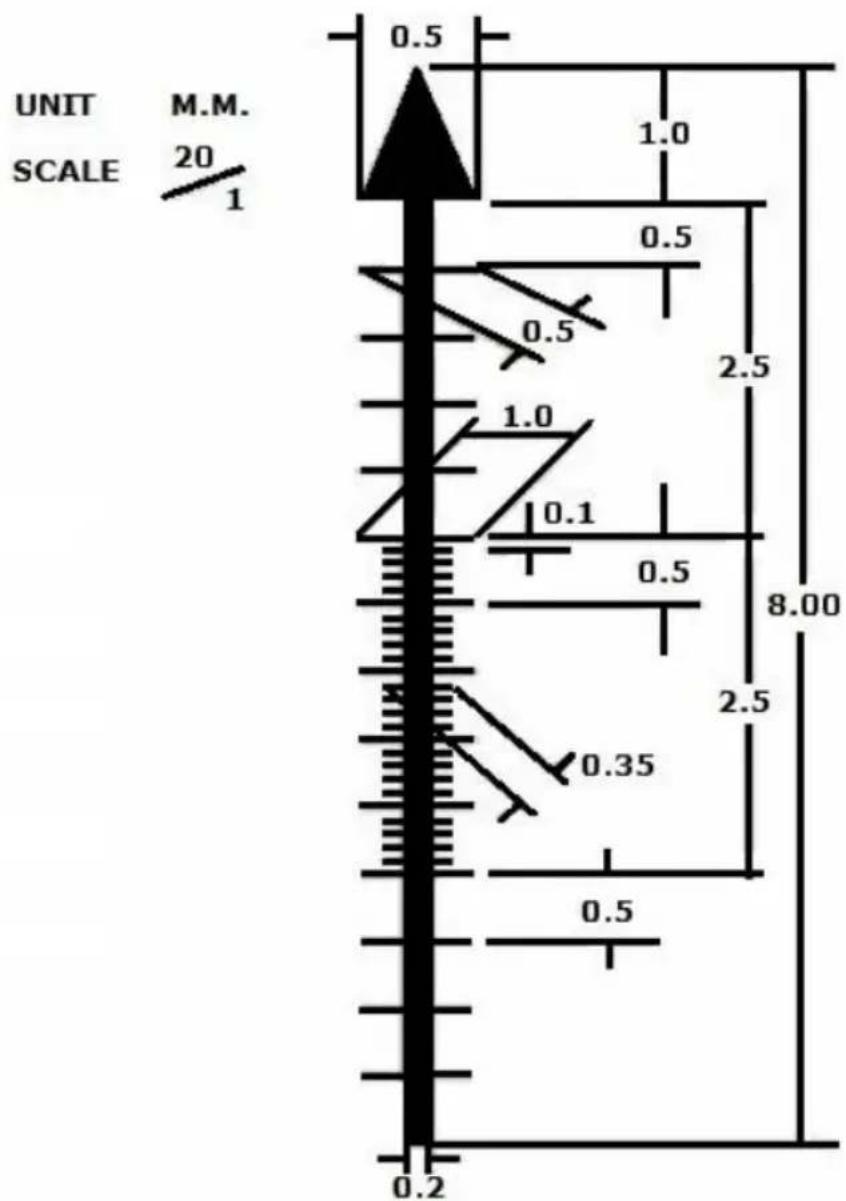
I. The numbers on the chart indicate the actual size of the POINTMASTER® scale in millimeters. For example, the length is 1.0mm from the top of the arrow to the bottom; the total length of the scale is 8.0mm, etc. The thickness of all the horizontal lines is 0.01mm.
- To obtain the actual physical size of a specimen, divide the POINTMASTER® scale readings by the magnification of the objective lens that is in use. Divide the readings by 10 if the 10X objective is being used, 40 if the 40XRD objective is in use, or 100 if of 100XRD is in use.
other
| Dimension | Value | | --------- | ----- | | Top Left | 0.5 | | Top Right | 1.0 | | Bottom Left | 0.5 | | Bottom Right | 2.5 | | Bottom Right | 8.00 | | Bottom Left | 0.35 | | Bottom Right | 2.5 | | Bottom Right | 0.5 | | Bottom Left | 0.2 | | Scale | M.M. 20 / 1 | UNIT | 20 |ADDING A DIGITAL CAMERA TO TOP CAMERA PORT
The top port of your M3600 series microscope allows the attachment of a digital camera, such as the Moticam camera. The purchase of an optional C-mount camera lens is necessary for the conversion (MA15604).
- First take your Moticam camera and remove the dust cap from the bottom of the camera, being careful not to introduce dust.
- Then take the MA15604 C-mount lens and attach it to the Moticam camera. Then set to the side.
- Remove the top camera port cover of the microscope, by loosening the three 1.5mm hex screws. 1.5mm hex wrench purchased separately.
- Take the Moticam with attached C-Mount and slide down into the open top camera port.
- Tighten the three 1.5mm hex screws back around the C-mount to secure it in place.
- Then follow the camera instructions.
CARE AND CLEANING
Motic Swiftline microscopes are designed to function with minimal maintenance, but certain components should be cleaned frequently to ensure ease of viewing. The power switch should be turned off or the microscope should be unplugged when not in use.
CLEANING - The front lens of the objectives (particularly the 40XRD and 100XRD) should be cleaned after use. The lens surface may be gently cleaned with a soft camel hair brush, or blown off with clean, oil-free air to remove dust particles. Then wipe gently with a soft lens tissue, moistened with optical cleaner (eyeglass or camera lens) or clean water. Immediately dry with a clean lens paper.
CAUTION - Objectives should never be disassembled by the user. If repairs or internal cleaning should be necessary, this should only be done by qualified, authorized microscope technician. The eyepiece(s) may be cleaned in the same manner as the objectives, except in most cases optical cleaner will not be required. In most instances breathing on the eyepiece to moisten the lens and wiping dry with a clean lens tissue is sufficient to clean the surface. Lenses should never be wiped while dry as this will scratch or otherwise mar the surface of the glass.
The finish of the microscope is hard epoxy and is resistant to acids and reagents. Clean this surface with a damp cloth and mild detergent.
Periodically, the microscope should be disassembled, cleaned and lubricated. This should only be done by a qualified, authorized microscope technician.
DUST COVER AND STORAGE - All microscopes should be protected from dust by a dust cover when in storage or not in use. A dust cover is the most cost-effective microscope insurance you can buy. Ensure that the storage space is tall enough to allow the microscope to be placed into the cabinet or onto a shelf without making undue contact with the eyepieces. Never store microscopes in cabinets containing chemicals which may corrode your microscope. Also, be sure that the objectives are placed in the lowest possible position and the rotating head is turned inward and not protruding from the base. Microscopes with mechanical stages should be adjusted toward the center of the stage to prevent the moveable arms of the mechanical stage from being damaged during storage in the cabinet.
LED REPLACEMENT - To prolong the life of the bulb you should always turn off the unit when not in use. The replacement LED part number can be found underneath the microscope on the metal base plate. The M3600 models use a .5W LED (Part Number MA14788).
COMMON PROBLEMS IN MICROSCOPY
CAUTION - Never disassemble mechanical or optical components. This servicing should only be done by an authorized Swift technician. The Limited Lifetime Warranty will be null and void if the mechanical or optical components are disassembled by a non-Swift dealer.
A. PROBLEM - No Illumination
CORRECTION -
- Is the power plug connected to an active A.C. outlet?
- Is the on/off power switch working properly?
- Turn the illuminator rheostat to a brighter setting.
- Check the bulb. Try a new bulb if you have one.
B. PROBLEM - Illumination "hot spots" and uneven brightness in the field of view.
CORRECTION -
- Is the Abbe condenser in the correct position?
- Is the nosepiece and objective clicked into proper position?
C. PROBLEM - Image appears "washed out" or weak.
CORRECTION -
- Slightly close the diaphragm to a smaller aperture
- Objective lens is dirty. See “Care and Cleaning” Section.
- Eyepiece is dirty. See “Care and Cleaning” Section.
D. PROBLEM - Dust or hairs seem to be moving in the image.
CORRECTION - The iris diaphragm is not open wide enough. Slowly open the diaphragm to increase the size of the opening allowing for additional illumination.
E. PROBLEM - Once the specimen is in focus, it moves out of focus.
CORRECTION - Gravity is causing the stage to drift downward, causing loss of focus. The focusing tension should be increased to act as a brake to prevent this downward drift
F. PROBLEM - Focusing knobs turn with difficulty.
CORRECTION -
- Loosen the tension collar adjustment. See page 10.
- The microscope should be disassembled, cleaned and re-lubricated by a qualified, authorized technician.
Motic®
Motic Hong Kong Limited (HONG KONG)
Unit 2002, L20, TowerTwo, Enterprise Square Five, 38 Wang Chiu Road, Kowloon Bay, Kowloon, Hong Kong Tel: 852-2837 0888 Fax: 852-2882 2792
Motic Instruments Inc. (CANADA)
130-4611 Viking Way Richmond, B.C.
V6V 2K9 Canada Tel: 1-877-977 4717
Fax: 1-604-303 9043
Wetzlar, Germany Tel: 49-6441-210
010 Fax: 49-6441-210 0122
Motic Europe (SPAIN)
C. Les Corts 12, Pol. Ind. Les Corts. 08349 Cabrera de Mar, Barcelona, Spain Tel: 34-93-756 6286 Fax 34-93-756 6287
Motic Hong Kong Limited Copyright © 2010-2017. All Rights Reserved.
Design Change : The manufacturer reserves the right to make changes in instrument design in accordance with scientific and mechanical progress, without notice and without obligation.
- M3600 Series Instruction Manual
- Motic Swiftline 3600 Series
- Microscope Components
- IMPORTANT MICROSCOPY TERMS
- CORDLESS OPERATION (Cordless models)
- USING YOUR SWIFT MICROSCOPE
- OIL IMMERSION (Only for models with a 100X objective)
- HOW TO USE THE POINTMASTER® EYEPIECE RETICLE
- ADDING A DIGITAL CAMERA TO TOP CAMERA PORT
- CARE AND CLEANING
- COMMON PROBLEMS IN MICROSCOPY
- CORRECTION -
- Motic®
Brand : Swift
Model : M3603C-USB
Category : Microscope