
BH620 - Uncategorized Baumr-AG - Free user manual and instructions
Find the device manual for free BH620 Baumr-AG in PDF.


| Product Type | Backhoe |
| Brand | Baumr-AG |
| Model | BH620 |
| Engine Type | 4-stroke, single cylinder, petrol |
| Fuel Type | Unleaded non-ethanol petrol |
| Engine Oil Type | SAE 10W-30 (recommended) |
| Engine Oil Capacity | Approximately 0.6 L |
| Hydraulic Working Pressure | 16 MPa |
| Hydraulic Oil Type | ISO 46 or equivalent |
| Hydraulic Oil Capacity | Approximately 12 L |
| Swivel Range | 120° |
| Maximum Digging Depth | 2040 mm (7 ft) |
| Maximum Digging Arc | 2560 mm (8.4 ft) |
| Maximum Bucket Height (Loaded) | 1400 mm (4.6 ft) |
| Tow Coupling Size | 50 mm (2 in) |
| Wheel Diameter | 16 in |
| Safety Features | Travel safety pins, spark arrestor (if required), chain guards |
| Maintenance Schedule | Check oil, tires, hoses before each use; change engine oil every 20 hours; replace hydraulic oil annually |
| Warranty | See manual; improper use voids warranty |
| Included Manual Languages | English (EN) |
Frequently Asked Questions - BH620 Baumr-AG
User questions about BH620 Baumr-AG
0 question about this device. Answer the ones you know or ask your own.
Ask a new question about this device
Download the instructions for your Uncategorized in PDF format for free! Find your manual BH620 - Baumr-AG and take your electronic device back in hand. On this page are published all the documents necessary for the use of your device. BH620 by Baumr-AG.
USER MANUAL BH620 Baumr-AG
[Revision 7.0 October 2022]
READ THIS MANUAL CAREFULLY BEFORE USE – FAILURE TO DO SO MAY RESULT IN INJURY, PROPERTY DAMAGE AND MAY
VOID WARRANTY. • KEEP THIS MANUAL FOR FUTURE REFERENCE. • Products covered by this manual may vary in appearance,
assembly, inclusions, specifications, description, and packaging
Safety
- Read this User Manual completely before attempting to use this backhoe.
- Before you dig, contact applicable authorities or utility suppliers to locate any buried cables, pipes etc. Do not dig until you have fully investigated the area. Use extreme caution when overhead power lines or buried gas and water pipes etc are present.
- Make sure the backhoe is on a level surface with no more than 10^ incline. Block the machine wheels as required to prevent unintended movement. Do not operate on or near excessively soft terrain or inclines that may not provide adequate support.
- Do not allow anyone to operate the backhoe who has not read this manual or has not been instructed on safe operation of the backhoe.
- Never allow children or untrained adults to operate this machine.
- Never allow anyone to ride on the backhoe while towing.
• Never transport cargo on the backhoe. - High fluid pressures are developed in the hydraulic system. Pressurized fluid escaping though a pin hole opening can puncture skin and cause severe blood poisoning. The following safety warnings and instructions should be followed at all times.
- Never operate the unit with frayed, kinked, cracked or damaged hoses, fittings, or tubing.
- Stop the engine and release hydraulic system pressure before leaving the backhoe unattended or servicing fittings, hoses, tubing, or other system components.
- Do not adjust the pressure settings of the pump or control valve.
- Do not check for leaks with your hand. Leaks can be located by passing cardboard or wood over the suspected area. Look for discoloration. If injured by escaping fluid, see a doctor at once. Serious infection or reaction can develop if proper medical treatment is not administered immediately.
- Keep the operator zone and adjacent areas clear for safe digging.
- Be thoroughly familiar with all controls and with the proper use of the equipment.
- Always wear safety shoes or boots, safety glasses or goggles and approved safety headgear when operating the machine.
• Always wear protective hearing devices when operating the machine. - Never wear jewelry or loose fitting clothing that might become entangled in moving or rotating parts of the machine.
- Use extreme caution when operating near structures, power lines, gas and water pipes etc, or when other workers are present.
- Do not straddle trenches with the machine. Move the machine back and away from the trench as you dig.
- If the machine is intended for use near forest, brush, grass or flammable greenery or material, the engine exhaust should be equipped with a spark arrestor. Make sure you comply with applicable local, state, and federal codes. Have appropriate fire-fighting equipment on hand.
- The machine should be used for digging and trenching only. Do not use for other purposes.
- Never modify the machine or any part of its manufactured design or safety mechanisms.
• Machine assembly requires 2 or more persons. - Always operate the backhoe from the operator seat with hands positioned near valve controls and feet flat on the area provided.
-
Handle fuel with care; it is highly flammable.
-
Use approved fuel containers.
• Never add fuel to a running or hot engine. - Fill fuel tank outdoors and with extreme care. Never fill fuel tank indoors.
- Replace fuel cap securely and clean up spilled fuel before starting the engine.
- Only use the backhoe in daylight or adequate artificial light.

DANGER

Running petrol engines in confined areas CAN KILL IN MINUTES. Engine exhaust fumes contain carbon-monoxide – a deadly gas that you cannot smell or see.
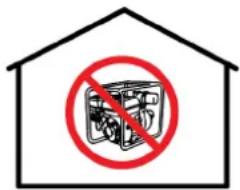
NEVER run a petrol engine in confined areas EVEN IF windows and doors are open. ONLY run petrol engines OUTDOORS and away from doors, windows and vents.
Do not operate the equipment in hazardous locations, such as where there may be a risk of fire or explosions from flammable liquids, gases or dust.
Do not operate the equipment in confined areas where exhaust gases, smoke or fumes could reach dangerous concentrations.
Do not refuel petrol engines while they are running.
Never smoke while refuelling petrol engines.
For generators, the electrical output is potentially lethal and must only be connected to a fixed electrical installation by an appropriately licensed person.
Be aware that the equipment may include hazardous components, such as blades, hot surfaces and moving parts.
Table of Contents
Safety 2
Assembly 5
Engine Oil 9
Hydraulic Oil....10
Towing the Backhoe....11
Preparing the Backhoe for Digging and Trenching....12
Operation....14
Maintenance and Troubleshooting ....16
Specifications....19
Assembly
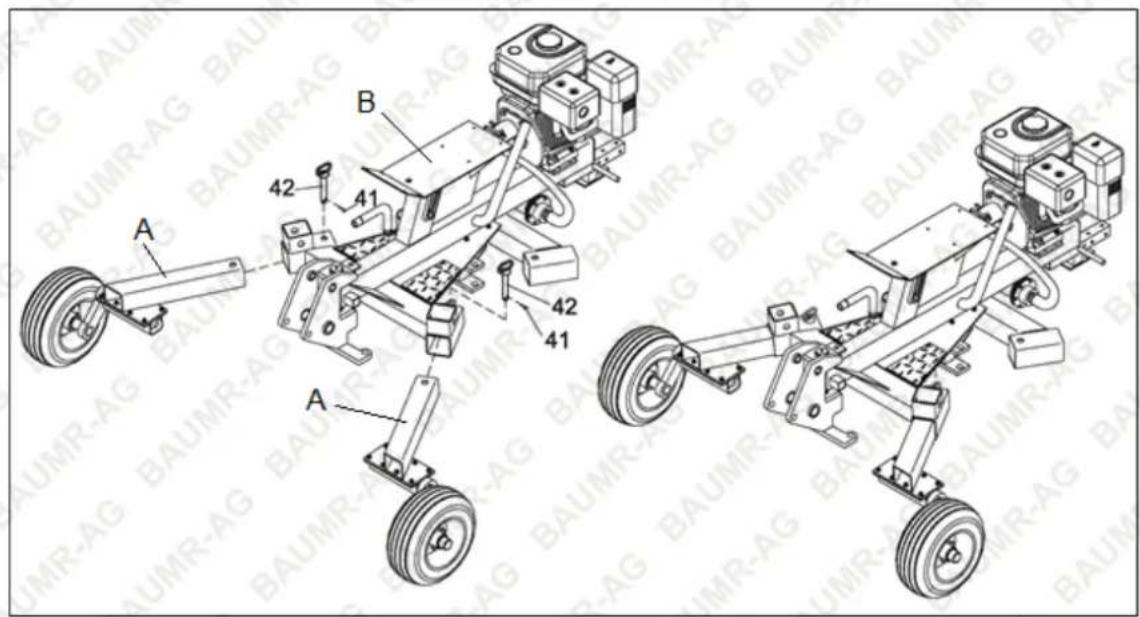
Step 1: Assemble Wheel Arms
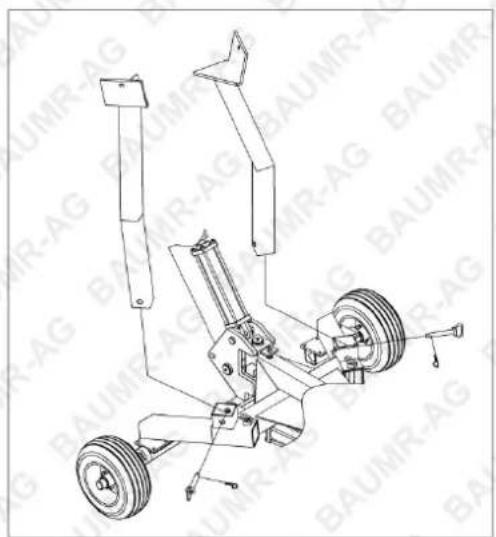
- Insert each wheel arm assembly (A) into the backhoe frame (B), then insert a locating pin (42) through frame and wheel arm. Secure each locating pin with an R-pin (41).
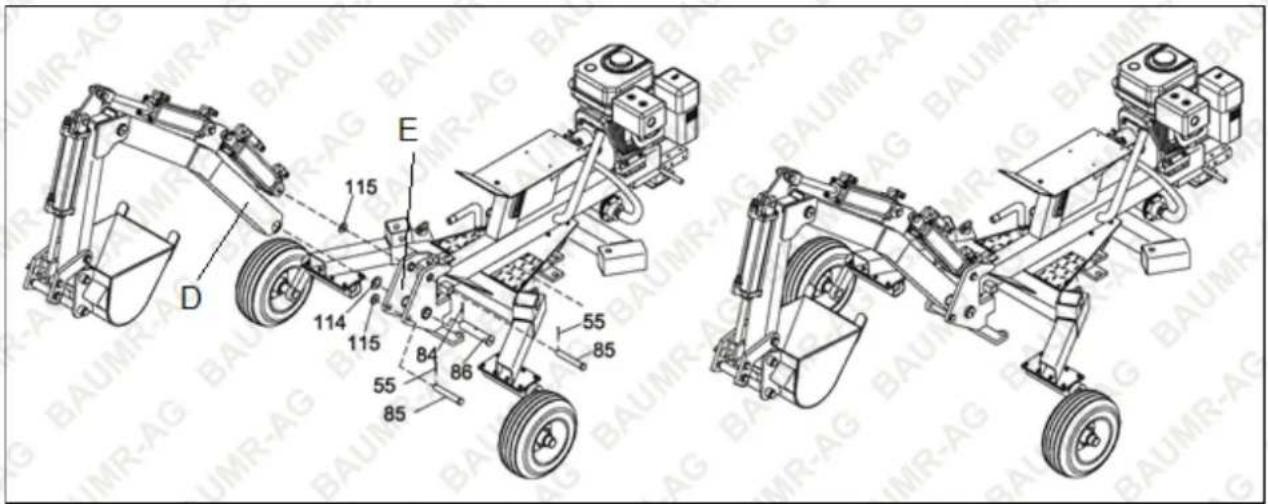
Step 2: Assemble the Boom and Stick
- Connect the stick (digging arm) assembly (C) to the excavator boom assembly (D) using the pivot pin (86), ∅38 flat washer (114). Secure the pivot pin with cotter pin (84).
- Connect the hydraulic cylinder on the boom to the stick using ∅30x97mm pin (63) and ∅24 flat washer (115). Secure the pin with ∅4x50mm cotter pin (55).
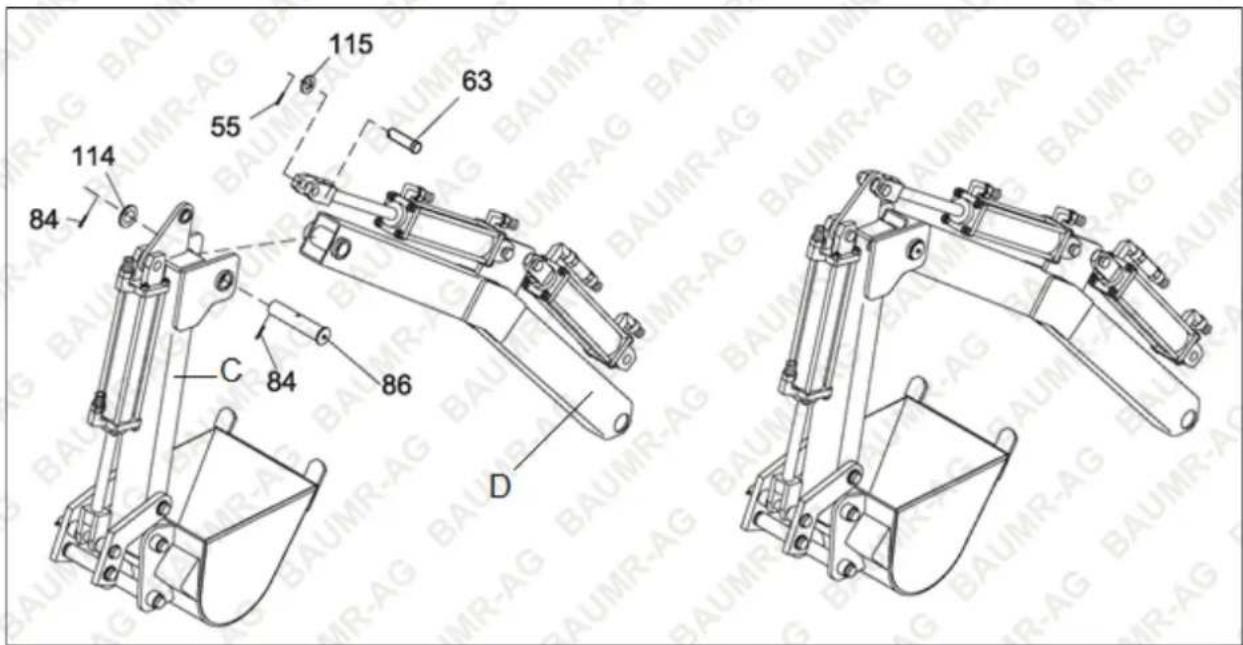
- Attach the boom (D) to the boom swivel (E) using pivot pin (86) and ∅38 flat washer (114). Secure the pivot pin with cotter pin (84).
- Secure the boom assembly to the backhoe frame using a ∅30x170mm pin (85) and ∅24 flat washer (115). Secure the pin with ∅4x50 cotter pin (55).
Note: Pin (85) is a safety device to prevent the boom moving when the machine is not in use. Remove it before using the machine and re-insert it when finished.
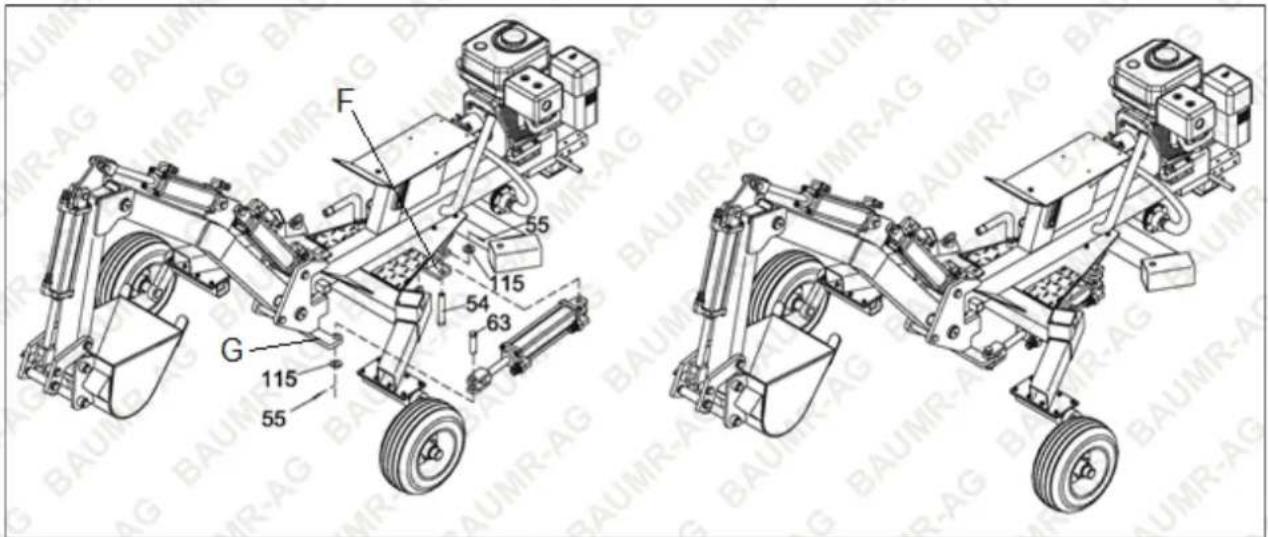
Step 3: Attach the Swivel Hydraulic Cylinder.
- Attach the hydraulic cylinder (59) to the backhoe frame bracket (F) using a ∅30x124mm pin (54) and ∅24 flat washer (115). Secure the pin with ∅4x50mm cotter pin (55).
- Connect the hydraulic cylinder (59) to the base of the boom swivel (G) by using a ∅30x97mm pin (63) and ∅24 flat washer (115). Secure the pin with ∅4x50mm cotter pin (55).
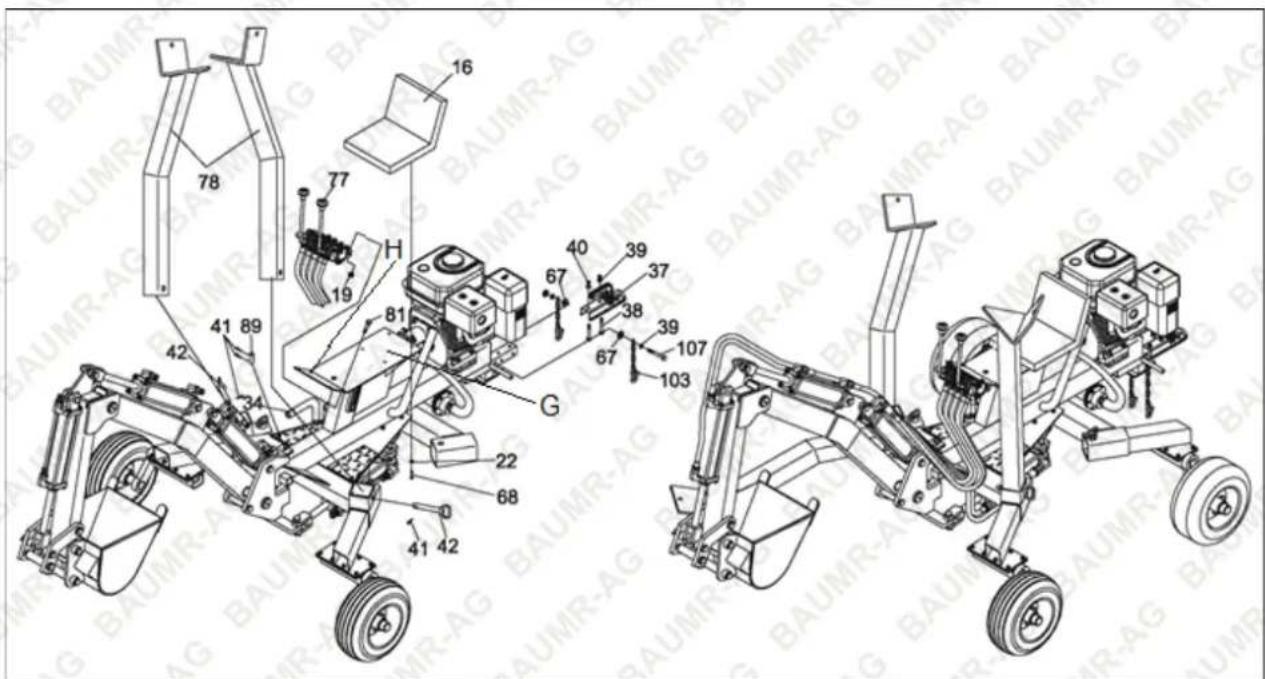
Step 4: Assemble Seat, Control Valve and Coupler
- Attach the seat (16) to the seat plate (G) using 5/16x3/4" bolts (68), ∅8 flat washers (21) and ∅8 lock washers (22).
- Attach the boom control assembly (77) to the boom control plate (H) using M10x20 bolts (81) and M10 lock nuts (19).
- Insert each outrigger (78) into the square tube, then secure each with a pin (42) and ∅3x55mm R-pin (41).
- Insert the ∅19x50mm pin (89) into the backhoe frame and secure it with R-pin (41).
- Attach the coupler (37) to the tow bar by using M12x80mm bolts (38), M12 flat washers (39) and M12 lock nuts (40).
- Attach the two chains (103) to the tow bar by using M12x90mm bolts (107), M12 flat washers (39), thick M12 flat washers (67) and M12 lock nuts (40).
Note: Pin (89) is a safety device to prevent the boom swivelling when the machine is not in use. Remove it before using the machine and re-insert it when finished.
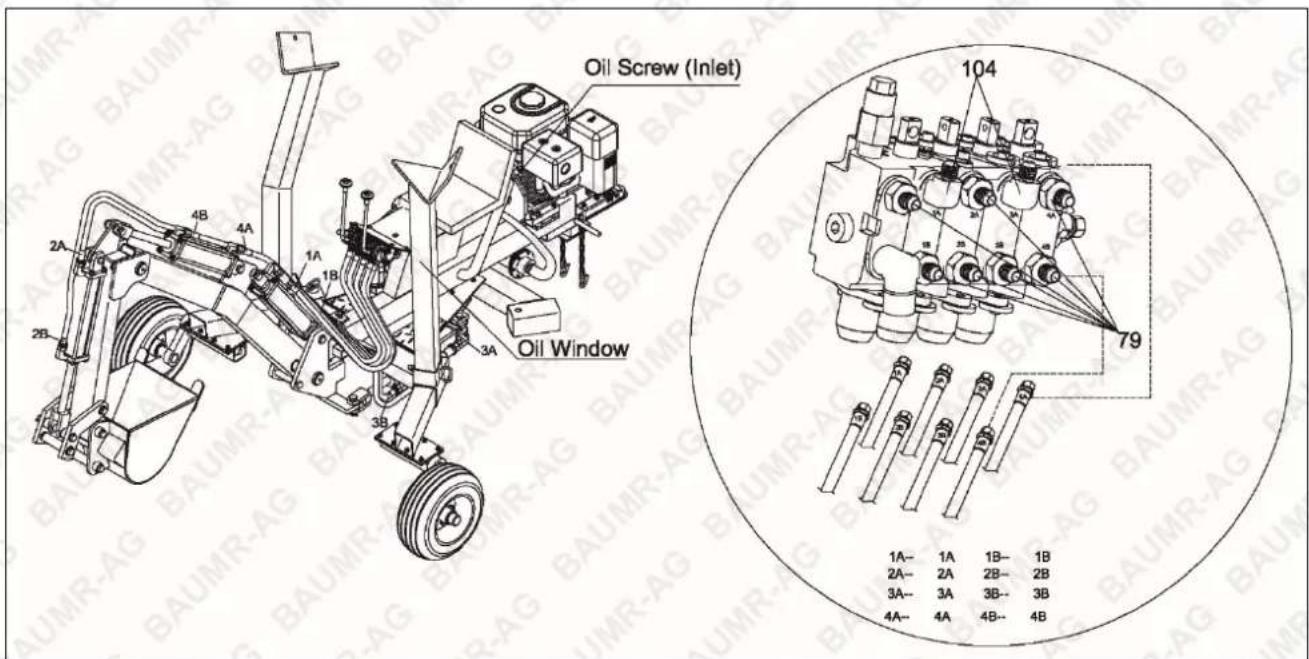
Step 5: Connect the Hydraulic Hoses
- Attach the hydraulic hose 1A to valve 1A (as shown on hose and valve labels).
- Attach the Hydraulic hose 1B to valve 1B (as shown on hose and valve labels).
- Connect other hoses according to the labelling.
Note: Attach hose 1A and 1B along the right-hand side of the boom. Attach all other hoses along the left-hand side of the boom. Secure all hoses to the boom using the supplied hose clamps.
Spare parts available for purchase, scan QR code below:


Engine Oil


Engines are NOT supplied with engine oil, although traces of oil from the manufacturing process may be present. It is essential to add adequate engine oil of the correct type to the engine before use. Failure to add engine oil will void the product warranty. • Always check engine oil level when the machine is in an upright position on a flat and level surface. • Do not use used or contaminated engine oils. • Use only engine oils of the correct type (see Specifications). • Perform the first oil change within the first 20 hours of use. Subsequently, change the oil every 20 hours of use. • It is recommended that the engine be warm, but not hot, when performing oil changes. When the oil is warm it drains faster. • Using dirty or incorrect engine oil may cause engine damage and void any warranty • Always use suitable tools. • Always dispose of used oil in an environmentally responsible manner and according to regulations. • Some engines feature oil level detection, which will prevent the engine being started or automatically stop a running engine if there is insufficient oil. • Always check the oil level and ensure is at or near the "MAX" indicator before using the machine. • Some models may have 2 oil drain plugs and fillers on either side of the engine – it does not matter which one is used.
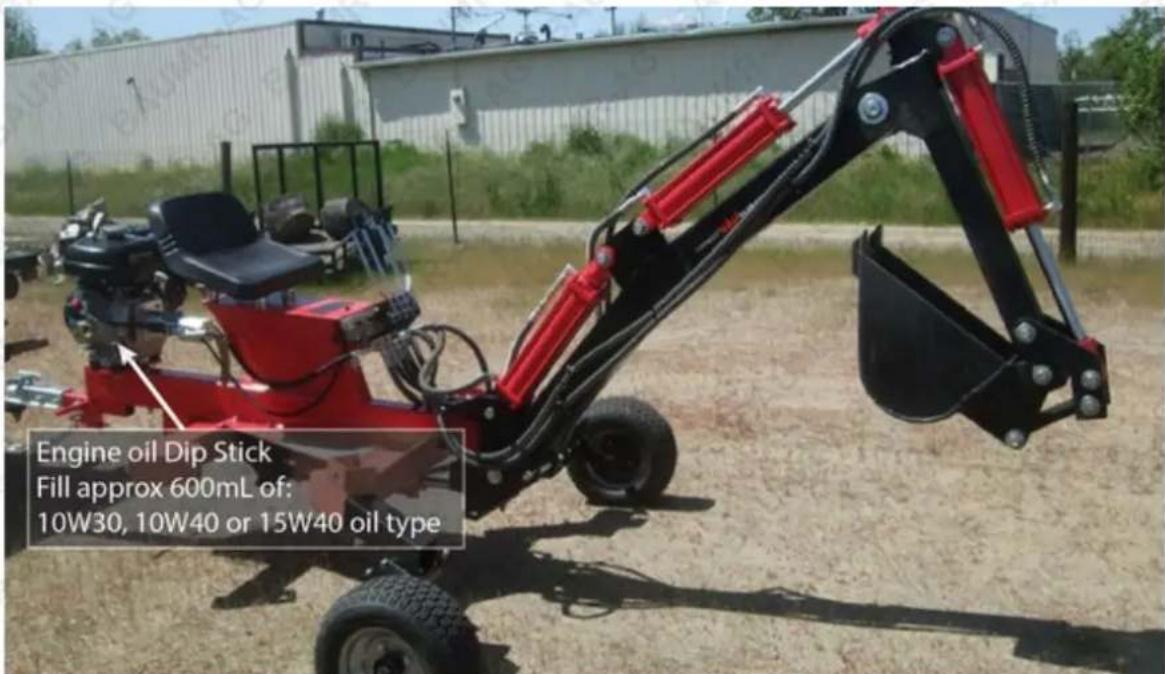
Adding Engine Oil
- Ensure the machine is on a level surface.
- The engine oil filler is located at the base of the engine. Unscrew the oil filler cap from the engine.
- Fill the engine with either 10W-30, 10W-40 or 15W-40 engine oil. Check the oil level dipstick during filling – wipe the dipstick clean, then re-install the oil filler cap. Remove the oil filler cap and check the dipstick. Add oil until the oil level must be at or just under the "maximum" indicator. The engine requires approximately 600ml of oil.
- Once sufficient oil is in the engine, re-install the oil filler cap.
Hydraulic Oil
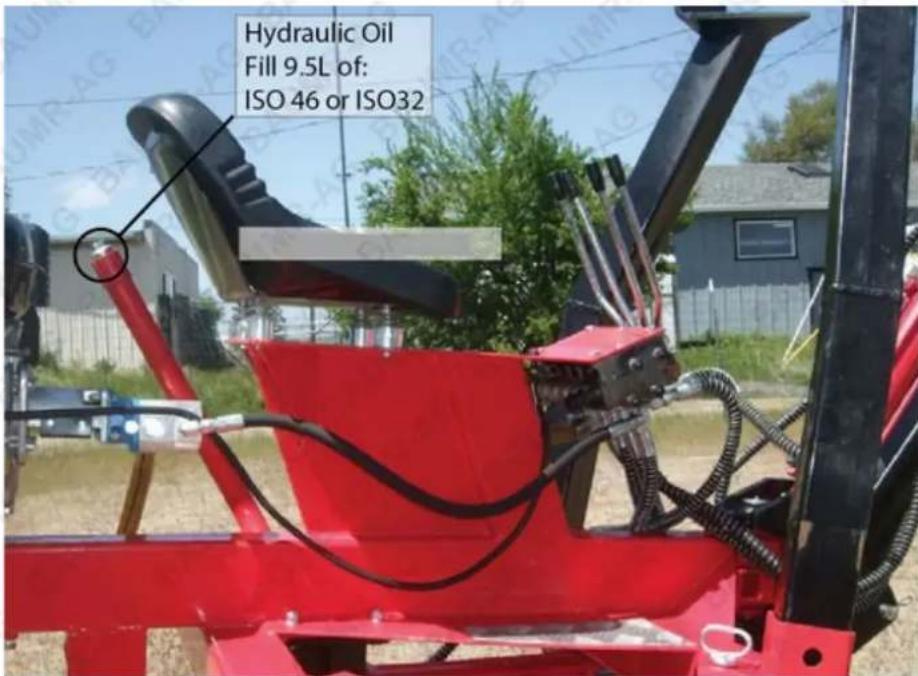
Adding Hydraulic Oil
-
Ensure the machine is on a level surface.
-
The hydraulic oil filler pipe is located behind the seat. Unscrew the oil filler cap from the filler pipe.
-
Fill the oil tank slowly with either ISO 46 hydraulic oil. Check the oil level sight glass on the left side of the boom control assembly during filling. The oil level must be between the black and red lines on the sight glass. The hydraulic system capacity is approximately 12l.
-
Once sufficient oil is in the tank, re-install the oil filler cap to the filler pipe.
-
Remove the travel safety pins from the boom (the pins that prevent the boom being moved when the machine is being towed or otherwise not in use)
-
Start the engine and run at slow idle
-
Push and pull lever #4 back and forth 6-8 times and fully extend and retract the hydraulic cylinder to remove air from the hydraulic lines. While moving the lever, watch the clear hose on the right side under the control levers. If there is a stream of bubbles or a foamy solution in the oil, air is still in the oil. Keep pushing and pulling the lever until no signs of air in the oil can be seen.
Perform the same action with lever#3, lever#2, and lever#1. Watch the oil levers. Once all four levers are done, check the oil level and top is up to the correct level if required.
- Shut off the engine. Secure the boom with the travel safety pins.
Changing the Hydraulic Oil
1) Remove the hydraulic oil drain plug located on the bottom part of the frame, below the engine.
2) Drain oil into a suitable container. Allow several minutes for the oil to drain completely.
3) Once the oil is drained, re-install and tighten the drain plug.
4) Dispose of used oil in an environmentally responsible manner and according to regulations.
5) Follow the instructions for adding hydraulic oil, described above.
Towing the Backhoe
• Always obey all state and local regulations when towing the backhoe on public roads or highways.
• Never allow anyone to sit or ride on the backhoe.
- Do not carry any cargo on the backhoe or use it as a trailer.
- Ensure the backhoe is securely attached to the towing vehicle before towing. The safety chains should be hooked onto the towing vehicle with sufficient slack for turning allowance. Always secure the trailer hitch with locking bolt.
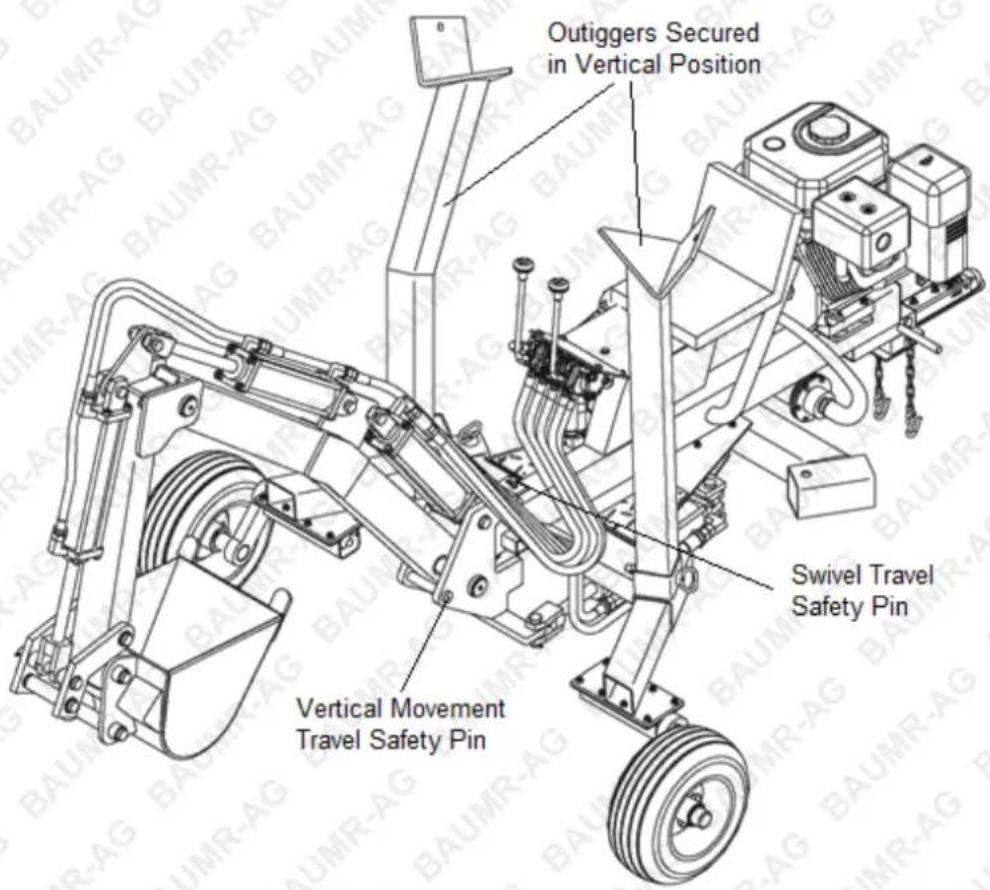
- Ensure that the boom is up and centered and is secured with the travel safety pins. With the engine off, slightly lower the boom to lock it in place and prevent it from swinging. Also, pull in the stick and bucket to achieve a compact towing configuration.
- Be sure the outriggers are secured in the vertical position before towing. Do not tow with outriggers down.
- Be aware of the added length of the backhoe when you are towing it. Be careful not to jack-knife your backhoe when reversing the vehicle.
- Towing speed should be according to driving conditions. Use a "Slow Moving Vehicle" sign when driving on roads. Take extra care when driving on rough terrain.
- Disconnect the backhoe from the towing vehicle before using backhoe.
- Grease wheel bearings annually, or after long trips, to extend the life of the bearings.
Preparing the Backhoe for Digging and
Trenching
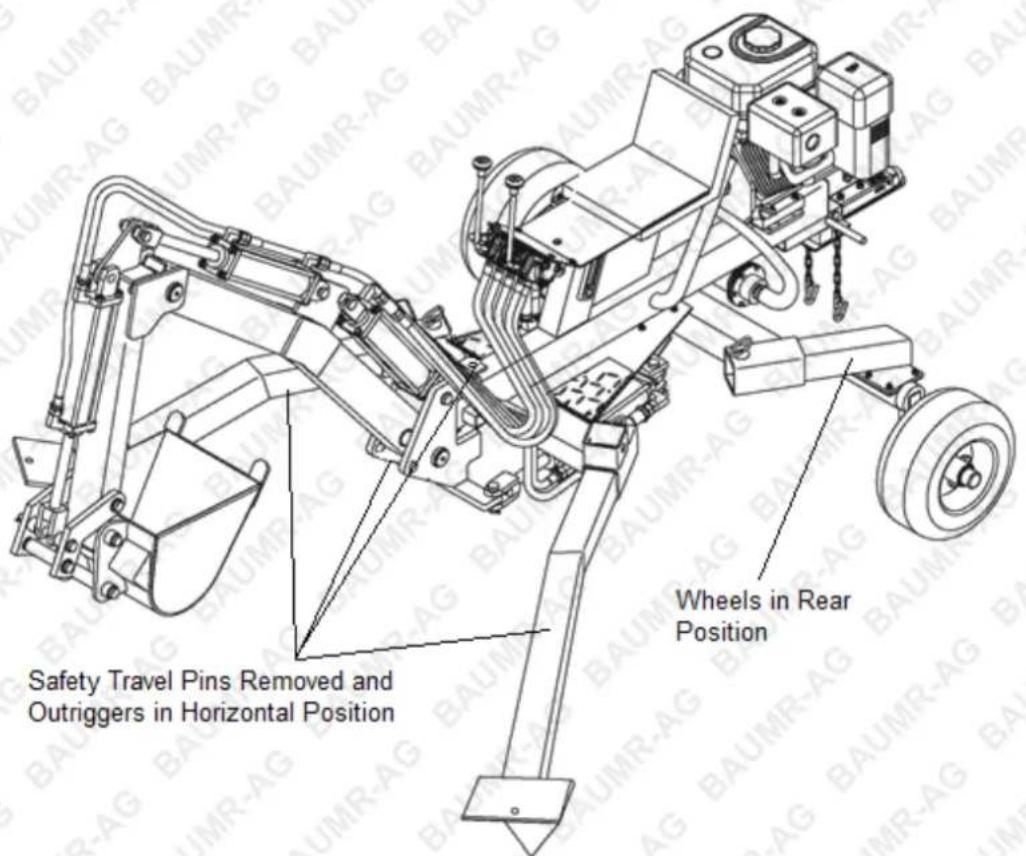
After towing the backhoe to the desired location, unhook it from the towing vehicle then follow these set-up instructions. Do not sit on the backhoe while setting it up.
1) Remove the pins securing the outriggers in the vertical position, then lift the outriggers out of the backhoe frame and set them aside.
2) Remove the boom vertical and swivel movement travel safety pins. Keep the pins in a safe place to re-install for towing.
natural_image
Technical line drawing of an aircraft landing gear assembly (no text or symbols)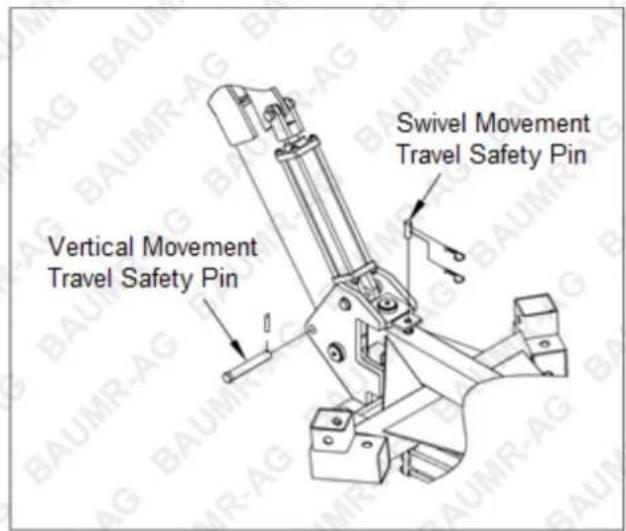
Install Outriggers and Reposition Wheels
3) Start the engine.
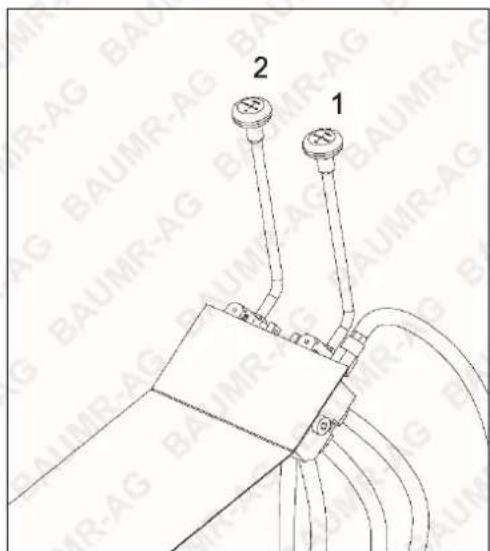
4) Push lever 2 to the left to move the stick and bucket downward. Continue until the wheels are raised approximately 100mm (4") off the ground.
5) Remove the pins securing the wheel arms to the backhoe frame and remove each wheel assembly.
6) Looking at the machine as if you were sitting in the operator seat, put the left-side outrigger in the front left slot in the backhoe frame and the right-side outrigger in the front right slot. The outriggers must point outward from the machine with ground spikes facing downward. Secure each outrigger with its locating pin.
7) Push lever 2 to the right to raise the bucket and allow the machine to rest on the outriggers.
8) Use lever 1 to position the bucket next to the right-side outrigger, then use lever 2 to lower the bucket so the right-side of the machine rises. Continue until the right side of the machine is raised high enough to install the wheel assembly
9) Install the wheel removed from the front left-side of the machine to the rear right of the machine and secure it with the pin.
10) Raise the bucket so that the wheel is in contact with the ground. Repeat step 8 to 9 on the other opposite side of the machine for the rear left wheel.
The backhoe is now ready for digging and trenching. Read the entire manual before attempting to operate the backhoe. Like any industrial tool, proper training and preparation are needed to safely and efficiently operate the backhoe.
Operation

Before starting the machine, fully understand all "Safety Warnings". Failure to follow the rules may result in serious injury to the operator or bystanders. The machine owner should instruct all operators in safe backhoe operation.
- Before digging, make sure backhoe is properly prepared for digging and trenching.
- Run the engine only in well ventilated areas. Carbon monoxide fumes are odorless and colorless. Inhaling these gases can cause carbon monoxide poisoning. Never leave the machine unattended with the engine running.
- Never operate the machine when under the influence of alcohol, drugs, or medication.
- Always operate the backhoe with all safety equipment in place and all controls properly adjusted for safety operation.
- Always operate the backhoe at the manufacturers recommended speed. Always be ready to stop the engine and disengage the boom in case of emergency.
• Always keep hands, feet, and all other body parts clear of moving parts. - Do not straddle or climb over the boom. Serious injury can result from a slip while straddling or climbing.
- Be sure the terrain allows wheels and outriggers to make firm contact with ground.
- Do not attempt to straddle the backhoe over a trench. It could fall into the excavation site and cause serious injury. Move backhoe backward and away from trench as you dig.
- Do not refuel the engine until it has cooled for several minutes.
- Before digging, take the time to learn the controls and the function each performs and how they work in combination with each other. A description of each control is illustrated on the control lever mounting plate Practice using the controls before digging, it will make for safer and more efficient trenching.
Digging
- Position bucket so the digging teeth are perpendicular to the ground.
- Extend the boom, then lower the stick/bucket until resistance is felt.
- Curl the arm or bucket to scoop up earth. Do not make the outriggers leave the ground – if the outrigger move or leave the ground, raise the boom slightly to make the outriggers dig in for support.
- Once the bucket is dug in, completely curl the bucket toward the machine.
- Raise the boom so the bucket is clear of the trench.
- Rotate the boom as required, then empty the bucket.
Moving the Machine

It is possible to move the backhoe under its own power when digging. This movement should be done with caution. Do not attempt these maneuvers until fully comfortable with the controls and only when the backhoe is away from hazards. • Do not attempt to straddle the backhoe over a trench. It could fall into the excavation site and cause serious injury. Move backhoe backward and away from trench as you dig
Moving Backward
- Curl the boom and stick inward and lower the bucket so its teeth are in the ground. The bucket should be aligned with the center of the machine, approximately 60cm (2') from the front of the backhoe frame.
- Push the bucket into the ground so the outriggers rise off the ground.
- Keep the bucket in contact with the ground, then slowly extend the boom – the machine will move backward.
- Slowly raise the bucket so the machine rests on its outriggers. Repeat as required.
Moving Forward
- Extend the boom and stick outward and lower the bucket so its teeth are in the ground. The bucket should be aligned with the center of the machine.
- Push the bucket into the ground so the outriggers rise off the ground.
- Keep the bucket in contact with the ground, then slowly retract the boom – the machine will move forward.
- Slowly raise the bucket so the machine rests on its outriggers. Repeat as required.
Rotating
- Raise the boom, then rotate it in the direction you want to move the machine.
- Lower the bucket so its teeth are in the ground.
- Push the bucket into the ground so the outriggers rise off the ground.
- Keep the bucket in contact with the ground, then slowly rotate the boom in the opposite direction to where you want to move the machine – the machine will rotate.
- Slowly raise the bucket so the machine rests on its outriggers. Repeat as required.
Maintenance and Troubleshooting
Basic Maintenance Schedule

Never store the backhoe where fumes might reach an open flame or spark. Allow the engine to cool before storing in any enclosure.
Before performing any maintenance on the backhoe or storing it, do the following:
- Switch the engine OFF.
- Move the boom controls back and forth to relieve any hydraulic pressure.
• Lower the boom so the bucket is resting on the ground. -
Disconnect the spark plug wire from the spark plug.
-
Check the engine oil level and ensure it is at or near the "MAX" level.
- Check the hydraulic fluid level and ensure it is within the allowable range.
- Clean any debris from the engine, including cylinder head and exhaust areas. If the engine is equipped with a spark arrestor, inspect and clean it regularly. Replace if damaged. Clear debris from movable parts, but only after the power source is shut off.
- Check that all nuts and bolts are tight to assure the equipment is in safe working condition.
- Inspect all hoses and fitting for wear and leaks. Perform all inspections and replace all damaged and worn parts prior to starting the engine or attempting to operate the machine.
- Be sure all guards, shields, and safety mechanism are in place and operating correctly.
- Inspect the air filter and clean or replace if required.
| What to check When to check What to do | ||
| Tires | Each use | Check Pressure. The pressure rating is listed on the tire |
| Engine oil | Each use | Add oil as needed. Replace every 6 months. |
| Spark plug | Every 6 months | Check gap and adjust/clean as necessary. Replace annually. |
| Hydraulic hoses | Each use | Inspect for wear and leaks. Replace all worn or damaged hoses before starting engine. |
| Hydraulic fittings | Each use | Inspect for wear and leaks. Replace all damaged fittings before starting engine. |
| Fasteners | Each use | Check for loose bolts |
| Hydraulic oil | Each use | Add oil as needed. Replace annually or if it appears dark or cloudy. |
| Boom pins | Each use | Grease |
| Air filter | Annually | Replace |
| Wheel bearings | Annually | Repack with grease. |
Storage
Prepare the machine as previously described, then:
- Drain the petrol tank or add fuel stabilizer to the fuel to prevent gumming. If adding stabilizer, run the engine for five minutes, then switch the engine OFF.
- Remove the spark plug, then pour 10ml engine oil into spark plug hole. Cover spark plug hole with a rag and turn engine over several times to lubricate the cylinder, then re-install spark plug.
Basic Troubleshooting
| Problem Refer to Possible Cause | |
| Hydraulic ram will not move | A, C, E, O, Q, R, U, V |
| Slow hydraulic movement when extending or retracting | E, J, L, O, R, S, T, W |
| Backhoe will not dig or digs extremely slowly | D, H, J, M, R, S, T, W |
| Engine stalls during digging motion | K, N, P |
| Engine will not turn or stalls under low load conditions | B, F, K, Q, V |
| Leaking pump shaft seal | A, B, E, G, I |
| Possible Cause Solution | |
| A - Broken driveshaft on pump | Return pump for authorized repair |
| B - Engine/ pump misalignment | Correct the engine/pump alignment |
| C - Loose shaft coupling | Correct the engine/pump alignment |
| D - Small gear section damaged | Items D through H require repair of the pump by an authorized service centre |
| E – Gears damaged | |
| F - Frozen or seized pump | |
| G - Poorly positioned shaft seal | |
| H - Pump check valve leaking | |
| I - Plugged oil breather | Make sure the reservoir is properly vented |
| J - Excessive pump inlet vacuum | Clean inlet hoses and free them of any leaks |
| K - Low horsepower/weak engine | Have engine serviced at an authorized service centre |
| L - Slow engine speed | Have engine serviced at an authorized service centre |
| M - Low relief valve setting | Adjust while using a pressure gauge and with assistance of a professional |
| N - High relief valve setting | Adjust while using a pressure gauge and with assistance of a professional |
| O - Damaged relief valve | Return directional valve for authorized repair |
| P - High unloading valve setting | Adjust while using a pressure gauge and with assistance of a professional |
| Q - Hydraulic lines blocked | Flush and clean the hydraulic system |
| R - Too little oil to the pump | Add oil to the reservoir |
| S - Air in the hydraulic oil | Clean reservoir and add oil |
| T - Control valve leaking internally | Return directional valve for authorized repair |
| U - Damaged control valve | Return directional value for authorized repair |
| V - Blocked control valve | Flush and clean the hydraulic system |
| W - Internally damaged cylinder | Return cylinder for authorized repair |
Specifications
| Engine Type | 4-stroke, single cylinder |
| Fuel Type | Unleaded non-ethanol petrol |
| Engine Oil Type SAE | 10W-30 automotive engine oil recommended for general use |
| Engine Oil Capacity | Approximately 0.6l (always check level) |
| Hydraulic Working Pressure | 16MPa |
| Hydraulic Oil Capacity | Approximately 12l |
| Hydraulic Oil Type ISO 46 or equivalent | |
| Swivel Range 120° | |
| Maximum Digging Depth | 2040m m (7') |
| Maximum Digging Arc | 2560mm (8.4') |
| Maximum Bucket Height (Loaded) | 1400mm (4.6') |
| Tow Coupling | 50mm (2") |
| Wheel Diameter | 16" |

Some experts believe the incorrect or prolonged use of almost any product could cause serious injury or death. For information that may reduce your risk of serious injury or death, consult the points below and additionally, the information available at www.datastreamserver.com/safety
- Consult all documentation, packaging and product labelling before use. Note that some products feature online documentation which should be printed and kept with the product.
- Check product for loose / broken / damaged / missing parts, wear or leaks (if applicable) before each use. Never use a product with loose / broken / damaged / missing parts, wear or leaks (if applicable).
- Products must be inspected and serviced (if applicable) by a qualified specialist every 6 months assuming average residential use by a person of average weight and strength, above average technical aptitude, on a property matching average metropolitan specification. Intended use outside these guidelines could indicate the product is not suitable for intended use or may require more regular inspection or servicing.
-
Ensure all possible users of the product have completed an industry recognized training course before being given access to the product.
-
The product has been supplied by a general merchandise retailer that may not be familiar with your specific application or your description of the application. Be sure to attain third-party approval for your application from a qualified specialist before use regardless of prior assurances by the retailer or its representatives.
- This product is not intended for use where fail-safe operation is required. As with any product (take an automobile, aircraft, computer or ball point pen for example), there is always a small chance of technical issues that needs to be repaired or may require replacement of the product or a part. If the possibility of such failure and the associated time it takes to rectify could in any situation inconvenience the user, business or employee then the product is not suitable for your requirements. This product is not for use where incorrect operation or a failure of any kind, including but not limited to a condition requiring product return, replacement, service by a technician or replacement of parts could cause a financial loss, loss of employee time or an inconvenience requiring compensation.
- If this item has been purchased in error after considering the points above, simply contact the retailer directly for details of their returns policy, if required.

©2022 Baumr-AG. All rights reserved. No part of this document, including descriptive content, concepts, ideas, diagrams or images may be reproduced or transmitted in any form or by any means, electronic or mechanical, including photocopying, scanning or recording, or any information storage and retrieval system, without express permission or consent from the publisher.

- Safety
- DANGER
- Table of Contents
- Assembly
- Step 1: Assemble Wheel Arms
- Step 2: Assemble the Boom and Stick
- Step 3: Attach the Swivel Hydraulic Cylinder.
- Step 4: Assemble Seat, Control Valve and Coupler
- Step 5: Connect the Hydraulic Hoses
- Engine Oil
- Adding Engine Oil
- Hydraulic Oil
- Adding Hydraulic Oil
- Changing the Hydraulic Oil
- Towing the Backhoe
- Preparing the Backhoe for Digging and
- Trenching
- Install Outriggers and Reposition Wheels
- Operation
- Digging
- Moving the Machine
- Moving Backward
- Moving Forward
- Rotating
- Maintenance and Troubleshooting
- Basic Maintenance Schedule
- Storage
- Some experts believe the incorrect or prolonged use of almost any product could cause serious injury or death. For information that may reduce your risk of serious injury or death, consult the points below and additionally, the information available at www.datastreamserver.com/safety
Brand : Baumr-AG
Model : BH620
Category : Uncategorized