KBKM4570 - Food processor Kubo - Free user manual and instructions
Find the device manual for free KBKM4570 Kubo in PDF.


| Product Type | Food Processor |
| Model | KBKM4570 |
| Brand | Kubo |
| Power Consumption | 800 W |
| Bowl Capacity | 2.0 L |
| Dimensions (W x D x H) | 30 x 25 x 40 cm |
| Weight | 5.0 kg |
| Material | Plastic body, stainless steel blades |
| Speed Settings | 2 speeds plus pulse |
| Main Functions | Chopping, slicing, shredding, mixing, blending, dough kneading |
| Included Attachments | Chopping blade, slicing disc, shredding disc, dough hook, citrus press, spatula |
| Safety Features | Lid lock safety switch, non-slip feet, overload protection |
| Cleaning & Maintenance | Removable parts dishwasher safe; wipe motor base with damp cloth |
| Spare Parts Availability | Replacement bowls, blades, and discs available via manufacturer |
| Certifications | CE, RoHS |
| Power Cord Length | 1.2 m |
Frequently Asked Questions - KBKM4570 Kubo
User questions about KBKM4570 Kubo
0 question about this device. Answer the ones you know or ask your own.
Ask a new question about this device
Download the instructions for your Food processor in PDF format for free! Find your manual KBKM4570 - Kubo and take your electronic device back in hand. On this page are published all the documents necessary for the use of your device. KBKM4570 by Kubo.
USER MANUAL KBKM4570 Kubo
natural_image
Green KUBO kitchen mixer with a blender and control panel (no visible text or symbols on the main body)Thank you for purchasing this product.
The quality of this appliance has been certified by several laboratory tests. This instructions manual is provided to simplify the use of the appliance as well as to guarantee a safe use.
Please read carefully the instructions and safety measures described in this manual.
We sincerely hope you will be satisfied when using your new appliance.
INDEX
1. SAFETY INSTRUCTIONS 4
1.1. Power Supply 5
1.2. Power Cord and Other Cables 5
1.3. Humidity and Water 6
1.4. Cleaning 6
1.5. General Precautions 6
2. OPERATING INSTRUCTIONS 11
2.1. Product Description 11
2.2. Product Usage 12
2.3. Maintenance 22
2.4. Troubleshooting 23
3. TECHNICAL SPECIFICATIONS 24
- POST-SALE SERVICE 24
- ENVIRONMENTAL PROTECTION 25
1. SAFETY INSTRUCTIONS
 | WARNING |  |
| RISK OF ELECTRIC SHOCKDO NOT OPEN | ||
| Warning: to avoid the risk of electric shock,do not remove the cover. The interior doesnot contain any parts that can be repairedby the user. Ask for assistance from theCustomer Support Service. | ||
Important Warnings
Before using your appliance read this instructions manual carefully and keep it in a safe place as you may need to consult it in the future.
Before turning on your appliance, and to ensure a safe and correct operation, do not use if:
- It has fallen to the ground;
- You notice any evidence of damage;
- Any anomaly occurs during its operation.
To avoid hazards or deterioration of your appliance through incorrect use it is advisable to read these instructions thoroughly.
Your appliance should not be used for other purposes than the ones intended and solely for household use. Any damage resulting from using
the appliance outside this scope, any incorrect use, as well as any manual modifications to the product will not be covered and automatically voids the warranty.
Assistance
In case of malfunction, take your appliance to the Customer Support Service for assistance.
This appliance can be used by children from the age of 8 and by people with reduced physical, sensorial or mental capabilities and/or lack of experience and knowledge if they have been given instructions on using the appliance safely and if they understand the hazards involved.
Children may not play with the appliance.
Cleaning and maintenance must not be carried out by children without supervision.
These instructions are also available at
www.suporteworten.pt
1.1. Power Supply
Make sure the main voltage is compatible with the appliance's. If this is not the case, please consult the Customer Support Service.
1.2. Power Cord and Other Cables
Do not tangle the cord or pull it to disconnect the appliance. Also, keep the cord away from warm surfaces.
Never use the appliance if it has a damaged cable or socket.
Take it to the Customer Support Service for replacement.
1.3. Humidity and Water
Do not use your appliance in humid places. Do not allow the appliance to become wet under any circumstances as this may be dangerous. To avoid fire hazard or electric shock do not expose your appliance to humidity or water. Furthermore, do not place your appliance under water (e.g. for cleaning).
1.4. Cleaning
Before cleaning, be sure to switch off the appliance and remove the plug from the main power supply. Always allow the unit to cool down before cleaning.
To clean the exterior of the product, use a dry soft cloth only.
1.5. General Precautions
- Please follow the instructions in the user manual which will help you to properly install and operate this product and enjoy its advanced features. Please keep the instructions for future reference.
- Please read the operating instructions carefully before putting the appliance into operation and keep the instructions including the warranty, the receipt and, if possible, the box with the internal packing. If you give this device to other people, please also pass on the operating instructions.
- Read all instructions before using the product.
- Maintenance and service operations are only to be carried out by authorized professionals.
- Any damage caused by manual modifications to the product is not covered by the warranty.
- If this product is used for other purposes than the ones originally intended, or if it is not correctly connected, the product may become damaged and the warranty will be voided.
- This appliance is designed exclusively for private use and for the envisaged purpose. It is not fit for commercial use. Do not use it outdoors (except if it is designed for that purpose) and keep it away from sources of heat, direct sunlight, humidity (never dip it into any liquid) and sharp edges. Do not use the appliance with your hands wet. If the appliance is humid or wet, unplug it immediately.
- When cleaning or putting it away, switch off the appliance and always unplug it from the socket (pulling on the plug, not the cable) if it is not being used and remove the attached accessories.
- Do not operate the machine without supervision. If you should leave the workplace, always switch the machine off or unplug it from the socket.
- Check the appliance and the cable for damage on a regular basis and do not use the appliance if damaged. Please do not try to repair the appliance on your own - always contact an authorised technician. To avoid the exposure to danger, always have a faulty cable be replaced with a cable of the same type only by the manufacturer, by our Customer Support Service or by a qualified person.
• Use only original spare parts.
- Pay careful attention to the following special safety instructions.
- In order to ensure your children's safety, please keep all packaging (plastic bags, boxes, polystyrene, etc.), as well as the appliance itself and its cord, out of their reach.
- CAUTION: Do not allow small children to play with the foil as there is a danger of suffocation!
- This device is not a toy, so children shall not play with it.
- Always disconnect the appliance from the supply if it is left unattended and before assembling, disassembling or cleaning.
- Switch off the appliance and unplug it from the mains before changing accessories or approaching moveable parts while in use.
- Do not use this appliance for other purposes other than the intended one.
- CAUTION: In order to avoid a hazard due to inadvertent resetting of the thermal cut-out, this appliance must not be supplied through an external switching device, such as a timer, or connected to a circuit that is regularly switched on and off by the utility.
- Only operate this machine under supervision.
- Do not tamper with any safety switches.
- Do not insert anything into the rotating hooks while the machine is working.
- Place the machine on a smooth, flat and stable working surface.
- Do not plug the machine to the mains without having installed all the necessary accessories.
- CAUTION: Ensure that the blender is switched off before removing it from the stand.
- Care shall be taken when handling the sharp cutting blades, emptying the bowl and during cleaning.
2. OPERATING INSTRUCTIONS
2.1. Product Description
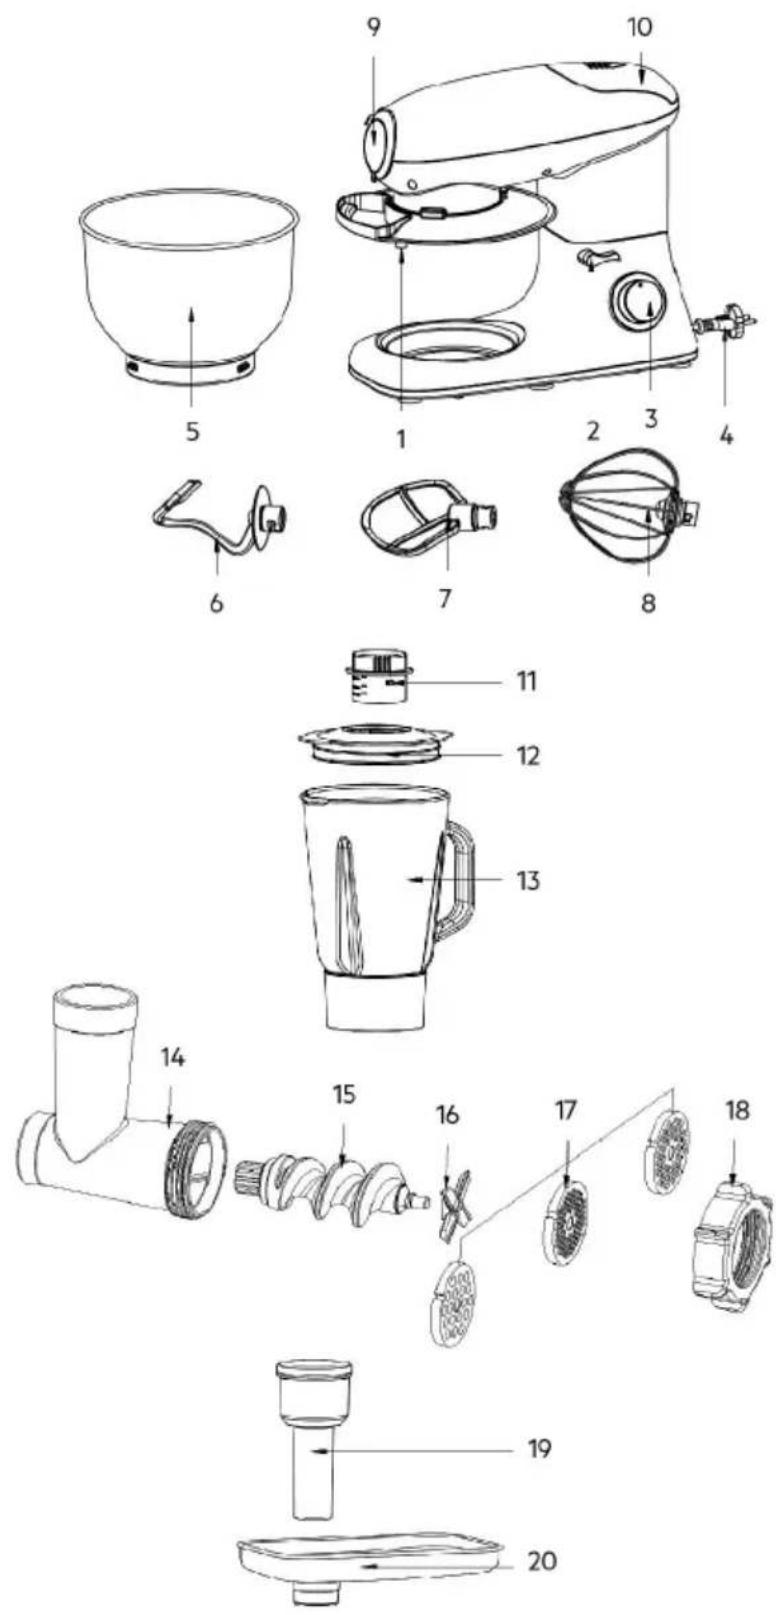
- Output shaft
- Rise knob
- Speed knob
- Power Cord
- Mixing bowl
- Dough hook
- Beater
- Whisk
- Front cover
- Rear cover
- Measuring cup
- Jar lid
- Glass cup
- Helix housing
- Helix
- Blade
- Sieve
- Lock
- Meat mincer presser
- Filling tray
2.2. Product usage
Using the Mixing Bowl
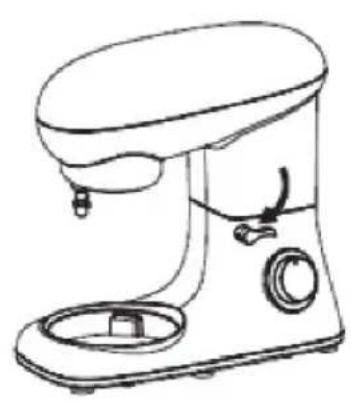
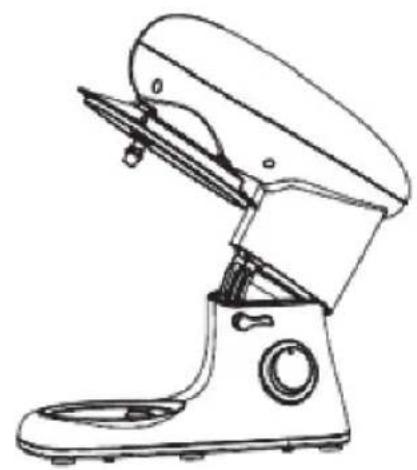
- In order to lift the arm, turn the rise knob (2) clockwise. The arm will now move upwards (FIG. 1).
- Place the pot cover into its body (FIG. 2).
- Place the mixing bowl into its holding device (Step 1) and turn the bowl clockwise until it locks into place (Step 2) (FIG. 3).
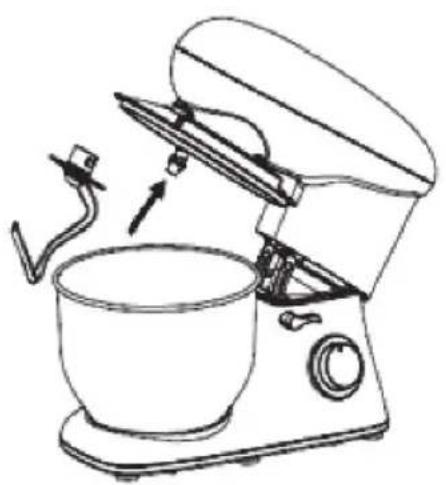
- Mount the required utensil (Dough hook, Beater or Whisk) by inserting the top into the output shaft, and turn it counter clockwise until it locks into place (FIG. 4 & FIG. 5).
- Now fill in your ingredients, but please be careful not to overfill the machine - the maximum quantity of ingredients is 1.5 kg.
- Lower the arm using the rise knob (2) (FIG. 6).
- Insert the mains plug into a properly installed 220-240 V \~ 50-60 Hz safety power socket.
- Switch the machine's speed using the speed knob to a speed between 1 and 6 (corresponding to the mixture).
- For pulse operation (kneading at short intervals), turn the switch to the "PULSE" position. The switch has to be held in this position according to the desired interval length. When the switch is released it returns automatically to the "0" position.
- After kneading/stirring turn the speed knob (3) back to the "0" position as soon as the mixture has formed a ball. Then remove the mains plug.
- Push the rise knob (2) downwards and the arm will be raised.
- The mixture can now be released with the help of a spatula and removed from the mixing bowl.
- The mixing bowl can now be removed.
- Clean the parts as described under "Cleaning".
natural_image
Line drawing of a modern kitchen mixer (no text or symbols)FIG. 1

natural_image
Line drawing of a kitchen blender with handle and control panel (no text or symbols)FIG. 2

FIG. 3
natural_image
Line drawing of a kitchen mixer with a bowl and stand (no text or symbols)FIG. 4

natural_image
Line drawing of a kitchen mixer with a bowl and stand (no text or symbols)FIG. 5

natural_image
Line drawing of a kitchen mixer with a bowl and control knob (no text or symbols)FIG. 6
Adjusting the Levels and Using the Dough Hook for not more than 1.5 kg of Mixture
| Use Picture Levels | Time (Min) | Maxi-mum | Remarks | |
| Dough hook |  | 1-3 | 3-5 | 1000 g flour and 538 g water |
| Beater |  | 2-4 | 3-10 | 660 g flour and 840 g water |
| Whisk |  | 5-6 | 3-10 | 3 egg whites (mini-mum) |
Blender Function:
The blender can be used for pureeing very finely and for blending, like for example soups, sauces, milk shakes, baby food, vegetable, fruit batter, puree, etc. If necessary, cut solid ingredients into smaller pieces before you put them in the blender.
Important:
- Before use: do not plug the machine into the socket until you have properly attached the blender jar and the jar lid.
- After use: unplug the appliance before you remove the blender jar from the housing.
- Do not fill the blender jar with ingredients that are hotter than 80^ C.
- To prevent spilling, do not put more than 1.5 litres of liquid in the blender jar.
- Never remover the jar lid while the blender is running.
- Always cover the blender lid before mounting or dismounting the blender jar onto/from the machine.
- Do not operate the blender attachment over 3 minutes.
How to use the blender:
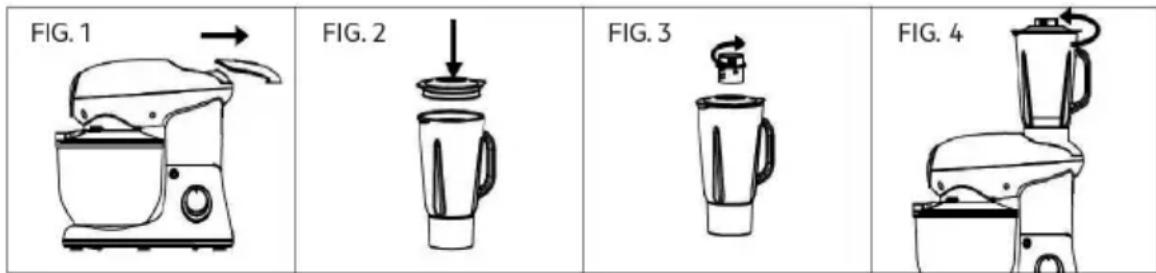
- Remove the Rear cover (FIG.1)
- Place the food stuff you wish to process into the jar
- Press the jar lid into place until it is firmly fixed (FIG. 2)
- Place the blender measuring cup into the jar lid and turn it clockwise to lock (FIG. 3)
- Take the blender jar onto the attaching hole and turn it counter clockwise until it is firmly fixed (FIG. 4)
- Set the speed control to position 6.
Note:
- You can add ingredients while the appliance is running by removing the measuring cup from the jar lid.
-
It may be necessary to switch off the appliance from time to time to remove pieces of food slicking into the blender jar.
-
Switch off the appliance and unplug it from the mains.
- Remove the jar lid.
- Use a soft spatula to remove the pieces of food which have slicked into the blender jar. Keep the spatula at a safe distance from the knives.
- Turn the blender jar clockwise to take out the blender jar.
Recommended formulation:
Remove the fruit's kernel and hard peel, cut the fruit into small pieces and place them in the cup, then pour in the corresponding amount of pure water. The maximum amount of food is 600 g and water 900 g. Do not exceed the maximum scale of the juice cup. Cover the cup with its lid and load it into the machine. Plug the machine to the mains and then set the speed control to position 4-6. After continuously operating for 3 minutes please stop working. Do not continuously operate the machine for more than 15 minutes. Please note that disregarding this warning may affect the machine's performance.
Meat mincer Function:
How to use the mincer
-
To mount the mincer parts, first place the blade (16) on the end of the helix (15) and then a sieve (17) of your choice. Please pay attention to the sieve and the recesses on the helix housing (14). Screw the lock (18) on until it is "hand tight" (FIG. 1).
-
Remove the front cover (FIG. 2) from the machine.
-
Press the fixed button and then place the helix housing into the machine, turning it counter clockwise to lock (FIG. 3).
-
Place the filling tray (FIG. 4) on the filler neck.
-
Place a vessel under the exit.
-
Plug the machine to the mains and then set the speed control to position 3. Place the pieces of meat on the filling tray (20) and into the filler neck. If necessary, push the meat with the presser (19). Do not use your fingers to push the meat!
-
After use, switch off and unplug the appliance.

Recommended formulation:
Remove the bones from the meat and cut it into 2.5 cm pieces. Plug the machine to the mains and then set the speed control to position 1-3. Place the meat into the Filling tray. This machine allows processing 3 kilograms of meat - max. - at once. After continuously operating the machine for 5 minutes, please stop working. Do not continuously operate the machine for more than 15 minutes. Please note that disregarding this warning may affect the machine's performance.
Suggested Recipes
Sponge Mixture (Basic Recipe), Level 1-4 Ingredients:
200 g of soft butter or margarine, 200 g of sugar, 1 packet of vanilla sugar or 1 bag of Citro-Back, 1 pinch of salt, 4 eggs, 400 g of wheat flour, 1 packet of baking powder, approx. 1/8 litre of milk.
Preparation:
Transfer the wheat flour and the remaining ingredients to the mixing bowl, stir with the beater for 3 seconds on level 1, then for approximately 3 minutes on level 2. Grease a mould or cover with baking paper. Fill in the mixture and bake. Before the cake is removed from the oven, test to see if it is done. With a sharp wooden stick pierce the centre of the cake. If no mixture sticks to it, the cake is cooked. Turn the cake on to a cake grid and allow it to cool.
Traditional Oven
Insertion height: 2
Heating: electric oven, top and bottom heat 175-200 °C; gas oven: level 2-3
Baking time: 50-60 minutes
Depending on taste, this recipe can be changed, for example with 100 g of raisins or 100 g of nuts or 100 g of grated chocolate. In fact, the possibilities are endless.
Linseed Bread Rolls, Level 1-4 Ingredients:
500-550 g of wheat flour, 50 g of linseed, 3/8 litre of water, 1 cube of yeast (40 g), 100 g of low-fat curds, well drained, 1 tsp of salt. For coating: 2 tbsp of water.
Preparation:
Soak the linseed in 1/8 litre of lukewarm water. Transfer the remaining lukewarm water (1/4 litre) into the mixing bowl, crumble in the yeast, add the curds and mix with the dough hook on level 2. The yeast must be completely dissolved. Put the flour with the soaked linseed and the salt into the mixing bowl. Knead thoroughly on level 1, then switch to level 3 and continue kneading for 3-5 minutes. Cover the mixture and allow to rise in a warm place for 45-60 minutes. Knead thoroughly once more, remove from the bowl and form sixteen rolls. Cover the baking mould with wet baking paper. Place the rolls on this and allow to rise for 15 minutes. Coat with lukewarm water and bake.
Traditional Oven:
Insertion height: 2
Heating: electric oven: top and bottom heat 200-220 °C (preheated for 5 minutes), gas oven level 2-3
Baking time: 30-40 minutes
Chocolate Cream, Level 5-6
Ingredients:
200 mL of sweet cream, 150 g of semi-bitter chocolate coating, 3 eggs, 50-60 g of sugar, 1 pinch of salt, 1 packet of vanilla sugar, 1 tablespoon of cognac or rum, chocolate flakes.
Preparation:
Beat the cream in the mixing bowl with the whisk until stiff. Remove from the bowl and place somewhere to cool. Melt the chocolate coating according to the instructions on the packet or in the microwave at 600 W for 3 minutes. In the meantime, beat the eggs, sugar, vanilla sugar, cognac or rum and salt in the mixing bowl with the whisk on speed 2 to form a foam. Add the melted chocolate and stir in evenly on speed 5-6. Leave a little of cream for decoration. Add the remaining cream to the creamy mixture and stir in briefly using the pulse function. Decorate the chocolate cream and serve well cooled.
Pizza dough, Level 1-4
Ingredients:
400 g of plain flour, 250 mL of warm water, 1/2 tsp of sugar, 1 sachet of active dried yeast (about 2-1/2 tsp), 1-1/2 tsp of olive oil and 1 tsp of salt.
Preparation:
Put the flour in the bowl. Mix the remaining ingredients in a bowl or jug. Run the mixer at speed 1-2, and gradually add the liquid. As the ingredients incorporate, and the dough ball increasingly forms, increase the speed to 3-4. Knead for a couple of minutes on this speed until the dough ball is smooth. Remove from the bowl and split into 2-4 pieces. Roll into pizza bases (circles or rectangles) on a floured surface, then lay them on a baking sheet or pizza tray. Spread the pizza bases with tomato purée and add toppings - mushrooms, ham, olives, sundried tomatoes, spinach, artichoke, etc. Top with dried herbs, pieces of mozzarella, and a drizzle of olive oil. Bake in a preheated oven at 200 °C/400 °F/gas 6 for 15-20 minutes until the toppings are bubbling and golden brown.
Basic White Bread, Level 3-6
Ingredients:
600 g of strong white bread flour, 1 sachet of active dried yeast (about 2½ tsp), 345 mL of warm water, 1 tbsp of sunflower oil or butter, 1 tsp of sugar, 2 tsp of salt.
Preparation:
Use the mixing instructions for pizza dough, then put the dough in a bowl, cover it and leave it in a warm place until it's doubled in size (30-40 minutes). Remove the dough and punch down to remove air. Knead lightly on a floured board, shape it into a loaf, or put it in a mould, cover it and leave it in a warm place to rise for another 30 minutes. Bake in a preheated oven at 200 °C/400 °F/gas 6 for 25-30 minutes until golden brown and hollow sounding on the base.
Soft Poppy Seed Rolls, Level 1-3
Ingredients:
570 g of strong white bread flour, 1 sachet of active dried yeast (about 2½ tsp), 300 mL of milk (warmed slightly), 2 eggs (at room temperature), 1 tbsp of sunflower oil, 1½ tsp of sugar, 2 tsp of salt, 75 g of poppy seeds.
Preparation:
Mix the milk, eggs, oil, sugar, salt and yeast in a jug or bowl, and leave for 5 minutes. Put the flour and poppy seeds in the bowl, and mix at speed 1, gradually adding the liquid, then increase the speed to 2, and mix for five minutes. Remove the dough to a floured surface, cut into 8-10 pieces, roll into shape, then put on a greaseproof baking sheet. Leave it in a warm place until it's doubled in size. Brush with a little egg or milk, and bake in a preheated oven at 220 °C/425 °F/gas 7 for 20-25 minutes until golden brown and hollow sounding on the base.
Italian Herb Bread
Ingredients:
575 g of strong white bread flour, 1 sachet of active dried yeast (about 2½ tsp), 290 mL of water, 2 tbsp of olive oil, 2 tsp of sugar, 2 tsp of salt, 4 tbsp of mixed dried herbs.
Preparation:
Mix the water, oil, sugar, salt and yeast in a jug or bowl, and leave for 5 minutes. Put the flour and dried herbs in the bowl, and mix at speed 1, gradually adding the liquid, then increase the speed to 2, and mix for 5 minutes. Put the dough in a bowl, cover it and leave it in a warm place until it's doubled in size (20-30 minutes).
Put on a floured surface, knead gently to knock out the air, then shape, put on a baking sheet, and leave it in the warm place until it's doubled in size.
Bake in a preheated oven at 200 °C/400 °F/gas 6 for 25 minutes or until golden brown and hollow sounding on the base.
Coffee & Brandy Ice Cream, Level 5-6 Ingredients:
3 eggs, 75 g of caster sugar, 300 mL of single cream, 2 tbsp of instant coffee powder, 300mL of double cream, 2½ tbsp of brandy.
Preparation:
Add the sugar and eggs to the bowl and process at speed 6 until smooth in texture. In a saucepan, bring the single cream and coffee just to the boil and stir in the egg and sugar mixture. Put in a heatproof bowl over a simmering pan of water and cook gently, stirring well until thick enough to coat the back of a spoon. Strain into a bowl and leave to cool. Whip the double cream at speed 6 until soft peaks form, then fold into the cold egg and sugar mixture, with the brandy. Pour into a container, cover it and freeze it for 2½-3 hours until partially frozen.
Remove, stir well and then freeze again until the desired texture is achieved.
Basic Meringues, Level 5-6
Ingredients:
4 egg whites, 100 g of caster sugar, 100 g of icing sugar.
Preparation:
Put the egg whites in the bowl and process at speed 6 until fairly stiff. Add half the sugar and whisk again until the mixture is smooth, and stiff peaks have formed. Remove the bowl, and lightly fold in the remaining sugar with a metal spoon. Line a baking sheet and spoon or pipe the meringue mixture into ovals. Sprinkle with the remaining sugar and put on the lowest shelf of a cool oven (120 °C/250 °F/ gas 12 ) for 1 12 hours. Let it cool on a wire rack, top with soft fruits, chocolate, and sweetened cream.
2.3. Maintenance
Motor Housing
- Only a damp rinsing cloth should be used to clean the outside of the housing.
Mixing Bowl, Mixing Equipment
CAUTION:
- The components are not suitable for cleaning in a dishwasher. If exposed to heat or caustic cleaners they might become misshapen or discoloured.
- Components that have come into contact with food can be cleaned in soapy water.
- Allow the parts to dry thoroughly before reassembling the device.
- Please apply a small quantity of vegetable oil likely to the screens after they have dried.
2.4. Troubleshooting
| No. Troubles Solution | |
| 1 The machine doesn’t work | Check if the plug is firmly inserted into the socket.Check if the rise button has sprung back in place.Check if the machine works continuously for more than 6 minutes, and wait until the motor cools down. |
| 2 Noise in the mixing bowl when working (the accessory scraped the bowl) | Check if the mixing bowl is properly installed.Check if the accessory is properly installed on the machine. |
| 3 The pot cover doesn’t fit the mixing bowl properly | Check if the pot cover is properly placed on the machine.Check if the mixing bowl is properly installed on the machine and locked correctly. |
| 4 The machine doesn’t work on certain speed | Check if the mark on the speed knob corresponds to the speed silkscreen on the housing.Rotate the speed knob to 0, and re-check if the machine works. |
| 5 The machine moves while working | Check if the anti-slip feet have fallen off.Check if the machine is placed on a smooth and flat table top. |
| 6 The rise button didn’t spring back in place after installing the mixing bowl and pot cover | Check if the pot cover is properly placed on the machine.Check if the mixing bowl is properly installed. |
3. TECHNICAL SPECIFICATIONS
Model: KBKM4570
Rated voltage: 220-240 V \~ 50-60 Hz
Power consumption: 1400 W
Protection class: ||
Subject to technical changes without prior notice.
4. POST-SALE SERVICE
KUBO has designed this appliance in order to guarantee maximum reliability. However, if a problem occurs do not attempt to open the appliance - there is a risk of electrical shock. If you are not able to solve the problem, please contact the Customer Support Service of any Worten, Modelo or Continente store in order to be assisted. Worten Equipamentos para o Lar provides a 2-year warranty for manufacturing defects from the date of purchase of the appliance.
WARNING: any attempt to repair the appliance without contacting the manufacturer or seller will void the warranty.
All users must be familiar with these instructions. Knowing what could go wrong can help prevent problems from occurring.
5. ENVIRONMENTAL PROTECTION
In order to protect the environment, we strive to reduce the volume of packaging used, limiting it to three easily sorted materials: cardboard, paper and plastic. The appliance is manufactured using recyclable materials after disassembled by a specialized company. Please comply with local regulations concerning the recycling of all materials.

natural_image
Simple line drawing of a trash bin with crossed lines indicating no waste or restriction (no text or symbols)Do not dispose of the device in normal domestic waste.
Dispose of the device over a registered waste disposal firm or through your communal waste disposal facility.
Observe the currently valid regulations. In case of doubt, consult your waste disposal facility.
Estimado cliente:
natural_image
Line drawing of a kitchen mixer with control panel and handle (no text or symbols)FIG. 1
natural_image
Line drawing of a kitchen blender with handle and base (no text or symbols)FIG. 2

FIG. 3

natural_image
Line drawing of a kitchen mixer with a bowl and stand (no text or symbols)FIG. 4

natural_image
Line drawing of a kitchen mixer with a bowl and stand (no text or symbols)FIG. 5

natural_image
Line drawing of a kitchen mixer with handle and control panel (no text or symbols)FIG. 6
natural_image
Line drawing of a kitchen mixer with a side panel and handle, labeled 'FIG. 1' (no text or symbols on the diagram itself)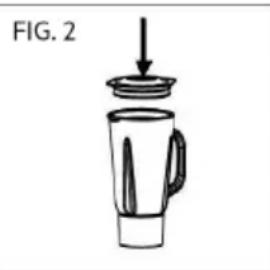
natural_image
Simple line drawing of a blender with a lid and handle, labeled 'FIG. 2' (no text or symbols on the diagram itself)
natural_image
Simple line drawing of a blender with a handle and lid, labeled 'FIG. 3' (no text or symbols on the diagram itself)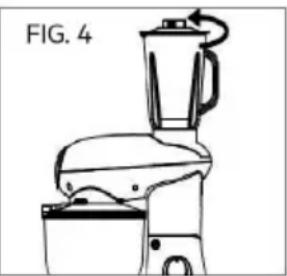
natural_image
Line drawing of a kitchen blender with a side panel and handle (no text or symbols)NOTA:
natural_image
Simple line drawing of a trash bin with crossed lines indicating no waste or restriction (no text or symbols)natural_image
Line drawing of a kitchen mixer with handle and control panel (no text or symbols)FIG. 1

natural_image
Line drawing of a kitchen blender with handle and base (no text or symbols)FIG. 2
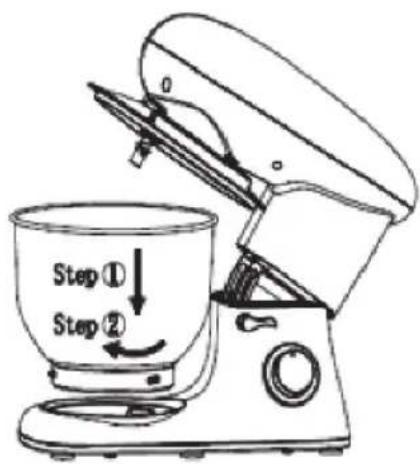
FIG. 3

natural_image
Line drawing of a kitchen mixer with a bowl and fan (no text or symbols)FIG. 4

natural_image
Line drawing of a kitchen mixer with a bowl and stand (no text or symbols)FIG. 5

natural_image
Line drawing of a kitchen mixer with handle and control panel (no text or symbols)FIG. 6
natural_image
Simple line drawing of a trash bin with crossed lines indicating no waste or restriction (no text or symbols)- INDEX
- SAFETY INSTRUCTIONS 4
- OPERATING INSTRUCTIONS 11
- TECHNICAL SPECIFICATIONS 24
- SAFETY INSTRUCTIONS
- Important Warnings
- Assistance
- Power Supply
- Power Cord and Other Cables
- Humidity and Water
- Cleaning
- General Precautions
- OPERATING INSTRUCTIONS
- Product Description
- Product usage
- Using the Mixing Bowl
- Adjusting the Levels and Using the Dough Hook for not more than 1.5 kg of Mixture
- Blender Function:
- Important:
- How to use the blender:
- Note:
- Recommended formulation:
- Meat mincer Function:
- How to use the mincer
- Suggested Recipes
- Sponge Mixture (Basic Recipe), Level 1-4 Ingredients:
- Preparation:
- Traditional Oven
- Linseed Bread Rolls, Level 1-4 Ingredients:
- Traditional Oven:
- Chocolate Cream, Level 5-6
- Ingredients:
- Pizza dough, Level 1-4
- Basic White Bread, Level 3-6
- Soft Poppy Seed Rolls, Level 1-3
- Italian Herb Bread
- Coffee & Brandy Ice Cream, Level 5-6 Ingredients:
- Basic Meringues, Level 5-6
- Maintenance
- Motor Housing
- Mixing Bowl, Mixing Equipment
- CAUTION:
- Troubleshooting
- TECHNICAL SPECIFICATIONS
- POST-SALE SERVICE
- ENVIRONMENTAL PROTECTION
- Do not dispose of the device in normal domestic waste.
- NOTA:
Brand : Kubo
Model : KBKM4570
Category : Food processor