
Cast - Wireless pointer Elmo - Free user manual and instructions
Find the device manual for free Cast Elmo in PDF.


| Product Type | Wireless presentation receiver (dongle) |
| Model | ELMO Cast |
| Network Standards | IEEE802.11a/b/g/n/ac; 5 GHz default, 2.4 GHz optional (Legacy WiFi mode) |
| HDMI Output Resolution | Up to 4K (4096×2160 @24p, 3840×2160 @24/25/30p); 1080p @50/60p, 720p @50/60p |
| Power Supply | USB Type-C 5V/1.5A (supplied AC adapter recommended) |
| Power Consumption | 3W standby, 6W during projection |
| Operating Temperature | 0–40°C |
| Dimensions (Dongle) | 97 × 32 × 11 mm (without HDMI connector) |
| Weight (Dongle) | 120 g |
| Package Contents | HDMI receiver (dongle), USB cable (Type-C to A), HDMI cable, power plug, AC adapter, Quick Start Guide |
| Supported OS | iOS 10+, Android 4.4+, Windows 8.1+, macOS 10.11+, Chrome OS |
| Wireless Protocols | Miracast, AirPlay, Google Cast |
| Management Interface | Web browser via IP address (admin login) |
| Maximum Simultaneous Connections | Up to 32 devices (split screen up to 4) |
| Warranty Repair Parts Period | 5 years after product discontinuation |
| Country of Origin | Japan (ELMO CO., LTD.) |
Frequently Asked Questions - Cast Elmo
User questions about Cast Elmo
0 question about this device. Answer the ones you know or ask your own.
Ask a new question about this device
Download the instructions for your Wireless pointer in PDF format for free! Find your manual Cast - Elmo and take your electronic device back in hand. On this page are published all the documents necessary for the use of your device. Cast by Elmo.
USER MANUAL Cast Elmo
■ Contents....2
■ Important safeguards....3
Usage precautions....7
① Before use....8
◆Package contents 8
◆Part names....9
■Receiver (dongle)....9
■Home screen....10
② Basic operations.... 11
◆ Connecting to a projector or display monitor .... 11
◆ Miracast streaming from the document camera.... 12
◆ Miracast streaming from other devices 12
◆ Switching between connected devices.... 13
③ Advanced operations....14
◆Configuring settings of the receiver....14
◆ Connecting the receiver to the network....20
④ FAQ (Frequently Asked Questions) 21
⑤ Troubleshooting....22
◆Symptom, possible cause, and remedy 22
⑥ Specifications....24
◆ Hardware 24
◆System requirements....25
■ Trademarks and licenses....26
■ Important safeguards
■ Read Instructions
All the safety and operating instructions should be read before the appliance is operated.
■ Retain Instructions
The safety and operating instructions should be retained for future reference.
■ Heed Warnings
All warnings on the product and in the operating instructions should be adhered to.
■ Follow Instructions
All operating and use instructions should be followed.
■ Cleaning
Unplug this product from the wall outlet before cleaning. Do not use liquid cleaners or aerosol cleaners. Use a damp cloth for cleaning.
■ Attachments
Do not use attachments not recommended by the product manufacturer as they may cause hazards.
■ Water and Moisture
Do not use this product near water - for example, near a bath tub, wash bowl, kitchen sink, or laundry tub, in a wet basement, or near a swimming pool, and the like.
■ Power Sources
This product should be operated only from the type of power source indicated on the marking label. If you are not sure of the type of power supply to your home consult your appliance dealer or local power company. For products intended to operate from battery power, or other sources, refer to the operating instructions.
■ Grounding or Polarization
This product may be equipped with either a polarized 2-wire AC line plug (a plug having one blade wider than the other) or a 3-wire grounding type plug, a plug having a third (grounding) pin. If the 2-Wire polarized plug will not fit in the outlet, try reversing the plug. If the plug still fails to fit, contact your electrician to replace your obsolete outlet. Do not defeat the safety purpose of the polarized plug. The 3-wire grounding type plug will fit into a grounding type power outlet.
This is a safety feature. If you are unable to insert the plug into the outlet, contact your electrician to replace your obsolete outlet. Do not defeat the safety purpose of the grounding type plug.
■ Power-Cord Protection
Power-supply cords should be routed so that they are not likely to be walked on or pinched by items placed upon or against them, paying particular attention to cords at plugs, convenience receptacles, and the point where they exit from the product.
■ Lightning
For added protection for this product during a lightning storm, or when it is left unattended and unused for long periods of time, unplug it from the wall outlet and disconnect the antenna or cable system. This will prevent damage to the product due to lightning and power-line surges.
■ Overloading
Do not overload wall outlets, extension cords, or integral convenience receptacles as this can result in a risk of fire or electric shock.
■ Object and Liquid Entry
Never push objects of any kind into this product through openings as they may touch dangerous voltage points or short-out parts that could result in a fire or electric shock. Never spill liquid of any kind on the product.
■ Servicing
Do not attempt to service this product yourself as opening or removing covers may expose you to dangerous voltage or other hazards. Refer all servicing to qualified service personnel.
■ Damage Requiring Service
Unplug this product from the wall outlet and refer servicing to qualified service personnel under the following conditions:
- When the power-supply cord or plug is damaged.
- If liquid has been spilled, or objects have fallen into the product.
- If the product has been exposed to rain or water.
- If the product does not operate normally by following the operating instructions. Adjust only those controls that are covered by the operating instructions as an improper adjustment of other controls may result in damage and will often require extensive work by a qualified technician to restore the product to its normal operation.
- If the product has been dropped or damaged in any way.
- When the product exhibits a distinct change in performance - this indicates a need for service.
■ Replacement Parts
When replacement parts are required, be sure the service technician has used replacement parts specified by the manufacturer or have the same characteristics as the original part. Unauthorized substitutions may result in fire, electric shock or other hazards.
■ Safety Check
Upon completion of any service or repairs to this product, ask the service technician to perform safety checks to determine that the product is in proper operating condition.
■ Heat
The product should be situated away from heat sources such as radiators, heat registers, stoves, or other products (including amplifiers) that produce heat.

CAUTION
RISK OF ELECTRIC SHOCK DO NOT OPEN

CAUTION:
TO REDUCE THE RISK OF ELECTRIC SHOCK, DO NOT REMOVE COVER (OR BACK). NO USER-SERVICEABLE PARTS INSIDE. REFER SERVICING TO QUALIFIED SERVICE PERSONNEL.

SA 1965
The lightning flash with arrowhead symbol, within an equilateral triangle, is intended to alert the user to the presence of uninsulated "dangerous voltage" within the product's enclosure that may be of sufficient magnitude to constitute a risk of electric shock to persons.

SA 1966
The exclamation point within an equilateral triangle is intended to alert the user to the presence of important operating and maintenance (servicing) instructions in the literature accompanying the product.


This symbol [crossed-out wheeled bin WEEE Annex IV] indicates separate collection of waste electrical and electronic equipment in the EU countries. Please do not throw the equipment into the domestic refuse. Please use the return and collection systems available in your country for the disposal of this product.
WARNING
TO REDUCE THE RISK OF FIRE OR ELECTRIC SHOCK, DO NOT EXPOSE THIS PRODUCT TO RAIN OR MOISTURE.
The connection of a non-shielded equipment interface cable to this equipment will invalidate the FCC Certification or Declaration of this device and may cause interference levels which exceed the limits established by the FCC for this equipment. It is the responsibility of the user to obtain and use a shielded equipment interface cable with this device. If this equipment has more than one interface connector, do not leave cables connected to unused interfaces. Changes or modifications not expressly approved by the manufacturer could void the user's authority to operate the equipment.
FOR UNITED STATES USERS:
INFORMATION
This equipment has been tested and found to comply with the limits for a Class B digital device, pursuant to Part 15 of the FCC Rules. These limits are designed to provide reasonable protection against harmful interference when the equipment is operated in a commercial environment.
This equipment generates, uses, and can radiate radio frequency energy and, if not installed and used in accordance with the instruction manual, may cause harmful interference to radio communications. Operation of this equipment in a residential area is likely to cause harmful interference in which case the user will be required to correct the interference at his own expense.
USER-INSTALLER
CAUTION:
Your authority to operate this FCC verified equipment could be voided if you make changes of modifications not expressly approved by the party responsible for compliance to Part 15 of the FCC rules.
Usage precautions
■ About electric waves used by this product
This product uses electric waves in the 5.0GHz band (default setting) and 2.4 GHz band. When using this product, a radio station license is not necessary. However, please note the following precautions.
Do not use this product near the followings:
- In-factory radio stations for mobile unit identification systems (radio stations that require a license) used in production lines of factories
- Microwave ovens and industrial, scientific or medical equipment, such as pacemakers
- Specified low power radio stations (radio stations that do not require a license)
- IEEE802.11a/b/g/n/ac wireless LAN units
When this product is used near any of the equipment mentioned above, electric wave interference may occur, making this product difficult to use.
■ Precautions for using the product in 5.0GHz band or 2.4GHz band
• In addition to industrial, scientific and medical equipment such as microwave ovens, in-plant radio stations for mobile equipment identifier (radio stations requiring licenses) and specified low-power radio stations (radio stations not requiring licenses) used for factory production lines are used in the frequency bands used by this product.
- Before use, confirm that in-plant radio stations for mobile equipment identifier and specified low-power radio stations do not operate in your vicinity.
• In the event that this product causes harmful interference to any in-plant radio stations for mobile equipment identifier, immediately halt radio wave emission and contact the dealer from whom you purchased the product for consultation on interference avoidance measures (e.g., partition installation).
- Please contact the dealer from whom you purchased the product if this product causes harmful interference to any specified low-power radio stations or amateur radio stations, or if other problems arise.
https://www.elmousa.com https://www.elmoeurope.com
① Before use
◆Package contents
The items below are included in the package. If any item is missing, contact the dealer from whom you purchased this product.

natural_image
Illustration of a rectangular electronic device with a port and internal mesh structure (no text or symbols)HDMI receiver (dongle)

natural_image
Illustration of a U-shaped USB cable with two connectors (no text or symbols)USB cable for power supply (Type-C to A)

natural_image
Illustration of a U-shaped cable with two connectors (no text or symbols)HDMI cable

natural_image
Four isometric technical drawings of electrical plug connectors (no text or symbols)Power plug

AC adapter
Quick Start Guide
- AC adapter
While pushing the power plug into the groove of the AC adapter, rotate it.
※Push and rotate it until it clicks.
※Choose the correct plug according to the outlet.
To remove the plug, rotate the plug while pressing the lock button and pull.
Lock button

natural_image
Diagram of a mechanical device with a lid and base, showing directional arrows (no text or symbols)Caution
Do not wrap the USB cable tightly around the AC adapter. The cable could be damaged (disconnected) or the inside of the cable could be exposed and result in an accident.
Do not bundle the cables when using this product.
◆Part names
■Dongle

| Number | Name | Description |
| 1 | HDMI port | To connect to the HDMI port of a device such as TV. |
| 2 | Status LED | Lights up blue when the power is turned on. |
| 3 | USB port for power supply | To connect to the AC adapter with the supplied USB cable (Type-C to TypeA) . |
| 4 | Reset button | To initialize settings or administrator password.Press this button for about 8 seconds after the product is started ( P.10). |
■Home screen

flowchart
graph TD
    A["SSID: ELMOCast_BF8D8013"] --> B["1"]
    C["Password: 59031494"] --> D["2"]
    E["ELMO"] --> F["3"]
    G["ELMO Cast"] --> H["4"]
    H --> I["Direct Link IP: 192.168.168.1 Infrastructure IP"]
    H --> J["Auto Allow: Off"]
    H --> K["Share Screen: On"]
    L["1.7545.10"] --> M["5"]
| Number | Description | |
| 1 | The connection destination of ELMO Cast. | |
| 2 | Password of the access point of ELMO Cast. | |
| 3 | Status of ELMO Cast. | |
| No connection. (2.4GHz) | ||
| No connection. (5.0GHz) | ||
| Direct connection (WiFi) only. | ||
| Connection via router only.(Additional network configuration required.⇒P.20) | ||
| Direct connection and connection via router. | ||
| Latest firmware is available for update.(Perform the update as necessary.⇒P.21) | ||
| 4 | IP address of the dongle. | |
| Direct Link IP | IP address for direct connection. | |
| Infrastructure IP | IP address for connection via router. | |
| 5 | Firmware version. | |
Note
- It is also possible to connect the dongle to an existing network in addition to the "direct connection". Enter the IP address in the browser and log in as an administrator. Then configure the network settings of the dongle from the Settings screen, and connect to a wireless access point on the existing network.
② Basic operations
◆Connecting to a projector or display monitor
- Connect the receiver to the HDMI input port of a projector or a display monitor.
- Connect the receiver and the AC adapter with the USB cable for power supply. Then connect the adapter to a wall outlet.
- In about 3 seconds after the adapter is connected to the outlet, the power of the receiver turns on (Status LED: blue) and the "ELMO Cast" Home screen appears on the screen.

flowchart
graph TD
    A["Monitor or projector"] --> B["HDMI-IN"]
    B --> C["Status LED"]
    C --> D["HDMI dongle"]
    D --> E["5V/1.5A"]
    E --> F["USB cable for power supply"]
    G["AC adapter"] --> H["USB cable for power supply"]
Caution
For stable operation, do not connect the dongle to the USB port of a TV or projector or recording device. Use the supplied AC adapter.
Note
Use the supplied HDMI cable as necessary.
◆Miracast streaming from the document camera
- Select "Miracast" from the menu of the document camera.
- Select "ELMOCast" from a list of connectable devices.
- When the connection is established, the image of the document camera appears on the screen.
※For details of how to do Miracasting, refer to the instruction manual of the respective document cameras.
※When "Miracast automatic connection setting" of the document camera is enabled, Miracast connection is automatically performed from the second time onwards.

natural_image
Blue icon depicting a wireless signal symbol inside a rectangular frame with 'ON' text (no additional text or symbols)
◆Miracasting from other devices
- When using Android OS
- Turn on the Wi-Fi setting of your device.
- Turn on the Miracast (mirroring) setting of your device.
※The menu item may be different depending on the device.
- Select the SSID of the dongle.
- When using Windows OS
- Click the Action Center icon [ ] in the task bar.
- Click the Connect icon [ ]
※If this icon is not displayed, click the Open icon.
- Select the SSID of the dongle from the list.
※If the following message is displayed, it is not possible to do Miracasting:
"Your PC or mobile device does not support Miracast, so it can't project wirelessly."
- When using shortcut keys on Windows OS
- Press [ ] of your device at the same time to open a list of connectable devices.
- Select the SSID of the dongle from the list.
- When using iOS, iPad OS, or Mac OS
- Tum on the WiFi setting of your device and select the SSID of the dongle. Then connect the device to the dongle via WiFi
- Tum on the Mirroring setting [ ] of your device.
- Select the SSID of the dongle from the list.
- When using Chrome OS
- Turn on the Wi-Fi setting of your device and select the SSID of the dongle. Then connect the device to the dongle via Wi-Fi.
- Enter the IP address of the dongle in the Chrome browser and log in as an administrator.
- Enter the network management menu and connect the dongle to the network.
- Open the Chrome browser on your device.
- Tap the Other icon [ : ] on the top right and tap [Cast].
- Select "ELMO Cast" from a list of connectable devices.
Perform Chromecast (mirroring) from your device.
※No matter which OS is used, you need to connect to the network when Miracasting from the Chrome browser.
※For details of the Wi-Fi connection and mirroring operations, refer to the instruction manual of the respective devices.
◆Switching devices to be mirrored
- When performing Miracast streaming
Disconnect the Miracast connection of the device currently used first and start Miracasting of the next device.
- When mirroring via Airplay or Google Cast
By default, if mirroring is started from other device while mirroring is in progress, the screen images of both devices will be displayed simultaneously (up to 4 splits) in one screen.
If you want to switch devices without displaying the images in one screen, disconnect the Miracast connection of the device currently mirrored first and start mirroring of the next device.
Alternatively, change the setting of the Host control menu in the Administrator settings as follows:
③ Advanced operations
◆Configuring settings of the receiver
Connect your device to the receiver via WiFi.
Start the browser on your device and enter the IP address (default value: http://192.168.168.1) of the receiver in the address field to access the Settings screen.
When you access for the first time, the selection screen for the country in which this receiver is used will be displayed.
Select the country from the list and click the button at the bottom to restart. After restarting, the WiFi settings of the selected country will be applied.
Caution
Choosing an inappropriate country may violate the laws and regulations of each country. Be sure to select the country correctly.

Caution
Depending on the device or browser you are using, the setting menu may remain in English. In that case, select the language you want to use from "Device management" → "Language".
■Login to the Administrator account
You can change detailed settings by logging in to the Administrator account. When you log in for the first time, you will be asked to change your password. Follow the steps below to change your password.
You can skip changing your password, but unless you change your password, you will be prompted to change your password every time you log in.
- Logging in to the Administrator account (changing the adminn password)
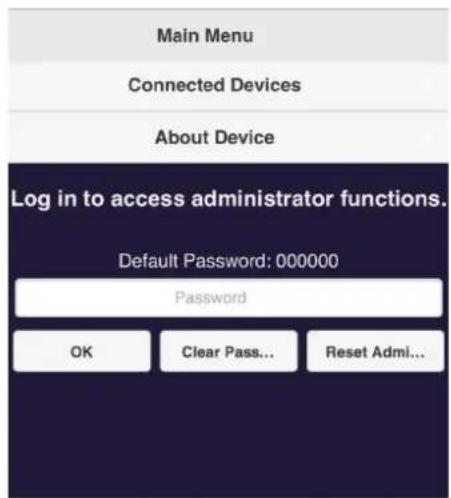
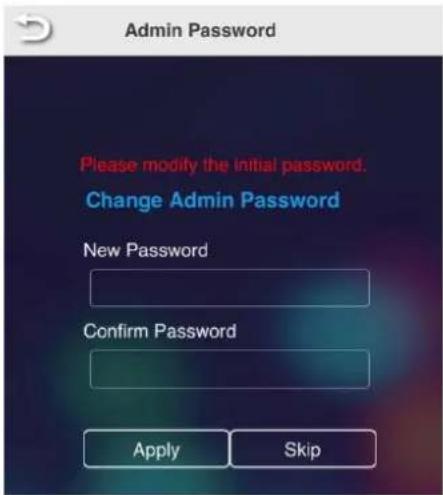

- Log in with the default password "000000".
- The password change screen will be displayed. Set a new password.
※The password needs to be:
- 6 characters or more
- 64 characters or less
- Only alphanumeric characters
-
Other than "000000"
-
When the password change is completed, the message "Password modified successfully! Please log in again." will be displayed. Click "OK".
- You will need to log in again after changing the password.
When the login screen is displayed, log in with the new password.
■ Home menu
| Menu item | Description |
| Connected Devices | To display the device name and IP address of the connected device. |
| Conference Control | To manage casting of each device. |
| Device Management | To set the display language and resolution. |
| Network Management | To configure the network settings. |
| Admin settings | To configure the advanced settings. |
| Reboot | To restart the dongle. |
| About Device | To display basic information such as the SSID of the dongle. |
■Menu descriptions
- Conference control

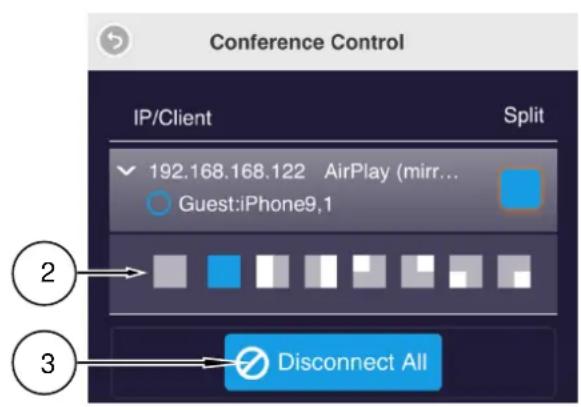
- Click "Split". (①) The menu to select a position to display the screen (②) will appear.
- Select a position to display the screen.
-
Click "Disconnect all" to disconnect all the connected devices.
-
Device management (✓:Default setting)
| Menu item | Description | When the changes take effect | ||
| Language | To set the display language. Default setting: [Auto] (The display language will be set to the language used for the OS.) | Immediately | ||
| Device Name | To change the device name.·Hide SSID | After reboot | ||
| OFF ✓ | To display SSID. | |||
| ON | To hide SSID. | |||
| ·Turn Off | ||||
| OFF ✓ | To enable SSID function. | |||
| ON | To disable SSID function. | |||
| Resolution | To set the output resolution from the HDMI port. Default setting: [Au | After reboot | ||
| Display Mode | To set the display mode. | After reboot | ||
| Fit to Screen ✓ | To maintain aspect ratio of the input source. | |||
| Stretch Full Screen | To display in full screen. | |||
| AirPlay Mode | To enable / disable display via AirPlay.·AirPlay Mirroring | After reboot | ||
| ON ✓ | To enable AirPlay. | |||
| OFF | To disable AirPlay. | |||
| ·AirPlay mode | ||||
| Auto ✓ | To automatically perform mirroring or video streaming. | |||
| Screen Mirroring Only | To support screen mirroring only. | |||
| Screen Mirroring + Video Streaming | To support both screen mirroring and video streaming.※The receiver needs to be connected to the network. | |||
| Air View | Not used. | - | ||
| EZNote | Not used. | - | ||
| Castcode Control | To set castcode. Castcode will be displayed at the bottom of the Home screen.When this setting is set to “Random” or “Fixed”, you will need to enter castcode to perform mirroring or video streaming. | Immediately | ||
| OFF ✓ | To disable castcode. | |||
| Random | To generate castcode randomly. | |||
| Fixed | To generate fixed castcode (4 digit number). | |||
| Maximum Connections | To set the maximum number of devices than can be connected to the receiver wirelessly.4/8✓/16/32 | Immediately | ||
| Android audio streaming | Not used. | Immediately | ||
| Google Cast Support | To set ON✓/OFF the Google Cast function. | Immediately | ||
| Miracast Support | To set ON✓/OFF the Miracast function. | After reboot | ||
| To set ON/OFF√ the PIN code setting. | ||||
| Legacy WiFi mode | To enable WiFi 2.4GHz by setting this mode to ON.※Note that turning this setting ON will degrade the performance. With this receiver, 5GHz band and 2.4GHz band cannot be used the same time.※The frequency band used is that of the device that was first connected to the receiver. | After reboot | ||
| Timed restart | To set ON/OFF√ the automatic restart function.When this setting is set to ON, the receiver will reboot automatically no casting operation is performed for 8 hours. | After reboot | ||
- Network management (✓:Default setting)
| Menu item | Description | When the changes take effect | |
| Connect via 5G router | To display the connection condition of the receiver to the existing network.By selecting this item when the receiver is connected to the WiFi router, it is possible to connect the receiver to the Internet via WiFi | Immediately | |
| Blank √ | No Internet access. | ||
| SSID is displayed | Internet access is established.SSID of the connection destination will be displayed. | ||
| Save WiFi setting | To set whether to save WiFi settings. (ON/OFF)When this setting is ON, the WiFi connection will be established automatically at next reboot. | After reboot | |
| WiFi IP setting | To set the IP address of the receiver.Select whether to set the IP address automatically or manually wh connecting to the Internet with WiFi. | Immediately | |
| WiFi password | To set the WiFi password.The password can be hidden. | Immediately | |
| WiFi channel | To set country, channel, and bandwidth for WiFi. | After reboot | |
- Administrator settings (✓:Default setting)
| Menu item | Description | When the changes take effect | |
| Admin Password | To change admin password. | Immediately | |
| Enterprise WiFi | To change the wireless certificate from WPA2-PSK to WPA2-EAP.A digital certificate is required for WPA2-EAP. | After reboot | |
| Host's Authority | Not used. | - | |
| Host Control | ·Auto Allow Requests | - | |
| ON | It is possible to change screen sharing. | ||
| OFF √ | It is not possible to change screen sharing. | ||
| ·Share Screen | |||
| ON √ | When multiple devices are mirrored, their screen content will be displayed in split-screen display.(Max.4 split screen) | ||
| OFF | When multiple devices are mirrored, their screen content will be displayed one by one. | ||
| Internet Access control | To set the network access of the device directly connected to the receiver. | Immediately | |
| ALL ALLOWED √ | All devices connected are allowed to connect to the existing network through the receiver. | ||
| Only Casting Users | Devices that are casting are allowed to connect to the existing network through the receiver. | ||
| All Denied | No devices are allowed to connect to the existing network through the receiver. | ||
| SNMP | To set ON/ OFF √ the SNMP. | Immediately | |
| My screen | To change the Home screen.※Resolution 1,920×1,080, size 2MB or less, PNG format only | Immediately | |
| Dynamic Wallpaper | Not used. | Immediately | |
| OTA Update URL | Not used. | Immediately | |
| Connection | To select the connection method. | After reboot | |
| Both √ | Devices may connect to the receiver through the existing network by using direct link to WiFi and a router. | ||
| Direct Link Only | Only devices connected to the WiFi of the receiver are allowed to connect.The video streaming performance of the local media improves in this connection. | ||
| Via Router Only | WiFi of the receiver is disabled and only connections from the existing network are allowed. | ||
| Fixed host | Not used. | - | |
| Upgrade | To access the Internet and upgrade to the latest firmware. | After reboot | |
| Reset to Factory default | To reset the setting value to factory default. | After reboot | |
◆Connecting the receiver to the network
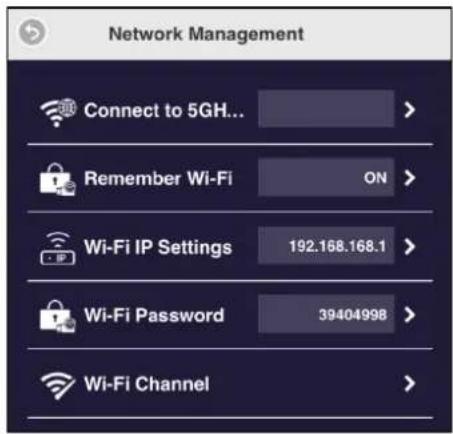

- Establish a WiFi connection between your device and the dongle.
- Access the Settings screen (Home menu) and select the "Network Management" menu. (⇒P.19)
-
Select "Connect via 5G router" to display the "Add network" screen.
Click the Refresh button on the top right to display a list of available access points. -
Select the connection destination and enter the password.
※ If you want to connect to an access point not displayed in the list, select "Add network" and enter the SSID manually.
- When the connection is successfully established, an icon [ ] will be displayed on the top right of the Home screen, indicating that the dongle is connected to the network via a router.
■Connecting to the receiver via WiFi router
- Connect your device to the network to which the dongle is connected.
- Start the browser on your device and enter the Infrastructure IP address displayed at the bottom left of the Home screen in the address field to access the Settings screen of the dongle.
④ FAQ (Frequently Asked Questions)
Q. How do I initialize my dongle?
A. Press and hold the reset button on the side for about 8 seconds or select "Reset to Factory default" from the "Administrator settings" menu to perform initialization. Note that all settings will be reset to factory settings.
Q. I forgot the admin password.
A. Perform initialization. Note that all settings will be reset to factory settings.
Q. I want to use 2.4GHz WiFi.
A. By setting "Legacy WiFi mode" in the "Device management" menu to ON, the 2.4GHz WiFi is enabled. ※Note that turning this setting ON will degrade performance. With this receiver, 5GHz band and 2.4GHz band cannot be used at the same time. ※The frequency band used is that of the device that was first connected to the receiver. For this reason, if the receiver is set to connect to a 5GHz WiFi router, it will automatically connect to the 5GHz WiFi router at startup, and it will not connect to the 2.4GHz band. In that case, perform initialization of the receiver or delete the connection settings to the WiFi router.
Q. The content of online video distribution service cannot be projected.
A. We do not guarantee the playback of content of all online video distribution services. Depending on the content of the online video distribution service, projection may not be possible.
Q. I want to change the channel in order to prevent wireless interference.
A. The default setting for the WiFi channel is "Auto". You can change this setting to "Fixed" from "Network management" → "WiFi channel".
Q. How do I update the firmware of the dongle?
A. When a new firmware is available, an icon will be displayed on the top right of the Home screen. The purpose of new firmware is to correct defects or improve security or improve performance. Update the firmware as necessary.
The firmware update procedure: "Administrator settings" → "Upgrade" → "OK"
When the progress bar reaches 100%, the receiver will restart. The update is now completed.
※The dongle needs to be connected to an external network.
※Do not turn off the power until the update is completed.
Q. How do I turn off the power of the dongle?
A. The dongle does not have a power switch, so disconnect the USB cable from the dongle or disconnect the AC adapter from the outlet.
Q. How do I change the settings such as SSID and password of ELMO Cast?
A. Refer to P.14-P.20.
Q. Even after the initial setting of the dongle is completed, the setting menu is still displayed in English.
A. Depending on the country selected or the browser (IE or Edge) being used, the display language for the setting menu may remain in English. In that case, select the language you want to use from: "Device management" → "Language".
Q. What is the maximum distance the dongle can be used at?
A. The maximum distance to obtain the optimum projection quality will be 10 m.
The communication range may be shortened due to the performance of the output device and the interference of radio waves.
Q. Can I mute the audio?
A. You cannot turn off the audio from the receiver. Set the audio volume of the monitor or projector to which the dongle is connected, or the device that is mirrored to the dongle to 0, or set to mute.
⑤ Troubleshooting
◆Symptom, possible cause, and remedy
Check the following items. If any abnormality is found, consult the dealer from whom you purchased this product or our nearest branch/office.
| Symptom | Possible cause/ remedy |
| No image is displayed. | ·The dongle is not connected to the HDMI input port of a display monitor or projector.·The AC adapter is disconnected from the wall outlet.·The USB cable is disconnected from the USB port of the dongle.·The USB cable is disconnected from the AC adapter.·If this problem occurred after changing the resolution of the dongle, restore the original resolution or set the resolution setting to "Auto", or initialize the dongle.·Display monitor or projector or device to be mirrored does not support HDCP. If any of them does not support HDCP, image output may not be possible. |
| It is not possible to connect the dongle to the network. | ·The connected router is in stealth mode. Cancel stealth mode.·The DHCP of the connected router is dongle or has a static IP address. Enable DHCP or set the IP setting of the receiver to fixed IP address.·The subnet mask is not class C. Only class C subnet mask is supported.·The proxy is set.·The "Connection" setting in "Administrator settings" is set to "Direct Link Only". With this setting, the device cannot connect to the network. Change the setting.·Initialize the receiver. |
| It is not possible to do mirroring. | ·Mirroring may not be possible depending on the security settings of the device. Change the security settings such as temporarily turning off the firewall settings. |
| Projected video is jerky and not smooth. | ·The CPU of the device is not powerful enough. In order to project a screen with a lot of movement like a movie, compared to a video with little movement like a presentation, a high-spec device is required.·The network environment is not good enough. (For example, the wireless strength is weak.) Improve the network environment by changing the wireless channel of the WiFi access point or changing the layout of each device. |
| When the number of devices for simultaneous projection is increased, the projected image sometimes freezes. | ·The network environment is not good enough. (For example, the wireless strength is weak.) Improve the network environment by changing the wireless channel of the WiFi access point or changing the layout of each device. |
| No audio is output. | ·A monitor or projector that cannot output audio is used.·The audio volume of the monitor or projector is set to 0 or is set to mute.·The audio setting of the monitor or projector is not set to HDMI input.·The audio volume of the device to be mirrored is set to 0, or is set to mute. |
| The operation is not stable, such as the output image is distorted or the receiver restarts unintentionally. | ·The power is supplied to the receiver from the USB port of a monitor or projector or other AC adapter than the supplied one. Be sure to use the supplied AC adapter. |
| The receiver does not appear in the list of connection destination. | ·Miracast projection is in progress. During miracast projection other device cannot be connected and is not displayed in the list of connection destination. The device will be displayed in the list after the current miracast projection is disconnected.·"Hide SSID" is set to ON in "Device name" in "Device management". Change the setting or initialize the receiver. |
| Error message appears when entering the password. | ·Wrong password has been entered. (For example, uppercase letter is used for lowercase letter or number “0” is used for alphabet “O”.)Enter the password correctly. |
| IP address is not displayed in the Home screen. | ·If the "Connection" setting in "Administrator settings" is set to "Via router only", the Direct Link IP address will not be displayed. Change the setting.·If the "Connection" setting in "Administrator settings" is set to "Direct link only", Infrastructure IP address will not be displayed. Change the setting. |
| Password is not displayed in the Home screen. | ·If the "Connection" setting in "Administrator settings" is set to "Via router only", the password will not be displayed. Change the setting.·"WiFi password" setting in "Network management" is set to "Hide password".Change the setting. |
| SSID is not displayed in the Home screen. | ·"Hide SSID" is set to ON in "Device name" in "Device management".Change the setting or initialize the receiver. |
About long-term usage of this product
Due to the lifetime of its parts, if this product is used for longer than the warranty period, its performance and quality may deteriorate. In this case, we will replace the parts for a charge. Consult the dealer from whom you purchased this product or our nearest branch/office.
⑥ Specifications
◆Hardware
| Model name | ELMO Cast |
| Network standards | IEEE802.11a/b/g/n/acBy default, only 5GHz band can be used.The 2.4GHz band and 5GHz band cannot be used simultaneously. |
| Protocol | TCP / IP, SNMP |
| IP address setting | DHCP (Auto) / Manual IP address configuration |
| HDMI output resolution | 4,096×2,160 (24P) ※13,840×2,160 (24/25/30P) ※11,920×1,080 (24/50/60P)1,280×720 (50/60)「720p」「1080p」progressive 60Hz display supported.「720p」「1080p」interlace-method not supported. |
| Interface | Video output : HDMI1.4Power : USB Type C |
| Power supply | USB power supply (5V / 1.5A)For stable operation, do not connect the dongle to the USB port of a TV or projector or recording device. Use the supplied AC adapter. |
| Operating temperature | 0~40°C |
| Power consumption | In standby status : 3WIn projection : 6W |
| External dimensions | Dongle : L97×W32×H11mm (HDMI connector not included.)Package box : L134×W80×H72mm |
| Weight | Dongle : 120gReceiver+package box+ accessories : 254g |
※1 Video files such as mirroring video files (the operation screen of a computer or smartphone) is will be displayed on TV at a maximum resolution of 1080p (1920x1080) after being scaled.
◆System requirements
| OS | Recommended conditions | Recommended conditions of hardware |
| iOS device | iOS10 or later | Recommended model:iPhone 5 or lateriPad 4th generation or lateriPad mini 2 or later |
| Android device | Android4.4 or later | - |
| Windows PC | Windows 8.1 or later※Windows Starter edition, Windows RT8 / RT8.1, Windows 10S (S mode) not supported. | CPU : Intel Core i5 (2GHz or higher processor)RAM : 2GB or higher (8GB or higher recommended) |
| Macintosh | Mac OS 10.11 or later | CPU : Intel multi-core processorRAM : 2GB or higher (8GB or higher recommended)Disk space : more than 300MB empty space |
| Chrome OS device | All Chrome OS | Computer with Chromebook or ChromeOS installed |
※Compliant with Airplay and Miracast.
Note) Linux not supported.
※About Airplay: We do not guarantee the same performance as Apple TV.
※If you use Miracast for image projection, split screen display is not possible.
※The supported OS may change due to product updates.
※We do not guarantee the operation on the original OS based on the above OS.
※Even in non-compatible OS such as windows7, casting may be possible with Chrome browser.
※By default, only 5GHz band can be used. However, you can connect to a 2.4GHz Wi-Fi network by setting "Legacy WiFi mode" in the "Device Management" menu to ON.
■ Trademarks and licenses
ELMO is the registered trademark of ELMO Co., Ltd.
Apple TV, Airplay, iPhone, iPad, Mac OS, and Macintosh are registered trademarks of Apple Inc. in the U.S. and other countries.
iOS is a trademark or registered trademark of Cisco in the U.S. and other countries and is used under license.
Android, Chromecast, Chrome OS, Chromebook, are trademarks or registered trademarks of Google Inc.
Miracast is a registered trademark of Wi-Fi Alliance.
Windows is a registered trademark of Microsoft Corporation in the U.S. and other countries.
All other company and product names described in this manual are trademarks or registered trademarks of their respective companies.
Attention
- This product is designed to be used in industrial environment. If it is used in a residential area or in an adjacent area thereto, harmful interference to radio or television reception may occur.
- Repair parts
Repair parts are the items which are needed to maintain product functionality. The holding period of such repair parts is 5 years after the product discontinuation, which is equal to the repair period we will accept.
株式会社エルモ社
〒457-0078
名古屋市南区塩屋町一丁目3番地4
Web : https://www.elmo.co.jp
製品のお問い合わせは、下記オフィスへ
□ 札幌オフィス
6851 Jericho Turnpike
Suite 145
Syosset, NY 11791
Tel. (516) 501-1400
Fax.(516) 501-0429
E-mail : elmo@elmousa.com
Web : https://www.elmousa.com/
ELMO Europe SAS
□Headquarters
40549 Düsseldorf Germany
Tel. +49 (0) 211 544756 40
Fax. +49 (0) 211 544756 60
E-mail: info@elmo-germany.de
Web :
https://www.elmo-germany.de/
□Middle East Branch
5WA-129, Dubai Airport Free Zone,
P.O Box 371556, Dubai,
United Arab Emirates
Tel. +971-(0)4-260-2390
Fax. +971-(0)4-260-2392
Web : https://www.elmoeurope.com
ELMO CO., LTD.
1-3-4, Shioya-cho, Minami-ku
Nagoya, 457-0078, Japan
- ■ Important safeguards
- ■ Lightning
- ■ Overloading
- ■ Object and Liquid Entry
- ■ Servicing
- ■ Damage Requiring Service
- ■ Replacement Parts
- ■ Safety Check
- ■ Heat
- CAUTION
- WARNING
- TO REDUCE THE RISK OF FIRE OR ELECTRIC SHOCK, DO NOT EXPOSE THIS PRODUCT TO RAIN OR MOISTURE.
- FOR UNITED STATES USERS:
- INFORMATION
- USER-INSTALLER
- CAUTION:
- Usage precautions
- ■ About electric waves used by this product
- ■ Precautions for using the product in 5.0GHz band or 2.4GHz band
- ① Before use
- ◆Package contents
- - AC adapter
- ◆Part names
- ■Dongle
- Note
- ② Basic operations
- ◆Connecting to a projector or display monitor
- ◆Miracast streaming from the document camera
- ◆Miracasting from other devices
- ◆Switching devices to be mirrored
- ③ Advanced operations
- ◆Configuring settings of the receiver
- ■Login to the Administrator account
- - Logging in to the Administrator account (changing the adminn password)
- ■Menu descriptions
- - Conference control
- ◆Connecting the receiver to the network
- ■Connecting to the receiver via WiFi router
- ④ FAQ (Frequently Asked Questions)
- How do I initialize my dongle?
- I forgot the admin password.
- I want to use 2.4GHz WiFi.
- The content of online video distribution service cannot be projected.
- I want to change the channel in order to prevent wireless interference.
- How do I update the firmware of the dongle?
- How do I turn off the power of the dongle?
- How do I change the settings such as SSID and password of ELMO Cast?
- Even after the initial setting of the dongle is completed, the setting menu is still displayed in English.
- What is the maximum distance the dongle can be used at?
- Can I mute the audio?
- ⑤ Troubleshooting
- ◆Symptom, possible cause, and remedy
- About long-term usage of this product
- ⑥ Specifications
- ■ Trademarks and licenses
- Attention
- 株式会社エルモ社
- ELMO Europe SAS
- ELMO CO., LTD.
Brand : Elmo
Model : Cast
Category : Wireless pointer