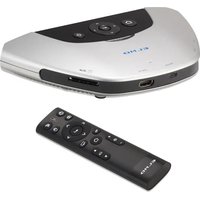
HS-2 - Wireless pointer Elmo - Free user manual and instructions
Find the device manual for free HS-2 Elmo in PDF.


| Product Type | Wireless Presenter / Pointer |
| Brand | Elmo |
| Model | HS-2 |
| Dimensions (approx.) | 12.0 cm x 2.0 cm x 1.5 cm |
| Weight (approx.) | 30 g (without battery) |
| Power Source | 1x AAA battery (1.5 V) |
| Battery Life | Up to 12 months under normal use |
| Wireless Technology | 2.4 GHz RF |
| Operating Range | Up to 20 m (65 ft) |
| Laser Type | Class 2 laser, < 1 mW output |
| Laser Color | Red (635-650 nm) |
| Functions | Laser pointer, slide forward/back, black screen toggle |
| Compatibility | Windows, macOS, Linux; USB receiver included |
| Interface | USB Type-A receiver (nano) |
| Number of Buttons | 5 buttons (laser, slide up/down, black screen, power) |
| Construction Material | ABS plastic body |
| Cleaning Instructions | Wipe with a soft, dry cloth; do not use liquids |
| Storage Temperature | -10°C to 50°C (14°F to 122°F) |
| Operating Temperature | 0°C to 40°C (32°F to 104°F) |
| Regulatory Approvals | FCC, CE, RoHS |
| Package Contents | Presenter, USB receiver, AAA battery, user manual |
Frequently Asked Questions - HS-2 Elmo
User questions about HS-2 Elmo
0 question about this device. Answer the ones you know or ask your own.
Ask a new question about this device
Download the instructions for your Wireless pointer in PDF format for free! Find your manual HS-2 - Elmo and take your electronic device back in hand. On this page are published all the documents necessary for the use of your device. HS-2 by Elmo.
USER MANUAL HS-2 Elmo
Wireless Presentation System
HS-2
Instruction Manual

natural_image
Line drawing of a mobile phone with control buttons and lens (no text or symbols)■ IMPORTANT SAFEGUARDS
Make sure to read the "IMPORTANT SAFEGUARDS" in this guide before using this product.
■ Read Instructions
All the safety and operating instructions should be read before the appliance is operated.
■ Retain Instructions
The safety and operating instructions should be retained for future reference.
■ Heed Warnings
All warnings on the product and in the operating instructions should be adhered to.
■ Follow Instructions
All operating and use instructions should be followed.
■ Cleaning
Unplug this product from the wall outlet before cleaning. Do not use liquid cleaners or aerosol cleaners. Use a damp cloth for cleaning.
■ Attachments
Do not use attachments not recommended by the product manufacturer as they may cause hazards.
■ Water and Moisture
Do not use this product near water - for example, near a bath tub, wash bowl, kitchen sink, or laundry tub, in a wet basement, or near a swimming pool, and the like.
■ Placement
Do not place this product on an unstable cart, stand, tripod, bracket, or table. The product may fall, causing serious injury to a child or adult, and serious damage to the product. Use only with a cart, stand, tripod, bracket, or table recommended by the manufacturer, or sold with the product. Any mounting of the product should follow the manufacturer's instructions, and should use a mounting accessory recommended by the manufacturer.
Do not place the following items near the air exhaust vent on the bottom as warm air blows out from the exhaust vent:
- Spray cans (Heat may increase the pressure inside the can and may cause an explosion.)
- Metals (They may become hot and may cause an accident or injury.)
• Houseplants and pets - Items that are deformed or adversely affected by heat
■ Ventilation
Slots and openings in the cabinet are provided for ventilation and to ensure reliable operation of the product and to protect it from overheating, and these openings must not be blocked or covered. The openings should never be blocked by placing the product on a bed, sofa, rug, or other similar surface. This product should not be placed in a built-in installation such as a bookcase or rack unless proper ventilation is provided or the manufacturer's instructions have been adhered to.
■ During use and immediately after use, do not touch anywhere near the air exhaust vent on the bottom as they may become hot and may cause burns.
■ Power Sources
This product should be operated only from the type of power source indicated on the marking label. If you are not sure of the type of power supply to your home consult your appliance dealer or local power company.
■ Grounding or Polarization
This product may be equipped with either a polarized 2-wire AC line plug (a plug having one blade wider than the other) or a 3-wire grounding type plug, a plug having a third (grounding) pin. If the 2-Wire polarized plug will not fit in the outlet, try reversing the plug. If the plug still fails to fit, contact your electrician to replace your obsolete outlet. Do not defeat the safety purpose of the polarized plug. The 3-wire grounding type plug will fit into a grounding type power outlet.
This is a safety feature. If you are unable to insert the plug into the outlet, contact your electrician to replace your obsolete outlet. Do not defeat the safety purpose of the grounding type plug.
■ Power-Cord Protection
Power-supply cords should be routed so that they are not likely to be walked on or pinched by items placed upon or against them, paying particular attention to cords at plugs, convenience receptacles, and the point where they exit from the product.
■ Lightning
For added protection for this product during a lightning storm, or when it is left unattended and unused for long periods of time, unplug it from the wall outlet and disconnect the antenna or cable system. This will prevent damage to the product due to lightning and power-line surges.
■ Overloading
Do not overload wall outlets, extension cords, or integral convenience receptacles as this can result in a risk of fire or electric shock.
■ A product and cart combination should be moved with care. Quick stops, excessive force, and uneven surfaces may cause the product and cart combination to overturn.

■ Object and Liquid Entry
Never push objects of any kind into this product through openings as they may touch dangerous voltage points or short-out parts that could result in a fire or electric shock. Never spill liquid of any kind on the product.
Servicing
Do not attempt to service this product yourself as opening or removing covers may expose you to dangerous voltage or other hazards. Refer all servicing to qualified service personnel.
■ Damage Requiring Service
Unplug this product from the wall outlet and refer servicing to qualified service personnel under the following conditions:
- When the power-supply cord or plug is damaged.
- If liquid has been spilled, or objects have fallen into the product.
- If the product has been exposed to rain or water.
- If the product does not operate normally by following the operating instructions. Adjust only those controls that are covered by the operating instructions as an improper adjustment of other controls may result in damage and will often require extensive work by a qualified technician to restore the product to its normal operation.
- If the product has been dropped or damaged in any way.
- When the product exhibits a distinct change in performance - this indicates a need for service.
■ Replacement Parts
When replacement parts are required, be sure the service technician has used replacement parts specified by the manufacturer or have the same characteristics as the original part.
Unauthorized substitutions may result in fire, electric shock or other hazards.
■ Safety Check
Upon completion of any service or repairs to this product, ask the service technician to perform safety checks to determine that the product is in proper operating condition.
■ Heat
The product should be situated away from heat sources such as radiators, heat registers, stoves, or other products (including amplifiers) that produce heat.


The lightning flash with arrowhead symbol, within an equilateral triangle, is intended to alert the user to the presence of uninsulated "dangerous voltage" within the product's enclosure that may be of sufficient magnitude to constitute a risk of electric shock to persons.

The exclamation point within an equilateral triangle is intended to alert the user to the presence of important operating and maintenance (servicing) instructions in the literature accompanying the product.

This symbol [crossed-out wheeled bin WEEE Annex IV] indicates separate collection of waste electrical and electronic equipment in the EU countries.
Please do not throw the equipment into the domestic refuse. Please use the return and collection systems available in your country for the disposal of this product.
WARNING
TO REDUCE THE RISK OF FIRE OR ELECTRIC SHOCK, DO NOT EXPOSE THIS PRODUCT TO RAIN OR MOISTURE.
The connection of a non-shielded equipment interface cable to this equipment will invalidate the FCC Certification or Declaration of this device and may cause interference levels which exceed the limits established by the FCC for this equipment. It is the responsibility of the user to obtain and use a shielded equipment interface cable with this device. If this equipment has more than one interface connector, do not leave cables connected to unused interfaces. Changes or modification not expressly approved by the manufacturer could void the user's authority to operate the equipment.
FOR UNITED STATES USERS:
INFORMATION
This equipment has been tested and found to comply with the limits for a Class B digital device, pursuant to Part 15 of the FCC Rules. These limits are designed to provide reasonable protection against harmful interference when the equipment is operated in a commercial environment. This equipment generates, uses, and can radiate radio frequency energy and, if not installed and used in accordance with the instruction manual, may cause harmful interference to radio communications. Operation of this equipment in a residential area is likely to cause harmful interference in which case the user will be required to correct the interference at his own expense.
USER-INSTALLER
CAUTION:
Your authority to operate this FCC verified equipment could be voided if you make changes or modifications not expressly approved by the party responsible for compliance to Part 15 of the FCC rules.
■ BEFORE YOU USE
■ Be sure to use the supplied power cord and the AC adapter.
The power cord and AC adapter that come with this product are for this product only. Do not use them with another product.
- Be sure to use the power cord applicable to your local power specifications. If the product was sold in Japan, use the AC adapter sold with the product with 100 VAC and 50 or 60 Hz.
■ When storing the product, do not leave it under direct sunlight or by heaters. It may be discolored, deformed, or damaged.
■ Do not place this product in any humid, dusty, salt bearing wind, or vibrating locations.
Use it under the following environmental conditions:
Temperature : 0°C\~ 40°C
Humidity : 30%\~ 85%(No condensation)
■ Use a soft, dry cloth for cleaning. Do not use any volatile solvent such as thinner or benzene.
■ Follow the guidelines below to prevent the unit from dropping or overturning. - Use the product on a stable base, desk, or table. Do not place the product on an unstable base or slanted location. - Place or wire the product so as to prevent the cables from being pulled or drawn.
If this product is used for longer than the warranty period, its performance and quality may deteriorate due to the lifetime of its parts. For parts replacement (on chargeable basis), consult the dealer from whom you purchased this product or our branch/office near your location.
■ Battery precautions - If this product is not going to be used for a long time, take the batteries out of the remote control. - Do not use rechargeable batteries. - Do not try to recharge or short-circuit the batteries. - When disposing of used batteries, follow the instructions of your local government. - Insert from one side and pay particular attention to the polarity (+/- directions). - Children may ingest small batteries; always keep batteries safe and out of reach. - If a battery is swallowed, consult a doctor immediately as this could result in asphyxiation or be an obstacle to digestion, etc. - If any liquid from a battery leaks onto your skin or clothes, flush the area with clean water immediately. If it gets into your eye, flush immediately with clean water and then contact a doctor.
■ Copyright Unless used for personal use, it is prohibited strictly under copyright law to use any photo files without the prior consent of the copyright holder. Even if using for personal use, be careful that there could be a situation where video or audio recording is restricted or illegal.
The contents of this document are subject to change without notice. The latest version is available from the following official website: https://www.elmousa.com https://www.elmoeurope.com
It is prohibited under copyright law to use or copy any part or the whole of this document without our prior written consent.
■ ELMO shall not be liable for any claim for damage or loss of earnings or any claim raised by a third person due to the use, malfunction or repair of this product.
■ TABLE OF CONTENTS
■ IMPORTANT SAFEGUARDS .... 1
■BEFORE YOU USE 4
■ TABLE OF CONTENTS 5
① PREPARATION....7
◆Package contents....7
② PART NAMES AND FUNCTIONS 8
◆ Name of each part 8
◆ Operating panel 9
◆Front panel 10
◆Rear panel 11
◆ Remote control 12
◆ Fixing HS-2 to a desk....13
◆ About the FAN 13
3 BASIC OPERATIONS ...... 14
◆ Connecting to a projector or monitor....14
◆ Connecting to a power source....14
◆ Power on/off....15
◆ Setting the destination....16
◆ Inserting batteries to the remote control …… 16
4 USING THE HS-2....17
■ Cast app(Display app)....17
◆ Connecting 17
◆ Displaying 20
◆ Operating the HS-2....22
◆ Recording 24
◆Audio output 25
◆ Selecting the file …… 31
■ EZT(Remote Meeting) 32
◆Operation of EZT 32
- Startup 32
- Joining a Meeting 33
- Configuring the Meeting Settings 33
◆ Available Operations during the Meeting …… 39
- Menu bar Operations 39
- Configuring the Security Settings....40
- Configuring the Participants Settings 41
- Sharing the Screen 42
■ ELMO Play 44
◆Installing an app....44
◆ Uninstalling an app 44
6 CONFIGURING THE SETTINGS 45
◆Password screen 45
◆ Settings screen 46
◆ Changing the device name....51
◆ Security setting 52
◆ Connecting to the network....53
◆ Network proxy settings …… 55
◆ Pairing of the remote control....56
◆ Resolution of the monitor …… 57
◆Date and time settings....57
◆ Keyboard selection 58
◆Mic.&speaker settings 59
◆ App selection …… 60
◆Installing the client certificate 61
7 FAQ (Frequently asked questions and answers) 66
⑧ TROUBLESHOOTING 72
◆ Symptoms and solutions....72
9 SPECIFICATIONS....74
◆ Video input....75
◆ Video output....76
◆ Video recording....76
◆ Still image recording 76
◆List of supported media types 77
◆ System requirements ...... 77
■ TRADEMARKS AND LICENSES 78
1 PREPARATION
◆ PACKAGE CONTENTS
The items below are included with the product. If any item is missing, contact the dealer from whom you purchased the product.

natural_image
Line drawing of a mobile phone casing with buttons and display (no text or symbols)HS-2 (Main unit)

natural_image
Line drawing of a cable and rectangular electronic device (no text or symbols)AC adapter
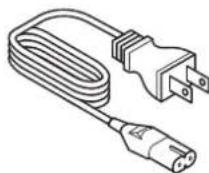
Power cable

Remote control
※Batteries are not included in the package. Please use AAA batteries.

natural_image
Simple line drawing of a blank rectangular book or document (no text or symbols)Quick Start Guide

Warranty Card
(For Japan/
North America only)

IMPORTANT SAFEGUARDS
② PART NAMES AND FUNCTIONS
◆NAME OF EACH PART


| Name Function | |
| 1 Operating panel ⇒P.9 | |
| 2 Front panel ⇒P.10 | |
| 3 Rear panel ⇒P.11 | |
| 4 Fixing screw holes ⇒P.13 | |
| 5 Intake vent | |
| 6 Exhaust vent |
※The HS-2 has a built-in cooling fan.
◆ OPERATING PANEL
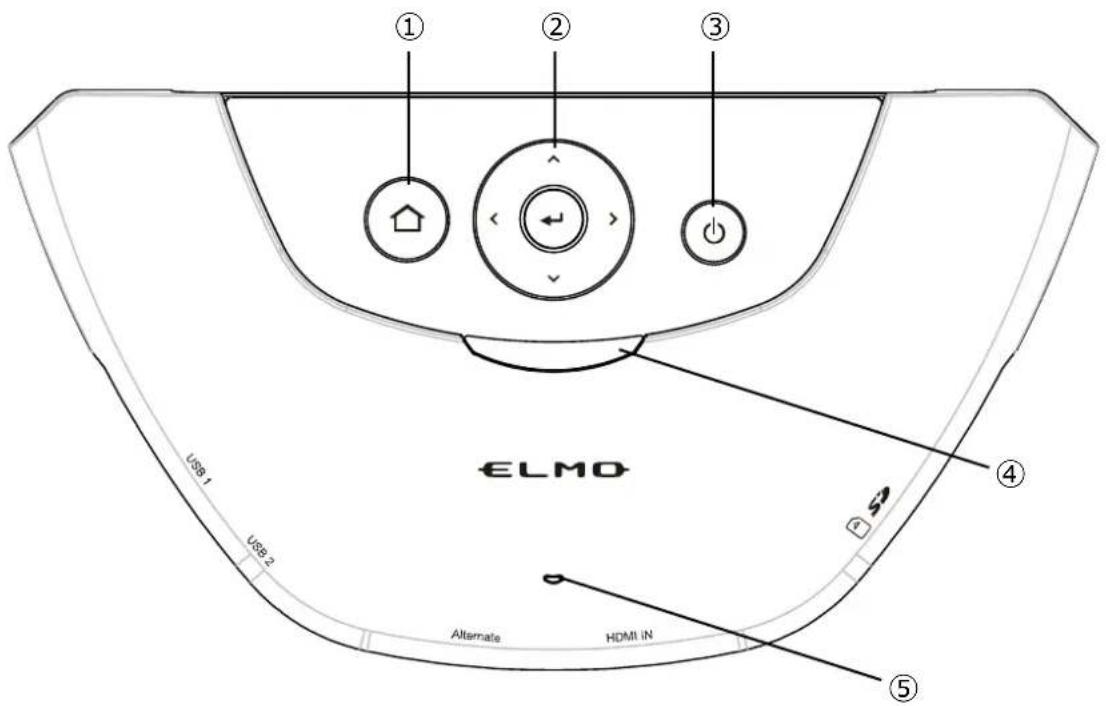
| Mark Name Function | |||
| 1 |  | Home button To display the Display selection screen. | |
| 2 |  | D-pad / Enter button | Up/Down/Left/Right buttons: To move the cursor in the direction of the arrow.Enter button: To decide operation. |
| 3 |  | Power button | To turn ON/OFF the HS-2.Press once: To turn ON. (Power LED: lights up blue)Press again: To turn OFF. (Power LED: lights up red) |
| 4 | PowerLED | To indicate the status of the HS-2.Flashing red: StartingSolid red: StandbySolid blue: In operation | |
| 5 | [4kWS] | Built-in microphone | To be used as an audio source for recording and EZT(video conference). |
◆FRONT PANEL

| Name Function | ||
| 1 | USB2.0 ports [Type-A] | To connect a USB device [USB2.0] such as a mouse USB flash drive, microphone, and speaker. |
| 2 | USB Type-C Input port [DisplayPort Alternate] | To connect a device with USB Type-C port (such as Mac, Chromebook, and Windows that supports DisplayPort Alternate (Alt) mode) for image input.※Use a USB Type-C cable that supports DisplayPort Alternate (Alt) mode. |
| 3 | HDMI Input port [Type-A] | To connect a device with HDMI Type-A port (such as a computer and document camera) for image input. |
| 4 | SD card slot | To insert the SD card or SDHC card (Class 10 or higher) for image recording or file playback. |

| Name Function | ||
| 1 | LAN port [RJ45] | To connect a LAN cable to access the external network (For EZT,web browsing, displaying digital textbook,video watching, etc.) |
| 2 | HDMI Output port [Type-A] | To connect a device with HDMI Type-A port (such as a monitor and projector) for image output. |
| 3 | USB3.0 port [Type-A] | To connect a USB device [USB3.0] such as a mouse, USB flash drive, microphone, and speaker. |
| 4 | USB2.0 port [Type-A] | To connect a USB device [USB2.0] such as a mouse, USB flash drive, microphone, and speaker. |
| 5 | DC IN 12V To connect | the supplied AC adapter. |
| 6 | Security slot | To connect a security wire. Use this slot when installing in a classroom to prevent theft. |
◆REMOTE CONTROL

| Mark | Name Function | ||
| 1 |  | Power button To | turn ON/OFF the HS-2. |
| 2 |  | Mute button | To turn ON/OFF the audio output.You can switch between mute and unmute by pressing this button. |
| 3 |  | Capture button | To capture the current image.※This function is available only on the Cast app or Paint app. |
| 4 |  | Cursor button | When this button is pressed the cursor appears. The cursor disappears when this button is pressed again. Move the cursor to an icon and press the Enter button to operate. |
| 5 |  | D-pad / Enter button | Up/Down/Left/Right buttons: To move the cursor in the direction of the arrow.Enter button: To decide operation. |
| 6 |  | Return button To | return to the previous screen. |
| 7 |  | EZT button | To start EZT. If this button is pressed during the screen sharing, the screen sharing will be cancelled. |
| 8 |  | Home button To | go to the Display selection screen. |
| 9 | [38KW] | Volume button To | adjust the volume. (+: increase -: decrease) |
| 10 | [CDBD] | Channel button | To switch the channel of the image to be input to HS-2. |
◆FIXING HS-2 TO A DESK
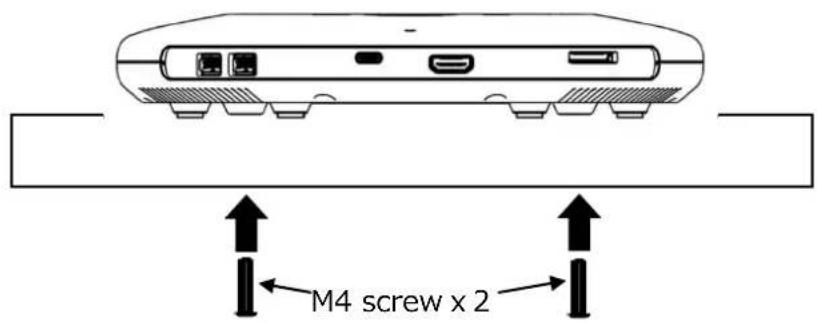
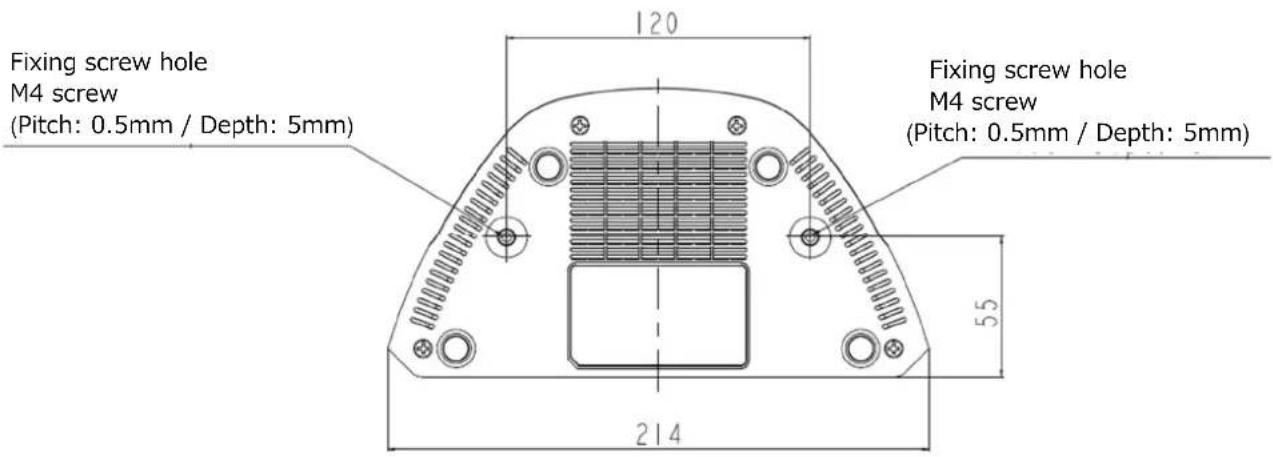
When fixing the HS-2 to a desk, use M4 screws (pitch 0.5 mm) with a length that allows you to insert 5 mm from the bottom of the main unit.
■ Securing unit
■ Dimensions
Note
Select a screw that matches the thickness of the desk.
If the screw length is insufficient, the HS-2 cannot be affixed properly.
(For example, if the desk is 20 mm thick, use 25 mm screws.)
◆ ABOUT THE FAN
If the built-in fan fails, the unit may become hot or unstable. If the "Fan error" message is displayed, turn off the HS-2 by clicking the "OK" button and stop using the unit. Request a replacement at an additional charge.
Fan error!
Fan error! System powers off.
OK

BASIC OPERATIONS
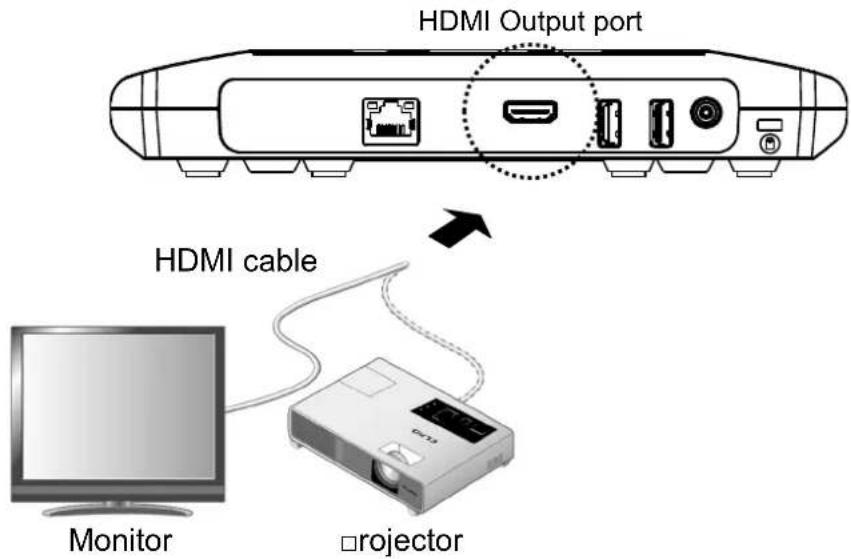
◆ CONNECTING TO A PROJECTOR OR MONITOR
After connecting the HDMI cable to the HDMI Output port of the HS-2, connect it to the HDMI port of the monitor or projector.
◆ CONNECTING TO A POWER SOURCE
Connect the power cable and the AC adapter. Connect the AC adapter to the DC IN 12V port. Then, connect the power cable to a wall outlet.
The power of the HS-2 enters the standby state. (□ower LED: flashes red -> lights up red)
![□ower LED [DC IN 12V] port Wall outlet AC adapter □ower cable](/content/2026/05/1080990/images/4051657ef9af08500b345dd4b64609979af8d42550625cf17749cf32e8728420.jpg)
◆ POWER ON/OFF
Press the Power button to turn on the power. (Power LED: lights up blue) Press the Power button again to turn off the power. (Power LED: lights up red)

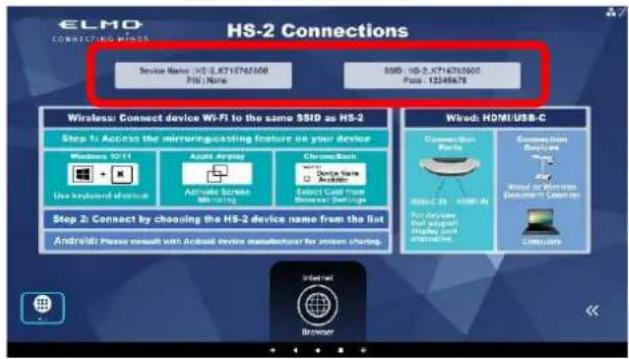
The image signal from the device connected via HDMI or USB Type-C is output from the HDMI Output port. If a device is connected to the HS-2 with a cable and there is no image signal input from the device, the Connection screen appears on the screen.
As shown in the picture, it is possible to do mirroring by connecting to the "Device Name" displayed on the screen via Wi-Fi.
※Depending on your environment, it may take some time to startup or display Device Name and SSID.
Connection destination
◆ SETTING THE DESTINATION
The Destination selection screen is displayed when the HS-2 is started for the first time or after initialization. Select the country you want to use the HS-2 and press the Enter button [←] on the remote control to set the destination.

Depending on your environment, the time zone setting needs to be set.
Set the time zone when the Time Zone setting screen is displayed after selecting the destination.

◆ INSERTING BATTERIES TO THE REMOTE CONTROL
Remove the cover in the back of the remote control and insert 2pcs of AAA batteries.

natural_image
Simple line drawing of a rectangular object with a curved handle and a black arrow pointing downward (no text or symbols)Note
- □ay attention to the direction of the battery.
● Batteries are not included in the product. - Refer to “⑥ CONFIGURING THE SETTINGS ◆ □airing of the remote control(⇒□.56)” for details of the pairing of the remote control.
4 USING THE HS-2
■ Cast app(Display app)
The HS-2 supports wireless mirroring without installing a dedicated app or using a USB dongle regardless of Windows, iOS, Android, or Chrome OS.
In addition, devices can be connected with cables using the HDMI Input port or USB Type-C port [DisplayPort Alternate].
Up to 4 screens can be switched and displayed at the same time.
Immediately after startup, the Connection screen is displayed.
Caution
- You can use up to 4 units in total, wired and wireless. You can use up to 2 wireless units when 2 wired units are connected, and up to 3 wireless units when 1 wired unit is connected.
- If you want to connect more than 5 devices, disconnect one of the connected devices.
Note
Compatible products
The L-12W, MA-1, and MO-2 support MiraCast.
Devices that have HDMI Output port can be connected to the HDMI Input port.
◆ CONNECTING
■ Connecting with a cable
The image from the device can be displayed by connecting to the HDMI Input port or USB Type-C port [DisplayPort Alternate].
The image being input appears during startup when the device is connected to the HDMI Input port or USB Type-C port.
(Input priority: HDMI Input > USB Type-C [DisplayPort Alternate])

natural_image
Diagram of a computer chassis showing internal components and two upward arrows indicating orientation (no text or symbols present)USB Type-C port
[DisplayPort Alternate]
HDMI Input port
■ Connecting wirelessly
The image from the device that supports mirroring (such as MiraCast, Air□lay, and Chrome(Google)Cast) can be mirrored.
※When using with the □IN setting enabled, make sure that each device is connected before entering the □IN for wireless connection.
▶Mirroring via MiraCast
※For details of the mirroring via MiraCast with the document camera, refer to the instruction manual of the document camera.
- When using Android OS
- Turn on the Wi-Fi setting of your device.
- Select [Cast] in the settings menu of your device.
※The menu item may be different depending on the device.
※If the list does not appear, enable the wireless display setting.
- Select [HS-2_******] from the list.
※It is possible to change the name of the HS-2 to be displayed in the list from "Device name setting".
![Select [Cast] in the Display settings menu. Caution Display Brightness level Wolppar Sleep After 10 minutes of lighting Press power button twice for camera Closely open camera without clicking your system Screen cover Colors Font size Shell When device is rotated Cast Enable the wireless display. Select the cast to connect from the list. Cast Enable the wireless display.](/content/2026/05/1080990/images/8d293711d4845774aae057eb53a95eb95b7d3cca760f2b1208a12c8e07918cc4.jpg)
● Depending on the device the connection procedure may vary.
- Android devices do not support the touch back control function.
● Some Android devices may not be used with the HS-2.
- When using Windows OS(Windows10)
- Click the Action Center icon [ ] in the task bar.
- Click the Connect icon [ ] If this icon is not displayed, click the Open icon.
- Select [HS-2_*****] from the list.
※It is possible to change the name of the HS-2 to be displayed in the list from "Device name setting".

Select the device to connect from the list.
※ For Windows OS(Windows10), shortcut keys can also be used.
- □ress the Windows logo key [ ] on the keyboard of your device and the K key [ ] at the same time to open the connection list.
- Select [HS-2_******] from the list.
▶Mirroring via Air□lay
- When using iOS, i□ad OS, or Mac OS
-
Turn on the Wi-Fi setting of your device and select the SSID of the HS-2. Then connect the device to the HS-2 via Wi-Fi.
-
From the Control Center of your device, turn on the Screen Mirroring [☐].
-
Select [HS-2 *****] from the list.
※It is possible to change the name of the HS-2 to be displayed in the list from "Device name setting".

Select "Screen Mirroring".
Select the device (HS-2) to connect from the list.
▶Mirroring via Chrome(Google)Cast
- When using Chrome OS, Windows OS, or Mac OS
- Connect the HS-2 to the external network (Internet) via LAN or Wi-Fi from the Settings menu [💡]. ([Settings] > [System Settings] > [Network and Internet] > [Wi-Fi]).
- Turn on the Wi-Fi setting of your device and select the SSID of the HS-2.
- Open the Chrome browser.
- Tap the icon [ : ] on the top right and tap [Cast].
- Select [HS-2 *****] from the list.
※It is possible to change the name of the HS-2 to be displayed in the list from "Device name setting".

Caution
- No matter which OS is used, you need to connect to the network when casting from the Chrome browser. The password can be entered with the D-pad on the remote control.
- For details of the Wi-Fi connection and mirroring operations, refer to the instruction manual of the respective devices.
- “Cast Desktop” option of Chrome(Google)Cast may not be used on Mac OS. In that case, select “Cast Tab” option or use Air□lay.
- When recording Chrome(Google)Cast, the video may be delayed depending on the operating usage environment.
◆DISPLAYING
■ Single screen
The screen of the device connected to the HS-2 is displayed in the single screen.

natural_image
Flowers in red, purple, and blue against a blurred cityscape background (no text or symbols visible)▶Switching the screen to be displayed in the single screen display You can switch the screen to be displayed by pressing the Channel button [ ] on the remote control when displaying a single screen.
Switching the screen can also be possible from the Display selection screen, which can be displayed either by pressing the Display selection icon at the bottom left of the screen or by pressing [ ] on the remote control. □ress the Single screen tab and selecting the screen you want to display.

natural_image
Close-up of vibrant purple and red flowers in a field, no visible text or symbols

□ress the Single screen tab and select the screen you want to display.
 | Display selection | To display the screen of the device connected to the HS-2. |
 | Split screen | To display the screens of the devices connected to the HS-2 in one screen. (Max. 4 split screens. This menu will appear when the split screen display is possible.) |
 | Touch back control | To operate the mouse on your computer using the remote control of the HS-2.※Compatible only with Miracast(Windows). Check "Allow input" when connecting wirelessly.Can be used in "Duplicate" mode. If you use in "Extend" mode, misalignment of the cursor and coordinates occurs, preventing stable operation. |
 | Recording start/stop | To start/stop recording of the current screen. The record icon [ ] will appear in the top left of the screen during recording.□ress the record icon or stop recording icon to stop recording. |
 | Change icon display position | To swap the display position of the icon on the left and right of the screen. |
Note
- The operation icon will appear on the screen when the [Cross key] button or [Enter] button on the main unit or remote control is pressed. If no operation is performed for 5 seconds, the operation icon will be hidden automatically.
- Some icons may not be displayed depending on the operating status and settings of the HS-2.
■ Split screen
When there are multiple input sources, the screen can be split to up to 4 areas by pressing the Enter button

] after selecting the screens to display in the Split screen tab of the Display selection screen.
※A number (split position and selection number) will appear on the bottom right of the selected screen.

The selected screens are displayed in the following selection order.
| 1 | 2 |
| 3 | 4 |
▶ Selecting other screen
To return to the Selection screen, press the Display selection icon [ ] during the Split screen display mode.
※The input select status is maintained.
▶Changing from Split screen display to Single screen display
To enter the Single screen display mode during the Split screen display mode, select any screen.

natural_image
Two-panel image showing a mobile app interface and a photo of purple flowers in the same view, both with UI elements (no readable text or symbols)▶Switching from the Single screen display to Split screen display
To enter the Split screen display mode during the Single screen display mode, press the split screen icon [1 2 3 4].
■ Remote control operations
□ress the Cursor button [ ] on the remote control to display the cursor. □ress it again to hide it. You can operate the screen by moving the cursor to the displayed icon and pressing the Enter button [ ← ].
※By pressing the D-pad / Enter button on the remote control, the operation icons are displayed.
Note
For the function of each button on the remote control, refer to "☐.12:◆ Remote control".
■ Display selection screen
□ress the Home button [ △ ] on the remote control to move to the Display selection screen.

 | Apps To display the installed apps and launch the selected app. | |
 | Connection To display the connection method of each device. | |
 | Change icon display position | To swap the display position of the icon on the left and right of the screen. |
| - | Device Name | To display the device name of the HS-2. |
| - | SSID To display the SSID of the HS-2. | |
■ Navigation bar
The Navigation bar [ ] is displayed when the cursor is moved to the bottom of the screen.
 | Volume | To adjust the audio volume.(The volume adjustment bar is displayed on the right side of the screen during operation.) |
 | Back | To go back to the previous screen.( [IMAGE]) |
 | Home | To go to the Display selection screen.( [IMAGE]) |
 | List of apps | To display a list of running apps (screens).You can switch apps or close apps. |
◆RECORDING
■ Still image recording
You can take a still image by pressing the Capture button [ ] on the remote control while using the Cast app or □aint app.
The image data can be saved to the SD card, USB flash drive, or internal storage.
The save destination can be changed from the "Save destination" in the settings menu.
Caution
- If there is no external memory device connected when the save destination is set to an external memory device, the image data will be saved to the internal storage.
- The save destination can be set in the Recording settings menu. The path differs depending on the save destination.
- When saving to internal storage
HS2¥DCIM¥100_ELMO
- When saving to SD card / USB flash drive
Android¥data¥jp.co.elmo.hs2paint¥files¥DCIM¥100_ELMO
■ Video recording
□ress the Record button [ ] to record the current screen. (During recording: )
☐ress the Record button again to stop recording. The video will be automatically saved to either the SD card or USB flash drive or internal storage. The save destination can be changed from the “Save destination” in the settings menu.
Caution
- If there is no external memory device connected when the save destination is set to an external memory device, the image data will be saved to the internal storage.
● Recording can also be stopped by pressing the record icon in the upper left of the screen. - Recording is possible only when using the Cast app. Recording will stop when other app is started.
- If the HS-2 enters the standby mode during recording to external memory, a corrupted file will be generated. Make sure that the HS-2 enters the standby mode after the recording is stopped.
- The save destination can be set in the Recording settings menu. The path differs depending on the save destination.
- When saving to internal storage
HS2¥DCIM¥100_ELMO
- When saving to SD card / USB flash drive
Android¥data¥jp.co.elmo.hs2home¥files¥DCIM¥100_ELMO
- When recording Chrome(Google)Cast, the load on the HS-2 unit may increase and the video may be delayed depending on the operating environment.
◆ AUDIO OUTPUT
The following table shows the audio output of the HS-2 for different connected devices and operating conditions.
※The operation sound of the HS-2 is always output.
[Cast App] (○ : audio is output × : audio is not output)
| Input Output | |||||
| Single screen | Video input USB(audio) HDMI Out | USB speaker Recording | |||
| HDMI or USB Type-C is connected | Not connected × | ※1 - Built-in mic. | |||
| USB mic. × ※1 - USB mic. | |||||
| USB speaker - × ※1 Built-in mic. | |||||
| USB mic.&speaker | - × ※1 | USB mic. | |||
| Mirroring connection is established | Not connected | ○ ※2 | - | Built-in mic. | |
| USB mic. | ○ ※2 | - | USB mic. | ||
| USB speaker | - | ○ ※2 | Built-in mic. | ||
| USB mic.&speaker | - | ○ ※2 USB mic. | |||
| Split screen (4 screens) | Video input USB(audio) HDMI Out | USB speaker Recording | |||
| HDMI & USB Type-C are connected & Mirroring connection is established | Not connected | ○ ※3 | - | Built-in mic. | |
| USB mic. | ○ ※3 | - | USB mic. | ||
| USB speaker | - | ○ ※3 | Built-in mic. | ||
| USB mic.&speaker | - | ○ ※3 USB mic. | |||
| Input Output | |||||
| Single screen | Video input USB(audio) | HDMI Out USB speaker | Recording | ||
| HDMI or USB Type-C is connected | Not connected | ○※4 | - | ○※5 | |
| USB mic. | ○※4 | - | |||
| USB speaker | - | ○※4 | |||
| USB mic.&speaker | - | ○※4 | |||
| Mirroring connection is established | Not connected | ○※2 | - | × | |
| USB mic. | ○※2 | - | × | ||
| USB speaker | - | ○※2 | × | ||
| USB mic.&speaker | - | ○※2× | |||
| Split screen (4 screens) | Video input USB(audio) | HDMI Out USB speaker | Recording | ||
| HDMI & USB Type-C are connected & Mirroring connection is established | Not connected | ○※6 | - | ○※7 | |
| USB mic. | ○※6 | - | |||
| USB speaker | - | ○※6 | |||
| USB mic.&speaker | - | ○※6 | |||
※1 The audio of the connected source (HDMI or USB Type-C) is not output.
※2 The audio of the mirrored device (AirPlay, MiraCast, Chrome(Google)Cast) is output.
※3 The audio of the mirrored device (AirPlay, MiraCast, Chrome(Google)Cast) is combined and output. The audio of the HDMI or USB Type-C is not output.
※4 The audio of the HDMI or USB Type-C is output.
※5 The audio of the HDMI or USB Type-C is recorded.
※6 The audio of the mirrored device (AirPlay, MiraCast, Chrome(Google)Cast) is combined and output. The audio of the HDMI or USB Type-C, whichever connected later, is output.
※7 The audio of the HDMI or USB Type-C is recorded. The audio of the mirrored device is not output.
[Browser, file ( playback)] (The audio is output regardless of the microphone settings.)
| USB(audio) Microphone Speaker | |
| Not connected Built-in mic. HDMI Out | |
| USB speaker Built-in mic. USB speaker | |
| USB mic. USB mic. HDMI Out | |
| USB mic.&speaker | USB mic. USB speaker |
Caution
- As for the USB devices connected after starting the main unit, the one connected later has priority. Example) If you connect a USB speaker later while a USB mic.&speaker is connected, the USB mic.&speaker will be disabled, and only the USB speaker connected later can be used. You can enable the USB mic.&speaker from the Mic.&speaker settings in the Settings menu. (⇒P.59 : ◆Mic.&SPEAKER SETTINGS)
■ List of apps
 | Browser | To display a web browser by connecting to an external network after inserting a LAN cable into the LAN port on the back.→ You can search the browser and watch videos. |
 | ELMO □lay To update or install apps via the network. | |
 | File | To open the storage such as internal storage, SD card, and USB flash drive. File operation is possible. |
 | Settings | To change various setting items. ⇒ Refer to ◆ Settings screen |
 | □aint To draw on various background images using a pen or marker. | |
 | W□S Office To open Office documents and □DF files. | |
 | CVAS CTRL | To operate the CVAS connected to the HS-2. |
 | EZT(Video conference app) | To do a video conference via the Internet. |
■ PAINT
Select the □aint app [ ] in the list of apps. The □aint app will launch and the □aint icon will appear on the screen.
By selecting the □aint icon [ ] on the screen, you can display the □aint tool with icons such as pen, marker, and eraser to draw on the screen.
Select a pen, marker, or eraser to display a sub menu where you can change the type of pen or eraser.
※The selected icon will be highlighted (background: light blue).
※If you perform the capture or record function while writing on the screen, the written/drawing content will be recorded.
Paint

Paint tool

□en, marker, sub menu

You can change the color of the pen or marker.


You can change the line thickness of the pen or marker.
Eraser, sub menu

| □aint tool | ||
| Item Icon | Function | |
| Move tool | [To]move the □aint tool around the screen using drag and drop. | |
| □en 1□en 2 | [34A  | o draw a line. |
| o draw a transparent marker line. | ||
| Marker | To draw a marker line. The icon disappears after drawing. | |
| To draw a transparent marker line. The icon disappears after drawing. | ||
| Eraser |  delete the drawing by tapping it. delete the drawing by tapping it. | |
 | To delete all the drawings by tapping this icon. | |
| Undo / Redo |  | To cancel the last drawing action and returns to the previous operation. |
 | To redisplay the drawing canceled by "Undo" and the line partially erased by the eraser. | |
| Capture |  | To capture the screenshot. (Still image capture) |
| Enlarge / Shrink |  | To enlarge the screen. |
| To shrink the screen. | ||
| Exit |  | To close the Paint tool and return to the Paint icon. When using Zoom, the Paint tool is displayed. |
◆DRAWING ON THE SCREEN
-
□ress the Cursor button [ ] on the remote control to display the cursor [ ].
-
Select the □aint icon [ ] to display the □aint tool.

- Select the □en icon [ ] to display a sub menu. You can select pen type, thickness, and color. Select the □en icon again to close a sub menu. (The cursor [ ] changes to the pen [ ].)
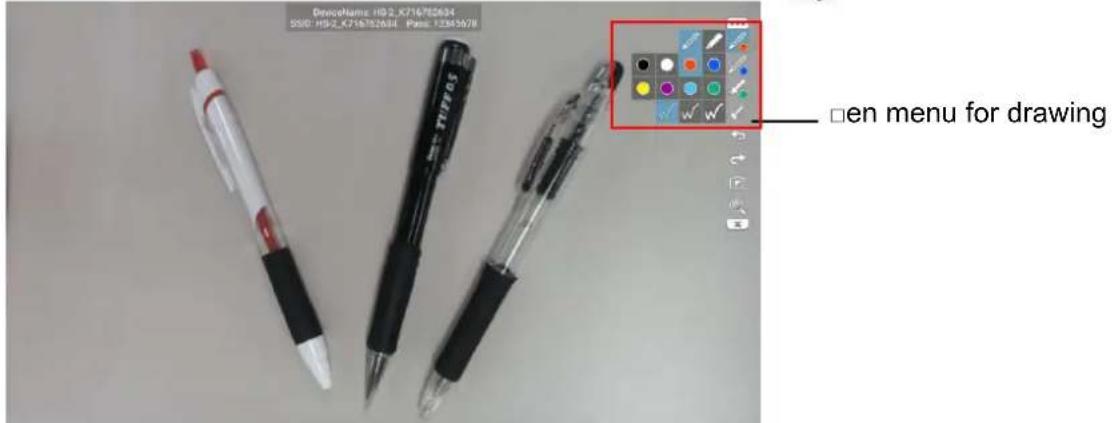
- Start drawing by moving the pen [ ] while pressing the Enter button [ ← ] on the remote control.
Caution
- When playing videos such as YouTube with the Browser app, or when playing videos in the internal storage with the Gallery app, drawing is not possible with the □aint app.
● Make sure to play still images or videos with the File app. Otherwise, you may not be able to draw normally.
BROWSER
Select the Browser app [ ] in the list of apps. A browser will start up and you can access the Internet. Complete the network settings of the HS-2 in advance.
(⇒P.55 : Refer to “⑥ CONFIGURING THE SETTINGS ◆ Network proxy settings.)
Caution
- Videos such as YouTube can be played, but some videos cannot be played.
● Electronic textbooks can be displayed, but some functions may be restricted. - If you want to use the browser by connecting to a network with proxy settings, you need to set the proxy settings from the browser settings.
⇒Set the proxy from "General settings" in the settings menu of the browser.
FILE
Select the File app [ ] in the list of apps. You can open the storage such as internal storage, SD card, and USB flash drive.
◆SELECTING THE FILE
Move the cursor with the remote control to the storage you want to open and press the Enter button [←].
A list of files and folders in the selected storage is displayed. Move the cursor to the file you want to open and press the Enter button [←].
■ Playing the file
When the Enter button [←] is pressed twice when selecting a file, the selected file is played (if it can be played).
If a folder is selected, the contents in the folder are listed.
Caution
● Content cannot be switched with the D-pad during playback.
- Videos up to 4K / 30fps can be played. Some videos such as 4K / 60fps videos may not be played normally.
■ Operating the file
When you move the mouse cursor to the File icon and select it with the Enter button [←], a check mark [√] is displayed, indicating that the file has been selected.
While the file is selected, the File operation menu is displayed at the top of the screen, and you can perform operations such as deleting [ ] and others (copy, move, etc.).
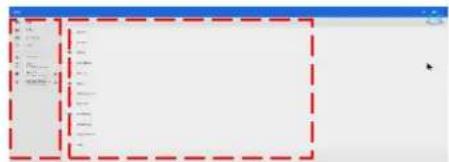
Storage File and folder
Caution
- File sharing operation [ ] is not possible.
- When you open a file using a USB mouse, left-click the mouse to open. It cannot be opened normally by right-clicking the mouse and selecting "Open File".
■ EZT(Remote Meeting)
You can have a remote meeting using EZT.
Caution
- Start the meeting after connecting and setting the external mic.&speaker. If you connect or disconnect or set the external mic.&speaker during the meeting, it may not be recognized correctly.
● Functions that require sign-in can only be used in Japan.
◆ OPERATION OF EZT
- Startup
1 Tap the EZT icon in the list of apps.
2 The Home screen will appear.


| Name | Icon | Description |
| Meeting |  | To start a scheduled meeting. |
| Join |  | To join an invited meeting. (⇒□.33) |
| New |  | To start a meeting immediately. |
| Schedule |  | To schedule a meeting. |
| Settings |  | To configure the settings of EZT. (⇒□.33) |
Note
● Once you sign in, you will be automatically signed in the second time or later.
- Sign-in information (EZT account and password) will be recorded in the history once you sign in. For the second time or later when you sign-in, press the “▼” button to select the past sign-in information.
- If you want to join the meeting without signing in, press the Join icon.(⇒□.33)
- To set the Join screen as the startup screen, check the checkbox nextg to "Show Join screen at startup."
The startup screen can also be set from the Settings screen. (⇒□33)
- Joining a Meeting
1 Tap the Join icon.
2 Enter the Meeting ID and Meeting Passcode.
If you are not signed in, enter a name to display during the meeting.
3 Tap "JOIN".
The meeting screen will appear and you can join the meeting.

Note
- Contact the organizer (host) of the meeting for the Meeting ID and Meeting Passcode.
- The Meeting ID and Passcode of the meeting you attended will be recorded in the history. When you join the same meeting next time, you can select the Meeting ID and Passcode from the history.
- Configuring the Meeting Settings
1 Tap the Settings icon.
2 Configure each setting item.

| Name Description | |
| Room | To display Room name and Meeting ID. |
| Microphone | To adjust the microphone volume. To display the connected microphone.(⇒P.34) |
| Speaker | To adjust the speaker volume. To display the connected speaker. (⇒P.35) |
| Camera | To display the connected camera. |
| Display Settings | To set the startup screen. (⇒P.38) |
| Overview | To display Terms of Service and Privacy Policy |
■ Microphone settings
If an external (USB) microphone is connected to the unit, the external microphone will be enabled. If multiple microphones are connected and you want to change the microphone or fix the microphone to be used at startup, you can set the microphone by tapping "Microphone" while "Lock Settings" is disabled. ( P.59)

Tap "Settings" to display the "Mic.&speaker settings" dialog box for the HS-2.

Tap "Microphone in use". Select the microphone to use.
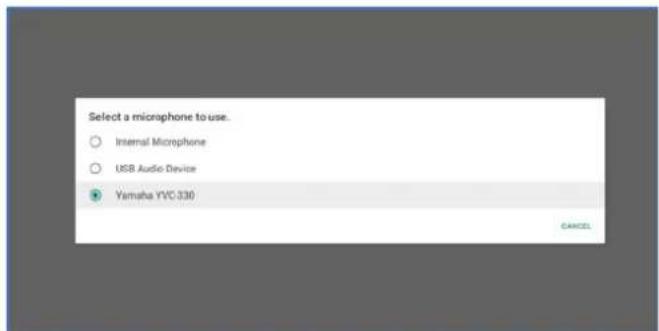
Tap ← to finish the configuration.
Note
- If an external mic.&speaker is connected after the unit is started, the connected mic.&speaker will have the priority.
- If multiple microphones are connected at startup and the microphone settings have not been set, the microphone recognized earlier by the unit will have the priority.
■ Speaker settings
If an external (USB) speaker is connected to the unit, the external speaker will have the priority. If multiple speakers are connected and you want to change the speaker or fix the speaker to be used at startup, you can set the speaker by tapping "Speaker" while "Lock Settings" is disabled.(⇒P.59)
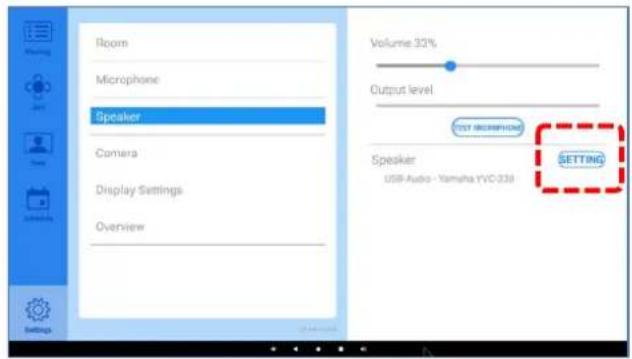
Tap "Settings" to display the "Mic.&speaker settings" dialog box for the HS-2.

Tap "Speaker in use". Select the speaker to use.
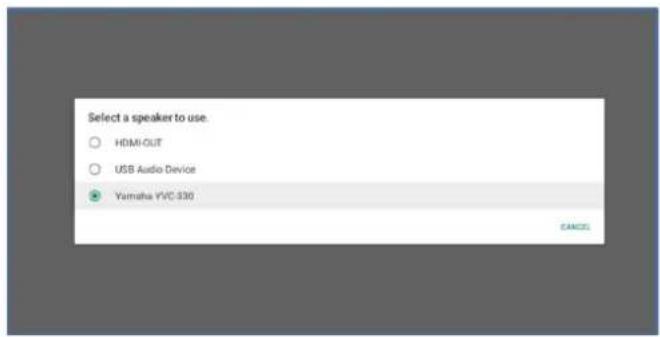
Tap ← to finish the configuration.
Note
- If an external mic.&speaker is connected after the unit is started, the connected mic.&speaker will have the priority.
- If multiple speakers are connected at startup and the speaker settings have not been set, the speaker recognized earlier by the unit will have the priority.
■ Permission settings
If you perform the following operations at the first startup, a dialog asking for permission of access authority will be displayed.
| Display Operation Dialog | ||
| Meeting | Tap “Unmute”. | Allow EZT to record audio?Don't ask againDENY ALLOW |
| Tap “Start Video”. | Allow EZT to take pictures and record video?Don't ask againDENY ALLOW | |
| Settings | Tap “Microphone”. | Allow EZT to take pictures and record video?Don't ask again1 of 3 DENY ALLOW |
| Tap “Speaker”. | Allow EZT to access photos, media, and files on your device?Don't ask again2 of 3 DENY ALLOW | |
| Tap “Camera”. | Allow EZT to record audio?Don't ask again3 of 3 DENY ALLOW | |
Select "ALLOW" for all items.
※If you do not select "ALLOW", you cannot use the camera or mic.&speaker.
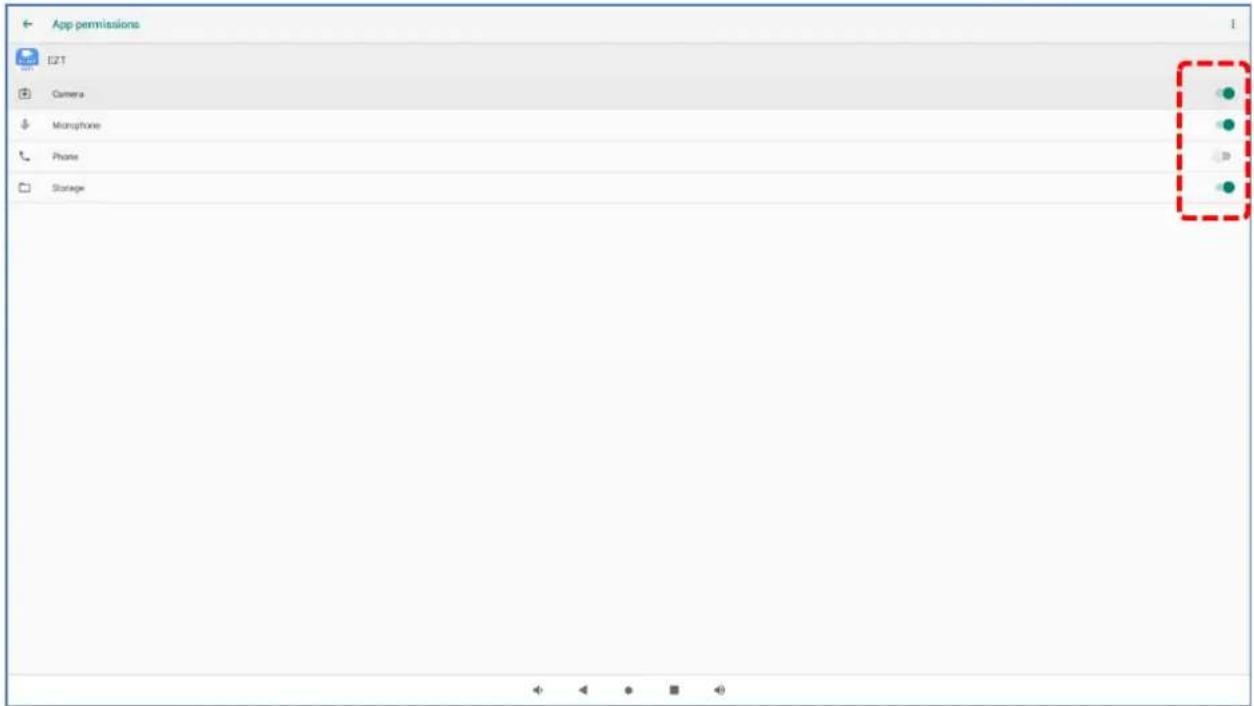
If you accidentally select "Don't ask again", follow the steps below to grant permissions.
- Select the Settings app in the list of apps to display the Settings screen(⇒P.46). Then select "Apps & notifications".

- Select "EZT".

- Select "Permissions".

- Enable the pemissions setting for "Camera", "Microphone", and "Storage". ( )
■ Display Settings
You can set the screen to be displayed when EZT is started.

| Setting item Startup screen of EZT | |
| New List of meetings (The sign-in screen will appear if you are not signed in.) | |
| Join Join screen |
◆ AVAILABLE OPERATIONS DURING THE MEETING
- Menu bar Operations
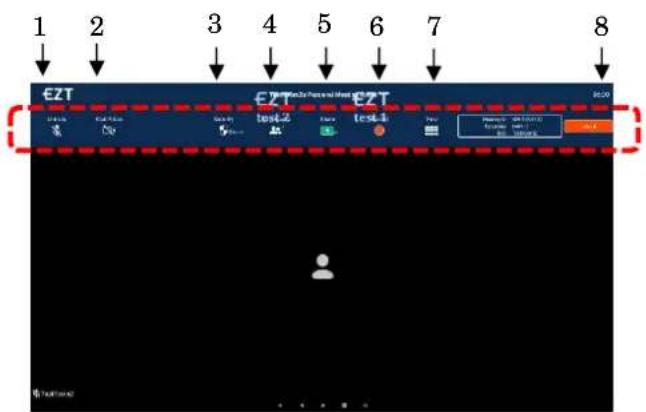
| No. | Name Description |
| 1 Mute | To mute the sound. Tap this icon again to unmute. |
| 2 Start Video | To start the video streaming. Tap this icon again to stop the video streaming |
| 3 Security | To configure the meeting security settings. (⇒P.40) |
| 4 Participants | To display a list of participants. (⇒P.41) |
| 5 Share | To share the screen or whiteboard. (⇒P.42) |
| 6 Record | To start the cloud recording. Tap this icon again to stop the recording. |
| 7 View | To switch between Gallery view and Speaker view. |
| 8 Leave | To leave the meeting. |
Note
- If the menu bar is not displayed, tap anywhere on the screen to display it.
● The menu bar will automatically disappear over time.
- Configuring the Security Settings
1 Tap the Security icon.

2 The Security settings dialog box will appear.
You can configure each setting item.
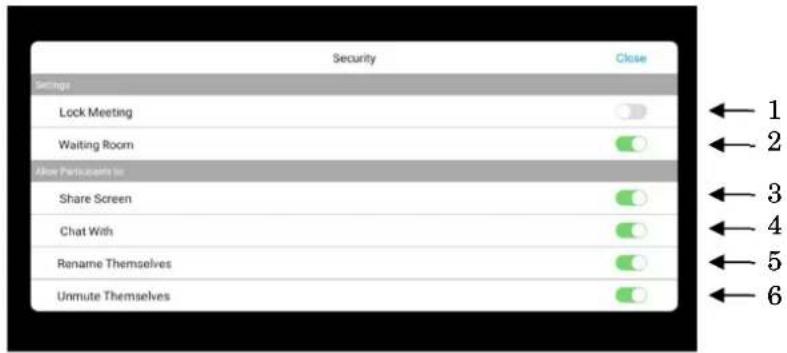
| No. | Name Description | |
| 1 | Lock Meeting | When this option is enabled ( ), no participants will be permitted. |
| 2 | Waiting Room | To set whether or not to create a waiting room.: □participants can join the meeting via a waiting room.: □participants can skip a waiting room to join the meeting. |
| 3 | Share Screen | : □participants can share the screen.: Only host can share the screen. |
| 4 | Chat | When this option is enabled ( ), participants can send chat. |
| 5 | Rename Themselves | When this option is enabled ( ), participants can change their name during the meeting. |
| 6 | Unmute Themselves | : □participants can unmute by themselves.: □participants cannot unmute by themselves. |
- Configuring the Participants Settings
1 Tap the Participants icon.

2 Tap the icon of participant.
You can configure the □participants settings such as "Mute", "Chat" and "Make Host".

- Sharing the Screen
1 Tap the Share icon to display the Screen sharing option.

| Name Description | |
| Screen | To share the screen being displayed on the monitor with other participants. |
| Whiteboard | To share the whiteboard so that both presenter and participants can write to it. |
2 Tap the screen or whiteboard to display the shared screen.
2-1 Displaying the □en Tool
You can draw on the shared screen while the □en tool is displayed.
2-1-1 Screen sharing
Tap [>] at the bottom left of the screen to display the □en tool icon.

Tap the □en tool icon. The □en tool will be displayed.
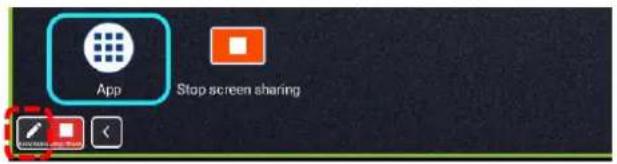
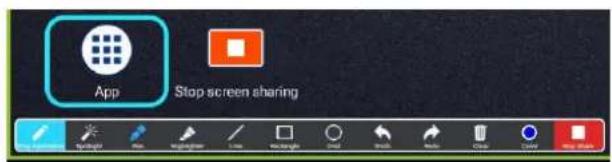
2-1-2 White board sharing
Tap [>] at the bottom left of the screen to display the □en tool icon.

natural_image
Simple line drawing with a red dashed square border and a gray circular element at the top (no text or symbols)
2-2 Operations during the Screen Sharing
When you select "Screen", a green frame indicating the shared screen will appear on the entire screen. You can share the screen of the Cast app with other participants during meeting.
(⇒□.17 : ■Cast app(Display app)
2-3 Stop screen sharing
Tap "Stop screen sharing" to stop the screen sharing.
2-3-1 Screen sharing

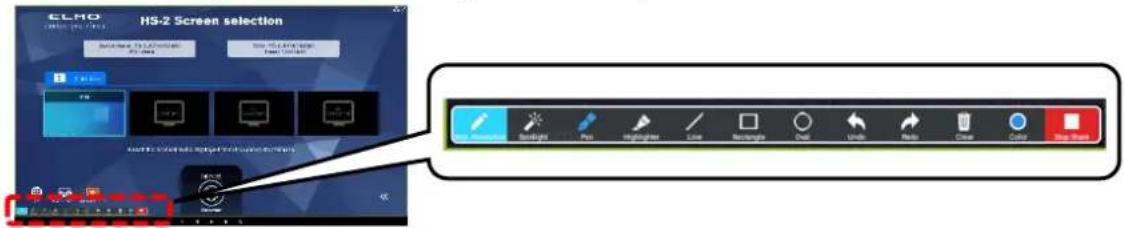
Tap "Stop screen sharing" at the bottom left of the screen to stop the screen sharing.

Tap "OK" to stop the screen sharing.
You can also stop the screen sharing with the "Stop share" button in the □en tool.
2-3-2 White board sharing
Tap the screen while the □en tool is hidden to display the menu bar.
You can stop the screen sharing by tapping "Stop Share" button.

Note
- When using EZT, the sound from a device connected via the HDMI cable or USB Type-C cable will not be output. When you connect the HDMI cable or USB Type-C cable to the unit during the screen sharing, you cannot to use an external USB (face) camera.
- No sound can be shared (streamed) during the screen sharing, no matter whether the device is connected wirelessly or wired.
ELMO Play
ELMO Play is an application for installing apps from the ELMO portal site.
With ELMO Play, you can install convenient apps or update apps. (Some apps are chargeable.)
◆INSTALLING AN APP
Connect to the Internet and select the ELMO Play app.
Select the app you want to install and start the installation.
Note
- When installing, you are asked if you want to install unknown app.
● The apps on the ELMO portal site are provided by the application developer.
Select "Allow installation" to install.
◆UNINSTALLING AN APP
If you press and hold the icon of the app to be uninstalled, the trash can icon will appear on the bottom right of the screen.

You can uninstall the app by dragging and dropping the app icon onto the trash can icon. ※Pre-installed apps cannot be uninstalled.
6 CONFIGURING THE SETTINGS
◆ PASSWORD SCREEN
When the Settings app [ 🔊 ] in the list of apps is selected, the Settings screen will appear. Enter a password to unlock the screen.
You will be asked to enter a password again to resume the HS-2 from the standby mode.

Note
- The default password is "0000000"(7 digits).
◆ SETTINGS SCREEN
When the Settings app [ ] in the list of apps is selected, the Settings screen will appear.
Tap [←] to return to the Home screen.
You will need to enter a password to view the Settings screen. (=>P.45 : ◆ Password screen)
| Network settings | |||||
| Icon Name | Selection | item | Setting value Function | ||
 | System settings | System settings | - | To configure the Android settings. | |
 | Network settings | Wi-Fi - | To configure the various Wi-Fi settings from “Network and internet”. | ||
 | Ethernet | I address netmask gateway dns1 dns2 | To display various information when connected to Ethernet with LAN cable. static: To display information about network setting such as I address configured manually. dhcp: To display information about network setting such as I address acquired automatically. | ||
| Ethernet Ip mode | static / dhcp | To make network settings for static or dhcp. static: I address can be set manually. dhcp: I address is acquired automatically. Default setting: dhcp | |||
 | Wireless connection to external A□ | Enabled / Disabled | To enable or disable the setting to connect to an external A□. When set to “Enabled”, you can connect to an external A□. Default setting: Disabled fault setting: Disabled *If you change the setting, the HS-2 will restart. | ||
 | AP settings | A□ on at startup | Enabled / Disabled | To enable or disable Startup A□ (Access □oint). Default setting: Enabled | |
 | External access from input device | Enabled / Disabled | To enable or disable the external access from the device connected to the A□ (Access □oint) of the HS-2. When set to “disabled”, the device will not be able to access the outside network even if it is connected to the A□ of the HS-2. Default setting: Enabled *If you change the setting, the HS-2 will restart. | ||
 | SSID stealth function | Enabled / Disabled | To hide the SSID of the A□ (Access □oint) of the HS-2. Default setting: Disabled *If you change the setting, the HS-2 will restart. | ||
 | □roxy settings | □roxy status Enabled / Disabled | When set to “Enabled”, “□roxy host” and “□roxy port” are enabled, and the HS-2 can connect to the Internet via a proxy server. Default setting: Disabled | ||
 | □roxy host - | To enter I address of proxy server. Specify the I address excluding "http://". | |||
 | □roxy port - | To enter port number of proxy server. | |||
 | WLAN channel | A□ (Access □oint) | (2.4GHz) 1ch/2ch/3ch/4ch 5ch/6ch/7ch/8ch 9ch/10ch/11ch (5GHz) 36ch/40ch/44ch/48ch/Auto | To make settings for WLAN channel for “A□ (Access □oint)” and “MiraCast”. Default setting: A□ (Access □oint) 48ch MiraCast 36ch ※The HS-2 automatically restarts when the setting is changed. | |
 | MiraCast | ||||
 | Wi-Fi(STA) | - | To display SSID and channel for the connected Wi-Fi. | ||
| HS-2 settings | ||||
| Icon | Name | Selection item | Setting value | Function |
 | - Device name | - | To change the name of the HS-2 to be displayed in the list when mirroring via MiraCast, Air□lay, or Chrome(Google)Cast.Default setting: “HS-2_product serial number”※The HS-2 automatically restarts when the setting is changed. | |
 | □IN settings □IN code - | To enter □IN code. □IN code is a 4-digit number. Enter a number other than 0 as the first number. If this field is left blank, □IN code will be disabled.□IN settings is available only for Miracast and Airplay.Default setting: Disabled※The HS-2 automatically restarts when the setting is changed. | ||
 | Cast settings | Air□lay Enabled / Disabled | To enable or disable Air□lay.Default setting: Enabled※The HS-2 automatically restarts when the setting is changed. | |
 | MiraCast Enabled / Disabled | To enable or disable MiraCast.Default setting: Enabled※The HS-2 automatically restarts when the setting is changed. | ||
 | GoogleCast Enabled / Disabled | To enable or disable Chrome(Google)Cast.Default setting: Enabled※The HS-2 automatically restarts when the setting is changed. | ||
 | Automatic switching | Enabled / Disabled | To automatically switch the screen when a new connection is detected.Default setting: Enabled | |
 | 4K input Enabled / Disabled | To enable or disable 4K input on HDMI or USB Type-C.Default setting: Disabled※Air□lay, MiraCast, Chrome(Google)Cast cannot be used if this setting is enabled.※The HS-2 automatically restarts when the setting is changed. | ||
 | Recording settings | Mute Enabled / Disabled | To enable or disable the mute function during recording.Default setting: Disabled | |
 | Microphone | Enabled / Disabled | When the microphone is enabled, the audio source is set to the microphone.Disabling the microphone will switch the audio source to HDMI or USB Type-C.Default setting: Disabled | |
 | Recording quality | HighNormalLow | To make settings for recording quality.Default setting: Normal | |
 | Save destination | SD cardUSB flash driveInternal storage | To make settings for the save destination of recorded image or video.Default setting: SD card※If no external memory is connected, the recorded image or video will be saved in the internal storage. | |
| Security setting | ||||
| Icon | Name | Selection item | Setting value | Function |
 | ☐assword | - | To set a password to login the Settings screen.Default setting: 0000000 | |
 | Screen lock release | - | To unlock the screen when the client certificate is installed.Do not use this setting unless you install the client certificate.Otherwise, the HS-2 may not operate correctly. | |
| Externally connected device | ||||
| Icon | Name | Selection item | Setting value | Function |
 | Externally connected device | Mic.&speaker settings | - | To set the USB mic.&speaker to be used at startup. Set this option when you want to use the same USB mic.&speaker every time the unit starts up with the mic.&speaker connected. |
| Display settings | ||||
| Icon | Name | Selection item | Setting value | Function |
 | Display settings | Main shortcut icon | EZT/Browser | To switch the main shortcut icon at the bottom of the Home screen.Default setting may vary depending on the destination. |
 | Connections design | Type1/Type2 | To switch the connections design.Default setting may vary depending on the destination. | |
| ☐roduct information | ||
| Icon Name Function | ||
 | Android Version | To display the version of Android OS. |
 | Build number To display the build number of Android OS. | |
 | Serial number To display the serial number of the unit. | |
 | Wi-Fi MAC Address 1 | To display Wi-Fi MAC Address of the unit for the mirroring via MiraCast. |
 | Wi-Fi MAC Address 2 | To display Wi-Fi MAC Address of the unit for A _☐ . |
 | Bluetooth MAC Address | To display Bluetooth MAC Address of the unit. |
 | Ethernet MAC Address To display Ethernet MAC Address of the unit. | |
 | Initialization | To reset the Destination settings and other settings to factory default.※The HS2 will restart and the Destination selection screen will be displayed. |
Caution
- After entering the text such as the proxy host name, press the Enter button and confirm that the text you entered is displayed on the left side.
-
About WLAN channel
-
If you want to select a channel for MiraCast that is grayed out, change the channel for A□ from "WLAN channel" in the Network settings screen.
- If you want to select a channel for A□ that is grayed out, change the channel for MiraCast from "WLAN channel" in the Network settings screen.
- About MiraCast channel
- Only W52 of 2.4GHz and 5.0GHz can be set.
- If you enable the "Wireless connection to external A□" setting, the WLAN channel setting for MiraCast will be automatically set to Auto.
-
If the MiraCast channel and the external A□ channel are different, set them to be the same.
-
When you change the channel of the external A□, restart the HS-2.
- When using the HS-2 with the □IN settings enabled, connect each device wirelessly one by one.
To display the settings screen, click "System settings" [icon].
 System settings System settings | ||
| Icon | Name | Function |
 | Hotspot is on | To indicate that the access point is on.(The access point can be turned off by pressing this icon.) |
 | Network & internet | To make settings for network and Internet such as Wi-Fi function and Ethernet. |
 | Connected devices | To display connected devices or make settings for pairing for remote control. |
| [2DBZ] | Apps and notifications | To display recently used apps or make settings for notification and advanced functions. |
 | Display | To make settings for the screen display, such as HDMI output resolution and display size. |
 | Storage | To make settings for storage or check the used capacity of the memory. |
 | Accessibility | To make settings for accessibility options such as the size of the mouse cursor. |
 | System | To make settings such as language, keyboard, and time settings, or reset the system. |
 | About tablet | To display information about your tablet. You can change the name of the device. |
Caution
- Do not change the following items in the System settings. Otherwise the HS-2 may not work properly.
- Do not change the Home app from Hs2Home.
- Do not change the Sleep setting from OFF.
- Do not use the screen saver.
- Do not use "Reset app preference" of the Reset options.
- Do not use V□N settings.
- Do not change the default font size and displaysize in the Accessibility menu.
◆CHANGING THE DEVICE NAME
For the mirroring via MiraCast, AirPlay, or Chrome(Google)Cast, it is possible to change the name of the HS-2 to be displayed in the list from "Device name setting".
Characters that can be used for the device name
| Character type Characters that can be used | |
| Uppercase alphabet | ABCDEFGHIJKLMNOPQRSTUVWXYZ |
| Lowercase alphabet | abcdefghijklmnopqrstuvwxyz |
| Number | 0123456789 |
| Symbol | Only “- (hyphen)”, “_ (underscore)”, and “@ (at)” can be used. |
| Hiragana, Katakana | All characters can be used. |
Note
● The maximum character length depends on the character type.
• The maximum character length for single-byte characters is 30.
• The maximum character length for double-byte characters is 15.
• The maximum character length for Hiragana, Katakana, or Kanji is 10.
Caution
- You can enter different types of characters. In this case, the maximum character length varies depending on the number of character types used.
● The set device name may be garbled depending on the input device. - Mirroring may not be possible if characters other than the above are used.
◆ SECURITY SETTING
The password can be changed from the Password setting menu in the Security setting.
Only 7 digits numbers can be used for password. If you do not want to use a password, leave this field blank. (⇒P.45 : ◆Password screen)
※The password with less than 7 digits cannot be set.

Caution
● Make sure you do not forget your password.
- If you forget your password, please contact your nearest branch or sales office.
◆ CONNECTING TO THE NETWORK
■ LAN settings
Connect the HS-2 to the network using a LAN cable.
□ress the Settings icon in the list of apps [ 🔊] to open the Settings screen.
Then configure the settings from the Ethernet menu [ ]
※If a LAN cable is connected and the "Ethernet" setting is completed, the LAN connection has priority over Wi-Fi. (⇒P.46 : Ethernet)
When DHC□ is set to "ON", the HS-2 automatically connects to the network. To enter the I□ address manually, set it to "OFF".

※The setting items of the Ethernet menu will not be reset by the Initialization menu. Change the setting items of Ethernet from this Ethernet settings menu.
■ Wi-Fi settings
-
Select the Home button to display the Display selection screen.
-
□ress the Settings icon in the list of apps [ 🔊] to open the Settings screen.
Then go to [System settings][⚙️] > [Network and internet][◀️] > [Wi-Fi][◀️].(⇒□.46 : Wi-Fi)

-
A list of SSID is displayed. Select the SSID to connect.
-
If the security setting is enabled, the □assword entry screen is displayed. Tap the password field and enter the password on the keyboard.

- Tap or click the "Connect" button to connect to the Wi-Fi network.
Note
- To connect to stealth Wi-Fi, you need to set "Hidden network" setting in "Advanced options" to "Yes".
- To connect this unit to a wireless access point, enable "Wireless connection to external A□" in the settings.
- With the HS-2, it is possible to change the channel of MiraCast and A□ as a countermeasure against wireless interference.
● The HS-2 supports only W52 of 5GHz and does not support W53 (52-64ch) and W56 (100-140ch). - When connecting to an external wireless access point, make sure to set the MiraCast channel to the same channel as the external wireless access point. Otherwise mirroring via MiraCast may not work normally.
◆NETWORK PROXY SETTINGS
□roxy settings for the HS-2 can be configured. The setting procedure varies depending on the connection method.
■ Ethernet
-
□ress the Settings icon in the list of apps [💡] to open the Settings screen.
-
Enable the □roxy status setting [ ] of “□roxy settings” in “Network settings”.
-
You will be able to set □roxy host[ ] and □roxy port [ ] now.
-
Enter the proxy server address in the "☐roxy host" field and the proxy server port number in the "☐roxy port" field.
※If you set the proxy for Ethernet, the proxy settings will also be reflected in Wi-Fi.
※If you set the proxy for both Ethernet and Wi-Fi, the proxy settings for Ethernet has priority. If you want to use the proxy settings for Wi-Fi while the proxy are set for both Ethernet and Wi-Fi, disable the proxy settings for Ethernet.
■ Wi-Fi
The proxy can be set when connecting to the SSID from "Wi-Fi" in the System settings.
-
Select the Home button to display the Display selection screen.
-
□ress the Settings icon in the list of apps [ 🔊] to open the Settings screen.
Go to [System settings][ ⚙ ] > [Network and Internet][ ▼ ] > [Wi-Fi][ ▼ ].
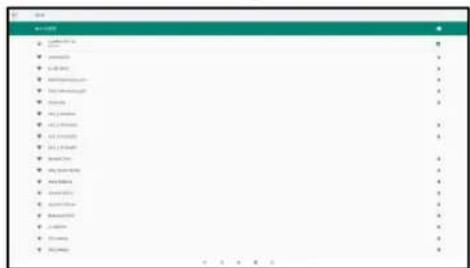
- A list of SSID is displayed. Select the SSID to connect.
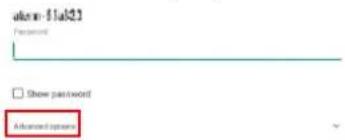
- Enter the password. Open "Advanced options" and set the proxy settings.
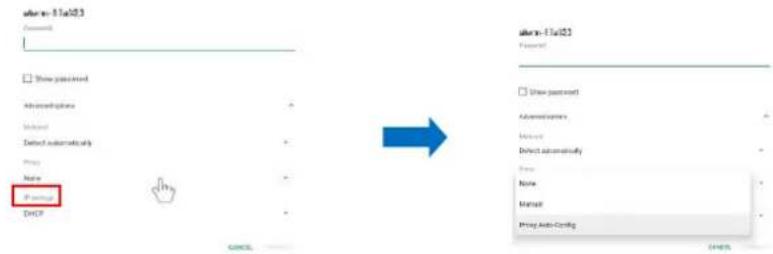
※If the proxy is set only for Wi-Fi, it will not be reflected in Ethernet.
■ Browser
To use the proxy in the browser you need to set the proxy settings from the settings menu of the browser.
Set the proxy from "General settings" in the settings menu of the browser.
※Set the proxy setting for the browser separately. The proxy settings set for Ethernet and Wi-Fi will not be reflected in the browser.
◆PAIRING OF THE REMOTE CONTROL
The remote control is paired at the factory. In the unlikely event that the remote control becomes unusable or is replaced with a new one due to a malfunction, perform the following pairing procedure.
-
□ress the Settings icon in the list of apps [💡] to open the Settings screen.
-
Go to [Settings] > [System settings][⚙️] > [Connected devices][☐].
-
□ress the Return button [ ➤ ] and the Enter button [ ← ] on the remote control at the same time. The LED on the remote control flashes blue.
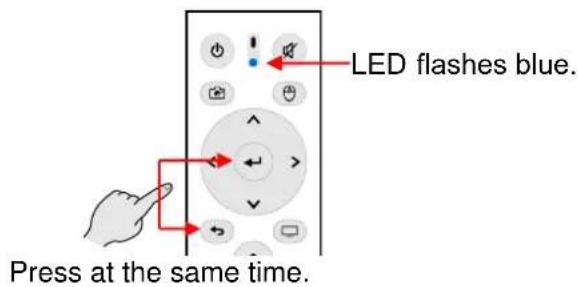
- Go to [□air with a new device] > [HS-2 BT].
The blue LED stops flashing and pairing is complete.

flowchart
graph LR
    A["Connected devices"] --> B["Pair new device"]
    B --> C["Previously connected devices"]
    C --> D["Connection preferences\nBluetooth"]

    E["Pair new device"] --> F["Device name\nHS2BT"]
    F --> G["Available devices\nHS2BT"]

    H["Connected devices"] --> I["Currently connected\nHS2BT"]
    I --> J["Pair new device"]

    style A fill:#f9f,stroke:#333
    style B fill:#ccf,stroke:#333
    style E fill:#cfc,stroke:#333
    style H fill:#fcc,stroke:#333
- □ress the Cursor button [ 🔒 ] on the remote control to display the cursor [ ↗ ]. Shake the remote control. □airing is successfully complete if the cursor moves according to the movement of the remote control.
If pairing is not successful, delete the registered device before pairing.
◆RESOLUTION OF THE MONITOR
- □ress the Settings icon in the list of apps [💡] to open the Settings screen.
- Go to [Settings] > [System settings] [⚙️] > [Display][💡].
- Go to [Advanced settings] > [HDMI] > [Resolution].

- A list of resolutions available on your display appears.
Select the resolution you want to use.
※Default setting: AUTO

◆DATE AND TIME SETTINGS
- Go to [System settings][⚙️] > [System][💡] > [Date and Time][💡].

flowchart
graph LR
    A["Systems"] --> B["Language & Input<br>Android Keyboard (AGPS)"]
    A --> C["Date & time<br>GMT: 81.00 Pacific Daylight Time"]
    A --> D["Reset options<br>Reference, type, or device name listed"]
    B --> E["Date & time"]
    C --> F["Automatic date & time<br>Use network geospatial time"]
    C --> G["Set time<br>AUG 17.13.2021"]
    C --> H["Set time,<br>and a Time"]
    D --> I["Select time zone<br>GMT: 87.00 Pacific Daylight Time"]
    D --> J["Automatic 24-hour format<br>Use local default"]
    D --> K["Set 24-hour format<br>AUG Time"]
    L["Select time zone"] --> M["Region<br>United States"]
    L --> N["Time zone<br>Los Angeles: GMT: 97.136"]
    L --> O["Union Pacific Time (GMT: 97.135), Pacific Daylight Time Starts on November 2, 2021"]
- Set the time zone you want to use in [Select Time Zone].

◆ KEYBOARD SELECTION
There are two keyboards available, a Japanese keyboard and an English keyboard. The Japanese keyboard only supports romaji typing.
※The software keyboard cannot be operated with the D-pad on the HS-2 or remote control. Use the cursor of the remote control or connect the USB mouse.
- Select the text input screen to display the keyboard.

- You can select a Japanese keyboard or an English keyboard with the Keyboard icon [ ] that appears at the bottom right of the screen.


■ You can check the USB mic.&speaker you are currently using by opening the Mic.&speaker settings in the Settings menu.
- Go to Settings [💡] >Mic.&speaker settings [◀].
- You can check the USB mic. And USB speaker you are currently using

Microphone / speaker settings
Microphone settings
Microphone in use Yamaha YVC-300
Speaker settings
Speaker in use Yamaha YVC-300
■ Set the USB mic. and USB speaker to be used at startup.
- Go to Settings [ ] > Mic.&speaker settings [ ]
- Select [Microphone in use] and [Speaker in use] to open the Setting dialog box.

- Select the USB mic. and USB speaker to be used at startup.
After selecting from the list, the USB mic. and USB speaker in use will also switch.
Select a microphone to use.
Internal Microphone
○ MX-P2A
Yamaha YVC-300
Select a speaker to use.
○ HDMI-OUT
Yamaha YVC-300


CANCEL
CANCEL
Note
- If the set USB mic.& speaker is not connected when the unit starts up, another USB mic.&speaker will be used.
- When the USB mic.&speaker is connected and disconnected after the units starts up, for the USB connection (USB mic., USB speaker, or USB mic.&speaker), the one connected later has priority. When more than 2 units of USB devices are connected, only the one connected later can be used.
- Do not connect or disconnect the external mic.&speaker or configure the settings during the meeting using EZT. If you connect or disconnect or set the external mic.&speaker during the meeting, it may not be recognized correctly. Start the meeting after connecting and setting the external mic.&speaker.
◆ APP SELECTION
In some cases the following App selection dialog may appear.

If the above dialog is displayed, select Lightning [ 🔊 ], WPS Office [ Ⓦ ], Hs2Home [ ● ], Gallery / Video Player [ 🚗 ]. If you select another app, the selected app or the HS-2 may not work normally. Select "Always".
◆INSTALLING THE CLIENT CERTIFICATE
If you connect to a network that uses a digital certificate (client certificate), you can install it manually.
Caution
When installing the certificate, be sure to follow the steps below to the end. The HS-2 will not work properly unless the screen is unlocked after installation.
- From Settings[ ] on the List of apps screen, set the "Wireless connection to external A□" option to "Enable". The HS-2 will reboot. (For Wi-Fi connection) ※By enabling this option, you will be able to connect to an external A□ via Wi-Fi.
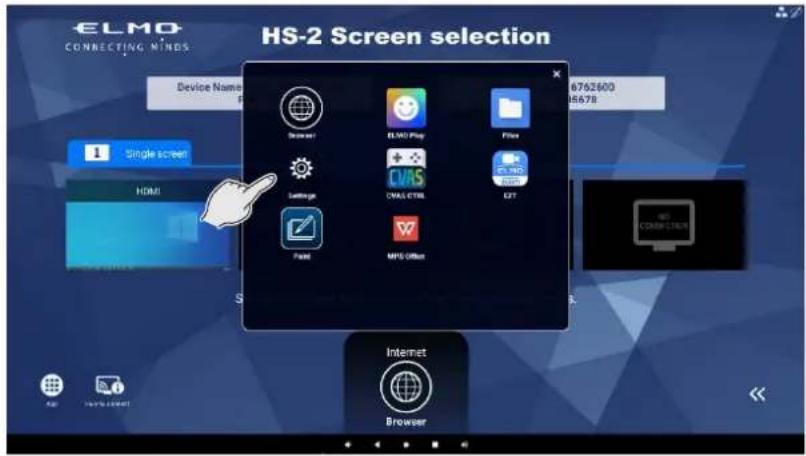

- Copy the digital certificate into a USB flash drive or SD card and connect it to any of the USB port (1 to 4) of the HS-2.
- Select the File app [ ] in the list of apps.

- Select the connected device and click on the digital certificate.
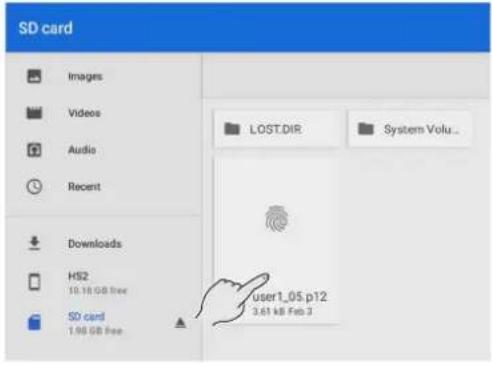
- Enter the password to extract the certificate and press "OK".

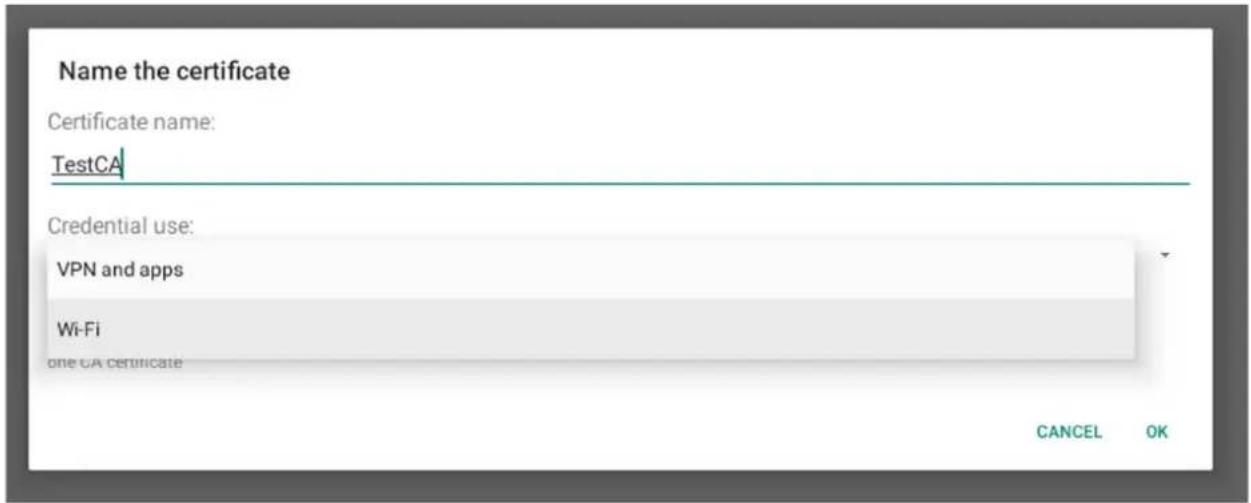
- Enter the "Certificate name", select "Wi-Fi" in "Use certificate information", and press "OK".
- Set the screen lock option.

8. Select "☐IN" for the screen lock.
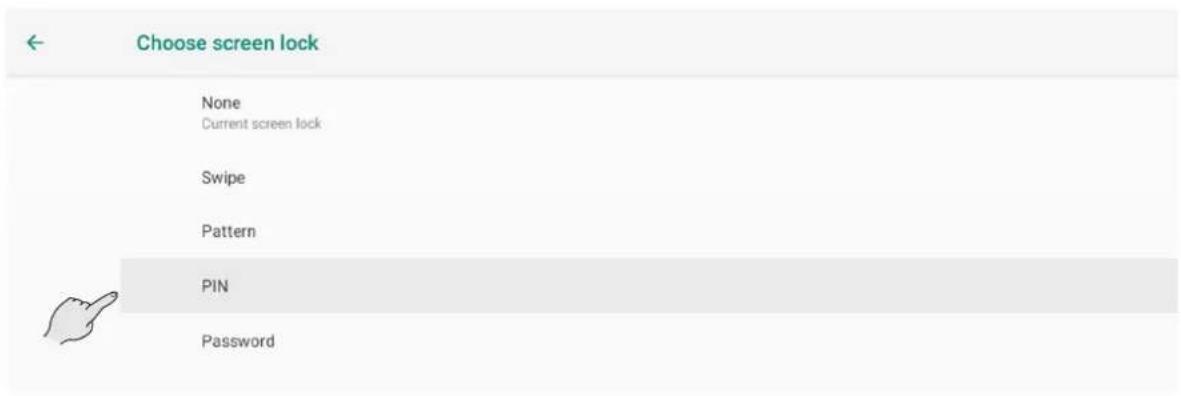
9. Set the □IN.
Enter "0000" in the Screen lock setting and press "Next".
Enter "0000" again in the □IN re-entry and press "Confirm".
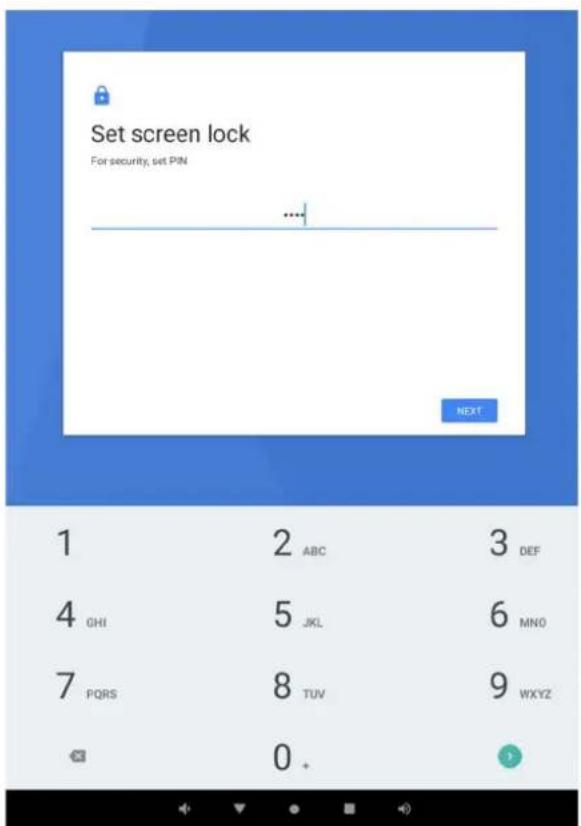

- The notification window will be displayed. Select "Hide all notifications" and press "Finish".

- Select the Settings app [💡] in the list of apps and select "Wi-Fi" to connect to Wi-Fi.


- □ress "Network and Internet" and select "Wi-Fi". Then select the SSID to connect from the list and connect.
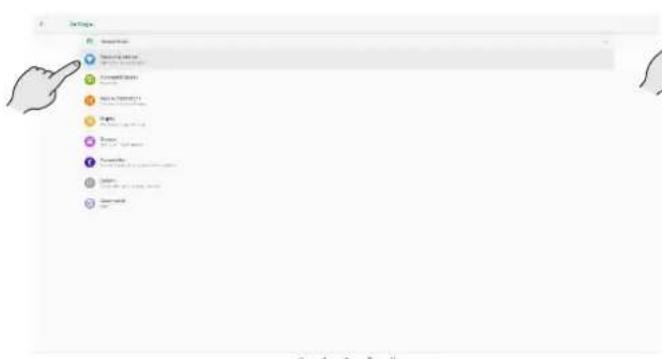

- After confirming the Wi-Fi connection, go back to "Settings" and select "Screen lock release". ※If you do not unlock the screen, the HS-2 will not operate normally.

- Select "None" in the "Screen lock select" screen.

- A dialog box will be displayed as shown below. Select "Disable".

7 FAQ (Frequently asked questions and answers)
■ Cast
▶General
Q. It is not possible to do the mirroring. The mirroring session is often terminated.
A. Try to reconnect the cables (including the AC adapter) or restart the HS-2.
→The problem may be improved by reconnecting or restarting the HS-2 and the input device.
• Wi-Fi is off.
→Go to [Network & Internet] in the Settings menu and turn on Wi-Fi.
• The firewall of the input device is enabled.
→If the firewall is enabled, it may not be possible to connect the HS-2 and the input device.
- MiraCast channel and AP channel may be interfering with each other.
→Change the MiraCast channel from the WLAN channel settings menu. The problem may be solved by changing the channel.
• The Cast settings of the HS-2 are disabled.
→If the Cast settings are disabled, it is not possible to connect the HS-2 and the input device. Also, if "Automatic switching" setting in the Cast settings is disabled or if a single screen is displayed, the video of the second and subsequent devices will not be displayed automatically. In that case, manually switch the screen and select the video of the device to be displayed.
- The input device is in standby mode.
→The mirroring session may be terminated when the input device is in standby mode.
- Wi-Fi is cut off or signal is weak.
→Check the radio wave environment.
- Sometimes it fails to establish a mirroring connection. / Sometimes a mirroring session is terminated.
→When using the HS-2 by connecting it to an external AP wirelessly (Wi-Fi), you may fail to establish a mirroring connection or a mirroring session may be terminated depending on your environment. The problem may be improved by connecting the HS-2 to an external AP via a wired LAN.
→It may be improved by updating the Wi-Fi driver of the computer.
- You are trying to do the mirroring using an app other than the Cast app
→If you do the mirroring using an app other than the Cast app (such as Browser app and Settings app), the mirroring connection will be terminated within dozens of seconds. Do the mirroring using the Cast app. (The mirroring connection will be maintained when you do the mirroring while you are sharing your screen using EZT.) The mirroring connection will be maintained when other app is started while doing the mirroring using the Cast app.
Q. Are there any ports that need to be opened to use each cast?
A. Port configuration may be required to do the mirroring. Contact the dealer from whom you purchased the product for further information.
Q. The mirrored video freezes or turns black.
A. The app may be unstable. The problem may be improved by reconnecting the cast or restarting the HS-2.
▶MiraCast
Q. It is not possible to do the mirroring via MiraCast.
A.·The network card driver or graphic card driver of your computer is not the latest version.
→If the network card driver or graphic card driver is not the latest version, update it to the latest version with the driver wizard. The problem may be solved.
- You are using a computer with Windows 10 updated from Windows 7 or Windows 8.
→It is not possible to do the mirroring via MiraCast using a computer with Windows 10 updated from Windows 7 or Windows 8. Do the mirroring via Chrome(Google)Cast instead.
• The Mobile Hotspot setting of your computer is on.
→If the Mobile Hotspot setting of the computer is on, the HS-2 may fail to establish a MiraCast connection with the computer. Turn off the Mobile Hotspot setting of the computer.
• The Group Policy is blocking MiraCast.
→On domain-joined devices, Group Policy may block MiraCast.
- Your smartphone does not support MiraCast.
→Some smartphones do not support MiraCast. Check the instruction manual of your device. If mirroring via MiraCast is not possible, try to use Chrome(Google)Cast.
Q. It is not possible to use the Touch back control function in "Extend" mode during the mirroring.
A. The Touch back control function can only be used in "Duplicate" mode. If you use in "Extend" mode, misalignment of the cursor and coordinates occurs, preventing stable operation. Use the Touch back control function in "Duplicate" mode.
Q. When I try to do mirroring on the Andorid device, a message "Invitation Sent" is displayed.
A. In rare cases, a message "Invitation Sent" may be displayed on the Andorid device when connecting with the PIN input of the HS-2 enabled. If this message appears, it means that the connection has failed. Connect the device again. If the PIN entry screen is displayed, you can connect by entering the PIN code displayed on the HS-2.
▶ AirPlay
Q. It is not possible to do the mirroring via AirPlay.
A. The input device is not connected to the HS-2 or an AP that exists on the same network as the HS-2 wirelessly.
→Connect the input device to the HS-2 or an AP that exists on the same network as the HS-2. • When mirroring via an AP, the input device needs to be connected wirelessly to the HS-2 or an AP that exists on the same network as the HS-2.
→Connect the input device to the HS-2 or an AP that exists on the same network as the HS-2.
- The device is connected to Virtual Private Network (VPN) or a proxy server.
→Depending on your network environment, the HS-2 may not be able to communicate with the input device. Try to disable VPN and proxy settings.
▶Chrome(Google)Cast
Q.·It is not possible to do the mirroring via Chrome(Google)Cast.
A.·The HS-2 is not connected to the Internet.
→Internet access is required to use Chrome(Google)Cast. The input device and the HS-2 must be on the same network.
- The device displaying the Chrome browser is not on the same network as the HS-2.
→If the device and the HS-2 are not on the same network, connection may not be established. If you want to connect them beyond the network, we recommend that you check in advance under your usage environment.
- Your Chrome browser is not the latest version.
→The problem may be improved by updating the browser to the latest version.
- The device is connected to Virtual Private Network (VPN) or a proxy server.
→Depending on your network environment, the HS-2 may not be able to communicate with the input device. Try to disable VPN and proxy settings.
- The time of the input device, the time of the HS-2, and the time of the Internet are not synchronized.
→If you set the clock manually, you may not be able to connect the HS-2 and the input device. The problem may be improved by enabling the Automatic time synchronization setting to always set the clock correctly.
- If the Chrome settings of your Mac do not allow external connections, you will not be able to use Chrome(Google)Cast on your Mac.
Follow the steps below to see if external connections are allowed in the Chrome settings.
- Click the Apple icon at the top left of the screen.
- Go to [System Environment setting] > [Security and Privacy] > [Firewall].
- If the firewall is enabled, go to [Firewall Options]. (If the firewall is disabled, skip the next steps).
- If [Block all external connections] setting is enabled, disable this setting. After saving the setting, close Chrome and reopen it. Then try again.
- If [Automatically allow signed software to receive incoming connections] is enabled, do not include the Google Chrome entry in the list of applications.
- If [Automatically allow signed software to receive incoming connections] is disabled, click [+] button and select Chrome in the application folder.
- You are logged in to your Chrome browser or ChromeBook as a Guest.
→You need to log in with an account other than Guest.
■ Audio and Video
Q. The image quality is poor. (The image freezes or delays or there is block noise in the image.) A.·The radio wave environment may be bad.
→When using the HS-2 in the 2.4GHz band, radio wave interference may occur with microwave ovens, Bluetooth products, wireless routers, etc. Use the HS-2 in the 5GHz band or keep it away from interference sources. Do not block the HS-2 or the input device with metal cabinets, walls, TVs, etc. Obstacles (especially metal) can reduce the quality of communication.
- Data with a large amount of text information such as an Excel file and a novel is displayed via MiraCast.
→Due to the nature of the mirroring, block noise may be noticeable when displaying static data. The block noise may be reduced by displaying a moving object or by changing the radio wave environment or by reconnecting the HS-2 and the input device.
Q. Video content such as YouTube coming from a computer cannot be played.
A. We do not guarantee the playback of all video files of all the video streaming sites. Depending on the video files on the video streaming site, it may not be possible to display the video file. It depends on the security settings of the device that plays the video or the security settings of the video streaming site.
Q. Is HDCP supported?
A. HDCP is not supported. Some video content being input to the HDMI Input from Blu-ray players etc. may not be displayed. Playing protected content may terminate the mirroring session.
Q. It is not possible to record audio during the mirroring.
A. It is a specification. Audio sources that can be recorded are the built-in microphone's audio, the external microphone's audio, and the wired input audio. You can change the audio source to be recorded by changing the microphone settings.
Q. Audio of the HS-2 is not output from the HDMI Output or USB speaker.
A. The audio settings are not set correctly.
→Check the audio settings (⇒P.25 : ◆Audio output).
→Check the USB mic.&speaker you are currently using (⇒P.59 : ◆Mic.&speaker settings).
- The audio of the input device is set to mute, or the HS-2 is muted.
→Unmute the input device or the HS-2.
- There is no audio output from the HDMI output, USB microphone, USB speaker, or USB mic.&speaker.
→You can change the USB mic.&speaker to be used from the Settings (⇒P.59 : ◆Mic.&speaker settings). Check the current settings.
→When an external device such as a USB mic.&speaker is connected, the output audio source automatically changes to the connected device from the HDMI output and no audio is output from the built-in microphone and the HDMI output.
→As for the USB devices (USB microphone, USB speaker, or USB mic.&speaker) after starting the main unit, the one connected later has priority. When more than 2 units of USB devices are connected, the one connected first cannot be used.
→If you insert and remove the USB device continuously, the audio may not switch normally. Make sure to insert it slowly after confirming that the audio is switched.
- USB microphone, USB speaker, or USB mic.&speaker is not recognized.
→Some USB devices may not be used. Check whether it can be used with the HS-2 in advance.
- After initialization, there is no audio from the input device.
→The problem may be improved by opening the settings.
Q. Microphone audio is not recorded during video recording.
A. "Microphone mute" in the Recording settings is enabled or the microphone is disabled.
→If "Microphone mute" is enabled or the microphone is disabled, microphone audio is not recorded.
■ App
Q. PIN settings are not reflected.
A. PIN code is available only for Miracast and Airplay. PIN code is not available for Chrome(Google) Cast.
Q. The setting item is grayed out and cannot be set.
A.·The Proxy settings are disabled.
→If the Proxy settings are disabled, the setting items are grayed out and cannot be set.
• The 4K input setting is enabled.
→If the 4K input setting is enabled, the Cast settings are grayed out. Disable the 4K input setting.
- The AP channel and the MiraCast channel are close to each other.
→To prevent channel interference, grayed out channels cannot be selected without changing the other channel.
■ Other
Q. I want to know where to save the captured still image file or recorded video file. The captured still image file or recorded video file is not saved. The captured still image file or recorded video file does not appear in the File app.
A. If you are looking for the saved file in "Images" or "Videos" of the File app, it will be displayed in "Images" or "Videos" of the File app after turning off and on the HS-2.
Internal storage: Select a file from the Home screen and select "HS-2" (internal storage).
Save destination of the captured still image file and recorded video file: /HS2/DCIM folder
SD card, USB flash drive: Select a file from the Home screen to display the storage option. Then select the storage.
Save destination of the captured still image file: /Android/data/jp.co.elmo.hs2paint/files/DCIM folder Save destination of the recorded video file: /Android/data/jp.co.elmo.hs2home/files/DCIM folder
- There is not enough space in the storage.
→Check the capacity of the internal storage or external memory device, and then save again.
Q. It is not possible to connect to the Internet.
A. A proxy is set for your network.
→You can connect to the Internet by setting the proxy on the HS-2.
- HS-2 is connected to an external network via Wi-Fi or LAN.
→Check the Wi-Fi or LAN connection status. Try again after connecting the HS-2 to the external network.
Q. I want to change the settings such as SSID, password, and DeviceName.
A. You can change SSID and password for the HS-2 AP from the System Settings menu. DeviceName (Miracast connection destination, etc.) can be changed from the Settings menu.
Q. I want to install a client certificate.
A. For the installation procedure, see "INSTALLING THE CLIENT CERTIFICATE (⇒P.61 : ◆Installing the client certificate)".
Q. The supplied remote control does not work.
A. Immediately after the power of the AC adapter is turned on, negotiation between the remote control and the HS-2 starts. This process may take up to 10 seconds. If the remote control still does not work, perform a pairing again. (⇒P.56 : ◆ Pairing of the remote control)
If there is an error in the app, the remote control may become unusable. In that case, restart the HS-2 and the remote control may start to work again.
Q. I want to change the speed and sensitivity of the cursor of the supplied remote control.
A. You can change the speed of the cursor with the Pointer speed menu.
“System Settings” > “System” > “Languages&input” > “Advanced” > “Pointer speed”
Q. The Capture button on the remote control does not work.
A. This button can only be used in the Cast app or Paint app. If you want to take a screen capture with the Browser app, use the capture button during using the Paint app.
Q. Some functions cannot be operated with the D-pad or buttons on the main unit.
A. Rather complicated operations such as typing texts cannot be done by using only the D-pad on the main unit. Use the cursor functions of the supplied remote control too.
Q. If the power of the monitor is turned off, the power of the HS-2 is also turned off.
A. The HS-2 is partially compatible with CEC. By turning off the power of the monitor that supports CEC, the power of the HS-2 may also be turned off.
Q. External memory device (such as USB flash drive or SD card) is not recognized.
A. Check if the memory device is inserted correctly. The problem may be improved by inserting it again or restarting the HS-2.
Q. Is it possible to connect a Bluetooth compatible device?
A. Do not use anything other than the supplied remote control. The HS-2 may not work properly if it is connected to other devices.
Q. Time setting is not displayed correctly.
A. Go to [System] > [Date and Time] > [Select Time Zone] to set the time zone. If the HS-2 is not connected to the Internet, time information cannot be obtained.
Q. When I connect to the Internet by connecting to the AP of the HS-2 via Wi-Fi, the network is slow.
A. Up to 16 devices can be connected to the AP of the HS-2 at the same time. The problem may be improved by reducing the number of connected devices. Also, as the HS-2's AP function is designed for the mirroring, the network speed may be slower depending on the type and number of connected devices compared to general access points. Prepare a separate access point according to your environment.

TROUBLESHOOTING
◆SYMPTOMS AND SOLUTIONS
Check the following items. If any abnormality is found, consult the dealer from whom you purchased this product or our nearest branch/office.
| Symptom Possible cause/ remedy | |
| No image is displayed. | ·The cable is not correctly connected. (Input cable / Output cable)·The power cable is disconnected from the wall outlet.·Wrong HDMI cable is used.·The HDMI cable is damaged (disconnected).·The AC adapter is disconnected from the power supply socket of the HS-2.·The power is not ON. (Check whether the Power button lights up blue.)·Reconnect the AC adapter, power cable or other cables.·The power of the connected HDMI device or the device connected to the USB Type-C port is not ON.·To mirror the image of a mirroring compatible device, the connection settings must be completed in advance. Complete the Wi-Fi settings for each device and select the HS-2 from the list of connection destinations.·If you turn on the power immediately after turning off, the HS-2 may not start. Wait several seconds after turning off the power and then turn on.·Data format of the input image is not supported by HS-2. Make sure that the data format of the image to be input is supported by the HS-2.·Video data and audio data protected by HDCP cannot be output. |
| The output image (resolution) changes automatically. | When a monitor is connected, the displayed image (resolution) is automatically changed according to the information from the connected monitor. |
| USB camera is not recognized. | ·The USB camera cannot be used as a video input device for the Cast app. The USB camera can be used as a face camera only when there is no wired connection (input) while using EZT.·If you turn the Power button ON or OFF too quickly, the USB camera may not recognize it. Reconnecting the AC adapter of the HS-2 and restarting it may improve the problem. After turning off the power, wait for a few seconds before turning on the power again. |
| An abnormal image such as a sandstorm is displayed. | There is a problem with the signal transmission. Check that the cables are properly connected. |
| The color of the image is strange. | The setting of the output device is not correct. Check the setting of the output device. |
| It is not possible to control the HS-2 from the remote control. | ·The remote control can only be used when the power of the HS-2 is ON. (The LED is lit in blue). Press the Power button to turn on the HS-2.·Immediately after the power of the HS-2 is turned on or the battery of the remote control is inserted, communication with the HS-2 is started by pressing the button on the remote control. In some cases, it may take up to 7 seconds after you press a button on the remote control before it becomes available, but you can use it by pressing the button several times.·The battery level of the remote control is low. Replace the battery.·The battery of the remote control is inserted in the wrong polarity. Make sure that the “+” mark is visible from the back of the remote control when installing the battery.·Perform a pairing with the remote control. Refer to ◆Pairing of the remote control for details.) |
| It is not possible to record videos. | ·The SD card or USB flash drive is not inserted.·The SD card or USB flash drive is broken.·There is not enough space in the storage. |
| No audio is recorded when recording videos. | The microphone is set to mute. |
| It is not possible to connect the HS-2 to the network. | ·The connected router is in stealth mode.·The DHCP of the connected router is disabled.Enable DHCP or set the IP setting of the HS-2 to fixed IP address.·The proxy is set.·Wi-Fi signal may be weak. Check the radio wave condition of the external AP.·If “Wireless connection to external AP” option in the Settings menu is set to "Disabled", you will not be able to connect to an external AP via Wi-Fi. To connect to an external AP, set this option to “Enabled”. |
| It is not possible to do the mirroring. | Mirroring may not be possible depending on the security settings of the device. Change the security settings such as temporarily turning off the firewall settings. |
| Projected video is jerky and not smooth. | ·The CPU of the device is not powerful enough. In order to project a screen with a lot of movement like a movie, compared to a video with little movement like a presentation, a high-spec device is required.·The network environment is not good enough. (For example, the Wi-Fi signal is weak.)Improve the network environment by changing the Wi-Fi channel of the HS-2 or the wireless channel of the Wi-Fi access point or the layout of each device. |
| No audio is output. ·A monitor | or projector that cannot output audio is used.·The audio volume of the monitor or projector is set to 0 or is set to mute.·The audio setting of the monitor or projector is not set to HDMI input.·The audio volume of the device to be mirrored is set to 0 or is set to mute.·The audio volume of the HS-2 is set to 0 or is set to mute. |
| Error message appears when entering the password. | Wrong password has been entered. (For example, uppercase letter is used for lowercase letter or number “0” is used for alphabet “O”.)Enter the password correctly. |
| “Fan error” message is displayed. | The built-in fan is broken. Request replacement of the fan. |
About long-term usage of the product
- Due to the lifetime of its parts, if this product is used for longer than the warranty period, its performance and quality may deteriorate. In this case, we will replace the parts for a charge. Consult the dealer from whom you purchased this product or our nearest branch/office.
| Item Specifications | |
| Power Source | DC12V/2A (AC adapter AC100V - 240V 50/60Hz) |
| Power consumption 24 | W |
| Outside dimensions | W: 214mm D: 114mm H: 37mm |
| Weight 470g | |
| Operating temperature | 0°C~40°C |
| Humidity 30%~85%(No condensation) | |
| OS Android 9.0 | |
| Video output | |
| Output port HDMI Output port (Type-A) X1 | |
| Network Video streaming | |
| Split screen | Displays max. 4 split images on a single screen of the connected devices to the HS-2. |
| Save destination Internal storage, SD card, USB flash drive | |
| Video input (wired) | |
| Input port HDMI (Type-A)×1、USB(Type-C)×1 | |
| Compatible HDMI input devices | Video equipment and computers equipped with an HDMI output port |
| HDMI audio Yes | |
| HDCP Not supported. | |
| Compatible USB(Type-C) input devices | Computers that support DisplayPort Alternate Mode (video output function) (such as Mac and ChromeBook) |
| USB audio | Yes |
| HDCP | Not supported. |
| Video input (wireless) | |
| Supported mirroring protocols | AirPlay、MiraCast (with touch back function)、Chrome(Google)Cast |
| Supported OS for mirroring | Mac OS(OS X 10.11 or later)、iOS(iOS10 or later)、iPad OS、Android OS(5.0 or later)、Windows OS(8.1 or later)Chrome OS |
| Supported input resolution | Max.1920×1080p |
| Audio | Yes |
| HDCP | Not supported. |
| Audio input / output | |
| Built-in microphone | Yes (MEMS mic. X1) |
| Audio input HDMI input, USB(Type-C) input, USB mic., network | |
| Audio output | HDMI output, USB speaker, network |
| USB | |
| Input / output port | USB host ports (Type-A) X4 (USB 2.0X3 + USB 3.0 X1) with bus power (4 ports, total 1.5A) |
| Supported device class | HID, Mass storage, UVC, UAC, HUBPossible to connect a USB mic.& speaker. |
| Storage | |
| Internal storage 16GB (including OS and apps) | |
| SD card SD slot×1 for SD card and SDHC card (Class10 or higher) | |
| USB flash drive Still image recording / video recording (with audio) | |
| Bluetooth | |
| Remote control 16 buttons + Gyro mouse | |
| Network | |
| LAN 10BASE-T、100BASE-TX、1000BASE-T | |
| Wi-Fi IEEE 802.11 ac/a/b/g/n | |
| Authentication method(Wi-Fi) | Open system、WPA-PSK、WPA2-PSK、802.1x-EAP |
◆VIDEO INPUT
• HDMI video input format
| Resolution Aspect ratio | Frequency | ||
| 3840×2160p UHD、4K 16 | : 9 24/25/30Hz | ||
| 1920×1080p FHD、2K 16 | : 9 24/25/30/50/60Hz | ||
| 1280×720p HD | 16 : 9 50/60Hz | ||
| 1024×768 | XGA | 4 : 3 | 60Hz |
• Wi-Fi video input format
| Resolution Aspect ratio | Frequency | ||
| 1920x1080p FHD、2K 16 | : 9 24/25/30Hz | ||
| 1280x720p HD | 16 : 9 50/60Hz | ||
- USB (Type-C) video input format
| Resolution Aspect ratio | Frequency | ||
| 3840×2160p UHD、4K 16 | : 9 24/25/30Hz | ||
| 1920×1080p FHD、2K 16 | : 9 24/25/30/50/60Hz | ||
| 1280×720p HD | 16 : 9 50/60Hz | ||
◆VIDEO OUTPUT
• HDMI video output format
| Resolution Aspect ratio | Frequency | ||
| 3840×2160p UHD、4K 16 : 9 30Hz | |||
| 1920×1080p FHD、2K 16 : 9 60Hz | |||
| 1280×720p HD 16 : 9 60Hz | |||
| AUTO - - - | |||
◆VIDEO RECORDING
| Save destination | Internal storageSD card and SDHC card (Class10 or higher)USB flash drive |
| Recording format | H.264, AAC |
| Recording quality | High / Normal / Low |
| Video file size / frame rate | High : 8Mbps 1920x1080@30fpsNormal : 6Mbps 1920x1080@30fpsLow : 4Mbps 1920x1080@30fps |
| Audio recording | Built-in mic. / External mic. / HDMI audio / USB Type-C audio / no audio |
| Recording restriction | The maximum recording file size is 4GB. If the file size exceeds 4GB, it will be saved in multiple files. |
◆ STILL IMAGE RECORDING
| Save destination | Internal storageSD card and SDHC card (Class10 or higher)USB flash drive |
| File size 1920×1080 | |
| File format JPEG |
◆LIST OF SUPPORTED MEDIA TYPES
| Media type | Extension | Description |
| Still image | JPG/PNG/BMP | Jpeg file/Png file/Bmp file |
| Video | MP4 MP4 file | |
| PDF pdf PDF file | ||
| Excel xlsx, xls Excel file | ||
| PowerPoint pptx, ppt PowerPoint file | ||
| Word docx, doc Word file |
◆ SYSTEM REQUIREMENTS
| Windows | Windows 8.1/10CPU : Intel Core i5 (with processor higher than 2GHz)RAM : More than 2GB (RAM more than 8GB recommended) |
| Android Android 5.0 or later | |
| Mac OS | Mac OS : 10.11 or laterCPU : Intel Core i5 equivalent ( Multi-core processor)Memory : 4GB or more ( Memory more than 8GB recommended)Disk capacity : 300MB or more free space |
| iOS | iPhone5 or laterSystem version : iOS 10 or later |
| Chrome OS | All versions of Chrome OSMemory : 4GB or more |
※It may be possible to do casting via Chrome browser running on OS other than the above (such as windows7)
■ TRADEMARKS AND LICENSES
ELMO is a registered trademark of TECHNO HORIZON CO., LTD.
SD, SDHC, and S logo are trademarks of SD-3C,LLC.
HDMI and High-Definition Multimedia interface are trademarks or registered trademarks of HDMI Licensing LLC.
Windows and other Microsoft products referenced herein are registered trademarks of Microsoft Corporation in the U.S. and other countries.
Google, Google Chrome, Android, Chromecast and YouTube are registered trademarks of Google Inc.
MiraCast is a registered trademark of Wi-Fi Alliance.
AirPlay is a registered trademark of Apple Inc. in the U.S. and other countries.
All other company and product names described in this manual are trademarks or registered trademarks of their respective companies.
This product is licensed under the AVC Visual Patent Portfolio License (AVC Video) for the personal and non-commercial use of a consumer to
(i) Play AVC Video that was recorded by a consumer engaged in a personal and a non-commercial activity and/or,
(ii) Play AVC Video that was obtained from a video provider licensed from MPEG-LA, LLC.
Additional information including that relating to promotional and commercial uses may be obtained from MPEG-LA, LLC.
Bluetooth® is a trademark or registered trademark of Bluetooth SIG, Inc. USA.
Attention
- Unless used for personal use, it is prohibited by copyright law to record slides, books and photos without the prior consent of copyright holder.
- This product is designed to be used in industrial environment. If it is used in a residential area or in an adjacent area thereto, harmful interference to radio or television reception may occur.
- Repair parts
Repair parts are the items which are needed to maintain product functionality. The holding period of such repair parts is 5 years after the product discontinuation, which is equal to the repair period we will accept.
テクノホライゾン株式会社
〒457-0071
6851 Jericho Turnpike
Suite 145
Syosset, NY 11791
Tel. (516) 501-1400
Fax.(516) 501-0429
E-mail: elmo@elmousa.com
Web : https://www.elmousa.com/
ELMO Europe SAS
□Headquarters
60, av. Charles de Gaulle
5WA-129, Dubai Airport Free Zone,
P.O Box 371556, Dubai,
United Arab Emirates
Tel. +971-(0)4-260-2390
Fax. +971-(0)4-260-2392
Web : https://www.elmoeurope.com
TECHNO HORIZON CO., LTD.
2-13-1, Chikamatori Minami-ku
Nagoya, 457-0071, Japan

- Instruction Manual
- ■ IMPORTANT SAFEGUARDS
- Make sure to read the "IMPORTANT SAFEGUARDS" in this guide before using this product.
- ■ Safety Check
- ■ Heat
- WARNING
- TO REDUCE THE RISK OF FIRE OR ELECTRIC SHOCK, DO NOT EXPOSE THIS PRODUCT TO RAIN OR MOISTURE.
- FOR UNITED STATES USERS:
- INFORMATION
- USER-INSTALLER
- CAUTION:
- ■ BEFORE YOU USE
- ■ TABLE OF CONTENTS
- PREPARATION
- ◆ PACKAGE CONTENTS
- ② PART NAMES AND FUNCTIONS
- ◆ OPERATING PANEL
- ◆FRONT PANEL
- ◆REMOTE CONTROL
- ◆FIXING HS-2 TO A DESK
- Note
- ◆ ABOUT THE FAN
- BASIC OPERATIONS
- ◆ CONNECTING TO A PROJECTOR OR MONITOR
- ◆ CONNECTING TO A POWER SOURCE
- ◆ POWER ON/OFF
- ◆ SETTING THE DESTINATION
- ◆ INSERTING BATTERIES TO THE REMOTE CONTROL
- USING THE HS-2
- ■ Cast app(Display app)
- Caution
- ◆ CONNECTING
- ■ Connecting wirelessly
- ▶Mirroring via MiraCast
- - When using Android OS
- ▶Mirroring via Air□lay
- ▶Mirroring via Chrome(Google)Cast
- ◆DISPLAYING
- ■ Single screen
- ■ Split screen
- ■ Remote control operations
- ■ Display selection screen
- ■ Navigation bar
- ◆RECORDING
- ■ Still image recording
- ■ Video recording
- ◆ AUDIO OUTPUT
- ■ PAINT
- ◆DRAWING ON THE SCREEN
- BROWSER
- FILE
- ◆SELECTING THE FILE
- ■ Playing the file
- ■ Operating the file
- ■ EZT(Remote Meeting)
- ◆ OPERATION OF EZT
- - Startup
- - Joining a Meeting
- - Configuring the Meeting Settings
- ■ Microphone settings
- ■ Speaker settings
- ■ Permission settings
- ■ Display Settings
- ◆ AVAILABLE OPERATIONS DURING THE MEETING
- - Menu bar Operations
- - Configuring the Security Settings
- Tap the Security icon.
- The Security settings dialog box will appear.
- - Configuring the Participants Settings
- Tap the Participants icon.
- Tap the icon of participant.
- - Sharing the Screen
- Tap the Share icon to display the Screen sharing option.
- Tap the screen or whiteboard to display the shared screen.
- 2-1 Displaying the □en Tool
- 2-1-1 Screen sharing
- 2-1-2 White board sharing
- 2-2 Operations during the Screen Sharing
- 2-3 Stop screen sharing
- 2-3-1 Screen sharing
- 2-3-2 White board sharing
- ELMO Play
- ◆INSTALLING AN APP
- ◆UNINSTALLING AN APP
- CONFIGURING THE SETTINGS
- ◆ PASSWORD SCREEN
- ◆ SETTINGS SCREEN
- ◆CHANGING THE DEVICE NAME
- ◆ SECURITY SETTING
- ◆ CONNECTING TO THE NETWORK
- ■ LAN settings
- ■ Wi-Fi settings
- ◆NETWORK PROXY SETTINGS
- ■ Ethernet
- ■ Wi-Fi
- ■ Browser
- ◆PAIRING OF THE REMOTE CONTROL
- ◆RESOLUTION OF THE MONITOR
- ◆DATE AND TIME SETTINGS
- ◆ KEYBOARD SELECTION
- ◆ APP SELECTION
- ◆INSTALLING THE CLIENT CERTIFICATE
- Select "☐IN" for the screen lock.
- Set the □IN.
- FAQ (Frequently asked questions and answers)
- ■ Cast
- ▶General
- ▶MiraCast
- ■ Audio and Video
- It is not possible to connect to the Internet.
- TROUBLESHOOTING
- ◆SYMPTOMS AND SOLUTIONS
- About long-term usage of the product
- ◆VIDEO INPUT
- ◆VIDEO OUTPUT
- ◆VIDEO RECORDING
- ◆ STILL IMAGE RECORDING
- ■ TRADEMARKS AND LICENSES
- Attention
- テクノホライゾン株式会社
- ELMO Europe SAS
- TECHNO HORIZON CO., LTD.
Brand : Elmo
Model : HS-2
Category : Wireless pointer