
PV-S1600 - Mobile Phone CASIO - Free user manual and instructions
Find the device manual for free PV-S1600 CASIO in PDF.


| Product Type | Personal Digital Assistant (PDA) with mobile phone functionality |
| Brand | Casio |
| Model | PV-S1600 |
| Dimensions (Unfolded) | 11.8 H × 83 W × 131.5 D mm (1/2" × 3 1/4" × 5 1/8") |
| Dimensions (Folded) | 14 H × 83 W × 139.5 D mm (1/2" × 3 1/4" × 5 1/2") |
| Weight | Approximately 155 g (5.5 oz) including batteries |
| Power Supply | Two AAA-size alkaline batteries |
| Battery Life (No Backlight) | Approximately 80 hours (normal usage) |
| Memory Capacity | 16 MB (12 MB user area + 4 MB OS) |
| Display | 160 × 160 dots, monochrome LCD with EL backlight |
| Auto Power Off | Selectable: 1, 3, or 6 minutes of inactivity |
| Operating Temperature | 0°C to 40°C (32°F to 104°F) |
| Keyboard Formats | QWERTY, QWERTZ, AZERTY (auto-selected based on language) |
| Main Modes | Scheduler, Contacts, Memo, Expense Manager, Currency Converter, Quick-Memo, Pocket Sheet, P.Referencer, Games |
| Clock | World time with dual clocks, daily alarm, schedule alarms |
| Data Communication | Via optional SB-305 serial cable, infrared, or PC sync |
| Secret Memory | Password-protected area for sensitive data |
| Euro Conversion | Supports 12 national currencies with preset rates |
| Touch Screen | Resistive touch screen, stylus included |
| Backlight Duration | Selectable: 15 or 30 seconds |
| Low Battery Warning | Display warning when batteries need replacement |
| Reset Procedure | Press RESET button on back; erases all data |
| Compliance | FCC Part 15 Class B, CE marked |
Frequently Asked Questions - PV-S1600 CASIO
User questions about PV-S1600 CASIO
0 question about this device. Answer the ones you know or ask your own.
Ask a new question about this device
Download the instructions for your Mobile Phone in PDF format for free! Find your manual PV-S1600 - CASIO and take your electronic device back in hand. On this page are published all the documents necessary for the use of your device. PV-S1600 by CASIO.
USER MANUAL PV-S1600 CASIO
GUIDELINES LAID DOWN BY FCC RULES FOR USE OF THIS UNIT IN THE U.S.A. (not applicable to other areas).
NOTICE
This equipment has been tested and found to comply with the limits for a Class B digital device, pursuant to Part 15 of the FCC Rules. These limits are designed to provide reasonable protection against harmful interference in a residential installation. This equipment generates, uses and can radiate radio frequency energy and, if not installed and used in accordance with the instructions, may cause harmful interference to radio communications. However, there is no guarantee that interference will not occur in a particular installation. If this equipment does cause harmful interference to radio or television reception, which can be determined by turning the equipment off and on, the user is encouraged to try to correct the interference by one or more of the following measures:
- Reorient or relocate the receiving antenna.
- Increase the separation between the equipment and receiver.
- Connect the equipment into an outlet on a circuit different from that to which the receiver is connected.
- Consult the dealer or an experienced radio/TV technician for help.
FCC WARNING
Changes or modifications not expressly approved by the party responsible for compliance could void the user's authority to operate the equipment.
Proper connectors must be used for connection to host computer and/or peripherals in order to meet FCC emission limits.
Cable ...... PV-S1600 to Windows PC or SB-90
Declaration of Conformity
Model Number: PV-S1600
Trade Name: CASIO COMPUTER CO., LTD.
Responsible party: CASIO, INC.
Address: 570 MT. PLEASANT AVENUE, DOVER, NEW JERSEY 07801
Telephone number: 973-361-5400
This device complies with Part 15 of the FCC Rules. Operation is subject to the following two conditions: (1) This device may not cause harmful interference, and (2) this device must accept any interference received, including interference that may cause undesired operation.
- CASIO COMPUTER CO., LTD. assumes no responsibility for any damage or loss resulting from the use of this manual.
- CASIO COMPUTER CO., LTD. assumes no responsibility for any loss or claims by third parties which may arise through the use of the PV Unit.
- CASIO COMPUTER CO., LTD. assumes no responsibility for any damage or loss caused by deletion of data as a result of malfunction, repairs, or battery replacement. Be sure to back up all important data on other media to protect against its loss.
- No part of this manual may be reproduced in any form without the express written consent of the manufacturer.
Microsoft and Windows are registered trademarks of Microsoft Corporation in the United States and/or other countries.
Before using the PV-S1600 for the first time...
Use the following procedure to load batteries before using it for the first time.
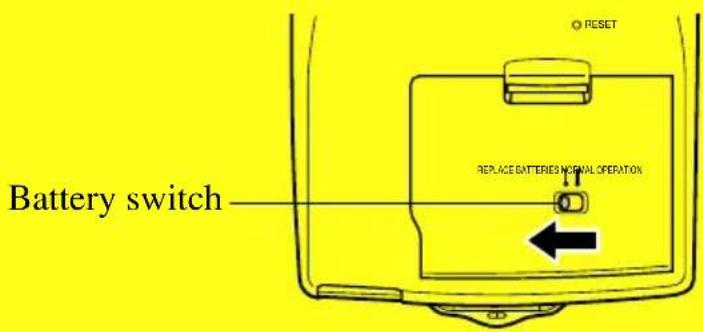
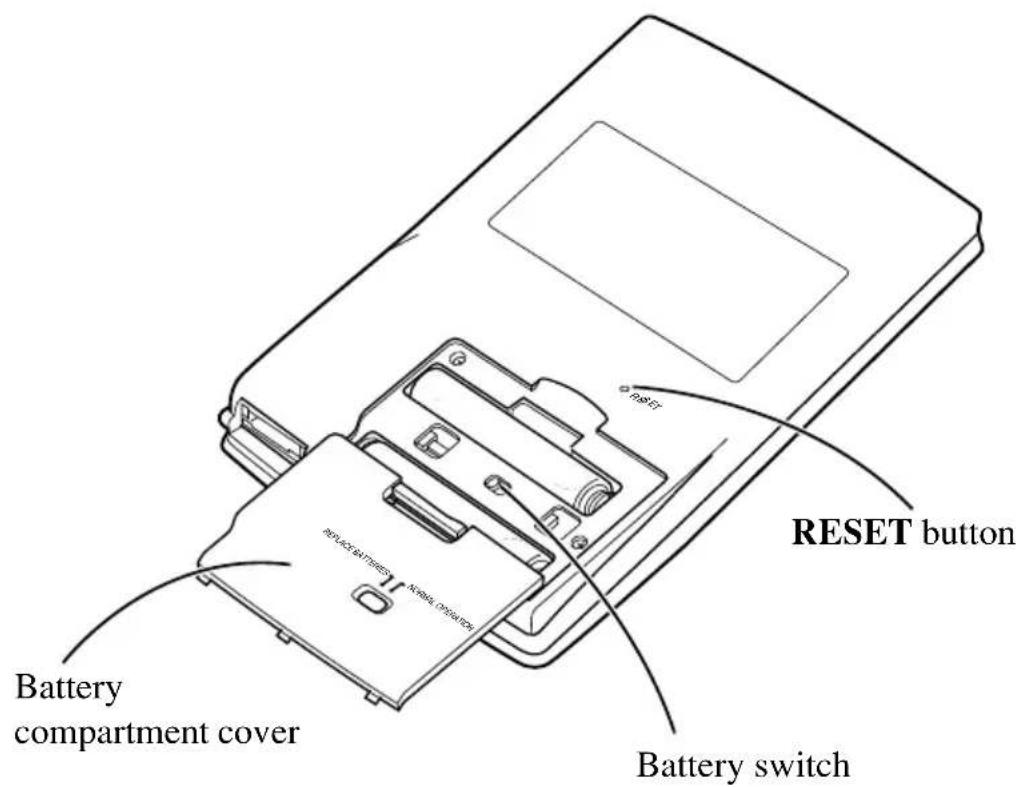
- Slide the battery switch on the back of the PV Unit to the REPLACE BATTERIES position.
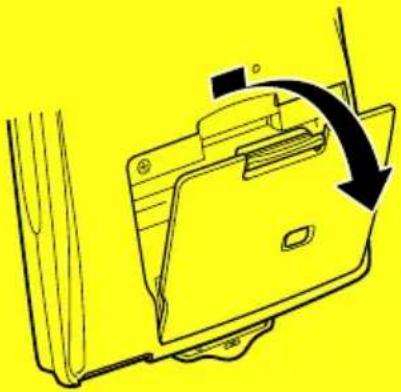
- Pull with your finger on the battery compartment cover tab to release it, and then open the cover.
natural_image
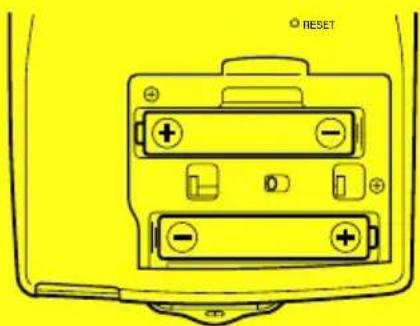
Diagram of a yellow folder with an arrow indicating rotation or movement (no text or symbols)- Load two new batteries, making sure that their positive (+) and negative (−) ends are facing in the proper directions.
natural_image
Diagram of a car front panel with battery and switch components (no text or labels)- Taking care not to damage its tabs, replace the battery compartment cover back onto the PV Unit.
- Slide the battery switch back to the NORMAL OPERATION position.
Important!
• Always make sure the battery switch is in the NORMAL OPERATION position at all times, except when loading batteries.
6. Remove the stylus from the PV Unit.
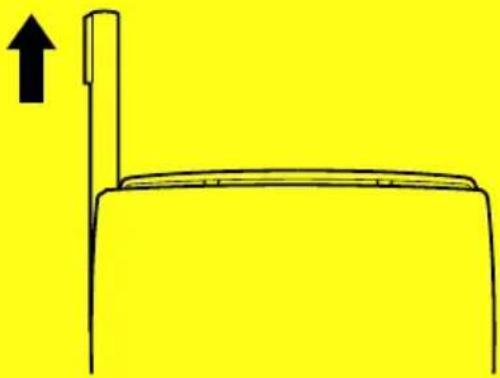
- Pull the stylus straight out in the direction indicated by the arrow.
natural_image
Simple line drawing of a mechanical component with an upward arrow, no text or symbols present- Pressing down lightly on the center of the cover, pull upwards on the bottom of the cover, and then lift up to remove it.
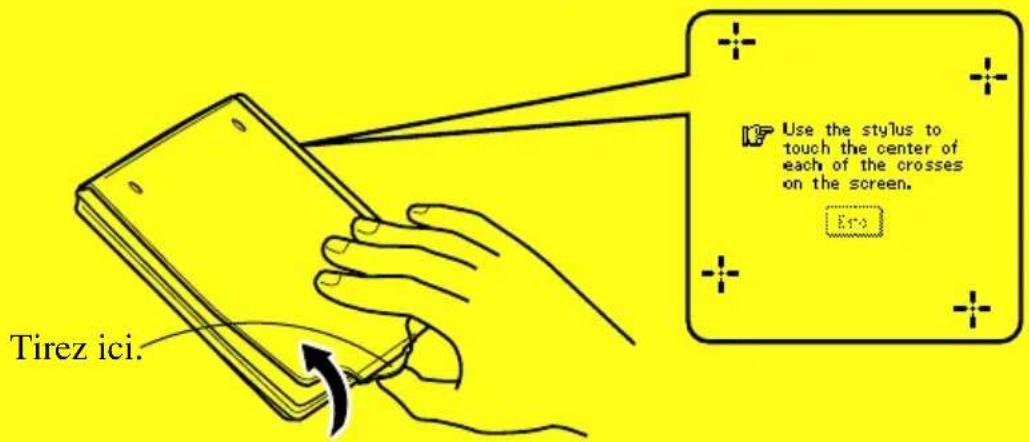
- If the above does not appear on the display, remove the batteries and then reload them into the PV Unit, making sure you follow proper procedures.
- Tap the center of each of the four cross marks as they appear on the screen.
- The contrast adjustment screen appears next.
- Tap ◀ or ▶ to adjust the contrast of the display, and then tap OK.
• This causes the system language selection screen to appear.
-
Tap the button next to the language you want to select as the system language, and then tap Set.
-
In response to the message that appears (Check your home time setting and correct it if necessary!), tap OK to change to the pop up tool screen.
-
Check the time setting and correct it if necessary (page 160).
-
Tap the Menu icon to display the on-screen icon menu (page 26).
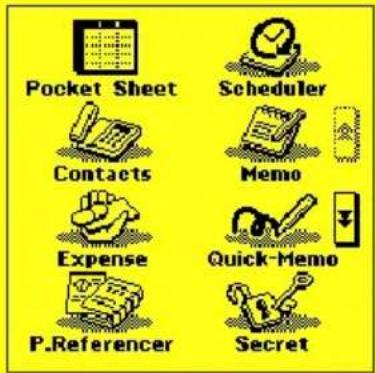
About the EL backlight
- The PV Unit is equipped with an EL backlight that allows easy viewing of display contents in a theater, or anywhere else where lighting is dim.
- Tap the icon to turn on the EL backlight and illuminate the display screen.
- You can use the procedure on page 23 to specify how long the EL backlight stays on (approximately 15 or 30 seconds).
- Note that EL backlight operation consumes large amounts of electrical power and can greatly shorten battery life.
- Note that frequent or extended use of the EL backlight shortens battery life.
The following shows how backlight use affects battery life under controlled test conditions*. For comparison with the values below, battery life is normally approximately 80 hours with 55 minutes of continuous display only and 5 minutes of processing operation per hour in the Contacts Mode when no backlight operation is performed.
| Backlight Operation Battery Life | |
| 3 minutes per hour Approximately 60 hours | |
| 15 minutes per hour Approximately 30 hours |
\* Test Conditions
- “Battery Life” is the number of hours before battery failure when the unit is left on (5 minutes of a processing operation and 55 minutes of continuous display only (no processing operation) per hour in the Contacts Mode, plus the backlight operation described below). The above values assume ambient temperature of 20^ , starting with a fresh set of new batteries.
- “Backlight Operation” is the number of minutes the backlight is turned on per hour during the display only (no processing operation) period.
- Be sure to use alkaline batteries. Manganese batteries provide very short battery life.
If you do not plan to use the PV Unit for a long time...
Remove the batteries. Batteries will go dead after about six months if you leave them in the PV Unit while it is not used.
Turning On the PV Unit
You can turn on the PV Unit by pressing the center key. You can also set up the PV Unit so it turns on when you tap its screen with the stylus (screen tap power on).
Note
- Use the procedure under “To turn the screen tap power on feature on and off” on page 21 to control the screen tap power on setting.
- The screen tap power on feature is turned on when you use the PV Unit for the first time after purchasing it.
Contents
Before using the PV-S1600 for the first time.... 1
Chapter 1 | Getting Acquainted .... 14
Read this first! 14
Make backup copies of important data! 14
Important Precautions 15
Data Errors 16
To reset after viewing data 16
General Guide 17
Using the Cover 18
To remove the cover 18
To replace the cover 18
Power Supply 19
Low Battery Warning 19
Battery Precautions 19
To replace the batteries.... 21
To turn power on and off 21
To turn the screen tap power on feature on and off 21
Auto Power Off 22
To set the Auto Power Off Interval 22
Configuring the Start-up Screen 22
To select a start-up screen 22
To enable and disable start-up screen operation 23
Using the Backlight 23
To specify the backlight duration 23
About the EL backlight 23
Cursor Keys and Stylus 24
Stylus 24
Cursor Keys 25
Using the Icon Menu 25
Modes 26
To enter a mode using the icon menu 26
To enter a mode using the on-screen icon menu 27
To enter a mode using the Action Menu 27
Customizing the Appearance of the Mode Menu 28
Swapping Two Icons 28
Moving an Icon to a Specific Location 28
Chapter 2
Scheduler 29
Entering the Scheduler Mode 29
Inputting New Scheduler Data 29
To input a single-date Schedule item 30
To input a multiple-date Schedule item with the New button 30
To input a To Do item 31
To input a Reminder item 32
Reminder Types and Settings 33
Importing Contacts Data Into a Schedule Item 34
To import Contacts data into a Schedule item 35
Viewing Scheduler Data 37
Screen Organization 37
Calendar Screens 38
Periodic Schedule Screens 41
Schedule Data Screen 44
Reminder Screens 45
To Do Screens 46
Date Highlighting 48
To highlight dates 48
To unhighlight dates 48
Jumping to a Specific Date 49
Renaming To Do Categories 49
Chapter 3 | Contacts .... 50
Entering the Contacts Mode 50
To enter the Contacts Mode from the icon menu 50
To enter the Contacts Mode from the Action Menu 50
To enter the Contacts Mode from the Mode Menu using the stylus 50
Changing the Display Category 51
Latest Calls List 52
Resizing Contacts List Screen Columns 52
Inputting New Contacts Data 53
Viewing Contacts Data 54
To view Business data 54
To view other data 55
Changing Contacts List Screen Contents 56
To change the contents of a category's list 56
Changing Contacts Input Screen Contents 57
To change the contents of a category's input screen 57
Managing Untitled Categories and Free Entries 58
Contacts Categories 58
To edit Contacts Untitled category and Free entry names 59
Copying Data Items Between the Personal and Business Categories ...... 60
Exporting Contacts Data Into a Schedule Item 60
Chapter 4
Memo 61
Entering the Memo Mode 61
Changing the Display Category 61
Inputting New Memo Data 62
Viewing Memo Data 63
To view memo data 63
To display an item in the full-screen view 64
Moving a Memo within a List Screen 65
Renaming Memo Categories 65
Chapter 5
Expense Manager 66
Entering the Expense Manager Mode 66
Inputting a New Transaction 66
Recalling Expense Manager Data 68
Calculating Periodic Totals 69
Managing Payment and Expense Types 70
To change a payment type or expense type name 70
Chapter 6
Currency Converter 71
Entering the Currency Converter Mode 71
General Currency Conversion 71
Performing a Conversion 71
Changing the Currency Name and Rate 72
Displaying the Current General Rates 73
Euro Conversion 73
Performing a Conversion 73
Changing the Displayed National Currencies 75
Displaying the Current Euro Rates 75
Changing the Currency Name and Rate 75
Specifying the Rounding Method 76
Chapter 7
Quick-Memo 78
Entering the Quick-Memo Mode 78
Quick-Memo Categories 78
To select a Quick-Memo category 78
Using the Quick-Memo Drawing Tools 79
Creating a New Quick-Memo 80
To input a new Quick-Memo 80
To draw a line or rectangle 80
Recalling a Quick-Memo 81
Screen Copy 82
To record a screen copy 82
Chapter 8
Pocket Sheet 83
Entering the Pocket Sheet Mode 83
Pocket Sheet Basics 83
Creating a New Sheet from Scratch 84
Making a Cell the Active Cell 85
Selecting a Range of Cells 85
Jumping to a Specific Cell in a Sheet 85
Inputting Data Into a Cell 86
General Input Rules 86
Cell References 86
Relative Cell References 87
Absolute Cell References 87
Mixed Cell References 88
Using the On-screen Keyboards 88
Inputting Mathematical Expressions 89
Inputting Text 91
Input Example 92
Example Data 92
Controlling the Appearance of a Cell 93
Changing the Format Settings of a Cell 93
Specifying Cell Border Lines 96
Row and Column Operations 97
Changing the Width of a Column 97
Scroll Freezing Rows and Columns 98
Inserting Rows 100
Inserting Columns 101
Deleting Rows and Columns 101
Sheet Operations 102
Opening a Sheet 102
Displaying the Input Screen 102
Saving a New Sheet 102
Saving an Existing Sheet Under a New Name 102
Exiting a Sheet 103
Renaming a Sheet 103
Cut, Copy, Paste, Clear 103
Cutting and Copying Cell Data 103
Pasting Cell Data 104
Copying a Relative Cell Reference 105
Copying an Absolute or Mixed Cell Reference 105
Clearing Cell Data 105
Searching for Data in a Sheet 106
To search for data in a sheet 106
Setting Sheet Calculation, Gridline, and Protect Options 107
Date and Size Information 107
Displaying Date and Size Information 107
Pocket Sheet Sync 108
Pocket Sheet Errors 108
Chapter 9
P.Referencer 109
Preparing and Transferring Data from Your PC 109
Entering the P.Referencer Mode 109
Searching for Text in a Data File 110
Viewing Database Data 110
To view database data 110
Chapter 10
Secret Function 112
Creating a New Secret Memory Area 112
Using the Secret Memory Area 113
To enter an existing secret memory area 113
To exit the secret memory area 113
To change your password 113
To transfer data from the open memory area to the secret memory area 114
To transfer data from the secret memory area to the open memory area 114
Chapter 11
Pop Up Tools 115
Displaying the Pop Up Tool Screen 115
Using the Clock Screen 115
To display the clock screen 116
To make one of the clocks the main clock 116
To select a time zone city 117
To switch between standard time and daylight saving time (DST) 117
Using the Calculator Screen 117
To display the calculator 117
Calculator Keys 118
To perform calculations....119
To perform constant calculations 120
To correct entries during calculations 120
About calculation errors 120
To clear an error 121
Next Appointment Screen.... 121
To display the next appointment screen 121
Chapter 12
Data Communication 122
Specifying the Type of Cable You are Using 122
Using the Cable 123
To connect the cable to the PV Unit 123
To disconnect the cable from the PV Unit 123
Data Communications Between Two PV Units 124
To connect two PV Units 124
To send data from the host unit to the terminal unit 125
To receive data from the terminal unit on the host unit 126
Data Communications Between a PV Unit and a BN Unit 127
To connect a BN Unit to your PV Unit 127
To send data from the PV Unit to the BN Unit 128
To receive data from the BN Unit on the PV Unit 130
Receiving Data From an SF/CSF/NX Series Unit 131
To connect an SF/CSF/NX Series Unit to your PV Unit 131
To make communication parameter settings 132
To receive data from an SF/CSF/NX Series Unit 132
Chapter 13
PV Applications and File Transfer 134
PV Applications 134
Obtaining PV Applications 134
Installing a PV Application to your PV Unit 135
Deleting PV Application Data Files 136
Updating Your PV Unit Operating System 136
Transferring Files 137
Chapter 14
Game 138
Entering the Game Mode and Selecting a Game 138
Game-1 138
How to play 139
To move a card or stack of cards 139
Game Levels 140
Game-2 140
How to play 140
Game Levels 141
General Game Procedures 142
To change the level.... 142
To undo the last play 142
Chapter 15
General Reference 143
Scroll Bars 143
Cursor Key Scrolling 144
Menu Bar 144
To execute a menu bar command 144
Data Input and Editing 144
Moving Between Entries (Fields) 145
On-screen Keyboards 145
Time Setting Screens 147
Selecting a Range of Text by Dragging 149
Cut, Copy, Paste 150
Initial Default Dates for new items 151
Scheduler 151
Expense Manager 151
Closing a Screen 151
Using the Quick Find Feature 152
To input a word with the Quick Find feature 152
Editing Data Items 153
Creating a Copy of a Data Item 153
Deleting Data 154
Searching for Data 156
To perform a search 156
Search Results 157
Changing the Display Font 158
Program Version Information 158
To display version information 159
Chapter 16
Configuring the Unit 160
Setting the Date and Time 160
Turning Sound On and Off 161
Setting a Daily Alarm Time 161
Setting the Date, Time, Calendar, and Keyboard Formats 162
Setting the System Language 163
Adjusting Display Contrast 163
Calibrating the Touch Screen 164
Checking Memory Capacity 164
Memory Management 165
To perform memory management 165
Chapter 17
Technical Reference 166
Date Formats 166
Time Formats 166
Tool Bars 167
Keyboard Formats 169
Scheduler Mode Alarms 169
Input Limits 170
Resetting the PV Unit 170
Euro Conversion Rate Presets 172
Storage Capacity 173
Auto Sort Sequence 174
City Name List 175
Message Table 177
Troubleshooting 182
Power Supply 182
Display Contrast 182
Key Tone 182
Operation 183
Data Communication 184
Specifications 185

Read this first!
- Be sure to read this part of the User's Guide before doing anything else! It includes important information that you need to know in order to use the PV-S1600 (hereinafter referred to as the “PV Unit”) correctly.
- You can find more detailed information about other PV Unit operations in “Chapter 15 – General Reference” on page 143 and “Chapter 17 – Technical Reference” on page 166.
Important!
Please keep this User's Guide and all information handy for future reference.
Note
The screen shots shown in this User's Guide may differ slightly from the displays actually produced by your PV Unit.

Make backup copies of important data!
Your PV Unit employs flash memory, which makes it possible to store large volumes of data and to recall data quickly and easily. Data is retained when power is turned off and even when batteries go dead, but it can be corrupted or lost entirely due to operational mistakes or malfunction. Data contents can also be corrupted or lost due to strong electrostatic charge, strong impact, or extremes in temperature and humidity. All of this means that you should always keep backup copies of important data by transferring it to a personal computer or by writing it down somewhere.

Important Precautions
Note the following important precautions whenever using your PV Unit.
- Never expose the PV Unit to fire.
- Avoid temperature extremes. Do not locate the PV Unit in direct sunlight, near a window, near a heater, etc.
- In very low temperatures display response may slow down or fail entirely. This condition is temporary and operation should resume under normal temperatures.
- Avoid areas subject to excessive moisture, dirt, and dust.
- Avoid dropping the PV Unit and otherwise subjecting it to strong impact.
- Never bend or twist the PV Unit.
- Never try to take the PV Unit apart.
- Make sure nothing gets between the hard cover and the touch screen. Besides creating the risk of scratching the touch screen, an object coming into contact with the screen can cause power to turn on and run down the batteries.
- Do not use a pen, pencil, or other sharp object to touch or press the display.
- To clean the exterior of the PV Unit, wipe it with a soft cloth dampened in a weak solution of a mild neutral detergent and water. Be sure to wring out any excess moisture from the cloth before wiping off the PV Unit. Never use benzene, thinner, or any other volatile agent to clean the unit. Doing so can remove the figures printed on the case or otherwise damage the case finish.
- The contents of this manual are subject to change without notice.
- CASIO COMPUTER CO., LTD. assumes no responsibility for any loss or claims by third parties that may arise from the use of this product.

Data Errors
The PV Unit performs a self-check routine whenever you turn it on. The message shown below appears if the PV Unit detects a problem with data stored in its memory.
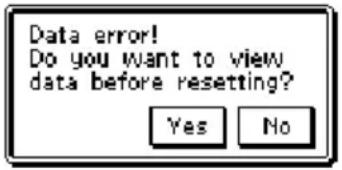
Once data is lost due to a data error it cannot be recovered. Data errors are generally caused by one of the following problems.
- Interruption of battery power
- Severe electrostatic charge, strong impact, changes in temperature, or changes in humidity
- Hardware problems
Once the data error message appears, the PV Unit will not accept any input or editing of data. In order to return memory to normal (and permit further data editing and input), you have to perform the RESET operation to clear all data. Before doing so, you may want to recall important data and write it down (if you don't yet have a copy). You can then re-input the data after clearing PV Unit memory.
Continued problems after performing the RESET operation can indicate a serious hardware problem. Consult with your nearest CASIO dealer if problems persist.
To reset after viewing data
- After the Data error message appears, tap Yes.
- In response to the message that appears (Data error! Consult your User's Guide for correct procedure.), tap OK.
- This displays the pop up tool screen.
- Now you can enter other modes to recall data and make handwritten copies if you want.
- After recalling the data you want, perform the RESET operation under "Resetting the PV Unit" on page 170.

General Guide
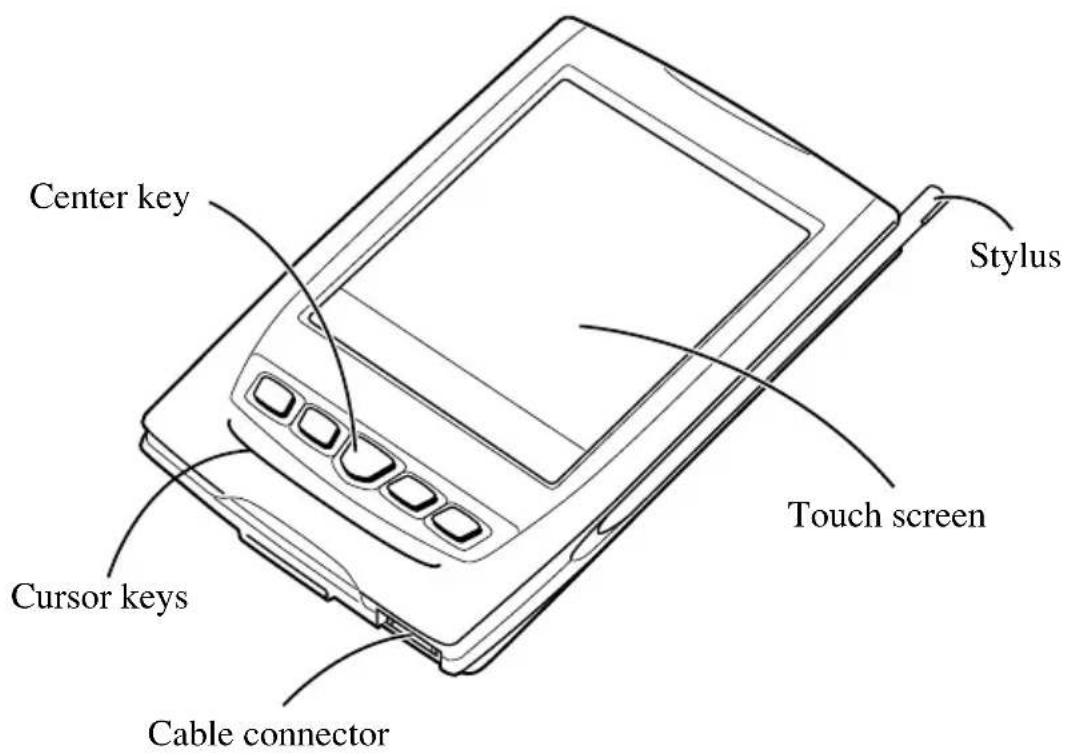

Using the Cover
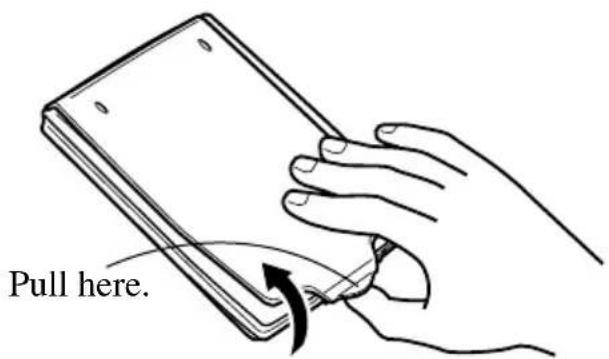
To remove the cover
Pressing down lightly on the center of the cover, pull upwards on the bottom of the cover, and then lift up to remove it.
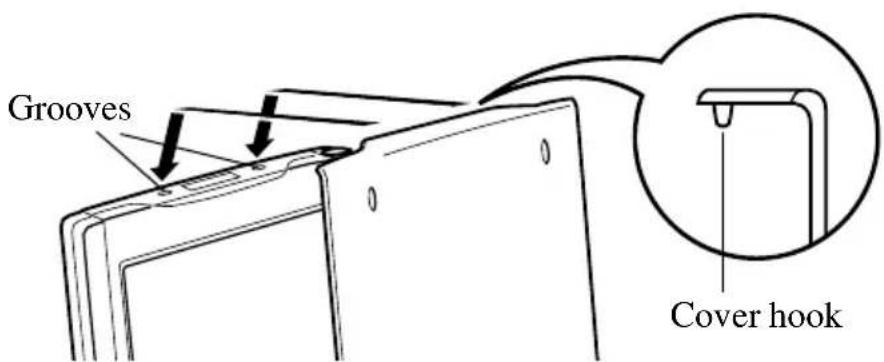
To replace the cover
- Hook the tabs on the top of the cover into the grooves in the PV Unit.
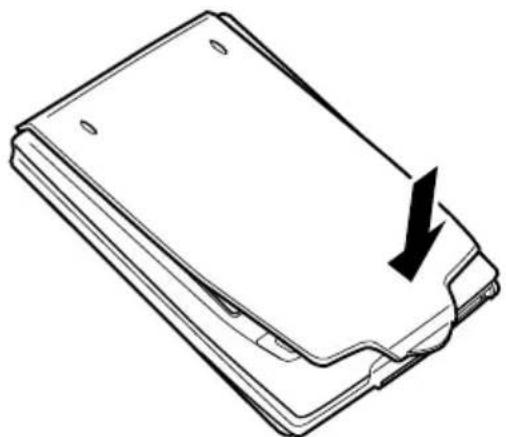
- Swing the cover down and press the bottom against the PV Unit until it snaps securely into place.
natural_image
Line drawing of a flat-panel electronic device with a black arrow pointing to its side panel (no text or symbols)
Power Supply
Your PV Unit can be powered by two AAA-size alkaline batteries.
Important!
- Normally the flash memory of the PV Unit retains its data even when power is turned off and when batteries go dead. Mis-operation or other problems, however, can cause data to become corrupted or lost. Always keep separate copies of important data.
Low Battery Warning
The message shown below appears whenever battery power drops below a certain level. Replace the batteries immediately after this message appears: Batteries are getting weak! Replace them as instructed in the User's Guide.
Important!
- If you continue using the PV Unit after the low battery warning message appears, power may suddenly turn off or the contrast adjustment screen may suddenly appear. Should this happen, replace batteries immediately.
- Be sure to use alkaline batteries. Manganese batteries provide very short battery life.
Battery Precautions
Incorrectly using batteries can cause them to burst or leak, possibly damaging the interior of the PV Unit. Note the following precautions.
- Be sure to use alkaline batteries only to power this PV Unit.
- Be sure that the positive (+) side of each battery is facing in the correct directions.
- Never mix batteries of different types.

natural_image
Cartoon illustration of two anthropomorphic bones with spiky hair and dynamic limbs (no text or symbols)
natural_image
Cartoon illustration of a distressed character with arms raised and fangs, surrounded by radiating lines (no text or symbols)- Never mix old batteries and new ones.

natural_image
Cartoon illustration of two anthropomorphic batteries, one with arms raised and the other with arms flexing (no text or symbols)- Do not expose batteries to direct heat, let them become shorted, or try to take them apart.


natural_image
Simple line drawing of a mechanical component with pins and rods (no text or symbols)- Never leave dead batteries in the battery compartment.

- Remove the batteries if you do not plan to use the PV Unit for a long time. Batteries will go dead after about six months if you leave them in the PV Unit while it is not used.
- Replace batteries at least once every year, no matter how much you use the PV Unit during that period.
- About once a month, turn on the PV Unit and check its battery level. If the low battery warning appears or if nothing at all appears on the display, replace batteries as soon as possible.
- Never try to recharge the batteries that come with the PV Unit.
- Should a battery leak, clean out the battery compartment of the PV Unit immediately, taking care to avoid letting battery fluid come into direct contact with your skin.
Keep batteries out of the reach of small children. If swallowed, consult with a physician immediately.
- Frequent data synchronization using the optional SB-305 serial cable shortens battery life.
- The batteries that come with this unit discharge slightly during shipment and storage. Because of this, they may require replacement sooner than the normal expected battery life.
To replace the batteries
Important!
- Always make sure the battery switch is in the NORMAL OPERATION position at all times, except when replacing batteries.
- Turn off PV Unit power.
- Remove both of the old batteries and replace them with new ones, referring to the procedure on pages 1 through 3.
To turn power on and off
-
Touch anywhere on the PV Unit screen or press the center key to turn on power.
-
To turn power off, tap Off with the stylus.
- You can disable screen tap power on (so power can be turned on only by pressing the center key) using the procedure below.
To turn the screen tap power on feature on and off
- While the Mode Menu or Action Menu is on the display, tap Menu Bar to display the menu bar, and then tap Option – Screen Options.
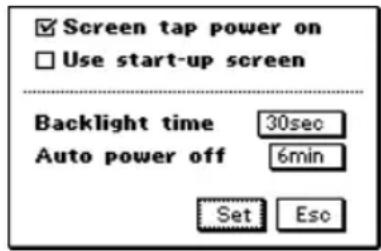
- Tap the check box next to the “Screen tap power on” option to toggle the option on (checked) and off (unchecked).
- When this feature is on, you can turn on power by touching the PV Unit screen or by pressing the center key. When off, you can turn on power only by pressing the center key.
- Tap Set to register your setting.
- Replacing batteries or resetting the PV Unit turns on the screen tap power on feature.
Auto Power Off
The Auto Power Off function automatically turns off power whenever you do not perform any operation for a specified period. You can specify 1 minute, 3 minutes, or 6 minutes before Auto Power Off is triggered. Use the procedure described under “To turn power on and off” above to turn power back on.
To set the Auto Power Off Interval
- While the Mode Menu or Action Menu is on the display, tap Menu Bar to display the menu bar, and then tap Option – Screen Options.
- Tap the value next to Auto power off.
• Each tap of the value cycles it in the sequence: 1 3 6 1 , etc.
- The value you specify controls how many minutes is allowed to pass without any operation being performed. The PV Unit turns off automatically after the specified number of minutes passes without any operation.
3. Tap Set to register your settings.

Configuring the Start-up Screen
You can select a Quick-Memo (page 78) and use its contents as a start-up screen image. You can even use images from a personal computer, which you transfer to Quick-Memo using PC sync for Windows.
To select a start-up screen
- Enter the Quick-Memo Mode.
- Select the Quick-Memo whose data you want to use as the start-up screen.
-
You can select a Quick-Memo by displaying its data screen.
-
Tap Menu Bar to display the menu bar, and then tap Option – Start-Up Screen.
- This specifies the data of the Quick-Memo you selected as the start-up screen, and enables start-up screen operation.
To enable and disable start-up screen operation
- While the Mode Menu or Action Menu is on the display, tap Menu Bar to display the menu bar, and then tap Option – Screen Options.
- On the configuration screen that appears, tap the check box next to the "Use start-up screen" option to toggle it on (checked) and off (unchecked).
- Tap Set to register your setting.

Using the Backlight
Tapping the *eon beneath the PV Unit screen illuminates the display screen for easy viewing in the dark. You can specify a duration of 15 seconds or 30 seconds for the backlight.
To specify the backlight duration
- While the Mode Menu or Action Menu is on the display, tap Menu Bar to display the menu bar, and then tap Option – Screen Options.
- On the configuration screen that appears, tap the box next to "Backlight time" to toggle it between 15sec (15 seconds) and 30sec (30 seconds).
- Tap Set to register your setting.
About the EL backlight
- Tapping the icon while the backlight is on turns it off.
- The backlight may fail to turn on when battery power is low and during data communication.
- Frequent use of the backlight shortens battery life. The following shows how backlight use affects battery life under controlled test conditions.* For comparison with the values below, battery life is normally approximately 80 hours with 55 minutes of continuous display only and 5 minutes of processing operation per hour in the Contacts Mode when no backlight operation is performed.
| Backlight Operation Battery Life | |
| 3 minutes per hour Approximately 60 hours | |
| 15 minutes per hour Approximately 30 hours |
\* Test Conditions
- “Battery Life” is the number of hours before battery failure when the unit is left on (5 minutes of a processing operation and 55 minutes of continuous display only (no processing operation) per hour in the Contacts Mode, plus the backlight operation described below). The above values assume ambient temperature of 20^ C, starting with a fresh set of new batteries.
- “Backlight Operation” is the number of minutes the backlight is turned on per hour during the display only (no processing operation) period.
- Be sure to use alkaline batteries. Manganese batteries provide very short battery life.

Cursor Keys and Stylus
Many of the PV Unit's operations can be performed using either a stylus or the cursor keys under the display screen. The following describes the general operations that can be performed with each.
Stylus
The stylus takes the place of a computer mouse. You can perform all PV Unit operations with the stylus. In this manual, all data input operations are described using stylus operations.
You can perform the following basic operations with the stylus.
• Tap
Tap the tip of the stylus on the display to press a button, select an item, select a data input field, etc.
- Double-tap
Tap the display twice in relatively quick succession.
- Drag
Touch the tip of the stylus to the screen, and drag it across the screen to select a range of text, draw a line, etc.
Cursor Keys
The cursor keys beneath the display screen make it possible to perform certain PV Unit operations with one hand. In this manual, many data recall operations are described using the cursor key operations.
You can perform the following basic operations with the cursor keys.
- Click
Pressing the center key is like a “click” with a computer mouse. Pressing the center key executes the command that is highlighted on the display, executes the function assigned to the button whose name is enclosed by a dotted line (such as Set), switches between a list and a data screen, etc.
- Left/Right Scroll
Pressing the ◀ or ▶ cursor key causes movement in the corresponding direction. You can use left/right scroll to move the cursor, select a cell, etc.
- Up/Down Scroll
Pressing the ▲ or ▼ cursor key causes movement in the corresponding direction. You can use up/down scroll to move the cursor between lines, select a cell, display previous or next items, etc.

Using the Icon Menu
The PV Unit has an icon menu beneath its display screen. You can tap these icons to perform various functions no matter what mode you are using.
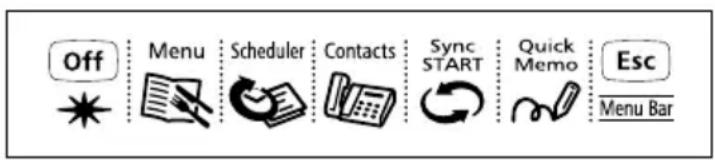
| Icon Description | |
| Off Turns off PV Unit power. | |
| * | Turns on the backlight. |
| Menu Displays the Mode Menu. | |
| Scheduler Enters the Scheduler Mode. | |
| Contacts Enters the Contacts Mode. | |
| Sync START Starts the data transfer operation. | |
| Quick-Memo Enters the Quick-Memo Mode. | |
| Esc Exits the current operation. | |
| Menu Bar Displays the menu bar. |

Modes
With most PV Unit operations, you must first enter a mode before you can input or view data. You can use any of the following methods to enter a mode.
- Tap an icon in the icon menu beneath the display screen
- Tap an on-screen icon in the Mode Menu
- Select a mode on the Action Menu with the stylus or the cursor keys
Note
- All the procedures in this User's Guide are performed using the icon menu whenever possible.
To enter a mode using the icon menu
Use the stylus to tap on the icon for the mode you want to enter.
To enter a mode using the on-screen icon menu
- On the icon menu, use the stylus to tap the Menu icon to display the on-screen icon menu.
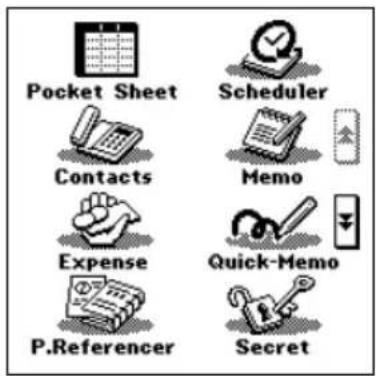
- Tap the ▲ and ▼ buttons on the right side of the display to change menu pages and display the icon of the mode you want. Next, tap the icon of the mode you want to enter.
To enter a mode using the Action Menu
- Press the center key to turn on PV Unit power and display the Action Menu.
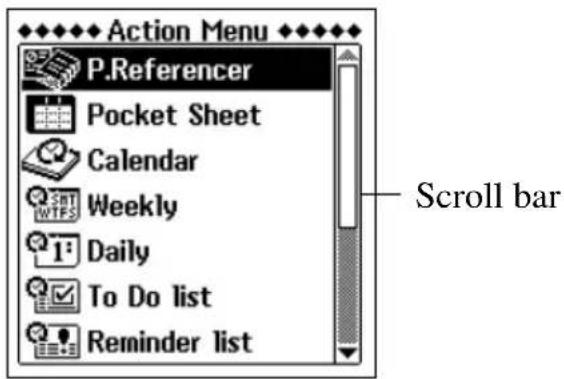
- If the mode you want is not on the screen, scroll the menu up and down.
• See “Scroll Bars” on page 143 for details on using the scroll bar.
- Enter the mode you want.
- You can enter a mode using either of the following methods.
- Tap on the mode name in the Action Menu.
- Scroll with the ▲ and ▼ cursor keys to highlight the name of the mode you want, and then press the center key.

Customizing the Appearance of the Mode Menu
You can rearrange Mode Menu so the icons are in any order you want. The following procedures describe how to swap the positions of two icons and how to move an icon to a specific location.
Note that you cannot change the positions of icons on the Action Menu.
Swapping Two Icons
Use the following procedure to swap the positions of two icons.
- On the Mode Menu, tap Menu Bar to display the menu bar, and then tap Option – Menu edit.
- On the menu that appears, tap Swap.
- Tap the first of the two icons whose positions you want to swap to select it.
- Tap the second icon to swap it with the first.
Moving an Icon to a Specific Location
Use the following procedure to move an icon to a specific location on the Mode Menu screen.
- On the Mode Menu, tap Menu Bar to display the menu bar, and then tap Option – Menu edit.
- On the menu that appears, tap Move.
- Tap the icon you want to move to select it.
- Tap the icon at the location where you want the icon you tapped in step 3 to be.
The Scheduler Mode provides you with a selection of powerful schedule management tools that help to keep you on time all the time. In addition to Schedule, Reminder, and To Do tools, you can select from among a variety of different screens to view your appointments on a monthly, weekly, or daily basis. You can even set alarms to help make sure you never miss an important appointment or event.

Entering the Scheduler Mode
On the icon menu beneath the display screen, tap the Scheduler icon. This enters the Scheduler Mode and displays the 1-month Calendar screen.
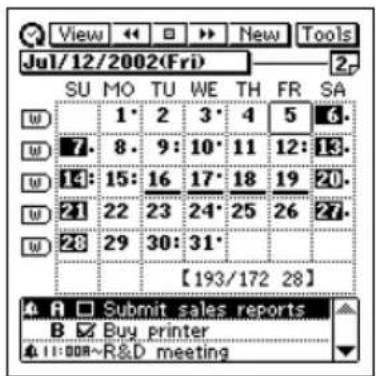
Now you can maneuver around the Scheduler Mode to input and recall data.

Inputting New Scheduler Data
This section describes how to input Schedule, To Do, and Reminder data. Note that a Schedule item can be input as a “single-date” item (an appointment that starts and ends on the same day) or a “multiple-date” item (an appointment that spans more than one day). You can input a new multiple-date item with the New button or with the calendar screen.
To input a single-date Schedule item
- While any Scheduler Mode data screen is on the display, tap New.
- On the menu that appears, tap Schedule.
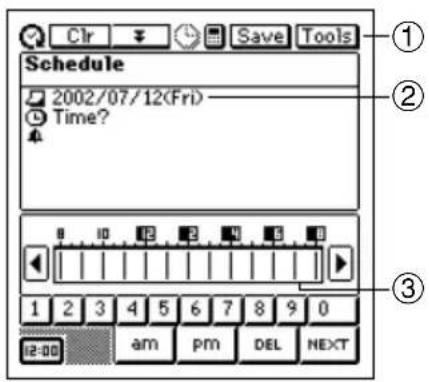
①Data input tool bar
②Date
③Time bar
- If you want to change the date of the appointment, tap the displayed date and then use the date keyboard that appears to make the changes you want. Tap NEXT to advance to the appointment time.
- Use the time keyboard that appears to input the start time and end time if you want, and then tap NEXT to advance to the alarm time.
- Use the time keyboard to input the Schedule alarm time if you want, and then tap NEXT to advance to description text input.
- Use the text keyboard to type text that describes the item.
- After the item is the way you want, tap Save to store it.
- In addition to a date, you must input description text or a start time. The PV Unit will refuse to store the item if it does not contain a date plus description text or a start time.
To input a multiple-date Schedule item with the New button
- While any Scheduler Mode data screen is on the display, tap New.
- On the menu that appears, tap Multi-date item.
- If you drag the stylus across a range of dates on the 1-Month Calendar screen (page 38), a multiple-date item is created with the corresponding range of dates.
- Tap the date you want to change and then input the year, month, and day.
- Tap NEXT to advance to the description text input screen.
- Input text that describes the item.
- After the item is the way you want it, tap Save to store it.
- Note that you must input a start date, end date, and description text. The PV Unit will refuse to store the item if it does not contain a start date, end date, and description text.
To input a To Do item
- While any Scheduler Mode data screen is on the display, tap New.
- On the menu that appears, tap To Do.
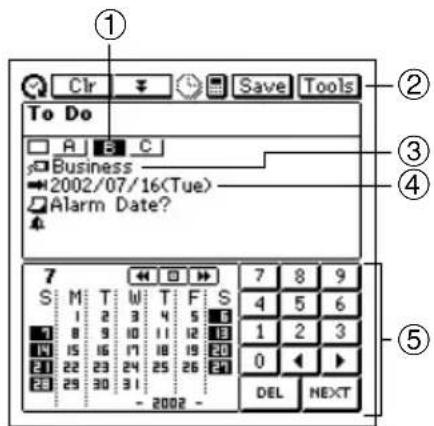
①Priority
②Data input tool bar
③Category
④Due date
⑤Date keyboard
-
Change the priority if you want.
-
A new To Do item is automatically assigned a priority of B. Tap the priority you want to change to.
- If you want to change the category, tap on current category setting.
- On the tab that appears, tap the category you want to assign (Business, Personal, or Free), and then tap NEXT to advance to the due date.
- Use the date keyboard that appears to input the due date if you want, and then tap NEXT to advance to the alarm date.
-
The initial due date setting is the date that was selected (flashing) when you tapped New.
-
Use the date keyboard that appears to input an alarm date if you want, and then tap NEXT to advance to the alarm time.
- Use the time keyboard that appears to input an alarm time if you want.
- If you input an alarm time, be sure to also input an alarm date. You will not be able to store the data item if you input an alarm time without an alarm date.
-
Tap NEXT to advance to description text input.
-
Use the text keyboard to type text that describes the item.
-
After the item is the way you want it, tap Save to store it.
- In addition to a due date, you must input description text. The PV Unit will refuse to store the item if it does not contain a due date and description text.
To input a Reminder item
- While any Scheduler Mode data screen is on the display, tap New.
- On the menu that appears, tap Reminder.
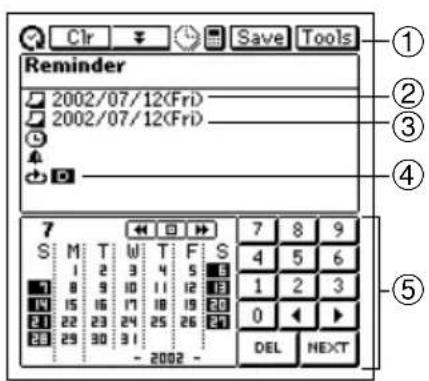
①Data input tool bar
②Start date
③End date
④Reminder type
⑤Date keyboard
- If you want to change the start and/or end date of the reminder, tap the displayed date and then use the date keyboard that appears to make the changes you want. Tap NEXT to advance to the reminder time.
-
Use the time keyboard that appears to input the start time and end time if you want, and then tap NEXT to advance to the alarm time.
-
Use the time keyboard to input the Reminder alarm time if you want, and then tap NEXT to advance to the Reminder type screen.
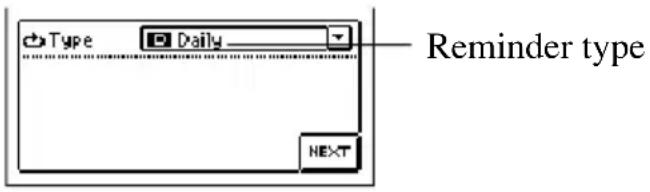
-
Input the required data for the Reminder type you select, and then tap NEXT to advance to description text input.
-
If you input data incorrectly (with a Reminder date that does not fall between the start date and end date, for example), the PV Unit will refuse to store the data item when you tap Save below.
- Use the text keyboard to type text that describes the item.
- After the item is the way you want it, tap Save to store it.
- In addition to a start date and end date, you must input description text or a start time. The PV Unit will refuse to store the item if it does not contain a start date and end date plus description text or a start time.

Reminder Types and Settings
The following describes each of the Reminder types available and provides details about the settings required by each.
Daily
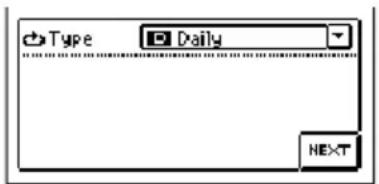
Repeated every day. No additional settings are required.
Weekly
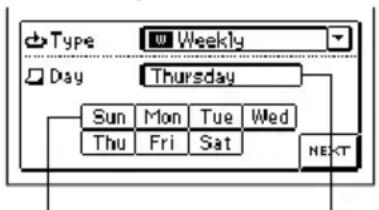
Repeated the same day of the week, each week. Specify the day of the week by tapping its button.
Buttons Selected day of the week
Monthly 1 FL
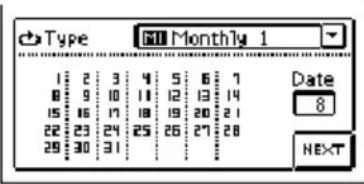
Repeated the same day of the month, every month. Specify the day of the month by tapping on it in the calendar.
Monthly 2 ME
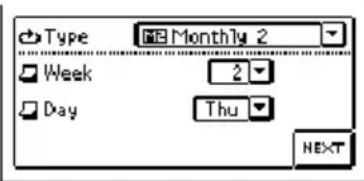
Repeated the same day of the week of a specific week each month. Tap the ▼ arrows next to the Week and Day boxes to display menus of options, and tap the ones you want to select.
Yearly 1
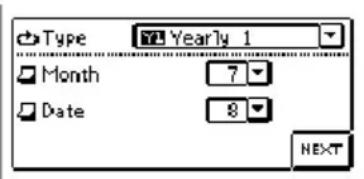
Repeated the same date every year. Tap the ▼ arrows next to the Month and Date boxes to display menus of options, and tap the ones you want to select.
Yearly 2 YE
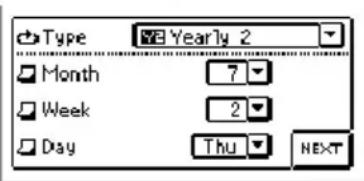
Repeated the same day of the week of a specific week of a specific month each year. Tap the ▼ arrows next to the Month, Week, and Day boxes to display menus of options, and tap the ones you want to select.
Important!
- Be sure to correctly specify all of the settings required for the Reminder type you specify.

Importing Contacts Data Into a Schedule Item
The following procedure lets you import certain Contacts data entries (fields) into the Description of a Schedule item, which provides you with handy reference information about the person you are planning to meet. The entries (fields) that are imported depend on whether you are importing Business or Personal data.
| Personal Data Business Data | |
| Name Name | |
| Phone (H) Company | |
| Fax (H) Phone (B) | |
| Mobile Fax (B) | |
| E-mail E-mail | |
| Phone (B) Phone (H) | |
| Fax (B) Fax (H) | |
| Mobile | |
- Entries (fields) that do not contain any data are skipped (not imported).
To import Contacts data into a Schedule item
- While any Scheduler Mode data screen is on the display, tap New - Appointment.
- On the screen that appears, input the date, time, and alarm time.
• See “To input a single-date Schedule item” on page 30 for details.
- Tapping the NEXT button after inputting the above data displays the following screen.
![Schedule Description? Tabs Business [Personal] C&R COMPUTE Johnson Lobin CASCO CO. Hansen Dennis COOLEST REAL Tyler Robin CORAL BAY HQ Taylor Richard Contacts data index](/content/2026/05/835219/images/5be34c23fc2f5e02357f62c8f47f812a43b1eb257275a74e02643473f29b68bb.jpg)
- Tap on a tab to access either Business or Personal Contacts data, and then use the index to locate the name whose data you want to import. Highlight the name whose data you want to import by tapping on it, and then tap the highlighted name again.
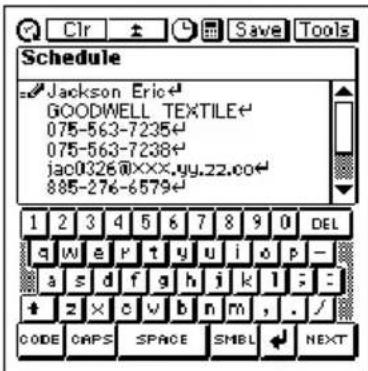
- Input any more text you want for the description, and then tap Save to store the item.
- The applicable entries (fields) contained in the Contacts item you specify are imported into the Schedule item. See page 34 for details on which entries are imported.
- You can move the cursor around the imported data and make any changes in it that you want.
- Note that Contacts data can be imported as you are creating a new Schedule item only. You cannot use this procedure to import into an existing Schedule item.

Viewing Scheduler Data
The Scheduler Mode provides a variety of screens that you can use to view Schedule, To Do, and Reminder data. This section describes the various data recall screens available in the Scheduler Mode, and provides information about how to navigate between them.
Screen Organization
The screens used for recall in the Scheduler Mode are arranged as shown in the following table.
| Type | Screen Name | Description |
| Calendar | 1-Month Calendar | Calendar of a single month |
| 2-Month Calendar | Calendars for two months | |
| 3-Month Calendar | Calendar for 17 weeks | |
| Periodic Schedule | Weekly Scheduler | Overview of Scheduler data for a specific week |
| Daily Scheduler | Overview of Scheduler data for a specific day | |
| Schedule | Schedule Data | Details of an individual Schedule item |
| Reminder | Reminder Data | Details of an individual Reminder item |
| Reminder List | List of all Reminder items | |
| To Do | To Do Data | Details of an individual To Do item |
| To Do List | List of all To Do items |
To select a Scheduler Mode screen
- In the Scheduler Mode, tap the View button to display a list of available screen types.
- The View list provides the following screen options: 1-Month Calendar, 2-Month Calendar, 3-Month Calendar, Weekly Scheduler, Daily Scheduler, To Do List, and Reminder List.
- Tap the screen type you want.
Calendar Screens
Use the calendar screens to quickly locate a specific date and view its Scheduler data.
1-Month Calendar
The 1-Month Calendar for the month that contains the today's date (as kept by the PV Unit's clock) appears first whenever you enter the Scheduler Mode.
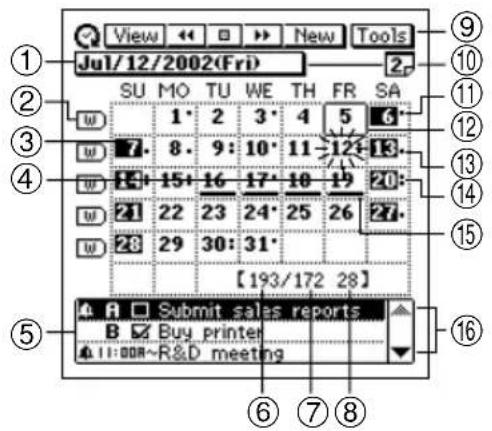
①Date jump button (page 49)
②Weekly Scheduler buttons
③Highlighted date
④Selected date (flashing)
⑤Data display area
⑥Days passed in the year
⑦Days remaining in the year
⑧Week number for the year
⑨Data display tool bar
⑩2-Month Calendar button
⑪ Indicates AM appointment.
⑫Today's date (as kept by the PV Unit's clock)
⑬Indicates PM appointment.
⑭Indicates AM and PM appointment or appointment without a time.
⑮Multiple-date item
⑯Scroll buttons
To view a date's Daily Scheduler screen
- Tap a date to select it. The selected date flashes in the calendar.
- Tap the flashing date to change to its Daily Scheduler screen.
- In the Daily Scheduler screen, tap Esc to return to the 1-Month Calendar screen.
To view the 2-Month Calendar screen
- Tap the 2-Month Calendar button to switch to the 2-Month Calendar screen.
- In the 2-Month Calendar screen, tap Esc to return to the 1-Month Calendar screen.
To view a Weekly Scheduler screen
- Tap the 📌 button to the left of the week whose Weekly Scheduler screen you want to view.
- In the Weekly Scheduler screen, tap Esc to return to the 1-Month Calendar screen.
Using the data display area
- This area shows an outline of data input for up to three Scheduler items for the currently selected (flashing) date. It shows Schedule, To Do and Reminder data.
- Use the scroll buttons to scroll the data up and down.
- Tapping the highlighted item displays its data screen.
2-Month Calendar
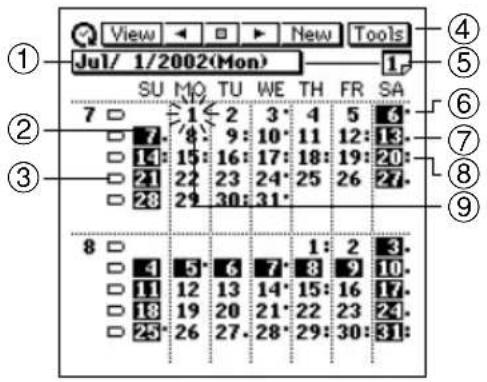
①Date jump button (page 49)
②Highlighted date
③Weekly Scheduler buttons
④Data display tool bar
⑤1-Month Calendar button
⑥Indicates AM appointment.
⑦Indicates PM appointment.
⑧Indicates AM and PM appointment, appointment without a time or multiple-date item.
⑨Selected date (flashing)
To view a date's Daily Scheduler screen
- Tap a date to select it. The selected date flashes in the calendar.
- Tap the flashing date to change to its Daily Scheduler screen.
To view the 1-Month Calendar screen
Tap the 1-Month Calendar button to switch to the 1-Month Calendar screen.
To view a Weekly Scheduler screen
Tap the □ button to the left of the week whose Weekly Scheduler screen you want to view.
3-Month Calendar
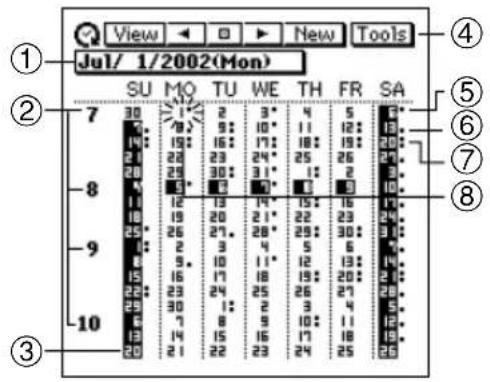
①Date jump button (page 49)
②Month numbers
③Highlighted date
④Data display tool bar
⑤Indicates AM appointment.
⑥Indicates PM appointment.
⑦Indicates AM and PM appointment, appointment without a time or multiple-date item.
⑧Selected date (flashing)
To view a date's Daily Scheduler screen
- Tap a date to select it. The selected date flashes in the calendar.
- Tap the flashing date to change to its Daily Scheduler screen.
To view a 1-Month Calendar screen
Tap the month number of a month to view its 1-Month Calendar screen.
Periodic Schedule Screens
The periodic schedule screens give you a quick overview of your scheduled appointments. You can view all your appointments for a specific day or week.
Weekly Scheduler Screen
The Weekly Scheduler screen shows your schedule for an entire week, including Schedule, To Do, and Reminder items.
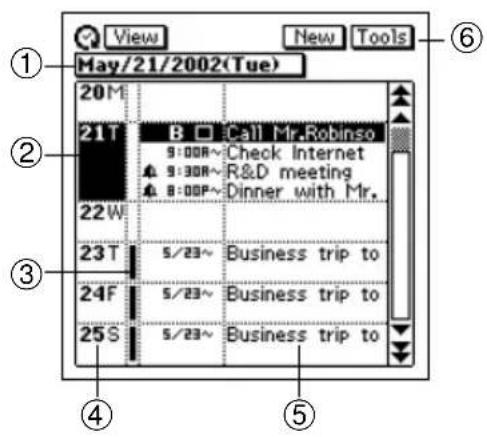
① Date jump button (page 49)
②Highlighted date
③Multiple-date item
④Date column
⑤Description text
⑥Data display tool bar
To view a date's Daily Scheduler screen
- Tap a date in the date column to select (highlight) it.
- Tap the selected date to display its Daily Scheduler screen.
To view an item's data screen
- Tap an item to select (highlight) it.
- Tap the selected item to display its data screen.
Daily Scheduler Screen
The Daily Scheduler screen gives you an overview of Scheduler (Schedule, Reminder, To Do) items for a particular date, along with a list of all currently unchecked To Do items.
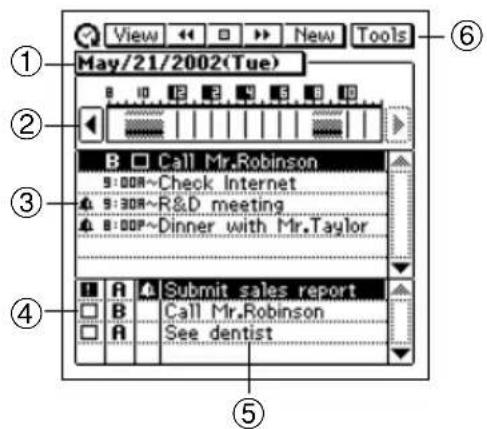
①Date jump button
②Time bar
③Scheduler area
④To Do area
⑤Description text
⑥Data display tool bar
To shift the time bar
Tap the ◀ and ▶ scroll buttons to shift the time bar left and right.
The shaded portion in the time bar indicates a period during which an appointment is scheduled. Overlapping time bars (schedules) are black.
Scheduler Area
- This area shows the current date's six Scheduler (Schedule, Reminder, To Do) items.
- Changing to a different date causes the data in the Scheduler area to be replaced with the Scheduler data of the new date.
- You cannot check or change the priority of a To Do data item in the Scheduler area.
To Do Area
- This area shows the four unchecked To Do items.
- You cannot use this screen to change the checked/unchecked status.
- The data in this area remains the same, even if you change to a different date.
- You can check a To Do data item in the To Do area by tapping its check box. As soon as you do, the data item disappears from the To Do area (though it remains stored in the To Do Mode).
- You can change the priority of a To Do data item in the To Do area by tapping on its current priority setting to cycle it in the following sequence: A → B → C → A, etc.
To view an item's data screen
- Tap an item to select (highlight) it.
- Tap the selected item to display its data screen.
Schedule Data Screen
The Schedule data screen shows the details of a selected Schedule item.
Schedule Data Screen (Single-Date)
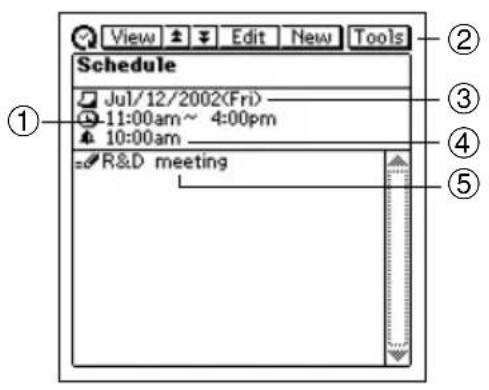
① Start time (and end time)
②Data display tool bar
③Date
④Alarm time
⑤Description
• Tapping Esc goes to the Daily Scheduler screen.
Schedule Data Screen (Multiple-Date)
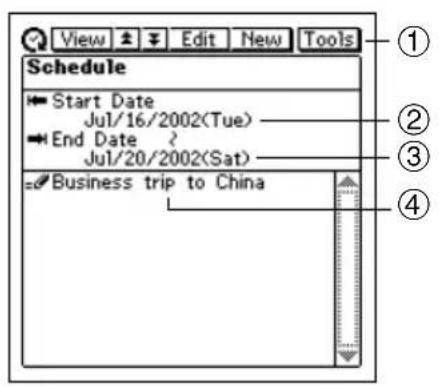
①Data display tool bar
②Start date
③End date
④Description
• Tapping Esc goes to the Daily Scheduler screen.
Reminder Screens
The two Reminder screens show currently stored Reminder items. The Reminder data screen shows full details of each item, while the Reminder list is a collection of one-line summaries of Reminder data items that can be used for quick location of a specific item.
Reminder List Screen
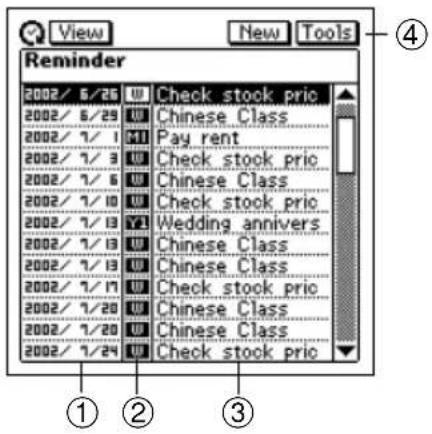
①Reminder dates
②Reminder types
③Descriptions
④Data display tool bar
To view a Reminder data screen
- In the Reminder list screen, tap a Reminder item to select (highlight) it.
- Tap the selected item again to display its data screen.
Reminder Data Screen
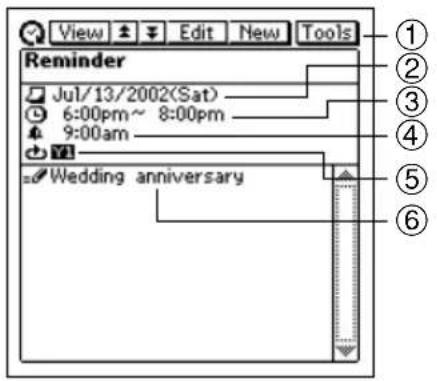
①Data display tool bar
②Reminder date
③Start time (and end time)
④Alarm time
⑤Reminder type
⑥Description
• Tapping Esc returns to the Reminder list screen.
To Do Screens
The two To Do screens show currently stored To Do items. The To Do data screen shows full details of each item, while the To Do list is a collection of one-line summaries of To Do items that can be used for quick location of a specific item.
To Do List Screen
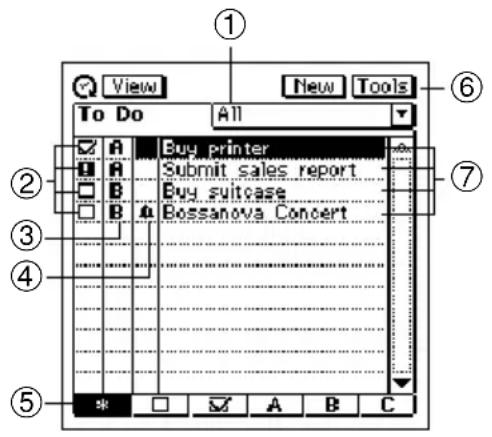
①Display category
②Check boxes
③Priorities
④Alarm indicator
⑤Display item buttons
⑥Data display tool bar
⑦Descriptions
To specify the display category
- Tap the display category box to open a menu of categories.
- Tap the category whose data you want to display.
To specify the display item type
Tap the display item button that corresponds to the type of items you want to display.
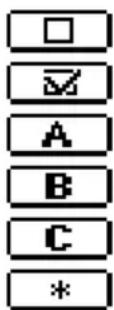
Unchecked items only
Checked items only
Priority A items only
Priority B items only
Priority C items only
All items
To check and uncheck items
Tap the check box of an item to toggle it between being checked and unchecked.
- The check boxes of all unchecked data items whose due dates are passed are replaced by exclamation points (!).
To change the priority of an item
Tap the current priority of an item to cycle it in the following sequence: A → B → C → A, etc.
To view a To Do data screen
- In the To Do list screen, tap a To Do item to select (highlight) it.
- Tap the selected item again to display its data screen.
To Do Data Screen
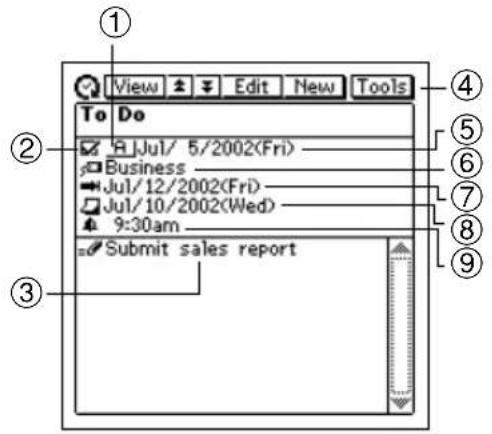
①Priority
②Check box
③Description
④Data display tool bar
⑤Date checked
⑥Category
⑦Due date
⑧Alarm date
⑨Alarm time
• Tapping Esc returns to the To Do list screen.
To check and uncheck the item
Tap the check box to toggle it between being checked and unchecked. The date checked is added automatically.
- The check boxes of all unchecked data items whose due dates are passed are replaced by exclamation points (!).
To change the priority
Tap the current priority to cycle it in the following sequence:
A → B → C → A, etc.

Date Highlighting
You can highlight dates on the 1-Month or 2-Month Calendar screen to specify them as holidays or other special events.
To highlight dates
- While the 1-Month Calendar or 2-Month Calendar is on the display, tap Menu Bar to display the menu bar, and then tap Option – Highlight.
- You can switch between the 1-Month Calendar and 2-Month Calendar at any time during the following steps.
- Tap the individual dates you want to highlight, or drag the stylus across the range of dates you want to highlight.
- If you make a mistake and highlight the wrong date, simply tap or drag across it to unhighlight.
- If you want to highlight dates in other months, tap the tool bar's ◀◀ (◀) and ▶▶ ▶) buttons to change months, and repeat step 2.
- You can highlight dates only within the year that contains the month where the date cursor was located when you started this procedure.
- After all date highlighting is the way you want it, tap Save to store it.
To unhighlight dates
-
While the 1-Month Calendar or 2-Month Calendar is on the display, tap Menu Bar to display the menu bar, and then tap Option – Unhighlight.
-
Specify the start month and end month of the period whose dates you want to unhighlight.
- Note that you can unhighlight dates for a range of months only. You cannot unhighlight individual dates.
-
After the dates are the way you want them, tap Exe.
-
In response to the message that appears, tap Yes to unhighlight all dates in the range you specified.

Jumping to a Specific Date
You can use the following procedure while the Calendar, Daily Scheduler, or Weekly Scheduler screen is on the display to select a date and display its data.
- While the 1-Month Calendar, 2-Month Calendar, 3-Month Calendar, Weekly Scheduler screen, or Daily Scheduler screen is on the display, tap the date jump button.
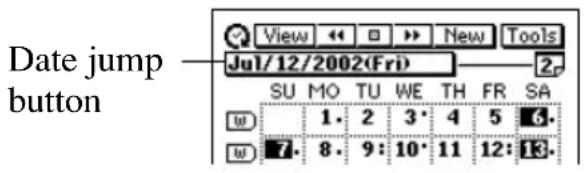
- Use the date keyboard that appears to input the date to which you want to jump, and then tap NEXT.

Renaming To Do Categories
Use the following procedure to change the name of a To Do category.
- In the To Do Mode, display the list screen or a data screen.
- Tap Menu Bar to display the menu bar, and then tap Option – Name edit.
- Type in the names you want to assign to the categories, and then tap Save to save them.
- You can input up to 14 characters for each category name.
- Category names revert to their preset defaults whenever the PV Unit is reset.
The Contacts Mode is the easy way to organize, store, and manage all your business and personal contact data. Fields are provided for name, address, phone number, fax number, e-mail address, and more. Business data is grouped under company name, so you have instant at-a-glance access to information on everyone who works for the same company.

Entering the Contacts Mode
You can use any one of the three following methods to enter the Contacts Mode. The method you use determines what appears on the screen first.
To enter the Contacts Mode from the icon menu
Tap the Contacts icon below the PV Unit screen to enter the Contacts Mode. This displays the list screen of the data items contained in the category that was on the display when you last exited the Contacts Mode.
To enter the Contacts Mode from the Action Menu
- Press the center key to turn on PV Unit power.
- Scroll with the ▲ and ▼ cursor keys to highlight the name of the Contacts Mode list you want.
• You can select Latest calls, Business, or Personal. - Press the center key.
To enter the Contacts Mode from the Mode Menu using the stylus
-
On the icon menu beneath the PV Unit display screen, tap Menu to display the on-screen icon menu.
-
Tap Contacts.
- This displays the list screen of the data items contained in the category that was on the display when you last exited the Contacts Mode.

Changing the Display Category
- Display a Contacts list screen.
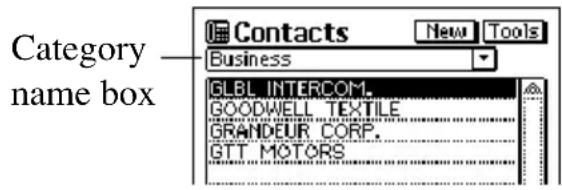
- Note that you can change the display category only from a Contacts list screen.
- Tap the ▼ arrow to the right of the category name box to open a list of categories, and tap the one you want to select.
| Category Name | List Contents |
| Latest calls | Last 16 Contacts data items whose data screens you opened. See “Latest Calls List” below for details. |
| All | All Contacts data, regardless of category |
| Business | Company names of Contacts data stored under the Business category. Selecting a company name displays a list of employees and their business phone numbers. |
| Personal | Personal names and home phone numbers of Contacts data stored under the Personal category |
| Untitled 1 - 5 | Free 1 and Free 2 fields of Contacts data stored under the applicable Untitled category |
- The above describes the default list screen contents. You can change the contents of the Personal and Untitled category lists, and of the employee list that appears when you select a company name from the Business category list. See “Changing Contacts List Screen Contents” on page 56 for details.

Latest Calls List
Selecting an item in the Contacts list screen and then changing to the item's data screen causes that item to be added to the Latest calls list. An item is not added to the Latest calls list if you scroll to its data screen from another data screen.
Note
- The contents of the Latest calls list are cleared whenever you perform a data synchronization operation with your computer, when you delete all the data items in a category, or when you delete all data items.

Resizing Contacts List Screen Columns
You can use the stylus to drag the separator line on a list screen left and right to change the relative sizes of the columns.
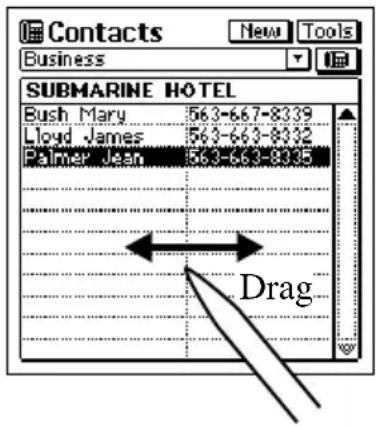

Inputting New Contacts Data
The following procedure shows how to input new Business category data. Data input procedures for Personal and Untitled category data are identical.
-
While a Contacts Mode list or data screen is on the display, tap the New button.
-
On the menu that appears, tap the category where you want to input the data.
• In this example, tap Business.
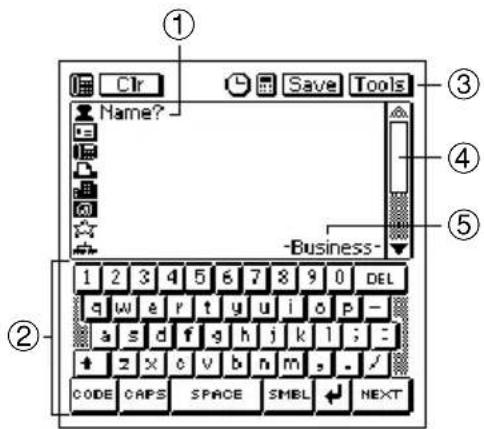
① Prompt
②Text keyboard
③Data input toolbar
④Scroll bar
⑤Category name
- Input the name of the person. Business and Personal data is sorted automatically by name, so it is a good idea to input the last name first.
- Note that you must input Name data for a Personal item, Name and Company data for a Business item, and data for the first entry (field) of an Untitled item. The PV Unit will refuse to store the item when you tap Save below if it does not contain the minimum required data.
-
Tap the other fields on the screen and input the data you want.
-
After you finish inputting all the data that you want, tap Save to store it.
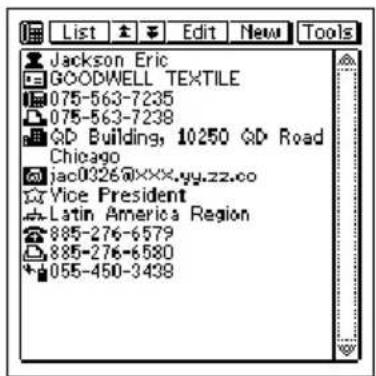

Viewing Contacts Data
Use one of the following procedures to view the Contacts data you want.
To view Business data
- In a Contacts list screen, tap the ▼ arrow to the right of the category name box to open a list of categories.
- Tap Business to change to the Business category.
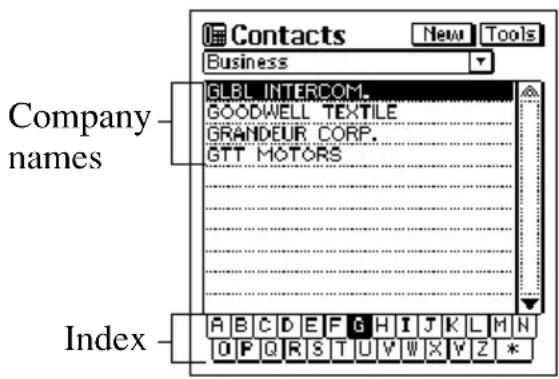
- Scroll with the ◀ and ▶ cursor keys to move the highlighting in the index at the bottom of the screen to the letter that starts the name of the company whose data you want to view.
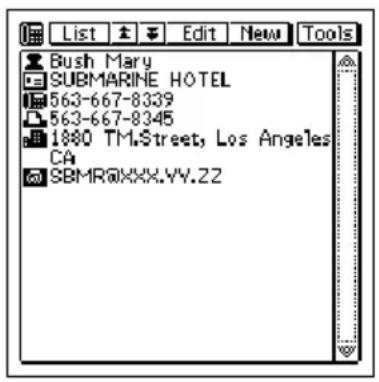
- Double-tap the name of a company to display a list screen (name and business phone number) of all entries whose company entry matches the company you selected.
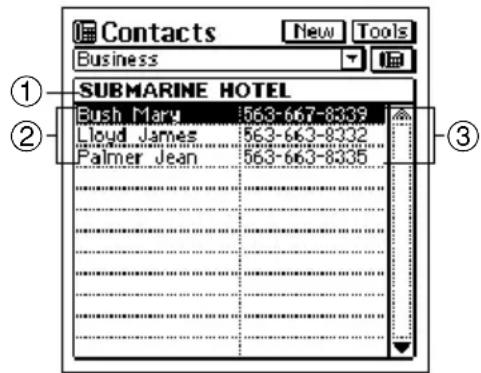
①Company name
②Names
③Phone numbers
- Scroll with the ▲ and ▼ cursor keys to move the highlighting to the name of the person whose data you want to view, and then press the center key to display the data screen for that person.
To view other data
- In a Contacts list screen, tap the ▼ arrow to the right of the category name box to open a list of categories.
- Tap the name of the category (besides Business) whose data you want to view.
- Scroll with the ◀ and ▶ cursor keys to move the highlighting in the index at the bottom of the screen to the letter that starts the data that appears in the left column of the list screen.
- The data that appears in the left column depends on the category you selected.
- Double-tap the data item in the list to display its data screen.

Changing Contacts List Screen Contents
You can specify one of the entries (fields) that appears in the list screens of the Personal category and the five Untitled categories, and of the employee list screen that appears when you select a company name from the Business category list. The following table shows the entries (fields) in each list screen that are fixed. All others are selectable.
| Category | Fixed Entries (Fields) |
| Business(Employee List) | Name |
| Personal | Name |
| Untitled 1-5 | Free 1 |
| Latest calls | All entries are fixed. |
| All | All entries are fixed. |
| Business(Company List) | All entries are fixed. |
- You can make separate settings for each of the five Untitled categories.
To change the contents of a category's list
- Display the Contacts list of the category whose contents you want to change.
- Tap the button under the Tools button to display a list of entries (fields) that can be displayed in the list.
- Tap the entry name that you want to display in the list together with the fixed entry.
- You can specify only one field per list.
- Tapping an entry name closes the list entry selection screen and displays the list with the entry you selected.

Changing Contacts Input Screen Contents
Use the procedure described here to change the contents of the Contacts Mode data input screen for each category. The following table shows the entries (fields) in each input screen that are fixed. All others are selectable.
| Category | Fixed Entries (Fields) |
| Business | Name |
| Company | |
| Personal | Name |
| Phone (H) | |
| Untitled 1-5 | Free 1 |
| Free 2 |
- You can make separate settings for each of the five Untitled categories.
To change the contents of a category's input screen
- Display the Contacts list of the category whose input screen's contents you want to change.
- Tap Menu Bar to display the menu bar, and then tap Option – Prompt edit to display a list of entries (fields) that can be displayed in category's input screen.
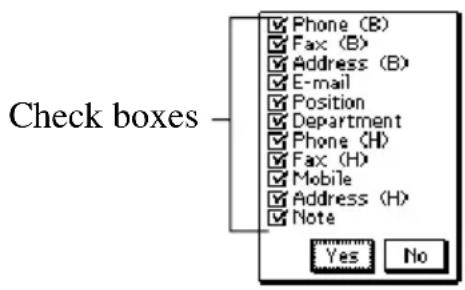
- The above is the entry selection screen for the Business category.
- Tap the check box next to an entry to toggle it between checked (display entry) and unchecked (do not display entry).
- You can check or uncheck any of the displayed entries shown on the screen.
- After making the settings you want, tap Yes to save them and close the entry selection screen.

Managing Untitled Categories and Free Entries
You can use the procedures described here to change the names of each of the five Untitled categories, and the names of the 13 entries (fields) under each of the Untitled categories.
Contacts Categories
There are seven categories in the Contacts Mode: the two preset categories named Business and Personal, and five undefined categories named Untitled 1 through Untitled 5.
The Business and Personal categories contain identical entries (fields). The difference between them is the sequence the fields appear on the display, and how data is sorted.
The Untitled categories contain entries that can be configured by you.
Contacts Field Names
| Business Personal Untitled 1 - 5 | ||
| Name* Name* Free Company* Phone (H) Free 2Phone (B) Fax (H) Free 3Fax (B) Mobile Free 4Address (B) Address (H) Free 5E-mail E-mail Free 6Position Company Free 7Department Phone (B) Free 8Phone (H) Fax (B) Free 9Fax (H) Position Free 10Mobile Department Free 11Address (H) Address (B) Free 12Note Note Free 13 | ||
* Indicates entries on which data items are sorted.
• (B): Business
• (H): Home
To edit Contacts Untitled category and Free entry names
- In the Contacts Mode, display the list screen of the Untitled category you want to edit.
- Tap Menu Bar to display the menu bar, and then tap Option – Name edit.
- On the screen that appears, tap the category name or one of the entry names, and make any changes you want. Repeat this step for as many names as you want to change.
- You can assign category names up to 14 characters long, and entry names up to 10 characters long.
- After everything is the way you want, tap Save to store the data.

Copying Data Items Between the Personal and Business Categories
You can select a Personal data item and copy it to create a Business data item, and vice versa. You can then make any changes you want in the copy.
- In the Business or Personal category, select the data item you want to copy.
- You can select an item by displaying its data screen or by tapping the item on a list screen.
- Tap Menu Bar to display the menu bar, and then tap Option – Business ↔ Personal.
- This creates a copy of the data item you selected in step 1.
- On the screen that appears, make any changes in the data you want.
- After you are finished, tap Save to save the copied data as a new data item.

Exporting Contacts Data Into a Schedule Item
The following procedure lets you export Contacts data into the description text of a Schedule item, which provides you with handy reference information about the person you are planning to meet.
- Display the data item (record) you want to export.
- Tap New – Appointment.
- On the screen that appears, input the date, time, alarm time, and any additional description text you want.
- Tap Save to store the item.
- The applicable entries (fields) of the Contacts item are exported into the Schedule item. See “Importing Contacts Data Into a Schedule Item” on page 34 for details on which entries are exported.
- Note that Contacts data can be exported to create a new Schedule item only. You cannot use this procedure to export into an existing Schedule item.
The Memo Mode works much like a basic word processor. It lets you input and store text files for later recall when you need them.

Entering the Memo Mode
Enter the Memo Mode by tapping Menu to display the Mode Menu, and then selecting Memo.
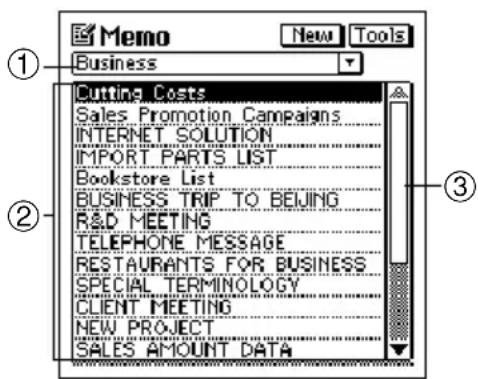
①Category name box
②Memo titles
③Scroll bar
- This is the Memo list screen, which appears first when you enter the Memo Mode.
- The display category is the one that was selected when you last exited the Memo Mode.

Changing the Display Category
- Display the Memo list screen.
- Note that you can change the display category only from the Memo list screen.
-
Tap the ▼ arrow to the right of the category name box to open a list of categories, and tap the one you want to select.
-
The Memo Mode list changes to show all memos stored under the category you select.
- All Memo Mode categories are initially named Untitled (1 through 5). See “Renaming Memo Categories” on page 65 for details on changing Memo Mode category names.

Inputting New Memo Data
Data input procedures are the same for all categories.
-
While a Memo Mode list or data screen is on the display, tap the New button.
-
On the menu that appears, tap the category where you want to input the data.
• In this example, tap Business.
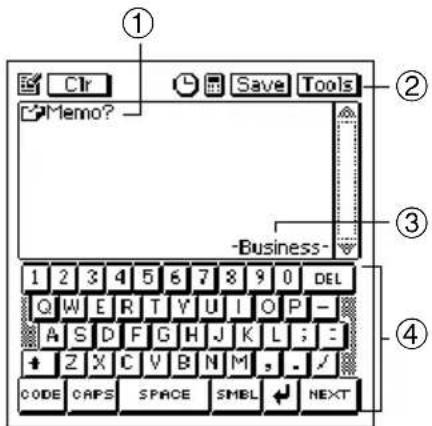
① Prompt
②Data input tool bar
③Category name
④Text keyboard
-
Input the text of the memo. The first line appears in the Memo list screen, so it is a good idea to input a descriptive title in the first line for later reference.
-
After you finish inputting all the data that you want, tap Save to store it.

Viewing Memo Data
The following procedures explain how to recall a memo item (record) for viewing, and how to expand the data display to fill the entire screen.
To view memo data
- Display the Memo list screen.
- Note that you can change the display category only from the Memo list screen.
- Tap the ▼ arrow to the right of the category name box to open a list of categories, and tap the one that contains the data you want to view.
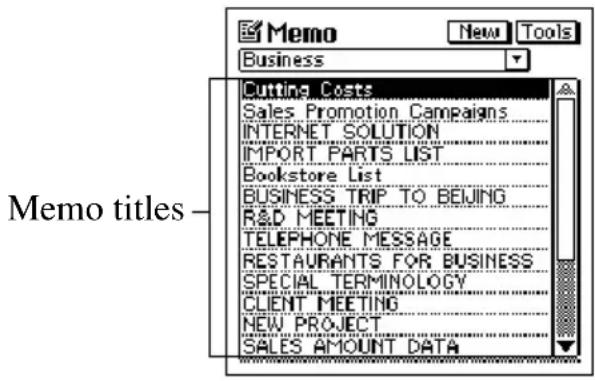
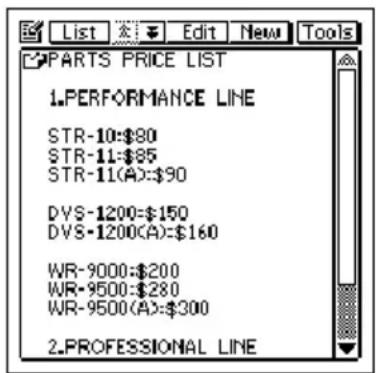
- Scroll with the ▲ and ▼ cursor keys to highlight the title of the memo you want to view, and then press the center key to display the memo's contents.
To display an item in the full-screen view
- Select the memo whose contents you want to display in the full-screen view.
- You can select a memo by highlighting it in the list screen or by displaying its data screen.
- Tap Menu Bar to display the menu bar, and then tap Option – Full screen.
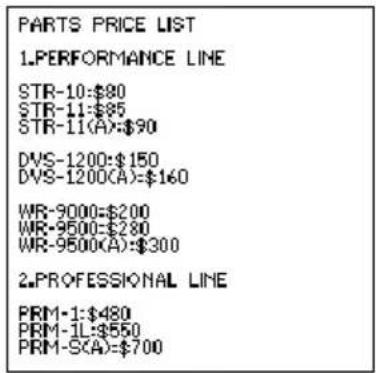
• Use the ▲ and ▼ cursor keys to scroll the screen page-by-page.
- Tap Esc to return to the normal view.

Moving a Memo within a List Screen
Use the following procedure when you want to move a memo to different location within the list screen of the same category.
- You can't move a memo from one category to another.
- Display the list screen that contains the memo you want to move, and tap the memo title to highlight it.
- Tap Menu Bar to display the menu bar, and then tap Option – Move.
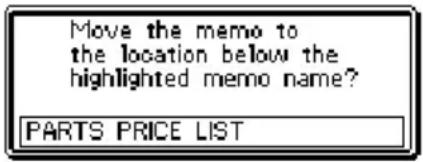
- Tap the memo above which you want to move the memo you selected in step 1.
- Tap Exe to move the memo.

Renaming Memo Categories
Use the following procedure to change the name of a Memo category.
- In the Memo Mode, display the list screen for the category whose name you want to change.
- Tap Menu Bar to display the menu bar, and then tap Option – Name edit.
- On the screen that appears, type in the name you want to assign to the category, and then tap Save to save it.
- You can use up to 14 characters for a category name.
- Category names revert to their preset defaults whenever the PV Unit is reset.
The Expense Manager is like having your own personal bookkeeper along with you wherever you go. You input transaction data as it occurs, and later you can calculate periodic totals. It's the easy way to keep track of your finances day by day.

Entering the Expense Manager Mode
Enter the Expense Manager Mode by tapping Menu to display the Mode Menu screen, and then selecting Expense. This displays a transaction list for today's date, as kept by the PV Unit's clock.
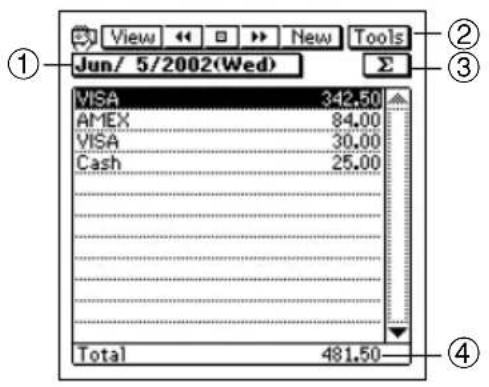
①Date jump button
②Data display tool bar
③Periodic total button
④Date total

Inputting a New Transaction
- In any Expense Manager Mode list screen or data screen, tap New to display a new transaction input screen.
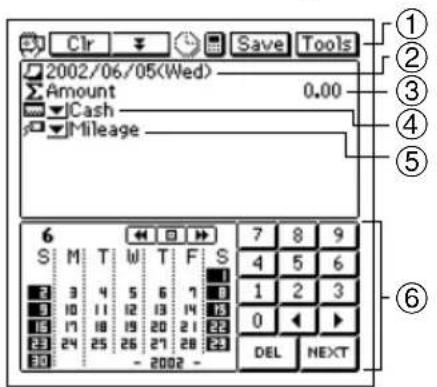
①Data input tool bar
②Transaction date
③Transaction amount
④Payment type
⑤Expense type
⑥Date keyboard
- If you want to change the date of the transaction, tap the displayed date and then use the date keyboard that appears to make the changes you want. Tap NEXT to advance to the amount.
- Input the amount of the transaction, and then tap NEXT.
- An Expense Manager item must have date and amount data. Otherwise, the PV Unit will refuse to store the data when you tap Save below.
- Tap the ▼ arrow to the left of the payment type to open a list of available payment types, and select the one you want to assign to the transaction.
- You could also use the text keyboard to input a payment type or to change the payment types inside the list. Payment types can be up to 14 characters long.
- Tap NEXT.
- Tap the ▼ arrow to the left of the expense type to open a list of available expense types, and select the one you want to assign to the transaction.
- You could also use the text keyboard to input a expense type or to change the expense types inside the list. Expense types can be up to 14 characters long.
- After everything on the screen is the way you want, tap ▼ to advance to the description input screen.
- After inputting the description, tap Save to save it.
- If you want to save the transaction without inputting a description, tap Save to save it without inputting description text.

Recalling Expense Manager Data
- In the Expense Manager Mode list screen, tap the date jump button.
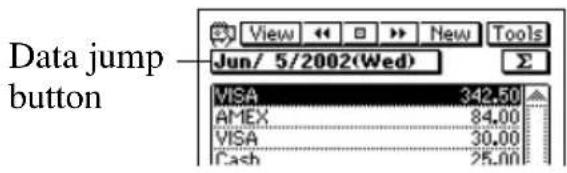
- Use the date keyboard that appears to input the date to which you want to jump, and then tap NEXT.
- You can also scroll forward and back through the dates by tapping and ▶ in the data display toolbar.

• Use the ◀ and ▶ cursor keys to scroll dates in sequence.
-
To select the contents of the list screen, tap the View button in the data display toolbar to open a menu of data types.
-
On the menu that appears, tap the type of data you want to display in the list.
-
To display the data screen of a transaction, tap the transaction to highlight it and then tap it again.

Calculating Periodic Totals
This section describes how to calculate total for a period you specify. You can calculate a periodic total for a specific payment type or expense type.
- In the Expense Manager Mode list screen, tap the button.
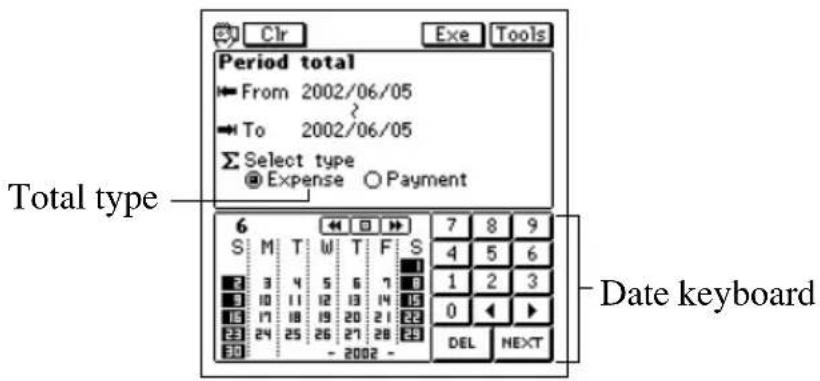
- Input the start date and the end date of the period for which you want to calculate a total.
- Tap either Expense or Payment to specify the type of total you want to calculate.
- When the date and total type are the way you want, tap the Exe button.
- The total of all transactions for which an expense type or payment type is not defined is shown under the title “Other”.
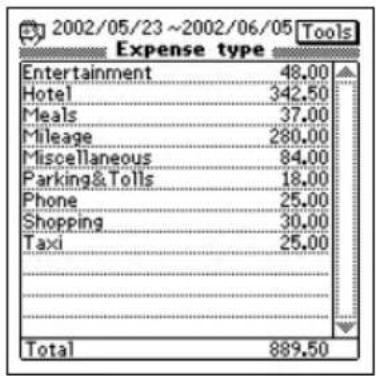
- Tap Esc to return to the list screen.

Managing Payment and Expense Types
Your PV Unit comes with the built-in payment and expense types shown below. You can use these as they are, or you can change the names of the built-in payment and expense types to suit your own needs.
Built-in Payment and Expense Types
| Payment Types Expense Types | |
| Cash Mileage | |
| Checking A Fuel | |
| Checking B Parking & Tolls | |
| Savings Taxi | |
| AMEX Meals | |
| VISA Phone | |
| Master Card Entertainment | |
| DISCOVER Hotel | |
| Diners Club Miscellaneous | |
| Free | Free |
To change a payment type or expense type name
- Tap Menu Bar to display the menu bar, and then tap Option – Label edit.
- Tap either Payment type or Expense type.
- Scroll with the ▲ and ▼ cursor keys to highlight the item whose name you want to edit, and then press the center key.
- Use the text keyboard to type up to 14 characters for the name that you want to assign to the payment type or expense type.
- After the name is the way you want, tap Save to save it.
The Currency Converter lets you instantly convert from one currency to two other currencies. You can even convert between euros and national currencies.

Entering the Currency Converter Mode
Tap the Menu icon to display the Mode Menu, and then tap Conversion.
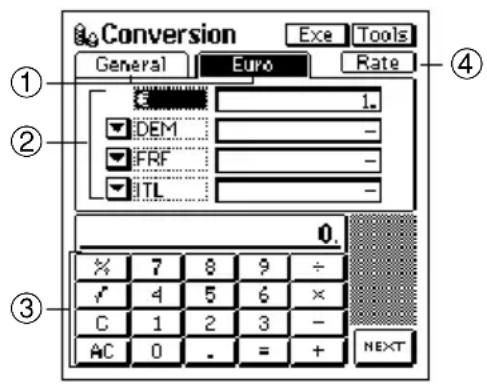
①Tabs
②Currency names
③Calculator keyboard
④Rate Table button
- Use the General tab for general currency conversion and the Euro tab for euro currency conversion.

General Currency Conversion
You can perform general currency conversion calculations using the General tab of the Currency Converter.
Performing a Conversion
Before actually performing a conversion, you must first set the exchange rate for each of the currencies and change the currency names, if you want. See “Changing the Currency Name and Rate” on page 72 for details.
Example: To find out the dollar and yen equivalents of 2 pounds.
- In the Currency Converter, tap the General tab.
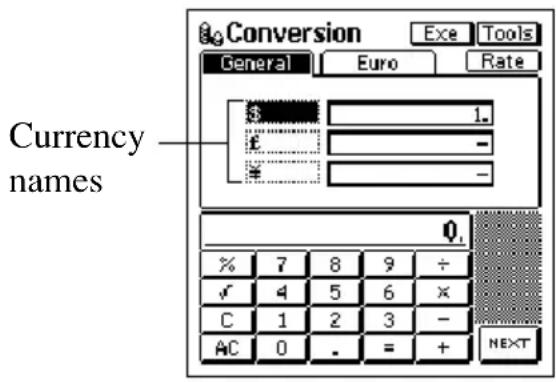
- Tap the name of the currency from which you want to convert. In this example you would tap £.
- Use the calculator keyboard to input an amount into for the selected currency and then tap = (or NEXT). In this example you would tap 2 =.
- Tap Exe to perform the conversion.
Changing the Currency Name and Rate
Use the following procedures to change the currency names that appear on the General tab, and the rates used for performing currency conversion calculations. Note that you must constantly update conversion rates to keep them current.
To set a conversion rate
- While the General tab is displayed on the Currency Converter screen, tap Menu Bar to display the menu bar, and then tap Option – Rate edit.
- On the screen that appears, tap the exchange rate value you want to change.
- Use the calculator keyboard to input the rate and then tap = (or NEXT).
- Now you can tap Set to apply the rate and close the editing screen or you can tap Name edit and display the name editing tab.
To change a currency name
- While the General tab is displayed on the Currency Converter screen, tap Menu Bar to display the menu bar, and then tap Option – Name edit.
- On the screen that appears, tap the currency name you want to change.
- Use the text keyboard to input a name up to four characters long.
- Now you can tap Set to apply the name and close the editing screen, or you can tap Rate edit and display the rate editing tab.
Displaying the Current General Rates
While the General tab is displayed on the Currency Converter screen, tap the Rate button.
To close the rate table, tap anywhere on the screen outside of the rate table.

Euro Conversion
The Euro tab lets you convert between euros and any three of the 12 national currencies of countries where the euro is used.
Performing a Conversion
The 12 national currencies are preset with the exchange rates and decimal place specifications shown the “Euro Conversion Rate Presets” table on page 172. If necessary, you can change exchange rates for each of the currencies and change the currency names. See “Changing the Currency Name and Rate” on page 75 for details.
Example: To find out the mark, franc, and lira equivalents of 5 euros.
- In the Currency Converter, tap the Euro tab.
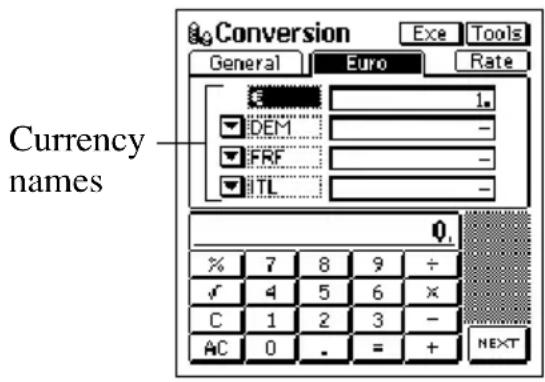
- Tap the name of the currency from which you want to convert. In this example you would tap €.
- Use the calculator keyboard to input an amount into for the selected currency and then tap = (or NEXT). In this example you would tap 5 =.
- Tap Exe to perform the conversion.
Important!
- The number of significant digits of this product is 11.
Errors may be generated in currency conversion calculations that produce results greater than the values shown below.
| €1.00= | Euro → National Currency | National Currency → Euro | |
| DEM | 1.95583 | 511,291,881.19 →999,999,999.99 | 1,955,830,000.00 →1,000,000,000.00 |
| FRF | 6.55957 | 152,449,017.23 →999,999,999.95 | 6,559,570,000.00 →1,000,000,000.00 |
| ITL | 1936.27 | 51,645,689.90 →99,999,999,983 | 999,999,999,999 →516,456,899.09 |
| ESP | 166.386 | 601,012,104.38 →99,999,999,999 | 166,386,000,000 →1,000,000,000.00 |
| NLG | 2.20371 | 453,780,216.08 →999,999,999.98 | 2,203,710,000.00 →1,000,000,000.00 |
| BEF | 40.3399 | 2,478,935,247.71 →99,999,999,999 | 40,339,900,000 →1,000,000,000.00 |
| PTE | 200.482 | 498,797,897.06 →99,999,999,998 | 200,482,000,000 →1,000,000,000.00 |
| ATS | 13.7603 | 72,672,834.16 →999,999,999.89 | 13,760,300,000.00 →1,000,000,000.00 |
| FIM | 5.94573 | 168,187,926.46 →999,999,999.99 | 5,945,730,000.00 →1,000,000,000.00 |
| IEP | 0.787564 | 1,269,738,078.42 →999,999,999.99 | 787,564,000.00 →1,000,000,000.00 |
| LUF | 40.3399 | 2,478,935,247.71 →99,999,999,999 | 40,339,900,000 →1,000,000,000.00 |
| GRD | 340.750 | 293,470,286.13 →99,999,999,999 | 340,750,000,000 →1,000,000,000.00 |
Changing the Displayed National Currencies
Use the following procedure to select from among the 12 national currencies and display the ones you want on the Euro tab.
-
On the Currency Converter Euro tab, tap the ▼ button next to the currency you want to change.
-
On the list that appears, tap the currency you want to use.
Displaying the Current Euro Rates
While the Euro tab is displayed on the Currency Converter screen, tap the Rate button.
To close the rate table, tap anywhere on the screen outside of the rate table.
Changing the Currency Name and Rate
You can use the following procedures to change the names and rates of the national currencies. Note that you cannot change the euro symbol or exchange rate.
To set a conversion rate
-
While the Euro tab is displayed on the Currency Converter screen, tap Menu Bar to display the menu bar, and then tap Option – Rate edit.
-
On the screen that appears, tap the exchange rate value you want to change.
-
Use the calculator keyboard to input the rate and then tap = (or NEXT).
-
Now you can tap Set to apply the rate and close the editing screen or you can tap Name edit and display the name editing tab.
To change a currency name
-
While the Euro tab is displayed on the Currency Converter screen, tap Menu Bar to display the menu bar, and then tap Option – Name edit.
-
On the screen that appears, tap the currency name you want to change.
-
Use the text keyboard to input a name up to four characters long.
- Tapping the Initial button displays a list of initial default currency names and rates. Tapping on a currency in this list returns its name and exchange rate to the settings shown on the list.
- Now you can tap Set to apply the name and close the editing screen or you can tap Rate edit and display the rate editing tab.

Specifying the Rounding Method
Normally, you can leave the preset rounding settings the way they are for each currency. When necessary, however, you can use the following procedure to change them.
- Tap the General or Euro tab.
- Tap Menu Bar to display the menu bar, and then tap Option – Rounding.
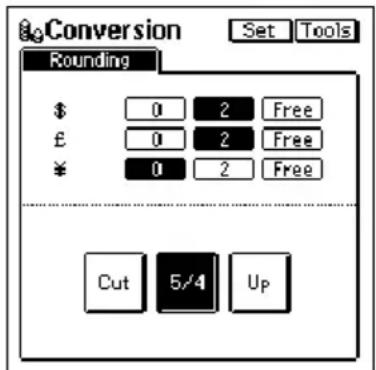
-
Specify the number of decimal places for each currency.
-
0 and 2 specify the number of decimal places for the Cut, 5/4, and Up rounding methods.
-
Free specifies a floating decimal point, which displays the value without rounding.
-
Tap a button at the bottom of the screen to specify the rounding method.
- The rounding method you select is applied for all currency conversion calculations involving a currency for which you specified 0 or 2 decimal places in step 3, above.
Cut: Cuts off the decimal part to the specified number of places.
5/4: Rounds off the decimal part to the specified number of places.
Up: Rounds up the decimal part to the specified number of places.
- After everything is the way you want, tap Set.
Quick-Memo is like having a digital memo pad on which you can sketch simple line drawings or jot down reminders.

Entering the Quick-Memo Mode
Tap the Quick-Memo icon below the PV Unit screen to enter the Quick-Memo Mode.
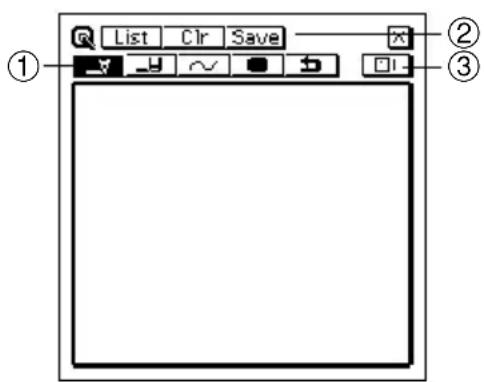
①Draw toolbar
②Input toolbar
③Quick-Memo category button
- This is the Quick-Memo input screen, which appears first whenever you enter the Quick-Memo Mode.
- Tap ☒ in the upper right corner of the screen to exit the Quick-Memo Mode and return to the screen from which you originally entered it.

Quick-Memo Categories
There are three Quick-Memo categories. As with categories in other modes, Quick-Memo categories let you group your memos for easier management.
To select a Quick-Memo category
Tap the Quick-Memo category button to cycle through the Quick-Memo categories in the following sequence: ☐1 → ☐2 → ☐3 ☐1 etc.
The display shows the Quick-Memos that are stored under the currently selected category.

Using the Quick-Memo Drawing Tools
The following describes the functions of the Quick-Memo Drawing tools when inputting Quick-Memo data.
Tap a drawing tool with the stylus to select it. The currently selected drawing tool is highlighted on the toolbar. Tapping some of the drawing tools also cycles through a number of optional settings.
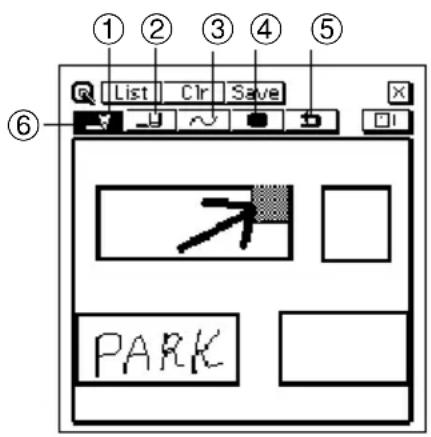
①Pencil
②Eraser
③Line
④Darkness
⑤Undo
⑥Selected tool
Important!
A diagonal line may appear jagged on the display, even in the Quick-Memo list (page 81).
Pencil Tool
- Tap this tool to cycle through line thickness in the sequence: medium _ → thick _ → thin _ → medium _ , etc.
- Dragging the stylus on the screen while this tool is selected draws a line.
- Note that you can control the type of line produced by the pencil tool with the line tool, described below.
Eraser Tool


- Tap this tool to cycle through eraser thickness in the sequence: medium -Y → thick -Y → thin -Y → medium -Y , etc.
- Dragging the stylus on the screen while this tool is selected erases anything along the line.
- Note that you can control the type of path produced by the eraser tool with the line tool, described below.
Line Tool \~ / + □
- Tap this tool to cycle through the type of line or eraser path produced when dragging the stylus on the display while the line tool or eraser tool is selected. Each tap of this tool cycles through the line type in the sequence: freehand → straight → vertical/horizontal + → rectangle → freehand , etc.
Darkness Tool
- Tap this tool to toggle the darkness of the line between the following settings: black (\boxed{\boxed{\boxed{\boxed{\boxed{\boxed{\boxed{\boxed{\boxed{\boxed{\boxed{\boxed{\boxed{\boxed{\boxed{\boxed{\boxed{\boxed{\boxed{\boxed{\boxed{\boxed{\boxed{\boxed{\boxed{\boxed{\boxed{\boxed{\boxed{\boxed{\boxed{\boxed{\boxed{\boxed{\boxed{\boxed{\boxed{\boxed{\boxed{\boxed{\boxed{\boxed{\boxed{\boxed{\boxed{\boxed{\boxed{\boxed{\boxed{\boxed{\boxed{boxed{\bf\ddots}}}}}}}}}}}}}}}}}}}}}}}}}}}}}}}}}}}}}}}}}}}}}}}}}}}}}}}}}}}}}}}}}}}}}}}}}}}}}}}}}}}}}}}}}}}}}}}}}}}}}}}}}}}}}}}}}}}}}}}}}}}}}}}}}}}}}}}}}}}}}}}}}}}}}}}}}}}}}}}}}}}}}}}}}}}}}}}}}}}}}}}}}}}}}}}}}}}}}}}}})
Undo Tool
- Tap this tool to undo the last draw operation you just performed.
Creating a New Quick-Memo
Use the procedures in this section to draw the figures you want in a Quick-Memo.
To input a new Quick-Memo
- Enter the Quick-Memo Mode.
- Tap the ☐! (category) button to select the category where you want to save the Quick-Memo.
- Use the drawing tools to draw the figure you want.
• To clear all Quick-Memo screen contents, tap Clr. - After you are finished, tap Save to save the Quick-Memo.
• If you want to input another Quick-Memo, tap New.
To draw a line or rectangle
- Select the line tool for the type of figure (freehand, straight line, vertical/horizontal line, rectangle) you want to draw.
- Drag the stylus on the display to draw the figure.

Recalling a Quick-Memo
Use the following procedure to scroll through a list of Quick-Memos and find the one you want. Then you can select a Quick-Memo in the list to view it.
- While the Quick-Memo input screen is on the display, tap List.
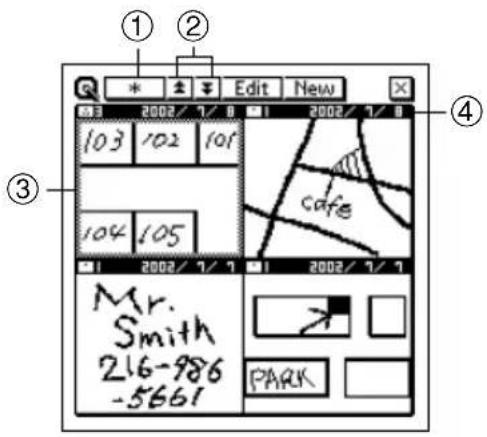
①Category button
②Scroll buttons
③Selected Quick-Memo
④Creation date
• This is the Quick-Memo list screen.
- Tap the category button to specify the category whose Quick-Memos you want to view. Selecting ☐ * displays the Quick-Memos in all categories.
- Use the scroll buttons to scroll through the Quick-Memos in the currently selected category.
- When the Quick-Memo you want to recall is on the screen, tap it with the stylus to select it.
- Tap the selected Quick-Memo to change to its data display.
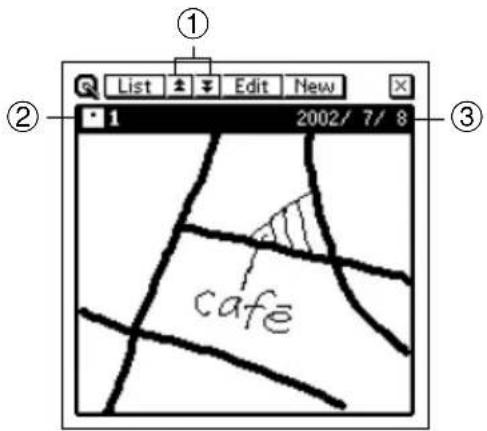
①Scroll buttons
②Category of displayed Quick-Memo
③Creation date
- In the Quick-Memo data display, you can use the scroll buttons to scroll back and forward to the data display of other memos.
- After viewing the Quick-Memo, tap List to return to the list screen.

Screen Copy
The screen copy feature lets you copy an image of certain screens and store it as a Quick-Memo screen. The following is a list of screens that you can copy with the screen copy feature.
| Mode | Data that can be screen copied |
| Contacts | All list and data screens |
| Scheduler | All calendar screens (1, 2, 3-month)Weekly SchedulerDaily SchedulerTo Do ListReminder ListAll data screens |
| Expense Manager | Screens listing periodic totals by expense types or payment types (page 69)All list and data screens |
| Memo | All list and data screens |
| Currency Converter | Conversion calculation screens |
| Pocket Sheet | List screen and sheet screen (without on-screen keyboard displayed) |
To record a screen copy
- Display the data for which you want to record a screen copy.
- Tap Menu Bar to display the menu bar, and then tap Option – Screen copy.
- The PV Unit switches to the Quick-Memo Mode, with the new screen copy on the display. Make any additions or changes if you want, and then store the image by tapping Save.
Pocket Sheet gives you access to basic spreadsheet capabilities while on the go. You can build your own spreadsheets from scratch, and even synchronize with Microsoft® Excel data on your computer.

Entering the Pocket Sheet Mode
- Tap the Menu icon to display the Mode Menu, and then tap Pocket Sheet.
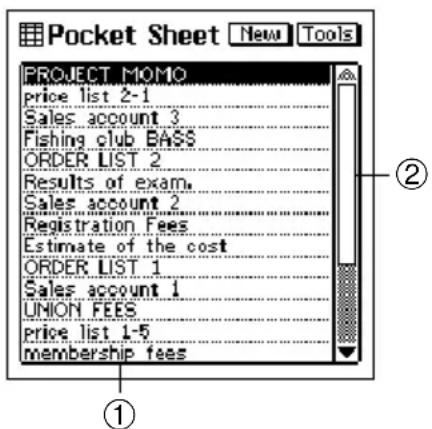
① Sheet titles
②Scroll bar
- This is the Pocket Sheet list screen, which appears first when you enter the Pocket Sheet Mode.

Pocket Sheet Basics
With Pocket Sheet, you can open up a blank sheet and build the sheet you want from scratch.
The following sections describe how to open a new sheet, and how to perform some of the most basic sheet operations.
Creating a New Sheet from Scratch
- Display the Pocket Sheet list screen.
- Tap the New button.
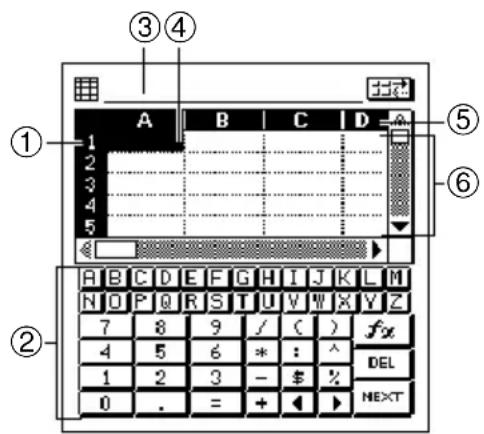
①Row numbers
②Keyboard
③Input field
④Current cell
⑤Column names
⑥Cells
- Columns are named using the letters of the alphabet from A to Z, while rows are numbered sequentially from 1 to 999.
- The maximum capacity for a single sheet is about 32KB (about 1,900 cells when each cell contains one character, without any format settings or borderlines). The message “Sheet is too big!” appears on the display whenever the contents of a file exceeds this limit.
If a sheet being received by the unit during a Pocket Sheet Sync operation exceeds the maximum limit (about 32KB), the excess cell data is automatically cut off. In this case, the sync operation ends normally, with no indication that the data was cut off. This means you should always check sheet contents visually after a sync operation is complete.
- A cell is referred to using its cell reference, which is made up of the cell's column name and row number. This means that the cell reference of the upper left cell in the above sheet is A1, and the cell reference of the lower right cell is D5.
- The active cell is the one that is currently selected for input. The active cell is highlighted.
- The numeric keyboard appears first whenever you open a new sheet.
Making a Cell the Active Cell
You can make a cell active by tapping it with the stylus so it becomes highlighted. You can also move the highlighting around the display using the scroll bar.
- Tapping the gray areas of the scroll bar scrolls the entire screen with the highlighted active cursor in the same relative position in the newly displayed screen.
Selecting a Range of Cells
While a sheet is open on the display, drag the stylus across the range of cells you want to select. The cells become highlighted as you drag across them.
Jumping to a Specific Cell in a Sheet
Important!
- You cannot jump to a cell located inside a row or column that is frozen. To jump to such a cell, you must unfreeze the row or column first (page 98).
- While a sheet is on the display, tap Menu Bar to display the menu bar, and then tap Edit – Go To to display the Go To screen.
- On the screen that appears, use the on-screen keyboard to type in the cell reference (column and row) of the cell to which you want to jump.
• To jump to cell Z999, for example, type “Z999”. - Tap Exe to jump to the cell you specified.

Inputting Data Into a Cell
This section explains the rules and procedures for inputting text, values, and mathematical expressions into sheet cells. It also contains detailed information on the various cell functions that are available.
General Input Rules
The following are the general rules that you should observe whenever inputting data.
- Anything you enter on the keyboard is input into the sheet's active cell.
- You can input up to 256 characters into each cell.
- Mixing text and numbers inside the same cell causes everything in the cell to be treated as text.
- Do not manually input commas as separators inside values. Doing so interferes with correct display of calculation results. Use the procedure under “Changing the Format Settings of a Cell” on page 93 to turn on automatic comma separators.
Cell References
The term cell reference means calling the contents of one cell into another cell. Pocket Sheet supports three types of cell references: relative, absolute, and mixed. Whether a cell references is relative, absolute, or mixed does not make affect the results it normally produces. The cell reference type matters only when the contents of the cell are copied and then pasted into another location. See “Copying a Relative Cell Reference” on page 105 and “Copying an Absolute or Mixed Cell Reference” on page 105 for full information about how cell references are affected by cut, copy, and paste operations.
Relative Cell References
As its name suggests, a relative cell reference is one that references a cell in relation to the cell where the reference is made. Note the following examples.
| Relative Cell Reference | Meaning |
| A1 | Contents of cell A1 |
| A1:A10 | Contents of the column of cells from A1 through A10 |
| A1:E1 | Contents of the row of cells from A1 to E1 |
Absolute Cell References
An absolute cell reference is one that references a specific cell, no matter where it is located in relation to the cell where the reference is made. A reference is made absolute by inserting a dollar sign in front of its column name and row number. Note the following examples.
| Absolute Cell Reference | Meaning |
| A1 | Contents of cell A1. Both the column ( A ) and row ( 1 ) references are absolute. |
| A1:A10 | Contents of the column of cells from A1 through A10. All the column and row references are absolute. |
| A1:E1 | Contents of the row of cells from A1 to E1. All the column and row references are absolute. |
Mixed Cell References
A mixed cell reference is one in which one component (column name or row number) is relative, and the other component is absolute. Note the following examples.
| Mixed Cell Reference | Meaning |
| A1 | Contents of cell A1. The column reference (A) is absolute, and the row reference (1) is relative. |
| A1 | Contents of cell A1. The column reference (A) is relative, and the row reference (1) is absolute. |
Using the On-screen Keyboards
Opening a new sheet that does not contain any data or tapping the highlighted cell within a sheet causes an on-screen keyboard to appear.
- Tapping the button above the text keyboard changes to the numeric keyboard.
- Tapping the button above the numeric keyboard changes to the text keyboard.
- Tapping _x displays a menu of built-in functions.
Inputting Mathematical Expressions
You can set up a cell to perform arithmetic operations (addition, subtraction, multiplication, division), and other useful functions like SUM (sum of a series of values), MIN (extracts the lowest value), and COUNT (counts the number of values). You can also use parentheses to ensure that operations are performed in the sequence you want.
- Inputting a mathematical expression causes its result to be displayed in the cell. The mathematical expression itself appears in the input field only.
- The results of mathematical operations are normally displayed flush right in the cell.
- If the result of a mathematical expression is longer than the cell that contains it, the contents of the cell are replaced by a string of # marks. This is to let you know that the cell contains a value, but the value cannot be displayed. If this happens, try making the cell wider (page 97).
To input a mathematical expression
- Make the cell where you want to input the expression the active cell.
- On the on-screen keyboard, tap =.
- Inputting = as the first character tells the PV Unit that what follows is a mathematical expression.
- Use the on-screen keyboard to input the mathematical expression you want.
- Tapping the buttons above the keyboard inputs the corresponding function. See “Examples” below for details.
- After the content of the cell is the way you want, tap NEXT to store it.
Examples
The following are some examples of mathematical expressions you can input into sheet cells.
| Cell Contents | Displayed Result |
| =1+2-3 | 0 |
| =(1+2)*(3+4) | 21 |
| =(A1+B5)*2 | Result of expression using contents of cells A1 and B5 |
| =A1+B2 | Contents of cell A1 + Contents of cell B2 |
| =2^3 | 8 (Raises left value to power specified by right value.) |
| =ABS(A1) | Absolute value of value in A1 |
| =AVERAGE(A1:D5) | Average of values in cells A1 through D5 |
| =COUNT(A1:D5) | Number of values in cells A1 through D5 |
| =COUNTA(A1:A7) | Number of non blank cells in cells A1 through A7 |
| =EVEN(3) | 4 (Rounds up to the nearest even number.) |
| =INT(8.9) | 8 (Rounds down to the nearest integer.) |
| =MAX(A1:D5) | Greatest value of those in cells A1 through D5 |
| =MIN(A1:D5) | Least value of those in cells A1 through D5 |
| =MOD(3,2) | 1 (Integer result when left value is divided by right value.) |
| =ODD(2) | 3 (Rounds up to the nearest odd number.) |
| =ROUND(2.15,1) | 2.2 (Rounds left value to decimal places specified by right value.) |
| =SQRT(A1*5) | Square root of value in cell A1 multiplied by 5 |
| =SUM(A1:D5) | Sum of contents of cells A1 through D5 |
Inputting Text
Text (letters and numbers) can be input into the active cell using the on-screen text input keyboard.
- Input make up entirely of numbers (including decimal point) is treated as a numeric value. Inclusion of even a single non-numeric character (alpha-character or symbol) causes the input to be treated as text.
- Text is normally aligned in the cell flush left, while numbers are aligned flush right.
- If a text string is longer than the cell, the extra text is allowed to extend into the next cell to the right in the sheet display, as long as the neighboring cell does not contain any data. If it does, the extra characters are cut off in the sheet display.
- If an input value is longer than the cell that contains it, the contents of the cell are replaced by a string of # marks. This is to let you know that the cell contains a value, but the value cannot be displayed. If this happens, try making the cell wider (page 97).
- If the first character in a cell is an equals sign (=) , the text is considered to be part of a mathematical expression.

Input Example
This section contains an example that illustrates a number of Pocket Sheet input techniques.
Example Data
All of the operations in this section are performed using the data shown below.
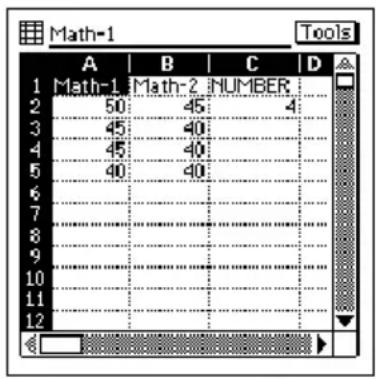
Example: To input the function below into cell C5.
$$ = \mathrm{SUM} (\mathrm{A2}: \mathrm{B5}) ^ {*} \mathrm{C2} $$
- This calculates the total of the values from cell A2 through cell B5, and then multiplies it by the value in cell C2 (4).
- Open a sheet and then tap cell C5.
- Perform the following keys operations to input characters into the input field.
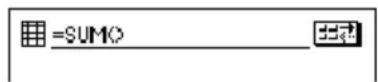
- Next, use the stylus to drag from cell A2 to cell B5, so all the required cells become highlighted.
- Remove the stylus from the screen to input the range of selected cells into the input field.
-
Tap in the input bar to the right of the close parenthesis to move the cursor there.
-
Type * into the input field.
- Tap cell C2.
- Tap any cell or the NEXT button to display the calculation result.
- The value in cell C5 shows the result of the function.
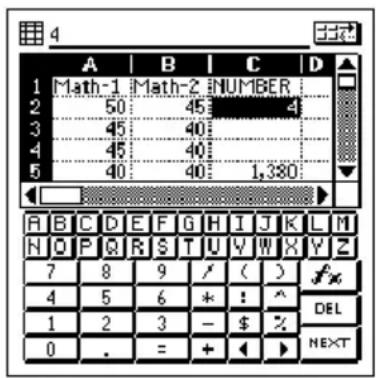

Controlling the Appearance of a Cell
This section explains how to make cell format settings that control the format of data inside individual cells or a range of cells. The format settings are: numeric value category (monetary unit, percent), number of decimal places, alignment, text style (bold or normal), comma separators for values, and cell lock.
Changing the Format Settings of a Cell
- Make the cell whose format you want to change the active cell (page 85).
- You can select a single cell or a range of cells.
- Tap Menu Bar to display the menu bar, and then tap Option – Formats to display the Formats tab.
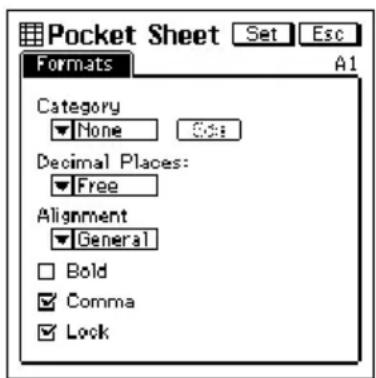
- Make the format settings you want.
- See the following sections for information about the settings you can make on the Formats tab.
- After making the settings you want, tap Set to apply them.
- Tapping Esc exits the Formats tab without applying any changes you have made in the settings.
Category
- Tap the ▼ arrow next to Category box to display a list of numeric value categories. The following shows the available settings and their meanings.
| Category Setting | Description |
| None | • Numeric value (no setting) |
| % | • Percent |
| $ | • Dollar value |
| £ | • British pound value |
| ¥ | • Japanese yen value |
| € | • Euro value |
- For the monetary units and percent, the applicable symbol is appended automatically to the value in the cell.
- When percent is selected as the category setting, a value of 0.1 becomes 10% , 1 becomes 100% , 10 becomes 1000% , etc.
Edit
- Tap this button to display the euro currency symbol editing screen shown below.
- Note that you can edit the euro currency symbol only. The symbols for the other currencies are fixed.
- Use the on-screen keyboard to type up to three letters for the currency to which you want to change. You could input DEM for German marks, FRF for French francs, etc. After inputting the letters you want, tap Set to save them.
- The letters you input above replace the euro symbol in the Category list.
Decimal Places
- Tap the ▼ arrow next to the Decimal Places box to display a list of decimal place settings. You can specify anywhere from 0 to four decimal places. Selecting Free specifies a free-floating decimal place, which means the decimal point is located wherever you input it.
Alignment
- Tap the ▼ arrow next to the Alignment box to display a list of alignment settings. You can select from among General, Left, Center, and Right. Selecting General causes text to be aligned left, and numbers aligned right.
Bold
- Tap the check box to toggle bold text on (checked) and off (unchecked).
Comma
- Tap the check box to toggle comma separators every three digits on (checked) and off (unchecked).
Lock
- Tap the check box to toggle cell lock on (checked) and off (unchecked).
- Note that the sheet where the locked cell is located must be a protected sheet (page 107) for the cell's locked status to be enforced. The content of a cell can always be edited whenever the sheet where it is located is unprotected, even if the cell is locked. The following shows the relationship between the cell lock and sheet protection.
| Cell Status | Sheet Status | Cell Content Editing |
| Locked | Protected | Not allowed |
| Locked | Unprotected | Allowed |
| Unlocked | Protected | Allowed |
| Unlocked | Unprotected | Allowed |
Specifying Cell Border Lines
- Select the range of cells whose borderlines you want to change.
• See “Making a Cell the Active Cell” on page 85. - Tap Menu Bar to display the menu bar, and then tap Option - Border.
- On the screen that appears, tap the borderline option you want to select.
| To select this type of border line: | Tap this button: |
| Bold outer lines only | [WCZZ] |
| Normal outer lines only |  |
| Normal outer lines and inner lines |  |
| Borderlines off | [0750] |
- When the borderlines are the way you want, tap Exe to apply them and to close the Border screen.

Row and Column Operations
This section contains such information as how to change the width of a column, how to insert rows and columns, and how to delete rows and columns.
Changing the Width of a Column
You can change the width of a column of cells either by dragging the boundary to the width you want, or by specifying width value that represents a number of display dots.
To change the width of a column by dragging its boundary
- In the black bar that shows the column names (A, B, C) at the top of a sheet, drag either of the white boundary markers of the cell left or right to change its width.
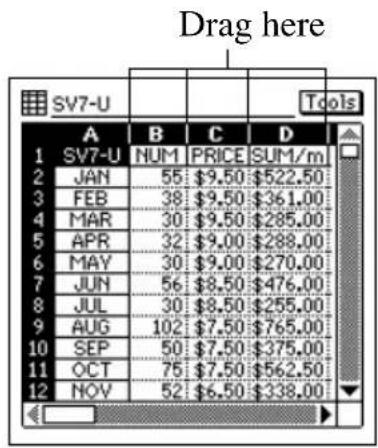
other
Drag here Tools | Month | A | B | C | D | |---|---|---|---|---| | 1 | SV7-U | NUM | PRICE | SUM1/m | | 2 | JAN | 55 | 9.50 |522.50 | | 3 | FEB | 38 | 9.50 |361.00 | | 4 | MAR | 30 | 9.50 |285.00 | | 5 | APR | 32 | 9.00 |288.00 | | 6 | MAY | 30 | 9.00 |270.00 | | 7 | JUN | 56 | 8.50 |476.00 | | 8 | JUL | 30 | 8.50 |255.00 | | 9 | AUG | 102 | 7.50 |765.00 | | 10 | SEP | 50 | 7.50 |375.00 | | 11 | OCT | 75 | 7.50 |562.50 | | 12 | NOV | 52 | 6.50 |338.00 |- You can drag a column boundary marker as far as the edge of the display screen.
To change the width of a column by specifying a value
- Make a cell in the column whose width you want to change the active cell (page 85).
- Tap Menu Bar to display the menu bar, and then tap Option – Width to display the Width dialog box.
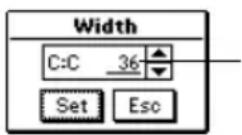
Current width (number of screen dots)
- Tap ▲ to increase the value or ▼ to decrease it.
- You can set the width value in the range of 3 to 130.
- When the setting you want is displayed, tap Set to apply it.
Scroll Freezing Rows and Columns
“Scroll freeze” is a technique you can use to stop rows, and columns from scrolling when you tap the scroll bars on the screen. This is helpful when you want to leave row and column titles frozen on the screen as you scroll the data only.
You can freeze rows only or columns, or you can freeze rows and columns at the same time.
To freeze columns only
Example: The following procedure describes how to freeze column A.
- In the top row of the displayed sheet, tap cell in the column to the right of the column you want to freeze.
• To freeze column A, for example, you would tap cell B in the top row. To freeze both column A and column B, tap cell C.
- Tap Menu Bar to display the menu bar, and then tap Option – Freeze.
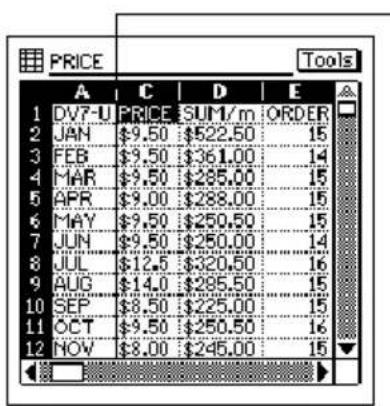
Solid line indicates column to the left is frozen.
To freeze a row only
- In the far left column of the displayed sheet, tap the cell in the row below the row you want to freeze.
• To freeze row 1, for example, you would tap cell 2 in the far left column. To freeze both rows 1 and 2, tap cell 3.
- Tap Menu Bar to display the menu bar, and then tap Option – Freeze.
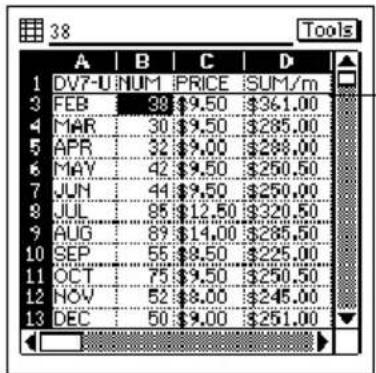
Solid line indicates row above is frozen.
To freeze a row and column at the same time
- Tap the cell below the row and to the right of the column you want to freeze.
-
To freeze column A and row 1, for example, you would tap cell B2.
-
Tap Menu Bar to display the menu bar, and then tap Option – Freeze.
To unfreeze rows and columns
If a row and/or column is frozen on the current sheet, tap Menu Bar to display the menu bar, and then tap Option – Freeze to unfreeze them.
Inserting Rows
- Select the location in the sheet where you want to input the rows.
- The number of cells you select determines the number of rows that are inserted. Selecting C1 inserts a single row at row 1. Selecting C1 and C2 inserts two rows at rows 1 and 2.
-
Existing rows will be shifted downwards to make room for the newly inserted rows.
-
Tap Menu Bar to display the menu bar, and then tap Option – Insert.
-
On the dialog box that appears, tap Rows to perform the row insert operation in accordance with the cells you selected in step 1.
Inserting Columns
- Select the location in the sheet where you want to input the columns.
- The number of cells you select determines the number of columns that are inserted. Selecting C1 inserts a single column at column C. Selecting C1 and D1 inserts two columns at columns C and D.
-
Existing columns will be shifted right to make room for the newly inserted columns.
-
Tap Menu Bar to display the menu bar, and then tap Option – Insert.
-
On the dialog box that appears, tap Columns to perform the column insert operation in accordance with the cells you selected in step 1.
Deleting Rows and Columns
- Select the location in the sheet where you want to delete rows or columns.
- The number of cells you select determines the number of rows or columns that are deleted.
- Selecting C1 deletes row 1 or column C.
- Selecting C1 and D1 deletes columns C and D.
- Selecting C1 and C2 deletes rows 1 and 2.
-
Remaining columns will be shifted to fill the room created by the deleted rows or columns.
-
Tap Menu Bar to display the menu bar, and then tap Option – Delete.
-
On the dialog box that appears, tap Rows or Columns to perform the delete operation in accordance with the cells you selected in step 1.

Sheet Operations
This section contains information about the procedures you need to perform when working with sheets.
Opening a Sheet
- Display the Pocket Sheet list screen.
- Double-tap the title of a sheet to open it.
Displaying the Input Screen
You can use any one of the following two operations to change from a sheet screen to the input screen.
- Tap the input field.
- Tap the currently selected (highlighted) cell.
To change back to the sheet screen from the input screen, tap Esc.
Saving a New Sheet
- After inputting data into a sheet, tap Menu Bar to display the menu bar, and then tap Edit – Save.
- Use the text keyboard to type in up to 32 characters for the name you want to assign to the sheet.
- Tap Save to save the sheet.
Saving an Existing Sheet Under a New Name
- Tap Menu Bar to display the menu bar, and then tap Edit – Save As.
- Use the text keyboard to type in up to 32 characters for the name you want to assign to the sheet.
- Tap Save to save the sheet.
Exiting a Sheet
While a sheet is on the display, tap Esc to exit.
- Instead of tapping Esc, you could tap Menu Bar to display the menu bar, and then tap Edit – Close.
- If there are unsaved edits in the sheet, tapping Esc displays a screen for saving the sheet. Type in a name and then tap Save to save the sheet.
• If you want to quit without saving the sheet, tap Esc.
Renaming a Sheet
- Display the Pocket Sheet list screen.
- Tap the sheet you want to rename so it is highlighted.
- Tap Menu Bar to display the menu bar, and then tap Edit – Rename item.
- Use the text keyboard to type up to 32 characters for the new name you want to assign to the sheet.
- Tap Save to save the sheet under its new name.

Cut, Copy, Paste, Clear
The cut, copy, and paste operations in the Pocket Sheet Mode are somewhat different from those in other modes.
Cutting and Copying Cell Data
- Select the cell or range of cells that contains the data you want to cut or copy.
• See “Making a Cell the Active Cell” on page 85.
- Tap Menu Bar to display the menu bar, and then tap Edit – Cut or Edit – Copy.
- With Cut, the original data is deleted from the cell and placed onto the clipboard.
- With Copy, a copy of the data is placed onto the clipboard without changing the original data.
- The data includes format settings (page 93) as well as any text, numbers, and mathematical expressions. The border specification, however, is not included.
- You can use the Paste command to paste the contents of the clipboard into another cell or range of cells.
Pasting Cell Data
Important!
- Pasting data into a cell or range of cells that already contains data causes the current data to be replaced with the pasted data.
- Select the cell or range of cells to which you want to paste the data currently on the clipboard.
• See “Making a Cell the Active Cell” on page 85.
- Data can be placed onto the clipboard using the cut or copy (page 103) operation.
- Tap Menu Bar to display the menu bar, and then tap Edit – Paste.
- The data is pasted from the clipboard into the currently active cells.
- The pasted data includes format settings (page 93) as well as any text, numbers, and mathematical expressions. No border specification is included.
Note
- Up to 256 characters can be pasted when pasting data from another application.
- The clipboard has a capacity of approximately 2KB.
Copying a Relative Cell Reference
With relative cell reference, the cell reference changes automatically to maintain the same relationship between the calling cell and the cell being called. Note the following example.
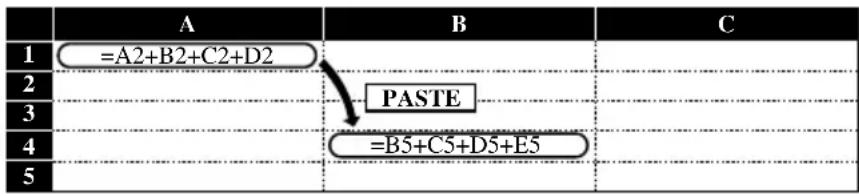
Copying an Absolute or Mixed Cell Reference
Since absolute cell references are “absolute,” they remain the same even when the expression is moved. With mixed cell references, the absolute part remains the same, while the relative part changes according to the location of the expression. Note the following example.
| A | B | C | |
| 1 | =A2+B2+C2+D2 | ||
| 2 | PASTE | ||
| 3 | |||
| 4 | =A2+$B5+DS2+E5 | ||
| 5 |
Clearing Cell Data
- Select the cell or range of cells whose data you want to clear.
• See “Making a Cell the Active Cell” on page 85. - Tap Menu Bar to display the menu bar, and then tap Edit – Clear.
- On the dialog box that appears, tap the option you want to execute it.
• All clears both cell format settings (page 93) and contents.
- Formats clears the format settings of the cell without affecting the contents. The borders of the cell are not cleared.
- Contents clears the contents (value, text, function) of the cell without affecting format settings.

Searching for Data in a Sheet
Use the following procedure to search for specific data in a sheet.
Note
- The Pocket Sheet search function checks cell data only for the characters you specify. It does not check calculation formulas and functions assigned to cells.
- The search starts from the cell that is currently selected in the sheet and proceeds to the right of the selected cell.
- The contents of cells located inside a row or column that is frozen are not searched. To search the contents of such cells, you must unfreeze the row or column first.
To search for data in a sheet
- In the Pocket Sheet Mode, open the sheet whose data you want to search.
- Tap the cell from which you want to start searching so it is highlighted.
- Tap Menu Bar to display the menu bar, and then tap Edit – Search.
-
If you previously performed a search operation since opening the current sheet, the text you searched for will be shown on the above screen.
-
Use the text keyboard to type up to 12 search characters.
-
Tap Exe to start the search.
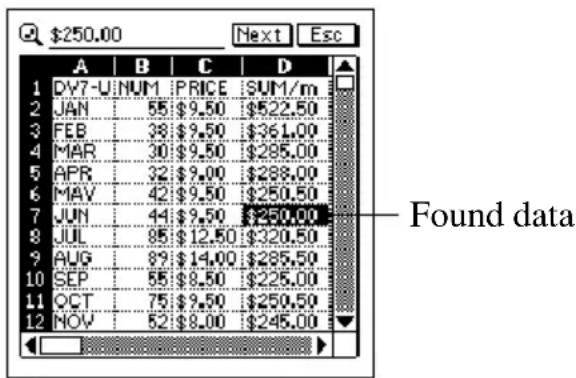
other
| Month | Price ($) | | :--- | :--- | | 1 | 55 | | 2 | 9.50 | | 3 | 9.50 | | 4 | 9.50 | | 5 | 9.50 | | 6 | 9.50 | | 7 | 9.50 | | 8 | 12.50 | | 9 | 14.00 | | 10 | 8.50 | | 11 | 9.50 | | 12 | 8.00 | | Found data- To search for the next occurrence of the same data, tap Next. You can repeat this step as many times as necessary.
- After you are finished searching for data, tap Esc to close the search screen.

Setting Sheet Calculation, Gridline, and Protect Options
- Display the sheet whose options you want to set.
- Tap Menu Bar to display the menu bar, and then tap Option – Sheet to display the option setting dialog box.
- On the screen that appears, tap the check boxes to turn the options you want on (checked) and off (unchecked).
- Check Auto Calculation when you want the calculations in the sheet performed automatically whenever a value is changed. When Auto Calculation is turned off, you can perform calculations manually by executing Menu Bar – Option – Calc Now.
- Check Gridlines to display the sheets gridlines.
- Check Protect Sheet when you want to protect the contents of the sheet from being changed. Note that sheet protection is related to cell locking described under “Lock” on page 96.
- After the settings are the way you want, tap Set to apply them.

Date and Size Information
You can use the following procedure to display a dialog box that shows the date the sheet was created or modified, and the size of the sheet in bytes.
Displaying Date and Size Information
- Display the Pocket Sheet list screen.
- Select the name of the sheet whose date and size information you want to view.
- Tap Menu Bar to display the menu bar, and then tap Option – Date/Size.
- The date format (M/D/Y, D/M/Y, Y/M/D) is in accordance with the system settings you make under “Setting the Date, Time, Calendar, and Keyboard Formats” on page 162.
- After you are finished viewing the information, tap OK to close the dialog box.

Pocket Sheet Sync
Pocket Sheet Sync for Microsoft® Excel 97/2000/2002 synchronizes Pocket Sheet data stored in your PV Unit with data in files created using Microsoft Excel (97, 2000, 2002). For details on using Pocket Sheet Sync, see the documentation contained on the CD-ROM that comes with your PV Unit.

Pocket Sheet Errors
The message #ERR appears inside of a cell any time one of the following operations is attempted with the cell.
- Division by zero
- Any mathematical operation that produces a value that exceeds the calculation limit
- Any mathematical operation in which a cell references itself
- Deletion of a row or column that contains a cell referenced by the cell
- A copy operation that causes the referenced cell to be outside the sheet
- Any copy operation, or row or column insert operation that causes the length of a function to exceed 256 characters
• Mathematical error - Adding a large number of mathematical expressions to a sheet for which Auto Calculation is turned off can cause the #ERR message to appear.
- Parentheses can be nested up to 10 times inside a single calculation.
- Referencing of other cells within the same sheet is limited to 256 levels per calculation.
Important!
- Referencing a cell that contains a calculation that has not yet been performed may cause the referencing calculation to take a long time.
P.Referencer is a tool that lets you view database data on your PV Unit. You can view data files created using Easy Referencer Tool on a Windows PC.
Preparing and Transferring Data from Your PC
See the user documentation that comes with the Easy Referencer Tool application for details about how to prepare database data and transfer it from your PC to your PV Unit.
Entering the P.Referencer Mode
Tap the Menu icon to display the Mode Menu, and then tap P.Referencer to enter the P.Referencer Mode.
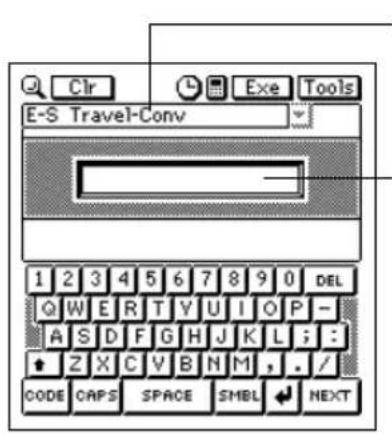
Data file name (up to 15 characters)
Search text input box
- This is the search screen, which appears first when you enter the P.Referencer Mode.

Searching for Text in a Data File
- Display the P.Referencer search screen.
- You can return to the search screen any time by tapping the 🔒 button.
- Tap the ▼ arrow to the right of the data file name box to open a list of data file names, and tap the one you want to select.
- Changing to a different data file automatically clears any text currently in the search text input box.
- Tap the search text input box, and then type in up to 12 characters of the record title you want to find.
- Note that a search operation is not case-sensitive. This means it does not distinguish between upper-case and lower-case characters.
- When the search text is the way you want, tap Exe to start the search.
- The display changes to a list screen of record titles, with the title that best matches the text you specified located at the top. For example, suppose there is data with the following titles in the currently selected data file.
AB ABCD ABD
Searching for “ABCA” would cause the list to start with the title “AB,” while a search for “ABC” would cause the list to be started by “ABCD.”

Viewing Database Data
The following procedure explains how to recall a database record for viewing.
To view database data
- Use P.Referencer search screen (page 109) to display a list of records in the data file whose data you want to view.
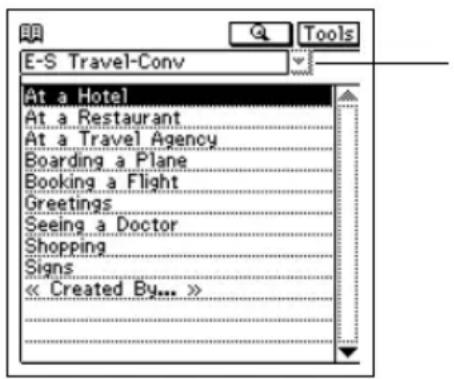
Data file name
(up to 15 characters)
- If you want to change to another data file, tap the ▼ arrow to the right of the data file name box to open a list of data file names, and tap the one you want to select.
- Tap the name of the record whose data you want to view so it is highlighted.
- Tap the highlighted record name again to display the record's contents.
![① Booking a Flight [ English -> Spanish ] Boarding a Plane ② Airline code Airport code Can I make a reservation for KLM](/content/2026/05/835219/images/6b4b5f10f3f9032a415efe7ea2eeb949576aa396ea54ed1e3afe9e2d83a24331.jpg)
①Record Title
② Broken line underlining
③Record Text
④Record Sub-title
⑤Graphic
⑥Solid line underlining
- Tapping an item with a solid line under it causes the item to become highlighted. Tapping the highlighted item again jumps to the destination linked to the item.
![Booking a Flight [ English -> Spanish ] Airline code AA American Airlines AC Air Canada AF Air France AI Air India Jump destination screen](/content/2026/05/835219/images/79bca4471224d05105cdc78147cf935b56f3ef381f16cade5a6a37a8dd62e424.jpg)
• To back jump to the previous screen, tap the button.
- Tapping an item with a broken line under it causes the item to become highlighted. Tapping the highlighted item again displays a link window.
• To close the link window, tap anywhere outside the link window or tap Esc.
• To unhighlight an item, tap somewhere outside of the highlighting or tap Esc.
- The maximum number of consecutive jumps you can perform is 12. Attempting a 13th jump causes the message “No more jumps allowed!” to appear.
Your PV Unit lets you set up a secret memory area that keeps your data safe and secure under a password you specify. After you enter the secret memory area, you can use the Scheduler, Contacts, Memo, and Expense Manager modes to store data.
Important!
- You can have only one secret memory area at any one time.
- All secret data for all modes is stored in the same secret memory area, regardless of what mode you were in when you created the secret memory area.
- Make sure you do not forget your password! There is no way to look up a password if you forget it. You will have to reset the PV Unit and clear all its memory contents in order to clear a forgotten password and create a new secret memory area.

Creating a New Secret Memory Area
Use the following procedure to create a new secret memory area. Note that this operation can be performed only if there is no secret memory area already in memory.
- Tap the Menu icon to display the Mode Menu, and then tap Secret.
- Use the text keyboard to type up to 12 characters for the password you want to use.
- Tap Set to register your password and create a secret memory area.
- In response to the confirmation message that appears, tap Yes.
- Registering a password creates and immediately enters the secret memory area, which is indicated by the icon.

Using the Secret Memory Area
The following describes the operations you can perform after you create a secret memory area.
To enter an existing secret memory area
- Tap the Menu icon to display the Mode Menu, and then tap Secret.
- Use the text keyboard to type the correct password, and then tap Set.
- If the password is correct, the PV Unit enters the secret memory area.
- Once you enter the secret memory area, you can move between it and the open (non-secret) memory area without having to input the password again until you turn power off and then back on again.
To exit the secret memory area
- While in the secret memory area, tap the Menu icon to display the Mode Menu.
- Tap Secret to exit the secret memory area and return to the open memory area.
To change your password
- While in the secret memory area, tap the Menu icon to display the Mode Menu.
- Tap Menu Bar to display the menu bar, and then tap Edit – Password edit.
- Use the text keyboard to type up to 12 characters for the new password you want to use.
- Tap Set to register the new password.
- In response to the confirmation message that appears, tap Yes.
To transfer data from the open memory area to the secret memory area
- Enter the mode that contains the data you want to transfer to the secret memory area.
- Select the data item you want to transfer.
- You can select a data item (record) by highlighting it on a list screen, 1-Month Calendar screen, etc. or by displaying the data item's data screen.
- Tap Menu Bar to display the menu bar, and then tap Edit – To secret area.
- Use the text keyboard to type the correct password and then tap Set.
- You do not need to input the password if you have entered the secret memory area since you last turned on power.
- In response to the message that appears, tap Yes to transfer the data.
To transfer data from the secret memory area to the open memory area
- Enter the secret memory area.
- Enter the mode that contains the data you want to transfer to the open memory area.
- Select the data item you want to transfer.
- You can select a data item (record) by highlighting it on a list screen, 1-Month Calendar screen, etc. or by displaying the data item's data screen.
- Tap Menu Bar to display the menu bar, and then tap Edit – To open area.
- In response to the message that appears, tap Yes to transfer the data.
The pop up tools of the PV Unit provide you with instant access to a calculator, a calendar, and a clock whenever you need them.
■ Displaying the Pop Up Tool Screen
While a screen that has a Tools button in its upper right-hand corner is on the display, tap Tools to display the pop up tool screen.
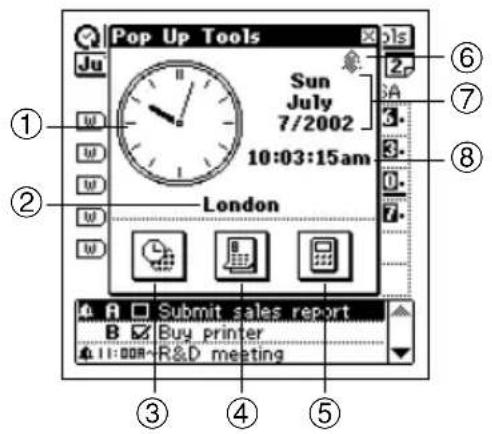
①Clock
(Tap to display date/time setting screen on page 160.)
②Home city
③Clock icon
④Calendar icon
⑤Calculator icon
⑥Alarm indicator (Tap to display alarm setting screen on page 161.)
⑦Current date
⑧Current time
Important!
- You can use only one pop up tool at a time. This means the calculator screen will not appear while the clock screen is on the display, etc.
Using the Clock Screen
The clock screen shows two clocks and the cities whose times are displayed on the clocks. It also shows whether daylight saving time (summer time) is set for either clock, and the date in the city of the main (currently selected) clock.
To display the clock screen
On the pop up tool screen, tap the ☐on.
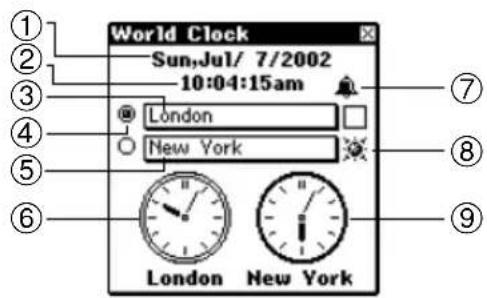
①Date in city of main clock
②Time in city of main clock
③Clock 1 city name
④Main clock
⑤Clock 2 city name
⑥Clock 1
⑦Alarm indicator
(Tap to display alarm setting screen on page 161.)
⑧Daylight saving time indicator
⑨Clock 2
- Holding the stylus on Clock 1 or Clock 2 causes the date and time for the clock to appear in the first two lines of the clock screen.
- You can close the clock screen by tapping

To make one of the clocks the main clock
-
While the clock screen is on the display, tap the button (☐) to the left of the city name whose clock you want to make the main clock.
-
In response to the confirmation message that appears, tap Set to change the main clock or Esc to close the dialog box without doing anything.
Important!
- The time being kept by the main clock affects all alarms and other date-sensitive data currently in PV Unit memory. If you set an alarm to sound at 11:00 a.m. while Tokyo time is being used for the main clock, changing to New York time, for example, will cause the alarm to sound at 11:00 a.m. New York time.
- Changing the main clock automatically resets the seconds count of the clock to 00.
To select a time zone city
- On the clock screen, tap the city name you want to change.
- Highlight the name of the city you want to select by tapping it or by using the cursor keys.
- Tap Set to register the selected city.
To switch between standard time and daylight saving time (DST)
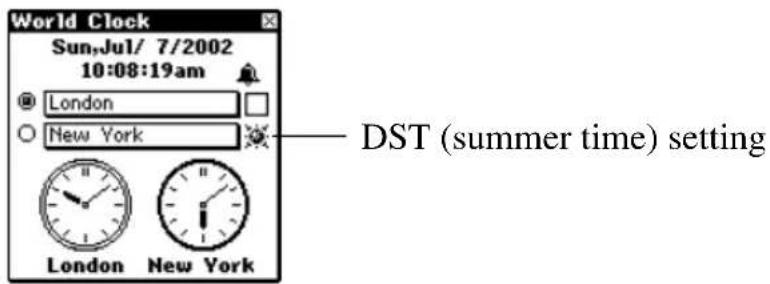
On the clock screen, tap on the DST (summer time) setting of one of the clocks to toggle it between DST on (✗) and DST off (no indicator).

Using the Calculator Screen
This screen provides you with a 12-digit calculator that can perform a variety of calculations.
To display the calculator
On the pop up tool screen, tap the 📄ron.
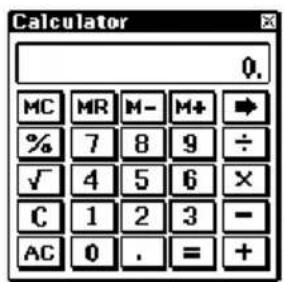
- You can also display the calculator in certain modes by tapping the button in the data input tool bar.
- You can close the calculator screen from the display by tapping ☒.
Calculator Keys
The following describes the functions of the calculator screen keys.
- Use the number keys to input values.
• MC clears calculator memory.
- MR recalls calculator memory contents.
- M– subtracts the currently displayed value from memory contents. Tapping M– in place of = at the end of a calculation subtracts its results from memory contents.
- M+ adds the currently displayed value to memory contents. Tapping M+ in place of = at the end of a calculation adds its results to memory contents.
- Tap +, -, ×, and ÷ to input the corresponding arithmetic operation.
- = executes the calculation and displays its results.
- AC clears the calculator (except the calculator memory).
- C clears the display without clearing calculator memory.
- Use for square root calculations.
- Use % for percent calculations.
- Tapping shifts the displayed value to the right, cutting off the rightmost digit.
- If you displayed the calculator by tapping the button in a data input tool bar, tapping 1234 copies the calculation result. Edit – Paste pastes the copied result at the current cursor location.
To perform calculations
| AC0. | ||
| 53+123-63= | 53+123-63= | 113. |
| 963·(23-56)= | 23-56×963= | -31'779. |
| (56·3-89)|5.2+63= | 56×3-89÷5.2 | |
| +63= | 78.1923076923 | |
| 1234567890·741852= | 1234567890×741852= | E 915.866658332 |
| C915.866658332 | ||
| AC0. | ||
| 3 · 5 = | 3 × 5 = | 8.6602540378 |
| 12+23= | 23++12= | K+ 35. |
| 45+23= | 45= | K+ 68. |
| 7-5.6= | 5.6- -7= | K- 1.4 |
| 2-5.6= | 2= | K- -3.6 |
| 2.3·12= | 12××2.3= | K· 27.6 |
| 4.5·12= | 4.5= | K· 54. |
| 45|9.6= | 9.6÷÷45= | K | 4.6875 |
| 78|9.6= | 78=K | | 8.125 |
| 12% of 1500 | 1500×12% | |
| Percentage of 660 against 880 | 660÷880% | |
| 15% add-on of 2500 | 2500×15%+ | |
| 25% discount of 3500 | 3500×25%- | |
| What will the selling price and profitbe when the purchasing price of anitem is 480 and the profitrate to the selling price is 25%? | 480+25%640. | |
| -160. | ||
| If you made80 last week and $100this week, what is the percentincrease? | 100-80% | 25. |
| 80·9=720 | MC80×9M+ | M 720. |
| -)50·6=300 | 50×6M- | M 300. |
| 20·3=60 | 20×3M+ | M 60. |
| 480 | MR M | 480. |
To perform constant calculations
- On the calculator screen, input the first value of the operation, tap an arithmetic operator key twice, and then input the second value of the operation.
• You can perform a constant calculation using +, -, ×, or ÷.
- The first value you input (the one to the left of the arithmetic operator) is the one that will be used as the constant.
- Tapping an arithmetic operator key twice causes the indicator K to appear on the display to indicate that a constant calculation is being performed.
- Tap = to display the result of the operation.
- Inputting 4 × × 2 = would produce a result of 8.
-
Tap = again to multiply the result by the constant.
-
Tapping = again with the example shown under step 2 would produce a result of 32 (8 · 4).
- Each subsequent tap of = multiplies the last result obtained by the constant. Continuing with the above example, tapping = would produce the following results: = 128(32 · 4), = 512(128 · 4), = 2048(512 · 4) , and so on.
To correct entries during calculations
- If you enter a wrong value, tap C to clear the value and then input the correct one.
- If you tap the wrong arithmetic key (+, -, ×, ÷), simply tap the correct arithmetic key before inputting anything else.
About calculation errors
An error indicator appears on the display and further calculation becomes impossible whenever an error occurs.

Any of the following conditions produces an error.
- Whenever the number of digits in the mantissa of an intermediate or final result exceeds 12
- Whenever the number of digits in the mantissa of a value in calculator memory exceeds 12 digits. In this case, the PV Unit automatically retains the last value stored that did not exceed 12 digits.
- Division by zero
- Attempting to calculate the square root of a negative value
To clear an error
Tap C to clear an error and continue with the same calculation from the point immediately before the error occurred.
To clear the entire calculation and start again, tap AC.

Next Appointment Screen
This screen shows a display of the current month, along with details about the next appointment scheduled from the current time and date, as kept by the main clock (if any).
To display the next appointment screen
On the pop up tool screen, tap the 📄 on.
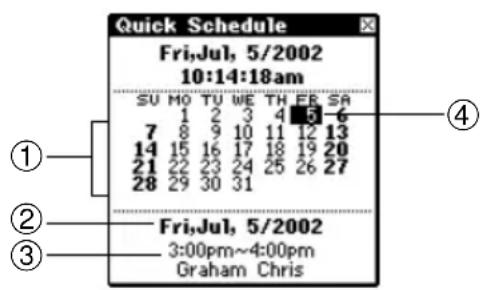
①Current month
②Date for which appointment is scheduled
③Next appointment details
④Next appointment
- The current month is determined in accordance with the time and date as kept by the main clock.
- The next appointment details area shows the next Schedule item or Reminder item that includes time data. It does not show any Schedule or Reminder items that do not include time data.
- The next appointment details area is blank when there is no future appointment scheduled.
- You can close the next appointment screen by tapping ☒.
Data communications capabilities let you transfer data between two CASIO PV Units, between a PV Unit and a BN-10/BN-20 Unit, or between a PV Unit and a BN-10A/BN-20A/BN-40A Unit. You can also receive data from a CASIO SF, CSF, or NX Series Unit, and communicate with a personal computer using PC sync for Windows.
- See the manual that comes with PC sync for Windows for details on connecting to a computer and setting up for communication.
- If you plan to synchronize with more than one computer and prefer to have a separate cable for each computer, it is up to you to purchase the SB-300 cables you need. Note that one SB-300 cable comes with your PV Unit.
- In order to perform serial data communication with a computer, you need to purchase a separately available SB-305 cable.

Specifying the Type of Cable You are Using
You can use either the USB cable that comes with your PV-S1600 Unit or a separately available SB-305 serial cable for data communication. Note, however, that before connecting, you need to perform the following procedure to specify the type of cable you will be using.
- On the Mode Menu, tap Menu Bar to display the menu bar, and then tap Option.
- On the screen that appears, tap Communication setup to display the cable type specification screen.
- Specify the type of cable you will be connecting by tapping the button in front of its name.
- Tap Yes.

Using the Cable
The PV Unit comes with a cable for data communication. Use the following procedure to connect the cable to the PV Unit.
To connect the cable to the PV Unit
-
Turn off PV Unit power.
-
Plug the cable into the cable connector at the bottom of the PV Unit as shown below.
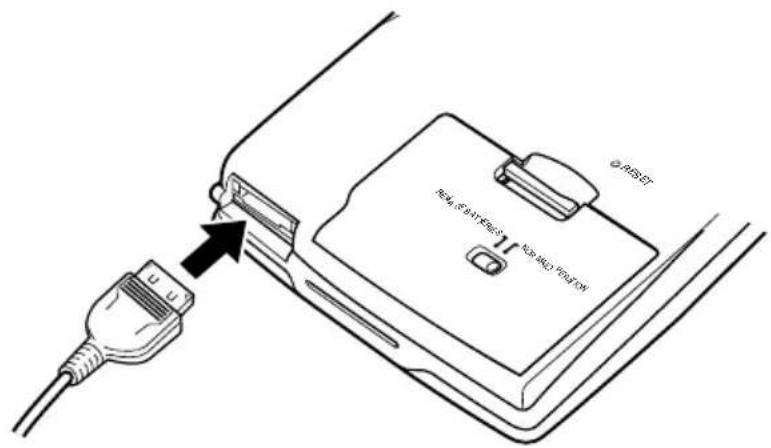
To disconnect the cable from the PV Unit
-
Turn off PV Unit power.
-
While pressing the release button indicated by (A) in the illustration below, disconnect the cable.
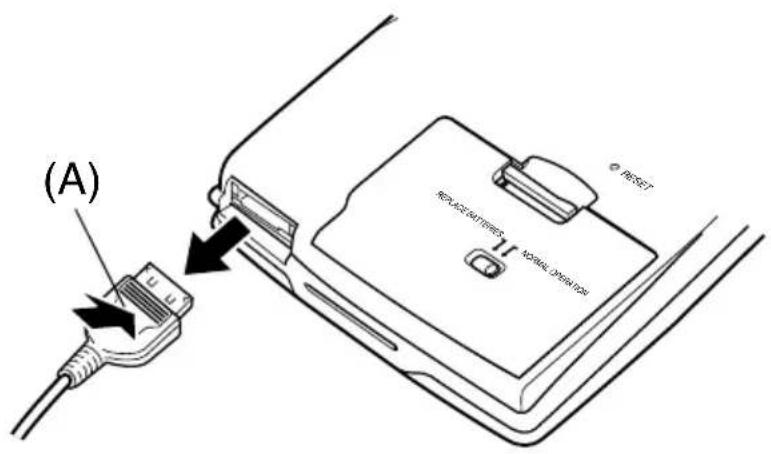

Data Communications Between Two PV Units
This section describes how to set up and communicate between two PV Units.
- You must purchase a separately available SB-305 serial cable, and SB-90 connector/cable set to connect two PV Units.
To connect two PV Units
- Make sure that the power of both units is turned off.
- Connect the cable to the cable connectors of each of the PV Units as described below.
- Connect the optional SB-305 serial cable to your PV-S1600.
-
Connect the cable that comes with the other PV Unit to the other PV Unit.
-
Use an optional SB-90 9-9 pin connector to connect the two cables to each other.
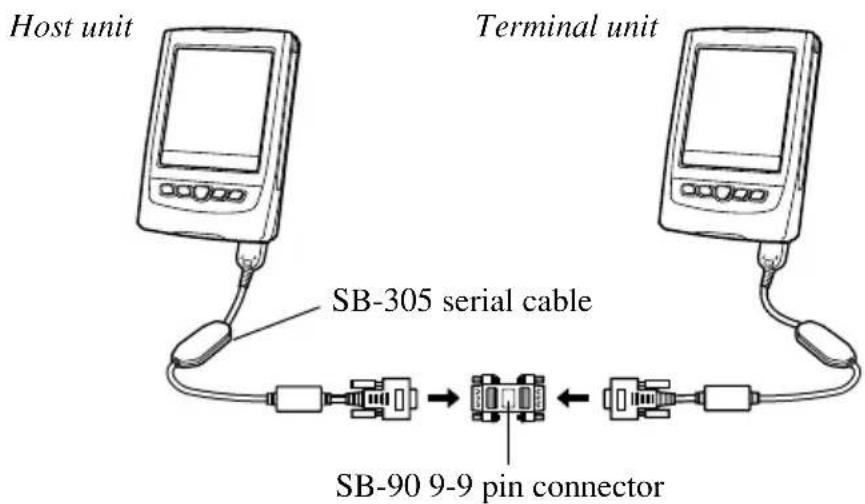
- All data communication settings must be made on one of the PV Units only. This unit is called the host unit, while the other unit is called the terminal unit.
To send data from the host unit to the terminal unit
- After connecting the two PV Units, turn on the host unit.
- Terminal unit power should still be off at this time.
- Display the list view in a mode whose data can be sent with this setup.
- This configuration supports transfer of Contacts (Business, Personal, Untitled 1-5), Memo (Untitled 1-5), Schedule, To Do, Reminder, Expense Manager, and Quick-Memo data.
- Tap Menu Bar to display the menu bar, and then tap System – Data communication.
- On the screen that appears, tap the button next to Pocket Viewer to specify the data communication configuration.
- Tap the button next to Send.
- Tap Set.
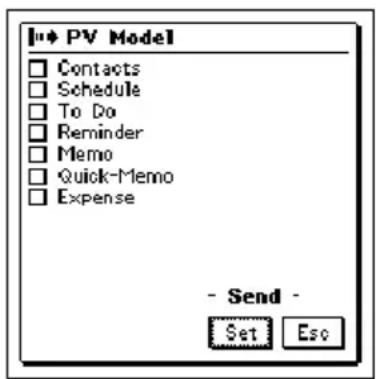
- Tap the check boxes to specify the data you want to send (checked) and the data you do not want to send (unchecked).
- After everything is the way you want it, tap Set.
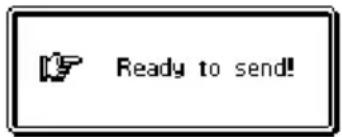
- Turn on the power of the terminal unit.
- Tap the Sync START icon to start the data transfer operation.
To receive data from the terminal unit on the host unit
- Perform steps 1 through 4 under “To send data from the host unit to the terminal unit”.
- On the screen that appears, tap the button next to Receive.
- Tap Set.
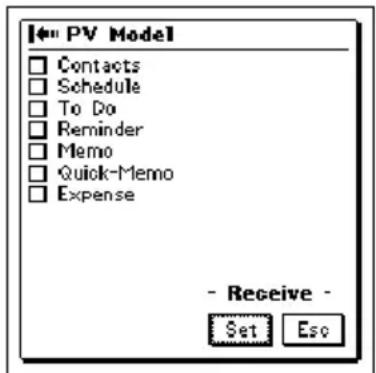
- Tap the check boxes to specify the data you want to receive (checked) and the data you do not want to receive (unchecked).
- After everything is the way you want it, tap Set.
- Turn on the power of the terminal unit.
- Tap the Sync START icon to start the data transfer operation.
Notes
- The above procedures can be used to send or receive all data in specific modes only. You cannot send or receive individual data items.
• Data communication can be interrupted at any time by pressing Esc. - If the secret memory area is accessed on a unit receiving data, the received data is stored in the secret memory area, regardless of the memory area the data is in on the sending unit.
- Transferring data from the PV-S1600 to a PV-100 or PV-200 causes all euro symbols to be replaced by spaces.
- The size of the PV-S1600 screen is 160 · 160 dots. Transferring PV-S1600 Quick-Memo data to a PV-100 or PV-200, which both have 98(V) · 124(H)-dot screens, causes the right side and bottom part of the Quick-Memo image to be cut off in order to fit the PV-100/PV-200 screen.

Data Communications Between a PV Unit and a BN Unit
This section describes how to set up and communicate between a PV Unit and a BN Unit (BN-10/BN-20 or BN-10A/BN-20A/BN-40A).
- You must purchase a separately available SB-305 serial cable, and SB-90 connector/cable set to connect a PV Unit to a BN Unit.
To connect a BN Unit to your PV Unit
- Make sure that the power of both units is turned off.
- Open the cover of the Mini Cradle port of the BN Unit, and connect its Mini Cradle to the port.
-
Connect the optional SB-305 serial cable to your PV-S1600.
-
Use the optional SB-90 9-9 pin connector to connect the SB-305 serial cable to the BN Unit's Mini Cradle.
Host unit (PV Unit)
Terminal unit (BN Unit)
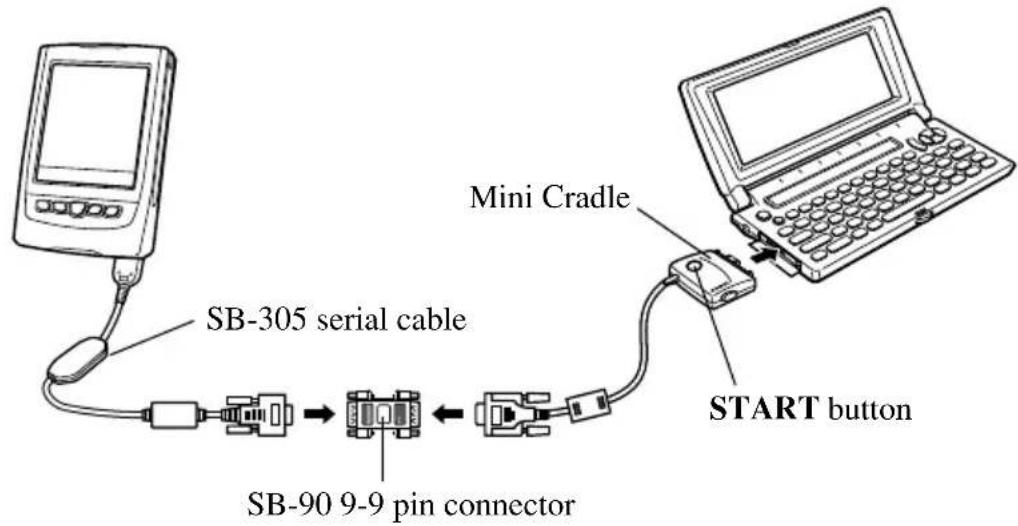
- All data communication settings must be made on the PV Unit, which is the host unit. The BN Unit is the terminal unit.
To send data from the PV Unit to the BN Unit
- After connecting the two units, turn on the PV Unit.
- BN Unit power should still be off at this time.
- Display the list view in a mode whose data can be sent with this setup.
- This configuration supports transfer of Contacts (Business, Personal), Memo, Schedule, To Do, and Reminder data.
- Calendar and Expense Manager data cannot be transferred.
- Contacts Untitled 1-5 data is transferred as Personal data.
- Memo Untitled 1-5 data is transferred as Memo data (no category).
-
Tap Menu Bar to display the menu bar, and then tap System – Data communication.
-
On the screen that appears, tap the button next to BUSINESS NAVIGATOR to specify the data communication configuration.
- Tap the button next to Send.
- Tap Set.
- Tap the check boxes to specify the data you want to send (checked) and the data you do not want to send (unchecked).
- After everything is the way you want it, tap Set.
- Turn on the power of the BN Unit and then press the START button on its cradle to start the data transfer operation.
- The following shows the relationship between data when sent from the PV Unit to a BN Unit.
| Mode | PV Unit | BN Unit |
| Contacts | Untitled 1-5 | PERSONAL• Check Contacts (1-5) as the data type to send this data. |
| Category names | Not transferred | |
| Item (field) names | Not transferred | |
| To Do | Category names | Not transferred |
| Due date | Due date | |
| Memo | Untitled 1-5 | MEMO• Check Memo (1-5) as the data type to send this data. |
| Category names | Not transferred | |
| Quick-Memo | No corresponding BN Mode | |
| Expense Manager | Not transferred. Use the data communication software that comes with the PV Unit to transfer this data. | |
To receive data from the BN Unit on the PV Unit
- Perform steps 1 through 4 under “To send data from the PV Unit to the BN Unit”.
- On the screen that appears, tap the button next to Receive.
- Tap Set.
- Tap the check boxes next to specify the data you want to receive (checked) and the data you do not want to receive (unchecked).
- After everything is the way you want it, tap Set.
- Turn on the power of the BN Unit and then press the START button on its cradle to start the data transfer operation.
Notes
- The above procedures can be used to send or receive all data in specific modes only. You cannot send or receive individual data items.
• Data communication can be interrupted at any time by tapping Esc. - If the secret memory area is accessed on a unit receiving data, the received data is stored in the secret memory area, regardless of the memory area the data is in on the sending unit.
- Transferring data from the PV-S1600 to the BN Unit causes all euro symbols to be replaced by spaces.
- The following shows the relationship between data when received by the PV Unit from a BN Unit.
| Mode | BN Unit | PV Unit |
| Contacts | PERSONAL | Personal |
| BUSINESS | Business | |
| Scheduler | SCHEDULE | Schedule |
| TO DO | To Do | |
| REMINDER | Reminder | |
| Memo | MEMO | Memo (Untitled 1) |
- The Company entry of the PV Unit is equivalent to the Employer entry of a BN Unit.

Receiving Data From an SF/CSF/NX Series Unit
This section describes how to set up and receive data from an SF/CSF/NX Series Unit. Note that you cannot send data from a PV Unit to an SF/CSF/NX Series Unit. In this configuration, you must set a number of communication parameters for correct operation.
- You must purchase a separately available SB-305 serial cable, and SB-90 connector/cable set to connect an SF/CSF/NX Series Unit to your PV Unit.
To connect an SF/CSF/NX Series Unit to your PV Unit
- Make sure that the power of both units is turned off.
- Connect the optional SB-305 serial cable to your PV-S1600.
- Open the cover of the data communications jack of the SF/CSF/NX Series Unit, and connect the optional SB-90 3-9 pin cable.
- Use the optional SB-90 9-9 pin connector to connect the two cables.
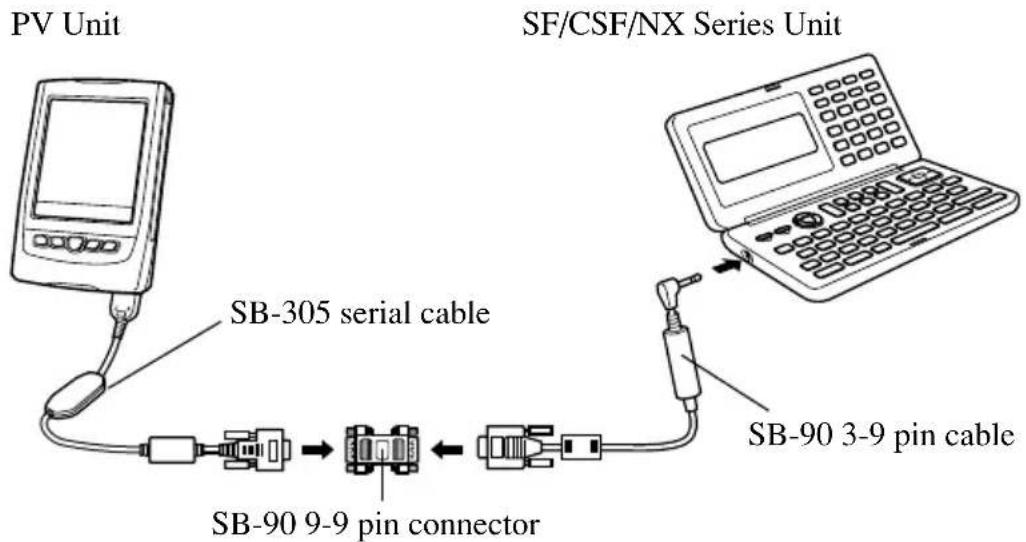
To make communication parameter settings
- After connecting the two units, turn on the PV Unit.
- Display the list view in a mode whose data can be received with this setup.
- This configuration supports receipt of Contacts, Memo, Schedule and To Do data.
-
REMINDER 1, REMINDER 2, EXPENSE, CALENDAR, SKETCH, and FREE FILE data cannot be received.
-
On the screen that appears, tap Menu Bar to display the menu bar, and then tap System – Data communication.
-
Tap the button next to SF/CSF/NX.
-
Press the button next to Set up parameters and then tap Set.
-
On the screen that appears, tap the buttons under Parity, Bit length, and BPS to make the settings you want.
- Note that the settings you make here must match those of the connected SF/CSF/NX Series Unit. Otherwise, proper data communication will be impossible.
- After making all the settings you want, press Set to register them, and return to the screen in step 4, above.
- Now you can continue with the following data receive procedure.
To receive data from an SF/CSF/NX Series Unit
- After connecting the two units, turn on the PV Unit.
- Display the list view in a mode whose data can be received with this setup.
- This configuration supports receipt of Contacts, Memo, Schedule and To Do data.
-
REMINDER 1, REMINDER 2, EXPENSE, CALENDAR, SKETCH, and FREE FILE data cannot be received.
-
Tap Menu Bar to display the menu bar, and then tap System – Data communication.
-
On the screen that appears, tap the button next to SF/CSF/NX.
- At this time you could perform steps 5 through 7 under “To make communication parameter settings” above to make communication set up parameter settings if you want.
- Tap Set.
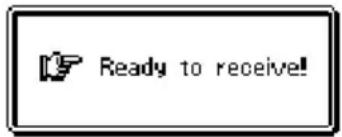
- Perform the required operations on the SF/CSF/NX Series Unit to send data. See the manual that comes with the unit you are using for details.
Notes
• Data communication can be interrupted at any time by tapping Esc.
- If the secret memory area of the PV Unit is accessed when you receive data, the data is stored in the secret memory area, regardless of the memory area where it was stored in the sending unit.
- Data cannot be received from the following CASIO units: SF-A Series, SF-5580, 5780, 5980, 5580E, 5780E, 5980E, 5590SY, 5790SY, 5990SY, 5590SYE, 5790SYE, 5990SYE, 6500SY, 6700SY, 6900SY, 7100SY, 7200SY.
- REMINDER1, REMINDER2, EXPENSE, CALENDAR, and SPREADSHEET data cannot be received from an SF, CSF, or NX Unit.
- NX Unit PERSONAL, FAMILY, TIMETABLE, and GOLF mode data cannot be received.
- Data from SKETCH, FREE FILE, and other SF, CSF, and NX Unit modes for which there is no equivalent PV modes cannot be received.
- Data from ILLUSTRATION, P.O. BOX, TELEX NUMBER, and other SF, CSF, and NX Unit entries for which there is no equivalent PV entries cannot be received.
- All data is received in monotone, without any color attributes.
- In the case of SF Unit data that is mark protected against deletion, the mark protection is ignored when received by the PV Unit.
File Transfer Manager is software that makes it easy to install and uninstall PV Applications, to delete PV Applications data, to update your operating system, and to transfer data between your PV Unit and a personal computer.
- The following shows the maximum number of items you can have stored in your PV Unit at one time.
| Type of Data Item Maximum | Number Allowed |
| PV Applications Programs 64 | |
| PV Applications Data Files 64 |

PV Applications
A “PV Application” is a program you can download from the CASIO Website (http://world.casio.com/download/pv/) or from other Websites to your computer, and then install on your PV Unit. You can delete PV Applications when you no longer need them.
- The CD-ROM that comes bundled with your PV Unit contains the PV Applications listed below. You can install these PV Applications as required by you.
- Travel Phrase Guide
• Bonus Add-in Software for PV
- For information on how to use a particular PV Application, see the manual that comes with it.
Obtaining PV Applications
PV Applications can be downloaded from the CASIO Website (http://world.casio.com/download/pv/) or from other Websites on the Internet.
Installing a PV Application to your PV Unit
You install a PV Application on your PV Unit by downloading it from your computer. Use the following procedure to download a PV Application from your computer to your PV Unit.
Important!
- You must have File Transfer Manager installed on your computer in order to download a PV Application from your computer to your PV Unit.
To download a PV Application to your PV Unit
- Use the cable to connect the PV Unit to your computer.
- See the manual that comes with PC sync for Windows for details on connecting to a computer and setting up for communication.
- On the PV Unit, display the Mode Menu or the Action Menu.
- Tap Menu Bar to display the menu bar, and then tap Option.
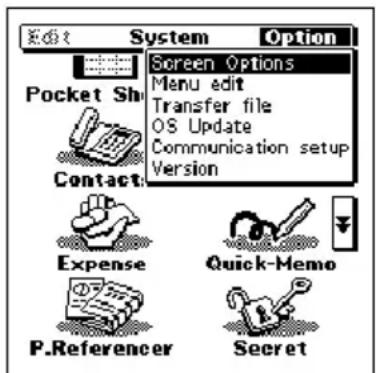
- Tap Transfer file to put the PV Unit into receive standby.
-
On your computer, run the File Transfer Manager software, and download the PV Application from your computer to your PV Unit.
-
The Mode Menu or the Action Menu screen reappears after download is complete.
- The icon of the PV Application you downloaded is shown in the Mode Menu.
- You can interrupt the download at any time by tapping Esc on the PV Unit.
- To start up the newly downloaded PV Application, tap its icon on the Mode Menu.
- To delete a PV Application from your PV Unit, perform the same PV Unit steps of the above procedure. See the File Transfer Manager documentation for information about the operations you need to perform on your computer.
Deleting PV Application Data Files
Use File Transfer Manager to delete data files created by a PV Application. For details, see the File Transfer Manager documentation.
Important!
- Note that this procedure deletes all of the data for the selected PV Application regardless of whether the data is in the secret memory area or the open memory area.
- Either of the following can happen with a PV Application when there are data files for 64 other PV Applications already in memory.
- Some PV Applications display an error message when you try to perform a data save operation.
- Some PV Applications that automatically create files when they are launched may refuse to start up.
When either of the above happens, delete data you no longer need to make room for the data of the PV Application you are trying to use. See the documentation for the PV Application you are using for full details.
Updating Your PV Unit Operating System
Installing certain PV Applications may require you to update your PV Unit operating system at some time in the future. See the user documentation that comes with File Transfer Manager for details about performing the OS update operation.

Transferring Files
You can use File Transfer Manager to transfer text files, Excel files, and other types of files to your PV Unit and carry them with you wherever you go. For details about file transfer, see the File Transfer Manager documentation.
Note, however, that you cannot display the contents of such files on your PV Unit.
The PV Unit comes with two built-in games for your enjoyment. The games are named Game-1 and Game-2.

Entering the Game Mode and Selecting a Game
- Tap the Menu icon to display the Mode Menu.
- Tap the ▲ and ▼ buttons on the right side of the menu screen to change menu pages and display the Game icon. Next, tap Game.
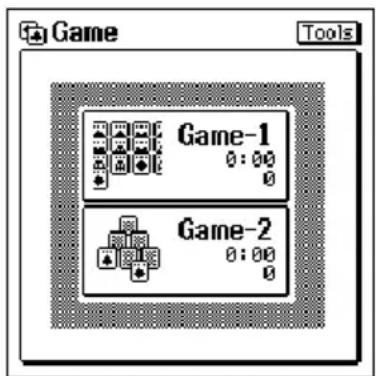
Game selection screen
- Alternate the cards in the piles by piling cards in descending order, alternating black and red.
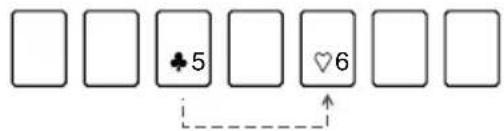
Place the black 5 on top of the red 6.
- Tap the next face down card in a pile to turn it up when you move the face up cards over to a different pile.
- You can move an entire pile of cards onto another pile, as long as the first (top) card of the pile being moved is one less and the opposite color of the last (bottom) card of the pile being moved to.
- If a pile location becomes empty when you move a pile, you can place any king or pile that starts with a king into the empty location.
• After making all the plays that are available in the piles, tap the deck to turn up every third card, and place the card that is turned up onto the piles in accordance with the rules described above, if possible.
- The symbol 🔒 appears in place of the deck when there are no more cards in the deck. Tap the deck again to start turning up the deck from the beginning again. 🔒 means the game is over.
- Any time an ace turns up, place it into one of the stacks at the side of the screen. There are four stacks, one each for hearts, clubs, diamonds, and spades.
- Once you start a stack with an ace, continue stacking cards in sequence: A, 2, 3, 4 .... J, O, K.
- The game is over when all of the cards into their respective stacks (you win) or when there are no more plays left before all the cards are stacked (you lose).
To move a card or stack of cards
Drag the cards to move them on the display.
Game Levels
Beginner: Tapping a card causes the applicable destination to become highlighted, showing you where it should go.
Intermediate: No indication of where cards should go
Advanced: Undo up to two steps only.

Game-2
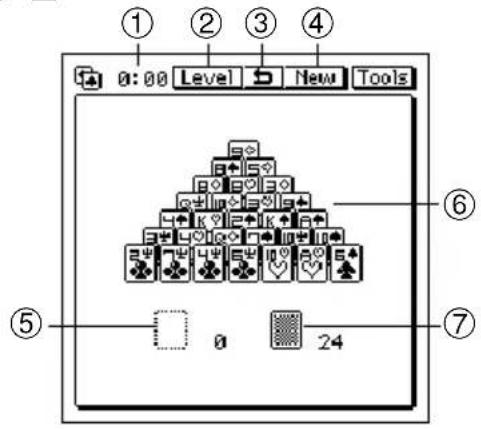
①Time
②Level button
③Undo button
④New button
⑤Up deck
⑥Pile
⑦Down deck
How to play
- Remove any two cards whose sum equals 13 from the bottom of the pile. A card at the bottom of the pile is one that does not have any cards on top of it.
- A king equals 13 by itself, and can be removed without removing any other card with it.
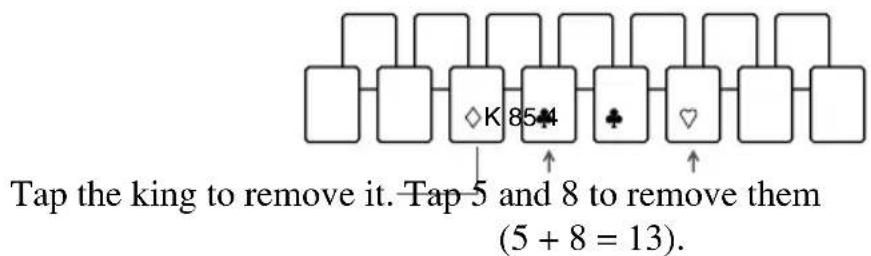
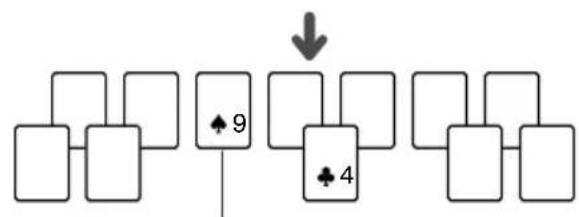
flowchart
graph TD
    A[" "] --> B[" "]
    B --> C[" "]
    C --> D["♠ 9"]
    D --> E[" "]
    E --> F["♣ 4"]
    F --> G[" "]
    G --> H[" "]
    H --> I[" "]
    I --> J[" "]
There are no cards on top of the 9, so it can be removed with the 4 to make 13.
- After making all the plays that are available at the bottom of the pile, tap the down deck to turn up the next card on top of the down deck. The card that is turned up can be tapped in combination with a card at the bottom of the pile to equal 13.
- After making all the plays that are available at the bottom of the pile and with the upturned card on the down deck, tap the upturned card and then tap on the up deck area to move the upturned card there. Next, tap the down deck to turn up the next card. Now you have three places with cards you can combine to total 13: the bottom of the pile, the upturned card on top of the down deck, and the card on the up deck.
- Repeat the above steps until you move the last card from the down deck to the up deck. When you do, there will be either a ☐ or ✉n place of the down deck. ☐ means you can continue playing, so tap the ☐ to move the cards from the up deck back to the down deck. ✉ means the game is over.
- The game is over when all of the cards are gone (you win) or when there are no more plays left before all the cards are gone (you lose).
Game Levels
Beginner: Tapping a card causes the another card that equals 13 in combination with the card you tap to become highlighted. This level also lets you turn the up deck over three times (so it becomes a new down deck) after you run out of cards in the down deck.
Advanced: No indication of which cards equal 13. At this level, get only one pass through the deck. You cannot turn the up deck over.

General Game Procedures
The following procedures can be used for either Game-1 or Game-2.
To change the level
Tap Level to open a menu of levels, and tap the one you want.
To undo the last play
Tapping 📁 does the last play. You can undo only the latest play you made.
This section describes general operations and procedures.

Scroll Bars
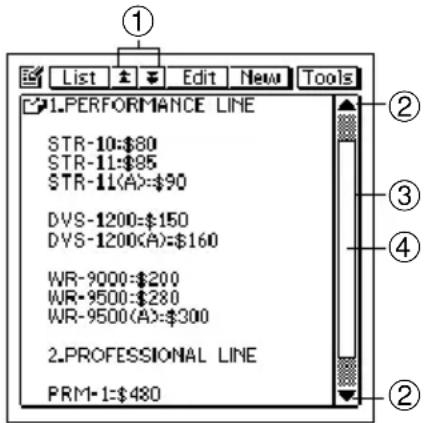
①Page scroll buttons
②Line scroll buttons
③Scroll bar
④Scroll handle
| Item | Description |
 | Tap to scroll up and down, a page at a time. (Tapping these buttons while the Weekly Scheduler screen is on the display, for example, scrolls a week at a time.)These buttons are dimmed if there is no page of data to scroll to. |
 | Tap to scroll up and down, a line at a time.These buttons are dimmed if there is no line of data to scroll to. |
| [HBW2] | Drag up and down to scroll the screen.The size of the scroll button changes in accordance with the amount of data above and below the current screen. If there is no data above or below, the scroll buttons are dimmed. |
| Scroll bar | Tap the gray area to jump to the next page above or below the current page. |
- The PV Unit scroll bars operate similarly to the scroll bars of many popular personal computer applications.
- The scroll handle location indicates approximately how much data is above and below the data on the screen. If the scroll handle is located in the middle of the scroll bar, for example, it means that there is about the same amount of data above and below.

Cursor Key Scrolling
When you are using the cursor keys to recall items on a list screen, the screen scrolls automatically after you move the highlighting to the top or bottom of the display. In the case of the data screen, a cursor key up or down scroll operation scrolls between data items.

Menu Bar
The PV Unit's menu bar gives you access to a number of useful commands for data editing and other operations.
To execute a menu bar command
- Tap Menu Bar at the beneath of the PV Unit screen to display the menu bar.
- Tap the name of the menu that contains the command you want to execute.
- Tap the command you want to execute, or use the ▲ and ▼ cursor keys to move the highlighting to the command you want, and then press the center key to execute the command.

Data Input and Editing
Use the procedures in this section to input and edit data. These procedures apply for all input and editing screens.
Moving Between Entries (Fields)
When inputting and editing data, you can move between entries (fields) either by tapping on the entry you want with the stylus, or by tapping the on-screen NEXT button to advance to the next sequential entry. Note that the NEXT button may not appear on some input or editing screen.
On-screen Keyboards
This section describes the keyboards that appear when data input is required.
Note
- To close a keyboard screen without registering the data you input with it, tap Esc.
Text Keyboard
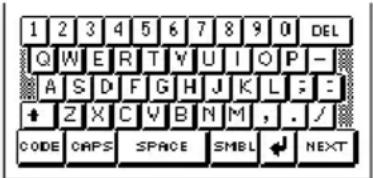
| Key Description | |
 | Deletes the character at the current cursor location. |
 | Shifts letter keys between upper-case and lower-case for the input of one character only. |
| [PHY4] | Shifts to the Code Keyboard. |
 | Shift-locks letter keys between upper-case and lower-case. |
 | Shifts to the Symbol Keyboard. |
| [TYDS] | Inputs a carriage return (newline) operation. |
 | Advances to the next entry (field). |
Symbol Keyboard
![8 % ∫ * + - × ÷ = ( ) ( ) < > [ ] / \ ← → ! i ? . , ? " ; : ~ _ $ ¥ F ≡ 9 ^ # Ω £ × φ ! ! + 2 9 1/2 1/4 3/4 CODE SPACE NEXT](/content/2026/05/835219/images/378194395e7748c01504e2def16c7439ab8163971f0de0cc6debda3b7aa22a63.jpg)
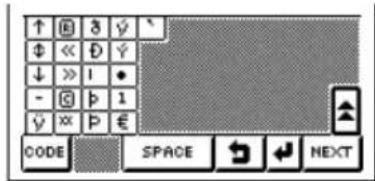
| Key | Description |
 | Displays other symbols. |
 | Returns to the Text Keyboard. |
Code Keyboard
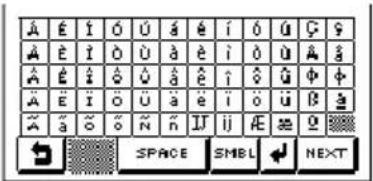
Date Keyboard
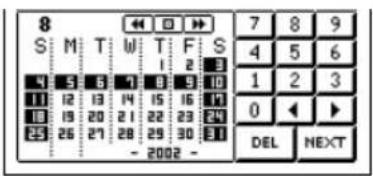
- Specify a date by tapping it in the calendar, or by tapping the number keys.
| Key | Description |
 | Scrolls the month shown on the input screen. |
 | Jumps to the month that contains today’s date as kept by the main clock. |
 | Moves the input point between the month, day, and year. |
 | Deletes the character at the current cursor location. |
 | Advances to the next field. |
Calculator Keyboard
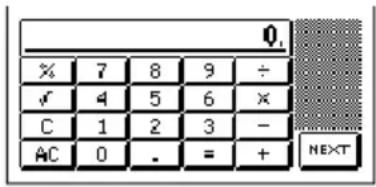
- See “Using the Calculator Screen” on page 117 for details on mathematical operations.
Time Setting Screens
There are two basic time setting screens that you can switch between while inputting time data: a dial type screen and a time bar type screen.
The dial type screen is best for setting a single time, while the bar type screen lets you specify a time period (start time and end time) quickly and easily.
Dial Type Time Setting Screens
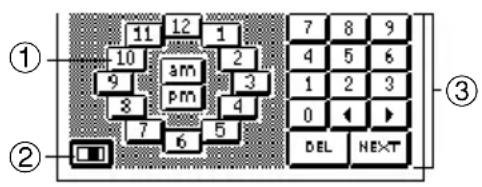
① Hour input dial
②Time bar screen button
③Keypad
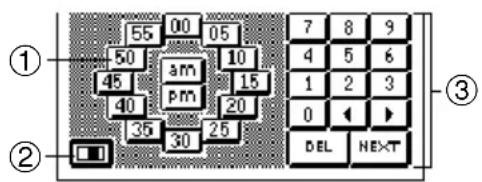
①Minute input dial
②Time bar screen button
③Keypad
- The hour input dial appears when the cursor is located within hour digits, while the minute input dial appears when the cursor is within minutes digits.
-
Specify a time by tapping the hour or minutes in the input dial. You can also input individual digits on the keypad.
-
The time format you should use for input should match the format of the system setting you selected under “Setting the Date, Time, Calendar, and Keyboard Formats” on page 162.
- If you are using the 12-hour time format, be sure to tap the am or pm button to specify “am” or “pm”.
| Key | Description |
| Dial | Tap on a button to specify the hour or minutes. |
 | Changes to the time bar type time setting screen. |
 | Tap to specify “am” or “pm” for a 12-hour format time. |
 | Deletes the character at the current cursor location. |
 | Advances to the next field. |
Bar Type Time Setting Screen
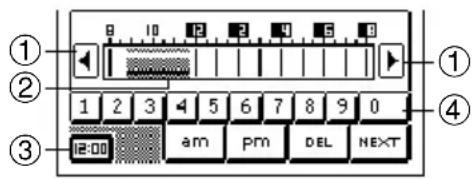
①Scroll buttons
②Selected time period
③Dial type screen button
④Number buttons
- Specify a time period by dragging the stylus across the time period you want. You can change the time period in 30-minute units using this method.
- Tapping the time bar inputs corresponding time at the current cursor position (either in the start time or end time area).
- Tap the scroll buttons to scroll the available hours left and right.
-
The time format you should use for input should match the format of the system setting you selected under “Setting the Date, Time, Calendar, and Keyboard Formats” on page 162.
-
Use the number buttons to input individual digits.
- If you are using the 12-hour time format, be sure to tap the am or pm button to specify “am” or “pm”.
| Key | Description |
 | Changes to the dial type time setting screen. |
| Tap to specify “am” or “pm” for a 12-hour format time. | |
 | Deletes the character at the current cursor location. |
 | Advances to the next field. |
Selecting a Range of Text by Dragging
You can select a range of text on the screen with a technique called dragging.
- Display the range of text you want to select.
- Press the stylus against the screen at the beginning of the range of text you want to select.
- Keeping the stylus against the screen, drag it to the end of the range you want to select.
- If the end of the text is not on the screen, drag down to the bottom of the display and the screen will start to scroll.
- If you make a mistake and drag too far, keep the stylus on the screen as you move back. This will reduce the size of the selected range of text.
- Remove the stylus from the screen.
- The selected text is highlighted on the screen.
- To deselect (unhighlight) text, tap anywhere outside of the highlighted area.
Cut, Copy, Paste
The cut, copy, and paste functions of the PV Unit operate just as they do on a personal computer.
To cut or copy data
- Drag the stylus across characters on the display that you want to cut or copy.
- The text you drag across will become highlighted on the display.
- Tap Menu Bar to display the menu bar, and then tap Edit – Cut or Edit – Copy.
- Edit – Cut deletes the selected text and places it onto a clipboard.
- Edit – Copy puts a copy of the text onto the clipboard, while leaving the original where it is.
To paste data at a location
-
After cutting or copying data, tap the location on an input or editing screen where you want to paste the data.
-
Tap Menu Bar to display the menu bar, and then tap Edit – Paste.
- The data on the clipboard is inserted at the current input position on the screen.
To paste data and replace existing data
-
After cutting or copying data, select the text that you want to replace with the data on the clipboard by dragging the stylus across it.
-
Tap Menu Bar to display the menu bar, and then tap Edit – Paste.
- The data on the clipboard replaces the selected data on the screen.

Initial Default Dates for new items
When you create a new Scheduler or Expense Manager item, the PV Unit automatically assigns dates to the required date fields in accordance with the rules described below. You can leave an initial default date as it is or change it to another date, if you want.
Scheduler
- Whenever you create a new Schedule item or To Do item, the date that was selected (flashing) on the screen when you tapped the New button is automatically input as the item date.
- In the case of a multiple-date Schedule item, or a Reminder item, the date that was selected (flashing) on the screen when you tapped the New button is automatically input as both the start date and end date.
Expense Manager
- Whenever you create a new Expense Manager transaction, the date that was displayed in the date jump button when you tapped the New button is automatically input as the item date.

Closing a Screen
You can always close a screen by tapping the Esc button.
In addition, some screens have a close button (☒). To close such a screen, simply tap the close button with the stylus.

Using the Quick Find Feature
The Quick Find feature automatically remembers a list of words you have recently input, and displays a list of candidates when it senses you are inputting one of the words again. You can tap a word in the list of candidates to input it, without having to type all the characters.
- The Quick Find feature is enabled when inputting Schedule, To Do, or Reminder description text.
- Quick Find memory can hold approximately 30 words, when all are 32 characters long. The number of words that can be stored is greater when each word contains fewer characters.
- Quick Find memory comes with 30 default terms. These default terms are restored into Quick Find memory whenever you reset the PV Unit (page 170).
- When memory is full, oldest words are deleted automatically as new words are added to the memory.
To input a word with the Quick Find feature
- As you are typing in text in an input screen, the Quick Find input list appears after you input two characters, if there are words in Quick Find memory that start with the characters you input.
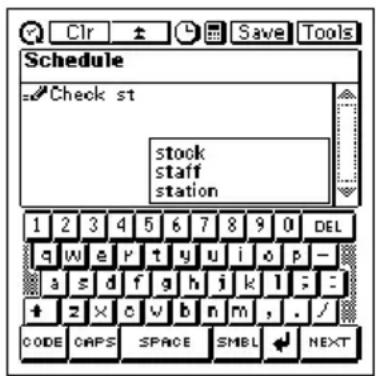
- Tap on one of the words in the Quick Find list to complete your input, or continue typing in text on the keyboard.
- Tapping a word inserts the remaining letters of the word you tap in the Quick Find list.
- If you type in more letters, the Quick Find list contents change accordingly.

Editing Data Items
Use the following procedure to edit data items. This general procedure applies in all modes.
- Select the data item you want to edit.
- You can select an item by displaying its data screen, or by tapping the item on a list screen, calendar, etc.
- Tap Menu Bar to display the menu bar, and then tap Edit – Item edit to display the data editing screen.
- Make any changes in the data you want.
- After you are finished, tap the Save button to save the new data.

Creating a Copy of a Data Item
You can use the following procedure to create a copy of a data item in all modes.
- Select the data item you want to copy.
- You can select an item by displaying its data screen, or by tapping the item on a list screen, calendar, etc.
- Tap Menu Bar to display the menu bar, and then tap Edit – Item copy to display a new data input screen that contains the data of the item you selected in step 1.
- Make any changes in the data you want.
- After you are finished, tap the Save button to save the copied data as a new data item.

Deleting Data
The following describes the general procedure for deleting data.
- Enter the mode that contains the data you want to delete.
- If you want to delete a particular data item, select the item.
- Tap Menu Bar to display the menu bar, and then tap Edit – Delete to display the data delete screen.
- Note that the contents of the data delete screen differ from mode to mode.
-
On the data delete screen, tap the delete operation you want to perform.
-
See the “Delete Operations Table” below for details on available delete operations in each mode.
-
Some modes allow delete operation that delete data within a range of dates. Selecting such an option displays a screen for input of a start date and end date. Specify the dates you want and then tap the Exe button before advancing to the next step.
-
On the confirmation message that appears, tap Yes to perform the delete operation you selected or No to close the dialog box without doing anything.
Delete Operations Table
| Delete Operation | Deletes |
| Single data item | Data item that is selected when Edit – Delete is tapped |
| Schedule data items | All Schedule data |
| Done data items | All done To Do data items |
| To Do data items | All To Do data |
| Reminder data items | All Reminder data |
| Specified data items | All Scheduler Mode data up to a specific date. Tapping this option displays a screen that you must use to specify the date up to which you want to delete Scheduler Mode data. |
| All Scheduler data items | All Scheduler data |
| All data items | All data items in the mode you are in when you tap Edit – Delete |
| Category data items | All data items in the selected category when Edit – Delete is tapped |

Searching for Data
You can use either initial character search or all search to look for specific data in the Scheduler (Schedule, To Do, Reminder), Contacts, and Memo Modes. Note that both search operations check the data only in specific entries (fields) of each data item.
The following table shows which entries (fields) are checked in each mode for each type of search.
| Mode | Fields Checked | |
| Initial Character Search | All Search | |
| Schedule | Description | Description |
| To Do | Description | Description |
| Reminder | Description | Description |
| Contacts - Personal | Name | All |
| Contacts - Business | Company | All |
| Contacts - Untitled | Free 1 | All |
| Contacts - All | Name (Free 1) | All |
| Memo | Memo contents | Memo contents |
Initial Character Search
This search method checks the initial characters of a specific field in each mode to see if any items match characters you specify.
All Search
With all search, the PV Unit looks for any occurrences of the text you specify, regardless of its location in the searched field.
To perform a search
- Enter the mode whose data you want to search.
- If the mode you are in uses categories, select the category whose data you want to search.
- Note that a search checks the data only in the category you are in.
- Tap Menu Bar to display the menu bar, and then tap Edit – Search.
- On the screen that appears, tap Initial to specify initial character search or All to specify all search.
- Input up to 12 search characters.
- Tap Exe to start the search.
- Searches are not case-sensitive. This means that upper-case and lower-case letters are not taken into consideration.
Search Results
A search operation produces a list screen of all items that match the search characters you specify.
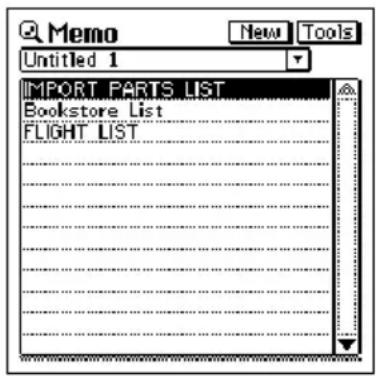
- To view the data screen of an item, tap the item to highlight it and then tap it again.
- When you are through using the data screen, tap Esc to close it.

Changing the Display Font
You can select one of two different display fonts for list and data screens in the Scheduler, Contacts, Memo, and Expense Manager Modes.
- Display the list screen or data screen in the mode whose display font you want to change.
- The font you select is applied in the current mode only. You can make separate settings for each mode.
- Tap Menu Bar to display the menu bar, and then tap Option – Font.
- On the screen that appears, tap the button next to the font you want to select.
- Tap Yes.

Program Version Information
Use the following procedure to display version information when you need it. The following is a list of the items for which version information is available.
• Built-in application version
- Messages, fonts, graphic data
- PV Applications
- Libraries linked to built-in applications and PV Applications
- Operating system
- System library
To display version information
- On the Mode Menu, tap Menu Bar to display the menu bar, and then tap Option.
- On the screen that appears, tap Version to display the version list screen.
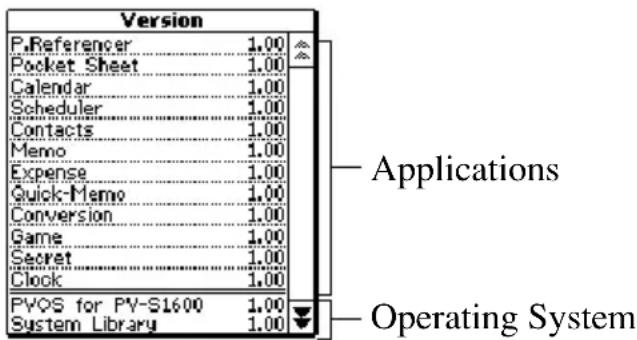
- Tap an item in the list to display its full data.
- Tap OK to return to the Mode Menu screen.
The System menu provides you with a number of items that you can use to set up the unit to suit your particular needs.
Note that the System menu is available on the menu bar while the Mode Menu is on the display.

Setting the Date and Time
- Tap Menu Bar to display the menu bar, and then tap System – Set date/time.
- You can also display the date/time setting screen by tapping the clock on the pop up tool screen (page 115).
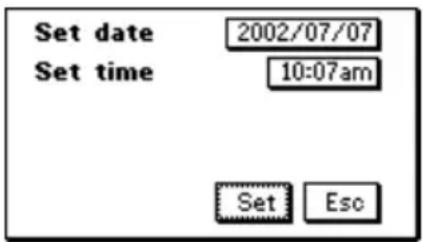
- Tap the date next to Set date. This causes a date keyboard to appear.
- Use the date keyboard to input the date you want to set, and then tap NEXT.
- You can specify a date within the range of January 1, 1901 to December 31, 2099.
- After setting the date, tap the time next to Set time. This causes a time keyboard to appear.
- Use the time keyboard to input the time you want to set.
- Tap Set to register your settings.

Turning Sound On and Off
- Tap Menu Bar to display the menu bar, and then tap System – Sound.
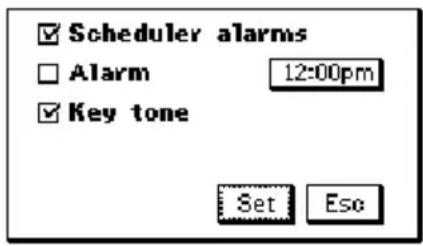
-
Tap a check box to toggle the corresponding item's sound on (checked) and off (unchecked).
-
Scheduler alarms turns all Scheduler Mode alarms on and off.
- Alarm turns the daily alarm on and off.
• Key tone turns the key input confirmation tone on and off. - See “Setting a Daily Alarm Time” for details about setting the alarm time.
- Tap Set to register your settings.

Setting a Daily Alarm Time
- While the sound on/off setting screen is on the display in the above procedure, tap on the time to the right of the Alarm item.
- You can also display the alarm setting screen by tapping the alarm indicator on the pop up tool screen (page 115) or the clock screen (page 116).
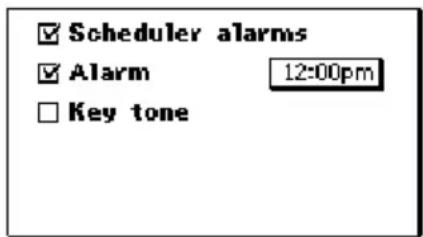
-
Input the time you want to set, and then tap NEXT.
-
While the Daily Alarm is turned on, a tone sounds for about 20 seconds at the preset time each day.
- You can stop a sounding alarm by tapping anywhere on the screen.

Setting the Date, Time, Calendar, and Keyboard Formats
- Tap Menu Bar to display the menu bar, and then tap System – Format.
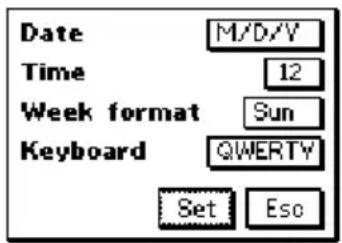
- Tap the date format next to Date.
• Each tap of the date format changes it in the cycle: M/D/Y → D/M/Y → Y/M/D → M/D/Y, etc.
- After setting the date format, tap the time format next to Time.
• Each tap of the time format toggles it between 12 and 24.
- After setting the time format, tap the day of the week next to Week format.
• Each tap of the day of the week toggles it between Sun and Mon.
- After setting the calendar format, tap the keyboard format next to Keyboard.
• Each tap of the keyboard format changes it in the cycle: QWERTY → AZERTY → QWERTZ → QWERTY, etc.
- Tap Set to register your settings.

Setting the System Language
- Tap Menu Bar to display the menu bar, and then tap System – Language.
- On the screen that appears, tap the button next to the language you want to select as the system language.
- Tap Set to register your setting.
- All on-screen text messages appear in the language you set as the system language.
Note
- The system language you set also affects the keyboard format (page 169) and the code keyboard contents (page 146).

Adjusting Display Contrast
- Tap Menu Bar to display the menu bar, and then tap System – Contrast.
- On the screen that appears, tap ◀ to make the figures on the screen lighter, or ▶ to make them darker.
- To return to the initial default contrast setting, tap Initial.
- After the setting is the way you want it, tap OK.

Calibrating the Touch Screen
Use the following procedure to calibrate the touch screen after initializing the unit, or if you feel that the function performed when your tap the screen does not match the button or command you tapped.
- Tap Menu Bar to display the menu bar, and then tap System – Touch Panel Alignment.
- Tap the center of each of the four cross marks as they appear on the screen.

Checking Memory Capacity
- Tap Menu Bar to display the menu bar, and then tap System – Capacity.
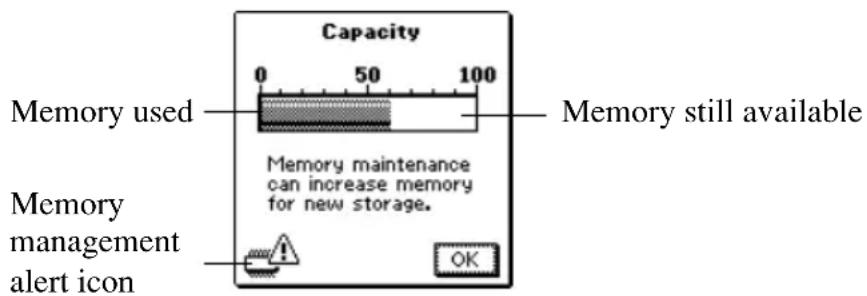
- We suggest that you perform memory management whenever appears.

- Tap OK to clear the memory capacity screen.

Memory Management
The memory of your PV Unit is designed to make your normal data input and recall operations as quick and efficient as possible. After repeated storage and deletion of data, however, you may find that you are unable to store new data, even after you have deleted some data from memory. When this happens, you need to perform the following “memory management” procedure, which cleans up and rearranges unused memory to make it available for storage of more data.
Note
- When you need to perform memory management depends entirely on how often you delete data from memory and store new data. The more you delete and store, the sooner you will need to perform the memory management procedure.
To perform memory management
-
Tap Menu Bar to display the menu bar, and then tap System – Memory management.
-
In response to the message that appears, tap Yes to start memory management or No to close the dialog box without doing anything.
- The message shown below appears after you tap Yes to start memory management.
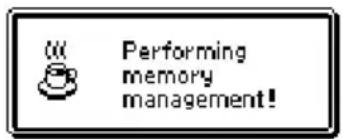
- You can tap Esc at any time to interrupt the memory management procedure.
This section contains technical information about the PV Unit.

Date Formats
The following describes the date formats that can be set for the system (page 162).
| Format | Description |
| M/D/Y | Month/Day/Year. Example: Jan/31/2003 |
| D/M/Y | Day/Month/Year. Example: 31/Jan/2003 |
| Y/M/D | Year/Month/Day. Example: 2003/1/31 |

Time Formats
The following describes the time formats that can be set for the system (page 162).
| Format | Description |
| 12-hour | Represents time in two blocks, from midnight to 11:59am, and from noon to 11:59pm. |
| 24-hour | Represents time as a single block, from 0:00 to 23:59. This format is often referred to as “military time.” |

Tool Bars
The PV Unit uses standard tool bars for data input and display. The following shows typical examples of these tool bars, and describes the items that can appear in each.
Data Input Tool Bar
Mode icon

| Button | Description |
| Mode icon | Indicates the mode you are currently in. |
 | Clears all characters in the entry (field) where the cursor is located. In the Contacts Mode, pressing this button clears the data from all the input fields for the data item (record) you are inputting. |
 | Pastes the current date and time as being kept by the main clock at the current cursor location. |
 | Displays a calculator. |
 | Advances to the next screen. |
 | Returns to the previous screen. |
 | Saves input data and closes the input screen. |
 | In the Quick-Memo Mode, tapping this button changes to the list view. |
 | Displays the pop up tool screen. |
- The above table shows all the buttons that can possibly appear in a data input tool bar. Depending on mode and other factors, some of the tools shown above may not be included in a data input tool bar.
Data Display Tool Bar
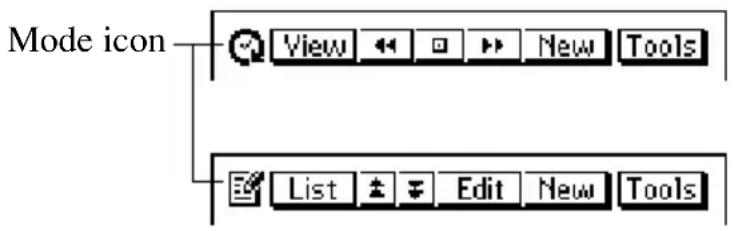
| Button | Description |
| Mode icon | Indicates the mode you are currently in. |
| Displays a menu of other views that can be used to display data. | |
| In the Scheduler and Expense Manager modes, jumps to today's date as kept by the PV Unit's built-in clock. | |
| Advances to the next item. | |
| Returns to the previous item. | |
| Displays the new data input screen. | |
| Returns to the list screen from a Contacts, Memo, Expense Manager, and Quick-Memo mode data screen. | |
| Changes to the data editing screen for the current data item. | |
| Displays the pop up tool screen. |
- The above table shows all the buttons that can possibly appear in a data display tool bar. Depending on mode and other factors, some of the tools shown above may not be included in a data display tool bar.

Keyboard Formats
The PV Unit provides you with a selection of keyboard formats.
QWERTY
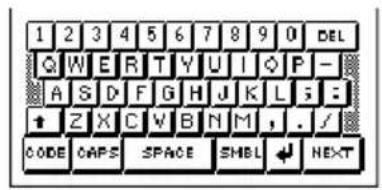
This format is automatically selected when English, Spanish, or Italian is set as the system language.
AZERTY
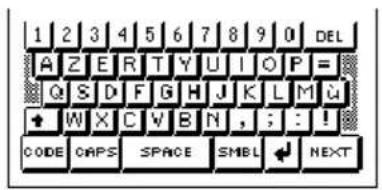
This format is automatically selected when French is set as the system language.
QWERTZ
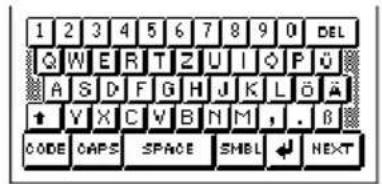
This format is automatically selected when German is set as the system language.

Scheduler Mode Alarms
- When you set an alarm time for a Schedule, To Do, or Reminder item, an alarm sounds for about 20 seconds when the alarm time is reached on the date that is also specified for the data item.
- Alarms may fail to sound when battery power is low.
- Alarms are deleted automatically after the Scheduler alarm time is passed. You cannot set an alarm time for a date and time that are already passed.
- Up to 1,000 Scheduler alarm times can be set at one time.

Input Limits
The following table shows the maximum number of characters that can be input into various fields.
| Mode | Entry (Field) | Maximum Number of Characters |
| Schedule | Description | 2,046 |
| To Do | Description | 2,046 |
| Category | 14 | |
| Reminder | Description | 2,046 |
| Contacts | - | 2,036 |
| Category | 14 | |
| Item | 12 | |
| Memo | Description | 2,048 |
| Expense Manager | Amount | 8 |
| Payment Type | 14 | |
| Expense Type | 14 | |
| Description | 2,008 | |
| Search | - | 12 |
| Password | - | 12 |
| Clipboard | - | 2,048 |

Resetting the PV Unit
Warning!
The following procedure erases all data stored in the memory of the PV Unit. Perform this operation only when you want to delete all data and initialize the settings of the PV Unit.
Remember - you should always keep copies of important data by writing it down, or by transferring it to a personal computer.
- Remove the cover and touch the screen with the stylus to turn on power.
- Use the stylus to press the RESET button on the back of the PV Unit.
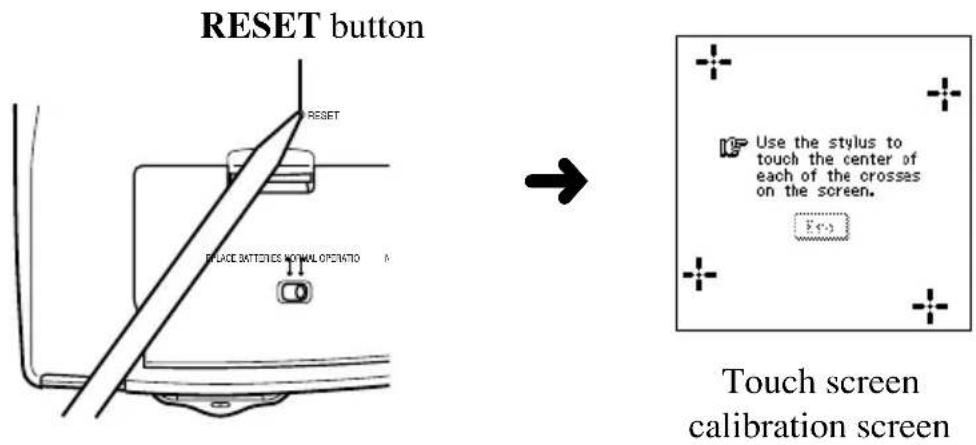
- It takes a while for the OS to load. After a few moments, the touch screen calibration screen should appear.
- If the touch screen calibration screen does not appear after a few moments after you press the RESET button, slide the battery switch to the REPLACE BATTERIES position and remove the battery compartment cover. Remove the batteries from the battery compartment, and then reload them. Replace the battery compartment cover, and then slide the battery switch back to the NORMAL OPERATION position.
- After the touch screen calibration screen appears, tap the center of each of the four cross marks as they are displayed one-by-one.
• The contrast adjustment screen appears next. - Tap ◀ or ▶ to adjust the contrast of the display, and then tap OK.
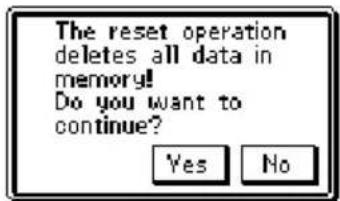
-
In response to the message that appears, tap Yes to reset the PV Unit and clear all memory contents, or No to abort the reset procedure without doing anything.
-
If you tapped Yes in the above step, a second confirmation message appears. Tap Yes to reset the PV Unit and clear all memory contents, or No to abort the reset procedure without doing anything.
• Tapping Yes in the above step starts the actual reset procedure.
- After the reset procedure is complete, tap the button next to the language you want to select as the system language.
- Tap Set to change to the pop up tool screen.
- Check the time setting and correct it if necessary (page 160).
- Following are the initial settings of the PV Unit after you perform the RESET operation.
Main clock: Clock 1
London
Jan/1/2003
12:00 am
12-hour format
Clock 2: New York
Daily Alarm: 12:00 pm
Sound: Daily Alarm off, all others on
Character input: CAPS off

Euro Conversion Rate Presets
| Country | Currency Code | Rate (for 1 euro) | Decimal Places |
| Germany | DEM | 1.95583 | 2 |
| France | FRF | 6.55957 | 2 |
| Italy | ITL | 1936.27 | 0 |
| Spain | ESP | 166.386 | 0 |
| Netherlands | NLG | 2.20371 | 2 |
| Belgium | BEF | 40.3399 | 0 |
| Portugal | PTE | 200.482 | 0 |
| Austria | ATS | 13.7603 | 2 |
| Finland | FIM | 5.94573 | 2 |
| Ireland | IEP | 0.787564 | 2 |
| Luxembourg | LUF | 40.3399 | 0 |
| Greece | GRD | 340.750 | 0 |

Storage Capacity
The memory capacity of the PV-S1600 is 16 Mbytes (12MB for the User Area and Add-in Area plus 4MB for the OS Area). The following shows the number of items that can be stored.
Scheduler
Approximately 32,000 items with 60-character description.
Contacts
Approximately 32,000 items, under the following conditions.
8-character name
10-character home phone number
10-character home fax number
20-character home address
Approximately 32,000 items, under the following conditions.
8-character name
10-character business phone number
10-character business fax number
40-character business address
20-character company name
20-character department
20-character position
Memo
Approximately 10,700 items, 1,024-character memos.
Expense Manager
Approximately 32,000 items, under the following conditions.
10-character description
Expense type and payment type set
Quick-Memo
Approximately 4,200 items.

Auto Sort Sequence
The following table shows the sequence used for alphabetical data sorts.
| 1 | (space) | 34 | A | 67 | b | 100 | Ú | 133 | Ã | 166 | ^2 |
| 2 | ! | 35 | B | 68 | c | 101 | À | 134 | Õ | 167 | ^3 |
| 3 | ” | 36 | C | 69 | d | 102 | È | 135 | Ñ | 168 | ∞ |
| 4 | # | 37 | D | 70 | e | 103 | Ì | 136 | IJ | 169 | 12 |
| 5 | 38 | E | 71 | f | 104 | Ò | 137 | Æ | 170 | \frac{1}{4} | |
| 6 | % | 39 | F | 72 | g | 105 | Ù | 138 | Ç | 171 | \frac{3}{4} |
| 7 | & | 40 | G | 73 | h | 106 | Â | 139 | Å | 172 | f |
| 8 | , | 41 | H | 74 | i | 107 | Ê | 140 | Φ | 173 | | |
| 9 | ( | 42 | I | 75 | j | 108 | Î | 141 | ß | 174 | Fr |
| 10 | ) | 43 | J | 76 | k | 109 | Ô | 142 | ¶ | 175 | ← |
| 11 | * | 44 | K | 77 | l | 110 | Û | 143 | ¢ | 176 | → |
| 12 | + | 45 | L | 78 | m | 111 | ¡ | 144 | ä | 177 | √ |
| 13 | , | 46 | M | 79 | n | 112 | á | 145 | ë | 178 | § |
| 14 | - | 47 | N | 80 | o | 113 | é | 146 | ï | 179 | ↑ |
| 15 | . | 48 | O | 81 | p | 114 | í | 147 | ö | 180 | \updownarrow |
| 16 | / | 49 | P | 82 | q | 115 | ó | 148 | ü | 181 | ↓ |
| 17 | 0 | 50 | Q | 83 | r | 116 | ú | 149 | ã | 182 | - |
| 18 | 1 | 51 | R | 84 | s | 117 | à | 150 | õ | 183 | ÿ |
| 19 | 2 | 52 | S | 85 | t | 118 | è | 151 | ñ | 184 | ® |
| 20 | 3 | 53 | T | 86 | u | 119 | ì | 152 | ij | 185 | « |
| 21 | 4 | 54 | U | 87 | v | 120 | ò | 153 | æ | 186 | » |
| 22 | 5 | 55 | V | 88 | w | 121 | ù | 154 | ç | 187 | © |
| 23 | 6 | 56 | W | 89 | x | 122 | â | 155 | å | 188 | ø |
| 24 | 7 | 57 | X | 90 | y | 123 | ê | 156 | φ | 189 | \partial |
| 25 | 8 | 58 | Y | 91 | z | 124 | î | 157 | £ | 190 | D |
| 26 | 9 | 59 | Z | 92 | 125 | ô | 158 | ¥ | 191 | 1 | |
| 27 | : | 60 | [ | 93 | ¡ | 126 | û | 159 | Ω | 192 | P |
| 28 | ; | 61 | \ | 94 | 127 | ¿ | 160 | a | 193 | p | |
| 29 | < | 62 | ] | 95 | ~ | 128 | Ä | 161 | o | 194 | ý |
| 30 | = | 63 | ^ | 96 | Á | 129 | Ë | 162 | × | 195 | Ý |
| 31 | > | 64 | — | 97 | É | 130 | Ï | 163 | ÷ | 196 | • |
| 32 | ? | 65 | 、 | 98 | Í | 131 | Ö | 164 | ± | 197 | ^{1}$ |
| 33 | @ | 66 | a | 99 | Ó | 132 | Ü | 165 | ° | 198 | € |

City Name List
| City Name | Time Difference | City Name | Time Difference | City Name | Time Difference |
| Abidjan | ±0:00 | Brisbane | +10:00 | Frankfurt | +1:00 |
| Abu Dhabi | +4:00 | Broken Hill | +9:3 | Freetown | ±0:00 |
| Acapulco | -6:00 | Brussels | +1:0 | G.M.T. | ±0:00 |
| Accra | ±0:00 | Bucharest | +2:0 | Geneva | +1:00 |
| Addis Ababa | +3:00 | Budapest | +1:0 | Georgetown | -4:00 |
| Adelaide | +9:30 | Buenos Aires | -3:00 | Guam | +10:00 |
| Aden | +3:00 | Cairo | +2:0 | Guatemala City | -6:00 |
| Al Manamah | +3:00 | Calcutta | +5:3 | Hamburg | +1:00 |
| Algiers | +1:00 | Canberra | +10:00 | Hannover | +1:00 |
| Alice Springs | +9:30 | Cape Town | +2:0 | Hanoi | +7:00 |
| Amman | +2:00 | Caracas | -4:00 | Havana | -5:00 |
| Amsterdam | +1:00 | Casablanca | ±0:00 | Helena | -7:00 |
| Anchorage | -9:00 | Cayenne | -3:00 | Helsinki | +2:00 |
| Andorra | +1:00 | Chatham Island | +12:45 | Hermosillo | -7:00 |
| Ankara | +2:00 | Cheyenne | -7:00 | Hong Kong | +8:00 |
| Antananarivo | +3:00 | Chicago | -6:00 | Honolulu | -10:00 |
| Asuncion | -4:00 | Cincinnati | -5:00 | Houston | -6:00 |
| Athens | +2:00 | Cleveland | -5:00 | ||
| Atlanta | -5:00 | Colombo | +6:0 | Indianapolis | -5:00 |
| Auckland | +12:00 | Conakry | ±0:00 | Istanbul | +2:00 |
| Azores | -1:00 | Copenhagen | +1:0 | Jacksonville | -5:00 |
| Baghdad | +3:00 | Dakar | ±0:00 | Jakarta | +7:00 |
| Baltimore | -5:00 | Dallas | -6:00 | Jeddah | +3:00 |
| Bangkok | +7:00 | Damascus | +2:0 | Jerusalem | +2:00 |
| Barcelona | +1:00 | Dar es Salaam | +3:0 | Johannesburg | +2:00 |
| Basel | +1:00 | Darwin | +9:3 | Kabul | +4:30 |
| Beirut | +2:00 | Delhi | +5:3 | Kampala | +3:00 |
| Belgrade | +1:00 | Denver | -7:00 | Kansas City | -6:00 |
| Bergen | +1:00 | Detroit | -5:00 | Karachi | +5:00 |
| Berlin | +1:00 | Dhaka | +6:0 | Kathmandu | +5:45 |
| Birmingham | -6:00 | Dubai | +4:0 | Khabarovsk | +10:00 |
| Bismarck | -6:00 | Dublin | ±0:00 | Khartoum | +3:00 |
| Bogota | -5:00 | Dusseldorf | +1:0 | Kingston | -5:00 |
| Boise | -7:00 | Kinshasa | +1:00 | ||
| Bonn | +1:00 | Edmonton | -7:00 | Kuala Lumpur | +8:00 |
| Boston | -5:00 | Fernando de Noronha | -2:00 | Kuwait | +3:00 |
| Brasilia | -3:00 | ||||
| Brazzaville | +1:00 | Fort Worth | -6:00 | La Paz | -4:00 |
| Lagos | + 1 : 0 | 0New York | -5:00 | San Jose | -6:00 |
| Las Palmas | ± 0:00 | Niamey | + 1 : 0 | 0San Juan | -4:00 |
| Lilongwe | + 2 : 0 | 0Norfolk | -5:00 | San Salvador | -6:00 |
| Lima | -5:00 | Norfolk Island | +11:30 | Sanaa | +3:00 |
| Lisbon | ± 0:00 | Noumea | +11:00 | Santa Fe | -7:00 |
| Lome | ± 0:00 | Santiago | -4:00 | ||
| London | ± 0:00 | Oklahoma City | -6:00 | Santo Domingo | -4:00 |
| Los Angeles | -8:00 | Omaha | -6:00 | Sao Paulo | -3:00 |
| Luanda | + 1 : 0 | Oslo | + 1 : 0 | Seattle | -8:00 |
| Lusaka | + 2 : 0 | Ottawa | -5:00 | Seoul | +9:00 |
| Luxembourg | + 1 : 0 | 0Panama City | -5:00 | Shanghai | +8:00 |
| Papeete | -10:00 | Singapore | +8:00 | ||
| Madrid | + 1 : 0 | 0Paramaribo | -3:00 | Sofia | +2:00 |
| Managua | -6:00 | Paris | + 1 : 0 | 0St Petersburg | +3:00 |
| Manaus | -4:00 | Peking (Beijing) | + 8 : 0 | 0Stockholm | +1:00 |
| Manila | + 8 : 0 | 0Perth | + 8 : 0 | 0Sydney | +10:00 |
| Maputo | + 2 : 0 | 0Philadelphia | -5:00 | ||
| Marseille | + 1 : 0 | 0Phnom Penh | + 7 : 0 | Taipei | +8:00 |
| Melbourne | +10:00 | Phoenix | -7:00 | Tampa | -5:00 |
| Memphis | -6:00 | Pittsburgh | -5:00 | Tegucigalpa | -6:00 |
| Mexico City | -6:00 | Port Louis | + 4 : 0 | Tehran | +3:30 |
| Miami | -5:00 | Port Moresby | +10:00 | Tijuana | -8:00 |
| Midway Is. | -11:00 | 0Port au Prince | -5:00 | Tokyo | +9:00 |
| Milan | + 1 : 0 | 0Port of Spain | -4:00 | Toronto | -5:00 |
| Milwaukee | -6:00 | Portland | -8:00 | Tripoli | +2:00 |
| Minneapolis | -6:00 | 0Prague | + 1 : 0 | Tunis | +1:00 |
| Mogadishu | + 3 : 0 | ||||
| Monrovia | ± 0:00 | Quito | -5:00 | Vancouver | -8:00 |
| Montevideo | -3:00 | Vienna | +1:00 | ||
| Montreal | -5:00 | Reykjavik | ± 0:00 | Vientiane | +7:00 |
| Moscow | + 3 : 0 | 0Rio de Janeiro | -3:00 | ||
| Mumbai | + 5 : 3 | 0Riyadh | + 3 : 0 | Warsaw | +1:00 |
| Munich | + 1 : 0 | 0Rome | + 1 : 0 | Washington,D.C. | -5:00 |
| Muscat | + 4 : 0 | 0Saint Louis | -6:00 | Wellington | +12:00 |
| Winnipeg | -6:00 | ||||
| Nadi | +12:00 | Salt Lake City | -7:00 | Yangon | +6:30 |
| Nairobi | + 3 : 0 | 0Salzburg | + 1 : 0 | Yaounde | +1:00 |
| Nashville | -6:00 | San Antonio | -6:00 | ||
| Nassau | -5:00 | San Diego | -8:00 | Zurich | +1:00 |
| New Orleans | -6:00 | San Francisco | -8:00 |

Message Table
| 1000 alarms are already set! | |
| Cause: The maximum allowable limit of 1,000 alarms are already set. | Action: Wait until some of the existing alarms are used, or delete alarms you do not need to make room for new ones. |
| All dates you select must be within the same year. | |
| Cause: You are trying to highlight dates for a period that spans multiple years. | Action: The range of dates when specifying highlights must be within one single year. Change your date range specification so it is within the same year. |
| Batteries are getting weak! Replace them as instructed in the User's Guide. | |
| Cause: Battery power is getting weak. | Action: Replace batteries as explained on page 21 of this User's Guide. |
| Cells in the range you are deleting contain data. Delete them anyway? | |
| Cause: Some of the cells in a range you are deleting in the Pocket Sheet Mode contain data. | Action: Tap Yes to delete the cells and the data they contain, or tap No to close the dialog box without deleting anything. |
| Check the secret memory area! | |
| Cause: An alarm time has been reached for secret memory area data. | Action: Enter the secret memory area to view details about the alarm. |
| Check your home time setting and correct it if necessary! | |
| Cause: This message appears after an operation that can affect your time settings. | Action: Since all alarms and other timekeeping related operations are based on your time setting, be sure to check it and make corrections as necessary whenever this message appears. |
| Communication error! | |
| Cause: An error occurred during data communication. | Action: Correct the cause of the error and try again. |
| Data error! Consult your User's Guide for correct procedure. | |
| Cause: An internal data error has corrupted memory data. | Action: See page 16 of this User's Guide for the correct procedure. |
| Data error! Do you want to view data before resetting? | |
| Cause: A data error requires that you perform the RESET operation, which deletes all data stored in memory and returns all settings to their initial defaults. | Action: Tap Yes to close the dialog box. You can then recall data stored in memory to make written copies before it is cleared by the RESET operation. Tap No to go immediately into to the RESET operation, which will delete all data stored in memory. |
| Data item not found! | |
| Cause: None of the data in memory matches the characters you specified for a search operation. | Action: Check the characters you specified to make sure you did not make a mistake, or try searching for different characters. |
| Input all required data. | |
| Cause: You did not input all of the minimum data required to store the data item. | Action: Input the minimum required entries for the mode where you are inputting new data. Check the minimum requirements and input the required data. |
| Make sure you are inputting the date correctly. | |
| Cause: You are trying to use invalid values for a date. | Action: Input the date correctly. |
| Make sure you are inputting the time correctly. | |
| Cause: You are inputting invalid values for a time setting. | Action: Input proper values for the time. |
| Memory is full! | |
| Cause: You are trying to input data or receive data while memory is already full. | Action: First try performing the memory management operation to see if more memory can be made available. If this message still appears, it means that memory is really full. Delete data you no longer need to make room for more data. |
| Sheet is too big! | |
| Cause: The sheet you are working with in the Pocket Sheet Mode is larger than the allowable maximum. | Action: Reduce the amount of data contained in the sheet or divide the data between two or more sheets. |
| That alarm time is already passed! | |
| Cause: The time you are trying to set for an alarm is already passed. | Action: This is merely a warning message that appears for about one second. After that, the dialog box closes and the data is stored without the alarm. |
| That alarm time is already used! | |
| Cause: The time you are setting for an alarm is already used. | Action: Change the alarm time to one that is not yet used. |
| That date is outside of the specified period. | |
| Cause: You are specifying a Reminder date that is outside the period specified by the start date and end date. | Action: Check the specified period and set the date correctly. |
| That name is already used! | |
| Cause: You are trying to assign a name that is already used when naming a payment type or expense type. | Action: Use a different name. |
| The next step starts data deletion and unit reset! Do you want to continue? | |
| Cause: This is the final warning before execution of the RESET operation, which deletes all data stored in memory and returns all settings to their initial defaults. | Action: Tap Yes to execute the RESET operation and delete all data, or No to close the dialog box without deleting anything. |
| The reset operation deletes all data in memory! Do you want to continue? | |
| Cause: You are about to perform the RESET operation, which deletes all data stored in memory and returns all settings to their initial defaults. | Action: Tap Yes to perform the RESET operation and delete all data, or No to close the dialog box without deleting anything. |
| There is no P.Referencer database! | |
| Cause: There is no database that can be opened in the P.Referencer Mode. | Action: Use Easy Referencer Tool for PV to create a database. See the Easy Referencer Tool for PV user documentation for more information. |
| This operation will push some data outside the sheet. Continue? | |
| Cause: The Pocket Sheet Mode operation you are performing will cause some of the cells of the sheet to be pushed outside the range of the sheet. This causes the data in the cells to be deleted. | Action: Tap Yes to go ahead with the operation, or No to close the dialog box without doing anything. |
| You cannot specify more than 60 repeats! | |
| Cause: You specified more than 60 repeats for a Reminder data item. | Action: Shorten the specified period of the Reminder item to reduce the number of repeats. |
| Wrong password! | |
| Cause: The password you input while trying to enter the secret memory area does not match the password that is registered. | Action: Input the correct password. |

Troubleshooting
Power Supply
| Problem: Nothing appears on the display when power is turned on. | |
| Possible Causes1. The battery switch on the back of the unit is set to REPLACE BATTERIES.2. Battery power is low.3. Display contrast is too light.4. Screen tap power on feature is turned off. | Recommended Actions1. Slide the battery switch to NORMAL OPERATION.2. Replace batteries (page 21).3. Adjust display contrast (page 163).4. Press the center key to turn on power or turn on the screen tap power on feature. |
Display Contrast
| Problem: Display is totally black. | |
| Possible CauseDisplay contrast is too dark. | Recommended ActionAdjust display contrast (page 163). |
Key Tone
| Problem: The PV Unit does not beep when you perform an operation. | |
| Possible CauseThe key tone is turned off. | Recommended ActionTurn on the key tone (page 161). |
Operation
| Problem: Nothing happens when you tap the screen. | |
| Possible Causes1. Battery power is low.2. Exposure of the PV Unit to some external condition is interfering with proper operation.3. The touch screen is damaged. | Recommended Actions1. Replace batteries (page 21).2. Remove the batteries from the battery compartment, and then reload them.See page 21 for information about battery replacement.3. The touch screen must be replaced.Contact your nearest CASIO dealer to have the touch screen replaced.You will be charged for this replacement. |
| Problem: Power suddenly turns off or contrast adjustment screen suddenly appears. | |
| Possible CauseBattery power is low. | Recommended ActionReplace batteries (page 21). |
| Problem: The functions or cursor movement performed does not match the location where you tap on the screen. | |
| Possible CauseThe touch screen needs to be calibrated. | Recommended ActionPerform the procedure under “Calibrating the Touch Screen” on page 164. |
Data Communication
| Problem: You are having problems performing data communication. | |
| Possible Causes1. Equipment is not connected correctly.2. Cable connector is dirty. | Recommended Actions1. Carefully follow the procedures on page 122 and connect the equipment correctly.2. Clean the connector on the bottom of the PV Unit and on the cable by wiping them with a cotton swab.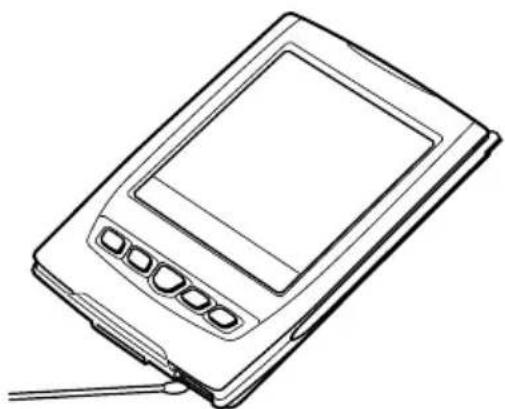 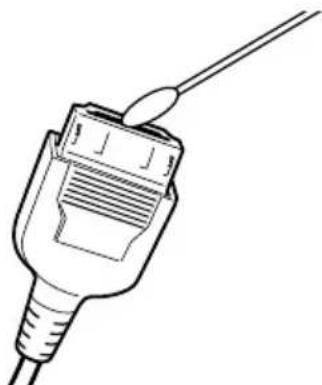 |
- If any of the above does not restore your PV Unit to normal operation, contact your nearest CASIO dealer for servicing.

Specifications
Model: PV-S1600
Main Modes:
Scheduler (Schedule, To Do, Reminder); Contacts; Memo; Expense Manager; Currency Converter; Quick-Memo; Pocket Sheet; P.Referencer; Pop Up Tools (Clock, Calendar, Calculator); Game
Data storage:
Storage and recall of Schedule, To Do, Reminder, Contacts, Memo, Expense, Quick-Memo, Pocket Sheet data; calendar display; secret memory area; editing; memory status display
Clock:
World Time; Schedule alarm; To Do alarm; Reminder alarm; Daily alarm; accuracy under normal temperatures: ±3 seconds per day
Calculations:
12-digit arithmetic calculations; arithmetic constants (+/-/· / |) ; independent memory; percentages; square roots; 24-digit approximations; other mixed calculations
General:
Display: 160 · 160 dots
Memory capacity: 16MB
Main component: LSI
Power supply: Two AAA-size alkaline batteries (Type: LR03 (AM4))
Battery life: (Ambient Temperature: 20°C (68°F))
- Approximately 120 hours of continuous display only in the Contacts Mode
- Approximately 80 hours with 55 minutes of continuous display only and 5 minutes of processing operation per hour in the Contacts Mode
- Approximately 60 hours with 55 minutes of continuous display only and 5 minutes of processing operation per hour in the Contacts Mode, plus 3 minutes of backlight operation per hour during continuous display only period
- Approximately 6 months when power is turned off
Power consumption: 0.5W
Auto power off: Selectable, approximately 6, 3, or 1 minute after last key operation
Operating temperature: 0^ C \~ 40^ C ( 32^ F \~ 104^ F)
Dimensions: Unfolded: 11.8H · 83W · 131.5D mm (1/2"H · 31/4"W · 51/8"D)
Folded: 14H · 83W · 139.5D mm ( ^1/2 "H · 3 ^1/4 "W · 5 ^1/_2 "D)
Weight: Approximately 155 g (5.5 oz) including batteries
Flash Driver
Fugue ©1999-2002 Kyoto Software Research, Inc. All rights reserved.
CE
CASIO ELECTRONICS CO., LTD. Unit 6, 1000 North Circular Road London NW2 7JD, U.K.


natural_image
Simple line drawing of a trash bin with no text or symbols- GUIDELINES LAID DOWN BY FCC RULES FOR USE OF THIS UNIT IN THE U.S.A. (not applicable to other areas).
- NOTICE
- FCC WARNING
- Declaration of Conformity
- Before using the PV-S1600 for the first time...
- Important!
- About the EL backlight
- \* Test Conditions
- If you do not plan to use the PV Unit for a long time...
- Turning On the PV Unit
- Note
- Contents
- Before using the PV-S1600 for the first time.... 1
- Chapter 1 | Getting Acquainted .... 14
- Chapter 2
- Scheduler 29
- Chapter 3 | Contacts .... 50
- Chapter 4
- Memo 61
- Chapter 5
- Expense Manager 66
- Chapter 6
- Currency Converter 71
- Chapter 7
- Quick-Memo 78
- Chapter 8
- Pocket Sheet 83
- Entering the Pocket Sheet Mode 83
- Pocket Sheet Basics 83
- Inputting Data Into a Cell 86
- Input Example 92
- Controlling the Appearance of a Cell 93
- Row and Column Operations 97
- Sheet Operations 102
- Cut, Copy, Paste, Clear 103
- Searching for Data in a Sheet 106
- Setting Sheet Calculation, Gridline, and Protect Options 107
- Date and Size Information 107
- Pocket Sheet Sync 108
- Pocket Sheet Errors 108
- Chapter 9
- P.Referencer 109
- Chapter 10
- Secret Function 112
- Chapter 11
- Pop Up Tools 115
- Chapter 12
- Data Communication 122
- Chapter 13
- PV Applications and File Transfer 134
- Chapter 14
- Game 138
- Chapter 15
- General Reference 143
- Chapter 16
- Configuring the Unit 160
- Chapter 17
- Technical Reference 166
- Read this first!
- Make backup copies of important data!
- Important Precautions
- Data Errors
- To reset after viewing data
- General Guide
- Using the Cover
- To remove the cover
- To replace the cover
- Power Supply
- Low Battery Warning
- Battery Precautions
- Keep batteries out of the reach of small children. If swallowed, consult with a physician immediately.
- To replace the batteries
- To turn power on and off
- To turn the screen tap power on feature on and off
- Auto Power Off
- To set the Auto Power Off Interval
- Configuring the Start-up Screen
- To select a start-up screen
- To enable and disable start-up screen operation
- Using the Backlight
- To specify the backlight duration
- Cursor Keys and Stylus
- Stylus
- • Tap
- - Double-tap
- - Drag
- Cursor Keys
- - Click
- - Left/Right Scroll
- - Up/Down Scroll
- Using the Icon Menu
- Modes
- To enter a mode using the icon menu
- To enter a mode using the on-screen icon menu
- To enter a mode using the Action Menu
- Customizing the Appearance of the Mode Menu
- Swapping Two Icons
- Moving an Icon to a Specific Location
- Entering the Scheduler Mode
- Inputting New Scheduler Data
- To input a single-date Schedule item
- To input a multiple-date Schedule item with the New button
- To input a To Do item
- To input a Reminder item
- Reminder Types and Settings
- Daily
- Weekly
- Monthly 1 FL
- Monthly 2 ME
- Yearly 1
- Yearly 2 YE
- Importing Contacts Data Into a Schedule Item
- To import Contacts data into a Schedule item
- Viewing Scheduler Data
- Screen Organization
- To select a Scheduler Mode screen
- Calendar Screens
- 1-Month Calendar
- To view a date's Daily Scheduler screen
- To view the 2-Month Calendar screen
- To view a Weekly Scheduler screen
- Using the data display area
- 2-Month Calendar
- To view the 1-Month Calendar screen
- 3-Month Calendar
- To view a 1-Month Calendar screen
- Periodic Schedule Screens
- Weekly Scheduler Screen
- To view an item's data screen
- Daily Scheduler Screen
- To shift the time bar
- Scheduler Area
- To Do Area
- Schedule Data Screen
- Schedule Data Screen (Single-Date)
- Schedule Data Screen (Multiple-Date)
- Reminder Screens
- Reminder List Screen
- To view a Reminder data screen
- Reminder Data Screen
- To Do Screens
- To specify the display category
- To specify the display item type
- To check and uncheck items
- To change the priority of an item
- To view a To Do data screen
- To Do Data Screen
- To check and uncheck the item
- To change the priority
- Date Highlighting
- To highlight dates
- To unhighlight dates
- Jumping to a Specific Date
- Renaming To Do Categories
- Entering the Contacts Mode
- To enter the Contacts Mode from the icon menu
- To enter the Contacts Mode from the Action Menu
- To enter the Contacts Mode from the Mode Menu using the stylus
- Changing the Display Category
- Latest Calls List
- Resizing Contacts List Screen Columns
- Inputting New Contacts Data
- Viewing Contacts Data
- To view Business data
- To view other data
- Changing Contacts List Screen Contents
- To change the contents of a category's list
- Changing Contacts Input Screen Contents
- To change the contents of a category's input screen
- Managing Untitled Categories and Free Entries
- Contacts Categories
- To edit Contacts Untitled category and Free entry names
- Copying Data Items Between the Personal and Business Categories
- Exporting Contacts Data Into a Schedule Item
- Entering the Memo Mode
- Inputting New Memo Data
- Viewing Memo Data
- To view memo data
- To display an item in the full-screen view
- Moving a Memo within a List Screen
- Renaming Memo Categories
- Entering the Expense Manager Mode
- Inputting a New Transaction
- Recalling Expense Manager Data
- Calculating Periodic Totals
- Managing Payment and Expense Types
- To change a payment type or expense type name
- Entering the Currency Converter Mode
- General Currency Conversion
- Performing a Conversion
- Changing the Currency Name and Rate
- To set a conversion rate
- To change a currency name
- Displaying the Current General Rates
- Euro Conversion
- Changing the Displayed National Currencies
- Displaying the Current Euro Rates
- Specifying the Rounding Method
- Entering the Quick-Memo Mode
- Quick-Memo Categories
- To select a Quick-Memo category
- Using the Quick-Memo Drawing Tools
- Pencil Tool
- Eraser Tool
- Line Tool \~ / + □
- Darkness Tool
- Undo Tool
- Creating a New Quick-Memo
- To input a new Quick-Memo
- To draw a line or rectangle
- Recalling a Quick-Memo
- Screen Copy
- To record a screen copy
- Entering the Pocket Sheet Mode
- Pocket Sheet Basics
- Creating a New Sheet from Scratch
- Making a Cell the Active Cell
- Selecting a Range of Cells
- Jumping to a Specific Cell in a Sheet
- Inputting Data Into a Cell
- General Input Rules
- Cell References
- Relative Cell References
- Absolute Cell References
- Mixed Cell References
- Using the On-screen Keyboards
- Inputting Mathematical Expressions
- To input a mathematical expression
- Examples
- Inputting Text
- Input Example
- Example Data
- Controlling the Appearance of a Cell
- Changing the Format Settings of a Cell
- Category
- Edit
- Decimal Places
- Alignment
- Bold
- Comma
- Lock
- Specifying Cell Border Lines
- Row and Column Operations
- Changing the Width of a Column
- To change the width of a column by dragging its boundary
- To change the width of a column by specifying a value
- Scroll Freezing Rows and Columns
- To freeze columns only
- To freeze a row only
- To freeze a row and column at the same time
- To unfreeze rows and columns
- Inserting Rows
- Inserting Columns
- Deleting Rows and Columns
- Sheet Operations
- Opening a Sheet
- Displaying the Input Screen
- Saving a New Sheet
- Saving an Existing Sheet Under a New Name
- Exiting a Sheet
- Renaming a Sheet
- Cut, Copy, Paste, Clear
- Cutting and Copying Cell Data
- Pasting Cell Data
- Copying a Relative Cell Reference
- Copying an Absolute or Mixed Cell Reference
- Clearing Cell Data
- Searching for Data in a Sheet
- To search for data in a sheet
- Setting Sheet Calculation, Gridline, and Protect Options
- Date and Size Information
- Displaying Date and Size Information
- Pocket Sheet Sync
- Pocket Sheet Errors
- Preparing and Transferring Data from Your PC
- Entering the P.Referencer Mode
- Searching for Text in a Data File
- Viewing Database Data
- To view database data
- Creating a New Secret Memory Area
- Using the Secret Memory Area
- To enter an existing secret memory area
- To exit the secret memory area
- To change your password
- To transfer data from the open memory area to the secret memory area
- To transfer data from the secret memory area to the open memory area
- ■ Displaying the Pop Up Tool Screen
- Using the Clock Screen
- To display the clock screen
- To make one of the clocks the main clock
- To select a time zone city
- To switch between standard time and daylight saving time (DST)
- Using the Calculator Screen
- To display the calculator
- Calculator Keys
- To perform constant calculations
- To correct entries during calculations
- About calculation errors
- To clear an error
- Next Appointment Screen
- To display the next appointment screen
- Specifying the Type of Cable You are Using
- Using the Cable
- To connect the cable to the PV Unit
- To disconnect the cable from the PV Unit
- Data Communications Between Two PV Units
- To connect two PV Units
- To send data from the host unit to the terminal unit
- To receive data from the terminal unit on the host unit
- Notes
- Data Communications Between a PV Unit and a BN Unit
- To connect a BN Unit to your PV Unit
- To send data from the PV Unit to the BN Unit
- To receive data from the BN Unit on the PV Unit
- Receiving Data From an SF/CSF/NX Series Unit
- To connect an SF/CSF/NX Series Unit to your PV Unit
- To make communication parameter settings
- To receive data from an SF/CSF/NX Series Unit
- PV Applications
- Obtaining PV Applications
- Installing a PV Application to your PV Unit
- To download a PV Application to your PV Unit
- Deleting PV Application Data Files
- Updating Your PV Unit Operating System
- Transferring Files
- Entering the Game Mode and Selecting a Game
- To move a card or stack of cards
- Game Levels
- Game-2
- How to play
- General Game Procedures
- To change the level
- To undo the last play
- Scroll Bars
- Cursor Key Scrolling
- Menu Bar
- To execute a menu bar command
- Data Input and Editing
- Moving Between Entries (Fields)
- On-screen Keyboards
- Text Keyboard
- Symbol Keyboard
- % ∫ * + - × ÷ =
- Code Keyboard
- Date Keyboard
- Calculator Keyboard
- Time Setting Screens
- Dial Type Time Setting Screens
- Bar Type Time Setting Screen
- Selecting a Range of Text by Dragging
- Cut, Copy, Paste
- To cut or copy data
- To paste data at a location
- To paste data and replace existing data
- Initial Default Dates for new items
- Scheduler
- Expense Manager
- Closing a Screen
- Using the Quick Find Feature
- To input a word with the Quick Find feature
- Editing Data Items
- Creating a Copy of a Data Item
- Deleting Data
- Searching for Data
- Initial Character Search
- All Search
- To perform a search
- Search Results
- Changing the Display Font
- Program Version Information
- To display version information
- Setting the Date and Time
- Turning Sound On and Off
- Setting a Daily Alarm Time
- Setting the Date, Time, Calendar, and Keyboard Formats
- Setting the System Language
- Adjusting Display Contrast
- Calibrating the Touch Screen
- Checking Memory Capacity
- Memory Management
- To perform memory management
- Date Formats
- Time Formats
- Tool Bars
- Data Input Tool Bar
- Data Display Tool Bar
- Keyboard Formats
- QWERTY
- AZERTY
- QWERTZ
- Scheduler Mode Alarms
- Input Limits
- Resetting the PV Unit
- Warning!
- Storage Capacity
- Contacts
- Memo
- Quick-Memo
- Auto Sort Sequence
- Troubleshooting
- Operation
- Data Communication
- Specifications
- Model: PV-S1600
- Main Modes:
- Data storage:
- Clock:
- Calculations:
- General:
- Battery life: (Ambient Temperature: 20°C (68°F))
- Power consumption: 0.5W
- Flash Driver
Brand : CASIO
Model : PV-S1600
Category : Mobile Phone