G'zOne Commando - Mobile Phone CASIO - Free user manual and instructions
Find the device manual for free G'zOne Commando CASIO in PDF.

User questions about G'zOne Commando CASIO
0 question about this device. Answer the ones you know or ask your own.
Ask a new question about this device
Download the instructions for your Mobile Phone in PDF format for free! Find your manual G'zOne Commando - CASIO and take your electronic device back in hand. On this page are published all the documents necessary for the use of your device. G'zOne Commando by CASIO.
USER MANUAL G'zOne Commando CASIO
Data Plans and Features:
Content and Internet Access
Many services and applications offered through your device may be provided by third parties. Before you use, link to or download a service provided by a third party, or an application such as a non-Verizon Wireless location-based GPS type service, chat room, marketplace or social network from your device, you should review the terms of such service or application and applicable privacy policy. Personal information you submit may be read, collected or used by the service or application provider and/or other users of those forums.
Verizon Wireless is not responsible for any information, content or services you access, download or use from the Internet.
You are responsible for maintaining virus and other Internet security protections when accessing service. For additional information, visit the Verizon Content Policy at responsibility.verizon.com/contentpolicy.
Your Verizon Wireless Customer Agreement terms and conditions and certain other specially identified terms govern your use of any Verizon Wireless products and services.
Getting Started with Your Phone 8
Phone overview 8
Feature overview 12
Installing and removing the battery 14
Removing and installing a microSD card 17
Charging the battery 22
Touchscreen operations 23
Turning the phone on and off 26
Initial setup 26
Basics 29
Turning the screen on and off 29
Getting to know the Home screen 30
Monitoring your phone's status 32
Managing notifications ....34
Opening and switching applications ....36
Customizing the Home screen 41
Working with widgets 43
Working with menus....49
Quickly connecting to your contacts 50
Placing your phone in Silent mode 51
Placing your phone in Airplane mode ....52
Personalizing your phone 52
Locking your screen 53
Optimizing battery life 54
Updating your phone's system software 56
Receiving a notice to update your system software ....56
Checking for phone system software updates manually......56
Entering and editing text ....57
Entering text ....57
Editing text 62
Phone 65
Placing a call 65
Answering a call 67
Operation during a call 68
Managing multiple calls 70
Working with the Call log 71
Dialing by voice 72
Using voicemail 73
Using Visual Voice Mail....74
Contacts 81
Opening your contacts 81
Adding a new contact 83
Editing contact details 84
Deleting a contact 87
Copying to PTT Contacts 88
Communicating with your contacts 88
Changing which contacts are displayed 90
Linking or unlinking contact information 91
Importing, exporting, and sharing contacts .....92
Working with Groups 93
Working with Favorites 95
Configuring Backup Assistant ^SM .....96
Push to Talk 99
About Push to Talk 99
Opening Push to Talk 100
Placing a PTT call ....101
Receiving a PTT call 104
Working with PTT Call log 105
Working with PTT Contacts 108
Working with PTT Groups 112
Searching for PTT contacts and PTT groups 115
Changing Push to Talk settings 115
Connecting to networks.... 117
Connecting to mobile networks 117
Connecting to virtual private networks ....121
Working with secure certificates 123
Connecting to devices 125
Connecting to a Headset 125
Connecting to a PC via USB 126
Connecting to Bluetooth® devices 128
Sharing your phone's mobile data connection 131
Accounts and sync 133
Adding and removing accounts 133
Configuring account sync settings 135
Email 138
Opening Email 138
Opening the Accounts screen and your Inbox....138
Reading your messages 140
Responding to a message ....141
Starring messages 142
Searching your messages 142
Working with message in batches 142
Composing and sending email 143
Working with account folders 144
Adding and editing email accounts 144
Messaging....149
Checking sent and received messages 149
Sending a message 152
Changing Messaging settings ....154
Browser....156
Opening Browser 156
Viewing a web page 158
Navigating between web pages 160
Working with bookmarks....162
Downloading files 164
Working with multiple Browser windows 165
Changing Browser settings 166
Camera....170
Opening Camera 170
Taking pictures and shooting videos 171
Changing Camera settings 173
Gallery....176
Opening Gallery and viewing your albums 176
Working with albums....177
Working with pictures 180
Working with videos 183
Music 186
Copying music files to the phone's microSD card ....186
Opening Music and working with your library 188
Playing music ....190
Working with playlists 192
Using V CAST Media Manager ....195
Calendar 196
Viewing your calendar and events 196
Creating an event 203
Editing or deleting an event 204
Setting an event reminder....205
Responding to an event reminder 206
Displaying and synchronizing calendars ....206
Changing Calendar settings ....208
V CAST Apps Store 209
Opening V CAST Apps Store....209
V CAST Music with Rhapsody ^® 210
Opening V CAST Music with Rhapsody .....210
Purchasing songs with your phone 210
Transferring music from a PC 211
V CAST Tones 214
Opening V CAST Tones 214
Verizon Video 215
Opening Verizon Video 215
VZ Navigator ^® 216
Opening VZ Navigator 216
My Verizon Mobile 217
Opening My Verizon Mobile 217
G'zGEAR ^® 218
Opening G'zGEAR 218
Earth Compass ....219
Walking Counter 223
Adventure Training 225
Trip Memory 228
Thermometer 230
Tides....231
Sun/Moon 233
Star Gazer 234
Configuring G'zGEAR 237
Widgets in G'zGEAR 238
More Applications 240
Bing™ 240
Bing™ Maps 240
Android Market 242
YouTube™ 246
Gmail™ 249
Google Talk™ 251
City ID ^® 252
Social Beat 252
Skype Mobile™ 253
News and Weather 253
Slacker Radio 254
NFL Mobile 254
Document Viewer....255
Alarm Clock 255
Calculator 258
Sound Recorder 258
Voice Control 259
Desk Cradle 261
Car Mode 262
Settings 265
Opening Settings 265
Personalization ....265
Wireless & network settings 266
Call settings 269
Sound settings 270
Display settings 271
Location & security settings 272
Applications settings 275
Tutorial settings 277
Accounts & sync settings 278
Privacy settings ....279
SD card & phone storage settings 280
USB settings 281
Language & keyboard settings ....281
Voice input & output settings 283
Accessibility settings ....284
Date & time settings ....285
About phone 285
Safety 286
TIA Safety Information 286
Safety Information for FCC RF Exposure 289
FDA Information 292
Emergency Calls 300
Compliance with Other FCC Regulations ....302
General Safety 302
Games 308
Camera 309
Accessibility ....309
RECYCLE YOUR CELL PHONE! 313
12 MONTH LIMITED WARRANTY ....315
Index 319
Getting Started with Your Phone
Phone overview

text_image
1. Earpiece 2. Temperature Sensor 3. Touchscreen 4. Microphone 5. Speaker 12. Internal Antenna Area* 13. Camera/Camcorder Lens 14. Battery Cover Lock 12. Internal Antenna Area* 6. Light Sensor 7. Proximity Sensor 8. Menu Key 9. Home Key 10. Back Key 11. Search Key 15. Camera Flash/Flashlight 16. Camera Indicate 17. Secondary Microphone 18. microSD Card Slot (under the battery) 19. Battery Cover* For best performance, do not touch these areas when using your phone.
text_image
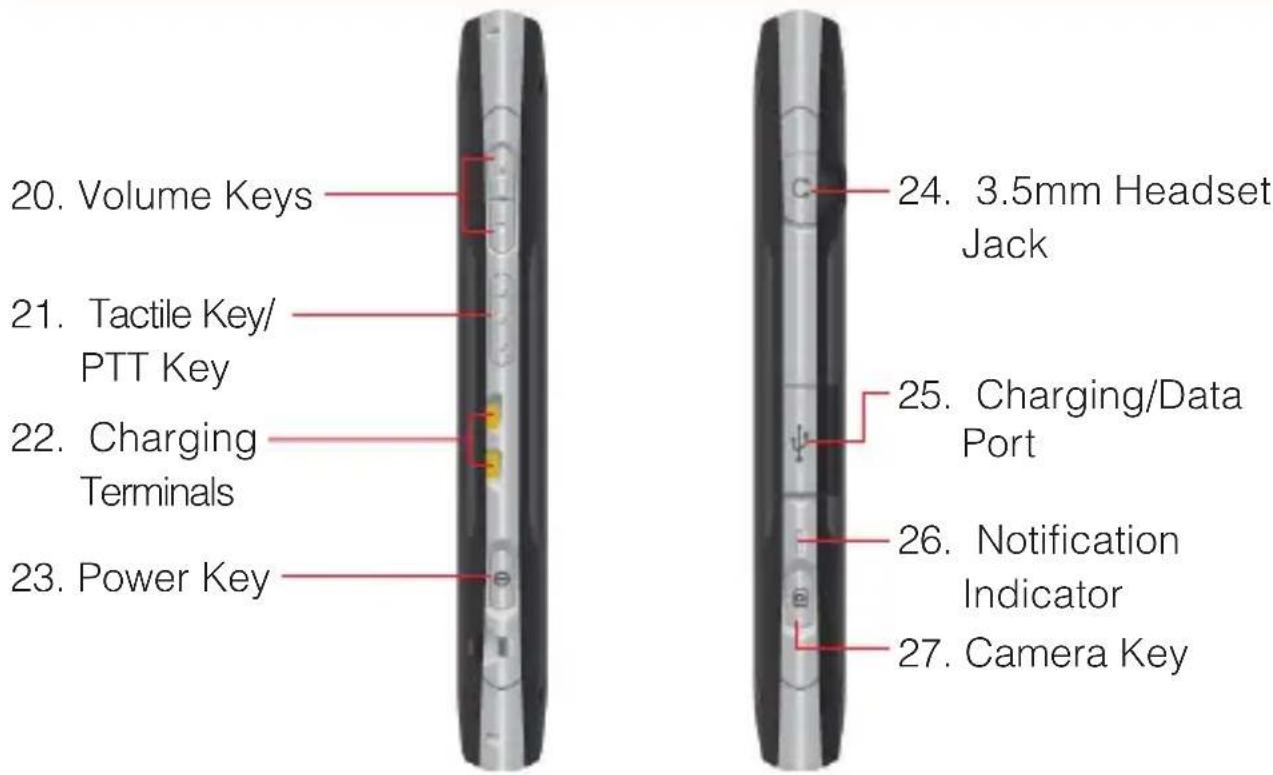
20. Volume Keys 21. Tactile Key/ PTT Key 22. Charging Terminals 23. Power Key 24. 3.5mm Headset Jack 25. Charging/Data Port 26. Notification Indicator 27. Camera Key- Earpiece
- Temperature Sensor
- Touchscreen
You can operate your phone by touching the screen.
- Microphone
- Speaker
- Light Sensor
Senses the ambient light and the phone will automatically adjust the brightness of the display accordingly (applicable when Automatic brightness is enabled).
- Proximity Sensor
- ☐ Menu Key
Touch to open the menu for the current screen or application.
- Home Key
Touch to return to the Home screen while viewing an application. If you are viewing a Home screen extension panel, touching this key returns you to the central panel.
Touch and hold to display up to eight icons of recently used applications.
10. Back Key
Touch to return to the previous screen. When a pop-up screen, such as menu or a dialog box, is displayed touching this key will close it.
11. Search Key
On the Home screen, touch to open Bing ^™ search box to search data in the phone and on the web.
In many applications, you can touch this key to search within that application.
Touch and hold to open Bing search by voice.
12. Internal Antenna Area
For best performance, do not touch these areas when using your phone.
13. Camera/Camcorder Lens
14. Battery Cover Lock
15. Camera Flash/Flashlight
16. Camera Indicator
Blinks green when the Camera or Camcorder application is opened. Lights up in red when the shutter is pressed or recording is in progress.
17. Secondary Microphone
Used when the speakerphone is turned on.
18. microSD Card Slot (under the battery)
A microSD card should be inserted in the phone in order to use multimedia functions such as the camera, and for downloading and playing music and videos.
The phone comes with a pre-installed 8GB microSD card.
19. Battery Cover
20. Volume Keys
Press to adjust the volume of ringtone, receiving voice during a call, or the playback volume of music or video.
21. ◇ ◇ ◇ Tactile Key/PTT Key
When PTT is turned off, press to open the application selected in the Tactile key setting of Personalization in advance. By default, G'zGEAR® opens.
When PTT is turned on, press to open the PTT Contacts List, or press and hold to place a Barge PTT call.
22. Charging Terminals
The terminals used to charge the phone when it is placed on the cradle (sold separately).
23. Ⓐ Power Key
Press and hold to open the pop-up menu to turn off the phone, or to switch On/Off the Silent and Airplane modes.
Press to turn off the screen display and lock the Touchscreen. To restart phone operation, press this key again to turn on the screen display and unlock the Touchscreen.
24. 3.5mm Headset Jack
3.5mm connector port
25. Charging/Data Port
Plug in the USB Cable here (included in box).
26. Notification Indicator
Indicates as follows:
| State Lighting pattern | |
| Charging Lights up in red. | |
| Notification is present or a call is being placed, when the screen is turned off. | Blinks green every three seconds. |
27. Camera Key
Press to open the Camera application.
While in Camera application, press to take a picture. Press halfway to adjust and lock focus without activating the shutter.
While in Camcorder application, press to start/stop recording.
NOTES
Descriptions and instructions in this manual are based on • the software version and default settings of the phone when purchased. Operations may differ when any settings are changed or software version is updated. Screen images in this manual are shown as the reference purpose • and may differ from the actual images.
Feature overview
Water resistance
The CASIO G'zOne Commando™ is water resistant. It provides reliable performance for outdoor activities, and in wet conditions such as driving rain or high humidity.
The tested device meets the requirements of the MIL-STD-810G (Rain & immersion 1m, 30min) standard.
Warning!
The Water Resistance feature does not guarantee protection against the usage of this device underwater. Do not use the phone underwater.
NOTE
To maintain water resistance:
Securely close the Charging/Data Port cover and the Headset • Jack cover.
Completely close the battery cover and slide the battery cover • lock to the LOCK position.
Shock resistance
The rugged construction of the Commando™ provides outstanding shock and vibration resistance. The tested device meets the requirements of the MIL-STD-810G (Drop 1.5m) standard.
Warning!
The shock and vibration resistance features do not guarantee protection against every type of shock and vibration. Your phone may be damaged or malfunction depending on the severity of the shock or vibration.
Dust resistance
For additional peace of mind, the Commando ^™ is also dust resistant. The device was tested using silica flour at a temperature of 95°F and meets the MIL-STD-810G (Dust) standard.
NOTES
Your phone can be rinsed with clean water when dirty. To ensure • water resistance, make sure that all covers are securely closed before rinsing.
Periodically, clean the Charging Terminals and the Battery • Terminals with a dry cloth or cotton swab. Dust may cause electrical connection problems. Avoid wiping with excessive force, which can damage the terminals.

text_image
Charging TerminalsBattery

Battery Terminals
Warning!
Do not clean terminals inside the phone, or they may be • damaged.
If mud or sand is adhered to the phone, do not use it until wiping • completely.
Do not place the phone directly on sand. If sand gets into the • Earpiece or Speaker, sounds may be difficult to hear.
Installing and removing the battery
The phone comes with a rechargeable battery.
Warning!
Use only approved batteries for the Commando™. Wipe your phone before opening the battery cover to prevent moisture or dust from entering.
Failure to follow the directions below for installing/removing the battery could result in product failure.
Fully charge the battery before using the phone for the first time. Do not install the battery in humid places, like a bathroom, or places where water or liquid can come into contact with the phone or battery. Doing this may cause electrical circuits shorts or erode and cause the phone to malfunction.
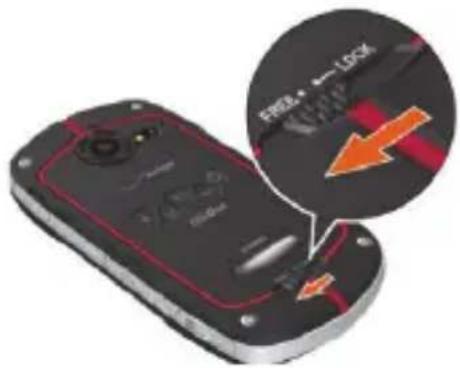
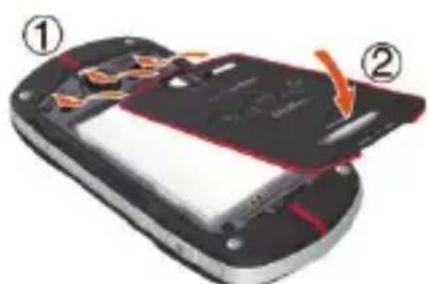
- Slide the Battery Cover Lock to the left to the FREE position, as shown in the figure.
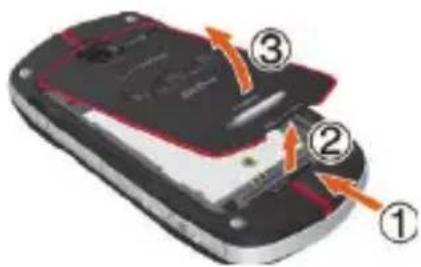
- Insert your finger in the groove ① and pull up on the battery cover in the direction of the arrow ②. When the battery cover is disengaged, pull it up in the direction of the arrow ③.
text_image
Diagram of a mobile phone showing labeled parts with arrows indicating movement or change- To install the battery, slide the battery into the slot by aligning the contacts and tabs ① and press down ② until it fits into place. Fold down the battery tab toward the battery.

text_image
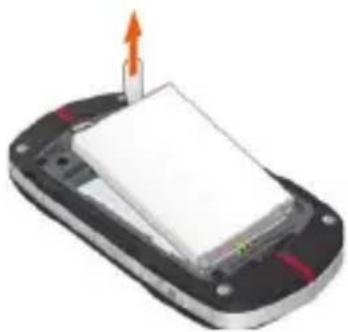
Diagram of a mobile phone showing internal components with numbered labels and directional arrows indicating movement or flow.To remove the battery, pull up the tab.
natural_image
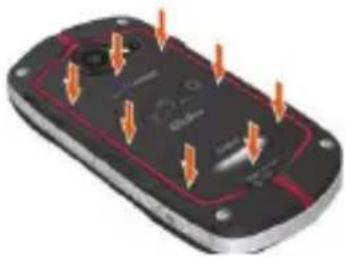
3D illustration of a device with a white rectangular block and an orange arrow pointing upward (no text or symbols)- Insert the battery cover tabs into the slots ① and press the battery cover in the direction of the arrow ②.
natural_image
Close-up of a black mobile phone with visible circuitry and battery cover, showing internal components (no text or symbols)- Press down firmly on all sides of the battery cover at each arrow point, as shown in the right figure.
natural_image
3D diagram of a black electronic device with orange arrows pointing to internal components (no text or symbols)- Slide the Battery Cover Lock to the right to the LOCK position, as shown in the figure.

text_image
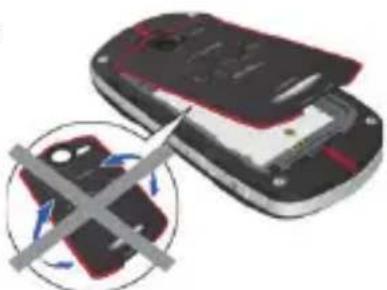
FREE - LOCK OFFICEWarning!
- Do not twist the battery cover as shown in the right figure. Doing so can damage the phone and the battery cover.
natural_image
Illustration of a mobile phone with a crossed-out device and a cross symbol (no text or symbols present)Do not press hard on the battery cover • if the tabs are not properly inserted into the slots of the phone. Doing this may cause damage to the battery cover tabs. Be careful not to get the tab of the battery caught between the • edges of the battery cover and the phone. Failure of proper battery installation will result in the loss of water resistance.
If you are using a wrist strap (sold separately), be careful not to get it caught between the battery cover and the phone. Failure of proper battery installation will result in the loss of water resistance. Do not leave the removed battery in direct sunlight, or near heat sources such as an open flame or stove. Doing this may cause phone malfunction or cause a fire by the battery bursting or igniting. Do not hit, or exert excessive shock on the battery, as it may ignite or break.
Removing and installing a microSD card
To use the multimedia functions such as the Camera application and downloading/playing music or video, a microSD card should be installed in the phone.
NOTE
The phone comes with a pre-installed 8GB microSD card.
Removing a microSD card
Warning!
Never remove a microSD card from the phone while it is being accessed. Doing so can damage the microSD card or the data stored on it. The microSD card is very small. Make sure you do not drop it. Failure to completely reseal the battery cover after removal may result in damage if the phone is exposed to water. Do not touch a microSD card terminal with your finger or hand. It may contaminate a terminal to cause the contact failure.
- Remove the battery cover and the battery.
For instructions on how to remove the battery cover and the battery, refer to steps 1 through 3 of “Installing and removing the battery” on page 14.
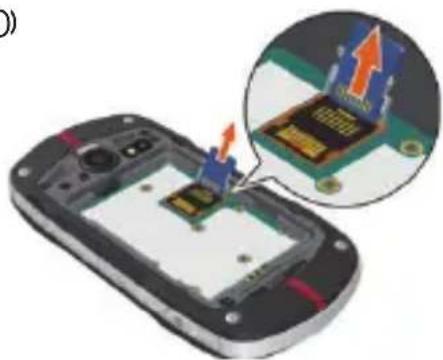
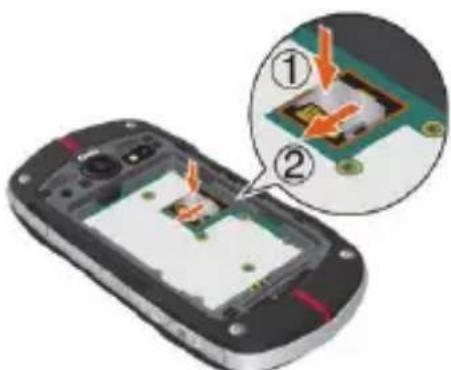
- Lightly press and hold the microSD card cover
with your finger cushion ①, then unlock it by sliding it in the direction of the arrow ② as shown in the right figure.
The microSD card cover pops up with the microSD card when unlocked.

text_image
Ver ① ②- Raise the microSD card cover by rotating it in the direction of the arrow shown in the right figure.

natural_image
Close-up of a smartphone showing a close-up of its internal components with an inset close-up highlighting a blue component (no text or symbols visible)- Remove the microSD card from the microSD) card cover as shown in the right figure.
natural_image
Close-up of a smartphone showing a small electronic component being inserted, with an inset close-up highlighting the internal structure (no text or symbols visible)- Lower the microSD card cover by rotating it in the direction of the arrow shown in the right figure.
natural_image
Close-up of a smartphone showing internal components with an inset close-up of a circuit board (no text or symbols visible)- Lightly press and hold the microSD card cover with your finger cushion ①, then lock it by sliding it in the direction of the arrow ② as shown in the right figure.
text_image
Diagram showing a smartphone with an internal circuit board and a magnified view of the component, labeled with parts ① and ②.- Install the battery and replace the battery cover making sure to slide the Battery Cover Lock to the LOCK position.
For instructions on how to install the battery and the battery cover, • refer to steps 3 through 6 of “Installing and removing the battery” on page 14.
Warning!
Whenever installing or removing a microSD card, make sure the phone is turned off and that the Wall/USB Charger is not connected.
When installing or removing a microSD card, avoid touching the • microSD card terminal to avoid damaging the microSD card, causing malfunction or loss of data.
The front and the back of the microSD card • look different. When inserting the memory card, make sure that the terminals of the phone and the microSD card are facing each other. If not, the microSD card may not fit in the microSD card socket, or the microSD card and/or card cover may be damaged.

natural_image
Blue folder icon with an upward arrow, no text or symbols presentInsert like this.
Do not forcibly insert the microSD card into the microSD card • cover. Hold the card so that the terminals of the phone and the microSD card are facing each other, and carefully insert it.
To lock or unlock the microSD card cover, lightly press and hold • it with your finger cushion, and slide it in the direction of lock or unlock. Do not use your nail or like when sliding the microSD card cover. Otherwise personal injury or damages on the microSD card, microSD card cover, and/or phone may result.
Failure to completely reseal the battery cover after installing the • memory card may result in damage if the phone is exposed to water.
- Remove the battery cover and the battery.
For instructions on how to remove the battery cover and the battery, refer to steps 1 through 3 of “Installing and removing the battery” on page 14.
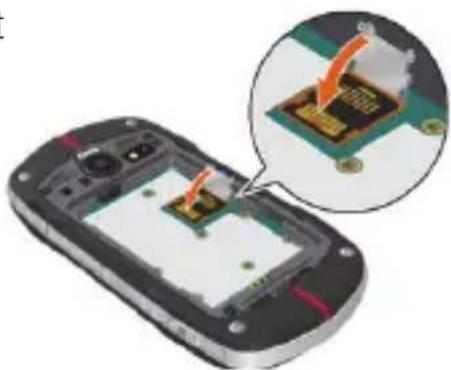
- Lightly press and hold the microSD card cover with your finger cushion ①, then unlock it by sliding it in the direction of the arrow ② as shown in the right figure.

text_image
Over ① ②- Raise the microSD card cover by rotating it in the direction of the arrow shown in the right figure.

natural_image
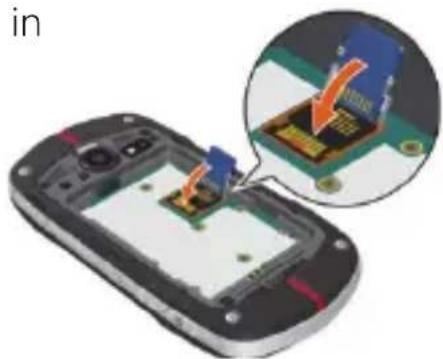
Close-up of a smartphone showing internal components with an inset close-up highlighting a specific circuit board (no text or symbols visible)- Hold the microSD card so that the terminals of the phone and the microSD card are facing each other, and carefully insert the microSD card into the microSD card cover, as shown in the right figure.

natural_image
Close-up of a smartphone with an inset showing a close-up of a small electronic component being inserted (no text or symbols visible)- Lower the microSD card cover by rotating it in the direction of the arrow shown in the right figure.
natural_image
Illustration of a smartphone with an inset showing a close-up of a circuit board component being inserted (no text or symbols visible)- Lightly press and hold the microSD card cover
①, then lock it by sliding it in the direction of the arrow ② shown in the right figure.

text_image
Over ① ②- Install the battery and replace the battery cover, making sure to slide the Battery Cover Lock to the LOCK position.
For instructions on how to install the battery and the battery • cover, refer to steps 3 through 6 of “Installing and removing the battery” on page 14.
Installing the microSD card cover
If the microSD card cover comes off, install it using the following procedure:
-
Make sure that rod for the microSD card cover is not deformed before installation.
-
Hold the microSD card cover vertically and insert one end of the cover rod into position ① as shown in the right figure.
-
Insert another end of the rod into the position as shown in the right figure.

natural_image
Close-up of a mobile phone showing internal components and a close-up view of the chip (no text or symbols visible)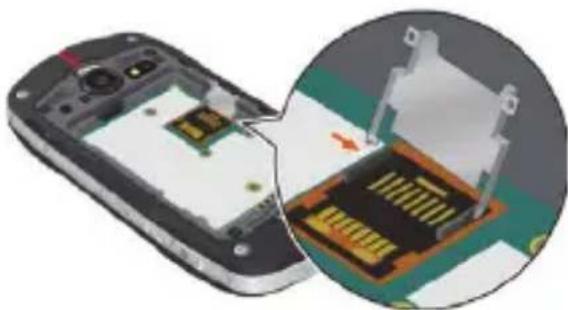
natural_image
Illustration of a smartphone showing internal components and a close-up view of the chip (no text or symbols present)Charging the battery
To charge your battery:
- To open the Charging/Data Port cover, insert your fingertip into the notch and open the cover. Then connect the USB Cable (included in box) to the Charging/Data Port.
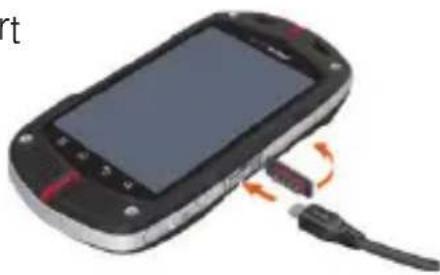
natural_image
Close-up of a mobile phone with a cable and USB cable inserted, showing no visible text or symbols.- Connect the opposite end of the USB Cable to the USB port on the Wall Charger (included in box).
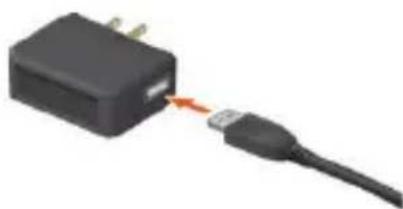
natural_image
Close-up of a black USB drive connected to a cable, with a red arrow indicating the cable's connector (no text or symbols visible)- Plug the Wall Charger power plug into an electrical outlet.
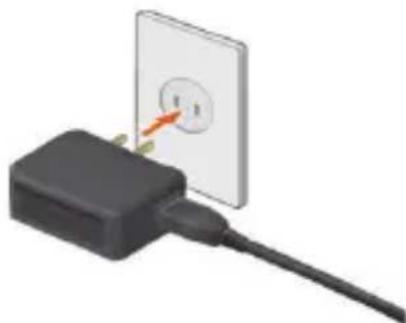
natural_image
3D illustration of a black plug connected to a wall-mounted power outlet (no text or symbols visible)- After the phone is completely charged, unplug the USB Cable from the Charging/Data Port, then close the port cover.
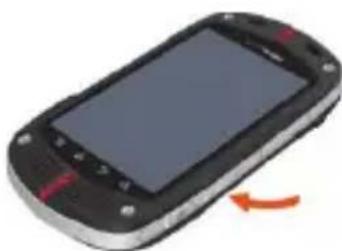
natural_image
Black handheld mobile phone with a red scroll wheel and blue screen, showing no visible text or symbols.- Make sure the port cover is completely closed.
Warning!
- Hold the small connector with the USB mark facing up.
When inserting the connector into the
Charging/Data port on the phone, hold the connector straight against the port without
tilting it vertically or horizontally and insert it gently.
Failure to completely reseal the Charging/Data Port cover after • charging may lead to water or other liquids entering the casing, which may cause damage to the phone.

natural_image
Close-up of a USB cable connector with an orange arrow indicating a connection point (no text or symbols visible)NOTE
Charging time varies depending upon the battery level.
Touchscreen operations
Most of the phone operations can be performed from the Touchscreen by touching or dragging with your finger.
In this manual, the following terms are used for Touchscreen operations.
Warning!
Touch the Touchscreen lightly with your finger. Do not press it • hard with your finger or a plastic pen, etc.
Any of the following operations may lead to the Touchscreen • inoperable or malfunction.
Operation with gloves worn -
Operation with your nail tip -
Operation with foreign materials put on the Touchscreen -
Operation with protective sheet or sticker adhered on the - Touchscreen
Operation in high-humidity environment or when the - Touchscreen is wet.
Touch
To select an item, touch the Touchscreen with your finger once.
You can select a menu item or icon, or enter text, by touching the screen.
Touch and hold
To open the pop-up menu, touch and hold the Touchscreen with your finger.
For example, if you touch and hold the empty area of the Home screen, the pop-up menu to customize the Home screen will open.
Drag
To move an item such as an icon on the screen, touch and hold it with your finger then keeping your finger on the icon move (drag) it.
For example, you can move an icon to a desired place by touching and holding then dragging it.
Swipe or slide
To swipe or slide, move your finger quickly in a horizontal or vertical direction on the Touchscreen.
For example, you can swipe the Home screen to view the left/right Home screen extension panel, or slide the screen up or down to scroll the Email list.
Double-tap
Double-tap is a finger action of quickly tapping the Touchscreen twice.
For example, you can zoom in to the desired section of a web page by double-tapping it.
Pinch
In some applications (such as Browser, Maps, Gallery, and Document Viewer), you can zoom in and out by placing two fingers on the screen at once and spreading them apart (to zoom in) or pinching them together (to zoom out).
Rotate the screen
In many applications, turning the phone clockwise or counterclockwise from upright to sideways rotates the orientation of the screen display. Turning the phone from sideways to upright rotates the orientation of screen display back again.

flowchart
graph TD
    A["Mobile Phone 1"] -->|Orange Arrow Down| B["Mobile Phone 2"]
    B -->|Orange Arrow Up| C["Mobile Phone 3"]
    C -->|Orange Arrow Down| A
NOTE
The screen orientation rotating function is enabled by default. To disable it, touch the Menu key ☐ on the Home screen, then touch Settings > Display and uncheck Auto-rotate screen.
Turning the phone on and off Turning the phone on
- Press and hold the Power Key Ⓐ for at least two seconds.
NOTES
When you first turn on the phone, you are prompted to perform • Initial setup. See “Initial setup” on page 26. If your phone is left for a certain period of time without operation, • the screen display will turn off and the Touchscreen will be locked. To restart the phone operation, press the Power Key ☐ to turn on the screen display and unlock the Touchscreen. See “Turning the screen on and off” on page 29. Avoid any unnecessary contact with the internal antenna area • while your phone is on.
Turning the phone off
- Press and hold the Power Key Ⓐ until the pop-up menu appears.
- Touch Power Off > OK.
Initial setup
Initial setup should be performed when you turn on the phone for the first time.
- Press and hold the Power Key Ⓐ until the main display lights up.
- Select the language to be used on the phone. Check that English is selected and touch Next.
- Touch Activate to activate the phone.
- Set up the Backup Assistant.
Touch Create a Backup Assistant Account or Get Stored Contacts to proceed to Backup Assistant setting. Follow the on-screen instructions to set up Backup Assistant. Touch Skip or No thanks to skip Backup Assistant setting.
- Set up the Google ^TM account.
Touch Set up > Next, then touch one of the following options:
Create: Enables you to create a new Google account. Follow the on-screen instructions to enter information such as a user name. Once the Google account is created, you can sign in to your account by entering your username and password.
Sign in: If you already have your own Google account, you can sign in to your account by entering your username and password. Touch Skip to skip the Google account setting and exits the Initial setup. You may set up a Google account later.
- Set up Account settings.
Touch Set up > Email to proceed to Email settings. For instructions on how to set up Email, see “Adding an email account” on page 145. Touch Skip to skip Account Setup.
- Specify whether to permit services such as VZW Location Services to use your phone's location information.
To permit, check the checkbox and touch Agree.
When finished, touch Next.
- Touch one of the following options:
Start Video tutorial: Starts Video tutorial to learn how to use functions on your phone. The video tutorial is stored on the pre-installed microSD card.
Begin: Finishes the initial setup to use your phone.
NOTES
- If Emergency is touched in step 3, you can place an emergency call without activating the phone. You can also perform the same settings using the Setup Wizard • later on, by touching the Launcher icon 📁 on the Home screen, then the Setup Wizard icon 📁.
About Google account
To use Google services such as Gmail™, Google Talk™, Google Calendar™, and other Google applications, or for backing up settings to the Google server, you should sign in to your Google account.
When signed in, the phone will be synchronized with the data such as Contacts, Gmail Messages, and Event Calendar that are registered in the applications and services on the web.
Usage of some applications such as the Calendar may be limited to the first account you created on the phone. If you want to use several Google accounts on the phone, make sure to first sign into the account that allows you to use the limited applications.
NOTES
If you have obtained a corporate account through a company or • other organization, a special procedure may be required to sign in to that account. Contact your IT department.
If you have not signed in to the Google account in the initial setup • steps, you may be prompted to sign in or create a new account when you try to use any application that requires you to sign in, such as Gmail or Google Talk.
To restore the data backed up from another phone with Android • release 2.0 or higher to this phone, you should sign in to the specific Google account that was used for the backup in the initial setup steps. Once the initial setup is complete, this type of restoration is not possible.
Basics
Turning the screen on and off
You can turn off the screen to conserve the battery. The touchscreen is locked while the screen is off to prevent improper operation.
NOTE
The screen also turns off when the phone is not used for a certain period of time.
You can set the time until the screen goes off with Screen timeout of Display settings. See “Display settings screen” on page 271.
- Press the Power Key ① to turn off the screen display and lock the touchscreen.
- Press the Power Key Ⓐ to turn on the screen display.
- To unlock the touchscreen, drag the slide icon to the right.
text_image
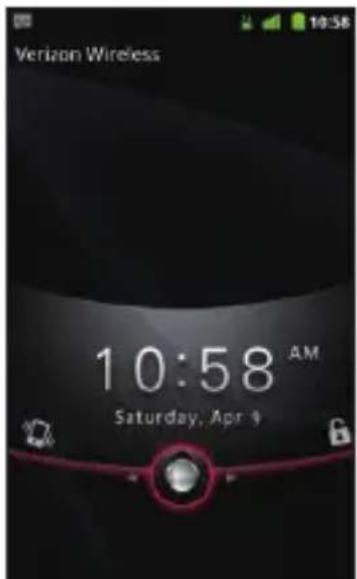
Verizon Wireless 10:58 AM Saturday, Apr 4- The last screen you were working on opens.
NOTES
Drag the slide icon 🙏 left to set the phone to Silent mode. This will cancel the Silent mode if the phone is already in Silent mode. If you have locked your screen, you must draw an unlock pattern • or enter a PIN or password to unlock it. See “Locking your screen” on page 53.
Getting to know the Home screen
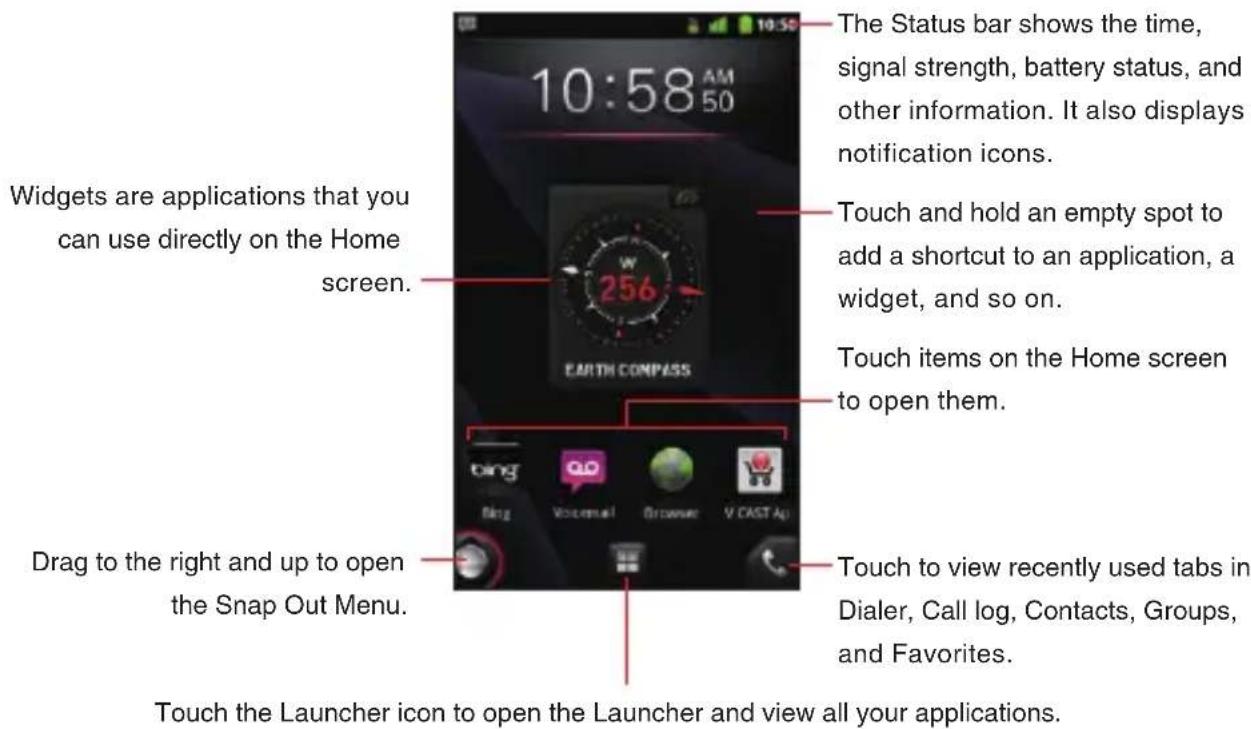
The Home screen is your starting point to access all the features on your phone. It displays application icons, widgets, shortcuts, and other features.
text_image
The Status bar shows the time, signal strength, battery status, and other information. It also displays notification icons. Touch and hold an empty spot to add a shortcut to an application, a widget, and so on. Touch items on the Home screen to open them. Drag to the right and up to open the Snap Out Menu. Touch to view recently used tabs in Dialer, Call log, Contacts, Groups, and Favorites. Touch the Launcher icon to open the Launcher and view all your applications.At the top of the screen, the Status bar displays the time, information • about the status of your phone, and icons for notifications that you have received. To learn more, see “Monitoring your phone’s status” on page 32 and “Managing notifications” on page 34.
You can customize the Home screen with different wallpaper and • display the items you want. See “Customizing the Home screen” on page 41.
Touch the Launcher icon ➕ at the bottom of the screen to view all installed applications. See “Opening and switching applications” on page 36.
Touch and hold the Launcher icon 📋 to view thumbnails of the Home screen and its extensions, which you can touch to open.
Viewing other parts of the Home screen
Slide your finger left or right across the Home screen.
These extensions to the Home screen provide more space for widgets, shortcuts, and other items.

text_image
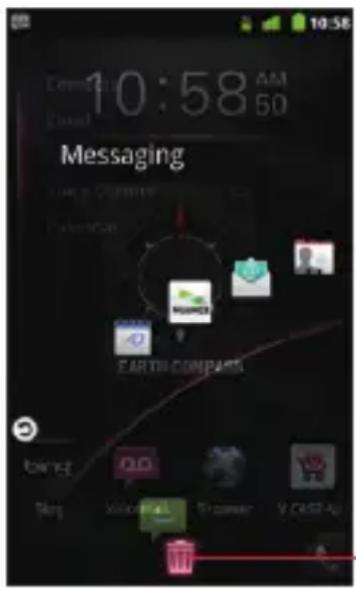
10:58 AM 10:58 45 F 34 F 3 bing all 3.2 0 01:12 07:58 Market EARTH COMPASS Gallery Music Em Social Beat Maps Read out Menu Ring Voicemail Browser V CAGT AgjReturning to the Home screen
- Touch the Home key 📋 at any time, in any application.
Monitoring your phone's status
The Status bar appears at the top of every screen. It displays icons indicating that you have received notifications (on the left) and icons indicating the phone's status (on the right), along with the current time.

text_image
Mobile status bar with smiley face, 3G battery icon, and time display showing 10:58Notification icons Status icons
If you have more notifications than can fit in the status bar, a plus icon prompts you to open the Notifications panel to view them all. See "Managing notifications" on page 34.
Status icons
The following icons indicate the status of your phone.
 | Connected to 3G mobile network |  | Roaming |
 | 3G in use No signal |  | |
 | Connected to 1x mobile network |  | Silent mode |
 | 1x in use Ringer is silenced |  | |
 | Mobile network signal strength |  | Phone microphone is mute |
 | Connected to a Wi-Fi network |  | Battery is very low |
 | Bluetooth is on Battery is low |  | |
 | Connected to a Bluetooth device |  | Battery is partially drained |
 | Airplane mode Battery is full |  | |
 | Alarm is set Battery is charging |  | |
 | Speakerphone is on E911Onl |  | |
| Location information is available | Receiving location data from GPS | ||
 | GPS is on |  | Device encryption and/or Storage card encryption enabled |
Notification icons
The following icons indicate that you have received a notification.
See “Responding to a notification” on page 35 for information about responding to these notifications. In addition to these icons, applications you install on your phone may use their own notification icons.
 | New email(Yahoo® account) |  | New voicemail |
 | New email(Hotmail account) |  | Upcoming event |
 | New email(Google account) |  | Data is syncing |
| Aol. | New email (AOL® account) | Problem with sign-in or sync | |
 | New email(Exchange account) |  | Battery is charging and full |
 | New email(Verizon account) |  | SD card is full |
 | New email(other accounts) |  | An open Wi-Fi network is available |
 | New GmailTM message |  | Phone is connected via USB cable |
 | New text or multimediamessage |  | Number of devicesconnected using 3G Mobile Hotspot |
 | Problem with text ormultimedia message delivery |  | 3 more notifications notdisplayed |
 | New Google TalkTMmessage |  | Call in progress |
 | Call in progress using a Bluetooth headset |  | Carrier data use threshold approaching or exceeded |
 | Missed call |  | Application update available |
 | Call forwarding is on System u |  | ate available |
 | Song is playing Car Mode is r |  | |
 | Uploading data PTT is on |  | |
 | Downloading data PTT is on b |  | inavailable |
 | Download finished PTT call in |  | gress |
 | Connected to VPN Missed PT |  ull ull |
Managing notifications
Notification icons report the arrival of new messages, calendar events, and alarms, as well as ongoing events, such as when call forwarding is on or the current call status.
When you receive a notification, its icon appears in the Status bar, along with a summary that appears only briefly.
Depending on your settings, when you receive a new notification you may hear a notification sound, or the phone may vibrate. These settings, as well as the sound volume adjustment and other general notifications settings, are described in “Sound settings” on page 270. You can open the Notifications panel to view a list of all your notifications.
NOTE
Applications whose activities produce notifications, such as Email and Gmail, have their own settings, which you can use to configure whether or not notifications are sent, and how they send the notifications, such as whether they sound a ringtone, or vibrate, and so on. See the sections on those applications for details.
Opening the Notifications panel
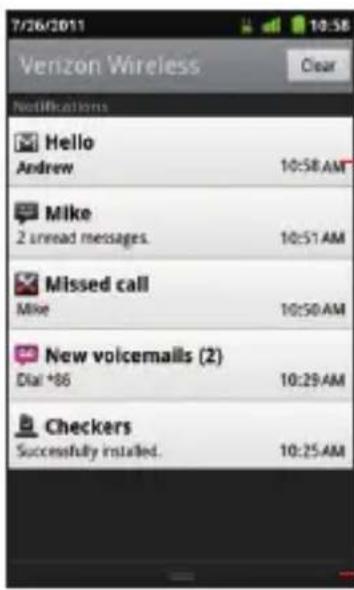
- Drag the Status bar down from the top of the screen.
The Notifications panel displays your wireless provider and a list of your current notifications. Notifications about ongoing activities are listed first, followed by Notifications about events, such as new mail notifications or Calendar reminders.
text_image
7/26/2011 Venzon Wireless Clear Notifications Hello Andrew 10:58 AM Mike 2 unread messages. 10:51 AM Missed call Mike 10:50 AM New voicemails (2) Dial +86 10:29 AM Checkers Successfully installed. 10:25 AMTouch a notification to open it in its application.
Drag this bar up to close the Notifications panel.
NOTE
On the Home screen, you can also open the Notifications panel by touching the Menu key ☐ > Notifications.
Responding to a notification
- Open the Notifications panel.
Your current notifications are listed in the panel, each with a brief description.
- Touch a notification to respond to it.
The Notifications panel will close, and the next step depends on the notification.
For example, new email notifications will open your inbox, and network disconnect notifications will open the list of configured networks so you can reconnect.
Clearing all notifications
- Open the Notifications panel.
- Touch Clear at the top right of the panel.
All event-based notifications are cleared; ongoing notifications remain in the list.
Closing the Notifications panel
- Drag the tab at the bottom of the Notifications panel to the top of the screen.
Or, just touch the Back key ↩.
The panel also closes when you touch a notification to respond to it.
Opening and switching applications
The Launcher, which you open from the Home screen, holds icons for all of the applications on your phone, including any applications that you downloaded and installed from Market or other sources.
When you open an application, the other applications you have been using do not stop; they keep on running: playing music, rendering web pages, and so on. You can quickly switch between your running applications to work with several at once. The Android operating system and applications work together to ensure that applications that you are not using do not consume resources unnecessarily, by stopping and starting them as needed. For this reason, there is no need or facility for quitting applications.
NOTE
To learn how to discover and install additional applications and games on your phone, see “Android Market” on page 242.
Opening and closing the Launcher
- Touch the Launcher icon on the Home screen.
The Launcher opens.
If you have more applications than can fit on the Launcher in one view, you can slide the Launcher up or down to view more.

text_image
3G Mobile Hotspot Alarm Clock bing Bing Books Browser Calculator Calendar Cameroon Camera Car Mode City ID Contacts Desk Cradle Document Viewer Downloads Email G2Touch an application to open it
Slide the Launcher up or down to bring more icons into view.
Touch to close the Launcher.
You can add an application icon to the Home screen by touching • and holding it on the Launcher until it vibrates, and then dragging it to a location on the Home screen.
Touch the Home icon 🙏 or the Home key 🔒 to close the Launcher.
The Launcher closes automatically if you touch an icon to open • its application, or if you move an icon from the Launcher to the Home screen.
Opening an application
- Touch an application's icon on the Launcher.
Or, touch an application's icon on the Home screen.
Switching to a recently used application
- Touch and hold the Home key 📋.
A small window opens, with icons of applications that you have recently used.
- Touch an icon to open its application.
Or, touch the Back key ↩ to return to the current application.
Opening an application from the Snap Out Menu
You can quickly open applications using the Snap Out Menu.
- On the Home screen, drag the Snap Out Menu icon ☐ at bottom left of the screen diagonally up and right, drawing an arc.
The Snap Out Menu opens and shortcut icons appear along the arc where the Snap Out Menu icon was dragged.

text_image
10:58 AM 60 Contacts Email Marketing EARTH.COM 3.5 QQ Home Vicemail Bracony VCAST Ag- While touching the screen with your finger, drag back the Snap Out Menu icon to select a shortcut icon.
text_image
Contacts 10:58 AM Email Messaging Voice Control E-mail COMPOSITE Bags minutes Business You're- Lift your finger to open the application corresponding to the selected shortcut icon.
NOTES
If you drag the Snap Out Menu icon 🔒 that is at the bottom left of the Home screen to the right and up, drawing an arc to the right edge of the screen, and then lift your finger, the Snap Out Menu remains displayed.
You can open an application by touching a shortcut icon in the • Snap Out Menu.
If you touch somewhere other than an icon, the Snap Out Menu • closes and the Home screen reappears.
If you drag down the Snap Out Menu icon 📋 on the Home screen, the bottom edge of the screen turns red. If you keep dragging the Snap Out Menu icon 📋 the opposite corner of the screen, it remains there.
You can play the video tutorial for Snap Out Menu by touching the • Menu key ☐ > Tutorial on the Home screen. The video tutorial is stored on the pre-installed microSD card.
Deleting or adding a Snap Out Menu shortcut
The Snap Out Menu can contain up to five shortcuts. If you want to add your favorite shortcuts, delete some shortcuts before adding. The shortcuts that are available depend on the applications you have installed.
- Drag the Snap Out Menu icon that is at bottom left of the Home screen to the right and up, drawing an arc to the left edge of the screen, and then lift your finger.
The Snap Out Menu remains displayed.
- Touch the edit icon
The Snap Out Menu enters edit mode and the trash can icon appears.

- Drag the shortcut icon to the trash can icon
- When the trash can icon turns red, lift your finger.
text_image
10:58 AM 50 Messaging Long Sequence Sentence EARTH COMPARTS bing Hot Welcome Browser V.CAST-UpDrag the shortcut icon to the trash can icon and lift your finger to delete the shortcut icon.
- Touch the plus icon
- Touch a shortcut type from the displayed shortcut type list.
- Touch an item in the displayed list to enter in the Snap Out Menu.
- Touch the back icon 🔒 to return to Snap Out Menu in normal mode.

Customizing the Home screen
You can add application icons, shortcuts, widgets, and other items to any part of the Home screen. You can also change the wallpaper.
Adding an item to the Home screen
- Open the Home screen where you want to add the item.
For an introduction to working with the Home screen, including how to switch Home screens, see “Getting to know the Home screen” on page 30.
- Touch the Menu key > Add.
Or just touch and hold an empty location on the Home screen.
- Touch the type of item to add in the menu that opens.
You can add the following types of items to the Home screen:
Shortcuts: Add shortcuts to applications, a bookmarked web page, a favorite contact, a Gmail label, a music playlist, G'zGEAR® tools, and many other items.
The shortcuts available depend on the applications you have installed.
Widgets: Add any of a variety of miniature applications (widgets) to your Home screen, including a clock, a music player, a picture frame, a power manager, a calendar that shows upcoming appointments, and a news widget. You can also download widgets from Market.
Folders: Add a folder where you can organize Home screen items, or folders that contain all your contacts, contacts with phone numbers, or starred contacts. Your folders' contents are kept up-to-date automatically.
Wallpaper: See “Changing the Home screen wallpaper” on page 43.
NOTE
If there are no empty spots on the Home screen, Add is dimmed; you must delete or move an item before you can add another item, or switch to another Home screen.
Moving an item on the Home screen
- Touch and hold the item you want to move, until it vibrates. Do not lift your finger.
- Drag the item to a new location on the screen.
Pause at the edge of the screen to drag the item onto another Home screen panel. - When the item is placed where you want it, lift your finger.
Removing an item from the Home screen
- Touch and hold the item you want to remove, until it vibrates. Do not lift your finger.
The Launcher icon changes to the trash can icon .
-
Drag the item to the trash can icon
-
When the icon turns red, lift your finger.
Renaming a folder
- Touch the folder to open it.
- Touch and hold the folder window's title bar.
- Enter a new name in the dialog that appears.
- Touch OK.
Changing the Home screen wallpaper
-
On the Home screen, touch the Menu key ☐ > Wallpaper.
-
Touch one of the following wallpaper types:
Gallery: Allows you to use a picture that you have captured using the camera, or copied to your phone as a wallpaper. You can crop the picture before setting it as a wallpaper. Working with pictures is described in “Gallery” on page 176.
Live wallpapers: Opens a scrolling list of animated wallpapers installed on your phone. Some live wallpapers change according to the time of day, in response to touching the screen, tell the time, or offer other information. Some live wallpapers have a Settings option.
Wallpapers: Opens a screen where you can view a sample of the wallpaper images that come with the phone. Slide the miniature images left and right to view the samples. Touch a sample to view a larger version.
- Touch Save or Set wallpaper.
NOTE
You can also change the Home screen wallpaper by touching and holding an empty area of the Home screen and touching Wallpapers in the menu that opens.
Working with widgets
This phone has various types of widgets pre-installed. You can also download widgets from Market.
For instructions on how to add a widget to the Home screen, see "Adding an item to the Home screen" on page 41.
Bing™
Touch the text field of the Bing widget and enter the word(s) to search for. As you type, search results from your phone, previously chosen search results, and web search suggestions appear. Touch a suggestion to open it.
Or, touch the microphone icon 🤒 to search using your voice.

text_image
Touch to enter the word (s) you want to search for. bing m Touch to search using your voice.Touch the text field of the widget, then touch the Menu key >
Settings to set searchable items or clear the search history.
Calendar

The Calendar widget displays upcoming Calendar events. Touch the widget to open the Calendar application.
Clock
You can select the clock to display on the Home screen from eight types of digital clocks and four types of analog clocks.
Data Usage

You can use the Data Usage widget to open My Verizon Mobile to display the data usage overview.

The Email widget displays the number of unread Emails. Touch the widget to open the Email application.
Flashlight
Touch the Flashlight widget to turn the Flashlight on or off.
G'zGEAR®
With G'zGEAR, you can use six types of widgets: Compass, Moonrise Moonset, Pedometer, Sunrise Sunset, Tide, and Virtual Trek. See "Widgets in G'zGEAR" on page 238 for details.
Market
The Market widget displays recommended application one after another. Touch the application to view its detail and install it.
Memo
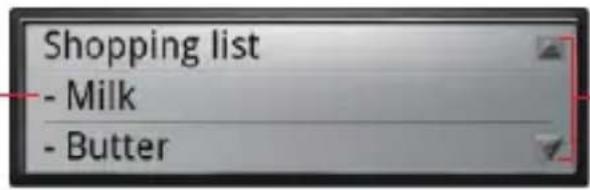
You can use the Memo widget to keep a memo displayed on the Home screen.
Touch to edit the memo.
text_image
Shopping list - Milk - ButterTouch to scroll if the entire text is not visible.
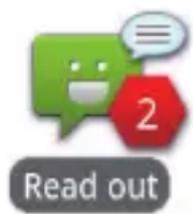
Messaging

text_image
2 MessagingThe Messaging widget displays the number of unread messages. Touch the widget to open the Messaging application.
Music
You can use the Music widget to control the playback of music from the Home screen.

text_image
Touch to open the Music application. Touch to select music. Touch to play the next song. Touch to play music. Touch while playing to stop playing.News and Weather
The News and Weather widget displays the latest news and today's weather forecast for the current location.
Touch to open the News and Weather application with a summary of the weather.

text_image
Standoff on tax-cuts extension puts Schumer, Obama at odds Washington Post 54°Touch to open the News and Weather application with a list of the top stories in the news.
Picture frame
You can use the Picture frame widget to display a picture taken with the camera, or an image copied to the phone, on the Home screen.
You can crop the picture before setting it as a wallpaper. Working with pictures is described in “Gallery” on page 176.
Power control
You can use the Power control widget to turn Wi-Fi, Bluetooth, GPS, or Auto-sync on or off. You can also adjust the brightness of the screen from the Home screen.

natural_image
Grid of six gray rectangular icons representing wireless, signal, weather, app, timer, and sun functions (no text or symbols)PTT
Touch the widget to turn the PTT function on or off.
Read out
text_image
Read outYou can use the Read out widget to have the phone read out the unread received messages with a synthetic voice. The Read out widget displays the number of unread messages. Touch the widget to start reading out unread messages.
When the phone starts reading out a message, the details of the message appear on the screen. Touch
Read again to have the phone read out the message again or touch Next message to proceed to the next message.
Search
Using the Google search widget, you can search for information on your phone and on the web. Touch the left icon to change the target of your search.
Touch to change the target of your search.
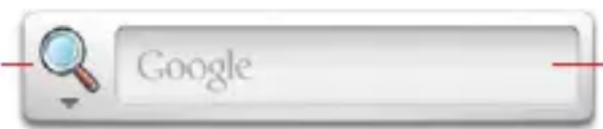
text_image
GoogleTouch to enter the word or phrase you want to search for.
Slacker Radio
Touch the widget to open the Slacker Radio application.
Social Beat Companion
The Social Beat Companion widget displays your latest Feed events. Touch the widget to open the Social Beat Companion application.
Voice Memo
You can use the Voice Memo widget to record and save voice recordings to the microSD card.
Touch to start recording.
Touch again to stop recording and save to the microSD card.
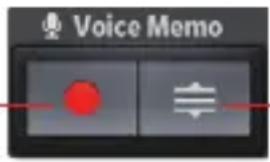
text_image
Voice MemoTouch to display the list of voice recordings and play.
Voicemail

The Voicemail widget displays the number of new voicemails.
If you have not yet subscribed to Visual Voice Mail, you can touch the widget to dial *86 to playback your voicemail. If you have already subscribed to Visual Voice Mail, the Visual Voice Mail screen appears when you touch the widget.
Weather
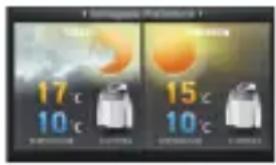
text_image
T Atmospheric Climate 17°C 10°C 15°C 10°CThe Weather widget displays today's and tomorrow's weather forecasts for the current location.
Touch to display the Weather API screen.
Touch Refresh Now to update weather forecasts.
YouTube™
The YouTube widget displays thumbnails and titles of videos one after another in the order from the most frequently played. Touch a video to play it.
Working with menus
There are two kinds of Android menus: options menus and context menus.
Options menus
Options menus contain tools that apply to the activities of the current screen or application, not to any specific item on the screen. You open options menus by touching the Menu key ☐. Not all screens have options menus; if you touch the Menu key ☐ on a screen that has no options menu, nothing happens.
Some screens have more options menu items than can fit in the main menu; touch More to open a menu of additional items.
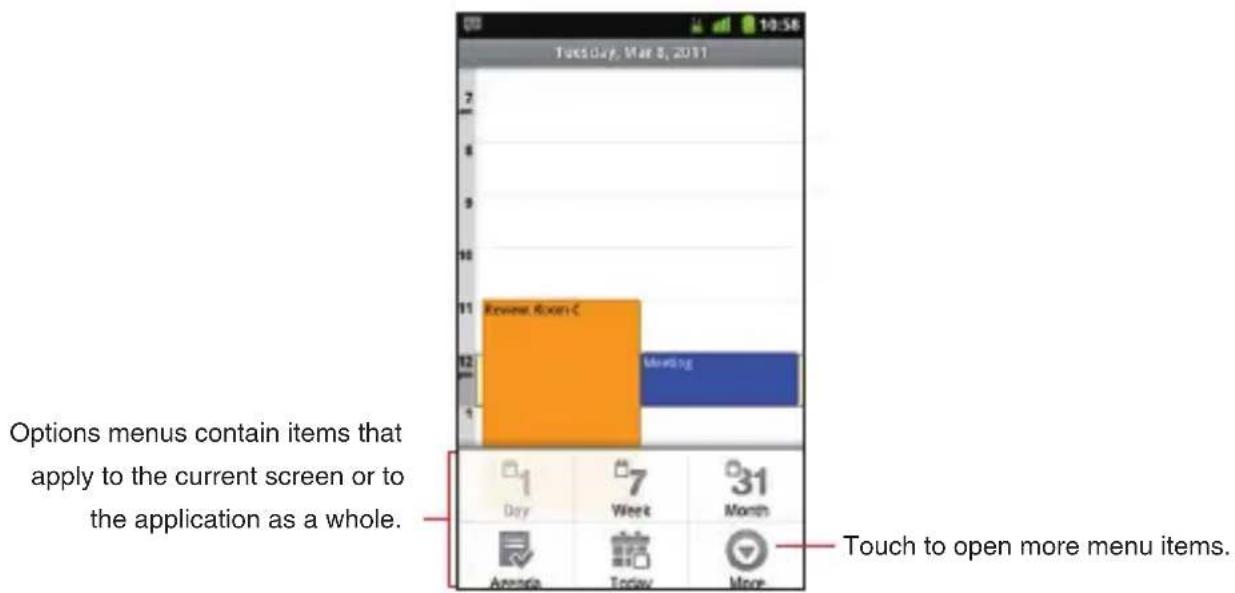
text_image
Tuesday, Mar 8, 2011 Options menus contain items that apply to the current screen or to the application as a whole. Rewert Room C Meeting 1 Day 7 Week 31 Month Ananda Today More Touch to open more menu items.Context menus
Context menus contain tools that apply to a specific item on the screen. You open a context menu by touching and holding an item on the screen. Not all items have context menus. If you touch and hold an item that has no context menu, nothing happens.
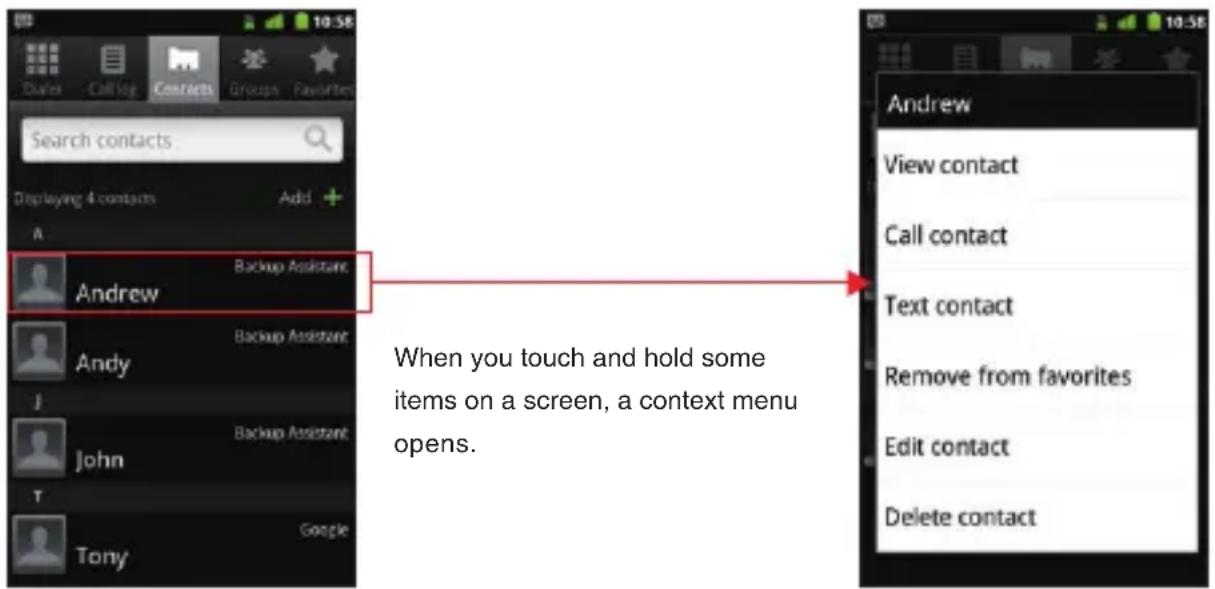
text_image
Search contacts Deploying 4 contacts Add + A Andrew Backup Assistant When you touch and hold some items on a screen, a context menu opens. Andrew View contact Call contact Text contact Remove from favorites Edit contact Delete contactQuickly connecting to your contacts
As you build up your list of contacts on your phone, you can use Quick Contact for Android in many applications to quickly start a chat, email, or text message; to place a call; or to locate your contacts. Quick Contact for Android is a special icon that you touch to open a bubble with options for quickly initiating a connection to that contact.
1. Identify a Quick Contact icon by its frame.
Contacts that you can access with Quick Contact are displayed differently in different applications, but usually with a picture frame that looks like this:

Touch to open a bubble with icons.
- Touch a Quick Contact icon to open a bubble with icons for all the ways you can communicate with the contact.
If there are more icons than can fit in the bubble, drag them left and right to view them all.
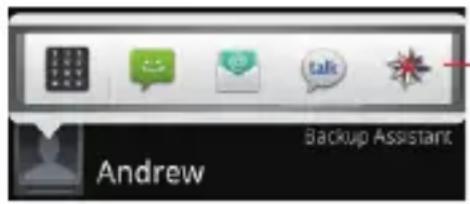
text_image
Andrew Backup AssistantTouch an icon to start communicating with the contact in that application.
- Touch an icon to open its application, so you can start communicating with your contact right away.
You can also touch an icon to edit the contact's information in Contacts, to view the contact's address in VZ Navigator®, and so on, depending on which applications and accounts are configured on your phone.
NOTE
You can add a shortcut for a contact to your Home screen, which you can then touch to open Quick Contact for Android for that contact. For more information about adding shortcuts to the Home screen, see “Adding an item to the Home screen” on page 41.
Placing your phone in Silent mode
You can silence all sounds including call and notification ringtones by placing your phone in Silent mode.
- Press and hold the Power Key Ⓑ until the pop-up menu appears.
- Touch Silent mode.
In Silent mode, the Silent mode icon

appears in the Status bar.
NOTES
Repeat the same operation in Silent mode to exit Silent mode. • The audio from music, videos, and other media and any alarms • you have set still sound in Silent mode. You must silence media and alarms in their own applications.
Placing your phone in Airplane mode
Some locations may require you to turn off your phone's mobile, Wi-Fi, and Bluetooth wireless connections. You can turn off all these wireless connections at once by placing your phone in Airplane mode.
- Press and hold the Power Key Ⓐ until the pop-up menu appears.
- Touch Airplane mode.
In Airplane mode, the Airplane mode icon bar.
appears in the Status
NOTE
Repeat the same operation in Airplane mode to exit Airplane mode.
Personalizing your phone
You can change the application that opens when you press the Tactile Key/PTT Key ◇ ◇ ◇ or change the ringtone that sounds when you receive a call, to your favorite applications and ringtones.
Selecting an application to be opened by pressing the Tactile Key/PTT Key
-
On the Home screen, touch the Menu key > Settings > Personalization > Assign app to Tactile key.
-
Touch a shortcut type from the displayed shortcut type list.
-
Touch the item you want to open when the Tactile Key/PTT Key is pressed from the displayed list.
NOTE
When PTT is turned on, the Assign app to Tactile key setting is disabled.
Selecting a ringtone to sound when receiving a call
-
On the Home screen, touch the Menu key > Settings > Personalization > Phone ringtone.
-
In the scrolling list of ringtones that opens, touch the one to play when you receive a phone call. The ringtone plays a sample.
-
Touch OK.
NOTE
You can select a ringtone that comes with the phone, or one that you saved as a ringtone by using the Music application. See “Using a song as a ringtone” on page 192.
Locking your screen
You can lock your screen so that only you can unlock it to place calls, access your data, buy applications, and so on.
-
On the Home screen, touch the Menu key ☐ > Settings > Location & security.
-
Touch Set up screen lock.
If you already have a screen lock configured, touch Change screen lock to change how you lock your screen or to turn off screen locking.
- Touch Pattern, PIN, or Password.
If you touch Pattern, you will be guided to create a pattern you must draw to unlock the screen. The first time you do this, a short tutorial about creating an unlock pattern appears. You can touch the Menu key ☐ at any time for a refresher. Then you will be
prompted to draw and redraw your own pattern.
If you touch PIN or Password, you will be prompted to set a numeric PIN or a password you must enter to unlock your screen.
The next time you turn on your phone or wake up the screen, you must draw your unlock pattern or enter your PIN or password to unlock the screen.
NOTE
Even when the screen is locked, you can still place an emergency call by touching Emergency call on the screen to draw an unlock pattern or enter your PIN or password.
Optimizing battery life
You can extend your battery's life by turning off unwanted features and applications. You can also monitor how applications and system resources consume battery power.
Extending the life of your battery
You can extend the life of your battery by performing the following operations:
Turn off radios that you are not using. •
If you are not using Wi-Fi, Bluetooth, or GPS, use the Settings application to turn them off. See “Wireless & network settings” on page 266 and “Location & security settings” on page 272. (The GPS receiver is only turned on when you are using an application that makes use of it.)
Turn down screen brightness and set a shorter screen timeout.
See "Display settings screen" on page 271.
If you do not need automatic syncing for Contacts, Calendar, Gmail, • and other applications, turn them off.
See "Configuring account sync settings" on page 135.
Use the Power Control widget to check and control the status of • radios, the display brightness, and syncing.
Adding widgets is described in “Adding an item to the Home screen” on page 41.
Checking the battery charge level
- On the Home screen, touch the Menu key ☐ > Settings > About phone > Status.
The battery status (charging, discharging) and level (as a percentage of full charge) are displayed at the top of the screen.
Monitoring and controlling what uses the battery
The Battery Use screen shows which applications consume the most battery power.
You can also use it to turn off applications that you have downloaded, if they are consuming too much power.
- On the Home screen, touch the Menu key ☐ > Settings > About phone > Battery use.
The Battery Use screen lists the applications that have been using the battery, from greatest to least battery use.
The top of the screen displays the time when the phone was last connected to a charger. If connected, the amount of time the phone was running on battery power before connected is displayed.
Then each application or service that used battery power during that time is displayed, in order of the amount of power they used.
- Touch an application to learn details about its power consumption.
Different applications offer different kinds of information. Some applications include options that open screens with settings to adjust power use.
Updating your phone's system software
Your phone automatically checks for whether it can use system software update for your phone.
You will be notified if system software update can be used. You can download the update and install it on your phone.
Warning!
Depending on the type of update, all your personal data and customized settings may be erased, and applications and widgets you installed may be deleted by performing the update.
Be sure to backup necessary files and information before performing an update.
NOTE
Checking and downloading system software updates may incur additional data transfer fees from Verizon Wireless.
Receiving a notice to update your system software
- When a system software update is available, a dialog prompting you to install it appears.
- Touch Install now > OK.
- Wait until update completes. When update is completed, your phone restarts automatically.
Checking for phone system software updates manually
- On the Home screen, touch the Menu key ☐ > Settings > About phone > System updates > Check new.
- The System updates screen opens with reports on the availability of system software updates. If no update is available the message "Your system is currently up-to-date." appears.
Entering and editing text
Entering text
You can enter text using the onscreen keyboard. Some applications open the keyboard automatically. In others, you touch a text field where you want to enter text to open the keyboard.
- Touch a text field.
The onscreen keyboard opens.
- Touch the keys on the keyboard to type.
The characters you have entered appear in a selection list above the keyboard, with suggestions for the word you are typing to the right. Touch the left or right arrow in the selection list to view more suggestions. You can also view more suggestions by sliding the selection list left or right.
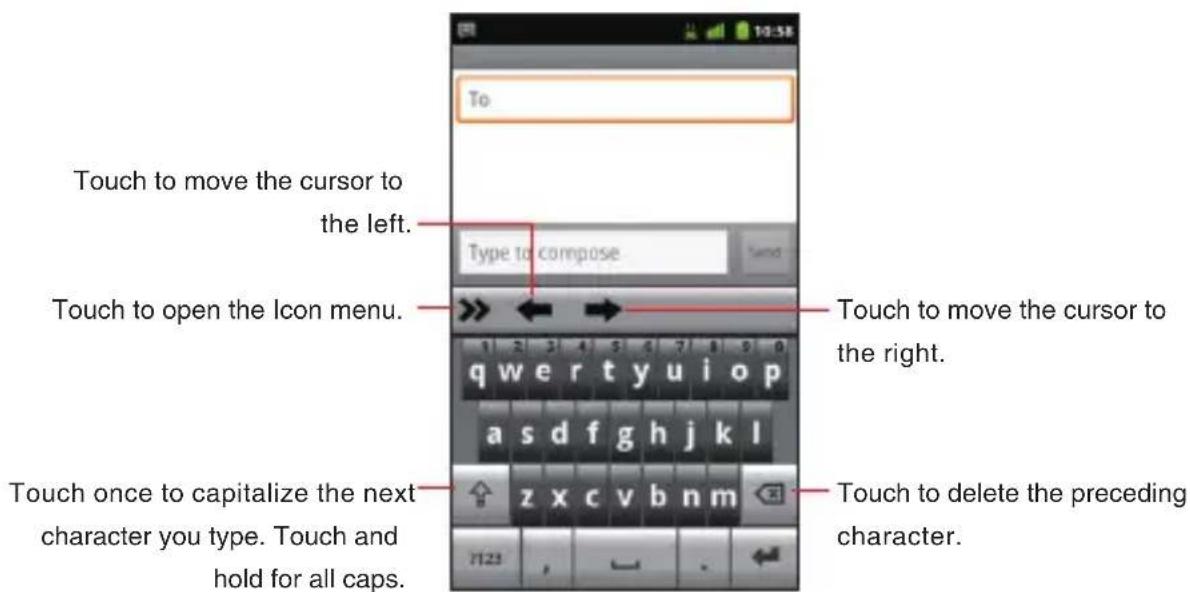
text_image
To Touch to move the cursor to the left. Type to compose Touch to open the Icon menu. q w e r t y u i o p a s d f g h j k l z x c v b n m Touch once to capitalize the next character you type. Touch and hold for all caps. Touch to move the cursor to the right. Touch to delete the preceding character.- To enter the word as typed, touch the first word displayed in the selection list.
To enter the blue bold word in the selection list, touch the Space key — or that word.
To enter another suggested word, touch the word you want to enter.
- When you are finished typing, touch and hold the Menu key ☐ to close the keyboard.
NOTES
If you touch a suggested word that is not in the predictive text • dictionary, it is automatically added to the dictionary.
Depending on a key, the list of relevant characters or symbols • pops up when you touch and hold the key. You can enter a character or symbol by touching it in the list.
You can enter words by tracing from key to key on the XT9 • onscreen keyboard.
To hide the onscreen keyboard, touch and hold the Menu key •
To show the hidden keyboard, touch and hold the Menu key again.

Entering numbers, punctuations, and symbols
- Touch the ?123 key on the onscreen keyboard.
The onscreen keyboard will switch to the keyboard with numbers, punctuations and symbols. Touch the keys on the keyboard to type.
- Touch the ALT key.
The onscreen keyboard will switch to the keyboard with other symbols such as currencies and operators for expressions. Touch the keys on the keyboard to type.
Touch the ALT key again to return to the previous keyboard with numbers, punctuations and symbols.
- Touch the ABC key to return to the keyboard to type alphabetical characters.
Changing the keyboard type
- Touch the right arrow icon on the keyboard.
The icon menu will be displayed on the keyboard.
- Type of keyboard will be switched every time you touch the keyboard switch icon in the icon menu.
You can switch between the following types of keyboards:
Keyboard: Full QWERTY keyboard same as that of PC. This keyboard is displayed by default.
Reduced keyboard: The keyboard with two alphabetical characters assigned to one key.
Phone keypad: Keypad same as regular cell phones.
text_image
qwertyuiop asdfghjkl zxcvbnm ?123 , - .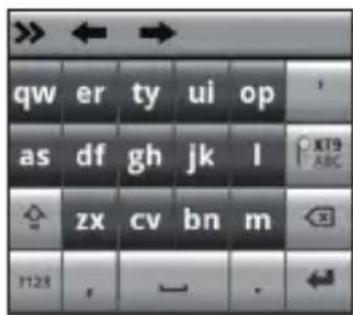
text_image
qw er ty ui op as df gh jk l zx cv bn m 1123 , → .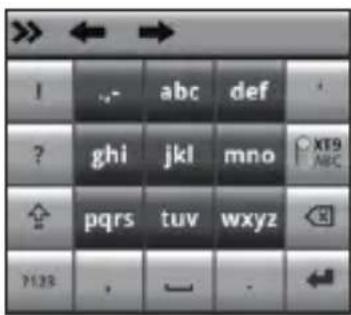
text_image
! ? ghi jkl mno XT9 pqrs tuv wxyz P123 . - .Keyboard Reduced Keyboard Phone Keypad
- Touch the left arrow icon << to hide the icon menu.
NOTES
You can display the XT9 Text Input settings screen by touching • the settings icon ⚙ in the icon menu. See “XT9 Text Input settings screen” on page 282.
You can turn off the Trace Input feature by touching the T9 Trace • icon in the icon menu. To turn it on, touch the T9 Trace icon
19 Trace again. For the Trace Input feature, see “Entering words using Trace Input feature” on page 61.
Keys with special functions
The following table describes the keys with special assigned functions. Some keys are not displayed depending on types of keyboards or applications.
| Shift Case key | Touch once to capitalize the next character you type.Touch and hold for all caps. |
| ?123 key | See “Entering numbers, punctuations, and symbols” on page 58. |
| Delete key | Deletes the preceding character.If Word Reselection of XT9 Text Input settings is checked, by placing the cursor at the end of the word and touching the Delete key once, the word is highlighted and the original selection list is displayed. |
| Enter key | Accepts an entry or inserts a carriage return. |
| Smart Punctuation key | Enters a common punctuation mark by a single key touch.Touch and hold to open the popup menu of common punctuations. |
| XT9/ABC key | Switches between XT9 mode and ABC (Multi-tap) mode. XT9 mode uses a built-in-dictionary to determine a word based on the entered characters. A word is entered more quickly because you only need to touch each key once per character. In ABC (Multi-tap) mode, you need to touch each key repeatedly until the desired character appears. |
| Search key | Touch to start a search. |
Entering words using Trace Input feature
On the Full QWERTY keyboard, you can enter a word by tracing from key to key with your finger held on it. If, for example, you want to enter "Word", trace from W to D key on the keyboard as shown in the figure below.

text_image
Word Word World Words Won qw w ty u op as d f g h j k l z x c v b n m F123 ,Changing the keyboard orientation
When entering text, you can change the keyboard orientation to horizontal by turning the phone sideways. You may feel the horizontal keyboard is easier to use because the keys are displayed larger.
1. Turn the phone sideways.
The screen rotates to horizontal, and so does the keyboard.

text_image
ro Next qw er t y u i o p a s d f g h j k l z x c v b n m 1123NOTES
To rotate the screen to horizontal automatically as you turn the • phone sideways, Auto-rotate screen of Display settings must be checked. See “Display settings screen” on page 271.
The horizontal keyboard may not be available in some applications.
Editing text
You can edit the text you entered in text fields. Use the menu commands to cut, copy, and paste text, within or across applications.
NOTE
Some applications do not support editing of some or all of the text displayed; others may offer their own editing function to work with text.
Selecting text
You select text that you want to cut, copy, delete, or replace.
- Touch and hold the text or word you want to select.
- Touch Select word or Select all in the menu that opens.
The selected text is highlighted in orange, with a tab at each end of the selection.
- Drag either selection tab to expand or reduce the range of selected text.
- Perform one of the following actions:
Touch the selected text to open a menu you can use to cut or - copy your selection, or if you have previously cut or copied text, replace the selected text by pasting.
Simply enter text by typing or speaking, to replace the selection - with what you type.
Touch the Delete key to delete the selected text. -
NOTE
You can unselect the text by touching unselected text in the same or in another text field, or touching the Back key ↩.
Cutting or copying text
- Select the text to cut or copy.
- Touch and hold the selected text.
- Touch Cut or Copy in the menu that opens.
If you touch Cut, the selected text is removed from the text field. In either case, the text is stored in a temporary area on the phone, so that you can paste it into another text field.
NOTE
You can cut or copy all the text in the text field by touching and holding the text field, then touching Cut all or Copy all from the menu that opens.
Pasting text
You can paste text that you cut or copied from one application into a text field of another application.
- Cut or copy the text to paste.
- Touch the text field where you want to paste the text.
- Touch in the text field to move the cursor to the location where you want to paste the text.
- Touch and hold the text field.
- Touch Paste in the menu that opens.
The text is inserted at the cursor. The text that you pasted still remains in a temporary area on the phone, so you can paste the same text in another location.
Phone
You can use the Phone application to place a call. You can dial an incoming, outgoing, or missed call number recorded in the call log.
Placing a call
- Touch the phone icon on the Home screen.
The Phone application opens.
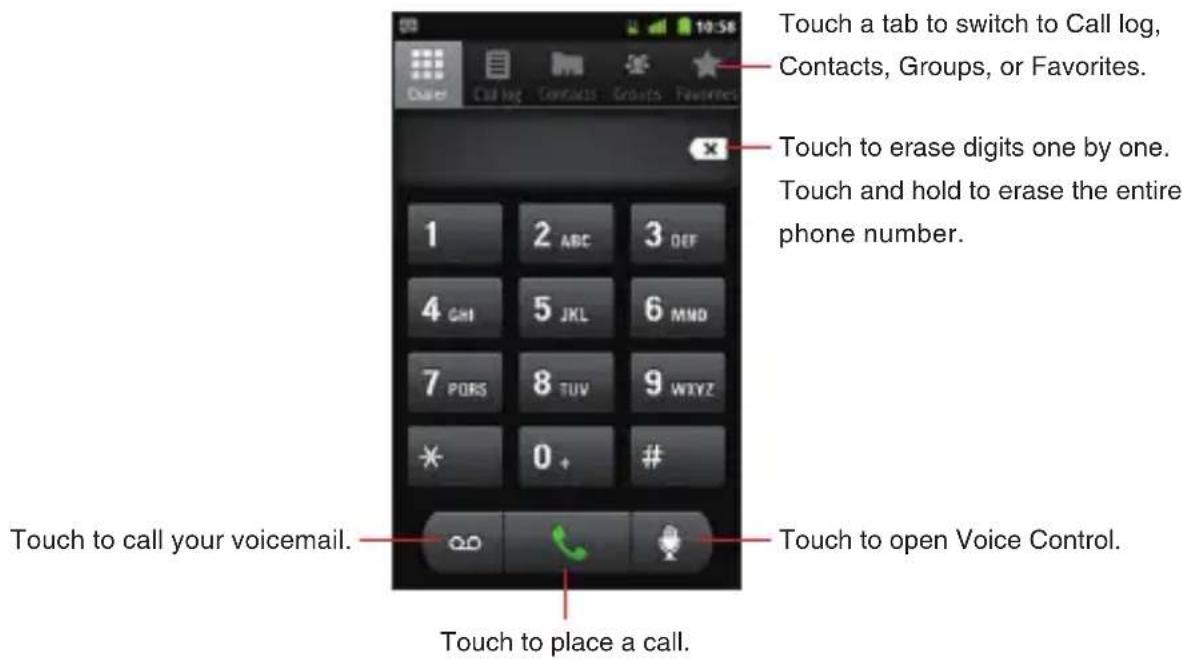
text_image
Touch a tab to switch to Call log, Contacts, Groups, or Favorites. Touch to erase digits one by one. Touch and hold to erase the entire phone number. 1 2 ABC 3 OFF 4 GMI 5 JKL 6 MND 7 PORS 8 TUV 9 WXYZ * 0 + # Touch to call your voicemail. Touch to place a call. Touch to open Voice Control.- Enter a phone number by touching the dialpad on the screen (include the area code if needed).
- If you enter a wrong number, touch the delete icon ✕ to erase digits one by one.
To erase the entire number, touch and hold the delete icon ✗.
- To place an international call, touch and hold the 0 key to enter the plus symbol (+). Then enter the international prefix for the country, followed by the full phone number.
3. Touch the call icon to place a call.
The call in progress screen appears.
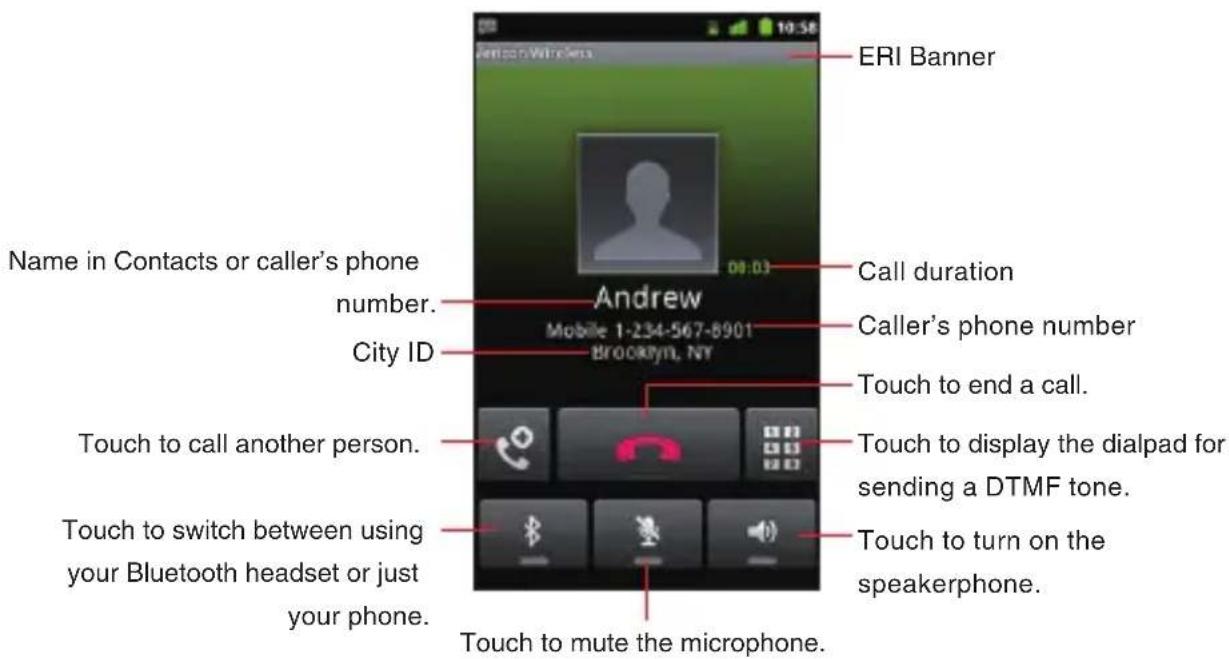
text_image
Name in Contacts or caller's phone number. City ID ERI Banner Call duration Caller's phone number Mobile 1-234-567-8901 Brooklyn, NY Touch to end a call. Touch to call another person. Touch to display the dialpad for sending a DTMF tone. Touch to switch between using your Bluetooth headset or just your phone. Touch to turn on the speakerphone. Touch to mute the microphone.- Press the Volume Keys ◀ ▶ to adjust the call volume.
4. Touch the end call icon to end a call.
When a call ends, the Call log screen appears.
5. Touch the Home key 📋 to return to the Home screen.
NOTES
During a call, the screen will turn off and the touchscreen will lock • when the phone is not used for other functions for 15 seconds.
Press the Power Key Ⓑ to turn the screen on and to unlock the touchscreen.
When the Proximity Sensor senses proximity towards other object such as your head, the icons on the call in progress screen will be hidden temporarily.
- You can also touch the Home key 📋 during a call to return to the Home screen and open another application. Even when another application is opened, the call in progress icon 🌐 appears on the Status Bar.
To end a call in progress when another application is opened, • touch the phone icon 📋 on the Home screen, touch Return to call in progress, and then touch the end call icon 📋.
Answering a call
- When there is an incoming call, the Incoming call screen opens. Information such as the caller's phone number or the caller's name is displayed if the phone number is already stored in Contacts.
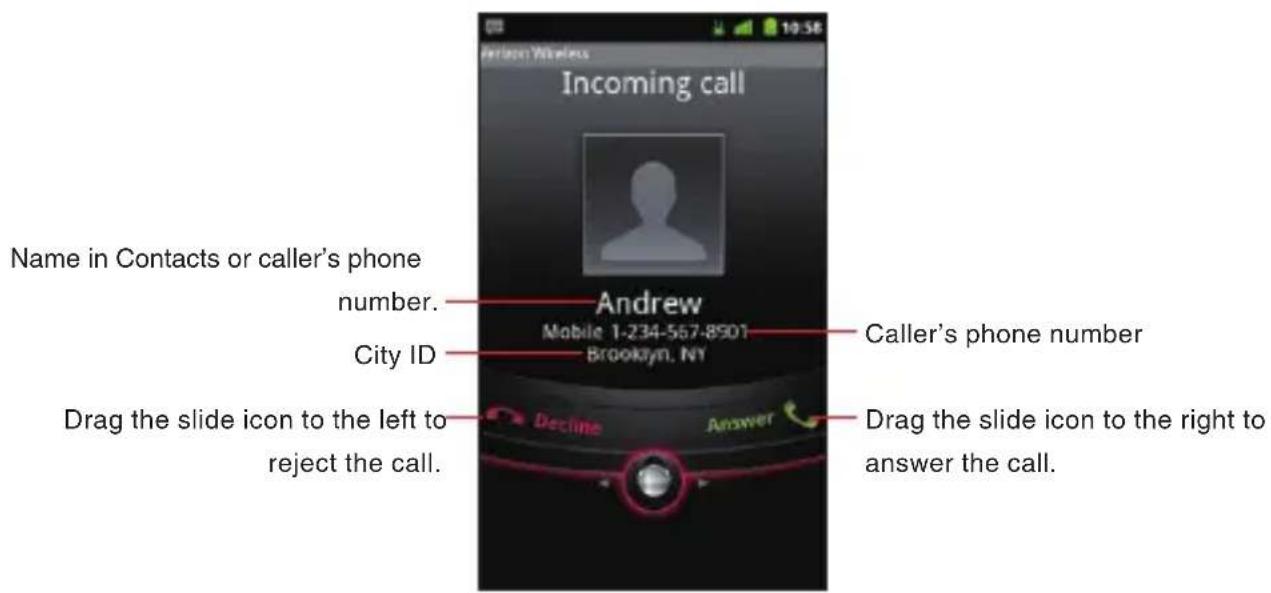
text_image
Incoming call Name in Contacts or caller's phone number. City ID Andrew Mobile 1-234-567-8501 Brooklyn, NY Caller's phone number Drag the slide icon to the left to reject the call. Decline Answer Drag the slide icon to the right to answer the call.- Press the Volume Keys ◀◀▶ when the phone is ringing to mute the ringer.
- Drag the slide icon to the right to answer a call.
NOTES
All incoming calls are recorded in the Call log. •
If there is an incoming call while another call is in progress, the • first caller will be put on hold if you choose to answer the new call.
Rejecting an incoming call
- When there is an incoming call, the Incoming call screen opens.
Drag the slide icon

to the left to reject the incoming call.
- The Send Message dialog appears prompting you to send a message to a caller after you rejected an incoming call.
Touch OK to compose a message. See “Messaging” on page 149.
Touch Cancel to return to the Home screen.
NOTE
When you reject a call, the caller is sent directly to voicemail.
Operation during a call
Switching to the speakerphone
- To turn on the speakerphone, touch the speaker icon 📷 on the call in progress screen.
When the speakerphone is turned on, the speakerphone icon appears on the Status bar.

- To turn off the speakerphone, touch the speaker icon 📋 again on the call in progress screen.
NOTES
When the speakerphone is turned on, Phone microphone • functions as Secondary microphone.
The speakerphone turns off automatically when you end a call. •
Warning!
In order to prevent hearing damage, keep the phone away from your ear while the speakerphone is on.
Muting the microphone
- To mute the microphone, touch the microphone icon 📁 on the call in progress screen.
When you mute the microphone, the mute icon 🖼✗ appears on the Status bar. - To un-mute the microphone, touch the microphone icon 📁 again on the call in progress screen.
NOTE
The microphone un-mutes automatically when you end a call.
Switching between a Bluetooth headset and the phone
When a Bluetooth headset is connected to your mobile phone, you can switch between using your Bluetooth headset or just your phone.
-
While placing a call using a Bluetooth headset, touch the Bluetooth icon 📋 on the call in progress screen to switch to using just your phone.
-
Touch the Bluetooth icon 📋 on the call in progress screen to switch to using the Bluetooth headset.
NOTES
When placing a call using the Bluetooth headset, the call in progress screen and the ongoing call notification icon on the status bar turn blue.
For instructions on how to pair a Bluetooth headset with your mobile phone, see “Pairing your phone with a Bluetooth device” on page 129.
Managing multiple calls Switching between multiple calls
If you accept a new call when you are already on a call, you can switch between the two calls.
- When there is another incoming call while you are already on a call, the Incoming call screen opens.
- Drag the slide icon to the right to answer the new call.
When you answer the new call, the current call is placed on hold.
- Touch the swap icon ➕ to put the current call on hold and connect to another call.
- Touch the end call icon to disconnect both calls at once.
Setting up a conference call
You can set up a conference call with multiple callers.
- Touch the add call icon 📞 on the call in progress screen to call another person.
Then, you can also touch the Call log, Groups or Favorites tab to place a call from each list.
The first participant is put on hold while placing a call to the other person.
- Touch the merge calls icon 🖱️ on the call in progress screen to merge the calls into a single conference call.
- Touch the end call icon to disconnect both calls at once.
NOTE
After merging calls into a conference call, you can touch the end last call icon 📋 on the call in progress screen to end the second participant's call and talk privately with the first participant.
Working with the Call log
The Call log is a list of all the calls you have placed, received, or missed.
Placing a call from the Call log
- Touch the phone icon on the Home screen.
- Touch the Call log tab.
The Call log screen opens. Calls are listed with the most recent call at the top. Scroll to view earlier entries in the log.

text_image
: Missed call : Dialed call : Received call Phone number or name in Contacts. Michael Home 516-456-7: 2 days ago Voicemail 3 days ago Anderson Mobile 010-123-456: 3 days ago 012-110-55555 (4) 3 days ago 012-345-6789 (2) 3 days ago Anderson Mobile 010-123-456: 3 days ago Andrew (2) Mobile 1-234-5678: 3 days ago Touch to place a call.- Touch a phone number or name.
The details of the Call log appear.
text_image
Outgoing call 14:57, Thursday, November 24, 2011 0 min 21 sec Call again 123-456-7890 Send text message Add to contacts Add to PTT Contacts If the phone number is not in PTT Contacts, Add to PTT Contacts is displayed and you can touch to add the phone number to PTT Contacts. If the phone number is already in PTT Contacts, View PTT contact is displayed and you can touch to open the details of the PTT contact. Touch to place a call. Touch to send a text message. If the phone number is not in Contacts, Add to contacts is displayed and you can touch to add the phone number to Contacts. If the phone number is already in Contacts, View contact is displayed and you can touch to open the details of the Contact- Touch Call phone number or name to place a call.
NOTES
Touch and hold a phone number or name on the Call log screen • to access the following options:
Call phone number or name: Calls a number in the Call log.
View contact: Opens the contact details for the phone number. (Only applicable when the phone number is already in your Contacts)
Edit number before call: Opens the Dialer tab containing the phone number. You can edit the number and then place a call.
Send text message: Allows you to compose a text message using the phone number as the recipient.
Add to contacts: Adds the phone number to Contacts. (Only applicable when the phone number is not already in your Contacts)
Remove from call log: Deletes an entry from the Call log.
If there is a missed call, a missed call icon ⚙ is displayed in the Status bar. Drag the Status bar down to open the Notification panel and touch Missed call to check the Call log.
Clearing the entire Call log
- On the Call log screen, touch the Menu key ☐ > Clear call log.
Dialing by voice
You can use the Voice Dialer application to place a phone call by speaking the name of a contact or a phone number.
- Touch the Launcher icon on the Home screen.
The Launcher opens.
- Touch the Voice Dialer icon
The Voice Dialer opens, listening for your spoken instructions, and displaying some hints for how to use it.
- Say "Call" followed by the name of the contact to call.
Or, follow one of the suggestions for dialing a number or controlling your phone in other ways.
NOTE
If you have a Bluetooth headset that supports “voice-recognition” or “voice dialing,” you may be able to open the Voice Dialer by pressing your headset’s main button or in some other way, and dial by voice using your headset. For details, see the documentation that came with your headset.
Using voicemail
Setting up voicemail
You should set up your voicemail according to the tutorial you hear the first time you call the voicemail.
- Touch the Voicemail icon 📞 on the Home screen or in the Launcher.
The Voicemail menu screen opens.
- Touch Call Voicemail to dial *86.
- The dialpad will automatically appear on the call in progress screen. Follow the instructions and enter a number or the # sign as requested.
- Follow the tutorial to set the password of your voice mailbox and record a voice signature and greeting.
Listening to your voicemail
- Touch the Voicemail icon 📞 on the Home screen or in the Launcher.
The Voicemail menu screen opens.
- Touch Call Voicemail to dial *86.

-
The dialpad will automatically appear on the call in progress screen. Follow the instructions and enter a number or the # sign as requested.
-
Follow the prompts to enter your password and retrieve your messages.
NOTES
When you have a new voicemail message, the new voicemail • icon 📁 appears on the Status bar. Drag the status bar down to open the Notification panel and touch New voicemail to open the Voicemail menu screen.
If you have already subscribed to Visual Voice Mail, touch New voicemails displayed in the Notification panel to open a Visual Voice Mail.
- You can also touch the Menu key > Voicemail on the Call log screen to display the Voicemail menu screen.
If you have already subscribed to Visual Voice Mail, a Visual Voice Mail opens when you touch Voicemail.
Using Visual Voice Mail
Visual Voice Mail is an application that allows subscribers to view caller and voicemail information and listen to voicemail messages in any order on their phones. Scroll through your messages, pick the ones you want to listen to, and erase or archive them right from the screen on your phone. You can call back, text, and add to contacts directly from the Visual Voice Mail screen.
Subscribing to Visual Voice Mail
- Touch the Voicemail icon 📞 on the Home screen or in the Launcher.
The Voicemail menu screen opens.
- Touch Subscribe to Visual Voice Mail > Accept.
- Touch OK > Subscribe > Accept > Accept > Exit.
Typical steps when you access the Visual Voice Mail for the first time are described above. Steps may be different if you have accessed it before. To subscribe, follow the on-screen instructions.
- Wait 5 minutes before starting to use Visual Voice Mail.
NOTE
If you have already subscribed to Visual Voice Mail, a screen for entering password will be displayed after step 3. Enter your password and touch Login. When you log in, the Visual Voice Mail screen will be displayed.
Logging in to Visual Voice Mail
- Touch the Voicemail icon 📄 on the Home screen or in the Launcher.
- Touch the "Password" field and enter your password. Visual Voice Mail uses the same password as your standard Voicemail system.
- Touch Login.
The Visual Voice Mail screen is displayed when login is completed.
NOTE
Once you logged in, you need not login for subsequent operation to open the Visual Voice Mail. You do need to login if you change your password or perform Factory data reset.
Listening to your voicemail
- Touch the Voicemail icon 📞 on the Home screen or in the Launcher.
The Visual Voice Mail screen opens.
text_image
An unheard voicemail A heard voicemail- Touch the voicemail you want to listen to. The Voicemail player screen is displayed.
text_image
Visual Voice Mail Touch to display the previous voicemail. John Mobile 1-234-567-890 Yesterday, 7:19 pm Touch to turn on the speakerphone. Touch to return a call to the sender of voicemail. Touch to display the next voicemail. Caller's phone number, or both name in Contacts and caller's phone number Date and time when the Voicemail system received a voicemail Touch to play a voicemail. Touch to delete a voicemail. Call Back Reply Delete Touch to reply by voicemail, text message, or Email.- Touch the play icon ▶ to listen to your voicemail.
- Press the Volume Keys ◀▶ to adjust the volume.
NOTE
When you have a new voicemail message, a new voicemail icon appears on the Status bar. If you have already subscribed to Visual Voice Mail, drag the Status bar down to open the Notification panel and touch New voicemails to open Visual Voice Mail.
Using the menu on the Visual Voice Mail screen
The following menu is available on the Visual Voice Mail screen.
Touch the Menu key • ☐ to access the following options:
Select All: Selects all voicemails. See “Deleting multiple voicemails or marking as “Heard”” on page 79.
Compose: Allows you to compose a voicemail. See “Composing and sending a voicemail” on page 79.
Deselect All: Deselects all voicemails.
Refresh: Updates the list on the Visual Voice Mail screen.
Call Voicemail: Places a call to the voicemail.
Sort by: Allows you to sort the list by Caller, Date, Sensitivity, Listened to, Priority, or Duration.
Logout: Logs out of Visual Voice Mail. (Touch More if this option is not visible in the menu.)
More: See below.
- Touch the Menu key > More to access the following options:
Preferences: Allows you to change the Visual Voice Mail settings. See “Changing Visual Voice Mail settings” on page 80.
Select Lock/Unlock: Of the selected voicemails, locks all the unlocked voicemails and unlock all the locked voicemails.
About: Displays the version of Visual Voice Mail.
Unsubscription: Cancels the Visual Voice Mail subscription.
Touch and hold a phone number or name to access the following • options:
Lock (Unlock): Locks or unlocks the selected voicemail. Locked voicemails cannot be deleted by the Select all function.
Play: Plays your voicemail.
Mark as Heard: Marks the selected voicemail as heard.
Call Voicemail: Places a call to the voicemail. (Only applicable for Voicemail system message)
Delete: Deletes a voicemail.
Call Back: Places a call to the sender of voicemail.
Reply: Sends a reply by voicemail, text message, or Email.
Add to Contacts: Adds the phone number to Contacts. (Only applicable when the phone number is not already in your Contacts)
View Contact: Opens the details in Contacts, with the phone number of the voicemail sender. (Only applicable when the phone number is already stored in your Contacts)
Forward: Forwards the voicemail by voicemail, multimedia message, or Email.
Save a copy: Saves your voicemail on a microSD card or the internal storage.
Using the menu on the Voicemail player screen
The following menu is available on the Voicemail player screen:
Touch the Menu key • ☐ to access the following options:
Add to contacts: Adds the phone number to Contacts. (Only applicable when the phone number is not already in your Contacts)
View contact: Opens the details in Contacts, with the phone number of the voicemail sender. (Only applicable when the phone number is already in your Contacts)
Add to PTT Contacts: Adds the phone number to PTT Contacts. (Only applicable when the phone number is not already in your PTT Contacts)
Forward: Forwards the voicemail by voicemail, multimedia message, or Email.
Save a copy: Saves the voicemail on a microSD card or the internal storage.
Deleting multiple voicemails or marking as “Heard”
- From the Visual Voice Mail screen, touch the Menu key ☐ > Select All.
All voicemails will be check-marked. Touch a check-marked voicemail to un-check it.
- Touch Mark as Heard to mark all the check-marked voicemails as heard.
Touch Delete > OK to delete the check-marked voicemails.
Composing and sending a voicemail
- From the Visual Voice Mail screen, touch the Menu key >Compose.
The Compose Voice Message screen is displayed.
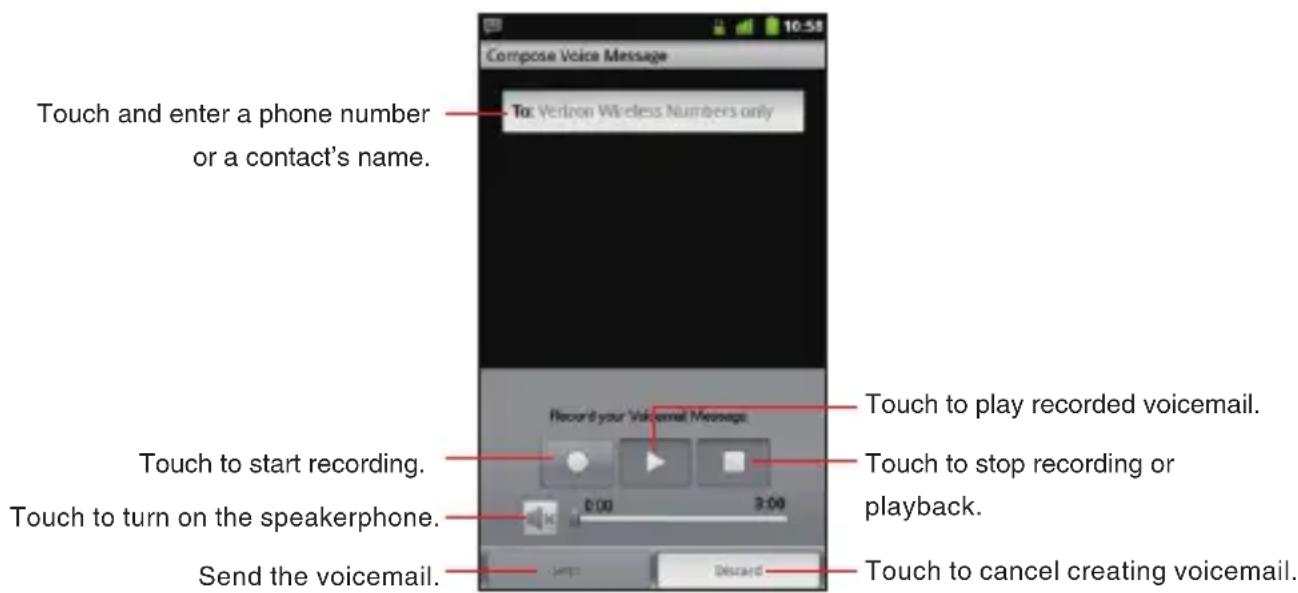
text_image
Compose Voice Message Touch and enter a phone number or a contact's name. To: Verizon Wireless Numbers only Record your Voicemail Message Touch to start recording. Touch to turn on the speakerphone. Send the voicemail. Touch to play recorded voicemail. Touch to stop recording or playback. Touch to cancel creating voicemail.- Touch the "To" field.
- Enter a phone number or a contact's name. As you enter the phone number or the contact's name, the search function displays suggestions.
- You can touch a suggestion or continue entering the phone number.
- Touch the record icon to start recording a voicemail.

-
Touch the stop icon ☐ to stop recording a voicemail. Even if you don't touch the stop icon ☐, recording stops after 3 minutes.
-
Touch Send to send a voicemail.
NOTE
Touch the Menu key ☐ on the Voicemail composing screen to access the following options:
Add from Contacts: Allows you to select and add a recipient from Contacts.
Mark Urgent: Sets the status of the voicemail to urgent.
Mark Private: Sets the status of the voicemail to private.
Changing Visual Voice Mail settings
-
From the Visual Voice Mail screen, touch the Menu key ☐ > More > Preferences.
-
Change the following settings as necessary.
Save voicemail message to: Allows you to set the location where the voicemails will be saved; either the phone (Internal storage) or microSD card (External storage).
Select ringtone: Allows you to set the default notification ringtone for when there is a new voicemail.
Vibrate: Check to have the phone vibrate when you receive a new voicemail.
Contacts
The Contacts application gives you quick and easy access to the people you want to reach. Information about your contacts is shared with other applications, such as Email, Messaging, Gallery (for sharing photos and videos), and so on.
Opening your contacts
Open Contacts to add, view, and communicate with your friends and acquaintances.
Opening your contacts
-
Touch the phone icon on the Home screen.
-
Touch the Contacts tab.
All of your contacts are displayed alphabetically in a scrolling list.

text_image
Touch to view Groups. Search contacts Displaying 4 contacts Add + A Andrew Backup Assistant Andy Backup Assistant J Backup Assistant John Google Tony Touch an icon to open Quick Contact. Touch to view only your favorite contacts. Touch a contact to view its details.You can drag the list up or down to scroll it, or slide your finger • up or down to scroll quickly. Either way, a tab briefly appears to the right of the list, which you can drag up and down to scroll very quickly, while displaying the letter of the alphabet for the contacts you are scrolling past.
NOTE
If you have a new phone and haven't added any contacts yet, Contacts displays a message with hints on how to start adding contacts to your phone.
Viewing details about a contact
- Open your contacts.
- Touch the contact whose details you want to view.
Entries for communicating with the contact are followed by details.
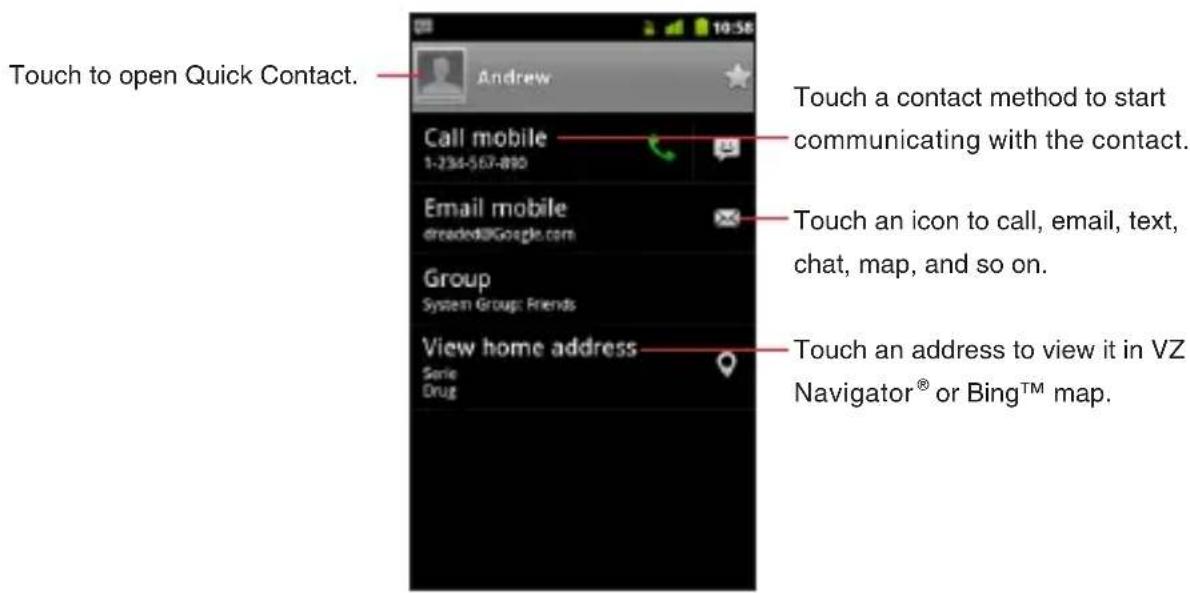
text_image
Touch to open Quick Contact. Andrew Call mobile 1-234-567-890 Email mobile dreaded@Google.com Group System Group: Friends View home address Serie Drug Touch a contact method to start communicating with the contact. Touch an icon to call, email, text, chat, map, and so on. Touch an address to view it in VZ Navigator® or Bing™ map.Touch a communication method to start dialing, texting, or • emailing the contact by using the listed number, address, and so on.
You can edit the contact's information by touching the Menu key •

Edit Contact. See "Editing contact details" on page 84.
Searching for a contact
You can search for a contact by name.
- Open your contacts.
-
Touch the Search key 🔒.
-
Start entering the name of the contact you are searching for. As you type, contacts with matching names appear below the search box.
- Touch the matching contact in the list to open the Details screen, or touch the search icon 🔒 to open a screen with a list of matching contacts.
Adding a new contact
You can add contacts on your phone and synchronize them with the contacts in your Google Account, Backup Assistant account, Microsoft Exchange ActiveSync account, or other accounts that support syncing contacts.
- Open your contacts.
- Touch the Menu key ☐ > New contact.
- If you have more than one account with contacts, touch the account to which you want to add the contact.
The Edit contact screen opens.

text_image
New contact Backup Assistant cont... from Backup Assistant Touch to select a picture. Enter the contact's name. First name Last name Phone Mobile Phone Touch to open a menu with preset labels. Done Revert Touch to add more than one entry for the category. Touch to delete this entry.-
Enter the contact's name.
-
Touch a category of contact information, such as phone numbers and email addresses, to enter that category of information about your contact.
Scroll the page to view all categories.
- Touch a category's plus icon ⚙ to add more than one entry for that category—for example, to add both work and home numbers.
Touch the label to the left of the item of contact information to open a menu with preset labels, such as Mobile and Work for a phone number, or touch Custom in the menu to create your own label.
-
Touch the picture frame icon 📋 to take a photo or select a photo from your Gallery to represent the contact.
-
When you are finished, touch Done.
NOTES
When you reply to or forward an email message to an email • address that is not in Contacts, the email address is added as a contact.
Contacts will try to join new addresses with existing contacts, • to create a single entry. You can also manage that process manually. See “Linking or unlinking contact information” on page 91.
Editing contact details
You can change or add details about your contacts. You can also set the ringtone for when a specific contact calls, or divert all calls from a contact to your voicemail.
NOTES
Some contact entries contain information from multiple sources: • information that you added manually, information that Contacts joined from multiple accounts to consolidate duplicates, and so on. If you find duplicate entries in Contacts, you can join them into a single entry, as described in “Linking contacts” on page 91. If you find that information from unrelated contacts was joined in error, you can separate them, as described in “Unlinking contacts” on page 91.
Changes that you make to the information from one source do • not affect the information from other sources. For example, if you have information about a contact from a Google Account and an Exchange ActiveSync account and both are configured to sync contacts, edits to the information from the Google Account are synced to that account on the web, but the information from the Exchange ActiveSync account remains unchanged.
Editing contact details
- Open your contacts.
- Touch and hold the contact whose details you want to edit.
- Touch Edit contact in the menu that opens.
- Edit the contact information, using the same controls as when you create a contact. See “Adding a new contact” on page 83.
- Touch Done.
NOTE
You can also edit contact details by touching the Menu key > Edit contact while viewing a contact's details.
Changing a contact's default phone number
The default phone number is used when you initiate a call or send a text message from the list by touching and holding a contact.
- Open your contacts.
- Touch the name of a contact in the list to view its details.
- Touch and hold the phone number to use as the contact's default phone number.
- Touch Make default number in the menu that opens.
Diverting all of a contact's calls to your voicemail
- Open your contacts.
- Touch the name of a contact in the list to view its details.
- Touch the Menu key ☐ > Options.
- Check Incoming calls.
- Touch the Back key ↩.
When this contact calls you, your phone doesn't ring and the caller is sent directly to your voicemail.
Setting a ringtone for a contact
- Open your contacts.
- Touch the name of a contact in the list to view its details.
- Touch the Menu key ☐ > Options > Ringtone.
-
In the scrolling list of ringtones that opens, touch the one to play when the contact calls.
The ringtone plays a sample. -
Touch OK.
Setting a ringback tone for a contact
- Open your contacts.
- Touch the name of a contact in the list to view its details.
- Touch the Menu key ☐ > Options > Ringback tone.
- In the scrolling list of ringback tones that opens, touch the one to play when you call the contact.
The ringback tone plays a sample. - Touch OK.
Deleting a contact
- Open your contacts.
- Touch the name of a contact in the list to view its details.
- Touch the Menu key ☐ > Delete contact.
- Touch OK to confirm that you want to delete the contact.
NOTES
If you delete a contact from Google Contacts (or another account with editable contacts), the contact is also deleted from Contacts on the web the next time you sync your phone.
You cannot delete contacts from a read-only account. Instead, • a dialog informs you that the contact will be hidden. To restore hidden contacts from a read-only account, you must delete that account from your phone and then add it again.
If the contact contains information from both editable accounts • (such as Contacts) and from a read-only account, a dialog informs you that the information from the read-only account will be hidden, not deleted.
Copying to PTT Contacts
- Open your contacts.
- Touch the name of a contact in the list to view its details.
- Touch the Menu key ☐ > Copy to PTT Contacts.
- If two or more phone numbers are stored in the contact, touch the one you want to copy to the PTT Contacts.
- If necessary, edit the PTT contact information. See “Adding a new PTT contact” on page 108.
- Touch Done.
Communicating with your contacts
From the Contacts or Favorites tab, you can quickly call or send a text (SMS) or multimedia message (MMS) to a contact's default phone number. You can also open details to view a list of all the ways you can communicate with that contact.
Connecting by using Quick Contact for Android
- Touch a contact's picture to open Quick Contact for Android.

text_image
Touch a contact's picture. Then touch the icon for the way you want to connect.- Touch the icon for the way you want to connect. The icons available depend on the information you have for the contact and the applications and accounts on your phone.
For more information, see “Quickly connecting to your contacts” on page 50.
Communicating with a contact
- Open your contacts.
- Touch the contact with whom you want to communicate.
- From the contact's details screen, you can automatically call, send a text message, or initiate other tasks by touching the corresponding application icon.
Calling a contact's default number
- Open your contacts.
- Touch and hold the entry for the contact to call.
- Touch Call in the menu that opens.
The actual menu item depends on the default number you set for your contact, so it may be Call Mobile, Call Work, and so on.
The Phone application is automatically activated when the number is called.
NOTE
You can also call a contact's default number by touching the call icon in the list of favorites.
Sending a text or multimedia message to a contact's default number
- Open your contacts.
- Touch and hold the entry for the contact to send a text or multimedia message.
- Touch Text contact in the menu that opens.
The Messaging application is automatically activated, with the contact's phone number entered in a new message. For more
information about sending text and multimedia messages, see "Messaging" on page 149.
Changing which contacts are displayed
You can hide contacts that don't have phone numbers. You can also configure which account's groups of contacts you want to display in the Contacts list.
Displaying/hiding contacts without phone numbers
If you use your list of contacts only to call people, you can hide any contacts that don't have phone numbers.
- Open your contacts.
- Touch the Menu key > Display options.
- Check or uncheck Only contacts with phones.
Changing what account's groups are displayed
- Open your contacts.
- Touch the Menu key > Display options.
- Touch an account to open its list of groups.
Account's groups depend on the type of account. - Check or uncheck the groups whose contacts you want to view in Contacts.
- Touch Done.
A message appears while your changes are made. If your changes affect many contacts, this will take a short while.
NOTE
This setting affects only the display of groups of contacts. Your sync settings are not affected.
Linking or unlinking contact information Linking contacts
When you add an account or add contacts in other ways, such as by exchanging emails, Contacts attempts to avoid duplication by linking any new contact information with existing contacts under a single entry. You can also link contacts manually.
- Open your contacts.
-
Touch the contact entry to which you want to add information. This is the contact you will see in Contacts after the link.
-
Touch the Menu key ☐ > Edit contact.
-
Touch the Menu key > Link.
Likely contacts are displayed at the top of the screen. You can touch Show all contacts to pick a contact from your full list of contacts.
- Touch the contact whose information you want to link with the first contact.
The information from the second contact is added to the first contact, and the second contact is no longer displayed in the Contacts list.
Unlinking contacts
If contact information from different sources was linked in error, you can unlink the information back into individual contacts on your phone.
- Open your contacts.
- Touch the contact entry whose information you want to separate.
- Touch the Menu key > Edit contact.
- Touch the Menu key ☐ > Unlink.
The contact information is unlinked into individual contacts in the list of contacts.

Importing, exporting, and sharing contacts
If you have contacts stored in vCard format on a microSD card, you can import them into Contacts on your phone. You can export contacts in vCard format onto a microSD card, to back them up to a PC or other device. You can also send a contact in vCard format via email.
Importing contacts from your microSD card
You can copy individual or group contacts in vCard format onto your microSD card and then import them into one of your accounts on the phone.
NOTES
For details about copying files to a microSD card from your PC, • see “Connecting to a PC via USB” on page 126.
You may also have contacts stored on a microSD card from another device. Refer to the other device's owner's guide for details about working with microSD cards.
- Open your contacts.
- Touch the Menu key ☐ > Import/Export > Import from SD card.
- If you have more than one account on your phone, touch the account into which you want to import the contacts.
- If you have more than one vCard file on the microSD card, touch the option to import a single contact file, multiple contact files, or all of the contact files on the microSD card.
The contacts are imported.
Exporting contacts to your microSD card
You can export all of the contacts on your phone to your microSD card, as a group vCard file.
You can then copy this file to a PC or another device that can work with files in this format, such as an address book application.
- Open your contacts.
- Touch the Menu key ☐ > Import/Export > Export to SD card.
- Touch OK to confirm.
Contacts creates a file with the .vcf extension on your microSD card. This file contains all of your contacts.
Sharing a contact
You can share the contact in vCard format via Email, Messaging, or Bluetooth connection.
- Open your Contacts.
- Open the contact you want to share.
- Touch the Menu key □ > Share.
- In the menu that opens, touch the application to use for sharing the contact.
The application you selected opens. See the section about that application.
Working with Groups
Once you add contacts to a group, you can broadcast messages or emails to all members of the group.
Adding a new group
- Touch the phone icon on the Home screen.
- Touch the Groups tab.
- Touch the Menu key > Add Group.
- Enter the group name.
- Touch the picture frame icon 📄 to select a picture to display next to the name in your lists of groups.
- When you are finished, touch Done.
Adding contacts to a group
- Open the Groups tab.
- Touch the group to which you want to add contacts.
- Touch the Menu key ☐ > Add contacts.
- Check the contacts you want to add.
- When you are finished, touch Done.
Sending messages or emails to group members
- Open the Groups tab.
- Touch the group for which you want to send a message.
- Touch the Menu key ☐ > Group Send SMS or Group Send Email.
The Messaging or Email application is automatically activated. For more information about sending a message, see “Messaging” on page 149 and “Email” on page 138.
Editing a group
- Open the Groups tab.
- Touch the group you want to edit.
- Touch the Menu key > Edit group.
- Edit the group name.
- Touch the picture or the picture frame icon to select the picture.
- When you are finished, touch Done.
Removing a contact from a group
- Open the Groups tab.
- Touch the group whose contact you want to remove.
- Touch and hold the contact you want to remove.
- Touch Remove contact in the menu that opens.
- Touch OK.
Deleting a group
- Open the Groups tab.
- Touch the group you want to delete.
- Touch the Menu key ☐ > Delete group.
- Touch OK.
Working with Favorites
The Favorites tab contains the contacts you have starred as favorites followed by a short list of the contacts you communicate with most frequently.
Adding a contact to your favorites
- Touch the phone icon on the Home screen.
- Touch the Contacts tab.
- Touch a contact to view its details.
- Touch the star ☆ to the right of the contact's name.
The star turns gold

Opening a list of your favorite contacts
- Touch the phone icon on the Home screen.
- Touch the Favorites tab.
The Favorites tab lists the contacts you have added to the list, followed by a list of your most frequently called contacts.
Removing a contact from your favorites list
- Touch the phone icon on the Home screen.
- Touch the Favorites tab.
- Touch a contact to view its details.
- Touch the gold star ☆ to the right of the contact's name.
The star turns gray favorites.
☆ and the contact is removed from your
NOTE
You can also remove the contact from your favorites by touching the gold star to the right of the contact's name on the contact's details displayed on the Contacts tab.
Configuring Backup Assistant ^SM
Backup Assistant safeguards your phone's contacts and automatically saves a copy of the names, phone numbers, email addresses, etc., stored in your phone. You can view, print, add, delete, or edit your contacts online.
NOTES
Subject to specific terms of use. Results may vary based on • backup schedule and other factors. See verizonwireless.com/backupassistant for more details.
For more information about account administration or data sync, • see “Accounts and sync” on page 133.
Configuring Backup Assistant
If you have not configured Backup Assistant settings by the initialization when you first turned on your phone, configure the settings using the following procedure:
- Touch the phone icon on the Home screen.
- Touch the Contacts tab.
- Touch the Menu key ☐ > Backup Assistant > Next.
- Check the checkbox to agree with the terms of the license agreement.
- Touch Next.
- If you are registering to Backup Assistant for the first time, enter the desired 4 to 8 digit PIN (Personal identification number) in the "Enter new PIN" field, then enter the same PIN in the "Confirm PIN"
field. Check the checkbox of "If I forget my PIN. I authorize Backup Assistant to send it to my phone." as needed.
If you have registered to Backup Assistant before, enter the PIN in the “Enter old PIN” field.
- Touch Next > OK.
NOTE
If you forgot or do not know the PIN code, touch Get PIN in step 5. Then, touch OK if you forgot the PIN code. The received PIN code will be displayed. To use Backup Assistant as the new user, touch New. In that case, the previously backed up contacts will be discarded.
Syncing Contacts manually
You need to sync your Contacts manually, if you unchecked Auto-sync of Account & Sync settings.
- Touch the phone icon on the Home screen.
- Touch the Contacts tab.
- Touch the Menu key ☐ > Backup Assistant.
- Touch the Menu key ☐ > Sync now.
Configuring auto-sync of Contacts
If you checked Auto-sync of Account & Sync settings, you can configure whether sync Contacts by Backup Assistant should also be auto-synced.
- Touch the phone icon on the Home screen.
- Touch the Contacts tab.
- Touch the Menu key ☐ > Backup Assistant.
- Check Sync Contacts to make it auto-synced.
NOTE
The Sync Contacts checkbox will not be displayed, if you unchecked Auto-sync of Account & Sync settings.
Changing schedule for auto-syncing
You can change the time to perform auto-syncing.
- Touch the phone icon on the Home screen.
- Touch the Contacts tab.
- Touch the Menu key ☐ > Backup Assistant.
- Touch Account settings > Set Schedule.
- Touch the time to perform syncing in the menu that opens.
- Touch OK.
Changing PIN
- Touch the phone icon on the Home screen.
- Touch the Contacts tab.
- Touch the Menu key ☐ > Backup Assistant.
- Touch Account settings > Change PIN.
- Enter your current PIN in the "Enter old PIN" field and touch Next.
- Enter your desired new 4 to 8 digit PIN in "Enter new PIN" field, then enter the same PIN in "Confirm PIN" field and touch Next.
- Touch OK.
Push to Talk
Push one button to contact other Verizon Wireless Push to Talk (PTT) customers. A Barge call automatically connects, while an Alert call sends a tone—giving the recipient the option to either answer or ignore the call. For complete details go to verizonwireless.com/ptt.
NOTE
PTT is off by default, which means you are not able to send or receive PTT calls and alerts. To use PTT, check the Push to Talk option of Call settings to turn it on. See “Call settings screen” on page 269.
About Push to Talk
Push to Talk calls may only be made with other Verizon Wireless Push to Talk subscribers, and only from the National Enhanced Services Rate and Coverage Area. A Push to Talk call is terminated by touching the end call icon 📞 on the PTT call in progress screen or will automatically time out after 10 seconds of inactivity. While you are on a Push to Talk call, voice calls received will go directly to Voice Mail. When you are on a voice call, you cannot receive a Push to Talk call. You cannot prevent others who have your wireless phone number from entering you into their Push to Talk Contact List. Only one person can speak at a time during Push to Talk calls. When using Dialer to make a Push to Talk call, you must enter the 10-digit phone number of the called party. Your Push to Talk service cannot be used for any applications that tether your phone to computers or other devices for any purpose. Push to Talk-capable phone and Calling Plan required. If you wish to switch from a Push to Talk Calling Plan to another Calling Plan, you must first stop using your Push to Talk-capable phone and purchase or provide another compatible phone.
Opening Push to Talk
- Touch the Launcher icon on the Home screen.
The Launcher opens.
-
Touch the Push to Talk icon 📋.
-
When PTT is turned off, the message asking you whether to turn on PTT appears. Touch Enable PTT > OK.
The Push to Talk application opens, displaying the most recently used tab on top of four tabs: Dialer, Call log, Contacts, and Groups.
NOTES
When PTT is turned on and the PTT service is available, the PTT icon 🔒 appears on the Status bar.
When PTT is turned on but the PTT service is not available, the • PTT icon on the Status bar is displayed in grey
When PTT is turned on, pressing the Tactile Key/PTT Key • ◇◇◇ opens the PTT Contacts screen by default. Pressing and holding the Tactile Key/PTT Key ◇◇◇ places a Barge PTT call to the most recent contact or group by default. For instructions on how to change the Push to Talk settings, see “Changing Push to Talk settings” on page 115.
Placing a PTT call
You can make two types of PTT calls:
- A Barge call automatically connects to the other party. The called party does not have the option to ignore the call.
- An Alert call is a call to notify a called party that the calling party wants to talk using a tone. The called party has the option to answer or ignore the call.
Placing a Barge call
- Touch the Dialer tab on the Push to Talk application. The PTT Dialer screen opens.

text_image
Touch to add the phone number to PTT Contacts. Touch to place a Barge call. Touch to erase digits one by one. Touch and hold to erase the entire phone number. Touch to open the Dialer screen of the Phone application. Touch to place an Alert call.- Enter the 10-digit number of Verizon Wireless PTT subscriber.
- Touch Barge, then press the Tactile Key/PTT Key ☐ ☐ ☐.
The PTT call in progress screen appears.
- Press the Volume Keys ◀▶ to adjust the call volume.
- Press the Tactile Key/PTT Key ◇◇◇. Listen for the OK to Talk tone. The message Talking to will appear on the display. Speak while pressing down the Tactile Key/PTT Key ◇◇◇.

text_image
Talking Me Talking to... Name in PTT Contacts Andrew 123-456-7777 Caller's phone number Touch to switch between a Bluetooth headset and the phone. Touch to end a call. Touch to toggle the speakerphone on and off.-
Release the Tactile Key/PTT Key ◇ ◇ ◇ when finished speaking. This allows the called party to reply.
-
Touch the end call icon to end a call.
NOTES
While the PTT call is in progress, the PTT icon on the Status bar is • displayed in green
When a phone number of a called party is not stored in your • PTT Contacts, the message asking whether to add it to your PTT Contacts will appear after ending a call. Touch Save this number to add it to your PTT Contacts.
Placing an Alert call
You can send an alert to any user with Verizon Wireless PTT service.
The user may answer or ignore the alert.
- Touch the Dialer tab on the Push to Talk application.
The PTT Dialer screen opens. - Enter the 10-digit number of Verizon Wireless PTT subscriber.
- Touch Alert, then press the Tactile Key/PTT Key ☐☐☐. When the called party answers the Alert call, the message Connected to appears.
- Press and hold the Tactile Key/PTT Key ◇ ◇ ◇ to talk.
- Release the Tactile Key/PTT Key ◇◇◇ to let the other party talk.
- Touch the end call icon to end a call.
Using the menu on the PTT Dialer screen
The following menu is available on the PTT Dialer screen.
Touch the Menu key • ☐ to access the following options:
Add contact: Adds the entered phone number to PTT Contacts.
(Only applicable when the phone number is not already in your PTT Contacts)
Add to phone contacts: Adds the entered phone number to
Contacts. (Only applicable when the phone number is not already in your Contacts)
PTT off (PTT on): Turns PTT off or on.
Settings: See "Changing Push to Talk settings" on page 115.
Receiving a PTT call
Receiving a Barge call
- When your phone receives a Barge call, the Barge tone plays. You then hear the calling party speaking through the speakerphone. The calling party's phone number and saved contact name will appear on your display.
- Press and hold the Tactile Key/PTT Key ◇ ◇ ◇ to talk.
- Release the Tactile Key/PTT Key ◇◇◇ to let the other party talk.
- Touch the end call icon to end a call.
Receiving an Alert call
- When your phone receives an Alert call, the PTT Alert tone plays. The message Incoming call is displayed with the phone number and contact name of the calling party. The PTT Alert tone repeats until it is answered or ignored, or until 20 seconds have passed. If you do not answer within 20 seconds, the PTT call is automatically disconnected.
- To answer the alert, press the Tactile Key/PTT Key ☐ ☐ ☐. To ignore the alert, touch the ignore icon ✗.
- Press and hold the Tactile Key/PTT Key ◇ ◇ ◇ to talk.
- Release the Tactile Key/PTT Key ◇◇◇ to let the other party talk.
- Touch the end call icon to end a call.
Working with PTT Call log
The PTT Call log is a list of all the PTT calls you have placed, received, or missed.
Viewing PTT Call log
- Touch the Call log tab on the Push to Talk application.
The PTT Call log screen opens. Calls are listed with the most recent call at the top. Scroll to view earlier entries in the log.

text_image
Touch to place a Barge call. Presence icon : Missed PTT call : Dialed PTT call : Received PTT callThe presence icon varies by statuses as follows: •
| Online Offline Unknown | |||
| Contact | |||
| Group | |||
A contact or group with Do Not Disturb set is indicated by the presence icon 🔒.
An enterprise PTT contact or enterprise PTT group is indicated by • the presence icon e
2. Touch a phone number or name.
For the personal PTT call, the following PTT Call log details screen appears.
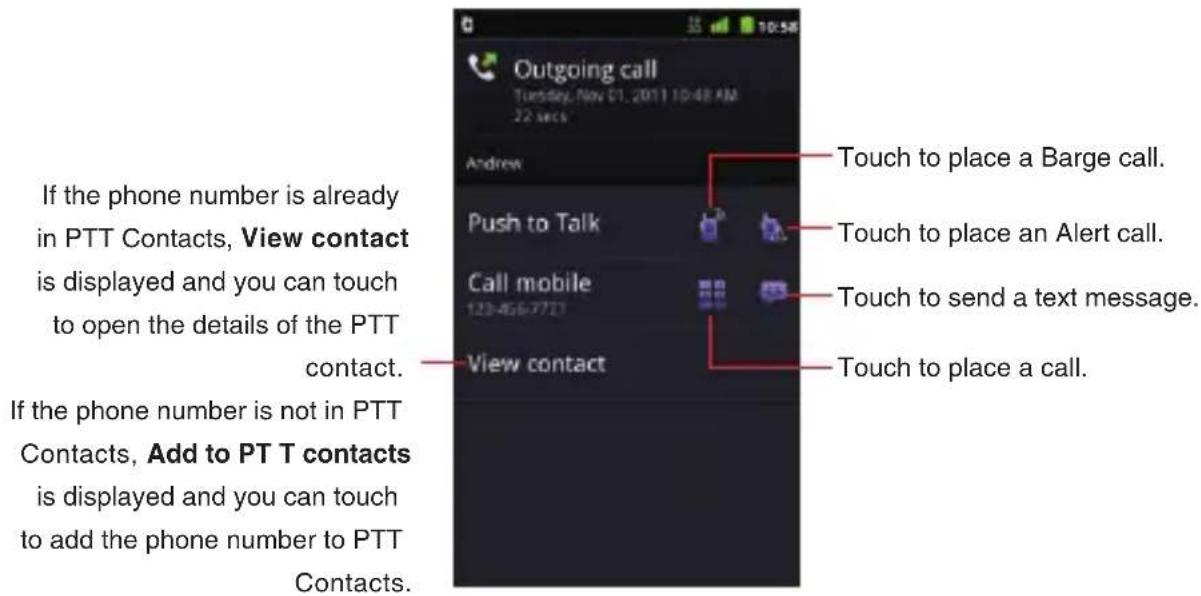
text_image
Outgoing call Tuesday, Nov 01, 2011 10:48 AM 22 secs Andrew Push to Talk Call mobile 123-456-7727 View contact Touch to place a Barge call. Touch to place an Alert call. Touch to send a text message. Touch to place a call. If the phone number is already in PTT Contacts, View contact is displayed and you can touch to open the details of the PTT contact. If the phone number is not in PTT Contacts, Add to PT T contacts is displayed and you can touch to add the phone number to PTT Contacts.For the group PTT call, the following PTT Call log details screen appears.

text_image
Outgoing call Tuesday, Nov 01, 2011 3:04 PM 22 secs Work Building Barge call View group Touch to open the details of the group. (Only applicable when the group is already stored in PTT Groups) Touch to place a group call. (Only applicable when the group is already stored in PTT Groups)NOTES
Touch and hold a name or phone number on the PTT Call log • screen to access the following options:
View contact: Opens the PTT contact details for the phone number. (Only applicable when the phone number is already stored in your PTT Contacts)
Add to PTT contacts: Adds the phone number to PTT Contacts. (Only applicable when the phone number is not already in your PTT Contacts)
Export to phone contacts: Exports a phone number to your phone Contacts.
Barge: Places a Barge call to the phone number.
Send alert: Places an Alert call to the phone number.
Turn on Do Not Disturb (Turn off Do Not Disturb): Turns
Do Not Disturb on or off. If you turn on Do Not Disturb, only an incoming PTT call (non-group call) from this PTT contact will be rejected. (Only applicable when the phone number is already stored in your PTT Contacts)
Call name or phone number: Place a call to the phone number.
Send text message: Allows you to compose a text message using the phone number as the recipient.
Remove from call log: Deletes an entry from the PTT Call log. Touch and hold a group name on the PTT Call log screen to • access the following options:
View group: Opens the details of the group in PTT Groups. (Only applicable when the group is already stored in PTT Groups)
Barge: Places a Barge call to the group. (Not applicable when the call was from an unknown group)
Turn on Do Not Disturb (Turn off Do Not Disturb): Turns Do Not Disturb on or off. If you turn on Do Not Disturb, only a group call from that PTT group will be rejected. (Only applicable for an enterprise group)
Remove from call log: Deletes an entry from the PTT Call log. If there is a missed PTT call, a missed PTT call icon 🙏 is displayed in the Status bar. Drag the Status bar down to open the Notification panel and touch PTT missed call to check the PTT Call log.
Using the menu on the PTT Call log screen
The following menu is available on the PTT Call log screen.
Touch the Menu key • ☐ to access the following options:
Clear call log: Clears the entire Call log.
Display options: Allows you to display all calls, or display only missed calls, received calls, or outgoing calls, on the PTT Call log screen.
PTT off (PTT on): Turns PTT off or on.
Settings: See “Changing Push to Talk settings” on page 115.
Using the menu on the PTT Call log details screen
The following menu is available on the PTT Call log details screen.
Touch the Menu key • ☐ to access the following options:
Do Not Disturb on (Do Not Disturb off): Turns Do Not Disturb on or off.
Remove from call log: Deletes this entry from the PTT Call log.
Working with PTT Contacts Adding a new PTT contact
-
Touch the Contacts tab on the Push to Talk application. The PTT Contacts screen opens.
-
Touch the Add icon +.
The Add contact screen opens.
-
Touch the "Name" field, then enter the PTT contact's name.
-
Touch the "PTT number" field, then enter the 10-digit number of Verizon Wireless PTT subscriber.
-
Touch Groups.
- In the list of groups that opens, check the groups to which you want to add the contact. Then touch OK.
- Touch Save.
The PTT contact will be added to the list on the PTT Contacts screen.
Viewing PTT Contacts
- Touch the Contacts tab on the Push to Talk application.
The PTT Contacts screen opens. All of your PTT contacts are displayed alphabetically in a scrolling list.
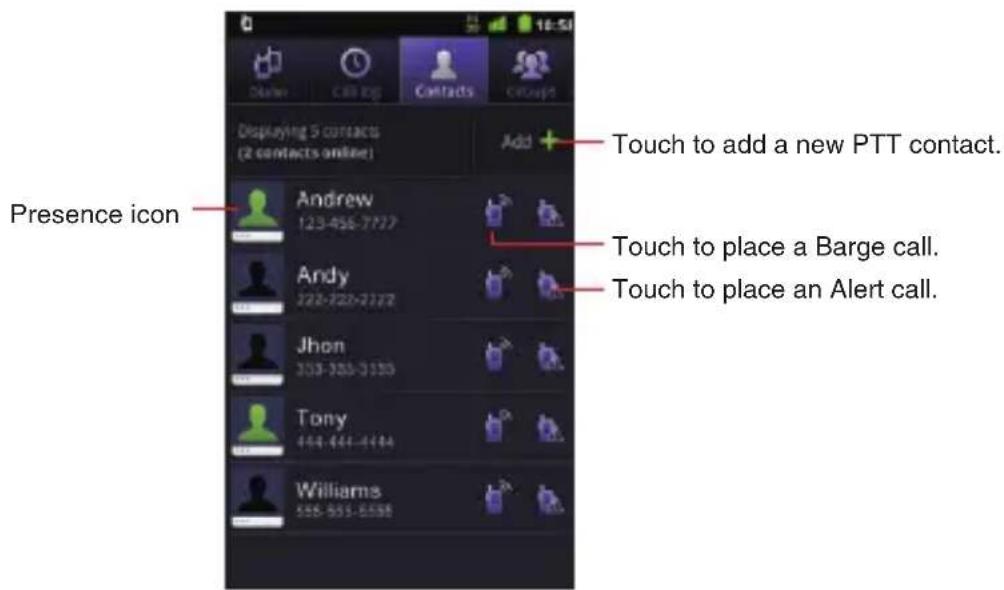
text_image
Presence icon Add Touch to add a new PTT contact. Touch to place a Barge call. Touch to place an Alert call.
- Touch the contact whose details you want to view.
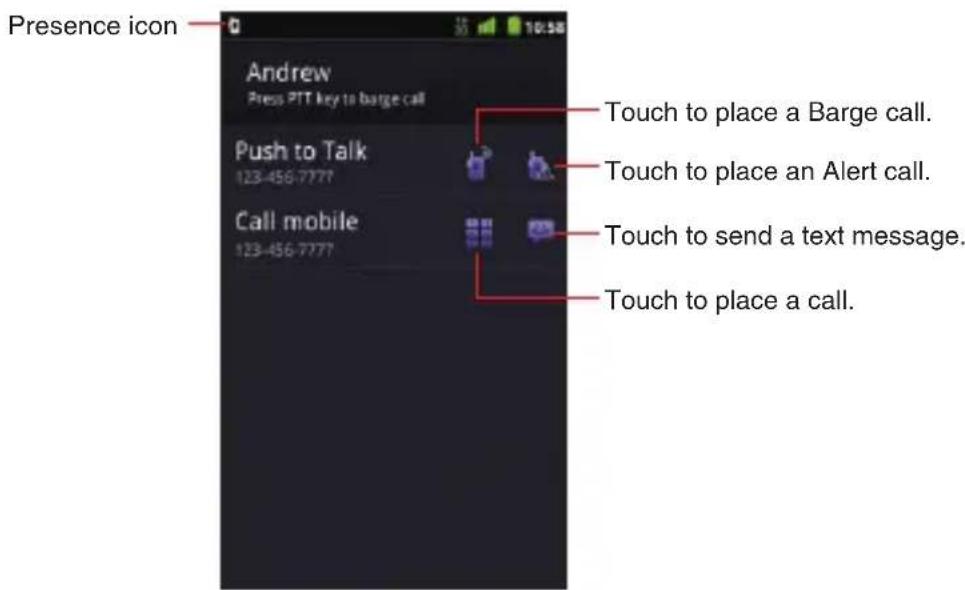
text_image
Presence icon Andrew Press PTT key to barge call Push to Talk 123-456-7777 Call mobile 123-456-7777 Touch to place a Barge call. Touch to place an Alert call. Touch to send a text message. Touch to place a call.NOTE
Touch and hold a contact on the PTT Contacts screen to access the following options:
View contact: Opens the details of the contact.
Barge: Places a Barge call to the contact.
Send alert: Places an Alert call to the contact.
Turn on Do Not Disturb (Turn off Do Not Disturb): Turns Do Not Disturb on or off. If you turn on Do Not Disturb, only an incoming PTT call (non-group call) from that PTT contact will be rejected.
Call name: Place a call to the contact.
Send text message: Allows you to compose a text message using the phone number as the recipient.
Edit contact: Allows you to edit the contact. (Not applicable for an enterprise PTT contact)
Delete contact: Deletes the contact. (Not applicable for an enterprise PTT contact)
Using the menu on the PTT Contacts screen
The following menu is available on the PTT Contacts screen.
Touch the Menu key • ☐ to access the following options:
Add contact: See "Adding a new PTT contact" on page 108.
Temp group : Allows you to temporarily select multiple PTT contacts to place a temporary group call. A temporary group call automatically connects to the temporary group recipients. The recipients cannot ignore the call.
Display options: Allows you to display all contacts, or only contacts with Do Not Disturb set, on the PTT Contacts screen. Also allows you to sort the list by name or presence status.
PTT off (PTT on): Turns PTT off or on.
Search: See “Searching for PTT contacts and PTT groups” on page 115.
More: See below.
- Touch the Menu key ☐ > More to access the following options:
Set Do Not Disturb: Opens a dialog where you can set Do Not Disturb on or off by checking or unchecking contacts in the PTT contacts list.
Settings: See "Changing Push to Talk settings" on page 115.
Using the menu on the PTT contact details screen
The following menu is available on the PTT contact details screen.
Touch the Menu key • ☐ to access the following options:
Edit: Allows you to edit this contact. (Not applicable for an enterprise PTT contact)
Export: Exports this PTT contact to your phone Contacts.
Do Not Disturb on (Do Not Disturb off): Turns Do Not Disturb on or off.
Delete: Deletes this contact. (Not applicable for an enterprise PTT contact)
Working with PTT Groups Adding a new PTT group
- Touch the Groups tab on the Push to Talk application. The PTT Groups screen opens.
- Touch Add.
The Add group screen opens. - Touch the "Name" field, then enter the PTT group's name.
- Touch Next.
- In the list of PTT contacts that opens, check the contacts which you want to add to the group. Then touch OK.
- Touch Save.
The PTT group will be added to the list on the PTT Groups screen.
Viewing PTT Groups
- Touch the Group tab on the Push to Talk application. The PTT Groups screen opens. All of your PTT groups are displayed alphabetically in a scrolling list.

text_image
Presence icon Family Work Buddies Work Buddies2 Work Buddies3 Work Buddies4 Work Buddies5 Add + Touch to add a new PTT group. Touch to place a group call.- Touch the group whose details you want to view.
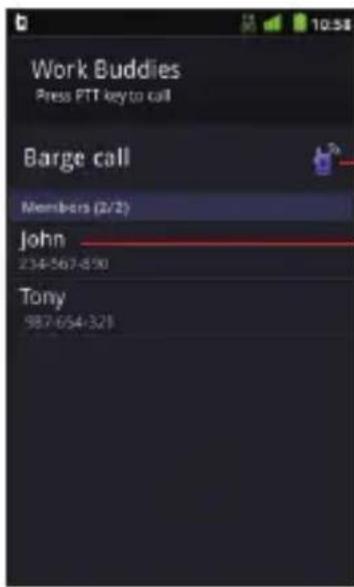
text_image
Work Buddies Press PTT key to call Barge call Members (2/2) John 234-567-850 Tony 987-654-321Touch to place a group call.
Touch to open the details of the contact.
Touch and hold to perform operations such as placing a Barge or Alert call to this contact, or remove it from the group. (Contacts in an enterprise PTT group cannot be removed)
NOTES
Touch and hold a group on the PTT Groups screen to access the following options:
View group: Opens the details of the group.
Barge: Places a Barge call to the group.
Rename group: Allows you to rename the group. (Not applicable for an enterprise PTT group)
Manage group members: Allows you to add or delete members to/from the group. (Not applicable for an enterprise PTT group)
Delete group: Deletes the group. (Not applicable for an enterprise PTT group)
Turn on Do Not Disturb (Turn off Do Not Disturb): Turns Do
Not Disturb on or off. If you turn on Do Not Disturb, only a group call from that PTT group will be rejected. (Only applicable for an enterprise group)
A group call automatically connects to the group recipients. The • recipients cannot ignore the call.
Using the menu on the PTT Groups screen
The following menu is available on the PTT Groups screen.
Touch the Menu key • ☐ to access the following options:
Add group: See "Adding a new PTT group" on page 112.
Save temp grp: Saves the recently called temp group as the new group in the PTT Groups.
Display options: Allows you to display all groups, or only groups with Do Not Disturb set, on the PTT Groups screen. Also allows you to sort the list by name or presence status.
PTT off (PTT on): Turns PTT off or on.
Search: See "Searching for PTT contacts and PTT groups" on page 115.
More: See below.
- Touch the Menu key > More to access the following options:
Set Do Not Disturb: Opens a dialog where you can set Do Not Disturb on or off by checking or unchecking contacts in the PTT groups list. (Only applicable for an enterprise PTT group)
Settings: See "Changing Push to Talk settings" on page 115.
Using the menu on the PTT group details screen
The following menu is available on the PTT group details screen.
Touch the Menu key • ☐ to access the following options:
Rename: Allows you to rename this group. (Not applicable for an enterprise PTT group)
Edit members: Allows you to add or delete members to/from this group. (Not applicable for an enterprise PTT group)
Delete: Deletes this group. (Not applicable for an enterprise PTT group)
Do Not Disturb on (Do Not Disturb off): Turns Do Not Disturb on or off. (Only applicable for an enterprise PTT group)
Searching for PTT contacts and PTT groups
- Touch the Search key ☐ while in the Push to Talk application.
- Start entering the name of the PTT contact or the PTT group you are searching for.
As you type, PTT contacts and PTT groups with matching names appear below the search box.
- Touch the matching name of PTT contact or PTT group in the list to open the details screen, or touch the Barge call icon to place a Barge call.
Changing Push to Talk settings
- On the PTT Dialer screen, the PTT Call log screen, the PTT
Contacts screen, or the PTT Groups screen, touch the Menu key
Settings.
- Change the following settings as necessary.
Push to Talk settings
Push to Talk mode: Check or uncheck to turn Push to Talk on or off.
Status notification: When checked, an ongoing PTT status notification is displayed on the Status bar. (An ongoing PTT status notification is always displayed on the Status bar while a PTT call is in progress, regardless of this setting.)
Alert tone: Opens a dialog where you can select the ringtone to sound when you receive an Alert call.
Vibrate: Opens a dialog where you can set the phone to vibrate whenever you receive an Alert call, or never, or only in Silent mode, or only when not in Silent mode.
Push to Talk key
Short press: Allows you to select the action to be initiated when the Tactile Key/PTT Key ◇ ◇ ◇ is pressed shortly.
Long press: Allows you to select the action to be initiated when the Tactile Key/PTT Key ◇◇◇ is pressed and held.
Help
Help: Displays information about how to use PTT.
Tutorial: Starts playing the video tutorial for PTT.
Connecting to networks
Connecting to mobile networks
When you buy your phone and sign up for service, your phone is configured to use your provider's mobile networks for voice and data communication.
The icons in the Status bar indicate which type of data network you are connected to and the network signal strength.
 | Connected to the high-speed EVDO |
 | Connected to the 1x data network |
 | The more bars the stronger the wireless signal |
 | Connected to another wireless service provider's network (roaming) |
NOTE
When connected to slower networks, you may want to postpone using your phone for data-intensive tasks until you are connected to a faster network, or find a Wi-Fi network on which to connect.
Disabling data when roaming
You can prevent your phone from transmitting data over the carrier's mobile networks when you leave an area that is covered by your carrier's networks.
This is useful for controlling expenses if your phone's service plan doesn't include data roaming.
-
On the Home screen, touch the Menu key ☐ > Settings > Wireless & networks > Mobile networks > Global Data Roaming Access.
-
Touch Deny data roaming access in the dialog that opens.
Configuring system select
You can set your phone to search or roam for another network when you are not in your home area.
Leave this setting as default unless you want to alter the system selection as instructed by your service provider.
-
On the Home screen, touch the Menu key > Settings >
Wireless & networks > Mobile networks > System select. -
Touch one of the following:
Home Only: Only within your home area or home affiliated area.
Automatic: Scan radio channels based on the Automatic setting.
Connecting to Wi-Fi networks
You can transmit data at a faster speed when you connect to a Wi-Fi network “hotspot” or wireless access point.
Some access points are open and you can simply connect to them.
Others are hidden or implement other security features, so you must configure your phone to connect to such access points.
The following Status bar icons indicate your Wi-Fi status.
 | Connected to a Wi-Fi network (Waves indicate connection strength) | |
| [AXSG] | Notification that an open Wi-Fi network is in range | |
NOTE
You can extend your battery life by turning off the Wi-Fi when you are not using it.
Turning Wi-Fi on and connecting to a Wi-Fi network
- On the Home screen, touch the Menu key > Settings > Wireless & networks > Wi-Fi settings.
The Wi-Fi settings screen appears.
- Touch Wi-Fi to check it.
Wi-Fi turns on and your phone scans for available Wi-Fi network.
- A list of available Wi-Fi networks will be displayed. Secured networks are indicated by a lock icon 📄.
If the phone finds a network that you have connected to previously, it automatically connects to that network.
- Touch the network you want to join.
- If the network is open, you will be prompted to confirm that you want to connect to that network. Touch Connect to confirm.
If the network is secured, you will be prompted to enter a password. (Ask your network administrator for details.)
NOTES
Touch a network name on the Wi-Fi settings screen while connected to a network to display detail information such as speed, security, address, and other settings.
Touch and hold a network name on the Wi-Fi settings screen • while connected to a network to access the following options:
Forget network: Erases detail information for the added Wi-Fi network. For example, erase detail information for a Wi-Fi network if you do not want to connect automatically to that network or no longer use that network.
Modify network: Allows you to change your password.
- Touch Menu key > Scan on the Wi-Fi settings screen to manually scan for networks.
When connecting to a Wi-Fi network, your phone obtains network • address and other information from the network via DHCP protocol.
- Touch the Menu key > Advanced to use static IP address, check MAC address, or set Wi-Fi sleep policy.
Adding a Wi-Fi network
You can add a Wi-Fi network manually if it does not broadcast its name (SSID) or if you want to add a Wi-Fi network when you are out of its range.
To add a secured network, you need to contact the network administrator to obtain the password or other required security credentials.
- On the Home screen, touch the Menu key > Settings > Wireless & networks > Wi-Fi settings.
The Wi-Fi settings screen appears.
-
Touch Add Wi-Fi network.
-
Enter the network's SSID. If the network is secured, touch the Security box, then touch the type of security deployed on that network in the menu that opens.
-
Enter the required passwords and security credentials.
-
Touch Save.
NOTE
The phone will connect automatically to the added Wi-Fi network when you enter its access range.
Receiving notifications when open networks are in range
Set to receive notifications in the Status bar when your phone detects an open Wi-Fi network when Wi-Fi is on.
- On the Home screen, touch the Menu key > Settings > Wireless & networks > Wi-Fi settings.
The Wi-Fi settings screen appears.
- Touch Wi-Fi to check it.
- Touch Network notification to check it.
NOTE
An open Wi-Fi network icon 📋 is displayed in the Status bar when an open Wi-Fi network is detected. Drag the status bar down to open the Notification panel and touch the network name to open the Wi-Fi settings screen.
Connecting to virtual private networks
Virtual private networks (VPNs) allow you to connect to resources inside a secured local network, from outside that network.
VPNs are commonly deployed by corporations, schools, and other institutions so that their users can access local network resources when not on campus, or when connected to a wireless network.
NOTE
There are numerous systems for securing VPN connections, including some that rely on secure certificates or other methods to ensure that only authorized users can connect. For instructions on how to install secure certificates, see “Installing a secure certificate from the microSD card” on page 123.
Adding a VPN
To configure VPN access from your phone, you must obtain the details from your network administrator.
- On the Home screen, touch the Menu key ☐ > Settings > Wireless & networks > VPN settings.
The VPN settings screen appears.
- Touch Add VPN.
- Touch the type of VPN to add.
- In the screen that opens, follow the instructions obtained from your network administrator to configure each component of the VPN settings.
- Touch Menu key > Save.
The VPN will be added to the list on the VPN settings screen.
NOTE
Touch and hold the added VPN name on the VPN settings screen to access the following options:
Connect to network: Connects to VPN.
Disconnect from network: Disconnects if connected to a VPN.
Edit network: Allows you to edit the VPN settings.
Delete network: Deletes the VPN settings.
Connecting to a VPN
- On the Home screen, touch the Menu key ☐ > Settings > Wireless & networks > VPN settings.
The VPNs you have added are listed on the VPN settings screen.
-
Touch the VPN to which you want to connect.
-
In the dialog box that opens, enter any required credentials then touch Connect.
NOTES
When you are connected to VPN, a VPN icon ● is displayed in the Status bar.
Drag the status bar down to open the Notification panel, then touch the ongoing notification for the VPN connection to disconnect the VPN connection.
Working with secure certificates
If your organization's VPN or Wi-Fi network relies on secure certificates, you must obtain the certificates and store them in your phone's secure credential storage before you can configure access to that VPN or Wi-Fi network on your phone.
For specific instructions, contact your network administrator.
Installing a secure certificate from the microSD card
The installed certificate can be used to connect to a secured network.
- Copy the certificate from your PC to the root (that is, not in the folder) of the microSD card.
For instructions on how to connect your phone to a PC and copy files to the microSD card, see “Connecting your phone to a PC via USB” on page 126.
-
On the Home screen, touch the Menu key ☐ > Settings > Location & security.
-
Scroll the screen up, then touch Install from SD card.
Only the names of certificates that you have not already installed on your phone are displayed.
- Touch the file name of the certificate to install.
- If prompted, enter the certificate's password then touch OK.
- Enter a name for the certificate then touch OK.
If you have not already set a password for your phone's credential storage, you will be prompted to enter a password for it twice, then to touch OK.
For security purposes, the certificate will be deleted from the microSD card.
Connecting to devices
Connecting to a Headset
You can connect a compatible headset device equipped with a standard 3.5mm plug to your phone for safe, convenient, hands-free conversations.
-
To open the Headset Jack cover, insert your fingertip into the notch and open the cover.
-
Plug the connector into the Headset Jack.
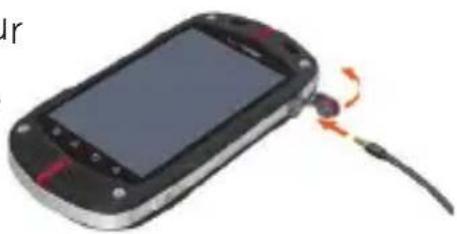
natural_image
Close-up of a mobile phone with a cable and a small screen, showing a red-orange contact point (no text or symbols visible)Warning!
Do not forcibly insert/remove the connector into/from the Headset • Jack. Insert/remove it carefully.
Failure to completely reseal the Headset Jack cover after use • may lead to water or other liquids entering the casing, which may cause damage to the phone.
You cannot insert the headset plug all the way in, depending on its plug grip thickness. In that case, use a plug with thinner plug grip or an extension cable with such a plug.
If you insert the headset with the microphone (4-pole type) which has an IC controller, no sound is output from the headset.
Connecting to a PC via USB
You can connect your phone to a PC with the USB Cable (included in box), to transfer music, pictures, and other files between your phone's microSD card and the PC.
NOTE
The first time you connect the phone to your PC using the USB Cable, you need to install the USB driver for CASIO G'zOne Commando™, following the instructions displayed on the PC.
Warning!
When connecting your phone to a PC and mounting its microSD • card, you must follow your PC's instructions for connecting and disconnecting USB devices, to avoid damaging or corrupting the files on your microSD card.
Failure to completely reseal the Charging/Data Port cover after • use may lead to water or other liquids entering the casing, which may cause damage to the phone.
Connecting your phone to a PC via USB
- Use the USB cable (included in box) to connect the phone to a USB port on your PC.
- If your phon's microSD card is not mounted on your PC, drag the Status bar down from the top of the screen, then touch USB connection. In the USB connection dialog that opens, touch to select Mass Storage, then touch OK.
When the phone is connected as USB storage, the screen indicates that USB storage is in use and you receive a notification.
Your phone's microSD card is now mounted as a drive on your PC. You can now copy files to and from the microSD card. For more information, check the manual for your PC.
NOTE
While the microSD card is mounted as a drive on your PC, you cannot access the microSD card from your phone, so you will not be able to use applications that rely on the microSD card, such as Camera, Gallery, and Music. You also will not be able to share your phone's data connection with your PC via USB.
Disconnecting your phone from the PC
Warning!
Carefully follow your PC's instructions to unmount the microSD card, and disconnect USB device correctly to avoid losing information on the microSD card.
- Unmount the microSD card from your PC.
- Disconnect the USB cable.
Formatting a microSD card
If you purchase a new microSD card, you may need to format it before you can use it with your phone. You can also format a microSD card to erase its contents.
NOTE
You can only format a microSD card when it is unmounted.
- On the Home screen, touch the Menu key ☐ > Settings > SD card & phone storage.
- If necessary, touch Unmount SD card.
- Touch Format SD card.
- On the screen that warns you that formatting the microSD card will erase its contents, touch Format SD card.
Connecting to Bluetooth ^® devices
Bluetooth is a short-range wireless communications technology that devices can use to exchange information over a distance of about 8 meters. The most common Bluetooth devices are headphones for placing calls or listening to music, hands-free kits for cars, and other portable devices, including laptops and cell phones.
To connect to a Bluetooth device, you must turn on your phone's Bluetooth radio. The first time you use a new device with your phone, you must "pair" them, so that they know how to connect securely to each other. After that, you can simply connect to a paired device. The Status bar displays icons that indicate Bluetooth status.
| * | Bluetooth is on |
| * | Connected to a Bluetooth device |
NOTES
There are several Bluetooth profiles that define the features and • communications standards for Bluetooth devices. Your phone supports the Bluetooth profiles: HSP, HFP, A2DP, AVRCP, OBEX, OPP, PBAP, GAVDP, AVDTP, and AVCTP.
OPP (Object Push Profile) allows you to send and receive the following types of files between Bluetooth devices: Contacts (vCard), image (JPEG, Bitmap, PNG, WinBMP, GIF), and movie (3G2, 3GP, MP4). Movie (WMV) and music (MP3, M4A) files can only be received.
Turning Bluetooth on or off
-
On the Home screen, touch the Menu key ☐ > Settings > Wireless & networks.
-
Check or uncheck Bluetooth to turn it on or off.
NOTE
Turn off Bluetooth when you are not using it, to extend the life of your battery between charges. You may also be required to turn Bluetooth off in some locations. Bluetooth should be turned off during flight by setting it to Airplane mode.
Changing your phone's Bluetooth name
Your phone's Bluetooth name is visible to other devices when you connect them. You can change the default name so that it is more recognizable.
- On the Home screen, touch the Menu key ☐ > Settings > Wireless & networks > Bluetooth settings.
The Bluetooth settings screen opens.
- If Bluetooth isn't turned on, touch Bluetooth to turn it on.
- Touch Bluetooth name, enter a name, and touch OK.
Pairing your phone with a Bluetooth device
You must pair your phone with a device before you can connect to it. Once you pair your phone with a device, they stay paired unless you unpair them.
- On the Home screen, touch the Menu key ☐ > Settings > Wireless & networks > Bluetooth settings.
- If Bluetooth isn't turned on, touch Bluetooth to turn it on.
Your phone scans for and displays the IDs of all available Bluetooth devices in wireless communication range.
- If the device you want to pair with isn't in the list, make it discoverable.
Check the manual that came with your device to learn how to make it discoverable by your phone, and for other instructions on pairing.
-
If your phone stops scanning before you make the other device discoverable, touch Scan for devices.
-
Touch the ID of the other device in the list in Settings to pair them. The devices will pair with each other. If you are prompted to enter a passcode, try entering 0000 or 1234 (the most common passcodes), or consult the manual that came with the device for its passcode. If the pairing is successful, your phone will connect to the device.
Connecting to a Bluetooth device
Once paired, you can easily connect to the Bluetooth device—for example, by switching between devices or reconnecting to the device after the phone and the device come back into wireless communication range.
- On the Home screen, touch the Menu key ☐ > Settings > Wireless & networks > Bluetooth settings.
- If Bluetooth isn't turned on, touch Bluetooth to turn it on.
- In the list of devices, touch a paired but unconnected device in the list.
If the device you expected isn't displayed, touch Scan for devices.
When the phone and the device are connected, the device is displayed as connected in the list.
Configuring the Bluetooth features to use
Some Bluetooth devices have multiple profiles. Profiles can include the capability to transmit your phone conversations, to play music in stereo, or to transfer files or other data. You can select which profiles you want to use with your phone.
- Touch and hold the device in the Bluetooth settings screen.
- Touch Options in the menu that opens.
A screen opens with a list of the device's profiles. - Check or uncheck a profile to use it or not.
- When you are finished, touch the Back key ↩.
Disconnecting from a Bluetooth device
- Touch and hold the device in the Bluetooth settings screen.
- Touch Disconnect in the menu that opens.
Unpairing a Bluetooth device
You can unpair a Bluetooth device to erase all pairing information about the device.
- Touch and hold the device in the Bluetooth settings screen.
- Touch Disconnect & unpair in the menu that opens.
Sharing your phone's mobile data connection
You can share your phone's data connection with up to five devices at once, by turning your phone into a 3G Mobile Hotspot.
When your phone is sharing its data connection, an icon appears in the Status bar and an ongoing notification in the Notifications panel (see “Managing notifications” on page 34).

3G Mobile Hotspot is active (Number indicates devices connected)
Sharing your phone's data connection as a 3G Mobile Hotspot
- On the Home screen, touch the Menu key ☐ > Settings > Wireless & networks > 3G Mobile Hotspot.
- Check 3G Mobile Hotspot.
After a moment, the phone starts broadcasting its Wi-Fi network name (SSID), so you can connect to it with up to five PCs or other devices. An ongoing notification icon is added to the Status bar and Notifications panel.
When 3G Mobile Hotspot is checked, you can change its network
name or secure it. See “Renaming or securing your mobile hotspot” on page 132.
- Uncheck 3G Mobile Hotspot to stop sharing your data connection via Wi-Fi.
Renaming or securing your mobile hotspot
You can change the name of your phone's Wi-Fi network name (SSID) and secure its Wi-Fi network.
- On the Home screen, touch the Menu key > Settings > Wireless & networks > 3G Mobile Hotspot.
- Ensure 3G Mobile Hotspot is checked.
- Touch 3G Mobile Hotspot settings.
- Touch Configure 3G Mobile Hotspot.
The Configure 3G Mobile Hotspot dialog opens.
You can change the network SSID (name) that other PC see when scanning for Wi-Fi networks.
You can also change the security type and password to use for connection with other PC.
- Touch Save.
NOTE
Default 3G Mobile Hotspot settings are as follows:
SSID: VerizonC771-*****
Where ***** represents last 6 digits of your phone's Wi-Fi MAC address.
Security: WPA2 PSK
Password: 1234567890
Accounts and sync
You can sync contacts, email, calendar events, and other information with your phone, from multiple Google Accounts, Microsoft Exchange ActiveSync accounts, or other types of accounts, depending on the applications installed on your phone.
For example, you can start by adding your personal Google Account, so your personal email, contacts, and calendar are always available.
You can also add an Exchange ActiveSync account from work, so you can read your work email and have your work contacts handy.
Adding and removing accounts
You can add multiple Google Accounts and Microsoft Exchange ActiveSync accounts.
You may also be able to add other types of accounts, depending on your applications.
NOTES
For more information on how to set up your email, visit https://smartphones.verizonwireless.com/. Click on the Smartphone Support tab and select your phone.
You can add accounts in the Accounts & Sync settings, as • described in this section.
You can add other accounts using an application that works with those types of accounts; for example, you can add IMAP and POP3 email accounts with the Email application (see “Adding and editing email accounts” on page 144).
Adding an account
NOTE
To add some accounts, you may need to obtain details from an IT support representative about the service to which the account connects. For example, you may need to know the account's domain or server address.
- On the Home screen, touch the Menu key ☐ > Settings > Accounts & sync.
The Accounts & Sync Settings screen displays your current sync settings and a list of your current accounts.
-
Touch Add account.
-
Touch the type of account to add.
-
Follow the on-screen instructions to enter the required and optional information about the account.
Most accounts require a username and password, but the details depend on the type of account and the configuration of the service you are connecting to.
Depending on the type of account, you may be asked to configure the types of data you want to sync to the phone, name the account, and provide other details.
When you are finished, the account is added to the list in the Accounts & Sync Settings screen. Depending on how you configured the account, email, contacts, and other information will start syncing to your phone.
Removing an account
You can remove an account and all information associated with it from your phone, including email, contacts, settings, and so on.
- On the Home screen, touch the Menu key ☐ > Settings > Accounts & sync.
The Accounts & Sync Settings screen displays your current sync settings and a list of your current accounts.
- Touch the account to remove.
- Touch Remove account.
- Touch Remove account again to confirm that you are sure you want to remove the account.
NOTE
You cannot remove the first Google Account you signed into on the phone, except by deleting all personal information from your phone. For more information, see “Privacy settings screen” on page 279.
Configuring account sync settings
You can configure background data use and synchronization options for all of the applications on your phone. You can also configure what types of data you synchronize for each account. Some applications, such as Gmail™ and Calendar, have their own synchronization settings.
NOTES
Some applications, such as Contacts, Gmail, and Calendar, can sync data from multiple applications. Others sync data only from the first Google Account you sign into on your phone, or from an account associated specifically with that application.
For some accounts, syncing is two-directional; changes that you make to the information on your phone are made to the copy of that information on the web. Your Google Account works this way. Other accounts support only one-way sync; the information on your phone is read-only.
Configuring general sync settings
- On the Home screen, touch the Menu key > Settings > Accounts & sync.
The Accounts & Sync Settings screen opens.
- Check or uncheck Background data to control whether applications and services can transmit data when you are not working with them directly (that is, when they are running in the background).
If you uncheck this option, Gmail stops receiving new mail, Calendar stops syncing events, and so on, until you touch the Refresh menu item or send an email.
- Check or uncheck Auto-sync to control whether changes you make to information on the phone or on the web are automatically synced with each other.
For example, when this option is checked, changes that you make in Contacts on the phone are automatically made in Google Contacts on the web.
If you uncheck this option, you may be able to use an application's tools to sync data manually. You can also sync account data manually from the Accounts & Sync Settings screen. For more information, see "Syncing information manually" on page 137.
Changing account sync settings
- On the Home screen, touch the Menu key ☐ > Settings > Accounts & sync.
The Accounts & Sync Settings screen opens.

text_image
Accounts & sync settings General sync settings Background data Applications tax sync, send, and receive data at any time Auto-sync Applications sync data automatically Manage accounts Backup Assistant Sync is OFF nonmanual.nolife@gm... Sync is DN Some or all information from this account is configured to sync automatically with your phone. No information from this account syncs automatically with your phone. Add account- Touch the account whose sync settings you want to change.
The Data and Synchronization screen opens, displaying a list of the types of information the account can sync.
Checked items are configured to sync to your phone.
- Check or uncheck the types of information you want to sync to the phone.
NOTE
Unchecking a types of information does not remove the information from your phone; it simply stops it from being kept in sync with the version on the web. To remove the information previously synced for the account, you must remove the account.
Syncing information manually
-
On the Home screen, touch the Menu key ☐ > Settings > Accounts & sync.
-
Touch the account whose data you want to sync.
-
Touch the Menu key ☐ > Sync now.
You can use the Email application to read and send email. Email includes a wizard that makes it easy to configure it to several popular email service providers.
Opening Email
- Touch the Launcher icon on the Home screen.
The Launcher opens.
- Touch the Email icon
The first time you open Email, the Select service screen opens to help you add an email account, as described in “Adding an email account” on page 145.
After the initial setup, Email opens to the last screen you were viewing or, if you have not used Email recently, it displays the contents of your Inbox (if you have only one account) or the Accounts screen (if you have multiple accounts).
Opening the Accounts screen and your Inbox
The Accounts screen lists each of your email accounts.
- On a folder screen, touch the Menu key > Accounts.
The Accounts screen opens.

text_image
Touch an account to open its Inbox. nomanual.nolife@gmail.... Add account The account from which you send email by default is indicated with a checkmark.The account from which you send email by default is indicated • with a checkmark.
- Touch an account to open its Inbox.

text_image
john-smith All About your product 5:28 AM Ethan return to message... 5:20 AM john-smith return to message... December 12,2010 Gmail Team Customize Gmail with c... October 12,2010 Gmail Team Impleen your contacts an... October 12,2010 Load more messages An unread message. Previously read messages.Only some of your account's recent emails are downloaded to • your phone. To download earlier messages in batches for IMAP or POP3 accounts, touch Load more messages at the bottom of the list of emails.
NOTE
For Exchange ActiveSync accounts, you can change how many days or weeks of email to store on your phone; see “Adding and editing email accounts” on page 144.
Reading your messages
You can read messages in the Inbox or other folders for individual accounts.
NOTE
When you receive a new message, you also receive a notification in the Status bar, unless you have turned off Email notifications using the Email Account settings, where you can also set whether or not the phone vibrates when it receives an Email notification, and pick a ringtone.
See “Changing an account’s settings” on page 146. When you touch an Email notification, it opens an account’s Inbox.
- Open an account's Inbox or another folder of messages.
- Touch the message to read.
The message opens in a screen with information about who sent it, the date it was sent, and related information at the top, followed by the contents of the message.

text_image
Touch to add sender's email address to your Contacts. john-smith for: nannual.noll@gmail.com 2:47 PM All About your product Dear Sir or Nadam: I saw your product on your website, I would like to know the price of your product. Could you send me a price list, including shipping cost? Sunset.jpg 64.1 KB Open Save Reply Reply all Delete Touch an arrow to read the next or previous message in the folder. Touch to open an attachment. Touch to reply to or delete the message.You can reply, forward, delete, or take other actions with a • message, as described in “Responding to a message” below.
Responding to a message
You can reply to, or forward, a message that you receive. You can also delete messages and manage them in other ways.
Replying to, or forwarding a message
- While reading a message, touch Reply or Reply all.
Or, touch the Menu key ☐ > Reply, Reply all, or Forward.
A Compose message screen opens with the addresses (when replying), subject, and a copy of the message you are responding to already filled in.
You can send this message as you would a new message, as described in “Composing and sending email” on page 143.
Marking a message as unread
You can return a read message to the unread state—for example, to remind yourself to read it again later.
- While reading a message, touch the Menu key ☐ > Mark as unread.
NOTE
You can also mark a batch of messages as unread. See “Working with message in batches” on page 142.
Deleting a message
You can delete a message from its folder.
- While reading a message, touch Delete.
Or, touch the Menu key ☐ > Delete.
NOTES
For most types of accounts, deleted messages are moved to a • Trash folder, so you can retrieve them if you deleted them in error. You can also delete a batch of messages. See “Working with • message in batches” on page 142.
Starring messages
You can star an important message to make it easy to keep track.
NOTE
You can also star a batch of messages. See “Working with message in batches” on page 142.
Starring a message
- While reading a message, touch the star ☆ in its header.
Or, while viewing a list of messages in a folder, touch a message's star ☆.
The star turns gold ☆.
Unstarring a message
- While reading a message, touch the gold star ★ in its header. Or, while viewing a list of messages in a folder, touch a message's gold star ★.
Searching your messages
- Open an account's Inbox, or another folder of messages.
- Touch the Menu key □ > Search.
- Enter the word(s) you want to search for.
- Touch the search icon to start the search.
The list of searched emails is displayed.
Working with message in batches
You can delete, star, or mark as unread a batch of messages at once.
- Open an account's Inbox or another folder of messages.
- Check the checkbox at the left of each message.
When you check one or more messages, the Mark read/unread, Add star/Remove star, Delete, and Move option appear at the bottom of the screen.
- Touch Mark read/unread, Add star/Remove star, Delete, or Move.
You can also touch the Menu key ☐ > Deselect all.
Your action affects the entire batch of messages.
Composing and sending email
You can send email to your contacts or to other people or groups.
- On the Accounts screen or a folder screen, touch the Menu key >Compose.
- Enter an address for the message.
As you enter text, matching addresses are suggested from your Contacts. You can touch a suggested address or enter a new one. Separate multiple addresses with commas.
- Touch the Menu key ☐ > Add Cc/Bcc to enter an address to send a copy or blind copy of the message.
- Enter a subject for the message.
- Enter the content of the message.
- Touch the Menu key ☐ > Add attachment to send a photo with the message.
- Touch Send.
NOTES
- If you are not ready to send the message, touch Save as draft to save it in a Drafts folder. See “Working with account folders” on page 144. Touch a draft message in a Drafts folder to resume working on it. Your message is also saved as a draft if you touch the Back key ← before sending it.
If you are not connected to a network--for example, if you are • working in airplane mode--the messages that you send are stored in your Outbox folder until you are connected to a network again.
Working with account folders
Each account has an Inbox, Outbox, Sent, and Drafts folders.
Depending on the features supported by your account's service provider, you may have additional folders.
-
Open an account's Inbox or another folder of messages.
-
Touch the Menu key > Folders.
The account's Folders screen opens, with a scrolling list of the folders in the account. Touch a folder to view a list of the messages it contains.
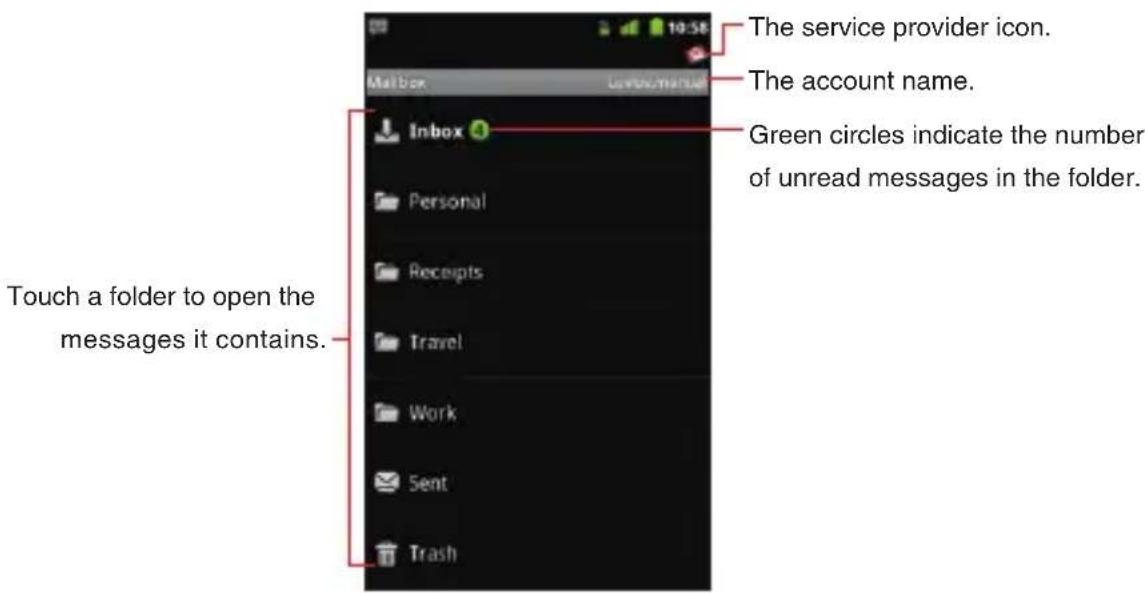
text_image
The service provider icon. The account name. Green circles indicate the number of unread messages in the folder. Touch a folder to open the messages it contains.Adding and editing email accounts
The first time you open Email, you are prompted to set up an email account. After that, you can configure Email to send and receive email from additional accounts. The accounts that you configure are displayed in the Accounts screen.
The Email setup wizard helps you set up your account for many popular email systems, including those based on IMAP and POP3, so you can read and work with the same emails you have on a PC in a web browser, or with another email application. If your service provider requires additional settings, or if your service provider is unknown to Email, you can enter the necessary details manually,
though you will typically need to contact your email service provider to determine the right settings for your account.
You can also set up a Microsoft Exchange ActiveSync account (Exchange 2003 and 2007), so you can read and work with the same emails you have on a PC using Microsoft Outlook. Email supports username and password authentication for Exchange ActiveSync accounts, and your IT administrator may set additional security policies for the account (contact your IT administrator for more information).
You can set up a maximum of 10 email accounts.
Adding an email account
- Open the Accounts screen.
See “Opening the Accounts screen and your Inbox” on page 138.
- Touch the Menu key ☐ > Add account.
The Select service screen opens.
- Touch your email service provider.
If you touched Windows Live Hotmail, touch the domain of the account.
If your email service provider is not listed on the Select service screen, see “Adding an account of the provider that does not appear on the Select service screen” on page 146.
- Enter your email address and password.
If you are adding a second or subsequent email address, you can also check Send email from this account by default to use the new account to send all outgoing messages.
-
Touch Next.
-
Enter the name for this account (Optional) and your name.
-
Touch Sign In.
Email starts downloading your email messages and you can start using it to send and receive messages using the new account.
Adding an account of the provider that does not appear on the Select service screen
If your email service provider is not listed on the Select service screen, perform the following steps to add an email account.
- Open the Accounts screen.
-
Touch the Menu key > Add account.
The Select service screen opens. -
Touch Other.
-
Enter your email address and password.
If you are adding a second or subsequent email address, you can also check Send email from this account by default to use the new account to send all outgoing messages.
-
Touch Sign In.
-
An email server information will be automatically set.
If an email server information is not automatically set, the POP3 and IMAP options will be displayed. Touch either of the options according to the type of the server to connect.
POP3: Touch when you add an email account to which you access with POP3. Consult your email service provider or IT administrator for required information such as POP3 server name, port number, and security settings.
IMAP: Touch when you add an email account to which you access with IMAP. Consult your email service provider or IT administrator for required information such as IMAP server name, port number, and security settings.
- Follow the on-screen instructions to configure your account.
Changing an account's settings
You can change a number of settings for an account, including how often you check for email, how you are notified of new mail, and details about the servers the account uses to send and receive mail.
-
Open the Accounts screen.
-
Touch and hold the account whose settings you want to change.
- Touch Account settings in the menu that opens.
- Change the following settings as necessary.
These settings apply only to the account with which you are working.
Account name: The name of the account as it appears in the Accounts and Folders screens.
Your name : Your name as it appears to others when they receive an email from you.
Use signature: Check to insert the signature you entered in Signature setting into all the emails to be sent from this account.
Signature setting: Opens a screen where you can enter a signature to tag on to the messages you send from this account.
Default account: Use this account's outgoing email server for the email you compose and send when you are not currently viewing or working with an email from a specific account.
Email notifications: Set whether or not you want to receive notifications when you receive new emails sent to this account.
Select ringtone: Select a ringtone to sound when you receive an email notification for this account.
Vibrate: Opens a dialog where you can set the phone to vibrate whenever you receive an email notification for this account, or only when the phone is in Silent mode, or never.
Incoming settings: Opens a screen where you can configure settings for how you receive emails for this account. If necessary, consult your email service provider or your IT administrator about these settings. (This option is not displayed for Yahoo!, Windows Live Hotmail, AOL, Gmail™, or Verizon.net account.)
Outgoing settings: Opens a screen where you can configure settings for how you send emails from this account. If necessary, consult your email service provider or your IT administrator about these settings. (Microsoft Exchange ActiveSync accounts do not

have separate outgoing server settings. This option is not displayed for Yahoo!, Windows Live Hotmail, AOL, Gmail, or Verizon.net account.)
Sync contacts: For accounts that can sync contacts, check to sync contacts from this account to your phone. See “Configuring account sync settings” on page 135. (This option is only displayed for Microsoft Exchange ActiveSync account.)
Sync calendar: For accounts that can sync calendars, check to sync calendars from this account to your phone. See “Configuring account sync settings” on page 135. (This option is only displayed for Microsoft Exchange ActiveSync account.)
- When you are finished changing the settings, touch the Back key ↩.
NOTE
You can also open the settings for an account while you are viewing its inbox, by touching the Menu key ☐ > Account settings.
Deleting an email account
- Open the Accounts screen.
- Touch and hold the account to delete.
- Touch Remove account in the menu that opens.
- Touch OK in the dialog to confirm that you want to delete the account.
Messaging
Checking sent and received messages
You can check the messages you exchanged with each person as a different thread.
- Touch the Launcher icon on the Home screen.
The Launcher opens.
- Touch the Messaging icon
The Messaging screen opens.
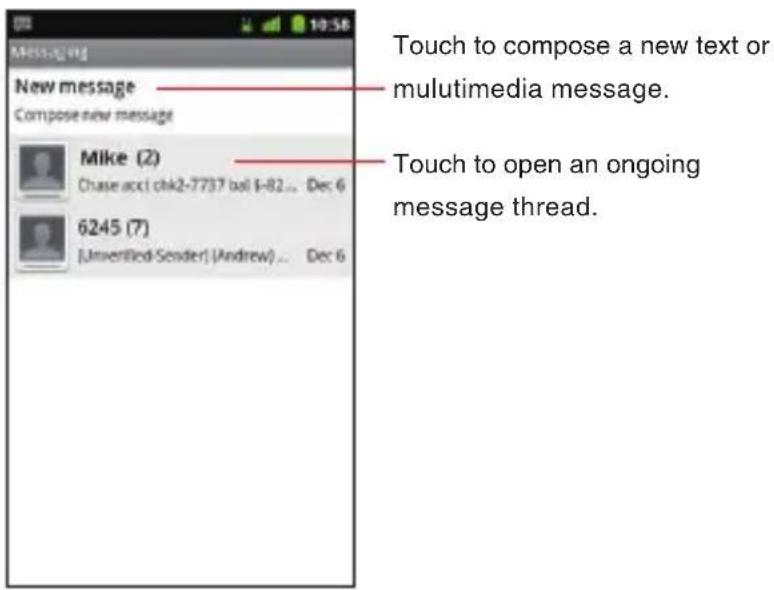
text_image
Touch to compose a new text or multimedia message. Touch to open an ongoing message thread. New message Compose new message Mike (2) Chase acc1 chk2-7737 bol 4-82... Dec 6 6245 (7) (Unverified Sender) (Andrew)... Dec 6- Touch the thread of the exchanged message you want to check. The Message thread screen opens.
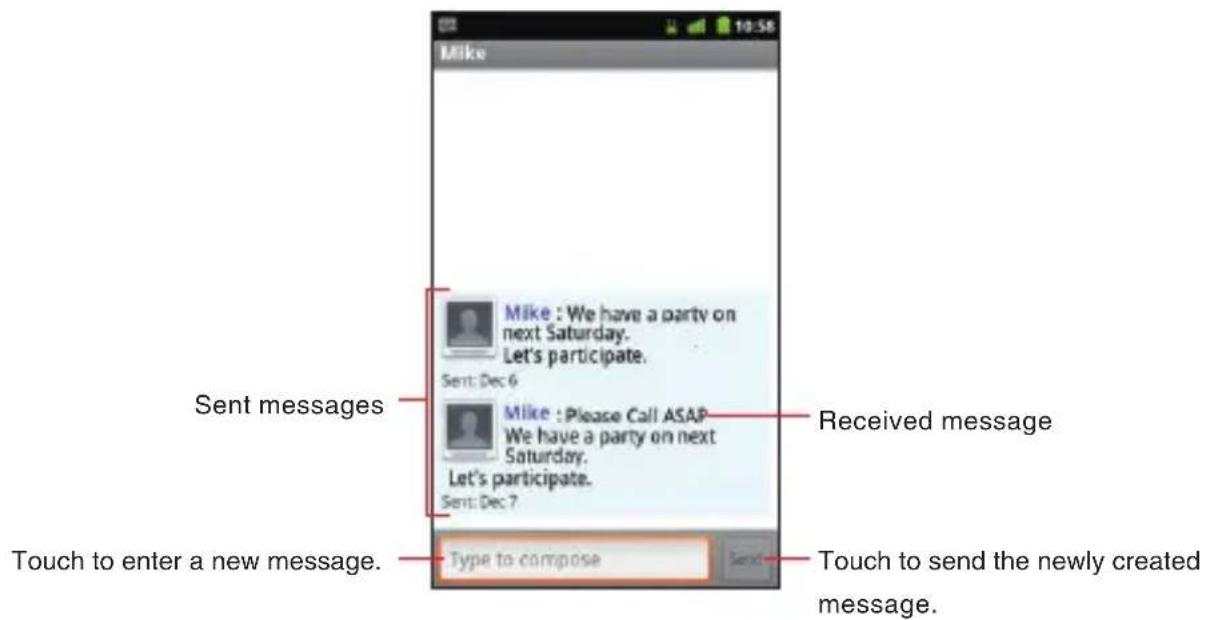
text_image
Mike Sent messages Mike : We have a party on next Saturday. Let's participate. Sent: Dec 6 Mike : Please Call ASAP We have a party on next Saturday. Let's participate. Sent: Dec 7 Touch to enter a new message. Type to compose Received message Touch to send the newly created message.- If the message contains a multimedia file, you can touch Play to open, view, or listen to the file.
NOTE
When there is a new message, the new message icon appears on the Status bar. Drag the status bar down to open the Notifications panel and touch the new message to open the Message thread screen.
Using the menus on the Messaging screen
The following options are available on the Messaging screen.
Touch the Menu key • ☐ to access the following options:
Compose: Allows you to compose a new text or multimedia message. See “Sending a message” on page 152.
Delete threads: Deletes all threads. If there are locked messages, check Delete locked messages and then touch Delete to delete them also.
Search: Allows you to search the text of the message by entering a word(s) to search.
Settings: Allows you to set messaging settings. See “Changing Messaging settings” on page 154.
Touch and hold a thread on the Messaging screen to access the following options:
View thread: Displays the messages from a thread on the Message thread screen.
Add to contacts: Adds the phone number to Contacts. (Only applicable when the phone number is not already in your Contacts)
View contact: Opens the contact details for the phone number.
(Only applicable when the phone number is already in your Contacts)
Add to PTT Contacts: Adds the phone number to PTT Contacts.
(Only applicable when the phone number is not already in PTT Contacts)
Delete thread: Deletes the thread. If there are locked messages, check Delete locked messages and then touch Delete to delete them also.
Using the menus on the Message thread screen
The following options are available on the Message thread screen.
Touch the Menu key • ☐ to access the following options:
Call: Calls the phone number of the person with whom you are exchanging messages.
View contact: Opens the contact details for the phone number. (Only applicable when the phone number is already in your Contacts)
Add subject: Adds subject to the message you are composing.
Attach: Adds an attachment to the message you are composing.
Send: Sends the message you composed.
Insert smiley: Inserts a smiley. (Touch More if this option is not visible in the menu.)
Delete thread: Deletes the displayed thread. If there are locked messages, check Delete locked messages and then touch Delete to delete them also. (Touch More if this option is not visible in the menu.)
All threads: Returns to the Messaging screen. (Touch More if this option is not visible in the menu.)
Touch and hold a message on the Message thread screen to • access the following options:
Call phone: Calls the phone number of the person you have been exchanging messages with.
Add to Contacts: Adds the phone number to Contacts. (Only applicable when the phone number is not already in your Contacts)
Lock message (Unlock message): Locks or unlocks the selected message.
Edit: Allows you to edit and send the message. (Only applicable when the message is not already sent)
Forward: Forwards the message.
Copy attached to SD card: Copies an attached file on the microSD. (Only applicable when a file is attached.)
Import contacts: Imports content of attached vCard file to Contacts. (Only applicable when an attached file is vCard.)
Copy message text: Copies the text of the message to the clipboard.
View message details: Displays details such as message type and sender's phone number.
Delete message: Deletes the message.
Sending a message
Sending a text message
You can send text message (SMS) of up to 160 characters* to another mobile phone. If you keep typing after the limit, your message is sent as a series of messages.
* If you send message to an Email address, you can send message of up to 160 characters including the Email address.
- Touch the Launcher icon on the Home screen.
The Launcher opens.
- Touch the Messaging icon 😊.
The Messaging screen opens.
-
Touch New message.
-
Enter the mobile phone number of the person you are sending the message to in the "To" field. As you enter the phone number, the search function makes suggestions.
-
You can touch a suggestion or continue entering the phone number.
-
Touch the "Type to compose" field and start entering your message.
7. Touch Send.
The Message thread screen opens and the sent message appears next to the name “Me.”
A message thread is created and the message from the recipient is displayed on the same screen.
NOTE
If you touch the Back key ↩ while composing a message, it is saved as a draft. Touch the message draft displayed in the Messaging screen to resume composing the message.
Sending a multimedia message
You can attach text, photo, recorded voice, audio file, video, contact, or photo slideshow to a multimedia (MMS) message.
NOTE
A message is automatically converted into a multimedia message if you add a subject, attach a file, or send it to an Email address instead of a mobile phone number.
- Touch the Launcher icon on the Home screen.
The Launcher opens.
- Touch the Messaging icon
The Messaging screen opens.
-
Touch New message.
-
Enter a mobile phone number or an Email address of the person you are sending the message to in the "To" field. As you enter the phone number, the search function displays suggestions.
-
You can touch a suggestion or continue entering the phone number or Email address.
-
Touch the "Type to compose" field and start entering your message.
-
To add a subject, touch the Menu key ☐ > Add subject and enter the subject.
-
To attach a file, touch the Menu key ☐ > Attach and touch one of the following multimedia file types.
Pictures: Allows you to select and attach a picture saved on the microSD card.
Capture picture: The Camera application opens so you can take a picture and attach it.
Videos: Allows you to select and attach a video saved on the microSD card.
Capture video: The Camera application opens in camcorder mode so you can take a video and attach it.
Audio: Prompts you to select one of the internal audio files.
Record audio: The voice recorder function opens so you can record and attach a voice message.
Contact: Allows you to select and attach a contact from Contacts.
Slideshow: The Edit slideshow menu opens. You can assemble photos into a slideshow of up to ten slides to attach to the message. Touch the name of a slideshow in the Edit slideshow menu to add photos, preview a slideshow, or delete a slideshow. When you are finished editing a slideshow, touch Done.
- Touch Send.
Changing Messaging settings
-
From the Messaging screen, touch the Menu key > Settings.
-
Change the following settings as necessary.
Storage settings
Delete old messages: Check to delete older messages in a thread when the Text message limit or Multimedia message limit is reached. Uncheck to keep all messages.
Text message limit: Allows you to set the number of messages to save per thread of text messages.
Multimedia message limit: Allows you to set the number of messages to save per thread of multimedia messages.
Text message (SMS) settings
Delivery reports: Check to receive delivery reports for the text messages you send.
Multimedia message (MMS) settings
Delivery reports: Check to receive delivery reports for the multimedia messages you send.
Read reports: Check to receive reports when your multimedia messages are read or deleted.
Auto-retrieve: Uncheck to download only the heading of multimedia messages. You can later touch a heading to open a menu to download the whole message.
Roaming auto-retrieve: Uncheck to download only the heading of multimedia messages when connected to other carriers' data networks. This is useful for avoiding unexpected charges if your contract has limits on data roaming.
Notification settings
Notifications: Check to receive a notification whenever you receive a new message.
Select ringtone: Allows you to select the ringtone to sound when you receive a new message notification.
Vibrate: Check to have the phone vibrate when you receive a new message.
NOTE
Check with your service provider to see whether they support Delivery reports and Read reports.
Browser
The Browser allows you to view web pages.
Opening Browser
- Touch the Browser icon 📋 on the Home screen or in the Launcher. The Browser opens with the web page you most recently viewed. If you have not used the Browser recently, your home page is displayed.
NOTES
The Browser also opens when you touch a link to a web page •
included in an email or text message.
You can open your home page by touching the Menu key • □ >
More > Home on the Browser screen.
You can open the Verizon Wireless home page by touching the •
Menu key > More > VZW Home on the Browser screen.
You can open the My Verizon top page by touching the Menu key •
More > My Verizon on the Browser screen.
Web contents may not be viewed if the latest version of the •
Flash library is not installed. Update it when notified for the latest version.
Viewing a web page by specifying URL
- Touch the URL bar at the top of the Browser screen.
If the URL bar is not visible, scroll up until the URL bar can be seen, or touch the Menu key ☐.

text_image
http://mw2.vzwwap.co... VERI ON BRAKING NEWS LOCAL AND AROUND THE WORLD VZ Services My Web Channels Today's Weather Enter a Zip or City e.g: 'Rockville' Submit Forecast from WeatherBug NFL.com MobileThe address (URL) of the current page is displayed in the URL bar.
- Enter the address (URL) of the web page.
As you enter the address, the search function shows suggestions of web pages and queries. When you use the search function, you can choose Bing™ or Google™ as your default search engine by touching the check box in the pop up that appears.

text_image
vzw- Touch the suggestion or continue to enter the full address and touch the right arrow icon →.
NOTES
The URL bar may not be displayed at the top of the Browser • screen on some websites. In that case, drag the page downward or touch the Menu key ☐ to display the URL bar.
If it takes long time to open the specified web page, or if you change your mind, you can cancel the downloading of the page.
To do so, touch the cancel icon ✕ at right of the URL bar, or touch the Menu key ☐, then touch Stop.
Viewing a web page
You can use the Browser to view full-size web pages designed for PC web browser, just as you would view on a PC. Full-size web pages are initially displayed in the overview mode. You can easily zoom in to a section on a web page.
NOTES
In some websites, web pages optimized for mobile device's • browsers are displayed. You may not be able to zoom in or scroll the contents on such pages.
Navigation of the web varies from web page to web page • depending on the website format.
Scrolling a web page
- On the Browser screen, slide the page toward the desired direction with your finger.
Zooming in or out of a web page
Place two fingers on the desired area of the screen at once and • spread them apart to zoom in. Double-tap after zooming in this way, to reflow a column of text to fit the screen.
Place two fingers on the desired area of the screen at once and • pinch them together to zoom out.
Slightly slide your finger on the Browser screen to display the zoom • control icons 🔒. Touch the plus icon or minus icon

of the zoom control to zoom in or out.
Zooming in a section on a web page
- Double-tap on a section of a web page you want to zoom in.
- The web page zooms in so that you can read all the text in the section by scrolling up and down.
- To return to the overview mode, double-tap the screen again.
Searching for text on a web page
- Touch the Menu key ☐ while viewing the Browser screen.
- Touch More > Find on page.
- Type in the text you want to search.
When you type, the first word with matching characters is highlighted on the screen and subsequent matches are boxed-in.

text_image
Touch to jump to the previous or next matching word. 10 matches without an interception for the eighth straight game. Deion Branch caught eight passes for a career-high 151 yards, including a 59-yard touchdown at the end of the first 181F. Wes Welker had eight receptions for 115 yards and the Patriots totaled 475 yards while holding NFC North leader Chicago to 185. The Bears (9-4) had won five straight since their bye, saving their season when it appeared to be slipping away. But they were no match for the team that came in tied for the league's best record. Chicago is still a game ahead of Green Bay in the division, but came out flat with a chance to widen its lead and show it could beat the league's elite. Jay Cutler struggled, going 12 of 26 for 152 yards with two interceptions and two- Touch the left arrow icon ▶ or right arrow icon ▶ to jump to and highlight the previous or next matching word.
- Touch the close icon to end your search.
Copying text on a web page
- Touch the Menu key ☐ while viewing the Browser screen.
- Touch More > Select text.
- Highlight the text you want to copy.
The text is copied to the clipboard.
Refreshing the current web page
- Touch the Menu key ☐ while viewing the Browser screen.
- Touch Refresh.
The web page is reloaded, updating any changes.
Setting the current web page as the home page
- Touch the Menu key ☐ while viewing the Browser screen.
- Touch More > Settings > Set home page > OK.
Viewing information about the current web page
- Touch the Menu key ☐ while viewing the Browser screen.
- Touch More > Page info.
A dialog box opens and displays the web page's title and full address.
Navigating between web pages Opening a link
- Touch a link you want to open on the web page.
NOTES
When you touch and hold a link, the following options will appear:
Open: Opens the linked web page.
Open in new window: Opens the linked web page in a new window.
Bookmark link: Bookmarks the link.
Save link: Saves the linked web page as a file.
Share link: Shares the link via Email, text message, or social networking site.
Copy link URL: Copies the link's URL to the clipboard.
When you touch a phone number link, the Phone application • opens and allows you to place a call to that number.
When you touch a street address link, the VZ Navigator® opens with a map of the area.
Going back and forward between opened web pages
Touch the Back key • ↩ to go back to the previous page.
- Touch the Menu key > More > Forward to go to the next page.
Viewing your most frequently visited pages
- Touch the bookmark icon on the URL bar.
If the URL bar is not visible, scroll up until the URL bar can be seen or touch the Menu key ☐.
- Touch the Most visited tab.
The titles of the most frequently visited pages are listed in order.
- Touch the page's title to open the page.
NOTES
Bookmarked pages have a gold star next to their title.
When you touch a gold star next to the page's title, the page is • deleted from the bookmark.
When you touch a gray star next to the page's title, the page is • added to the bookmark.
Viewing the history of the visited web pages
- Touch the bookmark icon on the URL bar.
If the URL bar is not visible, scroll up until the URL bar can be seen, or touch the Menu key ☐.
- Touch the History tab.
The browser history is sorted by time period, such as Today or 5 days ago.
-
Touch a time period.
-
Touch the page's title to open the page.
NOTES
- You can also open the History tab by touching and holding the Back key on the Browser screen. Bookmarked pages have a gold star next to their title.
When you touch a gold star next to the page's title, the page is • deleted from the bookmark.
When you touch a gray star next to the page's title, the page is • added to the bookmark.
- You can delete all history by touching the Menu key > Clear history while viewing the History tab.
Working with bookmarks
You can bookmark frequently visited web pages to quickly view them.
Bookmarking a web page
- Touch the bookmark icon 📄 on the URL bar while viewing the web page you want to bookmark.
If the URL bar is not visible, scroll up until the URL bar can be seen, or touch the Menu key ☐.
You will see the Bookmarks tab.
-
Touch Add on the upper left side of the Bookmarks tab.
-
Edit the name or address as needed and touch OK.
The bookmark is added to your list of bookmarks.
NOTES
- You can also view the Bookmarks tab by touching the Menu key >Bookmarks while viewing the web page. You can also bookmark the most recently viewed web page by • touching the Menu key >Bookmark last-viewed page while viewing the Bookmarks tab. You can switch the thumbnail view to the list view by touching the • Menu key >List view while viewing the Bookmarks tab. You can return to the thumbnail view by touching the Menu key >Thumbnail view while viewing the list view.
Viewing bookmarked pages
- Touch the bookmark icon of the URL bar.
If the URL bar is not visible, scroll up until the URL bar can be seen, or touch the Menu key ☐.
You will see the Bookmarks tab.
- Touch a bookmark.
The bookmarked web page opens in the current window.
NOTES
- When you touch and hold the bookmark on the Bookmarks tab, the following options will appear:
Open: Opens the bookmarked web page.
Open in new windows: Opens the bookmarked web page in a new window.
Edit bookmark: Edits the name and address of the bookmark.
Add shortcut to Home: Adds a shortcut of the bookmark on the Home screen.
Share link: Shares a bookmark via Email, text message, or social networking site.
Copy link URL: Copies a bookmark URL to the clipboard.
Delete bookmark: Deletes the bookmark.
Set as homepage: Sets the bookmarked web page as the Home page.
You cannot edit or delete the default bookmarks.
Downloading files
Image files, web pages, and applications can be downloaded from websites.
Downloaded files will be stored in the phone's microSD card.
NOTES
The way to download image files, documents, applications and other files depends on the web page. Download files according to the web page instructions.
By default, the Phone is set to disable installation of applications • downloaded from web pages. To enable installation of applications, check Unknown sources of Application settings.
See "Applications settings screen" on page 275.
Warning!
To protect the phone and personal data, download applications • only from trusted sources, such as Market.
Downloading files
- Touch and hold an image on a web page, a link to a file, or a link to another web page.
The context menu will open.
- Touch Save image or Save link.
If the file is in a format supported by an application on the phone, it will be downloaded to your microSD card.
NOTE
If you change your mind about downloading a file, or want to stop downloading one started by mistake, you can cancel the download in progress. Touch the Menu key ☐ > More > Downloads > Menu key ☐ > Cancel all downloads.
Viewing downloaded files
- Touch the Menu key ☐ while viewing the Browser screen.
- Touch More > Downloads.
A list of the files you have downloaded in Browser and other applications will be displayed.
- Touch the file you want to view.
NOTE
You can also view a list of downloaded files by touching the Downloads icon in the Launcher.
Downloading an image and setting it as wallpaper
- Touch and hold an image on a web page.
The context menu opens.
- Touch Set as wallpaper.
The images is downloaded and set as wallpaper of the Home screen.
Working with multiple Browser windows
You can open up to eight Browser windows at a time and switch between them.
Opening a new Browser window
- Touch the Menu key ☐ while viewing the Browser screen.
- Touch New Window.
A new Browser window opens to your home page.
Switching Browser windows
-
Touch the Menu key ☐ while viewing the Browser screen.
-
Touch Windows.
The list of Browser windows is displayed.
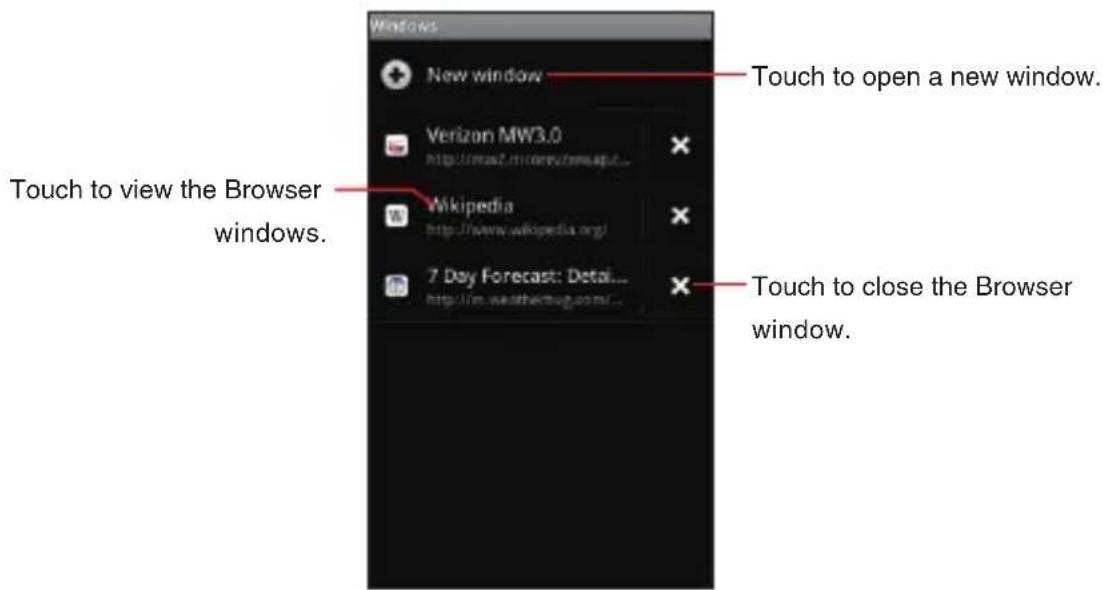
text_image
Windows New window Touch to open a new window. Verizon MW3.0 http://www.mimw3.net/ Wikipedia http://www.wikipedia.org/ 7 Day Forecast: Detail... http://www.weatherbug.com/... Touch to view the Browser windows. Touch to close the Browser window.- Touch the Browser window you want to view.
Closing a Browser window
-
Touch the Menu key ☐ while viewing the Browser screen.
-
Touch Windows.
The list of Browser windows is displayed.
- Touch the close icon ✗ of the Browser window you want to close.
Changing Browser settings
-
Touch the Menu key ☐ while viewing the Browser screen.
-
Touch More > Settings.
-
Change the following settings as needed:
Page content setting
Text size: Allows you to increase or decrease the text size that the Browser uses when displaying web pages.
Default zoom: Allows you to increase or decrease the magnification ratio that the Browser uses when first opening a web page.
Open pages in overview: When checked, web pages are displayed in an overview. When unchecked, web pages are displayed at 100% size.
Text encoding : Allows you to change the character-encoding standard that the Browser uses when displaying text on a web page.
Block pop-up windows: When checked, the Browser blocks pop-up windows.
Load images: When checked, the Browser loads images when displaying web pages. When unchecked, the Browser does not load images when displaying web pages.
Auto-fit pages: When checked, the Browser optimizes the presentation of the text and other elements of a web page to fit the screen.
Landscape-only display: When checked, the Phone displays pages in landscape (horizontal) orientation on the screen, regardless of how you are holding the Phone.
Enable JavaScript: When checked, the Browser allows JavaScript to run. When unchecked, the Browser prevents JavaScript from running.
Enable plug-ins: When checked, plug-ins are enabled on web pages. When unchecked, plug-ins are disabled on web pages.
Open in background: When checked, the linked page opened in a new window will open in the background. When unchecked, new windows will open in place of the current window.
Set home page: Allows you to set the current web page as a home page. You can also edit the URL.
Invert color: When checked, web pages are displayed with colors inverted.
Desktop mode: Check to enter Desktop mode.
Privacy settings
Clear cache: Allows you to delete the temporary files which the Browser stores in order to open web pages more quickly.
Clear history: Allows you to delete the browser history.
Accept cookies: When checked, the Phone allows web pages to store cookies on it. When unchecked, the Phone prevents web pages from storing cookies on it.
Clear all cookie data: Touch to delete all cookies from the Phone.
Remember form data: When checked, the Browser remembers what you enter on a form on a website and helps you re-enter that text when you use that form next time. When unchecked, this feature is disabled.
Clear form data: Touch to delete all the information which the Browser remembers about what you have entered on forms.
Enable location: When checked, you permit websites with location-specific contents to ask whether you want to share your location information, using the Phone's location information. To provide your location information for a website, you must also have location sharing enabled in My Location of Location & security settings. See “Location & security settings screen” on page 272.
Clear location access: Prevents websites from accessing your location information which you had previously given. If such websites want permission to access your location information again, you must re-permit access to the information.
Security settings
Remember password: Permits the Browser to remember your passwords required to log in on some web pages in order to access more quickly. When unchecked, the Browser does not remember your passwords.
Clear password: Touch to delete, all passwords which the Browser has stored.
Show security warnings: When checked, the Browser warns you about web pages with common security problems such as outdated or invalid certificates. When unchecked, these warnings are suppressed.
Advanced settings
Website settings: Opens a screen where you can access advanced settings for particular web pages.
Reset to default: Touch to return all the Browser settings to their default values, except for the browser history, cookies, passwords and bookmarks, which remain unchanged.
NOTE
You can display the list of security certificates used by the browser by touching the Menu key ☐ > More > Certificates on the Browser screen.
Camera
The Camera application is a combination of both the camera and camcorder, which allows you to take pictures, shoot videos, and share them.
Opening Camera
- Touch the Launcher icon on the Home screen.
The Launcher opens.
- Touch the Camera icon
Camera opens, ready to take a picture.

natural_image
Close-up of a black camera module with adjustment knobs and a scroll wheel (no visible text or symbols)Touch to preview your pictures or videos in Gallery.
Drag up to shoot videos; drag down to take photos.
Touch to take a picture or shoot a video.
Touch to open the Icon menu.
NOTE
Pictures and videos will be stored in the phone's microSD card, so you must install one to use the Camera application.
Taking pictures and shooting videos
NOTE
Be sure to clean the protective lens cover with a microfiber cloth before taking pictures. A lens cover with smudges from fingers can cause blurry pictures with a “halo” effect.
Taking a picture
- Touch the Launcher icon on the Home screen.
The Launcher opens.
- Touch the Camera icon
Camera opens, ready to take a picture.
- You can adjust your white balance, flash, and other settings, or leave them on automatic.
The preview image changes as you change the settings.
For instructions on how to change Camera settings, see “Changing Camera settings” on page 173.
- Frame your subject on screen.
Touch the arrow icon ☐, then touch the current zoom level to display the slider. You can drag the slider to change the zoom level.
You can also zoom all the way in or out by double-tapping the screen. (You cannot zoom in or out a picture if its size is 5M.)
- Press the Camera Key ☐ all the way or touch the Shutter icon on the screen.
The camera focuses on the subject. When the subject is in focus, the focus indicator in the center of the screen turns green and the camera takes a picture.
The picture you just took is displayed for a moment, and then it is displayed as a thumbnail.
- Touch the thumbnail to view, share, and work with your pictures in Gallery.
See "Gallery" on page 176.
NOTES
To focus first and then take a picture, press the Camera Key • halfway to focus on a subject, then press the key the rest of the way down to take a focused picture.
If you want to cancel taking the picture, take your finger off the key before pressing the key the rest of the way down.
To focus first and then take a picture, touch and hold the Shutter icon to focus on a subject, then lift your finger to take a focused picture.
If you want to cancel taking the picture, slide your finger off the Shutter icon 🔒 and release your finger.
Pictures that you take with digital zoom may be smaller (in pixels) • than the size you set with the Picture Size setting.
Orientation of a picture is determined according to the phone • orientation when taking a picture.
Shooting a video
- Touch the Launcher icon on the Home screen.
The Launcher opens.
- Touch the Camcorder icon
Camcorder opens, ready to shoot a video.
Camcorder is always displayed in landscape orientation.
- You can adjust the quality, white balance, and other settings.
The preview image changes as you change the settings.
For instructions on how to change Camera settings, see “Changing Camera settings” on page 173.
-
Point the lens to frame the scene where you want to start.
-
Press the Camera Key 📄 or touch the start video icon 🙏 on the screen.
The camcorder starts shooting the video. The countdown of the shooting time remaining is displayed on the left. When the remaining time becomes less than a minute, the countdown turns red.
- Press the Camera Key 📄 or touch the stop video icon 🔒 to stop shooting.
An image from your most recent video is displayed as a thumbnail at the top right.
- Touch the thumbnail to view, share, and work with your videos in Gallery.
See "Gallery" on page 176.
Changing Camera settings
The Camera application has automatic settings that you can use to take quick point-and-shoot photographs and videos. But Camera also has a number of ways to control your exposures, including controlling the focus, turning the flash on and off, and adjusting the white balance. You can even shoot negatives or use other special effects.
Camera also includes settings for controlling picture and video quality and video length, whether to store the location where you take your pictures, and so on.
- Open the Camera screen for taking pictures or shooting videos and touch the arrow icon ▶.
The Icon menu opens.
- Touch the icon of the setting category which contains the item you want to change.
Settings menu for that category opens.
-
Touch the item you want to change. Touch the value or drag the slider to change settings.
-
Touch the Back key ↩ to close the settings menus.
-
Take pictures or shoot videos using the new settings.
Camera settings

Quality: Touch to open the Quality settings menu.
Picture size:• Touch to choose the size (in pixels) of the pictures you take.
• Picture quality: Touch to choose from Super fine, Fine, or Normal picture quality when taking pictures.

Lighting: Touch to open the Environment settings menu.
Brightness:• Touch to adjust the brightness level within the range of +5 to -5.
White balance:• Touch to select how Camera adjusts colors in different kinds of light, to achieve the most natural-looking colors for your shots. Or you can allow Camera to adjust the white balance automatically.

Auto

Incandescent

Daylight

Fluorescent

Cloudy
Night mode:• Touch to toggle Night mode on and off.

On

Off

Effect: Touch to open the Effect setting menu.
Color effect:• Touch to choose a special effect for your shots, such as monochrome, sepia tone, or negative.

Device: Touch to open the Device settings menu.
Flash mode:• Touch to toggle a flash on and off when taking a picture.

On

Off
- Focus mode: Touch to set Camera to use its Autofocus feature (Auto), or to take pictures more quickly, set the Camera to use focus at infinity (Infinity).

Auto

Infinity
Store location:• Touch to set whether or not the current location measured with the phone's GPS to be stored with each picture you take.
On: Location stored with photo
Off: Location not stored with photo
Zoom level: Touch to zoom. (You cannot zoom in or out a picture if its size is 5M.)
Camcorder settings

Quality: Touch to open the Quality setting menu.
Quality:• Touch to set the appropriate maximum length/quality combination for viewing on a PC or for sharing with others via Messaging or YouTube™.
High (30m)
Low (30m)
MMS (Low, 60s)
YouTube (High, 10m)

Environment: Touch to open the Environment settings menu.
Brightness:• Touch to adjust the brightness level within the range of +5 to -5.
White balance:• Touch to select how Camera adjusts colors in different kinds of light, to achieve the most natural-looking colors for your shots. Or you can allow Camera to adjust the white balance automatically.

Auto

Incandescent

Daylight

Fluorescent

Cloudy

Effect: Touch to open the Effect setting menu.
Color effect:• Touch a special effect for your videos, such as monochrome, sepia tone, or negative.
Gallery
You can use Gallery application to view pictures and play videos that you have taken with Camera, downloaded, or copied onto your microSD card.
Opening Gallery and viewing your albums
- Touch the Launcher icon on the Home screen.
The Launcher opens.
- Touch the Gallery icon
The main Gallery screen opens displaying the pictures and videos on your microSD card, including those taken with Camera and downloaded from websites or other locations.
Touch in any view to return to the main Gallery screen.

text_image
Gallery Camera (5) My Picture (5)Touch to open Camera.
An album of the photos and videos you took with Camera.
Slide left or right to view more albums.
- Touch an album to open it and view its contents.
The pictures and videos in the album are displayed in chronological order. See “Working with albums” on page 177.
NOTE
If you have a lot of pictures or videos on your microSD card, it may take Gallery a few minutes to discover and organize them when you open the application.
Working with albums
Albums are groups of images and videos in folders on your microSD card.
Opening an album and viewing its contents
- Touch the Launcher icon on the Home screen.
The Launcher opens.
- Touch the Gallery icon
The main Gallery screen opens.
- Touch the album with the contents you want to view.
The album opens and displays the pictures and videos it contains in a chronological order. The name of the album is shown at the top of the screen.
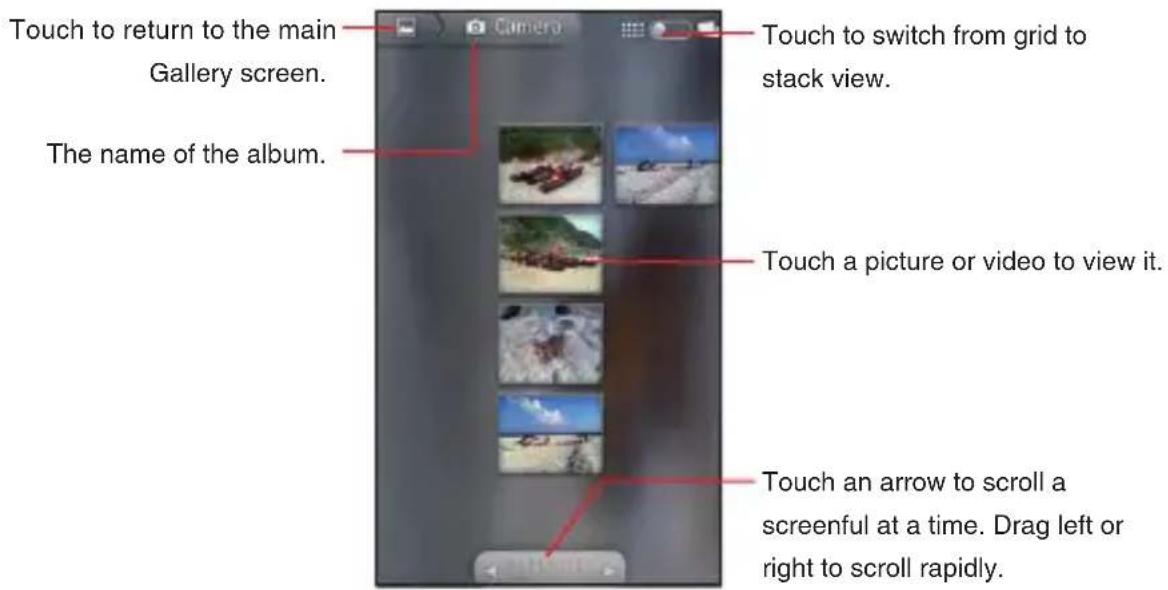
text_image
Touch to return to the main Gallery screen. The name of the album. Touch to switch from grid to stack view. Touch a picture or video to view it. Touch an arrow to scroll a screenful at a time. Drag left or right to scroll rapidly.- Drag the scroll tool to the left or right to scroll slowly or quickly. The date of the image in view is displayed, so you can scroll by date.
You can also scroll through an album by swiping left or right.
- Touch a picture or video to view it.
See “Working with pictures” on page 180 and “Working with videos” on page 183.
Changing how the contents of an album are displayed
You can view the images and videos in your albums in a chronological grid or in stacks, sorted by the date and by the location where the images or videos were taken. You can switch album views with the Album View switch 📄 at the top right of the screen.
- Drag the Album View switch to the right to view the contents of the album in stacks.
- Drag the Album View switch to the left to view the album contents in a chronological grid again.
Working with batches of pictures or videos
In addition to working with whole albums and with individual pictures, you can select one or more pictures or videos in an album to work on them in batches—for example, to send a few pictures from an album to a friend.
- Open the album to view the pictures and videos to work with.
-
Touch and hold a picture or video.
Or, touch the Menu key ☐ twice. -
Check or uncheck the items you want to work with.
You can check all items by touching Select All at the top left of the window.
You can uncheck all items you have checked by touching Deselect All at the top right of the window.
- Use the controls at the bottom of the screen to use on the checked items.
The controls available depend on the mix of items you have selected. For information about sharing and editing pictures and videos, see “Working with pictures” on page 180 and “Working with videos” on page 183.
Sharing an album
You can share the entire contents of one or more albums.
- Open the main Gallery screen.
- Touch and hold a picture or video.
Or, touch the Menu key ☐ twice.
-
Check or uncheck the albums you want to share.
-
Touch Share at the bottom of the screen.
-
In the menu that opens, touch the application you want to use to share the selected albums.
The application that you select will open with the pictures from the selected albums or links, attached to a new message. For information about addressing and sending the message, see the section on that application.
NOTES
If you are sharing an album via Gmail™, do not delete the original • of an attachment before the message is completely sent (wait until it has the Sent label, not the Outbox label), or the attachment will not be sent.
You can also share individual images or videos from an album. • See “Sharing a picture” on page 183 and “Sharing a video” on page 184.
Getting details about an album
- Open the main Gallery screen.
-
Touch and hold a picture or video.
Or, touch the Menu key ☐ twice. -
Check or uncheck the albums for which you want to get the details.
-
Touch More at the bottom of the screen.
-
Touch Details in the menu that opens.
Deleting an album
- Open the main Gallery screen.
- Touch and hold a picture or video.
Or, touch the Menu key ☐ twice. - Check or uncheck the albums you want to delete.
- Touch Delete at the bottom of the screen.
- Touch Confirm Delete in the dialog that opens.
Working with pictures
Use Gallery to view pictures that you have taken with Camera, downloaded, or copied onto your microSD card. You can also edit the pictures on your microSD card and share them with friends.
Viewing and browsing pictures
- Touch the Launcher icon on the Home screen. The Launcher opens.
- Touch the Gallery icon
- Touch the album whose contents you want to view.
- Touch a picture to view it.
Touch to return to the main Gallery screen.
Touch to return to the album.
natural_image
Beach scene with silhouetted people on a dock, no visible text or symbolsTouch to open Camera.
Touch the picture to see the controls.
Drag left or right to see the next or previous picture in the album.
Touch to zoom in or out.
Turn the phone to view the picture in upright (portrait) or • sideways (landscape) orientation.
The picture is displayed (but not saved) in the new orientation.
Touch the picture to view the zoom and other controls.
Touch the zoom icons 📄 or 📋 mole-tap the screen to zoom in or out.
Place two fingers on the screen at once and spread them apart • or pinch them together to zoom in or out.
When the picture is zoomed in, drag the picture to view parts that are not in view.
When the picture is zoomed to fit in the window, drag left or right • to view the next or previous picture in the album.
- Touch Slideshow to watch a slideshow of pictures in the album. Touch a picture to end the slideshow.
Rotating a picture
- Touch a picture to view the controls.
- Touch Menu > More.
A menu opens with tools for working with the picture.
- Touch Rotate > Rotate left or Rotate right.
The picture is saved with the new orientation.
Using a picture as a contact icon or as Home screen wallpaper
- Touch a picture to view the controls.
- Touch Menu > More > Set as.
If you touch Contact icon, you will be prompted to select the contact that will be associated with the picture, and then to crop the picture.
If you touch Group icon, you will be prompted to select the group that will be associated with the picture, and then to crop the picture. If you touch Wallpaper, you will be prompted to crop the picture.
Cropping a picture
You can save a zoomed-in portion of a picture by cropping it.
- Touch a picture to view the controls.
- Touch Menu > More > Crop.
The cropping rectangle appears on top of the picture. - Use the cropping tool to select the portion of the picture to crop.
Drag from the inside of the cropping tool to move it.
Drag an edge of the cropping tool to resize it to any proportion.
Drag a corner of the cropping tool to resize it with fixed proportions. - Touch Save to save a copy of the picture as you cropped it.
The original uncropped version remains on your microSD card.
Getting details about a picture
- Touch a picture to view the controls.
- Touch Menu > More > Details.
Viewing the location of a picture on map
If you have configured Camera to save location information with your pictures (see “Changing Camera settings” on page 173), you can view the location where you took the picture on map.
- Touch a picture to view the controls.
- Touch Menu > More > Show on map > Bing or VZ Navigator.
Bing™ Maps or VZ Navigator ^® opens, centered on the location stored in the picture.
NOTES
For a picture with location information saved, you can remove • location information by touching Menu > More > Remove location information.
For a picture without location information saved, you can add current location information by touching Menu > More > Add location information.
Sharing a picture
You can share a picture by sending it to friends.
- Touch a picture to view the controls.
- Touch Menu > Share.
- In the menu that opens, touch the application you want to use to share the selected picture.
The application you select will open with the picture (or a link) attached to a new message. For information about addressing and sending the message, see the section about that application.
NOTE
If you are sharing a picture via Gmail, do not delete the original picture before the message is completely sent (wait until it has the Sent label, not the Outbox label), or the attached picture will not be sent.
Deleting a picture
You can delete a picture from your microSD card.
- Touch a picture to view the controls.
- Touch Menu > Delete.
- Touch Confirm Delete in the dialog that opens.
Working with videos
Use Gallery to play or share the videos that you have taken with Camera.
Playing videos
- Touch the Launcher icon on the Home screen.
The Launcher opens. - Touch the Gallery icon
- Touch the album with the contents you want to view.
4. Touch a video to play it.
Video always plays back in landscape mode.
text_image
Touch to pause playback; touch again to resume playback. Touch to fast forward the video. Drag the slider to go directly to a section of the video. Touch the video to view the playback controls. Touch to rewind the video.Sharing a video
You can share a video by sending it in an email or with a multimedia (MMS) message. You can also share a video by uploading it to the YouTube™ web site.
-
While viewing an album, touch and hold a video. Or, touch the Menu key ☐ twice.
-
Check the videos to share.
-
Touch Share.
-
In the menu that opens, touch the application you want to use to share the selected videos.
The application you select will open with the video attached to a new message. If you selected YouTube, you will be prompted to enter details about the video to upload.
For more information, see the section on that application.
NOTES
MMS messages have size limits, typically 1.2MB, or •
approximately 1 minute of high-quality video or 2 minutes of low-quality video.
If you are sharing one or more videos via Gmail, do not delete the • originals before the message is completely sent (wait until it has the Sent label, not the Outbox label), or the attached videos will not be sent.
Deleting a video
- While viewing an album, touch and hold a video.
Or, touch the Menu key ☐ twice. - Check the videos or pictures to delete.
- Touch Delete at the bottom of the screen.
- Touch Confirm Delete in the dialog that opens.
Music
You can use the Music application to organize and play music and audio files transferred from your PC to your microSD card.
Copying music files to the phone's microSD card
The Music application plays audio files that are stored on your phone's microSD card, so before you open Music, you must copy audio files from your PC to the microSD card.
NOTES
Music application supports a wide variety of audio file formats, so it can play music that you purchase from online stores, music that you copy from your CD collection, and so on.
Music application supports audio files in numerous formats, including MP3, M4A (iTunes application AAC, DRM-free), AMR, and MIDI.
- Use the USB cable (included in box) to connect the phone to a USB port on your PC.
- If your phone's microSD card is not mounted on your PC, drag the Status bar down from the top of the screen, then touch USB connection. In the USB connection dialog that opens, touch to select Mass Storage, then touch OK.
- To organize your audio files, use the PC to create a music folder at the top level of the microSD card.
- Use the PC to copy music and other audio files into the folder that you created on the microSD card.
- If you have created any playlists, create a subfolder for them in your music folder on the microSD card and copy the playlists into it.
- Unmount the microSD card from the PC and disconnect the phone.
NOTES
You can use subfolders on the microSD card to organize your • music files, or simply copy the audio files to the top level of the microSD card.
If the music files have accompanying artwork in JPEG format, • include it in the same folder as the music files.
If your phone is connected to your PC via the USB cable, you can transfer songs on your PC to your phone's microSD card using V CAST Music with Rhapsody on your PC. To do so, open the Music application, then touch the Menu key ☐ > Sync. For details about V CAST Music with Rhapsody PC software, see "Transferring music from a PC" on page 211.
Warning!
When connecting your phone to a PC and mounting its microSD • card, you must follow your PC's instructions for connecting and disconnecting USB devices, to avoid damaging or corrupting the files on your microSD card.
Failure to completely reseal the Charging/Data Port cover after • use may lead to water or other liquids entering the casing, which may cause damage to the phone.
Opening Music and working with your library
After you have copied some music to your microSD card according to the instructions in “Copying music files to the phone’s microSD card” on page 186, or downloaded music from another source, you can open the Music application and see your music library, sorted in one of four ways.
- Touch the Launcher icon on the Home screen.
The Launcher opens.
- Touch the Music icon
When you copy music to your microSD card, Music searches the card for music files and creates a catalog of your music, based on information about each file that is stored in the file itself. This may take a few seconds or several minutes, depending on how many files you have copied to the microSD card.
When the music catalog creation is complete, the Music library screen opens with tabs that you can touch to view your music library organized by Artists, Albums, Songs, or Playlists.
text_image
Touch a tab to view your library in one of four ways. Recently added My recordings Believe AI Touch the summary of the current track to open the Playback screen.NOTE
You can return to the Music library screen from the Playback screen by touching the Menu key ☐ > Library.
Searching for music in your library
- Touch the Search key 🔒 on any Music application screen.
- Start typing the name of the artist, album, or track you are looking for.
Matching songs are displayed in the list below the search box.
- Touch a song to play it, or touch an album or artist to view a list of associated songs.
Deleting a song from the microSD card
- Touch and hold a song in a library list.
- Touch Delete in the menu that opens.
- Touch OK.
NOTES
You can also delete the song that is playing by touching the Menu • key □ > More > Delete > OK on the Playback screen.
When your phone is connected to a PC, you can also delete • music files from the microSD card.
Playing music
1. Touch a song in your library to listen to it.
The Playback screen opens and the song you touched starts to play.
The tracks in the current playlist play in order until the last track of the playlist (unless you choose a repeat option). Otherwise, playback stops only if you stop it, even when you switch applications or receive a phone call.

text_image
Touch to open the current playlist. Touch to shuffle the current playlist. Touch to repeat the current playlist; touch again to repeat the current track. Your recordings Audio recordings 2010-11-09-01:00:29 Touch and hold to search for information. Touch to skip to the previous track in the album, playlist, or shuffle. Touch to pause playback; touch again to resume playback. Touch to skip to the previous track in the album, playlist, or shuffle. Drag the slider to go directly to a section of a track.NOTES
You can adjust the volume of music by pressing the Volume Keys • ◀ ▶ . A panel opens to show the current media volume; the indicator moves as you adjust the volume.
You can start playback from the first song in the list by touching • the Menu key ☐ > Play all while viewing a list of tracks in an album or in the Songs tab.
You can return to the Playback acreen from most other screen • in the Music application by touching the summary of the current track shown at the bottom of the screen.
You can return to the Playback screen from any other application • by opening the Notifications panel and touching the ongoing music notification.
You can listen to music by using the phone's built-in speaker, • through a wired headset, or through a wireless Bluetooth stereo headset that supports the A2DP profile. See “Connecting to Bluetooth® devices” on page 128 and refer to your phone’s owner’s guide for more information about the headset that comes with your phone.
Some headsets include their own volume controls or ways to • pause and resume playback or to switch tracks.
Playing tracks in a party shuffle
When you turn on Party Shuffle, Music plays tracks from your microSD card in random order, until you turn Party Shuffle off.
- In the Playback or a Library screen, touch the Menu key □ > Party shuffle.
Music creates a current playlist of a dozen tracks selected randomly from your microSD card and starts playing them. When it finishes playing the first dozen tracks, it adds another dozen and keeps playing.
- To stop Party Shuffle, touch the Menu key ☐ > Party shuffle off.
NOTES
To view the current playlist that Party Shuffle is playing, touch the • playlist icon ≡ on the Playback screen.
You can add a track to the end of the Party Shuffle playlist by • touching and holding the name of a track in your library. In the menu that opens, touch Add to playlist and then Current playlist. The track is added to the end of the Party Shuffle playlist.
Using a song as a ringtone
You can use a song as your phone ringtone, in place of one of the ringtones that come with the phone.
- Touch and hold a song in a library list.
- Touch Use as phone ringtone in the menu that opens.
NOTE
You can also use the song that is playing in the Playback screen as your phone ringtone by touching the Menu key ☐ > More > Use as ringtone.
Working with playlists
You can create playlists to organize your music files into sets of songs, which you can play in the order you set or in a shuffle.
Creating a playlist
- When viewing a list of songs in the library, touch and hold the first song you want to add to the new playlist.
- Touch Add to playlist.
- Touch New.
- Enter a name and touch Save.
The new playlist is added to the Playlist library.
NOTE
You can also add the song that is playing in the Playback screen as the first song in a playlist by touching the Menu key ☐ > Add to playlist.
Adding a song to a playlist
- While viewing a list of tracks in the Library, touch and hold a song to add it to a playlist.
- Touch Add to playlist.
- Touch the name of the playlist to add the song to.
The song is added to the playlist.
NOTE
You can also add the song that is playing in the Playback screen to a playlist by touching the Menu key ☐ > Add to playlist.
Rearranging songs in a playlist
- Open a playlist by touching it in the Playlists tab.
- Drag the directional icon ≈ next to the song up or down to change its order in the playlist.
NOTE
You can also open the currently playing playlist by touching the playlist icon in the Playback screen.
Removing a song from a playlist
- Open a playlist by touching it in the Playlists tab.
- Touch and hold a song and then touch Remove from playlist. Or you can touch the Menu key ☐ > Clear playlist to remove all the songs from the playlist.
NOTE
The song will not be deleted from the microSD card or other playlists; it will only be removed from the playlist you are working with.
Renaming or delete a playlist
-
Touch and hold a playlist in the Playlists tab.
-
Touch Rename or Delete in the menu that opens.
NOTES
You cannot delete or rename the Recently Added playlist. • No songs will be affected by the deleting of a playlist. •
Creating playlists on your PC
You can create playlists on your PC to use in the Music application. Music can work with playlists in the M3U, WPL, and PLS file formats. Copy playlists to your microSD card the same way you copy music, according to the instructions in “Copying music files to the phone’s microSD card” on page 186. The best method is to create a subfolder within your music folder for playlists.
NOTES
If you don't have an application dedicated to creating playlists on your PC, you can create a playlist in a text editor, using the following guidelines:
Enter each music file name to include in the playlist on its own • line.
Use music file names as displayed on your PC. Music ignores all but the track names when displaying the playlist.
Save the file with the .m3u extension •
Using V CAST Media Manager
The CASIO G'zOne Commando™ is compatible with V CAST Media Manager. The desktop application, offered free by Verizon Wireless, allows you to transfer photos, music and videos between your phone and PC. Once the desktop application is installed, simply connect your phone and PC with a USB cable, and V CAST Media Manager makes it easier than ever to transfer, play and manage your media. The application also includes a media player and an array of intuitive features to help you manage and enjoy your media.
To get started visit www.verizonwireless.com/vmm.
Calendar
Calendar on the phone works with the web-based Google Calendar service for creating and managing events, meetings, and appointments. It also works with the Microsoft Exchange ActiveSync calendar service.
NOTE
Calendar on the phone is optimized for the phone. Some Calendar features, such as creating Calendars, are only available in Google Calendar on the web. Visit http://calendar.google.com to learn about the features of the web version of Calendar.
Viewing your calendar and events
When you first set up your phone, you configured it to use an existing Google Account, or you created a new account. The first time you open the Calendar application on your phone, it will display any existing calendar events from your Google Account on the web.
NOTES
You can add additional accounts with Google Calendar or • Microsoft Exchange calendars to your phone, and configure them to display in Calendar. See “Accounts and sync” on page 133. When you first set up Calendar to synchronize events on your • phone, it includes events from the previous month through one year in the future. Subsequently, Calendar keeps a year’s worth of future events synchronized between your phone and the web, plus any later events that you add to your calendar using Calendar on your phone.

Opening your calendar
Open Calendar to view events you have created or that others have invited you to.
- Touch the Launcher icon on the Home screen.
The Launcher opens.
- Touch the Calendar icon
The calendar displays events added to your phone for each account that is set to synchronize with the calendar.
Changing your calendar view
Calendar has four views: Agenda, Day, Week, and Month.
- Touch the Menu key ☐ > Agenda, Day, Week, or Month.
Each view displays the events in your calendar for the period of time that you specify. For details, see:
"Working in Agenda view" on page 198
"Working in Day view" on page 199
"Working in Week view" on page 200
"Working in Month view" on page 201
NOTE
From any view, you can touch the Menu key ☐ > Today to view the Day view for today's schedule.
Working in Agenda view
Agenda view is a list of your events in chronological order. All-day and multiday events are listed at the start of each day.
- Touch the Menu key ☐ > Agenda.

text_image
Agamie Monday, March 7, 2011 Meeting neom - 1:30pm Tuesday, March 8, 2011 Meeting neom - 1:30pm Wednesday, March 9, 2011 Meeting neom - 1:30pm Thursday, March 10, 2011 Meeting neom - 1:30pm Friday, March 11, 2011 Meeting neom - 1:30pm Touch an event to view its details. Drag up or down to view earlier or later events. This event repeats.Touch an event to view its details. •
A screen with details about the event opens. See “Viewing event details” on page 202.
Working in Day view
Day view displays a chart of the events of one day in a table of one-hour rows. The red line indicates the current time. All-day and multiday events are displayed at the top.
Part of the title of each event is displayed in the rows that correspond to when it occurs.
1. Touch the Menu key > Day.

text_image
Thursday, Mar 5, 2011 Drag left or right to view earlier or later days. Touch and hold a time slot or an event to create a new event at that time. Blasting Touch an event to view its details.Touch an event to view its details. •
A screen with details about the event opens. See “Viewing event details” on page 202.
Touch and hold an event to open a menu with options for viewing, • editing, or deleting the event and for creating a new event at that time.
Touch and hold an empty spot or an event in the day to open a • menu with the option for creating a new event at that time. See “Creating an event” on page 203.
Working in Week view
Week view displays a chart of the events of one week. All-day and multiday events are displayed at the top.
- Touch the Menu key > Week.

text_image
February 2011 - March 2011 An all-day event. Touch and hold a time slot or an event to create a new event at that time. Touch an event to view its details. Drag left or right to view earlier or later days.Touch an event to view its details. •
A screen with details about the event opens. See “Viewing event details” on page 202.
Touch and hold an event to open a menu with options for viewing, • editing, deleting or creating a new event.
Touch and hold an empty spot or an event in the day to open a • menu with the option for creating a new event at that time. See “Creating an event” on page 203.
Working in Month view
Month view displays a chart of the events of one month. Segments with scheduled events turn blue in each day's vertical bar.
- Touch the Menu key > Month.
| Sun | Mon | Tue | Wed | Thu | Fri | Sat |
| 27 | 28 | 1 | 2 | 3 | 4 | 5 |
| 6 | 7 | 8 | 9 | 10 | 11 | 12 |
| 13 | 14 | 15 | 16 | 17 | 18 | 19 |
| 20 | 21 | 22 | 23 | 24 | 25 | 26 |
| 27 | 28 | 29 | 30 | 31 | 1 | 2 |
| 3 | 4 | 5 | 6 | 7 | 8 | 9 |
Touch a day to view the events of that day.
Drag up or down to view earlier or later months.
Touch a day to view its events in Day view. • See “Working in Day view” on page 199.
Viewing event details
Depending on the viewing type, you can view more information about an event in a number of ways.
- In Agenda, Day, or Week view, touch an event to view its details. In Month view, touch one of the days to switch to Day view. Then touch an event to view its details.
text_image
View event Review Calendar: nomarsia@molfe@gmail.com 11:00am - 3:00pm, March 8, 2011 Room C Attending? Yes Maybe (1) Tony Reminders 10 minutes Add reminder Touch to set whether you'll attend this event. Other attendees' status is shown below yours. Touch to change when you want to be reminded about this event. Touch to delete this reminder. Touch to add another reminder for this event.You can set or change whether you will attend the event by using • the Attending? menu.
Other attendees' status is displayed below your own.
You change any event reminders, or touch the plus icon 📋 to add one. You can also add a reminder by touching the Menu key > Add reminder. See “Setting an event reminder” on page 205.
If you have permission to change events, you can touch the • Menu key ☐ to edit or delete the event, as described in “Editing or deleting an event” on page 204.
Creating an event
You can use Calendar on your phone to create events that appear on your phone and in Google Calendar on the web.
- In any Calendar view, touch the Menu key ☐ > More > New event to open an Event details screen for a new event.

text_image
Event details What Event name From Tue, Mar 8, 2011 noon To qwertyuiop asdfghjkl zxcvbnm 7125 ,- Add details about the event.
Enter an event name, time, and optional additional details about the event.
If you have more than one calendar, you can choose which calendar to add an event on.
Touch the plus icon 🧑 to add more reminders. See “Setting an event reminder” on page 205.
- Invite guests to the event.
In the Guests field, enter the email addresses of everyone you want to invite to the event. Separate multiple addresses with commas ( , ). If your guests use Google Calendar, they will receive an invitation in Calendar and by email.
-
Touch the Menu key ☐ > Show extra options to add details about the event.
-
Scroll to the bottom of the Event details screen and touch Done. The event is added to your calendar.
NOTE
You can also touch and hold a spot in Day, Week, or Month view. In the menu that opens, touch New event to open the Event details screen with that day and time already entered.
Editing or deleting an event
You can edit or delete an event that you created on the phone or on the web. You can also edit or delete events created by others, if you have their permission.
Editing an event
- Open the summary of the event.
See "Viewing event details" on page 202. - Touch the Menu key > Edit event.
The Event Details screen opens. This is the same screen described in “Creating an event” on page 203.
Touch the Menu key ☐ > Show extra options to add or edit event details. - Make your changes to the event.
- Scroll to the bottom of the screen and touch Done.
Deleting an event
There are a number of ways to delete an event.
In Agenda view, touch an event to view its details. Then touch the •
Menu key > Delete.
- In Day or Week view, touch and hold the event and touch Delete in the menu that opens.
When editing an event, scroll to the bottom of the Event Details • screen and touch Delete.
NOTE
If a specific event repeats, you will be asked if you want to delete that one occurrence, or all future and past occurrences of that event in your Calendar application.
Setting an event reminder
You can set one or more reminders for an event.
Setting an event reminder
- Open the event summary.
See "Viewing event details" on page 202.
- If you already have a reminder set, touch the plus icon ⚙ to add a reminder. You can also add a reminder by touching the Menu key
Add reminder.
A new reminder is added, for 10 minutes before the event.
- Touch the reminder time, then in the dialog that opens, touch to set when you want to be reminded for an event.
NOTES
When the time comes, you receive a notification about the event. • See “Responding to an event reminder” on page 206.
You can use Google Calendar on the web to configure additional • reminder settings.
Deleting an event reminder
-
Open the event summary.
-
Touch the reminder's minus icon
Responding to an event reminder
If you set a reminder for an event, the Upcoming Event icon appears in the Notifications area of the Status bar when the reminder time arrives.

-
If you receive notifications in the Status bar, drag the Status bar down to open the Notifications panel. Then touch the event notification to open the list of Calendar notifications. Or if you receive notifications with alerts, the Calendar notifications list opens, listing all notifications awaiting your response.
-
Perform any of the following operations with the Calendar notifications list as needed:
Touch an event to view more information about that event.
- Touch Snooze all to turn off all event reminders for 5 minutes.
- Touch Dismiss all to delete all reminders in the list.
Touch the Back key • ↻ to keep the reminders pending. The icon remains in the Status bar and the reminders remain in the Notifications panel.
Displaying and synchronizing calendars
When you add a Google Account or Microsoft Exchange ActiveSync account to your phone that includes a calendar service, and you configure that account to synchronize calendar events to the phone, the events from that calendar are added and kept up to date in Calendar on the phone.
NOTE
Control whether an account synchronizes changes to calendar events between a Google or other calendar service with the Settings application's Accounts & Sync Settings screen (see "Changing account sync settings" on page 137). Configure which calendars to store on the phone (for quicker access) and which to show or hide on the phone in Calendar.
Setting whether calendars are stored on the phone or visible
1. Touch the Menu key ☐ > More > Calendars.
The Calendars screen displays all the calendars you have added or subscribed to for each account that is configured to synchronize events to your phone, organized by account. (Calendars for accounts you have configured not to synchronize Calendar events are not included in the list.)
2. Touch the name of an account to show or hide its calendars on your phone.
An icon to the right of each calendar indicates whether its events are synchronized to/stored on the phone and whether they are visible in Calendar.
 | Calendar events that are stored on the phone and visible in Calendar |
 | Calendar events that are stored on the phone but not visible in Calendar |
 | Calendar events that are not synchronized to the phone |
-
Touch the icon next to a calendar to change whether it is stored on the phone and visible in Calendar.
-
Touch OK.
NOTE
You remain subscribed to Calendars that you configure not to store on the phone, and you can still work with them via Google Calendar on the web, or in other calendar services.
Changing Calendar settings
You can change the following settings for how Calendar displays event and how it notifies you of upcoming events.
-
Open a Calendar view, touch the Menu key > More > Settings.
-
Change any of the following settings as needed:
Use home time zone: Check to use your home time zone when viewing calendars and event information in Calendar while on a trip, rather than the local time zone reported by the mobile network you're connected to.
Home time zone: Opens a dialog where you can set the time zone to use in Calendar while on a trip, if you have the Use home time zone setting checked.
Hide declined events: Check to hide events you have declined invitations to.
Set alerts & notifications: Opens a dialog where you can configure event reminders to open an alert, send you a notification, or turn off event notifications on your phone.
Select ringtone: Opens a dialog where you can select the ringtone to sound when you receive an event reminder.
Vibrate: Opens a dialog where you can configure the phone to vibrate whenever you receive an event reminder, only when the phone is in Silent mode, or never.
Default reminder time: Opens a dialog where you can select the default time before an event for event reminders.
Build version: The version of Calendar you are using.
V CAST Apps Store
V CAST Apps Store is Verizon Wireless's mobile storefront which delivers thousands of applications, games, and more to advanced devices. V CAST Apps Store enables you to discover, purchase, and use applications from your phone.
Opening V CAST Apps Store
- Touch the V CAST Apps Store icon 📁 on the Home screen or in the Launcher.
V CAST Apps Store opens.
V CAST Music with Rhapsody®
V CAST Music with Rhapsody is a digital music service that lets you listen to millions of songs from thousands of artists. Discover new and old favorites in an extensive music catalog. Download V CAST Music with Rhapsody to sync tracks, albums, and playlists to your new compatible phone, while managing your existing PC music library all in one place.
Opening V CAST Music with Rhapsody
- Touch the Launcher icon on the Home screen.
The Launcher opens.
- Touch the V CAST Music | Rhapsody icon
The V CAST Music with Rhapsody menu screen opens.
NOTE
You can also open the V CAST Music with Rhapsody menu screen by touching the Menu key ☐ > V CAST Music I Rhapsody while viewing any Music application screen.
Purchasing songs with your phone
- On the V CAST Music with Rhapsody menu screen, touch What's New, What's Hot, or Recommended to see the lists of specially-selected songs.
Or, touch Browse to search for specific songs.
You can preview a song by touching the song title and then touching Preview.
-
When you find the song you want, touch Buy.
-
Review the items and price, then touch Buy This Song to confirm your purchase.
You'll receive a confirmation of your purchase and that the music is ready for download.
- Touch Download Now to save the music to your phone.
Downloaded songs will be stored in the phone's microSD card. For instructions on how to play the downloaded songs, see “Music” on page 186.
NOTES
You will be charged per song.
- You will be charged when you touch Buy This Song in step 3. Note that you can purchase the same song multiple times.
- If you touch Download Later in step 4, you can download the purchased song later by touching Download on the V CAST Music with Rhapsody menu screen.
When you purchase a song from your phone, you will also get • a second copy that can be downloaded to your PC from the VCAST Music with Rhapsody software at no additional charge.
Transferring music from a PC
Once you have installed V CAST Music with Rhapsody on your PC, you can transfer songs on your PC to your phone's microSD card using the USB cable which came with your phone. You can also purchase songs with V CAST Music with Rhapsody on your PC, or import songs from your CD collection.
V CAST Music with Rhapsody can be downloaded free of charge. Visit http://www.verizonwireless.com/music with the web browser on your PC, and follow the on-screen instructions to download V CAST Music with Rhapsody to your PC.
NOTE
The system requirements for the V CAST Music with Rhapsody PC software are as follows:
Windows® XP, Windows Vista® or Windows 7
Pentium • III 1.0 GHz or higher
128 MB RAM •
380 MB available hard disk space (This is the minimum disk •
space required to install the program. Additional disk space is
necessary for downloading music files.)
Microsoft Internet Explorer 5.5 or higher with JavaScript/Active •
Scripting enabled
Windows Media Player 10 •
Importing songs from audio CD
- Start V CAST Music with Rhapsody on your PC.
- Insert an audio CD into the CD ROM drive on your PC.
Songs on the CD will be listed in the window.
Enter the song information such as an artist name, as needed. - Check to select the names of the songs which you want to import.
To select all the songs, check the checkbox above the song list. - Click the Import CD button.
The selected songs will be imported into the My Library section of the V CAST Music with Rhapsody PC software.
Syncing music from your PC
- Start V CAST Music with Rhapsody on your PC.
- Use the USB cable (included in box) to connect the phone to a USB port on your PC.
- If your phone is not recognized by V CAST Music with Rhapsody, drag the Status bar down from the top of the screen on your phone, then touch USB connection. In the USB connection dialog that opens, touch to select Media Sync, then touch OK.
When the connection to your PC is established, your phone will be listed in the “Sources” area of the V CAST Music with Rhapsody screen.
-
On your PC, select the songs or playlists you want to transfer, then drag them to your phone listed in the “Sources” area.
-
When syncing completes, touch Done on your phone.
-
Remove the USB cable from your phone and PC.
The synced songs will be stored in the phone's microSD card. For instructions on how to play the synced songs, see “Music” on page 186.
Warning!
Failure to completely reseal the Charging/Data Port cover after use may lead to water or other liquids entering the casing, which may cause damage to the phone.
V CAST Tones
V CAST Tones application lets you preview and buy from Verizon Wireless' extensive catalog of Ringtones, Ringback Tones, and Ringback Tones Jukeboxes. You can download, manage, preview, and play the latest Tones content from your phone.
Opening V CAST Tones
-
Touch the Launcher icon on the Home screen. The Launcher opens.
-
Touch the V CAST Tones icon . The V CAST Tones screen opens.
-
The first time you start V CAST Tones, you will be prompted to subscribe to the service. Follow the on-screen instructions to install and use V CAST Tones.
NOTE
Airtime and/or download charges may apply when using V CAST Tones.
Verizon Video
Verizon Video application lets you enjoy unlimited, on-demand access to full episodes of your favorite television shows from all of the major networks, plus the latest in local and national news, live and recorded sports and entertainment and weather.
NOTE
Subscription fee is billed to your Verizon Wireless bill. The download and use of Verizon Video incurs data usage and will be billed according to your data package. A data package is required for use of this service.
Opening Verizon Video
-
Touch the Launcher icon on the Home screen. The Launcher opens.
-
Touch the Verizon Video icon
The Verizon Video screen opens.
-
Touch a category.
-
Touch the title of the video you want to view. For videos requiring subscription, a notification will be displayed.
VZ Navigator®
Now you can find the address of an excellent restaurant or the nearest ATM. Check movie times. Discover the latest hot spots. And know exactly how to get where you are going. VZ Navigator puts all the advanced features of the latest GPS devices and systems on your phone — at a fraction of the price.
NOTES
- To use VZ Navigator, check the VZW Location Services option of Location & security settings to enable the GPS function. See “Location & security settings screen” on page 272.
You must subscribe to the service, and will cost 2-3MB of data to download this application.
The service is only available in National Enhanced Services • Coverage Area.
Accuracy and completeness of information is not guaranteed. Information about the location of your phone will be used to deliver service.
For more information about VZ Navigator, visit •
www.verizonwireless.com/vznavigator.
Opening VZ Navigator
- Touch the Launcher icon on the Home screen.
The Launcher opens.
- Touch the VZ Navigator icon ✿️.
VZ Navigator opens.
My Verizon Mobile
You can use My Verizon Mobile to manage your Verizon Wireless account, i.e. you can view minute, message and data usage, and adjust an allowance minutes on current plans.
NOTE
No airtime or minute charges apply when accessing My Verizon Mobile.
Opening My Verizon Mobile
- Touch the Launcher icon on the Home screen.
The Launcher opens.
- Touch the My Verizon Mobile icon
The My Verizon Mobile screen opens.
G'zGEAR®
G'zGEAR provides eight useful tools for outdoor activities.
Warning!
Do not use G'zGEAR while engaging in any dangerous sports.
NOTE
To get the current location with GPS, check the VZW Location Services option of Location & security settings to enable GPS function. See “Location & security settings screen” on page 272.
Opening G'zGEAR
- Touch the Launcher icon on the Home screen.
The Launcher opens.
- Touch the G'zGEAR icon G'z.
The G'zGEAR Home menu screen opens.
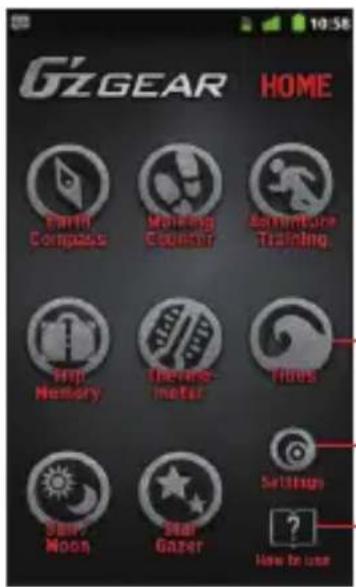
text_image
G2GEAR HOME PARTN Compass Walking Counier Simpentry Training. Inf Memory Tennis meter Hoes Saw Moon Star Gazer Settings ? How to useTouch the respective tool icon to open each tool.
Touch to configure G'zGEAR.
Touch to display an operation description.
Touch the respective tool icon to open each tool. See the description below for the details about each tool.
- Touch Settings to configure G'zGEAR. See “Configuring G'zGEAR” on page 237.
- Touch How To Use > Tutorial to play the video tutorial for G'zGEAR. The video tutorial is stored on the pre-installed microSD card.
- Touch How To Use, then the name of the tool to display how to use it.
Earth Compass
The Earth Compass tool allows you to view the direction measured with the built-in electronic compass.
NOTES
When using the electronic compass, orient the phone so it is • horizontal. The compass becomes less accurate when the phone is tilted.
Any of the following actions can create accuracy issues with • the electronic compass. If any of these occur, recalibrate the electronic compass as soon as possible.
When the phone is used near a strong magnet. -
When the phone is left for a long time in an area with extreme - temperature change.
When the phone is magnetized. -
- To calibrate the electronic compass, touch the Menu key > Calibrate compass. Next, hold the phone as shown in the right figure and wave the phone in the shape of a large figure eight, making sure that each of six sides of the phone faces down toward the ground by rolling your wrists as illustrated in the figure below for about 15 seconds.

natural_image
Illustration of a hand holding a smartphone (no text or symbols visible)
natural_image
Illustration of a person running with motion arrows indicating movement (no text or symbols)The electronic compass uses the Earth's magnetic field to determine direction. The direction readings produced by the electronic compass can be different from actual compass readings due to environment and temperature.
Direction readings taken in any of the following locations may result in very inaccurate readings.
Near buildings (especially ferro-concrete structures), large metal objects (trains, motor vehicles, etc.), high-voltage power lines, or overhead wires
Near metal objects (desks, lockers, etc.), household appliances - (TVs, computers, speakers, etc.), or permanent magnets (magnetic necklaces, etc.)
If you suspect a reading error, move away from the above locations and try again.
Compass mode
You can check the direction in Compass mode.
- On the G'zGEAR Home menu screen, touch Earth Compass.
- If necessary, touch either of the switch mode icons 🔍 ➤ to switch to Compass mode.
The Compass mode screen shows the direction and angle of direction together with the compass.
- Touch and hold the screen or touch the Menu key ☐ to access the following options:
Home: Returns to the G'zGEAR Home menu screen.
Calibrate compass: Calibrates the electronic compass.
Layer Compass mode
The Layer Compass mode screen displays seven types of layer on top of the compass. My Layer enables you to display the point you added on the compass.
- On the G'zGEAR Home menu screen, touch Earth Compass.
- If necessary, touch either of the switch mode icons 🔍 ➤ to switch to Layer Compass mode.
The Layer Compass mode screen displays the object in the direction you point the phone.
- The layer switches each time you touch Switch Layer. Touch the object on the screen to display its longitude and latitude, direction from the current location, distance, and description on the detail screen. Touch Maps on the detail screen to view the location of the object on the map. Touch Wikipedia to open the browser and display the Wikipedia page of the object.
If you touch a point while displaying My Layer, the longitude and • latitude and the distance to the point are displayed on the detail screen. Touch Maps on the detail screen to view the location of
the object on the map. Touch Edit to edit the point. Touch Delete to delete the point.
If more than one objects or points are selected by touching the screen, a list of the selected objects or points will be displayed. Touch an icon on the list to display the detail screen.
- If My Layer is displayed, touch Add a Point to create a new point. See “Adding a Point” on page 222.
- Touch and hold the screen or touch the Menu key ☐ to access the following options:
Calibrate compass: Calibrates the electronic compass.
Update GPS: Updates the current location using GPS.
Add a point: See “Adding a Point” on page 222. (This option is only available when My Layer is displayed.)
Home: Returns to the G'zGEAR Home menu screen.
Adding a Point
You can Add up to 50 points to be displayed on My Layer in Layer Compass mode.
- On the G'zGEAR Home menu screen, touch Earth Compass.
- If necessary, touch either of the switch mode icons 🔍 to switch to Layer Compass mode.
- If necessary, touch Switch Layer to switch to My Layer.
- Touch Add a Point.
- Touch Next to add the current location displayed on the map as a point. To update the current location, touch My Location.
- Touch to select an icon and touch Next.
- Touch to select the color of an icon and touch Next.
- Enter a name for the point and touch Next.
- Touch OK to add the point.
Walking Counter
You can count the number of steps you traveled with the Walking Counter tool.
NOTES
The pedometer counts your steps while the phone power is on. • You do not need to open G'zGEAR to count your steps. The counter is reset everyday at midnight.
The pedometer detects the small vibrations generated when you are walking or jogging and counts them as steps. The error of the count increases if your steps cannot be detected normally or if vibration other than from walking or jogging is detected.
The steps counted by the pedometer may differ from the actual number of your steps. Use the counted result only as a guide.
The length between points as displayed in Virtual Trek mode is • not accurately scaled to the actual real-world distance between points.
Virtual Trek mode
In Virtual Trek mode, you can virtually hike along famous trails on the seven continents. The distance you hiked on the trail is calculated based on the number of steps counted by the pedometer.
- On the G'zGEAR Home menu screen, touch Walking Counter.
- If necessary, touch either of the switch mode icons < > to switch to Virtual Trek mode.
The Virtual Trek screen displays your distance hiked, current position on the trail, the percentage of the trail you have hiked, and trail milestones.
- Touch and hold the screen or touch the Menu key ☐ to access the following options:
Trek selection: Allows you to select the trail to walk from the list.
Delete trek walking data: Deletes trail's walking data.

Body Settings: Allows you to enter your height, weight, age, sex, and length of stride which are used to calculate the traveled distance and burned calories from the number of steps. Check Automatic calculation to automatically calculate the length of stride.
Set Pedometer: Opens a dialog where you can toggle the pedometer on and off.
Home: Returns to the G'zGEAR Home menu screen.
Pedometer mode
In Pedometer mode, you can check the number of steps you traveled in a day, etc.
- On the G'zGEAR Home menu screen, touch Walking Counter.
- If necessary, touch either of the switch mode icons 🔍 ➕ to switch to Pedometer mode.
The Pedometer screen displays the number of steps you took for the day, a chart displaying the number of steps you took for the last few days, the distance you walked and the estimated number of calories you burned.
Touch Day, Week, or Month on the list to display the details.
- Touch and hold the screen or touch the Menu key ☐ to access the following options:
Switch display time: Opens a dialog where you can select the unit used to display the number of steps chart.
Delete pedometer data: Deletes the today's number of steps data or the cumulative number of steps data up to today.
Body Settings: Same as Virtual Trek mode.
Set Pedometer: Opens a dialog where you can toggle the pedometer on and off.
Home: Returns to the G'zGEAR Home menu screen.
Adventure Training
With Adventure Training tool, you can enjoy running with the selected virtual opponent and record running logs. You can also analyze your running form.
Running with your virtual opponent
You can choose your virtual opponent among male or female world record holders of one mile, marathon or 100km races, or from wild animals such as emperor penguin. Alternatively, you can choose one of your training histories which have been recorded before as your virtual opponent. Of course you can record your running log without setting any opponent.
- On the G'zGEAR Home menu screen, touch Adventure Training.
- If necessary, touch either of the switch mode icons < > to switch to Run Training mode.
- Touch Change opponent.
- Touch to select your virtual opponent you want to run with.
- Touch Start > OK.
The tool will start logging your location using GPS.
Information such as elapsed time, burned calories, traveled distance and speed chart, average speed, current speed, and distance difference from your virtual opponent are displayed on the screen.
- Touch Stop to end logging. Then touch Save to save the log as the training history.
Touch • Pause to pause logging.
- Touch Maps to view the traveled route on the map. The current location is indicated with the green marker. Red markers are placed at one-mile intervals along the traveled route. Touch Graph to return to the previous screen.
-
When you complete the target distance defined per virtual opponent or touch Stop > Save, the race result will be displayed. The information such as recorded time and date, traveled time and distance, burned calories, speed and distance chart, average speed, distance difference from the opponent will be displayed. Drag the speed and distance chart to left or right to scroll the • chart.
-
Touch Form Analysis to view the form analysis result.
- Touch Start Over to start the race from the beginning.
- Touch Maps to view the traveled route on the map. Red markers are placed at one-mile intervals on the traveled route. Touch Graph to return to the previous screen.
NOTES
If you chose a wild animal as your virtual opponent, no target • distance will be set. Touch Stop to end running.
Please note the following considerations when using the Form • Analysis function.
Enable the Form Analysis function in advance. For instructions - on how to turn on this function, see "Using menus in Run Training mode" on page 227.
Obtain a commercial holster to hold the phone close to your - body. Use a holster which can hold the phone firmly in it.
When you place the phone into the holster, set the phone so that its screen facing outside with the Verizon logo in the left side. It is recommended to attach the holster on your belt. If you - attach the holster on your pants, it will become unstable and unable to perform the form analysis correctly.
Attach the holster in the center of your back. -
Attach the holster to fit tight to your body. The belt should not be - loose.
Secure the holster firmly on the belt so as not to move left or - right and tilt against the belt.
The form analysis result may be affected if the speaker sounds - or the vibrator vibrates while you are running.
Using menus in Run Training mode
- On the G'zGEAR Home menu screen, touch Adventure Training.
- If necessary, touch either of the switch mode icons < > to switch to Run Training mode.
- Touch and hold the screen or touch the Menu key ☐ to access the following options:
Home: Returns to the G'zGEAR Home menu screen.
Form Analysis On/Off: Opens a dialog where you can toggle the Form Analysis function on and off.
Change opponent: Opens a menu from which you can select your virtual opponent.
Body Settings: Allows you to enter your height, weight, age, sex, and length of stride which are used to measure the burned calories from the running distance. Check Automatic calculation to automatically calculate the length of stride.
Viewing training history
You can check the saved log in Run Training mode.
- On the G'zGEAR Home menu screen, touch Adventure Training.
- If necessary, touch either of the switch mode icons ◀ ➞ to switch to Training History mode.
- Touch the training history you want to view.
The information such as recorded time and date, traveled time and distance, burned calories, speed and distance chart, average speed, distance difference from the opponent will be displayed.
Drag the speed and distance chart to the left or right to scroll the • chart.
- Touch Form Analysis to view the form analysis result.
- Touch Delete to delete currently viewed training history.
- Touch Maps to view the traveled route on the map. Red markers are placed at one-mile intervals on the traveled route. Touch Graph to return to the previous screen.
NOTE
Touch and hold the screen or touch the Menu key ☐, then touch Home to return to the G'zGEAR Home menu screen.
Trip Memory
The Trip Memory tool allows you to keep records of your outdoor activities with location information. It also allows you to post your current outdoor activity on Twitter or Facebook.
Trip Plot mode
You can keep records of your current outdoor activity with logged location and temperature data. You can also post your activity on Twitter or Facebook.
- On the G'zGEAR Home menu screen, touch Trip Memory.
- If necessary, touch either of the switch mode icons 🔍 to switch to Trip Plot mode.
-
Touch Next to add the displayed current location and temperature information.
Touch Refresh to update the information such as current location. Touch Maps to display the map for selecting a location. -
Touch to select an outdoor activity and touch Next.
-
Enter a comment.
-
Touch Save to save. Touch Share to post your activity on Twitter or Facebook
NOTE
Touch and hold the screen or touch the Menu key ☐, then touch
Home to return to the G'zGEAR Home menu screen.
Trip List mode
You can check the record of outdoor activities you saved.
- On the G'zGEAR Home menu screen, touch Trip Memory.
- If necessary, touch either of the switch mode icons ◀ ➞ to switch to Trip List mode.
The Trip List screen displays a list of outdoor activity records.
- Touch Sort to change the display order of the list.
- Touch All Trip Maps to display the icon for the location where the outdoor activity was recorded on the map. Touch List to return to list view.
Touch the record of an outdoor activity in the list or on the map to • display its details. Touch Share to post your activity on Twitter or Facebook.
- Touch and hold the screen or touch the Menu key ☐ to access the following options:
Home: Returns to the G'zGEAR Home menu screen.
Display order: Opens a dialog where you can change the list's display order.
Thermometer
You can check the current temperature with the Thermometer tool.
NOTES
The Thermometer cannot be used while the phone is being charged.
Expose the phone to open air and wait until it reaches the same • temperature as the environment, which may take about 30 minutes.
The thermal sensor may be affected by factors such as body • heat, heat generated by the phone itself, direct sunlight, or humidity.
The phone may get warm after it is charged or used for voice or data communication, which may lead to inaccurate temperature readings.
The measurable temperature range is from -20 to 60°C (-4 to • 140°F).
Temperature Comparison mode
You can check the current temperature.
- On the G'zGEAR Home menu screen, touch Thermometer.
- If necessary, touch either of the switch mode icons 🔍 ➤ to switch to Temperature Comparison mode.
The Temperature Comparison screen displays a thermometer and today's high and low temperature forecasts for three cities.
- Touch and hold the screen or touch the Menu key ☐ to access the following options:
Home: Returns to the G'zGEAR Home menu screen.
Point selection: Select the three cities to display the high and low temperature forecasts from a list.
Temperature Trip mode
Temperature Trip takes you on an air balloon trip to cities with the similar current temperature, from among 30 cities around the world. Each time you visit a city, up to five flags are displayed.
- On the G'zGEAR Home menu screen, touch Thermometer.
- If necessary, touch either of the switch mode icons 🔍 to switch to Temperature Trip mode.
The Temperature Trip screen displays a map of the world and a balloon moves to the city with the similar current temperature.
When the balloon reaches the city, the current temperature and today's high and low temperature forecasts of the city are displayed.
- Touch and hold the screen or touch the Menu key ☐ to access the following options:
Home: Returns to the G'zGEAR Home menu screen.
Set temperature: Allows you to set the desired temperature to move the balloon.
Delete flags: Removes flags.
Tides
The Tides tool lets you check the tidal information of desired location.
NOTES
The tidal information is subject to error.
The Tides tool can display information for dates between January • 1, 2010 and December 31, 2015.
Do not use it for navigation. •

One-Day View mode
The One-Day View mode displays the tidal graph for a single day.
-
On the G'zGEAR Home menu screen, touch Tides.
-
If necessary, touch either of the switch mode icons 🔍 to switch to One-Day View mode.
The One-Day View screen displays the tidal graph, time of sunrise and sunset, and time of high and low tides.
- Touch and hold the screen or touch the Menu key ☐ to access the following options:
Home: Returns to the G'zGEAR Home menu screen.
Point selection: Allows you to select a point to display the tidal information from a list. You can also touch Maps to display the map for selecting a point.
Touch Go to Surfline, then touch a point in a list or on a map to open the browser to view the information for the point on Surfline ^® site.
Set date: Opens a dialog where you can set the date to display the tidal information.
Current View mode
The Current View mode screen displays the current tide.
- On the G'zGEAR Home menu screen, touch Tides.
- If necessary, touch either of the switch mode icons 🔍 ➕ to switch to Current View mode.
The Current View screen displays the current tide, time of sunrise and sunset, and time of high and low tides.
- Touch and hold the screen or touch the Menu key ☐ to access the following options:
Home: Returns to the G'zGEAR Home menu screen.
Point selection: Same as One-Day View mode.
Set time and date: Opens a dialog where you can set the time and date to display the tidal information.
Sun/Moon
You can use the Sun/Moon tool to check the time of sunrise, sunset, moonrise, and moonset at current location or desired point.
NOTES
The Sun/Moon tool can display information for dates between • January 1, 2010 and December 31, 2015. The altitude of the Sun and the Moon is not completely accurate. • The path of the Sun and the Moon shown on the main display is not accurate and is only for illustrative purposes.
Sunrise Sunset mode
You can check the time of sunrise and sunset and the position of the Sun.
- On the G'zGEAR Home menu screen, touch Sun/Moon.
- If necessary, touch either of the switch mode icons 🔍 to switch to Sunrise Sunset mode.
The Sunrise Sunset screen displays the time of sunrise and sunset and the position of the Sun.
- Touch and hold the screen or touch the Menu key ☐ to access the following options:
Home: Returns to the G'zGEAR Home menu screen.
Set date: Opens a dialog where you can set the date to display the information.
Point selection: Allows you to select a point from a list whose information will be displayed. You can also touch Maps to display the map for selecting a point.
Moonrise Moonset mode
You can check the time of moonrise and moonset and the position of the Moon.
- On the G'zGEAR Home menu screen, touch Sun/Moon.
- If necessary, touch either of the switch mode icons 🔍 to switch to Moonrise Moonset mode.
The Moonrise Moonset screen displays the time of moonrise and moonset and the position of the Moon.
- Touch and hold the screen or touch the Menu key ☐ to access the options similar to Sunrise Sunset mode.
Star Gazer
The Star Gazer screen displays the constellations and stars that can be viewed from the current location in the direction the phone is pointed at.
NOTES
The stars on the screen may not match the stars in the sky exactly. The Star Gazer tool can display information for dates between January 1, 2010 and December 31, 2015.
The Star Gazer screen is always displayed in landscape • orientation.
Constellation View mode
You can check the name and position of constellations that can be viewed from current location.
- On the G'zGEAR Home menu screen, touch Star Gazer.
- If necessary, touch either of the switch mode icons 🔍 to switch to Constellation View mode.
The Constellation View screen displays the constellations and stars that can be viewed from the current location in the direction the phone is pointed at.
- Touch the plus icon 🔒 or minus icon 🔒 to zoom in or out. Touch a constellation to display a detail screen showing its • illustration and the main stars. Then touch Wikipedia to open a browser to view the information of that constellation in Wikipedia.
- Touch and hold the screen or touch the Menu key ☐ to access the following options:
Home: Returns to the G'zGEAR Home menu screen.
Compass: Select Compass On to display the constellations in the direction the phone is pointed at, using the built-in compass. If you select Compass Off, you can drag the screen to scroll the display.
Set time and date: Opens a dialog where you can set the date and time to display the constellation.
Update GPS: Updates the current location using GPS.
Set display: See the following list:
- Touch and hold the screen or touch the Menu key ☐, then touch Set display to configure the screen display with the following options:
Constellation lines: Check to display lines connecting the stars forming the constellation.
Name of star: Check to display the name of stars.
Hourly background color: Check to display the background color that matches the time of day.
Brightness of back light: Opens a dialog where you can select the brightness of backlight. Select Normal View to display the screen with the brightness set by the Brightness option of Display settings. Select Search View to dim the screen.
Constellation Finder mode
You can locate constellations in the sky using Constellation Finder mode.
- On the G'zGEAR Home menu screen, touch Star Gazer.
- If necessary, touch either of the switch mode icons 🔍 to switch to Constellation Finder.
- Touch the constellation to find from the displayed list.
- Touch Search.
An arrow indicating the location of the selected constellation is displayed at the center of the screen. Change the direction of the phone according to the arrow to find the constellation.
Touch the plus icon 🔒 or minus icon 🔒 zoom in or out.
- Touch and hold the screen or touch the Menu key ☐ to access the following options:
Home: Returns to the G'zGEAR Home menu screen.
Update GPS: Updates the current location using GPS.
Set display: Same as Constellation View mode.
NOTE
Touch Detail in step 4 to display a detail screen showing an illustration of constellations and their main stars. Then touch Wikipedia to open a browser to view the information of that constellation in Wikipedia.
Configuring G'zGEAR
- On the G'zGEAR Home menu screen, touch Settings.
- Change the following settings as necessary.
Calibrate compass: Allows you to calibrate the electronic compass.
GPS: Check to automatically set the current location while using G'zGEAR.
G Switch: Check to enable switching of tools by shaking the phone to the left. When shaking the phone, be sure to hold the phone firmly and make sure you do not hit the phone against nearby objects.
Save last mode: Check to display the previously displayed mode when starting a tool.
Pedometer: Check to count your steps with the pedometer.
Form analysis: Check to enable analysis of your running form during Adventure Training.
Unit of temperature: Allows you to set the unit for displaying temperature to Centigrade or Fahrenheit.
Unit of distance/length: Allows you to set the unit for displaying distance to miles or metric.
Body Settings: Allows you to enter your height, weight, age, sex, and length of stride which are used to measure the traveled distance and burned calories from the number of steps counted with the pedometer. Check Automatic calculation to automatically calculate the length of stride.
Star Gazer Settings: See “Constellation View mode” on page 234.
Widget Settings: Allows you to configure the display refresh interval for Virtual Trek widget and Pedometer widget.
Restore defaults: Resets all G'zGEAR settings to defaults.
Widgets in G'zGEAR
G'zGEAR provides six different widgets.
For instructions on how to add a widget to the Home screen, see "Adding an item to the Home screen" on page 41.
Compass
The Compass widget displays a stationary compass.
When touched, the compass activates for 30 seconds to display the direction.
Virtual Trek
The Virtual Trek widget displays the name of the selected trail, distance hiked, and percentage completed.
When touched, G'zGEAR opens to display the Virtual Trek screen.
Pedometer
The Pedometer widget displays the cumulative number of steps, today's number of steps, distance walked, and burned calories.
When touched, G'zGEAR opens to display the Pedometer screen.
Tides
The Tides widget displays the time of high and low tides at the selected point.
When touched, G'zGEAR opens to display the Tides screen.
Sunrise Sunset
The Sunrise Sunset widget displays the time of sunrise and sunset. When touched, G'zGEAR opens to display the Sunrise Sunset screen.
Moonrise Moonset
The Moonrise Moonset widget displays the time of moonrise and moonset and the date in the lunar cycle.
When touched, G'zGEAR opens to display the Moonrise Moonset screen.
More Applications
Bing™
Use the Bing search application to search webs, images, or videos. You can also retrieve current location-related information or view its map.
NOTE
To get the current location with GPS, check the VZW Location Services option of Location & security settings to enable GPS function. See “Location & security settings screen” on page 272.
- Touch the Bing icon 📁 on the Home screen or in the Launcher. The Bing search screen opens.
Bing™ Maps
You can find your current location, get directions and other location-based information.
NOTE
To get the current location with GPS, check the VZW Location Services option of Location & security settings to enable GPS function. See “Location & security settings screen” on page 272.
- Touch the Maps icon 📋 on the Home screen or in the Launcher. The Bing Maps screen opens.
- After performing a search, touch an icon on the map to display information about the location.
Using the menu on the Bing Maps screen
The following menu is available on the Bing Maps screen.
Touch the Menu key • ☐ to access the following options:
Home: Opens Bing homepage.
Directions: Displays driving, public transport, or walking directions.
List view: Displays the search results in a list format rather than with icons on the map.
Map type: Allows you to select Road, Hybrid, or Traffic maps.
Favorites: Displays saved favorites. Touch a favorite to display it on the map.
History: Displays recent search criteria. Touch an item to search the criteria again.
More: See below.
- Touch the Menu key > More to access the following options:
Clear map: Removes search results from the map.
Full screen: Check to display a map in full-screen mode.
Settings: See “Changing Bing Maps settings” on page 241.
About: Displays information about Bing Maps, including the Service Agreement and Privacy Policy, and provide Feedback.
Changing Bing Maps settings
-
From the Bing Maps screen, touch the Menu key ☐ > More > Settings.
-
Change the following settings as necessary:
SafeSearch: Allows you to set the sensitivity for filtering explicit images from your search results.
Distance: Check to display distance in miles or kilometers.
Daily image: Check to display Bing Maps daily image when you go to the Bing Maps homepage.
Search suggestions: Check to display possible matches as you enter search criteria. You can touch a match to display results.
Location: Check to use your location information to display search results that are close to you.
Clear history: Erases recent search criteria records.
Restore defaults: Resets all Bing Maps settings to defaults.
Reset: Removes recent searches, favorites, locations and resets all Bing Maps settings to defaults.
Android Market
Android Market provides direct access to applications and games to download and install on your phone.
Opening Android Market and browsing for applications
- Touch the Launcher icon on the Home screen.
The Launcher opens.
- Touch the Market icon
The Android Market home screen opens.
If you have not already set up a Google account, you will be transferred to the Add a Google Account screen. For details on setting up a Google account, see “Initial setup” on page 26.
The first time you open Android Market, you must read and accept the Android Market Terms of Service to continue.
-
Touch a top-level category, such as Apps, Games, or Verizon.
-
Scroll to view subcategories and touch the one you want to explore.
-
Touch Top paid, Top free, or Just in to further sort the subcategory.
-
Touch an application to open a screen with details about it.
Application details screens include a description, ratings, reviews from people who have tried the application, and related information about the application.
NOTE
You can return to the Android Market home screen from most of the other screens in Android Market, by touching the Market icon 📄 at the top left or touching the Menu key ➕ > Home.
Searching for applications
- Touch the search icon 🔒 at the top right of the screen or touch the Search key 🔒.
- Enter what you want to search for and touch the search icon again.
Enter all or part of an application's name or description, or the developer's name you want to search for. - Touch a search result to open that application's details screen.
Downloading and installing an application
NOTE
Before you can download a paid application, you must set up a billing arrangement, as described in “Creating a Google Checkout account” on page 244.
-
Find an application you want to download and open its details screen.
See “Opening Android Market and browsing for applications” on page 242 and “Searching for applications” on page 243. In the application’s details screen, you can read more about the application, including its cost, overall rating, and comments by users. -
Touch the Menu key ☐ > Security to preview the functions and data the application can access on your phone if you install it.
If you are not comfortable with the access the application requires, do not continue.
-
Touch Free (for free applications) or application price displayed under "Buy" (for paid applications).
-
If the application requires access to your data or control of any functions on your phone, you are asked to review and grant permission before downloading. Read this screen carefully. Be especially cautious with applications that have access to many functions or to a significant amount of your data. Once you touch OK on this screen, you are responsible for the results of using this application on your phone.
-
If you agree to the application's access requirements, touch OK. If you select a paid application, you will be redirected to the Google Checkout screen to pay for the application before it is downloaded to your phone.
If you select a free application (or after touching Buy now in Google Checkout), you will receive a series of notifications when downloading the application and then installing on your phone.
- When the application is installed, you can touch the notification to open the application, or open it by touching its icon in the Launcher.
Creating a Google Checkout account
You must have a Google Checkout account associated with your Google Account to purchase items from Android Market.
On your PC, go to http://checkout.google.com to establish a Google Checkout account.
Or, the first time you use your phone to buy an item from Android Market, you will be prompted to enter your billing information to set up a Google Checkout account.
Warning!
When you have used Google Checkout once to purchase an application from Android Market, the phone remembers your password, so you do not need to enter it the next time. For this reason, you should secure your phone to prevent others from using it without your permission. See “Locking your screen” on page 53.
Uninstalling an application
- On the Android Market home screen, touch the Menu key > Downloads.
- Touch the application to uninstall.
The details screen for the application opens. - Touch Uninstall.
- Touch OK in the confirmation dialog.
- Touch the explanation that best matches why you are uninstalling and touch OK.
The application will be uninstalled.
Requesting a refund for an application
If you are not satisfied with an application, you can ask for a refund within a short time after your purchase. Your credit card will not be charged and the application will be uninstalled from your phone. If you change your mind, you can install the application again, but you can not request a refund the second time.
-
On the Android Market home screen, touch the Menu key > Downloads.
-
Touch the application to uninstall for a refund.
The details screen for the application opens.
- Touch Uninstall & refund.
Your application will be uninstalled and the charge will be cancelled.
- Touch the explanation that best matches why you are uninstalling and touch OK.
YouTube™
YouTube is Google's online video streaming service for viewing and uploading videos.
Opening YouTube
- Touch the Launcher icon on the Home screen.
The Launcher opens.
- Touch the YouTube icon
The YouTube home screen shows the list of the most popular, most discussed, and featured videos.

text_image
You Time Protestors at Tahir Square, pt 2 by video/range from from featured videos David Guetta/With Me! One More Love Album Mogarnix by Guetta/Reize 1953.2 from Most Popular SPONGE BOBBLE! by Ray/WilliamJohnson from Most Popular Protestors at Tahir Square by Ershenagar Tark from Featured Videos INDIAN ACTION by Ray/WilliamJohnson from from Most Discussed praying beside the tanks by unrealizable from from featured videosTouch to search for a video.
Touch to shoot a video with the phone's camcorder for sharing on YouTube.
Touch a video to play it.
Watching a video
-
On any YouTube screen, touch a video to play it.
-
To watch the video full screen, rotate the phone 90 degrees clockwise or counterclockwise. Perform any of the following operations as necessary:
Drag the slider • to go directly to a section of the video.
Touch the HQ icon 🔒 to toggle high quality playback mode on and off. You can set the default playback mode in YouTube settings.
See "Changing YouTube settings" on page 248.
Touch the Back key • ↩ to stop playback and return to the videos list.
Searching for videos
- At the top of the YouTube home screen, touch the search icon
- Enter the text to search for.
- Touch a suggestion below the search box or touch the search icon
- Scroll through the search results and touch a video to watch it.


Sharing your videos on YouTube
You can shoot a video on the phone's camcorder and upload it to YouTube.
NOTE
You need to sign in to your YouTube account before you can upload a video. When the dialog to sign in to YouTube opens, enter your username and password to sign in, or follow the on-screen instructions to create a new YouTube account.
- At the top of the YouTube home screen, touch the camcorder icon
- Point the lens to frame the scene where you want to start.
- Press the Camera Key 📄 or touch the start video icon 🙏 on the screen.
The camcorder starts shooting the video. The time remaining before you hit the maximum duration allowed for the video is shown on the left of the screen. The timer will turn red when you have less than a minute of recording time.
- Press the Camera Key 📄 or touch the stop video icon 🙏 on the screen to stop shooting.
The Upload video screen opens.
- Enter a title for your video.
You can add additional details by touching More details.
- Touch Upload.
Changing YouTube settings
-
On the YouTube home screen, touch the Menu key > Settings.
-
Change the following settings as necessary.
High quality video on mobile: Check if you prefer to watch videos in high-quality by default when connected to mobile networks, to reduce startup time and data use. This setting has no effect if you are connected to a Wi-Fi network, where videos always open in high-quality.
Captions font size: Opens a dialog where you can set the text size you prefer when viewing captions with your videos.
Clear search history: Touch to clear your search history, so that your previous searches will not be presented as suggestions in new searches.
SafeSearch filtering: Opens a dialog where you can set whether you want Google SafeSearch filtering to block some results when you search for videos: Block no search results (off), only explicit or offensive videos (moderate), or both explicit and offensive text and videos (strict).
Help: Displays information about how to use YouTube.
YouTube Terms of service: Displays the YouTube terms of service.
Google Mobile Privacy Policy: Displays the Google Mobile Privacy Policy.
YouTube Privacy Policy: Displays the YouTube Privacy Policy.
Application version: The version of the YouTube application installed on your phone.
Gmail™
Gmail is Google's web-based email service. Your messages are stored on Google servers, but you can read, write, and organize messages with the Gmail application on your phone or by a web browser. Because your mail is stored on Google servers, you can search your entire message history, backed by the speed and power of Google search.
NOTE
For more information about Gmail, visit the Google website at the following URL: http://mail.google.com.
Opening Gmail and your Inbox
You can use your existing Gmail account when setting up Gmail on your phone. In this case, your Inbox will display mail from your Gmail account. You can also set up a new Gmail account on your phone.
- Touch the Launcher icon on the Home screen.
The Launcher opens.
- Touch the Gmail icon

Your Inbox displays conversations with the newest messages at the top. All of your conversations are displayed in your Inbox unless you delete, archive, or filter them.
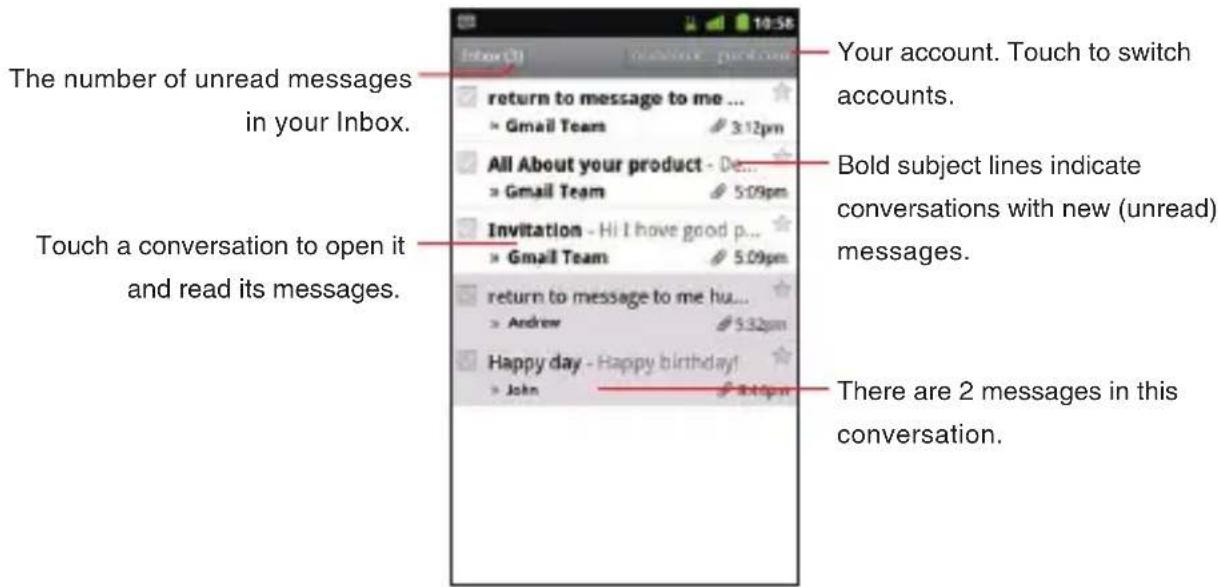
text_image
The number of unread messages in your Inbox. Touch a conversation to open it and read its messages. return to message to me ... × Gmail Team 3:12pm All About your product - De... × Gmail Team 5:09pm Invitation - Hi I have good p... × Gmail Team 5:09pm return to message to me hu... × Andrew 5:32pm Happy day - Happy birthday! × John 8:46pm Your account. Touch to switch accounts. Bold subject lines indicate conversations with new (unread) messages. There are 2 messages in this conversation.Conversations with new messages have bold subject lines. To • read a message in a conversation, touch its subject.
The current Google Account is displayed at the top right of the • Inbox. If you have more than one account, touch the current account to switch accounts.
Reading a message
- Open your Inbox.
- Touch a conversation that contains the message you want to read.
Composing and sending a message
-
When viewing the Inbox or other list of conversations, touch the Menu key ☐ >Compose.
-
Enter an address for the message. As you enter text, matching addresses are offered from your Contacts list. You can touch a suggested address or enter a new one.
-
Touch the Menu key ☐ > Add Cc/Bcc to enter an address for sending a copy or a blind copy of the message.
-
Enter a subject for the message.
-
Enter the content of the message.
-
Touch the Menu key ☐ > Attach to send a photo with the message.
-
Touch Send.
NOTES
If you are not connected to a network—for example, if you are working in Airplane mode—the messages that you send are stored on your phone with the Outbox label until you connect to a network again.
Do not delete the original of an attachment before the message • is completely sent (wait until it has the Sent label, not the Outbox label), or the attachment will not be sent.
Google Talk™
Google Talk is Google's instant messaging service. You can use it to communicate in real time with other people who also use Google Talk, on a phone, on the web, or with a desktop application.
NOTE
For more information about Google Talk, visit the Google website at the following URL: http://www.google.com/talk/.
Opening Google Talk and signing in
- Touch the Launcher icon on the Home screen.
The Launcher opens.
- Touch the Talk icon talk.
When you first open Google Talk, your Friends list is displayed. This list includes all of the friends you have added by using Google Talk on the web, on the phone, or with a desktop application.
Chatting with a friend
- Touch a friend in your Friends list.
The chat screen opens.
- Enter your message and touch Send.
The messages that you exchange are alternately displayed on the screen.
City ID®
You can use the City ID application to display the City and State of the telephone number you entered, or check the status of the subscription to City ID.
- Touch the Launcher icon on the Home screen.
The Launcher opens.
- Touch the City ID icon
City ID opens.
- Touch one of the following options:
City & State lookup: Opens a screen where you can enter a telephone number to display its City and State.
Subscription status: Displays your subscription status.
Check for updates: Checks for updates and installs it, if any.
About City ID: Displays the version information.
Social Beat
Social Beat application is your one stop shop for keeping with your social rhythm. Currently the following services are supported: Facebook, Twitter, MySpace, and New.
-
Touch the Launcher icon on the Home screen. The Launcher opens.
-
Touch the Social Beat icon Social Beat opens.
-
Follow the on-screen instructions.
Skype Mobile™
You can place unlimited Skype-to-Skype calls and unlimited amount of instant messages by using Skype Mobile application.
- Touch the Launcher icon on the Home screen.
The Launcher opens.
- Touch the Skype Mobile icon Ⓢ.
Skype Mobile opens.
- Follow the on-screen instructions.
NOTE
For more information about Skype, go to:
http://www.verizonwireless.com/skype.
News and Weather
News and Weather application offers weather forecasts and news stories about common topics.
You can also customize the news topics that will be displayed.
This information is summarized in the News and Weather widget, which you can place on the Home screen.
- Touch the Launcher icon on the Home screen.
The Launcher opens.
- Touch the News and Weather icon
When you open News and Weather, you view a summary of the weather or headlines.
Touch one of tabs in the scrolling list at the top of the screen to view the weather or top stories by category. Or just swipe left or right across the screen to switch news categories.
Slacker Radio
Slacker Radio allows you to access to the entire Slacker music library featuring millions of songs from thousands of artists. Listen to over 120 expert programmed radio stations or create your own custom stations.
- Touch the Launcher icon on the Home screen.
The Launcher opens.
- Touch the Slacker icon 📊.
Slacker Radio opens.
- Follow the on-screen instructions to sign in or create a new account.
NFL Mobile
You can watch live NFL game broadcasts every Thursday and Sunday night by using NFL Mobile application. Plus, you can see highlights from the best NFL games and fantasy football leaders, track your team's every move, and so on.
- Touch the Launcher icon on the Home screen.
The Launcher opens.
- Touch the NFL Mobile icon 📋.
NFL Mobile opens.
- Follow the on-screen instructions.
NOTE
For more information about NFL Mobile, go to:
http://solutions.vzwshop.com/nfl.
Document Viewer
You can use the Document Viewer to view files in Microsoft ^® Word, Microsoft ^® Excel, Microsoft ^® PowerPoint ^® , or PDF format.
- Touch the Launcher icon on the Home screen.
The Launcher opens.
- Touch the Document Viewer icon
Document Viewer opens.
- Touch Folders to view folders and supported files on the microSD.
Touch Supported files to view the list of supported files.
Touch doc files, xls files, ppt files, or pdf files to view the list of supported files by format.
- Touch the file you want to view its content.
The content of the file will be displayed.
Alarm Clock
You can set an alarm by modifying an existing alarm or by adding a new one.
Setting an alarm
- Touch the Launcher icon on the Home screen.
The Launcher opens.
2. Touch the Alarm Clock icon
The Alarm Clock screen opens.

text_image
Touch to open a screen where you can set the alarm's time and other attributes. 7:00 AM money Day 8:30 AM Max. Tan Wind, The Fri 9:00 AM Touch to change the clock display. Check or uncheck to turn an alarm on or off.- Touch an existing alarm to change its time and other attributes.
The Set alarm screen opens.
- Touch Time to set the alarm.
In the dialog that opens, change the time by touching the + or - icons. Or touch the digits to change the hours and minutes directly.
- Touch Ringtone to select a ringtone for the alarm.
You can select a ringtone from those that come with the phone.
The ringtone plays briefly when you select it.
- Check Vibrate to have the phone vibrate, in addition to playing the ringtone.
- Touch Repeat to set the days when you want the alarm to sound. If you do not set a repeat, the alarm will only sound one time.
- Touch Label to enter a name for the alarm.
- When you are finished, touch Done.
When you change the alarm setting, that alarm will automatically be activated.
The alarm will go off at the time it was set.
NOTES
- On the Alarm Clock screen, touch the Menu key > Hide clock to hide the clock on the Alarm Clock screen.
- On the Set alarm screen, touch the Menu key > Delete alarm to delete the set alarm.
When any alarm is set to on, the alarm icon ●L is displayed on the Status bar.
Adding an alarm
- Open Alarm Clock.
- Touch the Menu key ☐ > Add alarm.
- Set the alarm's time and other attributes. See "Setting an alarm" on page 255.
- Touch Done.
Changing Alarm Clock settings
- Open Alarm Clock.
- Touch the Menu key > Settings.
- Change the following settings as necessary.
Alarm in silent mode: Check to play alarms even when the phone is in Silent mode.
Alarm volume: Opens a dialog where you can set the volume of alarms.
Snooze duration: Opens a dialog where you can set how long Alarm Clock waits before playing an alarm again.
Side button behavior: Opens a dialog where you can set what will happen if you press the Volume Keys ◀▶ when an alarm sounds. You can set the key behavior to have no effect, to snooze the alarm, or to dismiss it.
Calculator
Use Calculator to solve simple arithmetic problems or use its advanced operators to solve more complex equations.
- Touch the Launcher icon on the Home screen.
The Launcher opens.
- Touch the Calculator icon
Calculator opens with Basic panel.
- Enter numbers and arithmetic operators.
NOTES
Touch • Clear to delete the last number or operator you entered.
Touch and hold Clear to delete everything in the display.
Touch and hold the Calculator's display to open a menu where •
you can copy what you have entered and access other tools.
- Swipe the screen from right to left, or touch the Menu key >
Advanced panel to switch to the Advanced panel.
In the Advanced panel, you can enter functions such as sin or log for advanced operations.
Swipe the screen from left to right, or touch the Menu key >
Basic panel to switch to the Basic panel.
Sound Recorder
Use the Sound Recorder to record sound, such as voice, and save the recorded data on your microSD card.
- Touch the Launcher icon on the Home screen.
The Launcher opens.
- Touch the Sound Recorder icon ⚠️.
Sound Recorder opens.
- Touch the start record icon .
The Sound Recorder starts recording a sound.
-
Touch the stop record icon
-
Perform any of the following operations as necessary:
-
Touch Use this recording to save the recorded data on your microSD card.
- Touch Discard to discard the recorded data.
Touch the play icon • to play the recorded data.
Touch the start record icon ● to save the recorded data on your microSD card and start the new recording.
Voice Control
The Voice Control application allows users to: access other applications, check status, process phone calls, and to create text messages. Your phone recalls the number from your Contacts, displays it briefly, and then dials it.
NOTE
When you open the Voice Control application for the first time, its tutorial will be displayed. You will be able to learn about Voice Control following the on-screen instructions.
Opening and Using Voice Control
- Touch the Launcher icon on the Home screen.
The Launcher opens.
- Touch the Voice Control icon
Voice Control screen opens
- Follow the prompts to use voice command(s).
Using the Voice Control application, you can perform the following operations:
Call
example, "Call John Work") to access the contact's phone number directly.
Send
Go To