
AccuSync PV40 - Television NEC - Free user manual and instructions
Find the device manual for free AccuSync PV40 NEC in PDF.


| Product Type | LCD Color Monitor / TV |
| Model | AccuSync PV40 (ASPV40-AVT) |
| Screen Size (Diagonal) | 101 cm / 40 inches |
| Aspect Ratio | 16:9 |
| Resolution | WXGA (1366 x 768) |
| Brightness | 500 cd/m² |
| Contrast Ratio (Dynamic) | 5000:1 |
| Viewing Angle | > 178° |
| Color Depth | 16.7 million colors |
| Speaker Output | 20 W x 2 |
| Audio Features | 7-Band Equalizer, Auto Volume Leveler, SRS TruSurround XT |
| Inputs | RF, AV1/AV2/AV3 (composite), S-Video, Component (Y Pb Pr), PC (15-pin D-Sub), HDMI (3 ports with HDCP), PC Audio (L+R) |
| Outputs | AV Out (composite), Headphone, Digital Audio Optical (SPDIF) |
| Other Ports | RS-232 (for external control), Service Only |
| Power Supply | 125 - 240 V AC, 50/60 Hz |
| Power Consumption | Not specified (estimated ~150 W) |
| Dimensions (W x D x H) | 998.0 x 298.0 x 748.0 mm (39.3 x 11.7 x 29.4 in) |
| Weight | 23.6 kg (52.1 lbs) |
| Operating Temperature | 10°C to 40°C (50°F to 104°F) |
| Operating Humidity | 10% to 80% (non-condensing) |
| Safety and Maintenance | Do not open cabinet; unplug during cleaning; use soft cloth; avoid liquids; keep vents clean |
| Repair and Parts | Contact NEC Customer Service (1-800-632-4662); no user-serviceable parts |
| Warranty | 1 year limited (parts and labor) from date of purchase |
| Included Accessories | Power cord, VGA cable, Remote control with AAA batteries, User manual |
Frequently Asked Questions - AccuSync PV40 NEC
User questions about AccuSync PV40 NEC
0 question about this device. Answer the ones you know or ask your own.
Ask a new question about this device
Download the instructions for your Television in PDF format for free! Find your manual AccuSync PV40 - NEC and take your electronic device back in hand. On this page are published all the documents necessary for the use of your device. AccuSync PV40 by NEC.
USER MANUAL AccuSync PV40 NEC
natural_image
Illustration of a flat-screen television monitor with 'NEC' branding on the front panel (no additional text or symbols)LCD Color Monitor
AccuSync™ PV32
AccuSync™ PV40
AccuSync™ PV46

English
Important Information .... English-2
Safety Precautions and Maintenance .... English-3
Recommended Use English-4
Package Contents .... English-5
Part Names and Functions
Control Panel English-6
Terminal Panel - APV32/APV40 English-7
Terminal Panel - APV46 English-8
Remote Control English-9
Battery Installation English-10
Connections
Connect Antenna . . . . . . . . . . . . . . . . . . . . . . . . . . . . . . . . . . . . . . . . . . . . . . . . . . . . . . . . . . . . . . . . English-11
Connect VCR English-11
Connect Cable TV . . . . . . . . . . . . . . . . . . . . . . . . . . . . . . . . . . . . . . . . . . . . . . . . . . . . . . . . . . . . . . . . English-12
Connect External AV Source English-12
Connect DVD Player English-13
Connect HDMI .... English-13
Connect Headphones ..... English-14
Connect PC (DTV) English-14
Connect Digital Audio . . . . . . . . . . . . . . . . . . . . . . . . . . . . . . . . . . . . . . . . . . . . . . . . . . . . . . . . . . . . . . . . . . . . . . . English-14
Basic Operation
Power On and Off . . . . . . . . . . . . . . . . . . . . . . . . . . . . . . . . . . . . . . . . . . . . . . . . . . . . . . . . . . . . . . . . . . . English-15
Volume Adjustment . . . . . . . . . . . . . . . . . . . . . . . . . . . . . . . . . . . . . . . . . . . . . . . . . . . . . . . . . . . . . . . . . . English-15
On Screen Language Selection English-15
Menu English-16
Channel Programming ..... English-17
Add/Delete Channels English-18
Fine Tuning . . . . . . . . . . . . . . . . . . . . . . . . . . . . . . . . . . . . . . . . . . . . . . . . . . . . . . . . . . . . . . . . . . . . . . . . . . . . . English-19
Favorite Channel English-20
DTV Channel Edit English-21
Color Temperature English-22
Picture Mode .... English-23
Manual Picture Control . . . . . . . . . . . . . . . . . . . . . . . . . . . . . . . . . . . . . . . . . . . . . . . . . . . . . . . . . . . . . . . . . . . . . . . English-23
Picture Format . . . . . . . . . . . . . . . . . . . . . . . . . . . . . . . . . . . . . . . . . . . . . . . . . . . . . . . . . . . . . . . . . English-24
Sound English-25
Balance English-26
Auto Volume English-26
SRS TruSurround XT English-27
TV Speaker English-28
Stereo/SAP Broadcasts Setup . . . . . . . . . . . . . . . . . . . . . . . . . . . . . . . . . . . . . . . . . . . . . . . . . . . . . . . . . . . . . . . . . . . English-29
Clock English-30
On/Off Time English-31
Auto Sleep English-32
Daylight Saving (Digital Mode only) ..... English-33
Sleep Timer English-33
Child Lock English-34
Front Light English-34
Closed Caption English-35
Closed Caption (Digital Mode) English-36
Lock Menu Options . . . . . . . . . . . . . . . . . . . . . . . . . . . . . . . . . . . . . . . . . . . . . . . . . . . . . . . . . . . . . . . . . . . . . . . English-37
Lock System English-38
PC Setup English-41
WXGA or VGA (PC-RGB Mode only) English-42
Information (Digital Mode only) ..... English-42
Picture in Picture ..... English-43
External Control Device Setup .... English-46
Set ID .... English-47
Specifications English-49
Troubleshooting . . . . . . . . . . . . . . . . . . . . . . . . . . . . . . . . . . . . . . . . . . . . . . . . . . . . . . . . . . . . . . . . . . . . . . English-50
WARNING

TO PREVENT FIRE OR SHOCK HAZARDS, DO NOT EXPOSE THIS UNIT TO RAIN OR MOISTURE. DO NOT USE THIS UNIT'S POLARIZED PLUG WITH AN EXTENSION CORD RECEPTACLE OR OTHER OUTLETS UNLESS THE PRONGS CAN BE FULLY INSERTED.

REFRAIN FROM OPENING THE CABINETAS THERE ARE HIGH VOLTAGE COMPONENTS INSIDE. REFER SERVICING TO QUALIFIED SERVICE PERSONNEL.
CAUTION
CAUTION:
TO REDUCE THE RISK OF ELECTRIC SHOCK, MAKE SURE POWER CORD IS UNPLUGGED FROM WALL SOCKET. TO FULLY DISENGAGE THE POWER TO THE UNIT, PLEASE DISCONNECT THE POWER CORD FROM THE AC OUTLET. DO NOT REMOVE COVER (OR BACK). NO USER-SERVICABLE PARTS INSIDE. REFER SERVICING TO QUALIFIED SERVICE PERSONNEL.

This symbol warns user that uninsulated voltage within the unit may have sufficient magnitude to cause electric shock. Therefore, it is dangerous to make any kind of contact with any part inside this unit.

This symbol alerts the user that important literature concerning the operation and maintenance of this unit has been included. Therefore, it should be read carefully in order to avoid any problems.
Canadian Department of
Communications Compliance Statement
DOC: This Class B digital apparatus meets all requirements of the Canadian Interference-Causing Equipment Regulations.
C-UL: Bears the C-UL Mark and is in compliance with Canadian Safety Regulations according to CAN/CSA C22.2 No. 60950-1.
FCC Information
- Use the attached specified cables with the ASPV32-AVT, ASPV40-AVT, or ASPV46-AVT color monitor so as not to interfere with radio and television reception.
(1) Please use the supplied power cord or equivalent to ensure FCC compliance.
(2) Please use the supplied shielded video signal cable, 15-pin mini D-SUB to 15-pin mini D-SUB.
-
This equipment has been tested and found to comply with the limits for a Class B digital device, pursuant to part 15 of the FCC Rules. These limits are designed to provide reasonable protection against harmful interference in a residential installation. This equipment generates, uses, and can radiate radio frequency energy, and, if not installed and used in accordance with the instructions, may cause harmful interference to radio communications. However, there is no guarantee that interference will not occur in a particular installation. If this equipment does cause harmful interference to radio or television reception, which can be determined by turning the equipment off and on, the user is encouraged to try to correct the interference by one or more of the following measures:
-
Reorient or relocate the receiving antenna.
- Increase the distance between the equipment and receiver.
- Connect the equipment into an outlet on a circuit different from that to which the receiver is connected.
- Consult your dealer or an experienced radio/TV technician for help.
If necessary, the user should contact the dealer or an experienced radio/television technician for additional suggestions. The user may find the following booklet, prepared by the Federal Communications Commission, helpful: "How to Identify and Resolve Radio-TV Interference Problems." This booklet is available from the U.S. Government Printing Office, Washington, D.C., 20402, Stock No. 004-000-00345-4.
Safety Precautions and Maintenance
FOR OPTIMUM PERFORMANCE, PLEASE NOTE THE FOLLOWING WHEN SETTING UPAND USING THE MONITOR:
- DO NOT OPEN THE MONITOR. There are no user-servicable parts inside and opening or removing covers may expose you to dangerous shock hazards or other risks. Refer all servicing to qualified service personnel.
- Do not spill any liquids into the cabinet or use your monitor near water.
- Do not insert objects of any kind into the cabinet slots, as they may touch dangerous voltage points, which can be harmful or fatal or may cause electric shock, fire or equipment failure.
- Do not place any heavy objects on the power cord. Damage to the cord may cause shock or fire.
- Do not place this product on a sloping or unstable cart, stand or table, as the monitor may fall, causing serious damage to the monitor.
- When operating the monitor with its AC 125-240V power supply, use a power supply cord that matches the power supply voltage of the AC power outlet being used. The power supply cord you use must have been approved by and comply with the safety standards of your country. (Type H05VV-F 3G 1mm^2 should be used in Europe)
- Do not place any objects onto the monitor and do not use the monitor outdoors.
- The lamps in this product contain mercury. Please dispose according to state, local, or federal law.
- Do not bend, crimp or otherwise damage the power cord.
- Do not use monitor in high temperature, humid, dusty, or oily areas.
- Do not cover vent on monitor.
- If monitor or glass is broken, do not come in contact with the liquid crystal.
- Handle broken glass with care.
- Allow adequate ventilation around the monitor so that heat can properly dissipate. Do not block ventilated openings or place the monitor near a radiator or other heat sources. Do not put anything on top of monitor.
- The power cable connector is the primary means of detaching the system from the power supply. The monitor should be installed close to a power outlet that is easily accessible.
- Handle with care when transporting. Save packaging for transporting.
- Keep the vent holes on the back of the product clean of dirt and dust. It is recommended to wipe vent holes with a soft cloth a minimum of once per month.

CAUTION
Immediately unplug your monitor from the wall outlet and refer servicing to qualified service personnel under the following conditions:
- When the power supply cord or plug is damaged.
- If liquid has been spilled on, or objects have fallen into the monitor.
- If the monitor has been exposed to rain or water.
- If the monitor has been dropped or the cabinet damaged.
- If the monitor does not operate normally by following operating instructions.
CAUTION
CORRECT PLACEMENT AND ADJUSTMENT OF THE MONITOR CAN REDUCE EYE, SHOULDER AND NECK FATIGUE. CHECK THE FOLLOWING WHEN POSITIONING THE MONITOR:
- For optimum performance, allow 20 minutes for warm up.
- Rest your eyes periodically by focusing on an object at least 5 feet away. Blink often.
- Position the monitor at a 90^ angle to windows and other light sources to minimize glare and reflections.
- Clean the LCD monitor surface with a lint-free, nonabrasive cloth. Avoid using any cleaning solution or glass cleaner.
- Adjust the monitor's brightness and contrast controls to enhance readability.
- A void displaying fixed patterns on the monitor for long periods of time to avoid image persistence (afterimage effects).
- Get regular eye checkups.
Ergonomics
To realize the maximum ergonomic benefits, we recommend the following:
- Use the preset Size and Position controls with standard signals.
- Use the preset Color Setting.
- Use non-interlaced signals.
- Do not use primary color blue on a dark background, as it is difficult to see and may produce eye fatigue due to insufficient contrast.
For more detailed information on setting up a healthy work environment, refer to the following document:
American National Standard for Human Factors Engineering of Visual Display Terminal Workstations ANSI-HFS Standard No. 100-1988
Published by:
The Human Factors and Ergonomics Society P.O. Box 1369, Santa Monica, California 90406.
Cleaning the LCD Panel
- When the liquid crystal panel becomes dusty or dirty, wipe gently with soft cloth.
- Do not rub the LCD panel with coarse material.
- Do not apply pressure to the LCD surface.
- Do not use OA cleaner. OA cleaner will cause deterioration or discolor the LCD surface.
Cleaning the Cabinet
- Unplug the power supply
• Gently wipe the cabinet with a soft cloth - To clean the cabinet, dampen the cloth with a neutral detergent and water, wipe the cabinet and follow with a dry cloth.
NOTE: The surface of the cabinet is composed of plastic. DO NOT clean with benzene thinner, alkaline detergent, alcoholic system detergent, glass cleaner, wax, polish cleaner, soap powder, or insecticide. Rubber or vinyl should not be in contact with the cabinet for an extended period of time. These types of fluids and materials can cause the paint to deteriorate, crack or peel.

natural_image
Illustration of a flat-screen computer monitor with blank screen (no text or symbols)LCD Monitor Power Cord x 1 VGA Cable
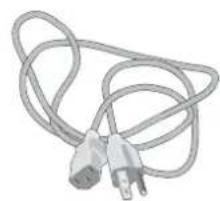
natural_image
Coiled electrical plug with two terminal connectors (no text or symbols visible)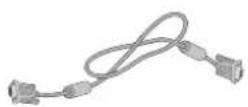
User's Manual
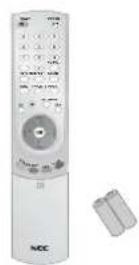
Wireless Remote Control and AAA Batteries
Part Names and Functions
Control Panel

- ▲ / ▼ (Channel Up/Down)
Selects a Channel or a menu item
Switches the set on from standby.
- ◀ / ▶ (Volume Up/Down)
Adjusts the volume.
Adjusts menu settings.
- MENU
Selects a menu.
- INPUT
Select input source: DTV, TV, AV1, AV2, AV3, S-Video, Component, PC-RGB, HDMI1, HDMI2, HDMI3 (HDMI3 available for 40/46 inch models only).
Switches the set on from standby.
Select on-screen menu setting.
- POWER (○○)
Switches the set on from standby or to standby from on.
- POWER/STANDBY INDICATOR (☐)
Glows red in standby mode.
Glows blue when the set is switched on.
-
REMOTE CONTROL SENSOR
-
Front Light LED (32inch model only)
Front Light LED & POWER (☐)
(40/46inch model only)
- MAIN POWER (⏻) (46inch model only)
Switches the set on or off.
Terminal Panel - APV32/APV40

- AC IN
Connects with the supplied power cord.
- HDMI1 IN (DVI) / HDMI2 IN (DVI) / RGB IN (PC/DTV) / AUDIO IN (RGB/DVI)
Connect the Digital output of a PERSONAL COMPUTER to this socket.
- DIGITAL AUDIO (OPTICAL) OUT
Connect digital audio from various types of equipment. NOTE: In standby mode, these ports will not work.
- COMPONENT IN (480i / 480p / 720p / 1080i)
Connecting equipment such as a DVD player, HDTV device, or Laser disc player.
- AUDIO/VIDEO IN
Connect the audio/video output of the VCR to AV sockets of the set.
- S-VIDEO IN
S-Video input
- RS-232 PORT
Connect to the RS-232 port on a PC.
-
SERVICE ONLY INPUT
-
HEADPHONE OUTPUT
-
AUDIO/VIDEO OUT
Connect an external amplifier or add a subwoofer to your surround sound system.
- "F" Connector
Antenna connection.
- Mini Stereo Input
Audio connection for HDMI and VGA inputs.
- VGA Connector
Connect the Analog output of a personal computer to this socket.
Terminal Panel - APV46

1. RS-232 PORT
Connect to the RS-232 port on a PC.
2. HDMI1 IN (DVI) / HDMI2 IN (DVI) / HDMI3 IN (DVI) / RGB IN (PC/DTV) / AUDIO IN (RGB/ DTV)
Connect the set output socket of the PERSONAL COMPUTER to this socket.
3. SERVICE ONLY INPUT
4. COMPONENT IN (480i / 480p / 720p / 1080i)
Connecting equipment such as a DVD player, HDTV device, or Laser disc player.
5. AUDIO/VIDEO IN
Connect the audio/video output of the VCR to AV sockets of the set.
6. S-VIDEO IN
S-Video input
7. "F" Connector
Antenna connection.
8. DIGITAL AUDIO (OPTICAL) OUT
Connect digital audio from various types of equipment.
NOTE: In standby mode, these ports will not work.
9. AC IN
Connects with the supplied power cord.
10. AUDIO/VIDEO OUT
Connect an external amplifier or add a subwoofer to your surround sound system.
11. HEADPHONE OUTPUT
12. VGA Connector
Connect the Analog output of a personal computer to this socket.
13. Mini Stereo Input
Audio connection for HDMI and VGA inputs.
■ Remote Control Functions

1. POWER (ON)
Switches the power on.
* If the Power Indicator on the display is not glowing, then no controls will work.
2. POWER (OFF)
Switches the power off.
3. KEYPAD
Input Channel numbers.
4. - (DASH)
Used to enter program number for multiple program channels such as 2-1, 2-2, etc.
5. TV/DTV
Choose between Analog and Digital TV (DTV) modes.
6. PICTURE
Recalls preferred picture settings.
7. ASPECT
Changes aspect ratio of the image being displayed.
8. SOUND
Recalls preferred sound settings.
9. MENU
Activates menu.
10. INPUT
Selects input source.
11. MUTE
Mutes audio output.
12. MTS
Multi-track sound system selection.
13. CC
Closed captioning.
14. FAVORITE
Selects favorite channel.
15. EXIT
Exits each mode.
16. CHANNEL UP/DOWN (▲ / ▼)
Selects a channel or a menu item.
Switches the set on from standby.
VOLUME UP/DOWN (◄ / ►)
Adjusts the volume.
Adjusts menu settings.
OK
Accepts your selection or displays the current mode.
17. Q.VIEW
Returns to previous channel.
18. CH EDIT (Digital Mode only)
Displays channel edit menu.
19. SLEEP
Sets the sleep timer.
20. INFO (Digital Mode only)
Displays information on top of the screen during DTV viewing.
21. PICTURE IN PICTURE mode
PIP
Switches the sub picture On or Off.
PIP POSITION
Relocates the sub picture in clockwise direction.
SWAP
Alternates between main and sub picture.
PIP CH +/-
Selects a channel for the sub picture.
PIP INPUT
Selects the input mode for the sub picture.
A.SWAP
PIP mode - main and sub picture audio select.
22. SCAN (TV mode only)
Switches on the channel scan mode through 9 sub pictures.
23. STILL
Freezes picture.
24. INPUT SELECT
Choose the input source.
Part Names and Functions - continued
■ Battery Installation
The remote control is powered by two AAA batteries.
- To insert batteries, turn the remote control handset over and remove the battery cover.
- Put the two batteries into the compartment, observing battery polarity.
- Replace the cover.
To avoid damage from possible battery leakage, remove the batteries if the remote will not be used for an extended period time. Do mix old and new batteries.
Do not mix battery types.
Always dispose of batteries properly.

natural_image
Three technical illustrations of a remote control casing showing internal components and battery assembly (no text or symbols)Additional equipment (VCRs, camcorders, etc.) can be connected to the set. Check with your equipment manufacturer's instructions for specific information. Unplug the set and all equipment before connecting to avoid damage to the set or equipment.
Items shown may be different than actual equipment.
■ Connect Antenna
To connect an Antenna or Cable Service without a Cable Box Connection.
For optimum picture quality, adjust antenna direction if needed.
Multi-family Dwellings / Apartments (Connect to wall antenna socket)

Connect VCR

When in Video mode, the set will automatically revert to TV mode if the CH ▲ / ▼ button or number buttons are pressed.
Connection 1
Set VCR switch to 3 or 4 and then tune TV to the same channel number.
Connection 2
- Connect the audio/video output jacks on VCR to the corresponding input jacks on the TV. When connecting the TV to a VCR, match the jack colors (Video = yellow, Audio Left = white, and Audio Right = red).
- Insert a video tape into the VCR and press PLAY on the VCR. (Refer to the VCR owner's manual.)
- Use the INPUT button on the remote control to select AV1, AV2 or AV3. (If connected to S-VIDEO on back panel, select the S-Video external input source.)
■ Connect Cable TV

Subscription to a local cable TV service and cable converter required. For further cable TV information, contact a local cable service provider.
Connection 1
- Select 3 or 4 with channel switch on cable box.
- Tune the TV channel to the same selected output channel of cable box.
- Select channels at the cable box or with the cable box remote control.
Connection 2
- Connect the audio/video output jacks on Cable Box to the corresponding input jacks on the TV. When connecting the TV to Cable Box, match the jack color (Video = yellow, Audio Left = white, and Audio Right = red).
- Use the INPUT button on the remote control to select AV1, AV2 or AV3.
- Select channels with the cable box remote control.
■ Connect External AV Source
Connect the audio/video output jacks on the external A/V equipment to the corresponding input jacks on the TV. When connecting the TV to external A/V equipment, match the jack color (Video = yellow, Audio Left = white, and Audio Right = red).
Viewing Setup
- Turn on the external A/V equipment.
- Use the INPUT button on the remote control to select AV1, AV2 or AV3.
- Operate the corresponding external equipment. Refer to external equipment operating guide.

■ Connect DVD Player

Connect the DVD video outputs to the COMPONENT (Y, Pb, Pr) jacks and connect the DVD audio outputs to the AUDIO jacks.
Viewing Setup
-
Turn on the DVD player, insert a DVD.
-
Use the INPUT button on the remote control to select Component.
-
Refer to the DVD player's manual for operating instructions.
- Component Input ports
To get better picture quality, connect a DVD player to the component input ports as shown.
Component input signal : 480i / 480p / 720p / 1080i
| Component input on Set | Y | Pb | Pr |
| Video Output on DVD | Y | PB | PR |
| Y | B-Y | R-Y | |
| Y | Cb | Cr | |
| Y | PB | PR |
■ Connect HDMI(DTV)

This TV SET can receive High-Definition Multimedia Interface (HDMI) or Digital Visual Interface (DVI) signals.
Connect the signal cable from the monitor output socket of the PERSONAL COMPUTER to the particular HDMI INPUT socket of the set.
Connect the audio cable from the PC to the AUDIO INPUT sockets of the set.
Press the INPUT button to select HDMI1, HDMI2, or HDMI3 (APV40/46 only).
Switch on the HDMI device, and the HDMI screen appears on the set.
HDMI-DTV input signal: 480p-60Hz, 720p-50Hz, 720p-60Hz, 1080i-50Hz, 1080i-60Hz.
HDMI Interface with HDCP (High Definition Copy Protection) enables all-digital rendering of video without the losses.
■ Connect Headphones
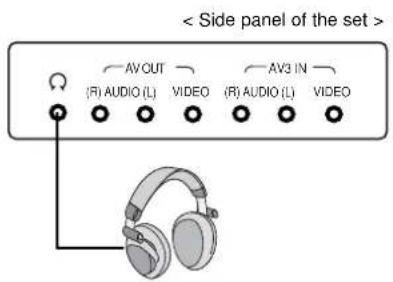
Insert the headphone plug to the headphone socket of the set.
You can listen to the sound through the headphone. To adjust the headphone volume, press the ◀ / ▶ button.
Control the volume of the headphone to the appropriate level.
Hearing for a long time with the high volume will damage the eardrum.
■ Connect PC (DTV)
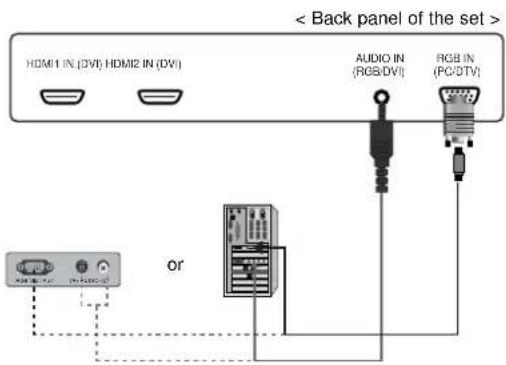
The set can be used as a PC monitor.
Connect the signal cable from the monitor output socket of the PERSONAL COMPUTER to the RGB IN socket of the set.
Connect the audio cable from the PC to the AUDIO IN sockets of the set.
Press the INPUT button to select PC-RGB.
Switch on the PC, and the PC screen appears on the Menu.
Select the AUTO PROGRAM function in the PC setup Menu to adjust the screen automatically.
RGB-DTV input signal: 480p-60Hz, 720p-50Hz, 720p-60Hz, 1080i-50Hz, 1080i-60Hz.
■ Connect Digital Audio
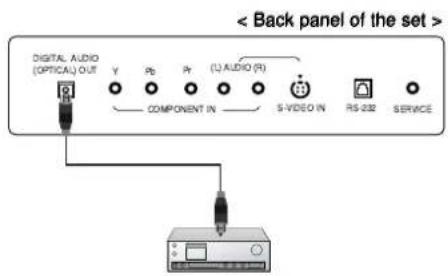
Send the set's audio to external audio equipment (stereo system) via the Digital Audio Output (Optical).
Caution: Do not look into the optical output port. Looking at the laser beam will damage your vision.
To connect
Connect one end of an optical cable to the TV Digital Audio (Optical) Output port.
Connect the other end of the optical cable to the digital audio (optical) input on the audio equipment.
■ On and Off
After the set is properly connected to the correct power outlet with the proper rating, it enters the standby mode.
When the set is in standby mode, press the POWER, or the ▲ /▼ buttons on the remote control to switch it on fully.
Press the POWER button on the remote control to go back into the standby mode.
Volume Adjustment
Press the ◀ / ▶ button to adjust the volume.
Press the MUTE button to silence the audio.
Press MUTE, ◀ / ▶, SOUND or the MTS buttons to cancel.
■ On Screen Language Selection
Press the MENU button and then use ▲ / ▼ button to select the SETUP menu.
Press the ▶ button and then use ▲ / ▼ button to select your desired language.
All the text of the on screen displays will appear in the selected language.
Repeatedly press the MENU button to return to normal TV viewing.
Basic Operation - continued
Menu
Use the on screen display menu to access various functions and features and to change settings of the set.
Press the MENU button and then use ▲ / ▼ button to display each menu.
Press the ▶ button and then use ▲ / ▼ button to select a menu item.
Press the ▶ button to display the sub menu.
Change the setting of an item in the sub menu with ▲ / ▼ or ◀ / ▶.
Move to the previous menu using the ◀ button and move to the next menu using the ▶ button.
NOTE: Menus may vary according to input mode.



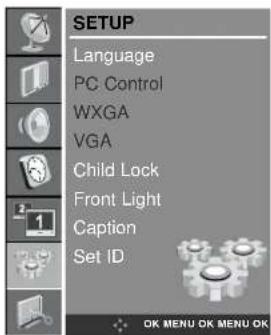


■ Channel Programming
For the Auto Program function to work properly, the TV must be receiving signals either from a cable-type source or over the air.
Press the MENU button and then use ▲ / ▼ button to select the STATION menu.
Press the ▶ button and then use ▲ / ▼ button to select DTV (Digital TV) Antenna Select.
Press the ▶ button and then use ▲ / ▼ button to select Antenna or Cable.
Press the OK button to save.
Press the ▲ / ▼ button to select Auto Program.
Press the ▶ button and then use ▲ / ▼ button to select System.
Press the ◀ / ▶ button to select Analog, Digital, ALL.
ALL: Digital & Analog search
Digital: Digital search only
Analog: Analog search only
Press the ▲ / ▼ button to select Search.
Press the ▶ button to begin the channel search.
- Wait for auto channel to complete the channel search cycle before choosing a channel. The TV scans first for over-the-air channels and then channels provided by a cable service.
NOTE: When the channel search is complete, use the ▲ / ▼ buttons to review the stored channels.
If you press the MENU button while scanning, the Auto Program function will stop and only those channels scanned up to that point will remain in memory.
Auto channel function can store only the channels which are being scanned at that time.
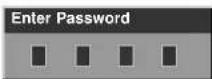
NOTE: The "Enter Password" appears on screen a password in required to gain access to STATION menu, if the Look System turued on.

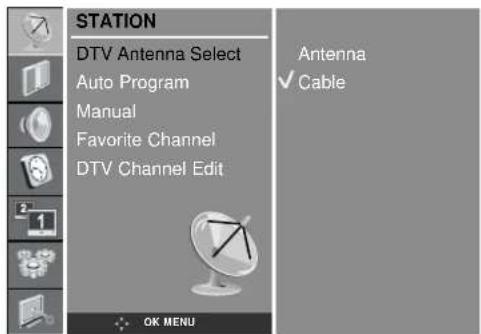


Basic Operation - continued
■ Add/Delete Channels
You can manually add or delete individual channels. The channel being displayed is either added to or erased from memory.
Press the MENU button and then use ▲ / ▼ button to select the STATION menu.
Press the ▶ button and then use ▲ / ▼ button to select Manual.
Press the ▶ button and then use ▲ / ▼ button to select Channel.
Press the ◀ / ▶ button to select the channel number.
Press the ▲ / ▼ button to select Storage.
Press the ◀ / ▶ button to select Memory (add) or Erase (Not Viewable).
Your choices are DTV mode: The Not Viewable channel is modified to Viewable from the channel edit.
Press the MENU button repeatedly to return to normal TV viewing.
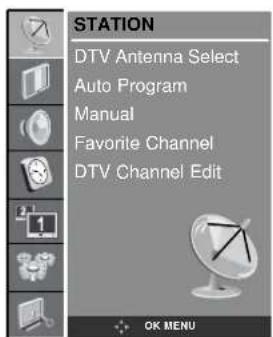


■ Fine Tuning
Adjusts poor picture stability and image quality.
Press the MENU button and then use ▲ / ▼ button to select the STATION menu.
Press the ▶ button and then use ▲ / ▼ button to select Manual.
Press the ▶ button and then use ▲ / ▼ button to select Fine.
Use the ◀ / ▶ button to adjust the picture to your preference.
Repeatedly press the MENU button to return to normal TV viewing.


Basic Operation - continued
- Favorite Channel
Favorite Channel lets you quickly tune in up to 8 channels of your choice without having to wait for the TV to scan through all the in-between channels.
Press the MENU button and then use ▲ / ▼ button to select the STATION menu.
Press the ▶ button and then use ▲ / ▼ button to select Favorite Channel.
Press the ▶ button and then use the ▲ / ▼ buttons to select the first favorite channel position.
Press the ◀ /▶ buttons to set the desired channel number for the first favorite channel.
- Repeat this step to store the other 7 channels.
Press the OK button to save.
Press the FAVORITE button to cycle through the stored favorite channels.
Repeatedly press the MENU button to return to normal TV viewing.
NOTE: The 8 favorite channels appear on the screen one after another.
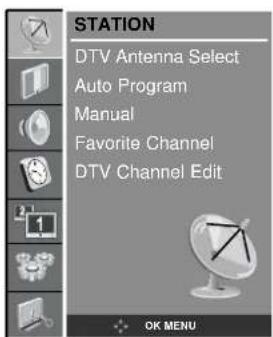

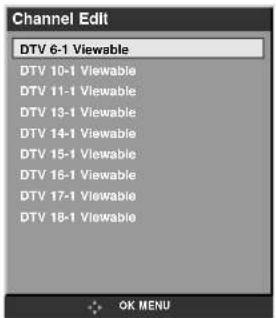
■ DTV Channel Edit
The Edit function enables the user to delete or skip stored channels or to move to programmed channels to different positions.
Press the MENU button and then use ▲ / ▼ button to select the STATION menu.
Press the ▶ button and then use ▲ / ▼ button to select DTV Channel Edit.
Press the ▶ button and then use the ▲ / ▼ buttons to select the channel.
Press the ◀ / ▶ button to select the Viewable, Not Viewable, or FCR Channel.
Press the OK button to save.
Press the FAVORITE button to cycle through the stored favorite channels.
Repeatedly press the MENU button to return to normal DTV viewing.


Basic Operation - continued
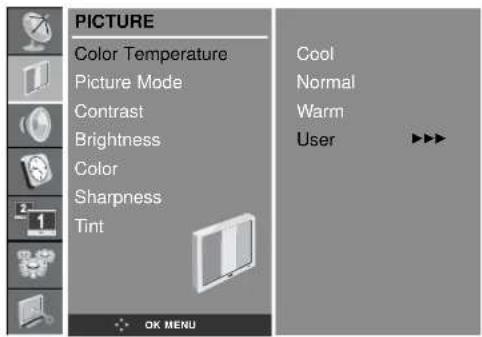
■ Color Temperature
Press the MENU button and then use ▲ / ▼ button to select the PICTURE menu.
Press the ▶ button and then ▲ / ▼ button to select Color Temperature.
Press the ▶ button and then ▲ / ▼ button to select the desired color temperature.
Repeatedly press the MENU button to return to normal TV viewing.
- Y ou can adjust red, green, or blue to any color temperature you prefer.
Press the MENU button and then use ▲ / ▼ button to select the PICTURE menu.
Press the ▶ button and then use ▲ / ▼ button to select Color Temperature.
Press the ▶ button and then use ▲ / ▼ button to select User.
Press the ▶ button and then use ▲ / ▼ button to make appropriate adjustments.
To reset default settings, select the Normal option.
Repeatedly press the MENU button to return to normal TV viewing.


■ Picture Mode
Picture Mode adjusts the TV for the best picture appearance.
Press the MENU button and then use ▲ / ▼ button to select the PICTURE menu.
Press the ▶ button and then use ▲ / ▼ button to select Picture Mode.
Press the ▶ button and then use ▲ / ▼ button to select a picture setting on the Picture Mode pulldown menu.
Repeatedly press the MENU button to return to normal TV viewing.
You can also recall a desired picture setting (Dynamic, Standard, Mild, Game or User) by pressing the PICTURE button on the remote control.
The Dynamic, Standard, Mild and Game settings are set for good picture reproduction and cannot be changed.


■ Manual Picture Control
Press the MENU button and then use ▲ / ▼ button to select the PICTURE menu.
Press the ▶ button and then use ▲ / ▼ button to select the desired picture option.
Press the ▶ button and then use ▲ / ▼ button to make appropriate adjustments.
You can adjust picture contrast, brightness, color, sharpness and tint to the levels you prefer.

■ Picture Format
You can watch TV in various picture formats; 16:9, 14:9, 4:3, ZOOM1, ZOOM2, and SPECTACLE.
- Press the ASPECT button repeatedly to select a desired picture format.
- Y ou can only select 16:9, 14:9, 4:3, ZOOM1, ZOOM2, SPECTACLE in TV, AV1, AV2, AV3, and S-Video modes only.
- Y ou can select 16:9, 4:3 in Component, PC-RGB, HDMI, and DTV mode only.
NOTE: A short term or permanent afterimage effect may remain on the screen as a result of displaying an unmoving image, such as text in a broadcasting name, or when using the 4:3 screen at the ARC adjustment for a long period of time.

flowchart
graph TD
    A["16:9"] --> B[" "]
    B --> C["4:3 14:9"]
    C --> D["SPECTACLE"]
    D --> E["ZOOM2"]
    E --> F["ZOOM1"]
Sound
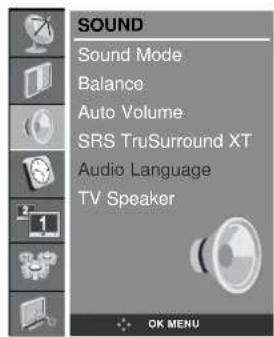
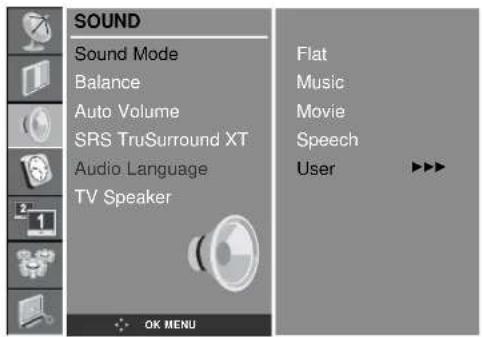
Sound Mode helps to provide the best sound without any special adjustment because the TV sets the appropriate sound options based on the channel content.
Press the MENU button and then use ▲ / ▼ button to select the SOUND menu.
Press the ▶ button and then use ▲ / ▼ button to select Sound Mode.
Press the ▶ button and then use ▲ / ▼ button to select a sound setting on the Sound Mode pulldown menu.
Repeatedly press the MENU button to return to normal TV viewing.
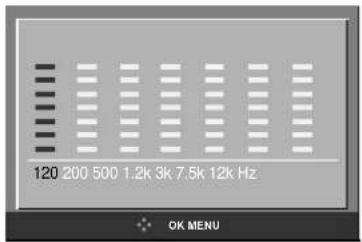
Sound Frequency Adjustment
a. Press the ▶ button in User.
b. Select a sound band by pressing the ◀ / ▶ button.
c. Make appropriate sound level with the ▲ / ▼ button.
d. Press the OK button to store it for the sound User.
You can also recall a desired sound setting (Flat, Music, Movie, Speech or User) with SOUND button on the remote control.
The Flat, Music, Movie and Speech sound options are default settings and cannot be changed.

Basic Operation - continued
Balance
You can adjust the sound balance between the speakers to the levels you prefer.
Press the MENU button and then use ▲ / ▼ button to select the SOUND menu.
Press the ▶ button and then use ▲ / ▼ button to select Balance.
Press the ▶ button and then use ◀ / ▶ button to make appropriate adjustments.
Repeatedly press the MENU button to return to normal TV viewing.


■ Auto Volume
Auto Volume automatically keeps the audio level the same when you change channels.
Press the MENU button and then use ▲ / ▼ button to select the SOUND menu.
Press the ▶ button and then use ▲ / ▼ button to select Auto Volume.
Press the ▶ button and then use ▲ / ▼ button to select On or Off.
Repeatedly press the MENU button to return to normal TV viewing.
NOTE: Available only in TV mode.

■ SRS TruSurround XT SRS(○) TruSurround XT
SRS TruSurround XT is a trademark of SRS Labs, Inc.
TruSurround XT technology is incorporated under license from SRS Labs, Inc.
Manufactured under license form Dolby Laboratories.
Press the MENU button and then use ▲ / ▼ button to select the SOUND menu.
Press the ▶ button and then use ▲ / ▼ button to select SRS TruSurround XT.
Press the ▶ button and then use ▲ / ▼ button to select On or Off.
Repeatedly press the MENU button to return to normal TV viewing.


Basic Operation - continued
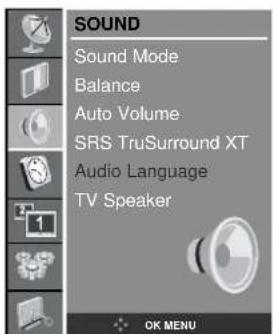
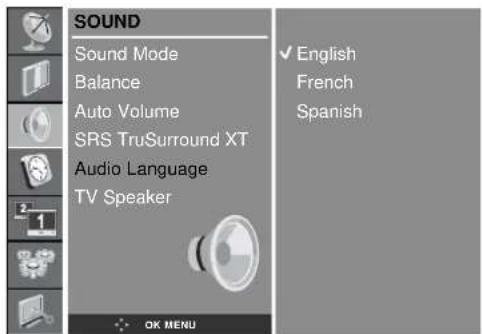
■ Audio Language (Digital Mode only)
This function lets you select preferred audio language.
Press the MENU button and then use ▲ / ▼ button to select the SOUND menu.
Press the ▶ button and then use ▲ / ▼ button to select Audio Language.
Press the ▶ button and then use ▲ / ▼ button to select English, French or Spanish.
Repeatedly press the MENU button to return to normal DTV viewing.
TV Speaker
Turn TV speakers off when using external audio equipment.
Press the MENU button and then use ▲ / ▼ button to select the SOUND menu.
Press the ▶ button and then use ▲ / ▼ button to select TV Speaker.
Press the ▶ button and then use ▲ / ▼ button to select On or Off.
Repeatedly press the MENU button to return to normal TV viewing.

■ Stereo/SAP Broadcasts Setup
The TV can receive MTS stereo channels and any SAP (Secondary Audio Program) that accompanies the stereo channel, if the broadcaster transmits an additional sound signal as well as the original one.
STEREO: The primary language is heard from left and right speakers. Signal mode is stereo.
SAP: The secondary language is heard from left and right speakers.
MONO: The same primary language is heard from left and right speakers. Signal mode is mono.
- Press the MTS button repeatedly.
Select mono sound mode if the signal is not clear or if signal reception is poor.
STEREO and SAP modes are available only if they are included on the broadcast signal.

flowchart
graph LR
    A["STEREO $AP-MONO"] --> B["Processing Box"]
    B --> C["Output"]
Basic Operation - continued
Clock
Auto
The digital channel signal includes information for the current time provided by the broadcasting station and sets the clock automatically.
Set the clock manually if the time is set incorrectly by the auto clock function.
Press the MENU button and then ▲ / ▼ button to select the TIME menu.
Press the ▶ button and then ▲ / ▼ button to select Clock.
Press the ▶ button and then ▲ / ▼ button to select Auto.
Repeatedly press the MENU button to return to normal TV viewing.
Manual
If current time setting is wrong, reset the clock manually.
Press the MENU button and then ▲ / ▼ button to select the TIME menu.
Press the ▶ button and then ▲ / ▼ button to select Clock.
Press the ▶ button and then ▲ / ▼ button to select Manual.
Press the ▶ button and then ▲ / ▼ button to adjust the hour/minute.
Repeatedly press the MENU button to return to normal TV viewing.


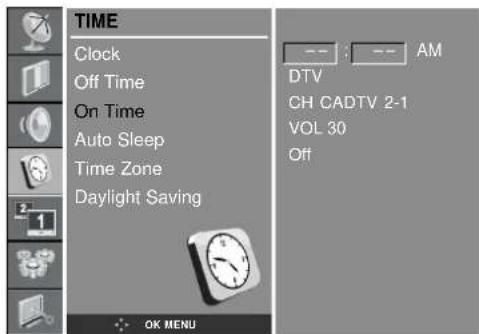
On/Off Time
The off timer automatically switches the set to standby after a preset time.
Press the MENU button and then ▲ / ▼ button to select the TIME menu.
Press the ▶ button and then ▲ / ▼ button to select Off Time or On Time.
Press the ▶ button and then ▲ / ▼ button to select On.
To cancel Off/On Time function, press the ▲ / ▼ button to select Off.
Press the ▶ button and then use ▲ / ▼ button to select DTV or TV.
Press the ▶ button and then ▲ / ▼ button to adjust the hour / minute.
Only for the On Time function; Press the ▶ button and then ▲ / ▼ button to adjust volume level and channel number.
Repeatedly press the MENU button to return to normal TV viewing.
NOTE:
In the event of power interruption (disconnection or power failure) the clock must be reset.
Two hours after the set is switched on by the On Time function it will automatically switch back to standby mode unless a button is pressed.
Once the on or off time is set, these functions will operate daily at the preset time.
Off Timer function overrides On Timer function if they are set to the same time.
The set must be in standby mode for the On Timer to work.

Basic Operation - continued
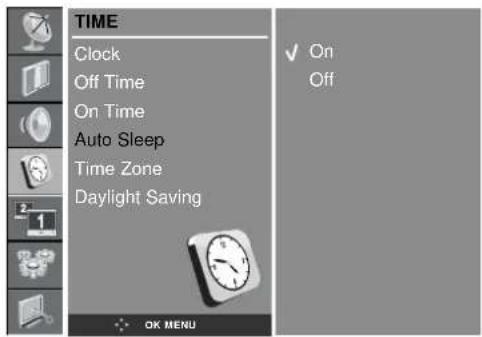
■ Auto Sleep
If you select On in the Auto Sleep menu, the set will automatically switch itself to standby mode approximately ten minutes after it stops receiving external signals.
Press the MENU button and then ▲ / ▼ button to select the TIME menu.
Press the ▶ button and then ▲ / ▼ button to select Auto Sleep.
Press the ▶ button and then ▲ / ▼ button to select On or Off.
Repeatedly press the MENU button to return to normal TV viewing.

■ Time Zone (Digital Mode only)
Not available when clock is set manually.
Press the MENU button and then ▲ / ▼ button to select the TIME menu.
Press the ▶ button and then ▲ / ▼ button to select Time Zone.
Press the ▶ button and then ▲ / ▼ and ◀ / ▶ button to select USA or Canada.
Press the ▲ / ▼ button to select Time Zone.
U.S. time zones: Eastern, Central, Mountain, Pacific, Alaska or Hawaii.
Canada time zones: New F.Land (New Foundland), Atlantic, Eastern, Central, Mountain, Pacific.
Press the OK button to save.
Repeatedly press the MENU button to return to normal DTV viewing.

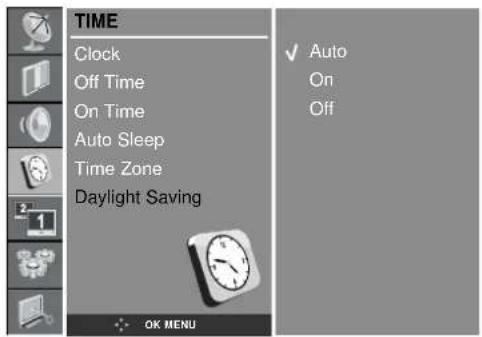
■ Daylight Saving (Digital Mode only)
If your area observes Daylight Saving time, turn this setting On.
Press the MENU button and then ▲ / ▼ button to select the TIME menu.
Press the ▶ button and then ▲ / ▼ button to select Daylight Saving.
Press the ▶ button and then ▲ / ▼ button to select Auto, On or Off.
Repeatedly press the MENU button to return to normal DTV viewing.


Sleep timer
The sleep timer automatically switches the set to standby after the preset time has elapsed.
Press the SLEEP button to select the number of minutes. 'Sleep Time : - - min' will appear on the screen, followed by 10, 20, 30, 60, 90, 120, 180 and 240. The timer begins to count down from the number of minutes selected.
NOTE:
a. To view the remaining sleep time, press the SLEEP button once.
b. To cancel the sleep time, repeatedly press the SLEEP button until the display 'Sleep Time : - -min' appears.
c. When you switch the set off, the sleep timer is reset.
Basic Operation - continued
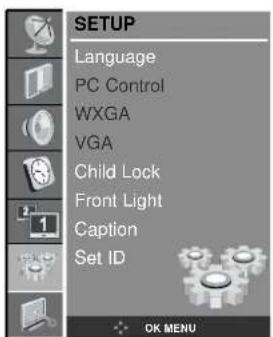
■ Child Lock
The TV can be set so that the remote control handset is required to control it. This feature can be used to prevent unauthorized use of the control buttons on the unit.
Press the MENU button and then ▲ / ▼ button to select the SETUP menu.
Press the ▶ button and then ▲ / ▼ button to select Child Lock.
Press the ▶ button and then ▲ / ▼ button to select On or Off.
Repeatedly press the MENU button to return to normal TV viewing.
With the lock on, the display Child Lock appears on the screen if any button on the front panel is pressed while viewing the TV.


■ Front Light
You can switch Front Light LED on or off.
Press the MENU button and then ▲ / ▼ button to select the SETUP menu.
Press the ▶ button and then ▲ / ▼ button to select Front Light.
Press the ▶ button and then ▲ / ▼ button to select On or Off.
Repeatedly press the MENU button to return to normal TV viewing.

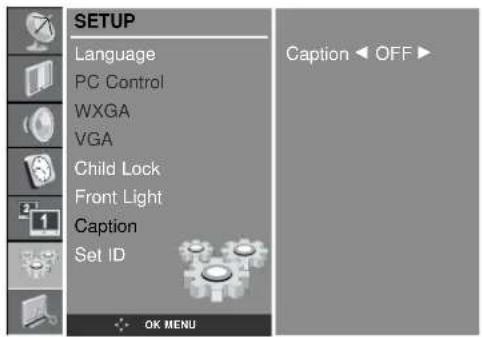
■ Closed Caption
Use the CC button repeatedly to select the Closed Captions.
Not available in Component, RGB-PC, and HDMI modes.
Press the MENU button and then ▲ / ▼ button to select the SETUP menu.
Press the ▶ button and then ▲ / ▼ button to select Caption.
Press the ▶ button and then ▲ / ▼ button to select your caption selection.
Choices are: OFF, CC1, CC2, CC3, CC4, TEXT1, TEXT2, TEXT3, and TEXT4.
Repeatedly press the MENU button to return to normal TV viewing.
Basic Operation - continued
■ Closed Caption (Digital Mode)
Press the CC button repeatedly to select Closed Caption method.
Customize The DTV/CADTV captions that appear on your screen.
Not available in Component and RGB-PC modes.
Press the MENU button and then ▲ / ▼ button to select the SETUP menu.
Press the ▶ button and then ▲ / ▼ button to select Caption.
Press the ▶ button and then ▲ / ▼ button to select your caption selection.
Your choices are: OFF, English, Spanish, French, Service4, Service5, and Service6.
Caption Option
Press the ▲ / ▼ button to select Closed Caption Option.
Press the ▶ button and then ▲ / ▼ button to select the desired font style item.
Press the ◀ / ▶ button to make appropriate adjustments to the font style.
A preview icon is provided at the bottom of the screen, use it to see the closed caption language.
Repeatedly press the MENU button to return to normal DTV viewing.


■ Lock Menu Options
Parental Control can be used to block specific channels, ratings, and other viewing sources.
The Parental Control Function (V-Chip) is used to block program viewing based on the ratings sent by the broadcast station. The default setting is to allow all programs to be viewed. Viewing can be blocked by the type of program and by the categories chosen to be blocked. It is also possible to block all program viewing for a time period. To use this function, the following must be set:
- Ratings and categories to be blocked.
- Set a password
- Enable the lock of V-Chip ratings and categories
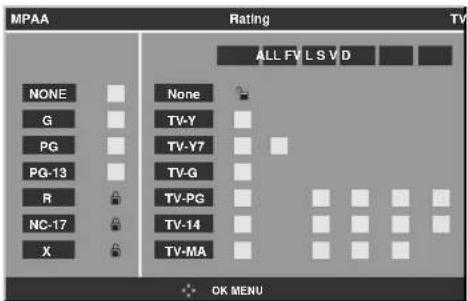
Rating guidelines are provided by broadcast stations. Most television programs and television movies can be blocked by TV Rating and/or Individual Categories. Movies that have been shown at the theaters or direct-to-video movies use the Movie Rating System (MPAA) only.
Options for Movies previously shown in theaters:
- None
• G and Above (general audience)
• PG and Above (parental guidance suggested)
• PG-13 and Above (13 years and older) - R and Above (Restricted, Children under 17 should be accompanied by an adult.)
• NC-17 and Above (18 years and older)
• X : (adult)
If you set PG-13 and Above: G and PG movies will be available.
PG-13, NC-17 and X will be blocked.
Options for Television programs including made-for-TV movies:
- None
- T V -G and Above (general audience): (individual categories do not apply)
• T V -PG and Above: (parental guidance suggested)
• T V -14 and Above: (14 years and older)
• T V -MA: (mature audience) - T V-Y and Above: (youth) (individual content categories do not apply)
• T V -Y7: (youth, 7 years and older)
Content Categories:
- Dialog - sexual dialogue: (Applies to TV-PG and Above. TV-14)
- Language - adult language: (Applies to TV-PG and Above, TV-14 and Above, and TV-MA)
- Sex scenes - sexual situations: (Applies to TV-PG and Above, TV-14 and Above, and TV-MA)
• V violence: (applies to TV-PG and Above, TV-14 and Above, and TV-MA)
- F V violence - fantasy violence: (Applies to TV-PG and Above, TV-14 and Above, and TV-MA)
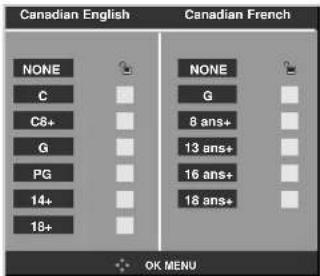
Canadian English/French language rating system:
- None
• C and Above: (Children)
• C8+ and Above: (8 years and up)
• G and Above: (General programming. Suitable for all audiences.)
• PG and Above: (Parental guidance suggested)
• 14+and Above: (Viewers 14 years and older)
• 18+: (Adult programming)
Canadian French language rating system:
- None
• G: (General)
• 8 ans+: (8 years and older)
• 13 ans+: (13 years and older)
• 16 ans+: (16 years and older)
• 18 ans+: (18 years and older)
Basic Operation - continued
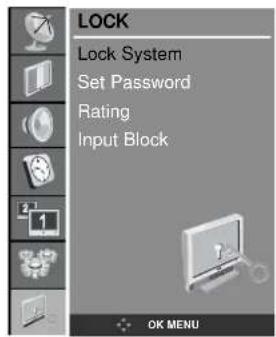
■ Lock System
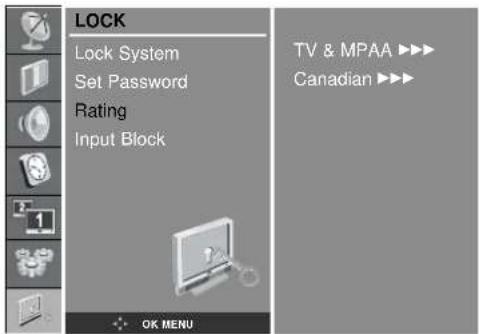
Press the MENU button and then use ▲ / ▼ button to select the LOCK menu. Then, press the ▶ button.
If Lock is already set, enter the password.
The initial password is "0-0-0-0".
Setting Lock on/off
Enables or disables the blocking scheme you set up previously.
Press the ▲ / ▼ button to select Lock System.
Press the ▶ button and then use ▲ / ▼ button to select On or Off.
Set password
Change the password by inputting a new password twice.
Press the ▲ / ▼ button to select Set Password.
Press the ▶ button.
Enter a four digit password.
As soon as the 4 digits are entered, re-enter the same 4 digits in the New, and Confirm areas.
Press the OK button to save.
If an invalid password is input in Confirm Password screen, "Password Mismatch" appears on screen.
The changed password is stored.


Rating
To Select Canadian / English / French rating system press the ▲ / ▼ button to select Rating.
Press the ▶ button and then use ▲ / ▼ button to select TV Rating Limit or Canadian.
Press the ▶ button and then use ▲ / ▼ button to select type of ratings to block.
Press the ▲ / ▼/ ◀ / ▶ button to select your rating selection.
Press the OK button to lock or unlock.
Press the MENU button to rating save, return to normal TV viewing.


Basic Operation - continued
Input Block
Select an external source to block.
Press the ▲ / ▼ button to select Input Block.
Press the ▶ button and then use ▲ / ▼ button to select a source.
Press the ▶ button and then use ◀ / ▶ button to select Blocked or Unblocked for each source.
Repeatedly press the MENU button to return to normal TV viewing.


PC Setup
The following items can be selected or adjusted: Horizontal/Vertical position, Clock, Phase, and Auto Program.
Press the MENU button and then use ▲ / ▼ button to select the SETUP menu.
Press the ▶ button and then use ▲ / ▼ button to select PC Control.
Press the ▶ button and then ▲ / ▼ button to select the desired picture item.
Press the ▲ / ▼ button to make appropriate adjustments.
H-Position / V-Position
Adjusts picture to left/right and up/down as you prefer.
Clock
This function is to minimize any vertical bars or stripes visible on the screen background. Horizontal screen size will also change.
Phase
Removes any horizontal noise. Clears or Sharpens text.
Auto Program
This function is for the automatic adjustment of the screen position, clock and phase. The displayed image will disappear for a few seconds while the Auto Program is in progress.
Reset
Restores factory settings.
NOTE: Some signals from some graphics boards may not function properly. If the results are unsatisfactory, adjust your monitor's H/V position, Clock and Phase manually.
Press the OK button to store settings.
Press the EXIT button to return to PC mode.


Basic Operation - continued
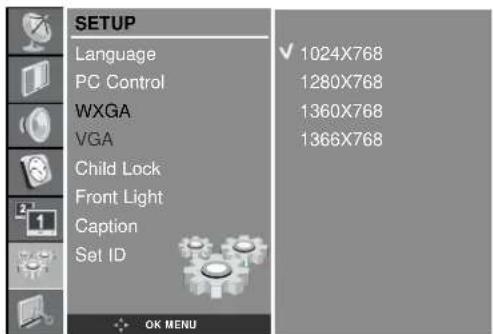
■ WXGA or VGA (PC-RGB Mode only)
When a WXGA signal is present, select the desired resolution.

■ Information (Digital Mode only)
This function shows the present input information.
Press the INFO button while watching DTV. The information appears on screen.
Press the INFO or MENU button to exit.
(The Information window will disappear on its own after a few seconds.)

■ Picture in Picture
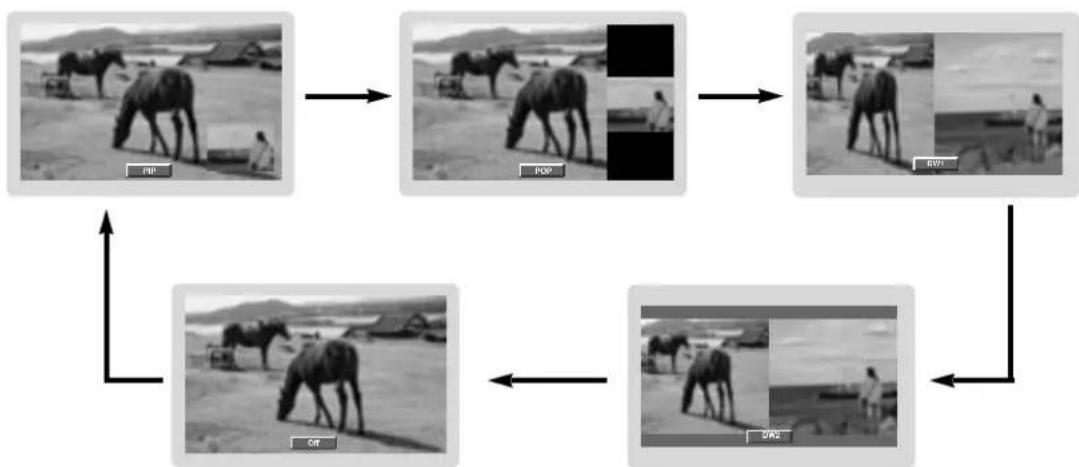
PIP lets you view 2 different inputs (sources) on your monitor screen at the same time. One source will be large, and the other source will show a smaller inset image.
Press the PIP button to show the sub picture.
Each press of PIP button changes the screen display as shown below.
flowchart
graph TD
    A["PIP"] --> B["POP"]
    B --> C["BV1"]
    C --> D["DAV2"]
    D --> E["Off"]
    E --> A
40/46inch model only
Basic Operation - continued
■ PIP Audio Output
PIP mode - main and sub picture audio select.
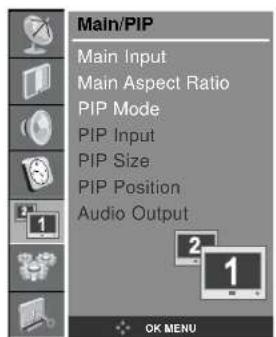
Press the MENU button and then use ▲ / ▼ button to select the Main/PIP menu.
Press the ▶ button and then use ▲ / ▼ button to select Audio Output.
Press the ▶ button and then use ▲ / ▼ button to select Main or Sub.
Repeatedly press the MENU button to return to normal TV viewing.

■ Moving the PIP
Press the PIP POSITION button.
Press the PIP POSITION button repeatedly until desired position is achieved. The sub pictures move clockwise.

flowchart
graph TD
    A["Animal"] --> B["Sheep"]
    B --> C["Human"]
    C --> D["Sheep"]
    D --> E["Human"]
    E --> F["Sheep"]
    F --> G["Human"]
    G --> H["Sheep"]
    H --> I["Human"]
    I --> J["Sheep"]
    J --> K["Human"]
    K --> L["Sheep"]
    L --> M["Human"]
    M --> N["Sheep"]
    N --> O["Human"]
    O --> P["Sheep"]
    P --> Q["Human"]
    Q --> R["Sheep"]
    R --> S["Human"]
    S --> T["Sheep"]
    T --> U["Human"]
    U --> V["Sheep"]
    V --> W["Human"]
    W --> X["Sheep"]
    X --> Y["Human"]
    Y --> Z["Sheep"]
■ Selecting an Input Signal Source for the PIP
Use the PIP INPUT button to select the input source for the sub picture.

natural_image
Black-and-white photo of a horse grazing in a field with a person nearby (no visible text or symbols)■ Channel selection for sub picture (Sub picture only TV mode)
Press the PIP CH +/- button. The selected channel number is displayed just below the channel number of main picture.
■ Channel Scan
Press the PIP POSITION button.
Look at all of the stored channels on 9 windows.
Press the SCAN button to show all 9 windows on the screen.
Press the EXIT button to return to normal viewing.
■ Swapping the PIP
Press the SWAP button to switch between the Main and Sub pictures.
Available only in TV, AV1, AV2, AV3, and S-VIDEO modes.

natural_image
Grid of black-and-white photos showing people walking and interacting outdoors (no visible text or symbols)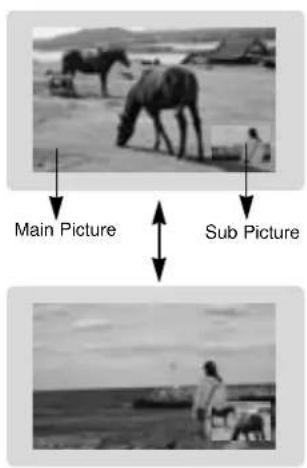
■ External Control Device Setup
Connect the RS-232 input jack to a control device (such as a computer or an A/V control system) in order to control the set's functions externally.
■ Connect External Equipment
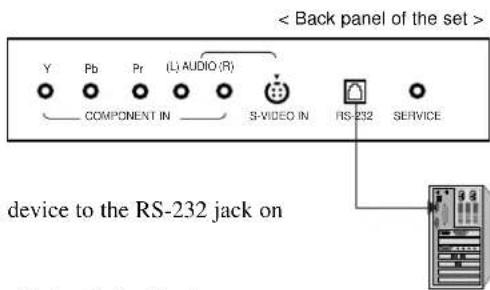
Connect the serial port of the control device to the RS-232 jack on the set.
RS-232 connection cables are not supplied with the Monitor.
The Monitor remote control and front panel controls (except main power) will not be functional if the set is controlled by a PC computer or other external device.
■ RJ-45 8PIN CONNECTOR
| NO. PIN NAME |
| 1 RXD(RECEIVE DATA) |
| 2 TXD(TRANSMIT DATA) |
| 3 NO CONNECTION |
| 4 GND |
| 5 GND |
| 6 NO CONNCETION |
| 7 NO CONNCETION |
| 8 NO CONNCETION |
Communication Parameters
• B aud rate : 4800bps (UART)
- Data length : 8bits
- Parity: None
- S t op bit : 1bit
- Communication code : HEX code

Set ID
Press the MENU button and then ▲ / ▼ button to select the SETUP menu.
Press the ▶ button and then ▲ / ▼ button to select Set ID.
Press the ▶ button and then ◀ / ▶ button to adjust Set ID to choose the desired monitor ID number.
The adjustment range of Set ID is 1 \~ 99.
Use this function to specify a monitor ID number.


RGB Mode / HDMI Mode
| MODE | Resolution | Vertical Frequency (Hz) |
| DOS | 640X350 | 70.0 |
| 720X400 | 70.0 | |
| 85.0 | ||
| VGA | 640X480 | 60.0 |
| 72.0 | ||
| 75.0 | ||
| 85.0 | ||
| SVGA | 800X600 | 56.0 |
| 60.0 | ||
| 72.0 | ||
| 75.0 | ||
| 85.0 | ||
| XGA | 1024X768 | 60.0 |
| 70.0 | ||
| 75.0 | ||
| 85.0 | ||
| SXGA | 1280X1024 | 60.0 |
| WXGA | 1280X768 | 60.0 |
| 75.0 | ||
| 1360X768 | 60.0 | |
| 1366X768 | 60.0 |
| DTV | 480p/60 |
| 720p/50 | |
| 720p/60 | |
| 1080i/50 | |
| 1080i/60 |
(Separate Sync Signal only)
| ASPV32-AVT ASPV40-AVT | ASPV46-AVT | |||
| Panel | Size (Diagonal) | 80cm/32" | 101cm/40" | 116cm/46" |
| Aspect Ratio | 16:9 | 16:9 | 16:9 | |
| Resolution | WXGA (1366x768) | WXGA (1366x768) | WXGA (1366x768) | |
| Brightness | 500 cd/m2 | 500 cd/m2 | 500 cd/m2 | |
| Contrast Ratio | 5000:1 (Dynamic) | 5000:1 (Dynamic) | 5000:1 (Dynamic) | |
| Viewing Angle | over 178° | over 178° | over 178° | |
| Color Depth | 16.7M colors | 16.7M colors | 16.7M colors | |
| Audio | Speaker Output | 15W x 2 | 20W x 2 | 20W x 2 |
| 7 Band Equalizer | Y | Y | Y | |
| Auto Volume Leveler | Y | Y | Y | |
| Input | RF Input | Y | Y | Y |
| AV Input | AV1, AV2, AV3, S-VIDEO | AV1, AV2, AV3, S-VIDEO | AV1, AV2, AV3, S-VIDEO | |
| Component Input | Y | Y | Y | |
| PC Input (15P D-SUB) | ANALOG INPUT | ANALOG INPUT | ANALOG INPUT | |
| PC Audio Input | L+R | L+R | L+R | |
| HDMI (HDCP, DVI) | 2 | 3 | 3 | |
| SPDIF (Optical) Output | Y | Y | Y | |
| Output | AV Output | Y | Y | Y |
| Headphone Output | Y | Y | Y | |
| Features | Closed Captioning | Y | Y | Y |
| V-Chip | Y | Y | Y | |
| Picture in Picture | Y | Y | Y | |
| 4 Language Menu | English / French / Spanish / Portuguese | English / French / Spanish / Portuguese | English / French / Spanish / Portuguese | |
| Sleep Timer | Y | Y | Y | |
| Weight | 15.1kg / 33.3 lbs | 23.6kg / 52.1 lbs | 38.6kg / 85.1 lbs | |
| Dimensions (WxDxH) | 806.0 mm x 235.0 mm x 644.0mm31.7" x 9.3" x 25.4" | 998.0 mm x 298.0 mm x 748.0 mm39.3" x 11.7" x 29.4" | 1142.0 mm x 355.0 mm x 837.0 mm45.0" x 14.0" x 33.0" | |
| Environmental Considerations | ||||
| Operating Temperature | 50°F to 104°F (10°C to 40°C) | 50°F to 104°F (10°C to 40°C) | 50°F to 104°F (10°C to 40°C) | |
| Operating Humidity | 10% to 80%, non-condensing | 10% to 80%, non-condensing | 10% to 80%, non-condensing | |
| Storage Temperature | -4°F to 113°F (-20°C to 45°C) | -4°F to 113°F (-20°C to 45°C) | -4°F to 113°F (-20°C to 45°C) | |
| Storage Humidity | 5% to 95%, non-condensing | 5% to 95%, non-condensing | 5% to 95%, non-condensing | |
| Power Supply | 125-240V, AC50/60Hz | 125-240V, AC50/60Hz | 125-240V, AC50/60Hz | |
Symptoms

bar
| Item | Value | | :--- | :--- | | Sound OK, poor picture | 1 | | Picture OK, poor sound | 1 | | Picture blurred | 1 | | Lines or streaks in picture | 1 | | Poor reception on some channels | 1 | | No color | 1 | | Poor color | 1 | | Remote control does not work | 1 | | Incorrect position | 1 | | Vertical bars or stripes on background | 1 | | Horizontal noise | 1 | | Signal Cable message appears | 1 | Check these items and try to adjust these → The mains plug-(plugged in and switched on) → Is the TV switched on → Try another channel (weak signal) → Check aerial (plugged into TV?) → Check aerial (broken lead?) → Check aerial → Check for local interference → Adjust contrast → Adjust brightness → Adjust color → Adjust volume → Check the batteries in remote control → Check Audio/Video sockets (VCR only) → Auto-configure or adjust the H/V position → Auto-configure or adjust Clock → Auto-configure or adjust Clock Phase → Is the Signal Cable connected or loose
NEC Monitor Customer Service & Support
| Customer Service and Technical Support: | (800) 632-4662Fax: (800) 695-3044 |
| Parts and Accessories/Macintosh Cable Adapter: | (800) 632-4662 |
| Warranty Information: | www.necdisplay.com |
| Online Technical Support: | www.necdisplay.com |
| Sales and Product Information | |
| Sales Information Line: | (888) 632-6487 |
| Canadian Customers: | (866) 771-0266, Ext#: 4037 |
| Government Sales: | (800) 284-6320 |
| Government Sales email: | gov@necdisplay.com |
| Electronic Channels | |
| World Wide Web: | www.necdisplay.com |
| Product Registration: | www.necdisplay.com |
| European Operations: | www.nec-display-solutions.com |
| Drivers and Downloads: | www.necdisplay.com |
NEC Display Solutions of America, Inc. (hereinafter “NEC DISPLAY SOLUTIONS”) warrants this Product to be free from defects in material and workmanship and, subject to the conditions set forth below, agrees to repair or replace (at NEC DISPLAY SOLUTIONS’ sole option) any part of the enclosed unit which proves defective for a period of one (1) years from the date of first consumer purchase. Spare parts are warranted for ninety (90) days. Replacement parts or unit may be new or refurbished and will meet specifications of the original parts or unit.
This warranty gives you specific legal rights and you may also have other rights, which vary from state to state. This warranty is limited to the original purchaser of the Product and is not transferable. This warranty covers only NEC DISPLAY SOLUTIONS-supplied components. Service required as a result of third party components is not covered under this warranty. In order to be covered under this warranty, the Product must have been purchased in the U.S.A. or Canada by the original purchaser. This warranty only covers Product distribution in the U.S.A. or Canada by NEC DISPLAY SOLUTIONS No warranty service is provided outside of the U.S.A. or Canada. Proof of Purchase will be required by NEC DISPLAY SOLUTIONS to substantiate date of purchase. Such proof of purchase must be an original bill of sale or receipt containing name and address of seller, purchaser, and the serial number of the product.
It shall be your obligation and expense to have the Product shipped, freight prepaid, or delivered to the authorized reseller from whom it was purchased or other facility authorized by NEC DISPLAY SOLUTIONS to render the services provided hereunder in either the original package or a similar package affording an equal degree of protection. All Products returned to NEC DISPLAY SOLUTIONS for service MUST have prior approval, which may be obtained by calling 1-800-632-4662. The Product shall not have been previously altered, repaired, or serviced by anyone other than a service facility authorized by NEC DISPLAY SOLUTIONS to render such service, the serial number of the product shall not have been altered or removed. In order to be covered by this warranty the Product shall not have been subjected to displaying of fixed images for long periods of time resulting in image persistence (afterimage effects), accident, misuse or abuse or operated contrary to the instructions contained in the User's Manual. Any such conditions will void this warranty.
NEC DISPLAY SOLUTIONS SHALL NOT BE LIABLE FOR DIRECT, INDIRECT, INCIDENTAL, CONSEQUENTIAL, OR OTHER TYPES OF DAMAGES RESULTING FROM THE USE OF ANY NEC DISPLAY SOLUTIONS PRODUCT OTHER THAN THE LIABILITY STATED ABOVE. THESE WARRANTIES ARE IN LIEU OF ALL OTHER WARRANTIES EXPRESS OR IMPLIED, INCLUDING, BUT NOT LIMITED TO, THE IMPLIED WARRANTIES OF MERCHANTABILITY OR FITNESS FOR A PARTICULAR PURPOSE. SOME STATES DO NOT ALLOW THE EXCLUSION OF IMPLIED WARRANTIES OR THE LIMITATION OR EXCLUSION OF LIABILITY FOR INCIDENTAL OR CONSEQUENTIAL DAMAGES SO THE ABOVE EXCLUSIONS OR LIMITATIONS MAY NOT APPLY TO YOU.
This Product is warranted in accordance with the terms of this limited warranty. Consumers are cautioned that Product performance is affected by system configuration, software, the application, customer data, and operator control of the system, among other factors. While NEC DISPLAY SOLUTIONS Products are considered to be compatible with many systems, specific functional implementation by the customers of the Product may vary. Therefore, suitability of a Product for a specific purpose or application must be determined by consumer and is not warranted by NEC DISPLAY SOLUTIONS.
For the name of your nearest authorized NEC Display Solutions of America, Inc. service facility, contact NEC Display Solutions of America, Inc. at 1-800-632-4662.
APV32, APV40, APV46
PROPRIETARY NOTICE AND LIABILITY DISCLAIMER
The information disclosed in this document, including all designs and related materials, is the valuable property of NEC Display Solutions of America, Inc. and/or its licensors, as appropriate, reserve all patent, copyright and other proprietary rights to this document, including all design, manufacturing, reproduction, use and sales rights thereto, except to the extent said rights are expressly granted to others.
The NEC Display Solutions of America, Inc. product(s) discussed in this document are warranted in accordance with the terms of the Limited Warranty Statement accompanying each product. However, actual performance of each such product is dependent upon factors such as system configuration, customer data and operator control. Since implementation by customers of each product may vary, the suitability of specific product configurations and applications must be determined by the customer and is not warranted by NEC Display Solutions of America, Inc.
To allow for design and specification improvements, the information in this document is subject to change at any time without notice.
Reproduction of this document or portions thereof without prior approval of NEC Display Solutions of America, Inc. is prohibited.
DECLARATION OF CONFORMITY
This device complies with Part 15 of FCC Rules. Operation is subject to the following two conditions. (1) This device may not cause harmful interference, and (2) this device must accept any interference received, including interference that may cause undesired operation.
U.S. Responsible Party: NEC Display Solutions of America, Inc.
Address: 500 Park Blvd. Suite 1100
Itasca, IL 60143
Tel. No.: (630)467-3000
Type of Product: Computer Monitor
Equipment Classification: Class B Peripheral
Model: AccuSync PV32 (ASPV32-AVT)
AccuSync PV40 (ASPV40-AVT)
AccuSync PV46 (ASPV46-AVT)

We hereby declare that the equipment specified above conforms to the technical standards as specified in the FCC Rules.
NEC is a registered trademark of NEC Corporation. All other brands and product names are trademarks or registered trademarks of their respective owners.
Part No NECDS-A-ASL-6-2007
Printed In Korea
P/No : MAN07GDP078
GPN07MA016J


- WARNING
- CAUTION
- CAUTION:
- Canadian Department of
- Communications Compliance Statement
- FCC Information
- Safety Precautions and Maintenance
- FOR OPTIMUM PERFORMANCE, PLEASE NOTE THE FOLLOWING WHEN SETTING UPAND USING THE MONITOR:
- CORRECT PLACEMENT AND ADJUSTMENT OF THE MONITOR CAN REDUCE EYE, SHOULDER AND NECK FATIGUE. CHECK THE FOLLOWING WHEN POSITIONING THE MONITOR:
- Ergonomics
- Cleaning the LCD Panel
- Cleaning the Cabinet
- Part Names and Functions
- Control Panel
- Terminal Panel - APV46
- RS-232 PORT
- HDMI1 IN (DVI) / HDMI2 IN (DVI) / HDMI3 IN (DVI) / RGB IN (PC/DTV) / AUDIO IN (RGB/ DTV)
- SERVICE ONLY INPUT
- COMPONENT IN (480i / 480p / 720p / 1080i)
- AUDIO/VIDEO IN
- S-VIDEO IN
- "F" Connector
- DIGITAL AUDIO (OPTICAL) OUT
- AC IN
- AUDIO/VIDEO OUT
- HEADPHONE OUTPUT
- VGA Connector
- Mini Stereo Input
- POWER (ON)
- POWER (OFF)
- KEYPAD
- - (DASH)
- TV/DTV
- PICTURE
- ASPECT
- SOUND
- MENU
- INPUT
- MUTE
- MTS
- CC
- FAVORITE
- EXIT
- CHANNEL UP/DOWN (▲ / ▼)
- VOLUME UP/DOWN (◄ / ►)
- OK
- Q.VIEW
- CH EDIT (Digital Mode only)
- SLEEP
- INFO (Digital Mode only)
- PICTURE IN PICTURE mode
- PIP
- PIP POSITION
- SWAP
- PIP CH +/-
- PIP INPUT
- A.SWAP
- SCAN (TV mode only)
- STILL
- INPUT SELECT
- Part Names and Functions - continued
- ■ Battery Installation
- ■ Connect Antenna
- Connect VCR
- Connection 1
- Connection 2
- ■ Connect Cable TV
- ■ Connect External AV Source
- Viewing Setup
- ■ Connect DVD Player
- ■ Connect HDMI(DTV)
- ■ Connect Headphones
- ■ Connect PC (DTV)
- ■ Connect Digital Audio
- To connect
- ■ On and Off
- Volume Adjustment
- ■ On Screen Language Selection
- Basic Operation - continued
- Menu
- ■ Channel Programming
- ■ Add/Delete Channels
- ■ Fine Tuning
- - Favorite Channel
- ■ DTV Channel Edit
- ■ Color Temperature
- ■ Picture Mode
- ■ Manual Picture Control
- ■ Picture Format
- Sound
- Balance
- ■ Auto Volume
- ■ SRS TruSurround XT SRS(○) TruSurround XT
- ■ Audio Language (Digital Mode only)
- TV Speaker
- ■ Stereo/SAP Broadcasts Setup
- Clock
- Auto
- Manual
- On/Off Time
- NOTE:
- ■ Auto Sleep
- ■ Time Zone (Digital Mode only)
- ■ Daylight Saving (Digital Mode only)
- Sleep timer
- ■ Child Lock
- ■ Front Light
- ■ Closed Caption
- ■ Closed Caption (Digital Mode)
- Caption Option
- ■ Lock Menu Options
- Options for Movies previously shown in theaters:
- Options for Television programs including made-for-TV movies:
- Content Categories:
- Canadian English/French language rating system:
- Canadian French language rating system:
- ■ Lock System
- Setting Lock on/off
- Set password
- Rating
- Input Block
- PC Setup
- H-Position / V-Position
- Phase
- Auto Program
- Reset
- ■ WXGA or VGA (PC-RGB Mode only)
- ■ Information (Digital Mode only)
- ■ Picture in Picture
- ■ PIP Audio Output
- ■ Moving the PIP
- ■ Selecting an Input Signal Source for the PIP
- ■ Channel selection for sub picture (Sub picture only TV mode)
- ■ Channel Scan
- ■ Swapping the PIP
- ■ External Control Device Setup
- ■ Connect External Equipment
- ■ RJ-45 8PIN CONNECTOR
- Communication Parameters
- Set ID
- APV32, APV40, APV46
- PROPRIETARY NOTICE AND LIABILITY DISCLAIMER
- DECLARATION OF CONFORMITY
Brand : NEC
Model : AccuSync PV40
Category : Television