
RPM250W - Tachometer Extech - Free user manual and instructions
Find the device manual for free RPM250W Extech in PDF.


| Product Type | Laser Tachometer |
| Model | RPM250W |
| Brand | Extech |
| Measurement Range (RPM) | 5 to 99,999 RPM (typical) |
| Resolution | 0.1 RPM (for low range) / 1 RPM (high range) |
| Accuracy | ±0.05% + 1 digit |
| Bluetooth Range | Up to 295.3 ft (90 m) line-of-sight |
| Connectivity | Bluetooth 4.0 or higher with ExView app |
| Display | Backlit LCD with interactive color graphs on smart device |
| Data Logging | Up to 8 hours per session; exportable to CSV |
| Functions | MIN/MAX/AVG, data hold, auto power off disable, high/low alarms |
| Power Supply | 9V alkaline battery (NEDA 1604, 6LR61) |
| Battery Life | Approximately 40 hours continuous use |
| Dimensions | 6.1 x 3.8 x 9.3 in (155 x 97 x 236 mm) |
| Weight | 14 oz (400 g) including battery |
| Laser Class | Class II laser; power < 1 mW |
| Operating Temperature | 32 to 104°F (0 to 40°C) |
| Storage Temperature | 14 to 140°F (-10 to 60°C) |
| Humidity | Max 80% RH non-condensing |
| Maintenance | Clean with damp cloth; avoid solvents |
| Safety Precautions | Do not stare into laser beam; avoid eye exposure |
| Spare Parts | Battery; no user-serviceable parts inside |
| Repair | Contact Extech customer support for service |
| Warranty | 1 year limited warranty |
Frequently Asked Questions - RPM250W Extech
User questions about RPM250W Extech
0 question about this device. Answer the ones you know or ask your own.
Ask a new question about this device
Download the instructions for your Tachometer in PDF format for free! Find your manual RPM250W - Extech and take your electronic device back in hand. On this page are published all the documents necessary for the use of your device. RPM250W by Extech.
USER MANUAL RPM250W Extech
Bluetooth® Connectivity for Extech 250W Series Meters and Smart Devices
Table of contents
1 Introduction....1
2 Install the ExView App ....2
3 Preparing the Meter....3
4 Adding Meters to the App....4
5 Exploring the App ....7
5.1 The Home Screen 7
5.2 Data Recording 8
5.3 Detailed Measurement/Options Menu 13
5.4 The Settings Menu.... 14
5.5 The Five Options Icons 15
5.5.1 Record List Icon.... 15
5.5.2 Report Icon.... 16
5.5.3 Set Alarms Icon 17
5.5.4 Connect/Disconnect Icon.... 18
5.5.5 Record Icon 18
6 Customer Support.... 19
1 Introduction
The ExView app allows you to remotely communicate with the Extech 250W series meters, using Bluetooth. The app and the meters were developed together, for seamless integration. Up to eight (8) meters, in any combination, can be connected simultaneously with the app.
The current line of 250W series meters is listed below. As more meters are added to the series, they will be introduced on the Extech website, related sales outlets, and on social media, check often to stay up-to-date on new product offerings.
• AN250W Anemometer
- LT250W Light Meter
• RH250W Hygro-Thermometer
• RPM250W Laser Tachometer
- SL250W Sound Meter
The app offers the following features:
- View measurement data on animated, interactive color graphs.
- Tap and drag on a graph to see instantaneous measurement data.
- Check MIN-MAX-AVG readings at a glance.
- Export data log text files for use in spreadsheets.
- Set high/low alarms tailored for each meter type.
- Receive text notifications for low battery, meter disconnection, and alarms.
- Generate and export custom test reports.
- Select dark or light display mode.
- Link directly to the Extech website.
- Easy to update.
2 Install the ExView App
Install the ExView app on your smart device from the App Store (iOS®) or from Google Play (Android™). The app icon is green with the Extech logo at the center and the ExView app name underneath (Figure 2.1). Tap the icon to open the app.
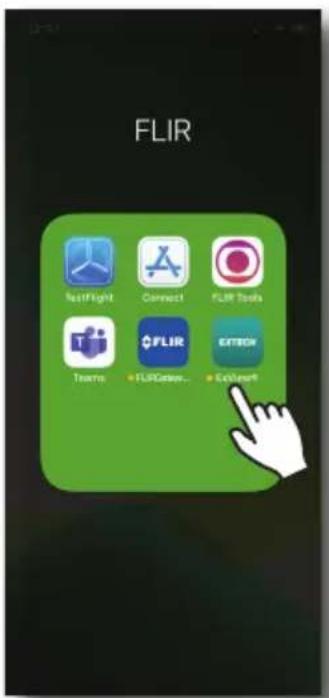
Figure 2.1 The app icon. Tap to open the app.
3 Preparing the Meter
- Long press the power button to switch on the Extech meter(s).
- Long press the Bluetooth button to activate the Extech meter's Bluetooth function.
- If there is no line-of-sight obstruction, the meter and smart device can communicate up to 295.3 feet (90 m). With obstruction, you many need to move the meter closer to the smart device.
- Disable the meter's Auto Power Off (APO) function. With the Extech meter powered, press the power and data hold (H) buttons for 2 seconds. The APO icon and the APO function will be disabled. Refer to the meter's user manual for more information.
4 Adding Meters to the App
After completing the preparations in Section 3, continue with the steps below to add meters to the app.
Note that the app behaves differently the first time it is opened, compared with how it appears after some use. Further, the app responds differently depending on whether or not it detects a meter with which to connect. After some practice, you will find the app easy to use and intuitive.
The first time you open the app, with one or more meters detected, the detected meters will appear on a list (Figure 4.1).
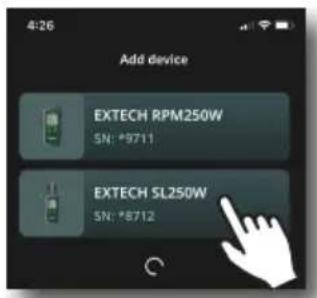
Figure 4.1 List of detected meters. Tap to add a meter to the app.
Tap a meter from the list to begin the process of adding it to the app. The app will prompt you to rename the meter (Figure 4.2). Rename, amend, or use the default name (tap Skip).
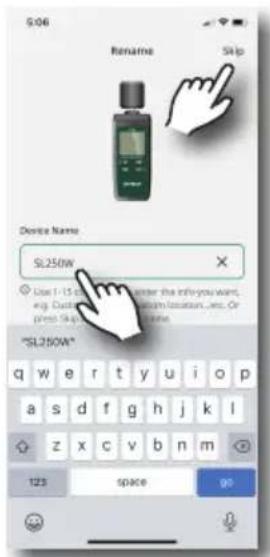
Figure 4.2 Renaming a Device.
After you add a device, the Home screen opens (Figure 4.3), showing a simplified representation of the meter readings, along with several options.
You can then access the detailed Measurement/Options menu (Section 5.3) by tapping a meter from this Home screen.
To add more meters, that are in range, tap the plus sign (+) on the upper rigl Refer to Section 5.1 for Home screen details.
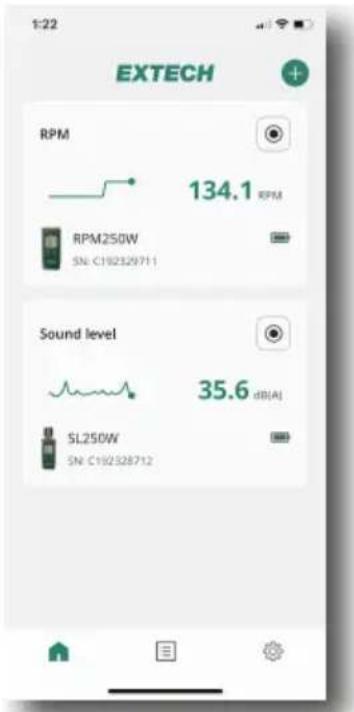
Figure 4.3 The Home screen.
If the app does not detect a meter, the screen shown in Figure 4.4, below, appears. Retry the steps in Section 3 if the app does not detect your meter; contact Extech support directly from the Settings menu (Section 5.4) for assistance if necessary.
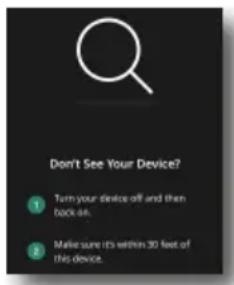
Figure 4.4 If the app does not detect a device, this screen appears.
5 Exploring the App
5.1 The Home Screen
After adding meters to the app, the Home screen opens.
Refer to Figure 5.1, and the associated numbered list below it, for details about the Home screen options.
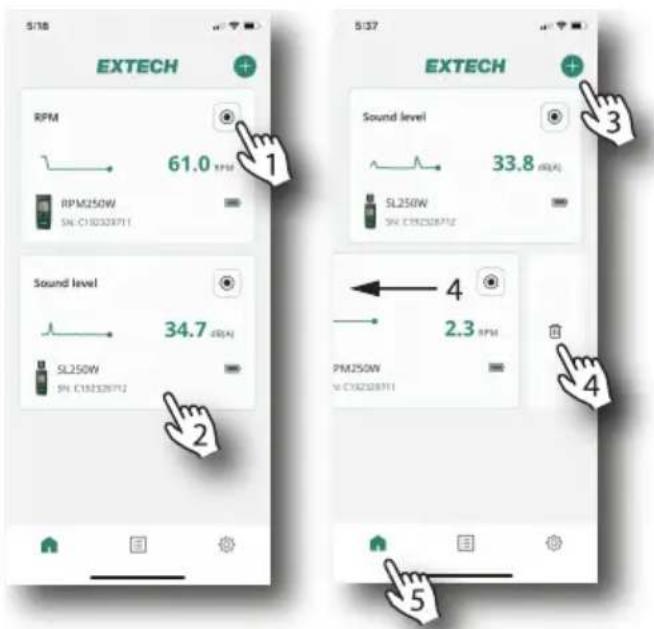
Figure 5.1 The Home screen shows meters that have been added to the app, basic meter readings, and additional options.
- Start/Stop recording (Section 5.2).
- Open the detailed Measurement/Options menu (Section 5.3).
- Add a new meter.
- Swipe to the left and tap the trash icon to remove a device.
- Home screen icon (left), Record List (center), and Settings (right).
If a meter has more than one measurement type, only the primary measurement is shown on the Home screen. Other measurement types are shown on the detailed Measurement/Options menu (Section 5.3).
The three icons, across the bottom of many of the app screens, are shown in Figure 5.2, below. The currently selected icon appears with a green colored fill.
Figure 5.2 Option icons available at the bottom of many of the app screens.

• Home Screen icon. Tap to return to the Home screen.

- Settings menu. Tap to open the menu where you can set text notifications, change the display mode, view general information, and connect directly to the Extech website (Section 5.4).

- Record List icon. Tap the Record List icon (bottom of screen, center) to open a list of stored recording sessions (Section 5.2).
5.2 Data Recording
Access the Record icon (Figure 5.3, below), from the Home screen or from the Five Options menu (Section 5.5).
Figure 5.3 The Recording Icon (red when recording, black when stopped).
Tap the Record icon to start recording and then tap OK to confirm (Figure 5.4) The recording icon will turn red and blink as recording begins and progresses.
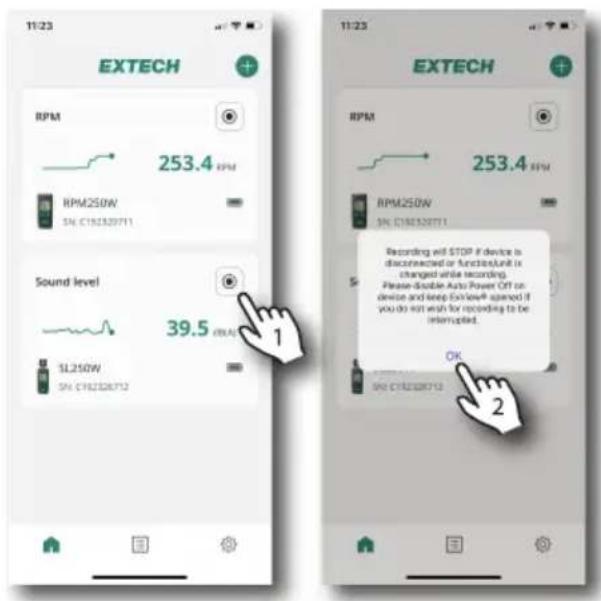
Figure 5.4 Start recording.
To stop recording, tap the record icon again, the icon will stop blinking and turn black. You will then be prompted to confirm or cancel. If you confirm, a message will appear stating that the data recording has been saved to the Record List.
The recording session appears on the Record List only after the recording has stopped. If a recording is not manually stopped, it will automatically end after approximately 8 hours.
Open the Record List by tapping the icon on the bottom, center of the screen. You can also access the Record List from the Five Options menu (Section 5.5).
Figure 5.5, below, shows the basic Record List menu structure. Refer to the numbered steps below Figure 5.5 for a description of each item.
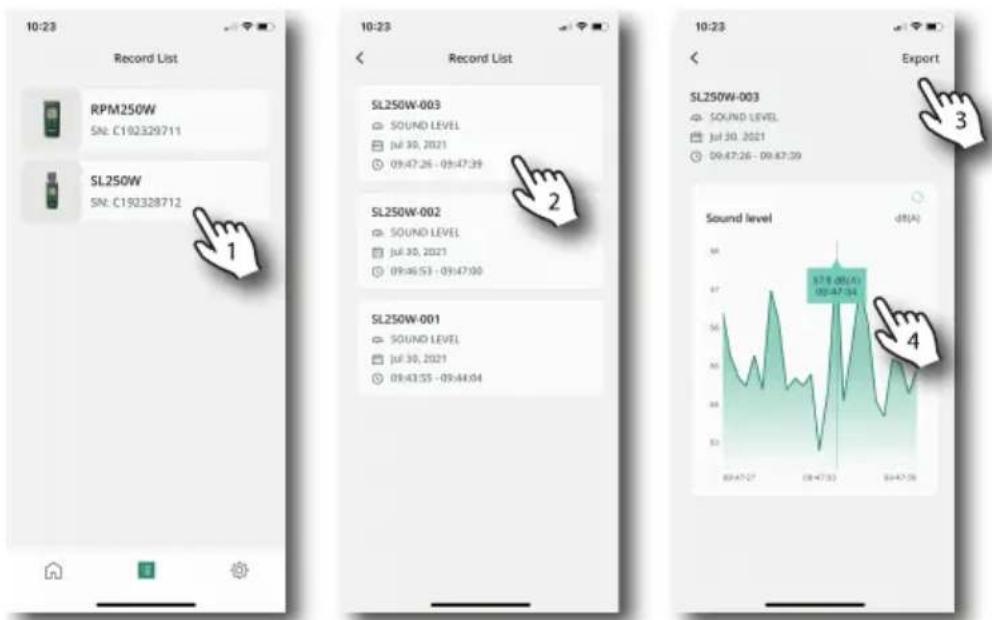
Figure 5.5 Record List menu. The numbered list below corresponds to the items identified in this figure.
- Tap a meter to select it.
- Tap a recording session from the list to show its contents.
- Tap to Export the data as a text file for use in spreadsheets (Figure 5.6 below).
- Tap and drag on the data graph to view instantaneous readings.
| # | DATE | TIME | VALUE | UNIT | OUT OF RANGE |
| 0 | 7/27/2021 | 8:03:33 | 43 | dB(A) | |
| 1 | 7/27/2021 | 8:03:34 | 42.1 | dB(A) | |
| 2 | 7/27/2021 | 8:03:34 | 41.8 | dB(A) | |
| 3 | 7/27/2021 | 8:03:35 | 43.8 | dB(A) | |
| 4 | 7/27/2021 | 8:03:35 | 42.2 | dB(A) | |
| 5 | 7/27/2021 | 8:03:36 | 41.5 | dB(A) | |
| 6 | 7/27/2021 | 8:03:36 | 43.2 | dB(A) |
Figure 5.6 Example data log file exported to a spreadsheet.
To delete all recorded reading logs for a meter, swipe the meter to the left, as shown in Figure 5.7 (item 1), below, and then tap the trash icon (2). When the confirmation prompt appears (3), tap Cancel to abort the action or tap Yes to proceed with the deletion.
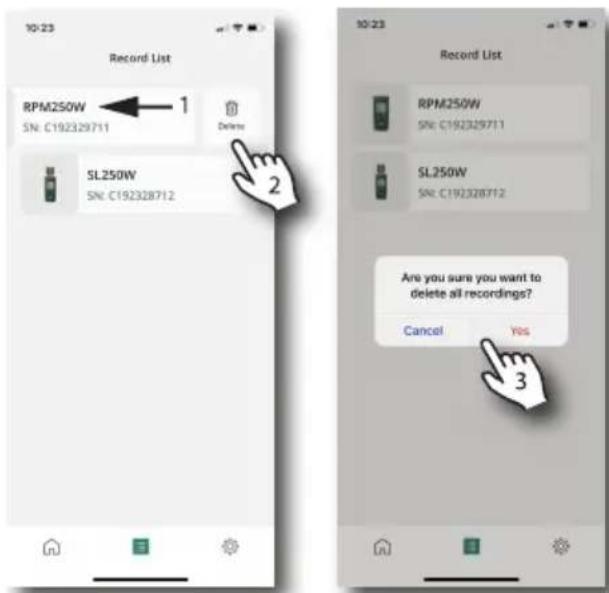
Figure 5.7 Deleting recorded data.
Note that an alert will appear if recording is in progress for the meter in question. If you choose to delete data while recording is in progress, you will lose all recorded data for the current session.
To delete only one recording log, swipe the record to the left (1) and then tap the trash icon (2), as shown in Figure 5.8 below.
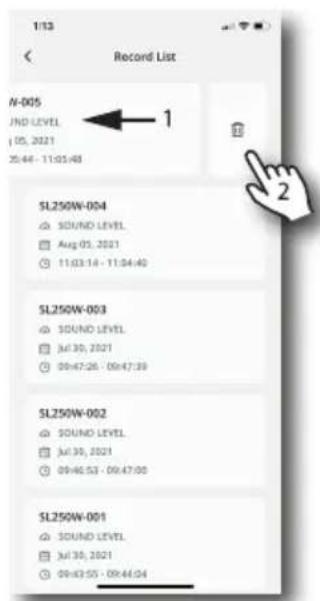
Figure 5.8 Deleting one recording session from the Record List.
5.3 Detailed Measurement/Options Menu
This menu is opened by tapping a connected meter on the Home screen. The Home screen is shown below in Figure 5.9 (on left). To return to the Home screen from other menus, tap the Home icon
The detailed Measurement/Options menu is shown on the second screen from left, in Figure 5.9. The Device Settings menu is spread out over the two remaining screens, on right, in Figure 5.9. The numbered steps, below, correspond to the numbered items in Figure 5.9.
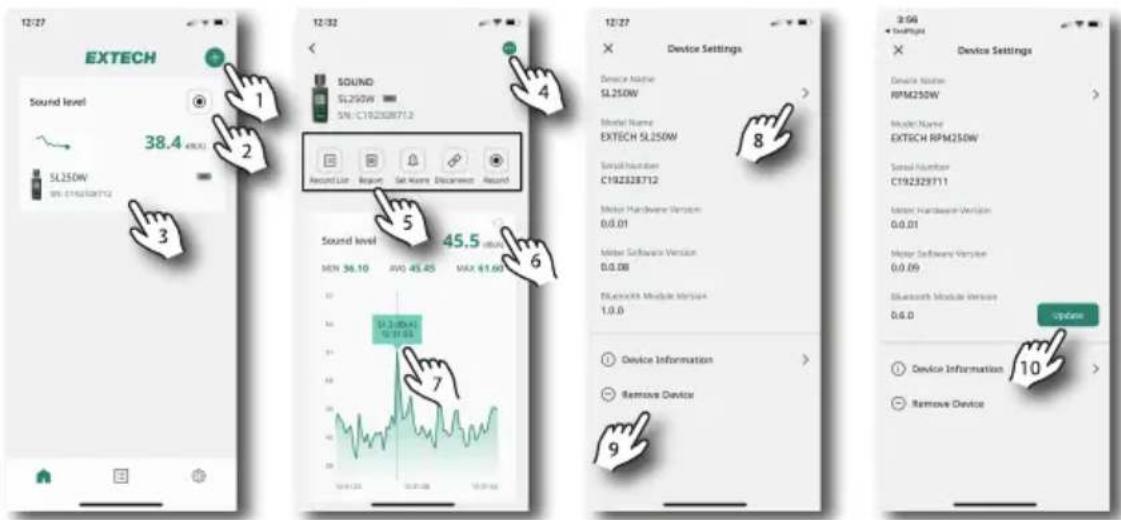
Figure 5.9 Navigating the Measurement/Options Menu.
- Tap + to add a new device to the app.
- Tap the recording icon to start recording.
- Tap a connected meter to open its Measurement/Options menu.
- Tap the dots to open the Device Settings menu.
- The Five Options icons (Section 5.5).
- Tap to refresh the display.
- Tap and drag on the graph to view instantaneous reading data.
- Tap to rename the meter.
- Tap to view meter information or to remove the meter from the app.
- When updates are available, they appear here. Tap to update.
5.4 The Settings Menu
Open the Settings menu by tapping the Settings icon (bottom, right). Figure 5.10 below shows the menu, the numbered list below it explains its options.
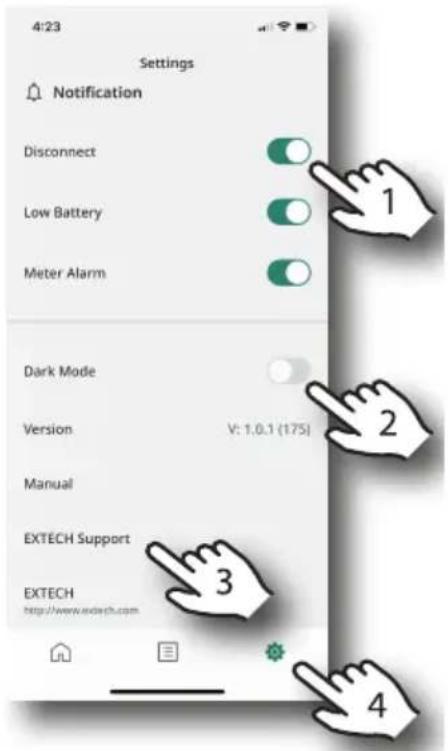
Figure 5.10 The Settings menu.
- Set text notifications on or off. Text alerts are sent when meters become disconnected, when a meter's battery is low, or when a meter reading triggers an alarm.
- Select dark or light display mode.
- Tap on a link to open the user manual, to contact the support staff, or to connect to the home page of the Extech website. You can also note the firmware version here.
- The Settings menu icon.
5.5 The Five Options Icons
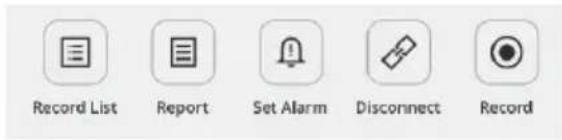
Figure 5.11 The Five Options icons.
The Five Options shown above in Figure 5.11 are available from the detailed Measurement/Options menu (Section 5.3). These options are explained below.
5.5.1 Record List Icon

Tap this icon to open the list of recorded data log sessions. Each time a recording has ended, a log is added to the Record List. Tap a session log fro the Record List to open it. See Section 5.2 for Data Recording and Record List details.
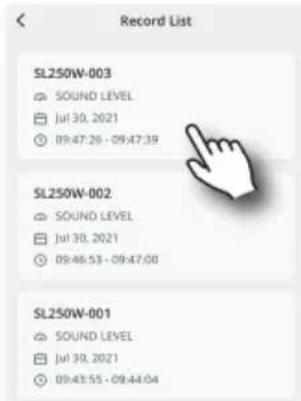
Figure 5.12 Tap to open a recording log from the Record List.
Selecting the Record List from the Five Options menu is similar to tapping the same Record List icon at the bottom (center) of many of the app screens. The only difference is that selecting the list from the Five Options menu bypasses the meter selection step (since, in this menu, a meter is already assumed).
5.5.2 Report Icon

Tap the Report icon to create a detailed document that includes meter identification, measurement graphs, uploaded images, alarm activity, and custom fields. See Figure 5.13 below.
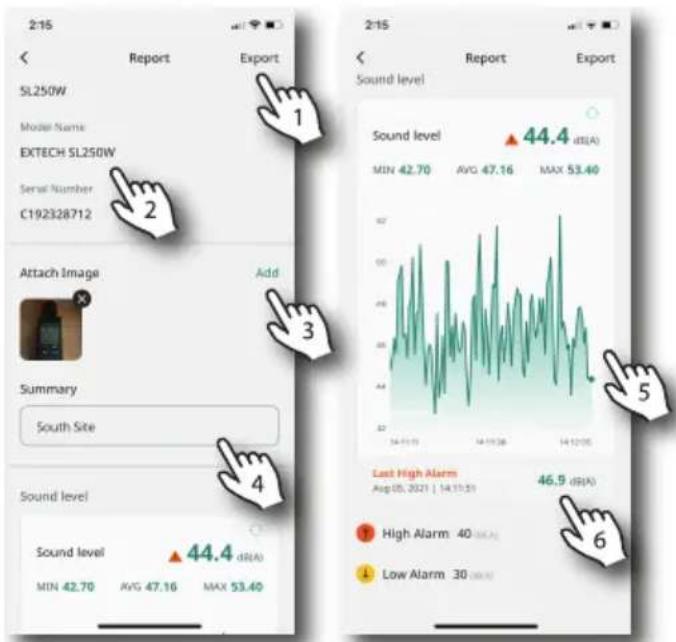
Figure 5.13 Generating a Report.
- Export the report to another device.
- Meter information.
- Add a photo to the report.
- Add text notes.
- Detailed measurement graph with MIN-MAX-AVG readings.
- Triggered alarm information.
5.5.3 Set Alarms Icon

Set high and low alarm limits for each of the connected meters (see example in Figure 5.14, below). Note that the alarms in the ExView app are customized for each of the measurement types available on each meter.
Text notifications are sent to your smart device when alarms are triggered. Refer to Section 5.4 (Settings menu) for information on configuring text notifications.
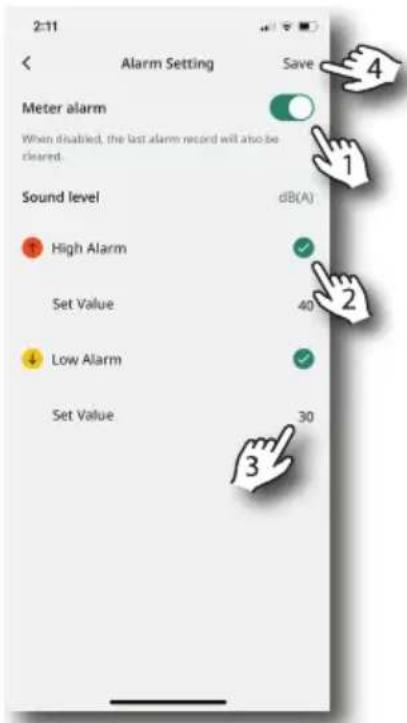
Figure 5.14 Setting Alarms.
- Enable/disable the alarm utility.
- Tap to enable the high or low alarm.
- Tap and type the alarm limit.
- Save the alarm configuration.
5.5.4 Connect/Disconnect Icon

Tap the Connect/Disconnect icon to enable or disable communication with a meter.
5.5.5 Record Icon

Tap the Record icon to start or stop recording. When recording, the icon is red and blinking; when recording is stopped the icon stops blinking and turns black. See Section 5.2 for full details.
6 Customer Support
Customer Support Telephone List: https://support.flir.com/contact
Technical Support: https://support.flir.com
Contact Extech directly from within the app, see Section 5.4, The Settings Menu.
Website
http://www.flir.com
Customer support
http://support.flir.com
Copyright
© 2021, FLIR Systems, Inc. All rights reserved worldwide.
Disclaimer
Specifications subject to change without further notice. Models and accessories subject to regional market considerations. License procedures may apply. Products described herein may be subject to US Export Regulations. Please refer to exportquestions@flir.com with any questions.

- Table of contents
- Introduction
- Install the ExView App
- Preparing the Meter
- Adding Meters to the App
- Exploring the App
- The Home Screen
- Data Recording
- Detailed Measurement/Options Menu
- The Settings Menu
- The Five Options Icons
- Record List Icon
- Report Icon
- Set Alarms Icon
- Connect/Disconnect Icon
- Record Icon
- Customer Support
Brand : Extech
Model : RPM250W
Category : Tachometer