
Subwoofer 300 - Loudspeaker LOEWE - Free user manual and instructions
Find the device manual for free Subwoofer 300 LOEWE in PDF.


| Product Type | Active Subwoofer |
| Brand | Loewe |
| Model | Subwoofer 300 |
| Dimensions (W x H x D) | 24.1 x 25.8 x 24.1 cm |
| Weight | 6.8 kg |
| Power Consumption (Max) | 370 W |
| Standby Power Consumption | < 0.4 W |
| Mains Voltage | 220-240 V AC, 50/60 Hz |
| Frequency Response (Subwoofer) | 35 Hz – 250 Hz (-6 dB) |
| Frequency Response (Other Channels) | 30 Hz – 20 kHz (-3 dB) |
| Speaker Impedance | 4 – 8 Ohm |
| Amplifier Power (Subwoofer Channel) | 150 W (sine) / 300 W (music) |
| Amplifier Power (Other Channels at 4 Ohm) | 75 W (sine) / 150 W (music) |
| Woofer Size | 1 x 160 mm (6.3 in) |
| Enclosure Type | Bass reflex, active |
| Connectivity | Digital Audio Link IN/OUT, LINE IN (RCA L/R, SUB/LFE), speaker terminals |
| Controls | MODE, PHASE, SUBWOOFER GAIN, BASS EQ, CONNECTED SPEAKERS |
| Status LED Colors | Blue (Digital Audio Link active), Green (LINE IN active), Red (error) |
| Cleaning Instructions | Aluminum top: damp soft cloth; Fabric housing: vacuum with soft brush; stains: mild detergent on cloth |
| Safety Notes | Unplug before connecting/disconnecting; keep 10 cm clearance; do not obstruct air supply; avoid heat, moisture, magnetic fields |
| Operating Temperature | 5°C – 35°C |
| Humidity | 20% – 80% (non-condensing) |
| Included Accessories | Mains cable, network cable, audio cable 3.5mm jack/2x RCA, fabric tube, operating instructions |
Frequently Asked Questions - Subwoofer 300 LOEWE
User questions about Subwoofer 300 LOEWE
0 question about this device. Answer the ones you know or ask your own.
Ask a new question about this device
Download the instructions for your Loudspeaker in PDF format for free! Find your manual Subwoofer 300 - LOEWE and take your electronic device back in hand. On this page are published all the documents necessary for the use of your device. Subwoofer 300 by LOEWE.
USER MANUAL Subwoofer 300 LOEWE
natural_image
Black square electronic device with textured surface and small feet at base (no visible text or symbols)Operating instructions
LOEWE.

natural_image
Black square electronic device with glossy surface and white trim (no visible text or symbols)Subwoofer 300
Operating instructions
Table of contents
Table of contents 3
Welcome! 4
Delivery specification ....4
For your safety ....5
Cleaning 5
Connectors and operating controls ....6
Configuration examples 7
Connector/set-up solution with one subwoofer (2.1 / 3.1 system) ....7
Connector/set-up solution with two subwoofers (5.2 system) 7
Connecting Subwoofer via Digital Audio Link 8
Connecting Subwoofer via LINE IN 9
Settings directly on the Subwoofer 10
Settings via control buttons....10
Configuration of the subwoofer via Digital Audio Link 12
Configuration of the subwoofer via LINE IN 14
Software update.... 15
Specifications.... 16
Disposal....16
Conformity / Manufacturer's declaration 16
Legal details 16
| Subwoofer 300 |
| Operating instructions |
| Welcome! |
| Delivery specification |
Thank you
for choosing a Loewe product! We are happy to have you as a customer.
Loewe stands for the highest standards of technology, design and ease of operation. This applies equally to TV. DVD/Blu-ray, audio and accessories.
Neither technology nor design is an end in itself, but both are intended to provide our customers with the best possible audio and visual experience.
Our design is not influenced by short-term, fashionable trends. You have, after all, purchased a high-quality piece of equipment which you do not want to tire of tomorrow or the day after.
The Locwe Subwoofer 300 is designed for Locwe TV sets and Locwe speaker systems. The device has a powerful bass amplifier and an integral stereo amplifier.
Loewe TV sets with an integrated digital multi-channel audio decoder transfer the audio signals to the subwoofer via the DIGITAL AUDIO LINK connection. The configuration and settings for the subwoofer 300 and the connected speakers can be comfortably done via the current Loewe TV sets. The connection via DIGITAL AUDIO LINK also offers the possibility to connect a second subwoofer in order to obtain an even more powerful bass.
Via an analogue LINE IN connector, you can also use the subwoofer 300 for Loewe TV sets without DIGITAL AUDIO LINK connector or other audio sources.
Delivery specification
• Loewe Subwoofer 300
- Mains cable
- Network cable
• Audio cabel 3.5mm jack/2 x cinch
- Fabric tube
- Operating instructions

natural_image
Line drawing of a rectangular electronic device with a flat top and side panel (no text or symbols)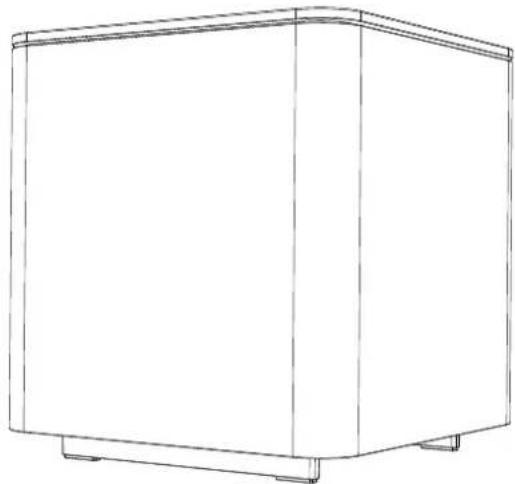
natural_image
Line drawing of a rectangular cabinet or enclosure with three legs and a top shelf (no text or symbols)
natural_image
Line drawing of two types of electrical cables with terminal connectors (no text or symbols)
natural_image
Line drawing of a coiled electrical cable with two connectors and a separate terminal connector (no text or symbols)
natural_image
Illustration of two crossed strips with textured surfaces (no text or symbols)Subwoofer 300
Operating instructions
For your safety
Cleaning
For your safety
For your safety, and to avoid unnecessary damage to your unit, please read and follow the safety instructions below:
• The unit is intended exclusively for the playback of audio signals.
- Pull the power plug before connecting or disconnecting other devices or speakers.
- Do not operate the unit unattended. In case of longer absence, pull out the power plug.
- The power plug of the TV set must be easily accessible so that the TV can be disconnected from the power supply at all times.
- When unplugging the unit from the mains, pull at the connector body and not at the cable. The cables in the mains plug could otherwise be damaged and could cause a short-circuit when plugged in again.
- Pull out the power cable during thunderstorms. A voltage surge caused by lightning conducted through the mains could damage the unit.
- Place the unit or a firm, level surface.
- Do not set up the unit near strong heat sources or in direct sunlight.
- Do not place objects containing liquids on top of the unit.
- Candles and other open flames must be kept away from the unit at all times to prevent the spread of fire.
- When installing in a cabinet or closed shelf, leave about 10 cm free space around the unit to allow the air to circulate freely, thereby avoiding a build-up of heat and an influence on the sound reproduction.
- Under no circumstances, the air supply of the subwoofer may be obstructed. Make sure it is far enough away (>10 cm) from the floor or wall.
- Lay the speaker and power cables in such a way that they cannot be damaged. The power cable may not be kirked or laid over sharp edges, not stood on and not exposed to chemicals; the latter also applies to the system as a whole. A power cable with damaged insulation can lead to electric shocks and is a fire risk and must therefore be changed before operation of the set continues.
- The speakers generate magnetic dispersion fields which act in the vicinity of the housing. We recommend a minimum distance of >0.5m from magnetically sensitive equipment, such as magnetic data media etc.
- If you have moved the unit out of the cold into a warm environment, leave it switched off for about an hour to avoid condensation forming. Do not switch the unit on until it has reached room temperature. This prevents serious damage to the components.
- WARNING: To prevent electrical shock, do not open the unit. There are no parts inside the unit that can be repaired by the user. Repairs should only be carried out by a Loewe dealer.
Protect the unit from ...
• Water, dampness, dripping or sprayed water or steam
• Impacts and mechanical stresses
• magnetic and electric fields
• higher electrical powers than specified
• cold, heat, direct sunlight and high temperature fluctuations.
• Dust
• Covering which obstructs air circulation
• Interference with the internal workings of the unit
This device has been built exclusively for private use in domestic environments. Warranty services cover this intended use.
See the rating plate on the bottom of the set for the precise product designation.
Cleaning
Clean the top side of the subwoofer made of aluminium with a damp, soft and clean cloth only (without any abrasive cleaning agent).
The housing of the subwoofer is fabric covered. Vacuum the surface regularly with a soft brush attachment.
In case of dirt or stains:
Moisten a soft, colour-neutral cloth with detergent or normal stain remover and gently rub away the stain. You can also treat the stain directly with normal dry stain remover spray (vacuum up powder).
Do not moisten the fabric cover directly with detergent or stain remover (risk of encrustation). Do not use any so vents to clean the fabric.
Follow the manufacturer's instructions when using stain removers.
There is an increased risk of encrustation when cleaning the cloth grills with nicotine deposits.
Subwoofer 300
Operating instructions
Connectors and operating controls
Connectors and operating controls

① MODE - setting / display of the On Mode
② PHASE - setting / display of the phasing
③ SUBWOOFER GAIN - selling / display of the bass intensity
④ BASS EQ setting / display of the bass equalizer
⑤ Status-LED
⑥ OUTPUT TO SPEAKERS - LEFT - Speaker connection left (-)
⑦ OUTPUT TO SPEAKERS - LEFT - Speaker connection left (+)
⑧ OUTPUT TO SPEAKERS - RIGHT Speaker connection right ( )
⑨ OUTPUT TO SPEAKERS - RIGHT - Speaker connection right (-)
⑩ 220-240 V \~ 50 / 60 Hz - Mains connection
⑪ CONNECTED SPEAKERS - Setting / display of the connected speaker typ
⑫ DIGITAL AUDIO LINK IN - Audio input (digital)
⑬ DIGITAL AUDIO LINK OUT Audio output (digital)
⑭ SERVICE - Service interface for internal purposes
⑮ LINE IN - SUB/LFE - Audio input of subwoofer (analogue)
⑯ LINE IN - LEFT - Audio input left (analogue)
⑰ LINE IN - RIGHT - Audio input right (analogue)
Subwoofer 300
Operating instructions
Configuration examples
Configuration examples
Connector/set-up solution with one subwoofer (2.1 / 3.1 system)
When configuring a 2.1 / 3.1 system, the subwoofer is connected to the audio source either via DIGITAL AUDIO LINK or LINE IN. In a 3.1 system, two speakers are connected to the subwoofer.
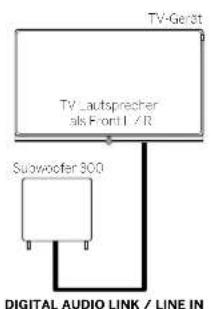
An example of a 2.1 system

An example of a 3.1 system

A set-up example of a 3.1 system
How to connect the subwoofer via DIGITAL AUDIO LINK is described on page 8. The connection via LINE IN is described on page 9.
Connector/set-up solution with two subwoofers (5.2 system)
When expanding a 3.1 system connected to DIGITAL AUDIO LINK by a second subwoofer, you get a 5.2 system. The speakers connected to the second subwoofer represent the surround channels.

flowchart
graph TD
    A["Surround left"] --> B["Subwooor 300 (2)"]
    C["Surround right"] --> B
    D["Front left"] --> E["Subwooor 300 (1)"]
    F["Front right"] --> E
    B --> G["TV scl"]
    E --> G
    G --> H["TV speaker as centre speaker"]
    style G fill:#f9f,stroke:#333,stroke-width:2px
An example of a 5.1 system

A set up example of a 5.2 system
How to connect the subwoofer via DIGITAL AUDIO LINK is described on page 8.

Subwoofer 300
Operating instructions
Connecting Subwoofer via Digital Audio Link
Connecting Subwoofer 300 via Digital Audio Link
Via the DIGITAL AUDIO LINK IN interface, you can digitally connect the subwoofer 300 to your TV set ^c .
Switch off the TV set before connecting the subwoofer.
Using the included network cable, connect the DIGITAL AUDIO LINK interface of the Loewe TV set to the DIGITAL AUDIO LINK IN interface of the subwoofer 300. If you want to connect a second subwoofer 300, connect the DIGITAL AUDIO LINK OUT interface of the first subwoofer to the DIGITAL AUDIO LINK IN interface of the second subwoofer.
One of the two wires of the speaker cable is usually marked black. Connect this black marked cable to the black screw terminal OUTPUT TO SPEAKERS on Subwoofer 300 and the black terminal on the speaker. To this end, turn the screw of the relevant screw terminal on the subwoofer anticlockwise about 5 turns. Guide the wire end into the screw terminal and close the screw terminal by turning the screw clockwise. Connect the unmarked wires to the red terminals.
Connect the speaker cable to the speaker according to the corresponding installation instructions.
Use the mains cable supplied to connect the 220-240 VAC 50/60 Hz socket of the subwoofer 300 to a 220-240V 50/60 Hz socket.
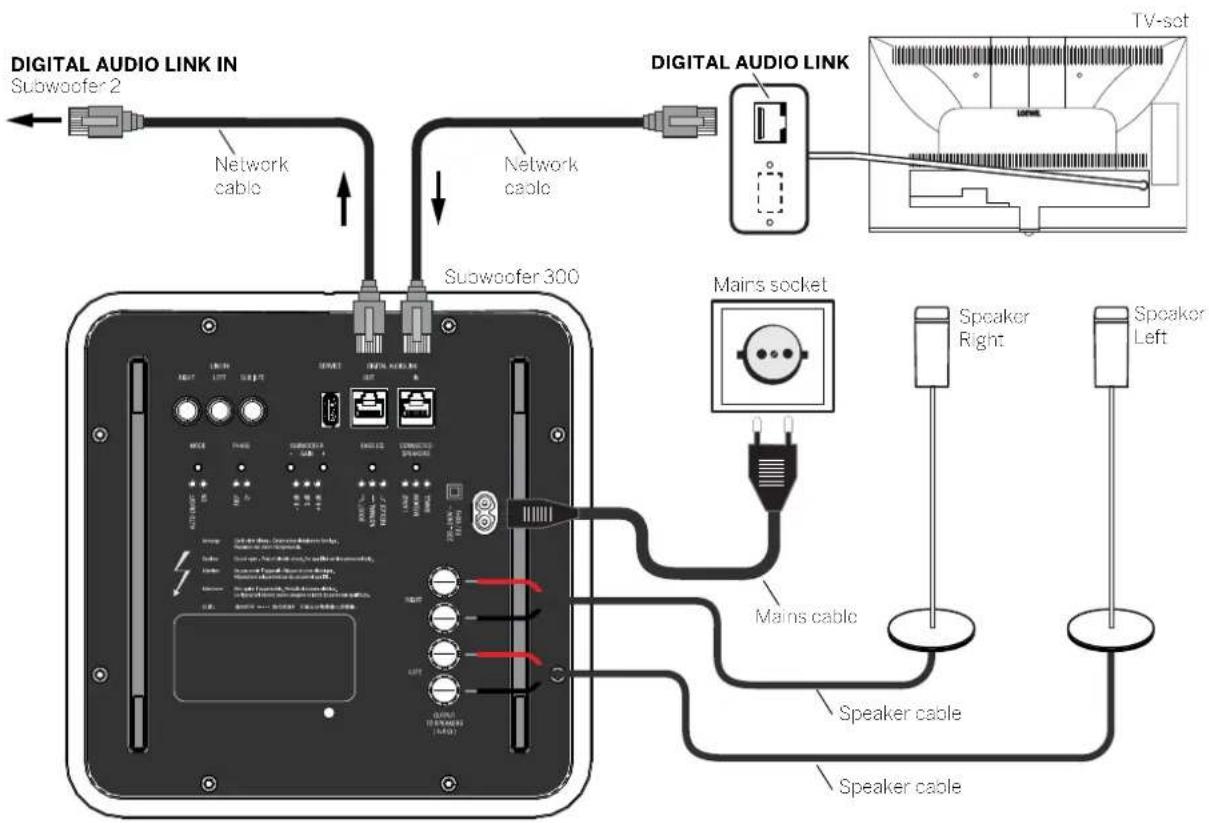
^3 Availability and position of the DIGITAL AUDIO LINK interface depends on the type of TV set.
Subwoofer 300
Operating instructions
Connecting Subwoofer via LINE IN
Connecting Subwoofer 300 via LINE IN
Via the LINE IN analogue interface, you can connect the subwoofer 300 to your TV set or any audio source.
Switch off all devices before connecting the subwoofer.
Connect the analogue audio output AUDIO OUT of the TV set with the LINE IN audio inputs LEFT/RIGHT of the subwoofer. To do so, use the supplied audio cable 3.5mm jack/2 x cinch. If an audio source is used, which has separate jacks for left/right or a separate SUB/LFE output, use appropriate standard cinch cables.
One of the two wires of the speaker cable is usually marked black. Connect this black marked cable to the black screw terminal OUTPUT TO SPEAKERS on Subwoofer 300 and the black terminal on the speaker. To this end, turn the screw of the relevant screw terminal on the subwoofer anticlockwise about 5 turns. Guide the wire end into the screw terminal and close the screw terminal by turning the screw clockwise. Connect the unmarked wires to the red terminals:
Connect the speaker cable to the speaker according to the corresponding installation instructions.
Use the mains cable supplied to connect the 220-240 VAC 50/60 Hz socket of the subwoofer 300 to a 220-240V 50/60 Hz socket.
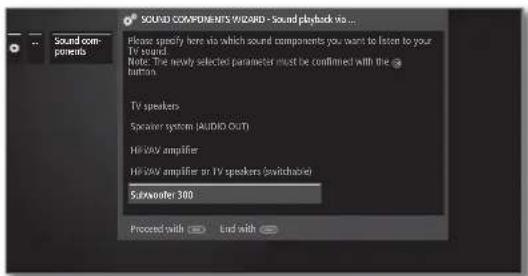
If the menu item TV speaker is active in the sound components wizard of the Loewe TV set, it may happen that after turning on the TV set, the Subwoofer 300 connected to AUDIO OUT is operated at a high volume. Therefore, select in the sound components wizard first the Speaker system (AUDIO OUT) ^1 (see page 14) before connecting the subwoofer to the mains.
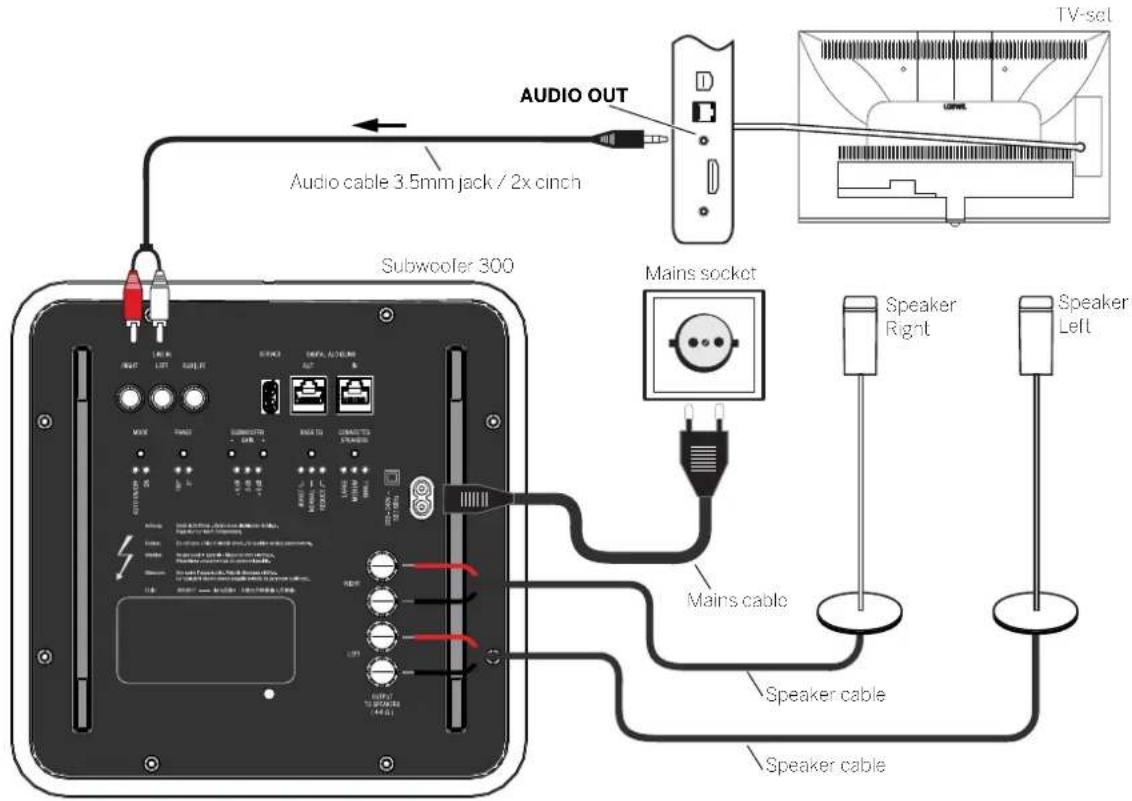
^a For TV set types without AUDIO CU ^-1 , use the HEADPHONE connector.

Subwoofer 300
Operating instructions
Settings directly on the Subwoofer
Settings directly on the Subwoofer 300
Before commencing the start-up and settings, please make sure that all cables are connected correctly.
Status LED
Meaning of the colours of the status LED:
Blue: DIGITAL AUDIO LINK - input active
Green: LINE IN - input active (analogue signal)
Red Disorder
Status appears for 10 sec., then the LED will turn off. If one of the control buttons is pressed, the status LED switches on as well.
Settings via control buttons
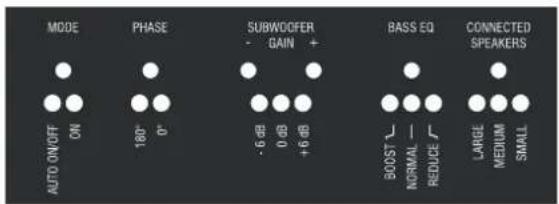
Using several control buttons you can make various settings on the subwoofer. The corresponding LEDs indicate the status. The LED display switches off after 10 sec.; when pressing one of the control buttons, the LEDs turn on again.
The handling of the settings directly on the subwoofer will depend on the connection types of the subwoofer. Depending on whether the subwoofer is connected via DIGITAL AUDIO LINK or LINE IN to the TV or an audio source.
When connecting the subwoofer via DIGITAL AUDIO LINK to a TV (SL3xx chassis and more advanced) the settings PHASF and SUBWOOFER GAIN can optionally be made on the television or directly on the subwoofer 300 A local change on the subwoofer 300 will result in a feedback to the TV set.
When connecting the subwoofer to a TV or any audio source via LINE IN, these settings must be made directly on the Subwoofer 300.
All set values remain unchanged after the subwoofer has been switched on and off.
MODE settings
With the MODE button you can set the on/off behaviour of the subwoofer. The two LED indicators AUTO ON/OFF and ON show the selected mode.
i The setting for MODE will only be made locally on the subwoofer.
Selecting AUTO ON/OFF
By selecting AUTO ON/OFF, the subwoofer automatically switches on from standby, when a connected TV set is switched on at the DIGITAL AUDIO LINK connector or when an audio signal is applied at the cinch jacks LINE IN (RIGHT / LEFT / SUB/LFE).
If both connectors are simultaneously used (switched on TV set at DIGITAL AUDIO LINK, audio source signal at LINE IN) DIGITAL AUDIO LINK has priority. If you switch the TV set at DIGITAL AUDIO LINK to standby mode, the subwoofer automatically switches to LINE IN.
If the TV set connected to the subwoofer at DIGITAL AUDIO LINK is switched to standby, or an audio signal is not applied at LINE IN, the subwoofer in AUTO ON/OFF mode will automatically switch off after 10 min (standby mode).
When connected to LINE IN, the subwoofer may be automatically turned on, if we have interference signals on the audio lines (LINE IN).
When connected to LINE IN, the subwoofer can switch off automatically during longer, very quiet periods. In this case, increase the volume.
Selecting ON
When being in mode ON, the subwoofer will automatically switch off after 4 hours (standby mode), on the condition that the TV set connected to the subwoofer at DIGITAL AUDIO LINK is switched to standby or an audio signal is not applied at LINE IN.
PHASE settings
With the PHASE button you can set the phasing of the subwoofer. The two LED indicators 0° and 180° indicate the selected setting.
Test both values (0° and 180°) and select the one with which you perceive a clearer pass reproduction at your listening position.
When connecting the subwoofer via DIGITAL AUDIO LINK, the phase is set in the sound components wizard (Setting of the phasing, see page 13) on the TV set.
If after configuring the subwoofer via the sound components wizard the PHASE setting is changed locally with the button on the first subwoofer, an on-screen display appears with the modified values.
Subwoofer 300
Operating instructions
Settings directly on the Subwoofer
Adjusting the SUBWOOFER GAIN
Using the SUBWOOFER GAIN +/- buttons you can adjust the basic bass volume. The three LED indicators -6 dB / 0 dB / +6dB indicate the adjusted volume.
The adjustment range of -6 dB to +6 dB can be changed in steps of 1 dB. The corresponding LED will light up for the values -6 dB, 0 dB and +6 dB. For intermediate values, the LEDs will be dimmed accordingly.
When connecting the subwoofer via DIGITAL AUDIO LINK, the subwoofer volume is set in the sound components wizard (Adjusting the speaker volume, see page 13) on the TV set.
If after configuring the subwoofer via the sound components wizard the SUBWOOFER GAIN setting is changed locally with the buttons on the first subwoofer, an on-screen display appears with the modified values.
Setting the BASS EQ
When using the BASS EQ button, you can set the lowest frequency ranges (20 Hz - 50 Hz) for bass reproduction to be raised or lowered. The three LED indicators REDUCE / NORMAL / BOOST indicate the selected setting.
i The setting for BASS EQ will only be made locally on the subwoofer.
Selecting REDUCE:
When the subwoofer is near the corner of the room, select the setting REDUCE (-3 dB).
Selecting NORMAL:
When the subwoofer is near a wall, select the setting NORMAL (0 dB).
Selecting BOOST:
When the subwoofer is in free space, select the setting BOOST (+3 dB).
Setting the CONNECTED SPEAKERS
With the CONNECTED SPEAKERS button you select the speaker type that is connected to the subwoofer. The three LED indicators SMALL / MEDIUM / LARGE indicate the selected setting.
Depending on the setting, the crossover frequency for the bass response changes (small = 160 Hz, medium = 110 Hz, large = 80 Hz).
The setting for CONNECTED SPEAKERS will only be made locally on the subwoofer.
For certain Loewe speaker types, a compensation curve is stored to achieve optimum audio playback.
Speaker types:
Small: Loewe Satellite Speaker (Art. no. 66201xxx)
Medium: Loewe Speaker (Art. no. 56223xxx)
Large: Loewe Stand Speaker (Art. no. 66202xxx)
A long press (about 4 sec.) on the CONNECTED SPEAKERS button turns off the stored compensation curve. This provides the possibility to use other types of speakers. The flashing LED indicates that the compensation curve has been disabled. The crossover frequency can be changed as described above.
To enable the compensation curve again, press button again and hold.
Subwoofer 300
Operating instructions
Configuration of the subwoofer via Digital Audio Link
Configuration of the subwoofer 300 (DIGITAL AUDIO LINK)
After switching on the TV set, the sound components wizard detects that the subwoofer 300 was connected to DIGITAL AUDIO LINK for the first time and automatically displays a screen menu. A system 3.1 is assumed as a configuration example.
After the subwoofer 300 is configured on the TV set, there will not be a repeated automatic detection when re-separating and connecting the DIGITAL AUDIO LINK.
The configuration can be opened via System settings – Connections – Sound components.
The one-time automatic detection of the subwoofer 300 depends on the Locwe chassis type and the software version used (starting with chassis type SL3xx and software version V3.x). For other types of chassis/software versions call manually the sound components wizard to select the Speaker system (DIGITAL AUDIO LINK). The order and appearance of the menu items can be different from the case described here.
Sound playback
via...


Current
subwoofer
system
configuration
▶ Proceed to next step.

The current configuration of the subwoofer system 300 is displayed. At the first start, only the subwoofers found are displayed. When calling the configuration again, the connected speakers are shown.

▶ Proceed to connection of the front speakers.
Connect front speakers


Select TV or Subwoofer system 1. Please specify here whether you want to use the built-in TV speakers or the external speakers connected to the subwoofer 300 as front speakers.
▶ Proceed to TV loudspeakers as centre speaker.
TV loudspeakers as centre speaker
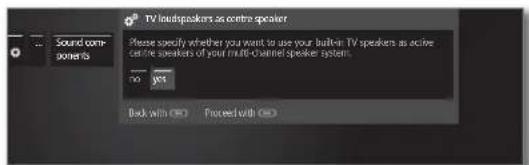

Select whether you want to use the TV speaker as centre speaker.
i If you select no, the front speakers will also transmit the centreparts of sound.
▶ Proceed to next step.
Current subwoofer system configuration

The configuration of the subwoofer system 300 is displayed.
▶ Proceed to Distance to left front speaker.
Subwoofer 300
Operating instructions
Configuration of the subwoofer via Digital Audio Link
Distance to left front speaker


Set the distance between the left front speaker and your listening position in 10 cm steps.
1 Measure the distances from your listening position to the front speakers and the centre speaker (if used). The system calculates delay times from this for the loudspeaker signals, so that these reach the listener simultaneously.

▶ Proceed to the respective other speakers (right front speaker, centre speaker and subwoofer) and also
◀ set distance. The selected speaker will be coloured blue.
After setting the distance to the subwoofer.


▶ Proceed to Adjust speaker level.
Adjust speaker level


▶ Adjust the level for the speaker.
▲▼ Selectspeakers.
The selected speaker will be coloured blue.
For balanced audio reproduction all speakers should be set to the same volume level. A noise signal will be reproduced automatically on each speaker in succession. Adjust every speaker to equal perceived volume from your listening position.
After adjustment of the last speaker.

▶ Proceed to Subwoofer phase.
Subwoofer phase

Switch to a station with music or start playing music with a DVD player.

Test both values (0° and 180°) and select the one with which you perceive a clearer bass reproduction at your listening position.

Back: End of wizard.
This ends the sound components wizard for connecting and selling up a speaker system.
Subwoofer 300
Operating instructions
Configuration of the subwoofer via LINE
Configuration of the subwoofer 300 (LINE IN)
Configure the sound components wizard of the Loewe TV set telling that you use a subwoofer 300 that is connected to AUDIO OUT via LINE IN of the TV set. A system 3.1 is assumed as a configuration example.
When the subwoofer 300 is connected to AUDIO OUT ^1 and you want to return to the selection of TV speakers, unplug the power cord of the subwoofer before you select the TV speakers. At the AUDIO OUT connector ^2 , the audio signal may be output with high volume in the selection of TV speakers.

HOME: Call Home view.

◀ ▶ ▲ ▼ Mark System settings.
OK call System settings.
▲▼ Select Connections
go to next column.
▲▼ Select Sound components
go to next column.
Sound playback via...


▲▼ SelectSpeaker system (AUDIO OUT)
OK Confirm selection.

▶ Proceed to next step.
Connect socakers


Select TV speakers + Subwoofer or Subwoofer + ext. front speakers.
Specify here whether you want to operate the speakers of the TV set with an additional subwoofer or a subwoofer with external front speakers at the AUDIO OUT socket of the TV set.

▶ Continue with the appropriate selection.
TV speakers + Subwoofer
Adjust subwoofer level


Adjust the volume for the subwoofer.

Back: End of wizard.
This ends the sound components wizard for connecting and setting up a speaker system.
Subwoofer 300
Operating instructions
Configuration of the subwoofer via LINE N
Software update
Subwoofer + ext. front speakers
TV loud speakers as centre speaker


Select yes, if you want to use the built-in TV speakers as centrespeakers.
If you select no here, the external front speakers also transmit the centre sound parts additionally.

▶ Proceed to next step
Adjust ext. Speaker level


▶ Adjusted volume of the external sound system optimally to the TV volume.
A1 audio broadband signal is transmitted via the AUDIO OUT jack. Therefore, the level of the front speakers and the subwoofer varies uniformly with the volume setting.

Back: End of wizard
This ends the sound components wizard for connecting and setting up a speaker system.
Software update
Software update via DIGITAL AUDIO LINK
If a new version of the subwoofer 300 software is available during an update of the TV software, it will also be updated via the DIGITAL AUDIO LINK interface. For more information on the software update, refer to the instruction manual of your TV set.
The software version of the subwoofer 300 may be accessed on the TV set via the menu TV set equipment.
During the update, you must not unplug the subwoofer.
Call TV set equipment

HOME: Call Home view.

Select System settings
OK Call System settings.
▼ ▲ Select Extras.
go to next column.
▲▼ Select Integrated features
OK Call Integrated features.
◀ ▶ ▲ ▼ Select category Software.
OK to open it.


▲▼ If necessary, scroll content up/down.
The entry Activespeaker indicates the software version of the subwoofer 300.
| Subwoofer 300 |
| Operating instructions |
| Specifications |
| Disposal / Conformily |
Specifications
| Order No. 55201 | |
| Operating temperature [°C] 5...35 | |
| Humidity [%] (no condensation) 20...80 | |
| Dimensions [W x H x D in cm] W 24.1 x H 25.8 x D 24.1 | |
| Weight [kg] 6.8 kg | |
| Digital output stages 3 | |
| Principle I-Way bass reflex, active | |
| Fitting 1x bass 160 mm | |
| Power rating of subwoofer channel |Wall| 150 (sine) / 300 (music) | |
| Power rating of other channels at 4 Ohm [Watt] 75 (sine) / 150 (music) | |
| Mains voltage [Volt 50/60 Hz] 220 - 240 | |
| Max. power consumption |Wall| 370 | |
| Standby power consumption [Watt] < 0.40 | |
| Power consumption Power OFF [Watt] 0 | |
| Bass intensity |dB| | +/-6 |
| Frequency range of subwoofer (acoustic) | 35 Hz - 250 Hz - 6dB |
| Frequency range of other channels | 30 Hz - 20 kHz - 3dB |
| Impedance of the speakers at the connecting terminals [Ohm] | 4-8 |
Disposal
Cardboard box and packaging
In line with national regulations regarding the disposal of packaging materials, we pay a fee to authorised recyclers who collect packaging from dealers. Nevertheless, we recommend that you keep the original cardboard box and the rest of the packaging materials so that the device can, if necessary, be transported under the safest possible conditions.
The device

Attention: The EU Directive 2002/96/EC governs the proper return, handling and recycling of used electronic appliances. Old electronic devices must therefore be disposed of separately. Never dispose of this device in normal domestic waste! You can hand in your old unit free of charge at identified collection points or to your dealer if you buy a similar new unit. Additional details about return (also for non EU countries) are available from your local municipal authority.
Conformity / Manufacturer's declaration
CE Locwe Technologies hereby declares that this product meets the essential requirements and other relevant provisions of the currently applicable EU directives.
You can find the complete declaration of conformity under:
www.loewe.tv/int/my-loewe
Legal details
| Loewe Technologies GmbH | Printed in Germany |
| Industriestrasse 11 | Editorial date 04/15-1.0 TB/PS |
| D-96317 Kronach | © Loewe Technologies GmbH, Kronach |
| www.loewe.tv |
All rights including translation, technical modifications and errors reserved.

Subwoofer 300
Service
AUS
Qualifi ty _td
24 Lionel Road
M. Waverley VIC 3149 Australia
Tel +61-03-8542 1111
Fax-610395/33677
L-mai: info@qualiti.com.au
B
Loewe Oola Beneux NV/SA
Uilenbaan &
2160 Wommelgem, Belgie
Tel +32-3-2709930
Fax+32-3-2710108
L-mail: ccc@oewe.be
CH
Telon AG
Rüstrasse 26
No.8 Jinghu Rd. Xinhua St. Huadu
Reg. GZ, PRC
Tel +86-020-226/5666
Fax+86-(0)20-22675777
F-mail: service@loewe-mg.com
X amer Tenote Investment Co. Ltd
26F 3# Xing in Bay Operation Center,
No.478 xinglinwan Avenue,
Jimci District, Xiamen, Fujian, FRC
Tel 186-400 088 1566
E-mail: service@cewe.tnt.com
CY
Iadikvriakes & Sons Ltd.
121 Prodromos Str., P.O Box 21587
1511 Nicosia, Cyprus
Tel+357-22872111
Fax: 357-22663391
E-mail savvas@hadjkyriakos.com.cy
CZ
BaSys CS s.r.o
Sodomkova 1478/8
10200 Praha 10 - Hoslar
Česká republika
Tel+420 234 706 700
Fax:420234706701
Customer Care Center
Industriestraße II
C2130 Espcc. Finland
Tel 1358947850900
www.eeteuroparts.fi
GB IRL
Loewe JK Limited
1st Floor, 237A Kensington High St
London
W805A,JK
Tel 144- (0) 207368_103
Fax +44 - (0) 207 368 1101
E-mail: enquiries@icewe.uk.com
GR RO AL
ssagogiki Ember ki Llados S.A.
321 Mosogion Av.
152 31 Chalandri-Athens, Hellas
Tel: 130-2106721200
Fax 130-2106740204
E-mail: christ na argyropoulou@
sembel.g
HR
Plug&Pay Ltd.
Bednjanska 8, 10000 Zagreb
Hrvatska (Kroatia)
Tel-38514979683
Fax-38514929682
E-mail: info@locwc.hr
①
I oewe Italiana S.r.l.
Via Monte Baldo, 14/P - 14/N
Nonplus Ultra Home Automation Pvt Ltd
First Floor. No. 615, Second Main Road
Indiranagar Stage I, Indiranagar
Bangalore 550038
India
Tel-91804114599
E-mail: jimmy@nplusultra.in
IR
Pars Royal Taramesh
I OFWE Gallery
3 Shariati St. Opp. Soheil St.
P.O Box 194965537
Tehran, Iran
Tel 9621-22391661
E-Mail info@laramoshgroup.com
JOR
ACCU-TFCH Solutions Co.
1-Karia Al-Ashja Street
Jabal Al-Weibdch
P.O.Box 9668 Amman 11191, Jordan
Tel:+962-6-465-9985
Fax: 962-6-165-0119
E-Mail info@acoutech-solutions.net
KSA
I OFWF Show Room
Olaya Street, Near Kingdom Center
RIYADH, SAUDI ARABIA
P.O Box 92831 Riyadh 11663
Tel-365114640927
Fax 966-11-4640759
E-mail: hkkurkjian@gmail.com
LV EST
Kpartners, SIA
A.Caka iela 80
Riga, LV-1011, Latvia
Tel+371-67797959
Fax +3 71-67310568
E-mail:evgcni.bcbnev@loewc.lv
LT
A Cappella Ltd
Ausros Vertu 5, Pasazo skg.
01129 V in us. Lithuania
c 1370-52 22296
Fax +3/0 - 52676681
E-mail: Inoc@cewe.it
N
LET Europarts AS
Building 328 1st Floor Beirut, Lebanon
Tel:196_1446777/1587476
Fax 19611582446
F-mail:info@control-leo.com
RUS
Service Center I oewe
Aptekarsky per 1 podjezd 5A
105005 Moscow, Russia
Tel-7-4999404232 (ext. 454)
Fax +7 -495 730 78 61
L-mail: service@locwc-cis.ru
S
FFT Europearts AB
ceve Sweden
Box 4124
SL-1310", Nacka, Sverge
Tel-46-85075000
E-mail: Kuncservice@eeteuroparts.se
SGP
Atlas Care Centre
11 chang south street: 3
03-01 builders centre
Singapore/86122
Tel: 65-67452028
Fax +65 - 6545 7861
E-mail: service@at as sv.com
TR
LNKAY GROUP
SFRVISPUSMUSTFRIHIZMFTIFRI
Alemdag Cad. Site Yolu No.18
Umraniye, Istanbul, TÜRKİYL
1044478
E-mail:info@servisplus.com.tr
ZA
Volco Enterprise Close Corporation
Unit 8
7 on Mastiff (Road)
Longlake Fxt', Lingbro Business Park
2165 Johannesburg
Tel: 27116061228
Fax +27116081740
E-mail:v63@mweb.co.za
© by Lccwe Technologies 01.09.15
LOEWE.


- Thank you
- Delivery specification
- For your safety
- Cleaning
- Connectors and operating controls
- Configuration examples
- Connector/set-up solution with one subwoofer (2.1 / 3.1 system)
- Connector/set-up solution with two subwoofers (5.2 system)
- Connecting Subwoofer 300 via Digital Audio Link
- Connecting Subwoofer 300 via LINE IN
- Settings directly on the Subwoofer 300
- Status LED
- Settings via control buttons
- MODE settings
- Selecting AUTO ON/OFF
- Selecting ON
- PHASE settings
- Adjusting the SUBWOOFER GAIN
- Setting the BASS EQ
- Setting the CONNECTED SPEAKERS
- Configuration of the subwoofer 300 (DIGITAL AUDIO LINK)
- Configuration of the subwoofer 300 (LINE IN)
- TV speakers + Subwoofer
- Subwoofer + ext. front speakers
- Software update
- Software update via DIGITAL AUDIO LINK
- Call TV set equipment
- Disposal
- Cardboard box and packaging
- Conformity / Manufacturer's declaration
- Legal details
- AUS
- B
- CH
- CY
- CZ
- GB IRL
- GR RO AL
- HR
- ①
- IR
- Shariati St. Opp. Soheil St.
- JOR
- KSA
- LV EST
- LT
- N
- RUS
- S
- SGP
- 03-01 builders centre
- TR
- ZA
Brand : LOEWE
Model : Subwoofer 300
Category : Loudspeaker