
5 Speed Extractor With Touch Activated Display - Juicer Beautiful - Free user manual and instructions
Find the device manual for free 5 Speed Extractor With Touch Activated Display Beautiful in PDF.


| Product Type | Juice Extractor (Juicer) |
| Brand | Beautiful |
| Model | 5 Speed Extractor With Touch Activated Display |
| Power Supply | 120V AC, 60 Hz (polarized plug) |
| Number of Speeds | 5 (1: Soft, 2: Citrus, 3: Medium, 4: Leafy Greens, 5: Hard) |
| Control Panel | Touch-activated display with power, start/stop, speed +/- buttons |
| Feed Tube | Extra wide feed tube |
| Blade Basket | Stainless steel with sharp cutter blades at bottom |
| Safety Features | Safety locking bar, manual resettable thermal protector, polarized plug |
| Anti-Drip Spout | Yes, with cover; must be in OPEN position during juicing |
| Pulp Container | Removable pulp basket |
| Juice Jug | Included with lid; lid fits over pouring spout |
| Dishwasher Safe Parts | Clear cover, juice bowl, pulp jug, juice jug and lid (top rack only) |
| Hand Wash Only | Blade basket (use included cleaning brush), motor base (wipe only) |
| Materials | Plastic body, stainless steel blade basket, rubber feet |
| Warranty | 2-year limited warranty (mechanical parts); 90 days for non-mechanical parts |
| Recommended Usage | Fresh fruits and vegetables only; not for frozen or starchy items |
| Dimensions | Not specified in manual |
| Weight | Not specified in manual |
Frequently Asked Questions - 5 Speed Extractor With Touch Activated Display Beautiful
User questions about 5 Speed Extractor With Touch Activated Display Beautiful
0 question about this device. Answer the ones you know or ask your own.
Ask a new question about this device
Download the instructions for your Juicer in PDF format for free! Find your manual 5 Speed Extractor With Touch Activated Display - Beautiful and take your electronic device back in hand. On this page are published all the documents necessary for the use of your device. 5 Speed Extractor With Touch Activated Display by Beautiful.
USER MANUAL 5 Speed Extractor With Touch Activated Display Beautiful
natural_image
Exterior view of a black and white BAN juicer with digital display and control buttons, set against a solid red background (no text or symbols visible on the device itself)5-Speed Juice Extractor with Touch-Activated Display Instruction Manual Juguera digital de 5 velocidades Manual de instrucciones

natural_image
Black-and-white photo of a smiling woman sitting on a wooden counter surrounded by kitchen appliances including air fryers, refrigerators, and food items (no visible text or symbols)The kitchen is my family's happy place. It's where we cook and eat and bake and laugh and share our most beautiful moments together. That's what inspired the creation of Beautiful, my new collection of easy-to-use kitchenware that you'll want to keep out on your kitchen counter. So whether your kitchen has flour all over the place from a kid's baking session or you're throwing an adult dinner party, I hope every step will be simple, delicious and beautiful!
- Drie J ♥
www.cookwithbeautiful.com
Table of Contents
Section 1: Safety
Important Safeguards 4-6
Additional Important Safeguards 7
Notes on the Plug 8
Notes on the Cord 8
Plasticizer Warning 9
Electric Power 9
Section 2: Instructions
Getting to Know Your 5 Speed Digital Juice Station....11
Before Using for the First Time....12
Assembly instructions 12-13
Preparing fruits and vegetables for your 5 speed digital juice extractor....13-14
Operating instructions 15-16
Manual Thermal Protector....19
Disassembly Instructions 19
User Maintenance Instructions 19
Care & Cleaning Instructions 20
Storing instructions 21
Troubleshooting 22-23
Warranty 24-25
Índice
When using electrical appliances, basic safety precautions should always be followed, including the following:
- READ ALL INSTRUCTIONS.
- To protect against risk of electrical shock do not put cord, plugs, or appliance in water or other liquid.
- This appliance is not intended for use by persons (including children) with reduced physical, sensory or mental capabilities, or lack of experience and knowledge, unless they have been given supervision or instruction concerning use of the appliance by a person responsible for their safety.
- Close supervision is necessary when any appliance is used by or near children. Children should be supervised to ensure that they do not play with the appliance.
- Turn the appliance OFF. Unplug from outlet when not in use, before putting on or taking off parts, and before cleaning. To unplug, grasp the plug and pull from the outlet. Never pull from the power cord.
- Avoid contacting moving parts.
-
Do not operate any appliance with a damaged cord or plug or after the appliance malfunctions, or is dropped or damaged in any manner. Contact the manufacturer at their customer service telephone number for information on examination, repair, or adjustment.
-
The use of attachments, including canning jars, not recommended by the manufacturer may cause fire, electric shock, or injury.
- Do not use outdoors.
- Do not let cord hang over edge of table or counter. Do not touch sharp blade in the base of the juicing disc.
- Do not let cord contact any hot surface, including the stove. Make sure the juicer is properly assembled before operating.
- Always make sure the juice extractor cover is locked securely in place before the extractor is turned on. Do not unfasten locking bar while the juice extractor is in operation. Vibration can occur during normal operation.
- Press the ⏻ and unplug from electrical outlet after each use of your juice extractor. Make sure the motor is completely stopped before disassembling. Do not use any frozen fruit/vegetables in this machine. This juicer is designed to juice fresh fruits and vegetables only.
- Do not put your fingers or other objects into the juice extractor opening while it is in operation. If food becomes lodged in the feed tube, use the food pusher or another piece of fruit or vegetable to push it down. When this method is not possible, press the ⏻ ,
unplug the juice extractor from the electrical outlet, and disassemble the juice extractor to remove remaining food. When juicing hard fruits or vegetables, always juice on the high speed settings (settings 4 or 5). Failure to do so will cause damage to the juicer motor. Do not juice harder fruits on any of the lower speed settings which is meant for juicing softer fruits and vegetables.
- Do not use the appliance if the rotating juicing blades and basket are damaged.
- Use care when handling the stainless steel blade basket. Hold the basket's rim only. Do not touch the cutter blades on the bottom of the basket. The cutter blades are very sharp!
- Do not operate without the pulp container in place. Please see assembly instructions for proper placement.
SAVE THESE INSTRUCTIONS
ADDITIONAL IMPORTANT SAFEGUARDS
- All users of this appliance must read and understand this instruction manual before operating or cleaning this appliance.
- The cord to this appliance should be plugged into a 120V AC electrical outlet only.
- Do not leave this appliance unattended during use.
- If this appliance begins to malfunction during use, immediately press the ⏻ and unplug the cord. Do not use or attempt to repair the malfunctioning appliance.
- If this appliance falls or accidentally becomes immersed in water, unplug it immediately. Do not reach into the water! Do not use this appliance after it has fallen into or becomes immersed in water.
- To reduce the risk of injury to persons or property, never use this appliance in an unstable position.
- Do not use this appliance for other than its intended use.
- Pay special attention to the amount of pulp and residue produced while juicing. Always empty a full pulp container before continuing to juice.
- Always ensure that the anti-drip spout is in the OPEN position when juicing. The anti-drip spout should only be used to prevent dripping when the juice jar is removed.
NOTES ON THE PLUG
This appliance has a polarized plug (one blade is wider than the other). To reduce the risk of electric shock, this plug will fit in a polarized outlet only one way. If the plug does not fit fully into the outlet, reverse the plug. If it still does not fit, contact a qualified electrician. Do not modify the plug in any way.
NOTES ON THE CORD
A. A short power-supply cord (or detachable power-supply cord) is to be provided to reduce risks resulting from becoming entangled in or tripping over a longer cord.
B. Longer detachable power-supply cords or extension cords are available and may be used if care is exercised in their use.
C. If a long detachable power-supply cord or extension cord is used:
1) The marked electrical rating of the detachable power-supply cord or extension cord should be at least as great as the electrical rating of the appliance;
2) If the appliance is of the grounded type, the extension cord should be a grounding-type 3-wire cord; and
3) The longer cord should be arranged so that it will not drape over the counter top or table top where it can be pulled on by children or tripped over.
PLASTICIZER WARNING
CAUTION: To prevent Plasticizers from migrating to the finish of the counter top or table top or other furniture, place NON-PLASTIC coasters or place mats between the appliance and the finish of the counter top or table top. Failure to do so may cause the finish to darken; permanent blemishes may occur, or stains can appear.
ELECTRIC POWER
If the electrical circuit is overloaded with other appliances, your appliance may not operate properly. It should be operated on a separate electrical circuit from other appliances.
Section 2
Instructions
2
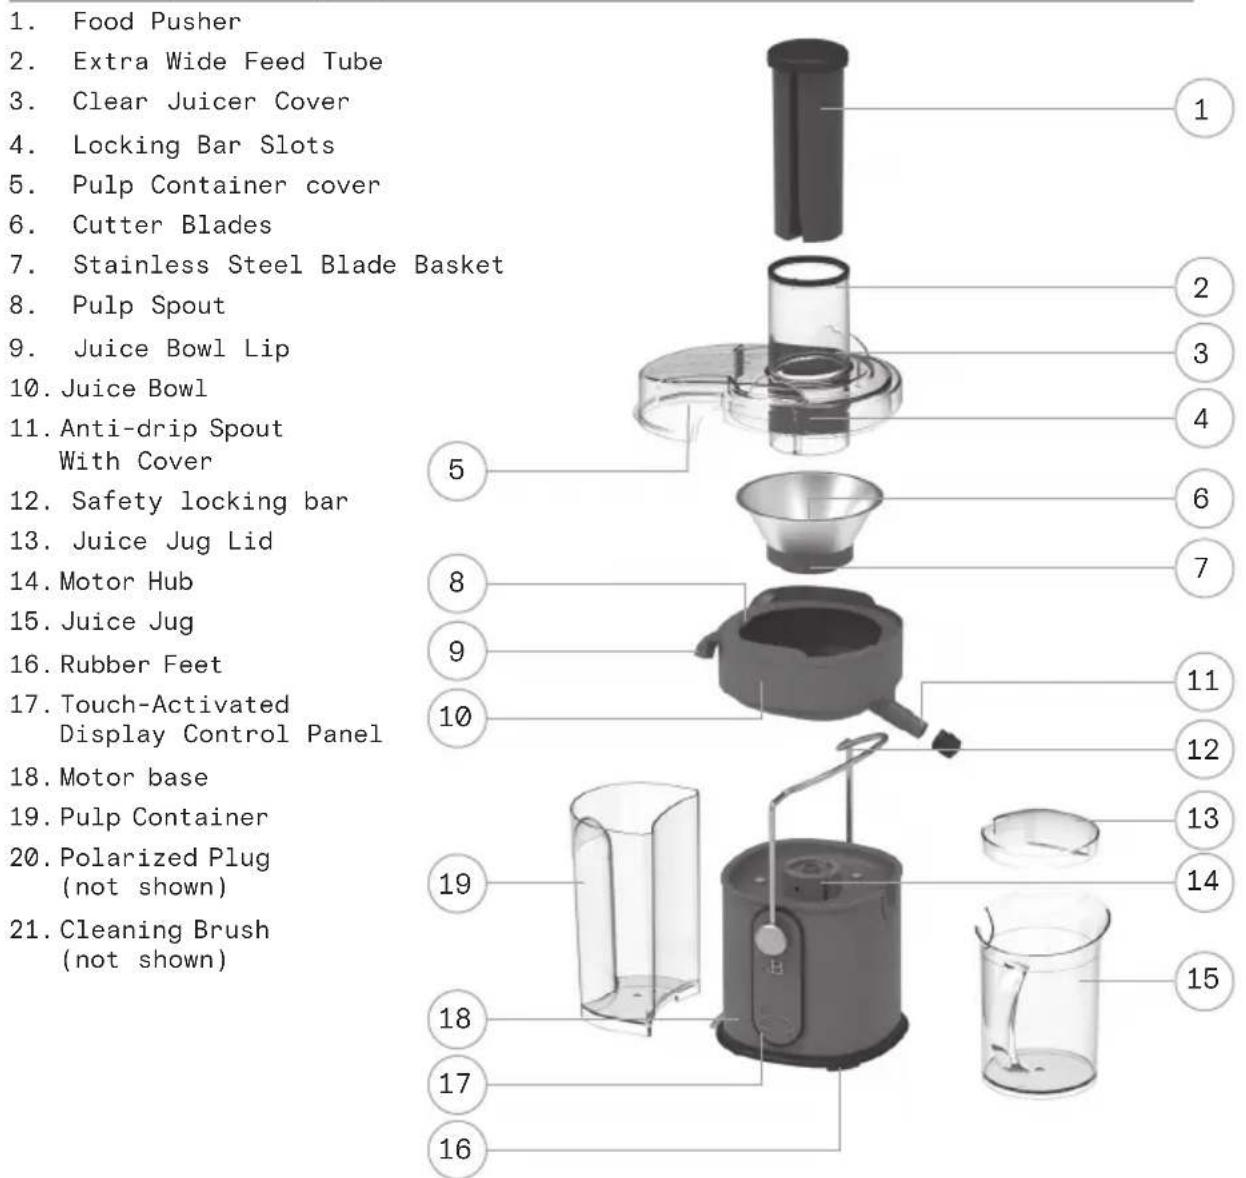
Getting To Know Your 5 Speed Digital Juice Station
Product may vary slightly from illustrations.
Before Using For The First Time
The juice extractor comes almost completely assembled in the box.
- Your extractor may be shipped with a protective cardboard insert between the clear cover and the blade basket. Remove this and any other protective packaging before using your juice extractor. Also included in the box is a cleaning brush.
- Following the disassembly instructions, remove the food pusher from the feed tube, then the cover, juice bowl with stainless steel blade basket.
- Wash all removable parts (food pusher, clear cover, juice bowl, pulp basket, and juice jug with lid) in warm water with a biodegradable, non-abrasive liquid detergent. Rinse well and air-dry. This will eliminate any traces of dust or residue from manufacturing or shipping.
Caution: Use care when handling the blade basket. Hold the basket's rim only. Do not touch the cutter blades on the bottom of the basket. The cutter blades are very sharp!
Caution: Never rinse or immerse the motor base in water or any other liquid.
Assembly instructions
Warning: Always make sure the juice extractor is unplugged before starting assembly.
Important: The juice extractor is equipped with a safety system that prevents the extractor from being turned on unless the unit is completely and properly assembled.
- Rotate the locking bar so that it sits at the front of the base (see figure 1).
- Place the juice bowl on top of the motor base so that the juice spout fits into the cut out at the front of the base (see figure 2).
Caution: Use care when handling the stainless steel blade basket. Hold the basket's rim only. Do not touch the cutter blades on the bottom of the basket. The cutter blades are very sharp!
- Set the stainless steel blade basket onto the motor hub in the center of the juice bowl (see figure 2). Press down on the blade basket's outer rim until it drops into place and is securely seated. Gently rotate the blade basket to ensure that it turns freely. If initially it fails to seat, this should slip it into place. Double check by pressing down on the rim and spinning it again.
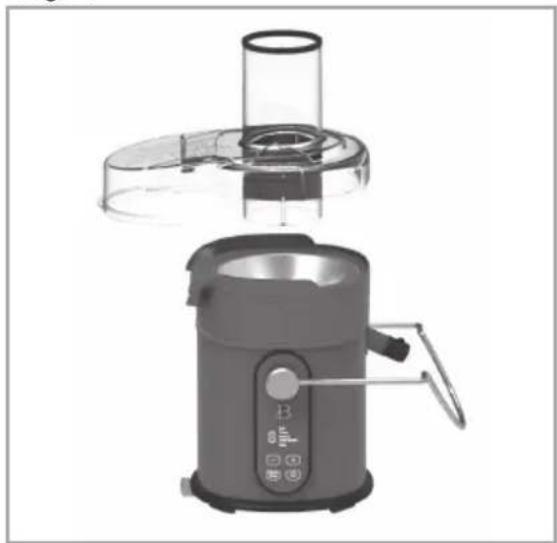
- Align the cover so that the pulp cover fits over the back of the base. (see figure 3).
- Turn the food pusher so that the groove in the side lines up with the tab in the feed tube. Insert the food pusher into the feed tube (see figure 4). Store the food pusher in the feed tube of the lid until the produce is ready to juice.
- Push the safety locking bar up and over the lid. Make sure the lid is locked securely into place (see figure 5).
- Add the pulp basket (see figure 6). Tilt the pulp basket slightly so that the lip of the juice bowl fits snugly over the inside of the pulp basket. Push the bottom of the pulp basket so that it rests securely on its platform.
Important: To avoid spillage, make sure the pulp basket sits flush up against the base.
Note: To save cleaning time, line the pulp basket with a plastic grocery store produce bag.
-
Make sure the anti-drip spout is properly open (see figure 7).
-
Add the juice jug lid to the juice jug so that the lid's cut out fits over the pitcher's pouring spout. Tilt the juice jug slightly so that the extractor's juice spout fits into the top of the pitcher lid (see figure 8). This will prevent juice spillage.
Preparing fruits and vegetables for your 5 speed digital juice extractor
- Clean all produce thoroughly, using a natural bristle brush. If you are not using organic produce, we recommend using a biodegradable cleaner to help remove pesticide residue.
- Remove and discard the outer leaves of non-organic produce and peel any waxed fruit or vegetable.
-
Trim away any discolored or bruised sections.
-
The skin may be left on all produce (including pineapple and melons) except oranges, grapefruit, and tangerines. The oil found in these skins tastes bitter and is difficult to digest.
- Remove melon seeds when possible, as they may escape through the top of the feed tube while juicing. The pits of fruits such as cherries, pears, and peaches should also be removed.
- Cut produce into pieces small enough to fit into the feed tube. Use the food pusher to gently direct produce through the tube. Never push produce into the feed tube with your fingers.
- It may be necessary to cut hard produce (carrots, beets, pineapple, etc.) into smaller pieces to facilitate juicing.
- Leafy greens, parsley, wheat grass, and sprouts should be bunched up into a small, tight ball and pushed through with either a carrot or the food pusher.
- Juicing herbs and leafy greens will yield a lower juice level due to the nature of the vegetable or greens. It is recommended to juice them in combination with other fruits and vegetables.
- Bananas are not suitable for juicing; a clear juice cannot be obtained from them and residue left in the machine can clog the micro-mesh screen.
- For best results when juicing apricots, plums, pears, peaches, and tomatoes, produce should be firm.
- When juicing apples, add a small amount of fresh lemon or lime to help slow down the browning process.
- Fruits that contain starch, such as bananas, papayas, avocados, figs and mangoes are not suitable for the juice extractor. Use a food processor, blender or bar blender to process these fruits.
- The juice extractor is not suitable for processing very hard and/or fibrous/starchy fruits or vegetables such as sugar cane.
Important: Always juice hard fruits (see detailed chart below) in the higher speed settings (settings 4 & 5). Failure to do so may result in a damaged motor and will cause the juicer to break.
Operating instructions
5 speed control panel
Your juice extractor offers 5 speed options that ensure optimal rpm to provide maximum juicing efficiency.
Note: Efficiency describes the amount of juice extracted from your produce.
| Speed Description Example | |
| 5 Hard Beets, Carrots, Fennel, Brussel | Sprouts |
| 4 Leafy Greens Pear, Celery, Cabbage, Cauliflower, Broccoli, Cucumber (with skin) | |
| 3 Medium Peach, Apricots, Plums, Tomato, | Apples, Pineapples |
| 2 Citrus Orange, Lime, Grapefruit, Lemon | |
| 1 Soft Mango, Watermelon, grapes, | Cucumbers (peel removed), Raspberries, Blueberries |
- Assemble the juice extractor following the assembly instructions described in this manual.
- Have all fruits and vegetables prepared for juicing. To begin, plug the unit into a 120v ac electrical outlet. All display will illuminate for 1 second, and the (power icon) will start blinking.
- Press the "power icon", and by default, speed 1 will appear.
-
Press "+" or "-" adjust the speed to 5 to juice harder produce.
-
Press "+" or "-" adjust the speed to 1 to juice softer produce.
Note: When juicing a combination of hard and soft produce, such as beets, carrots and strawberry, you will want to use the highest speed setting (5) for beets and carrots and the lowest speed setting (1) for the strawberry. You do not have to turn the machine off to change speeds. Simply press "-" or "+" to change to the appropriate speed for each type of produce being juiced.
Tip: To ensure maximum efficiency, alternate types of produce.
- Once you have selected the desired speed setting for juicing, press START/STOP to start the Juice Extractor. Remove the food pusher from the feed tube, and you are ready to begin juicing. Place the produce into the feed tube. Use the food pusher to gently direct through the feed tube and blade basket with the food pusher. When juicing is completed, press START/STOP.
NOTE: If press START/STOP to start the juice extractor, and the safety locking bar is not properly locked into place, the unit will not start, and LED will display "L". It is important to always ensure that the safety locking bar is properly secured and locked in place prior juicing.
-
Slide the juice jug out from the juice spout. Serve juice immediately for the freshest flavor and highest nutritional value.
-
Remove the pulp container and save or discard pulp.
Note: The pulp from your juice extractor can be used in many different applications such as breads, muffins, cakes, soup stocks, compressed facial packs and garden compost material.
-
Unplug the juice extractor from the outlet after use.
-
Follow disassembly instructions described in this manual; all removable parts should be rinsed and cleaned after each use. Clean the juice extractor following the procedures described in the care & cleaning instructions.
Fig. 1

natural_image
Exterior view of a modern kitchen electric cooker with control panel and handle (no visible text or symbols)Fig. 2

natural_image
Exterior view of a modern kitchen brushset with a funnel and control panel (no text or symbols visible)Fig. 3

natural_image
Product photo of a kitchen brushset with a digital display and control panel (no visible text or symbols)Fig. 4

natural_image
Exterior view of a modern kitchen brushset with a lid and control panel (no text or symbols visible)17
Fig. 5

natural_image
Product photo of a modern juice brush with a glass cup beside it (no visible text or symbols)Fig. 6

natural_image
Exterior view of a modern juice maker with control panel and rotary button (no text or symbols visible)Fig. 7

natural_image
Close-up of a black cylindrical device with 'OPEN' text on its side, mounted on a white surface (no other visible text or symbols)Fig. 8

natural_image
Exterior view of a modern electric juice maker with control panel and side dish (no visible text or symbols)18
Manual Thermal Protector
This product is equipped with a Manual Resettable Thermal Protector to protect the motor. If the motor shuts down and LED shows "E" flashing alternatively, press ⏻, and then unplug the juice extractor. Let the unit rest for approximately half an hour. Once the resetting period has elapsed, plug the power cord back into the outlet, press ⏻ and press "+" or "-" to the desired setting to continue..
Disassembly instructions
Warning: Always make sure juice extractor is unplugged before starting disassembly.
- Remove the pulp basket and juice jug.
- Lift the safety locking bar up and off the bar locking slots on the cover Rest the locking bar at the front of the unit.
- Lift juice extractor cover up and off the juice extractor.
- Grasping the pulp spout in one hand and the back of the juice bowl in the other, loosen and lift the juice bowl and blade basket off as one piece. These 2 parts will then easily separate for easy cleaning.
Caution: Use care when handling the blade basket. Hold the basket's rim only. Do not touch the cutter blades on the bottom of the basket. The cutter blades are very sharp! - Please follow the procedures outlined in the care & cleaning instructions for specific cleaning instructions.
User maintenance instructions
This appliance requires little maintenance. It contains no user serviceable parts. Do not try to repair it yourself. Any servicing that requires disassembly other than cleaning must be performed by a qualified appliance repair technician.
Care & cleaning instructions
- Unplug from outlet. Please follow the procedures outlined in the disassembly instructions to remove parts before cleaning.
- Clean unit and parts after each use.
- Do not immerse the motor base in water or spray it with water. Clean only by wiping with a damp sponge, cloth, or paper towel. Use any liquid dishwashing detergent but do not use products containing ammonia or scouring powders. These products will dull, scratch or mark the surface.
- If any juice has spilled under the juice extractor, clean legs and area with a lightly soaped sponge, then dry. Use a damp toothbrush or cloth to clean juice from inside the motor hub on top of the motor base.
- All parts (except the blade basket and motor base) are washable in warm, soapy water or in the dishwasher.
- When cleaning the blade basket, make sure the tiny holes in the basket are not clogged. This can be accomplished by holding the blade basket under running water faucet. Use the cleaning brush included in a circular motion to clean the basket holes from both inside and outside of the blade basket.
Caution: Use care when handling the blade basket. Hold the basket's rim only. Do not touch the cutter blades on the bottom of the basket. The cutter blades are very sharp!
Note: If necessary, allow the blade basket to soak in hot water with 10% lemon juice added. - The juice extractor clear cover, juice bowl, pulp jug, juice jug and juice jug lid may be washed in the top rack of a dishwasher. However, washing with warm (not hot) tap water on a daily basis should be sufficient.
- Due to the powerful staining properties of the carotenoids that are found in many vegetables, especially carrots, we suggest soaking stained parts overnight in any of these 4 cleaning solutions:
- Biodegradable soap in enough warm water to cover juice extractor parts
• 1 part warm water to 1 part cider vinegar
• 1/2 small box baking soda in enough warm water to cover parts. - Warm water with 10% lemon juice solution.
Caution: Never use ammonia or abrasives - Lightly clean with a sponge or kitchen rag and liquid detergent after soaking.
Warning: Never submerge the motor base in water or other liquid!
Storing instructions
- Unplug unit, assemble clean, dry parts before storing.
- Store the juice extractor in its box in a clean, dry place. Never store it while it is hot or still plugged in.
- Store the food pusher in the feed tube of the lid.
- Never wrap cord tightly around the appliance. Do not put any stress on the cord where it enters the unit; while holding the cord perpendicular to the unit, push inwards slowly to store it inside the base of the unit.
Troubleshooting
| Symptom Possible correction | |
| The juice extractor will not turn on | The juice extractor is equipped with a safety system that prevents the extractor from being turned on unless the unit is completely and properly assembled.Press ⏻. Check to make sure the blade basket is properly seated.Make sure the safety locking bar is securely locked into place on the top of the lid. (see figure 6.) The lid must be bared securely into place or the juice extractor will not turn on. |
| Excessive noise or vibrations, unpleasant odor, appliance is hot to the touch, or the juice extractor smokes after it is turned on. | Unplug the unit immediately. Take the juice extractor to a qualified appliance repair technician for servicing. |
| Excessive noise or vibrations occur after juice extractor is turned on. | Check to make sure the blade basket is properly seated.Pulp may have built up on the blade basket. Clean the blade basket.Try alternating different types of produce while juicing.Note: Because of the juice extractor's powerful motor, a small amount of noise and/or vibration is normal when the extractor is turned on and as it comes to a complete stop. All juicers will sound slightly different. |
| The blade basket is blocked. Food Is jammed in the base of the feed tube; the juice extractor has stopped during juicing. | Press Remove cover and clear feed tube. Chop fruits and vegetables into smaller pieces to facilitate juicing. |
| "E" and "1" Error on the LED screen | There was an error when turning on the juice extractor.This product is equipped with a Manual Resettable Thermal Protector to protect the motor. If the motor shuts down and LED shows “E” and “1” flashing alternatively, unplug the juice extractor. Let the unit rest for approximately half an hour. Once the resetting period has elapsed, plug the power cord back into the outlet, press and press "+" or "-" to the desired setting to continue. |
| “L” on the LED screen • The locking bar is not securely locked into place.• The LED will display “L” when the locking bar is down for safety measures to ensure that the locking bar is always properly secured and locked in place prior to juicing. | |
Limited Two-Year Warranty
Sensio Inc. dba Made by Gather™ hereby warrants that for a period of TWO YEARS from the date of purchase, this product will be free from mechanical defects in material and workmanship, and for 90 days in respect to non-mechanical parts. At its sole discretion, Sensio Inc. dba Made by Gather™ will either repair or replace the product found to be defective, or issue a refund on the product during the warranty period.
The warranty is only valid for the original retail purchaser from the date of initial retail purchase and is not transferable. Keep the original sales receipt, as proof of purchase is required to obtain warranty validation. Retail stores selling this product do not have the right to alter, modify, or in any way revise the terms and conditions of the warranty.
Exclusions:
The warranty does not cover normal wear of parts or damage resulting from any of the following: negligent use of the product, use of improper voltage or current, improper routine maintenance, use contrary to the operating instructions, disassembly, repair, or alteration by anyone other than qualified Sensio Inc. dba Made by Gather™ personnel. Also, the warranty does not cover Acts of God such as fire, floods, hurricanes, or tornadoes.
Sensio Inc. dba Made by Gather™ shall not be liable for any incidental or consequential damages caused by the breach of any express or implied
warranty. Apart from the extent prohibited by applicable law, any implied warranty of merchantability or fitness for a particular purpose is limited in time to the duration of the warranty. Some states, provinces or jurisdictions do not allow the exclusion or limitation of incidental or consequential damages, or limitations on how long an implied warranty lasts, and therefore, the above exclusions or limitations may not apply to you. The warranty covers specific legal rights which may vary by state, province and/or jurisdiction.
How To Obtain Warranty Service:
You must contact Customer Service at our toll-free number: 1-877-775-3564. A Customer Service Representative will attempt to resolve warranty issues over the phone. If the Customer Service Representative is unable to resolve the problem, you will be provided with a case number and asked to return the product to Sensio Inc. dba Made by Gather™ Attach a tag to the product that includes: your name, address, daytime contact telephone number, case number, and description of the problem.
Also, include a copy of the original sales receipt. Carefully package the tagged product with the sales receipt, and send it (with shipping and insurance prepaid) to SENSIO Inc.'s address. Sensio Inc. dba Made by Gather™ shall bear no responsibility or liability for the returned product while in transit to Sensio Inc. DBA Made by Gather™ Customer Service Center.
Beautiful™
Kitchenware
Sección 1
Seguridad
natural_image
Exterior view of a modern kitchen electric cooker with control panel and handle (no visible text or symbols)Fig. 2

natural_image
Exterior view of a modern kitchen brushset with a funnel and control panel (no text or symbols visible)Fig. 3
natural_image
Product photo of a modern kitchen brushset with a cylindrical lid and control panel (no visible text or symbols)Fig. 4

natural_image
Exterior view of a modern kitchen brushset with a lid and control panel (no text or symbols visible)40
Fig. 5

natural_image
Product photo of a modern juice brush with a glass side view (no visible text or symbols)Fig. 6

natural_image
Exterior view of a modern electric juice maker with control panel and handle (no visible text or symbols)Fig. 7

natural_image
Close-up of a black plastic electrical plug with 'OPEN' branding, no visible text or symbols beyond the logo.41
www.cookwithbeautiful.com
For customer service questions or comments
- Table of Contents
- Section 1: Safety
- Section 2: Instructions
- Índice
- SAVE THESE INSTRUCTIONS
- ADDITIONAL IMPORTANT SAFEGUARDS
- NOTES ON THE PLUG
- NOTES ON THE CORD
- PLASTICIZER WARNING
- ELECTRIC POWER
- Section 2
- Instructions
- 2
- Getting To Know Your 5 Speed Digital Juice Station
- Before Using For The First Time
- Assembly instructions
- Preparing fruits and vegetables for your 5 speed digital juice extractor
- Operating instructions
- speed control panel
- Manual Thermal Protector
- Disassembly instructions
- User maintenance instructions
- Care & cleaning instructions
- Storing instructions
- Limited Two-Year Warranty
- Exclusions:
- How To Obtain Warranty Service:
- Sección 1
- Seguridad
Brand : Beautiful
Model : 5 Speed Extractor With Touch Activated Display
Category : Juicer