
ACA500 - Dash cam JENSEN - Free user manual and instructions
Find the device manual for free ACA500 JENSEN in PDF.


| Product Type | Reverse Camera |
| Brand | Jensen |
| Model | ACA500 |
| Camera Type | CMOS Color Camera |
| Sensor Size | 1/4 inch |
| Resolution | 672 x 520 pixels |
| View Angle | 150 degrees |
| Minimum Illumination | < 0.3 Lux |
| Waterproof Rating | IP67 |
| Operating Temperature | -30°C to +70°C |
| Current Consumption | Max 80 mA |
| Housing Material | Zinc Alloy Die Cast |
| Connection Type | Wired RCA connector |
| Video Cable Length | 21 feet (6.4 m) with RCA ends |
| Power Cable Length | Included (specific length not specified) |
| Power Requirement | 12V DC (reverse lamp) |
| Warranty | 12 months limited |
| Package Contents | Camera, power cable, 21 ft RCA extension cable, hardware pack (nut & lock washer) |
| Mounting Hole Size | 5/16 inch drill bit required |
| Maintenance | Clean lens periodically; avoid water damage to connections |
Frequently Asked Questions - ACA500 JENSEN
User questions about ACA500 JENSEN
0 question about this device. Answer the ones you know or ask your own.
Ask a new question about this device
Download the instructions for your Dash cam in PDF format for free! Find your manual ACA500 - JENSEN and take your electronic device back in hand. On this page are published all the documents necessary for the use of your device. ACA500 by JENSEN.
USER MANUAL ACA500 JENSEN
natural_image
Abstract blue and white geometric logo design (no text or symbols)AUDIOVOX®
ELECTRONICS CORP.
Model: ACA400 & ACA500
Reverse Camera Installation Manual
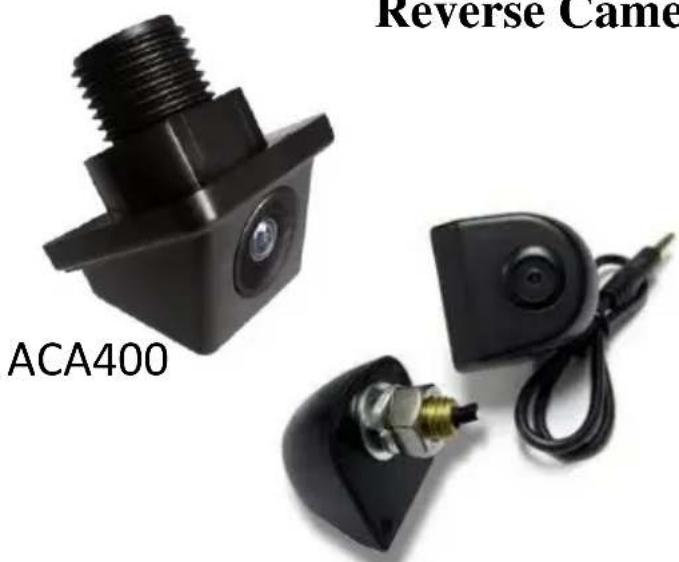
natural_image
Two black automotive sensor components with attached cables, labeled ACA400 (no text or symbols on the devices themselves)ACA500
FEATURES:
● High Resolution: 1/4" CMOS Color Camera
● Compact Zinc Alloy Die Cast Body
● Waterproof Housing
● 150 Degree Wide View Angle
● Minimum Illumination <0.3Lux
● Resolution - 672 x 520
● Waterproof – IP67 Rated
● Operating Temp - 30c to +70c
● Current – Max: 80mA
TABLE OF CONTENTS
Warnings -2
Product Description 4
Packing List -5
Camera Installation 6
Camera Wiring Diagrams-9
Troubleshooting 10-
Warnings
The product is intended to assist in safe driving and to allow the driver to have a broader rear view while the vehicle is in reverse. You, as the driver, are solely responsible for the safe operation of your vehicle and the safety of your passengers according to local traffic regulations. Do not use any features of this system to the extent it distracts you from safe driving. Your first priority while driving should always be the safe operation of your vehicle. Audiovox Electronics Corporation cannot accept any responsibility whatsoever for accidents resulting from failure to observe these precautions or safety instructions.
- This product utilizes high voltage. Any unauthorized modifications or damage to the product may result in electrical shock. Handle all components with care. Inspect regularly for damage to components and cabling.
- You are responsible for ensuring that the installation of this product does not void or affect the vehicle manufacturer's warranty. Audiovox Electronics Corporation or its subsidiaries are not liable in full or in part for improper installation resulting in loss or damage to your property, or for voiding all or part of the vehicle manufacturer's warranty.
- Do not apply excessive force to any of the components contained within this kit. Excessive force used before, during or after installation that results in a damaged or non-functional part will void all warranties.
- Please follow the procedures in this installation manual. Improper installation or modification of this product will void all warranties.
Product Description
This revolutionary camera design integrates a backup camera with your vehicle. The camera is easy to mount on your car, truck, or van but ALWAYS CHECK AND DOUBLE CHECK before drilling or mounting any item on the vehicle. Make sure there are no obstructions in front of the camera, behind where mounting the camera, and that the wire can be run without pinching or interfering with any other item.
This Wired Camera is compatible with most monitor/TFT screens and can be connected using a standard RCA connector. If an extension lead is required be sure to use a Video cable with RCA type ends. An Audio cable will cause poor picture quality.
Packing List
ACA400
- 1 piece CMOS Camera – 1 qty
- 1 piece Hardware pack with nut and retainer clip
- 1 piece 22mm Hole Saw
- 1 piece Power cable
- 1 piece 21' RCA Video Extension Cable – 1 qty
ACA500
- 1 piece CMOS Camera - 1 qty
- 1 piece Hardware pack with nut and lock washer
- 1 piece Power cable
- 1 piece 21' RCA Video Extension Cable – 1 qty
Camera Installation
Look for a location that will give you the best view behind the vehicle. This should not be directly next to or under a reverse/backup lamp as it may blind the camera at night. Avoid license plate lamps as well as they too can blind the camera at night. Before drilling determine the best way to run the power wires to the reverse lights & the extension cable through the car. Insure that your route will not interfere with any safety equipment, trunk release or other items on the vehicle. Once your location has been confirmed
AGAIN DOUBLE CHECK BEFORE YOU DRILL! Look for wires, sensors, double metal, anything that could cause a problem or damage. The camera should lay flat against the mounting surface for proper installation and weather proofing.
- After selecting a mounting surface, either remove the panel if possible or tape off the area to be drilled with masking tape in order to protect the surroundings.
- For the ACA400 Camera, we include a 22mm hole saw. Use this drill bit to drill through your mounting surface for the camera. Make sure that there is not a metal lip or double metal in this area as it could damage the hole saw blade.
- For the ACA500 Camera use a 5/16" drill bit to create your hole to mount the camera.
- After drilling carefully remove any burs or sharp edges so you do not damage the cable when pulling it through. Coat the edge of the hole with rust preventative. On the ACA400 remove the backing on the double sided tape on the top of the camera base before inserting into the mounting location.
-
Carefully route the camera cable connector through the hole and insert the camera into the hole.
-
Use the included hardware to secure the camera in place. DO NOT OVERTIGHTEN the hardware.
-
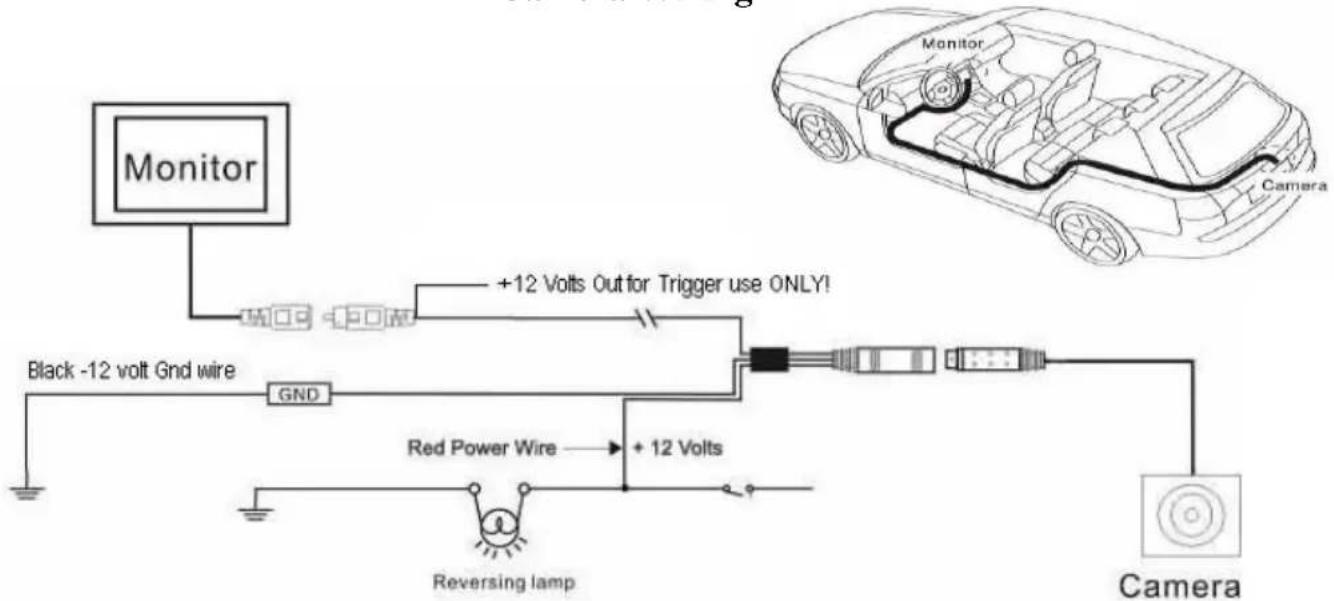
Wire the Camera's power wire to the vehicle's reverse lamp.
a) Locate the reverse lamp in the tail light assembly.
b) Using a crimp connector or by soldering attach the red wire to the positive 12 volt wire from the reverse lamp. This should only have power when the car is in reverse gear and the white lamp it illuminated.
Attach the black wire to the ground (Negative 12 Volts only).
c) If a trigger wire is required at the front of the vehicle or you wish to power your camera from the front of the vehicle use the additional red wire on the video extension cable. NOTE: Do not connect to the reverse lamp and to power at the front of the vehicle. This will cause the reverse lamp to turn on any time you power the camera.
- Run the extension cable to the location of the monitor and connect the other end of the extension cable to the camera. Yellow RCA connected to the Video input.
Camera Wiring
Troubleshooting
| Symptoms | Solutions |
| No video signal appears while reversing the vehicle | 1. Check you reverse trigger wire for your monitor.2. Check the rear view camera wiring connection and RCA connection. |
| Video image is not sharp enough | 1. Clean the camera lens.2. Make sure a Video cable was used and not an Audio cable as the extension |
| Camera stays on when not in reverse. | Check the camera power wiring or your reverse trigger wire. |
12 MONTH LIMITED WARRANTY
Applies to Audiovox Mobile Video Products
AUDIOVOX ELECTRONICS CORP. (the Company) warrants to the original retail purchaser of this product that should this product or any part thereof, under normal use and conditions, be proven defective in material or workmanship within 12 months from the date of original purchase, such defect(s) will be repaired or replaced with reconditioned product (at the Company's option) without charge for parts and repair labor. A game controller, if supplied, is similarly warranted for ninety (90) days.
To obtain repair or replacement within the terms of this Warranty, the product is to be delivered with proof of warranty coverage (e.g. dated bill of sale), specification of defect(s), transportation prepaid, to the Company at the address shown below.
This Warranty does not extend to the elimination of externally generated static or noise, to correction of antenna problems, to costs incurred for installation, removal or reinstallation of the product, or to damage to digital memory/media devices, gaming devices, discs, speakers, accessories, or vehicle electrical systems.
This Warranty does not apply to any product or part thereof which, in the opinion of the Company, has suffered or been damaged through alteration, improper installation, mishandling, misuse, neglect, accident, or by removal or defacement of the factory serial number/bar code label(s). THE EXTENT OF THE COMPANY'S LIABILITY UNDER THIS WARRANTY IS LIMITED TO THE REPAIR OR REPLACEMENT PROVIDED ABOVE AND, IN NO EVENT, SHALL THE COMPANY'S LIABILITY EXCEED THE PURCHASE PRICE PAID BY PURCHASER FOR THE PRODUCT.
This Warranty Is in lieu of all other express warranties or liabilities. ANY IMPLIED WARRANTIES, INCLUDING ANY IMPLIED WARRANTY OF MERCHANTABILITY, SHALL BE LIMITED TO THE DURATION OF THIS WRITTEN WARRANTY. ANY ACTION FOR BREACH OF ANY WARRANTY HEREUNDER INCLUDING ANY IMPLIED WARRANTY OF MERCHANTABILITY MUST BE BROUGHT WITHIN A PERIOD OF 24 MONTHS FROM DATE OF ORIGINAL PURCHASE. IN NO CASE SHALL THE COMPANY BE LIABLE FOR ANY CONSEQUENTIAL OR INCIDENTAL DAMAGES FOR BREACH OF THIS OR ANY OTHER WARRANTY. No person or representative is authorized to assume for the Company any liability other than expressed herein in connection with the sale of this product.
Some states do not allow limitations on how long an implied warranty lasts or the exclusion or limitation of incidental or consequential damage so the above limitations or exclusions may not apply to you. This Warranty gives you specific legal rights and you may also have other rights which vary from state to state.
Audiovox Electronics Corporation, 150 Marcus Blvd., Hauppauge, New York 11788 • 1-600-645-4994
128-5495F
natural_image
Simple line drawing of a laptop with a triangular icon on screen (no text or symbols)For Customer Service
Visit Our Website At
www.audiovox.com
Product Information, Photos,
FAQ's Owner's Manuals
© 2007 Audiovox Electronics Corp., 150 Marcus Blvd., Hauppauge, N.Y. 11788

Brand : JENSEN
Model : ACA500
Category : Dash cam