RP4-HD11 - Car audio interface PAC - Free user manual and instructions
Find the device manual for free RP4-HD11 PAC in PDF.


| Product Type | Aftermarket radio interface for Honda vehicles with MSCAN databus |
| Compatible Vehicles | Select Honda models equipped with MSCAN databus (e.g., Civic, CR-V) |
| Dimensions (approx.) | 4.0 x 3.0 x 1.0 inches |
| Weight (approx.) | 0.5 lb |
| Power Input | 12V DC (vehicle battery) |
| Accessory Output | 1 amp max |
| Outputs | Vehicle Speed Sensor (VSS), Illumination (+), Reverse (+), Parking Brake (-) |
| Steering Wheel Control (SWC) Support | Retains factory SWC with short press/long press dual command capability |
| Factory Amplifier Retention | Yes (for Premium Audio systems) |
| Factory Clock Setting | Retained via interface (except with 7" touchscreen display) |
| Radio Compatibility | Alpine, JVC, Kenwood, Clarion, Pioneer, Sony, Fusion, Advent, BOYO, Dual, Lightning Audio, Rockford Fosgate, Visteon |
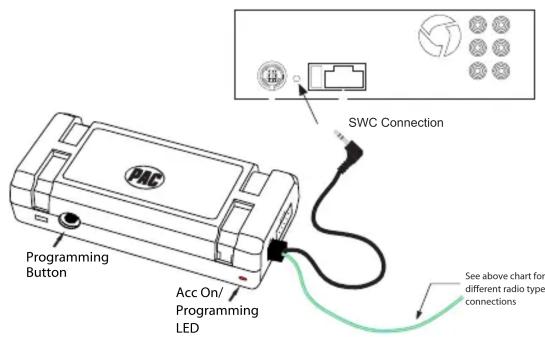
| SWC Connection | Wired remote input (3.5mm jack or Blu/Yel wire) |
| LED Indicator | Flashes when SWC button is pressed |
| Programming Method | On-board programming button; SWC re-calibration available |
| Firmware Update | Via PAC-UP interface updater (sold separately) |
| Installation | Professional installation recommended; ensure rotary switch set correctly |
| Warranty | Limited lifetime warranty (contact PAC-Audio) |
| Manual Languages | English (other languages available via request) |
Frequently Asked Questions - RP4-HD11 PAC
User questions about RP4-HD11 PAC
0 question about this device. Answer the ones you know or ask your own.
Ask a new question about this device
Download the instructions for your Car audio interface in PDF format for free! Find your manual RP4-HD11 - PAC and take your electronic device back in hand. On this page are published all the documents necessary for the use of your device. RP4-HD11 by PAC.
USER MANUAL RP4-HD11 PAC
Introduction & Features
The RP4-HD11 interface allows the replacement of a factory radio in select Honda vehicles with MSCAN databus radios. Using this interface will retain factory features such as steering wheel controls (SWC), the factory amplifier and the ability to set the factory clock when the original radio is removed. Use of this interface also allows you to program two radio functions to each SWC button by using short press long press dual command functionality. The RP4-HD11 also provides data bus driven outputs such as accessory power, vehicle speed sensor (VSS), illumination, reverse trigger and parking brake.
Important Notes
- The radio select rotary switch on the side of the interface must be adjusted to the proper radio setting before plugging the interface into the vehicle (see next page for setting chart).
- The interface comes pre-programmed for all of the vehicles factory SWC functions and does not require programming unless you wish to re-assign the SWC functions or utilize short press long press dual command functionality. The SWC can always be restored to default settings by pressing and releasing the program button on the side of the interface once and waiting 7 seconds for the LED to flash 4 times.
- Vehicles equipped with factory navigation must follow the installation tech brief listed at www.pac-audio.com under the RP4-HD11 product page.
- Vehicles equipped with a 7" touchscreen: Once the factory head unit has been removed you will no longer be able to set the clock or date on the factory display as this is derived from the factory head unit. The date on the screen can be permanently removed by disconnecting the battery to clear the screen's memory. In order to set the clock you will need to disconnect the vehicles battery at 1:00 as this is the time the screen defaults to once it has been reset.
- The LED will flash whenever a SWC button is pressed.
Wiring Connection Chart
Interface Connector
| Red / White | Parking Brake Output (-) |
| Purple / White | Vehicle Speed Output |
| Red | Accessory Output (1 amp) |
| Orange / White | Illumination Output (+) |
| Green | Reverse Output (+) |
| White/Green | SWC Analog Input |
Vehicle Connector
| Yellow | Battery +12v |
| Black | Ground |
| Orange | Dimmer |
| Orange/White | Illumination |
| White | Front L + input |
| White / Black | Front L - input |
| Grey | Front R + input |
| Grey / Black | Front R - input |
| Green | Rear L + input |
| Green / Black | Rear L - input |
| Purple | Rear R + input |
| Purple / Black | Rear R - input |
SWC Connector
| Blu/Yel | Kenwwod, Newer JVC |
| 3.5mm Jack | Alpine, JVC, Clarion, Fusion, Pioneer, Sony, Boyo, Dual, Lightning Audio, Visteon or Advent |
Illustration / Schematic
Wiring

SWC Connection
Installation Steps
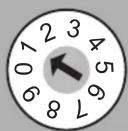
SET RADIO SELECT SWITCH
| Alpine | JVC | Kenwood | Clarion | Pioneer/Other | Sony | Fusion |
| 1 | 2 | 3 | 4 | 7 | 8 | 9 |
Other = Advent, BOYO, Dual, Lightning Audio, Rockford Fosgate, Visteon
IMPORTANT! If you wish to use the Voice, Answer and End buttons you must hardwire them into the RP4-HD11. The wire you need to connect into can be found by removing the plastic panels surrounding the steering wheel column and accessing the connector which houses the wire (Fig. 1). Once you have located the connector you must connect into the wire located in pin 3 (Fig. 2). Wire colors are normally Blue in the Civic & Yellow in the CRV but may vary by vehicle. Connect to the RP4-HD11 interface connector as shown in Fig. 3.
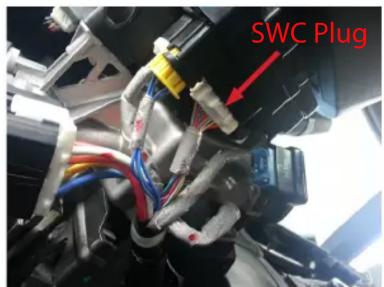
Fig. 1
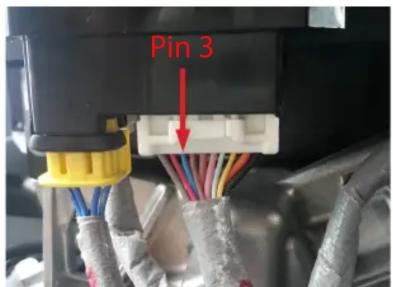
Fig. 2
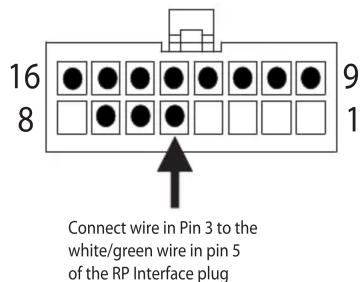
Fig. 3
- The radio select rotary switch on the side of the interface must be adjusted to the proper radio setting before plugging the interface into the vehicle.
- Make all connections as described in the chart on page 1. If there is a Premium Audio system present: Connect the RCA inputs to the aftermarket radios pre-amp output. The audio level will vary depending on the new radios pre-amp output voltage (2-4 volts is recommended). If there is not a Premium Audio system present: Cut the RCA inputs off and connect the aftermarket radios speaker outputs to the remaining wire according to the chart on page 1.
- If the vehicle is equipped with a factory subwoofer plug the RCA cables connected to the 8 pin plug into the Subwoofer or Non-Fading output of the aftermarket radio.
- Connect the SWC wire according to the chart on page 1 (aftermarket radio MUST support a wired remote input).
- If you wish to reassign functions to the SWC follow the programming instructions on the next page.
Default Steering Wheel Control Programming
IMPORTANT! The interface comes pre-programmed for all of the vehicles factory SWC functions and does not require programming unless you wish to re-assign the SWC functions or utilize short press long press dual command functionality. The SWC can always be restored to default settings by pressing and releasing the program button on the side of the interface once and waiting 7 seconds for the LED to flash 4 times.
Default SWC Button Assignments
| Alpine JVC | Kenwood Clarion Pionee | r | Sony | Fusion | ||
| Volume + Volume | + Volume + | Volume + Volume + | Volume + | Volume + | ||
| Volume - | Volume - | Volume - | Volume - | Volume - | Volume - | Volume - |
| Source | Source | Source | Source | Source | Source | Source |
| Track + | Track + | Track + | Track + | Search + | Track + | Track + |
| Track - | Track - | Track - | Track - | Search - | Track - | Track - |
| Voice/Mute | Mute | Mute | Mute | Mute | Mute | Mute |
| Phone Answer | Receive | Receive | Answer | Send | Answer Call | Answer/End |
| Phone End | End | Reject | Voice | End | End | Reject/Source |
Optional Steering Wheel Control Programming
If you wish to re-assign the SWC functions or utilize short press long press dual command functionality, the interface must be programmed in the specific order shown on the chart below. If you come across a function in the chart that your steering wheel does not have, or you do not want to program, press and release the program button on the side of the interface to skip that function. The LED will flash off and on confirming that you have successfully skipped that function and are ready to proceed to the next one.

SET RADIO SELECT SWITCH
| Alpine | JVC | Kenwood | Clarion | Pioneer/Other | Sony | Fusion |
| 1 | 2 | 3 | 4 | 7 | 8 | 9 |
Other = Advent, BOYO, Dual, Lightning Audio, Rockford Fosgate, Visteon
PLEASE NOTE: The screen on the dash can not be in the “Vehicle Menu” mode when reprogramming the SWC. If the screen displays “Vehicle Menu”, press the Menu button on the SWC to leave this screen and ensure you are in the proper mode before proceeding.
- Turn the key to the ignition position.
- Press and release programming button on the side of the interface.
- Within 7 seconds, press the button that is to be learned on the steering wheel. The LED will turn off when the button is pressed.
At this point you have two options:
A. For short press functionality: Release the button within 1.5 seconds. The LED will turn back on.
B. For long press functionality: Hold the button until the LED starts blinking. Release the button and the LED will go back to solid.
- If you need to program more buttons, repeat step 3 for each additional audio function on the steering wheel.
- If you come across a function in the chart that your steering wheel does not have, or you do not want to program, press and release the program button on the side of the interface to skip that function.
- Once programming is completed, wait seven seconds. The LED will flash three times indicating end of programming.
- Test the interface for proper functionality. Whenever a SWC is pressed the LED on the interface should blink. If any function does not work, repeat the programming steps
Optional Programming Order
| Radio | Alpine JV¢ Kenwood Clar | on Other* Pioneer | Sony | Fusion | ||||
| 1 | Volume + | Volume + | Volume + | Volume + | Volume + | Volume + | Volume + | Volume + |
| 2 | Volume - | Volume - | Volume - | Volume - | Volume - | Volume - | Volume - | Volume - |
| 3 | Mute | Mute | Mute | Mute | Mute | Mute | Mute | Mute |
| 4 | Preset + | Source | Source | Source | Preset + | Preset + | Preset + | Source |
| 5 | Preset - | Track + | Play | Search + | Preset - | Preset - | Preset - | Track + |
| 6 | Source | Track - | Track + | Search - | Source | Source | Source | Track - |
| 7 | Track + | Band/Disc + | Track - | Band | Track + | Track + | Track + | Audio |
| 8 | Track - | Preset/Disc - | Disc/FM + | Send/End | Track - | Track - | Track - | Power |
| 9 | Power | Select | Disc/AM - | Send | Band | Band | Band | |
| 10 | Enter/Play | Attenuation | Answer | End | Phone Menu | Reject Call/Source (Bluetooth equipped radios only) | ||
| 11 | Band/Program | Phone Receive | Voice Dial | Answer Call | Answer/End Call | |||
| 12 | Receive | Phone Reject | On Hook | End Call | ||||
| 13 | End | Voice Dial | Off Hook | Voice Activation | ||||
| 14 | Power | Mute (Multimedia units only) | ||||||
| *Other = Advent, Boyo, Dual, Lightning Audio, Rockford Fosgate, & Visteon | ||||||||
SWC Re-calibration
This section only applies to the Answer, Hang Up and Voice buttons. All of the other buttons are data driven and will never require recalibration.
SWC re-calibration is necessary when the SWC operation is erratic or non-existent. This process re-calibrates the SWC values to the RP4 interface so it will know what they can be set to for button function assignment. The interface must be programmed in the specific order shown in the chart below. If you come across a function in the chart that your steering wheel does not have you must press and release the program button on the side of the interface to skip that function. The LED will flash off and on confirming that you have successfully skipped that function and are ready to proceed to the next one.
The SWC and radio command assignments can always be restored to default values by entering re-calibration mode (Steps 1-2) and not pressing any buttons. After 7 seconds the re-calibration mode will time out and all default values will be restored.
- Turn the key to the ignition position.
- Press and hold the programming button for 7 seconds until the LED begins blinking. When the LED begins blinking, release the programming button.
- Within 7 seconds, press and release the button that is to be learned on the steering wheel. The LED will turn off when the button is pressed and come back on when it is released.
- If you need to program more buttons, repeat step 3 for each additional audio function on the steering wheel.
- If you come across a function in the chart that your steering wheel does not have, press and release the program button on the side of the interface to skip that function.
- Once programming is completed, wait seven seconds. The LED will flash three times indicating end of programming.
- Test the interface for proper functionality. Whenever a SWC is pressed the LED on the interface should blink. If any function does not work, repeat the programming steps
| Answer |
| Hang Up |
| Voice |
After you have re-calibrated the SWC buttons, the default SWC button assignments will be the same as what is listed in the chart on page 3. If you wish to re-assign button functions you must also go through the programming process on page 4.
Product Updates (Firmware)
The RP4-HD11 can be updated with new firmware as it becomes available using the PAC-UP interface updater (sold separately). Please visit www.pac-audio.com/firmware for available updates.
Follow the procedure listed below to update the RP4-HD11:
- Unplug all connectors from the RP4 interface
- Set the rotary switch to position 0
- Connect the PAC-UP
- Update the interface
- Disconnect the PAC-UP
- Set the rotary switch back to normal operating position
- Re-connect the RP4 to the vehicle
Brand : PAC
Model : RP4-HD11
Category : Car audio interface