
HCZ-6321 - Camera Hanwha - Free user manual and instructions
Find the device manual for free HCZ-6321 Hanwha in PDF.


| Product Type | PTZ Security Camera |
| Brand | Hanwha |
| Model | HCZ-6321 |
| Image Sensor | 1/2.8" Progressive Scan CMOS |
| Resolution | 2 Megapixel (1920 x 1080) |
| Lens | Motorized Zoom, 4.25-9mm (2.1x Optical) |
| Pan/Tilt Range | Pan: 360° Continuous; Tilt: -15° to 90° |
| Night Vision | IR LEDs, up to 30m Range |
| Power Supply | PoE (IEEE 802.3af) or 24V AC |
| Power Consumption | Max 12W (IR On) |
| Dimensions (W x H x D) | 200 x 220 x 180 mm |
| Weight | 1.8 kg |
| Weatherproof Rating | IP66 |
| Operating Temperature | -30°C to 55°C |
| Video Compression | H.265, H.264, MJPEG |
| Frame Rate | 30fps at 1080p |
| Motion Detection | Yes, with tampering alarm |
| Audio | Built-in microphone, speaker |
| Storage | MicroSD slot up to 256GB |
| Networking | 1 x RJ45 10/100 Base-T, PoE |
| Mounting | Wall or Ceiling mount, bracket included |
| Certification | CE, FCC, UL |
Frequently Asked Questions - HCZ-6321 Hanwha
User questions about HCZ-6321 Hanwha
0 question about this device. Answer the ones you know or ask your own.
Ask a new question about this device
Download the instructions for your Camera in PDF format for free! Find your manual HCZ-6321 - Hanwha and take your electronic device back in hand. On this page are published all the documents necessary for the use of your device. HCZ-6321 by Hanwha.
USER MANUAL HCZ-6321 Hanwha
High Resolution 32X Zoom Color Camera
User Manual
HCZ-6321
High Resolution 32X Zoom Color Camera
User Manual
Copyright
©2020 Hanwha Techwin Co., Ltd. All rights reserved.
Trademark
Each of trademarks herein is registered. The name of this product and other trademarks mentioned in this manual are the registered trademark of their respective company.
Restriction
Copyright of this document is reserved. Under no circumstances, this document shall be reproduced, distributed or changed, partially or wholly, without formal authorization.
Disclaimer
Hanwha Techwin makes the best to verify the integrity and correctness of the contents in this document, but no formal guarantee shall be provided. Use of this document and the subsequent results shall be entirely on the user's own responsibility. Hanwha Techwin reserves the right to change the contents of this document without prior notice.
◆ Design and specifications are subject to change without prior notice.
CAUTION
RISK OF ELECTRIC SHOCK. DO NOT OPEN

CAUTION:
TO REDUCE THE RISK OF ELECTRIC SHOCK, DO NOT REMOVE COVER (OR BACK) NO USER SERVICEABLE PARTS INSIDE. REFER SERVICING TO QUALIFIED SERVICE PERSONNEL.

This symbol indicates that dangerous voltage consisting a risk of electric shock is present within this unit.

This exclamation point symbol is intended to alert the user to the presence of important operating and maintenance (servicing) instructions in the literature accompanying the appliance.
WARNING
- To prevent damage which may result in fire or electric shock hazard, do not expose this appliance to rain or moisture.
- To prevent injury, this apparatus must be securely attached to the floor/wall in accordance with the installation instructions.
WARNING
- Be sure to use only the standard adapter that is specified in the specification sheet. Using any other adapter could cause fire, electrical shock, or damage to the product.
- Incorrectly connecting the power supply or replacing battery may cause explosion, fire, electric shock, or damage to the product.
- Do not connect multiple cameras to a single adapter. Exceeding the capacity may cause abnormal heat generation or fire.
- Securely plug the power cord into the power receptacle. insecure connection may cause fire.
-
When installing the camera, fasten it securely and firmly. The fall of camera may cause personal injury.
-
Do not place conductive objects (e.g. screwdrivers, coins, metal parts, etc.) or containers filled with water on top of the camera. doing so may cause personal injury due to fire, electric shock, or falling objects.
- Do not install the unit in humid, dusty, or sooty locations. doing so may cause fire or electric shock.
- If any unusual smells or smoke come from the unit, stop using the product. in such case, immediately disconnect the power source and contact the service center. continued use in such a condition may cause fire or electric shock.
- If this product fails to operate normally, contact the nearest service center. never disassemble or modify this product in any way. (Hanwha Techwin is not liable for problems caused by unauthorized modifications or attempted repair.)
- When cleaning, do not spray water directly onto parts of the product. doing so may cause fire or electric shock.
CAUTION
- Do not drop objects on the product or apply strong shock to it. Keep away from a location subject to excessive vibration or magnetic interference.
- Do not install in a location subject to high temperature (over 55° C), low temperature (below -10° C), or high humidity. Doing so may cause fire or electric shock.
- If you want to relocate the already installed product, be sure to turn off the power and then move or reinstall it.
- Remove the power plug from the outlet when then there is a lightning. Neglecting to do so may cause fire or damage to the product.
- Keep out of direct sunlight and heat radiation sources. It may cause fire.
- Install it in a place with good ventilation.
- Avoid aiming the camera directly towards extremely bright objects such as sun, as this may damage the CCD image sensor.
- Apparatus shall not be exposed to dripping or splashing and no objects filled with liquids, such as vases, shall be placed on the apparatus.
- The Mains plug is used as a disconnect device and shall stay readily operable at any time.
- Do not expose the camera to radioactivity. Radioactivity exposure may damage the CMOS.
4_ safety information
FCC STATEMENT
This device complies with part 15 of the FCC Rules. Operation is subject to the following two conditions :
1) This device may not cause harmful interference, and
2) This device must accept any interference received including interference that may cause undesired operation.
CAUTION
This equipment has been tested and found to comply with the limits for a Class A digital device, pursuant to part 15 of FCC Rules. These limits are designed to provide reasonable protection against harmful interference when the equipment is operated in a commercial environment.
This equipment generates, uses, and can radiate radio frequency energy and, if not installed and used in accordance with the instruction manual, may cause harmful interference to radio communications. Operation of this equipment in a residential area is likely to cause harmful interference in which case the user will be required to correct the interference at his own expense.

IC Compliance Notice
This Class A digital apparatus meets all requirements of the Canadian Interference.-Causing Equipment Regulations of ICES-003.
Correct Disposal of This Product (Waste Electrical & Electronic Equipment)
(Applicable in the European Union and other European countries with separate collection systems)
This marking on the product, accessories or literature indicates that the product and its electronic accessories (e.g. charger, headset, USB cable) should not be disposed of with other household waste at the end of their working life. To prevent possible harm to the environment or human health from uncontrolled waste disposal, please separate these items from other types of waste and recycle them responsibly to promote the sustainable reuse of material resources.
Household users should contact either the retailer where they purchased this product, or their local government office, for details of where and how they can take these items for environmentally safe recycling.
Business users should contact their supplier and check the terms and conditions of the purchase contract. This product and its electronic accessories should not be mixed with other commercial wastes for disposal.

Correct disposal of batteries in this product
(Applicable in the European Union and other European countries with separate battery return systems.)
This marking on the battery, manual or packaging indicates that the batteries in this product should not be disposed of with other household waste at the end of their working life. Where marked, the chemical symbols Hg, Cd or Pb indicate that the battery contains mercury, cadmium or lead above the reference levels in EC Directive 2006/66. If batteries are not properly disposed of, these substances can cause harm to human health or the environment.
To protect natural resources and to promote material reuse, please separate batteries from other types of waste and recycle them through your local, free battery return system.

- Read these instructions.
- Keep these instructions.
- Heed all warnings.
- Follow all instructions.
- Do not use this apparatus near water.
- Clean the contaminated area on the product surface with a soft, dry cloth or a damp cloth. (Do not use a detergent or cosmetic products that contain alcohol, solvents or surfactants or oil constituents as they may deform or cause damage to the product.)
- Do not block any ventilation openings. Install in accordance with the manufacturer's instructions.
- Do not install near any heat sources such as radiators, heat registers, or other apparatus (including amplifiers) that produce heat.
- Do not defeat the safety purpose of the polarized or grounding-type plug. A polarized plug has two blades with one wider than the other. A grounding type plug has two blades and a third grounding prong. The wide blade or the third prong is provided for your safety. If the provided plug does not fit into your outlet, consult an electrician for replacement of the obsolete outlet.
- Protect the power cord from being walked on or pinched particularly at plugs, convenience receptacles, and the point where they exit from the apparatus.
- Only use attachments/accessories specified by the manufacturer.
- Use only with cart, stand, tripod, bracket, or table specified by the manufacturer, or sold with the apparatus.
- Unplug this apparatus when a card is used. Use caution when moving the cart/ apparatus combination to avoid injury from tip-over.
- Refer all servicing to qualified service personnel. Servicing is required when the apparatus has been damaged in any way, such as powersupply cord or plug is damaged, liquid has been spilled or objects have fallen into the apparatus, the apparatus has been exposed to rain or moisture, does not operate normally, or has been dropped.
- This product is intended to be supplied by Listed Power Unit marked "Class 2" or "LPS" and rated 12 Vdc, min. 0.45 A.
- If you use excessive force when installing the product, the camera may be damaged and malfunction. If you forcibly install the product using non-compliant tools, the product may be damaged.
- Do not install the product in a place where chemical substances or oil mist exists or may be generated. As edible oils such as soybean oil may damage or warp the product, do not install the product in the kitchen or near the kitchen table. This may cause damage to the product.
- When installing the product, be careful not to allow the surface of the product to
- Read these instructions.
- Keep these instructions.
- Heed all warnings.
- Follow all instructions.
- Do not use this apparatus near water.
- Clean the contaminated area on the product surface with a soft, dry cloth or a damp cloth. (Do not use a detergent or cosmetic products that contain alcohol, solvents or surfactants or oil constituents as they may deform or cause damage to the product.)
- Do not block any ventilation openings. Install in accordance with the manufacturer's instructions.
- Do not install near any heat sources such as radiators, heat registers, or other apparatus (including amplifiers) that produce heat.
- Do not defeat the safety purpose of the polarized or grounding-type plug. A polarized plug has two blades with one wider than the other. A grounding type plug has two blades and a third grounding prong. The wide blade or the third prong is provided for your safety. If the provided plug does not fit into your outlet, consult an electrician for replacement of the obsolete outlet.
- Protect the power cord from being walked on or pinched particularly at plugs, convenience receptacles, and the point where they exit from the apparatus.
- Only use attachments/accessories specified by the manufacturer.
- Use only with cart, stand, tripod, bracket, or table specified by the manufacturer, or sold with the apparatus.
- Unplug this apparatus when a card is used. Use caution when moving the cart/ apparatus combination to avoid injury from tip-over.
- Refer all servicing to qualified service personnel. Servicing is required when the apparatus has been damaged in any way, such as powersupply cord or plug is damaged, liquid has been spilled or objects have fallen into the apparatus, the apparatus has been exposed to rain or moisture, does not operate normally, or has been dropped.
- This product is intended to be supplied by Listed Power Unit marked "Class 2" or "LPS" and rated 12 Vdc, min. 0.45 A.
- If you use excessive force when installing the product, the camera may be damaged and malfunction. If you forcibly install the product using non-compliant tools, the product may be damaged.
- Do not install the product in a place where chemical substances or oil mist exists or may be generated. As edible oils such as soybean oil may damage or warp the product, do not install the product in the kitchen or near the kitchen table. This may cause damage to the product.
- When installing the product, be careful not to allow the surface of the product to
be stained with chemical substance. Some chemical solvents such as cleaner or adhesives may cause serious damage to the product's surface.
- If you install/disassemble the product in a manner that has not been recommended, the production functions/performance may not be guaranteed. Install the product by referring to "Installation & connection" in the user manual.
- Installing or using the product in water can cause serious damage to the product.

Hanwha Techwin cares for the environment at all product manufacturing stages to preserve the environment, and is taking a number of steps to provide customers with more environment-friendly products. The Eco mark represents Hanwha Techwin's will to create environment-friendly products, and indicates that the product satisfies the EU RoHS Directive.
INTRODUCTION

9 Features
10 What's included
11 Component names and functions
CONNECTION
13 Connecting to Monitor
13 Connecting to Power
14 CONTROL VIA RS-485 INTERFACE
15 Using Coaxial Communications
16 Connecting to 8P Control Terminal
CAMERA OPERATION

18 Menu Configuration
19 Menu Setup
TROUBLESHOOTING
38 Troubleshooting
SPECIFICATIONS

39 Specifications
41 Dimensions
SAMSUNG-T PROTOCOL COMMAND DESCRIPTION
42 SAMSUNG-T Protocol Command Description
FEATURES
82x Optical Zoom
The built-in HCZ-6321(32x) optical zoom lens is a highly durable component. It features auto focus, auto iris, and zoom functions.
High Resolution
Use of a 2.38 mega pixel CMOS device provides clear pictures with a horizontal resolution of 1000TV lines.
SSNR (Samsung Super Noise Reduction)
The high-performance WN2 chip effectively removes low-light gain noise and ghosting to provide clear images even in dark environments.
DIS (Digital Image Stabilizer)
Digital image stabilization compensates camera shakings for enhanced image capture.
SSDR (Samsung Super Dynamic Range)
For images with high contrast between bright and dark areas from difficult lighting conditions such as backlighting, this camera selectively illuminates darker areas while retaining the same light level for brighter areas to even out the overall brightness.
DAY&NIGHT(ICR)
This camera has a function that automatically selects the mode that is appropriate for daytime or night-time conditions. The COLOR mode operates in daytime conditions to provide optimum colors, and BW mode operates in night-time conditions to enhance the definition of the image.
Motion Detection
Since the camera detects motion without any additional external sensor, you can monitor activity more efficient.
Miscellaneous Functions
HLC(High Light Compensation), FLIP(H/V-REV), D-ZOOM, SHARPNESS, MOTION DETECTION and PRIVACY functions are provided.
Communication
RS-485, Coaxial communication methods are supported.
- RS-485 Communications: Samsung-T/E, Pelco-D/P, Panasonic, Bosch, AD, Vicon, Honeywell
- Coaxial Communications: ACP (AHD Coax Protocol)
OSD
The camera's OSD is complimented by 9 foreign languages.
- English, French, German, Spanish, Italian, Russian, Portuguese, Japanese, Korean
WHAT'S INCLUDED

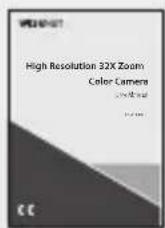
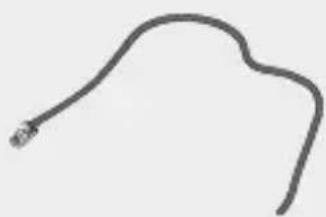
Main Body Quick Manual 8-PIN CABLE ASSY
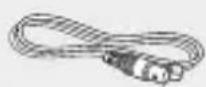
Cable for the testing monitor
FRONT SIDE

① Mounting Bracket Screw Hole
Used to fix the camera on a mounting bracket.
The screw size : It is the specification for the screws used to fasten the camera to the support.
1/4" -20 UNC
L: 4.5mm±0.2mm (ISO Standard), or 0.197" (ASA Standard)

② Zoom Lens
Built-in zoom lens.

- Mounting Bracket is not included. For more information to use mounting bracket, refer to the product's documentation.
- Wipe out a dirty surface of the lens softly with a lens tissue or cloth to which you have applied ethanol.
If it is installed in a way that the fixture part is placed upwards, the video will flip. To adjust this, use Horizontal/Vertical flip described on page 35.
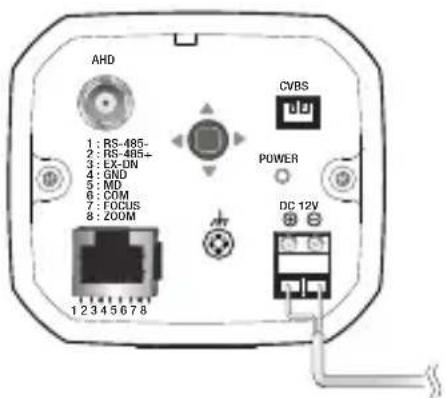
REAR SIDE

1 AHD Jack
Sends video signal and connects to the Video IN port of a AHD DVR.
2 CVBS Jack
Analog video output port. (for installation)
3 Function Setup switch
Press the Function Setup switch to display the menu screen. After the menu is displayed on the screen, move the cursor
Also, moving the cursor up/down/left/right to control zoom, focus, and auto focus functions.
moving the cursor down : To widen the view. (ZOOM OUT)
moving the cursor up : To close in on a far object. (ZOOM IN)
moving the cursor left : To see a near object clearly.
moving the cursor right : To see a far object clearly.
4 Power LED
Illuminates when power is supplied.
5 Power Input Terminal
Power supply terminal (DC12V±10%)
6 RJ-45 JACK
Terminals, such as RS-485 communications, MD OUT, ZOOM, and FOCUS, EX_DN are included.
CONNECTING TO MONITOR
Refer to the following figure to connect monitors through DVR.
![graph TD A["HCZ-6321"] --> B["AHD DVR"] B --> C["Monitor"]](/content/2026/05/831817/images/3d4af31ebae1fbd8104cf9fe8f1d225596ac9ce18ea49fb34e8fa636893857e5.jpg)
- As the connecting method varies with the instruments, refer to the manual supplied with the instrument.
- Only connect the cable when the power is turned off.
CONNECTING TO POWER
You can connect power as shown in the following figure.

■Use of an excessively long adaptor output line for connection to the camera may affect the performance of the camera.
■Standard voltage for camera operation : DC12V ± 10%
■The wire is polarized. Match ‘+’ and ‘-’ terminals properly.
When the resistance value of copper wire is at [20°C(68°F)]
| Copper wire size (AWG) #24 (0.22mm) #22 (0.33mm) #20 (0.52mm) #18 (0.83mm) | ||||||
| Resistance value(Ω/m) 0.078 0.050 0.030 0.018 | ||||||
| Voltage Drop (V/m) 0.028 0.018 0.011 0.006 | ||||||
- As shown in the table above, voltage decreases as the wire gets longer. Therefore use of an excessively long adaptor output line for connection to the camera may affect the performance of the camera.
*Standard voltage for camera operation : DC 12V±10%
There may be some deviation in voltage drop depending on the type of wire and the manufacturer.

Be sure to connect power only after all the installation is complete.
CONTROL VIA RS-485 INTERFACE
The camera can be controlled by using external controllers like a Remote controller. (RS-485 Communication)
(1) To control by PC
Connect the RS-485 control port of the camera and the serial cable through an RS-485 converter.
Example) PC Serial Port → Serial Cable → RS-485 Converter → Camera RS-485 Control Port.
(2) To control using a DVR or System Controller
Connect the RS-485 cable (TRX+, TRX-) to the connection port of the 485 control board that is connected to the DVR or System Controller.
| 485 Control Board Connection Port RS-485 Control Port | |
| (+) CONNECTION TERMINAL (TRX+) 485+ | |
| (-) CONNECTION TERMINAL (TRX-) 485- |
* RS-485 Communication establishment initial value
| Item | Camera ID | BAUD RATE | UART MODE | RET PKT |
| Initial value | 1 | 9600 | 8-NONE-1 | ENABLE |

To control the camera by constructing an additional controller, use the Samsung-T/E, Pelco-D/P, Panasonic, Bosch, AD, Vicon, Honeywell.
14 connection
USING COAXIAL COMMUNICATIONS
• Coaxial Communications System
- OSD Control method
The camera's video output port is connected to the monitor with a BNC coaxial cable, shown below: If the distance between the camera and the monitor exceeds the recommended maximum, please use an auxiliary video amp.

| Distance Recommended Cable Specification | |
| 500m 5C2V | |
It is recommended that pure copper coax cable is used and not copper coated steel, as this will cause issues with the communication over the coaxial cable.
CONNECTING TO 8P CONTROL TERMINAL
The camera can be controlled by using external controllers like a Remote controller. (RS-485 Communication)
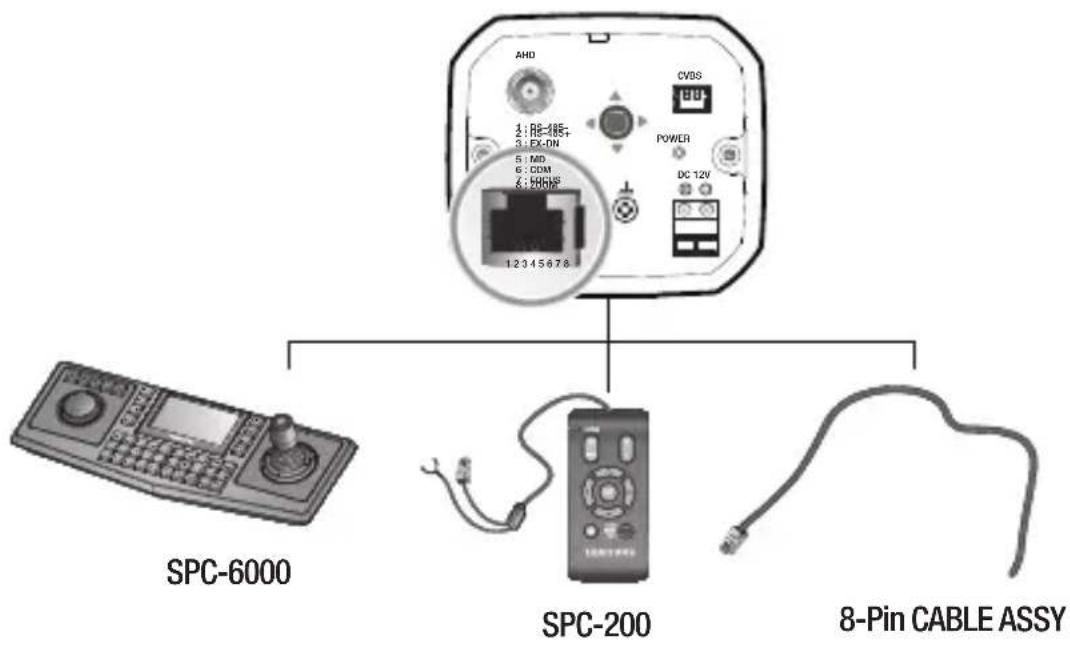
* 8P Control Terminal Configuration
| Name Cable color | Description | Name Cable color Description | |||
| ZOOM ORANGE | - | GND BLUE - | |||
| FOCUS | WHITE/ORANGE | EX DN WHITE/BLUE External D/N | |||
| COM GREEN 485+ BROWN RS-485 communication | |||||
| MD | WHITE/GREEN | 485- | WHITE/BROWN | RS-485 communication | |
| Connector | Function S | Signal Level I/O | |
| ZOOM | Tele | 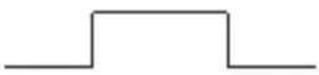 +6V ~ +12VCOM +6V ~ +12VCOM | I |
| Wide |  COM-6V ~ -12V COM-6V ~ -12V | ||
| FOCUS | Far |  +6V ~ +12VCOM +6V ~ +12VCOM | I |
| Near | 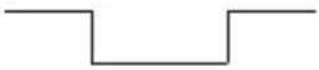 COM-6V ~ -12V COM-6V ~ -12V | ||
| COM |  COM COM | - | |
| MD |  | O | |
| EX DN | DAY mode: D&N terminals must be OPEN to external signals.(Do not input voltage)NIGHT mode: D&N terminal must be connected to the ground | I | |
MD(Motion Detection) Output format is open collector.
- When using the MD function, the 'GND' should be connected to the frame ground.
Do not simultaneously connect the RS-485 (+) (-) communication line when you use voltage control ZOOM and FOCUS, using the RECEIVER BOX (SRX-100B).
* Match the communication setup between devices when you use the wired controller (SPC-200) or SPC-6000.
| ITEM SPC-200 SPC-6000(Factory Default) | ||
| MODE Serial Serial | ||
| Data Bit 8 bit 8 bit | ||
| Bit/Sec 9600bps 9600bps | ||
| Parity | EVEN NONE | |
| CAM ID NO. | 0 | 1~255 |
| RETURN PACKET | ENABLE | See the SPC-6000 manual |
Contact an authorized technician for inspection.
MENU CONFIGURATION
| MAIN SETUP MENU | |||
| SSDR | ● ON | ● OFF | |
| WHITE BAL | ● ATW● OUTDOOR● SODIUM | ● MANUAL● INDOOR | ● AWC→SET● MERCURY |
| BACKLIGHT | ● OFF● WDR | ● BLC | ●HLC |
| INTELLIGENCE | ● OFF | ● ON | |
| FOCUS← | ● MODE● D-ZOOM● LENS INIT | ● ZOOM TRACK● ZOOM POS INIT● RETURN | ● ZOOM SPEED● USER PRESET |
| EXPOSURE← | ● BRIGHTNESS● AGC | ● IRIS● SSNR | ● SHUTTER● RETURN |
| SPECIAL← | ● PRIVACY● DEFOG● DISPLAY | ● DAY/NIGHT● COMM ADJ● RETURN | ● DIS● IMAGE ADJ |
| RESET | |||
| EXIT | |||
Use Function Setup switch on back of the camera.
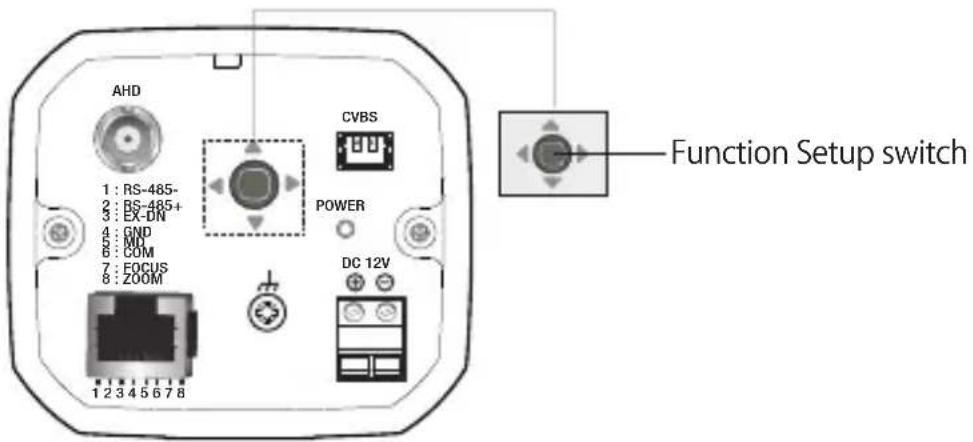
- Press Function Setup switch for 3 seconds.
- Main setup menu is displayed on the monitor screen.
Select the function using the Function Setup switch.
![graph TD A["MAIN SETUP"] --> B["SSDR ON"] B --> C["WHITE BAL ATW"] C --> D["BACKLIGHT OFF"] D --> E["INTELLIGENCE OFF"] E --> F["FOCUS ←"] F --> G["EXPOSURE ←"] G --> H["SPECIAL ←"] H --> I["RESET"] I --> J["EXIT"] A --> K["Change the status using the Function Setup switch."]](/content/2026/05/831817/images/37178cb4fe8ad81b6073671f941f6eebe13b000da1b8d0ca5fd84520164726bf.jpg)
- Select a desired function using the Function Setup switch
- Place the cursor over a desired item.
-
Set up a selected item by using the Function Setup switch.
-
To finish the setting, select 'EXIT' and press the Function Setup switch.
An item with the ← icon also has sub menus. To select a sub menu, select an item with the icon and press the Function Setup switch.
An item with the --- icon is unavailable due to function settings.
SSDR (SUPER DYNAMIC RANGE)
SSDR illuminates darker spots of an image while retaining the same light level for brighter spots to even out the overall brightness of images with high contrast between bright and dark spots
MAIN SETUP
▶ SSDR
ON
WHITE BAL ATW
- When the SETUP menu screen is displayed, select 'SSDR' by using the Function Setup switch so that the arrow indicates 'SSDR'.
- Use the Function Setup switch to change the SSDR level according to the contrast between bright and dark areas.

SSDR ON

SSDR OFF
WHITE BAL (WHITE BALANCE)
Use the White Balance function to adjust the screen color.
- When the SETUP menu screen is displayed, select 'White Bal' by using the Function Setup switch so that the arrow indicates 'White Bal'.
- Select a desired mode using Function Setup switch.
MAIN SETUP
SSDR
ON
WHITE BAL
ATW
BACKLIGHT
OFF
- Select one of the following 7 modes, as appropriate for your purpose.
ATW: Select this when the color temperature is between 1,800°K and 10,500°K.
MANUAL: Select this to fine-tune White Balance manually. Set White Balance first by using the ATW or AWC mode. After that switch to MANUAL mode, fine-tune the White Balance and then press the Function Setup switch.
AWC→SET : To find the optimal luminance level for the current environment, point the camera towards a sheet of white paper and press the Function Setup switch. If the environment changes, readjust it.
OUTDOOR: Select this when the color temperature is between 1,700°K and 11,000°K. (sodium light inclusion)
INDOOR: Select this when the color temperature is between 4,500°K and 8,500°K.
MERCURY: This is an auto compensation function that optimizes camera colors for the environments such as mercury lamps. (Color temperature: 2400°K\~11000°K)
- SODIUM: The image automatically compensates to the sodium lamp environment.
White Balance may not work properly under the following conditions. In this case select the AWC mode.
When the color temperature of the environment surrounding the subject is out of the control range (e.g. clear sky or sunset).
② When the ambient illumination of the subject is dim.
3 If the camera is directed towards a fluorescent light or is installed in a place where illumination changes dramatically, the White Balance operation may become unstable.
BACKLIGHT
Unlike conventional cameras, the HCZ-6321 is designed to deliver a distinctive subject and background at the same time, even when the subject is backlight, by using the features of the proprietary WN2 chip.
- When the SETUP menu screen is displayed, select 'Backlight' by using Function Setup switch so that the arrow indicates 'Backlight'.
- Select a desired mode using Function Setup switch depending on the camera purpose.
• OFF : Cancels the BLC function.
BLC :
You can specify a desired area on the video manually and set the area to be displayed more clearly.
- LEVEL : You can adjust the brightness of the monitoring area.
- TOP/BOTTOM/LEFT/RIGHT : You can adjust the position of the monitoring area.
- HLC (HIGH LIGHT COMPENSATION) : If the scene contains extremely bright light areas such as; from car headlight, the light can mask out much of the on-screen detail.
- LEVEL : Adjust level of the HLC function.(LOW,MIDDLE,HIGH)
- MASK TONE : Change the brightness

Since the following symptoms may occur according to the ambient illumination when WDR/BLC is selected, set it to OFF.
1 Color or screen changes unnaturally.
2 Noise appears in the bright part of the screen.
1 Color or screen changes unnaturally.
2 Noise appears in the bright part of the screen.
Since the performance of the BLC/WDR/HLC function may be affected by the area of the bright part of the screen, optimize the installation angle for the best BLC/WDR/HLC performance.
- Activating BLC may cause the camera to repeat the Auto Focus operation depending on lighting conditions. It is recommended that you use the Focus Setup menu in One-Push or Manual mode.
■ Smart Zoom and BLC cannot be used in conjunction with each other:
Setting up Smart Zoom and then BLC automatically cancels Smart Zoom.
Since the performance of the BLC/WDR/HLC function may be affected by the area of the bright part of the screen, optimize the installation angle for the best BLC/WDR/HLC performance.
- Activating BLC may cause the camera to repeat the Auto Focus operation depending on lighting conditions. It is recommended that you use the Focus Setup menu in One-Push or Manual mode.
■ Smart Zoom and BLC cannot be used in conjunction with each other:
Setting up Smart Zoom and then BLC automatically cancels Smart Zoom.
| MAIN SETUP | |
| SSDR | ON ← |
| WHITE BAL ATW | |
| ▶ BACKLIGHT | OFF |
| INTELLIGENCE | OFF |
| BLC SETUP | ||
| LEVEL | MIDDLE | |
| TOP | ********** | 30 |
| BOTTOM | ********** | 70 |
| LEFT | ********** | 30 |
| RIGHT | ********** | 70 |
| RETURN← | ||
| HLC SETUP | ||
| LEVEL | MIDDLE | |
| MASK TONE | ********** | 7 |
| RETURN← | ||
HLC SETUP
▶ LEVEL MIDDLE MASK TONE 😊* 😊 7 RETURN

Since the following symptoms may occur according to the ambient illumination when WDR/BLC is selected, set it to OFF.
- When dark, the HLC is only activated when a bright light exceeding a specific size. (In NIGHT ONLY mode.)
• WDR
When there are both bright and dark areas at the same time, this mode makes both areas distinctive.
- LEVEL : Select one from low, middle, high to adjust the brightness of the WDR setup.
- RETURN: Return to the MAIN SETUP menu.
WDR SETUP MODE
LEVEL
MIDDLE
RETURN


INTELLIGENCE
Commands the camera to motion-detect and trace an object
- When the SETUP menu screen is displayed, select 'INTELLIGENCE' by using the Function Setup Switch so that the arrow indicates 'INTELLIGENCE'.
-
Select a desired mode using the Function Setup switch.
-
DETECTION : Since the camera detects motion without any additional external sensor, you can monitor activity more efficient.
-
TRACKING : Commands the camera to detect and trace a moving object.
-
TYPE : Two types, line and area, of fences are available.
- COUNT : Displays the number of times that an object enters or leaves a fenced area.
- DISPLAY : Determines whether to display the fence.
- FILL : Fill or remove color from the FENCE.
- POSITION : Defines the position and detection direction of a line or fenced area.
1) LINE FENCE
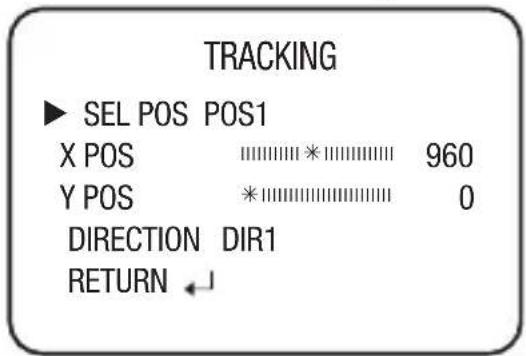
- SEL POS : Selects a position from POS1,POS2.
- X POS / Y POS : Adjust the size and position of the selected line fence.
- DIRECTION
- SEL POS : Selects a position from POS1,POS2.
- X POS / Y POS : Adjust the size and position of the selected line fence.
- DIRECTION
• DIR1 : Detects objects moving left to right on the fence line.
- DIR2 : Detects objects moving right to left on the fence line.
- DIR1/2 : Detects all objects moving crosswise on the fence line.
• DIR1 : Detects objects moving left to right on the fence line.
- DIR2 : Detects objects moving right to left on the fence line.
- DIR1/2 : Detects all objects moving crosswise on the fence line.
- RETURN : Select this to save the POSITION menu settings and return to the TRACKING menu.
2) AREA FENCE
- SEL POS : S elects a position from POS1 \~ POS4.
- X POS / Y POS : Adjust the size and position of the selected area fence.
INTELLIGENCE
| ▶ DETECTION | OFF |
| TRACKING | OFF |
| FIXED/MOVED OFF | |
| TAMPERING OFF | |
| DETECT BOX OFF | |
| ALARM OUT ON | |
| SMART ZOOM | OFF |
| SETUP CONFIG← | |
| RETURN← |
TRACKING
| TYPE | LINE |
| COUNT | OFF |
| DISPLAY | ON |
| FILL | ON |
| POSITION← | |
| RETURN← |
1) LINE FENCE
- RETURN : Select this to save the POSITION menu settings and return to the TRACKING menu.
- DIRECTION
• IN : Detects objects entering the fenced area.
• OUT : Detects objects exiting the fenced area
- IN/OUT : Detects all objects entering and exiting the fenced area.
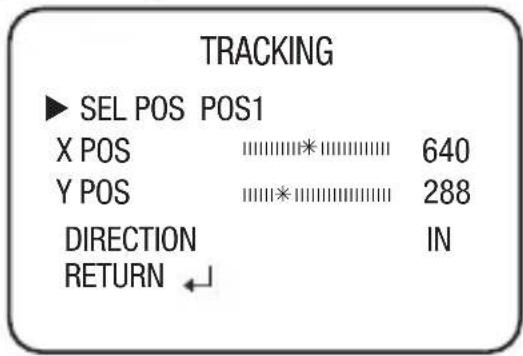
- RETURN : Select this to save the POSITION menu settings and return to the TRACKING menu.
- FIXED/MOVED : Detects an object that emerges or disappears from the screen, or stays onscreen without movement.

detection (FIXED/MOVED) error may occur if :
• multiple motions occur continuously in random directions
• A fixed object moves in one position continuously
• A second object screens the first moving object
- TAMPERING: You can set to detect tampering attempts and trigger events, such as blocked lens.
- DETECT BOX: Outlines an object on the screen in a box when its movement matches a custom Motion Type.
- ALARM OUT: Releases a signal from the MD Output Port on the back of the camera when an object's movement matches a custom Motion Type.
- SMART ZOOM :
Smart zoom is operated in connection with MOTION DETECTION. When the SMART ZOOM function is 'ON' while the MOTION DETECTION mode is 'ON', the zoom goes to the TARGET ZOOM

position once motion is detected. Once the zoom action is finished and 'DWELL TIME' has passed, the zoom returns to the 'START ZOOM' position.
- START ZOOM : By moving the Function Setup Switch in the 'START ZOOM' item to select the zoom position from 1x to 32x to be returned after the 'SMART ZOOM' action is over.
- TARGET ZOOM : Use the Function Setup Switch in the 'TARGET ZOOM' item to select the zoom position from 1x to 32x to be used during MOTION DETECTION.
- DWELL TIME : Use the left or right button in the 'DWELL TIME' item to select a time between 5 and 60 seconds for the dwell time before the zoom is returned to the 'START ZOOM' position. (5,7,10,15,20,30,40,60 sec)
- SETUP CONFIG
- DETECT AREA : Defines the Motion Detection area.
- AREA SEL: You can select up to 4 areas.
• MODE : Determines whether to use the area selected in the AREA.
• DETECT ALARM : Determines whether to use the detect alarm selected in the AREA.
- TOP / BOTTOM / LEFT / RIGHT : Adjust the size and position of the selected area.
- RETURN : Select this to save the DETECT AREA menu settings and return to the SETUP CONFIG menu.
- MASK AREA : Specify a detection exception area to mask. Select a mask area number and specify the size and position.
- AREA : You can select up to 4 areas.
• MODE : Determines whether to use the area selected in the AREA. - TOP/ BOTTOM/LEFT/ RIGHT : Adjust the size and position of the selected area.


- SENSITIVITY : Set the sensitivity of the motion detection. When you adjust the lower level, the more sensitive.
- DET. SIZE : Selects an object size to detect on the screen. When you adjust higher levels, the more larger size.
- RETURN : Return to the INTELLIGENCE menu.

Tips on Using the Motion Detection Feature
- The feature may not function properly under flickering light conditions.
- The camera interprets sudden changes in lighting and subsequent change in brightness of an object as motion.
- With the feature enabled, other algorithms may require additional time to operate.
- This system does not guarantee prevention of fire or theft. The manufacturer shall not be held responsible for any accident or damage incurred.
FOCUS
- Press the FUNCTION SETUP SWITCH to access the main setup menu and then position the indicator over FOCUS using the FUNCTION SETUP SWITCH.
- Press the FUNCTION SETUP SWITCH.
- MODE: You can select the most suitable zoom mode. Move the arrow indicator to 'MODE' using FUNCTION SETUP SWITCH.
FOCUS SETUP
| MODE | ONE-PUSH← |
| ZOOM TRACK | AUTO TRACK |
| ZOOM SPEED | FAST |
| D-ZOOM | OFF |
| ZOOM POS INIT | AUTO |
| USER PRESET | OFF |
| LENS INIT | MANUAL← |
| RETURN← |
- ONE-PUSH:
Focus is automatically adjusted just once, after zoom position is changed. Select 'ONE PUSH' and the FUNCTION SETUP SWITCH to confirm. Increase or decrease optical zoom (ZOOM) or digital zoom (D-ZOOM) positions using the FUNCTION SETUP SWITCHwhile verifying the changes on screen. Press
ZOOM/FOCUS POS SETUP
| ←: NEAR →: FAR |
| ↑: TELE ↓: WIDE |
the FUNCTION SETUP SWITCH once the desired image quality is obtained.
- AUTO :
Select AUTO and press the FUNCTION SETUP SWITCH to confirm. Increase or decrease optical zoom (ZOOM) or digital zoom (D-ZOOM) positions using the FUNCTION SETUP SWITCH while verifying the changes on screen.
ZOOM POS SETUP
| ↑ : TELE ↓ : WIDE |
Enabling D-ZOOM (ON) means that digital zoom will activate once optical zoom ends. The focus automatically adjusts when the lens zooms in and out.
- MANUAL :
Select 'MANUAL' and press the FUNCTION SETUP SWITCH to confirm. Increase or decrease optical zoom (ZOOM) or digital zoom (D-ZOOM) positions moving directional buttons while verifying the changes on screen. Press the FUNCTION SETUP SWITCH once desired image quality is obtained. Focus
can be manually adjusted, independent of moving zoom.
ZOOM/FOCUS POS SETUP

•ZOOM TRACK :
Select 'ON' for the 'SMART ZOOM' item in the MOTION DETECTION menu and press FUNCTION SETUP SWITCH to change the settings for the 'SMART ZOOM' function.
Use the FUNCTION SETUP SWITCH in the 'ZOOM' item to select 'AUTOTRACK' or 'TRACK' and press FUNCTION SETUP SWITCH to activate the zoom action focus function.

- AUTO TRACK : Zooming in while deciding or adjusting the status of the focus.
- TRACK : The camera moves the focus track which is established.
- OFF : Only the zoom lens moves.
ZOOM SPEED :
Configure zoom tracing speed using this feature. Position the indicator over 'ZOOM SPEED' using the FUNCTION SETUP SWITCH and then set to desired mode using the FUNCTION SETUP SWITCH.
- FAST : To move zoom fast.
- SLOW : To move zoom slowly.
- MEDIUM : To move zoom at medium speed.
FOCUS SETUP
▶ ZOOM SPEED FAST D-ZOOM OFF
D-ZOOM :
Configure magnification limit from x2\~x16 using this feature. Position the indicator over 'D-ZOOM' using the FUNCTION SETUP SWITCH Set 'D-ZOOM' to 'ON' and press the FUNCTION SETUP SWITCH to confirm.
D-ZOOM LIMIT SETUP
▶ LIMIT X2 RETURN
- Set 'ZOOM LIMIT' to the desired level using the FUNCTION SETUP SWITCH.

When the DIS is enabled, you cannot use the D-ZOOM.
ZOOM POS INIT :
Moves to the controlled ZOOM position when the power is turned on and the initial ZOOM position has been set.
- AUTO : If you turn the power off and on, the zoom magnification level is set to the previous level that was set before the power went off.
- MANUAL : The zoom magnification level can be set from 1x to 32x.
FOCUS SETUP
MODE ONE-PUSH
The zoom position is saved after 10 minutes when you set zoom function.
- USER PRESET :
Preset user-designated configurations using this feature. Position the indicator over 'USER PRESET' using the FUNCTION SETUP switch and then set to 'ON' using the FUNCTION SETUP switch. Press the FUNCTION SETUP switch to confirm.
- PRESET NO :
Up to 128 preset configurators are supported.
- PRESET SAVE : Save configured preset.
- PRESET CLEAR : Clear configured preset.
- RETURN : Revert to the FOCUS SETUP menu.
FOCUS SETUP
MODE ONE-PUSH
- AUTO : The lens can automatically be set by a pre-selected day, from 1-day to 7-days. This will start from when
LENS INIT SETUP
▶ DAY 1
RETURN ←
- Manual : The Lens will reset when you press the FUNCTION SETUP switch.
- RETURN: Save the current settings and return to the parent menu (MAIN SETUP).
EXPOSURE
From the Main Setup menu, select EXPOSURE and press Function Setup Switch. You can now change the exposure setting.
- Press the Function Setup Switch to access the main setup menu and then position the indicator over EXPOSURE.
- Press the Function Setup Switch button.
BRIGHTNESS :
Use this feature to adjust image brightness. Position the indicator over 'BRIGHTNESS' using the Function Setup Switch. Then increase or decrease brightness level using the Function Setup Switch while verifying the changes on screen.
- IRIS : Set 'IRIS' to 'AUTO' or 'MANUAL'. Position the indicator over 'IRIS' using the Function Setup Switch and then select the desired iris mode.
- AUTO: The iris is automatically activated upon illumination.
- MANUAL : Manual iris configuration. Set 'IRIS' to 'MANUAL' using the Function Setup Switch and then press the Function Setup Switch. Increase or decrease iris level using the
Function Setup Switch while verifying the changes on screen.
MAIN SETUP
| ▶ IRIS F-NoRETURN← | F1.6 |
SHUTTER : Control image brightness by adjusting shutter speed.
1 Position the indicator over 'SHUTTER' using the Function Setup Switch. Then select the desired shutter mode (A.FLK, ESC).
- A.FLK (NTSC: 1/100, PAL: 1/120) : Flicker-free mode.
- ESC : Automatic shutter speed setting (optimal).
EXPOSURE SETUP
| BRIGHTNESS | 50 |
| IRIS | AUTO |
| SHUTTER | ESC |
| AGC | HIGH |
| SSNR | MEDIUM |
| RETURN |
② Press the FUNCTION SETUP SWITCH to complete.
Image may become unstable if the camera is set to 'ESC' mode and faces a strong fluorescent light.
In case the shutter is set to Low Speed in a bright environment, saturation may occur.
- AGC (Automatic Gain Control) adjusts the camera's gain control and the screen brightness if the camera has captured an object under low-light conditions.
① Position the indicator over 'AGC' using the Function Setup Switch.
2 Set 'AGC' to the desired mode.
- HIGH : Wide range gain value adjustment
- LOW : Narrow range gain value adjustment
- MEDIUM : MEDIUM range gain value adjustment
EXPOSURE SETUP
| BRIGHTNESS | 50 |
| IRIS | AUTO |
| SHUTTER | ESC |
| AGC | HIGH |
| SSNR | MEDIUM |
| RETURN |
- SSNR(Super Noise Reduction): On screen noise reduction.
1 Position the indicator over 'SSNR' using the Function Setup Switch.
2 Set 'SSNR' to the desired mode.
- LOW: Low noise reduction
- MEDIUM: Medium noise reduction
- HIGH: High noise reduction
- OFF: Disabled
EXPOSURE SETUP
| BRIGHTNESS | 50 |
| IRIS | AUTO |
| SHUTTER | ESC |
| AGC | HIGH |
| SSNR | MEDIUM |
| RETURN |
Changing the 'AGC' setting from LOW to HIGH results in greater sensitivity, as well as on screen noise.
Setting 'AGC' to OFF locks 'SSNR' configuration.
- RETURN : To revert to the main setup menu.
SPECIAL
- Press the Function Setup Switch to access the main setup menu and then position the indicator over 'SPECIAL'.
- Press the Function Setup Switch to confirm.
- PRIVACY: Hide the area that you want not to be displayed on the screen.
When the SPECIAL menu screen is displayed, using the Function Setup Switch so that the arrow indicates 'PRIVACY'.
2 Set up the mode using the Function Setup Switch.
- AREA : You can select up to 12 areas.
- MODE : Determines whether to use the area selected in the AREA SEL.
-
MASK COLOR : Determine area color. You can select Green, Red, Blue, Black, White, Gray.
-
TOP / BOTTOM / LEFT / RIGHT:
Adjust the size and position of the selected area. - RETURN : Return to the SPECIAL SETUP menu.
DAY/NIGHT: You can display pictures in color or black and white.
When SPECIAL SETUP menu screen is displayed, select 'DAY/NIGHT' using the Function Setup Switch so that the arrow indicates 'DAY/NIGHT'.
2 Select a desired mode according to the picture display you want.
| MAIN SETUP | |
| SSDR | ON ← |
| WHITE BAL ATW | |
| BACKLIGHT | OFF |
| INTELLIGENCE | OFF |
| FOCUS← | |
| EXPOSURE← | |
| ▶ SPECIAL← | |
| RESET | |
| SPECIAL SETUP | |
| ▶ | PRIVACY←DAY/NIGHT AUTO← |
| PRIVACY SETUP | ||
| ▶ AREA SEL AREA 1 | ||
| AREA MODE OFF | ||
| MASK COLOR | GRAY | |
| TOP | ||||* | 192 |
| BOTTOM | ||||* | 352 |
| LEFT | ||||* | 256 |
| RIGHT | ||||* | 512 |
| RETURN← | ||
| SPECIAL SETUP | |
| PRIVACY← | |
| DAY/NIGHT | AUTO← |
| DIS | OFF |
| DEFOG | OFF |
- AUTO : The mode is switched to 'Color' in a normal environment, but switches to 'B/W' mode when ambient illumination is low. To set up the switching time or speed for AUTO mode, press the Function Setup Switch.
DAY/NIGHT AUTO SETUP
▶ DWELL TIME 5 SEC DURATION SLOW RETURN
▶ DWELL TIME : You can select day/night switching delay time from. →5, 7, 10, 15, 20, 30, 40, 60(sec)
▶ DURATION : You can select the day/night switching point.
- COLOR: The picture is always displayed in color.
- B/W : The picture is always displayed in black and white.
- EXTERN : This mode allows you to apply a desired filter to external signals.
You cannot control the DAY/NIGHT menu when AGC in the EXPOSURE menu is 'OFF'. At this time, the exchange between DAY mode and NIGHT mode operates as like selecting 'COLOR' mode.
- The OSD key does not work for 3 seconds when switching to Color or B/W, to ensure stable camera operation.
- The camera may focus less well under infrared illumination than under normal illumination.
■ The brightness of illumination is changeable by installed environment.
DIS: The DIS mode can compensate for vibration of the camera.

When DIS is operating, D-ZOOM does not operate.
SPECIAL SETUP
PRIVACY
DAY/NIGHT
AUTO
▶ DIS
DIS
OFF
DEFOG
OFF
- DEFOG: You can use the defog mode to allow the camera to automatically detect the fog density of the screen and display a clear image despite smog, fog or general poor visibility.
- AUTO : Adjust the level automatically.
- Manual : Depending on the defog level set by the user, adjust the clarity of image.
- OFF : Released state
DEFOG LEVEL SETUP
LEVEL
||||*|||||||||
4
RETURN
COMM ADJ (Communication Adjustment) :
This function sets up the camera communication status when controlling the camera through an external controlled device.
When the SPECIAL menu screen is displayed, using the UP or DOWN button so that the arrow indicates 'COMM ADJ'.
② Set up the mode moving the Function Setup Switch.
- Protocol : Select the communication PROTOCOL. (SAMSUNG-T, SAMSUNG-E, Pelco-P, Pelco-D, Vicon, Panasonic, Bosch, Honeywell, AD.)
- CAM ID: Determines the camera's identification number (between 0 and 255).
COMMUNICATION SETUP
▶ PROTOCOL
SAMSUNG-T
CAM ID
*|||||||||||||||||
9600
BAUD RATE
8-N-1
UART MODE
ENABLE
RET PKT
ON
COAX
RETURN←
- BAUD RATE : You can select 2400/4800/9600/19200/38400/57600/115200 bps.
- UART MODE : You can select NONE, EVEN or ODD for the parity bits.
- RET PKT : You can choose whether to send an ACK signal when the communication control command is issued to the camera.
- COAX : You can select whether to use COAX communication. Coaxial communication is not available in CVBS mode.
◆IMAGEADJ: Includes image quality or special function factors.
When the SETUP menu screen is displayed, select 'IMAGE ADJ.' using the Function Setup Switch so that the arrow indicates 'IMAGE ADJ.
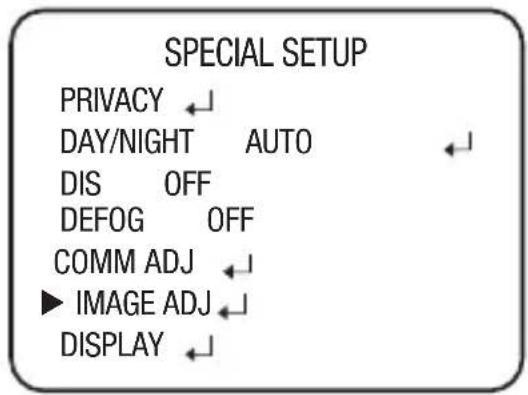
2 Select a desired mode using the Function Setup Switch.
- H-REV : You can flip the picture horizontally on the screen.
- V-REV : You can flip the picture vertically on the screen.
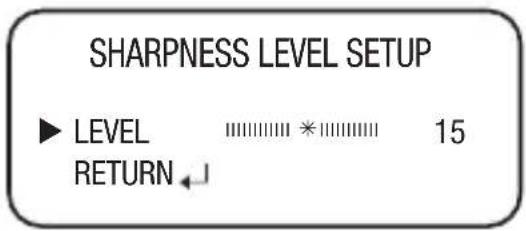
- SHARPNESS : As you increase this value, the picture outline becomes stronger and clearer.

- MONITOR : Please change the settings value of video appropriate to your monitor.
▶ LCD: Please select this menu item when using an LCD monitor.
▶ USER : Please use this menu item when
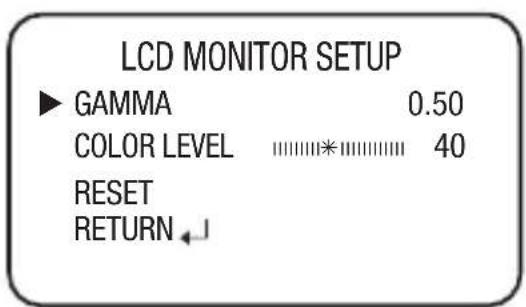
ard ones. You can change the gamma and
- RETURN : Return to the SPECIAL menu.
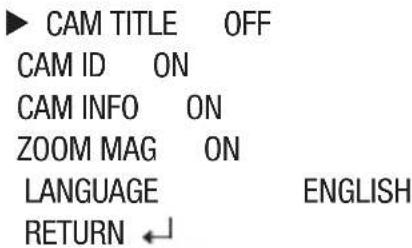
DISPLAY: Use this feature to designate a name for the camera, which will display on the monitor screen.
-CAM TITLE
1 PresstheFunction Setup Switch to display the main setup menu and move the arrow indicator to 'CAM TITLE' using the Function Setup Switch.
2 Set 'CAM TITLE' to 'ON' using the Function Setup Switch.

the CAM TITLE feature is set to OFF', the name will not displayed in the monitor
3 Press the Function Setup Switch.
4 Use the Function Setup Switch to move to a desired letter and select the letter by pressing the Function Setup Switch. Repeat this to enter multiple letters. You can enter up to 15 letters.
DISPLAY SETUP
CAMERA TITLE SETUP
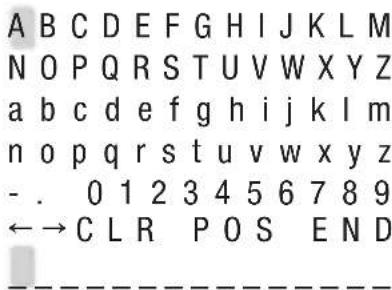
Correcting Mistakes
Move the cursor th 'CLR' and press the Function Setup Switch to clear the entire entry. To modify one character, use LEFT or RIGHT to position the cursor above the character to be modified and click the Function Setup Switch after selecting the character to enter.
5 Enter a title, move the cursor to 'POS' and press the Function Setup Switch. The entered title appears on the screen. Select the position to display the title on the screen by moving the Function Setup Switch and press the Function Setup Switch. When the position is determined, select END.

- CAM ID : Displays camera ID on top left corner of the screen.
- CAM INFO : Displays camera information on screen.
- ZOOM MAG : Use this feature to display the current zoom magnification level on screen. Position the indicator over 'ZOOM MAG' using the Function Setup Switch. Then set to ON using the Function Setup Switch.
- LANGUAGE : You can select the menu language according to your requirements.
- RETURN: Select this to save the SPECIAL menu settings and return to the SPECIAL menu.
RESET
Resets the camera settings to the factory defaults. Communication, Language and Monitor settings are not initialized.
EXIT
To finish setup menu.
TROUBLESHOOTING
If you have trouble operating your camera, refer to the following table.
If the guidelines do not enable you to solve the problem, contact an authorized technician.
| PROBLEM SOLUTION | |
| Nothing appears on the screen. | ▸ Ensure that your camera is supplied with rated power as appropriate.▸ Check that you have properly connected VIDEO cable to the camera VIDEO output jack. |
| The image on the screen is dim. | ▸ If the lens is dusty, wipe it out with a clean cloth or brush.▸ Set the monitor to proper condition.▸ If the camera is exposed to too strong light, change the camera position. |
| The image on the screen is dark. | ▸ Adjust the contrast feature of the monitor.▸ If you have an intermediate device, set the 75Ω / Hi-z properly. |
| The camera is not working properly, and the surface of the camera is hot. | ▸ Check that you have properly connected the camera to an appropriate power source. |
| The Motion Detection function does not work. | ▸ Check that MOTION DET of INTELLIGENCE menu is ‘OFF’. |
| Color is not correct. | ▸ Check the setting of WHITE BAL SETUP menu . |
| The screen flickers continually. | ▸ Check that direction of camera turns toward the Sun. |
| When coaxial communication is not available: | ▸ Make sure that the camera and monitor are installed within the recommended distance.▸ Use the video amplifier equivalent to coaxitron if the recommended installation distance is exceeded. |
SPECIFICATIONS
| HCZ-6321 | |
| VIDEO | |
| Imaging Device 1/2.8" 2.38M CMOS | |
| Total Pixels 1952(H) x 1116(V), 2.18M | |
| Effective Pixels 1944(H) x 1104(V), 2.14M | |
| Scanning System Progressive | |
| Min. Illumination | Color: 0.2 Lux (1/30sec, F1.6, 30IRE), 0.003 Lux(2sec, F1.6, 30IRE)B/W: 0.01 Lux (1/30sec, F1.6, 30IRE), 0.0001 Lux(2sec, F1.6, 30IRE) |
| S / N Ratio 50dB | |
| Video Output AHD: 1080p, BNCCVBS: SD, DIP connector type | |
| Lens Type | |
| Focal Length (Zoom Ratio) | 4.44 ~ 142.6mm(Optical 32X) |
| Max. Aperture Ratio F1.6 (Wide) / F4.4 (Tele) | |
| Angular Field of View H: 62.8°(Wide) ~ 2.23°(Tele)/ V: 36.80°(Wide) ~ 1.26°(Tele) | |
| Min. Object Distance Wide 1.5m ,Tele 2m | |
| Focus Control Auto / Manual / One Push | |
| Lens Type DC Auto Iris | |
| Mount Type Board-in type | |
| OPERATIONAL | |
| Camera Title Off / On (Displayed up to15 characters) | |
| Day & Night Auto (ICR) / External / Color / B/W | |
| Backlight Compensation | Off / BLC / HLC / WDR |
| Wide Dynamic Range | 120dB |
| Contrast Enhancement | SSDR(Off / On) |
| Digital Noise Reduction | SSNRIII (2D+3D Noise Filter) (Off / On) |
| Digital Image Stabilization | Off / On |
| Defog | Off/Auto/Manual |
| Motion Detection | Off / On (4ea Rectangle zone) |
| Privacy Masking | Off / On (12 Zones of Rectangle zone) |
| Gain Control | Off / Low / Middle / High |
| White Balance | ATW / AWC / Manual / Indoor / Outdoor / Mercury / Sodium |
| Electronic Shutter Speed | Minimum / Maximum / Anti flicker (2 ~ 1/33,000sec) |
| Digital Zoom 16x | |
| Flip / Mirror Off / On | |
| Intelligent Video Analytics Detection / Tracking / Fixed Moved / Tampering | |
| Remote Control I/F RS-485, Coaxial | |
| Protocol RS-485: Samsung-T/E, Pelco-D/P, Panasonic, Bosch, AD, Vicon, HoneywellCoaxial : ACP (AHD Coax Protocol) | |
| Video Transmission Distance 500m(5C2V Coaxial Cable) | |
| Environmental | |
| Operating Temperature / Humidity | -10°C ~ +55°C (+14°F ~ +131°F) / Less than 90% RH |
| Storage Temperature / Humidity | -10°C ~ +60°C (-22°F ~ +140°F) / Less than 90% RH |
| Electrical | |
| Input Voltage | DC12V |
| Power Consumption Max. 6W | |
| Mechanical | |
| Color / Material Dark Gray / Metal | |
| Dimension (WxHxD) | 71.8 x 63.9 x 137.25 mm |
| Weight 451g | |
※ The specification for this product may change without prior notice for product improvement.
Unit : mm [Inches]

SAMSUNG-T PROTOCOL COMMAND DESCRIPTION
| Command Name | Byte1 Byte2 Byte3 | |||
| Command Packet | STX | CAM ID | HOST ADDR | |
| Return Packet | STX | CAM ID | HOST ADDR | |
| Checksum | CHECKSUM CALCULATION: UNARY OPERATION OF SUMMATION (EX) CHECKSUM = ~(BYTE2+BYTE3+... +BYTE8+ BYTE9); | |||
| Reset | Function | Reset all data to factory default value. | ||
| Command Packet A0h CAM ID | HOST ADDR | |||
| Return Packet | A0h | CAM ID | HOST ADDR | |
| Focus Far | Function | Move focus lens to far direction. | ||
| Command Packet A0h CAM ID | HOST ADDR | |||
| Return Packet | A0h | CAM ID | HOST ADDR | |
| Focus Near | Function | Move focus lens to near direction. | ||
| Command Packet A0h CAM ID | HOST ADDR | |||
| Return Packet | A0h | CAM ID | HOST ADDR | |
| Zoom Wide | Function | Move zoom lens to wide direction. | ||
| Command Packet | A0h | CAM ID | HOST ADDR | |
| Return Packet | A0h | CAM ID | HOST ADDR | |
| Zoom Tele | Function | |||
| Command Packet | A0h | CAM ID | HOST ADDR | |
| Return Packet | A0h | CAM ID | HOST ADDR | |
| ZOOM Direct | Function | |||
| Command Packet A0h CAM ID | HOST ADDR | |||
| Return Packet | A0h | CAM ID | HOST ADDR | |
| Parameter | P1,P2: OPTICAL ZOOM = 0000h ~ 07DDhP3: DIGITAL ZOOM = ((256*10)/Ratio)-1EX) D-ZOOM 1.1x : P3 = E7h = ((256*10)/11)-1, Ratio 11 means D-ZOOM 2.0x : P3 = 7Fh = ((256*10)/20)-1, Ratio 20 means 2 | |||
| AF Stop | Function | Stop zoom & focus lens moving. | ||
| Command Packet | A0h | CAM ID | HOST ADDR | |
| Return Packet | A0h | CAM ID | HOST ADDR | |
| One push AF | Function | Unconditionally execute auto focus. | ||
| Command Packet | A0h | CAM ID | HOST ADDR | |
| Return Packet | A0h | CAM ID | HOST ADDR | |
| Byte4 II Byte5 Byte 6 Byte7 Byte8 Byte9 Byte10 Byte11 | ||||||
| CAMMAND | DATA3 | DATA4 | DATA5 | DATA6 | ETX | CHECKSUM |
| CAMMAND | DATA3 | DATA4 | DATA5 | DATA6 | ETX | CHECKSUM |
FROM BYTE2 TO BYTE9.
| 000Fh | 00h | 00h | 00h | 00h | AFh | CHECK SUM |
| 000Fh | 00h | 00h | 00h | 00h | AFh | CHECK SUM |
| 0100h | 00h | 00h | 00h | 00h | AFh | CHECK SUM |
| 0100h | 00h | 00h | 00h | 00h | AFh | CHECK SUM |
| 0200h | 00h | 00h | 00h | 00h | AFh | CHECK SUM |
| 0200h | 00h | 00h | 00h | 00h | AFh | CHECK SUM |
| 0040h | 00h | 00h | 00h | 00h | AFh | CHECK SUM |
| 0040h | 00h | 00h | 00h | 00h | AFh | CHECK SUM |
| 0045h | 00h | 00h | 00h | 00h | AFh | CHECK SUM |
| 0045h | 00h | 00h | 00h | 00h | AFh | CHECK SUM |
SAMSUNG-T Protocol Command Description
| User Preset Save | Function Save current user preset configuration information. | |||
| Command Packet A0h CAM ID HOST ADDR | ||||
| Return Packet | A0h | CAM ID | HOST ADDR | |
| Parameter P1:00h(USER PRESET 1) ~ 80h(USER PRESET 128) | ||||
| User Preset Exec. | Function Execute selected user preset. | |||
| Command Packet A0h CAM ID HOST ADDR | ||||
| Return Packet | A0h | CAM ID | HOST ADDR | |
| Parameter P1:00h(USER PRESET 1) ~ 80h(USER PRES ET 128) | ||||
| User Preset Clear | Function Clear selected user preset. | |||
| Command Packet A0h CAM ID HOST ADDR | ||||
| Return Packet | A0h | CAM ID | HOST ADDR | |
| Parameter P1:00h(USER PRESET 1) ~ 80h(USER PRES ET 128) | ||||
| OSD Menu On/Off | Function Display OSD menu on the screen.Clear OSD menu and save current menu setup. | |||
| Command Packet A0h CAM ID HOST ADDR | ||||
| Return Packet | A0h | CAM ID | HOST ADDR | |
| Parameter P1 : 00h = ON01h = OFF | ||||
| OSD Menu Up | Function Move OSD arrow to up. | |||
| Command Packet A0h CAM ID HOST ADDR | ||||
| Return Packet | A0h | CAM ID | HOST ADDR | |
| OSD Menu Down | Function Move OSD arrow to down. | |||
| Command Packet | A0h | CAM ID | HOST ADDR | |
| Return Packet | A0h | CAM ID | HOST ADDR | |
| OSD Menu Left | Function Move OSD arrow to left. | |||
| Command Packet | A0h | CAM ID | HOST ADDR | |
| Return Packet | A0h | CAM ID | HOST ADDR | |
| OSD Menu Right | Function Move OSD arrow to right. | |||
| Command Packet | A0h | CAM ID | HOST ADDR | |
| Return Packet | A0h | CAM ID | HOST ADDR | |
| OSD Menu Set | Function Move to inside menu | |||
| Command Packet | A0h | CAM ID | HOST ADDR | |
| Return Packet | A0h | CAM ID | HOST ADDR | |
| OSD Menu ESC | Function Move to upper menu. | |||
| Command Packet | A0h | CAM ID | HOST ADDR | |
| Return Packet | A0h | CAM ID | HOST ADDR | |
44_ SAMSUNG-T Protocol Command Description
| 0003h P1 00h 00h 00h Afh CHECK SUM | ||||||
| 0003h | P1 | 00h | 00h | 00h | Afh | CHECK SUM |
| 0008h 00h 00h 00h 00h AFh CHECK SUM | ||||||
| 0008h | 00h | 00h | 00h | 00h | AFh | CHECK SUM |
Gyeonggi-do, 463-400 Rep. of KOREA
Tel: +82.70.7147.8753 Fax: +82.31.8018.3740
www.hanwha-security.com
Hanwha Techwin America
500 Frank W. Burr Blvd. Suite 43 Teaneck, NJ 07666
Toll Free +1.877.213.1222 Direct +1.201.325.6920
Fax +1.201.373.0124
www.hanwhasecurity.com
Hanwha Techwin Europe
Heriot House, Heriot Road, Chertsey, Surrey, KT16 9DT, United Kingdom
Tel +44.1372.235663 Fax +44.1932.57.8101
www.hanwha-security.eu
Hanwha Techwin Vietnam Hanoi Office
28th Floor, Handico Building, Pham Hung Street, Me Tri ward,
Nam Tu Liem District, Hanoi City, Vietnam
Tel: +84.91.982.40.88
http://hanwha-security.com
- HIGH RESOLUTION 32X ZOOM COLOR CAMERA
- USER MANUAL
- TRADEMARK
- RESTRICTION
- DISCLAIMER
- CAUTION
- WARNING
- 4_ SAFETY INFORMATION
- FCC STATEMENT
- IC COMPLIANCE NOTICE
- CORRECT DISPOSAL OF THIS PRODUCT (WASTE ELECTRICAL & ELECTRONIC EQUIPMENT)
- CORRECT DISPOSAL OF BATTERIES IN THIS PRODUCT
- INTRODUCTION
- CONNECTION
- CAMERA OPERATION
- TROUBLESHOOTING
- SPECIFICATIONS
- SAMSUNG-T PROTOCOL COMMAND DESCRIPTION
- FEATURES
- 82X OPTICAL ZOOM
- HIGH RESOLUTION
- SSNR (SAMSUNG SUPER NOISE REDUCTION)
- DIS (DIGITAL IMAGE STABILIZER)
- SSDR (SAMSUNG SUPER DYNAMIC RANGE)
- DAY&NIGHT(ICR)
- MOTION DETECTION
- MISCELLANEOUS FUNCTIONS
- COMMUNICATION
- OSD
- WHAT'S INCLUDED
- FRONT SIDE
- ① MOUNTING BRACKET SCREW HOLE
- ② ZOOM LENS
- REAR SIDE
- CONNECTING TO MONITOR
- CONNECTING TO POWER
- CONTROL VIA RS-485 INTERFACE
- 14 CONNECTION
- USING COAXIAL COMMUNICATIONS
- CONNECTING TO 8P CONTROL TERMINAL
- SSDR (SUPER DYNAMIC RANGE)
- MAIN SETUP
- WHITE BAL (WHITE BALANCE)
- BACKLIGHT
- HLC SETUP
- WDR
- WDR SETUP MODE
- INTELLIGENCE
- DIRECTION
- TIPS ON USING THE MOTION DETECTION FEATURE
- FOCUS
- ZOOM/FOCUS POS SETUP
- ZOOM TRACK
- ZOOM SPEED
- FOCUS SETUP
- D-ZOOM
- D-ZOOM LIMIT SETUP
- ZOOM POS INIT
- USER PRESET
- LENS INIT SETUP
- EXPOSURE
- BRIGHTNESS
- EXPOSURE SETUP
- SPECIAL
- DAY/NIGHT AUTO SETUP
- SPECIAL SETUP
- DEFOG LEVEL SETUP
- COMMUNICATION SETUP
- CAM TITLE
- DISPLAY SETUP
- CAMERA TITLE SETUP
- RESET
- EXIT
- HANWHA TECHWIN AMERICA
- HANWHA TECHWIN EUROPE
- HANWHA TECHWIN VIETNAM HANOI OFFICE
Brand : Hanwha
Model : HCZ-6321
Category : Camera