
S05A - Montre-bracelet SEIKO - Free user manual and instructions
Find the device manual for free S05A SEIKO in PDF.


| Product Type | Digital Stopwatch for Industrial Measurement |
| Model | Cal. S05A |
| Brand | Seiko |
| Power Source | 1 Seiko CR2032 battery |
| Battery Life | Approximately 3 years (up to 7 years with auto shut-off activated) |
| Display | 2-row digital display and dot matrix (5x35 dots), liquid crystal panel |
| Stopwatch Capacity | Up to 99999.9 DM (decimal minutes) in 1/10 DM increments |
| Memory | Up to 100 lap/split time data sets |
| Timer | Double repeat timer with two independent timers (Timer 1 & Timer 2), settable from 10 seconds to 99 hours 59 minutes 59 seconds |
| Alarm | Daily alarm with 20-second beep, can be engaged/disengaged |
| Calendar | Automatic calendar from Jan 1, 2006 to Dec 31, 2055; includes leap years |
| Water Resistance | 5 bar (50 meters) – splash/rain resistant but not for swimming/diving |
| Operating Temperature Range | -10°C to +60°C |
| Storage Temperature Range | 0°C to 50°C recommended |
| Accuracy | ±0.0012% (approx. ±30 seconds per month at normal temperature) |
| Dimensions | Approx. 80mm (L) x 60mm (W) x 20mm (H) (estimated) |
| Weight | Approx. 50g (estimated) |
| Strap | Neck strap included |
| Maintenance | Periodic check every 2-3 years; replace battery at authorized dealer |
| Static Electricity Protection | Keep away from strong static sources like TV screens |
| Automatic Shut-off (ECO) | Display blanks after 1 hour of inactivity; time shown every 10 seconds in blank mode |
| IC Reset | Press all four buttons simultaneously for 2-3 seconds to reset if display abnormal |
Frequently Asked Questions - S05A SEIKO
User questions about S05A SEIKO
0 question about this device. Answer the ones you know or ask your own.
Ask a new question about this device
Download the instructions for your Montre-bracelet in PDF format for free! Find your manual S05A - SEIKO and take your electronic device back in hand. On this page are published all the documents necessary for the use of your device. S05A by SEIKO.
USER MANUAL S05A SEIKO
SEIKO DIGITAL STOPWATCH FOR INDUSTRIAL MEASUREMENT Cal. S05A
You are now the proud owner of a SEIKO Digital Stopwatch Cal. S05A. For best results, please read the instructions in this booklet carefully before using your SEIKO Digital Stopwatch. Please keep this manual handy for ready reference.

WARNING
NOTES ON THE BATTERY
●Do not remove the battery from the stopwatch.
- If it is necessary to take out the battery, keep it out of the reach of children. If a child swallows it, consult a doctor immediately.
● Never short-circuit, heat or otherwise tamper with the battery, and never expose it to fire. The battery may burst, become very hot or catch fire.
● The battery is not rechargeable. Never attempt to recharge it, as this may cause battery leakage or damage to the battery.
NOTES ON THE STRAP
● The stopwatch has a strap for wearing it around your neck. Take good care lest it should be caught by something near you or wind around your neck.
- Please also note that the strap may damage your clothes, or injure your hands, neck or other parts of your body.
TO PRESERVE THE QUALITY OF YOUR STOPWATCH

●WATER RESISTANCE (5 bar)
Your stopwatch is designed and manufactured to withstand up to 5 bar, such as accidental contact with splashes of water or rain.
Do not operate the buttons when the stopwatch is wet or in water.
●TEMPERATURES
If the stopwatch is left in direct sunlight for a long time, the display may become black, but this condition will be corrected when the stopwatch returns to normal temperature.
Do not leave your stopwatch in very low temperatures below -10^ (+14^) for a long time since the cold may cause:
a. a slight time loss or gain.
b. the change of digits to become slow.
c. the display light to dim.
However, the above conditions will be corrected when the stopwatch returns to normal temperature.
●SHOCKS
Do not subject it to violent shocks.

●CHEMICALS
Be careful not to expose the stopwatch to solvents, mercury, cosmetic spray, detergents, adhesives or paints. Otherwise, the case, etc. may become discolored, deteriorated or damaged.
●PERIODIC CHECK
It is recommended that the stopwatch be checked once every 2 to 3 years. Have your stopwatch checked by an AUTHORIZED SEIKO DEALER or SERVICE CENTER to ensure that the case, buttons, gasket and crystal seal remain intact.
●PRECAUTION REGARDING CASE BACK PROTECTIVE FILM
If your stopwatch has a protective film and/or a sticker on the case back, be sure to peel them off before using it.
●STATIC ELECTRICITY
The IC (Integrated Circuit) used in your stopwatch will be affected by static electricity which may disturb the display. Keep your stopwatch away from close contact with objects such as TV screens which emit strong static electricity.
●LIQUID CRYSTAL PANEL
The normal life expectancy for a liquid crystal panel is approximately 7 years. After that it may decrease in contrast, becoming difficult to read. Please contact your AUTHORIZED SEIKO DEALER or SERVICE CENTER if you wish to have a new panel fitted (guaranteed one year).


●MAGNETISM
Your stopwatch will not be affected by magnetism.

●STATIC ELECTRICITY
The IC (Integrated Circuit) used in your stopwatch will be affected by static electricity which may disturb the display. Keep your stopwatch away from close contact with objects such as TV screens which emit strong static electricity.
●LIQUID CRYSTAL PANEL
The normal life expectancy for a liquid crystal panel is approximately 7 years. After that it may decrease in contrast, becoming difficult to read. Please contact your AUTHORIZED SEIKO DEALER or SERVICE CENTER if you wish to have a new panel fitted (guaranteed one year).
FEATURES
The SEIKO Quartz Stopwatch for industrial measurement Cal. S05A is a digital decimal stopwatch that can be used for activities such as production control and performance analysis. The stopwatch features a lap time/split time memory function that can store and recall up to 100 sets of lap times and split times. Time/calendar, timer, and alarm functions are also provided.
■STOPWATCH
The stopwatch can measure up to 99999.9 DM (999.999 minutes) in 1/10 DM(1/1000 minute) increments.
*DM (Decimal): Unit used in a decimal system
1 DM=1/100 minute
100 DM = 1 minute
600 DM = 6 minutes
6000 DM = 60 minutes
■LAP TIME, LAP TIME IN PROGRESS AND SPLIT TIME DISPLAYS
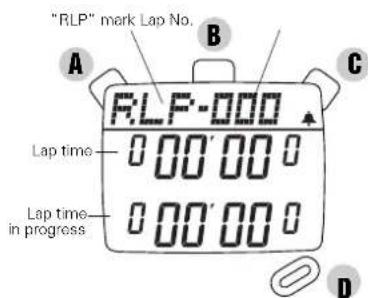
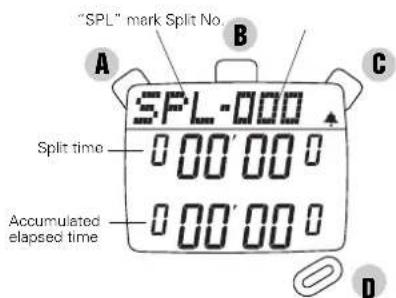
Three separate stopwatch displays are available for lap time, lap time in progress and split time measurements.
■MEMORY FUNCTION
Up to 100 lap/split time data can be stored in memory, and they can be recalled either during or after the measurement.
TIME/CALENDAR
Year, month, day, date, hour, minutes and seconds are displayed.
The calendar automatically adjusts for odd and even months including February of leap years from January 1, 2006 to December 31, 2055.
■AUTOMATIC SHUT-OFF FUNCTION
When the stopwatch is left untouched for one hour, the display automatically becomes blank in order to minimize battery consumption.
- The built-in two descending timers (which allow you to set two different timer times) can be used repeatedly one after the other.
• Each Timer 1 and Timer 2 can be set for any desired amount of time from 10 seconds up to 99 hours, 59 minutes and 59 seconds in one-second increments. - For easy distinction between Timer 1 and Timer 2, the time-up warning beeps are different in tones.
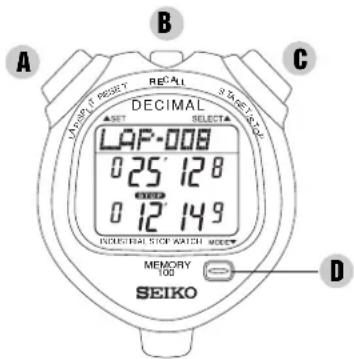
DISPLAY AND BUTTONS
ALARM
• The daily alarm sounds once at the designated time (hour, minute) every 24 hours.
■BATTERY LIFE INDICATOR
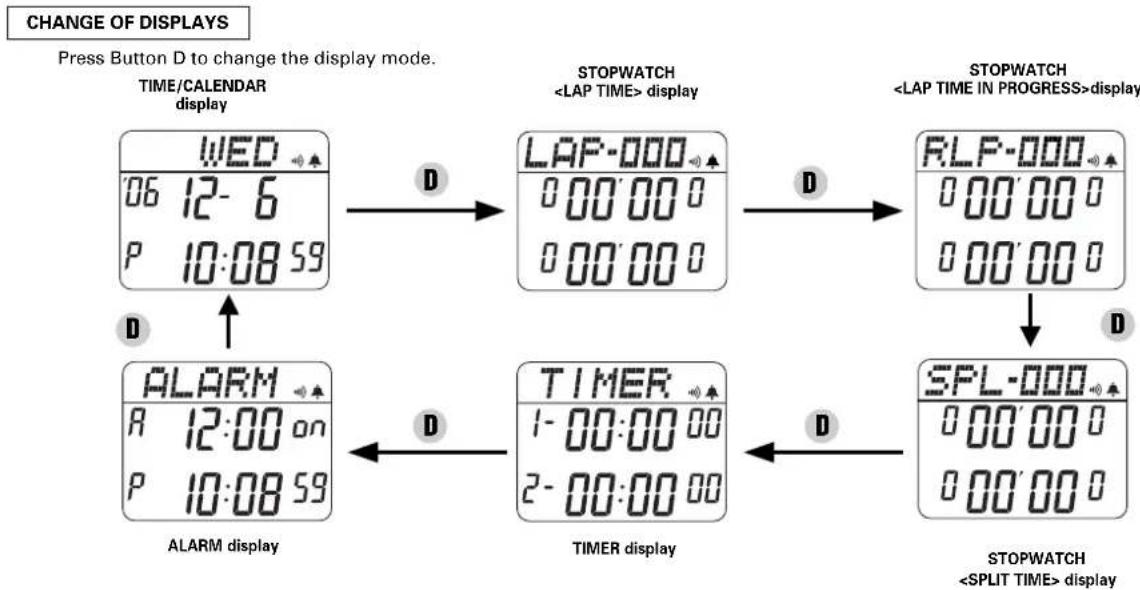
flowchart
graph TD
    A["ALARM display"] --> B["LAP-000"]
    B --> C["RLP-000"]
    C --> D["SPL-000"]
    D --> E["STOPWATCH <SPLIT TIME> display"]
    style A fill:#f9f,stroke:#333
    style B fill:#ccf,stroke:#333
    style C fill:#ccf,stroke:#333
    style D fill:#ccf,stroke:#333
    style E fill:#ccf,stroke:#333
* If Buttons A, B, C and D are pressed at the same time, all the data in memory will be erased. Refer to "HOW TO RESET THE BUILT-IN IC" on page 13 for further details.
TIME/CALENDAR SETTING
D Press to show the TIME/CALENDAR display.

B Press and hold for 2 seconds to show the TIME/CALENDAR SETTING display.
* The DAY disappears and the SECOND digits start flashing.
C Press repeatedly to select the digits (flashing) to be adjusted.

flowchart
graph TD
    A["SECONDS"] --> B["MINUTES"]
    B --> C["HOUR"]
    C --> D["DATE(DAY)"]
    D --> E["MONTH"]
    E --> F["YEAR"]
    F --> G["12-/24-HOUR INDICATION"]
    G --> H["AUTOMATIC SHUT-OFF (ECO)"]
    H --> A
A Press to set the flashing digits or reset the SECONDS to "00."
* The digits move quickly if Button A is kept pressed.
●12-/24-hour indication setting:
Change between 12- and 24-hour indications is made alternately with each press of Button A.
●Automatic shut-off function setting (ECO):
With each press of Button A, the automatic shut-off function(ECO) is alternately set to "ON" and "OFF."
B After all the adjustments are completed, press to return to the TIME/CALENDAR display.
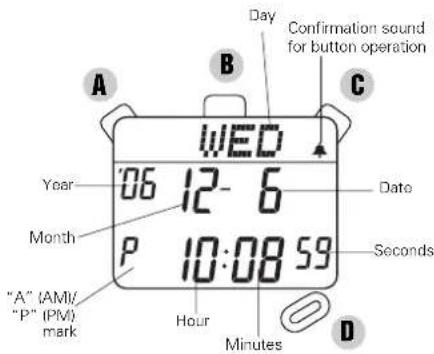
* With each press of Button C in TIME/CALENDAR display, the confirmation sound for button operation is alternately switched "ON" and "OFF." While the confirmation sound for button operation is set to "ON," the ▲ mark appears on display.
● The DAY is automatically set once the YEAR, MONTH and DATE are set.
- To quit the time/calendar setting, press Button B. When the stopwatch is left untouched, it automatically returns to the TIME/CALENDAR display within two to three minutes.
● The calendar adjusts automatically for odd and even months including February of leap years from January 1, 2006 to December 31, 2055.
- When setting the HOUR digits in the 12-hour indication, check that "A" (AM)/"P" (PM) mark is correctly set. In the 24-hour indication, no mark is displayed.
- If Button A and C are pressed simultaneously, all the digital segments light up. This is not a malfunction. Press any of Button A, B, C or D to return to the TIME/CALENDAR display.
STOPWATCH
●The stopwatch can measure up to 99999.9 DM in 1/10 DM increments.
● Three separate measurement displays are available; lap time, lap time in progress and split time displays.
[LAP TIME IN PROGRESS display][LAP TIME display] [SPLIT TIME display]
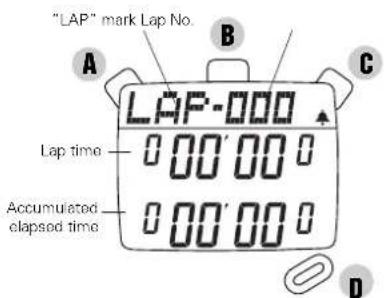
STOPWATCH OPERATION
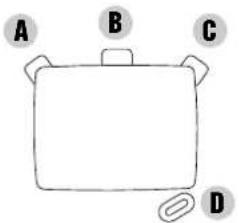
●Before using the stopwatch, be sure to reset the digits to "00."
When the stopwatch is stopped, press Button A.
When it is counting, press Button C to stop the measurement and then press Button A.
1 Standard measurement
Press to show the LAP TIME, LAP TIME IN PROGRESS or SPLIT TIME display.
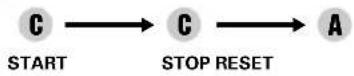
2 Accumulated elapsed time measurement
Press to show the LAP TIME, LAP TIME IN PROGRESS or SPLIT TIME display.

flowchart
graph LR
    A["START"] --> B["C"]
    B --> C["C"]
    C --> D["STOP"]
    D --> E["A"]
    E --> F["RESET"]
* Restarting and stopping the stopwatch can be repeated by pressing Button C.
3 Lap time measurement

flowchart
graph LR
    A["START"] --> B["A"]
    B --> C["LAP 1 LAP 2"]
    C --> D["A"]
    D --> E["FINISH"]
    E --> F["C"]
    F --> G["RESET"]
* Lap time measurement can be repeated by pressing Button A.
* "Lap time" is the time that has elapsed from the start of one stage of an activity to that of the next stage. "Split time" is the time that has elapsed from the start of an activity to any given stage.
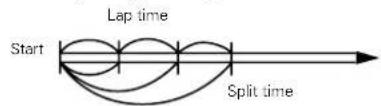
flowchart
graph LR
    A["Start"] --> B["Lap time"]
    B --> C["Split time"]
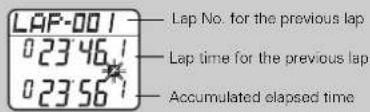
- In the LAP TIME display, the previous lap time is displayed in the upper row while the accumulated elapsed time is displayed in the lower row during measurement.
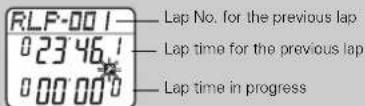
- In the LAP TIME IN PROGRESS display, the previous lap time is displayed in the upper row while the current lap time measurement is displayed in the lower row during measurement.
4 Split time measurement

flowchart
graph LR
    A["START"] --> B["A"]
    B --> C["A"]
    C --> D["C"]
    D --> E["A"]
    style A fill:#f9f,stroke:#333
    style B fill:#f9f,stroke:#333
    style C fill:#f9f,stroke:#333
    style D fill:#f9f,stroke:#333
    style E fill:#f9f,stroke:#333
* Split time measurement can be repeated by pressing Button A.
5 How to use the memory function
● Up to 100 lap/split time data can be stored and recalled either during or after measurement.


B Press to return to the STOPWATCH display.
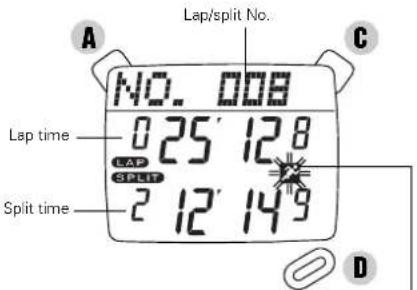
Flashing mark appears while the measurement is in progress.
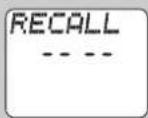
- If no lap time/split time measurement is made in the STOPWATCH display and no data is stored in memory, the display shown at right will appear when the display is changed over to the MEMORY RECALL.
Even if the stopwatch is reset to "00," stored data is not erased and can be recalled unless a new measurement is started. - The stopwatch can measure the lap time/split times as many times as necessary, but only the first 100 data will be stored in memory.
DOUBLE REPEAT TIMER
- Two timers are available for use either individually or in combination. When used together, Timer 2 starts counting down as soon as Timer 1 has finished counting down the set time. They repeat their respective countdown cycles alternately as many times as necessary unless stopped.
● Each Timer 1 and Timer 2 can be set for any desired amount of time from 10 seconds up to 99 hours, 59 minutes and 59 seconds in one-second increments.
● To use either Timer 1 or Timer 2 as a standard repeat timer, set the timer not in use to "00:00'00." - The number of times that the timers repeat their countdown cycles can be set from 1 to 100 times. If “---” is set for the number of repeating times, the timers will automatically start over a new counting until stopped by the user.
TIMER SETTING
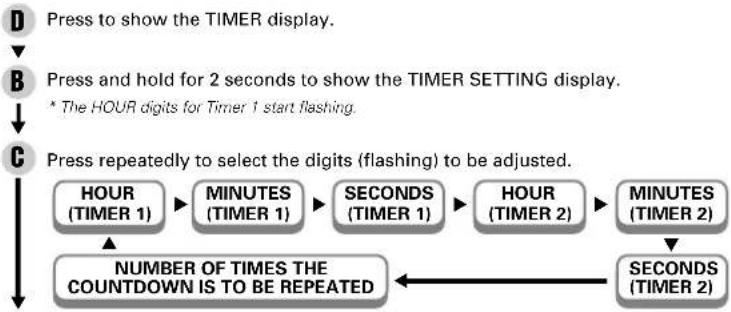
flowchart
graph TD
    A["Press to show the TIMER display."] --> B["Press and hold for 2 seconds to show the TIMER SETTING display. * The HOUR digits for Timer 1 start flashing."]
    B --> C["Press repeatedly to select the digits (flashing) to be adjusted."]
    C --> D["HOUR (TIMER 1)"]
    D --> E["MINUTES (TIMER 1)"]
    E --> F["SECONDS (TIMER 1)"]
    F --> G["HOUR (TIMER 2)"]
    G --> H["MINUTES (TIMER 2)"]
    H --> I["SECONDS (TIMER 2)"]
    I --> J["NUMBER OF TIMES THE COUNTDOWN IS TO BE REPEATED"]
    J --> D

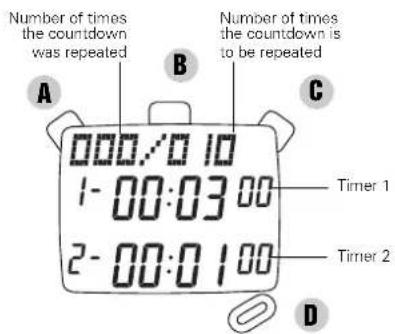
- The timers cannot be set for a time less than 10 seconds. If a time less than 10 seconds is set and Button B is pressed to return to the TIMER display, the timers will automatically be set to "00:00'10".
How to use the timer
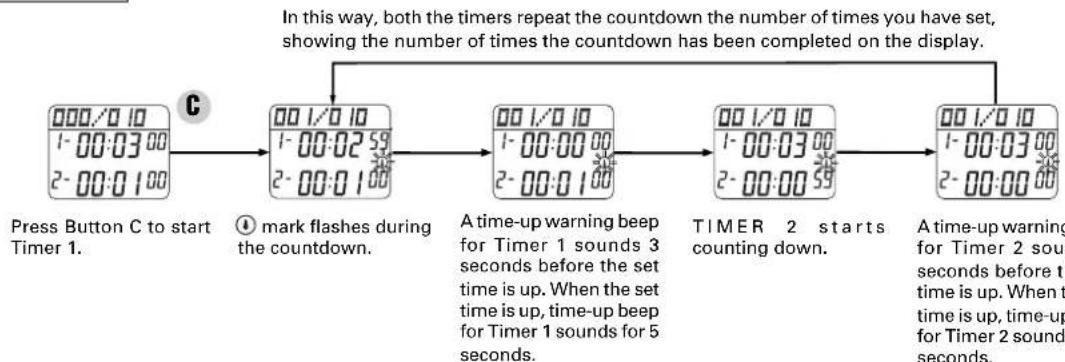
flowchart
graph LR
    A["000/0 10<br>1-00:03 00<br>2-00:0 100"] --> B["00 1/0 10<br>1-00:02 59<br>2-00:0 100"]
    B --> C["00 1/0 10<br>1-00:00 00<br>2-00:0 100"]
    C --> D["00 1/0 10<br>1-00:03 00<br>2-00:0 59"]
    D --> E["00 1/0 10<br>1-00:03 00<br>2-00:0 00"]
    E --> F["Timer 2 starts counting down."]
    F --> G["00 1/0 10<br>1-00:03 00<br>2-00:0 00"]
    style A fill:#f9f,stroke:#333
    style B fill:#ccf,stroke:#333
    style C fill:#cfc,stroke:#333
    style D fill:#fcc,stroke:#333
    style E fill:#cff,stroke:#333
    style F fill:#ffc,stroke:#333
    style G fill:#cfc,stroke:#333
A time-up warning beep for Timer 2 sounds 3 seconds before the set time is up. When the set time is up, time-up beep for Timer 2 sounds for 5 seconds.
TIMER 1 starts counting down.
- To stop the time-up warning beep and time-up beep while sounding, press either Button A, B, C or D. This will not affect the time-up beeps for the subsequent countdown cycles.
● The time-up beeps of Timer 1 and Timer 2 sound in different tones. - Restarting and stopping the timer can be repeated as many times as necessary by pressing Button C.
ALARM
●The daily alarm sounds once at the designated time (hour, minute) every 24 hours.
● The alarm sounds for approximately 20 seconds at the designated time and automatically stops.
●The alarm can be engaged (on) or disengaged (off) by pressing button C.
● Depending on which indication is selected in the Time/Calendar display, the alarm time is displayed in a 12-hour or 24-hour indication.
ENGAGEMENT/DISENGAGEMENT OF THE DAILY ALARM
C Press to engage (on) or disengage (off) the alarm.
ALARM TIME SETTING

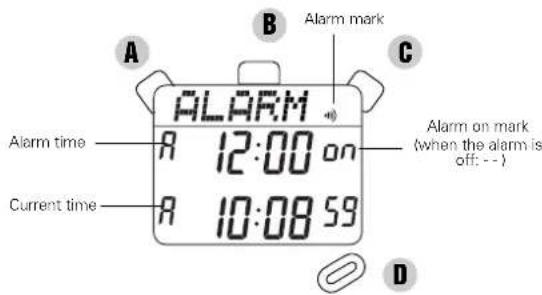


Press repeatedly to select the digits (flashing) to be adjusted.
HOUR
MINUTES

Press to set the flashing digits.
* The digits move quickly if Button A is kept pressed.

After all the adjustments are completed, press to return to the ALARM display.
* T he alarm mark and alarm on mark will be automatically displayed.
HOW TO STOP THE ALARM MANUALLY WHILE SOUNDING
● The alarm sounds for approximately 20 seconds at the designated time and automatically stops.
●Press any of buttons A, B, C, or D to stop the alarm while sounding.
*If the alarm time coincides with time-up time while the Double repeat time is counting, the time-up beep is activated first.
AUTOMATIC SHUT-OFF FUNCTION
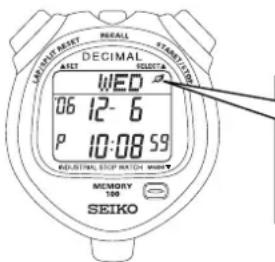
Automatic shut-off mark
When the automatic shut-off function is set to "ON," this mark appears in any display mode except while the stopwatch is in the setting mode.
When the automatic shut-off function is set to "ON" in the TIME/CALENDAR SETTING display, the following energy-saving functions will be activated to help extend the battery life.
●Regardless of the display modes, when the stopwatch is left untouched for one hour, the display becomes blank in order to minimize battery consumption.
●The current time will be displayed once every 10 seconds even while the display is blank, to indicate that the blank display is not caused by battery exhaustion.
●While the stopwatch or timer is measuring, the display will not become blank for the energy-saving functions.
- If the alarm is engaged, the alarm will sound at the designated time even while the display is blank.
●To return to the normal display, press either Button A, B, C or D. The last display before it became blank will be shown.
HOW TO RESET THE BUILT-IN IC
When an abnormal display (broken digits, etc.) appears, follow the procedure below. The built-in IC will be reset and the watch will resume normal operation.
HOW TO RESET THE IC
Be sure to press buttons A, B, C, and D at the same time for 2 to 3 seconds. The display will become blank, and then "Sun '06 1-1 A12:00 will be displayed. Set the time, calendar and alarm before using the watch.
*Please note that if the IC is reset, all data of the MEMO function is deleted.
BATTERY CHANGE

The miniature battery which powers your stopwatch should last approximately 3 years (or approximately 7 years if the ECO mode is activated). However, because the battery is inserted at the factory to check the function and performance of the stopwatch, its actual life once in your possession may be less than the specified period. When the battery expires, be sure to replace it as soon as possible to prevent any malfunction. For battery replacement, we recommend that you contact an AUTHORIZED SEIKO DEALER and request a SEIKO CR2032 battery.
- If the stopwatch is used for more than 3 hours a day, the Double Repeat Timer function is used more than 5 times a day, the confirmation sound for button operation rings more than 50 times a day, or if the alarm is used more than once a day, the battery life may be less than the specified period.
●Battery life indicator
When all the segments of the display start flashing in the TIME/CALENDAR display, or when "☐" mark starts flashing in other displays, the stopwatch may run down in 2 to 3 days. We suggest that you have the battery replaced by a SEIKO DEALER.
* Even though the display is flashing, time accuracy is not affected.
SPECIFICATIONS
- Frequency of crystal oscillator .... 32,768Hz (Hz = Hertz ... Cycles per second)
- Accuracy ±0.0012% or 30 seconds per month at normal temperature ( 25^±3 )
- Operational temperature range ....-10°C - +60°C
- Desirable temperature range of use 0°C - 50°C
- Display system
TIME/CALENDAR display .... Hour, minutes, seconds, year, month, date and day of the week (The calendar automatically adjusts for odd and even months including February of leap years from January 1, 2006 to December 31, 2055.)
STOPWATCH display .... 2 rows of digital displays and a dot matrix display (5 x 35 dots) Hour, minutes, seconds and 1/10 DM (Measures up to 99999.9 DM) LAP TIME display/ LAP TIME IN PROGRESS display/SPLIT TIME display Up to 100 sets of lap times and split times can be stored in memory.
TIMER display ....Timer 1 and Timer 2 displays Hour, minutes, seconds, the number of times the countdown was repeated and the number of times the countdown is to be repeated.
ALARM display .... Alarm time (hour, minute), current time (hour, minute, second) - Display medium ...... Nematic Liquid Crystal, FEM (Field Effect Mode)
- Battery SEIKO CR2032, 1 piece
- Battery life ..... Approximately 3 years (or approximately 7 years if the automatic shut-off function is activated)
- IC (Integrated Circuit) C-MOS-LSI, 1 piece
- Battery life indicator
* The specifications are subject to change without prior notice for product improvement.
- SEIKO DIGITAL STOPWATCH FOR INDUSTRIAL MEASUREMENT Cal. S05A
- WARNING
- NOTES ON THE BATTERY
- NOTES ON THE STRAP
- TO PRESERVE THE QUALITY OF YOUR STOPWATCH
- ●WATER RESISTANCE (5 bar)
- ●TEMPERATURES
- ●SHOCKS
- ●CHEMICALS
- ●PERIODIC CHECK
- ●STATIC ELECTRICITY
- ●LIQUID CRYSTAL PANEL
- ●MAGNETISM
- FEATURES
- ■STOPWATCH
- ■LAP TIME, LAP TIME IN PROGRESS AND SPLIT TIME DISPLAYS
- ■MEMORY FUNCTION
- TIME/CALENDAR
- ■AUTOMATIC SHUT-OFF FUNCTION
- ALARM
- TIME/CALENDAR SETTING
- STOPWATCH
- DOUBLE REPEAT TIMER
- TIMER SETTING
- How to use the timer
- ENGAGEMENT/DISENGAGEMENT OF THE DAILY ALARM
- ALARM TIME SETTING
- HOW TO STOP THE ALARM MANUALLY WHILE SOUNDING
- AUTOMATIC SHUT-OFF FUNCTION
- Automatic shut-off mark
- HOW TO RESET THE BUILT-IN IC
- HOW TO RESET THE IC
- BATTERY CHANGE
- ●Battery life indicator
- SPECIFICATIONS
Brand : SEIKO
Model : S05A
Category : Montre-bracelet