
KH-GSP600 - Dishwasher PKM - Free user manual and instructions
Find the device manual for free KH-GSP600 PKM in PDF.


| Product Type | Dishwasher |
| Model | KH-GSP600 |
| Brand | PKM |
| Installation Type | Table-top, free-standing |
| Place Settings | 6 standard place settings |
| Dimensions (H x W x D) | 43.8 x 55.0 x 50.0 cm |
| Energy Efficiency Class | A+ |
| Annual Energy Consumption | 174 kWh |
| Energy Consumption per Standard Cycle | 0.61 kWh |
| Annual Water Consumption | 1820 L |
| Noise Level | 49 dB(A) |
| Power Supply | 220-240 V, 50 Hz |
| Power Consumption | 1170 - 1380 W |
| Water Pressure (flow) | 0.04 - 1.0 MPa |
| Programmes | Intensive, Normal, ECO, Glass, Short (90 min), Rapid |
| Control Type | Electronic, push buttons |
| Water Softener | Integrated, requires dishwasher salt |
| Rinse Aid Dispenser | Yes, adjustable dosage |
| Filter System | 3-stage (coarse, fine, main) |
| Spray Arms | Removable, cleanable |
| Safety Features | Child lock, overflow protection, grounding |
| Warranty | 24 months |
Frequently Asked Questions - KH-GSP600 PKM
User questions about KH-GSP600 PKM
0 question about this device. Answer the ones you know or ask your own.
Ask a new question about this device
Download the instructions for your Dishwasher in PDF format for free! Find your manual KH-GSP600 - PKM and take your electronic device back in hand. On this page are published all the documents necessary for the use of your device. KH-GSP600 by PKM.
USER MANUAL KH-GSP600 PKM
natural_image
Front view of a white kitchen appliance with control buttons and a single door (no visible text or symbols)natural_image
Illustration of a hand holding a faucet and a bulb (no text or symbols)natural_image
Technical line drawing of a mechanical assembly with a magnified inset showing a tool interacting with a threaded component (no text or symbols present)natural_image
Diagram of a traditional mechanical device with a hand holding a tool above it, showing components like a bowl and a tray (no text or symbols present)natural_image
Interior view of a kitchen appliance showing a tray with a control knob and labeled component C (no text or symbols beyond label)
natural_image
Close-up of a hand pressing a button on a white appliance panel (no visible text or symbols)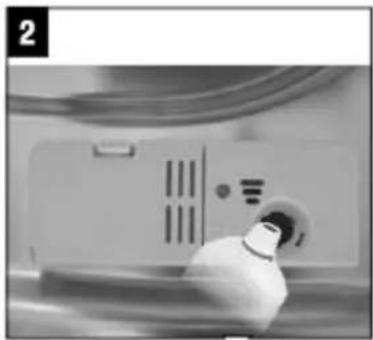
natural_image
Close-up of a person inside a medical device with visible tubing and a button (no text or symbols)
natural_image
Close-up of a hand holding a small electronic device with ports and cables (no visible text or symbols)natural_image
Close-up of a white appliance control panel with a black arrow pointing to a button (no visible text or symbols)
natural_image
Interior view of a kitchen appliance with a plastic container and a hand mixer (no visible text or symbols)natural_image
Technical line drawing of a mechanical assembly with no visible text or symbolsnatural_image
Isometric line drawing of a rectangular electronic device with internal components (no text or symbols)Dear customer! We would like to thank you for purchasing a product from our wide range of domestic appliances. Read the complete instruction manual before you operate the appliance for the first time. Retain this instruction manual in a safe place for future reference. If you transfer the appliance to a third party, also hand over this instruction manual.
Index
- Safety instructions.... 41
1.1 Signal words....42
- Installation 46
2.1 Unpacking and Positioning.... 46
2.2 Water inlet / drainage installation.... 46
2.3 Electrical connection....46
2.4 Water supply 47
2.5 Installation of the water drain hose 47
-
Appliance/Control Panel.... 49
-
Before initial use 50
4.1 Summary of the basic functions.... 50
4.2 Water softener (dishwasher salt) 52
4.3 Filling of the rinse aid dispenser.... 54
4.4 Dishwasher detergent....55
- Use of the dish rack 57
5.1 Loading instructions.... 57
5.2 Loading of the rack.... 58
5.3 Cutlery basket.... 58
5.4 Damage to glasses and dishes 60
- Use of the programmes....60
6.1 Starting of a programme 61
6.2 How to change a programme....61
6.3 Later addition of dishes....62
6.4 End of a programme 62
- Cleaning and maintenance....63
7.1 Filter system....63
7.2 Cleaning of the spray arms....65
7.3 Cleaning of the control panel 65
7.4 Cleaning of the door and the door seals 65
7.5 Frost protection....66
7.6 Decommissioning....66
8. Trouble shooting....66
8.1 Error codes....69
9. Technical date....70
10. Waste management....71
11. Guarantee conditions....72
The figures in this instruction manual may differ in some details from the current design of your appliance. Nevertheless follow the instructions in such a case. Delivery without content.
✿ Any modifications, which do not influence the functions of the appliance. shall remain reserved by the manufacturer. Please dispose of the packing with respect to your current local and municipal regulations.
The appliance you have purchased may be an enhanced version of the unit this manual was printed for. Nevertheless, the functions and operating conditions are identical. This manual is therefore still valid. Technical modifications as well as misprints shall remain reserved.
EU - Declaration of Conformity
The products, which are described in this instruction manual, comply with the harmonized regulations.
The relevant documents can be requested from the final retailer by the competent authorities.
1. Safety instructions
- READ THE SAFETY INSTRUCTIONS CAREFULLY BEFORE YOU OPERATE THE APPLIANCE FOR THE FIRST TIME. All information included in those pages serve for the protection of the operator. If you ignore the safety instructions, you will endanger your health and life.
Store this manual in a safe place so you can use it whenever it is needed. Strictly
observe the instructions to avoid damage to persons and property.
Check the technical periphery of the appliance! Do all wires and connections to the appliance work properly? Or are they time-worn and do not match the technical requirements of the appliance? A check-up of existing and newly-made connections must be done by an authorized professional. All connections and energy-leading components (incl. wires inside a wall) must be checked by a qualified professional. All modifications to the electrical mains to enable the installation of the appliance must be performed by a qualified professional.
The appliance is intended for private use only as well as to be used (1) in staff kitchen areas of shops, offices and other working environments; (2) by clients in hotels, motels, B&B and other residential type environments; (3) for catering and similar non-retail applications.
The appliance is intended for cleaning tableware and cookware in a private household only.
The appliance is intended for indoor-use only.
The appliance is not intended to be operated for commercial purposes, during camping and in public transport.
➢ Operate the appliance in accordance with its intended use only.
Do not allow anybody who is not familiar with this instruction manual to operate the appliance.
1.1 Signal words
⚠️ DANGER! indicates a hazardous situation which, if ignored, will result in death or serious injury.
⚠️ CAUTION! indicates a hazardous situation which, if not avoided, may result in minor or moderate injury.
⚠ WARNING! indicates a hazardous situation which, if ignored, could result in death or serious injury.
NOTICE! indicates possible damage to the appliance.
DANGER!
- Non-observance of the instructions of this instruction manual will endanger the life of the user and can cause damage to the appliance.
-
All electrical work to connect the appliance to the mains must be carried out by a qualified professional. Do not modify the energy supply. The connection must be carried out in accordance with the current local and legal regulations. RISK OF ELECTRIC SHOCK!
-
Do not connect the appliance to the mains if the appliance itself or the power cord or the plug are visibly damaged. RISK OF ELECTRIC SHOCK!
- Never try to repair the appliance yourself. If the appliance does not operate properly, please contact the aftersales service. Original spare parts should be used only.
- When the power cord is damaged, it must be replaced by the manufacturer or an authorized aftersales service or a qualified professional only.
- This appliance may be operated by children aged from 8 years and above as well as by persons with reduced physical, sensory and mental capabilities or lack of experience and knowledge if they are supervised or have been instructed concerning the safe use of the appliance and do comprehend the hazards involved. Children must not play with the appliance. Cleaning and user-maintenance must not be carried out by children unless they are supervised.
WARNING!
- While unpacking, the packaging materials (polythene bags, polystyrene pieces, etc.) should be kept away from children and pets. CHOKING HAZARD.
- Do not connect the appliance to the electric supply unless all packaging and transit protectors have been removed.
- Operate the appliance with 220\~240V/50Hz AC only. All connections and energy-leading components must be replaced by an authorized professional. Any repairs should be carried out by an authorized aftersales service
- Do not use a socket board or a multi socket when connecting the appliance to the mains.
- Never cut or remove the earth connection of the power cable.
- A dedicated and properly grounded socket (250V/10A) meeting the data of the plug is required to minimize any kind of hazard.
- Check that the power cord is not placed under the appliance or damaged when moving the appliance.
- The technical data of your energy supplier must meet the data on the model plate of the appliance.
- Your domestic circuit must be equipped with an automatic circuit breaker.
- Do not modify the appliance.
-
Turn off the power before you install the appliance and before you connect it to the mains. RISK OF FATAL ELECTRIC SHOCK!
-
Disconnect the appliance from the mains before you clean or maintain it. RISK OF ELECTRIC SHOCK!
- Never immerse the appliance, the power cord or the plug into water or any other liquid. RISK OF ELECTRIC SHOCK!
- Dishwasher-detergents are very alkaline and so they are extremely dangerous when swallowed. Skin and eyes should not come in contact with dishwasher-detergents. Always keep such detergents out of reach of children. RISK OF CHEMICAL BURN!
- Keep dishwasher-detergents and additives away from children. Keep children away from the appliance when its door is open as some detergent may be still in the appliance.
- When all indicators on the control panel flicker, the appliance malfunctions. Disconnect the appliance from the mains and the water-supply immediately in such a case.
- Do not operate the appliance without the filters installed.
- Children must never play with the appliance.
- Never operate the appliance unattended.
CAUTION!
- While the appliance is operating it is dangerous to open its door as hot water may spurt out. RISK OF SCALDING!
- When a rinse cycle has been completed, wait a few minutes before opening the door as hot vapour may escape.
- When a rinse cycle has been completed, wait at least 20 minutes before cleaning the interior of the appliance so the heating elements can cool down.
- Do not touch the heating elements during operation or immediately after operation. RISK OF BURNS!
- Do not sit or stand on the dish rack or the door of the appliance. RISK OF INJURY! RISK OF BREAKAGE!
- Do not place any heavy items on the open door as the appliance can tilt forwards.
- When you load the dishwasher:
a. check that sharp-edged items will not damage the door seals.
b. check that items do not project through the bases of the racks.
c. place sharp knives with the handle at the top or horizontally to avoid injuries. - Do not leave the door open so that no one can trip on it.
NOTICE
- The spray arms may be equipped with a transport protection. Remove the transport protection before installing the appliance.
- Only use a water softener (= dishwasher salt) which is suitable for dishwashers. The water hardness depends on your place of residence. Hard water in a dishwasher generates deposits of minerals and salts on your dishes and in the appliance. The water softener removes minerals and salts from the water.
- Use a rinse aid which is suitable for a dishwasher only. Never use other chemical substances, e.g. a dishwasher cleaner or liquid cleaners; otherwise you will damage the appliance.
- Only use a detergent and additives which are suitable for dishwashers. Do not use soap, washing agents, hand wash detergents etc.
- When you move the appliance, hold it at its base and lift it carefully. Keep the appliance in an upright position.
- Never use the door for moving the appliance as you will damage the hinges.
- The appliance must be transported and installed by at least two persons.
- When you unpack the appliance, you should take note of the position of every part of the interior accessories in case you have to repack and transport it at a later point of time.
- The connection to the water supply should be carried out by a qualified professional.
- Do not operate the appliance unless all components are installed properly.
- Do not stand or lean on the racks or the door.
- Plastic-made items must not touch the heating elements.
- Only wash dishwasher-proof plastic-made items in the appliance. Such items are labelled by their manufacturer.
- After each rinse cycle check that the water-softener container is empty.
- Never use cleaning sprays to clean the door as they can damage the lock and electric components.
- The appliance is intended for washing max. 6 place settings.
2.1 Unpacking and Positioning
- This appliance is a table-top model.
- Unpack the appliance carefully. Completely remove the transport-protection. Be very careful and do not use any aggressive or abrasive detergents to remove residuals of the transport-protection.
- The spray arms may be equipped with a transport protection. Remove the transport protection before installing the appliance.
- Install the appliance in a dry and well-ventilated place.
- Install the appliance on a level, dry and solid surface. Check the correct installation with a bubble level.
- Always install the appliance near of a water supply line, a water drain device and a safety plug.
- The back of the appliance must face the wall. The sides must be aligned to the adjacent pieces of furniture and/or walls.
- Connect the appliance to the mains and water supply properly.
- The nameplate is inside the appliance or at the back.
2.2 Water inlet / drainage installation
- The appliance is equipped with a water supply and a water drain hose which can be installed on the right or left to ensure proper installation.
- The water inlet and drainage installation must be carried out by a qualified professional.
- Use brand-new hoses and connector kids only.
- We recommend to secure the water supply with a back pressure valve.
2.3 Electrical connection
⚠ WARNING! The appliance must be properly grounded before initial operation. Find related information on the nameplate. Connect the appliance to a properly-grounded safety socket only.
⚠ WARNING! Have an improper socket replaced if it is unsuitable to connect the appliance to. Do not use any extension cords, multiple sockets or adapters. RISK OF FIRE!
⚠ WARNING! Always ensure that the power cord is not bent or squeezed during installation.
The voltage and the frequency of the power supply must meet the data on the rating plate.
If any malfunction occurs, the grounding will reduce the risk of electric shock as the electrical flow will prefer the way of 'least resistance.
If you are in doubt that the appliance is grounded properly, a qualified professional should check the status of the electrical installation (not included in guarantee).
2.4 Water supply
The water pressure must be between 0.04 and 1 MPa. Ask the aftersales service if the water pressure has different values.
Cold water supply. Connect the cold water hose to a 3/4 inches thread. When the hoses are new or were not used for an extended period of time, let the water flow until it is clear of any contamination. Otherwise the water inlet will be blocked and the appliance damaged.

natural_image
Line drawing of a hand holding a faucet and a valve (no text or symbols)1 Pull the complete hose out of its storage compartment at the back of the appliance.
2 Fix the hose with the 3/4 inches thread on the tap.
3 Open the water supply completely before you operate the appliance.
NOTICE! A hose that attaches to a sink spray can burst if it is installed on the same water line as the dishwasher. If your sink has one, it is recommended that the hose be disconnected and the hole plugged.
Disconnection of the water supply. Turn off the water supply completely. Decrease the water pressure by pressing the pressure reduction button to protect you and the room from spilled water. Finally remove the hose from the tap.
2.5 Installation of the water drain hose
Insert the drain water hose into a drain pipe with a diameter of at least 4 cm or into a sink. Do not bend or squeeze the hose. Use the supplied hose support (1). The free end of the water drain hose must not be higher than 60 cm and must not be immersed into water to avoid reflux. When installed to a water outlet the hose must be connected properly to avoid any leaks.
If an extension is needed, use a structurally identical hose. The length of the hose (including extension) should not exceed 4 meters; otherwise the performance of the appliance will be reduced.
Install the drain hose following the instructions given on figure A or on figure B, depending on your needs.


natural_image
Technical diagram showing a mechanical assembly with a magnified inset of a tool interacting with a threaded component (no text or symbols present)When the sink is higher than 100 cm the excess water cannot be drained directly. Drain excess water in a suitable container which is held outside and lower than the sink.
3. Appliance/Control Panel


1 Salt container
3 Cutlery basket
5 Rinse aid dispenser
7 Cup shelf
9 Inlet pipe connector
2 Detergent dispenser
4 Filter assembly
6 Spray arms
8 Basket
10 Drain pipe connectors

| 1 | Power on/off button | Switches on/off the appliance. |
| 2 | Delayed Start button | Press to set a delay period. Available delay periods are 2/4/6/8 hours. |
| 3 | Programme button | Press to set the desired programme. |
| 4 | Start / Pause button | Press to start/pause. |
| 5 | Rinse aid -/ Salt indicator | Goes on when the rinse aid dispenser has to be refilled.Goes on when the salt container has to be refilled. |
| 6 | Delayed Start indicator | Goes on during the period of delay.The corresponding indicator of the selected delay period goes on. When selecting a delay period of 6 hours, the indicators of 2 hours and 4 hours must go on. |
| 7 | Programme indicators | Indicates the washing programme. |
4. Before initial use
Before you start operating the appliance, check that
- the appliance is positioned and levelled properly.
- the inlet valve is opened.
- the connections of the hoses do not leak.
- the appliance is plugged in properly.
- the power is switched on.
- the hoses are not knotted.
- you have removed the complete packaging material..
4.1 Summary of the basic functions
WARNING! The summary below contains brief information about the basic functions of the appliance only and does not replace the instruction manual. It is essential to read the complete instruction manual before initial operation; otherwise you are not adequately informed about potential operational risks as well as the additional functions of the appliance.
Switching on of the appliance
Press the On/OFF button.. Open the door.
 | |||
| Filling of the detergent container | Compartment A:For each wash cycle.Compartment B:For wash cycles including pre-wash only. | 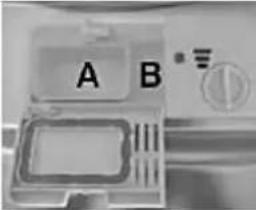 | |
| [B2TX] | |||
| Status of the rinse aid | Mechanical indicator C.Electric indicator of the control panel ^2 . | 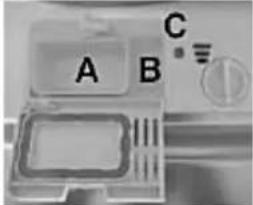 | |
| [TCTS] | |||
| Status of the water softener | (For models with electric water softening system only.)Electric indicator of the control panel. If the appliance is not equipped with an electric indicator, please estimate the point in time to refill relevant to the number of wash cycles. |  | |
| [TSZH] | |||
| Loading of the dish racks | Remove larger quantities of food remnants. Please soak burnt-in food remnants; then load the racks. | ||
| [SK2D] | |||
| Selecting of a programme | Close the door and open the tap. Press the Programme button until the selected programme is indicated on the display. | ||
 | |||
| Starting of a programme | Then press the START/PAUSE button. The programme will start after approx. 10 seconds. | ||
| [YXD9] | |||
| End of a programme | When a programme has ended, an acoustic signal sounds eight times The programme has ended. | ||
^2 Equipment depending on model.
Switch off the appliance using the ON/OFF button.
If you do not input any data within 30 minutes, the appliance will stop operation automatically.

Close the tap, unload the racks
WARNING! Open the door carefully. Hot water vapour can escape when the door has been opened!
Close the tap. Wait approx. 15 minutes, before you unload the racks. Unload the lower rack first.
4.2 Water softener (dishwasher salt)
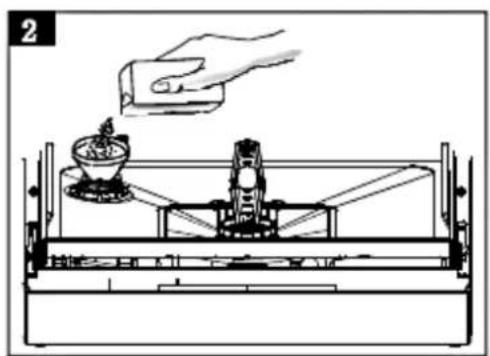
natural_image
Diagram of a hand pouring liquid into a container on a mechanical device (no text or symbols)Only use a water softener (= dishwasher salt) which is suitable for dishwashers. Other water softeners and salts, especially table salt, will damage the water softener container.
Fill the container only shortly before you start a programme, otherwise spilled residuals of the water softener may remain in the appliance and cause corrosion.
-
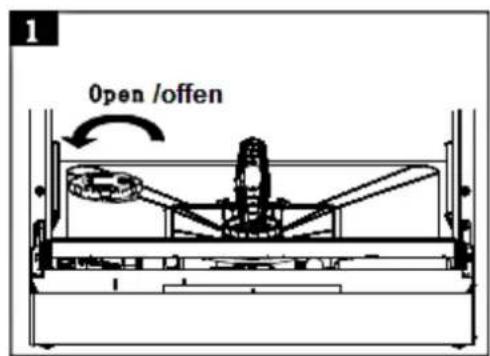
Remove the lower dish-rack and the lid of the water softener container.
-
When you fill the container for the first time, pour approx. 1 l water into the container.
-
Put the equipped funnel in the opening and pour approx. 1 kg water softener (=dishwasher salt) in the container.
-
Close the lid in clockwise direction carefully. The lid must be closed properly.
-
The control light for the hardness of water usually goes off after 2-6 days.
-
Start a programme as soon as you have filled the container (rapid programme); otherwise the filter system, pump or other important components of the appliance may be damaged. Failure to do so will void the guarantee.
NOTICE!
- Start a programme as soon as you have filled the container (rapid programme); otherwise the filter system, pump or other important components of the appliance may be damaged. Failure to do so will void the guarantee.
- You must fill the container when the salt indicator has gone on. As long as the salt has not dissolved, the indicator may stay on even the container is full. If there are spills of the salt, a soak or rapid programme should be run to remove excess salt.
Adjusting of the salt consumption
Step 1: Enter mode
Close the door within 60 seconds after you have switched on the appliance. Press the Start/Pause button for 5 seconds. The appliance is in the salt-setting-mode now. The indicators of the programmes indicate the current status of the salt consumption, e.g. the "glass"-indicator and the "90min"-indicator correspond to water hardness degree H6 (see schedule below).
Step 2: Setting of the salt consumption
Press the programme button to select a suitable setting corresponding to your local requirements. The settings are consecutively numbered H1->H2->H3->H4->H5->H6.
Step 3: Exit mode
When you have not made an input for more than 5 seconds, the appliances changes into the stand-by mode.
There are 6 levels of salt consumption. We recommend to set the level relevant to the schedule below.
You can receive all relevant information about the local water harness range from your water supplier.
| Water hardness range* | Setting on water softener | Display state | |
| ^0 dH | Mmol/l | ||
| 0-5 | 0-0.9 | 1 | H1 (Rapid) |
| 6-11 | 1.0-2.0 | 2 | H2 (90 min) |
| 12-17 | 2.1-3.0 | 3 | H3 (90min/Rapid) |
| 18-22 | 3.1-4.0 | 4** | H4 (Glass) |
| 23-34 | 4.1-6.1 | 5 | H5 (Glass/Rapid) |
| 35-45 | 6.2-8.0 | 6 | H6 (Glass/90 min) |
* You can find water hardness calculators on the internet.
** Factory setting
4.3 Filling of the rinse aid dispenser
Your appliance is designed to use liquid rinse aid. The rinse aid dispenser is located on the interior side of the door next to the detergent dispenser. To fill open the cap and pour the rinse aid into the container until the spot is black. The volume of the container is 110 ml.
The rinse aid is added automatically during operation and supports the spot-free and perfect drying of the dishes. Do not overfill the container; otherwise severe foam formation may occur.
◆ The rinse aid dispenser has 4 or 6 levels (depending on model).
Max. capacity of the container: approx 110 ml.
Do not forget to close the lid after refilling.
When the rinse aid indicator is not on, the colour of the display device "C" indicates the needed quantity of rinse aid.
Dark spot = container filled to capacity.
The smaller the spot the emptier the container. The container should be filled not less than 25%.

Full
3/4
1/2
1/4 (refill!)
empty

natural_image
Interior view of a washing machine with plastic housing and control panel (no visible text or symbols)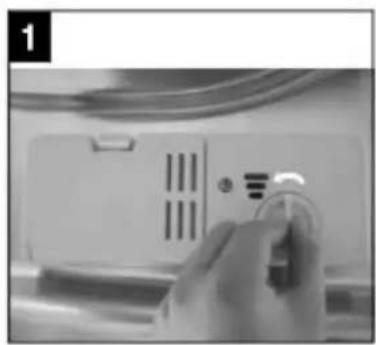
natural_image
Close-up of a hand holding a small circular button on a white electronic device panel (no visible text or symbols)
natural_image
Close-up of a small electronic device with ventilation slots and a speaker, no visible text or symbols
natural_image
Close-up of a hand holding a small electronic device with a label '3' in the corner (no readable text or symbols on the device itself)-
Turn the lid towards the open-arrow (left) and take it off.
-
Pour the rinse aid in the container. Do not overfill.
-
Put the lid back adjusted to the open-arrow and turn it towards the closed-arrow (right).

A: Rotary knob
Setting of the rinse aid dispenser
➢ Start with position 4.
➢ Select position 5 when stains have occurred or the drying is not satisfying.
➢ Select position 6 if these problems occur again.
The recommended and factory adjustment is position 4.
- If water drops or scale marks are on your dishes after washing, increase the amount of rinse aid.
- If whitish stripes are on glasses or bluish film is on the cutlery after washing, decrease the amount of rinse aid.
4.4 Dishwasher detergent
Dishwasher detergents are divided into 2 groups due to their chemical composition:
❖ conventional, alkaline detergents with caustic components.
◆ low-alkaline concentrated detergents with natural enzymes.
"Normal" programmes combined with concentrated detergents prevent pollution and are also good for your dishes. Such programmes support the washing effect of the enzymes. Therefore, "normal" programmes combined with concentrated detergents are as effective as "intensive" programmes.
There are 3 kinds of dishwasher detergents:
- with phosphate and chlorine.
- with phosphate / without chlorine
- without phosphate / without chlorine
Most recent powdered dishwasher detergents usually do not contain any phosphate so they do not soften the water. In such a case add a water softener(= dishwasher
salt) even if the hardness of water is e.g. 6dH. Otherwise white spots may occur on your dishes and glasses.
Dishwasher detergents without chlorine only bleach slightly, so they do not remove tough stains. In such a case select a programme with a higher temperature.
Dishwasher tabs
Dishwasher tabs of different manufacturers may need different periods of time for washing your dishes. So some kinds of tabs cannot be used when operating a short programme. Always select long lasting programmes to clean your dishes completely.
The detergent container
You must fill the container matching the information of the programme schedule.
◆ Use detergents which are suitable for dishwashers only.
◆ Always keep your detergent dry.
◆ Fill the container just before starting a programme.
The detergent and rinse aid consumption of your appliance is lower than the consumption of conventional appliances. In general you need 1 tablespoon of detergent for a normal programme.
You must increase the amount of detergent if your dishes are heavily soiled.
Filling of the container
Push latch to open.

natural_image
Close-up of a white kitchen refrigerator control panel with a black arrow pointing to the button (no visible text or symbols)
natural_image
Close-up of a kitchen appliance with a lid, tray, and control knob (no visible text or symbols)- When the lid is closed, press the open-button.
- Fill the container just before starting a programme. Use detergents which are suitable for dishwashers only.

A. Detergent main-wash.
B. Detergent pre-wash..
Note the manufacturer's dosage instructions on the packaging of your dishwasher detergent.
- Close the lid and press until it locks.
If the dishes are soiled heavily, select a programme which includes a pre-wash function and add some more dishwasher detergent into the container of the pre-wash function (B).
5. Use of the dish rack
Observe the instructions given in this chapter to reach the best performance of your appliance. The features and design of the rack depend on model.
5.1 Loading instructions
◆ Remove any remnants of food from the dishes.
◆ Soak burnt food on pots and pans.
◆ Cutlery and dishes must never block the rotating spray arms.
◆ Place cups, glasses and pots upside down.
◆ The dishes must not touch or cover each other.
◆ Glasses must not touch each other.
◆ Fill the racks as follows:
a. Objects such as cups, glasses, pots and pans upside down.
b. Curved objects and objects with recesses in a slanted position, so the water can drain off.
c. Arrange the dishes safely and tightly in the rack so they cannot tip over.
d. The dishes must not block the rotating spray arms.
e. Do not put very small objects in the appliance as they may easily drop out of the racks..
5.2 Loading of the rack
The tableware must not be moved by the sprayed water (spray arms) after loading.
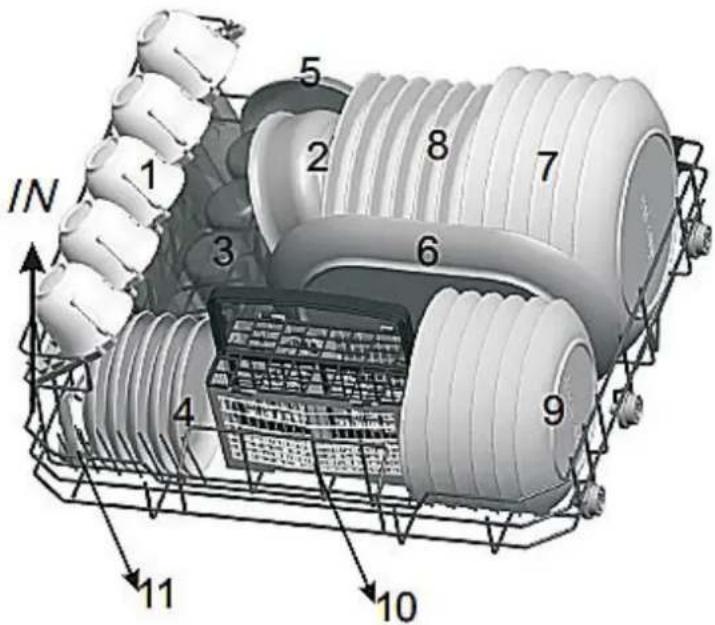
| 1 | Cups | 2 | Bowl |
| 3 | Glasses | 4 | Saucers |
| 5 | Bowl / Dish | 6 | Oval serving plates |
| 7 | Dinner plates | 8 | Soup plates |
| 9 | Dessert plates | 10 | Cutlery basket |
| 11 | Serving spoons |
5.3 Cutlery basket
Place the cutlery (except sharp knives) with the handles at the bottom. Place long objects vertically and safely in the appliance so they do not block the spray arms.

| Type | Cutlery | Type | Cutlery |
| 1 | Forks | 5 | Knives |
| 2 | Soup spoons | 6 | Serving spoons |
| 3 | Dessert spoons | 7 | Gravy spoons |
| 4 | Tea/Coffee spoons | 8 | Serving forks |

CAUTION!
- Do not let any items extend through the bottom.
- Always load sharp items with the sharp side down.
i
The following objects are not suitable to be washed in a dishwasher.
- Cutlery with handles made of wood, horn, china, or mother-of-pearl.
- Not heat-resistant objects.
- Cutlery with glued components, which are not heat-resistant.
- Objects with components of synthetic resin.
- Objects made of copper and/or tin.
- Objects made of leaded crystal.
- Objects made of steel which show signs of rust or are lightly corrosive.
- Any object made of wood.
- Objects made of synthetic fibres.
- Objects soiled by cigarette ashes, wax, lacquers and paints.
i
The following objects are partially suitable to be washed in a dishwasher.
- Some glass types may become dead or cloudy after a large number of programmes.
- Objects made of silver or aluminium may decolourise.
- Glazed motifs may dull when often washed in a dishwasher.
5.4 Damage to glasses and dishes
Possible causes
Recommended solution
| Type of the glasses/dishes or their production method. | Use dishwasher-proof glasses and dishes only. |
| The chemical composition of your detergent. | Use a mild dishwasher detergent. The manufacturer of the detergent provides information about its chemical properties. |
| Temperature of the water and duration of the programme. | Select a programme with a lower temperature and duration. |
6. Use of the programmes
| Programmes | Information | Description | Detergent PW/MW | Duration-consumption Min.-kW/h-L | Rinse aid |
 Intensive Intensive | Extremely dirty tableware. | Pre-wash (50°C)Main-wash (70°C)RinseRinseRinse (70°C)Drying | 3/15 g(or 3 in 1) | 140-1.2-9.6 | Yes |
 Normal Normal | Normally soiled tableware. | Pre-washWash (60°C)RinseRinse (70°C)Drying | 3/15 g(or 3 in 1) | 120-1.050-7.7 | Yes |
| ECO(EN 50242) | Standard-programme for daily use.1 | Pre-washWash (45°C)Rinse (65°C)Drying | 3/15 g(or 3 in 1) | 230-0.609-6.5 | Yes |
| [G7T]Glass | For delicate tableware and glass. | Wash (45°C)RinseRinse (60°C)Drying | 18 g(or 3 in 1) | 75-0.650-5.8 | Yes |
| [SC20] | Short | Wash (65°C) | 18 g | 90-1.1-6.6 | Yes |
| 90 min | programme for lightly soiled tableware which do not need excellent drying efficiency. | Rinse Rinse Rinse (70°C) Drying | (or 3 in 1) | ||
| Rapid | Short programme for lightly-soiled tableware without drying. | Wash (40°C) Rinse Rinse | 15 g | 30-0.5-5.8 | No |
1: This programme is suitable for cleaning normally soiled tableware and the most efficient programme in terms of its combined energy and water consumption for that kind of tableware.
6.1 Starting of a programme
- Load the dish rack.
- Pour the dishwasher detergent and the water softener (=dishwasher salt) - if needed - in the relevant containers (s. chapter 4.2, 4.3 and 4.4 . WATER SOFTENER (DISHWASHER SALT / FILLING OF THE RINSE AID DISPENSER / DISHWASHER DETERGENT).
- During operation the appliance must be supplied with water (full water pressure).
- Close the door of the dishwasher.
- Press the ON/OFF button to switch on the appliance.
- Press the PROGRAM button to select a programme. The sequence is ECO - Glass - 90 min - Rapid - Intensive - Normal. The programme indicator indicates the selected programme.
- Press the START/PAUSE button to initiate operation.
When you press the Start/Pause button during operation, the programme indicator stops flashing and an acoustic signal sounds every minute until you press the Start/Pause button again to re-start operation.
6.2 How to change a programme

You can only change a programme when it has run a short period of time. Otherwise the detergent has dissolved and the dishwater has been drained. In such a case you must refill the detergent container.
- Press the Start/Pause button with the door closed to interrupt the running programme.
- Press the programme button for at least 3 seconds. The appliance is in stand-by mode now.
- Set the new programme using the programme button.
- Pres the Start/pause button again to start the programme.
When you open the door while the appliance is operating, the appliance will stop operating. When you close the door again, the appliance will start operating after 10 seconds.
The programme indicators indicate the operation mode of the appliance.
★ One of the indicators is on permanently = Pause or stand-by mode.
★ One of the indicators is flashing = appliance is on duty.
6.3 Later addition of dishes
You can put dishes later in the appliance unless the detergent container has opened.
- Press the Start/Pause button
- Open the door slightly to interrupt the running programme.
- You can open the door completely after the rotating spray arms stopped operation.
- Now you can add dishes.
- Close the door.
- Press the Start/Pause button. The appliance will start operation after approx. 10 seconds.
6.4 End of a programme
An acoustical signal sounds when a programme has ended. Switch off the appliance with the ON/OFF button, turn off the water supply and open the door of the appliance. Wait approx. 15 minutes before you take out the dishes. The dishes are still hot and will break easily.
- Switch off the appliance using the ON/OFF button.
- Turn off the water.
- ⚠️ CAUTION! Wait a few minutes before you open the door as hot damp may escape. RISK OF SCALDING!
- Wait approx. 15 minutes before you take out the dishes. The dishes are still hot and will break easily.
- It is normal that the appliance is wet inside.
7. Cleaning and maintenance
⚠ WARNING! Disconnect the appliance from the mains before you clean or maintain it. RISK OF ELECTRIC SHOCK!
NOTICE! Never operate the appliance without the filter inserted properly.
◆ Always keep the appliance clean so that unpleasant odours do not occur.
Take off all rings and bracelets before cleaning or maintaining the appliance; otherwise you will damage the surface of the appliance.
7.1 Filter system
The filter system comprises a coarse filter (3), a fine filter (2) and a main filter (1).

1 The main filter shreds remnants with a special nozzle on the bottom of the spray arm.
2 The fine filter catches remnants in the drain so they cannot soil the
tableware again.
3 The coarse filter catches remnants such as bones and glass which may clog the drain. To remove the remnants gently squeeze the filter on the top and take it out.
◆ Check the status of the filters after each programme.
The filter system protects the pump against remnants of food and other objects. These remnants can clog the filters after a while. Clean the filters regularly.
Remove large food particles and any remnants after a programme has ended by rinsing the filters with flowing water.
You can use a suitable cleaning brush for the cleaning of the fine and coarse filter.
We recommend to clean the entire filter system once a week.
Do not knock against the filters as you will damage them. Your appliance will not work properly if the filters are damaged.
◆ Always install the filters properly.
- Improperly installed filters may damage the appliance and dishes.
-
Turn the filter system (1/2/3) to the left and lift carefully.
-
Lift the fine filter (2) and the coarse filter (3) simultaneously before you lift the main filter (1.
-
Separate the fine filter (2) and the coarse filter (3).


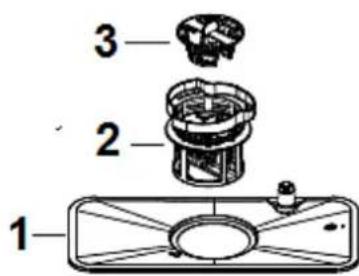
◆ Proceed in reverse order to install the filter system.
7.2 Cleaning of the spray arms

natural_image
Cross-sectional diagram of a mechanical device showing internal components and housing (no text or labels)Clean the spray arms regularly as chemicals and minerals may clog the nozzles and bearings.
Hold the centre of the spray arm assembly and pull it upwards.
➢ Rinse the spray arms with flowing water and reinstall it carefully.
➢ Ensure that the spray arms can rotate freely.
7.3 Cleaning of the control panel
- Clean the control panel with a soft damp cloth and dry it carefully.
✿ Never use sharp-edged items, scouring pads, scouring agents, paper towels or other abrasive and aggressive detergents to clean any component of the appliance.
7.4 Cleaning of the door and the door seals
NOTICE! Never use sharp-edged items, scouring pads, scouring agents, paper towels or other abrasive and aggressive detergents to clean the door of the appliance.
NOTICE! Never clean the door or the door seals with a cleaner spray as you may damage the lock and the electrical components.

natural_image
Isometric line drawing of a mechanical component or housing assembly (no text or symbols)- Clean the sides of the door with a warm damp cloth.
- Clean the door seals regularly using a soft and moist sponge to ensure proper operation and to avoid the formation of unpleasant odours.
7.5 Frost protection
- Disconnect the appliance from the mains.
- Turn off the water supply and disconnect the water inlet pipe from the water valve.
- Remove any water from the water inlet pipe and the valve.
- Connect the water inlet pipe with the valve again.
- Remove the filters. Remove any water from the drain.
- If the appliance cannot operate due to problems with ice or very low temperatures, contact the aftersales service.
7.6 Decommissioning
- When you do not operate the appliance for a certain period of time, e.g. during holidays/vacancies, let a programme run (empty appliance) before.
- Disconnect the plug and turn off the water supply of the appliance.
- Leave the door slightly ajar to protect the seals and to avoid the generation of unpleasant odours.
8. Trouble shooting
⚠ WARNING! Disconnect the appliance from the mains before you clean or maintain it. RISK OF ELECTRIC SHOCK!
ERROR
POSSIBLE CAUSES
MEASURES
Appliance does not work at all.
| 1. | The fuse in the fuse box is tripped. | ➢ Check the fuse box. |
| 2. | The appliance is not supplied with energy. | ➢ Check that the appliance is supplied with energy / the door is closed properly / the plug is in the socket. |
| 3. | Low water pressure. | ➢ Check the water supply and the water pressure. |
| 4. | The door is not closed properly. | ➢ Ensure that the door is closed properly. |
Drain pump does not work.
| 1. | Kink in drain hose. | ➢ Check drain hose. |
| 2. | Filter clogged. | ➢ Check the coarse filter. |
| 3. | Kitchen sink clogged. | ➢ Check kitchen sink. |
| Noise. | ||
| 1. | Some noise is normal. | ➢ The detergent container has opened. |
| 2. | Dishes are placed improperly. Small objects dropped out of the racks. | ➢ Check the position of the dishes. |
| 3. | Knocking sound inside the appliance: The spray arms touch items during operation. | ➢ Interrupt the programme and realign the items touched by the spray arms. |
| 4. | Motor hums. | ➢ Appliance was not used regularly. Even if you do not use the appliance regularly, let it operate once a week. |
| 5. | Knocking sound in the water lines can be caused by the kind of installation or the diameter of the water lines. | ➢ The proper function of the appliance is not affected. If you are in doubt, contact a qualified professional (not covered by guarantee). |
Foam in the appliance.
| 1. | Unsuitable detergent. | ➢ Use dishwasher detergent only. |
| 2. | Spilled rinse aid. | ➢ Remove any spilled rinse aid immediately.➢ Open the door and wait until the |
foam has evaporated.
Stained interior.
| 1. | Detergent contains colorants. | ➢ Use colorant-free detergents. |
| Dishes are not clean. | ||
| 1. | Unsuitable programme. | ➢ Select a stronger programme. |
| 2. | Dishes are placed improperly. | ➢ Check the position of the dishes. The dishes must not block the spray arms. |
Cloudiness on glassware.
| 1. Soft water in combination with toc much detergent. | ➢ If you have soft water, use less detergent. Select a short programme for glassware.. |
White film on inner surfaces.
| 1. Minerals in hard water. | ➢ Clean the interior with a soft sponge and dishwasher detergent. Wear rubber gloves! Use dishwasher detergent only to avoid formation of foam. |
Tableware is not dried properly.
| 1. | Improper use of the dish rack. | ➢ Load the dish rack properly. |
| 2. | Not enough rinse aid. | ➢ Check the quantity of the rinse aid. Refill if needed. |
| 3. | Tableware has been removed from the appliance too early. | ➢ Wait at least 15 min., before you remove the tableware. |
| 4. | Cutlery and tableware is made of low quality materials. | ➢ Do not clean such items using the appliance. |
Some detergent is left in the container.
| 1. | Dishes block the container of the detergent. | ➢ Place the dishes properly. |
| Steam. | ||
| 1. | Normal. | ➢ There is some steam coming through the vent near the door latch during drying and water draining. |
Black or grey spots or rust spots are on the tableware.
| 1. | Aluminium-made objects touched the dishes. | ➢ Clean the marks with a mild abrasive cleaner by hand. |
| 2. | The items are not corrosion-resistant. | ➢ Do not clean such items using the appliance. |
| 3. | The lid of the water softener container is not close properly. | ➢ Close the lid properly. |
| 4. | You have not started a programmeafter you added the water softener. The remaining salt is now affecting the running programme. | ➢ Always start the rapidprogramme without adding any tableware when you have added some water softener. |
| Water remains on the bottom of the appliance. | ||
| 1. | Normal. | ➢ A small amount of clean water around the outlet keeps the water seal functioning. |
| Appliance leaks. | ||
| 1. | Overfilled rinse aid container / spilled rinse aid. | ➢ Wipe up the rinse aid. |
| 2. | The appliance is not levelled. | ➢ Level the appliance. |
If the appliance shows a malfunction not noted on the schedule above or if you have checked all items on the above schedule but the problem still exists, please contact a service department.
8.1 Error codes
| Indicator/Code | Meaning | Possible causes |
| The indicator of the Rapid programme flickers rapidly. | Long inlet time. | ➢ Tap is closed.➢ Water intake is restricted.➢ Water pressure is too low. |
| The indicator of the Rapid and 90min programme flicker rapidly. | Requested temperature has not been reached. | ➢ Malfunction of the heating element. |
| The indicator of the Glass programme flickers rapidly. | Leakage/Overflow/Overfilled | ➢ Too much inlet water.➢ An element of the appliance leaks. |
If overflow occurs, turn off the main water supply before calling a service. If there is water in the base pan because of an overfill or small leak, remove the water before restarting the dishwasher.
9. Technical date

| Model | Dishwasher |
| Control | Electronic |
| Cleaning capacity | 6 standard place settings |
| Energy efficiency class1 | A+ |
| Annual energy consumption2 | 174 kWh |
| Energy consumption/1 standard cycle | 0.61 kWh |
| Energy consumption/off-mode | 0.45 W |
| Energy consumption/left-on mode | 0.49W |
| Annual water consumption3 | 1820 l |
| Drying efficiency class4 | A |
| Standard cleaning cycle/duration5 | ECO 50°C/180 min. |
| Noise emission | 49 dB(A) |
| Mounting | free-standing |
| Could be built-in | yes |
| Dimensions H*W*D in cm | 43.80*55.00*50.00 |
| Power consumption | 1170 - 1380 W |
| Voltage/frequency | 220-240V AC/50Hz |
| Water pressure (flow pressure) | 0.4-10 bar = 0.04-1.0 MPa |
- From A+++ (highest efficiency) to D (lowest efficiency).
- Based on 280 standard cleaning cycles using cold water fill and low power modes. The actual energy consumption depends on the type of use.
- Based on 280 standard cleaning cycles. The actual water consumption depends on the type of use.
- From A (highest efficiency) to G (lowest efficiency).
- This programme is suitable for cleaning normally soiled tableware and the most efficient programme in terms of its combined energy and water consumption for that kind of tableware.
10. Waste management
- While unpacking, the packaging materials (polythene bags, polystyrene pieces, etc.) should be kept away from children and pets. CHOKING HAZARD!
- Old and unused appliances must be send for disposal to the responsible recycling centre. Never expose to open flames.
- Before you dispose of an old appliance, render it inoperative. Unplug the appliance and cut off the entire power cord. Dispose of the power cord and the plug immediately.
- Remove the door completely so children are not able to get into the appliance as this endangers their lives!
- Dispose of any paper and cardboard into the corresponding containers.
- Dispose of any plastics into the corresponding containers.
- If suitable containers are not available at your residential area, dispose of these materials at a suitable municipal collection point for waste-recycling.
- Receive more detailed information from your retailer or your municipal facilities.


Materials marked with this symbol are Please contact your local authorities to recyclable. receive further information.
11. Guarantee conditions
This appliance includes a 24-month guarantee for the consumer given by the manufacturer, dated from the day of purchase, referring to its flawless material-components and its faultless fabrication. The consumer is accredited with both the dues of the guarantee given by the manufacturer and the vendor's guarantees. These are not restricted to the manufacturer's guarantee.
Any guarantee claim has to be made immediately after the detection and within 24 months after the delivery to the first ultimate vendee. The guarantee claim has to be verified by the vendee by submitting a proof of purchase including the date of purchase and/or the date of delivery.
The guarantee does not establish any entitlement to withdraw from the purchase contract or for a price reduction. Replaced components or exchanged appliances demise to us as our property.
The guarantee claim does not cover:
- fragile components as plastic, glass or bulbs;
- minor modifications of the PKM -products concerning their authorized condition if they do not influence the utility value of the product;
- damage caused by handling errors or false operation;
- damage caused by aggressive environmental conditions, chemicals, detergents;
- damage caused by non-professional installation and haulage;
- damage caused by non common household use;
- damages which have been caused outside the appliance by a PKM -product unless a liability is forced by legal regulations.
The validity of the guarantee will be terminated if:
-
the prescriptions of the installation and operation of the appliance are not observed.
-
the appliance is repaired by a non-professional.
- the appliance is damaged by the vendor, the installer or a third party.
- the installation or the start-up is performed inappropriately.
- the maintenance is inadequately or incorrectly performed.
- the appliance is not used for its intended purpose.
- the appliance is damaged by force majeur or natural disasters, including, but with not being limited to fires or explosions.
The guarantee claims neither extend the guarantee period nor initiate a new guarantee period. The geographical scope of the guarantee is limited with respect to appliances, which are purchased and used in Germany, Austria, Belgium, Luxembourg and the Netherlands.

August 2019
SERVICE INFORMATION
Aftersales service information on the leaflet inside this instruction manual.

- Index
- EU - Declaration of Conformity
- Safety instructions
- Signal words
- DANGER!
- WARNING!
- CAUTION!
- NOTICE
- Unpacking and Positioning
- Water inlet / drainage installation
- Electrical connection
- Water supply
- Installation of the water drain hose
- Appliance/Control Panel
- Before initial use
- Before you start operating the appliance, check that
- Summary of the basic functions
- Water softener (dishwasher salt)
- NOTICE!
- Filling of the rinse aid dispenser
- Setting of the rinse aid dispenser
- Dishwasher detergent
- Dishwasher detergents are divided into 2 groups due to their chemical composition:
- There are 3 kinds of dishwasher detergents:
- Dishwasher tabs
- The detergent container
- Filling of the container
- Use of the dish rack
- Loading instructions
- Loading of the rack
- Cutlery basket
- Damage to glasses and dishes
- Possible causes
- Recommended solution
- Use of the programmes
- Starting of a programme
- How to change a programme
- Later addition of dishes
- End of a programme
- Cleaning and maintenance
- Filter system
- Cleaning of the spray arms
- Cleaning of the control panel
- Cleaning of the door and the door seals
- Frost protection
- Decommissioning
- Trouble shooting
- ERROR
- MEASURES
- Error codes
- Technical date
- Waste management
- Guarantee conditions
- The guarantee claim does not cover:
- The validity of the guarantee will be terminated if:
- SERVICE INFORMATION
Brand : PKM
Model : KH-GSP600
Category : Dishwasher