
WA9-E1415I - Washing machine Wolkenstein - Free user manual and instructions
Find the device manual for free WA9-E1415I Wolkenstein in PDF.


| Product Type | Freestanding Washing Machine |
| Brand | Wolkenstein |
| Model | WA9-E1415I |
| Capacity | 9.0 kg |
| Maximum Spin Speed | 1400 rpm |
| Energy Efficiency Class | A+++ |
| Annual Energy Consumption | 205 kWh |
| Annual Water Consumption | 11000 L |
| Spin Efficiency Class | B |
| Residual Moisture | 48% |
| Noise Level (Wash/Spin) | 54 dB(A) / 78 dB(A) |
| Power Rating | 2000 W |
| Power Supply | 220-230 V AC, 50 Hz |
| Net Weight | 66 kg |
| Gross Weight | 70 kg |
| Dimensions (H x W x D) | 85.0 x 60.0 x 58.0 cm |
| Number of Programmes | 15 |
| Programmes | Cotton Eco, Cotton, MixWash, Jeans, Wool, Soak/Synthetic, Winter clothes, QuickWash 15', Colours 15 °C, Underwear, Shirt, Kidswear, Rinse + Spin, Spin, DrumClean |
| Display | LED Display |
| Delay Start | Up to 24 hours |
| Child Lock | Yes |
| Unbalance Protection | Yes |
| Drum Material | Stainless Steel |
| Water Connection | Cold water only, max 50 °C |
| Drain Hose Height | 60-120 cm |
| Adjustable Feet | Yes |
| Included Accessories | Water inlet hose, drain hose, shipping bolt caps, wrench |
Frequently Asked Questions - WA9-E1415I Wolkenstein
User questions about WA9-E1415I Wolkenstein
0 question about this device. Answer the ones you know or ask your own.
Ask a new question about this device
Download the instructions for your Washing machine in PDF format for free! Find your manual WA9-E1415I - Wolkenstein and take your electronic device back in hand. On this page are published all the documents necessary for the use of your device. WA9-E1415I by Wolkenstein.
USER MANUAL WA9-E1415I Wolkenstein
natural_image
Front view of a white Wolkenstein washing machine with digital display and control panel (no visible text or symbols on the device itself)Deutsch
Scite
2
English
Page
60
natural_image
Diagram of a mechanical or architectural component with labeled point A, showing internal components and dashed lines indicating hidden boundaries (no text or symbols beyond label)A
UNTERER GERÄTESCHUTZ
2.3 Nivellierung
natural_image
Line drawing of a front-loading washing machine with attached tubing (no text or symbols)natural_image
Line drawing of a washing machine with a large circular component and a crossed-out black X symbol (no text or labels)natural_image
Line drawing of a washing machine with a hand washing it and a large 'X' symbol crossed out, no text or symbols present.(Abb. ähnlich)
natural_image
Hand holding a curved object with a vertical line and label 'A' (no text or symbols on the object itself)Dear customer! We would like to thank you for purchasing a product from our wide range of domestic appliances. Read the complete instruction manual before you operate the appliance for the first time. Retain this instruction manual in a safe place for future reference. If you transfer the appliance to a third party, the instruction manual should be included.
Index
- Safety information....63
1.1 Signal words....64
1.2 Safety instructions....64
- Installation....68
2.1 Unpacking / Site 68
2.2 Removing of the shipping bolts 69
2.3 Levelling....70
2.4 Connection of the water inlet hose....71
2.5 Connection of the water drain hose 72
2.6 Connection to the mains....74
- Operation....75
3.1 Description of the appliance....75
3.2 Control panel....76
3.3 The washing programmes....78
3.4 Additional washing functions (options)....86
3.5 Before the first wash cycle....89
3.6 Programming and starting of a washing programme 89
3.6.1 Selecting of the additional functions....90
3.7 End of a washing programme 93
3.8 Cancelling of a programme / Selecting of other functions....93
3.9 Reload laundry....94
3.10 Door Lock....94
3.10.1 Child protection function 95
3.11 Unbalance protection....95
3.12 How to switch on / off the acoustic signal 96
3.13 Textile care symbols 96
- Instructions for proper use 97
4.1 Detergent 97
4.2 Use of the dispenser 97
4.2.1 The different compartments of the dispenser....98
4.2.2 How to use detergents and additives....98
4.3 Preparation of the laundry 99
- Cleaning and maintenance....100
5.1 Cleaning of the dispenser....101
5.2 Cleaning / Removing of the drain pump filter....101
5.3 Residual water drainage....102
5.4 Cleaning of the water inlet valve 103
5.5 Programme -DRUMCLEAN-....103
5.6 "Frozen" appliance .... 104
- Trouble shooting....105
6.1 Checklist....106
6.2 Error codes....107
- Technical data....109
7.1 SWA 8-E1216I....109
7.2 SWA 10-E1416I....111
- Waste management....112
- Guarantee conditions....113

Do not dispose of this appliance together with your domestic waste. The appliance must be disposed of at a collecting centre for recyclable electric and electronic appliances. Do not remove the symbol from the appliance.
The figures in this instruction manual may differ in some details from the current design of your appliance. Nevertheless, follow the instructions in such a case. Delivery without content.
i Any modifications, which do not influence the functions of the appliance. shall remain reserved by the manufacturer.
i Please dispose of the packing with respect to your current local and municipal regulations.
The appliance you have purchased may be an enhanced version of the unit this manual was printed for. Nevertheless, the functions and operating conditions are identical. This manual is therefore still valid.
i Technical modifications as well as misprints shall remain reserved.
EC - DECLARATION OF CONFORMITY
★ The products, which are described in this instruction manual, comply with the harmonized regulations.
★ The relevant documents can be requested from the final retailer by the competent authorities.
MAKE SURE THAT THIS MANUAL IS AVAILABLE TO ANYONE USING THE APPLIANCE AND MAKE SURE THAT IT HAS BEEN READ AND UNDERSTOOD PRIOR TO USING THE DEVICE.
READ THE SAFETY INFORMATION AND SAFETY INSTRUCTIONS CAREFULLY BEFORE YOU OPERATE THE APPLIANCE FOR THE FIRST TIME.
All information included in those pages serve for the protection of the operator. If you ignore the safety instructions, you will endanger your health and life.
Store this manual in a safe place so you can use it whenever it is needed. Strictly observe the instructions to avoid damage to persons and property.
Check the technical periphery of the appliance! Do all wires and connections to the appliance work properly? Or are they time-worn and do not match the technical requirements of the appliance? A check-up of existing and newly-made connections must be done by an authorized professional. All connections and energy-leading components (incl. wires inside a wall) must be checked by a qualified professional. All modifications to the electrical mains to enable the installation of the appliance must be performed by a qualified professional.
i The appliance is intended for private use only.
The appliance is intended for washing laundry in a private household only.
i The appliance is intended for indoor-use only.
i The appliance is not intended to be operated for commercial purposes, during camping and in public transport.
Operate the appliance in accordance with its intended use only.
Do not allow anybody who is not familiar with this instruction manual to operate the appliance.
This appliance may be operated by children aged from 8 years and above as well as by persons with reduced physical, sensory and mental capabilities or lack of experience and knowledge if they are supervised or have been instructed concerning the safe use of the appliance and do comprehend the hazards involved. Children must not play with the appliance. Cleaning and user-maintenance must not be carried out by children unless they are supervised
1.1 Signal words
⚠️ DANGER! indicates a hazardous situation which, if ignored, will result in death or serious injury.
⚠ WARNING! indicates a hazardous situation which, if ignored, could result in death or serious injury.
⚠️ CAUTION! indicates a hazardous situation which, if not avoided, may result in minor or moderate injury.
NOTICE! indicates possible damage to the appliance.
1.2 Safety instructions
DANGER!
To reduce the risk of electrocution:
- Non-compliance of the orders of this instruction manual will endanger the life and health of the operator and/or can result in damages to the appliance.
- All electrical work must be carried out by a qualified professional. Do not modify the energy supply. The connection must be carried out in accordance with the current local and legal regulations
- Do not connect the appliance to the mains if the appliance itself or the power cord or the plug are visibly damaged. RISK OF ELECTRIC SHOCK!
- Do not modify the plug provided with the appliance, if it will not fit the outlet, have a proper outlet installed by a qualified electrician (not covered by the guarantee).
- Never try to repair the appliance yourself. Repairs carried out by unauthorized persons can cause serious damage. If the appliance does not operate properly, please contact the aftersales service. Original spare parts should be used only.
- When the power cord is damaged, it must be replaced by the manufacturer or an authorized aftersales service or a qualified professional only.
- Never pull the power supply cable to unplug the appliance. Always use the power plug itself to unplug the appliance. RISK OF ELECTRIC SHOCK!
- Never touch the power plug, the power switch or other electrical components with wet or damp hands. RISK OF ELECTRIC SHOCK!
To reduce the risk of burns, electrocution, fire or injury to persons:
- Unplug the appliance after operation and turn off the water supply.
- Disconnect the appliance from the mains before you clean or maintain it.
- Operate the appliance with 220\~230V AC only. Use a suitable safety-socket near of the appliance.
- The appliance must always be grounded and protected corresponding to the requirements of your local energy supplier. The main current circuit must be equipped with a safety shut-down device.
- After installation, the power plug and the safety socket must be always easily-accessible.
- In case of an event caused by a technical malfunction, disconnect the appliance from the mains. Report the malfunction to your service centre so it can be repaired.
- Do not use adapters, multiple sockets and extension cords for connecting the appliance to the mains.
- Do not pull on the power cable. Pull on the plug.
- The plug must be connected to the power cable properly.
- Do not bend the power cord.
- Check that the power cord is not placed under the appliance or damaged when moving the appliance. RISK OF ELECTRIC SHOCK!
- Remove possible dust accumulation at the power plug, at the safety power socket and at all plug connectors regularly. RISK OF FIRE!
- Keep the cord away from heated surfaces.
- The technical data of your energy supplier must meet the data on the model plate of the appliance.
- Do not place any electrically-powered appliances on the appliance.
- Do not carry out any modifications to your appliance.
- The room the appliance is installed in must be dry and well-ventilated. When the appliance is installed, an easy access to all control elements is required.
- Do not install the appliance in rooms or at areas which contain flammable substances such as petrol, gas or paint. Do not put any laundry which is contaminated by such materials in or near of the appliance. RISK OF FIRE! RISK OF EXPLOSION!
- Use washer-suitable detergents only. Never use flammable, explosive or toxic detergents, e.g. petrol or alcohol.
- Do not install the appliance on a soft carpet or wooden floor.
- When any fuels or gases are set free near of the appliance:
➢ open all windows for proper ventilation.
➢ do not unplug the appliance and do not use the controls of the appliance.
➢ do not touch the appliance unless the gas has been discharged completely.
- otherwise sparks can occur. RISK OF FIRE!
-
Never use a steam cleaner to clean the appliance. The steam will cause serious damage to the electric components of the appliance. RISK OF ELECTRICAL SHOCK!
-
Do not install the appliance near of sources of heat.
- Do not install the appliance in a place where it can come in contact with rain or high levels of moisture. Otherwise the electric components can be damaged.
- Turn off the power before you install the appliance and before you connect it to the mains. RISK OF FATAL ELECTRIC SHOCK!
- Disconnect the appliance from the mains before you clean or maintain it.
- Do not spray the appliance with water.
- Children must not play with the appliance.
- Always supervise children if they are near the appliance.
- Check that children or pets have not get into the appliance before washing. Check the drum carefully before closing. RISK OF CHOKING HAZARD!
- Only allow children to use the appliance without supervision, when adequate instructions have been given before so that the child is able to use the appliance in a safe way and understands the risks of improper use.
- Strictly observe the instructions in chapter INSTALLATION.
CAUTION!
- Do not use any aggressive, abrasive and acrid detergents or sharpedged items to clean the appliance.
- The drained water can be very hot. RISK OF SCALDING!
- During operation the glass door of the appliance can become very hot. Keep children and pets away from the appliance during operation. RISK OF SCALDING! RISK OF BURNS!
- Never fill water by hand into the appliance while operating.
- Before you open the door check, that the water is drained completely. Do not open the door if any water is visible.
NOTICE
- Do not force the door to close. When you cannot close the door easily, check the amount and position of the laundry.
- After end of operation, wait 3 minutes before you open the door.
- When you move the appliance, hold it at its base and lift it carefully. Keep the appliance in an upright position.
- Never use the door for moving the appliance as you will damage the hinges.
- The appliance must be transported and installed by at least two persons.
- Remove the complete packaging materials before initial operation. The appliance may be equipped with a transportation lock. Remove the transportation lock completely. When removing be very careful. Do not use any aggressive detergents to remove residues of the transportation lock.
- When you unpack the appliance, you should take note of the position of every part of the interior accessories in case you have to repack and transport it at a later point of time.
- Do not operate the appliance unless all components are installed properly.
- Do not stand or lean on the base, the drawers, the doors etc of the appliance.
- The air vents of the appliance or its built-in structure (if the appliance is suitable for being built-in) must be completely open, unblocked and free of any kind of dirt.
- When you use fabric conditioner or a similar product, observe the information given on their packaging.
- Dry washer-proof fabrics only. Observe the information on the labels.
- Do not place any items liquid can escape from on the appliance as the liquid can damage the control panel.
- Metal-made items, e.g. keys, screws, coins etc., can damage the appliance. Check that your laundry is free of such items.
- Do not overload the appliance.
- Clean the appliance and its components regularly.
- Prewash programmes / prewash cycles are depending on the model of the appliance and are not available for all models of washing machines.
- The rating plate must not be removed or made illegible, otherwise all terms of the warranty become invalid!
SAVE THESE INSTRUCTIONS.
★ The manufacturer and distributor are not responsible for any damage or injury in the event of failure to comply with these instructions.
2. Installation
⚠ WARNING! Remove the safety bolts before initial use (see chapter 2.2 REMOVING OF THE SHIPPING BOLTS); otherwise the appliance may cause serious injury to persons and/or severe damage to the appliance.
Important information: The installation of this appliance must be carried out by a person who is experienced in such a work. The following instructions are intended for such a person. The manufacturer is not liable for any damage caused by improper installation.
2.1 Unpacking / Site
- Unpack the appliance carefully. Dispose of the packaging as described in chapter waste management.
- Check that the appliance and the power cord are not damaged.
- Do not install the appliance in a bathroom or a place where it may come in contact with water or rain; otherwise the insulation of the electrical system will be damaged. Do not install the appliance in a room where explosive or flammable gases are stored.
- Protect the appliance from direct sunlight.
- Install the appliance in a dry and well-ventilated place. The room temperature must be higher than 0^ C.
- Install the appliance in a suitable position with an adequate distance from sources of heat and cold.
- Do not install the appliance on a carpet / fitted carpet.
- Install the appliance on a level, dry and solid floor. Check the correct installation with a bubble level.
- All required installations for the electric and water supply must be carried out by a qualified professional.
- Connect the appliance to the mains properly.
- The nameplate is situated at the back of the appliance.
2.2 Removing of the shipping bolts
-
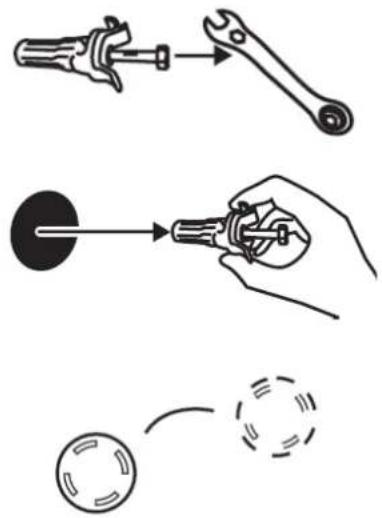
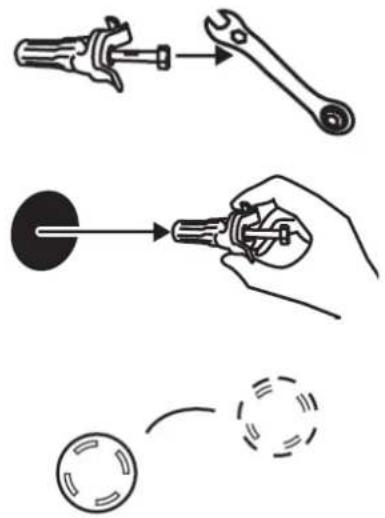
Remove the four shipping bolts using a wrench. Start with the lower bolts. Remove the shipping bolts horizontally (s. fig. on the right). Start with the lower bolts.
-
Insert the four caps into the holes.
-
Keep the shipping bolts and the wrench for future use.
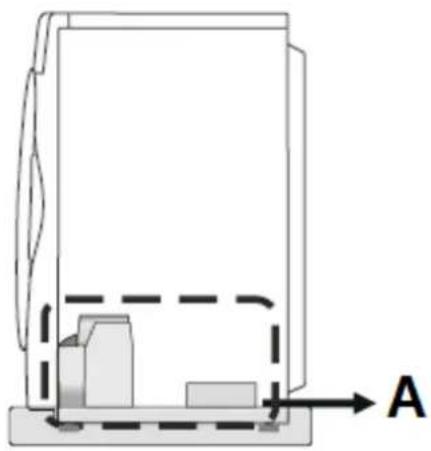
IMPORTANT NOTE: Make sure that the lower equipment protection (s. fig. below) has been removed completely before you use the appliance; otherwise, the normal operation of the washing machine will be affected.
natural_image
Diagram of a mechanical or architectural component with labeled point A, showing internal structure and dashed lines indicating hidden edges (no text or symbols beyond label)A
LOWER EQUIPMENT PROTECTION
2.3 Levelling
-
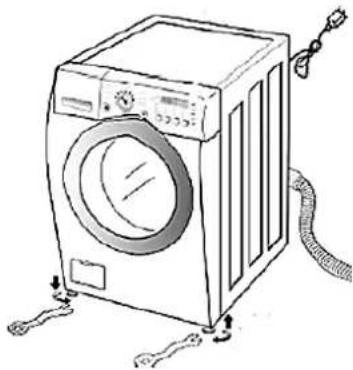
Install the appliance on a flat and solid ground only.
-
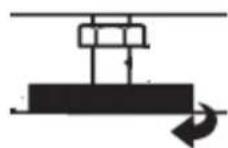
Turn the adjustable feet for horizontal alignment.
natural_image
Line drawing of a front-loading washing machine with attached hoses and control panel (no text or symbols)a. Raise: clockwise.
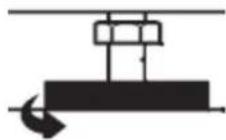
b. Lower: anti-clockwise
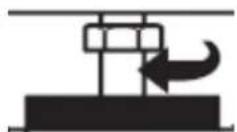
- NOTICE! While you adjust the feet, pay attention to the respective lock nut ^23 (s. below).
a. How to loose the lock nut: turn the lock nut clockwise (s. fig. on the right).
b. How to tighten the lock nut: turn the lock nut anti-clockwise (s. fig. on the right).
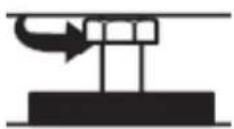
NOTICE! After you have levelled the appliance properly, always tighten the lock nuts again.
2.4 Connection of the water inlet hose
Do not use a water connection the water of which is warmer than 50 ^ .
| 1. Ensure that the rubber washer is in the valve connector (both ends ^24 / s. fig. on the right). | 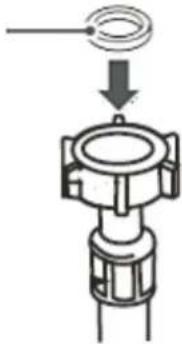 |
| 2. Attach the straight end of the water inlet hose to the appropriate water connection (s. fig. on the right). | 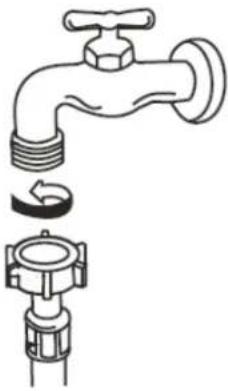 |
| 3. Put the other end of the water inlet hose into a bucket or into another suitable container (s. fig on the right) and open the water tap to flush foreign substances (c.g. dirt, sand, etc.) out of the water pipe and of the hose. Check the water temperature. | 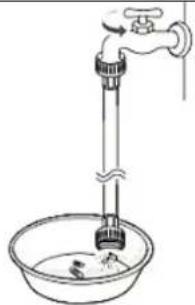 Fig. similar Fig. similar |
| 4. Ensure that the rubber washer ^25 is in the valve connector. Attach the curved end of the water inlet hose to the inlet valve of the washing machine (s. fig. on the right / 1). Tighten the water inlet hose firmly (clockwise) to avoid leakage (s. fig. on the right / 2). | 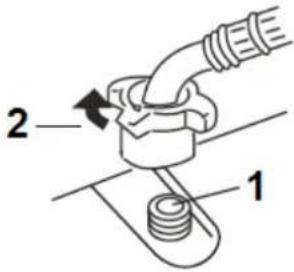 |
NOTICE! Do not overtighten the water inlet hose. Overtightening of the water inlet hose can damage the valves.
2.5 Connection of the water drain hose
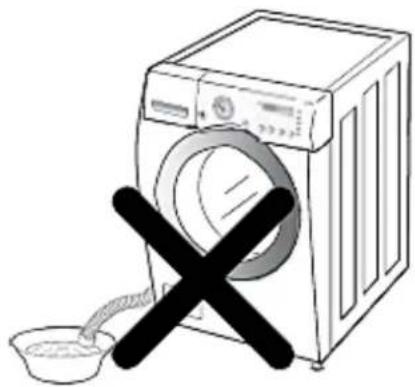
The water drain hose must be installed at a height between 60 cm and 120 cm above the floor (s. below; fig. 1, 2 and 3).
i The hose outlet must not be installed less than 60 cm above the floor.
The hose outlet must not be installed higher than 120 cm above the floor.
THE WATER DRAIN HOSE CAN BE INSTALLED IN DIFFERENT WAYS (see below; fig. 1, 2 and 3):
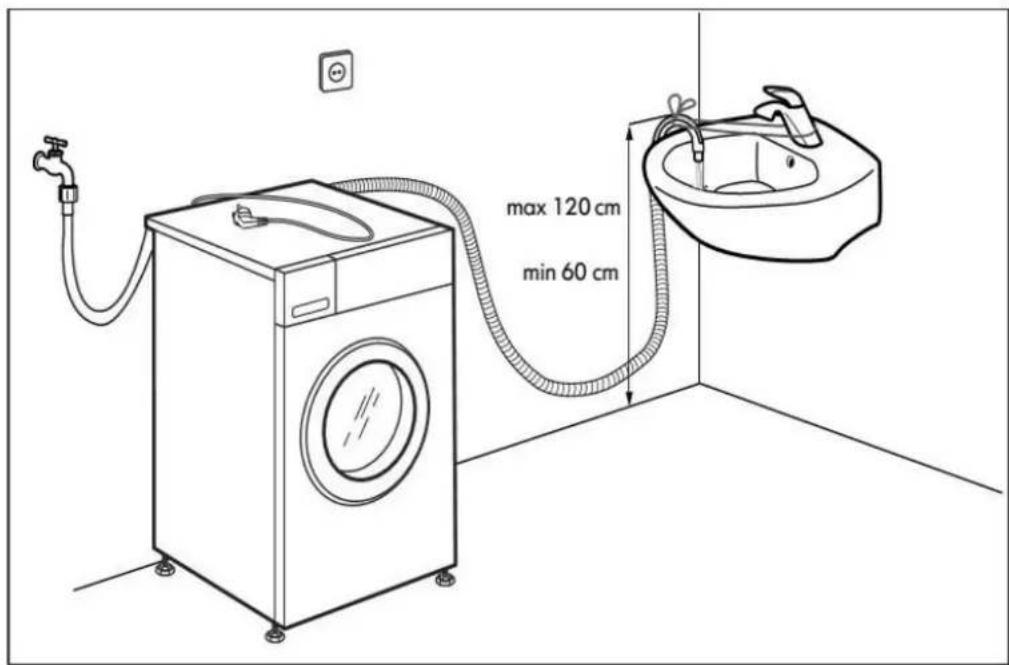
FIG. 1
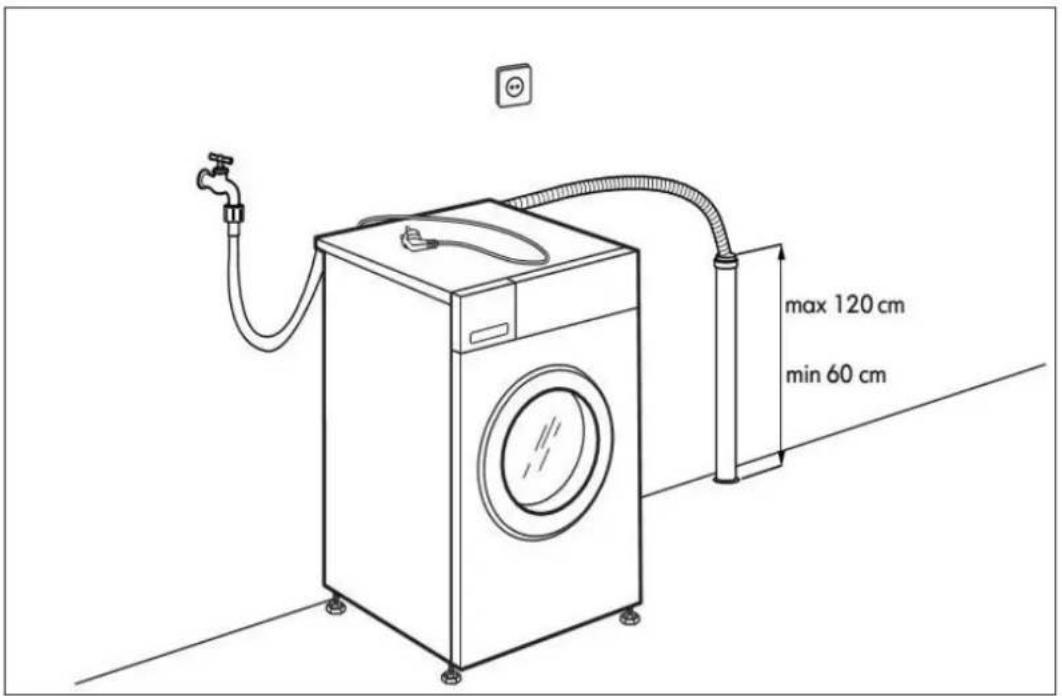
FIG. 2
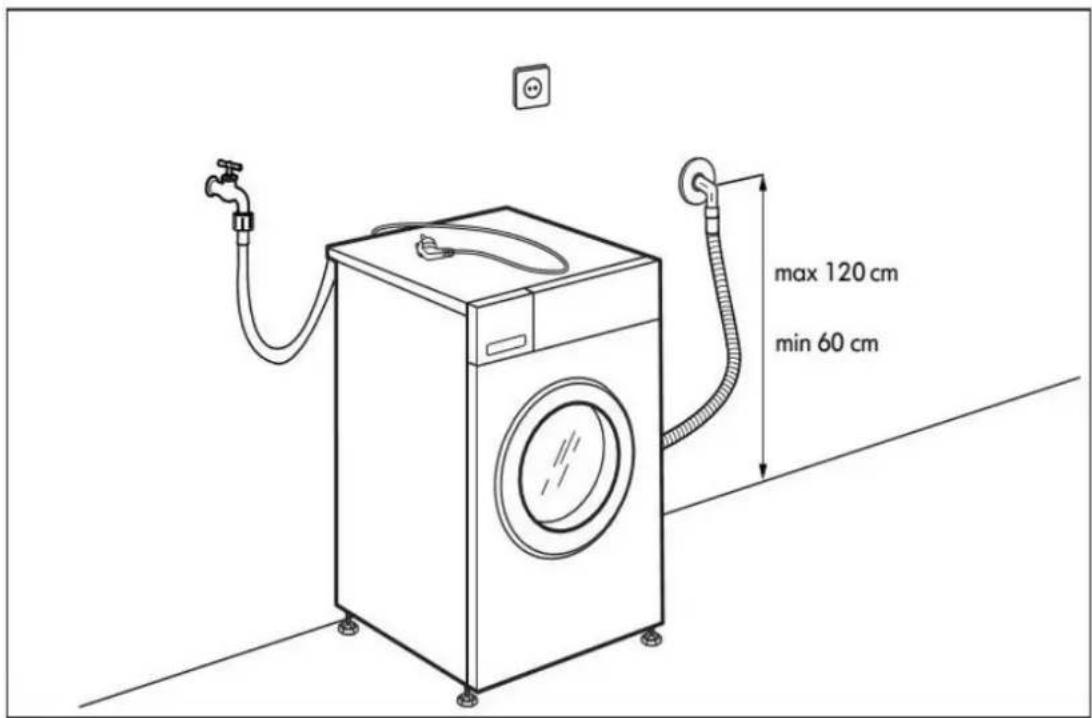
FIG. 3
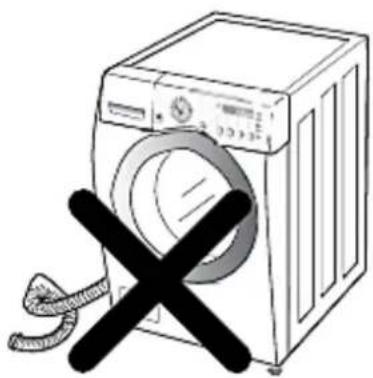
natural_image
Line drawing of a washing machine with a large circular roller and a crossed-out black X symbol (no text or labels)The hose must not be twisted.
natural_image
Simple line drawing of a washing machine with a crossed-out black X symbol (no text or symbols present)The hose outlet must not be submerged into water.
NOTICE! If the washing machine is out of operation, fix the water drain hose (A) on the back of the appliance using the appropriate bracket (B); s, fig. below. Do not remove the bracket!
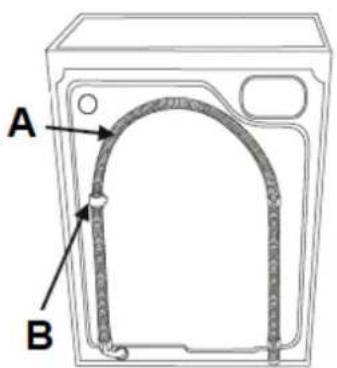
A
WATER DRAIN HOSE
B
BRACKET
2.6 Connection to the mains
⚠️ DANGER! Do not connect the appliance to the mains if the appliance itself or the power cord or the plug are visibly damaged. RISK OF ELECTRIC SHOCK!
⚠️ DANGER! Never touch the power plug, the power switch or other electrical components with wet or damp hands. RISK OF ELECTRIC SHOCK!
Connect the appliance with the safety plug to a properly grounded and dedicated safety socket only.
3. Operation
WARNING! Remove the safety bolts before initial use (see chapter 2.2 REMOVING OF THE SHIPPING BOLTS); otherwise the appliance may cause serious injury to persons and / or severe damage to the appliance.
3.1 Description of the appliance
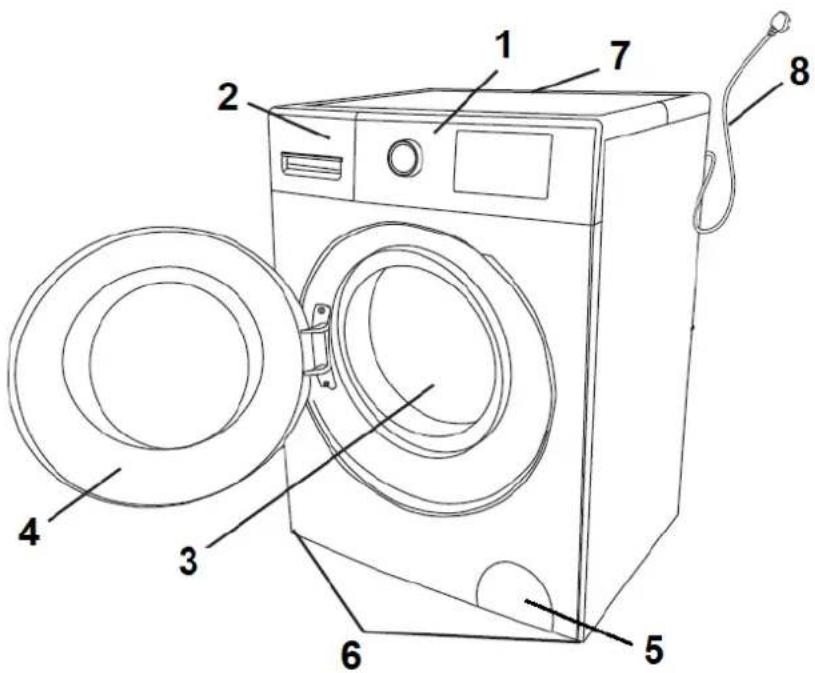
Fig. similar: modicaons are possible
| 1 | CONTROL PANEL |
| 2 | DETERGENT DISPENSER |
| 3 | DRUM |
| 4 | DOOR OF THE WASHING MACHINE |
| 5 | DRAIN PUMP FILTER / COVER OF THE DRAIN PUMP FILTER |
| 6 | ADJUSTABLE FEET |
| 7 | INLET VALVE FOR COLD WATER |
| 8 | POWER SUPPLY CABLE |
3.2 Control panel
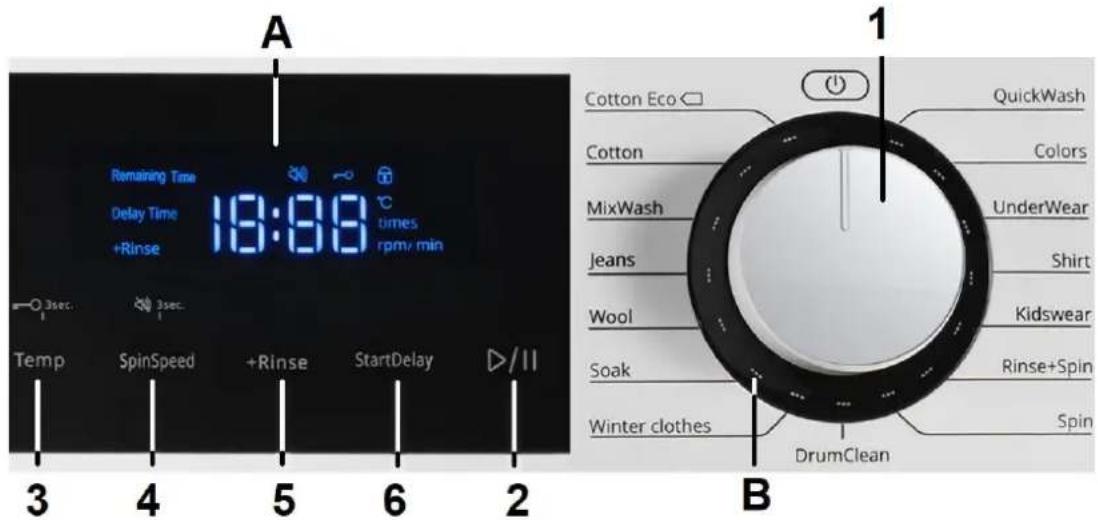
Fig. similar: modicaons are possible.
| OPERATING BUTTONS: | |
| 1 | ROTARY KNOB for PROGRAMME SELECTION / -On / Off-➢ To select a washing programme according to fibre type and degree of soiling.➢ Switches on / off the washing machine by selecting the desired programme. |
| 2 | BUTTON -START / PAUSE-:➢ To start or pause operation (e.g. changes of the washing functions, etc.). |
| 3 | BUTTON -TEMP-:➢ To change the temperature of a washing programme.➢ Press repeatedly to switch through the different temperatures.➢ See also chapter 3.6.1 SELECTING THE ADDITIONAL FUNCTIONS.➢ In some washing programmes the settable temperature range is limited (depending on model). |
| 4 | BUTTON -SPIN SPEED-:➢ To change the spin speed of a washing programme.➢ Press repeatedly to switch through the different speeds.➢ See also chapter 3.6.1 SELECTING THE ADDITIONAL FUNCTIONS.➢ In some washing programmes the settable spin speed is limited (depending on model). |
| 5 | BUTTON -RINSE-:➢ To change the default number of rinsing cycles of a washing programme (0 - 6 rinsing cycles / depending on the selected programme).➢ Press repeatedly to switch through the different options.➢ See also chapter 3.6.1 SELECTING THE ADDITIONAL FUNCTIONS.➢ In some washing programmes the settable number of rinsing cycles is limited (depending on model). |
| 6 | BUTTON -START DELAY-:➢ To set a delayed programme start.➢ Press repeatedly to switch through the different options.➢ See also chapter 3.6.1 SELECTING THE ADDITIONAL FUNCTIONS. |
| INDICATORS: | |
| A | DISPLAY:➢ Indication of detailed information displaying the selected washing programme and other functions (spin speed, temperature, washing time, child lock, etc.). |
| B | ➢ Indication of the selected WASHING PROGRAMME. |
3.3 The washing programmes
i You can receive information about the symbols on the textile labels in chapter 3.13 TEXTILE CARE SYMBOLS or on the webpage of your local consumer advice centre.
| Cotton Eco (2) | 40 °C/ 60 °CDEFAULT TEMPERATURE: 60 °C (1) | |||
| Material / Degree of soiling | ➢ For slightly and medium soiled cotton laundry.➢ Always observe the textile labels. | |||
| Detergent dispenser | Pre-wash √ | Main-wash √ | Softener ✉ * | |
| Model | WA 8-E1215I | WA 9-E1415I | ||
| Max. load | 8.0 kg | 9.0 kg | ||
| Max. rpm / spinning | 1200 | 1400 | ||
| Cotton | cold / 10°C / 20°C / 30°C / 40°C / 60°C/80°CDEFAULT TEMPERATURE: 30°C (1) | |||
| Material / Degree of soiling | ➢ For slightly, medium and highly soiled cotton or linen laundry.➢ Always observe the textile labels. | |||
| Detergent dispenser | Pre-wash √ | Main-wash √ | Softener ⊗ * | |
| Model | WA 8-E1215I | SWA 10-E1416I | ||
| Max. load | 8.0 kg | 9.0 kg | ||
| Max. rpm / spinning | 1200 | 1400 | ||
| MixWash | cold / 10°C / 20°C / 30°C / 40°C / 60°CDEFAULT TEMPERATURE: 30°C (1) | |||
| Material / Degree of soiling | Mixed loads of medium-soiled cotton and synthetic fibres.Always observe the textile labels. | |||
| Detergent dispenser | Pre-wash✓ | Main-wash✓ | Softener※* | |
| Model | WA 8-E1215I | WA 9-E1415I | ||
| Max. load | 6.0 kg | 6.0 kg | ||
| Max. rpm / spinning | 1200 | 1200 | ||
| Jeans | cold / 10°C / 20°C / 30°C / 40°CDEFAULT TEMPERATURE: 30°C (1) | |||
| Material / Degree of soiling | ➢ Special programme for the washing of jeans or fabrics made of denim.➢ Always observe the textile labels. | |||
| Detergent dispenser | Pre-wash √ | Main-wash √ | Softener ✕* | |
| Model | WA 8-E1215I | WA 9-E1415I | ||
| Max. load | 5.0 kg | 5.0 kg | ||
| Max. rpm / spinning | 1200 | 1200 | ||
| Wool | cold / 10°C / 20°C / 30°C / 40°CDEFAULT TEMPERATURE: cold (1) | |||
| Material / Degree of soiling | ➢ For washer-safe wool only.➢ Always observe the textile labels.➢ Remove the laundry immediately after the washing cycle is completed.➢ Always wash light and dark clothes separately.➢ The highest settable temperature of the wool programme is 40°C | |||
| Detergent dispenser | Pre-wash √√ | Main-wash √√ | Softener ⊗* | |
| Model | WA 8-E1215I | WA 9-E1415I | ||
| Max. load | 2.0 kg | 2.0 kg | ||
| Max. rpm / spinning | 800 | 800 | ||
| Soak / Synthetic | cold / 10°C / 20°C / 30°C / 40°C / 60°CDEFAULT TEMPERATURE: 30°C (1) | |||
| Material / Degree of soiling | Medium soiled synthetic fibres (polyester, polyacrylic, viscose) and cotton-blended fabrics.Always observe the textile labels. | |||
| Detergent dispenser | Pre-wash √ | Main-wash √ | Softener ⊗ * | |
| Model | WA 8-E1215I | WA 9-E1415I | ||
| Max. load | 5.0 kg | 5.0 kg | ||
| Max. rpm / spinning | 1200 | 1200 | ||
| Winter clothes | cold / 10 °C / 20 °C / 30 °C / 40 °CDEFAULT TEMPERATURE: 30 °C (1) | |||
| Material / Degree of soiling | ➢ Special programme for the washing of down (down jackets etc.)➢ For washer-safe down only.➢ Always observe the textile labels. | |||
| Detergent dispenser | Pre-wash √ | Main-wash √ | Softener ⊗ * | |
| Model | WA 8-E1215I | WA 9-E1415I | ||
| Max. load | 2.0 kg | 2.0 kg | ||
| Max. rpm / spinning | 1000 | 1000 | ||
| QuickWash 15` | cold / 10 °C / 20 °C / 30 °CDEFAULT TEMPERATURE: cold (1) | |||
| Material / Degree of soiling | ➢ For rarely-used or newly-bought clothing.➢ Always observe the textile labels.➢ High-speed wash cycle (approx. 15 min.) | |||
| Detergent dispenser | Pre-wash √ | Main-wash √ | Softener ⊗ * | |
| Model | WA 8-E1215I | WA 9-E1415I | ||
| Max. load | 1.0 kg | 1.0 kg | ||
| Max. rpm / spinning | 1200 | 1400 | ||
| Colours | The temperature cannot be changed. DEFAULT TEMPERATURE: 15°C (1) | |||
| Material / Degree of soiling | ➢ Special programme for the washing of coloured textiles (rich or light colours).➢ For rarely-used or newly-bought clothing.➢ Always observe the textile labels. | |||
| Detergent dispenser | Pre-wash √ | Main-wash √ | Softener ⊗ * | |
| Model | WA 8-E1215I | WA 9-E1415I | ||
| Max. load | 3.0 kg | 3.0 kg | ||
| Max. rpm / spinning | 800 | 800 | ||
| Underwear | cold / 10°C / 20°C / 30°C / 40°C / 60°CDEFAULT TEMPERATURE: 30°C (1) | |||
| Material / Degree of soiling | ➢ Special programme for the washing of underwear.➢ Always observe the textile labels. | |||
| Detergent dispenser | Pre-wash √ | Main-wash √ | Softener ⊗ * | |
| Model | WA 8-E1215I | WA 9-E1415I | ||
| Max. load | 3.0 kg | 3.0 kg | ||
| Max. rpm / spinning | 1000 | 1000 | ||
| Shirt | cold / 10°C / 20°C / 30°C / 40°C / 60°CDEFAULT TEMPERATURE: 30°C (1) | |||
| Material / Degree of soiling | ➢ Special programme for the washing of shirts made of cotton, linen, synthetic or blended fabric.➢ Always observe the textile labels. | |||
| Detergent dispenser | Pre-wash √ | Main-wash √ | Softener ⊗ * | |
| Model | WA 8-E1215I | WA 9-E1415I | ||
| Max. load | 3.0 kg | 3.0 kg | ||
| Max. rpm / spinning | 1000 | 1000 | ||
| Kidswear | The temperature cannot be changed. DEFAULT TEMPERATURE: 80 °C (1) | |||
| Material / Degree of soiling | ➢ Special programme for the washing of children's and baby clothing, etc.➢ Special programme for the washing of hard-wearing textiles.➢ Always observe the textile labels. | |||
| Detergent dispenser | Pre-wash ∥ √ | Main-wash ∥ √ | Softener ⊗ * | |
| Model | WA 8-E1215I | WA 9-E1415I | ||
| Max. load | 3.0 kg | 3.0 kg | ||
| Max. rpm / spinning | 1200 | 1400 | ||
| Rinse + spin | - | |||
| Material / Degree of soiling | Using this programme, you can remove excess water and remaining washing agent from textiles. | |||
| Detergent dispenser | Pre-wash↓↓- | Main-wash↓↓- | Softener⊗* | |
| Model | WA 8-E1215I | WA 9-E1415I | ||
| Max. load | 6.0 kg | 6.0 kg | ||
| Max. rpm / spinning | 1200 | 1400 | ||
| Spin | - | |||
| Material / Degree of soiling | Using this programme, you can remove excess water from textiles. | |||
| Detergent dispenser | Pre-wash | Main-wash | Softener | |
| - | - | - | ||
| Model | WA 8-E1215I | WA 9-E1415I | ||
| Max. load | 6.0 kg | 6.0 kg | ||
| Max. rpm / spinning | 1200 | 1400 | ||
| DrumClean | The temperature cannot be changed. DEFAULT TEMPERATURE: 80 °C (1) | ||
| Material / Degree of soiling | ➢ For the removing of contaminations and bacterial residues which may accumulate in the appliance after some time, especially then when you mainly use low-temperature-programmes.➢ For cleaning the drum, you can add a fair amount of chlorine bleach to the washing machine (please observe to the information given by the manufacturer of the chlorine bleach).➢ Do not use any additional washing agent.➢ Do not wash any textiles / laundry when using this programme. | ||
| Detergent dispenser | Pre-wash↓↓- | Main-wash↓↓- | Softener⊗- |
| Model | WA 8-E1215I | WA 9-E1415I | |
| Max. load | 0.0 kg | 0.0 kg | |
| Max. rpm / spinning | 800 | 800 | |
| * | Additional functions (options). |
| √ | Detergent. |
| - | Selection disabled. |
| (1) | The suitable washing temperature is indicated on the textile labels of your garments. |
| (2) | Wash performance test programmes are: Cotton 60 °C, full / partial loading, Cotton 40 °C, full / partial loading. The actual energy and water consumption can vary depending on the usage of the appliance. |
| (3) | The spinning speed is limited to 800 rpm to protect your clothing. |
| (4) | Prewash programmes / prewash cycles are depending on the model of the appliance and are not available for all models of washing machines. |
3.4 Additional washing functions (options)
| PROGRAMME | AVAILABLE ADDITIONAL FUNCTIONS (OPTIONS) |
| COTTON ECO | ➢Automatic switch off*➢End signal: switch on / off➢Reload laundry➢Delay➢Child lock➢Temperature setting (up to 60°C max.)➢Spin speed setting:WA 8-E1215I up to 1200 rpm max.WA 9-E1415I up to 1400 rpm max. |
| COTTON | ➢Automatic switch off*➢End signal: switch on / off➢Reload laundry➢Delay➢Selection of the number of rinsing cycles (0 - 6)➢Child lock➢Temperature setting (up to 80°C max.)➢Spin speed setting:WA 8-E1215I up to 1200 rpm max.WA 9-E1415I up to 1400 rpm max. |
| MIXWASH | ➢Automatic switch off*➢End signal: switch on / off➢Reload laundry➢Delay➢Selection of the number of rinsing cycles (0 - 6)➢Child lock➢Temperature setting (up to 60°C max.)➢Spin speed setting (up to 1200 rpm max.) |
| JEANS | ➢Automatic switch off*➢End signal: switch on / off➢Reload laundry➢Delay➢Selection of the number of rinsing cycles (0 - 6)➢Child lock➢Temperature setting (up to 40°C max.)➢Spin speed setting (up to 1200 rpm max.) |
| WOOL | ➢Automatic switch off*➢End signal: switch on / off➢Reload laundry➢Delay➢Selection of the number of rinsing cycles (0 - 6)➢Child lock➢Temperature setting (up to 40°C max.)➢Spin speed setting (up to 800 rpm max.) |
| SOAK / SYNTHETIC | ➢Automatic switch off*➢End signal: switch on / off➢Reload laundry➢Delay➢Selection of the number of rinsing cycles (0 - 6)➢Child lock➢Temperature setting (up to 60°C max.)➢Spin speed setting (up to 1200 rpm max.) |
| WINTER CLOTHES | ➢Automatic switch off*➢End signal: switch on / off➢Reload laundry➢Delay➢Selection of the number of rinsing cycles (0 - 6)➢Child lock➢Temperature setting (up to 40°C max.)➢Spin speed setting (up to 1000 rpm max.) |
| QUICKWASH 15' | ➢Automatic switch off*➢End signal: switch on / off➢Reload laundry➢Delay➢Selection of the number of rinsing cycles (0 - 4)➢Child lock➢Temperature setting (up to 30°C max.)➢Spin speed setting:WA 8-E1215I up to 1200 rpm max.WA 9-E1415I up to 1400 rpm max. |
| COLOURS | ➢Automatic switch off*➢End signal: switch on / off➢Reload laundry➢Delay➢Selection of the number of rinsing cycles (0 - 4)➢Child lock➢Spin speed setting (up to 800 rpm max.) |
| UNDERWEAR | ➢Automatic switch off*➢End signal: switch on / off➢Reload laundry➢Delay➢Selection of the number of rinsing cycles (0 - 6)➢Child lock➢Temperature setting (up to 60°C max.)➢Spin speed setting (up to 1000 rpm max.) |
| SHIRT | ➢Automatic switch off*➢End signal: switch on / off➢Reload laundry➢Delay➢Selection of the number of rinsing cycles (0 - 6)➢Child lock➢Temperature setting (up to 60°C max.)➢Spin speed setting (up to 1000 rpm max.) |
| KIDSWEAR | ➢Automatic switch off*➢End signal: switch on / off➢Reload laundry➢Delay➢Selection of the number of rinsing cycles (0 - 6)➢Child lock➢Spin speed setting:WA 8-E1215I up to 1200 rpm max.WA 9-E1415I up to 1400 rpm max. |
| RINSE + SPIN | ➢Automatic switch off*➢End signal: switch on / off➢Reload laundry➢Delay➢Selection of the number of rinsing cycles (0 - 6)➢Child lock➢Spin speed setting:WA 8-E1215I up to 1200 rpm max.WA 9-E1415I up to 1400 rpm max. |
| SPIN | ➢Automatic switch off*➢End signal: switch on / off➢Reload laundry➢Delay➢Child lock➢Spin speed setting:WA 8-E1215I up to 1200 rpm max.WA 9-E1415I up to 1400 rpm max. |
| DRUMCLEAN | ➢Automatic switch off*➢End signal: switch on / off➢Delay➢Child lock |
| * | Depending on model, the function -AUTOMATIC SWITCH OFF- is enabled by default. |
WOLKENSTEIN
3.5 Before the first wash cycle
To remove potential residues caused by production, testing or transportation of the appliance, the programme -DRUMCLEAN- should be started (always without laundry) before the first regular wash cycle.
- Open the tap.
- Close the door of the appliance.
- Set the programme -DRUMCLEAN- using the ROTARY KNOB. The washing machine is now switched on.
- Press the button -START / PAUSE- to start the programme.
3.6 Programming and starting of a washing programme
- Load the drum.
- Fill the detergent(s) into the relevant sections of the dispenser according to the desired programme.
- Open the tap.
- Set the desired programme using the ROTARY KNOB. The washing machine is now switched on.
- The DISPLAY (A) indicates the duration of the programme (hours : minutes) ^26 .
-
Additionally to the selected programme, further washing functions such as temperature, spin speed, delay, etc. can be selected by pressing the corresponding buttons (s. chapter 3.6.1 SELECTING OF THE ADDITIONAL FUNCTIONS)
-
Press the button -START / PAUSE- to start the washing programme.
- The door lock will be activated automatically.
- When the washing cycle is finished, an acoustic signal sounds (s. chapter 3.12 HOW TO SWITCH ON / OFF THE ACOUSTIC SIGNAL).
i It is possible that the current run time of the selected washing programme will be adjusted automatically so that it may vary from the washing time which is shown on the display.
3.6.1 Selecting of the additional functions
FOLLOWING ADDITIONAL WASHING FUNCTIONS CAN BE SELECTED:
→ SELECTION OF THE TEMPERATURE
→ SELECTION OF THE SPIN SPEED
→SELECTION OF THE NUMBER OF RINSING CYCLES
→ DELAY
→ CHILD LOCK (ON / OFF)
- Press the corresponding button(s) to select or to modify an additional function.
- Press the corresponding button(s) once or repeatedly, until the indicator of the desired washing function or combination ^27 is displayed.
i If the selected programme cannot be combined with the desired functions, these functions cannot be selected or will be cancelled and the indicator switches off automatically ^28 .
SELECTION OF THE TEMPERATURE (3):
The temperature of several washing programmes can be selected individually (up to the maximum allowed temperature of the selected programme).
◆ Each of the washing programmes contains a default temperature.
To set the temperature of a washing programme individually, press the button -TEMP- (3) repeatedly until the desired temperature is indicated on the display.
i If no temperature is indicated, the appliance washes with cold water ^29
In some washing programmes the settable temperature range is limited (depending on model).
The function -SELECTION OF THE TEMPERATURE- may not be available for all programmes (depending on model); see also chapter 3.4 ADDITIONAL WASHING FUNCTIONS (OPTIONS).
SELECTION OF THE SPIN SPEED (4):
The spin speed of several washing programmes can be selected individually (up to the maximum permitted spin speed of the selected programme).
◆ Each of the washing programmes contains a default spin speed.
To set the spin speed of a washing programme individually, press the button -SPIN SPEED- (4) repeatedly until the desired spin speed is indicated on the display.
i If no spin speed is indicated, the spin speed is "0" ^30 . If spin speed "0" has been selected, the final spin speed will be cancelled. Before the programme ends, the appliance drains the water only.
i In some washing programmes the settable spin speed is limited (depending on model).
The function -SELECTION OF THE SPIN SPEED- may not be available for all programmes (depending on model); see also chapter 3.4 ADDITIONAL WASHING FUNCTIONS (OPTIONS).
SELECTION OF THE NUMBER OF RINSING CYCLES (5):
The number of rinsing cycles of several washing programmes can be selected individually (up to the maximum permitted number of rinsing cycles of the selected programme / 0 - 6).
◆ Each of the washing programmes contains a default number of rinsing cycles.
To set the number of rinsing cycles of a washing programme individually, press the button -RINSE- (5) repeatedly until the desired number (0 - 6) is indicated on the display.
i In some washing programmes the settable number of rinsing cycles is limited (depending on model).
The function -SELECTION OF THE NUMBER OF RINSING CYCLES- may not be available for all programmes (depending on model); see also chapter 3.4 ADDITIONAL WASHING FUNCTIONS (OPTIONS).
DELAYED PROGRAMME START (6):
◆ You can set a delayed programme start.
- Set the washing programme and the desired additional function and then activate the DELAY-FUNCTION using the button -START DELAY- (6).
◆ Each press of the button -START DELAY- (6) increases the delay period by one hour.
i You can choose a delay period from 1 hours to 24 hours.
The delay period has to be longer than the duration of the washing programme as the set delay time defines the end of the washing programme. Example: If the duration of the set washing programme is 02:58, the delay period must be set between 03:00 and 24:00.
- Set the washing programme and the desired additional function.
- Press the button -START DELAY- (6) repeatedly until the desired delay period (desired end of the washing programme in h) is indicated on the display (A).
- The programmable delay periods are from 1 hours (min.) to 24 hours (max.).
- Press the button -START / PAUSE- (2) when having set the delay period. As soon as the count-down time has reached the starting time of the washing programme, the washing programme starts.
- If you wish to cancel the delayed programme start after pressing the button -START / PAUSE- (but before the washing programme has started), you have to switch off the appliance using rotary knob (ON / OFF) ^31 .
i It is possible that the current run time of the selected washing programme will be adjusted automatically so that it may vary from the washing time which is shown on the display.
The function -START DELAY- may not be available for all programmes (depending on model); see also chapter 3.4 ADDITIONAL WASHING FUNCTIONS (OPTIONS).
CHILD LOCK
❖ The appliance is equipped with a CHILD LOCK.
The CHILD LOCK serves to protect your children and disables all function buttons (except On / Off ^4 ).
- The washing machine must be switched on.
- Press and hold the button -TEMP- (3) for 3 seconds. An acoustic signal sounds.
- The activated child lock is indicated on the display.
- All buttons are locked (except ON / OFF ^33 ).
- Wait until the washing programme has been finished or repeat the procedure for deactivation.
3.7 End of a washing programme
When a programme has ended, an acoustic signal will sound.
i After a washing programme is finished, the washing machine is switched off automatically. ^34
i The door lock will be released after approx. 2 minutes.
- Open the door and remove the laundry.
- Close the water tap.
- Always switch off the washing machine using the ROTARY KNOP. ^35
- Leave the door and the detergent dispenser slightly opened, so the moisture can escape completely.
3.8 Cancelling of a programme / Selecting of other functions
If you press the button -START / PAUSE- (2) during a washing cycle, the running programme will be interrupted.
During the operating pause, settings and functions can be selected or modified if this is permitted by the set washing programme.
- Press the button -START / PAUSE- (2) during a washing cycle.
- The washing cycle will be interrupted.
- Select a new programme and / or other functions (if permitted).
- Start the new programme using the button -START / PAUSE- (2).
- Do not add more detergent.
3.9 Reload laundry
⚠️ CAUTION! If you stop a running programme, the temperature of the water, the laundry and the drum can be very high. Be very careful while removing the laundry. RISK OF SCALDING! RISK OF BURNS!
i It is very important to check the water level and the temperature of the water in the washing drum before opening the door.
TO RELOAD LAUNDRY DURING A RUNNING PROGRAMME, PROCEED AS FOLLOWS:
- Press the button -START / PAUSE- (2) until the time indication on the display goes off.
- The door lock is released. -Add- is indicated.
- Reload the laundry and close the door.
- Press the button -START / PAUSE- to reactivate the programme.
i If the door lock will not be released and the door cannot be opened, the temperature inside the washing drum is more than 50 °C or the current washing programme has progressed too far. ^36
NOTICE! Do not open the door by force. RISK OF DAMAGE!
NOTICE! If there is a lot of foam or water in the drum, open the door very carefully. Use a dry cloth to prevent foam and / or water from leaking out of the drum while the door of the appliance is opened.
3.10 Door Lock
⚠️ CAUTION! If you stop a running programme, the temperature of the water, the laundry and the drum can be very high. Be very careful while removing the laundry. RISK OF SCALDING! RISK OF BURNS!
- The appliance is equipped with an automatic door lock.
- The door lock will be indicated on the display after programme start ^37 .
- The door is locked.
The door is always locked while a programme is running. It is not possible to open the door while the door lock indicator is on. To open the door by force can damage the appliance seriously.
i Press the button -START / PAUSE- if you want to open the door in case of an emergency. It is very important to check the water level and water temperature inside the drum before opening.
If you cannot open the door after 2 minutes, you can select the spin programme to drain the water. Then switch off the appliance and open the door.
If the temperature inside the washing drum is higher than 50^ C, the door cannot be opened. You have to wait until the temperature in the washing drum has decreased.
3.10.1 Child protection function
The appliance is equipped with an automatic child protection function.
If the closed door of the appliance is opened again before the programme starts, the child protection function will be activated automatically.
- The door is opened again before the programme starts.
- Close the door and start the programme.
- The child protection function will be activated, i.e.:
a) the motor of the appliance runs for a while but the programme does not start yet.
b) the door lock will be unlocked for approx. 2 - 3 seconds so that the door can be opened from the inside.
c) if the door is opened during this operating pause, the appliance switches off automatically.
⚠️ CAUTION! When the washing machine starts the programme after the operating pause, the door will be locked again and can no longer be opened from the inside.
3.11 Unbalance protection
The appliance is equipped with an unbalance protection to avoid strong vibrations of the appliance during spinning.
Before starting spinning the appliance needs a certain period to space the laundry evenly.
If the laundry is not spaced evenly in the drum, the spin speed can be decreased to avoid strong vibrations of the appliance due to unbalance.
If the laundry load in the appliance is too low to reach a balance of the drum, the spin cycle may not start. Then you have to reload laundry (s. chapter 3.9 RELOAD LAUNDRY).
3.12 How to switch on / off the acoustic signal
The appliance is equipped with an acoustic signal which sounds when a washing programme is finished.
◆ The acoustic signal can be switched on or off.
The washing machine must be switched on. The adjustment of the acoustic signal can be made while the washing machine is set or during operation.
i Press and hold the button -SPIN SPEED- for 3 seconds. An acoustic signal sounds.
i The setting (acoustic signal ON or OFF) is completed.
3.13 Textile care symbols





Hand wash
Washer suitable
Professional cleaning
Bleaching allowed
Tumble drying
Iron
Damp ironing
110/150/200°C
Line dry



Do not clean in washer
Do not wash
Do not dry-clean
Do not wring out
Do not bleach


Do not tumble dry
Do not iron
Use intermediate layer


Dry


Dry in the shade
The textile care symbols above are examples only. Modifications are possible.
i The list above does not claim to be complete.
i You can receive further information about the symbols on the textile labels on the webpage of your local consumer advice centre.
4.1 Detergent
Choose your detergent relevant to the laundry you wish to wash (cotton, wool, synthetic etc.), the temperature and the level of contamination; otherwise a strong formation of bubbles may occur. Always observe the dosage instructions on the packaging of the detergent. Bleachers are alkaline and may damage your clothing. Use as less detergent as necessary. Powdery detergents may remain in your clothing, so rinse them thoroughly. If you use too much detergent or if the water-temperature is too low, the detergent will not dissolve completely; so residuals of the detergent may remain in the clothing, the hoses and the appliance itself. Customise the washing procedures relevant to the grade of contamination of the laundry, your local water hardness and the information given on the packaging of your detergent. For information about the water hardness, ask your local water supplier. Store your detergents in a safe and dry place out of the reach of children.
4.2 Use of the dispenser
Observe the dosage instructions on the packaging of the detergent. The proper dosage depends on:
▶ type and degree of soiling.
▶ quantity of the laundry.
i Half load: 3/4 of the detergent used for full load.
i Minimum load (approx. 1 kg): 1/2 of the detergent used for full load.
Your water supplier will inform you about the water hardness of your water. Soft water requires less detergent than hard water.
If you use too much detergent, a strong formation of foam may occur which can reduce the efficiency of the appliance. If the appliance detects too much foam, it may prevent spinning.
Using an insufficient quantity of detergent can cause calcification of the heating system, the drum and the hoses.
4.2.1 The different compartments of the dispenser
❖ The dispenser is separated in three compartments:
| THE PRE-WASH COMPARTMENT | |
| ▸ Detergent for Pre-Wash38. | |
| THE MAIN-WASH COMPARTMENT | |
| ▸ Detergent for Main-Wash.▸ Stain removers.▸ Water softener (Water hardness class 4). | |
| THE SOFTENER COMPARTMENT | |
| ▸ Softeners.▸ Liquid starches.▸ fill up to MAX-mark only! |
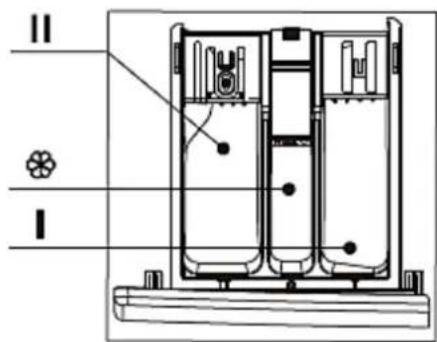
(fig. similar)
4.2.2 How to use detergents and additives
You can use liquid detergents for programmes including pre-wash (depending on model), but - in such a case - you have to use washing powder for main-wash.
Do not use any liquid detergent if you have selected the DELAY-function.
Use a laundry ball or bag ^39 to avoid dosing problems when using highly-concentrated detergents.
Only use descaling agents which are suitable to be used in a washer. Descaling agents can contain substances which will damage parts of the appliance.
Only use bleaching agents and dyes which are suitable to be used in a washer. bleaching agents and dyes can contain substances which will damage parts of the appliance.
➢ Never use solvents such as turpentine, petroleum ether etc.
WHEN YOU USE STARCH:
- Only use starch which is suitable to be used in a washer.
- Wash the laundry using the desired programme.
- Prepare the starch relevant to the instructions of its packaging.
- Select the PROGRAMME -RINSE AND SPIN- and start it.
-
Pull the dispenser until you can see approx. 3 cm of the main-wash compartment.
-
Pour the starch-solution into the main-wash compartment while the water is running into the dispenser.
- If some starch should have remained in the dispenser after programme end, clean the dispenser.
4.3 Preparation of the laundry
- Empty all pockets of each piece of your laundry.
- Classify the laundry relevant to the labels: cotton, blended fabric, synthetic, silk, wool, man-made fibres.
- Not suitable to be washed in a washer are:
a. tics, waistcoats, coats and clothes, which will shrink easily and clothing with components such as stickers, lace etc.
b. Crease-resistant clothing, clothing with imprints or lamination.
c. Crease-resistant silk, clothing with fur components, fur.
d. Clothing, which loose colour easily, e.g. gowns or traditional costumes.
e. Clothing contaminated with gas, petrol, paint thinner or alcohol etc.
f. Waterproof objects, e.g. skiing suits, sleeping bags, rain coats etc.
-
Wash clothing of different size together; so you maximise the efficiency of the appliance.
-
Wash delicate clothes separately. Select a gentle programme for silk and wool.
- Remove hooks and other fastening materials from curtains.
- Wash clothing with buttons or embroideries inside out.
- Close zippers, buttons and hooks. Tie loose ribbons.
- Wash clothing, which will release fluffs easily, separately and inside out.
- Put bras into pillow cases so they cannot damage the drum.
- Wash quite delicate and small clothing in wash bags (commercially available).
- When you wish to wash a single, large piece (e.g. a jacket or jeans), an imbalance in the drum may be generated. Always add 1 or 2 other pieces of laundry to ensure proper operation.
- Remove dust, mud and animal hair from the laundry.
- Wash baby-wear and clothes a baby may come in contact with separately to reduce the risk of infection. Increase the rinsing cycles to wash out the detergent completely if necessary.
- Do not leave any laundry in the washer for a longer period of time; otherwise the laundry becomes musty and will mould.
5. Cleaning and maintenance
⚠️ DANGER! Never touch the power plug, the power switch or other electrical components with wet or damp hands. RISK OF ELECTRIC SHOCK!
⚠ WARNING! Disconnect the appliance from the mains before cleaning and/or maintenance. RISK OF ELECTRIC SHOCK!
⚠ WARNING! Remove possible dust accumulation at the power plug, at the safety power socket and at all plug connectors regularly. RISK OF FIRE!
⚠️ CAUTION! Ensure before cleaning and maintenance that the water and the drum have cooled down completely. RISK OF SCALDING! RISK OF BURNS!
NOTICE! Clean the appliance and its components regularly.
Take off all rings and bracelets before cleaning or maintenance; otherwise you will damage the surface or the drum of the appliance.
HOUSING
▶ Use a neutral, diluted detergent.
Do not use any harsh, abrasive and aggressive detergents.
Do not use any solvents.
DRUM
Remove any rust, e.g. from metal-made objects in your laundry, immediately with a chlorine-free detergent.
▶ Never use wire wool.
DOOR SEALS
➢ Clean the door seal after each washing cycle using a soft cloth.
➢ Remove any foreign objects which got stuck in the door seal immediately.
5.1 Cleaning of the dispenser
-
Press the opened dispenser down carefully (as shown on the fig below / 1).
-
Pull the dispenser out of the appliance carefully using both hands and remove it (s. fig below / 2)
-
Clean all parts under running water.
-
Install the cover and insert the dispenser into its recess.
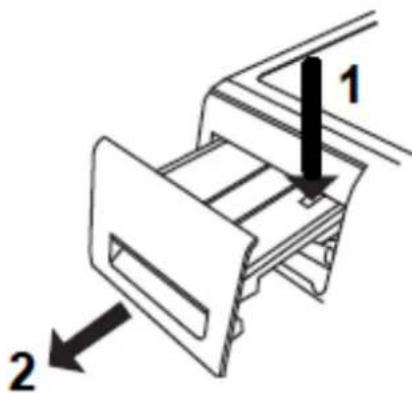
5.2 Cleaning / Removing of the drain pump filter
We strongly recommend to clean the drain pump filter regularly (monthly).
➢ You have to clean the drain pump filter if the appliance does not drain the water properly or does not run the spinning programme.
➢ You have to clean the drain pump filter if the pump is blocked by any foreign object (e.g. buttons, coins etc.).
WARNING! Do not clean the drain pump filter while the washing machine is in operation! Switch off the appliance and disconnect it from the mains before.
WARNING! If there is hot water in the washing machine, ensure before residual water drainage that the water has cooled down completely. RISK OF SCALDING! RISK OF BURNS!
- Switch off the appliance and disconnect it from the mains.
- Open the cover panel (A) of the drain pump filter: press on the groove (B) of the cover panel (A) using one of your fingers; s. below, fig. 1.
- Place a container in front of the opening.
- Open the drain pump filter (C), but do not remove it completely. Rotate the drain pump filter (C) in anti-clockwise direction until the water begins to run; s. below, fig. 2.
- Wait until the water has drained completely.
-
Unscrew the drain pump filter completely and remove it.
-
Clean the drain pump filter.
- Depending on model, check that the pump rotor can move freely.
- Insert the drain pump filter and screw it in as far as possible in clockwise direction; s. below, fig. 3.
- Check that the drain pump filter is installed properly.
- Install the cover panel; s. below, fig. 4.
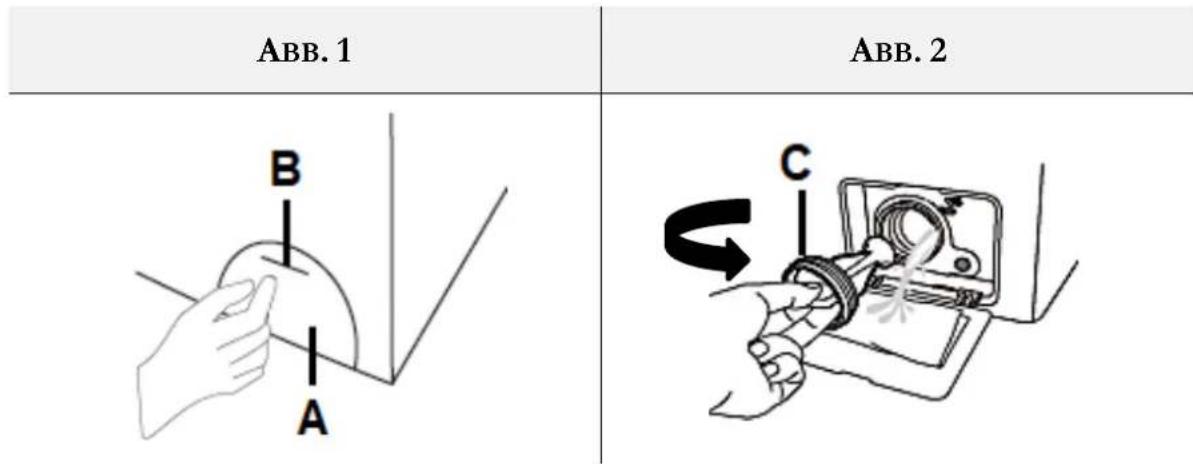
Fig. similar: g. serve as an example only.
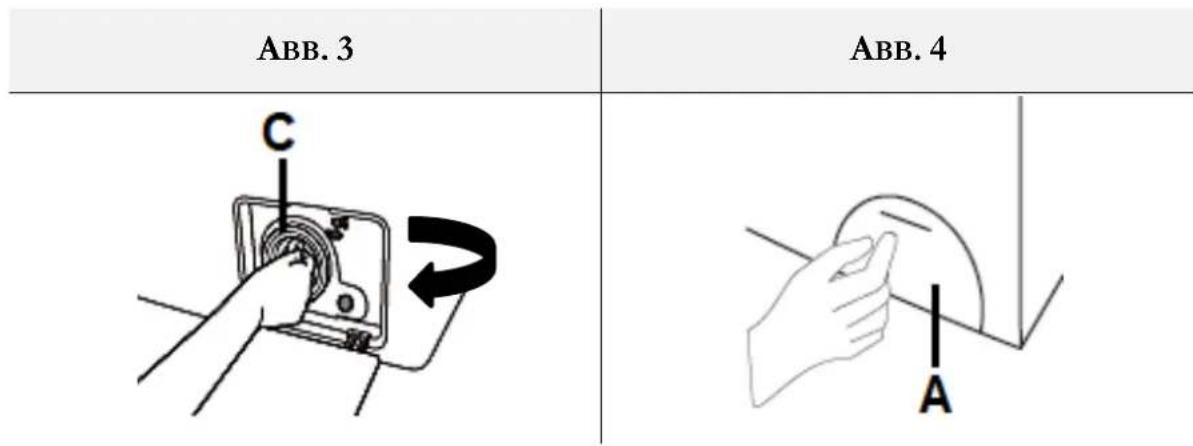
Fig. similar: g. serve as an example only.
5.3 Residual water drainage
- Switch off the appliance and disconnect it from the mains.
- Remove the cover panel of the drain pump filter.
- Place a container in front of the opening.
- Open the drain pump filter, but do not remove it completely. Rotate the drain pump filter in anti-clockwise direction until the water begins to run.
- Wait until the water has drained completely.
- Unscrew the drain pump filter completely and remove it.
-
Carefully tilt the appliance forward so the water can be drained.
-
Insert the drain pump filter and screw it in as far as possible in clockwise direction.
- Check that the drain pump filter is installed properly.
- Install the cover panel.
⚠ WARNING! Ensure before residual water drainage that the water has cooled down completely. RISK OF SCALDING! RISK OF BURNS!
5.4 Cleaning of the water inlet valve
The water inlet valve should be cleaned at least once every six months.
The water inlet valve has to be cleaned, when it is not or improperly supplied with water with the tap opened.
- Close the water tap.
- Disconnect the appliance from the mains (unplug).
- Remove the water inlet hose from the washing machine.
- Remove the filter net from the water valve.
- Clean the filter net using some water and a toothbrush.
- Reinstall the filter net properly.
- Reconnect the water inlet hose to the appliance again.
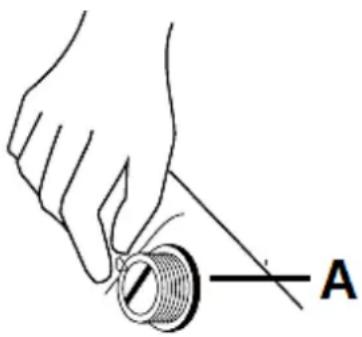
A
VALVE OF THE WATER INLET
5.5 Programme -DRUMCLEAN-
- Contaminations and bacterial residues may accumulate in the washing drum and / or hoses of the appliance after some time, especially then you mainly use low temperature programmes.
The washing drum should be cleaned at least once a month.
The programme -DRUMCLEAN- cleans the outside and inside of the washing drum.
For cleaning the drum, you can add a fair amount of chlorine bleach to the washing machine (please always observe to the information given by the manufacturer of the chlorine bleach).
Do not use any additional washing agent.
Do not wash any textiles / laundry when using this programme.
HOW TO START THE PROGRAMME -DRUMCLEAN-:
1 Open the tap.
2 Close the door of the appliance
3 Set the programme -DRUMCLEAN- using the ROTARY KNOB. The washing machine is now switched on.
4 Press the button -START / PAUSE- to start the programme.
5.6 "Frozen" appliance
IF THE AMBIENT TEMPERATURE IS LOWER THAN 0 ^0 C AND THE APPLIANCE HAS BEEN FROZEN, PROCEED AS DESCRIBED BELOW:
- Disconnect the appliance from the mains.
- Close the water tap.
- Wash the tap with warm water (approx. 50 °C) so you can take the water inlet hose off. You can also use a warm cloth (approx. 50 °C) at the junction between the water tap and the water inlet hose (B) to loosen the water inlet hose; s. fig. below.
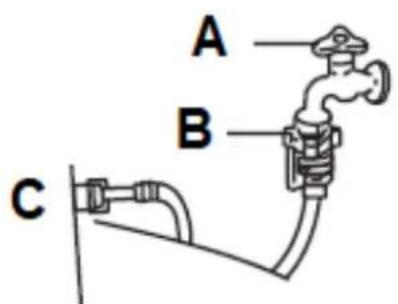
| A | TAP |
| B | JUNCTION BETWEEN TAP AND WATER INLET HOSE |
| C | WATER INLET HOSE |
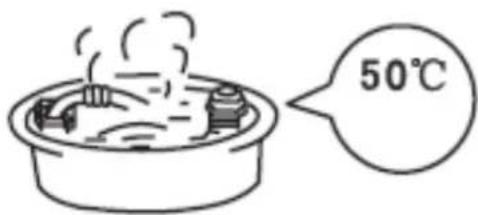
- Take off the hose and immerse it in warm water (approx. 50 °C); s. fig. below.
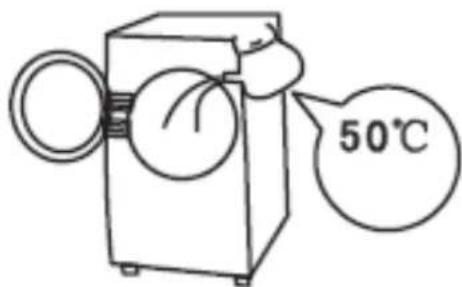
- Pour warm water (2 - 3 litres / approx. 50^ ) into the drum and wait approx. 10 minutes; s. fig. below.
-
Reconnect the water inlet hose to the tap and check, that the water inlet and the water drain works properly.
-
When you operate the appliance again, the ambient temperature must be higher than 0^ C.
6. Trouble shooting
⚠️ DANGER! Never try to repair the appliance yourself. Improper repairs or manipulating of the electric components of the appliance can endanger the life and health of the user. RISK OF ELECTRIC SHOCK! RISK OF FIRE!
6.1 Checklist
| MALFUNCTION | |
| POSSIBLE CAUSE(S) | MEASURE(S) |
| THE APPLIANCE DOES NOT WORK AT ALL. | |
| 1. The plug of the appliance is not connected to the socket.2. The plug has become loose.3. The socket is not supplied with energy.4. The fuse is switched off.5. The voltage is too low. | 1. Connect the appliance to the mains properly.2. Check the plug.3. Check the corresponding socket by connecting it with another appliance.4. Check the fuse box.5. Compare the data on the model plate with the data of your energy supplier. |
| PROGRAMMES ARE NOT STARTED. | |
| 1. Door is not closed properly.2. No water supply.3. START / PAUSE button is pressed.4. ON / OFF button is not pressed. | 1. Close the door properly.2. Check the water supply.3. Check your settings.4. Press the ON / OFF button. |
| FAULTY HEATING. | |
| 1. Heater defective. | 1. The appliance can wash but not heat. Please contact your customer service immediately. |
| WATER LEAKAGE. | |
| 1. Connection of the hoses are not watertight.2. Drain pump / drain pump filter is blocked.3. Water drain hose is dirty. | 1. Check the hoses.2. Check the drain pump / drain pump filter.3. Clean the water drain hose. |
| INDICATORS / DISPLAY DO NOT WORK. | |
| 1. No energy supply.2. Circuit board damaged.3. Wiring harness damaged. | 1. Check the energy supply.2. Please contact your customer service.3. Check the wiring harness (please contact your customer service if necessary). |
| SOME DETERGENT LEFT IN THE CONTAINER. | |
| 1.Accumulated, damp detergent. | 1. Clean the container.➢ Use liquid detergents.➢ Use detergents suitable for washers only. |
| UNSATISFACTORY WASHING RESULTS. | |
| 1.Heavily-contaminated laundry.2.Wrong amount of detergent. | 1. Select a suitable programme.2.Choose the proper amount of detergent (look at the information on the packaging of your detergent). |
| ABNORMAL NOISE / SEVERE VIBRATIONS | |
| 1.The shipping bolts are still in the appliance.2.The appliance is not installed and / or adjusted properly.3.Foreign objects are in the appliance.4.Load is too low.5.The laundry has accumulated at one side of the drum.6.Laundry which cannot be spaced is in the drum. | 1.Remove the shipping bolts.2.Install and / or adjust the appliance properly.3.Remove any foreign objects.4.Load the appliance properly.5.Space the laundry.6.Remove the pieces which cannot be spaced. |
If the appliance has a malfunction not noted on the schedule above or if you have checked all items on the above schedule but the problem still exists, please contact the customer service.
6.2 Error codes
| ERROR CODE | POSSIBLE CAUSE(S) | MEASURES |
| U 3(appliance does not spin) | 1. The shipping bolts are still in the appliance.2. The appliance is not installed and / or adjusted properly.3. Load is too low. | 1. Remove the shipping bolts.2. Install and / or adjust the appliance properly.3. Load the appliance properly. |
| U 4(Door is not closed) | 1. Door is not closed properly.2. Door lock is defective. | 1. Close the door properly.2. Please contact the customer service. |
| E 11(Problems with the water inlet) | 1. Water tap closed.2. Water pressure too low.3. Water inlet hose is frozen.4. Filter is blocked. | 1. Open the water tap.2. Wait some time.3. Defrost the water inlet hose.4. Remove the filters and clean them. |
| E 12(problems with the water outlet) | 1. The button -START/PAUSE- is pressed and the programme is paused.2. Water drain hose was installed too high.3. Water drain hose is frozen.4. Water drain hose is blocked.5. Water discharge is blocked. | 1. Press the button -START / PAUSE- again to reactivate the set programme.2. Max. height 120 cm.3. Defrost the water drain hose.4. Remove the blockage and clean the hose.5. Remove the blockage and clean the water discharge. |
| H (door cannot be opened) | 1. The temperature of the water in the drum is too high. | 1. The door unlocks automatically as soon as the water reaches a safe temperature. |
| Other code | - | 1. Press the button -START / PAUSE- again to reactivate the set programme.1. If the problem cannot be solved, switch off and unplug the appliance, close the water tap and contact the customer service. |
If you have checked all items on the above schedule but the problem still exists, please contact the customer service.
7.1 WA 8-E1215I
| TECHNICAL DATA* | |
| Type | Washing Machine |
| Control system | Electronic incl. display |
| Max load | 8.0 kg |
| Energy efficiency class1 | A+++ |
| Annual energy consumption2 | 175.00 kWh |
| Energy consumption3 | 0.82 kWh |
| Energy consumption4 | 0.80 kWh |
| Energy consumption5 | 0.78 kWh |
| Rated power input / off | 0.45 W |
| Rated power input / switched on | 0.50 W |
| Annual water consumption6 | 10400 l |
| Spinning efficiency class7 | B |
| Max. spinning rotation | 1200 rpm |
| Residual moisture | 48 % |
| Programme time3 | 293 Min. |
| Programme time4 | 245 Min. |
| Programme time5 | 240 Min. |
| Noise emission / washing3 | 54 dB(A) re 1 pW |
| Noise emission / spinning3 | 75 dB(A) re 1 pW |
| Power | 2000 W |
| Interior | Stainless steel |
| Programmes | 15 (Cotton Eco / Cotton / MixWash / Jeans / Wool / Soak (synthetic) / Winter clothes / QuickWash 15. min. / Colours 15 °C / Underwear / Shirt / Kidswear / Rinse + Spin / Spin / DrumClean) |
| ECO function | ✓ |
| Display | ✓ / LED |
| Unbalance protection | ✓ |
| Delayed programme start | ✓ |
| Adjustable feet | ✓ |
| Child lock | ✓ |
| Dimensions H*W*D in cm | 85.00*60.00*58.00 |
| Weight net / gross | 63.00 kg / 67.00 kg |
◆ Technical modifications reserved.
| * | According to Regulation (EU) No. 1061/2010 |
| 1 | From A+++ (highest efficiency) to D (lowest efficiency). |
| 2 | Based on 220 standard-washing cycles. The actual energy consumption depends on the type and use of the appliance. |
| 3 | Standard programme COTTON 60°C / fully loaded. |
| 4 | Standard programme COTTON 60°C / partially loaded. |
| 5 | Standard programme COTTON 40°C / partially loaded. |
| 6 | Based on 220 standard-washing cycles. The actual water consumption depends on the type and use of the appliance. |
| 7 | From A (highest) to G (lowest). |
7.2 WA 9-E1415I
| TECHNICAL DATA* | |
| Type | Washing Machine |
| Control system | Electronic incl. display |
| Max load | 9.0 kg |
| Energy efficiency class1 | A+++ |
| Annual energy consumption2 | 205.00 kWh |
| Energy consumption3 | 0.92 kWh |
| Energy consumption4 | 0.89 kWh |
| Energy consumption5 | 0.84 kWh |
| Rated power input / off | 0.45 W |
| Rated power input / switched on | 0.50 W |
| Annual water consumption6 | 11000 l |
| Spinning efficiency class7 | B |
| Max. spinning rotation | 1400 rpm |
| Residual moisture | 48 % |
| Programme time3 | 293 Min. |
| Programme time4 | 245 Min. |
| Programme time5 | 240 Min. |
| Noise emission / washing3 | 54 dB(A) re 1 pW |
| Noise emission / spinning3 | 78 dB(A) re 1 pW |
| Power | 2000 W |
| Interior | Stainless steel |
| Programmes | 15 (Cotton Eco / Cotton / MixWash / Jeans / Wool / Soak (synthetic) / Winter clothes / QuickWash 15. min. / Colours 15 °C / Underwear / Shirt / Kidswear / Rinse + Spin / Spin / DrumClean) |
| ECO function | ✓ |
| Display | ✓ / LED |
| Unbalance protection | ✓ |
| Delayed programme start | ✓ |
| Adjustable feet | ✓ |
| Child lock | ✓ |
| Dimensions H*W*D in cm | 85.00*60.00*58.00 |
| Weight net / gross | 66.00 kg / 70.00 kg |
◆ Technical modifications reserved.
| * | According to Regulation (EU) No. 1061/2010 |
| 1 | From Λ+++ (highest efficiency) to D (lowest efficiency). |
| 2 | Based on 220 standard-washing cycles. The actual energy consumption depends on the type and use of the appliance. |
| 3 | Standard programme COTTON 60°C / fully loaded. |
| 4 | Standard programme COTTON 60°C / partially loaded. |
| 5 | Standard programme COTTON 40°C / partially loaded. |
| 6 | Based on 220 standard-washing cycles. The actual water consumption depends on the type and use of the appliance. |
| 7 | From Λ (highest) to G (lowest). |
8. Waste management
- While unpacking, the packaging materials (polythene bags, polystyrene pieces, etc.) should be kept away from children and pets. CHOKING HAZARD!
- Old and unused appliances must be sent for disposal to the responsible recycling centre. Never expose to open flames.
- Before you dispose of an old appliance, render it inoperative. Unplug the appliance and cut off the entire power cord. Dispose of the power cord and the plug immediately.
- Remove the door completely so children are not able to get into the appliance as this endangers their lives!
- Dispose of any paper and cardboard into the corresponding containers.
- Dispose of any plastics into the corresponding containers.
- If suitable containers are not available at your residential area, dispose of these materials at a suitable municipal collection point for waste-recycling.
- Receive more detailed information from your retailer or your municipal facilities.
Materials marked with this symbol are recyclable.

Please contact your local authorities to receive further information.
This appliance includes a 24-month guarantee for the consumer given by the manufacturer, dated from the day of purchase, referring to its flawless material-components and its faultless fabrication. The consumer is accredited with both the dues of the guarantee given by the manufacturer and the vendor's guarantees. These are not restricted to the manufacturer's guarantee.
Any guarantee claim has to be made immediately after the detection and within 24 months after the delivery to the first ultimate vendee. The guarantee claim has to be verified by the vendee by submitting a proof of purchase including the date of purchase and/or the date of delivery.
The guarantee does not establish any entitlement to withdraw from the purchase contract or for a price reduction. Replaced components or exchanged appliances demise to us as our property.
The guarantee claim does not cover:
- fragile components as plastic, glass or bulbs;
- minor modifications of the WOLKENSTEIN-products concerning their authorized condition if they do not influence the utility value of the product;
- damage caused by handling errors or false operation;
- damage caused by aggressive environmental conditions, chemicals, detergents;
- damage caused by non-professional installation and haulage;
- damage caused by non common household use;
- damages which have been caused outside the appliance by a WOLKENSTEIN-product unless a liability is forced by legal regulations.
The validity of the guarantee will be terminated if:
- the prescriptions of the installation and operation of the appliance are not observed.
- the appliance is repaired by a non-professional.
- the appliance is damaged by the vendor, the installer or a third party.
- the installation or the start-up is performed inappropriately.
- the maintenance is inadequately or incorrectly performed.
- the appliance is not used for its intended purpose.
- the appliance is damaged by force majeure or natural disasters, including, but with not being limited to fires or explosions.
The guarantee claims neither extend the guarantee period nor initiate a new guarantee period. The geographical scope of the guarantee is limited with respect to appliances, which are purchased and used in Germany, Austria, Belgium, Luxembourg and the Netherlands.
WOLKENSTEIN
August 2014
WOLKENSTEIN
WOLKENSTEIN
SERVICE INFORMATION
Aftersales service information on the leaflet inside this instruction manual.

- Nivellierung
- Index
- EC - DECLARATION OF CONFORMITY
- READ THE SAFETY INFORMATION AND SAFETY INSTRUCTIONS CAREFULLY BEFORE YOU OPERATE THE APPLIANCE FOR THE FIRST TIME.
- Signal words
- Safety instructions
- DANGER!
- To reduce the risk of electrocution:
- To reduce the risk of burns, electrocution, fire or injury to persons:
- CAUTION!
- NOTICE
- Installation
- Unpacking / Site
- Removing of the shipping bolts
- Levelling
- Connection of the water inlet hose
- Connection of the water drain hose
- Connection to the mains
- Operation
- Description of the appliance
- Control panel
- The washing programmes
- Additional washing functions (options)
- Before the first wash cycle
- Programming and starting of a washing programme
- Selecting of the additional functions
- FOLLOWING ADDITIONAL WASHING FUNCTIONS CAN BE SELECTED:
- SELECTION OF THE TEMPERATURE (3):
- SELECTION OF THE SPIN SPEED (4):
- SELECTION OF THE NUMBER OF RINSING CYCLES (5):
- DELAYED PROGRAMME START (6):
- CHILD LOCK
- End of a washing programme
- Cancelling of a programme / Selecting of other functions
- Reload laundry
- TO RELOAD LAUNDRY DURING A RUNNING PROGRAMME, PROCEED AS FOLLOWS:
- Door Lock
- Child protection function
- Unbalance protection
- How to switch on / off the acoustic signal
- Textile care symbols
- Detergent
- Use of the dispenser
- The different compartments of the dispenser
- How to use detergents and additives
- WHEN YOU USE STARCH:
- Preparation of the laundry
- Cleaning and maintenance
- HOUSING
- DRUM
- DOOR SEALS
- Cleaning of the dispenser
- Cleaning / Removing of the drain pump filter
- Residual water drainage
- Cleaning of the water inlet valve
- Programme -DRUMCLEAN-
- HOW TO START THE PROGRAMME -DRUMCLEAN-:
- "Frozen" appliance
- IF THE AMBIENT TEMPERATURE IS LOWER THAN 0 0 C AND THE APPLIANCE HAS BEEN FROZEN, PROCEED AS DESCRIBED BELOW:
- Trouble shooting
- Checklist
- Error codes
- WA 8-E1215I
- WA 9-E1415I
- Waste management
- The guarantee claim does not cover:
- The validity of the guarantee will be terminated if:
- WOLKENSTEIN
Brand : Wolkenstein
Model : WA9-E1415I
Category : Washing machine