
RMP-D8 - Receiver Rupert Neve Designs - Free user manual and instructions
Find the device manual for free RMP-D8 Rupert Neve Designs in PDF.


| Product Type | 8-Channel Dante Microphone Preamplifier |
| Channels | 8 (MIC/LINE combo inputs) |
| Analog Inputs | 8 x Balanced XLR combo jacks (MIC/LINE) |
| Digital Outputs | 8 x AES (balanced), 16 x Dante (8 main + 8 gain compensated) |
| Network Connectivity | Dante Primary & Secondary (RJ45), Gigabit Ethernet required |
| Sample Rates | 44.1, 48, 88.2, 96, 176.4, 192 kHz with Pull-Up/Down options |
| Bit Depth (Encoding) | PCM 16, 24, 32 (up to 32-bit) |
| Gain Range | 0 to 60 dB (1 dB steps) |
| Phantom Power | +48V per channel (switchable) |
| High Pass Filter | 80 Hz, 12 dB/octave (switchable per channel) |
| Pad | -10 dB (switchable per channel) |
| Polarity Inversion | 0° or 180° (switchable per channel) |
| Gain Compensation (GC) | Dedicated mirrored Dante outputs (channels 9-16) with ±12 dB compensation |
| Line Mode | Disables phantom power, engages pad, restricts gain to +30 dB max |
| Front Panel Lockout | Via button combination or remote application |
| Remote Control | Windows & macOS app over network (up to 8 units simultaneously) |
| OLED Display | Shows channel status, menus (system info, Dante ID, IP, etc.) |
| Power Supply | Dual redundant (PSU-A & PSU-B), 100-240 VAC, 50/60 Hz, 150W max |
| Dimensions (Shipping) | 22" x 18" x 9" (55.9 x 45.7 x 22.9 cm) |
| Weight (Shipping) | 17.6 lbs (8 kg) |
| Dynamic Range | 110 dB |
| System Latency (96 kHz) | 0.588 ms |
| Maximum Input Level | +25.5 dBu |
| Warranty | 3 years limited (parts & labor) |
Frequently Asked Questions - RMP-D8 Rupert Neve Designs
User questions about RMP-D8 Rupert Neve Designs
0 question about this device. Answer the ones you know or ask your own.
Ask a new question about this device
Download the instructions for your Receiver in PDF format for free! Find your manual RMP-D8 - Rupert Neve Designs and take your electronic device back in hand. On this page are published all the documents necessary for the use of your device. RMP-D8 by Rupert Neve Designs.
USER MANUAL RMP-D8 Rupert Neve Designs
8 Channel Dante™ Microphone Preamp
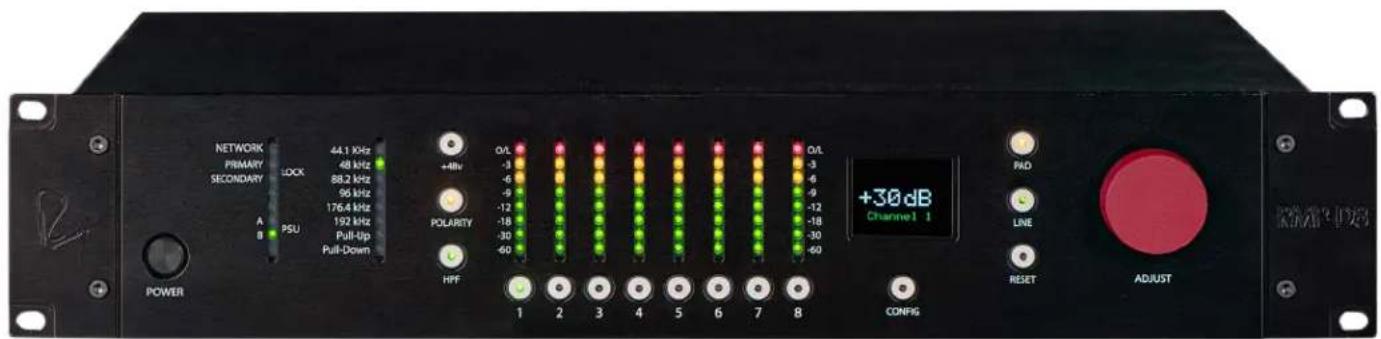
Operations Manual
Important Safety Instructions
- Read these instructions.
- Keep these instructions.
- Heed all warnings.
- Follow all instructions.
- Do not use this apparatus near water.
- Clean only with a dry cloth.
- Do not block any ventilation openings. Install in accordance with the manufacturer's instructions.
- Do not install near any heat sources such as radiators, heat registers, stoves, or other apparatus (including amplifiers) that produce heat.
- Do not defeat the safety purpose of the polarized or grounding-type plug. A polarized plug has two blades with one wider than the other. A grounding-type plug has two blades and a third grounding prong. The wide blade or the third prong are provided for your safety. If the provided plug does not fit into your outlet, consult an electrician for replacement of the obsolete outlet.
-
Protect the power cord from being walked on or pinched particularly at plugs, convenience receptacles, and the point where they exit from the apparatus.
-
Only use attachments/accessories specified by the manufacturer.
-
Use only with a cart, stand, tripod, bracket, or table specified by the manufacturer, or sold with the apparatus. When a cart is used, use caution when moving the cart/apparatus combination to avoid injury from tip-over.
-
Unplug this apparatus during lightning storms or when unused for long periods of time.

-
Refer all servicing to qualified service personnel. Servicing is required when the apparatus has been damaged in any way, such as power-supply cord or plug is damaged, liquid has been spilled or objects have fallen into the apparatus, the apparatus has been exposed to rain or moisture, does not operate normally, or has been dropped.
-
This apparatus shall not be exposed to dripping or splashing, and no object filled with liquids, such as vases or beer glasses, shall be placed on the apparatus.
-
Do not overload wall outlets and extension cords as this can result in a risk of fire or electric shock.
-
This apparatus has been designed with Class-I construction and must be connected to a mains socket outlet with a protective earthing connection (the third grounding prong).
-
This apparatus has been equipped with a rocker-style AC mains power switch. This switch is located on the rear panel and should remain readily accessible to the user.
-
The MAINS plug or an appliance coupler is used as the disconnect device, so the disconnect device shall remain readily operable.


- NOTE: This equipment has been tested and found to comply with the limits for a Class B digital device, pursuant to part 15 of the FCC Rules. These limits are designed to provide reasonable protection against harmful interference in a residential installation. This equipment generates, uses, and can radiate radio frequency energy and, if not installed and used in accordance with the instructions, may cause harmful interference to radio communications. However, there is no guarantee that interference will not occur in a particular installation. If this equipment does cause harmful interference to radio or television reception, which can be determined by turning the equipment off and on, the user is encouraged to try to correct the interference by one or more of the following measures:
• Reorient or relocate the receiving antenna.
- Increase the separation between the equipment and the receiver.
- Connect the equipment into an outlet on a circuit different from that to which the receiver is connected.
- Consult the dealer or an experienced radio/TV technician for help.
CAUTION: Changes or modifications to this device not expressly approved by Rupert Neve Designs LLC, could void the user's authority to operate the equipment under FCC rules.
- This apparatus does not exceed the Class A/Class B (whichever is applicable) limits for radio noise emissions from digital apparatus as set out in the radio interference regulations of the Canadian Department of Communications.
- Exposure to extremely high noise levels may cause permanent hearing loss. Individuals vary considerably in susceptibility to noise-induced hearing loss, but nearly everyone will lose some hearing if exposed to sufficiently intense noise for a period of time. The U.S. Government's Occupational Safety and Health Administration (OSHA) has specified the permissible noise level exposures shown in the following chart.
According to OSHA, any exposure in excess of these permissible limits could result in some hearing loss. To ensure against potentially dangerous exposure to high sound pressure levels, it is recommended that all persons exposed to equipment capable of producing high sound pressure levels use hearing protectors while the equipment is in operation. Ear plugs or protectors in the ear canals or over the ears must be worn when operating the equipment in order to prevent permanent hearing loss if exposure is in excess of the limits set forth here:
| Duration, per day in hours | Sound Level dBA, Slow Response | Typical Example |
| 8 | 90 | Duo in small club |
| 6 | 92 | |
| 4 | 95 | Subway Train |
| 3 | 97 | |
| 2 | 100 | Typical music via head phones |
| 1.5 | 102 | |
| 1 | 105 | Siren at 10 m distance |
| 0.5 | 110 | |
| 0.25 or less | 115 | Loudest parts at a rock concert |
WARNING — To reduce the risk of fire or electric shock, do not expose this apparatus to rain or moisture.
Table of Contents
Introduction 1
Block Diagram 1
Front Panel 2
Rear Panel 3
RMP-D8 Features 4
Network Connectivity 5
OLED Display 6
Dante Controller 8
Gain Compensation 10
Application Remote Control 11
Dante Firmware Updater 18
Dante Domain Manager 19
Yamaha ID 20
USB Firmware Update 21
Specifications 22
Limited Warranty 23
Rupert Neve Designs RMP-D8 Dante™ Microphone Preamp
Thank you for purchasing the Rupert Neve Designs RMP-D8. We hope you enjoy using this product as much as we have enjoyed designing and building it. The RMP-D8 represents the culmination of several years of analog and digital development, successfully merging custom-designed Rupert Neve Class-A analog circuitry, high-quality 24-bit Analog to Digital conversion and Dante™ network audio connectivity. This unit takes advantage of transformer coupling in the analog path to give the RMP-D8 its unique sonic profile. The combination of these performance characteristics allows the Rupert Neve Designs RMP-D8 to find itself equally comfortable in both live venue and studio applications.
RMP-D8 Block Diagram
![graph TD A["MIC/LINE INPUT"] --> B["2"] B --> C["PIANTOM"] C --> D["-45V"] D --> E["+"] E --> F["+"] F --> G["-3dB"] G --> H["+"] H --> I["MRCL"] E --> J["HPF"] J --> K["-3dB"] K --> L["+"] L --> M["MRCL"] N["PAD"] --> O["GAIN CTRL"] O --> P["+"] P --> Q["-14dB"] Q --> R["+"] R --> S["-3dB"] S --> T…](/content/2026/05/831074/images/4a25ec5007d1c4c12a966ce9d41be6a43e270412bb602eba18ce1f22148d56ac.jpg)

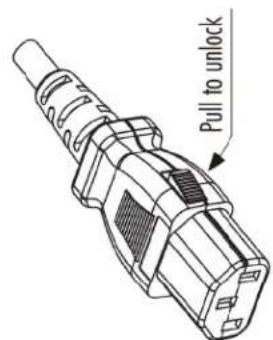
Note: IEC power cords provided are latching type.
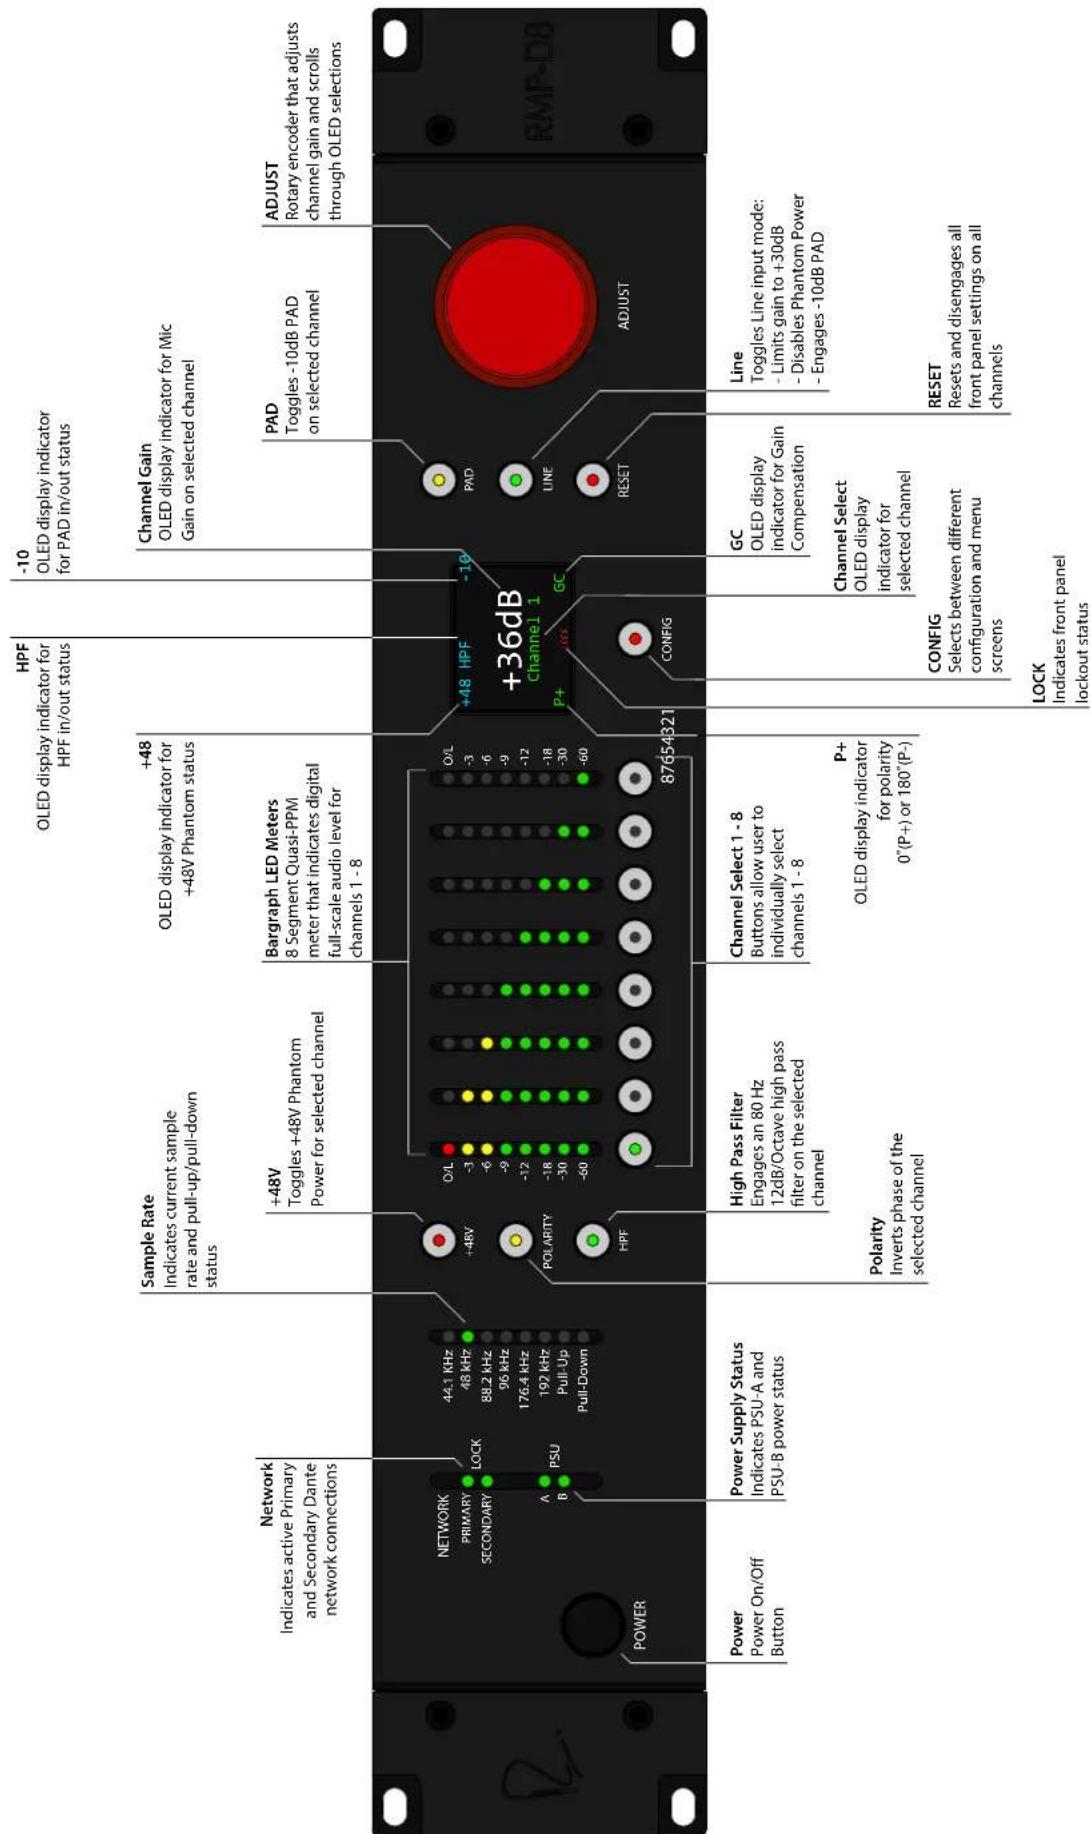
RMP-D8 Front Panel Features
Eight Segment LED Channel Metering
The RMP-D8 is equipped with 8-segment Bargraph LED meters for each input channel (1 through 8). These meters are scaled to represent a Quasi-Peak Programme (PPM) metering ballistic for optimal resolution. The front panel metering indicates the post ADC level in digital full-scale level from -60dBFS to 0dBFS.
LINE
Engaging LINE MODE on the RMP-D8 automatically selects the following features:
• PAD is engaged by default (-10dB)
- Phantom Power (+48VDC) is disabled to prevent potential fault conditions
- Individual channel gain is restricted to a maximum of +30dB to prevent potential input overload
RESET
If the RESET button is pressed on the RMP-D8 front panel, the user will be prompted with the following message on the front panel OLED display:
![graph LR A["RESET ALL?<br>SELECT:<br>NO"] --> B["ADJUST"] B --> C["RESET ALL?<br>SELECT:<br>YES"]](/content/2026/05/831074/images/7a0ff2e0d17746461e48735f39cd25595d4efe4e21d0da60194222e493103cbd.jpg)
Rotate the ADJUST encoder wheel one detent clock-wise until the OLED screen prompts "YES."
Press the RESET button again to accept the changes. The RMP-D8 will fully reset to its default state (all features disengaged and channel gain settings reset to 0dB).
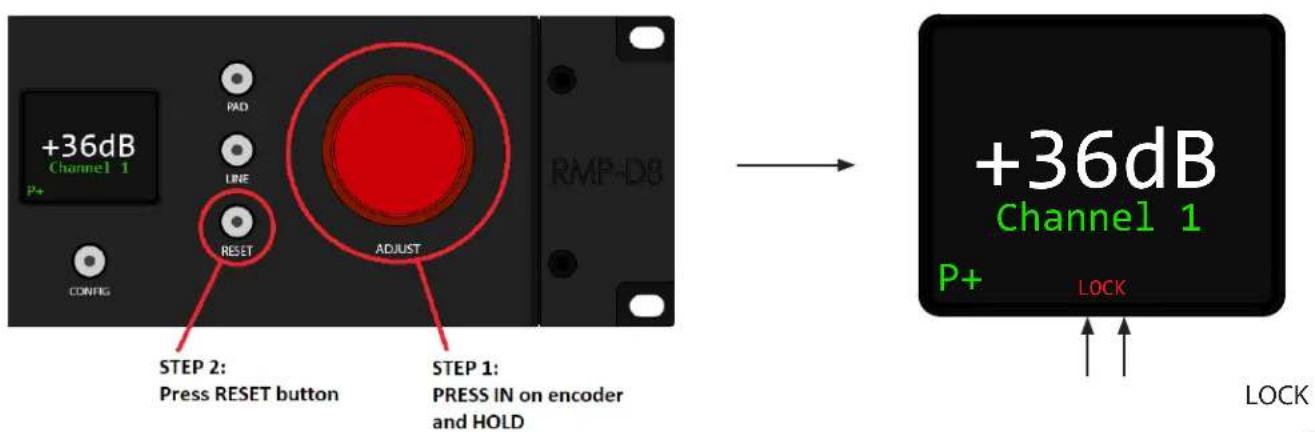
Front Panel Lockout
The RMP-D8 allows the user to lockout the front panel by executing a simple front panel button combination:
PRESS IN and HOLD down the ADJUST rotary encoder (STEP 1). While holding the ADJUST encoder down, press the RESET button once (STEP 2). The LOCK icon will appear on the bottom middle of the OLED display indicating successful front panel lockout. To disengage front panel lockout at any time, repeat steps 1 and 2.
RMP-D8 Network Connectivity
The RMP-D8 has a Primary Dante Network Port as well as a redundant Secondary Dante Network Port. The Primary Port provides the main Dante Network connectivity, as well as connection to Dante Controller running on your PC or MAC.
Note: A Gigabit Ethernet switch should be used to make all Dante network connections. See Audinate's Gigabit Ethernet switch recommendations available on their website.
The RMP-D8 Secondary Dante Network Port is available for Redundant network applications, acting as a failsafe if the Primary Network fails. All Secondary Dante Network connections must be made through a separate Gigabit Ethernet switch.
Note: If there is no DHCP server on the Dante network, the user must assure that the RMP-D8 and computer reside within the same local subnet. In addition, the RMP-D8 must be power-cycled after it is connected to the computer's ethernet adapter to achieve proper IP address auto-assignment.
![graph TD A["Primary Network"] --> B["Gigabit Ethernet Switch 1"] C["RMP-D8 Primary Network Port"] --> A D["Console Primary Network Port"] --> A E["Computer Ethernet Port"] --> A](/content/2026/05/831074/images/bfb637b3350f95041aedd1a23d1e9b8dddc7a753cc855536c9d92c8f69632040.jpg)
![graph TD A["Gigabit Ethernet Switch 2"] --> B["RMP-D8 Secondary Network Port"] A --> C["Console Secondary Network Port"]](/content/2026/05/831074/images/cd3c46b306cf49fa5bf09578e534e3559282aeda77c518c0d2d9503df1df350a.jpg)
RMP-D8 OLED Display
The RMP-D8 utilizes a front panel OLED display screen for multiple menu functions. The default operational screen will show the current status of the selected channel, including: Channel Gain, +48V Phantom status (+48), PAD status (-10), Polarity status (P+), HPF status (HPF), Front Panel Lockout (LOCK), and Gain Compensation status (GC).

In addition to front panel status indication for a selected channel, the OLED display also shows configuration menus, which can be accessed by repeatedly pressing the CONFIG front panel button directly underneath the OLED display screen.
Pressing the CONFIG button once will bring up the SYSTEM info screen:
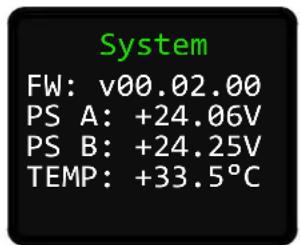
Pressing the CONFIG button twice will bring up the Dante Domain Manager info screen (Firmware v2.00 and later):
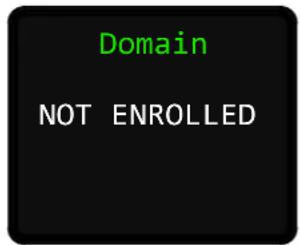
Pressing the CONFIG button a third time will bring up the Primary Network IP and MAC Address screen:
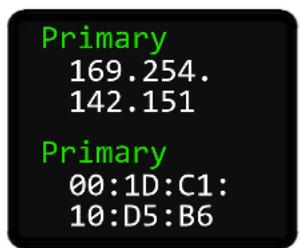
Pressing the CONFIG button a fourth time will bring up the Secondary Network IP and MAC Address screen:
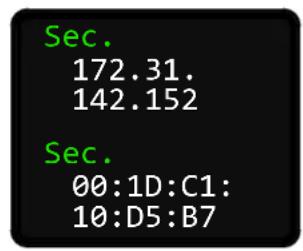
Pressing the CONFIG button a fifth time will bring up the Dante Software/Firmware info screen:

Pressing the CONFIG button a sixth time will bring up the Yamaha ID edit screen (see Yamaha ID section - page 16):

Pressing the CONFIG button a seventh time will bring up the Dante ID info screen:
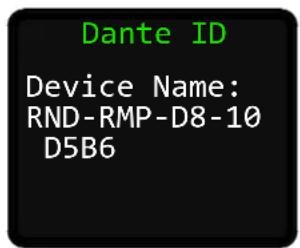
Pressing the CONFIG button an eighth time will bring you back to the standard operational status screen.
RMP-D8 and Dante Controller
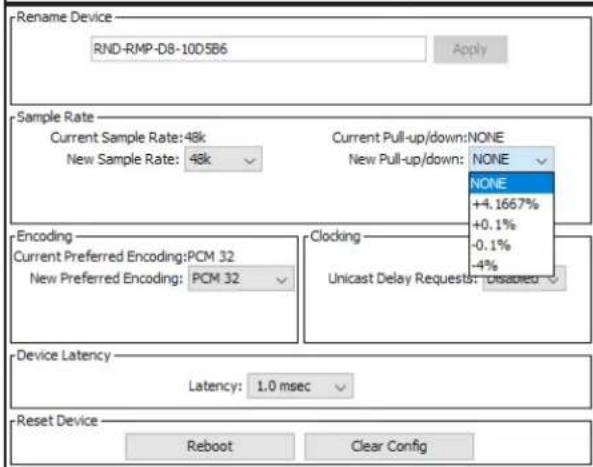
In order to configure sample rate, bit depth, and Dante network audio routing, you will need to run Dante Controller on your PC or MAC computer. The RMP-D8 will identify in Dante Controller with the same Dante ID as seen on the OLED display in the Dante ID configuration menu.

In order to change the RMP-D8 sample rate, bit depth, and pull-up/pull-down settings, double click on the RMP-D8 Device name in Dante Controller's routing tab to open the Dante Controller Device View Window.
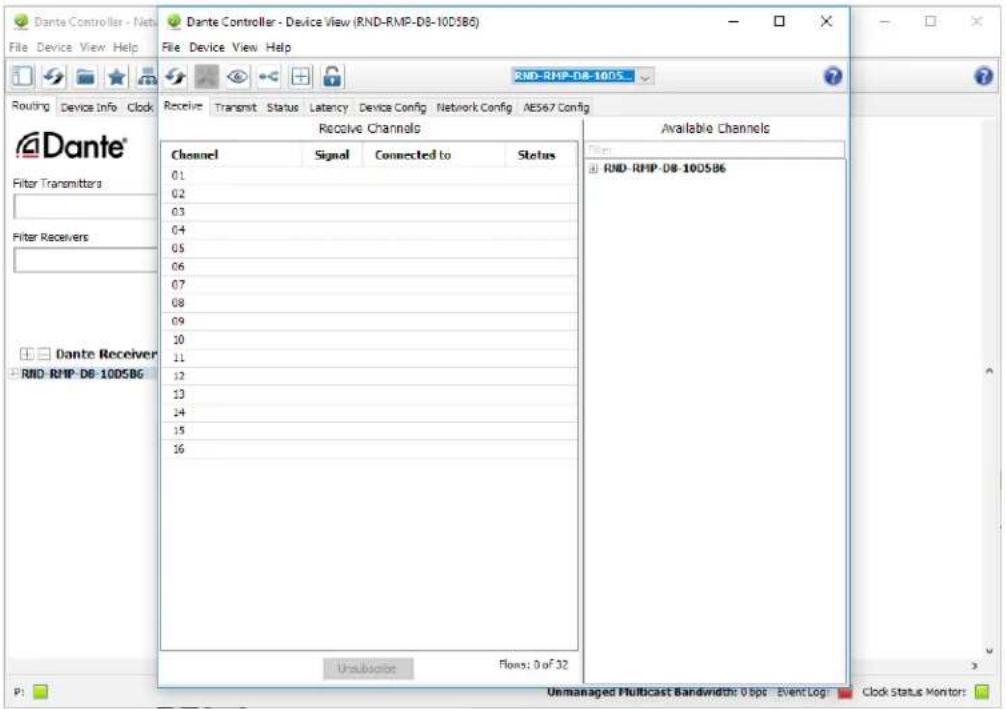
Within the Device View Window, click on the Device Config Tab:
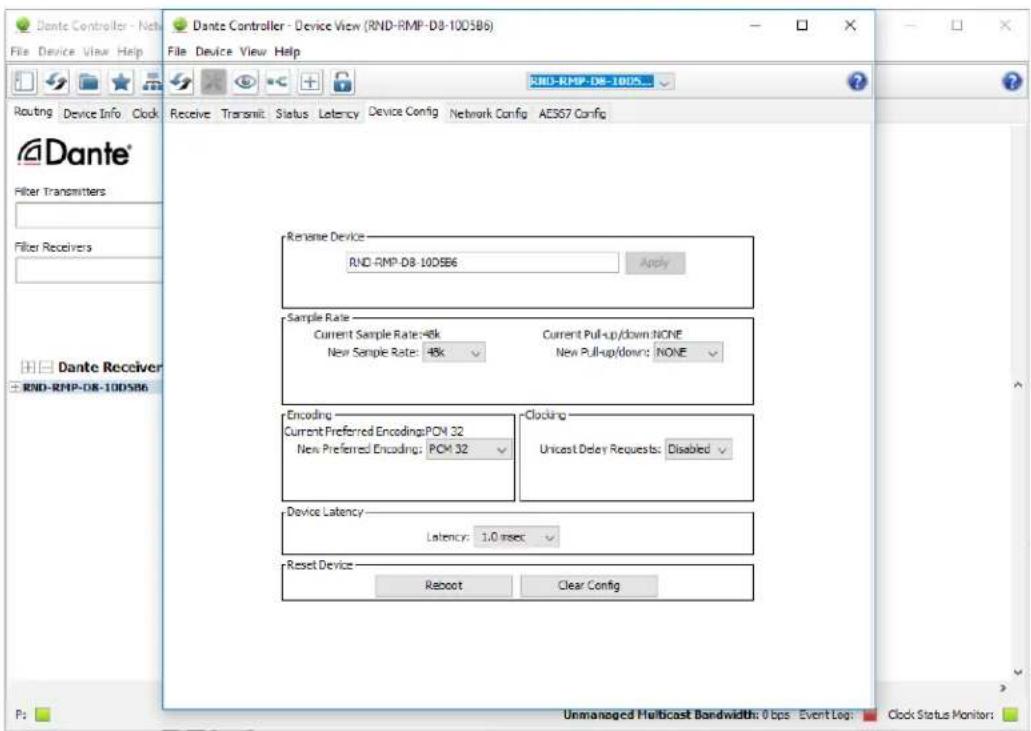
Within the Device Config Window, the user can adjust sample rate, bit depth, pull-up/pull-down and latency settings:
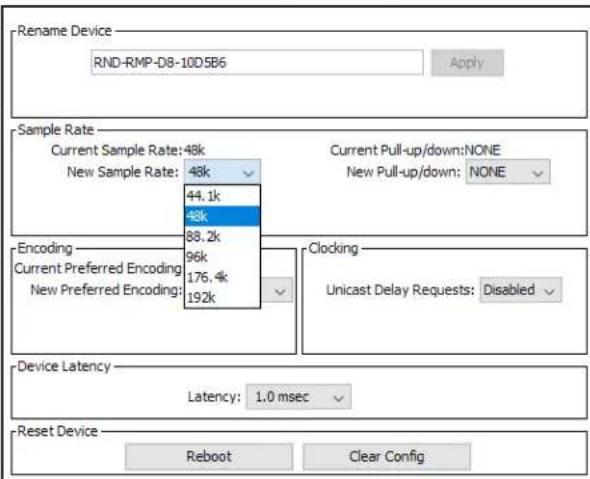


RMP-D8 Gain Compensation
The RMP-D8 has an available Gain Compensation (GC) mode that can be engaged on a channel by channel basis. RMP-D8 channels 1 through 8 are successively mirrored to RMP-D8 Dante Transmit channels 9 through 16 in Dante Controller. These mirrored outputs appear in Dante Controller on channels 9-16 identified as 'RMP-D8 Channel 1 GC Output' through 'RMP-D8 Channel 8 GC Output' and are output at an audio level which is pre-set to be 6dB below the set gain on each channel. This -6dB offset provides additional digital signal headroom to avoid clipping the gain compensated outputs. These mirrored channels can then be utilized as gain compensated outputs on a channel by channel basis by activating GC, once the desired nominal gain for each channel is set:
| RMP-D8 Channel 1 | Dante Transmit Channel 9, (RMP-D8 Channel 1 GC Output) |
| RMP-D8 Channel 2 | Dante Transmit Channel 10, (RMP-D8 Channel 2 GC Output) |
| RMP-D8 Channel 3 | Dante Transmit Channel 11, (RMP-D8 Channel 3 GC Output) |
| RMP-D8 Channel 4 | Dante Transmit Channel 12, (RMP-D8 Channel 4 GC Output) |
| RMP-D8 Channel 5 | Dante Transmit Channel 13, (RMP-D8 Channel 5 GC Output) |
| RMP-D8 Channel 6 | Dante Transmit Channel 14, (RMP-D8 Channel 6 GC Output) |
| RMP-D8 Channel 7 | Dante Transmit Channel 15, (RMP-D8 Channel 7 GC Output) |
| RMP-D8 Channel 8 | Dante Transmit Channel 16, (RMP-D8 Channel 8 GC Output) |
Setup:
Before entering gain compensation mode, adjust each channel's gain to the desired nominal gain level for the given input signal. Enter gain compensation mode by PRESSING and HOLDING the channel select button on the desired channel or by toggling the function on the remote user interface. Once gain compensation is engaged, the corresponding mirrored Dante Transmit channel will maintain a consistent level, compensated within a range of +/- 12dB of the primary channel being adjusted.

Application:
This feature becomes useful in the event that the FOH engineer needs to make a gain adjustment to a specific RMP-D8 channel (Channels 1-8), but does not want to affect the mirrored transmit channels going to the monitor engineer (Transmit Channels 9-16).
Example:
If Channel 1 is set to +36dB Gain before entering gain compensation mode, Channel 9's signal level will be 6dB below Channel 1.
Once Gain Compensation is engaged on Channel 1, Channel 9's level will maintain its gain setting as long as:
• The adjustment range does not exceed the +/-12dB Gain Compensation limits
• The required digital headroom is available to prevent clipping
In this example, the mirrored GC channel will remain at a +30dB gain level as long as the FOH engineer doesn't adjust the gain range beyond +/- 12dB of +36dB: the value that was set when GC mode was initially engaged.
Note: If the FOH engineer were to increase Channel 1's gain beyond +/- 12dB, Channel 9's gain compensated output would subsequently follow in 1dB increments.
Gain compensated outputs cannot exceed the limits of the 0 - 60 dB gain range available on the RMP-D8.
RMP-D8 Application Remote Control (PC)
The RMP-D8 has an available software application that can be used to remotely control the RMP-D8 feature set over the network.

Initial Connection
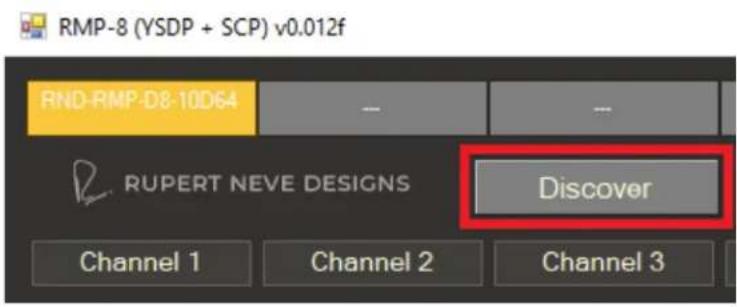
Once the application is open, click on the DISCOVER button. The application will scan for all available RMP-D8 units that are currently active on the local network. Active units will appear in the boxes at the top of the application window (up to a total of eight units).
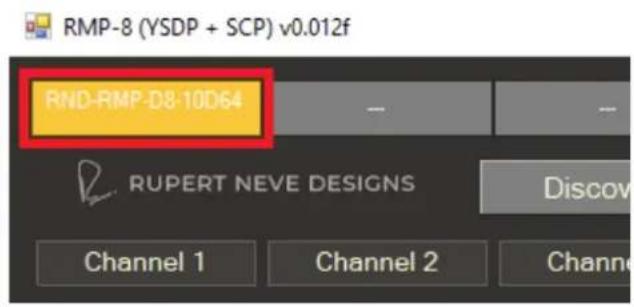
Once the desired RMP-D8 is selected, click the CONNECT button. A successful connection is indicated by the device ID box color changing from yellow to green as well as a "Connect Successful" message in the application dialog window in the lower left-hand corner.

To confirm which RMP-D8 is currently selected, the user can click on the IDENTIFY button. This will prompt the selected RMP-D8 to flash all eight channel select buttons repeatedly on the RMP-D8 front panel, until the IDENTIFY button is deselected.

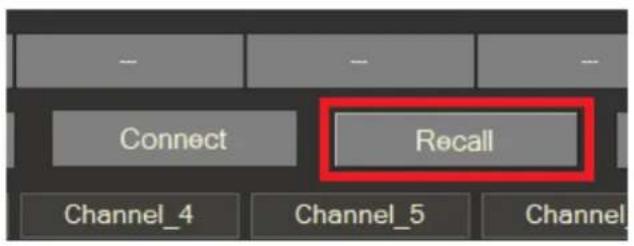
After verifying successful connection, the user should click on the RECALL button to recall the current status of all the features on the selected RMP-D8.
After pressing the RECALL button, the application will update current feature status.

Connecting to Multiple RMP-D8 Units
The user can connect to up to eight units simultaneously by clicking on the desired device ID box at the top of the GUI window and then clicking connect for each unit. A "Connect Successful" message should show up in the dialog box. After each successful connection, the RECALL button should be clicked to retrieve current device status.

Basic Application Operation
Clicking once on any channel's gain knob will make that channel active (highlighted). Once highlighted, the gain can be adjusted on that channel by using the mouse wheel, clicking and dragging the gain knob position indicator to the desired level, or pressing the up-down or left-right arrow keys. The user can also click in the box directly below the channel gain knob and type in the desired value for quick and precise gain adjustments.


The rest of the channel features are explained in other sections of the manual. For reference, the various features that can be engaged in the application are shown graphically below.

+48V
(Page 2)

-10dB PAD
(Page 2)

80Hz HPF
(Page 2)
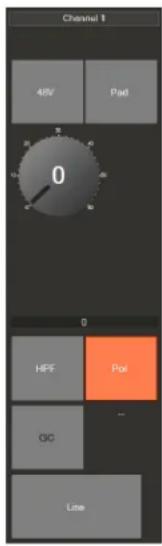
Polarity
(Page 2)
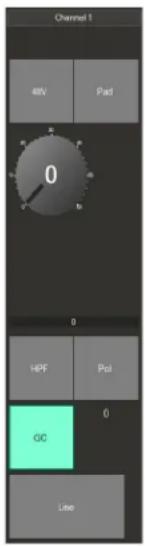
Gain Compensation
(Page 11)
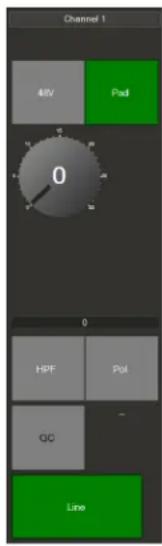
Line Mode
(Page 4)
Note: When Line Mode is engaged in the application, the available Channel Gain range indicated is limited to +30dB, and PAD is automatically engaged.
Application Front Panel Lockout
In addition to the RMP-D8 front panel button combination for Front Panel Lockout (see page 5), the user can also remotely lock the Front Panel within the application:
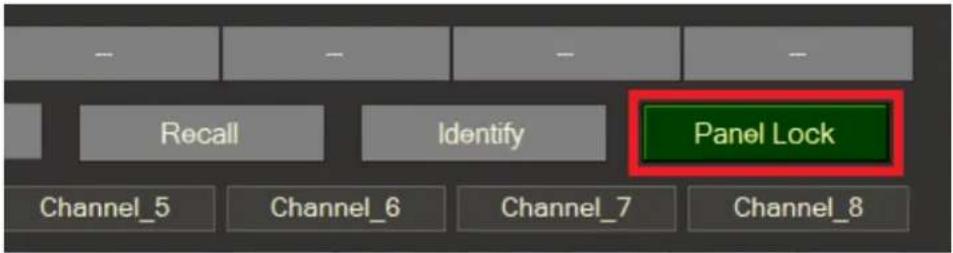
Application Channel Naming
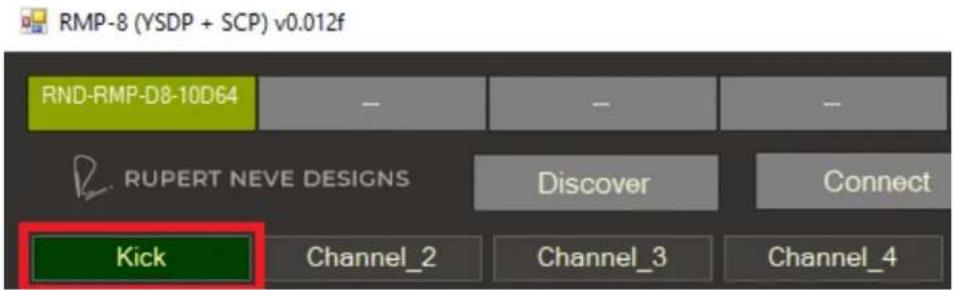
The application supports channel naming by CTRL-clicking on the channel name box above each channel and typing in the desired name (in this example: Channel 1 was renamed "Kick"). After pressing ENTER, the Channel Name will update in the application as well as in Dante Controller. If a channel rename is executed in Dante Controller, then the channel names will only display in the RMP-D8 application after the RECALL button is clicked for each RMP-D8 unit.
RMP-D8 Application Remote Control (MAC)
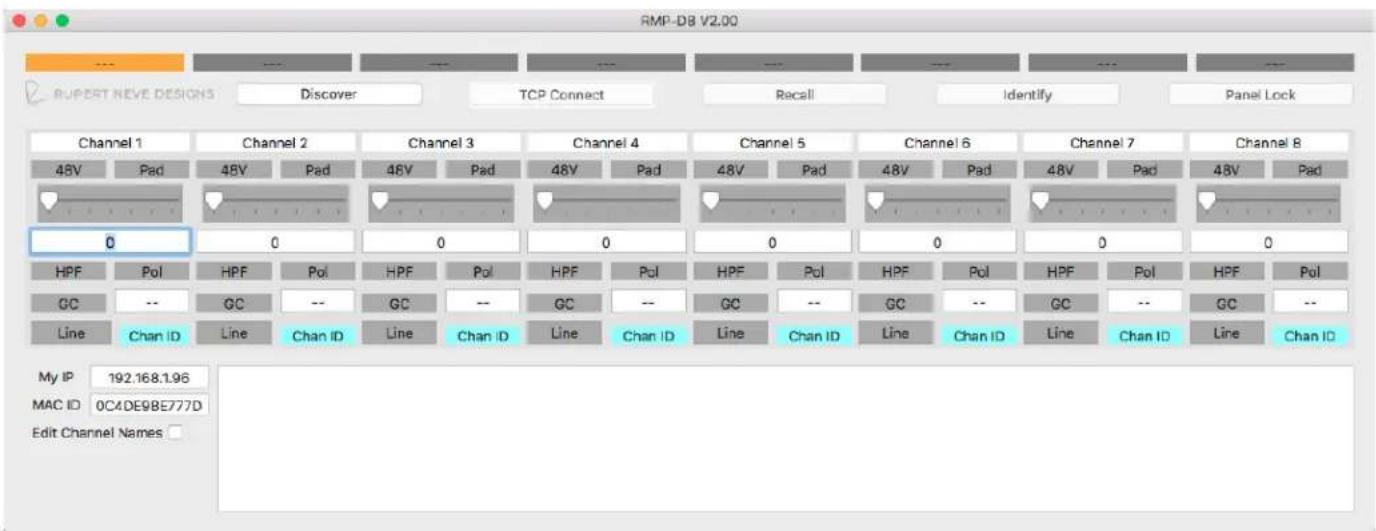
The MAC version of the RMP-D8 Application behaves very similarly to the PC version, with a couple minor differences.
Initial Connection
Once the application is open, click on the DISCOVER button. The application will scan for all available RMP-D8 units that are currently active on the local network. Active units will appear in the boxes at the top of the application window (up to a total of eight units).
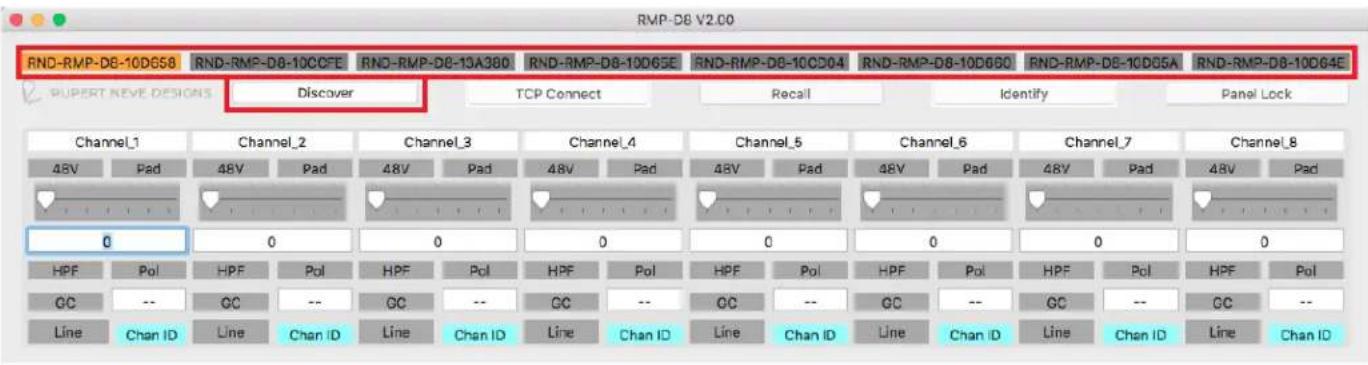
Once the desired RMP-D8 is selected, click the TCP CONNECT button. A successful connection is indicated by the device ID box color changing from orange to green as well as a "Connect Successful" message in the application dialog window.

To confirm which RMP-D8 is currently selected, the user can click on the IDENTIFY button. This will prompt the selected RMP-D8 to flash all eight channel select buttons repeatedly on the RMP-D8 front panel, until the IDENTIFY button is deselected.

After verifying successful connection, the user should click on the RECALL button to recall the current status of all the features on the selected RMP-D8.

Basic Application Operation
Clicking once on any channel's gain slider will make that channel active (highlighted). The gain can be adjusted on that channel by clicking and dragging the gain slider position indicator to the desired level. The user can also click in the box directly below the channel gain knob and type in the desired value for quick and precise gain adjustments. The rest of the channel features (48V, Pad, HPF, Pol, GC, Line) behave similarly to the PC Remote Application.


Application Front Panel Lockout
In addition to the RMP-D8 front panel button combination for Front Panel Lockout (see page 5), the user can also remotely lock the Front Panel within the application:

Application Channel Naming
The application supports channel naming by checking the "Edit Channel Names" box and typing in the desired name (in this example: Channel 1 was renamed "Kick"). Once all channels have been named, un-check the "Edit Channel Names" box.


RMP-D8 Dante Firmware Update
In the event that the RMP-D8 Dante Firmware needs to be updated in the field, the user should utilize Dante Updat-er within Dante Controller. More in-depth information on Dante Controller and Dante Updater can be found on the Audinate website (www.audinate.com). The basic procedure for updating the RMP-D8 Dante Firmware is outlined below:
Open Dante Controller and locate "Dante Updater" in the menu bar.

Within the Dante Updater menu, expand the "Update(s) Available" menu to show the RMP-D8 units that need to be updated. In this example, the RMP-D8 needs to be updated from Product Version 1.10.0 to the latest 1.10.1.

| UPDATE(S) AVAILABLE | ||||||||
| UPDATE | DEVICE NAME | MANUFACTURER | MODEL NAME | STATUS | PRODUCT VERSION | LATEST PRODUCT VERSION | DANTE VERSION | LATEST DANTE VERSION |
| RND-RMP-D8-10D660 | Rupert Neve | RMP-D8 | Cout of date | 1.10.0 | 1.10.1 | 4.2.0.28 | 4.2.0.28 | |
Click on the UPDATE √ checkbox, then click on UPDATE SELECTED DEVICES in the bottom right corner of the window.
1 DEVICES WILL BE UPDATED
| DEVICE NAME | IP ADDRESS | UPDATE STATUS |
| RND-RMP-D8-10D660 | 192.168.1.79 | Ready for update |

Do not power off or disconnect your computer or devices while updates are in progress
I understand that audio will be interrupted.
CANCEL
UPDATE NOW
Dante Updater will then ask to confirm the update. Click on
UPDATE NOW
Once the RMP-D8 has finished updating, Dante Updater will display UPDATING COMPLETED. At this point, click on the REBOOT REQUIRED checkbox √, then click REBOOT SELECTED DEVICES
UPDATING COMPLETED
| DEVICE NAME | IP ADDRESS | UPDATE STATUS |
| RND-RMP-D8-10D660 | 192.168.1.79 | REBOOT REQUIRED |

After the RMP-D8 is finished rebooting, the UPDATE STATUS will indicate "Successful."
UPDATING COMPLETED
| DEVICE NAME | IP ADDRESS | UPDATE STATUS |
| RND-RMP-D8-10D660 | 192.168.1.79 | ✓ Successful |

RMP-D8 and Dante Domain Manager (Firmware v2.00 and later)
The RMP-D8 indicates current Dante Domain enrollment status using it's OLED display. To access this information, press the RMP-D8 front panel CONFIG button twice. If the RMP-D8 is not currently enrolled in any Dante Domain, it will indicate "NOT ENROLLED" in the Domain status window.

If the RMP-D8 is currently enrolled in a Dante Domain, the "ENROLLED".

Changing the RMP-D8 Yamaha ID
Using the OLED display, navigate to the Yamaha ID edit menu screen by pressing the CONFIG button five times.
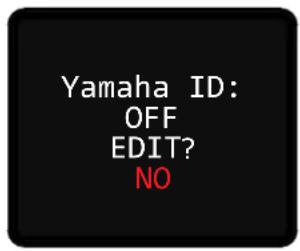
The RMP-D8 will prompt the user to EDIT the Yamaha ID. The default Yamaha ID is set to "OFF" and the EDIT prompt defaults to "NO." To EDIT the Yamaha ID number, rotate the ADJUST wheel one detent clock-wise until the EDIT prompt says "YES." Press the CONFIG button to accept the change.
![graph LR A["ADJUST"] --> B["Yamaha ID: OFF EDIT? YES"]](/content/2026/05/831074/images/f6e84fcb14de099e9dc44c8081b24f49a8fc60f318fe9d720a6c607f760e2e4b.jpg)
The RMP-D8 will then prompt the user to assign the Yamaha ID number. Rotate the ADJUST wheel to change the Yamaha ID number (in this example it was changed to ID 1). Press the CONFIG button to accept the Yamaha ID change.
![graph LR A["EDIT Yamaha ID OFF"] --> B["EDIT Yamaha ID 1"] style A fill:#000,stroke:#fff,color:#fff style B fill:#000,stroke:#fff,color:#fff](/content/2026/05/831074/images/94a176fa84d7726cea630963d877e23c4cd0ee82e1d3f94f17ac2f9a562b88d3.jpg)
The RMP-D8 will then prompt the user to confirm the SAVE of the new Yamaha ID. Press the CONFIG button to save the Yamaha ID EDIT. The RMP-D8 will then show the new Yamaha ID prefix on the Dante ID menu screen. Press the CONFIG button once more to return to the main operational screen.
![graph LR A["Save Edit?\nYES\nPress CFG to COMMIT"] --> B["Dante ID\nDevice Name:\ny001-RND-RMP-\nD8-10D5B6"]](/content/2026/05/831074/images/8ca486b2ce5f2166a7410a124fc38346c879dd3b33d0f75f76a8fdcd1c3b0bb4.jpg)
RMP-D8 USB Firmware Update
Field Update Procedure:
- Power ON the RMP-D8 and press the CONFIG button once to take note of the current firmware (FW) version on the SYSTEM screen.
- After confirming the current FW version, power the RMP-D8 OFF.
- Plug a USB flash drive with the most recent "image.hex" file into the FIRMWARE UPDATE USB A port on the RMP-D8 rear panel.
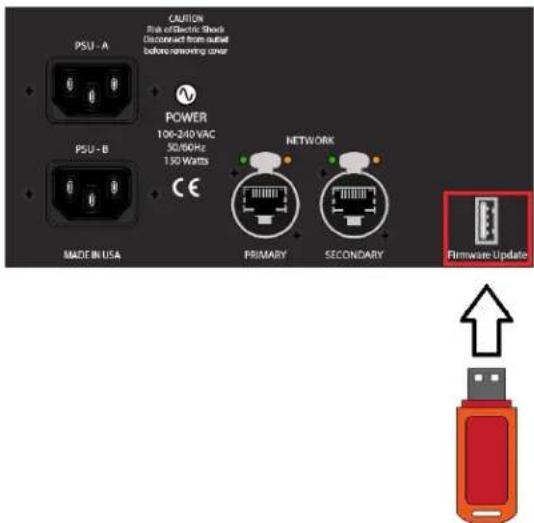
- PRESS and HOLD Channel 1 and Channel 8 "Channel Select" buttons (STEP 1). While holding Channel 1 and 8 channel select buttons, power on the RMP-D8 (STEP 2).

- The RMP-D8 button LEDs will start to flash. At this point, release the Channel 1 and Channel 8 channel select buttons. The LEDs will stop flashing once the new application code has finished loading. The RMP-D8 will subsequently boot up in standard operating mode.
- When the RMP-D8 has finished it's standard boot sequence, turn the RMP-D8 OFF and remove the USB Flash Drive from the FIRMWARE UPDATE USB port.
- Power the RMP-D8 ON again.
- When the RMP-D8 has finished its boot sequence, press the CONFIG button once to verify that the new firmware version has been successfully updated.
RMP-D8 Specifications
Noise 150 Ohm Balanced Source, AES Output, 22 Hz to 22 kHz, un-weighted
+60dB Gain
-91
dBFS
Unity Gain
-110
dBFS
Frequency Response
0dBu, Unity Gain @ 96 kHz F
30 Hz to 45 kHz
+/-
0.2
dB
Typical
10 Hz
-3
dB
Typical
Input Impedance
5.5
kOhms
Gain
0 to 60 dB in 1 dB steps
High Pass Filter -3dB @ 80 Hz, 12 dB/Octave Slope
Pad
-10
dB
Signal to Noise Ratio
84.4
dB
Dynamic Range
110
dB
Maximum Input Level
+25.5
dBu
System Latency @ 96kHz F s
0.588 mS
Shipping
Weight
17.6 lbs. (8 kg)
Shipping Dimensions
22" (W) × 18" (D) × 9" (H)
55.9 cm (W) x 45.7 cm (D) x 22.9 cm (H)
Power Cord Type
IEC Standard 3 Pin 18AWG Latching Type
Power
Consumption
150W (Max)
PRODUCT WARRANTY
Rupert Neve Designs warrants this product to be free from defects in materials and workmanship for a period of three (3) years from date of purchase, and agrees to remedy any defect identified within such three year period by, at our option, repairing or replacing the product.
LIMITATIONS AND EXCLUSIONS
This warranty, and any other express or implied warranty, does not apply to any product which has been improperly installed, subjected to usage for which the product was not designed, misused or abused, damaged during shipping, damaged by any dry cell battery, or which has been altered or modified in any way. This warranty is extended to the original end user purchaser only. A purchase receipt or other satisfactory proof of date of original purchase is required before any warranty service will be performed. THIS EXPRESS, LIMITED WARRANTY IS IN LIEU OF ALL OTHER WARRANTIES, EXPRESS OR IMPLIED, TO THE EXTEND ALLOWED UNDER APPLICABLE STATE LAW. IN NO EVENT SHALL RUPERT NEVE DESIGNS BE LIABLE FOR ANY SPECIAL, INCIDENTAL, OR CONSEQUENTIAL DAMAGES RESULTING FROM THE USE OF THIS PRODUCT. Some states do not allow the exclusion or limitation of consequential damages or limitations on how long an implied warranty lasts, so this exclusion may not apply to you.
WARRANTY SERVICE
If you suspect a defect in this product, please call us at 512-847-3013 or contact our support staff (service@rupertneve.com) for troubleshooting. If it is determined that the device is malfunctioning, we will issue a Return Material Authorization and provide instructions for shipping the device to our service department.
R _ i
Rupert Neve Designs
PO Box 1969
Wimberley TX 78676
www.rupertneve.com
tel:+1 512-847-3013
fax: +1 512-847-8869
775-00033 Rev C
- 8 CHANNEL DANTE™ MICROPHONE PREAMP
- OPERATIONS MANUAL
- IMPORTANT SAFETY INSTRUCTIONS
- TABLE OF CONTENTS
- RUPERT NEVE DESIGNS RMP-D8 DANTE™ MICROPHONE PREAMP
- RMP-D8 FRONT PANEL FEATURES
- EIGHT SEGMENT LED CHANNEL METERING
- LINE
- RESET
- FRONT PANEL LOCKOUT
- RMP-D8 NETWORK CONNECTIVITY
- RMP-D8 OLED DISPLAY
- RMP-D8 AND DANTE CONTROLLER
- RMP-D8 GAIN COMPENSATION
- SETUP
- APPLICATION
- RMP-D8 APPLICATION REMOTE CONTROL (PC)
- INITIAL CONNECTION
- CONNECTING TO MULTIPLE RMP-D8 UNITS
- BASIC APPLICATION OPERATION
- APPLICATION FRONT PANEL LOCKOUT
- APPLICATION CHANNEL NAMING
- RMP-D8 APPLICATION REMOTE CONTROL (MAC)
- RMP-D8 DANTE FIRMWARE UPDATE
- RMP-D8 AND DANTE DOMAIN MANAGER (FIRMWARE V2.00 AND LATER)
- CHANGING THE RMP-D8 YAMAHA ID
- RMP-D8 USB FIRMWARE UPDATE
- FIELD UPDATE PROCEDURE
- RMP-D8 SPECIFICATIONS
- PRODUCT WARRANTY
- LIMITATIONS AND EXCLUSIONS
- WARRANTY SERVICE
Brand : Rupert Neve Designs
Model : RMP-D8
Category : Receiver