
Cine Special - Camcorder KODAK - Free user manual and instructions
Find the device manual for free Cine Special KODAK in PDF.

User questions about Cine Special KODAK
0 question about this device. Answer the ones you know or ask your own.
Ask a new question about this device
Download the instructions for your Camcorder in PDF format for free! Find your manual Cine Special - KODAK and take your electronic device back in hand. On this page are published all the documents necessary for the use of your device. Cine Special by KODAK.
USER MANUAL Cine Special KODAK
EASTMAN KODAK COMPANY
ROCHESTER, NEW YORK
TABLE OF CONTENTS
LOADING THE
CINÉ-KODAK SPECIAL..... 5
Interchanging the Film Chambers.... 5
Aperture Cover.... 10
Threading the Film....11
Film Meters.... 17
Unloading.... 18
HAND-HELD OPERATION... 19
Condensed Instructions for Average Filming.... 20
General Information.... 23
Holding the Camera Steady. 23
Finder....23
Exposure 25
Focus 27
Miscellaneous Notes..... 28
Important Rules.... 28
Turret Head.... 29
Camera Speeds. 35
Variable Shutter 36
Masks.... 37
OPERATION ON THE
CINÉ-KODAK TRIPOD..... 41
Reflex Finder.... 42
Fades 45
Dissolves 46
Single Frames.... 49
Frame Counter 50
Double Exposure.... 52
Running Down the Motor.... 54
Hand Cranking.... 55
FILMS, FILTERS AND
ARTIFICIAL LIGHTS....56
SPECIAL EFFECTS
AND TRICKS....61
CARE OF THE
CINÉ-KODAK SPECIAL.....70
Cleaning the Gate....70
Cleaning the Lenses....71
Cleaning the Reflex Finder.... 71
Oiling the Camera....71
TITLE SERVICE, DUPLICATES
AND COPIES....74
TABLES 76
Exposure....76
Field Sizes 80
CINÉ-KODAK SPECIAL
THE CINÉ-KODAK SPECIAL is an instrument that creates wholly new possibilities for making motion pictures. It frees the advanced workers from certain limitations of the simple home movie camera, and yet retains the 16 mm. film economy and convenience. It is the camera for serious workers who wish to go beyond the average movie making technique.
The Ciné-Kodak Special uses standard 16 mm. Ciné-Kodak Panchromatic, Super Sensitive Panchromatic, Ciné-Kodak Safety, and Kodachrome Films.
A great variety of lenses can be used on the Ciné-Kodak Special. In addition to the 1-inch f.1.9 lens which is regularly supplied and is the best for general work, the camera can be equipped with a wide-angle lens for including a larger area than can be obtained with the standard 1-inch lens. Several long-focus lenses are available, so that telephoto effects can be obtained. These lenses will be found very desirable for making motion pictures of athletic games from the grandstand, hunting big game and similar subjects where it is not possible to get close to the object. These telephoto lenses also permit obtaining close-up effects from intermediate distances when it is inconvenient to place the camera very near the subject; such as pictures of insects, birds, surgical operations, dental work and similar subjects.
Members of movie clubs will find this camera an unequalled instrument for photographing scenarios that include the most difficult effects.
It is the camera for doctors, physicists, biologists, engineers, athletic instructors—in short, all those seeking an inexpensive and elastic method of disseminating knowledge or of preserving records. In the Special they have a photographic instrument that not only simplifies but greatly widens the scope of the work they are doing.
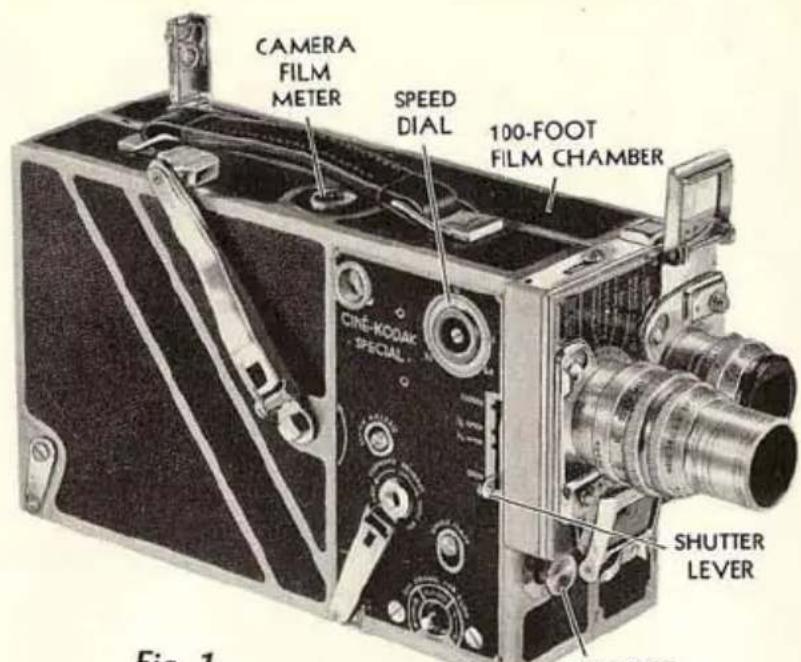
Fig. 1
EXPOSURE BUTTON
Ciné-Kodak Special with 100-foot film chamber in position, and with 1-inch f.1.9 lens and 3-inch f.4.5 telephoto lens on turret.
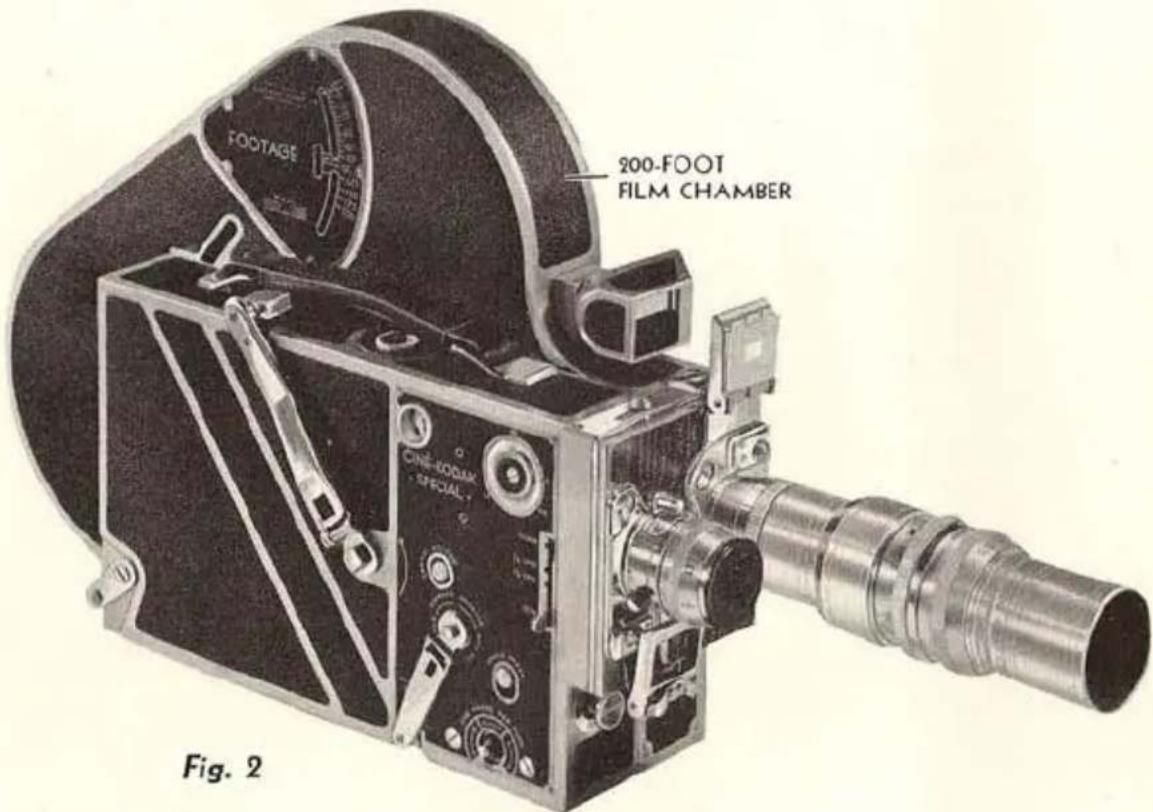
Ciné-Kodak Special with 200-foot film chamber in position, and with 1-inch f.1.9 lens and 6-inch f.4.5 telephoto lens on turret.
LOADING THE CINÉ-KODAK SPECIAL
INTERCHANGING THE FILM CHAMBERS
THE Ciné-Kodak Special consists of two units; the camera and the film chamber.
Figure 1 shows the camera with the 100-foot film chamber; Figure 2 shows it with the 200-foot film chamber. These film chambers are quickly interchangeable. This feature is invaluable as you may keep one chamber loaded with regular Ciné-Kodak Panchromatic, another with Super Sensitive Panchromatic, and another with Kodachrome Film. If an unusual opportunity arises for good pictures in Kodachrome, you will not have to wait until the rest of the black-and-white film is exposed. Also, you may be making a special sequence that requires considerable time, such as animation, yet not want to tie up the camera for this use exclusively.
By hand cranking or by using the Electric Motor Drive, over eight minutes of uninterrupted action can be filmed. This makes the 200-foot chamber invaluable for surgical operations, many types of athletic events, etc.
Ciné-Kodak Panchromatic, Super Sensitive Panchromatic, regular Kodachrome, and Kodachrome Type A can be obtained in 50-foot, 100-foot, or 200-foot lengths for use in 100-foot or 200-foot film chambers. Ciné-Kodak Safety Film is supplied in 100-foot rolls, only.
Removing the Chamber
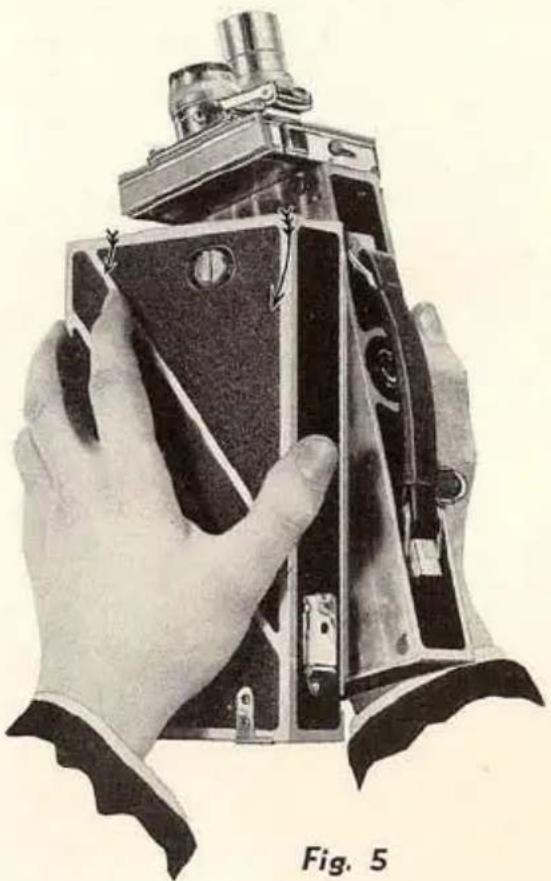
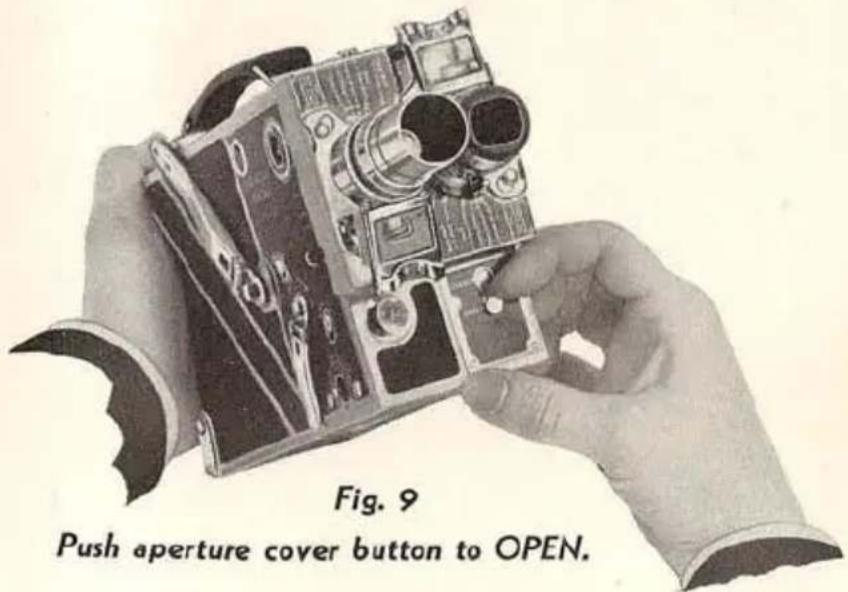
FIGURES 3, 4, and 5 show graphically how this is done:
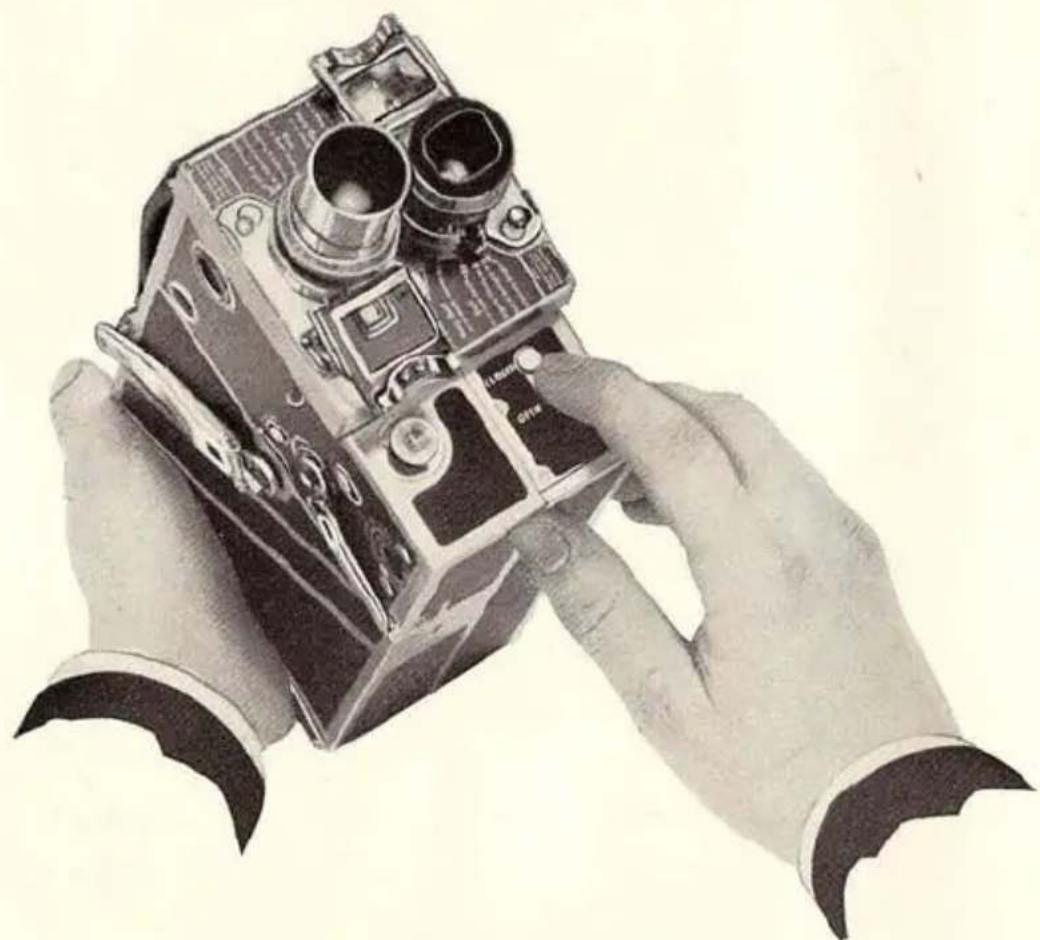
natural_image
Illustration of two hands holding a vintage camera, no text or symbols visibleFig. 3
Push aperture cover button to CLOSED.
(Make sure exposure button is OUT.)
natural_image
Illustration of hands assembling a vintage mechanical device with visible internal components (no text or symbols)Raise chamber release until it snaps out.
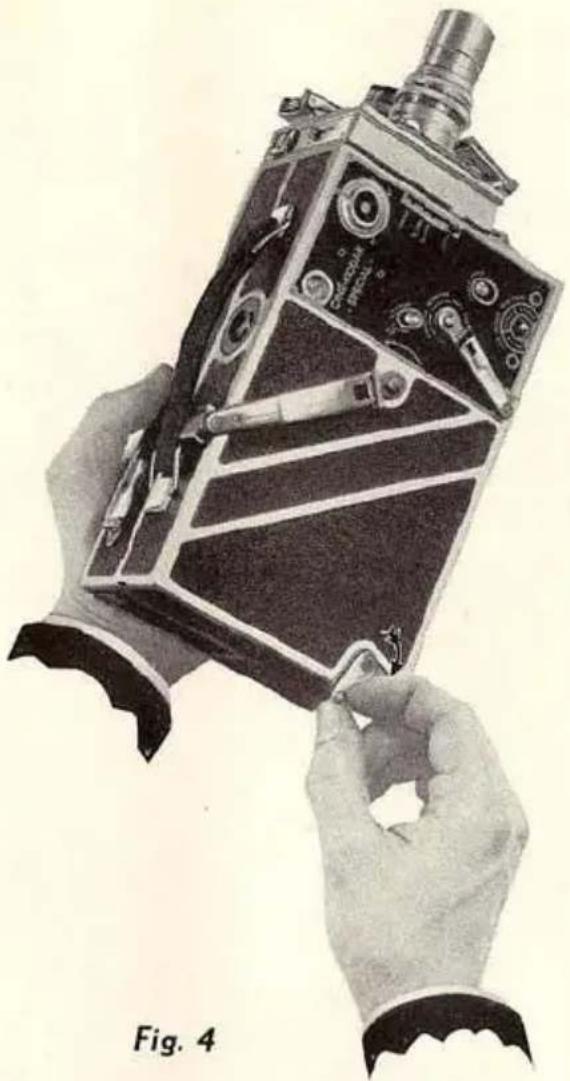
natural_image
Illustration of a hand holding a vintage camera module, labeled Fig. 5 (no text or symbols on the device itself)Disengage chamber by swinging it down as indicated by arrows, then lift it off.
Replacing the Chamber
FIGURES 6, 7, 8 and 9 show the method of doing this:
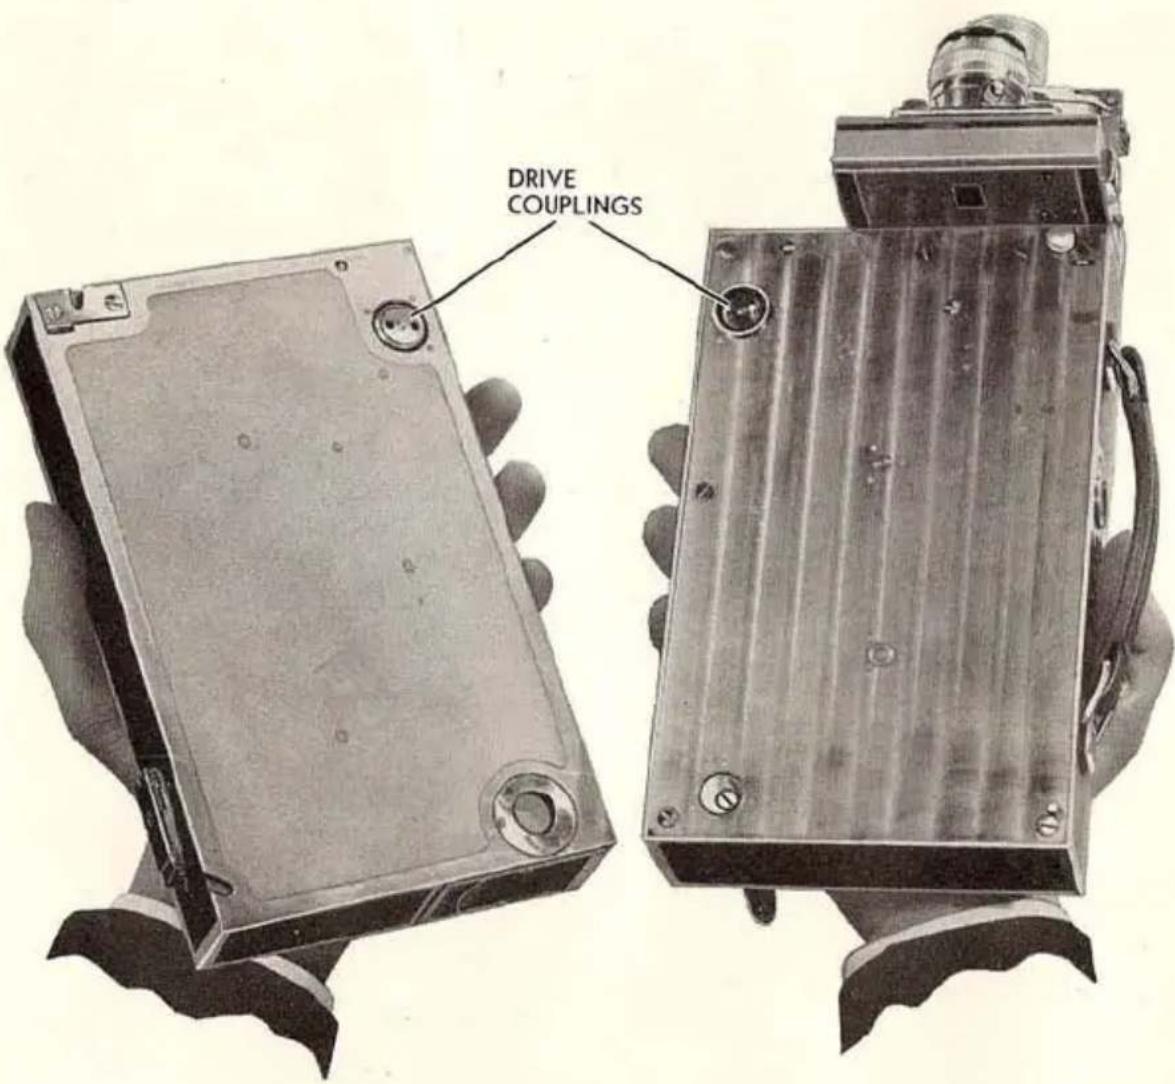
Fig. 6
Drive couplings are shown which must be engaged. Pins engage holes automatically.
natural_image
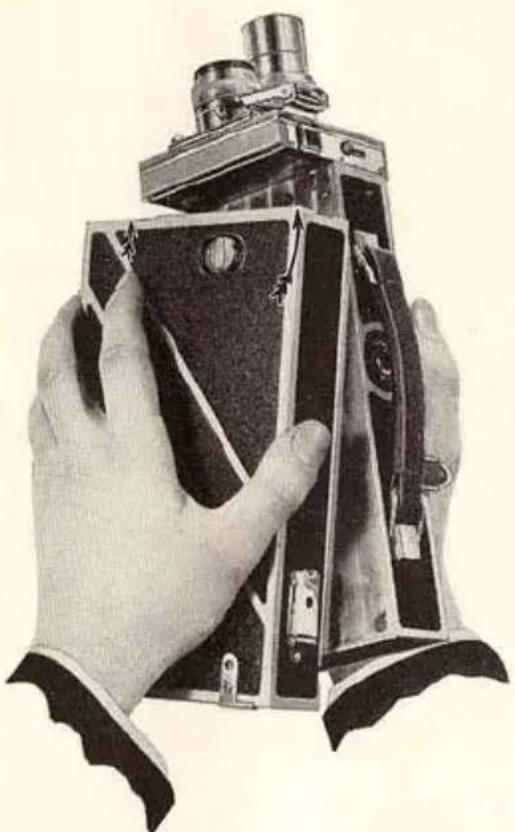
Black-and-white illustration of a hand holding a vintage camera module (no text or symbols visible)Fig. 7
Drive couplings engaged. Push chamber in direction of arrows.
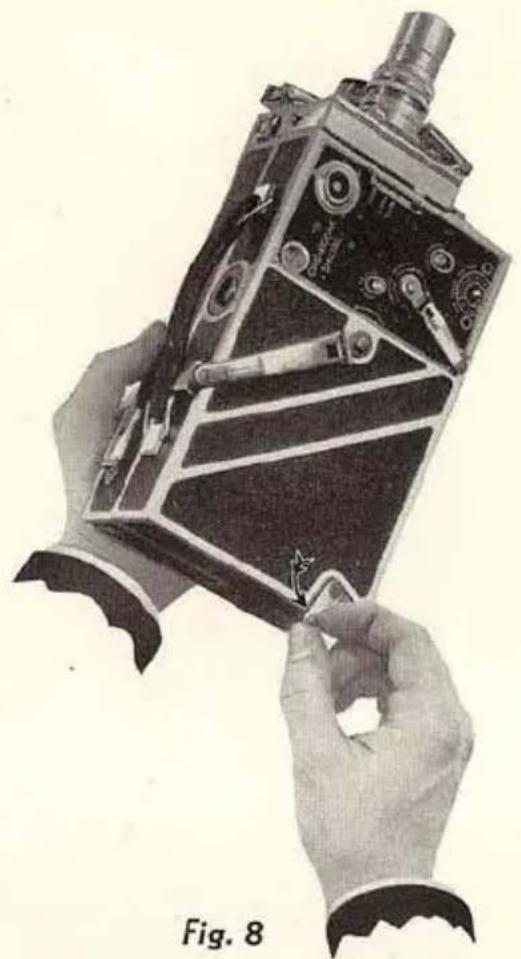
natural_image
Illustration of hands assembling a vintage mechanical device with visible gears and components (no text or symbols)Push in and down on chamber release.
9
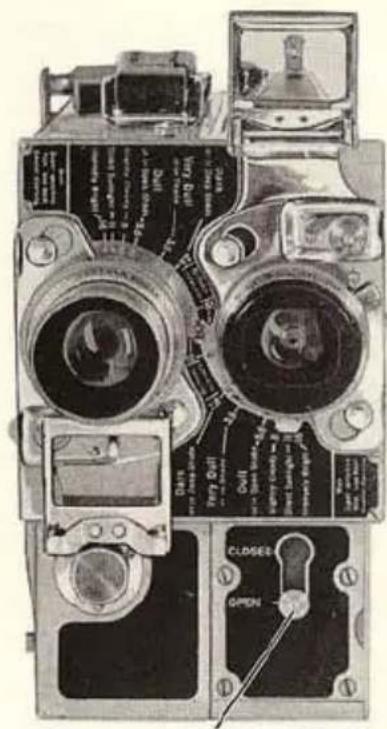
APERTURE COVER
THE APERTURE COVER BUTTON (Figure 10) closes the aperture of the film chamber so that no film is fogged when the chamber is removed from the camera.
You cannot run the camera when this button is at CLOSED.
The chamber cannot be removed with the button at OPEN.
If you wish to operate the mechanism of the Ciné-Kodak Special with the film chamber removed, see instructions on page 54.
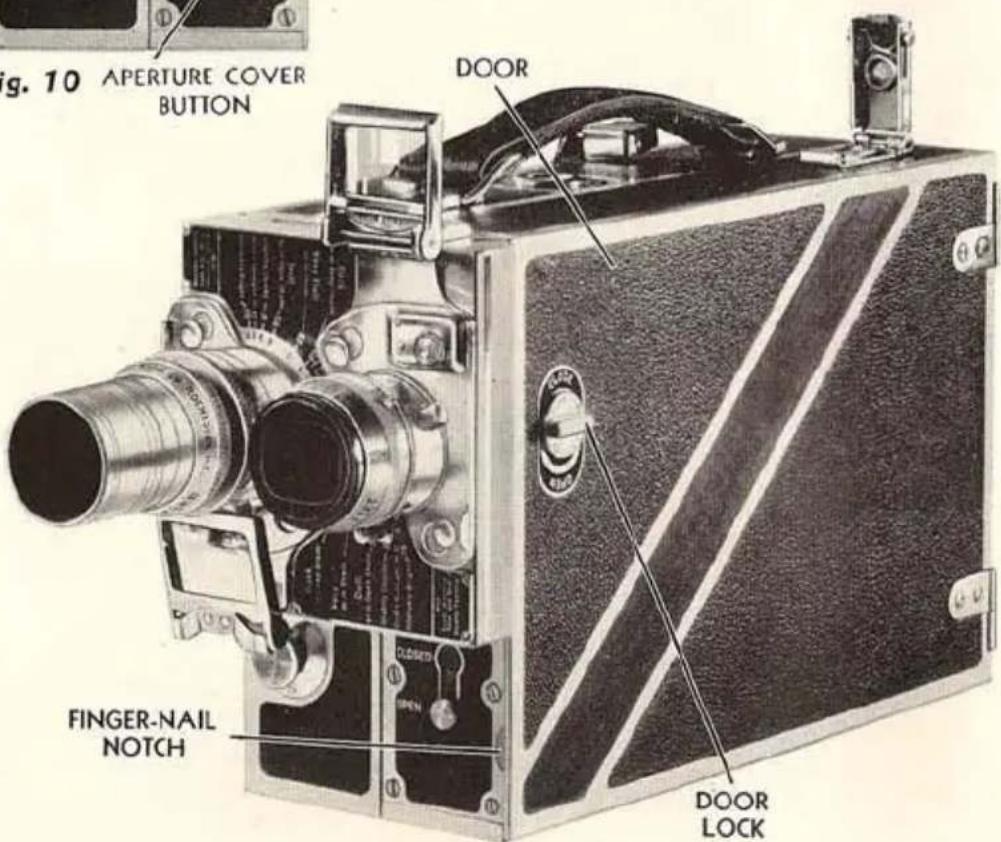
Fig. 11
THREADING THE FILM
100-Foot Film Chamber
Load in subdued light or in the shade of the body.
Rotate DOOR LOCK a half turn to the left and push it down to the word OPEN. Open the DOOR with the finger-nail inserted in the NOTCH provided (Figure 11). The door should be opened as far as it will go so that the FILM METER ARM will clear the spool, Figure 12.

Fig. 12
With the camera is supplied a 50-foot spool, a 100-foot spool, and some dummy film with which to practice threading. Save the spools.
After pushing TENSION LEVER in direction of the arrow in Fig. 12, remove the spools.
Open the SPROCKET CLAMP by pushing in and down on the CLAMP RELEASE (Figure 13, page 12).
After removing spool of unexposed film from carton and metal con-
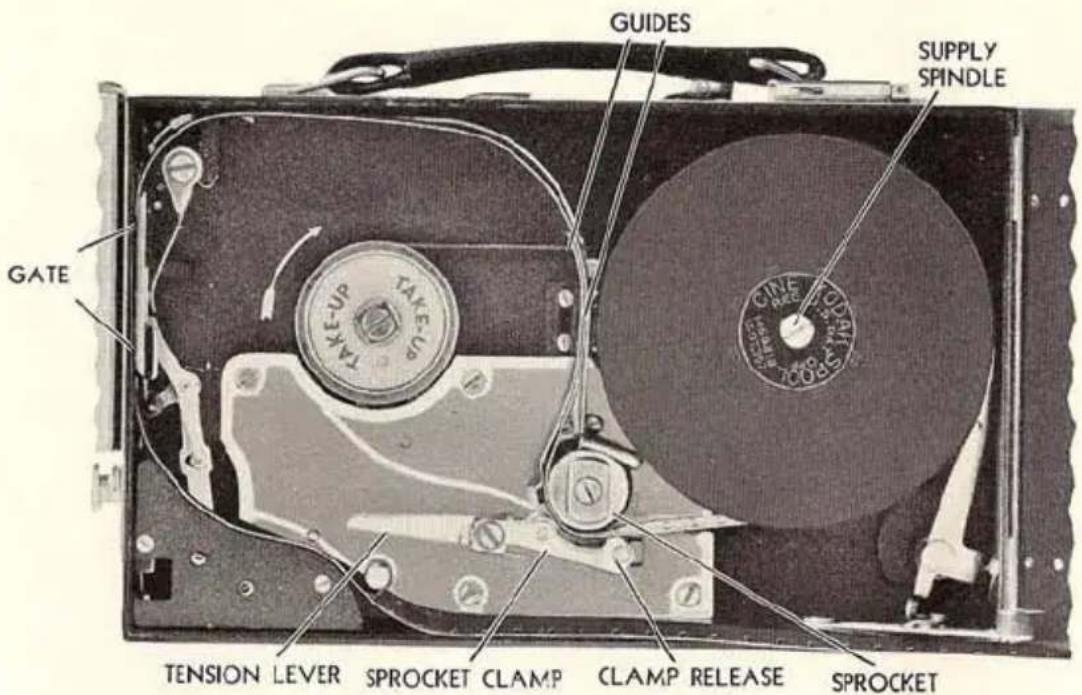
Fig. 13
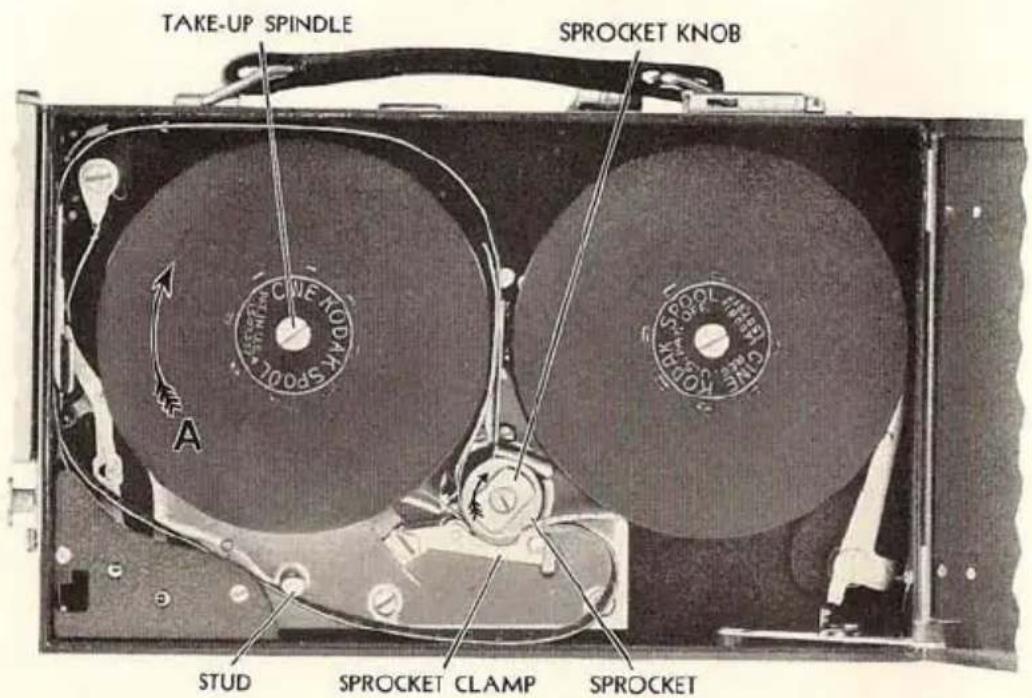
Fig. 14
tainer, unroll about two feet of film. Place the spool, with square hole down, on SUPPLY SPINDLE (Figure 13).
Note that lines and arrows on the inside of the chamber indicate the path of the film; two of the arrows show the direction in which the spools turn.
Thread the film under the SPROCKET and up between the GUIDES (Figure 13). Leave a free loop as indicated by upper loop line and push the film sideways into the GATE, starting at the top of the gate. Make sure the gate seats itself, indicating that the film lies in the film track.
The camera should now appear as in Figure 13.
Following the lower loop line, thread film under the STUD, and under the SPROCKET again, as in Figure 14. Fit the perforations over the sprocket teeth which already engage the film coming from the supply spool.
Close SPROCKET CLAMP by pushing upward until a click is heard.
Attach the end of the film to the core of the empty take-up spool, by inserting it in the slot. Give the spool a few turns in the direction indicated by the arrow A (Figure 14) to make sure film is securely attached. Be sure TENSION LEVER is pushed down as in Figure 13, then place the empty spool, square hole down, on the TAKE-UP SPINDLE (Figure 14). The TENSION LEVER can be released by pushing the lug near the hinge; if this operation is forgotten, the door will perform it automatically.
The camera should now appear as in Figure 14.
Run the camera a second or two to see that the film runs smoothly in its path and that the loops are maintained. Directions for running the camera are given on page 20. If the upper loop increases, pull the film down until the loop size is correct. Repeat the trial run.
If the film chamber is not on the camera, give the trial run described in the preceding paragraph by turning the SPROCKET KNOB clockwise, in the direction of the arrow (Figure 14).
Close camera door. If it does not close easily, the sprocket clamp is not fully closed or the spools are not seated properly.
Push the DOOR LOCK up to CLOSE (Figure 11, page 10) and give it a half turn to the right.
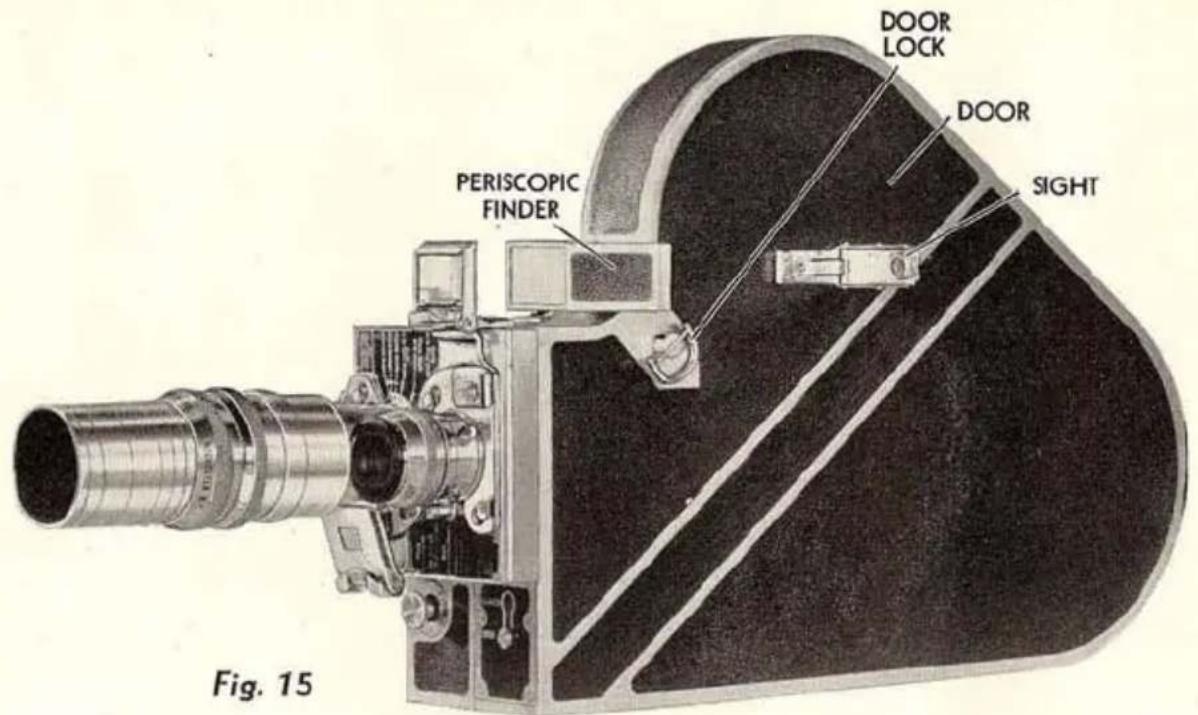

Fig. 16
Running off Leader
With the film chamber on the camera, remove the lens (see page 32), set SHUTTER LEVER at OPEN and set SPEED DIAL at 16 (Figure 1, page 4) not at 32 or 64. Looking directly into the LENS SOCKET (Figure 28, page 32), run the camera by pressing the EXPOSURE BUTTON (Figure 1, page 4). Stop the camera immediately when you see the perforations that are punched in the film at the end of the leader.
Set the CAMERA FILM METER, Figure 1, page 4, at 0 for 100-foot lengths or at 50 for 50-foot lengths of film.
200-foot Film Chamber
ROTATE DOOR LOCK a half turn to the right and remove DOOR (Figure 15).
In this chamber are three spools and some dummy film with which to practice threading. Save the spools.
Remove the spools, holding FILM METER ARM to the right; and open the SPROCKET CLAMPS by pushing the CLAMP RELEASES in and away from the sprocket. The chamber will now appear as in Figure 16.
After removing the film from the carton and metal container, unroll about two and one-half feet of film and place the spool on the SUPPLY SPINDLE, square hole down.
Thread the film over the top of the sprocket, engaging the teeth with the film perforations. Close the clamp by pushing it towards the sprocket until it clicks.
Following the upper loop line, slide the film sideways into the GATE, starting at the top (Figure 17, page 16). Be sure the film is seated in the film channel of the gate, and that loop does not touch casting.
Following the lower loop line, thread the film under the sprocket, engaging the teeth and closing the clamp as before.
The TENSION LEVER (Figure 16) should be placed to the left of the stud marked with the size of spool used.
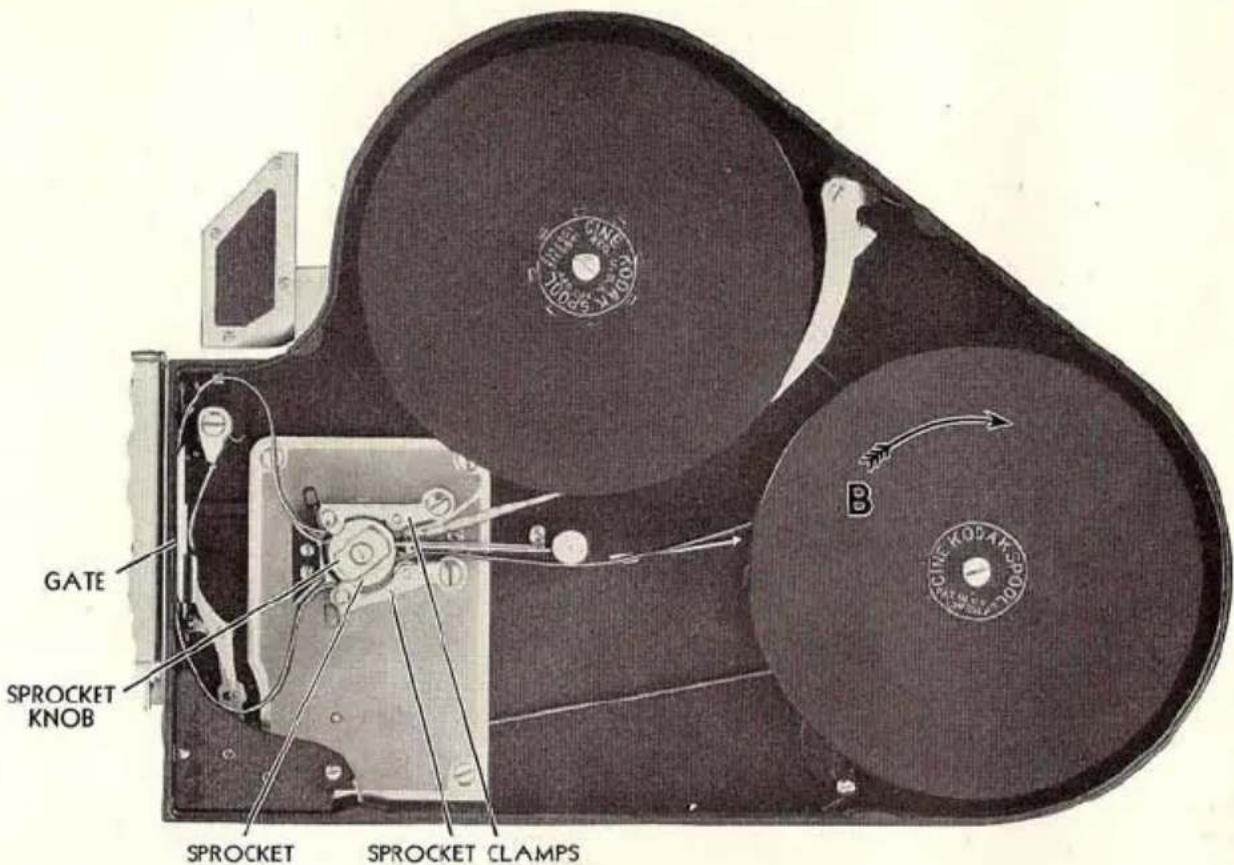
Fig. 17
Attach the end of the film to the core of the empty take-up spool by inserting it in the slot. Give the spool a few turns in the direction indicated by the arrow B, Figure 17, and pull the film to make sure it is firmly attached. Place the spool on the TAKE-UP SPINDLE (Figure 16, page 14), square hole down.
The threaded chamber should now appear as in Figure 17.
A short trial run should be given to see if the threading is correct and the loops maintained, as described for the 100-foot chamber.
Close the chamber by replacing the DOOR and rotating DOOR LOCK a half turn to the left (Figure 15, page 14). If the door does not close easily, the sprocket clamps or the spools are not in their proper positions.
Run off the leader and set CAMERA FILM METER (Figure 18) as described for the 100-foot chamber.
FILM METERS
THE Ciné-Kodak Special has two film meters; one for the film chamber and one for the camera proper, see Figure 18. There is also a FRAME COUNTER calibrated from 0 to 40. As there are forty 16 mm. frames to the foot, the frame counter ties in with the mechanical film meter on the camera. It is particularly useful in single frame, double, and multiple exposure work, see pages 50 and 51.
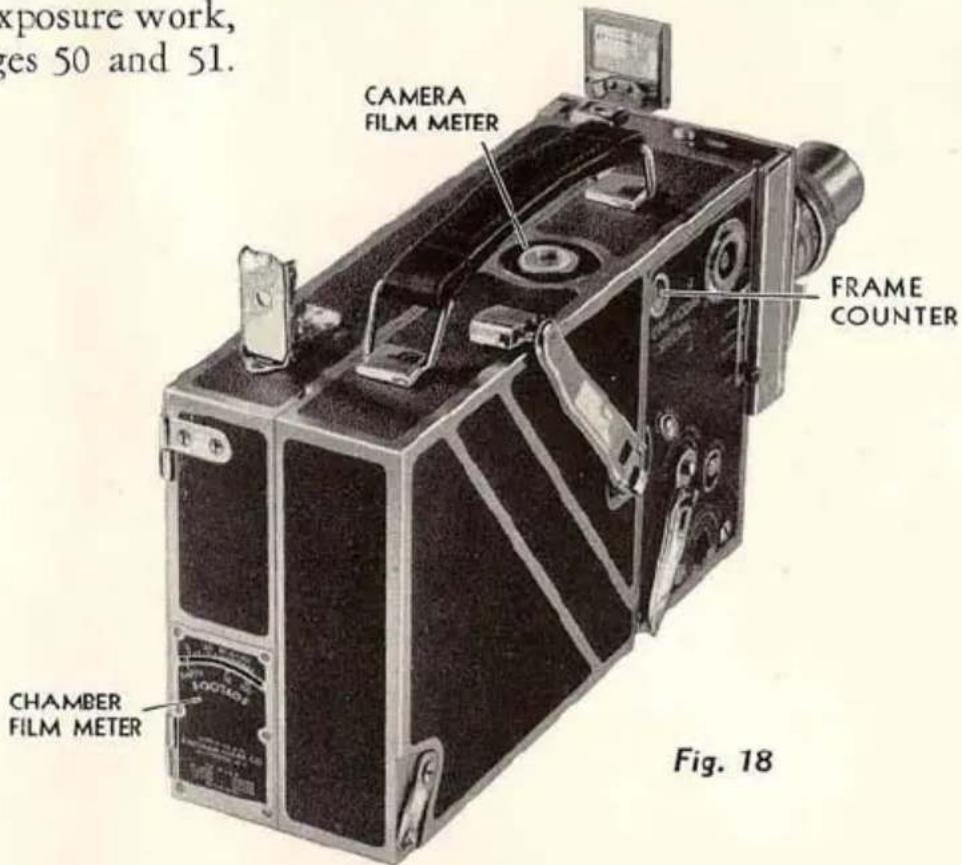
CHAMBER FILM METER. This meter operates on the circumference of the supply roll of film and requires no setting. Its purpose is to indicate the amount of unexposed film in the chamber, whether the latter is on or off the camera.
CAMERA FILM METER. This is geared to the camera mechanism and requires setting with each roll of film. Its purpose is to provide an accurate measure of the film in individual feet, and gives the number of feet exposed.
CHANGING FILM CHAMBERS: When replacing the film chamber with another loaded chamber, be sure to reset the Camera Film Meter to agree
with the amount of film already exposed, which is determined by subtracting the figure given on the Chamber Film Meter from 50, 100 or 200 depending upon the roll of film in the chamber. If a 200-foot spool is used and the figure on the chamber shows 60 feet remaining in the chamber, the Camera Film Meter should be set at 40 feet. If accuracy is required, the Camera Film Meter reading should be marked on the dull metal side of the film chamber when it is removed from the camera. When again using this chamber, erase the notation from the dull metal, after the Camera Film Meter has been reset to agree.
UNLOADING
WHEN the CHAMBER FILM METER (Figure 18, page 17) points to 0, you have exposed all the usable length of film.
In order to unload the camera in daylight, the protective trailer must be wound around the roll of film. To do this, run the camera until the CHAMBER FILM METER shows EMPTY, before opening the chamber door.
Open the chamber door, pull down the tension lever as when loading, and remove the full spool from the take-up spindle. Quickly replace it in its metal container. To prevent edge fog, unload only in subdued light or in the shade of the body.
The film is now ready for development. Print your name and address plainly in the space provided on the back of the yellow carton. Then return the exposed roll of film to your dealer, who will send it to our nearest laboratory for finishing, for which we make no additional charge. If you mail the film direct, tie a string around the carton; do not seal it in any way.
When returning the exposed film for development, be sure to replace it in the metal spool container before placing it in the yellow carton. If this is not done the film is liable to unwind and it will then be fogged and ruined.
We cannot emphasize too strongly the importance of placing your name and address on the yellow carton. This is the only way by which we can tell to whom the film belongs.
The open sided spool or reel on which the finished picture is returned from the processing laboratory, must not be used as a take-up spool in the Ciné-Kodak Special.
HAND-HELD OPERATION
It is well known that the finest motion pictures are made with the camera on a rigid support; and when convenient it is advisable to make even the simplest pictures with the use of the tripod.
While the full versatility of the Ciné-Kodak Special is only attainable by using a tripod, as a hand-held instrument it presents many unique features; namely, interchangeable chambers, interchangeable lenses on a turret, variable speed, variable shutter, masks, and long-running spring motor with audible signals.
Versatility versus Simplicity
VERSATILITY in a motion picture camera can be accomplished only by increasing the number of adjustments, giving the operator greater control over the way film is drawn through the camera and the manner in which the frames are exposed.
The next few pages give instructions in how to use the Ciné-Kodak Special as a simplified camera, such as the Ciné-Kodak Model K, which requires but two adjustments for each scene . . . diaphragm and distance.
If you have not extensively used a movie camera before, we urge you to expose at least one roll of film following only the Condensed Instructions for Average Filming on page 20 and reading over the General Information, pages 23 to 28. This will help to establish the fundamentals in your mind before attempting advanced cinematography.
CONDENSED INSTRUCTIONS FOR AVERAGE FILMING
—Refer to Figures 19 and 20—
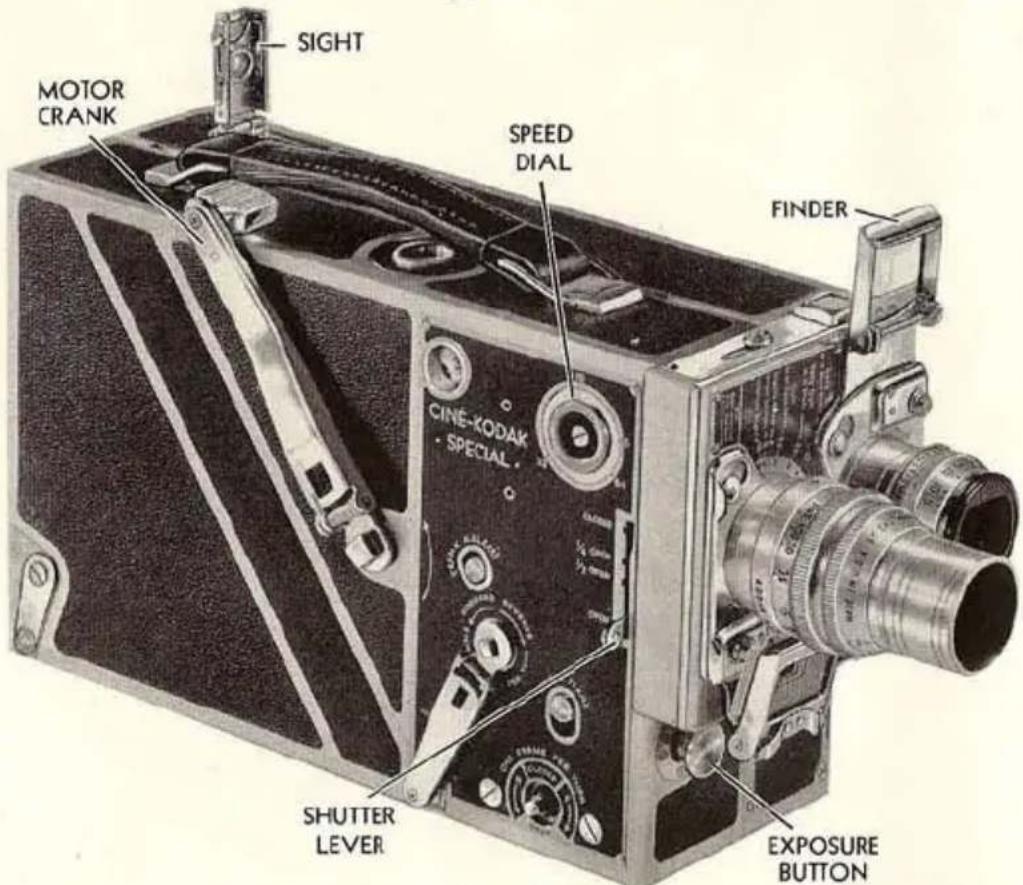
Fig. 19
WINDING THE MOTOR: Wind the motor of the Ciné-Kodak Special by turning MOTOR CRANK counter-clockwise, in the direction of the arrow, until the spring is wound tight. Before winding, make sure that the EXPOSURE BUTTON is out.
While winding, a bell signals when the camera is nearly wound (about three turns before the stop is reached). If you wish to continue winding after the bell rings, turn the crank slowly to avoid undue strain on the motor stop. Also, a bell signals when the motor is nearly run down (about 3 feet of film will be carried through after signal, requiring about seven seconds at speed 16). The motor has a total run of over 38 feet of film; and it requires about 38 turns of the MOTOR CRANK for a complete winding.
ADJUSTING THE CAMERA: For hand-held operation use only the 1-inch f.1.9 lens or the 15 mm. f.2.7 wide-angle lens. If particular attention is given to holding the camera steady, satisfactory hand-held telephoto effects can be obtained with the 2-inch f.3.5 lens. For attaching these lenses to turret, see instructions on page 32.
For simplified operation, set the:
SPEED DIAL at 16.
SHUTTER LEVER at OPEN.
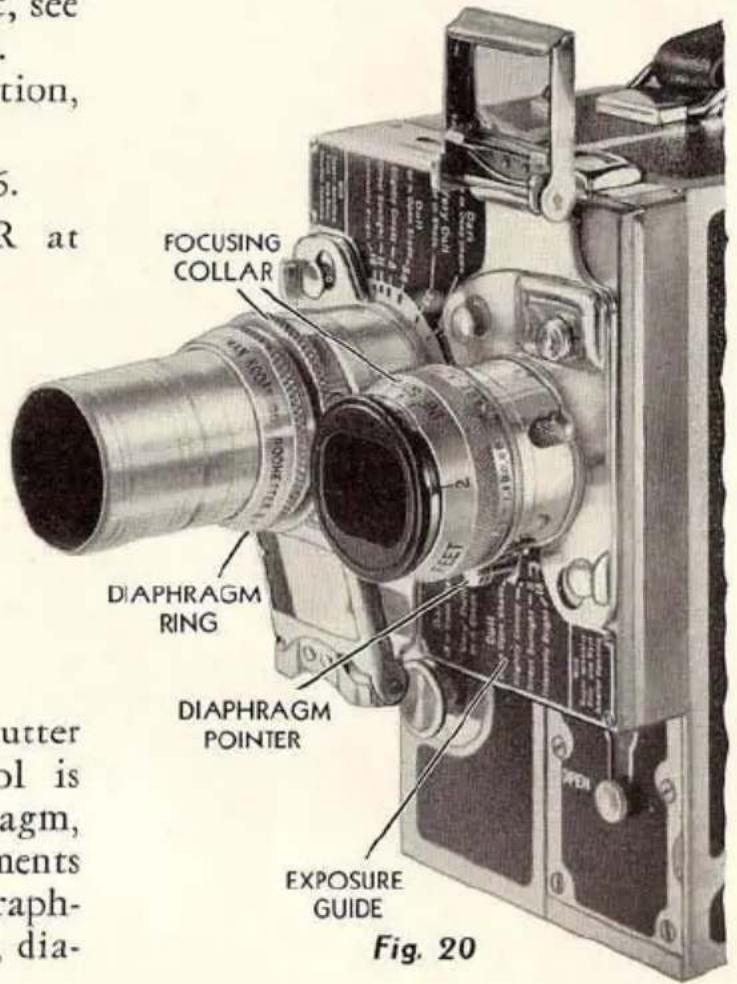
With the speed and shutter fixed, exposure control is confined to the diaphragm, leaving but two adjustments to make before photographing each scene; namely, diaphragm and distance:
DIAPHRAGM: Set the DIAPHRAGM POINTER at the figure that is next to the description of the prevailing light condition on the EXPOSURE GUIDE. For Kodachrome Film use the guide included with it.
DISTANCE: Rotate the FOCUSING COLLAR until the figure corresponding to the distance from camera to subject is at the index line. This operation is called focusing.
natural_image
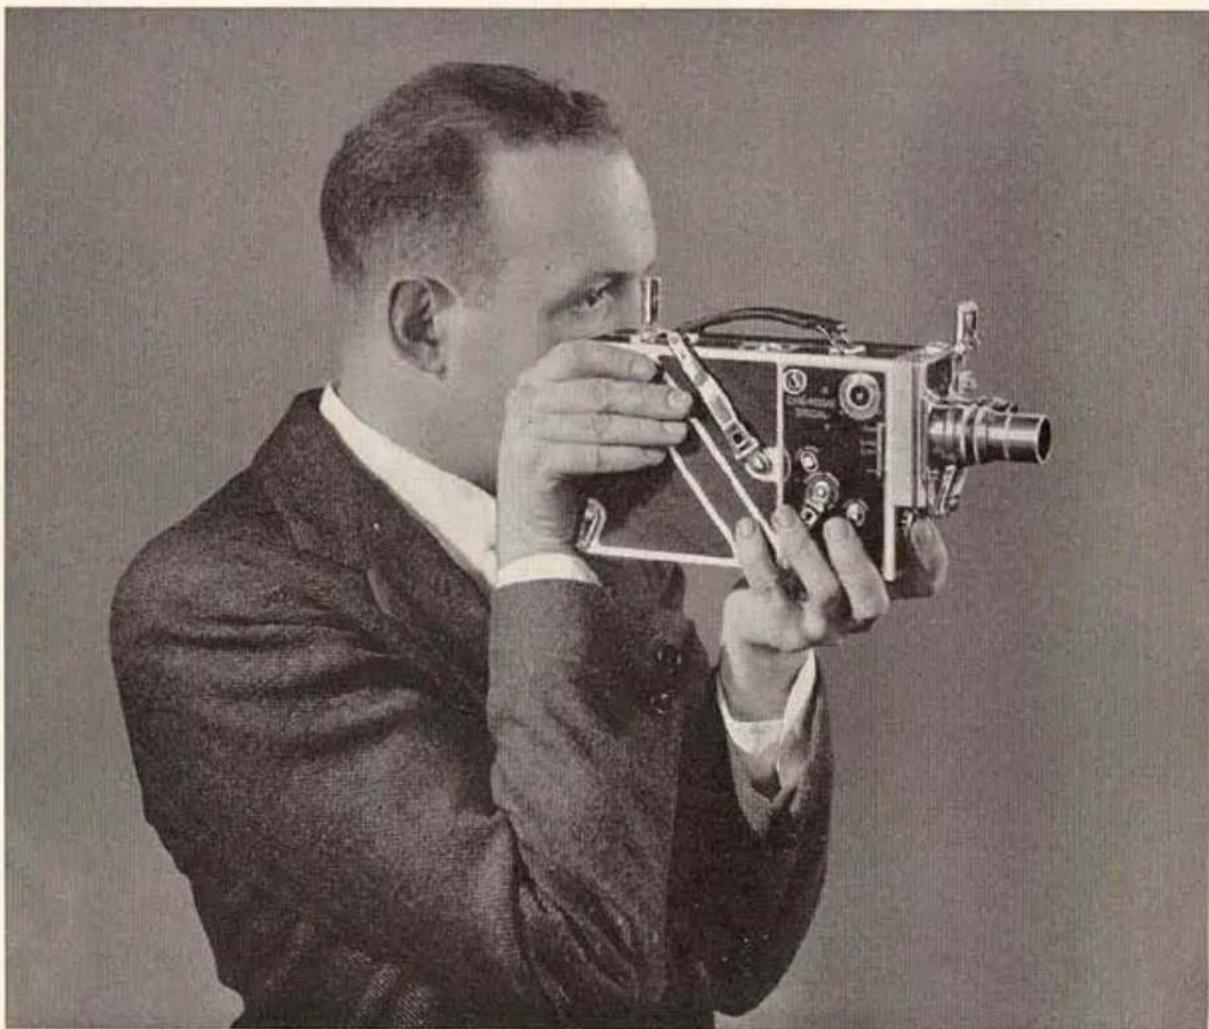
Black-and-white photo of a man in a suit holding a vintage film camera (no visible text or symbols)Fig. 21
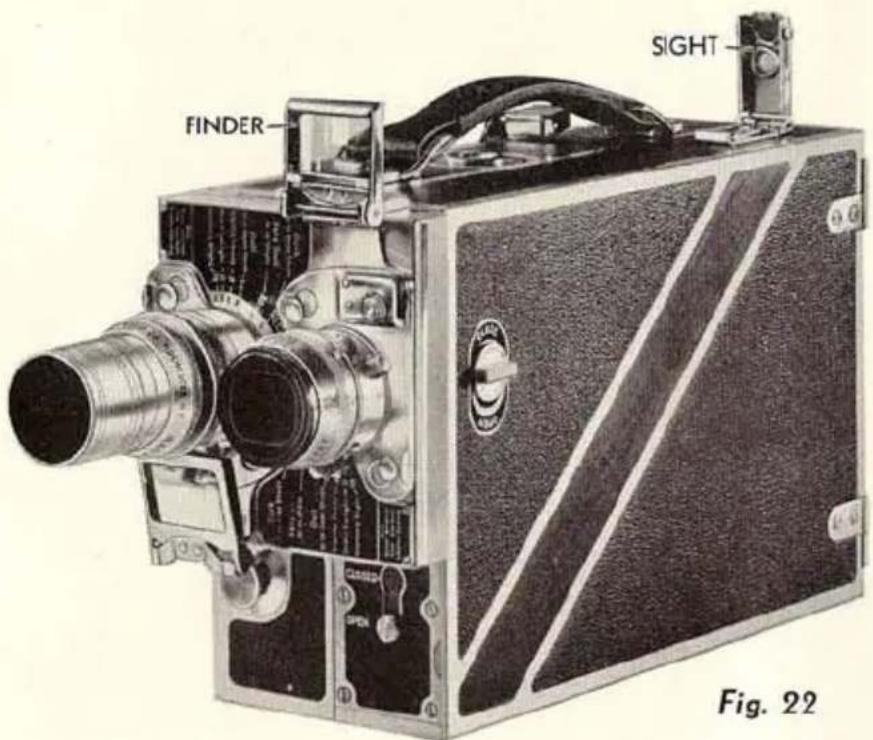
POSITION FOR OPERATING: Raise the FINDER and SIGHT to the vertical position (Figure 22, page 24). Hold the camera as shown in Figure 21, with the right hand bracing the camera against the face.
MAKING THE EXPOSURE: Hold the camera steady.
With the first or second finger of the left hand, push the EXPOSURE BUTTON (Figure 19, page 20) all the way in, holding it there until you wish to terminate the scene. Unless you are photographing long continued action, a ten-second exposure is effective for average scenes.
The EXPOSURE BUTTON can be locked in running position by pushing it in and down. To unlock, push button up, then release. For ordinary hand work it is not desirable to have the button locked.
GENERAL INFORMATION
Holding the Camera Steady
A FUNDAMENTAL principle of all cinematography is camera steadiness. We cannot too often repeat, nor too firmly emphasize, the importance of holding the Ciné-Kodak steady. Remember, the best pictures are made on a tripod—so that the more nearly you approach tripod rigidity, the better your pictures will be.
Audible Shutter Warning
When the Ciné-Kodak Special is run with the SHUTTER LEVER at CLOSED, a loud buzzing noise will be heard. This serves as a warning that the shutter is closed and that no attempt should be made to take pictures without further adjustment. After a “fade-out,” a winding-back operation, or any manipulation which involves closing the shutter, it may happen that the next scene is started with the shutter still closed. If this occurs, the audible signal is heard. It is then necessary to wind the film back to the last starting point, open the shutter, and start again. Thus there need be no film wastage or failure to photograph the desired scene.
When the film is being wound backward for a lap dissolve or a double exposure, the audible signal will be heard if the shutter is closed as it should be.
Finder
The eye-level finder consists of two parts; the FINDER proper, which is attached to the mount of the 1-inch f.1.9 lens and to the adapters for the 15 mm. f.2.7 wide-angle lens and telephoto lenses; and the SIGHT located on the top of the camera, to the rear (see Figure 22, page 24).
In the SIGHT there is a small lens. This lens should be pushed down and not used with the finder attached to the adapter for the telephoto lenses. The lens of the sight should be pushed up and used with the finders on the regular 1-inch f.1.9 lens and the 15 mm. f.2.7 wide-angle lens.
When the eye-level finder is used for making close-ups, it is necessary to correct for parallax. Since the finder necessarily is separated from the camera lens, it "sees" a slightly different view or field than is
recorded on the film. This error is called parallax. For distant and medium scenes the parallax is negligible, but it becomes noticeable in close-ups.
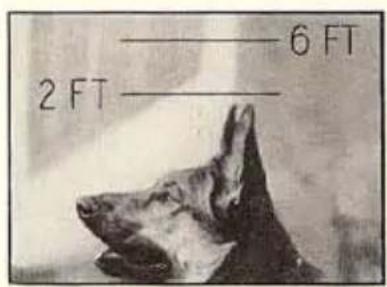
As shown in eye-level finder.
natural_image
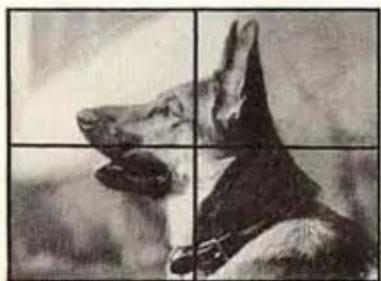
Black-and-white photo of a dog's head and neck in profile, divided into four quadrants (no text or symbols)As seen in reflex finder.
natural_image
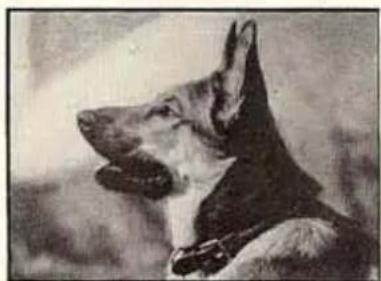
Black-and-white portrait of a German Shepherd dog (no text or symbols visible)As recorded on film.
To compensate for parallax, "6 FT." and "2 FT." lines are etched on the finder lens of the 1-inch f.1.9 lens. They show the top of the picture when the subject is 6- or 2-feet, respectively, from the camera. The finder lens of the adapter for the 15 mm. f.2.7 wide-angle lens is marked: 4 ft. and 2 ft., and the adapter used with the telephoto lenses has masks with pointers that accomplish the same purpose.
When using the 200-foot film chamber, the SIGHT is located on the side of the film chamber, and there is a PERISCOPIC FINDER on the front of the chamber which must be swung into position as shown in Figure 15, page 14, and used with the regular finder on the lens or the adapter.
Exposure
CAMERA SPEED: FIXED AT 16
SHUTTER: OPEN
The density of the finished film depends upon the exposure given as it runs through the camera. Too much exposure produces a picture that is too light; insufficient exposure gives a picture that is too dark.
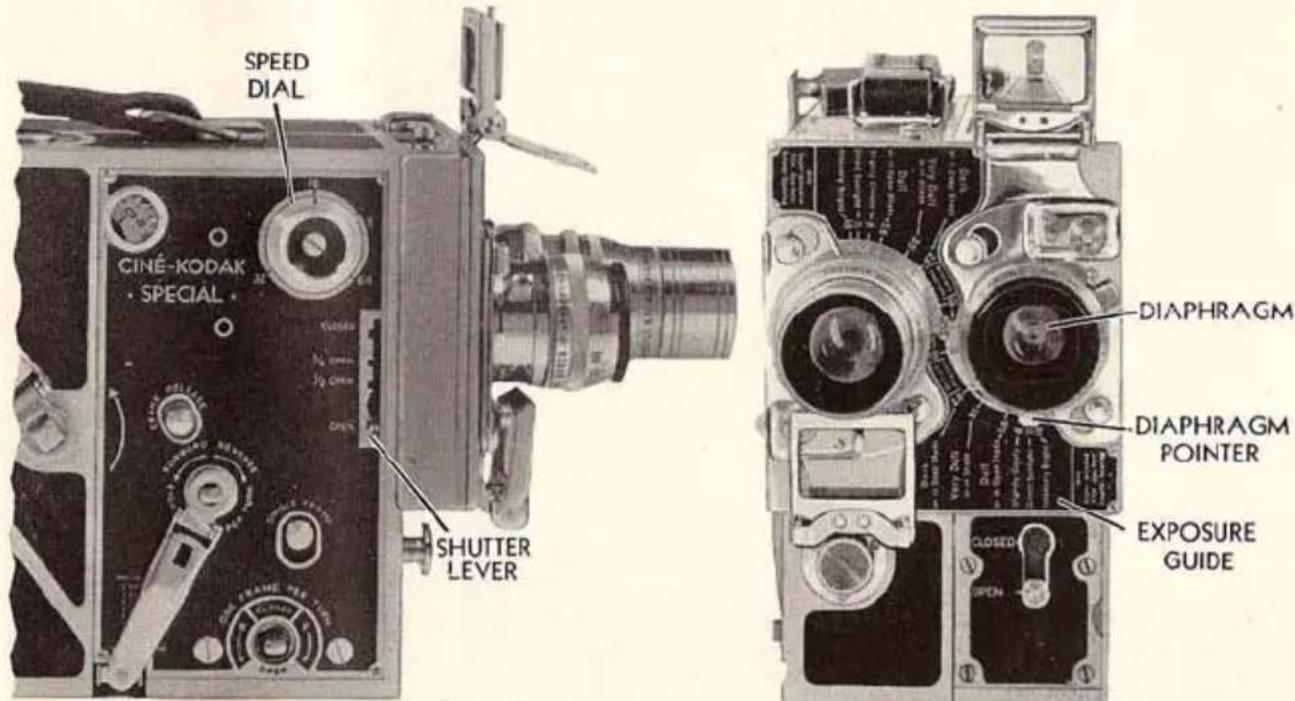
Fig. 23
Exposure can be varied either by changing the camera speed, or the shutter opening, or by altering the size of the diaphragm in the lens. SPEED and SHUTTER control the duration of exposure, while the DIAPHRAGM controls the brightness of the image on the film.
With the camera SPEED DIAL at 16, and the SHUTTER LEVER at OPEN, the exposure is of standard duration. This simplifies exposure,
leaving the DIAPHRAGM as the only exposure control (Figure 23, page 25).
The table on page 76 and the EXPOSURE GUIDE on the front of the camera give the proper diaphragm settings for the regular Ciné-Kodak Panchromatic Film when the camera is run at normal speed (16) and when the shutter is set at OPEN.
CAMERA SPEED: VARIED
SHUTTER: OPEN
CAMERA speed is controlled by turning the SPEED DIAL (Figure 23, page 25) until the index line is at the dot nearest to the figure indicating the desired speed.
Camera speed controls the speed of the action on the screen. Changing the camera speed alters the exposure, necessitating changed diaphragm to rectify the exposure. Probably the only time you will use camera speed as an exposure control will be when using speed 8 to prolong exposure where lighting conditions are very poor. When this is done you sacrifice normal action, so you must warn the subject to move slowly to avoid rapid, jerky motion pictures.
When the camera speed is increased, each frame on the film remains behind the lens for a shorter time; thus, exposure is decreased. If you decide to use speed 32 instead of speed 16, you cut the duration in half. Therefore, to give the film sufficient exposure, you must let twice as much light pass through the lens by using one diaphragm larger than the EXPOSURE GUIDE recommends for normal speed (16); if f.11 is recommended, open up to f.8.
RULE: For each step increase in camera speed, increase the size of the diaphragm opening by one stop.
Similarly, for each step decrease in camera speed, decrease the size of the diaphragm opening by one stop.
See page 35 for a more comprehensive description of camera speeds.
One of the uses of the variable shutter is that of an extra exposure control. This is explained more fully on page 36.
Focus
SHARPNESS or definition refers to the outlines of the image. When these outlines are sharp, the picture is in good focus. A camera lens is focused by moving it to and from the film. On the lenses for the Ciné-Kodak Special this is accomplished by rotating the FOCUSING COLLAR until the figure showing the distance in feet from camera to subject is at the INDEX LINE (Figure 24).
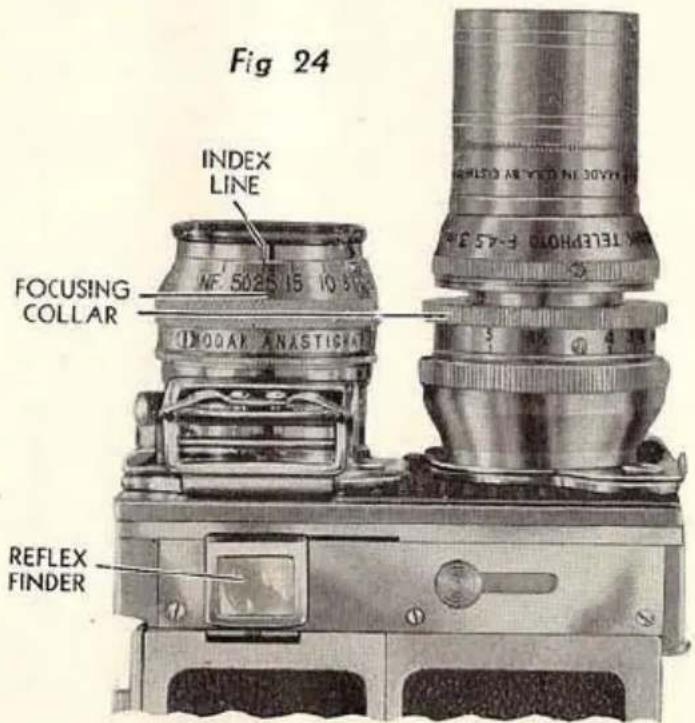
Another method of focusing the Ciné-Kodak Special is to use the REFLEX FINDER and to focus visually. This obviates estimating distances. Use of the reflex finder is described on page 42.
DEPTH OF FOCUS: When the lens is focused on a given distance, objects somewhat nearer and farther than that distance, will be in good focus. This range is called depth of focus or range of sharpness.
This depth is greater the smaller the diaphragm used. For example, the 1-inch f.1.9
lens wide open, focused at 6 feet, has a depth from 5 to 7 feet. Objects not in that range will be blurred. But when the smallest opening (f.16) is used, the depth increases so that objects from 212 feet to infinity are sharp.
When poor light conditions compel the use of a large diaphragm, care must be taken in estimating distances to avoid out-of-focus pictures.
With the smaller openings (f.5.6 and smaller), depth is so great that the 1-inch f.1.9 lens can be used as a “fixed-focus” lens when set on 25 feet. Even with these small openings, however, it is necessary to focus accurately for close-ups. Depth of focus is much less for near distances than for far.
Another factor affecting depth is the focal length of the lens. Lenses of short focal length have greater depth, while lenses of long focal length have less depth. The telephoto lenses require very accurate focusing, even when the smaller diaphragms are used.
Miscellaneous Notes
TEN SECONDS or about four feet of film are usually sufficient for scenes in which the action is not changing in character.
For good composition, do not allow the horizon to cut the picture exactly in half.
When making a distant view, the best effect is obtained by having a nearby object in the foreground.
Be careful not to get a drop of water on the lens as it will cause a blurred picture.
When making an exposure, do not tip the camera sideways.
It is sometimes necessary to panoram; that is, to move the Ciné-Kodak horizontally or vertically while photographing landscapes, large buildings, etc. To panoram successfully, hold the camera steady and move it very slowly and evenly. You can hardly panoram too slowly. The slow panoram is not used, however, when there is a subject that is to be followed and shown in action, such as races, etc. Here, the camera should be so moved as to keep the subject in the center of the finder.
Important Rules
-
Never try to take a picture with the shutter closed. A loud buzzing noise will be heard if exposures are attempted with the shutter closed.
-
You cannot run the camera with aperture cover closed.
-
Hold the camera steady.
-
Focus the lens and set the diaphragm before each scene.
-
Set shutter at OPEN and camera speed at 16 for average scenes.
-
When camera speed is changed, open diaphragm one stop for each higher speed.
-
Panoram very slowly and evenly, except when following a moving object.
-
When using the reflex finder, it is desirable to use the lens wide open to obtain the brightest image. Be sure to reset the lens for proper exposure before taking pictures.
TURRET HEAD
THE TURRET HEAD, which acts as a lens holder, enables the user to have two lenses of different focal lengths instantly available.
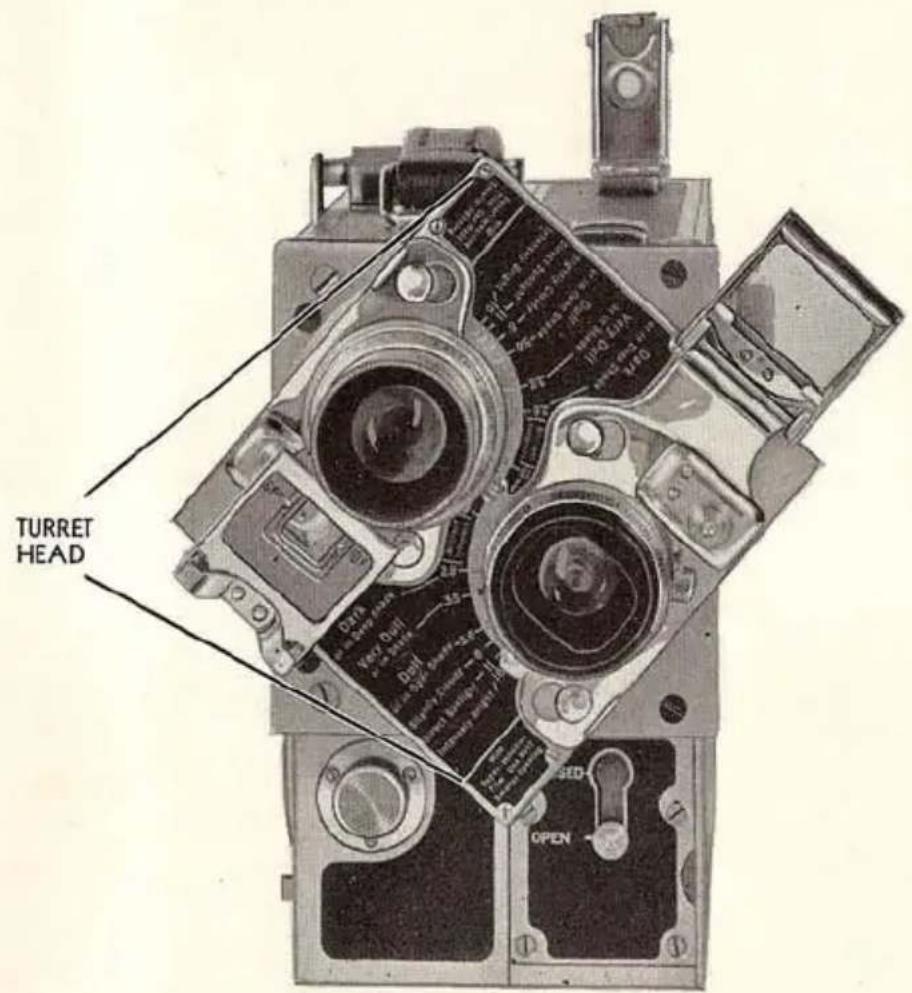
Fig. 25
Figure 25 shows the TURRET HEAD turned at an angle.
The turret is turned by grasping either of the lenses or the turret itself and rotating it until the desired lens is on the film chamber side of the camera.
In rotating the turret it will be noted that when either lens comes in front of the aperture, the turret snaps into position.
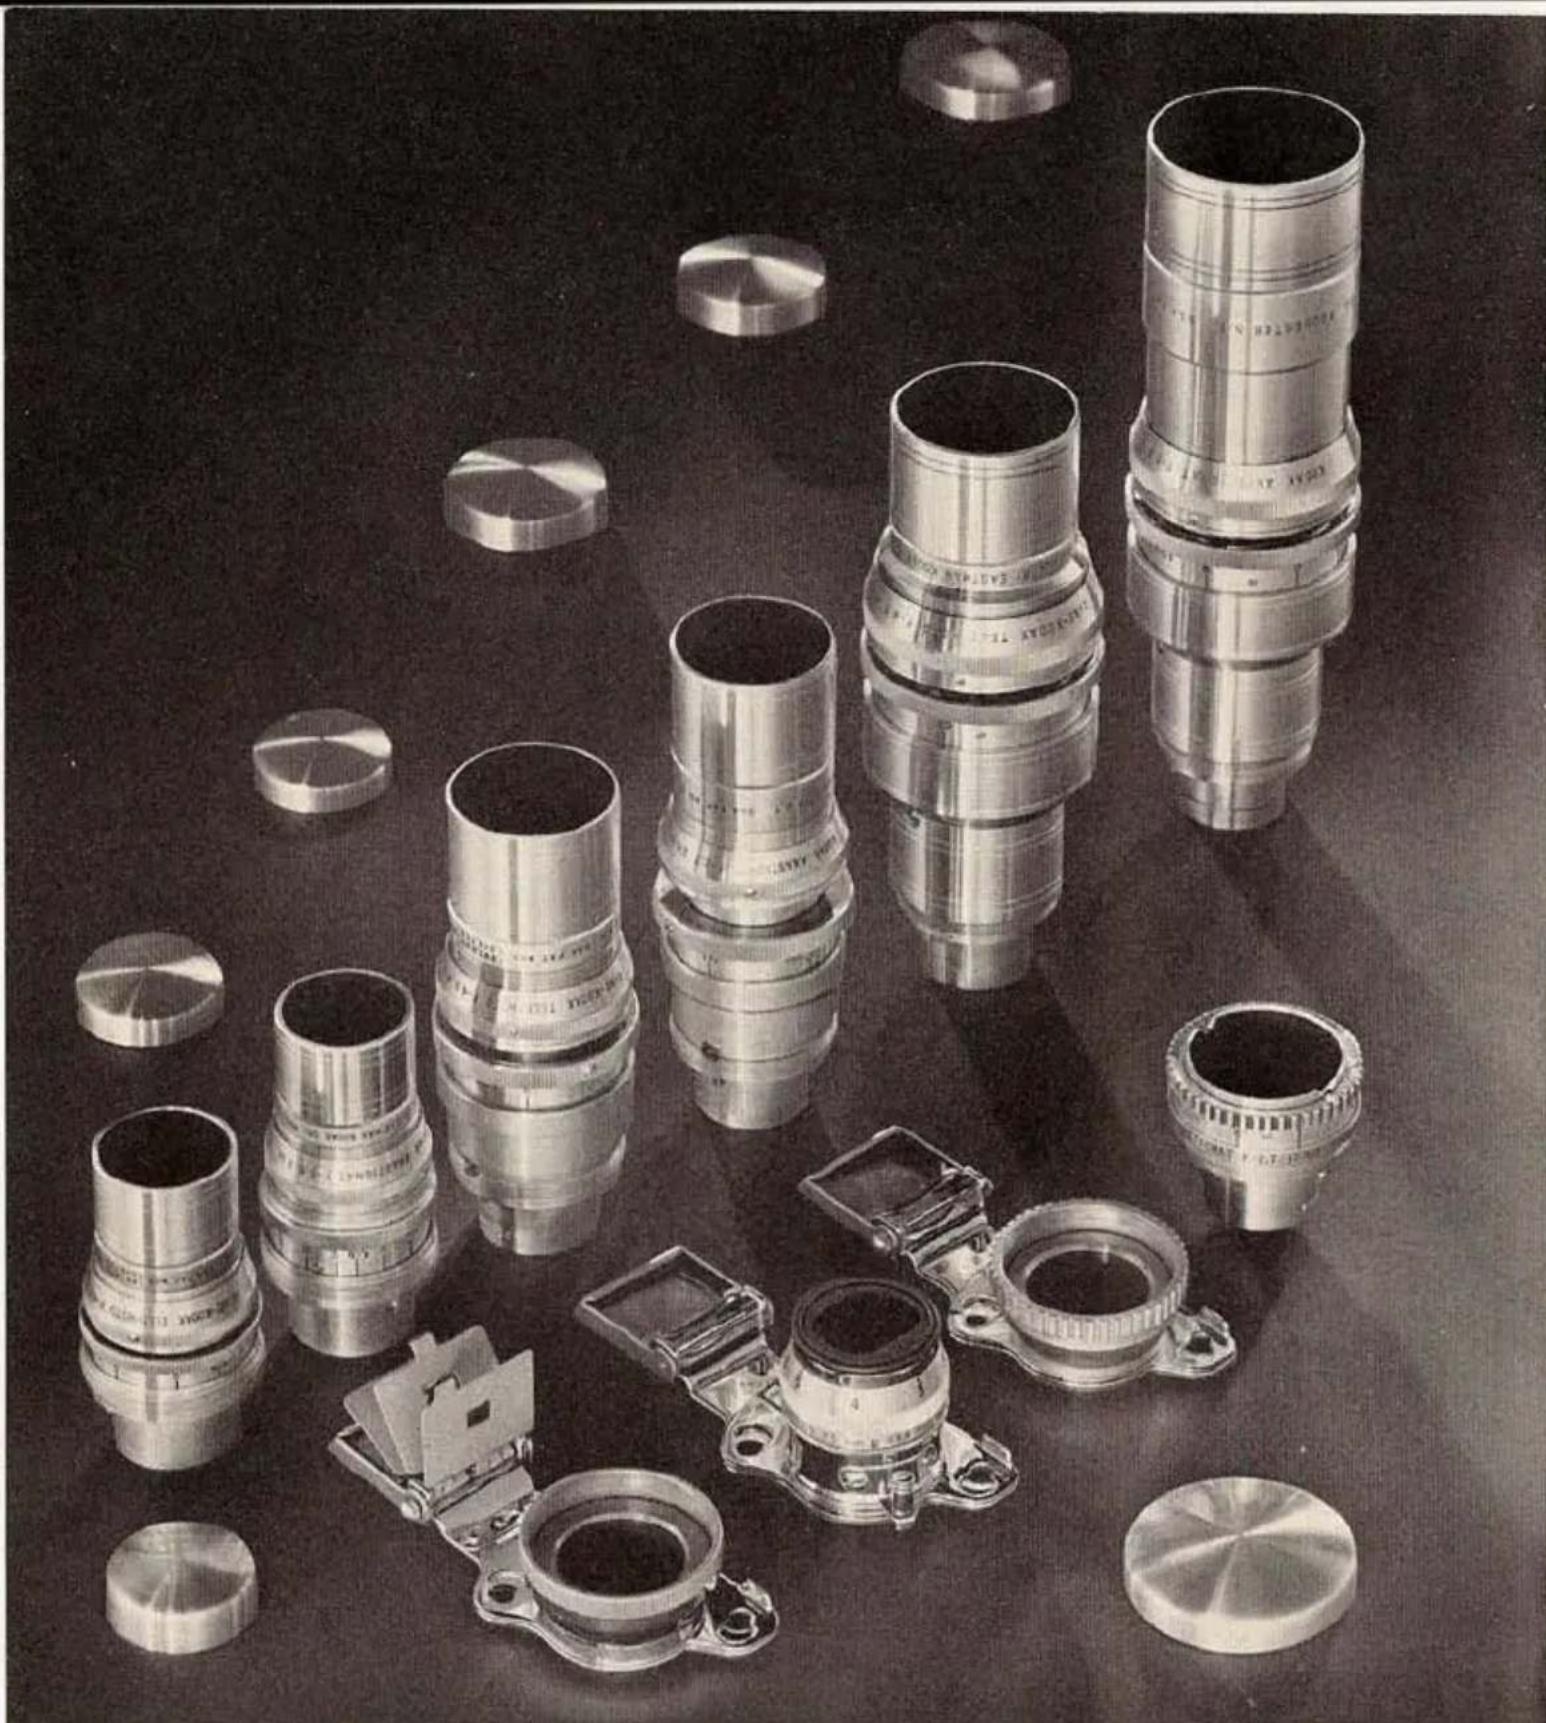
natural_image
Collection of various camera lens components and accessories displayed on a dark surface (no text or symbols visible)Fig. 26—The eight lenses and two adapters regularly available for use with the Ciné-Kodak Special.
Lenses of various focal lengths are available for the Ciné-Kodak Special. Figure 26 shows the eight lenses regularly available for use with this camera. Certain pairs of lenses cannot be mounted together on the turret because of their great diameters. Also, when a lens of great focal length is mounted with a shorter lens, the diameter and
Turret Accommodation of Lenses
| Lens in Taking Position | Accompanying Lens on Turret | Satis-factory | Interference |
| 15 mm. f.2.7 wide-angle | 1-inch f.1.9 | X | |
| 2-inch f.3.5 or 3-inch f.4.5 | X | All filters interfere optically | |
| 21⁄2-inch f.2.7, 4-inch f.2.7 41⁄2-inch f.4.5 or 6-inch f.4.5 | Lens mounts interfere optically | ||
| 1-inch f.1.9 | 15 mm. f.2.7, 2-inch f.3.5 or 3-inch f.4.5 | X | |
| 21⁄2-inch f.2.7 or 41⁄2-inch f.4.5 | X | All filters interfere optically | |
| 4-inch f.2.7 or 6-inch f.4.5 | Lens mounts interfere optically | ||
| 2-inch f.3.5 | All lenses | X | 4-inch f.2.7 and 6-inch f.4.5 lens mounts interfere physically when 2-inch f.3.5 lens is racked out for close-ups |
| 21⁄2-inch f.2.7 | 15 mm. f.2.7, 1-inch f.1.9, 2-inch f.3.5 or 3-inch f.4.5 | X | |
| 4-inch f.2.7, 41⁄2-inch f.4.5 or 6-inch f.4.5 | Lens mounts interfere physically | ||
| 3-inch f.4.5 | All lenses | X | |
| 4-inch f.2.7 41⁄2-inch f.4.5 6-inch f.4.5 | 15 mm. f.2.7, 1-inch f.1.9, 2-inch f.3.5 or 3-inch f.4.5 | X | |
| 21⁄2-inch f.2.7, 4-inch f.2.7 41⁄2-inch f.4.5 or 6-inch f.4.5 | Lens mounts interfere physically |
NOTE: If lenses are racked out beyond the marked focusing range, also if large filter mounts are used, interferences not indicated in the above table may occur.
length of the former is so great as to block the "view" of the shorter lens and will show in the picture. Furthermore, filters on the idle lenses will block the view. This can be noticed in the reflex finder, when using a small diaphragm. The table on page 31 gives the turret accommodations of the various lenses used on the Ciné-Kodak Special.
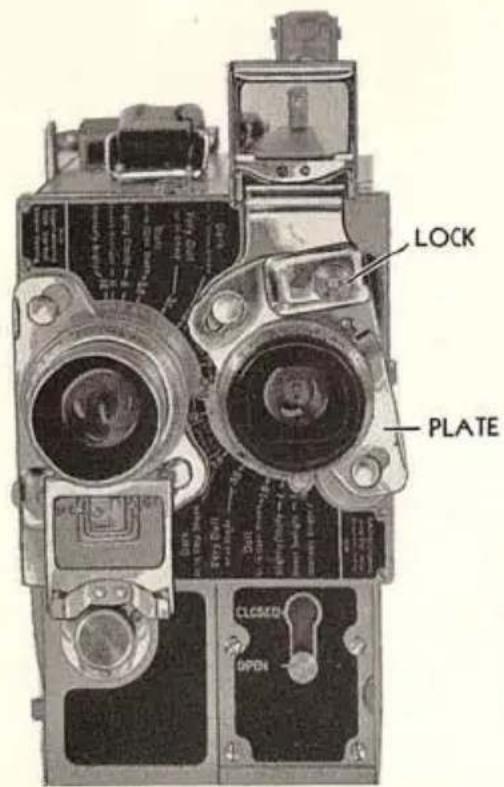
Fig. 27
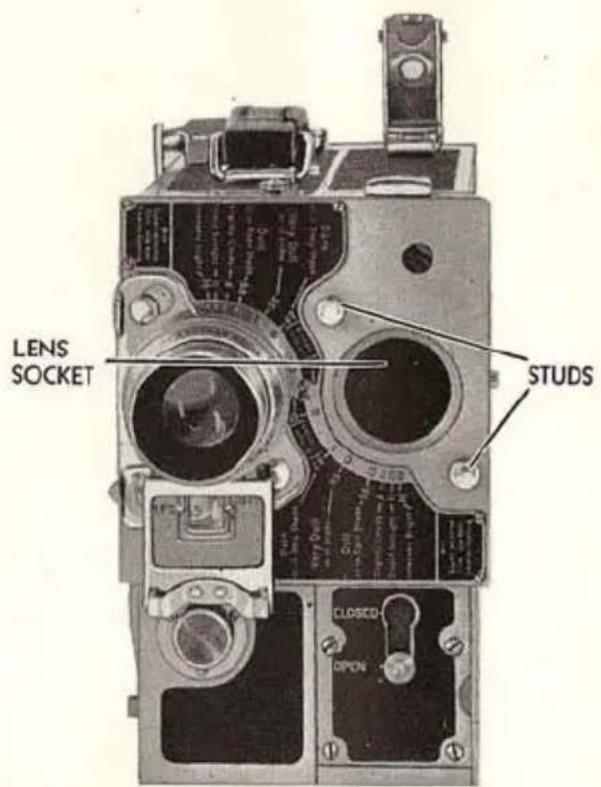
Fig. 28
HOW TO REMOVE AND ATTACH LENSES: Remove the protective cap and plug before attaching lenses. To remove a lens from the turret, push the LOCK up and to the left, so that the PLATE will be at an angle, as shown in Figure 27.
To attach a lens, place the lens or suitable lens adapter over the LENS SOCKET in the turret with the two holes in the PLATE over the STUDS in Figure 28. Press the PLATE firmly against the turret and push it back to the vertical position. Make sure that the LOCK snaps into place.
The 15 mm. f.2.7 wide-angle lens and the telephoto lenses are supplied in individual mounts with focusing and aperture collars, but
without front finders showing their individual fields. These lenses are attached to the Ciné-Kodak Special by means of an adapter. One adapter can be used with the 2-inch, 2½-inch, 3-inch, 4-inch, 4½-inch, and 6-inch lenses. A special adapter is needed with the 15 mm. f.2.7 wide-angle lens, because it requires a different lens in the finder.
The adapter used with the six telephoto lenses has a glass view finder for the 2-inch lens, and hinged masks to indicate the fields covered by any three of the 212 -, 3-, 4-, 412 - and 6-inch telephoto lenses. When the adapter is attached to the turret head as described above, any of the six telephoto lenses may be securely seated in it by sliding the lug on the lens into a slot in the adapter and tightening its rotating collar. Full instructions are included with each lens.
LENS SPEED: The “speed” of a lens is designated by the ratio of its largest diaphragm diameter to its focal length. Thus, a “fast” lens has a large diameter in relation to its focal length. The smaller the “f.” number, the “faster” the lens. When comparing “f.” values for relative speeds, the numbers must be squared.
USES OF VARIOUS LENSES: The magnification of the image depends upon the camera distance and the focal length of the lens.
With any one lens, the size of the image can be changed by moving the camera away from or closer to the subject.
Since it is often not convenient nor even possible to approach or withdraw from the subject, it is necessary to use a lens of different focal length. Lenses of short focal length take in a wide angle of view; lenses of long focal length, a narrow angle.
Unsteady screen results caused by camera movement increase with the focal length of the lens. Always use a tripod with the 2½-inch, 3-inch, 4-inch, 4½-inch and 6-inch telephoto lenses.
In general, the uses of the various lenses are:
15 MM. f.2.7 WIDE-ANGLE LENS: For including a large area in confined quarters. Valuable for interior work. Also useful in photographing buildings, where trees obstruct the view.
1-INCH, f.1.9 LENS: This is the lens regularly supplied as it is best for general work.
2-INCH, f.3.5 LENS: The focal length of this lens is sufficient to give good telephoto effects, yet not too long for hand-held use when extreme care is exercised in holding the camera steady.
2½-INCH, f.2.7 LENS: With this lens excellent telephoto effects can be obtained; its largest opening (f.2.7) permits making exposures under very poor light conditions.
3-INCH f.4.5 TELEPHOTO LENS: This lens with the f.1.9 lens make an ideal combination for turret use, permitting medium shots of subjects followed by "close-ups" without changing camera position. The 3-inch lens is useful for athletic events also. It gives a larger image than the 212 -inch lens, yet is not bulky when mounted on the turret.
4-INCH f.2.7, 4½- AND 6-INCH f.4.5 TELEPHOTO LENSES: With these long focus lenses quite distant objects appear to be at very close range. At a distance of 100 feet the field of the 4-inch lens is 7 by 9½ feet, the field of the 6-inch lens is about 4½ by 6 feet. These lenses are very useful in filming natural history subjects or for taking "candid" close-ups of people at a distance.
CLOSE RANGE WORK: To work closer than the focusing scales permit, write for instructions on adjusting the lenses. For even greater magnification send for particulars on auxiliary lenses and lens extension tubes.
FOCUSING TELEPHOTO LENSES: Extreme care must be used in focusing these lenses, because the depth of focus is so limited. Use the reflex finder as described on page 42.
EXPOSURE WITH TELEPHOTO LENSES: The largest diaphragm on the 3-, 4½- and 6-inch telephoto lenses is f.4.5, on the 2-inch lens it is f.3.5. Follow the exposure table on page 76 or the exposure guide on the camera, substituting f.4.5 for f.3.5. Pictures can be made on Dark Days or in Deep Shade (requiring f.2.8 in the exposure table on page 76) by setting the diaphragm at f.4.5 or f.3.5 and using a camera speed of 8. The largest diaphragm on the 2½- and 4-inch lenses is f.2.7 which makes it possible to use the normal speed (16) under poor light conditions.
CAMERA SPEEDS
For correct exposure, be sure to change the diaphragm when you change the camera speed. For each full step increase in camera speed, increase the diaphragm opening one stop. The dot between speeds 16 and 32 is speed 24. It is not marked as it is not a full step.
When motion pictures are taken and projected at the same speed, the action appears normal. The standard speed of taking and projecting home movies is 16 frames per second.
By means of the variable speed feature on the Ciné-Kodak Special, the action of the original subject can be slowed down for analysis or speeded up for comic effects. Camera speed is controlled by the SPEED DIAL shown in Figure 29. By setting the dial at 64, for instance, 64 individual frames are taken every second, or four times as many as normally.
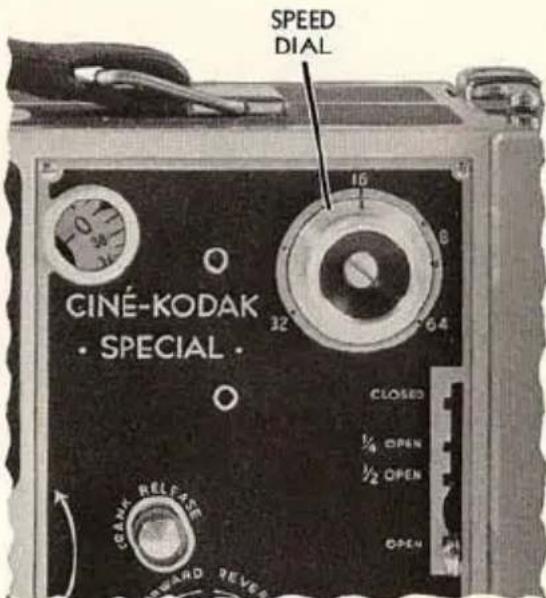
Fig. 29
Suppose it takes one second for a ball to drop from a certain height. If photographed at speed 64, 4 times the normal number of frames will be exposed. Projected at normal speed, the 64 frames require four seconds. In short, the ball will drop in four seconds instead of one, and the effect is slow motion.
Therefore, the camera is speeded up to make the action slow; slowed down to make the action fast.
Another use of the speed control is to prolong the exposure so that pictures can be made under light conditions necessitating a diaphragm the next size larger than the largest diaphragm opening. With the f.1.9 lens and speed 8, pictures can be made indoors even on dull days, provided the subject is near a window.
When slow motion pictures are desired, use speed 32 or 64, depending upon the amount you want the action slowed down. Use speed 8 for comic rapid action pictures or for prolonging the exposure when the light is unfavorable.
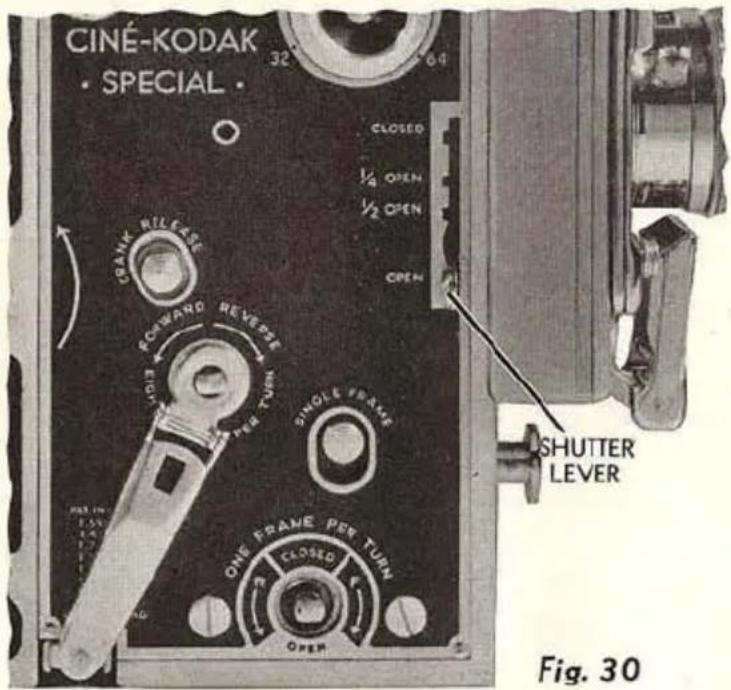
VARIABLE SHUTTER
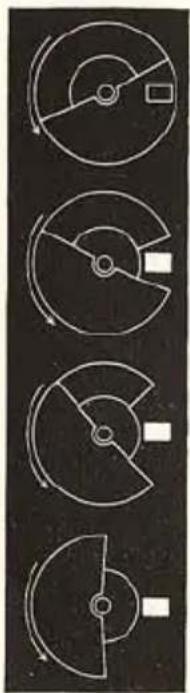
THE shutter opening is controlled by the SHUTTER LEVER, Figure 30. EXPLANATION: The shutter, a disk that rotates between lens and film, has an opening allowing light to pass only when the intermittent claw is not moving the film, or when the film is in the stationary position. Likewise, the solid portion of the shutter covers the film while it is in motion. Since about 50 per cent of the cycle is required for pulling down the film, about 50 per cent of the shutter must be solid. Figure 31 shows the appearance of the shutter itself when the SHUTTER LEVER is at CLOSED, at
natural_image
Four schematic diagrams of circular mechanical components with no text or symbolsFig. 31
CLOSED
1/4-OPEN
1/2-OPEN
OPEN
14 -OPEN, at 12 -OPEN and at OPEN.
The size of the shutter opening as well as the speed of rotation determines the duration of exposure.
USES: For the sake of simplicity, most users will prefer to control exposure with the diaphragm and the camera speed, eliminating the variable shutter by always using it at the OPEN position, except when making fades or dissolves described under Operation on the Ciné-Kodak Tripod, page 41. For many pictures the variable shutter will be helpful; these are listed on the following page.
AS AN EXTRA EXPOSURE CONTROL: There may be very unusual conditions where the light is so intense that even the smallest diaphragm open-
ing will give overexposure. The exposure can be further reduced either by using a filter, by using a smaller shutter opening, or by combining both.
For example, it is desired to photograph clouds at 8 frames per second to make them appear to move very rapidly. If the camera is pointed at the sun, and if the outline of the sun can be seen through the clouds, overexposure will result at this slow camera speed. Here, the smallest diaphragm, f.16, the CK-3 color filter, and the smallest shutter opening, ¼-OPEN, will be required to cut down the exposure.
FOR SHARP IMAGES: Sharp images of rapidly moving objects (races, waterfalls, etc.) can be obtained by using fastest camera speed (64) and smallest shutter opening ( 14 -OPEN). The exposure time is reduced to a minimum, necessitating good light and a fast lens.
FOR BLURRED BACKGROUNDS: It may be desired, in certain instances, to emphasize the subject in the foreground by throwing the background out-of-focus. This can be done by using a larger diaphragm in the lens to decrease the depth of focus and reducing the shutter opening to avoid overexposure.
MASKS
A set of masks is supplied with the Ciné-Kodak Special (Figure 32). Those that produce various picture shapes, the oval and round masks, can be used with the camera hand-held. A short plug is supplied to pro-
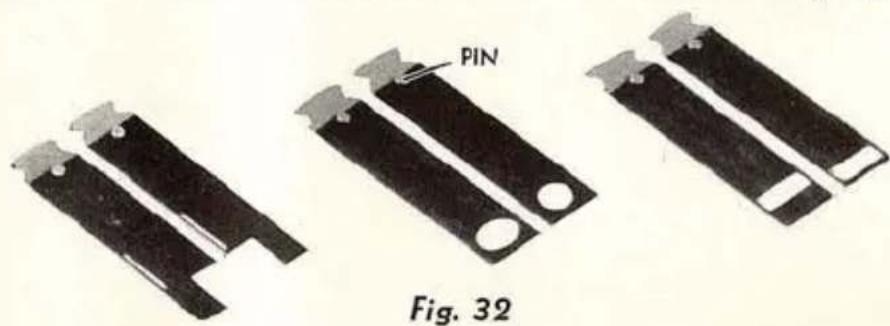
tect the MASK SLOT, Figure 33. It prevents slight fogging that might occur if light shines directly into the mask slot.
Insert the plug with the small depression in the top towards the front of the camera. When inserted backwards, it interferes with the reflex finder.
Keep the plug in the mask slot, whether the film chamber is on or
off the camera, to avoid fogging the film.
To use a mask, hold it with the PIN facing the front of the camera, and push it into the MASK SLOT (Figures 33 and 34), as far as it will go, as in Figure 35.
Keep the important parts of the scene in the center of the picture to prevent obscuring the subject with themask.
The subject should have sufficient light colored areas, to make the shape of the mask clear.
The half-masks are for double exposures see page 52.
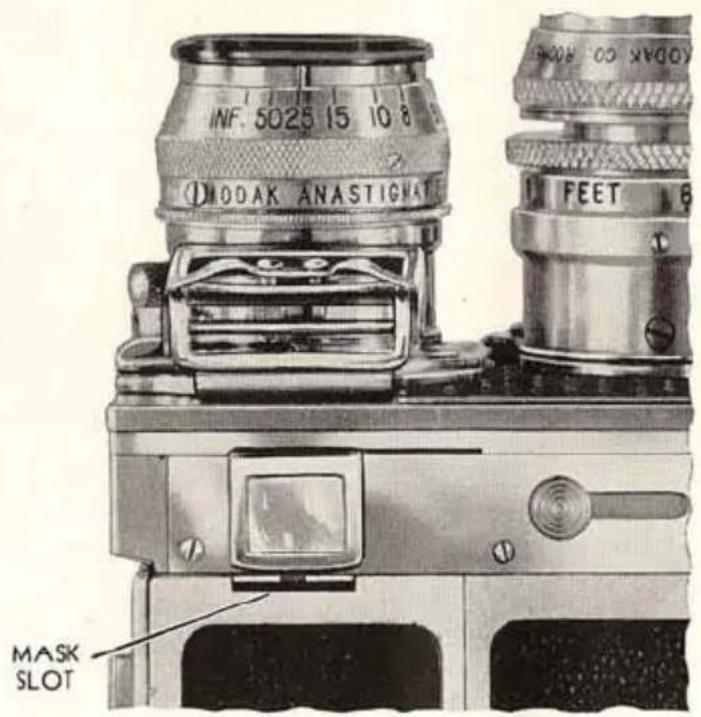
Fig. 33
Keep the masks covered with a thin film of Ciné-Kodak Oil to prevent rusting.
natural_image
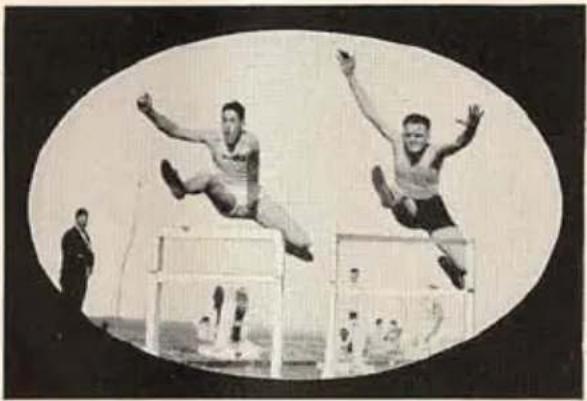
Black-and-white photo of two male athletes mid-air during a competition, jumping over hurdles with spectators in the background (no visible text or symbols)Effect when using oval mask.

natural_image
Black-and-white photo of a seagull in flight against a dark background (no text or symbols)Effect when using round mask.
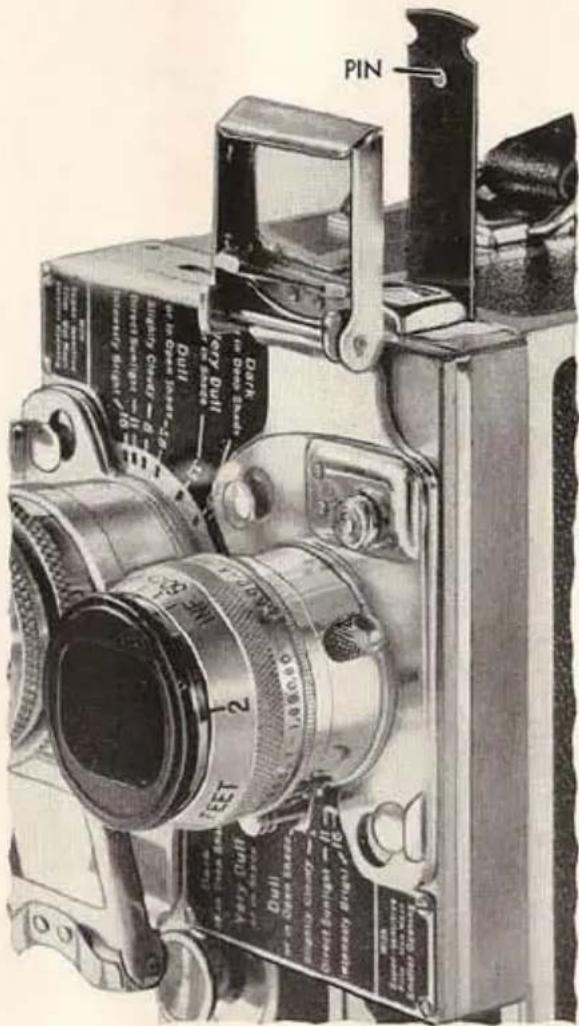
Fig. 34
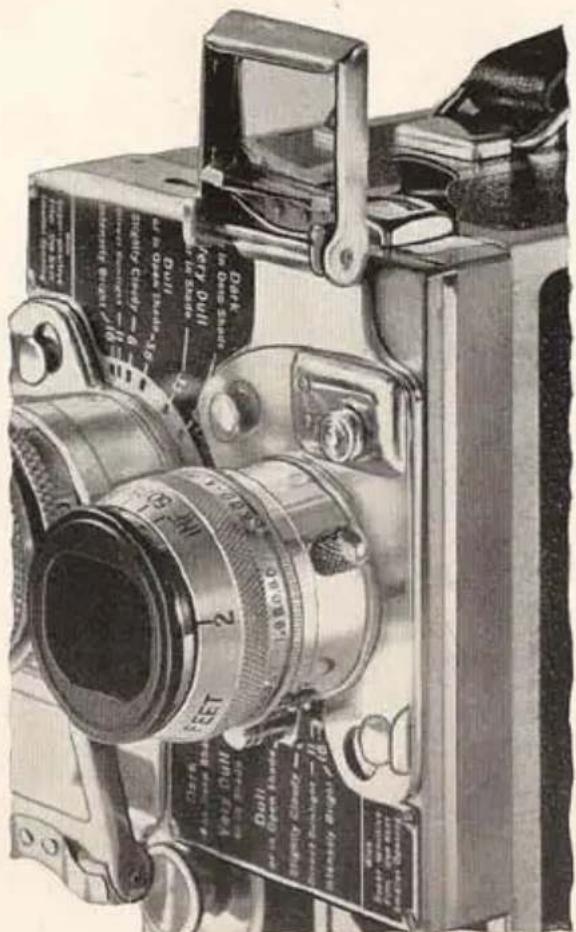
Fig. 35
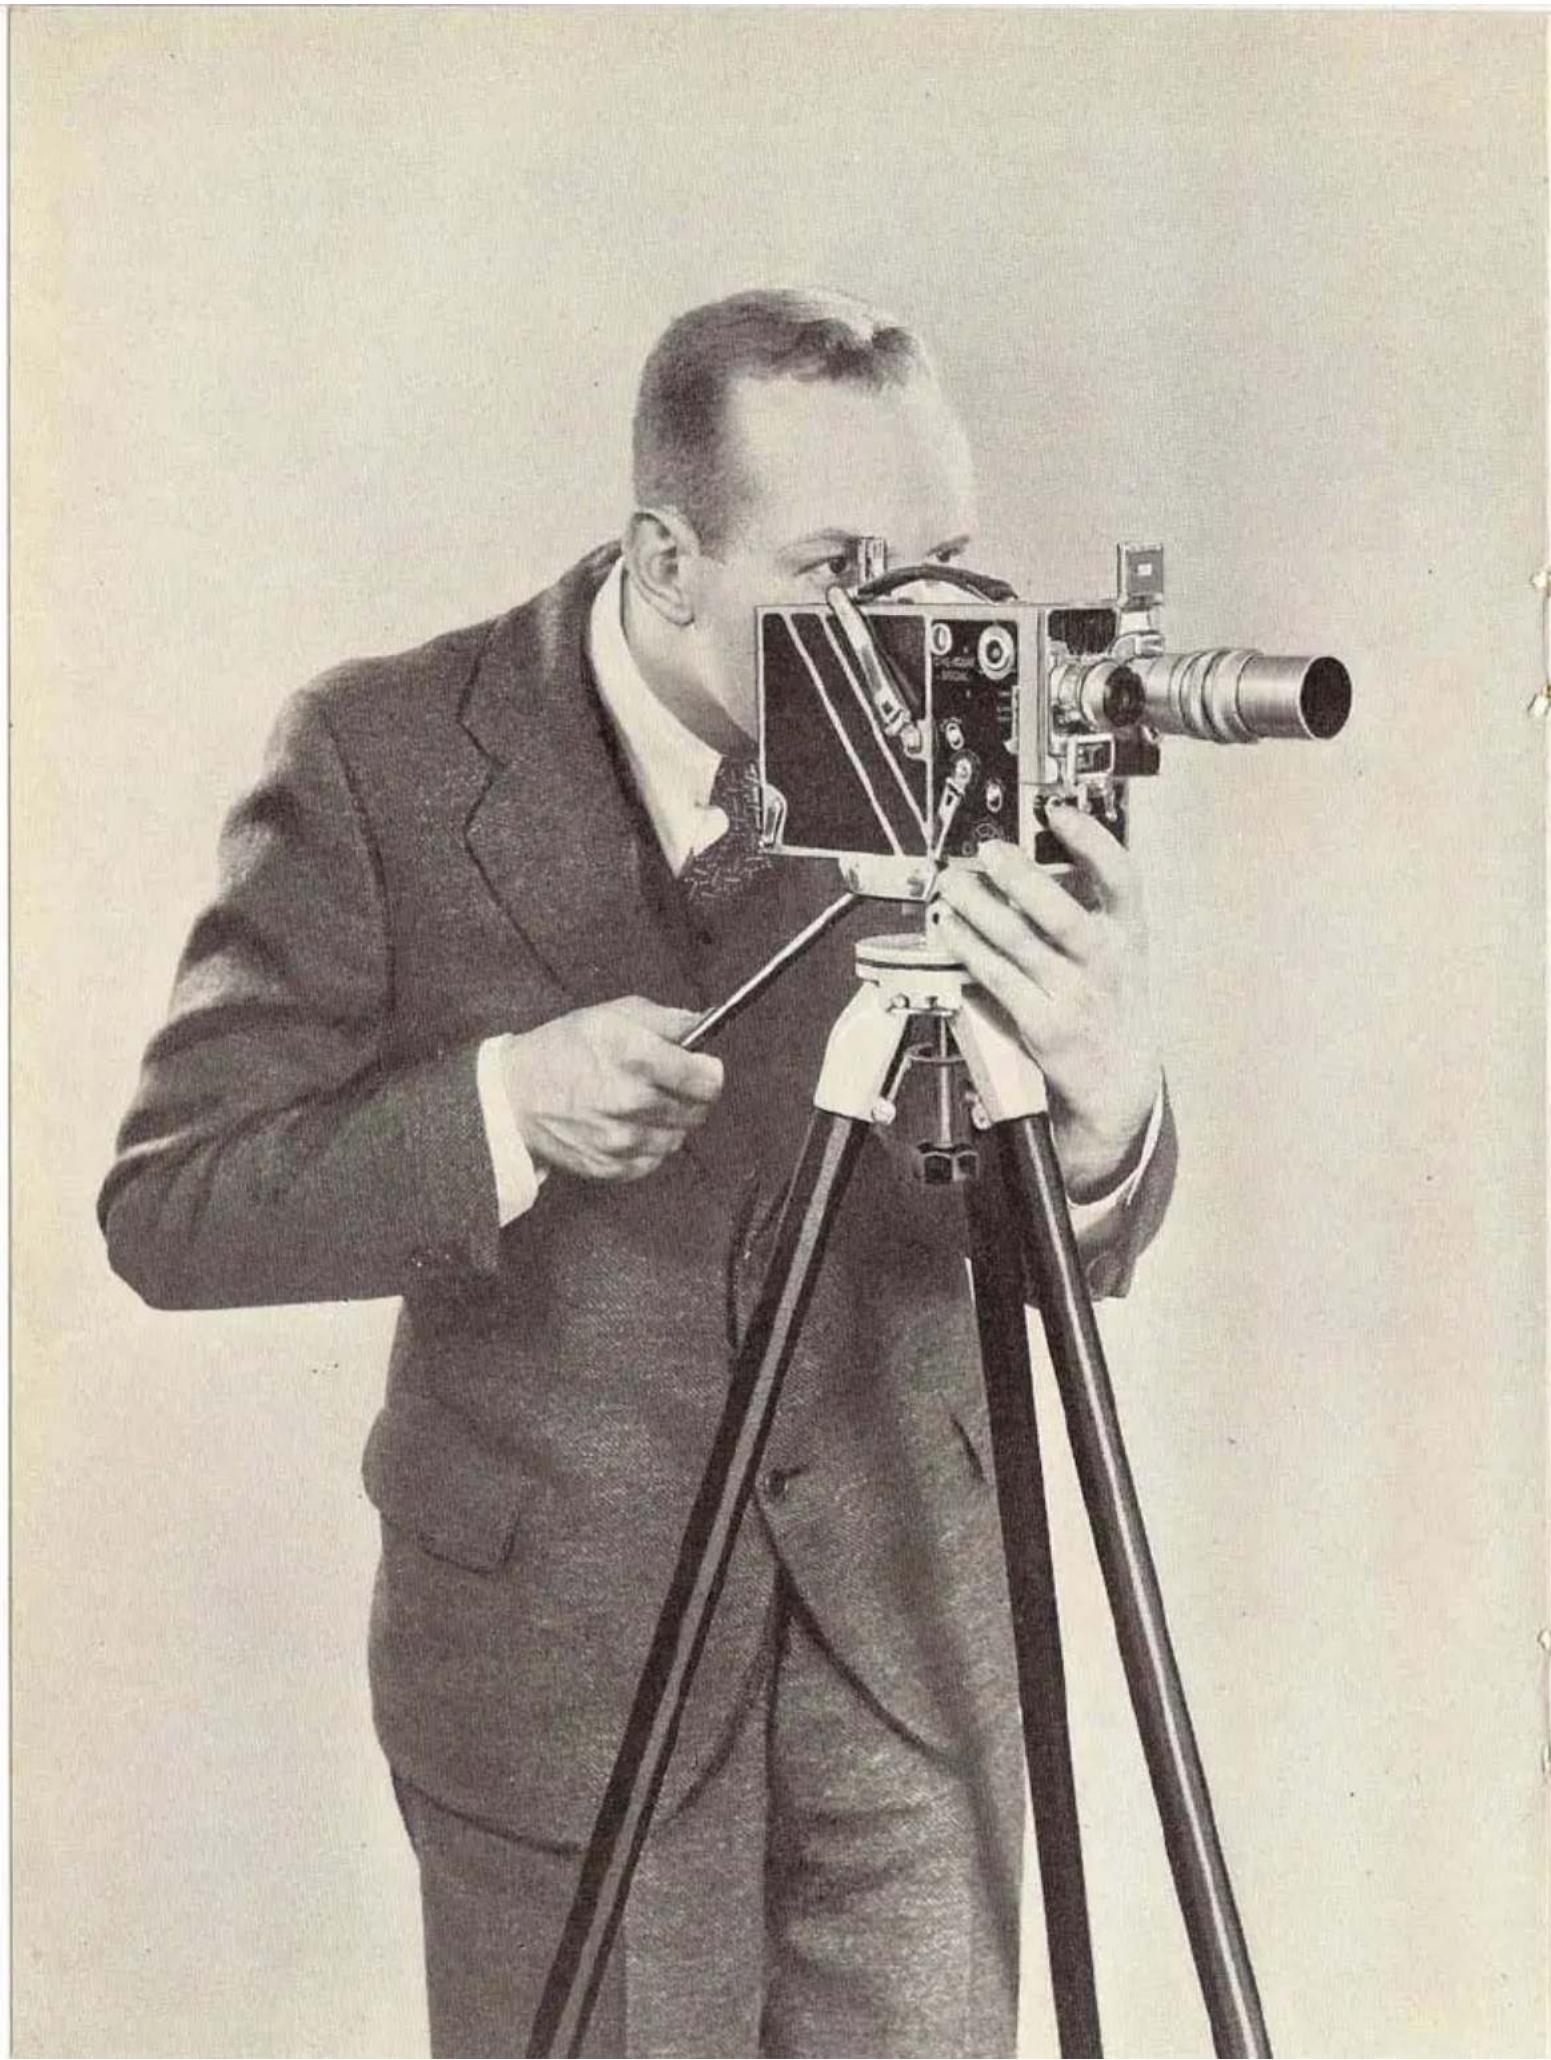
natural_image
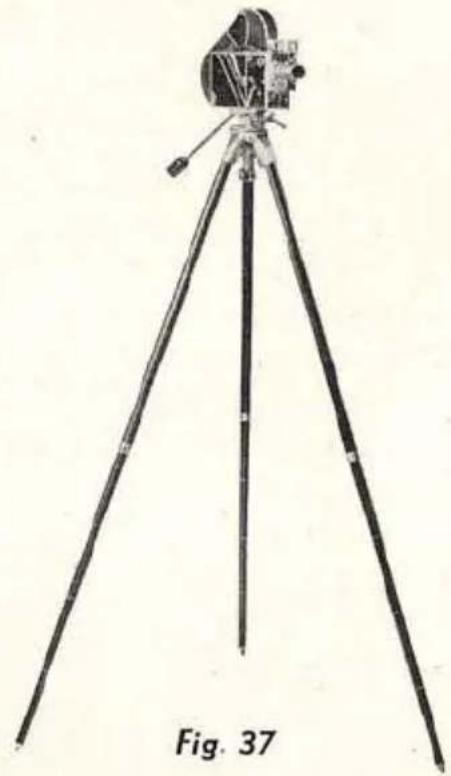
Black-and-white photo of a man in a suit operating a vintage film camera on a tripod (no visible text or symbols)To MAKE full use of the Ciné-Kodak Special's versatility, the camera must be rigidly held. The Ciné-Kodak Tripod has excellent rigidity combined with compactness and light weight. Figure 36 (on opposite page) shows the tripod and camera in use, Figure 37 shows the tripod fully extended, with the camera mounted on it.
Although the Ciné-Kodak Tripod may be used with many cameras, it is designed primarily to provide a support suitable for the Ciné-Kodak Special and the exacting tasks imposed upon it. It is designed to permit interchang- ing the film chambers without removing the camera.
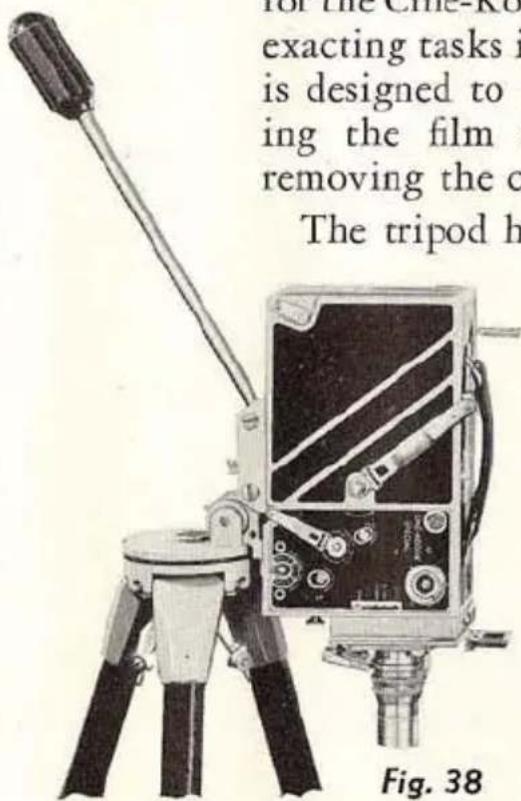
The tripod head can be panoramed horizontally, vertically, and diagonally at any speed, yet can be locked in any position for double exposure and
natural_image
Line drawing of a tripod-mounted surveying instrument with tripod legs and tripod base, labeled Fig. 37 (no text or symbols on the instrument itself)other work where accurate registration is essential. The camera can be pointed straight down (Figure 38), or straight up by mounting it in the reverse position on the platform.
The top sections of the legs of the Ciné-Kodak Tripod are covered with a durable material to match the Ciné-Kodak Special (Figure 39, page 42). The telescoping legs can be extended and then tightened at any point by
Fig. 36
giving them a turn. ETCHED LINES (Figure 39) facilitate lengthening all three legs equally.

Fig. 39
CINÉ-KODAK TRIPOD TRUCK: Mounted on the Ciné-Kodak Tripod Truck the camera and tripod will stand firmly fixed on even the most highly polished floors. A toe brake locks it in position; another pressure of the toe and the brake is released so that the camera can follow action—forward, backward, to either side. It is made in two easily assembled sections.
REFLEX FINDER
THE REFLEX FINDER, Figure 40, is valuable for exacting work because it shows an actual image formed by the camera lens. It is, therefore, free from parallax, described on pages 23 and 24; it also shows the focus visually. It is absolutely necessary for extreme “close-up” work.
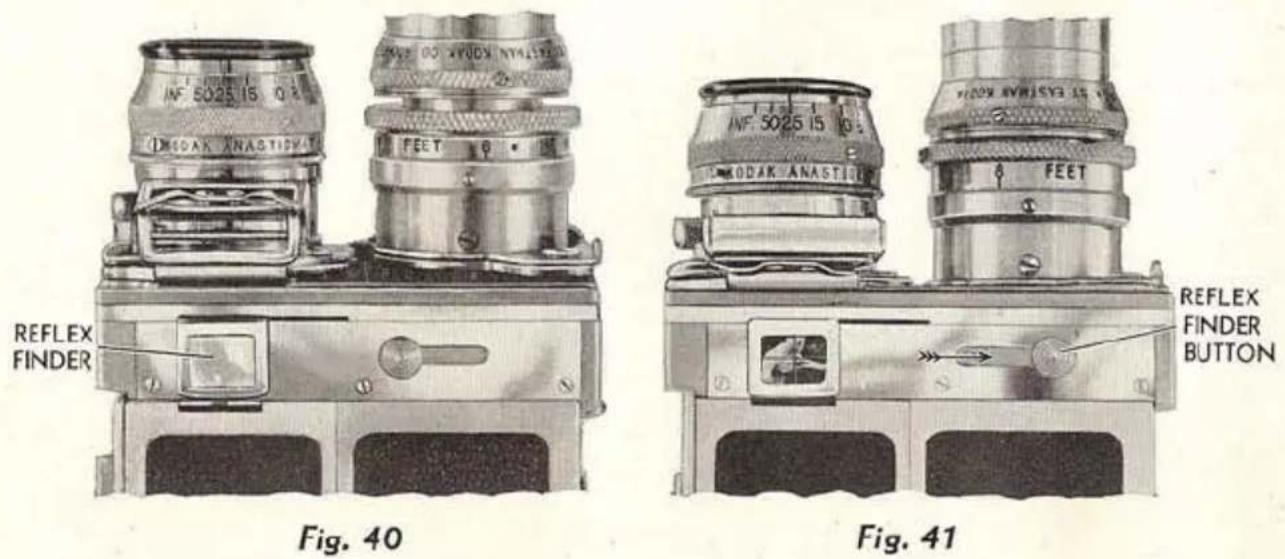
To use the reflex finder, push the REFLEX FINDER BUTTON in the direction of the arrow, Figure 41, until it catches, and then let go. This
uncovers the finder, places a 45^ mirror behind the camera lens, and reflects the image to a ground-glass. When using the sliding magnifier of the reflex finder, the eye should be not more than two inches from the lens of the magnifier.
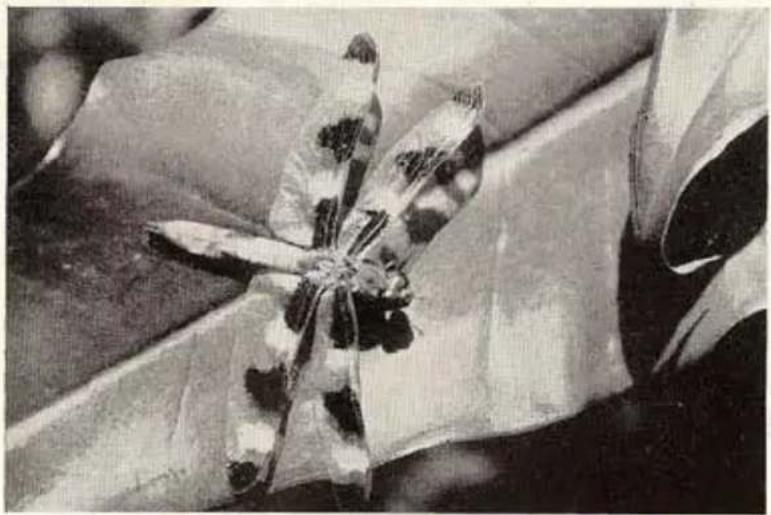
natural_image
Close-up of a dragonfly with patterned wings, partially covered by fabric (no visible text or symbols)Example of a "close-up" where the reflex finder is required.
The mirror blocks the light path from lens to film, therefore:
The reflex finder cannot be used while the camera is running. Never hold it open.
When the camera is started, the reflexfinder is covered and the mirror drops down automatically; the finder cannot be closed until the camera is started.
COMPOSING: The field can be determined before making the exposure to obviate parallax correction for "close-ups." If the image is dim, open the lens diaphragm to its largest stop while composing and focusing.
FOCUSING: The simplest, quickest method of focusing, whenever there is ample depth of focus, is by estimating the distance and setting the focusing scale.
When depth of focus is at a minimum, however, it is a great advantage to focus visually with the reflex finder. Average depth is lacking (1) when the subject is very close, and (2) when using the telephoto lenses.
To focus visually, open the lens diaphragm to its largest opening. Turn the focusing collar until the image on the ground-glass is critically sharp. Then set the diaphragm as required for exposure.
When focusing visually, it is extremely important to go through the focus several times to attain the sharpest image possible; choose a portion of the finder image that will show fine detail, such as hair, weave in fabric, etc.
natural_image
Uniform dark gray textured surface with no visible text, symbols, or distinct features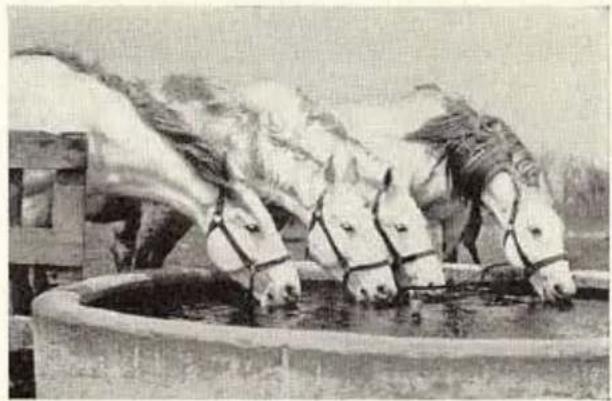
natural_image
Black-and-white photo of horses drinking from a water channel, no visible text or symbols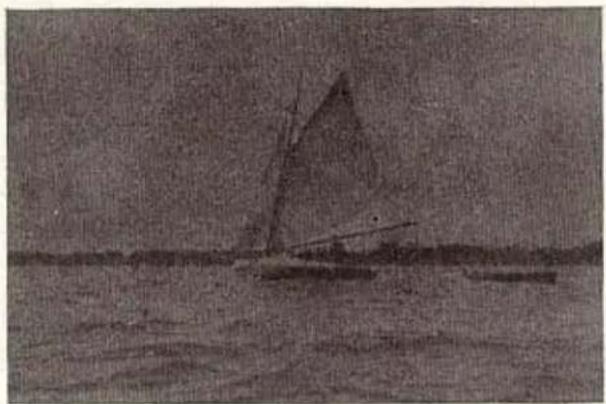
natural_image
Silhouette of a sailboat on water with calm water and distant shoreline (no text or symbols)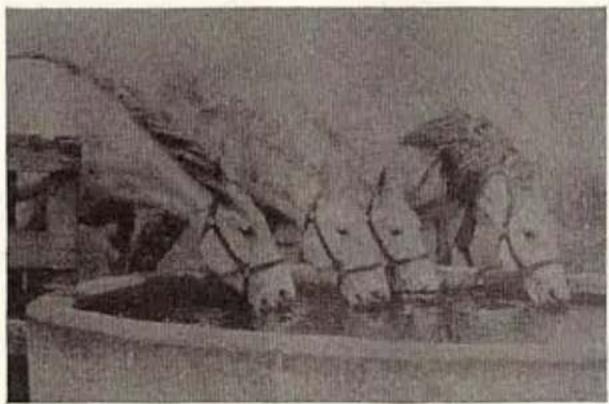
natural_image
Black-and-white photo of two figures in conical hats standing near a large structure, possibly a building or industrial facility (no visible text or symbols)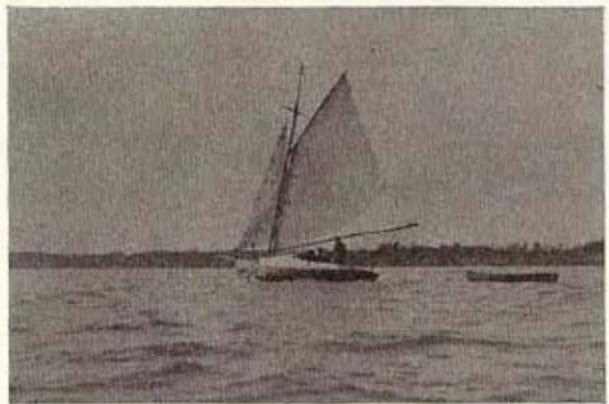
natural_image
Historic black-and-white photo of a sailboat on water with two smaller boats, no visible text or symbols
natural_image
Grayscale landscape photo showing trees and water with no visible text or symbols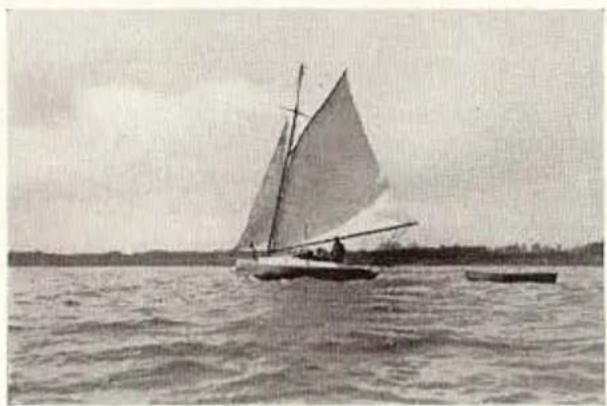
natural_image
Black-and-white photo of a sailboat on calm water with a single mast and another smaller boat nearby (no visible text or symbols)A "Fade-in."
natural_image
Close-up of a textured fabric surface with no visible text, symbols, or markingsA "Fade-out."
REFLEX FINDER IMAGE MAGNIFIER: To simplify focusing and framing subjects with the reflex finder, the Reflex Finder Image Magnifier can be attached to the Ciné-Kodak Special. With the magnifier in position the reflex finder image can be viewed from the back of the camera; it is especially recommended for use when working close to a subject at a large aperture or with telephoto lenses. It can be used only on Ciné-Kodak Specials fitted with 100-foot film chambers.
FADES
At the beginning and end of a series of "shots," the "fade-in" and "fade-out" serve to group scenes of one sequence. The speed of fades should be in keeping with the tempo of the scene; fades on a sunset should be very slow, while those on athletic events and other scenes containing rapid action should be quite fast.
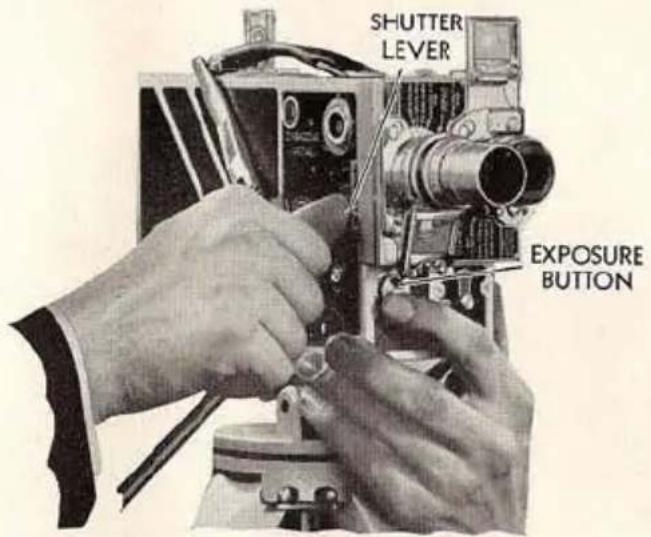
Fig. 42
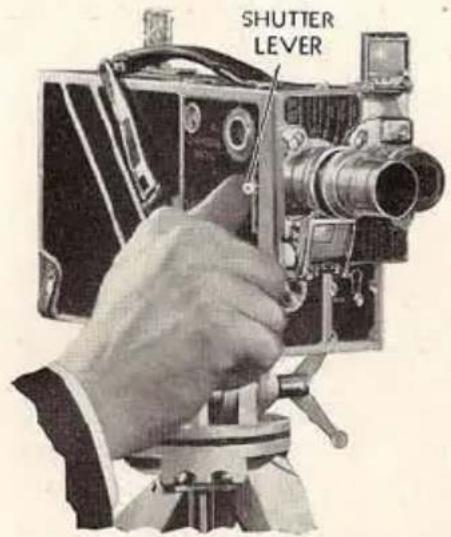
Fig. 43
MAKING A "FADE-IN:" Set the SHUTTER LEVER at CLOSED. Push in the exposure button in the usual way. The instant the motor starts, slowly move the SHUTTER LEVER to OPEN, as shown in Figure 42. While the lever is being moved, the "fade-in" occurs. Therefore, the speed of the "fade-in" depends upon the speed at which the shutter is opened.
MAKINGA "FADE-OUT:" Lock the exposure button in running position by pushing it in and down. Remove the finger from it, so that the
SHUTTER LEVER can later stop the motor. When the action in the scene reaches the point where you wish the "fade-out" to occur, slowly move the SHUTTER LEVER to top of slot, as shown in Figure 43, page 45. The motor will stop when this position is reached.
When moving the SHUTTER LEVER for fades, be sure to bear towards the front of the camera; this will prevent the lever from stopping in the 14 -OPEN and 12 -OPEN notches. Do not operate the shutter lever for fades oftener than necessary at speed 64.
DISSOL YES
IMPORTANT: Practice making dissolves several times with the camera empty before taking actual scenes.
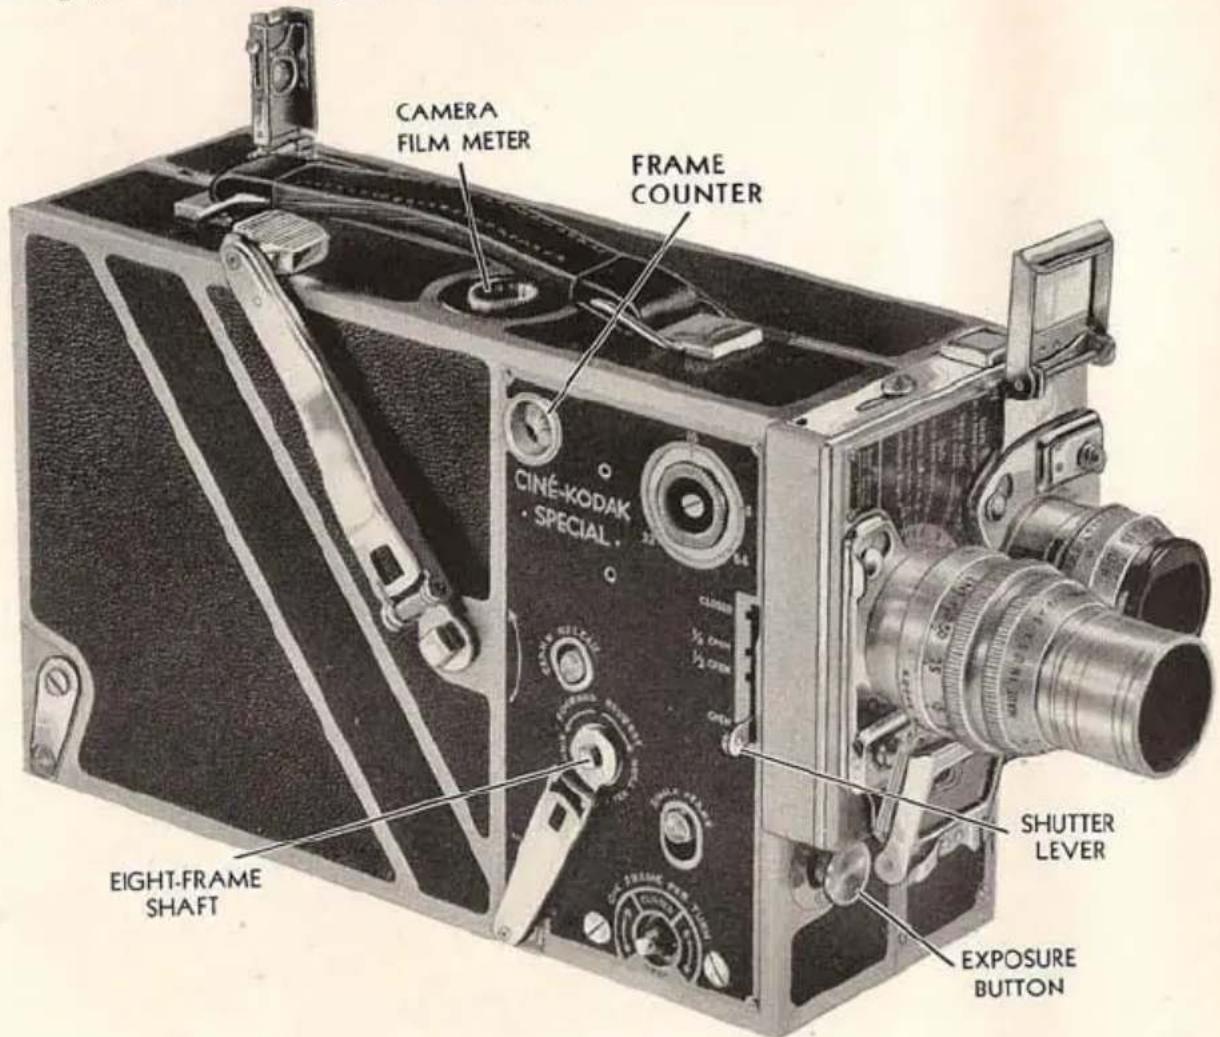
Fig. 44
The effect of a dissolve is that of one scene appearing to melt into another. What really occurs is that one scene “fades-out” simultaneously with the “fading-in” of the next scene. This overlapping of fades is made possible in the Ciné-Kodak Special by the variable shutter and by the provision for winding the film backward.
The dissolve is made by (1) "fading-out;" (2) winding back the film; (3) "fading-in." The fades must be made as described on page 45.
Dissolves make a pleasing transition between allied scenes. With the Ciné-Kodak Special, dissolves of any length can be made. Opinions vary as to the proper length. Some contend that they should roughly match the tempo of the action, while others prefer a definite length for all scenes.
For average scenes, dissolves a foot or two in length are effective. Until experience is gained in timing, the following method is suggested (refer to Figure 44):
- As you begin a "fade-out" at the end of the first scene, note the CAMERA FILM METER indication, or the FRAME COUNTER (see page 50).
- Gradually push SHUTTER LEVER as far as it will go beyond CLOSED, using two feet of film for the complete movement.
- Prepare to wind back the film by engaging the hand crank on the EIGHT-FRAME SHAFT and holding it to prevent its turning; then—
-
Watching the METER, hold in the EXPOSURE BUTTON and wind the film back two feet by turning the crank in the direction marked REVERSE, then release the EXPOSURE BUTTON. Be sure the SHUTTER LEVER is at CLOSED.
-
"Fade-in" on the next scene for two feet.
When making dissolves with the camera adjusted at speed 16, where it is necessary for the operator to watch the subject, the shutter can be closed while counting a given number of seconds according to the length of the dissolve. In rewinding the film, two reverse turns of the EIGHT-FRAME SHAFT must be made for each second of the “fade-out.” “Fade-in” for the same number of seconds that it took to “fade-out.” It takes about one second to pronounce “one hundred and one;” a little practice with a watch will make this procedure quite simple.

natural_image
Black-and-white photo of a worker operating machinery in a workshop (no visible text or symbols)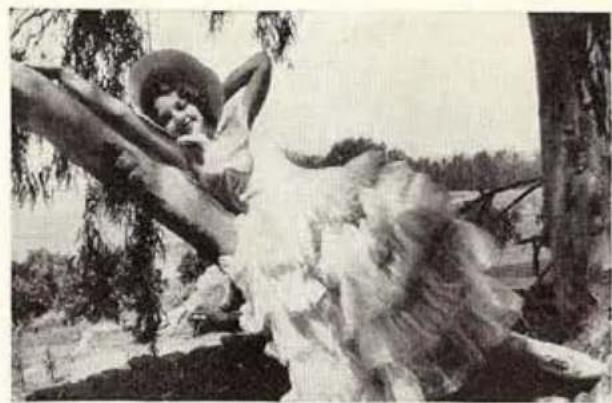
natural_image
Black-and-white illustration of a woman reclining on a tree branch in a forested landscape (no text or symbols visible)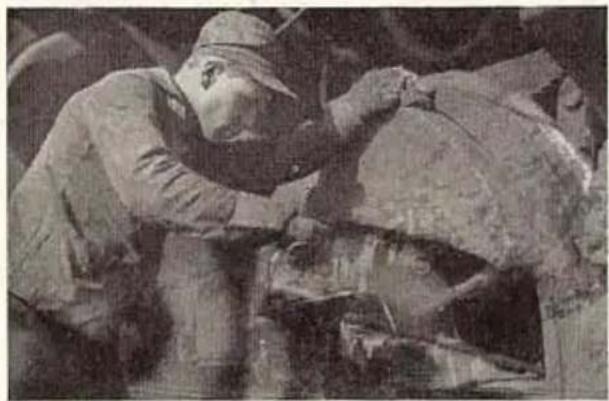
natural_image
Black-and-white photo of two workers in hard hats engaged in a mechanical operation (no visible text or symbols)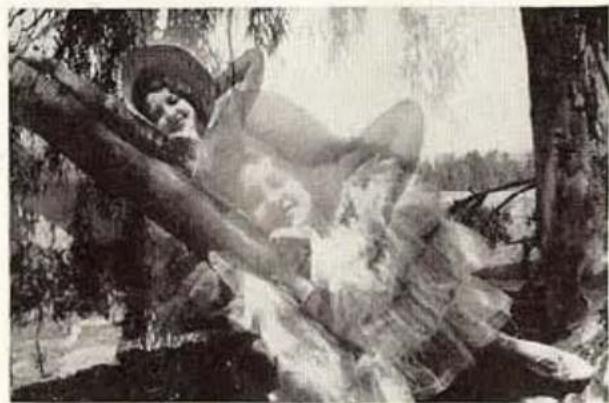
natural_image
Black-and-white illustration of a person in a hooded hat lying on a tree with a large fire, no visible text or symbols.
natural_image
Historic black-and-white photo of a steam locomotive on railway tracks, surrounded by snow-covered mountains (no visible text or symbols)
natural_image
Black-and-white photo of a person lying on a tree in a natural outdoor setting (no text or symbols visible)
natural_image
Historic black-and-white photo of a steam locomotive pulling through mountainous terrain (no visible text or symbols)
natural_image
Black-and-white photo of a person relaxing on a tree branch, surrounded by foliage (no text or symbols visible)Dissolving from a "close-up" to a distant subject.
Dissolving from a medium distance to a "close-up."
NOTE: After "fading-out" on a scene, you may wish to make a dissolve but find that you have inadvertently wound up the motor to the limit, thus preventing winding the film backward. In this event, the motor must be run down part way according to the special instructions on page 54.
SINGLE FRAMES
SINGLE FRAME RELEASE: Is for all ordinary animation and single picture work. To use this release pull it out as shown in Figure 45. Push it down to expose one frame.
With the camera speed set at 16, the SINGLE FRAME RELEASE exposes each frame approximately the same as when the camera is running on speed 8. Therefore, the normal exposure should be halved, either by using the next smaller diaphragm opening or by using shutter at 12 -OPEN.
Greatest uniformity of exposure from frame to frame is obtained by using the release only when motor is tightly wound. ONE-FRAME SHAFT: Can be used for single picture work by attach-
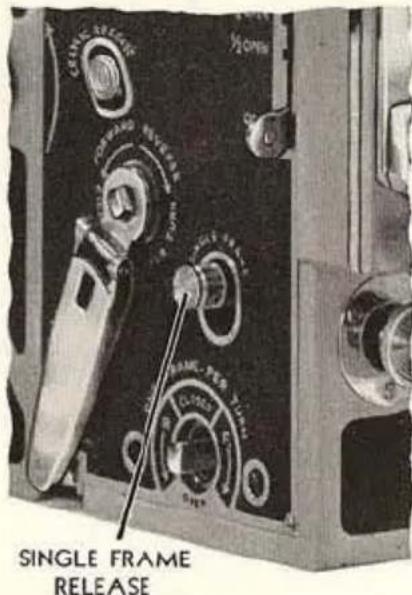
Fig. 45
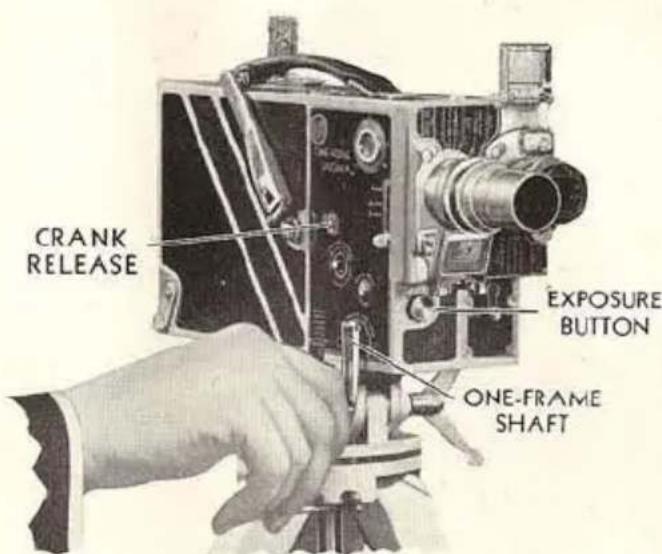
Fig. 46
ing to it the crank from the EIGHT-FRAME SHAFT as shown in Figure 46. The crank can be removed by first pushing up the knob of the CRANK RELEASE; then pull the crank off the shaft and place it on the ONE-FRAME SHAFT; lock it by pushing down the CRANK RELEASE.
The position of the dot on the end of the ONE-FRAME SHAFT, with reference to the labelled sectors on the sur-
rounding plate, indicates when the shutter is CLOSED and OPEN.
To move the film forward, push in and lock the EXPOSURE BUTTON, Fig. 46, page 49, then turn the crank in the direction of arrow F; arrow R (reverse) indicates the direction for winding the film backward.
It is impossible to turn the ONE-FRAME SHAFT backward if the spring of the motor is fully wound, in such case run down the motor as described on page 54.
The ONE-FRAME SHAFT (Fig. 46, page 49) enables the operator to prolong the exposure given each frame. This feature is valuable both for animated and still life subjects in very poor light.
This shaft is also useful in special multiple exposure work which requires winding the film forward or back a definite number of frames.
The FRAME COUNTER, described below, will be useful when exposures are made with the SINGLE FRAME RELEASE and the ONE-FRAME SHAFT as it gives the exact number of individual frames exposed.
FRAME COUNTER
THE individual FRAME COUNTER is a dial, graduated to indicate frames or individual pictures, from 0 to 40 (see Figure 47). One revolution of the dial indicates that one foot of film has passed through the gate. At the figure 0 there is an extended index line. By watching for the appearance of this line while the Ciné-Kodak is running, an accurate count can be made of the number of feet run or rewound. Further, the graduations for individual frames will be found useful in single frame, double, and multiple exposure work.
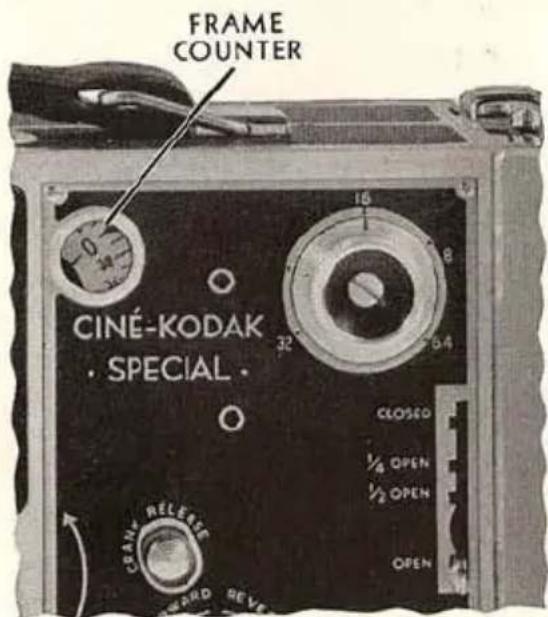
Fig. 47
Since the dial repeats after every forty frames, it may often be necessary to use it in conjunction with the CAMERA FILM METER which is located on the top of the Ciné-Kodak.
To adjust the two dials for the greatest convenience in making readings, proceed as follows:
Thread the film and run off the leader as described on pages 11 to 16. If the frame counter dial does not read 0 or very close to 0, remove the film chamber from the mechanism. Push in the PLUNGER, Figure 51, page 54, push the EXPOSURE BUTTON until the dial reads very close to 0, then operate the SINGLE FRAME RELEASE until the 0 index line is exactly at the pointer. Set the CAMERA FILM METER so that the figure 50 or 0 (50 for 50-foot rolls; 0 for 100- or 200-foot rolls) is exactly at the index line. Then replace the film chamber.
After these adjustments have been made, the two dials give a range of 4000 frames before they start repeating.
The FRAME COUNTER will be found very useful. For example, suppose you wish to start a double exposure when the CAMERA FILM METER reads between 7 and 8 feet and the frame counter reads 23. The total reading is 7 feet 23 frames, or it can be expressed as 303 frames. At the end of the first exposure take another reading, for example 12 feet 16 frames (496 frames). A length of 193 frames has been run, or 4 feet 33 frames. Close the shutter and wind the film backward to the 7-foot 23-frame position; open the shutter and run to the 12-foot 16-frame position again. Stopping at the exact frame for the second time requires some practice. If there is motion in the scene, it will be necessary to watch the rotating dials and stop as close as possible to the desired position. But if there is no motion, it is possible to stop a little short of the desired reading, set the shutter at 12 -OPEN to compensate for the increased exposure, and proceed to the end of the scene by using the SINGLE FRAME RELEASE, see page 49.
For double exposures there is another way to return to the exact starting position when rewinding. Before starting the first exposure, wind the spring tight by turning the MOTOR CRANK in the direction of the arrow. Wind slowly after the bell rings because the mechanical stop will act after three turns of the MOTOR CRANK. After the first exposure, close the shutter and wind the film backward with the hand crank on the EIGHT-FRAME SHAFT, until the mechanical stop prevents further turning of the hand crank. That the film is now at the exact starting position can be noted by checking the reading of the two dials.
DOUBLE EXPOSURE
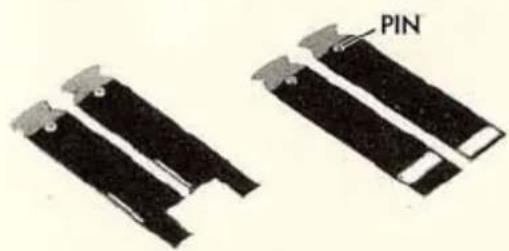
THERE are two sets of half-masks: A vertical pair and a horizontal pair (see Figure 48). Their purpose is to enable the recording of two separate halves of the picture on the same length of film.
natural_image
Two black electronic components with metallic leads and a labeled 'PIN' (no other text or symbols)Fig. 48
Be sure to insert the mask in the MASK SLOT with PIN forward, as in Figure 49. The mask must be pushed in as far as it will go.
With the vertical masks, the same person can appear in the picture twice by placing him so that his image is on, say, the right-hand side of the vertical line etched in the reflex finder. Expose the scene with the other half of the picture covered with the left-hand vertical half-mask. When exposing, note on the CAM-
ERA FILM METER and the FRAME COUNTER the starting and stopping points of the scene. With the SHUTTER LEVER at CLOSED, wind back the film to the starting point with the crank on the EIGHT-FRAME SHAFT and the EXPOSURE BUTTON locked in (Figure 50), being cautious not to move the camera or tripod. Place the person on the other side of the field, change half-masks, set SHUTTER LEVER at the proper opening and expose the scene until the stopping point is reached.
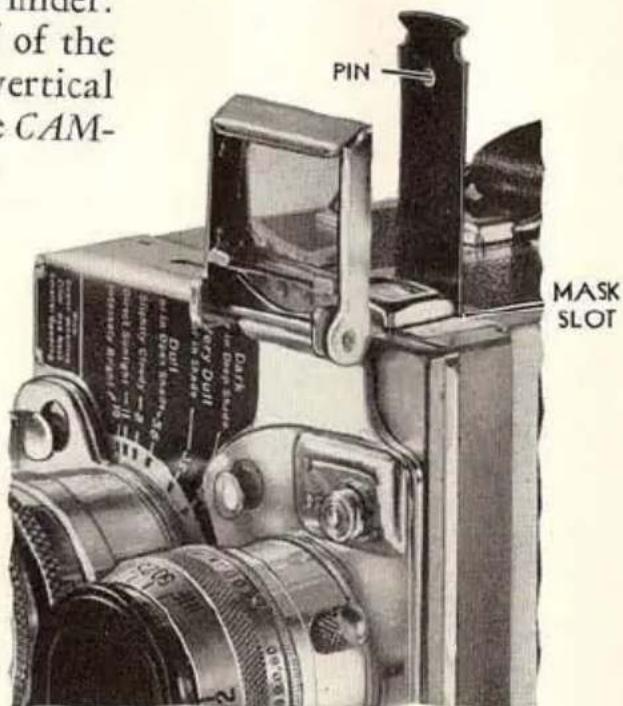
Fig. 49
Since the image on the film is inverted and reversed as to right and left, we suggest a rule to avoid confusion as to which side to cover. The rule is: Use the vertical half-masks as indicated by the reflex finder image. This image is reversed, so you don't need to reverse your thinking at the time of exposure. If the subject is on the left side of
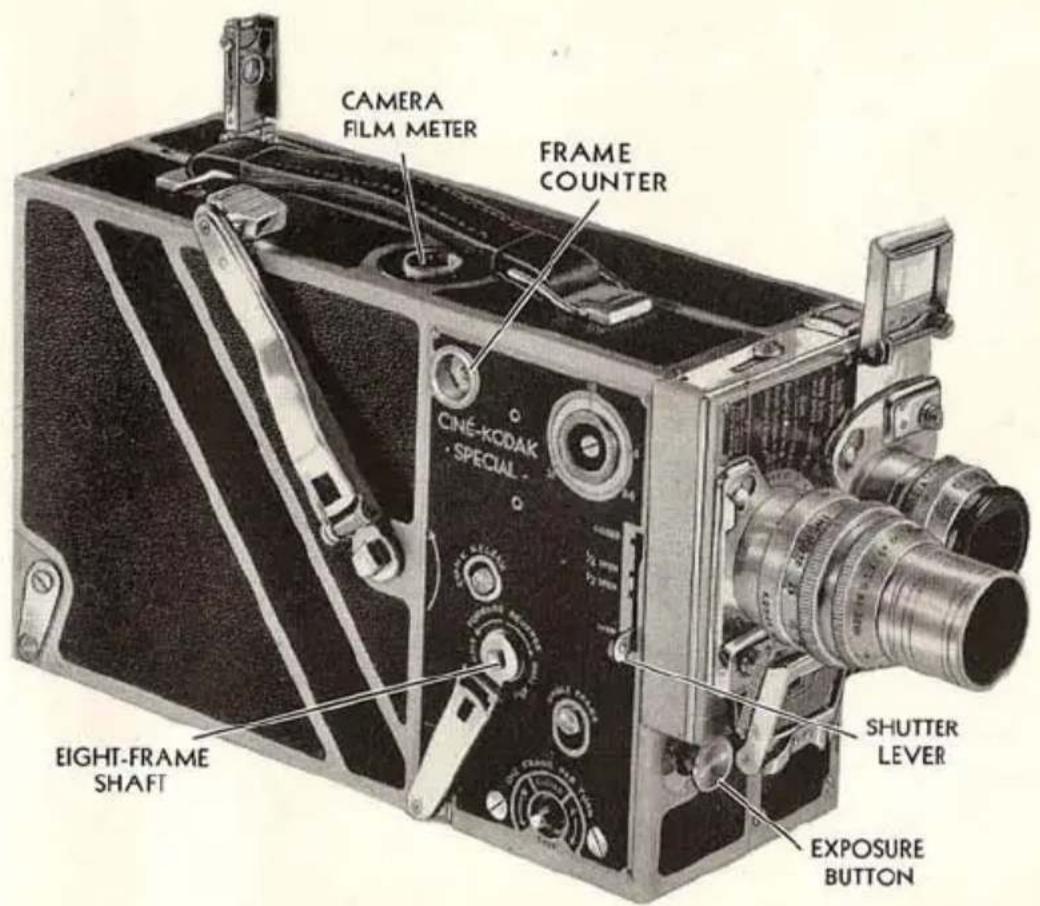
Fig. 50
reflex finder, leave this side open and cover the other side with the right-hand half-mask.
Successful double exposures depend upon the rigidity of the camera and the obtaining of exactly the same exposure for each half. Therefore, the tripod head must be locked, and the feet firmly planted; the same diaphragm, speed and shutter opening must be maintained; the light must not vary between halves. The masks must be clean.
By watching the camera film meter for cues, the action can be synchronized between the two halves of the picture.
In using the horizontal half-masks be sure that each mask is fully seated before making exposures. Remember that to film the top of a scene, use the mask with the lower opening, and vice-versa.
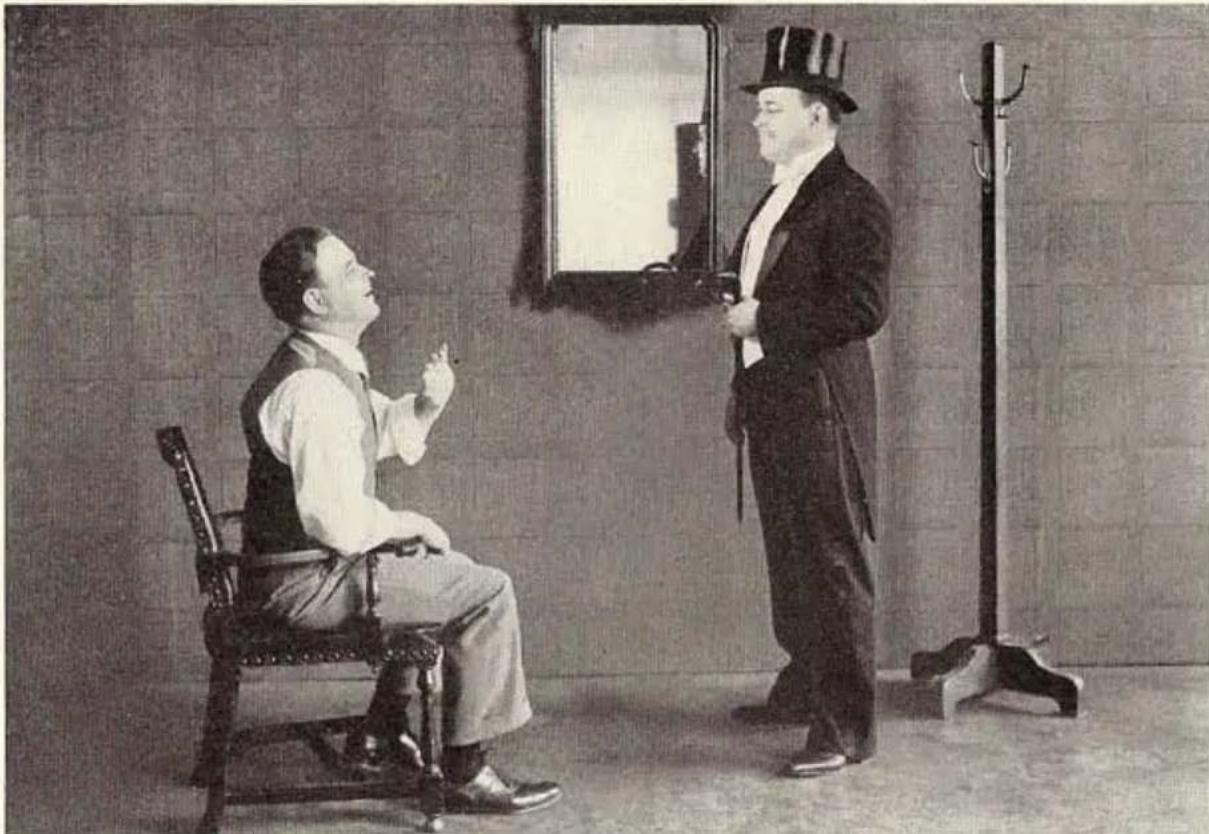
IMPORTANT: When using the half-masks for double exposures, use the diaphragm at f.5.6 or preferably a larger opening (f.3.5 or f.2.8). Do
natural_image
Black-and-white photo of two men in formal attire, one seated and gesturing, the other standing with a mirror; no visible text or symbols.A double exposure, showing the same person twice in the picture.
not use a smaller opening than f.5.6. When the light is bright, over-exposure can be avoided by using a filter or a smaller shutter opening.
If the camera is loaded and it is desired to run down the motor, remove the film chamber (see page 6) and press the PLUNGER, Figure 51, using a flat door key, then push the EXPOSURE BUTTON in the usual way. Before running down the motor, note footage indication on CAMERA FILM METER and reset it to this figure after running down the motor.
NOTE: When the camera is used with Fig. the Electric Motor Drive the spring motor should be run down.
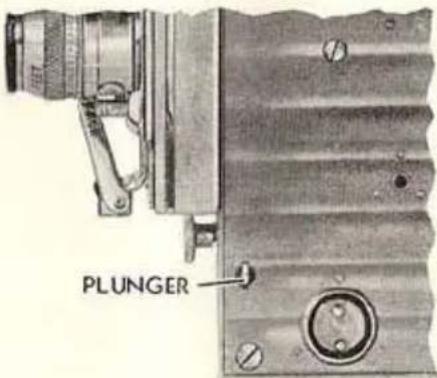
Fig. 51
HAND CRANKING
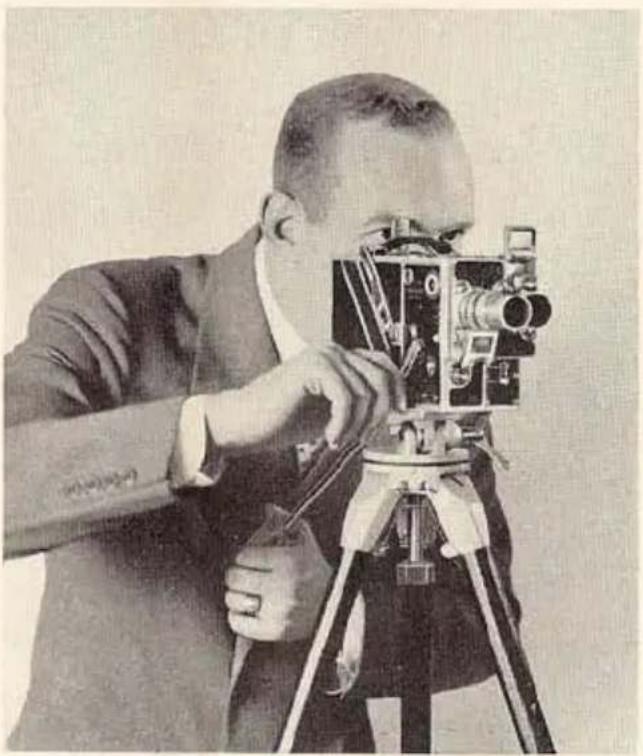
THERE are some scenes in which the action is of such duration that more than 38 feet of film (the run of the motor) will be required. For such scenes the Electric Motor Drive can be used or the camera must be hand cranked, as in Figure 52.
natural_image
Black-and-white photo of a man operating a vintage film camera on a tripod (no visible text or symbols)Fig. 52
To hand crank the Ciné-Kodak Special, allow the motor to run down and with the crank on the EIGHT-FRAME SHAFT, turn the crank in the direction marked FORWARD. For normal speed, turn the crank two turns per second. Setting the SPEED DIAL at 16 will help you to maintain this speed uniformly. Turn the hand from the wrist; do not rotate entire forearm as this tends to make cranking uneven.
FILMS, FILTERS AND ARTIFICIAL LIGHTS
CINÉ-KODAK PANCHROMATIC SAFETY FILM
CINÉ-KODAK PANCHROMATIC FILM is sensitive to all colors. It gives a truer black-and-white representation of the subject's coloring than does non-color-sensitive film. Cloud effects, foliage and flesh tones show great improvement, while almost every scene photographs better pictorially because of this film's ability to reproduce colors more nearly in their correct tone relationship.
The surpassing quality of Ciné-Kodak Panchromatic Film is evident when used either in daylight or artificial light. With the filters, described on page 58, many unusual effects can be obtained.
CINÉ-KODAK SUPER SENSITIVE PANCHROMATIC SAFETY FILM
SUPER SENSITIVE PANCHROMATIC is much faster than regular Panchromatic Film, which makes it possible to photograph scenes that do not have sufficient illumination for regular Panchromatic Film. Pictures can even be made at night without special lighting equipment. For instance, the light from two ordinary 100-watt lamps two feet from the subject will give good exposure at f.1.9, while three or four Photo-flood lamps in the regular light fixtures will illuminate a whole room sufficiently when Super Sensitive Panchromatic Film is used.
This film is equally good in daylight, being particularly useful for slow motion work on dull days.
When using Super Sensitive Panchromatic Film in daylight, halve the exposure required for regular Panchromatic, or use the Ciné-Kodak Color Filter (CK-3) with no change in exposure.
CINÉ-KODAK SAFETY FILM
CINÉ-KODAK SAFETY FILM is a general utility film of unusually fine grain and monochrome faithfulness. It is suggested for those occasions when the special qualities of “Pan,” Super Sensitive “Pan,” or Kodachrome are deemed unnecessary.
CINÉ-KODAK KODACHROME SAFETY COLOR FILM
Kodachrome Film enables one to make beautiful pictures in true natural colors. Colored pictures are as easy to make as black-and-white pictures. No filters are needed for the making of all average outdoor shots. Kodachrome movies can be made with the accessory lenses as well as with the standard lens. All 16 mm. projectors will show Kodachrome movies with the full size and brilliancy of black-and-white pictures; and no filters are necessary. Kodachrome Film is supplied in two different kinds of emulsions as described below.
Kodachrome Film (Regular) is the film to use for subjects when they are in daylight. For general use in daylight, filters are not essential with this film. The Kodachrome Haze Filter will improve the results under some conditions. When this film is used with Photoflood illumination, the Kodachrome Filter for Photoflood should be used in front of the lens.
KODACHROME FILM TYPE A is intended for Photoflood illumination, but it can also be used in daylight. When using the Photoflood Lamps no filter is required, because the film has been corrected for the excess red and yellow light from these lamps. For other artificial illumination, the use of a suitable Wratten Filter is recommended. "Daylight" or blue bulbs should not be used because the pictures will be too blue. Similarly, arc-lamps that give light which approaches daylight in quality will produce bluish results. Daylight should be excluded; otherwise the pictures will be too blue in those portions illuminated by daylight. Artificial light and daylight should not be mixed. When this film is used in daylight, it is necessary to use the special "Type A Kodachrome Filter for Daylight" which changes the quality of daylight to that of Photoflood illumination.
For further details refer to the booklet: "How to Make Home Movies in Full Color with Ciné-Kodak Kodachrome Safety Color Film."
natural_image
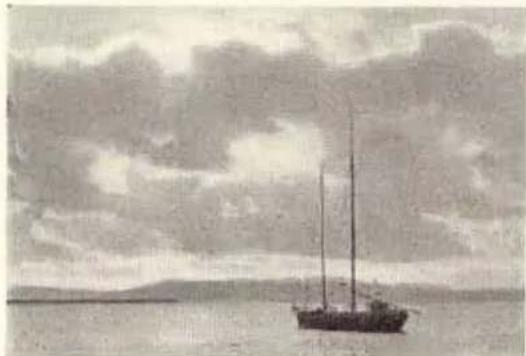
Black-and-white photo of a sailboat on calm water under cloudy sky (no text or symbols visible)With no Filter.
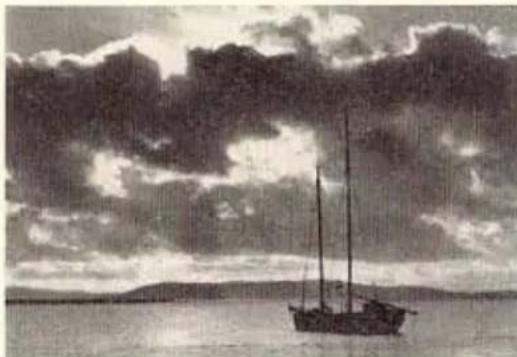
natural_image
Black-and-white landscape photo of a sailboat on calm water under cloudy sky (no text or symbols)With CK-3 Filter.
FILTERS
THE Ciné-Kodak Color Filters are for use with film for black-and-white pictures, when photographing colored objects, and for clearing haze when photographing distant landscapes and similar subjects.
The action of the Ciné-Kodak Color Filter tends to equalize the effect which the different colors have on the film. It retards the blue-green, blue and violet rays, thus allowing the greens, yellows, oranges and reds time to record on the film.
When using a Ciné-Kodak Color Filter with Ciné-Kodak Panchromatic Film or Ciné-Kodak Super Sensitive Panchromatic Film, it reproduces all the colors of the subject in monochrome on the screen, more nearly in their accurate tone relationship one to the other. The result is a black-and-white picture of surpassing quality.
In outdoor photography (marine or landscape) where there is a brilliant cloud effect, and when photographing all objects that include colors which act weakly on the sensitive film, the use of the Ciné-Kodak Color Filter will be advantageous.
The CK-3 filter is of the haze cutting or contrast type. It is to be used for clearing haze when photographing distant landscapes; and for increasing the contrast between blue sky and white clouds, and between other colored objects.
The Ciné-Kodak Color Filters are supplied in different kinds of mounts so that they will fit in front of the various lenses used on the Ciné-Kodak Special. Some of the filter mounts are not interchangeable, but by using the Ciné-Kodak Universal Filter Holder and the CK-3 filter in the U7, U9 or U12 mount, one filter can be made to serve with many lenses.
Exposure Factors for Ciné-Kodak Color Filter (CK-3) in Daylight
| Factor | |
| Ciné-Kodak Panchromatic Film | 4 |
| Ciné-Kodak Super Sensitive Panchromatic Film | 2 |
A factor of 2 means using the next larger diaphragm opening.
A factor of 4 means using the second larger diaphragm opening.
NOTE: The basic exposure for Super Sensitive Panchromatic Film with no filter is the next smaller opening than is indicated by the exposure guide on the front of the Ciné-Kodak Special. Therefore, with this film and the CK-3 Filter, simply follow the exposure guide.
IMPORTANT: Keep the Color Filters clean. Carefully wipe off any dust or finger marks, using a clean, lintless cloth.
Ciné-Kodak Color Filters for Lenses used on the Ciné-Kodak Special
U7-CK-3 is for the Ciné-Kodak Universal Filter Holder (used on various lenses), the 15 mm. (f.2.7) Wide-Angle lens, and for the 6-inch (f.4.5) Telephoto lens.
U9-CK-3 is for the Ciné-Kodak Universal Filter Holder, the 2½-inch (f.2.7) lens, the 4½-inch (f.4.5) and the 6-inch (f.4.5) Telephoto lenses.
U10-CK-3 is for the 2-inch (f.3.5) lens and 3-inch (f.4.5) Telephoto lens.
U12-CK-3 is for the Ciné-Kodak Universal Filter Holder and for the 4-inch (f.2.7) lens.
W-CK-3 is for the 1-inch (f.1.9) lens.
Ciné-Kodak Universal Filter Holder may be used on the 1-inch (f.1.9), 2-inch (f.3.5), 2½-inch (f.2.7), 3-inch and 4½-inch (f.4.5) Telephoto lenses and requires either the U7, U9, or the U12 filter only.
Red and green cemented Wratten Filters, such as the A and the X-1, and other colors, are available on special order.
A shielding tube which can be screwed into the front of the U7 or the U9 Filter is available as an accessory. As this tube is the same as the
lens hood on the 6-inch (f.4.5) Telephoto lens, it will not be necessary to obtain another one if the 6-inch lens has been purchased. Similarly, the lens hood of the 4-inch (f.2.7) Kodak Anastigmat Lens fits the U12 Filter, and the lens hoods of the 212 -inch (f.2.7) and 412 -inch (f.4.5) lenses fit the U10 Filter.
KODACHROME FILTERS
A full description of the filters for use with Kodachrome Film is given in the booklet: "How to Make Home Movies in Full Color with Ciné-Kodak Kodachrome Safety Color Film."
ARTIFICIAL LIGHTS
ORDINARY MAZDA LAMPS: When several are used close to the subject, pictures can be made at f.1.9, f.2.8 or f.3.5 on Super Sensitive Panchromatic Film. Follow exposure table on page 79.
PHOTOFLOOD LAMPS: The No. 1 Photoflood Lamp has a rated life of two hours on a 115-volt line; the No. 2 Lamp is larger, it has a life of six hours, and gives twice the illumination. Three or four No. 1 Lamps will illuminate a medium sized room sufficiently when using Super Sensitive Panchromatic Film and with a lens used at f.1.9. See exposure tables on page 77.
KODAFLECTORS: High-efficiency reflectors on stands for Photoflood Lamps. Especially suitable for home movies. Follow the complete instructions and exposure tables accompanying the Kodaflector. One unit consists of a folding, adjustable stand with swivel top, two special reflectors with sockets and cords, without lamps, price \$5.00. If using the No. 2 Photoflood Lamps in the Kodaflectors it will be necessary to obtain Kodaflector Adapters for No. 2 Photoflood Lamps, per pair, 65 cents. See exposure tables on page 77.
SPECIAL EFFECTS AND TRICKS
The many unique features of the Ciné-Kodak Special make it a most flexible instrument for the production of unusual films. Whether special effects are needed to convey ideas and impressions or trick shots are desired to make your films outstanding, this camera will prove itself capable of the most varied and exacting tasks.
About the only limit on the variety of motion pictures this camera can produce is the limit of the user's imagination and ingenuity. We cannot hope to describe the great number of feats made possible by different combinations of the Special's features plus various selections of subjects. The main purpose of the effects and tricks described below is to bring to your mind other ideas; feats that will be new and original with you and that have never been filmed before.
Important: In all multiple exposure work the camera must be locked on a rigid tripod to insure accurate registration of each successive image recorded.
Be sure to have the shutter closed when the film is wound back. If you have inadvertently wound up the motor and find that you cannot wind back, run down the motor with film chamber removed, as described on page 54.
The individual frame counter described on page 50 will be found very useful when photographing many of these special effects and tricks.
DISSOLVING-OUT OBJECTS WITHIN A SCENE
By MEANS of the dissolve, it is possible to have an object or person slowly disappear from a scene, but with the rest of the setting remaining as before.
To make such a shot, photograph the scene with the object present. "Fade-out" on the scene (page 45). Wind the film back as for a dissolve (page 47) and remove the object from the camera field. "Fade-in" on the same scene, but without the object.
The reverse is also easily done; that is, to have some object slowly appear against a constant background.
For these shots, the camera must not be moved.
GHOSTS
The procedure for making a picture of, say, a person who appears to be transparent is very simple. It is only necessary to photograph the scene without the subject present, then wind back and rephotograph the scene with the subject present. With each of the two filmings the normal exposure must be halved.
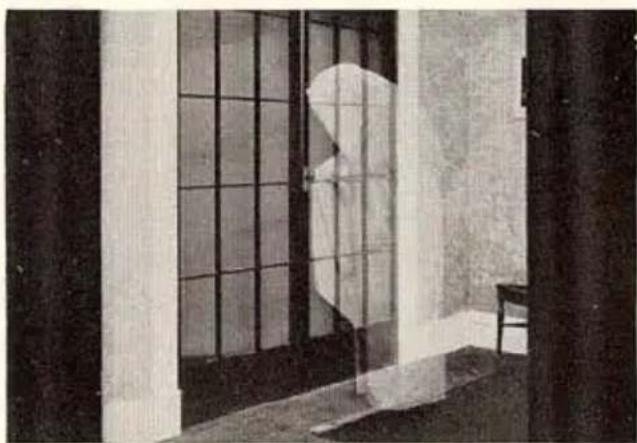
natural_image
Interior view of a room with large windows and a person in uniform standing near the door (no visible text or symbols)Double exposure, "Ghost" effect.
If a scene is wanted where one person is "solid" and the other transparent, the vertical half-masks will be needed. The half of the picture that is to contain the "solid" subject should be photographed in the normal way, with normal exposure. After winding back and changing the half-masks, photograph the other half as described in the preceding paragraph. Thus, the film will be exposed a total number of three times for this scene (wound back twice). In thinking through this type of shot, it can be readily seen that the ghost and the solid subject can be either the same person appearing twice on the film or two different people.
CUT-AWAY VIEWS
Cut-away or "X-Ray" views are particularly useful for industrial and mechanical pictures. With this technique, locations and workings of parts can be graphically illustrated much more effectively than can even be demonstrated with actual models or drawings.
Two techniques are useful for cut-away motion pictures. Also combinations of the two techniques often can be used to advantage.
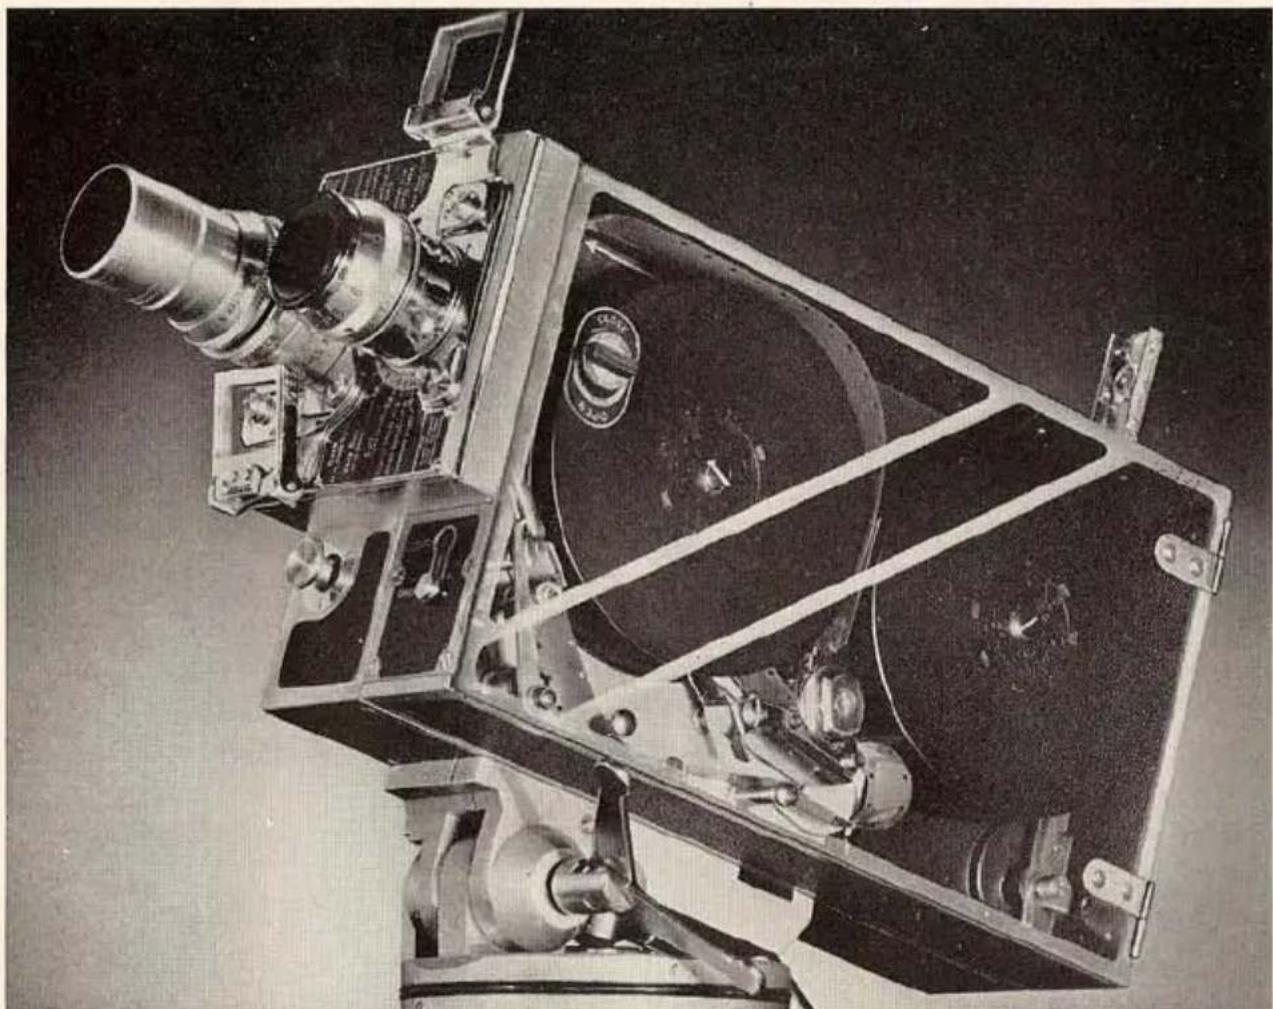
natural_image
Black-and-white photo of a vintage mechanical surveying instrument with visible lens, frame, and control panel (no text or symbols)A cut-away or "X-Ray" view of the Ciné-Kodak Special.
The first method is to adopt the routine previously described under DISSOLVING-OUT OBJECTS WITHIN A SCENE. With this technique the following scene could be made: A finished product appears on the screen; the outer housing fades away showing the mechanism housing; the mechanism housing fades away showing the working parts; some of the working parts fade away to emphasize the design and construction of other working parts. To make such a scene, first photograph the finished product; fade out; wind back and remove the outer housing; “fade-in” and photograph the product without the outer housing; etc., etc.
The second method is that of following the procedure for making
GHOST pictures. In such a scene the housings and unimportant mechanical parts of the product would be present in the picture as transparent objects, while the parts to be emphasized would appear solid. To attain this effect, the scene must be photographed successively on the same strip of film, giving less exposure when the housings and other subdued parts are present and giving more exposure when the important parts are finally photographed.
By combining the dissolving-out and ghost methods, solid parts can fade to transparent parts.
Other applications of cut-aways are: first to show the package, then the contents—such as candy, food, cigars; to demonstrate ply construction—such as tires, cables, wood; to indicate in photoplays where articles are concealed—such as bonds in a safe, or hidden jewels.
DOUBLE EXPOSURE
THE types of double exposures you can make are almost without limit. Half-masks enable you to have human and animated subjects in the same scene. By having a narrow tree or post in the center of the picture, a group of people or a vehicle can hide behind it. A person can be made to vanish into thin air, simply by having him walk from one side of the field to the other, thus crossing the dividing line.
Many weird and mysterious effects can be obtained with the horizontal half-masks. The tower of a building can be made to telescope into the lower part of the building or a person's head telescope into the body by panoraming the camera upward while the upper half is being
natural_image
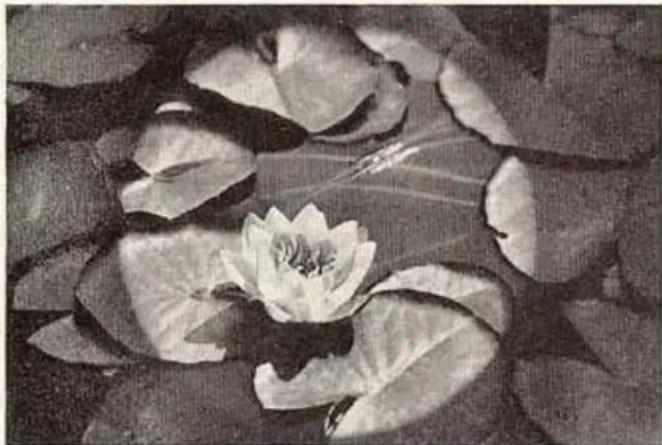
Black-and-white photo of a blooming water lily flower with large leaves, no text or symbols visibleDouble exposure, using the circle mask.
exposed. A person's legs can be made to run away from him, leaving his amazed trunk floating in mid-air by filming the top half of the subject first and not letting him move until the filming of the second half is well under way, when he will run away to supply the run-away-legs effect.
MULTIPLE EXPOSURE
THE winding-back feature of the Ciné-Kodak Special permits the obtaining of a wide range of effects by exposing the same strip of film two or more times. While it is impossible to enumerate all the possibilities in this field, a few of the more easily made stunts are:
A person can appear in a scene any number of times. No masks are used, but a black background must be employed to prevent more than one image “piling up” on any section of the scene.
People can be dwarfed by using black backgrounds. A man could appear to stand next to a pack of cigarettes and will look no larger than Tom Thumb, with the film exposed once with the camera close to the cigarettes and again with the camera far away from the man. Since it is difficult to obtain black backgrounds of sufficient size to fill the field for the latter shot, a good alternative is to place a piece of black paper with a hole cut in it about one or two feet in front of the camera lens. By using the reflex finder, it can be seen whether the hole is of the correct size so that the paper will overlap the black background behind the subject.
Double exposure, showing tower telescoping into the building.
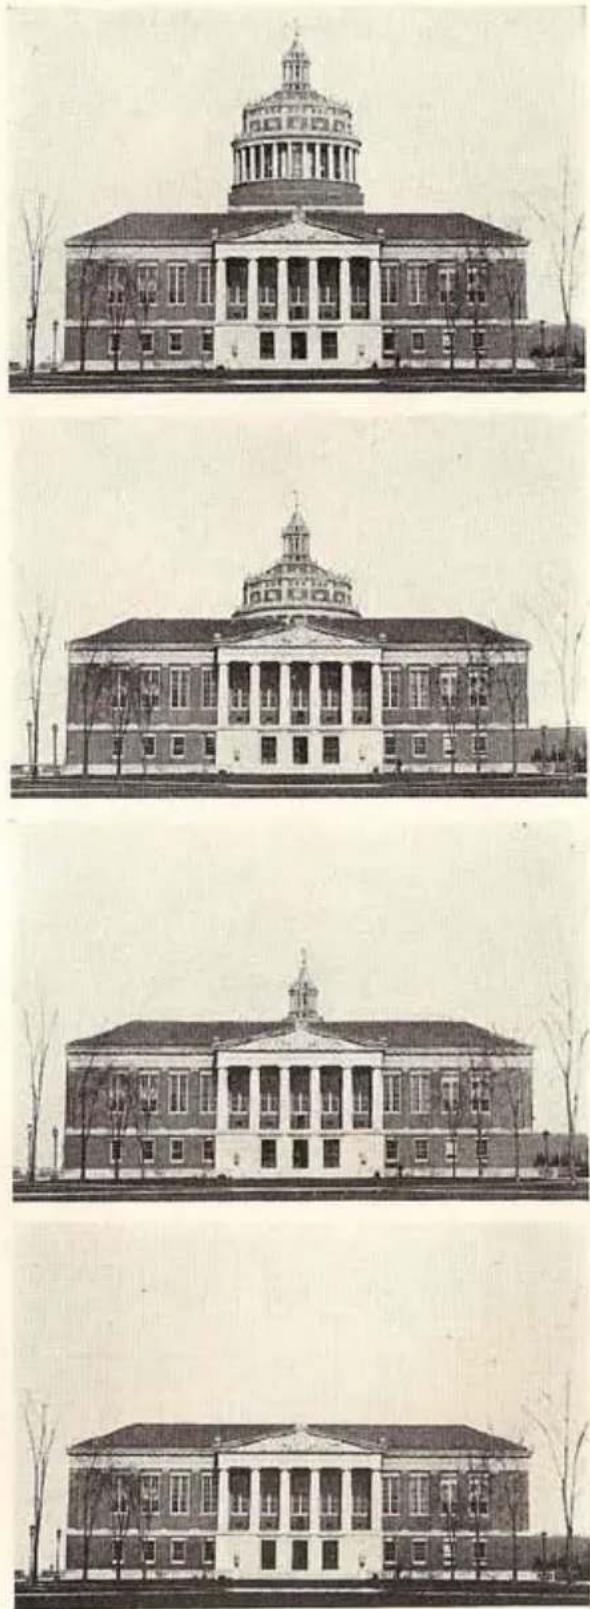
natural_image
Architectural line drawings of a neoclassical building with a prominent dome and column, showing exterior and interior views (no text or symbols)
natural_image
Black-and-white stage performance photo featuring a person standing beside a large floral arrangement with a vase (no visible text or symbols)Multiple exposure, showing person dwarfed on table with flowers.
Same person appearing three times in picture.

natural_image
Black-and-white photo of three young girls sitting on a bench, each with hands covering their face (no text or symbols visible)Photo-montage effect.
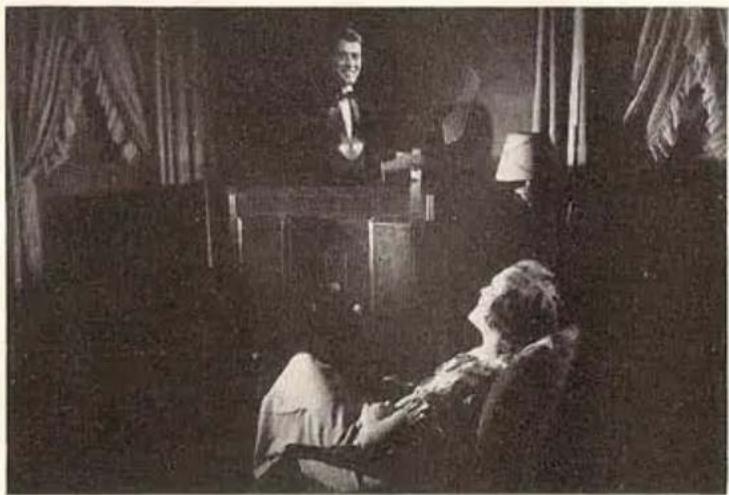
natural_image
Black-and-white historical photo showing a man at a podium addressing a seated person, with curtains and draped curtains in the background (no visible text or symbols)It is often desired to superimpose two or more scenes for impressionistic and photo-montage effects. This is done simply by winding back and taking the following scene or scenes on the same strip of film on which the first scene was made. Care should be taken to give approximately the same exposures to each scene, unless it is desired to subdue one of them.
ANIMATION
ONE of the most absorbing fields of the Ciné-Kodak Special is animation . . . the cinematographic technique of endowing inanimate objects with life. You may wish to try the simpler type where chess men play their own game and books, ash trays, etc. roam around over a table top. Or you may be sufficiently fascinated by the almost limitless possibilities of animation to try your hand at the more complicated type, say of a playlet with jointed dolls for actors.
To animate a subject, expose a single frame, move the subject a bit, expose another frame, move the subject a little more, and so on. The amount you move the subject each time determines the speed of the action on the screen. It is necessary to decide on the approximate speed desired; for instance, if you want a doll to raise its arm in one second, devote sixteen frames to that movement.
In jointed doll animation, much can be learned from studying single frames from films you have made of living subjects.
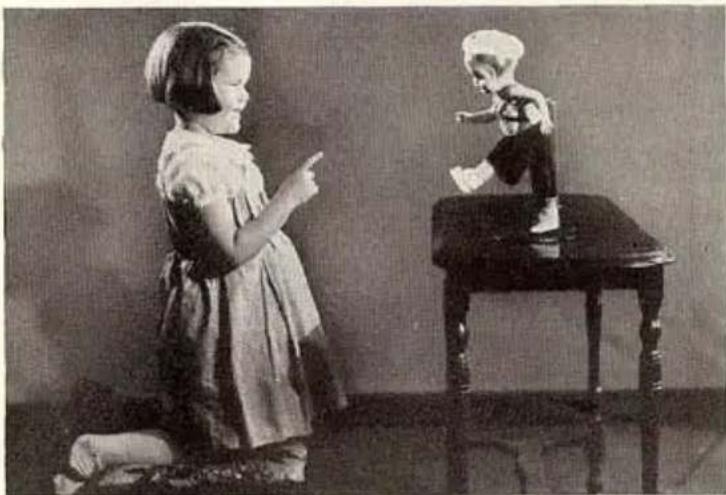
natural_image
Black-and-white photo of a young girl kneeling on her lap next to a child playing a small figurine on a small table (no text or symbols visible)Double exposure, including a living subject and an animated doll.
Other applications of animation are: Animated titles; graphs that draw themselves; machines and other manufactured products that assemble themselves; following the course of an auto tour with an animated line on a map, etc., etc.
SPEEDED ACTION
Just as action can be slowed down by increasing the number of frames exposed in a given time, so can action be speeded up by decreasing the exposure frequency by using the SINGLE FRAME RELEASE. Making one frame every 10 or 15 seconds, a cigaret will appear to burn its full length in a very few seconds. Beautiful cloud studies, where clouds rush rapidly across the sky, can be made by exposing frames at the rate of about one every second, as can comically speeded up pictures of street and traffic scenes.
"WIPES"
THE so-called “wipe” is a type of transition between scenes. The screen effect is that of a line passing across the screen which appears to wipe off the scene, leaving a new scene in its wake.
While in professional movies this is produced by a rather complicated printing process, it can be done in the Ciné-Kodak Special between scenes that contain no action, such as titles, etc. To produce a “wipe” the field must be blocked off bit by bit as single frames are exposed. The film is then wound back and the next scene uncovered as single frames are made.
A method for accomplishing this is to have the camera mounted on a table with a piece of fine ruled paper (such as graph paper) laid flat on the table surface between the camera and subject. Attach the paper to the table with tacks or adhesive tape.
Attach a piece of dull black paper to a block, the paper being of such a size as to obstruct completely the camera field when the block is placed vertically about one foot in front of the f.1.9 lens. With the aid of the reflex finder, determine the points on the graph paper (at a marked distance from the camera) that represent the two sides of the picture area. The block is to be drawn, square by square, from one side of the picture to the other.
Photograph the subject in the usual manner. When the camera is stopped at the end of the scene, make necessary exposure adjustments for single frame work, and draw the block across the camera field one
square of the graph paper, expose one frame, another square, another frame, and so on until the camera field is completely blocked.
Count the number of squares traversed, close the shutter and wind the film back that number of frames by means of the ONE-FRAME SHAFT. This necessitates the removal of the camera from the table.
With the camera returned to the same position in relation to the graph paper, and a new scene or title before the camera, place the block so as just to cover the field. Uncover the new scene by one square, expose a frame, and so on until the scene is entirely cleared. Be sure to move the block in the same direction for both phases of the “wipe.”
The speed of the "wipe" depends upon the number of frames consumed in blocking off or unblocking the scene. From 20 to 40 frames make a pleasing transition.


natural_image
Exterior view of an industrial complex with two tall chimneys emitting smoke, partially obscured by a textured wall (no visible text or symbols)
natural_image
Exterior view of an industrial building complex with two tall chimneys emitting smoke (no visible text or signage)An example of a "wipe," using a title card and a photographic print.
CARE OF THE CINÉ-KODAK SPECIAL
CLEANING THE GATE
For satisfactory results, the PRESSURE PLATE (Figure 53) must be removed and the APERTURE PLATE, GUIDE and PRESSURE PLATE cleaned frequently.
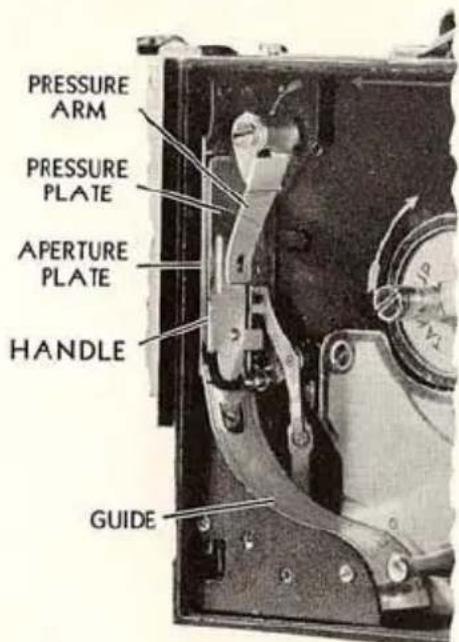
Fig. 53
To remove the PRESSURE PLATE, push the PRESSURE ARM to the right and lift the PRESSURE PLATE by the HANDLE.
Black backing from the film collects on the two polished tracks of the PRESSURE PLATE. Remove this by rubbing with the ball of the thumb. Backing and emulsion can be removed from the two polished tracks of the APERTURE PLATE and GUIDE by rubbing with a match covered with a clean cloth that has been dipped in carbon tetrachloride, gasoline, or any popular brand of dry cleaning fluid. (Do not use alcohol.) Also remove any dust or lint around the edge of the rectangular aperture.
Use great care not to scratch the polished surface of the tracks of the gate. Do not scrape the tracks with a metallic object.
When replacing the PRESSURE PLATE, the two small slots on the edge opposite to the HANDLE must fit over the two pins on the APER-TURE PLATE. Be sure the PRESSURE PLATE is seated properly.
CLEANING THE LENSES
It is impossible to obtain sharp pictures of good contrast unless the lens is kept critically clean.
The front and rear surfaces of the lens should be cleaned at frequent intervals. It is especially important to clean the lens during and after an ocean voyage or when using the camera at the seashore.
To clean the lens, wipe the surfaces gently with lens cleaning tissue or with a soft, washed linen or cotton cloth. Breathing on the glass surface generally furnishes sufficient moisture, but if not, use Kodak Lens Cleaner. Other liquids may contain ingredients that will be harmful to the glass, to the black lacquer or the balsam with which the lenses are cemented.
CLEANING THE REFLEX FINDER
KEEP the top surface of the magnifier very clean, this is most important when focusing accurately with the reflex finder.
If dust collects on the ground glass of the reflex finder, slide the magnifier to the right and blow on the glass. If this does not remove the dust, wrap a small, clean, lintless cloth around a match stick and carefully wipe the top surface of the ground glass. Do this very gently, with light pressure.
To reach the mirror and the under surface of the ground glass, remove the lens from the turret.
OILING THE CAMERA
NEVER oil the camera with any lubricant other than Ciné-Kodak Oil, otherwise high-speed and cold weather operation will be seriously impaired. A bottle of this oil with a wire applicator is furnished with each Ciné-Kodak Special.
Oil the Ciné-Kodak Special after every fifty, 100-foot rolls of film, or every six months if less than fifty rolls are run through the camera in that time.
To oil the camera, place it on its side with the control plate facing up (Figure 54, page 72). Apply the oil with the wire attached to the
cork, just touching the points indicated so that a drop runs down the sides of the shafts. After applying, run the camera at speed 16 and stop it successively several times to allow the oil to spread over the bearing surfaces. Wipe off excess oil.
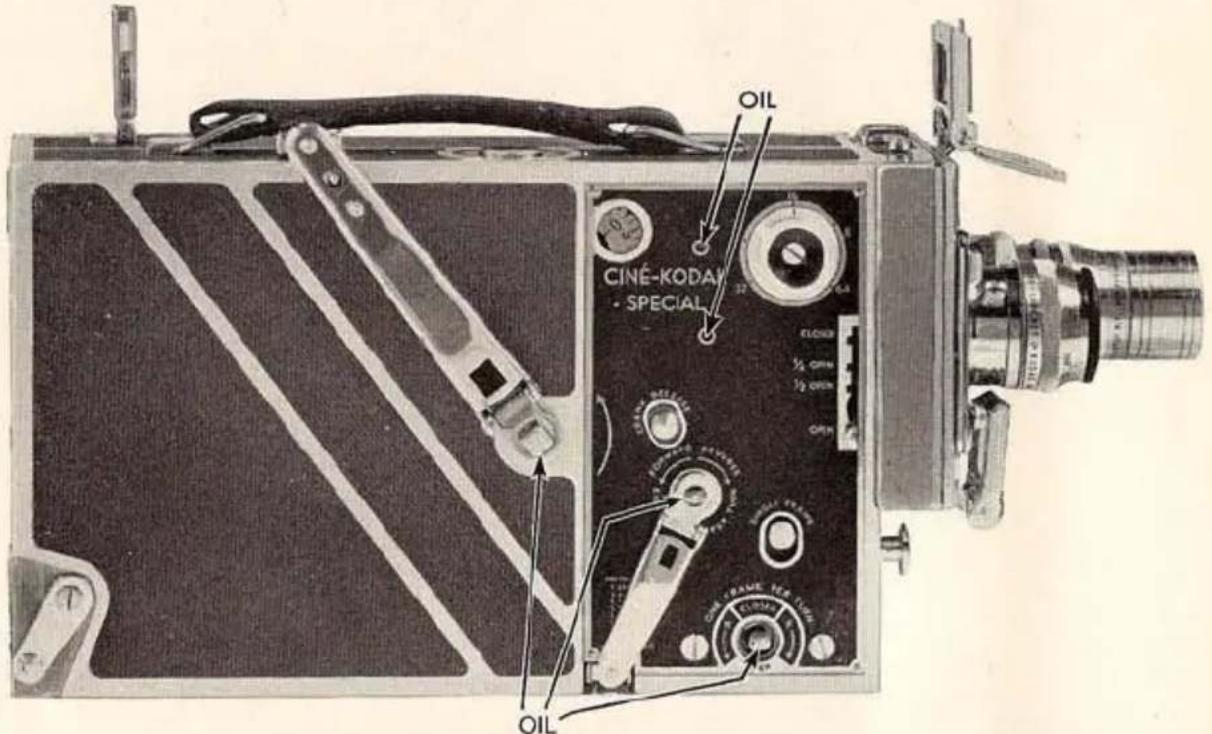
Fig. 54
Next, oil the inside of the film chamber at the points shown in Figure 55, page 73, with the camera again on its side but with the opened film chamber facing up. Run the camera intermittently as before. Wipe off excess oil, particularly at those points near the film track, as oil on the film will cause spots in the developed image. Follow this same procedure for both the 100-foot and 200-foot film chambers.
Finally, remove the film chamber and lay the camera part flat so that the surface shown in Figure 56, page 73, is face up, and oil the points indicated. Run the camera intermittently as described above. [The camera will run with the chamber removed only when the PLUNGER, Figure 56, page 73, is depressed (using a house key) and the EXPOSURE BUTTON is pushed in.] Wipe off excess oil and replace film chamber.

natural_image
Detailed cutaway view of a vintage oil and gas surveying instrument showing internal components like pump, gauges, and oil barrel (no text or labels beyond component labels)Fig. 55

Fig. 56
TITLE SERVICE
You will probably want titles describing the different scenes in your films. We can make the titles for you. Simply write out the titles you wish to insert in your film and send the list to us. We will send you film with the titles printed on it which you can then splice into your film in the proper places.
If titles are to be used with black-and-white films, specify in your order if the films are originals or duplicates.
When ordering titles for use with Kodachrome Film, be sure to mention it in your order, as titles are supplied with a base of standard tint that will harmonize with the average Kodachrome scene, at no additional charge. For the best results, order the special Kodachrome Titles, see description below and on page 75.
Ciné-Kodak Titles (card or scroll) are obtainable in the United States and Canada, at Rochester, Chicago, San Francisco and Toronto, only. The special Kodachrome Titles are obtainable at Rochester, only.
CARD TITLES: These titles (for black-and-white pictures or on tinted base for Kodachrome pictures) are limited to approximately 35 words, and are made at the rate of three cents a word with a minimum of twenty-five cents per title. The minimum charge for an order is \$1.00.
SCROLL TITLES: The Scroll Title is ideally suited for those longer explanatory titles so often needed at the beginning of a reel. The wording moves slowly and evenly upward on the screen. At the start a slight pause is allowed for the first line—one second for each word—for your spectators to read the start of the title. It then moves slowly upward, until the end of the title is reached.
A Scroll Title may have as many words as you wish. Scroll Titles with more than 33 words are made at the rate of three cents a word. The minimum charge for a Scroll Title is \$1.00.
KODACHROME TITLES
THESE special titles are printed with black letters on a brilliant red background with a conventional scroll design at the top and bottom
of the title. They are made on Kodachrome Film and harmonize beautifully with Kodachrome pictures.
Kodachrome Titles are limited to approximately 30 words; they are made at the rate of seven and one-half cents a word with a minimum of sixty cents per title. The minimum charge for an order is \$1.00.
Kodachrome Titles are obtainable at Rochester, N. Y., only. They cannot be made in the form of Scroll Titles.
DUPLICATES
WHILE in photography "an original is always better than a duplicate," Ciné-Kodak duplicates are indistinguishable in quality from originals. You may have as many duplicates made of your film as you wish.
If you want duplicates of any film which you make, send it to us as promptly as possible, and before the original has had a chance to become damaged from any cause. The best way to order duplicates is to send the original film to us together with your order for them immediately after you have projected it the first time. Kodachrome Film cannot be duplicated in color, although satisfactory black-and-white duplicates of it can be supplied.
Prices for duplicates: 77 to 100 feet, \5.00; 100 feet or more, \.05 per foot. Orders for less than 77 feet, \.06^{1/2}per foot; minimum charge, \3.25.
Duplicates are obtainable in the United States and Canada, at Rochester, Chicago, San Francisco and Toronto, only.
COPIES OF "STILL" PICTURES
We can make copies of any pictures, drawings, maps and similar subjects, provided they are not copyrighted, on amateur standard (16 mm.) film. Length of film required for each picture is four feet, enough to run ten seconds; an additional charge will be made for greater lengths. Any picture from Vest Pocket Kodak size (15/8 x 2½ inches) to 11 x 14 inches can be copied. The price of a black-and-white copy is fifty cents, Kodachrome copy \1.00, minimum order \1.00.
Copies are obtainable in the United States at Rochester only.
EASTMAN KODAK COMPANY, ROCHESTER, NEW YORK.
EXPOSURE TABLES
Outdoor Exposure Guide for Camera Speed 16 and Shutter at OPEN, using Ciné-Kodak Panchromatic Film
With Ciné-Kodak Super Sensitive Film use the next smaller opening (higher number), or use the Ciné-Kodak Color Filter (CK-3) with no change in the diaphragm opening. With Ciné-Kodak Kodachrome Film use the exposure table included with it.
| *Brilliant Interiors | Subject near window. | Very dull days. | f.1.9 Speed 8 |
| Dull days. | f.1.9 | ||
| Bright days. | f.2.8 | ||
| Dark or in Deep Shade | Extremely poor light.Deep Shade—Dense forests, shaded porches, etc. | f.2.8 | |
| Very Dull or in Shade | Cloudy days with poor light.Shade—Average shaded scenes. | f.3.5 | |
| Dull or in Open Shade | Sky completely overcast, but good light.Open Shade—Subject lighted by a large area of sky. | f.5.6 | |
| Slightly Cloudy | Sun just obscured, soft shadows cast.Also for clear days when only part of subject is in sunlight. | f.8 | |
| Direct Sunlight | Full sunlight, distinct shadows cast. | f.11 | |
| Intensely Bright | Unusually brilliant sunlight without large shaded areas. | f.16 | |
*Special directions for taking interiors at night are given on pages 77 to 79.
This guide is for the hours from two hours after sunrise until two hours before sunset; earlier or later, use a larger diaphragm opening.
The “Intensely Bright” classification should be used only for extremely brilliantly lighted subjects; for example, sea and beach views, distant landscapes, and tropical scenes in brilliant sunlight.
With the largest opening of the 3-inch, 41 12 -inch or 6-inch f.4.5 Telephoto Lens, pictures can be made under light conditions described for the f.3.5 diaphragm opening. With the light conditions described for the f.2.8 diaphragm opening, use the lens wide open (f.4.5) and Camera Speed 8.
Indoor Exposure Guides with Camera Speed 16 and Shutter at OPEN, using KODAFLECTORS with No. 1 PHOTOFLOOD LAMPS†
Exposure Table for Ciné-Kodak Super Sensitive Panchromatic Film
| Diaphragm Opening | f.1.9 | f.2.8 | f.3.5 | f.5.6 | f.8 |
| Number of Lamps and Distance between Lamps and Subject | 1 at 10 feet | 1 at 7 feet | 1 at 512 feet | *1 at 312 feet | *1 at 2 feet |
| 2 at 14 feet | 2 at 10 feet | 2 at 8 feet | 2 at 5 feet | *2 at 312 feet | |
| 3 at 12 feet | 3 at 10 feet | 3 at 612 feet | 3 at 412 feet | ||
| 4 at 14 feet | 4 at 12 feet | 4 at 8 feet | 4 at 5 feet |
For pictures around the room, use f.1.9 and 3 or 4 No. 1 Photoflood Lamps without reflectors.
Exposure Table for regular Ciné-Kodak Panchromatic Film
| Diaphragm Opening | f.1.9 | f.2.8 | f.3.5 | f.5.6 |
| Number of Lamps and Distance between Lamps and Subject | 1 at 6 feet | 1 at 4 feet | *1 at 312 feet | |
| 2 at 9 feet | 2 at 6 feet | 2 at 412 feet | *2 at 3 feet | |
| 3 at 11 feet | 3 at 8 feet | 3 at 6 feet | 3 at 4 feet | |
| 4 at 13 feet | 4 at 9 feet | 4 at 7 feet | 4 at 412 feet |
*Use only for “close-ups.” Camera should be two to four feet from subject so that reflectors will not be included in the picture.
†No. 2 Photoflood Lamps should not be used unless Kodaflector Adapters for No. 2 Photoflood Lamps are obtained; with these adapters use half as many lamps as shown in the tables.
NOTE: Do not use more than five No. 1 Photoflood Lamps or three No. 2 Photoflood Lamps on a single fused circuit. If more are required, be sure to use different circuits.
The distances and f. values in the above tables are based on the illumination obtained at 110 volts.
These tables are for portraits and light-colored interiors. For dark-colored interiors without people, use the next larger diaphragm opening.
Where two or more lamps are given in these tables, it is understood that the lamps should be placed so that the light from all of the reflectors is directed on the same area.
ARRANGEMENT OF LIGHTS
Pleasing results can be obtained by using the lamps, indicated in the tables on pages 77, and 79, on but one side of and somewhat higher than the subject. When the lights are close to the camera axis a “flat” picture results; moving the lights farther to one side of the axis increases the contrast but leaves heavy shadows on the other side of the subject. To illuminate these shadows a white reflector or auxiliary lamp must be used. This lamp should be placed near the camera axis and at camera height. By moving it toward and away from the subject the most pleasing amount of shadow illumination can be easily observed.
Considerable life and sparkle can be put into the pictures by backlighting the subject. This will give a pleasing result with a "flat" lighted subject, with the main lights near the camera axis. Since the light used for backlighting must be intense, one Photoflood in a Kodaflector close to the subject is suitable. It should be placed above and slightly behind the subject. To prevent light from striking the camera lens, place some object between the backlighting lamp and the camera.
Neither the lamp used for shadow illumination nor the one used for backlighting should be included in the lamps specified in the tables.
Full instructions are included with each Kodaflector.
Indoor Exposure Guide with Camera Speed 16 and Shutter at OPEN, with Ciné-Kodak Super Sensitive Panchromatic Film and using ordinary MAZDA LAMPS without Reflectors.
These exposures are for the Ciné-Kodak Special operated at speed 16. Halve the illumination at speed 8.
| Total Wattage and Distance from Lamps to Subject | Diaphragm Opening |
| 200 at 212 feet or300 at 3 feet or500 at 4 feet or1000 at 6 feet | f.1.9 |
| 400 at 212 feet or600 at 3 feet or800 at 312 feet or1200 at 412 feet | f.2.8 |
| 550 at 2 feet or800 at 212 feet or1200 at 3 feet | f.3.5 |
This table is for portraits and light-colored interiors. For dark-colored interiors without people, use the next larger diaphragm opening.
Field Sizes for Interchangeable Ciné-Kodak Lenses
| Distance from subject to front of camera | 15 mm. f.2.7 Wide-Angle Lens | 1-inch f.1.0 Anastigmat Lens | 2-inch f.3.5 Anastigmat Lens | 212 -inch f.2.7 Anastigmat Lens | 3-inch f.4.5 Telephoto Lens | 4-inch f.2.7 Anastigmat Lens | 412 -inch f.4.5 Telephoto Lens | 6-inch f.4.5 Telephoto Lens | ||||||||||||||||||||||||||
| Width | Height | Width | Height | Width | Height | Width | Height | Width | Height | Width | Height | Width | Height | Width | Height | |||||||||||||||||||
| ft. | in. | ft. | in. | ft. | in. | ft. | in. | ft. | in. | ft. | in. | ft. | in. | ft. | in. | ft. | in. | ft. | in. | ft. | in. | ft. | in. | ft. | in. | ft. | in. | ft. | in. | ft. | in. | ft. | in. | |
| 400 | 25 | 3 | 19 | |||||||||||||||||||||||||||||||
| 200 | 19 | 14 | 3 | 16 | 10 | 12 | 7 | 12 | 7 | 9 | 5 | |||||||||||||||||||||||
| 100 | 19 | 14 | 2 | 15 | 2 | 11 | 4 | 12 | 7 | 9 | 5 | 9 | 5 | 7 | 8 | 4 | 6 | 3 | 6 | 3 | 4 | 8 | ||||||||||||
| 50 | 18 | 11 | 14 | 2 | 9 | 6 | 7 | 1 | 7 | 6 | 5 | 8 | 6 | 4 | 4 | 8 | 4 | 8 | 3 | 6 | 4 | 2 | 3 | 1 | 3 | 1 | 2 | 4 | ||||||
| 25 | 9 | 5 | 7 | 1 | 4 | 9 | 3 | 6 | 3 | 9 | 2 | 9 | 3 | 1 | 2 | 4 | 2 | 4 | 1 | 9 | 2 | 1 | 1 | 6 | 1 | 6 | 1 | 2 | ||||||
| 15 | 9 | 2 | 6 | 10 | 5 | 8 | 4 | 3 | 2 | 10 | 2 | 1 | 2 | 2 | 1 | 8 | 1 | 10 | 1 | 4 | 1 | 412 | 1 | 12 | 1012 | 1012 | 712 | |||||||
| 12 | 2 | 3 | 1 | 8 | 1 | 5 | 1 | 1 | 1 | 1 | 912 | 812 | 812 | 612 | ||||||||||||||||||||
| 10 | 3 | 9 | 2 | 10 | 1 | 10 | 1 | 5 | 1 | 5 | 1 | 1 | 1 | 2 | 1012 | 11 | 812 | 912 | 7 | 612 | ||||||||||||||
| 8 | 4 | 10 | 3 | 7 | 3 | 2 | 3 | 1 | 6 | 1 | 1 | 1 | 2 | 10 | 1112 | 812 | 812 | 612 | 712 | 512 | ||||||||||||||
| 6 | 3 | 7 | 2 | 8 | 2 | 3 | 1 | 8 | 1 | 1 | 10 | 1012 | 8 | 812 | 6 | 612 | 412 | 512 | 4 | |||||||||||||||
| 5 | 3 | 2 | 3 | 1012 | 8 | 812 | 612 | 612 | 5 | 5 | 312 | 412 | 3 | |||||||||||||||||||||
| 412 | 912 | 712 | 6 | 412 | 412 | 312 | ||||||||||||||||||||||||||||
| 412 | 312 | 212 | ||||||||||||||||||||||||||||||||
| 4 | 2 | 5 | 1 | 9 | 1 | 6 | 1 | 1 | 812 | 612 | 612 | 512 | 512 | 4 | ||||||||||||||||||||
| 312 | 412 | 312 | ||||||||||||||||||||||||||||||||
| 312 | 712 | 512 | ||||||||||||||||||||||||||||||||
| 3 | 1 | 9 | 1 | 4 | 1 | 1 | 10 | 612 | 412 | 5 | 312 | |||||||||||||||||||||||
| 212 | 1 | 6 | 1 | 1 | 5 | 312 | 4 | 3 | ||||||||||||||||||||||||||
| 212 | 412 | 312 | ||||||||||||||||||||||||||||||||
| 2 | 1 | 2 | 10 | 9 | 612 | 3 | 212 | |||||||||||||||||||||||||||
| 112 | 1012 | 8 | 212 | 112 | ||||||||||||||||||||||||||||||
| 112 | 9 | 612 | ||||||||||||||||||||||||||||||||
| 1 | 7 | 512 | ||||||||||||||||||||||||||||||||
| 10 | 512 | 412 | ||||||||||||||||||||||||||||||||
| 9 | 512 | 312 | ||||||||||||||||||||||||||||||||
| 8 | 412 | 312 | ||||||||||||||||||||||||||||||||
| 7 | 4 | 3 | ||||||||||||||||||||||||||||||||
| 6 | 312 | 212 | ||||||||||||||||||||||||||||||||
The above figures are based on a projector aperture .380 in. by .284 in.
ELECTRIC MOTOR DRIVE
FOR THE CINÉ-KODAK SPECIAL
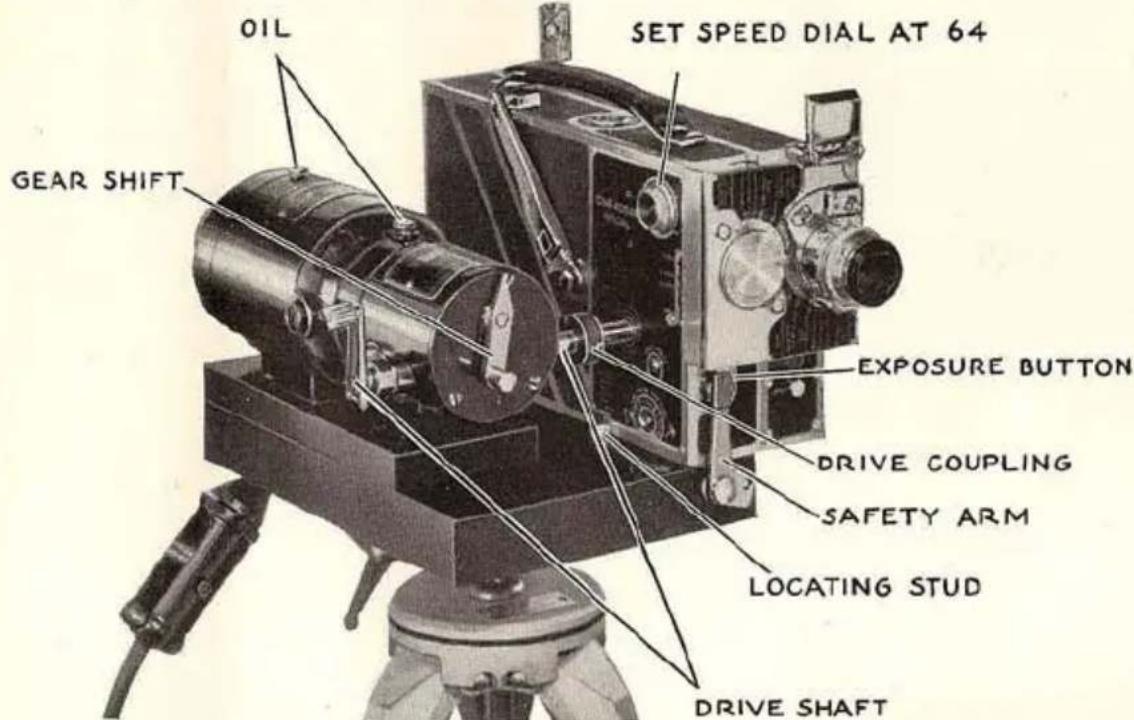
LONG, continuous runs of an entire roll of film if desired . . . full speed range down to one frame per second . . . no winding of the spring . . . these are some of the features that make the Electric Motor Drive valuable to advanced cinematographers. All of the "Special's" versatility is retained except single frame exposure.
DETAILS: Universal motor, D. C. or 25 to 60 cycle A. C. Electric governor maintains constant speeds through a line voltage range of 100 to 125. Gear shift and calibrated adjusting knob permit quick setting on any speed from 1 to 64 frames per second. Large, sturdy base equipped with tripod socket for 16 mm. or professional tripods. Motor directly connected to gears, which run in oil. Smooth-acting, positive coupling between gear box and "Special." Outfit includes 10 foot cord, small wrench, and instructions with artificial light exposure tables. To provide remote control, a switch can be added to the extension cord or an additional extension with switch can be used. Motors for other voltages and gear boxes for different speed ranges available on special order.
EASTMAN KODAK COMPANY, Rochester, New York
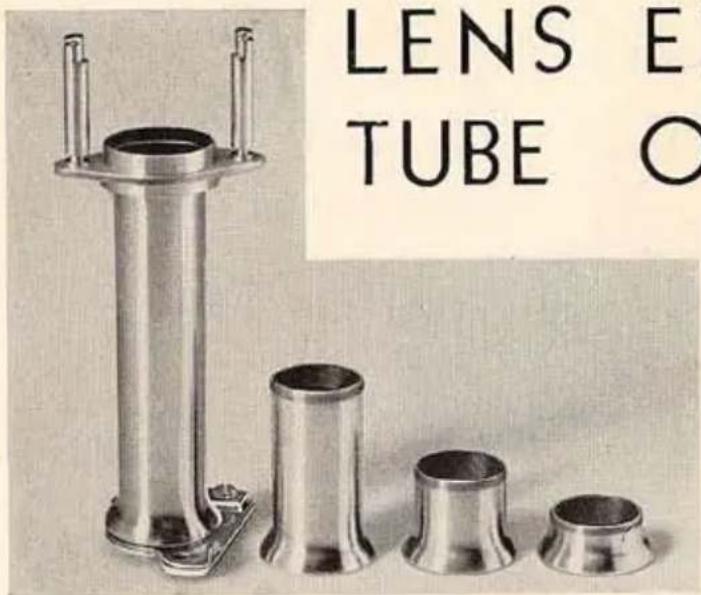
LENS EXTENSION TUBE OUTFIT
For the
Ciné-Kodak
Special
THIS outfit is useful for extremely close work, to obtain large images of small objects. It eliminates the necessity for expensive lenses with special focusing threads.
Four threaded aluminum alloy tubes, used together or separately, provide the range of field sizes shown in the following table:
Lens
| 1-inch f.1.9 | .942 to .047 |
| 2-inch f.3.5 | 1.880 to .108 |
| 212 -inch f.2.7 | 2.34 to .141 |
| 3-inch f.4.5 | 2.820 to .162 |
| 4-inch f.2.7 | 3.75 to .216 |
| 412 -inch f.4.5 | 4.240 to .243 |
| 6-inch f.4.5 | 5.600 to .324 |
AUXILIARY LENSES: Are for field sizes larger than those shown in the table at the left. They can be fitted to any filter mount; the U7 mount with the Ciné-Kodak Universal Filter Holder is the most convenient combination.
CINÉ-KODAK UNIVERSAL FILTER HOLDER WITH U7 FILTER MOUNT
This combination simplifies the line of filter mounts since it fits the 1-, 2-, 2½-, 3-, and 4½-inch lenses. The U7 mount alone fits the 6-inch lens and 15 mm. lens. A threaded tube to give extra hooding can be purchased as an accessory, or the hood from a 6-inch lens can be used.
For most purposes the U7-CK-3 Filter, made of colored optical glass, is sufficient. Wratten Filters, gelatin cemented between two pieces of optical glass, such as the red A and the green X-1 are available on special order.
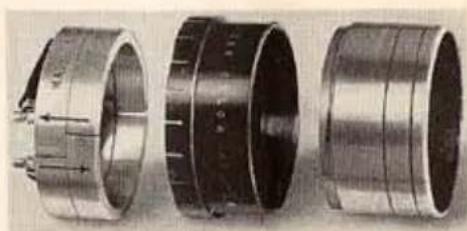
natural_image
Three views of a mechanical bearing housing, showing internal components and mounting holes (no text or symbols visible)Ciné-Kodak Universal Filter Holder, U7-CK-3 Filter and threaded shielding tube.
EASTMAN KODAK COMPANY, Rochester, New York
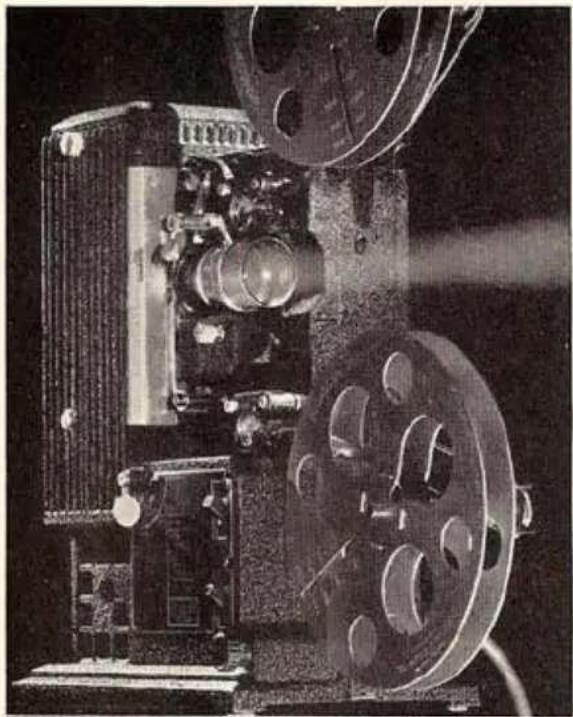
natural_image
Black-and-white photograph of a vintage film projector with visible lens and control panel (no text or symbols)KODASCOPE MODEL L
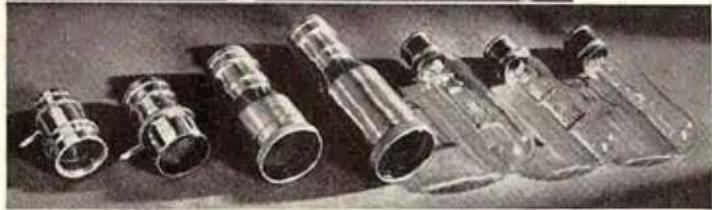
natural_image
Black-and-white photo of several small glass bottles with metallic fittings, arranged on a dark surface (no visible text or labels)The Kodascope L lenses, left to right—1-inch, f.2; 2-inch, f.1.6; 3-inch, f.2; 4-inch, f.2.5. The lamps—750-watt; 500-watt and 400-watt.
TO show pictures made with the Ciné-Kodak Special, you should have nothing less than the finest 16 mm. projection equipment.
Kodascope, Model L, can be used anywhere, in a small room or in a large auditorium. Twelve different lens and lamp combinations are available, making this Kodascope suitable to almost every conceivable projection condition.
The Kodascope Model L has many unusual features, making it very easy to operate. There is a beauty of appearance and dependability of performance that stamp the Kodascope Model L as outstanding among 16 mm. projection equipment.
Price, from \$183.25—depending upon the lens and lamp desired. See it at your dealer's.
EASTMAN KODAK COMPANY, Rochester, New York
CARRYING CASE FOR THE CINÉ-KODAK SPECIAL
IT is not practical to manufacture a standard carrying case for the Ciné-Kodak Special, so varied will be the equipment required by different users of this camera. For
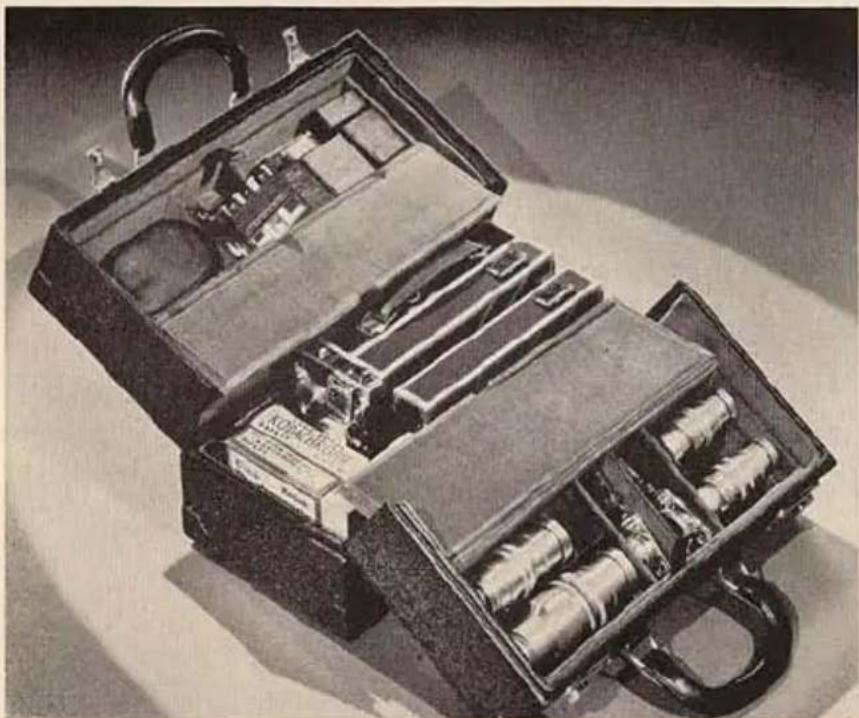
natural_image
Black-and-white photo of an open vintage mechanical tool case with internal compartments and handles (no visible text or symbols)this reason carrying cases will be made up on special order only. This illustration shows the type of carrying case available on special order for camera and accessories. The case shown accommodates the standard model camera, an extra 100-foot film cham-
ber, three 100-foot rolls of film, five accessory lenses, and it has compartments for incidental accessories.
After deciding upon the accessories required, every purchaser of the Ciné-Kodak Special will do well to acquire a sturdy, attractive and useful carrying case such as the one illustrated.
EASTMAN KODAK COMPANY, Rochester, New York
9-37-CH-2 Printed in U.S.A.
IMPORTANT RULES
- Never try to take a picture with the shutter closed.
- You cannot run the camera with the aperture cover closed.
- Hold the camera steady.
- Focus the lens and set the diaphragm before each scene.
- Set shutter at OPEN and camera speed at 16 for average scenes.
- When camera speed is changed, open diaphragm one stop for each higher speed.
- Panoram very slowly and evenly, except when following a moving object.
- When using the reflex finder, it is desirable to use the lens wide open to obtain the brightest image. Be sure to reset the lens for proper exposure before taking pictures.
